Professional C++ (2014)
Part IIICoding the Professional Way
Chapter 19Additional Library Utilities
WHAT’S IN THIS CHAPTER?
· How you can use std::function for function pointers
· How to work with compile-time rational numbers
· How to work with time
· How to generate random numbers
· What tuples are and how to use them
WROX.COM DOWNLOADS FOR THIS CHAPTER
Please note that all the code examples for this chapter are available as a part of this chapter’s code download on the book’s website at www.wrox.com/go/proc++3e on the Download Code tab.
This chapter discusses some additional library functionality that is available in the C++ standard library and that does not immediately fit into other chapters.
STD::FUNCTION
std::function, defined in the <functional> header file, can be used to create a type that can point to a function, a function object, or a lambda expression; basically anything that is callable. It is called a polymorphic function wrapper. It can be used as a function pointer or as a parameter for a function to implement callbacks. The template parameters for the std::function template look a bit different than most template parameters. Its syntax is as follows:
std::function<R(ArgTypes...)>
R is the return value type of the function and ArgTypes is a comma-separated list of argument types for the function.
The following example demonstrates how to use std::function to implement a function pointer. It creates a function pointer f1 to point to the function func(). Once f1 is defined, you can call func() by using the name func or f1:
void func(int num, const string& str)
{
cout << "func(" << num << ", " << str << ")" << endl;
}
int main()
{
function<void(int, const string&)> f1 = func;
f1(1, "test");
return 0;
}
Of course, in the preceding example it is possible to use the auto keyword, which removes the need for you to specify the exact type of f1. The following works exactly the same and is much shorter, but the compiler-deduced type of f1 is a function pointer, i.e. void (*f1)(int, const string&), instead of a std::function.
auto f1 = func;
Since std::function types behave as function pointers, they can be passed to STL algorithms as shown in the following example using the count_if() algorithm. STL algorithms are discussed in Chapter 17.
bool isEven(int num)
{
return num % 2 == 0;
}
int main()
{
vector<int> vec(10);
iota(begin(vec), end(vec), 0);
function<bool(int)> f2 = isEven;
int cnt = count_if(cbegin(vec), cend(vec), f2);
cout << cnt << " even numbers" << endl;
return 0;
}
After the preceding examples, you might think that std::function is not really useful; but, where std::function really shines, is accepting a function pointer as parameter to your own function. The following example defines a function called process(), which accepts a reference to a vector and a std::function. The process() function iterates over all the elements in the given vector and calls the given function f for each element. You can think of the parameter f as a callback.
The print() function prints a given element to the console. The main() function first creates a vector of integers and populates it. It then calls the process() function with a function pointer to print(). The result is that each element in the vector is printed.
The last part of the main() function demonstrates that you can also pass a lambda expression for the std::function parameter of the process() function, and that’s the power of std::function. You cannot get this same functionality by using a function pointer typedef.
void process(const vector<int>& vec, function<void(int)> f)
{
for (auto& i : vec) {
f(i);
}
}
void print(int num)
{
cout << num << " ";
}
int main()
{
vector<int> vec(10);
iota(begin(vec), end(vec), 0);
process(vec, print);
cout << endl;
int sum = 0;
process(vec, [&sum](int num){sum += num;});
cout << "sum = " << sum << endl;
return 0;
}
The output of this example is as follows:
0 1 2 3 4 5 6 7 8 9
sum = 45
RATIOS
The Ratio library allows you to exactly represent any finite rational number that you can use at compile time. Ratios are used in the std::chrono::duration class discussed in the next section. Everything is defined in the <ratio> header file and is in the std namespace. The numerator and denominator of a rational number are represented as compile-time constants of type std::intmax_t, which is a signed integer type with the maximum width supported by a compiler. Because of the compile-time nature of these rational numbers, using them might look a bit complicated and different than usual. You cannot define a ratio object the same way as you define normal objects, and you cannot call methods on it. You need to use typedefs. For example, the following line defines a rational compile-time constant representing 1/60:
typedef ratio<1, 60> r1;
The numerator and denominator of the r1 rational number are compile-time constants and can be accessed as follows:
intmax_t num = r1::num;
intmax_t den = r1::den;
Remember that a ratio is a compile-time constant, which means that the numerator and denominator need to be known at compile time. The following will generate a compiler error:
intmax_t n = 1;
intmax_t d = 60;
typedef ratio<n, d> r1; // Error
Making n and d constants removes the compilation error:
const intmax_t n = 1;
const intmax_t d = 60;
typedef ratio<n, d> r1; // Ok
Rational numbers are always normalized. For a rational number ratio<n, d>, the greatest common divisor, gcd, is calculated and the numerator, num, and denominator, den, are defined as follows:
· num = sign(n)*sign(d)*abs(n)/gcd
· den = abs(d)/gcd
The library supports adding, subtracting, multiplying, and dividing rational numbers. Because all these operations are also happening at compile time, you cannot use the standard arithmetic operators. Instead, you need to use specific templates in combination withtypedefs. The following arithmetic ratio templates are available: ratio_add, ratio_subtract, ratio_multiply, and ratio_divide. These templates calculate the result as a new ratio type. This type can be accessed with the embedded typedef called type. For example, the following code first defines two ratios, one representing 1/60 and the other representing 1/30. The ratio_add template adds those two rational numbers together to produce the result rational number, which, after normalization, is 1/20:
typedef ratio<1, 60> r1;
typedef ratio<1, 30> r2;
typedef ratio_add<r1, r2>::type result;
The standard also defines a number of ratio comparison templates: ratio_equal, ratio_not_equal, ratio_less, ratio_less_equal, ratio_greater, and ratio_greater_equal. Just like the arithmetic ratio templates, the ratio comparison templates are all evaluated at compile time. These comparison templates create a new type, std::integral_constant, representing the result. An integral_constant is a struct template that stores a type and a compile-time constant value. For example, integral_constant<bool, true> stores a Boolean with value true, while integral_constant<int, 15> stores an integer with value 15. The result of the ratio comparison templates is either integral_constant<bool, true> or integral_constant<bool, false>. The value associated with an integral_constant can be accessed using the value data member. The following example demonstrates the use of ratio_less. Chapter 12 discusses the use of boolalpha to output true or false for Boolean values:
typedef ratio<1, 60> r1;
typedef ratio<1, 30> r2;
typedef ratio_less<r2, r1> res;
cout << boolalpha << res::value << endl;
The following example combines everything. Note that since ratios are compile-time constants, you cannot do something like cout << r1, you need to get the numerator and denominator and print them separately:
// Define a compile-time rational number
typedef ratio<1, 60> r1;
cout << "1) " << r1::num << "/" << r1::den << endl;
// Get numerator and denominator
intmax_t num = r1::num;
intmax_t den = r1::den;
cout << "2) " << num << "/" << den << endl;
// Add two rational numbers
typedef ratio<1, 30> r2;
cout << "3) " << r2::num << "/" << r2::den << endl;
typedef ratio_add<r1, r2>::type result;
cout << "4) " << result::num << "/" << result::den << endl;
// Compare two rational numbers
typedef ratio_less<r2, r1> res;
cout << "5) " << boolalpha << res::value << endl;
The output should be as follows:
1) 1/60
2) 1/60
3) 1/30
4) 1/20
5) false
The library provides a number of SI (Système International) typedefs for your convenience. They are as follows:
typedef ratio<1, 1000000000000000000000000> yocto; // *
typedef ratio<1, 1000000000000000000000> zepto; // *
typedef ratio<1, 1000000000000000000> atto;
typedef ratio<1, 1000000000000000> femto;
typedef ratio<1, 1000000000000> pico;
typedef ratio<1, 1000000000> nano;
typedef ratio<1, 1000000> micro;
typedef ratio<1, 1000> milli;
typedef ratio<1, 100> centi;
typedef ratio<1, 10> deci;
typedef ratio< 10, 1> deca;
typedef ratio< 100, 1> hecto;
typedef ratio< 1000, 1> kilo;
typedef ratio< 1000000, 1> mega;
typedef ratio< 1000000000, 1> giga;
typedef ratio< 1000000000000, 1> tera;
typedef ratio< 1000000000000000, 1> peta;
typedef ratio< 1000000000000000000, 1> exa;
typedef ratio< 1000000000000000000000, 1> zetta; // *
typedef ratio<1000000000000000000000000, 1> yotta; // *
The SI units with an asterisk at the end are defined only if your compiler can represent the constant numerator and denominator values for those typedefs as an intmax_t. An example on how to use these predefined SI units is given during the discussion of durations in the next section.
THE CHRONO LIBRARY
The Chrono library is a collection of classes to work with times. The library consists of the following components:
· Duration
· Clock
· Time point
Everything is defined in the std::chrono namespace and requires you to include the <chrono> header file. The following sections explain each component.
Duration
A duration, which represents an interval between two points in time, is specified by the templatized duration class. The duration class stores a number of ticks and a tick period. The tick period is the time in seconds between two ticks and is represented as a compile-time ratio constant, which means it could be a fraction of a second. Ratios are discussed in the previous section. The duration template accepts two template parameters and is defined as follows:
template <class Rep, class Period = ratio<1>> class duration {...}
The first template parameter, Rep, is the type of variable storing the number of ticks and should be an arithmetic type, for example long, double, and so on. The second template parameter, Period, is the rational constant representing the period of a tick. If you don’t specify the tick period, the default value ratio<1> is used, which represents a tick period of 1 second.
Three constructors are provided: the default constructor; one that accepts a single value, the number of ticks; and one that accepts another duration. The latter can be used to convert from one duration to another duration, for example from minutes to seconds. An example is given later in this section.
Durations support arithmetic operations such as +, -, *, /, %, ++, --, +=, -=, *=, /= and %=, and support the comparison operators. The class contains the following methods:
|
METHOD |
DESCRIPTION |
|
Rep count() const |
Returns the duration value as the number of ticks. The return type is the type specified as parameter to the duration template. |
|
static duration zero() |
Returns a duration with a duration value equivalent to 0. |
|
static duration min() |
Returns a duration with the minimum/maximum possible duration value representable by the type specified as parameter to the duration template. |
Let’s see how durations can be used in actual code. A duration where each tick is one second can be defined as follows:
duration<long> d1;
Because ratio<1> is the default tick period, this is the same as writing the following:
duration<long, ratio<1>> d1;
The following specifies a duration in minutes (tick period = 60 seconds):
duration<long, ratio<60>> d2;
To define a duration where each tick period is a sixtieth of a second, use the following:
duration<double, ratio<1, 60>> d3;
As seen earlier in this chapter, the <ratio> header file defines a number of SI rational constants. These predefined constants come in handy for defining tick periods. For example, the following line of code defines a duration where each tick period is one millisecond:
duration<long long, milli> d4;
The following example demonstrates several aspects of durations. It shows you how to define durations, how to perform arithmetic operations on them, and how to convert one duration into another duration with a different tick period:
// Specify a duration where each tick is 60 seconds
duration<long, ratio<60>> d1(123);
cout << d1.count() << endl;
// Specify a duration represented by a double with each tick
// equal to 1 second and assign the largest possible duration to it.
duration<double> d2;
d2 = d2.max();
cout << d2.count() << endl;
// Define 2 durations:
// For the first duration, each tick is 1 minute
// For the second duration, each tick is 1 second
duration<long, ratio<60>> d3(10); // = 10 minutes
duration<long, ratio<1>> d4(14); // = 14 seconds
// Compare both durations
if (d3 > d4)
cout << "d3 > d4" << endl;
else
cout << "d3 <= d4" << endl;
// Increment d4 with 1 resulting in 15 seconds
++d4;
// Multiply d4 by 2 resulting in 30 seconds
d4 *= 2;
// Add both durations and store as minutes
duration<double, ratio<60>> d5 = d3 + d4;
// Add both durations and store as seconds
duration<long, ratio<1>> d6 = d3 + d4;
cout << d3.count() << " minutes + " << d4.count() << " seconds = "
<< d5.count() << " minutes or "
<< d6.count() << " seconds" << endl;
// Create a duration of 30 seconds
duration<long> d7(30);
// Convert the seconds of d7 to minutes
duration<double, ratio<60>> d8(d7);
cout << d7.count() << " seconds = " << d8.count() << " minutes" << endl;
The output is as follows:
123
1.79769e+308
d3 > d4
10 minutes + 30 seconds = 10.5 minutes or 630 seconds
30 seconds = 0.5 minutes
NOTE The second line in the output represents the largest possible duration with type double. The exact value might be different depending on your compiler.
Pay special attention to the following two lines:
duration<double, ratio<60>> d5 = d3 + d4;
duration<long, ratio<1>> d6 = d3 + d4;
They both calculate d3+d4 but the first one stores it as a floating point value representing minutes while the second one stores the result as an integer representing seconds. Conversion from minutes to seconds or vice versa happens automatically.
The following two lines from the preceding example demonstrate how to explicitly convert between different units of time:
duration<long> d7(30); // seconds
duration<double, ratio<60>> d8(d7); // minutes
The first line defines a duration representing 30 seconds. The second line converts these 30 seconds into minutes, resulting in 0.5 minutes. Converting in this direction can result in a non-integral value and thus requires you to use a duration represented by a floating point type; otherwise, you will get some cryptic compiler errors. The following lines, for example, will not compile because d8 is using long instead of a floating point type:
duration<long> d7(30); // seconds
duration<long, ratio<60>> d8(d7); // minutes // Error
 Converting in the other direction does not require floating point types if the source is an integral type, because the result is always an integral value if you started with an integral value. For example, the following lines convert 10 minutes into seconds, both represented by the integral type long:
duration<long, ratio<60>> d9(10); // minutes
duration<long> d10(d9); // seconds
The library also provides the following standard duration types, where X stands for “signed integer type of at least”:
typedef duration<X 64 bits, nano> nanoseconds;
typedef duration<X 55 bits, micro> microseconds;
typedef duration<X 45 bits, milli> milliseconds;
typedef duration<X 35 bits> seconds;
typedef duration<X 29 bits, ratio<60>> minutes;
typedef duration<X 23 bits, ratio<3600>> hours;
The exact type of X depends on your compiler, but the C++ standard requires it to be a signed integer type of at least the specified size. The preceding typedefs make use of the predefined SI ratio typedefs as described earlier in this chapter. The following is an example of how to use these predefined durations. The code first defines a variable t, which is the result of 1 hour + 23 minutes + 45 seconds. The auto keyword is used to let the compiler automatically figure out the exact type of t. The second line uses the constructor of the predefined seconds duration to convert the value of t to seconds and writes the result to the console:
auto t = hours(1) + minutes(23) + seconds(45);
cout << seconds(t).count() << " seconds" << endl;
Because the standard requires that the predefined durations use integer types, there can be compiler errors if a conversion could end up with a non-integral value. While integer division normally truncates, in the case of durations, which are implemented by ratiotypes, the compiler declares any computation that could result in a non-zero remainder as a compile-time error. For example, the following will not compile because converting 90 seconds results in 1.5 minutes:
seconds s(90);
minutes m(s);
However, the following will not compile either, even though 60 seconds is exactly 1 minute. It is flagged as a compile-time error because converting from seconds to minutes could result in non-integral values:
seconds s(60);
minutes m(s);
Converting in the other direction works perfectly fine because the minutes duration is an integral value and converting it to seconds always results in an integral value:
minutes m(2);
seconds s(m);
You can use the standard user-defined literals “h”, “min”, “s”, “ms”, “us”, and “ns” for creating durations. For example:
auto myDuration = 42min; // 42 minutes
Clock
A clock is a class consisting of a time_point and a duration. The time_point type is discussed in detail in the next section, but those details are not required to understand how clocks work. However, time_points themselves depend on clocks, so it’s important to know the details of clocks first.
Three clocks are defined by the standard. The first is called system_clock and represents the wall clock time from the system-wide realtime clock. The second is called steady_clock, a clock that guarantees its time_point will never decrease, which is not guaranteed forsystem_clock because the system clock can be adjusted at any time. The third is the high_resolution_clock, which has the shortest possible tick period. Depending on your compiler, it is possible for the high_resolution_clock to be a synonym for steady_clock orsystem_clock.
Every clock has a static now() method to get the current time as a time_point. The system_clock also defines two static helper functions for converting time_points to and from the time_t C-style time representation. The first is called to_time_t() converting a giventime_point to a time_t; the second is called from_time_t(), which returns a time_point initialized with a given time_t value. The time_t type is defined in the <ctime> header file.
The following example shows a complete program, which gets the current time from the system and outputs the time in a human readable format on the console. The localtime() function converts a time_t to a local time represented by tm and is defined in the <ctime>header file. The put_time() stream manipulator, defined in the <iomanip> header, is introduced in Chapter 12:
// Get current time as a time_point
system_clock::time_point tpoint = system_clock::now();
// Convert to a time_t
time_t tt = system_clock::to_time_t(tpoint);
// Convert to local time
tm* t = localtime(&tt);
// Write the time to the console
cout << put_time(t, "%H:%M:%S") << endl;
If your compiler does not yet support the put_time() manipulator, you can use the C-style strftime() function, defined in <ctime>, as follows. Using the old strftime() function requires you to supply a buffer that is big enough to hold the human readable representation of the given time:
// Get current time as a time_point
system_clock::time_point tpoint = system_clock::now();
// Convert to a time_t
time_t tt = system_clock::to_time_t(tpoint);
// Convert to local time
tm* t = localtime(&tt);
// Convert to readable format
char buffer[80] = {0};
strftime(buffer, sizeof(buffer), "%H:%M:%S", t);
// Write the time to the console
cout << buffer << endl;
NOTE These examples might give you a security-related error or warning on the call to localtime(). With Microsoft Visual C++ you can use the safe version called localtime_s(). On Linux you can use localtime_r().
The Chrono library can also be used to time how long it takes for a piece of code to execute. The following example shows how you can do this. The actual type of the variables start and end is system_clock::time_point and the actual type of diff is a duration:
// Get the start time
auto start = system_clock::now();
// Execute code that you want to time
double d = 0;
for (int i = 0; i < 1000000; ++i) {
d += sqrt(sin(i) * cos(i));
}
// Get the end time and calculate the difference
auto end = system_clock::now();
auto diff = end - start;
// Convert the difference into milliseconds and print on the console
cout << duration<double, milli>(diff).count() << "ms" << endl;
The loop in this example is performing some arithmetic operations with sqrt(), sin(), and cos() to make sure the loop doesn’t end too fast. If you get really small values for the difference in milliseconds on your system, those values will not be accurate and you should increase the number of iterations of the loop to make it last longer. Small timings will not be accurate, because, while timers often have a resolution in milliseconds, on most operating systems, this timer is updated infrequently, for example, every 10ms or 15ms. This induces a phenomenon called gating error, where any event that occurs in less than 1 timer tick appears to take place in zero units of time; any event between 1 and 2 timer ticks appears to take place in 1 timer unit. For example, on a system with a 15ms timer update, a loop that takes 44ms will appear to take only 30ms. When using such timers to time computations, it is important to make sure that the entire computation takes place across a fairly large number of basic timer tick units so that these errors are minimized.
Time Point
A point in time is represented by the time_point class and stored as a duration relative to the epoch. A time_point is always associated with a certain clock and the epoch is the origin of this associated clock. For example, the epoch for the classic Unix/Linux time is 1st of January 1970, and durations are measured in seconds. The epoch for Windows is 1st of January 1601 and durations are measured in 100 nanosecond units. Other operating systems have different epoch dates and duration units.
The time_point class contains a function called time_since_epoch(), which returns a duration representing the time between the epoch of the associated clock and the stored point in time. A time_point supports arithmetic operations that make sense for time points such as +, -, += and -=. Comparison operators are also supported to compare two time points. Two static methods are provided: min() returning the smallest possible point in time, and max() returning the largest possible point in time.
The time_point class has three constructors:
· time_point(): constructs a time_point initialized with duration::zero(). The resulting time_point represents the epoch of the associated clock.
· time_point(const duration& d): constructs a time_point initialized with the given duration. The resulting time_point represents epoch + d.
· template <class Duration2> time_point(const time_point<clock, Duration2>& t): constructs a time_point initialized with t.time_since_epoch().
Each time_point is associated with a clock. To create a time_point, you specify the clock as the template parameter:
time_point<steady_clock> tp1;
Each clock also knows its time_point type, so you can also write it as follows:
steady_clock::time_point tp1;
The following example demonstrates the time_point class:
// Create a time_point representing the epoch
// of the associated steady clock
time_point<steady_clock> tp1;
// Add 10 minutes to the time_point
tp1 += minutes(10);
// Store the duration between epoch and time_point
auto d1 = tp1.time_since_epoch();
// Convert the duration to seconds and write to console
duration<double> d2(d1);
cout << d2.count() << " seconds" << endl;
The output should be:
600 seconds
RANDOM NUMBER GENERATION
Generating good random numbers in software is a complex topic. Before C++11, the only way to generate random numbers was to use the C-style srand() and rand() functions. The srand() function needs to be called once in your application and is used to initialize the random number generator, also called seeding. Usually the current system time would be used as a seed.
WARNING You need to make sure that you use a good quality seed for your software-based random number generator. If you initialize the random number generator with the same seed every time, you will create the same sequence of random numbers every time. This is why the seed is usually the current system time.
Once the generator is initialized, random numbers can be generated with rand(). The following example shows how to use srand(), to initialize the generator with the current system time as the seed, and rand(), to generate a random number. The time(nullptr) call returns the system time, and is defined in the <ctime> header file:
srand(static_cast<unsigned int>(time(nullptr)));
cout << rand() << endl;
A random number within a certain range can be generated with the following function:
int getRandom(int min, int max)
{
return (rand() % static_cast<int>(max + 1 - min)) + min;
}
The old C-style rand() function generates random numbers in the range 0 to RAND_MAX, which is defined by the standard to be at least 32767. Unfortunately, the low-order bits of rand() are often not very random, which means, using the previous getRandom() function to generate a random number in a small range, such as 1 to 6, will not result in very good randomness.
NOTE Software-based random number generators can never generate truly random numbers and are therefore called pseudo-random number generators because they rely on mathematical formulas to give the impression of randomness.
The old srand() and rand() functions don’t offer much in terms of flexibility. You cannot, for example, change the distribution of the generated random numbers. C++11 has added a powerful library to generate random numbers by using different algorithms and distributions. The library is defined in the <random> header file. The library has three big components: engines, engine adapters, and distributions. A random number engine is responsible for generating the actual random numbers and storing the state for generating subsequent random numbers. The distribution determines the range of the generated random numbers and how they are mathematically distributed within that range. A random number engine adapter modifies the results of a random number engine you associate it with.
It’s highly recommended to stop using srand() and rand(), and to start using the classes from <random>.
Random Number Engines
C++ defines the following random number engine templates:
· random_device
· linear_congruential_engine
· mersenne_twister_engine
· subtract_with_carry_engine
The random_device engine is not a software-based generator; it is a special engine that requires a piece of hardware attached to your computer that generates truly non-deterministic random numbers, for example by using the laws of physics. A classic mechanism measures the decay of a radioactive isotope by counting alpha-particles-per-time-interval or something like that, but there are many other kinds of physics-based random-number generators, including measuring the “noise” of reverse-biased diodes (thus eliminating the concerns about radioactive sources in your computer). The details of these mechanisms fall outside the scope of this book.
According to the specification for random_device, if no such device is attached to the computer, the library is free to use one of the software algorithms. The choice of algorithm is up to the library designer.
The quality of a random number generator is referred to as its entropy measure. The entropy() method of the random_device class returns 0.0 if it is using a software-based pseudo-random number generator, and returns a nonzero value if there is a hardware device attached. The nonzero value is an estimate of the entropy of the attached device.
Using the random_device engine is rather straightforward:
random_device rnd;
cout << "Entropy: " << rnd.entropy() << endl;
cout << "Min value: " << rnd.min()
<< ", Max value: " << rnd.max() << endl;
cout << "Random number: " << rnd() << endl;
A possible output of this program could be as follows:
Entropy: 32
Min value: 0, Max value: 4294967295
Random number: 3590924439
Next to the random_device engine, there are three pseudo-random number engines:
· The linear congruential engine requires a minimal amount of memory to store its state. The state is a single integer containing the last generated random number or the initial seed if no random number has been generated yet. The period of this engine depends on an algorithmic parameter and can be up to 264 but usually less. For this reason, the linear congruential engine should not be used when you need a high-quality random number sequence.
· From the three pseudo-random number engines, the Mersenne twister generates the highest quality of random numbers. The period of a Mersenne twister depends on an algorithmic parameter but is much bigger than the period of a linear congruential engine. The memory required to store the state of a Mersenne twister also depends on its parameters but is much larger than the single integer state of the linear congruential engine. For example, the predefined Mersenne twister mt19937 has a period of 219937-1, while the state contains 624 integers or around 2.5 kilobytes.
· The subtract with carry engine requires a state of 25 integers or around 100 bytes, however, the quality of the generated random numbers is less than the numbers generated by the Mersenne twister.
The mathematical details of the engines fall outside the scope of this book, and defining the quality of random numbers requires a mathematical background. If you want to know more about this topic, you can consult a reference from the “Random Numbers” section in Appendix B.
The random_device engine is easy to use and doesn’t require any parameters. However, creating an instance of one of the three pseudo-random number generators requires you to specify a number of mathematical parameters, which can be complicated. The selection of parameters greatly influences the quality of the generated random numbers. For example, the definition of the mersenne_twister_engine class looks as follows:
template<class UIntType, size_t w, size_t n, size_t m, size_t r,
UIntType a, size_t u, UIntType d, size_t s,
UIntType b, size_t t, UIntType c, size_t l, UIntType f>
class mersenne_twister_engine {...}
It requires 14 parameters. The linear_congruential_engine and the subtract_with_carry_engine classes also require a number of these mathematical parameters. For this reason, the standard defines a couple of predefined engines. One example is the mt19937 Mersenne twister which is defined as follows:
typedef mersenne_twister_engine<uint_fast32_t, 32, 624, 397, 31,
0x9908b0df, 11, 0xffffffff, 7, 0x9d2c5680, 15, 0xefc60000, 18,
1812433253> mt19937;
These parameters are all magic, unless you understand the details of the Mersenne twister algorithm. In general, you do not want to modify any of these parameters unless you are a specialist in the mathematics of pseudo-random number generators. Instead, it is highly recommended to use one of the predefined typedefs such as mt19937. A complete list of predefined engines is given in a later section.
Random Number Engine Adapters
A random number engine adapter modifies the result of a random number engine you associate it with, which is called the base engine. This is an example of the adapter pattern. The following three adapter templates are defined:
template<class Engine, size_t p, size_t r> class
discard_block_engine {...}
template<class Engine, size_t w, class UIntType> class
independent_bits_engine {...}
template<class Engine, size_t k> class
shuffle_order_engine {...}
The discard_block_engine adapter generates random numbers by discarding some of the values generated by its base engine. It requires three parameters: the engine to adapt, the block size p, and the used block size r. The base engine is used to generate p random numbers. The adapter then discards p-r of those numbers and returns the remaining r numbers.
The independent_bits_engine adapter generates random numbers with a given number of bits w by combining several random numbers generated by the base engine.
The shuffle_order_engine adapter generates the same random numbers that are generated by the base engine, but delivers them in a different order.
The exact working of these adapters depends on mathematics and falls outside the scope of this book.
The standard includes a number of predefined engine adapters. The following section lists the predefined engines and engine adapters.
Predefined Engines and Engine Adapters
As mentioned earlier, it is not recommended to specify your own parameters for pseudo-random number engines or engine adapters, but instead to use one of the standard ones. C++ defines the following predefined engines and engine adapters, all in the <random>header file:
typedef linear_congruential_engine<uint_fast32_t, 16807, 0, 2147483647>
minstd_rand0;
typedef linear_congruential_engine<uint_fast32_t, 48271, 0, 2147483647>
minstd_rand;
typedef mersenne_twister_engine<uint_fast32_t, 32, 624, 397, 31,
0x9908b0df, 11, 0xffffffff, 7, 0x9d2c5680, 15, 0xefc60000, 18,
1812433253> mt19937;
typedef mersenne_twister_engine<uint_fast64_t, 64, 312, 156, 31,
0xb5026f5aa96619e9, 29, 0x5555555555555555, 17, 0x71d67fffeda60000, 37,
0xfff7eee000000000, 43, 6364136223846793005> mt19937_64;
typedef subtract_with_carry_engine<uint_fast32_t, 24, 10, 24>
ranlux24_base;
typedef subtract_with_carry_engine<uint_fast64_t, 48, 5, 12> ranlux48_base;
typedef discard_block_engine<ranlux24_base, 223, 23> ranlux24;
typedef discard_block_engine<ranlux48_base, 389, 11> ranlux48;
typedef shuffle_order_engine<minstd_rand0, 256> knuth_b;
typedef implementation-defined default_random_engine;
The default_random_engine is compiler dependent.
The following section gives an example of how to use these predefined engines.
Generating Random Numbers
Before you can generate any random number, you first need to create an instance of an engine. If you use a software-based engine, you will also need to define a distribution. A distribution is a mathematical formula describing how numbers are distributed within a certain range. The recommended way to create an engine is to use one of the predefined engines as discussed earlier.
The following example uses the predefined engine called mt19937, using a Mersenne twister engine. This is a software-based generator. Just as with the old srand()/rand() generator, a software-based engine should be initialized with a seed. The seed for srand() was often the current time. In modern C++ it’s recommended not to use any time-based seeds, but instead to use random_device to generate a seed.
random_device rndDevice;
mt19937 eng(rndDevice());
Next, a distribution is defined. This example uses a uniform integer distribution, for the range 1 to 99. Distributions are explained in detail in the next section, but the uniform distribution is easy enough to use for this example:
uniform_int_distribution<int> dist(1, 99);
Once the engine and distribution are defined, random numbers can be generated by calling a function whose name is the name of the distribution and passing as a parameter the engine. For this example this is written as dist(eng):
cout << dist(eng) << endl;
As you can see, to generate a random number using a software-based engine, you always need to specify the engine and distribution. The std::bind() utility introduced in Chapter 17 and defined in the <functional> header file can be used to remove the need to specify both the distribution and the engine when generating a random number. The following example uses the same mt19937 engine and uniform distribution as the previous example. It then defines gen() by using std::bind() to bind eng to the first parameter of dist(). This way, you can call gen() without any argument to generate a new random number. The auto keyword is used in the definition of gen() to avoid having to write the exact type ourselves. The example then demonstrates the use of gen() in combination with the generate()algorithm to fill a vector of 10 elements with random numbers. The generate() algorithm is discussed in Chapter 17 and is defined in <algorithm>:
random_device rndDevice;
mt19937 eng(rndDevice());
uniform_int_distribution<int> dist(1, 99);
auto gen = std::bind(dist, eng);
vector<int> vec(10);
generate(begin(vec), end(vec), gen);
for (auto i : vec) {
cout << i << " ";
}
NOTE Remember that the generate() algorithm overwrites existing elements and does not insert new elements. This means that you first need to size the vector to hold the number of elements you need, and then call the generate() algorithm. The previous example sizes the vector by specifying the size as argument to the constructor.
Even though you don’t know the exact type of gen(), it’s still possible to pass gen() to another function that wants to use that generator. However, you cannot use a normal function; you need to use a function template. The previous example can be adapted to do the generation of random numbers in a function called fillVector(), which is a function template that looks as follows:
template<typename T>
void fillVector(vector<int>& vec, T rndGen)
{
generate(begin(vec), end(vec), rndGen);
}
This function is used as follows:
random_device rndDevice;
mt19937 eng(rndDevice());
uniform_int_distribution<int> dist(1, 99);
auto gen = std::bind(dist, eng);
vector<int> vec(10);
fillVector(vec, gen);
for (auto i : vec) {
cout << i << " ";
}
Random Number Distributions
A distribution is a mathematical formula describing how numbers are distributed within a certain range. The random number generator library comes with the following distributions that can be used with pseudo-random number engines to define the distribution of the generated random numbers. It’s a compacted representation. The first line of each distribution is the class name and class template parameters, if any. The next lines are a constructor for the distribution. Only one constructor for each distribution is shown to give you an idea of the class. Consult a Standard Library Reference — for example http://www.cppreference.com/ or http://www.cplusplus.com/reference — for a detailed list of all constructors and methods of each distribution.
Uniform distributions:
template<class IntType = int> class uniform_int_distribution
uniform_int_distribution(IntType a = 0,
IntType b = numeric_limits<IntType>::max());
template<class RealType = double> class uniform_real_distribution
uniform_real_distribution(RealType a = 0.0, RealType b = 1.0);
Bernoulli distributions:
class bernoulli_distribution
bernoulli_distribution(double p = 0.5);
template<class IntType = int> class binomial_distribution
binomial_distribution(IntType t = 1, double p = 0.5);
template<class IntType = int> class geometric_distribution
geometric_distribution(double p = 0.5);
template<class IntType = int> class negative_binomial_distribution
negative_binomial_distribution(IntType k = 1, double p = 0.5);
Poisson distributions:
template<class IntType = int> class poisson_distribution
poisson_distribution(double mean = 1.0);
template<class RealType = double> class exponential_distribution
exponential_distribution(RealType lambda = 1.0);
template<class RealType = double> class gamma_distribution
gamma_distribution(RealType alpha = 1.0, RealType beta = 1.0);
template<class RealType = double> class weibull_distribution
weibull_distribution(RealType a = 1.0, RealType b = 1.0);
template<class RealType = double> class extreme_value_distribution
extreme_value_distribution(RealType a = 0.0, RealType b = 1.0);
Normal distributions:
template<class RealType = double> class normal_distribution
normal_distribution(RealType mean = 0.0, RealType stddev = 1.0);
template<class RealType = double> class lognormal_distribution
lognormal_distribution(RealType m = 0.0, RealType s = 1.0);
template<class RealType = double> class chi_squared_distribution
chi_squared_distribution(RealType n = 1);
template<class RealType = double> class cauchy_distribution
cauchy_distribution(RealType a = 0.0, RealType b = 1.0);
template<class RealType = double> class fisher_f_distribution
fisher_f_distribution(RealType m = 1, RealType n = 1);
template<class RealType = double> class student_t_distribution
student_t_distribution(RealType n = 1);
Sampling distributions:
template<class IntType = int> class discrete_distribution
discrete_distribution(initializer_list<double> wl);
template<class RealType = double> class piecewise_constant_distribution
template<class UnaryOperation>
piecewise_constant_distribution(initializer_list<RealType> bl,
UnaryOperation fw);
template<class RealType = double> class piecewise_linear_distribution
template<class UnaryOperation>
piecewise_linear_distribution(initializer_list<RealType> bl,
UnaryOperation fw);
Each distribution requires a set of parameters. Explaining all these mathematical parameters in detail is outside the scope of this book, but the rest of this section gives a couple of examples to explain the impact of a distribution on the generated random numbers.
Distributions are easiest to understand when you look at a graphical representation of them. For example, the following code generates one million random numbers between 1 and 99 and counts how many times a certain number between 1 and 99 is randomly chosen. This is stored in a map where the key is a number between 1 and 99, and the value associated with a key is the number of times that that key has been selected randomly. After the loop, the results are written to a CSV (Comma Separated Values) file, which can be opened in a spreadsheet application to generate a graphical representation:
const unsigned int kStart = 1;
const unsigned int kEnd = 99;
const unsigned int kIterations = 1000000;
// Uniform Mersenne Twister
random_device rndDevice;
mt19937 eng(rndDevice());
uniform_int_distribution<int> dist(kStart, kEnd);
auto gen = bind(dist, eng);
map<int, int> m;
for (unsigned int i = 0; i < kIterations; ++i) {
int rnd = gen();
// Search map for a key = rnd. If found, add 1 to the value associated
// with that key. If not found, add the key to the map with value 1.
++(m[rnd]);
}
// Write to a CSV file
ofstream of("res.csv");
for (unsigned int i = kStart; i <= kEnd; ++i) {
of << i << ",";
auto res = m.find(i);
of << (res != end(m) ? res->second : 0) << endl;
}
The resulting data can then be used to generate a graphical representation. The graph of the preceding uniform Mersenne twister is shown in Figure 19-1.
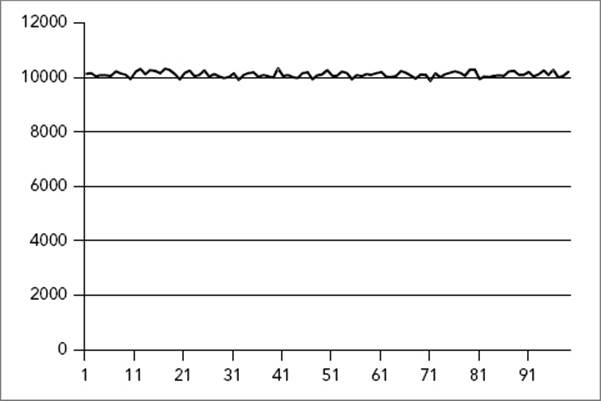
FIGURE 19-1
The horizontal axis represents the range in which random numbers are generated. The graph clearly shows that all numbers between 1 and 99 are randomly chosen around 10,000 times and that the distribution of the generated random numbers is uniform across the entire range.
The example can be modified to generate random numbers according to a normal distribution instead of a uniform distribution. Only two small changes are required. First, the creation of the distribution is modified as follows:
normal_distribution<double> dist(50, 10);
Because normal distributions use doubles instead of integers, you also need to modify the call to gen():
int rnd = static_cast<int>(gen());
Figure 19-2 shows a graphical representation of the random numbers generated according to the normal distribution.
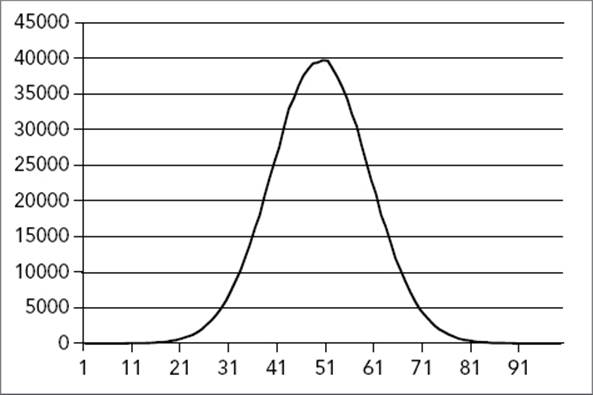
FIGURE 19-2
The graph clearly shows that most of the generated random numbers will be around the center of the range. In this example, the value 50 will be randomly chosen around 40,000 times, while values like 20 or 80 will be chosen randomly only around 500 times.
TUPLES
The std::pair class, defined in <utility> and introduced in Chapter 16, can store two values, each with a specific type. The type of each value should be known at compile time. The following is a short example:
pair<int, string> p1(16, "Hello World");
pair<bool, float> p2(true, 0.123f);
cout << "p1 = (" << p1.first << ", " << p1.second << ")" << endl;
cout << "p2 = (" << p2.first << ", " << p2.second << ")" << endl;
The output is as follows:
p1 = (16, Hello World)
p2 = (1, 0.123)
C++ also has a std::tuple class, defined in the <tuple> header file. A tuple is a generalization of a pair, and allows you to store any number of values, each with its own specific type. Just like a pair, a tuple has a fixed size and fixed value types, determined at compile time.
A tuple can be created with a tuple constructor, specifying the template types and specifying the actual values. For example, the following code creates a tuple where the first element is an integer, the second element a string, and the last element a Boolean:
using MyTuple = tuple<int, string, bool>;
MyTuple t1(16, "Test", true);
std::get<i>() is used to get the i-th element from a tuple, where i is a 0-based index; that is <0> is the first element of the tuple, <1> is the second element of the tuple and so on. The value returned has the correct type for that index in the tuple:
cout << "t1 = (" << get<0>(t1) << ", " << get<1>(t1)
<< ", " << get<2>(t1) << ")" << endl;
// Outputs: t1 = (16, Test, 1)
You can check that get<i>() returns the correct type by using typeid(), from the <typeinfo> header. The output of the following code says that the value returned by get<1>(t1) is indeed a std::string:
cout << "Type of get<1>(t1) = " << typeid(get<1>(t1)).name() << endl;
// Outputs: Type of get<1>(t1) = class std::basic_string<char,
// struct std::char_traits<char>,class std::allocator<char> >
NOTE The exact string returned by typeid() is compiler dependent. The preceding output is from Visual C++ 2013.
C++14 adds the ability to retrieve an element from a tuple based on the type with std::get<T>() where T is the type of the element you want to retrieve instead of the index. The compiler generates an error if the tuple has several elements with the requested type. For example, you can retrieve the string element from t1 as follows:
cout << "String = " << get<string>(t1) << endl;
// Outputs: String = Test
The size of a tuple can be queried with the std::tuple_size template. Note that tuple_size requires you to specify the type of the tuple (MyTuple in this case) and not an actual tuple instance like t1:
cout << "Tuple Size = " << tuple_size<MyTuple>::value << endl;
// Outputs: Tuple Size = 3
Another way to create a tuple is to use the std::make_tuple() utility function. This function only needs the actual values and deduces the types automatically at compile time. Because of the automatic deduction of types, you cannot use & to specify a reference. If you want to use make_tuple() to generate a tuple containing a reference or a constant reference, then you need to use ref() or cref(), respectively, as is demonstrated in the following example. The ref() and cref() helpers are defined in the <functional> header file. For example, the following make_tuple() call results in a tuple of type tuple<int, double&, string&, const string&>:
double d = 3.14;
string str1 = "Test";
auto t2 = make_tuple(16, ref(d), ref(str1), cref(str1));
To test the double reference in the t2 tuple, the following three lines of code first write the value of the double variable to the console. It then uses get<1>(t2), which actually returns a reference to d because ref(d) was used for the second tuple element. The second line changes the value of the variable referenced, and the last line shows that the value of d is indeed changed through the reference stored in the tuple:
cout << "d = " << d << endl;
get<1>(t2) *= 2;
cout << "d = " << d << endl;
// Outputs: d = 3.14
// d = 6.28
The following block of code demonstrates something similar, but uses strings. It tries to change the value of the variable referenced by the third element of the tuple, which works perfectly because of the use of ref(), which results in a string&. However, trying to change the variable referenced by the fourth element will fail because that is a const string&:
cout << "str = " << str1 << endl;
get<2>(t2) = "Hello";
//get<3>(t2) = "Hello"; // ERROR because of cref()
cout << "str = " << str1 << endl;
// Outputs: str = Test
// str = Hello
Tuples can also contain other containers. The following line creates a tuple where the first element is a string and the second element is a vector of integers:
tuple<string, vector<int>> t1("test", {1,2,3,4});
The standard defines a std::tie() utility function, which generates a tuple of references. The following example first creates a tuple consisting of an integer, a string, and a Boolean value. It then creates three variables: an integer, a string, and a Boolean and writes the values of those variables to the console. The tie(i, str, b) call creates a tuple containing a reference to i, a reference to str, and a reference to b. The assignment operator is used to assign tuple t1 to the result of tie(). Because the result of tie() is a tuple of references, the assignment actually changes the values in the three separate variables as is shown by the output of the values after the assignment:
tuple<int, string, bool> t1(16, "Test", true);
int i = 0;
string str;
bool b = false;
cout << "Before: i = " << i << ", str = \"" << str << "\", b = " << b << endl;
tie(i, str, b) = t1;
cout << "After: i = " << i << ", str = \"" << str << "\", b = " << b << endl;
The result is as follows:
Before: i = 0, str = "", b = 0
After: i = 16, str = "Test", b = 1
You can use std::tuple_cat() to concatenate two tuples into one tuple. In the following example, the type of t3 will be tuple<int, string, bool, double, string>:
tuple<int, string, bool> t1(16, "Test", true);
tuple<double, string> t2(3.14, "string 2");
auto t3 = tuple_cat(t1, t2);
Tuples also support the following comparison operators: ==, <, !=, >, <= and >=. For the comparison operators to work, the element types stored in the tuple should support them as well. For example:
tuple<int, string> t1(123, "def");
tuple<int, string> t2(123, "abc");
if (t1 < t2) {
cout << "t1 < t2" << endl;
} else {
cout << "t1 >= t2" << endl;
}
The output should be as follows:
t1 >= t2
Iterating over the values of a tuple is unfortunately not straightforward. You cannot write a simple loop and call something like get<i>(mytuple) because the value of i must be known at compile time. A solution is to use template metaprogramming, which is discussed in detail in Chapter 21, together with an example on how to print tuple values.
SUMMARY
This chapter gave an overview of additional functionality provided by the C++ standard that did not fit in other chapters. You learned how to use std::function to create function pointers. This chapter also gave an overview of the ratio template to define compile-time rational numbers, the Chrono library, and the random number generation library. The chapter finished with a discussion on tuples, which are a generalization of pairs.
This chapter concludes part 3 of the book. The next part discusses some more advanced topics and starts with a chapter showing you how to customize and extend the functionality provided by the C++ Standard Template Library.
All materials on the site are licensed Creative Commons Attribution-Sharealike 3.0 Unported CC BY-SA 3.0 & GNU Free Documentation License (GFDL)
If you are the copyright holder of any material contained on our site and intend to remove it, please contact our site administrator for approval.
© 2016-2026 All site design rights belong to S.Y.A.