C++ Recipes: A Problem-Solution Approach (2015)
CHAPTER 13
Scripting
C++ is a powerful programming language that can be used in a number of ways and supports several different programming paradigms. It allows for high-level object-oriented abstractions and generic programming, but it also allows you to code at a very low level that takes into consideration CPU characteristics such as the length of cache lines. This power comes at the expense of the need to compile the language into machine code. Compiling, building, and linking C++ is a task that programmers need to take on and not something that is simple for non-programmers to understand.
Scripting languages can help lower the barrier to making code-related changes to your program and enable art and design teams to take control over high-level tasks. It’s not uncommon for things such as screen layouts and UI flows to be written in a scripting language so they can easily be changed by non-programming members of a team. Several popular scripting languages are available, one of which is Lua. This chapter looks at how the Lua programming language differs from C++ and how the Lua interpreter and engine can be incorporated into your C++ programs.
13-1. Creating a Lua Library Project in Visual Studio
Problem
You wish to make a program using Visual Studio that incorporates the Lua scripting language.
Solution
The Lua programming language is supplied with all the source files you need to make a working Lua program. You can include these files into a separate Visual Studio project that can be used to build a static library.
How It Works
Visual Studio programs can be built from several constituent parts. Visual Studio supports this by creating a solution file for your application that contains multiple projects. A project in Visual Studio can be configured to create an EXE, a static library, or a dynamic library. For this recipe, you create a solution that consists of two projects: one to build a static library containing the Lua library and another to create an application that links statically to the Lua project and uses Lua in its code. Follow these steps to create a project that builds an application linked to the Lua C Library:
1. Open Visual Studio, and select the option to create a new project from the start screen or the File menu.
2. Click the Visual C++ category under Installed Templates, and select the Win32 Project template for your new application.
3. Give your project a name, choose a location to store its files, and click OK to proceed. Figure 13-1 shows the New Project Wizard.
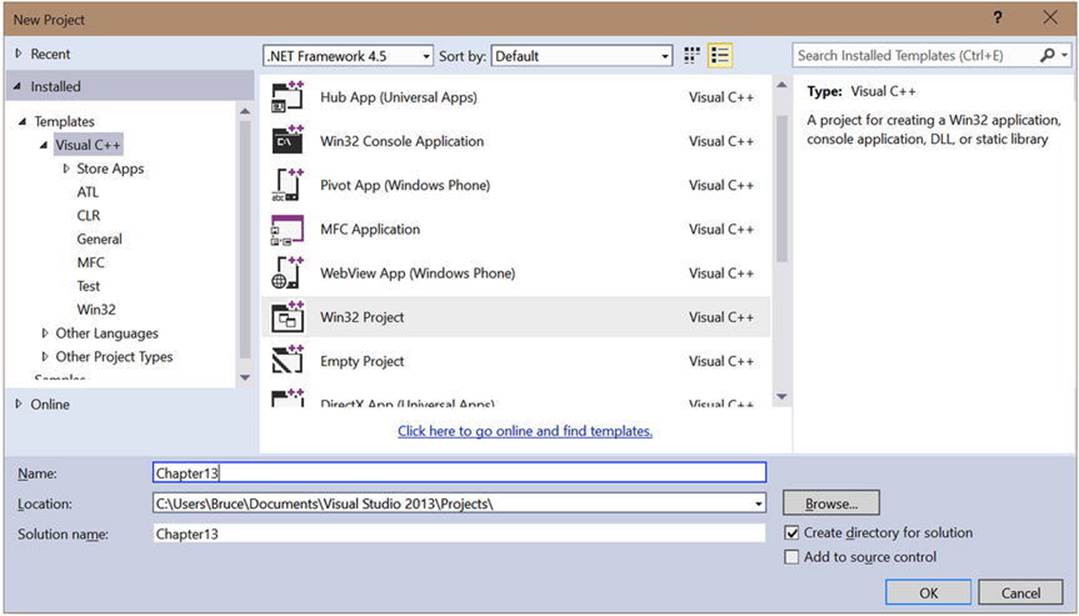
Figure 13-1. The Visual Studio New Project Wizard at step 3
4. In the Application Wizard, select Console Application, and uncheck the Precompiled Header and Security Development Lifecycle (SDL) options.
5. Click Finish.
6. Right-click the newly created solution in the Solution Explorer window, and select Add ![]() New Project.
New Project.
7. Select Win32 Project again, name the project Lua, and click OK.
8. Click Next in the Application Wizard, and then select the Static Library option.
9. Uncheck the Precompiled Header option and the SDL option, and click finish.
10.Download the Lua source code from www.lua.org.
11.Unpack the tar.gz file you downloaded, using an application such as 7-Zip, and copy the src folder to the folder you used to create your Lua project.
12.Right-click the Source Files folder in your Lua project in the Visual Studio Solution Explorer window, and select Add ![]() Existing Item.
Existing Item.
13.Add the following files from the src Lua folder you copied into the project directory:
· lapi.c
· lauxlib.c
· lbaselib.c
· lbitlib.c
· lcode.c
· lcorolib.c
· lctype.c
· ldblib.c
· ldebug.c
· ldo.c
· ldump.c
· lfunc.c
· lgc.c
· linit.c
· liolib.c
· llex.c
· lmathlib.c
· lmem.c
· loadlib.c
· lobject.c
· lopcodes.c
· loslib.c
· lparser.c
· lstate.c
· lstring.c
· lstrlib.c
· ltable.c
· ltablib.c
· ltm.c
· lundump.c
· lutf8lib.c
· lvm.c
· lzio.c
14.Right-click your Lua project, and click Build to see that the Lua.lib file is generated without error.
15.Right-click the Chapter 13 project, and select Properties.
16.Expand the Common Properties section, and click References.
17.Click Add New Reference.
18.Check the Lua project, and select OK.
19.Expand the C/C++ section under Configuration Properties, and click General.
20.Ensure that the Configuration option is set to All Configurations.
21.Edit the Additional Include Directories option so it has the path to the Lua source folder you copied into the Lua project folder.
22.Replace your main function source in the project CPP file with the code from Listing 13-1.
Listing 13-1. A Simple Lua Program
#include "lua.hpp"
int main(int argc, char* argv[])
{
lua_State* pLuaState{ luaL_newstate() };
if (pLuaState)
{
luaL_openlibs(pLuaState);
lua_close(pLuaState);
}
return 0;
}
23.Build and execute your program to see that the Lua static library is successfully included in your project.
Following these steps allows you to create a Lua static library project that you can use throughout the remainder of the recipes in this chapter.
13-2. Creating a Lua Library Project in Eclipse
Problem
You wish to create a C++ program using Lua as a scripting language, and you’re developing on a Linux computer with Eclipse installed.
Solution
Lua is supplied as source code, and you can create an Eclipse project that can be built into a static library for inclusion in other programs.
How It Works
The Eclipse IDE allows you to create new static library projects that can be linked into application projects. Follow these steps to create an Eclipse project that builds a Linux-compatible static library for your Lua projects:
1. Open your Eclipse IDE, and navigate to the C/C++ perspective.
2. Right-click in the Project Explorer window, and select New ![]() C++ Project.
C++ Project.
3. Expand the Static Library category, and select Empty Project.
4. Give the project a name, and choose a folder to store the project.
5. Click Finish.
6. Right-click your new project in the Project Explorer window, and select New ![]() Source Folder. Give it a name.
Source Folder. Give it a name.
7. Download the Lua source from www.lua.org.
8. Unpack the tar.gz file you obtained, and copy the .c and .h files from the src folder to your newly created project source folder.
9. Right-click your project in the Project Explorer window, and select Refresh.
10.Observe that the Lua source and header files appear in the Project Explorer window.
11.Right-click the project, and select Build to ensure that the source compiles correctly.
12.Right-click empty space in the Project Explorer window, and select New ![]() C++ Project.
C++ Project.
13.Select Executable ![]() Hello World C++ Project.
Hello World C++ Project.
14.Set the Project Name field.
15.Select a location.
16.Click Finish.
17.Right-click your new executable project in the Project Explorer window, and select Properties.
18.Click the C/C++ Build category, and ensure that Configuration is set to Debug.
19.Expand the C/C++ Build category, and click Settings.
20.Select the Libraries option under the GCC C++ Linker category.
21.Click the Add option in the Libraries section, and type Lua (you don’t need to type libLua.a—the lib and .a parts are added automatically).
22.Click the Add option on the Library search path option.
23.Click Workspace.
24.Select the Debug folder in the Lua project.
25.Repeat steps 18–24 for the Release configuration (you need to build the Lua project in the Release configuration before the Release folder and library are generated).
26.Select the GCC C++ Compiler ![]() Includes section in the C/C++ Build
Includes section in the C/C++ Build ![]() Settings dialog.
Settings dialog.
27.Set Configuration to All Configurations.
28.Click the Add option in the Include paths section.
29.Click the Workspace button.
30.Select the source folder that you added to the Lua project in step 6.
31.Select the Miscellaneous section under the GCC C++ Compiler settings in the C/C++ Build ![]() Settings section.
Settings section.
32.Add –std=c++11 to the Other Flags field.
33.Replace your main function with the source code in Listing 13-2.
Listing 13-2. A Simple Lua Program
#include "lua.hpp"
int main()
{
luaState* pLuaState{ luaL_newstate() };
if (pLuaState)
{
luaL_openlibs(pLuaState);
lua_close(pLuaState);
}
return 0;
}
34.Debug your application, and step through to ensure that the pLuaState variable in Listing 13-2 is valid and everything completes as expected.
The steps in this recipe allow you to create a Lua static library project in Eclipse that you can now use throughout the rest of this chapter.
13-3. Creating a Lua Project in Xcode
Problem
You would like to create a C++ program in Xcode that uses the Lua programming language for scripting.
Solution
You can create projects in Xcode that allow you to generate static libraries to be linked into C++ applications.
How It Works
The Xcode IDE lets you create projects that can build executables or libraries. This recipe shows you how to configure a project to build the Lua source as a static library and link this into another project that generates an executable. Follow these steps to set up your projects:
1. Open Xcode.
2. Select Create a New Xcode Project.
3. Select the Library option in the OS X Framework & Library section.
4. Click Next.
5. Set Product Name to Lua.
6. Change Framework to None.
7. Change Type to Static.
8. Select a folder to store the Xcode library project.
9. Download the Lua source from www.lua.org.
10.Unpack the tar,gz file obtained from the web page.
11.Copy the source files from the src folder to the Lua project folder created in step 8.
12.Right-click the project in Xcode, and select Add Files to Lua.
13.Close Xcode.
14.Open Xcode.
15.Select Create a New Xcode Project.
16.Select the Command Line Tool option from the OS X Application section.
17.Set the Product Name field.
18.Uncheck the Use Storyboards option.
19.Click Next.
20.Select a folder to store the project.
21.Open Finder, and browse to the folder containing your Lua project.
22.Drag the xcodeproj file into the app project in the Xcode window. You should now have the Lua project under the app project.
23.Click the app project, and then click the Build Phases option.
24.Expand the Link Binary with Libraries option.
25.Click the plus sign.
26.Select libLua.a from the Workspace section.
27.Click Build Settings.
28.Double-click the Header Search Paths option.
29.Click the plus sign, and enter the path to the Lua source in your Lua project.
30.Replace the code in AppDelegate.m with the code in Listing 13-3.
Listing 13-3. A Simple Lua Program
#import "AppDelegate.h"
#include "lua.hpp"
@property (weak) IBOutlet NSWindow *window;
@end
@implementation AppDelegate
- (void)applicationDidFinishLaunching:(NSNotofication *)aNotification {
lua_State* pLuaState{ luaL_newstate() };
if (pLuaState)
{
luaL_openlibs(pLuaState);
lua_close(pLuaState);
}
}
- (void)applicationWillTerminate:(NSNotification *)aNotification {
}
@end
31.Build and debug your program, using breakpoints to ensure that the Lua state is initialized properly.
The steps and code provided in this chapter were generated using Xcode 6.1.1. You may have to alter the remaining examples in the chapter to replace the main function with the applicationDidFinishLaunching Objective-C method. If your programs won’t compile, try changing Type of Source File from Objective-C to Objective-C++ in the Identity and Type settings.
13-4. Using the Lua Programming Language
Problem
You’re a C++ programmer and would like to learn the Lua programming language before you add it to your own applications.
Solution
The Lua programming language documentation is available at /www.lua.org/manual/5.3, and a live demo for testing code is available at www.lua.org/demo.html.
How It Works
The Lua programming language differs from C++ almost entirely. C++ is a compiled language that executes directly on a CPU. Lua, on the other hand, is an interpreted language that is executed by a virtual machine that in turn is running on a CPU. The Lua language comes with a virtual machine that is written in C, and the source is supplied. This means you can embed the virtual machine in any C or C++ program you write, and use the scripting language to write and control high-level features of your application.
It’s a good idea to learn some of the features of the Lua programming language before taking on such a task.
Working with Variables
C++ variables are statically typed. That means their type is specified when the variable is declared, and it can’t be changed at any point in the future. An int remains an int for the entirety of its lifetime. This helps make C++ programs predictable and highly performant when running on a CPU, because the correct instructions can be used on the correct types of variables. Lua code, on the other hand, runs in a virtual machine; therefore there are fewer restrictions on the types a variable can represent. This leads to Lua being known as a dynamically typed language. Listing 13-4shows the effect dynamic types have on an executing program.
Listing 13-4. Working with Lua Variables
variable = 1
print(variable)
print(type(variable))
variable = "1"
print(variable)
print(type(variable))
You can copy the code in Listing 13-4 and paste it directly into the Lua Live Demo available at www.lua.org/demo.html. The demo has controls to Run, Clear, Restore, and Restart the Lua virtual machine. Click Run after pasting or typing the code from Listing 13-4, and the following output is generated by the web page:
1
number
1
string
This output lets you see dynamic types in action. Listing 13-4 initially assigns an integer value to variable. This is output by the print function as the number 1 in the log. The type function returns a string that represents the type of the variable when it’s called. The first call totype returns number as the type of variable. A string representation of the value “1” is then assigned to variable. The print function represents the string value of 1 the same way as the integer value. There’s no way to tell from that which type is currently stored in the variable. The second call to the type function makes it clear that the value is actually a string and is no longer a number.
Dynamically typed languages can make interesting things happen to your program if you aren’t careful. In C++, there is no way to add a number to a string unless you overload the assignment operator to handle this special case. Lua can handle such an operation with ease. Listing 13-5shows this in action.
Listing 13-5. Adding a Number to a String
variable = 1
print(variable)
print(type(variable))
variable = "1"
print(variable)
print(type(variable))
variable = variable + 1
print(variable)
print(type(variable))
Listing 13-5 adds an extra operation to the code originally shown in Listing 13-4. This operation adds the value 1 to variable. Recall from the earlier output that the value in variable was last represented by a string. The following output shows what has happened after executingListing 13-5:
1
number
1
string
2.0
number
The variable now holds a number that is represented by the floating-point value 2.0. Not all strings are created equal, however. If you try to add a number to a string that can’t be converted to a numeric, then you’ll receive an error. Listing 13-6 shows code that attempts this.
Listing 13-6. Adding a Number to a Non-Numeric String
variable = "name"
variable = variable + 1
This code causes the Lua virtual machine to produce the following error:
input:2: attempt to perform arithmetic on a string value (global 'variable')
All the Lua arithmetic operators can convert types. If both variables are integers, then the resulting value is also an integer. If one or both of the values is a floating-point number, then the result is a floating-point number. And finally, if one or both of the values is a string that can be converted to a number, then the resulting value is a floating-point number. You saw this in the output from Listing 13-4, where the value shown by print was 2.0 with the .0 representing a floating-point number. Some operators, such as the division operator and the exponent operator, always return values that are represented by floating-point numbers.
These examples show one of the features of the Lua programming language that makes it easier for non-programmers to work with. You don’t need to have as firm a grasp on the underlying types of variables as you do when using C++. There is no concern about having an adequate number of bytes to represent the value 512 and having to choose between a char, a short, or an int. You also don’t need to be concerned with working with C-style strings or C++ STL strings. Any variable can store any type supported by Lua just by assigning a value to a variable at any time in the code.
Working with Functions
The previous section showed that Lua has some built-in functions you can call. It’s also possible to create your own functions using the function keyword. Listing 13-7 creates a Lua function.
Listing 13-7. Creating and Calling a Function
variable = "name"
function ChangeName()
variable = "age"
end
print(variable)
ChangeName()
print(variable)
Listing 13-7 begins by defining a variable that stores the value “name”. This is followed by a function definition that changes the value of variable to “age”. The code in the function isn’t called at the time of the function definition. This can be seen in the output generated by the print calls. The first call to print generates the output name, and the second call generates the output age.
This is a useful example because it shows that by default, Lua variables are global in nature. The value stored by variable is printed twice: once before the call to ChangeName and once after. If variable wasn’t global, you would expect the value to be the same both times. Lua does support the creation of local variables, but you must be careful with their usage. Listing 13-8 shows what happens when you make variable local.
Listing 13-8. Making variable Local
local variable = "name"
function ChangeName()
variable = "age"
end
print(variable)
ChangeName()
print(variable)
Adding the local specifier to variable in Listing 13-8 doesn’t achieve anything for the code shown. Making this local essentially tells the Lua virtual machine that the variable can be accessed anywhere in the current scope—which means anywhere in the current file. If you’re using the Lua demo, you can imagine that the text box for entering your code is a single Lua file. To prevent the ChangeName function from accessing the same instance of variable, you have to use the local keyword on this variable as well, as shown in Listing 13-9.
Listing 13-9. Making the ChangeName variable Local
local variable = "name"
function ChangeName()
local variable = "age"
end
print(variable)
ChangeName()
print(variable)
Both calls to print in Listing 13-9 result in the value “name” being printed to the output window. I recommend making all of your variables local to ensure that your code is less likely to introduce bugs that are hard to track down, caused by inadvertently using the same variable name in more than one place at a time.
Functions in Lua always return values. The ChangeName function in Listing 13-9 doesn’t specify a return value, so it implicitly returns nil. This can be seen in Listing 13-10.
Listing 13-10. Function Returning nil
function GetValue()
local variable = "age"
end
local value = GetValue()
print(value)
This code returns nil to the variable value, and this is printed by the print function. The nil value is the Lua equivalent of nullptr in C++. It means the absence of a value rather than representing 0. Trying to manipulate nil values results in a Lua error such as the following:
input:8: attempt to perform arithmetic on a nil value (local 'value')
This error was generated by trying to add 1 to value when it stores nil. You can avoid the error by properly returning a value from the GetValue function, as shown in Listing 13-11.
Listing 13-11. Returning Properly from a Function
function GetValue()
return "age"
end
local value = GetValue()
print(value)
This listing shows that the return function can be used the same as it is in C++. Lua’s return statement isn’t the same as return in C++, though. You can use it to return multiple values from a function using the comma operator (,). Listing 13-12 shows this in action.
Listing 13-12. Multiple Return Values
function GetValues()
return "name", "age"
end
local name, age = GetValues()
print(name)
print(age)
Listing 13-12 shows that to return and store multiple values from a function, you must use the comma operator on the return statement and the assignment statement when defining the function and calling the function.
Working with Tables
Lua provides tables as a means of storing collections of information. A table can be used as either a standard array with an integer-based index or an associative array with key-value pairs. You create a table using curly braces, as shown in Listing 13-13.
Listing 13-13. Creating a Tables
newTable = {}
This code simply creates a table that can now be used to store values. An associative table can use any type of variable as a key. This is true for strings, floats, integers, and even other tables. Listing 13-14 shows how to use a Lua table as an associative array.
Listing 13-14. Adding Values to an Associative Array
newTable = {}
newTable["value"] = 3.14
newTable[3.14] = "value"
keyTable = {}
newTable[keyTable] = "VALID"
print(newTable["value"])
print(newTable[3.14])
print(newTable[keyTable])
Listing 13-14 adds values to a Lua table using keys. There are examples of using strings, floats, and other tables as keys in this listing, and you can see how to use the array operator to assign values to a key in a table as well as read values from a table. Trying to read the value atnewTable[3.14] would result in nil being returned before any value was assigned to that key. This is also how you can remove values from a table: assign nil to the key you wish to remove. Listing 13-15 shows the removal of objects from a table.
Listing 13-15. Removing Objects from a Table
newTable = {}
newTable["nilValue1"] = 1
newTable["nilValue2"] = 2
print(newTable["nilValue1"])
print(newTable["nilValue2"])
newTable["nilValue1"] = nil
print(newTable["nilValue1"])
print(newTable["nilValue2"])
Lua tables can also be used as C-style arrays, and the Lua language provides helper functions to aid in the management of these types of arrays. Listing 13-16 shows the creation of an array table and the modification of its elements.
Listing 13-16. Creating a Lua Array
newTable = {}
table.insert(newTable, "first")
table.insert(newTable, "second")
table.insert(newTable, "third")
print(newTable[2])
print(newTable[2])
table.insert(newTable, 2, "fourth")
print(newTable[2])
table.remove(newTable, 1)
print(newTable[1])
print(newTable[2])
print(newTable[3])
print(newTable[4])
Listing 13-16 uses the table.insert and table.remove Lua functions. You can use the insert function two ways: without an index, to add elements to the end of the array; or with an index as the second parameter, to insert elements into the array and shift everything from that point on up a place. This shows you that Lua arrays behave more like a C++ vector. The remove function takes the index that you would like to see removed from the array.
Lua also provides a # operator that can be used with array-style tables. Listing 13-17 shows it in action.
Listing 13-17. Using the # Operator
newTable = {}
table.insert(newTable, "first")
table.insert(newTable, "second")
table.insert(newTable, "third")
print(#newTable)
newTable[9] = "fourth"
print(newTable[9])
print(#newTable)
The # operator in Listing 13-17 returns the last continuous index that it can find. The first three elements are added without issue, using the insert method; therefore they have continuous indices. However, the element added manually at 9 doesn’t. This prevents you from being able to use the # operator to count the number of elements in the array unless you can be certain that all the indices in the array are contiguous.
Using Flow Control
Lua provides an if statement, a for loop, and a while loop to help you structure your programs. These can be used to make decisions and to loop over all the elements in a table. Listing 13-18 shows the Lua if statement.
Listing 13-18. Using the Lua if Statement
value1 = 1
value2 = 2
if value1 == value2 then
print("Are equal")
elseif value1 ~= value2 then
print("Not equal")
else
print("Shouldn't be here!")
end
Lua’s if statement is formed by creating an expression that evaluates to not nil and not false wrapped in the if…then statement. The code in the if block creates its own scope and can consist of its own local variables. The elseif statement is supplied to allow multiple expressions to be evaluated in a sequential order, and the else statement can provide a default behavior of required. Both the elseif and else statements are optional and not required. The entire if statement block is terminated using the end keyword.
There are a couple of things to consider when coming from C++ to Lua and using flow-control statements such as if. Assigning a 0 value to a variable would result in a positive test when working with if statements. The if statement evaluates for not nil and not false, so a value of 0 is given as true. Listing 13-18 also shows the not-equal operator, which in Lua uses the ~ character in place of the C++ language’s use of !.
These cases are also true of the while statement, as shown in Listing 13-19.
Listing 13-19. Using a Lua while Loop
value1 = 2
while value1 do
print("We got here! " .. value1)
value1 = value1 - 1
if value1 == -1 then
value1 = nil
end
end
This code uses a while loop to show that a value of 0 evaluates to true in a Lua control statement. The output is as follows:
We got here! 2
We got here! 1
We got here! 0
The loop is finally terminated after the if statement has triggered and set the value of value1 to nil. A better method for controlling the termination of the while loop is shown in Listing 13-20.
Listing 13-20. Better while Termination
value1 = 2
while value1 do
print("We got here! " .. value1)
value1 = value1 - 1
if value1 == -1 then
break
end
end
Listing 13-20 uses a break statement to exit the execution of the while loop. The break statement works exactly as you would expect when coming from C++. Yet another option for leaving the loop is shown in Listing 13-21.
Listing 13-21. Using Comparison Operators to Leave a Loop
value1 = 2
while value1 >= 0 do
print("We got here! " .. value1)
value1 = value1 - 1
end
Despite the value 0 resulting in a true result in the while loop test, a comparison for 0 or any other valid comparison eventually returns false under normal operating circumstances. Here the value of value1 is compared with 0, and the loop stops executing once the value falls below 0.
You can use the Lua for loop to iterate in an algorithm. Listing 13-22 shows a simple for loop.
Listing 13-22. A Lua for Loop
for i=0, 10, 2 do
print(i)
end
This for loop prints the numbers 0, 2, 4, 6, 8, and 10. The statement to generate a for loop takes a start position (in this case, a variable and its value), a limit, and finally a step. This example creates a variable and assigns it 0, loops until the variable is greater than the limit, and adds the step to the variable at each iteration. The loop starts at 0, adds 2 with each iteration, and ends once the variable holds a number greater than 10. It the step was negative, it would loop until the variable held a value less than the limit.
You can also use a for loop to iterate over tables using the pairs or ipairs functions. Listing 13-23 shows these in action.
Listing 13-23. Using pairs and ipairs
newTable = {}
newTable["first"] = 1
newTable["second"] = 2
newTable["third"] = 3
for key, value in pairs(newTable) do
print(key .. ": " .. value)
end
newTable = {}
table.insert(newTable, "first")
table.insert(newTable, "second")
table.insert(newTable, "third")
for index, value in ipairs(newTable) do
print(index .. ": " .. value)
end
The pairs function returns the key and value from each element in an associative array table, and the ipairs function returns the numeric indices of an array-style table. This code shows the benefit of Lua’s ability to return multiple values from a function.
13-5. Calling Lua Functions from C++
Problem
You have a task in your program that would benefit from the fast iteration capabilities afforded by scripting in Lua.
Solution
The Lua programming language comes with source code that allows you to compile and execute scripts while your program is running.
How It Works
The Lua C++ API provides a programming interface to the Lua state’s stack. The C++ API can manipulate this stack to pass parameters to Lua code and receive values from Lua in return. This capability lets you create Lua source files that can then act as Lua functions. These Lua functions can be updated while your program is running, allowing you to iterate on your program logic much more quickly than would be possible with C++ alone.
The Lua APIs are supplied using the C programming language. This means you have to create proxy objects if you wish to take a more C++-style approach to using Lua. Listing 13-24 shows how you can create a program that loads and executes a Lua script as a function from C++.
Listing 13-24. Calling a Simple Lua Script as a Function
#include <iostream>
#include "lua.hpp"
using namespace std;
class Lua
{
private:
lua_State* m_pLuaState{ nullptr };
public:
Lua()
: m_pLuaState{ luaL_newstate() }
{
if (m_pLuaState)
{
luaL_openlibs(m_pLuaState);
}
}
~Lua()
{
lua_close(m_pLuaState);
}
Lua(const Lua& other) = delete;
Lua& operator=(const Lua& other) = delete;
Lua(Lua&& rvalue) = delete;
Lua& operator=(Lua&& rvalue) = delete;
bool IsValid() const
{
return m_pLuaState != nullptr;
}
int LoadFile(const string& filename)
{
int status{ luaL_loadfile(m_pLuaState, filename.c_str()) };
if (status == 0)
{
lua_setglobal(m_pLuaState, filename.c_str());
}
return status;
}
int PCall()
{
return lua_pcall(m_pLuaState, 0, LUA_MULTRET, 0);
}
};
class LuaFunction
{
private:
Lua& m_Lua;
string m_Filename;
int PCall()
{
return m_Lua.PCall();
}
public:
LuaFunction(Lua& lua, const string& filename)
: m_Lua{ lua }
, m_Filename(filename)
{
m_Lua.LoadFile(m_Filename);
}
~LuaFunction() = default;
LuaFunction(const LuaFunction& other) = delete;
LuaFunction& operator=(const LuaFunction& other) = delete;
LuaFunction(LuaFunction&& rvalue) = delete;
LuaFunction& operator=(LuaFunction&& rvalue) = delete;
int Call()
{
m_Lua.GetGlobal(m_Filename);
return m_Lua.PCall();
}
};
int main(int argc, char* argv[])
{
Lua lua;
if (lua.IsValid())
{
const string filename{ "LuaCode1.lua" };
LuaFunction function(lua, filename);
function.Call();
}
return 0;
}
Listing 13-24 shows a method of containing all the Lua C functions in a single class implementation. This lets you put the definitions for all of these methods in a single C++ file and limit the dependencies on Lua throughout your program. The Lua class is therefore responsible for maintaining the lua_State pointer that manages the Lua context for the program. This example creates a class that limits the ability to copy or move the Lua object; you may need this to be possible, but it isn’t necessary for these examples.
The constructor for the Lua class calls the luaL_newstate function. This function calls the lua_newstate function and passes default parameters. You could call lua_newstate directly if you wanted to supply your own memory allocator to the Lua state machine. A successful call to luaL_newstate results in the m_pLuaState field storing a valid address for the state. If that’s true, then the luaL_openlibs function is called. This function automatically loads the Lua-provided libraries into the state you created. You can avoid calling this function if you have no need for the Lua built-in library functionality.
The Lua class destructor is responsible for calling lua_close to destroy the Lua context created by luaL_newstate in the constructor. The IsValid function provides a simple method for your calling code to determine whether the Lua context was initialized correctly in the constructor.
The LuaFunction class stores a reference to the Lua class that it uses for the context. This class once again prevents copying and moving. The constructor takes a reference to the Lua object that provides it with functionality and a string containing the name of the file to load that contains the Lua source code. The constructor uses the m_Lua object to call the LoadFile method and passes the m_Filename field. The LoadFile method calls luaL_loadfile, which reads the file, compiles the Lua source, and pushes a Lua function object onto the top of the Lua stack using the compiled code. If the luaL_loadfile call was successful, the lua_setglobal function is called. This function gets the top object from the stack and assigns it to a global object with the name supplied. In this case, the function object created by luaL_loadfile is assigned to a global variable named with the name of the source file.
The main function creates a LuaFunction object with a file named LuaCode1.lua. The source of this file is shown in Listing 13-25.
Listing 13-25. The Code from LuaCode1.lua
print("Printing From Lua!")
This Lua code results in a simple message being printed to the console. This occurs when the main function calls the LuaFunction::Call method. This method uses the Lua::GetGlobal function to move the global object with a given name to the top of the stack. In this case, them_Filename variable moves the function object created in the LoadFile method onto the stack. The Lua::PCall method then calls the function that is closest to the top of the stack. The output generated by this program is shown in Figure 13-2.
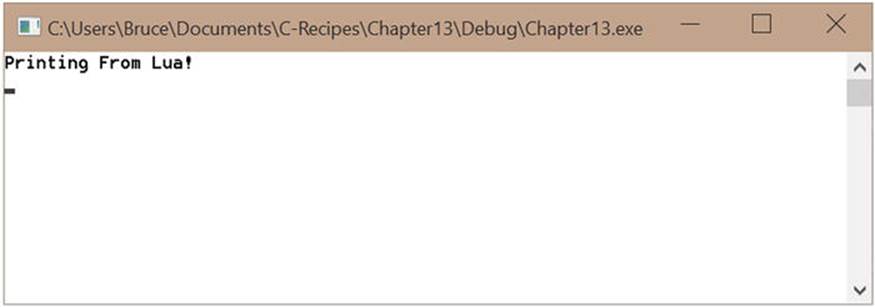
Figure 13-2. The output generated by running the code in Listing 13-24 and Listing 13-25
Listing 13-24 doesn’t initialize any data to be consumed by the Lua script. You can handle this by creating classes to represent Lua types. Listing 13-26 creates a LuaTable class to create Lua tables in C++ that can then be accessed by Lua.
Listing 13-26. Creating a Lua Table in C++
#include <iostream>
#include "lua.hpp"
#include <vector>
using namespace std;
class Lua
{
private:
lua_State* m_pLuaState{ nullptr };
public:
Lua()
: m_pLuaState{ luaL_newstate() }
{
if (m_pLuaState)
{
luaL_openlibs(m_pLuaState);
}
}
~Lua()
{
lua_close(m_pLuaState);
}
Lua(const Lua& other) = delete;
Lua& operator=(const Lua& other) = delete;
Lua(Lua&& rvalue) = delete;
Lua& operator=(Lua&& rvalue) = delete;
bool IsValid() const
{
return m_pLuaState != nullptr;
}
int LoadFile(const string& filename)
{
int status{ luaL_loadfile(m_pLuaState, filename.c_str()) };
if (status == 0)
{
lua_setglobal(m_pLuaState, filename.c_str());
Pop(1);
}
return status;
}
int PCall()
{
return lua_pcall(m_pLuaState, 0, LUA_MULTRET, 0);
}
void NewTable(const string& name)
{
lua_newtable(m_pLuaState);
lua_setglobal(m_pLuaState, name.c_str());
}
void GetGlobal(const string& name)
{
lua_getglobal(m_pLuaState, name.c_str());
}
void PushNumber(double number)
{
lua_pushnumber(m_pLuaState, number);
}
void SetTableValue(double index, double value)
{
PushNumber(index);
PushNumber(value);
lua_rawset(m_pLuaState, -3);
}
double GetNumber()
{
return lua_tonumber(m_pLuaState, -1);
}
void Pop(int number)
{
lua_pop(m_pLuaState, number);
}
};
class LuaTable
{
private:
Lua& m_Lua;
string m_Name;
public:
LuaTable(Lua& lua, const string& name)
: m_Lua{ lua }
, m_Name(name)
{
m_Lua.NewTable(m_Name);
}
void Set(const vector<int>& values)
{
Push();
for (unsigned int i = 0; i < values.size(); ++i)
{
m_Lua.SetTableValue(i + 1, values[i]);
}
m_Lua.Pop(1);
}
void Push()
{
m_Lua.GetGlobal(m_Name);
}
};
class LuaFunction
{
private:
Lua& m_Lua;
string m_Filename;
int PCall()
{
return m_Lua.PCall();
}
protected:
int Call()
{
m_Lua.GetGlobal(m_Filename);
return m_Lua.PCall();
}
double GetReturnValue()
{
double result{ m_Lua.GetNumber() };
m_Lua.Pop(1);
return result;
}
public:
LuaFunction(Lua& lua, const string& filename)
: m_Lua{ lua }
, m_Filename( filename )
{
int status{ m_Lua.LoadFile(m_Filename) };
}
};
class PrintTable
: public LuaFunction
{
public:
PrintTable(Lua& lua, const string& filename)
: LuaFunction(lua, filename)
{
}
double Call(LuaTable& table)
{
double sum{};
int status{ LuaFunction::Call() };
if (status)
{
throw(status);
}
else
{
sum = LuaFunction::GetReturnValue();
}
return sum;
}
};
int main(int argc, char* argv[])
{
Lua lua;
if (lua.IsValid())
{
int loop = 2;
while (loop > 0)
{
const string tableName("cTable");
LuaTable table(lua, tableName);
vector<int> values{ 1, 2, 3, 4, 5 };
table.Set(values);
const string filename{ "LuaCode.lua" };
PrintTable printTableFunction(lua, filename);
try
{
double result{ printTableFunction.Call(table) };
cout << "Result: " << result << endl;
}
catch (int error)
{
cout << "Call error: " << error << endl;
}
cout << "Waiting" << endl;
int input;
cin >> input;
--loop;
}
}
return 0;
}
Listing 13-26 adds a LuaTable class along with the relevant methods to the Lua class to manage the table. The lua_newtable function creates a new table and pushes it onto the stack. Then element is then assigned to a global variable with the supplied name in the LuaTableconstructor. Values are added to the table using the Lua::SetTableValue method. This method only supports number indices for the tables and works by pushing two numbers onto the stack: the index to be assigned in the table and the value to assign to that index. The lua_rawsetfunction assigns a value to an index on a table, with the table in question existing at the supplied index. The first element on the stack is referenced by -1, and this will be the value; the second element on the stack at this point is the index; and the third element is the table, so the value -3 is passed to the lua_rawset function. Both the index and the value are popped from the stack by this call, and therefore the table is once again found at position -1.
The LuaFunction class is inherited into a new class named PrintTable. This class provides a new call method that knows how to retrieve the value returned from the Lua script supplied. The Lua code in Listing 13-27 shows why this is necessary.
Listing 13-27. The LuaCode2.lua Source
local x = 0
for i = 1, #cTable do
print(i, cTable[i])
x = x + cTable[i]
end
return x
This code loops over the cTable table set up in C++ and prints out the values. It also calculates the total of all the values in the table and returns them to the calling code using the stack.
The C++ main function creates a table and assigns five integers to it using a vector. The PrintTable class creates a C++ Lua function with the LuaCode2.lua file. This function is called, and the value returned is retrieved from the stack using the Lua::GetReturnValuefunction.
The big thing to notice in main is the ability to reload Lua scripts and update the code executed at runtime. The main function stalls using cin. While it’s waiting, you can alter the Lua script and see the changes reflected once you unblock execution. Figure 13-3 shows output proving that this can occur.
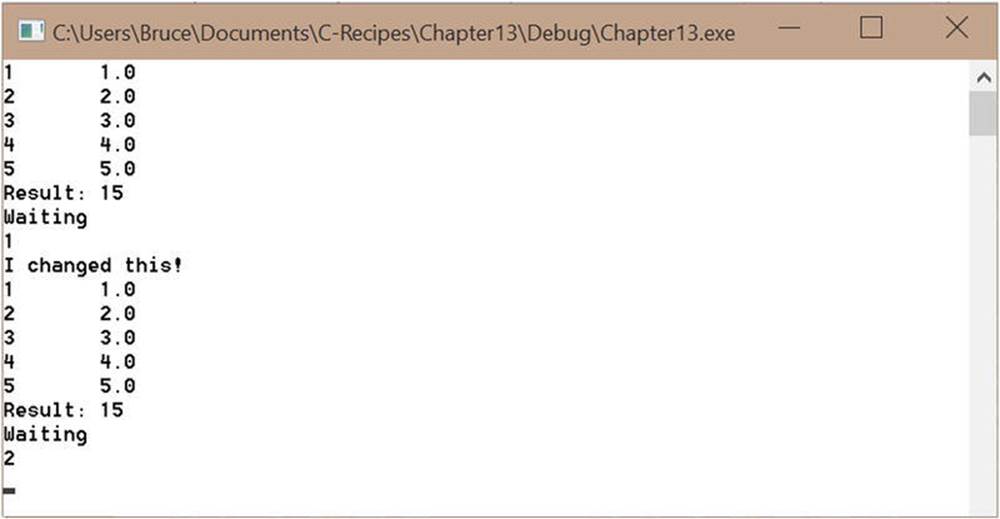
Figure 13-3. Output showing that scripts can be changed at runtime
This output shows that changing the Lua code and reloading the function replaces the code at the given global variable. I added a single line of output to the script: you can see this in the figure where the line “I changed this!” is printed.
13-6. Calling C Functions from Lua
Problem
You have some highly complex code that would benefit from the high performance afforded by C/C++ code, but you would like to be able to call these functions from Lua.
Solution
Lua provides the lua_CFunction type that lets you create C functions that can be referenced by Lua code.
How It Works
The Lua API provides a type lua_CFunction that essentially determines the signature that can be used with a C function to allow it to be called from Lua. Listing 13-28 shows an example that creates a function that can add all the parameters supplied to it by Lua.
Listing 13-28. Calling a C Function from Lua
#include <iostream>
#include "lua.hpp"
#include <vector>
using namespace std;
namespace
{
int Sum(lua_State *L)
{
unsigned int numArguments{ static_cast<unsigned int>(lua_gettop(L)) };
lua_Number sum{ 0 };
for (unsigned int i = 1; i <= numArguments; ++i)
{
if (!lua_isnumber(L, i))
{
lua_pushstring(L, "incorrect argument");
lua_error(L);
}
sum += lua_tonumber(L, i);
}
lua_pushnumber(L, sum / numArguments);
lua_pushnumber(L, sum);
return 2;
}
}
class Lua
{
private:
lua_State* m_pLuaState{ nullptr };
public:
Lua()
: m_pLuaState{ luaL_newstate() }
{
if (m_pLuaState)
{
luaL_openlibs(m_pLuaState);
}
}
~Lua()
{
lua_close(m_pLuaState);
}
Lua(const Lua& other) = delete;
Lua& operator=(const Lua& other) = delete;
Lua(Lua&& rvalue) = delete;
Lua& operator=(Lua&& rvalue) = delete;
bool IsValid() const
{
return m_pLuaState != nullptr;
}
int LoadFile(const string& filename)
{
int status{ luaL_loadfile(m_pLuaState, filename.c_str()) };
if (status == 0)
{
lua_setglobal(m_pLuaState, filename.c_str());
}
return status;
}
int PCall()
{
return lua_pcall(m_pLuaState, 0, LUA_MULTRET, 0);
}
void NewTable(const string& name)
{
lua_newtable(m_pLuaState);
lua_setglobal(m_pLuaState, name.c_str());
}
void GetGlobal(const string& name)
{
lua_getglobal(m_pLuaState, name.c_str());
}
void PushNumber(double number)
{
lua_pushnumber(m_pLuaState, number);
}
void SetTableValue(double index, double value)
{
PushNumber(index);
PushNumber(value);
lua_rawset(m_pLuaState, -3);
}
double GetNumber()
{
return lua_tonumber(m_pLuaState, -1);
}
void Pop(int number)
{
lua_pop(m_pLuaState, number);
}
void CreateCFunction(const string& name, lua_CFunction function)
{
lua_pushcfunction(m_pLuaState, function);
lua_setglobal(m_pLuaState, name.c_str());
}
};
class LuaTable
{
private:
Lua& m_Lua;
string m_Name;
public:
LuaTable(Lua& lua, const string& name)
: m_Lua{ lua }
, m_Name(name)
{
m_Lua.NewTable(m_Name);
}
void Set(const vector<int>& values)
{
Push();
for (unsigned int i = 0; i < values.size(); ++i)
{
m_Lua.SetTableValue(i + 1, values[i]);
}
m_Lua.Pop(1);
}
void Push()
{
m_Lua.GetGlobal(m_Name);
}
};
class LuaFunction
{
private:
Lua& m_Lua;
string m_Filename;
protected:
int PCall()
{
m_Lua.GetGlobal(m_Filename);
return m_Lua.PCall();
}
double GetReturnValue()
{
double result{ m_Lua.GetNumber() };
m_Lua.Pop(1);
return result;
}
public:
LuaFunction(Lua& lua, const string& filename)
: m_Lua{ lua }
, m_Filename(filename)
{
int status{ m_Lua.LoadFile(m_Filename) };
}
};
class PrintTable
: public LuaFunction
{
public:
PrintTable(Lua& lua, const string& filename)
: LuaFunction(lua, filename)
{
}
double Call(LuaTable& table)
{
double sum{};
int status{ LuaFunction::PCall() };
if (status)
{
throw(status);
}
else
{
sum = LuaFunction::GetReturnValue();
}
return sum;
}
};
int main(int argc, char* argv[])
{
Lua lua;
if (lua.IsValid())
{
const string functionName("Sum");
lua.CreateCFunction(functionName, Sum);
const string tableName("cTable");
LuaTable table(lua, tableName);
vector<int> values{ 1, 2, 3, 4, 5 };
table.Set(values);
const string filename{ "LuaCode3.lua" };
PrintTable printTableFunction(lua, filename);
try
{
double result{ printTableFunction.Call(table) };
cout << "Result: " << result << endl;
}
catch (int error)
{
cout << "Call error: " << error << endl;
}
cout << "Waiting" << endl;
int input;
cin >> input;
}
return 0;
}
The Sum function in Listing 13-28 shows how a C function must interface with Lua. The signature is simple: a C function that can be called from Lua returns an integer and receives a pointer to a lua_State object as a parameter. When Lua calls a C function, it pushes the number of arguments passed onto the top of the Lua stack. This value is read by the function called, which can then loop and pull the appropriate number of elements from the stack. A C function then pushes the appropriate number of results onto the stack and returns the number of elements that the calling code must pop from the stack.
The Lua::CreateCFunction method uses the lua_pushcfunction method to push a lua_CFunction object onto the stack and then uses lua_setglobal to assign it to a named object in the global context. The main function simply calls CreateCFunction and supplies the name to use in Lua along with the function pointer to be used. The Lua code to call this function is shown in Listing 13-29.
Listing 13-29. Lua Code Calling a C Function
local x = 0
for i = 1, #cTable do
print(i, cTable[i])
x = x + cTable[i]
end
local average, sum = Sum(cTable[1], cTable[2], cTable[3])
print("Average: " .. average)
print("Sum: " .. sum)
return sum
This Lua code shows the call to Sum and retrieves the average and sum values.
13-7. Creating Asynchronous Lua Functions
Problem
You have a long-running Lua operation that you would like to prevent from blocking your program’s execution.
Solution
Lua allows you to create coroutines. These can be yielded from to let your program execution continue and allow for the creation of well-behaved, long-running Lua tasks. Each coroutine receives its own unique Lua context.
How It Works
The Lua programming language allows for the creation of coroutines. Coroutines differ from normal functions in that they can call the coroutine.yield function from Lua to inform the state machine that their execution is suspended. The C API provides a resume function that you can call to wake up the coroutine after some time to allow the thread to check whether the situation it was waiting for has occurred. This could be because you want to wait for an animation to complete or the Lua script is waiting for information to be obtained from an I/O process, such as reading from a file or accessing data on a server.
You create a Lua coroutine using the lua_newthread function. Despite the name, a Lua coroutine is executed in the thread where the lua_resume call is made. The lua_resume call is passed a pointer to a lua_State object that contains a stack for the coroutine. The code executed on the stack is the Lua function object that exists closest to the top at the time of the lua_resume call. Listing 13-30 shows the C++ code required to set up a Lua thread and execute its code.
Listing 13-30. Creating a Lua Coroutine
#include <iostream>
#include <lua.hpp>
using namespace std;
class Lua
{
private:
lua_State* m_pLuaState{ nullptr };
bool m_IsThread{ false };
public:
Lua()
: m_pLuaState{ luaL_newstate() }
{
if (m_pLuaState)
{
luaL_openlibs(m_pLuaState);
}
}
Lua(lua_State* pLuaState)
: m_pLuaState{ pLuaState }
{
if (m_pLuaState)
{
luaL_openlibs(m_pLuaState);
}
}
~Lua()
{
if (!m_IsThread && m_pLuaState)
{
lua_close(m_pLuaState);
}
}
Lua(const Lua& other) = delete;
Lua& operator=(const Lua& other) = delete;
Lua(Lua&& rvalue)
: m_pLuaState( rvalue.m_pLuaState )
, m_IsThread( rvalue.m_IsThread )
{
rvalue.m_pLuaState = nullptr;
}
Lua& operator=(Lua&& rvalue)
{
if (this != &rvalue)
{
m_pLuaState = rvalue.m_pLuaState;
m_IsThread = rvalue.m_IsThread;
rvalue.m_pLuaState = nullptr;
}
}
bool IsValid() const
{
return m_pLuaState != nullptr;
}
int LoadFile(const string& filename)
{
int status{ luaL_loadfile(m_pLuaState, filename.c_str()) };
if (status == 0)
{
lua_setglobal(m_pLuaState, filename.c_str());
}
return status;
}
void GetGlobal(const string& name)
{
lua_getglobal(m_pLuaState, name.c_str());
}
Lua CreateThread()
{
Lua threadContext(lua_newthread(m_pLuaState));
threadContext.m_IsThread = true;
return move(threadContext);
}
int ResumeThread()
{
return lua_resume(m_pLuaState, m_pLuaState, 0);
}
};
class LuaFunction
{
private:
Lua& m_Lua;
string m_Filename;
public:
LuaFunction(Lua& lua, const string& filename)
: m_Lua{ lua }
, m_Filename(filename)
{
int status{ m_Lua.LoadFile(m_Filename) };
}
void Push()
{
m_Lua.GetGlobal(m_Filename);
}
};
class LuaThread
{
private:
Lua m_Lua;
LuaFunction m_LuaFunction;
int m_Status{ -1 };
public:
LuaThread(Lua&& lua, const string& functionFilename)
: m_Lua(move(lua))
, m_LuaFunction(m_Lua, functionFilename)
{
}
~LuaThread() = default;
LuaThread(const LuaThread& other) = delete;
LuaThread& operator=(const LuaThread& other) = delete;
LuaThread(LuaThread&& rvalue) = delete;
LuaThread& operator=(LuaThread&& rvalue) = delete;
void Resume()
{
if (!IsFinished())
{
if (m_Status == -1)
{
m_LuaFunction.Push();
}
m_Status = m_Lua.ResumeThread();
}
}
bool IsFinished() const
{
return m_Status == LUA_OK;
}
};
int main(int argc, char* argv[])
{
Lua lua;
if (lua.IsValid())
{
const string functionName("LuaCode4.lua");
LuaThread myThread(lua.CreateThread(), functionName);
while (!myThread.IsFinished())
{
myThread.Resume();
cout << "myThread yielded or finished!" << endl;
}
cout << "myThread finished!" << endl;
}
return 0;
}
The Lua class in Listing 13-30 contains a pointer to a lua_State object and a bool variable indicating whether a specific object has been created to handle a Lua thread. This is necessary to ensure that only a single Lua object is responsible for calling lua_close in its destructor. You can see that this bool value is checked in the ~Lua method.
The m_IsThread bool is set to true in the Lua::CreateThread method. This method calls the lua_newthread function and passes the new lua_State pointer to a newly constructed Lua object. This object then has the m_IsThread bool set to true and is returned from the function. The Lua object is returned using move semantics. This ensures that there can’t be any duplicates of a single Lua object at any time, and this is enforced by the delete keyword being specified in the copy constructor and copy assignment operator. Only the move constructor and move assignment operator are defined.
The Lua::Resume method is also shown in Listing 13-30. This method is responsible for starting or resuming the execution of a Lua coroutine.
The LuaThread class is responsible for managing a Lua coroutine. The constructor takes an rvalue reference to a Lua object and a string containing the name of the file to be loaded. The class has fields to store the Lua object and a LuaFunction object that will be used toPush the function onto the coroutine’s stack. The m_Status field determines when the coroutine has finished execution. It’s initialized to -1 because this value isn’t used by Lua to represent a state. The LUA_OK value is returned from lua_resume when the coroutine execution has been completed, and the LUA_YIELD value is returned when the coroutine has yielded. The LuaThread::Resume function first checks whether the status has been set to LUA_OK; if it has, then nothing is done. If the m_Status variable contains -1, then the m_LuaFunction object is pushed onto the stack. The m_Status variable is updated with the value returned by Lua::ResumeThread.
The main function uses all of this functionality by creating a LuaThread object and calling LuaThread::Resume in a while loop that executes until IsFinished returns true on the myThread object. The LuaCode4.lua file contains the Lua code from Listing 13-31, which contains several yields in a loop.
Listing 13-31. The LuaCode4.lua Source
for i=1, 10, 1 do
print("Going for yield " .. i .. "!")
coroutine.yield()
end
This is a simple example of how to use the coroutine.yield function from within Lua code. The lua_resume C function returns LUA_YIELD when this Lua function is executed in the running Lua script. Figure 13-4 shows the result of running the combination containing the C++ code in Listing 13-30 and the Lua code in Listing 13-31.
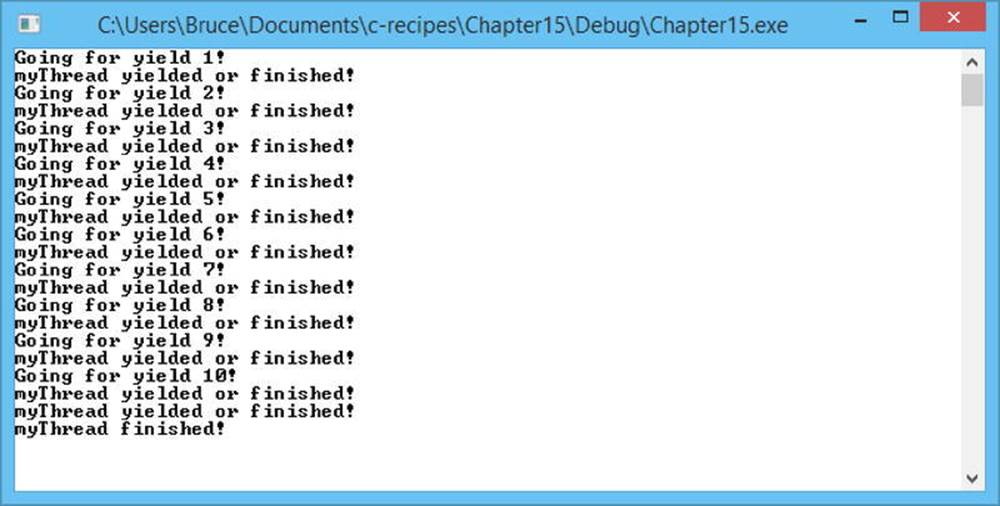
Figure 13-4. The output generated by executing Listing 13-30 in combination with Listing 13-31