C++ Recipes: A Problem-Solution Approach (2015)
CHAPTER 7
The STL Containers
The Standard Template Library (STL) consists of a standard set of functionality that implementers are required to support. Creating a standard ensures that code can be used interchangeably on different platforms and operating systems as long as the supplied implementations conform to that standard. A large part of the standard defines a set of containers that can be used to store data structures. This chapter looks at different scenarios where each of the STL containers prove useful.
![]() Note The string container was covered in Chapter 3.
Note The string container was covered in Chapter 3.
Recipe 7-1. Storing a Fixed Number of Objects
Problem
You have a requirement to store a fixed number of objects in your program.
Solution
C++ provides built in arrays that can be used for this purpose however the STL array provides a more flexible interface comparable to other STL containers.
How It Works
C++ has support for built-in arrays that have existed since the formation of the language. If you have programmed in C or C++ before these will be familiar to you. Listing 7-1 shows a standard C-style array.
Listing 7-1. A C-style array
#include <cinttypes>
#include <iostream>
using namespace std;
int main(int argc, char* argv[])
{
const uint32_t numberOfElements{ 5 };
int32_t normalArray[numberOfElements]{ 10, 65, 3000, 2, 49 };
for (uint32_t i{ 0 }; i < numberOfElements; ++i)
{
cout << normalArray[i] << endl;
}
return 0;
}
This code shows the use of a C-style array in C++. The array contains 5 integers and the main function has a for loop that is used to iterate the array and print out the values at each position. It’s also possible to use a range based for loop to iterate a C-style array. Listing 7-2 shows how this is done.
Listing 7-2. Using a range based for loop with a C-style array
#include <cinttypes>
#include <iostream>
using namespace std;
int main(int argc, char* argv[])
{
const uint32_t numberOfElements{ 5 };
int32_t normalArray[numberOfElements]{ 10, 65, 3000, 2, 49 };
for (auto&& number : normalArray)
{
cout << number << endl;
}
return 0;
}
The main function in Listing 7-2 takes advantage of a range based for loop to iterate the array. This is a useful construct to use when you have no need for the value of the index of the array.
![]() Note The range based for loop in Listing 7-2 uses syntax that looks like a rvalue reference. This isn’t the case. Head to Chapter 2 if you’re not sure how this code works or of the difference between a lvalue and a rvalue.
Note The range based for loop in Listing 7-2 uses syntax that looks like a rvalue reference. This isn’t the case. Head to Chapter 2 if you’re not sure how this code works or of the difference between a lvalue and a rvalue.
C-style arrays are useful in many circumstances however modern C++ also provides another version of arrays that can be used with the STL iterators and algorithms. Listing 7-3 shows how to define an STL array.
Listing 7-3. Using a STL array
#include <array>
#include <cinttypes>
#include <iostream>
int main(int argc, char* argv[])
{
const uint32_t numberOfElements{ 5 };
std::array<int32_t, numberOfElements> stlArray{ 10, 65, 3000, 2, 49 };
for (uint32_t i = 0; i < numberOfElements; ++i)
{
std::cout << stlArray[i] << std::endl;
}
for (auto&& number : stlArray)
{
std::cout << number << std::endl;
}
return 0;
}
Listing 7-3 shows that a STL array is defined by passing the type stored in the array and the number of elements it contains into the type template. Once the array has been defined it can be used interchangeably with a normal C-style array. This is because the range based for loop can iterate both types of array and because the STL array defines an array operator overload that allows elements to be accessed using [].
![]() Note The major advantage to using the STL array container over C-style arrays is that it allows access to STL iterators and algorithms, both of which are covered in Chapter 8.
Note The major advantage to using the STL array container over C-style arrays is that it allows access to STL iterators and algorithms, both of which are covered in Chapter 8.
Arrays store their objects in a contiguous block of memory. This means that the address of each array element lies next to each other in memory. This makes them very efficient for iteration on modern processors. An array will generally result in excellent cache coherency and as a result cause fewer stalls as the processor reads from RAM into a local cache. Arrays are excellent choices for algorithms where performance is paramount and a fixed number of objects is needed.
Recipe 7-2. Storing a Growing Number of Objects
Problem
Sometimes you will not know at compile time how many objects you need to store in your array.
Solution
The STL provides the vector template that allows for dynamically growing arrays.
How It Works
The vector works in a very similar way to array. Listing 7-4 shows the definition of a vector and two styles of for loop.
Listing 7-4. Using STL vector
#include <cinttypes>
#include <iostream>
#include <vector>
using namespace std;
int main(int argc, char* argv[])
{
vector<int32_t> stlVector{ 10, 65, 3000, 2, 49 };
for (uint32_t i = 0; i < stlVector.size(); ++i)
{
std::cout << stlVector[i] << std::endl;
}
for (auto&& number : stlVector)
{
std::cout << number << endl;
}
return 0;
}
The major different between the definition of a vector and an array is the lack of a size. As a vector is resizable setting a limit on the number of elements it can contain makes little sense. This manifests itself in the traditional for loop in the main function. You can see that the loop end condition checks for completion by comparing the index against the value returned from the size method. In this case size will return 5 as the vector contains 5 elements.
Listing 7-5 lets you see that a vector can be resized at runtime unlike an array.
Listing 7-5. Resizing a vector
#include <cinttypes>
#include <iostream>
#include <vector>
using namespace std;
int main(int argc, char* argv[])
{
vector<int32_t> stlVector{ 10, 65, 3000, 2, 49 };
cout << "The size is: " << stlVector.size() << endl;
stlVector.emplace_back( 50 );
cout << "The size is: " << stlVector.size() << endl;
for (auto&& number : stlVector)
{
std::cout << number << endl;
}
return 0;
}
The resulting output from Listing 7-5 is shown in Figure 7-1.
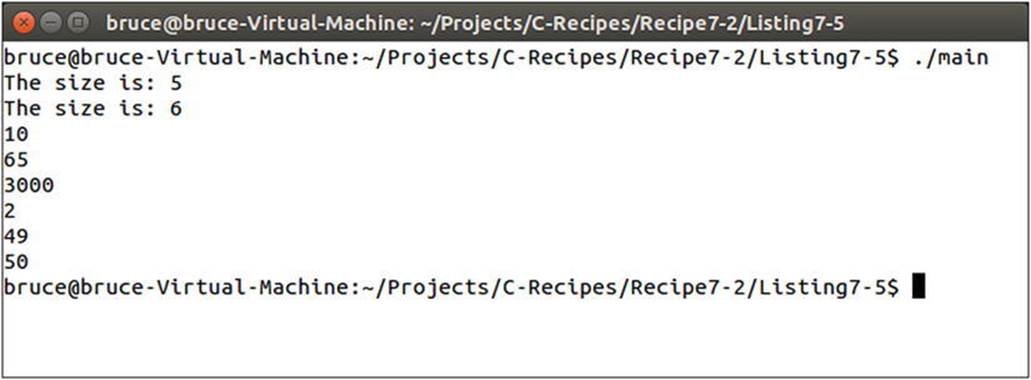
Figure 7-1. The output generated by Listing 7-5 showing a growing vector
Figure 7-1 shows that the vector has grown from size 5 to size 6 after the call to emplace_back. The range based for loop prints out all the values stored in the vector. You can see that emplace_back has added the value to the end of the vector.
The way a vector resizes is implementation defined which means that it’s up to the vendor creating the library you are using. All implementations operate by using a similar method. They generally tend to allocate memory for a new array internally that includes the current size of thevector as well as a variable number of empty slots for new values. Listing 7-6 contains code that uses the capacity method to determine how many elements the vector is capable of storing before it will resize.
Listing 7-6. A resizing vector
#include <cinttypes>
#include <iostream>
#include <vector>
using namespace std;
int main(int argc, char* argv[])
{
vector<int32_t> stlVector
{
1,
2,
3,
4,
5,
6,
7,
8,
9,
10,
11,
12,
13,
14,
15,
16
};
cout << "The size is: " << stlVector.size() << endl;
cout << "The capacity is: " << stlVector.capacity() << endl;
stlVector.emplace_back(17);
cout << "The size is: " << stlVector.size() << endl;
cout << "The capacity is: " << stlVector.capacity() << endl;
for (auto&& number : stlVector)
{
std::cout << number << std::endl;
}
return 0;
}
The code in Listing 7-6 creates a vector that contains 16 elements. Figure 7-2 shows the affect adding a new element has on the capacity of the vector.
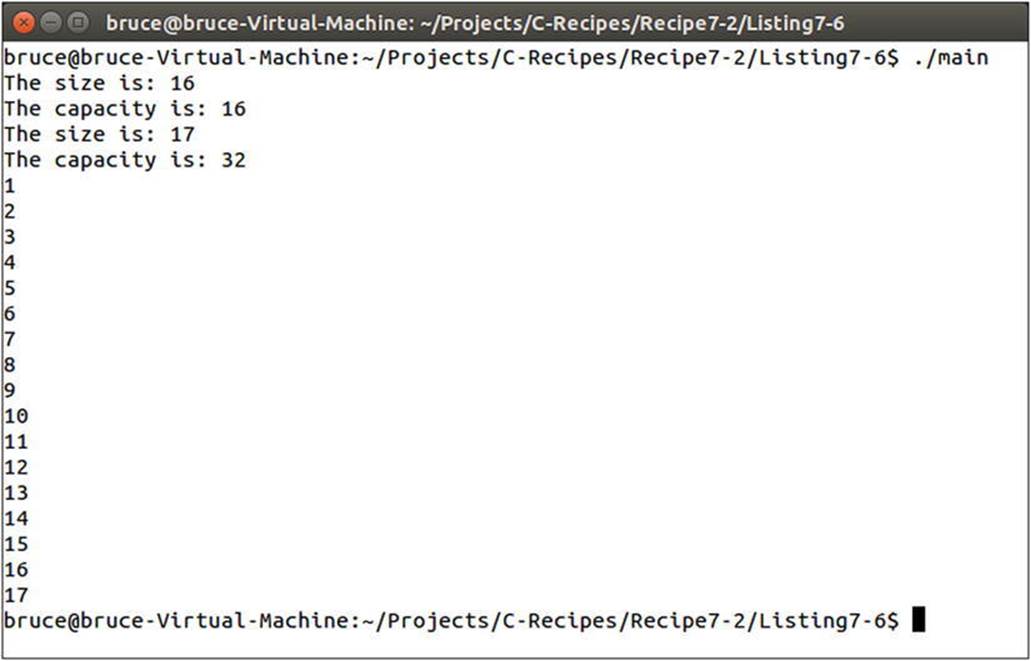
Figure 7-2. Output showing the increased capacity of a vector when using Microsoft Visual Studio 2013 STL
Figure 7-2 shows that adding a value to a vector does not result in an increase in size of one element. Microsoft have decided that their implementation of the STL will increase the capacity of the vector by 50%. Adding a new element to a vector of size 16 adds capacity for 8 new elements when a single new element is added.
It’s also possible to add elements into a vector at places other than the end. Listing 7-7 shows how the emplace method can be used for this purpose.
Listing 7-7. Adding elements to arbitrary points in a vector
#include <cinttypes>
#include <iostream>
#include <vector>
using namespace std;
int main(int argc, char* argv[])
{
vector<int32_t> stlVector
{
1,
2,
3,
4,
5
};
auto iterator = stlVector.begin() + 2;
stlVector.emplace(iterator, 6);
for (auto&& number : stlVector)
{
std::cout << number << std::endl;
}
return 0;
}
Listing 7-7 uses an iterator to place the value 6 into the 3rd position of the vector. This operation increases the capacity of the vector if necessary and shifts all elements after the position one place to the right. Figure 7-3 shows the output from this operation.
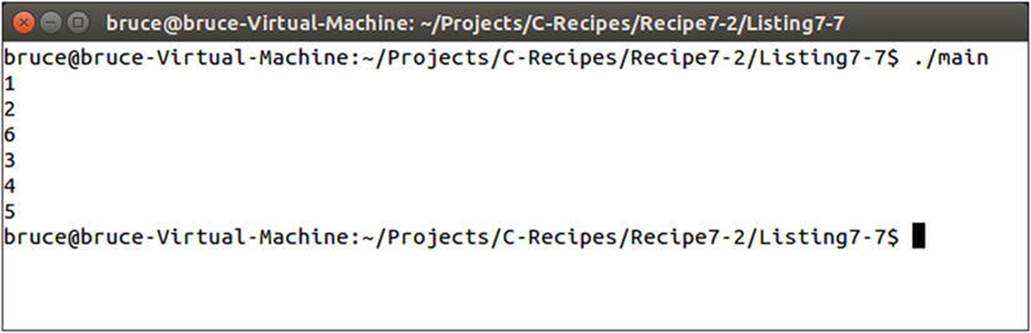
Figure 7-3. The output from Listing 7-7 showing the element inserted into the 3rd position in the vector
It is also possible to remove elements from a vector. Listing 7-8 shows code that removes each element of the vector using an iterator to the last element.
Listing 7-8. Removing elements from a vector
#include <cinttypes>
#include <iostream>
#include <vector>
using namespace std;
int main(int argc, char* argv[])
{
vector<int32_t> stlVector
{
1,
2,
3,
4,
5,
6,
7,
8,
9,
10,
11,
12,
13,
14,
15,
16
};
cout << "The size is: " << stlVector.size() << endl;
cout << "The capacity is: " << stlVector.capacity() << endl << endl;
for (auto&& number : stlVector)
{
std::cout << number << ", ";
}
while (stlVector.size() > 0)
{
auto iterator = stlVector.end() - 1;
stlVector.erase(iterator);
}
cout << endl << endl << "The size is: " << stlVector.size() << endl;
cout << "The capacity is: " << stlVector.capacity() << endl << endl;
for (auto&& number : stlVector)
{
std::cout << number << ", ";
}
std::cout << std::endl;
return 0;
}
The while loop in the main function of Listing 7-8 erases each element from the vector one by one. This will change the size of the vector but not the capacity. Listing 7-9 adds code to reduce the capacity of the vector.
Listing 7-9. Reducing the capacity of a vector
#include <cinttypes>
#include <iostream>
#include <vector>
using namespace std;
int main(int argc, char* argv[])
{
vector<int32_t> stlVector
{
1,
2,
3,
4,
5,
6,
7,
8,
9,
10,
11,
12,
13,
14,
15,
16
};
while (stlVector.size() > 0)
{
auto iterator = stlVector.end() - 1;
stlVector.erase(iterator);
if ((stlVector.size() * 2) == stlVector.capacity())
{
stlVector.shrink_to_fit();
}
cout << "The size is: " << stlVector.size() << endl;
cout << "The capacity is: " << stlVector.capacity() << endl << endl;
}
return 0;
}
As the while loop removes elements it also checks for when the size of the vector reaches half of the capacity. When this condition is met the shrink_to_fit method is called. Figure 7-4 shows the effect shrink_to_fit has on the capacity of the vector.

Figure 7-4. The effect of shrink_to_fit on a vector's capacity
Resizing a vector, either up or down, comes with a performance cost. New memory has to be allocated and the elements in the internal array have to be transferred from one to another. Two things are recommended in this scenario:
· Work out the maximum number of elements that can be added to the vector at runtime and use the reserve method to allocate the requisite amount of memory required only once.
· Determine if you can avoid using a vector altogether and use an array to create a pool of objects. This can be achieved by reusing elements in the array using a scheme such as a least recently used algorithm.
Recipe 7-3. Storing a Set of Elements that Is Constantly Altered
Problem
You have a set of data where you will be constantly entering and removing elements from arbitrary positions.
Solution
The STL provides two containers that offer efficient insertion and deletion from the middle of the container. These are the list and forward_list containers.
How It Works
The array and vector containers store elements in contiguous memory. This provides for fast iteration over the set as they play into the strengths of the modern CPU architectures. The array container cannot be added to or removed from at runtime, elements can simply be altered. Thevector container can have elements added and removed but this requires a new memory allocation and the transfer of all elements from the old memory block to the new memory block.
The list containers on the other hand do not store elements in contiguous blocks of memory. Instead each element in the list is stored in an independent node that contains a pointer to the next and last element in the list. This allows bi-directional traversal in the list container. Aforward_list only stores a pointer to the next element, not the last, and can therefore only be traversed front to back. Adding and removing elements from a list becomes a trivial exercise in updating the pointers that reference the next and last nodes in the list structure.
This non-contiguous storage results in a performance penalty when traversing the list. The CPU cache cannot always pre-load the next element in the list therefore these structures should be avoided for sets of data that are regularly traversed. Their advantage comes from the rapid insertion and deletion of nodes. Listing 7-10 shows a list container in use.
Listing 7-10. Using a list
#include <cinttypes>
#include <iostream>
#include <list>
using namespace std;
int main(int argv, char* argc[])
{
list<int32_t> myList{ 1, 2, 3, 4, 5 };
myList.emplace_front(6);
myList.emplace_back(7);
auto forwardIter = myList.begin();
++forwardIter;
++forwardIter;
myList.emplace(forwardIter, 9);
auto reverseIter = myList.end();
--reverseIter;
--reverseIter;
--reverseIter;
myList.emplace(reverseIter, 8);
for (auto&& number : myList)
{
cout << number << endl;
}
return 0;
}
The list container used in the main function of Listing 7-10 allows for forward and backward traversal from the iterators returned from begin or end. Figure 7-5 contains the output generated by traversing the list where you can see the arbitrary order of the added elements.
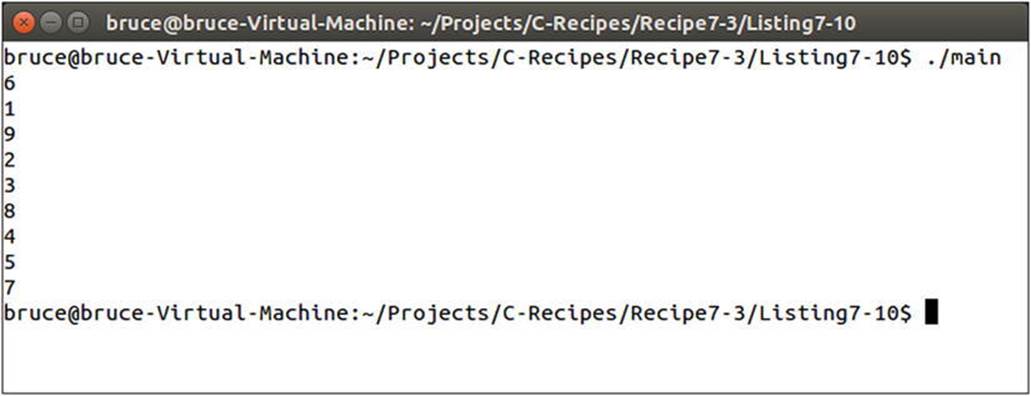
Figure 7-5. The output when traversing the list container in Listing 7-10
Listing 7-11 shows similar code with a forward_list
Listing 7-11. Using a forward_list
#include <cinttypes>
#include <forward_list>
#include <iostream>
using namespace std;
int main(int argv, char* argc[])
{
forward_list<int32_t> myList{ 1, 2, 3, 4, 5 };
myList.emplace_front(6);
auto forwardIter = myList.begin();
++forwardIter;
++forwardIter;
myList.emplace_after(forwardIter, 9);
for (auto&& number : myList)
{
cout << number << endl;
}
return 0;
}
There are a few differences in Listing 7-11 when compared to Listing 7-10. A forward_list does not contain the methods emplace or emplace_back. It does contain emplace_front and also emplace_after which allow you to add elements to the beginning of theforward_list or after a specific position in the forward_list.
Recipe 7-4. Storing Sorted Objects in a Container that Enables Fast Lookups
Problem
You have a large collection of objects that you would like to be ordered and frequently have to look up to find specific information.
Solution
The STL provides the set and map containers that can automatically sort their objects and provide very fast search characteristics.
How It Works
The set and map containers are associative containers. This means that they associate their data elements with a key. In the case of a set the key is the object or value itself and for a map they key is a value supplied along with an object or value.
These containers are implemented using binary search trees and this is why they offer automatic sorting and fast search characteristics. Binary search trees operate by comparing keys for objects. If an object’s key is less than that of the current node then it is added to the left, if it is greater it goes to the right or vice versa.
![]() Note In fact you can provide a function to both containers that allows you to specify the sort order for yourself.
Note In fact you can provide a function to both containers that allows you to specify the sort order for yourself.
Listing 7-12 shows the creation of a set that orders its elements from smallest to largest.
Listing 7-12. Using a set
#include <cinttypes>
#include <iostream>
#include <set>
#include <string>
using namespace std;
class SetObject
{
private:
string m_Name;
int32_t m_Key{};
public:
SetObject(int32_t key, const string& name)
: m_Name{ name }
, m_Key{ key }
{
}
SetObject(int32_t key)
: SetObject(key, "")
{
}
const string& GetName() const
{
return m_Name;
}
int32_t GetKey() const
{
return m_Key;
}
bool operator<(const SetObject& other) const
{
return m_Key < other.m_Key;
}
bool operator>(const SetObject& other) const
{
return m_Key > other.m_Key;
}
};
int main(int argv, char* argc[])
{
set<SetObject> mySet
{
{ 6, "Six" },
{ 3, "Three" },
{ 4, "Four" },
{ 1, "One" },
{ 2, "Two" }
};
for (auto&& number : mySet)
{
cout << number.GetName() << endl;
}
auto iter = mySet.find(3);
if (iter != mySet.end())
{
cout << "Found: " << iter->GetName() << endl;
}
return 0;
}
The set defined in the main function of Listing 7-12 is initialized with five SetObject instances. Each of these instances stores an integer key and a string representation of that key. By default a set is initialized to order the elements it contains from lowest to highest. You can see this proven in Figure 7-6.
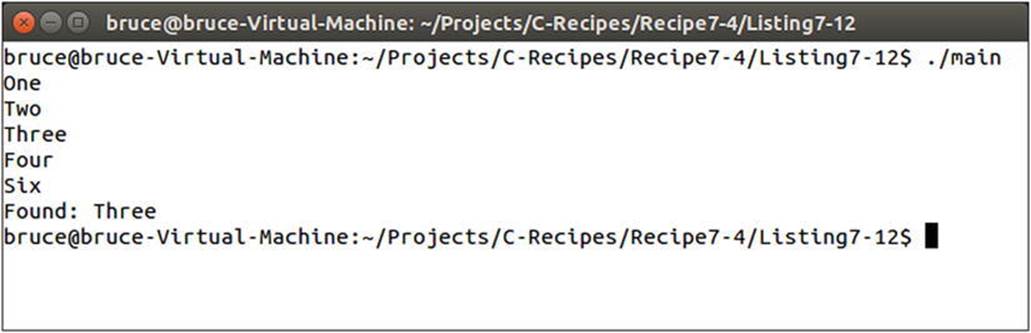
Figure 7-6. The output generated by the code in Listing 7-12
The ordering of class objects was achieved using operator overloading. The SetObject class overloads the < and > operators and this enables the class to be used with these operators. When adding a new element the set will call a comparison function that determines the order the elements should appear in the set. The default case calls for the use of the < operator on the elements. As you can see the SetObject class compares the m_Key variables in the operators to determine the order in which they should be stored.
Listing 7-13 shows how you can alter the default set to order the elements from highest to lowest.
Listing 7-13. Ordering elements in a set from highest to lowest
#include <cinttypes>
#include <functional>
#include <iostream>
#include <set>
#include <string>
using namespace std;
class SetObject
{
private:
string m_Name;
int32_t m_Key{};
public:
SetObject(int32_t key, const string& name)
: m_Name{ name }
, m_Key{ key }
{
}
SetObject(int32_t key)
: SetObject(key, "")
{
}
const string& GetName() const
{
return m_Name;
}
int32_t GetKey() const
{
return m_Key;
}
bool operator<(const SetObject& other) const
{
return m_Key < other.m_Key;
}
bool operator>(const SetObject& other) const
{
return m_Key > other.m_Key;
}
};
using namespace std;
int main(int argv, char* argc[])
{
set<SetObject, greater<SetObject>> mySet
{
{ 6, "Six" },
{ 3, "Three" },
{ 4, "Four" },
{ 1, "One" },
{ 2, "Two" }
};
for (auto&& number : mySet)
{
cout << number.GetName() << endl;
}
auto iter = mySet.find(3);
if (iter != mySet.end())
{
cout << "Found: " << iter->GetName() << endl;
}
return 0;
}
The only difference between Listing 7-12 and Listing 7-13 is the addition of a second template parameter to set. Listing 7-13 supplies the greater template from the functional header. This template will create a method from a function that can call the > operator on two SetObjectinstances. You can imagine that the default set had an implied less parameter:
set<SetObject, less<SetObject>>
Figure 7-7 shows the resulting output from a set with elements ordered from highest to lowest.
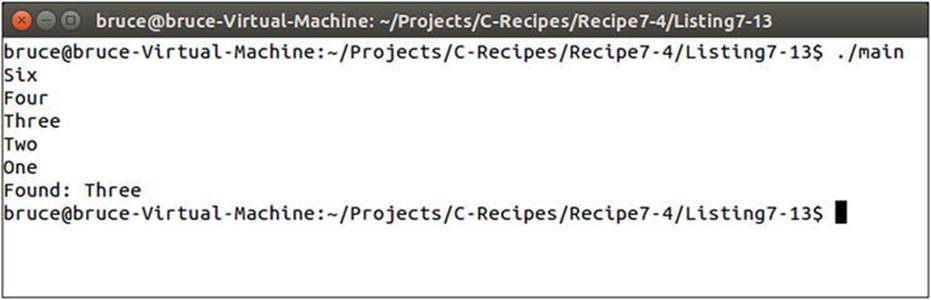
Figure 7-7. The set ordered from highest to lowest using greater
Listing 7-14 shows how you can add elements to a set after initialization.
Listing 7-14. Adding elements to a set
#include <cinttypes>
#include <functional>
#include <iostream>
#include <set>
#include <string>
using namespace std;
class SetObject
{
private:
string m_Name;
int32_t m_Key{};
public:
SetObject(int32_t key, const string& name)
: m_Name{ name }
, m_Key{ key }
{
}
SetObject(int32_t key)
: SetObject(key, "")
{
}
const string& GetName() const
{
return m_Name;
}
int32_t GetKey() const
{
return m_Key;
}
bool operator<(const SetObject& other) const
{
return m_Key < other.m_Key;
}
bool operator>(const SetObject& other) const
{
return m_Key > other.m_Key;
}
};
int main(int argv, char* argc[])
{
set<SetObject, greater<SetObject>> mySet
{
{ 6, "Six" },
{ 3, "Three" },
{ 4, "Four" },
{ 1, "One" },
{ 2, "Two" }
};
for (auto&& number : mySet)
{
cout << number.GetName() << endl;
}
cout << endl;
mySet.emplace(SetObject( 5, "Five" ));
for (auto&& number : mySet)
{
cout << number.GetName() << endl;
}
cout << endl;
auto iter = mySet.find(3);
if (iter != mySet.end())
{
cout << "Found: " << iter->GetName() << endl;
}
return 0;
}
The emplace method can be used to add new elements to a set as in Listing 7-14. Figure 7-8 shows that the new element was inserted into the set in the correct position given the greater ordering.

Figure 7-8. Shows a new element has been added to the set in the correct position
The map container is very similar to the set container except for the fact that the key is stored independently of the object value. Listing 7-15 shows code to create a map container.
Listing 7-15. Creating a map
#include <cinttypes>
#include <functional>
#include <iostream>
#include <map>
#include <string>
using namespace std;
class MapObject
{
private:
string m_Name;
public:
MapObject(const string& name)
: m_Name{ name }
{
}
const string& GetName() const
{
return m_Name;
}
};
int main(int argv, char* argc[])
{
map<int32_t, MapObject, greater<int32_t>> myMap
{
pair<int32_t, MapObject>(6, MapObject("Six")),
pair<int32_t, MapObject>(3, MapObject("Three")),
pair<int32_t, MapObject>(4, MapObject("Four")),
pair<int32_t, MapObject>(1, MapObject("One")),
pair<int32_t, MapObject>(2, MapObject("Two"))
};
for (auto&& number : myMap)
{
cout << number.second.GetName() << endl;
}
cout << endl;
myMap.emplace(pair<int32_t, MapObject>(5, MapObject("Five")));
for (auto&& number : myMap)
{
cout << number.second.GetName() << endl;
}
cout << endl;
auto iter = myMap.find(3);
if (iter != myMap.end())
{
cout << "Found: " << iter->second.GetName() << endl;
}
return 0;
}
Listing 7-15 achieves exactly the same result as the code in Listing 7-14 using a map in place of a set. The MapObject class does not contain a key nor does it contain any overloaded operators to compare the objects instantiated using this class. That’s because the key for a map is stored independently of the data. Elements are added to a map using the pair template and each pair associates a key value to an object.
The code for a map is more verbose than for that of a set however the objects contained can be less complex. A map is a good candidate over a set when the key is not related to the rest of the data in the class. Objects that have a natural order and are already comparable are good candidates for storing in a set.
The iterator to a map is also a pair. The MapObject it contains can be retrieved using the second field on the iterator while first stores the key value. Iterting over a map or a set is a slow operation as the elements are not contained in contiguous memory. The benefit of associative containers is mostly their fast lookups while the ordering is a secondary benefit that should only be used sparingly for performance reasons.
Recipe 7-5. Storing Unsorted Elements in a Container for Very Fast Lookups
Problem
You have a set of data that does not need to be sorted but will be used for frequent lookups and data retrieval.
Solution
The STL provides the unordered_set and unordered_map containers for this purpose.
How It Works
The unordered_set and unordered_map containers are implemented as hash maps. A hash map provides for constant time insertion, removal and searching of objects. Constant time means that the operations will take the same length of time regardless of how many elements are in the container.
As the unordered_set and unordered_map containers are hash maps they rely on a hashing function being supplied that can convert your data into a numeric value. Listing 7-16 shows how you can create a set to store user defined classes that can be hashed and compared.
Listing 7-16. Using an unordered_set
#include <cinttypes>
#include <functional>
#include <iostream>
#include <string>
#include <unordered_set>
using namespace std;
class SetObject;
namespace std
{
template <>
class hash<SetObject>
{
public:
template <typename... Args>
size_t operator()(Args&&... setObject) const
{
return hash<string>()((forward<Args...>(setObject...)).GetName());
}
};
}
class SetObject
{
private:
string m_Name;
size_t m_Hash{};
public:
SetObject(const string& name)
: m_Name{ name }
, m_Hash{ hash<SetObject>()(*this) }
{
}
const string& GetName() const
{
return m_Name;
}
const size_t& GetHash() const
{
return m_Hash;
}
bool operator==(const SetObject& other) const
{
return m_Hash == other.m_Hash;
}
};
int main(int argv, char* argc[])
{
unordered_set<SetObject> mySet;
mySet.emplace("Five");
mySet.emplace("Three");
mySet.emplace("Four");
mySet.emplace("One");
mySet.emplace("Two");
cout << showbase << hex;
for (auto&& number : mySet)
{
cout << number.GetName() << " - " << number.GetHash() << endl;
}
auto iter = mySet.find({ "Three" });
if (iter != mySet.end())
{
cout << "Found: " << iter->GetName() << " with hash: " << iter->GetHash() << endl;
}
return 0;
}
Using an unordered_set to store class objects requires some difficult to understand code. First off we have a partial specialization for the hash template. This allows us to create a function that is capable of creating a hash value for the SetObject class. This is achieved by passing a SetObject instance and calling the STL hash function for a string. The SetObject instance is passed to the () operator using a universal reference and the forward function to achieve perfect forwarding.
![]() Note Templates are covered in Chapter 9 and universal references are covered along with lvaues, rvalues and perfect forwarding in Chapter 2.
Note Templates are covered in Chapter 9 and universal references are covered along with lvaues, rvalues and perfect forwarding in Chapter 2.
The SetObject class requires an overloaded == operator to function properly in an unordered_set. The code would not compile if this was missing. The m_Hash member variable is not needed, I simply included this to show you the values hash creates and how you can call the hash function for yourself. If the m_Hash variable did not exist you can compare the m_Name strings for equality. Figure 7-9 shows the resulting output generated by this code.
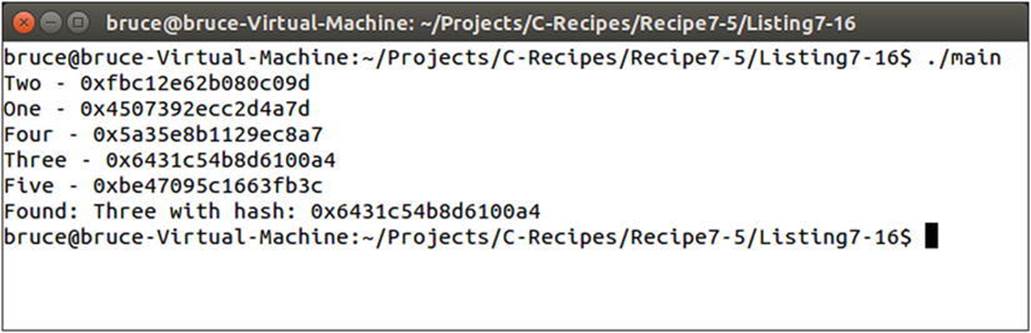
Figure 7-9. The output generated by Listing 7-16
An unordered_map does not come with the difficulty of creating your own hash function so long as you use a type for the key that the STL can already hash. Listing 7-17 shows an unordered_map that uses an integer as the key.
Listing 7-17. Using unordered_map
#include <cinttypes>
#include <iostream>
#include <string>
#include <unordered_map>
using namespace std;
class MapObject
{
private:
string m_Name;
public:
MapObject(const string& name)
: m_Name{ name }
{
}
const string& GetName() const
{
return m_Name;
}
};
int main(int argv, char* argc[])
{
unordered_map<int32_t, MapObject> myMap;
myMap.emplace(pair<int32_t, MapObject>(5, MapObject("Five")));
myMap.emplace(pair<int32_t, MapObject>(3, MapObject("Three")));
myMap.emplace(pair<int32_t, MapObject>(4, MapObject("Four")));
myMap.emplace(pair<int32_t, MapObject>(1, MapObject("One")));
myMap.emplace(pair<int32_t, MapObject>(2, MapObject("Two")));
cout << showbase << hex;
for (auto&& number : myMap)
{
cout << number.second.GetName() << endl;
}
auto iter = myMap.find(3);
if (iter != myMap.end())
{
cout << "Found: " << iter->second.GetName() << endl;
}
return 0;
}
Listing 7-17 shows that the unordered_map container stores key value pairs as its elements. The first field of the pair stores the key while the second field of the pair stores the value, in this case an instance of MapObject.