C# 24-Hour Trainer (2015)
Section I
The Visual Studio IDE and Controls
The lessons in this section of the book explain how to use the Visual Studio integrated development environment (IDE). They explain how to use the IDE to create forms, place controls on the forms, and set control properties. These lessons describe some of C#'s most useful controls and give you practice using them.
You can do practically all of this in the IDE without writing a single line of code! That makes C# a great environment for rapid prototyping. You can build a form, add controls, and run the program to see what it looks like without ever creating a variable, declaring a method, or getting stuck in an infinite loop.
The lessons in this section explain how to get that far. A few of these lessons show how to add a line or two of code to make a form more interesting, but for now the focus is on using the IDE to build forms and controls. Writing code (and fixing the inevitable bugs) comes later.
· Lesson 1: Getting Started with the Visual Studio IDE
· Lesson 2: Creating Controls
· Lesson 3: Making Controls Arrange Themselves
· Lesson 4: Handling Events
· Lesson 5: Making Menus
· Lesson 6: Making Tool Strips and Status Strips
· Lesson 7: Using RichTextBoxes
· Lesson 8: Using Standard Dialogs
· Lesson 9: Creating and Displaying New Forms
· Lesson 10: Building Custom Dialogs
Lesson 1
Getting Started with the Visual Studio IDE
The Visual Studio integrated development environment (IDE) plays a central role in C# development. In this lesson you explore the IDE. You learn how to configure it for C# development, and you learn about some of the more useful of the IDE's windows and what they do. When you finish this lesson, you'll know how to create a new project. It may not do much, but it will run and will prepare you for the lessons that follow.
Visual C#
Visual Studio is a development environment that you can use with several programming languages including Visual C#, Visual Basic, Visual C++, and F#. All of those are high-level programming languages that you can use to perform complex calculations, organize your Pokémon cards, draw pretty fractals (see en.wikipedia.org/wiki/Fractal and mathworld.wolfram.com/Fractal.html), play games, download cat pictures from the Internet, and do everything else you would expect from a program.
They can also contain bugs that delete files accidentally, discard an hour's worth of typing without warning, balance your checkbook incorrectly, and cause all sorts of other problems. Programming languages can help you do things, but they can't force you to do the right things. That's up to you.
Visual C# combines C# with the Visual Studio development environment. You can use a text editor to write C# programs without Visual Studio, but it's a lot of work. You don't get all of the nice features that Visual Studio provides, such as special code editing features, drag-and-drop control creation, and a debugger. In short, it's a lot less fun, so I won't cover that kind of programming in this book.
Visual C# and C# go together like hockey and fistfights: if you mention one, most people assume you're also talking about the other. Most people simply say C#, so this book does, too, unless there's a reason to distinguish between C# and Visual C#.
The .NET Framework also plays an important role in C# programs. It includes classes that make performing certain tasks easier, runtime tools that make it possible to execute C# programs, and other plumbing necessary to build and run C# programs.
Normally you don't need to worry about whether a feature is provided by Visual Studio, the C# language, or the .NET Framework. They all go together, so for the purposes of this book at least you can ignore the difference.
Installing C#
Before you can use C# to write the next blockbuster first-person Xbox game, you need to install it. So if you haven't done so already, install C#.
You can install one of the free Express Editions at www.microsoft.com/express/Windows. As I write this, that page lists versions of Visual Studio 2015, but when you visit that page it should let you install the latest version. (I'm using a preview build of Visual Studio 2015 to write the programs that go with this book.)
Several versions are available on that page, so be sure you pick the right one. Here's a quick summary of some of the versions that may be available:
· Community—This version lets you build web, Windows Store (including tablet and phone apps), Windows Desktop, Android, and iOS applications. This is probably the best version for you to download.
· Express for Web—This version focuses on building websites.
· Express for Windows—This version focuses on building Windows Phone and Windows Store apps.
· Express for Windows Desktop—This version focuses on desktop applications. You run these from the Windows desktop, not the start screen.
· Team Foundation Server Express—This edition is for people working in teams. This includes tools that you don't need right now and that can provide extra opportunities for confusion, so skip this version. (If you don't think things are confusing enough, e-mail me and I'll suggest some more confusing topics for you to study.)
The Community Edition includes tools to get started building any of these kinds of applications, so it's a good choice. You may never use it to build websites or iOS applications, but having those abilities installed won't hurt you.
The Express Editions are only intended to get you started, but they're seriously powerful so you probably won't need anything else for quite a while. I've been happily using Express Editions for about two decades.
If you think you need some other version of Visual Studio (for example, you're working on a big project and you need test management, source code control, and other team programming tools), go to msdn.microsoft.com/vcsharp and install the version that's right for you.
All of these are big installations (5 or 6 GB), so they could take a while. While a constant supply of cookies, caffeine, and conversation will help you pass the time more quickly, the other customers won't thank you if you hammer the Starbucks Wi-Fi for 12 straight hours. Be sure you have a reasonably fast connection before you start.
Talkin' 'Bout My Generation
Developers talk about different generations of programming languages ranging from the very primitive to the remarkably advanced. In a nutshell, the different generations of languages are:
· 1GL—Machine language. This is a series of 0s and 1s that the machine can understand directly. Here's a sample: 01001010 11010100 10101011 10001000. Pretty hard to read, isn't it?
· 2GL—Assembly language. This is a collection of mnemonic codes that represent machine language instructions. It is slightly more readable but provides no higher-level structure for performing complex tasks. Here's a sample: brfalse.s IL_0028 leave.s IL_007a ldloc.0 ldloc.1. This may be easier to read than binary, but it still looks like gibberish to me.
· 3GL—A higher-level language such as FORTRAN or BASIC. These provide additional structure (such as looping and subroutines) that makes building complex programs easier. Here's a sample: num_players = num_players + 1. Finally something I can read and almost understand!
· 4GL—An even higher-level language or a development environment that helps build programs, typically in a specific problem domain.
· 5GL—A language where you specify goals and constraints and the language figures out how to satisfy them. For example, the database Structured Query Language (SQL) allows you to use statements like SELECT FirstName FROM Employees. You don't need to tell the database how to get the names; it figures that out for you.
Visual Studio provides code snippets that let you copy standard chunks of code into your program, IntelliSense that helps you select and use functions and other pieces of code, refactoring tools that help you rearrange and restructure your code, and much more. That makes Visual C# a 4GL. (Or perhaps a 3.5GL depending on how high your standards are.)
Configuring the IDE
When you first run Visual Studio, the dialog shown in Figure 1.1 appears to let you configure the IDE. (You may also see a few other dialogs before that point asking you to log in to your Microsoft profile. You can create one if you don't already have one.)
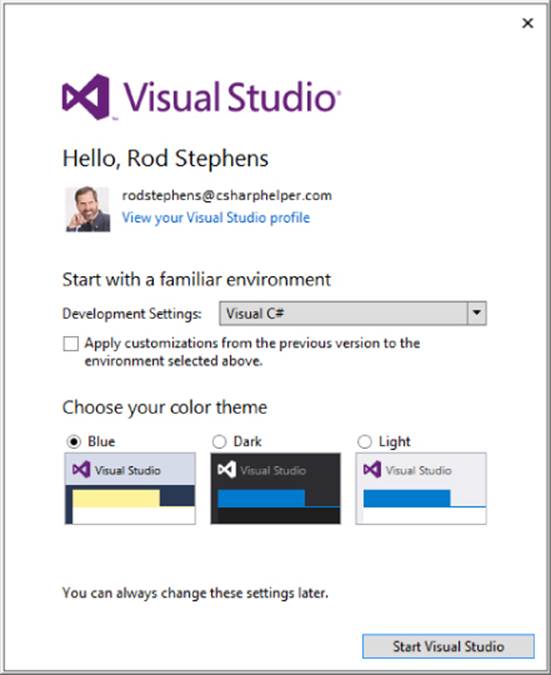
Figure 1.1
The dialog lets you pick settings for general development, Visual Basic, Visual C#, and so forth. Because you're going to be focusing on C# development, select that option.
NOTE
These settings determine such things as what keystrokes activate certain development features. You can certainly write C# programs with the Visual C++ settings, but we may as well use the same playbook, so when I say, “Press F5,” the IDE starts your program instead of displays a code window or whatever Visual C++ thinks F5 should do.
The dialog also lets you pick a color scheme. Pick the one you think you'll like best (admittedly without getting to try them out) and click Start Visual Studio. (Then be ready to wait again because the initial configuration can take a while.)
If you ever want to switch to different settings (for example, if you initially picked the Dark colors but then discovered that they give you a headache), you can always change them later.
To change the settings, open the Tools menu and select Import and Export Settings to display the Import and Export Settings Wizard. You can use this tool to save your current settings, reload previously saved settings, or restore the settings to their default values.
To reset the settings, select the Reset All Settings option on the wizard's first page and click Next.
On the next page, indicate whether you want to save your current settings. When you've made your choice, click Next to display the page shown in Figure 1.2. Select the Visual C# choice and click Finish.
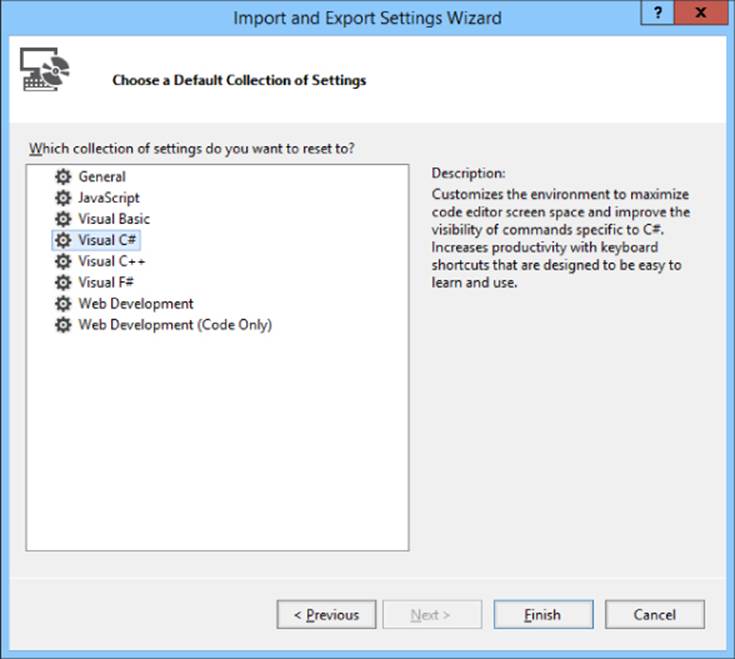
Figure 1.2
Then sit back and wait. Or better still, go get something to drink because this could take a while. Visual Studio has a lot of settings to reset, and it could take several minutes depending on how fast your computer is. (And how busy your computer is playing YouTube videos.)
Building Your First Program
Now that you've installed C#, you're ready to build your first program. Launch Visual Studio by double-clicking its desktop icon, selecting it from the system's Start menu, finding it with the Windows Search tool, or doing whatever you do to run programs on your version of Windows.
When it starts, Visual Studio should look more or less like Figure 1.3. You can use the links in the center pane to get more information about Visual Studio, .NET, Azure, and whatever else Microsoft thinks is important today.
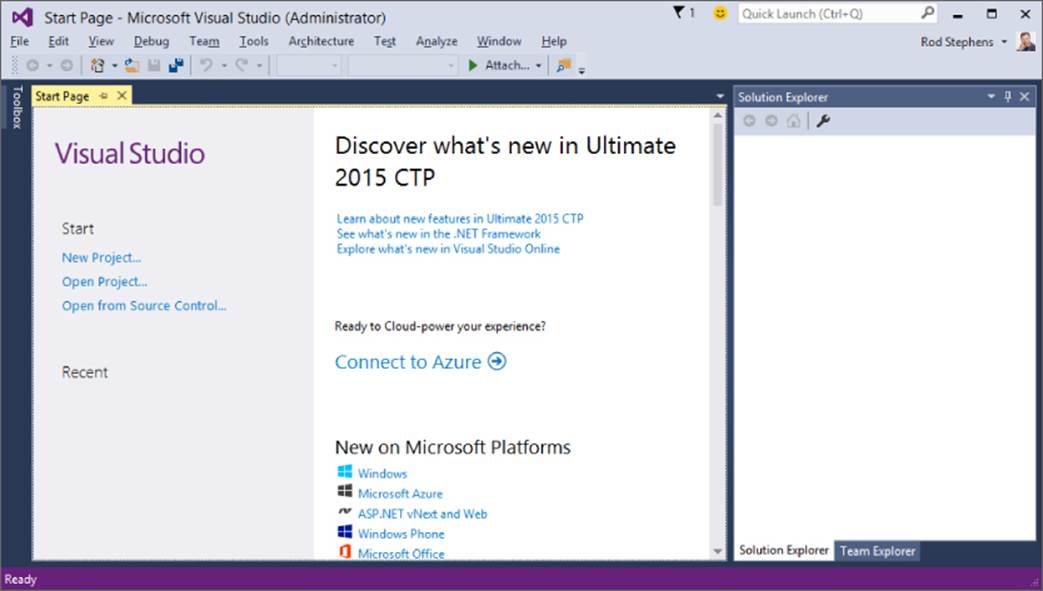
Figure 1.3
You can use the links in the left pane to create a new project or open an existing project. You can also create a new project by opening the File menu, expanding the New submenu, and selecting Project. Or if you're in a hurry to create your first project, just press Ctrl+Shift+N.
NOTE
Often you have several ways to do something in Visual Studio. You may be able to use a menu command, keyboard shortcut, or toolbar button to do the same thing. Usually I'll just mention one or two ways to do something, such as creating a new project, but you'll probably discover other ways, too.
All of those methods display the New Project dialog shown in Figure 1.4. Expand the Visual C# project types folder on the left and select the template for the type of project that you want to build on the right. For most of this book, that will be a Visual C# Windows Forms Application.
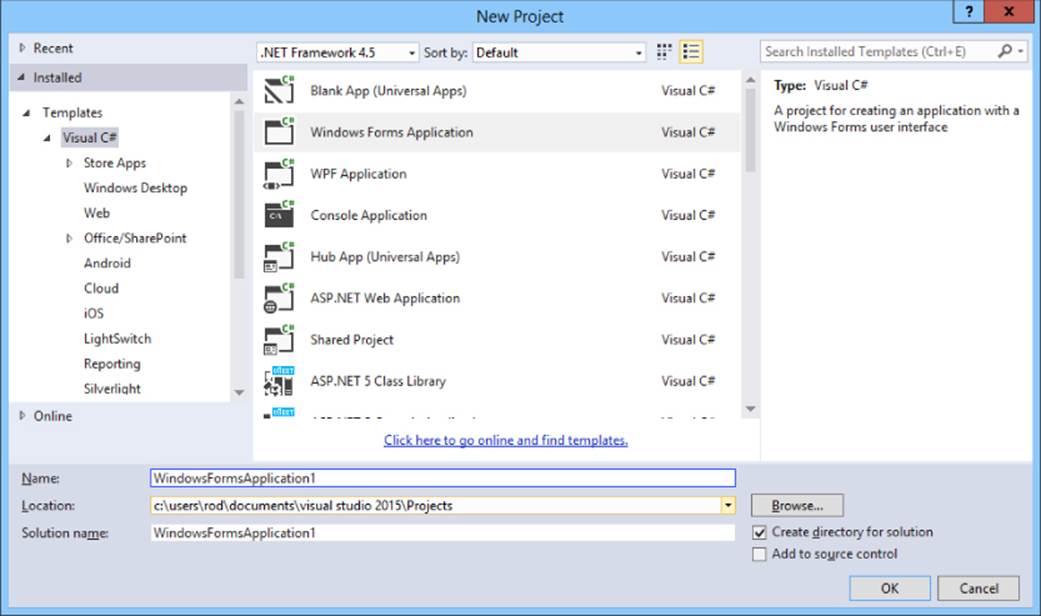
Figure 1.4
After you select a project type, you need to enter several pieces of information:
· Name—This is the application's name. Visual Studio creates a folder with this name to hold the program's files. It also uses this name for some key values in the project.
· Location—This is where you want Visual Studio to put the project's folder.
· Solution Name—If the Create Directory for Solution box is checked (which it is by default), Visual Studio creates a folder with this name at the location you entered. It then places the application's folder inside the solution's folder.
So if the Create Directory for Solution box is checked, you get a filesystem layout that looks like this:
1. SolutionFolder
1. SolutionFiles
2. ApplicationFolder
1. ApplicationFiles
If the Create Directory for Solution box is not checked, you get a filesystem layout that looks like this:
1. ApplicationFolder
1. ApplicationFiles
NOTE
A project typically includes the files that make up a single application. A solution can contain several projects. A solution is useful when you want to build applications that go closely together. For example, a project could contain one program that builds three-dimensional data sets, another that displays them, and a third that lets you print them from different points of view.
Solutions are particularly useful if you want to build a library of routines plus an executable program to test the library.
The applications you build in this book are single programs so they don't really need to be inside a separate solution folder. Most of the time, I uncheck the Create Directory for Solution box to keep my filesystem simpler.
NOTE
By default, Visual Studio places new projects in your Projects folder at some obscure location such as C:\Users\MyUserName\Documents\Visual Studio 2016\Projects. Later it can be hard to find these projects in File Explorer (for example, to make a copy).
To make finding projects easier, set the location to something more intuitive such as the desktop or a folder on the desktop. In fact, you might want to make a folder to hold projects for this book and then give each lesson a subfolder.
The next time you create a new project, Visual Studio will remember your last choice, so from now on it'll be easy to find your projects.
If you open the New Project dialog while you have another project open, you'll see an additional dropdown that lists the choices Create New Solution and Add to Solution. The first choice closes the current solution and creates a new one. The second choice adds the new application to the solution you currently have open. Normally you'll want to create a new solution.
After you display the New Project dialog and enter a Name, Location, and Solution Name, click OK. The result should look like Figure 1.5.
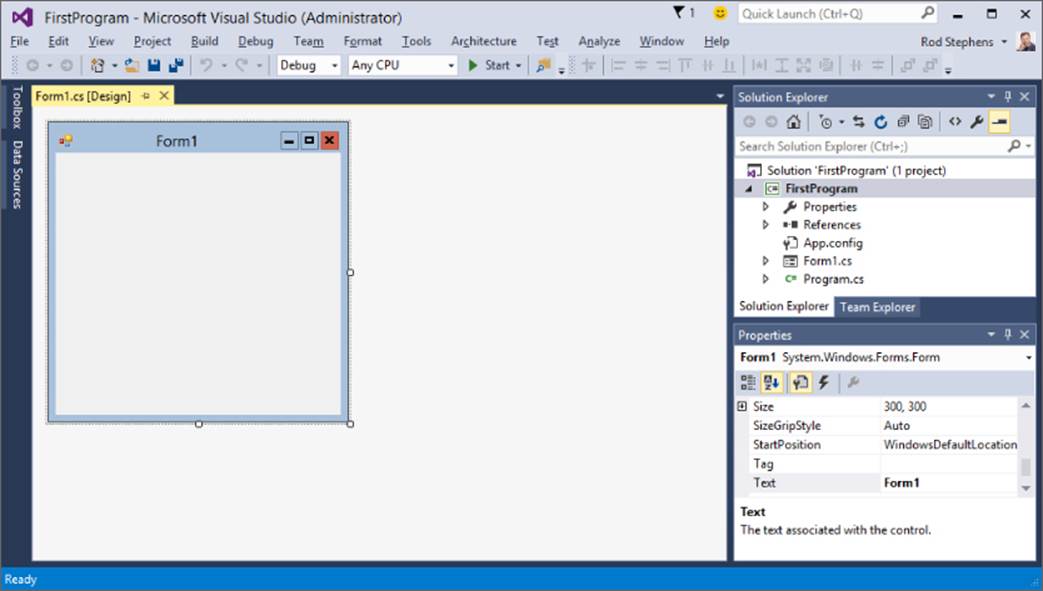
Figure 1.5
NOTE
If you have previously edited a project, you can quickly reload it from the File menu's Recent Projects and Solutions submenu. You can also load a solution into the IDE by using File Explorer to double-click the solution's .sln file.
The rest of this lesson deals with the features available in Visual Studio, some of which are displayed in Figure 1.5. Before you launch into an inventory of useful features, however, open the Debug menu and select Start Debugging. Or if you're in a hurry, just press F5.
Your first program should look like Figure 1.6. Admittedly this first program isn't very fancy, but by the same token you didn't need to do much to build it. All you did was press Ctrl+Shift+N and then F5!
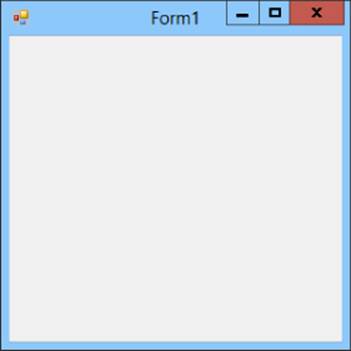
Figure 1.6
This first program may not seem terribly impressive, but there's a lot going on behind the scenes. C# has built a form with a bunch of useful features, including:
· A resizable border and a draggable title bar.
· Working minimize, maximize, and close buttons in the upper-right corner.
· A system menu in the upper-left corner that contains working Restore, Move, Size, Minimize, Maximize, and Close commands.
· An icon in the system taskbar that lets you minimize, restore, and close the program.
· The ability to use Alt+Tab and Flip3D (Win+Tab) to move between the application and others.
· Other standard window behaviors. For example, if you double-click the form's title bar it maximizes (or restores if it is already maximized), and if you press Alt+F4, the form closes.
Unless you're an absolute beginner to Windows, you probably take all of these features for granted, but providing them is actually a huge amount of work. Not too long ago you would have had to write around 100 lines of code to provide a subset of those features. Now Visual Studio automatically builds a form that handles most of the details for you.
You can still get in and change the way things work if you want to (for example, you can set a form's minimum and maximum allowed sizes), but usually you can ignore all of those issues and concentrate on your particular application instead of the Windows decorations.
A Suitable Executable
Whenever you run a program in the IDE, Visual Studio builds an executable program, normally in the project's bin\Debug subdirectory. You can run the executable by finding it in File Explorer and double-clicking it.
Unfortunately that doesn't mean the executable can run on any old computer! If you copy that file to another computer, it won't run unless the .NET Framework runtime libraries have been installed there. If that computer has Visual Studio installed, you're all set, but if it doesn't you'll need to install the redistributable yourself.
To install these libraries, go to Microsoft's download web page www.microsoft.com/downloads and search for “.NET Framework redistributable.” Pick the version that matches the one you're using (probably the most recent version if you just installed Visual Studio) and install it on the target computer.
Now you can copy C# executables onto the other computer and run them.
Copying Projects
Sometimes you may want to copy a project. For example, you might want to save the current version and then make a new one to try things out. Or you may want to give a copy of the project to a friend or your programming instructor so he or she can tell you why its New button makes the program exit.
You might look in Visual Studio's File menu and see the Copy As commands. Don't be tempted! Those commands copy single files, not the entire project. Later when you try to open one of those files, you'll discover that Visual Studio cannot find all of the other pieces that it needs and you'll be left with nothing usable.
To correctly copy a project, copy the entire solution or application folder and its directory hierarchy. Alternatively, you can compress the project directory and then copy the compressed file. Just be sure that whatever copying method you use brings along all of the project's files.
Note that you can delete the bin and obj subdirectories if you like to save space. Those directories contain files that Visual Studio creates when it loads and builds a program, and it will re-create them whenever it needs them later.
You can also delete the .vs directory, which contains user settings. Unfortunately that directory is hidden by default so it may be hard to find. To make File Explorer show you hidden files, open the Control Panel, click Appearance and Personalization, and select Folder Options. On the View tab, select Show Hidden Files and Folders, and then click OK. Now you can see the .vs directory to delete it.
NOTE
Compressing a project is very useful because it keeps all of its files together in a package. In particular, if you ever need to e-mail a project to someone (for example, if you e-mail me at RodStephens@CSharpHelper.com for help), you can remove the bin, obj, and .vs directories, compress the project folder, and e-mail the package as a single file.
If you're sending the project to your instructor as part of an assignment, rename the compressed file so it contains your name and the name of the assignment; for example, RodStephens6-1.zip.
Exploring the IDE
The Visual Studio IDE contains a huge number of menus, toolbars, windows, wizards, editors, and other components to help you build applications. Some of these, such as the Solution Explorer and the Properties window, you will use every time you work on a program. Others, such as the Breakpoints window and the Connect to Device dialog, are so specialized that it may be years before you need them.
Figure 1.7 shows the IDE with a simple project loaded and some of the IDE's most important pieces marked. The following list describes those pieces.
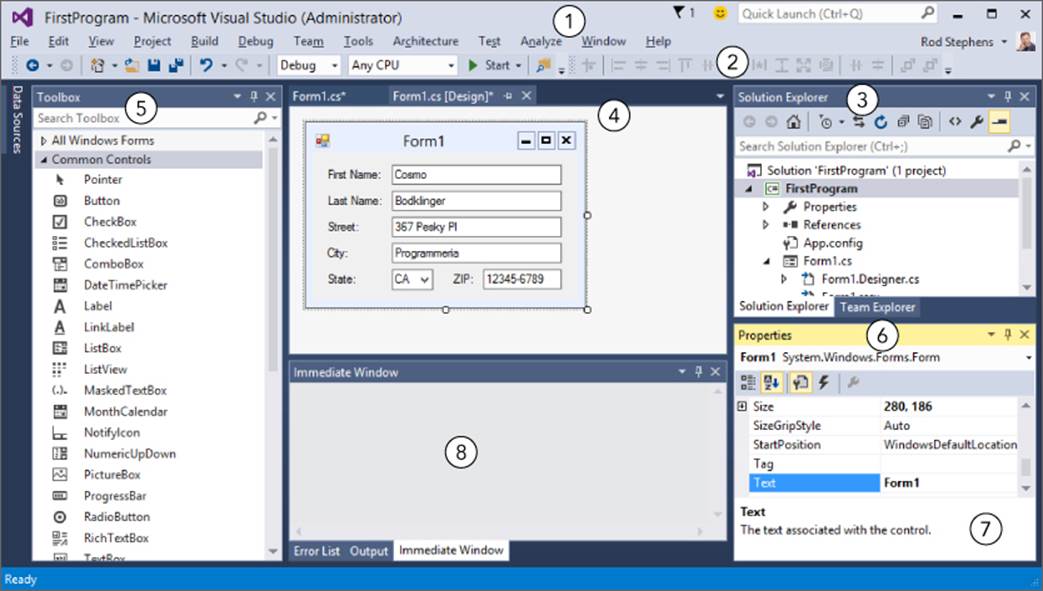
Figure 1.7
1. Menus—The menus provide all sorts of useful commands. Exactly which commands are available, which are enabled, and even which menus are visible depends on what kind of editor is open in the editing area (#4). Some particularly useful menus include File (opening old projects and creating new ones), View (finding windows), Project (adding new forms and other items to a project), Debug (build, run, and debug the project), and Format (arrange controls on a form).
2. Toolbars—The toolbars provide shortcuts for executing commands similar to those in the menus. Use the Tools menu's Customize command to determine which toolbars are visible.
3. Solution Explorer—The Solution Explorer lists the files in the project. One of the most important is Form1.cs, which defines the controls and code for the form named Form1. If you double-click a file in the Solution Explorer, the IDE opens it in the editing area.
4. Editing Area—The editing area displays files in appropriate editors. Most often you will use this area to design forms (place controls on them and set control properties) and write code for forms, but you can also use this area to edit other files such as text files, bitmaps, and icons.
5. Toolbox—The Toolbox contains controls and components that you can place on a form. Select a tool and then click and drag to put a copy of the tool on the form. Notice that the Toolbox groups controls in tabs (All Windows Forms, Common Controls, Containers, Menus & Toolbars, and so on) to make finding the controls you need easier.
6. Properties Window—The Properties window lets you set control properties. Click a control on the Form Designer (shown in the editing area in Figure 1.7) to select it, or click and drag to select multiple controls. Then use the Properties window to set the control(s) properties. Notice that the top of the Properties window shows the name (label1) and type (System.Windows.Forms.Label) of the currently selected control. The currently selected property in Figure 1.7 is Text, and it has the value First Name:. You'll spend a lot of time working with the Properties window.
7. Property Description—The property description gives you a reminder about the current property's purpose. In Figure 1.7, it says that the Text property gives the text associated with the control. (Duh!)
8. Other Windows—This area typically contains other useful windows. The tabs at the bottom let you quickly switch between different windows.
Figure 1.7 shows a fairly typical arrangement of windows, but Visual Studio is extremely flexible so you can rearrange the windows if you like. You can hide or show windows, make windows floating or docked to various parts of the IDE, make windows part of a tab group, and make windows automatically hide themselves if you don't need them constantly.
If you look closely at the right side of the title bar above one of the windows in Figure 1.7 (for example, the Properties window), you'll see three icons: a dropdown arrow (![]() ), a thumbtack (
), a thumbtack (![]() ), and an X (
), and an X (![]() ).
).
If you click the dropdown arrow (or right-click the window's title bar), a menu appears with the following choices:
· Float—The window breaks free of wherever it's docked and floats above the IDE. You can drag it around and it will not re-dock. To make it dockable again, open the menu again and select Dock.
· Dock—The window can dock to various parts of the IDE. (This is kind of fun and I'll say more about it shortly.)
· Dock as Tabbed Document—The window becomes a tab in a tabbed area similar to #8 in Figure 1.7. Unfortunately, it's not always obvious which area will end up holding the window. To make the window a tab in a specific tabbed area, make it dockable and drag it onto a tab (described shortly).
· Auto Hide—The window shrinks itself to a small label stuck to one of the IDE's edges and its thumbtack icon turns sideways (![]() ) to indicate that the window is auto-hiding. If you float the mouse over the label, the window reappears. As long as the mouse remains over the expanded window, it stays put, but if you move the mouse off the window, it auto-hides itself again (like a cockroach when you turn on the lights). Select Auto Hide again or click the sideways thumbtack to turn off auto-hiding. Auto-hiding gets windows out of the way so you can work in a bigger editing area.
) to indicate that the window is auto-hiding. If you float the mouse over the label, the window reappears. As long as the mouse remains over the expanded window, it stays put, but if you move the mouse off the window, it auto-hides itself again (like a cockroach when you turn on the lights). Select Auto Hide again or click the sideways thumbtack to turn off auto-hiding. Auto-hiding gets windows out of the way so you can work in a bigger editing area.
· Hide—The window disappears completely. To get the window back, you'll need to find it somewhere in the bewildering assortment of menus. You can find many of the most useful windows in the View menu, the View menu's Other Windows submenu, and the Debug menu's Windows submenu.
The thumbtack in a window's title bar works just like the dropdown menu's Auto Hide command does. Click the thumbtack to turn on auto-hiding. Expand the window and click the sideways thumbtack to turn off auto-hiding. (Turning off auto-hiding is sometimes called pinning the window.)
The (![]() ) symbol in the window's title bar hides the window just like the dropdown menu's Hide command does.
) symbol in the window's title bar hides the window just like the dropdown menu's Hide command does.
In addition to using a window's title bar menu and icons, you can drag windows into new positions. As long as a window is dockable or part of a tabbed window, you can grab its title bar and drag it to a new position.
As you drag the window, the IDE displays little drop targets to let you dock the window in various positions. If you move the window so the mouse is over a drop target, the IDE displays a translucent blue area to show where the window will land if you drop it. If you drop when the mouse is not over a drop target, the window becomes floating.
Figure 1.8 shows the Properties window being dragged in the IDE. The mouse is over the right drop target above the editing area so, as the translucent blue area shows, dropping it there would dock the window to the right side of the editing area. The picture is kind of messy, but it's not too hard to see what's going on if you give it a try.
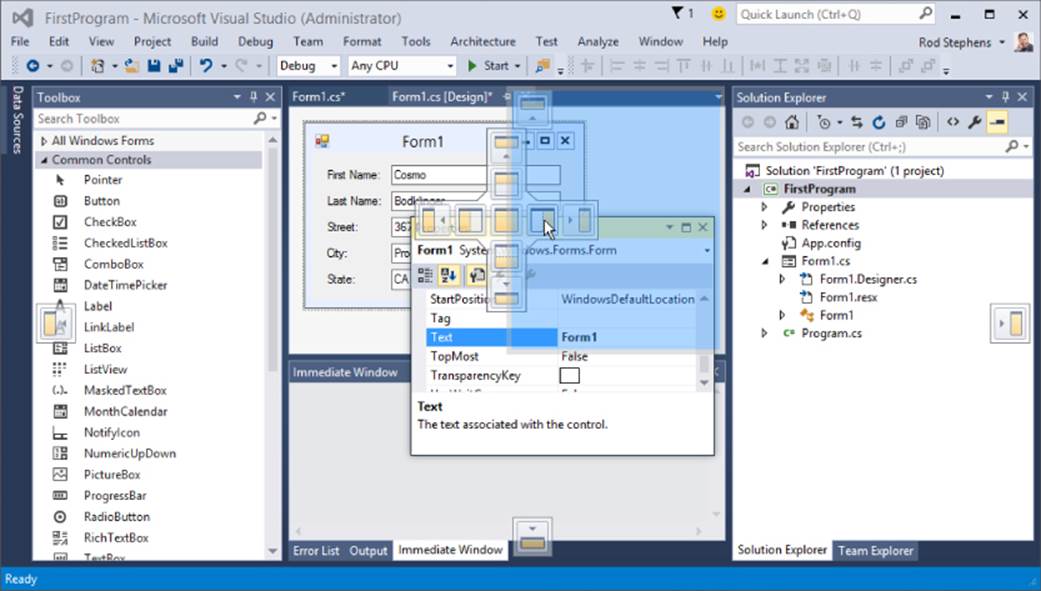
Figure 1.8
The drop area just to the left of the mouse represents a tabbed area. If you drop on this kind of target, the window becomes a tab in that area.
Customization Moderation
Visual Studio lets you move, dock, float, hide, auto-hide, and tabify windows. If you have multiple monitors, you can float a window and move it to another monitor, giving you a larger editing area. It's so flexible that it can present as many different faces as a politician during an election year.
Feel free to customize the IDE to suit your needs, but if you do, keep in mind that your version of Visual Studio may look nothing like the pictures in this book. To minimize confusion, you may want to keep the IDE looking more or less like Figure 1.7, at least until you get a better sense of which tools will be most useful to you.
Try It
In this Try It, you prepare for later work throughout the book. You locate web resources that you can use when you have questions or run into trouble. You create and run a program, explore the project's folder hierarchy, and make a copy of the project. You also get a chance to experiment a bit with the IDE, displaying new toolbars, moving windows around, and generally taking the IDE for a test drive and kicking the tires.
NOTE
Note that the solutions for this lesson's Try It and exercises are not all available on the book's website. The Try It and some of the exercises ask you to experiment with the IDE rather than produce a finished program, so there's really nothing to download. In later lessons, example solutions to the Try It and exercises are available on the book's website.
Lesson Requirements
In this lesson, you:
· Find and bookmark useful web resources.
· Launch Visual Studio and start a new Visual C# project.
· Experiment with the IDE's layout by displaying the Debug toolbar, pinning the Toolbox, and displaying the Output window.
· Run the program.
· Find the program's executable, copy it to the desktop, and run it there.
· Copy the project folder to a new location and make changes to the copy.
· Compress the project folder to make a backup.
NOTE
You can download the code and resources for this lesson from the website at www.wrox.com/go/csharp24hourtrainer2e.
Hints
· When you create a new project, be sure to specify a good location so you can find it later.
· Before you compress the project, remove the bin, obj, and .vs directories to save space.
Step-by-Step
· Find and bookmark useful web resources.
1. Open your favorite web browser.
2. Create a new bookmark folder named C#. (See the browser's documentation if you don't know how to make a bookmark folder.)
3. Go to the following websites and bookmark the ones you like (feel free to search for others, too):
§ My C# Helper website (www.CSharpHelper.com)
§ This book's web page (www.CSharpHelper.com/24hour.html)
§ This book's Wrox web page (go to www.wrox.com and search for C# 24-Hour Trainer, Second Edition)
§ Visual C# Express Edition MSDN forum (social.msdn.microsoft.com/Forums/en-US/Vsexpressvcs/threads)
§ Visual C# IDE MSDN forum (social.msdn.microsoft.com/Forums/en-US/csharpide/threads)
§ Visual C# Language MSDN forum (social.msdn.microsoft.com/Forums/en-US/csharplanguage/threads)
§ Visual C# General MSDN forum (social.msdn.microsoft.com/Forums/en-US/csharpgeneral/threads)
§ MSDN (msdn.microsoft.com)
§ Stack Overflow (www.stackoverflow.com)
§ Code Project (www.codeproject.com)
· Launch Visual Studio and start a new Visual C# project.
1. If you don't have a desktop or taskbar icon for Visual Studio, create one. For example, in Windows 8, follow these steps:
a. Open the Charms area, click Search, and type VS Express (or part of the name of the version you installed). If Visual Studio isn't in the result list, make sure the search box's dropdown list has Everywhere selected.
b. In the search results, right-click the program and select Pin to Start or Pin to Taskbar.
2. Launch Visual Studio by clicking the tile you just pinned to the start screen or the icon you just pinned to the taskbar.
3. Create a new project.
. Press Ctrl+Shift+N or open the IDE's File menu, expand the New submenu, and select Project.
a. Expand the Visual C# project types folder and select the Windows Forms Application template.
b. Enter a project name and a good, easy-to-find location like the desktop or a folder named C# Projects on the desktop.
c. Uncheck the Create Directory for Solution box.
d. Click OK.
· Experiment with the IDE's layout by displaying the Debug toolbar, pinning the Toolbox, and displaying the Output window.
1. Open the Tools menu and select Customize. On the Customize dialog, select the Toolbars tab and check the box next to the Debug toolbar. Experiment with the other toolbars if you like. Close the dialog when you're done.
2. If the Toolbox is auto-hiding (it should be after you first install Visual Studio), float the mouse over it until it expands. Click the thumbtack to pin it.
3. To display the Output window, open the View menu and select Output. Grab the Output window's title bar and drag it around. Move it over some drop targets to see where it lands. When you're finished, drop it at the bottom of the IDE as shown in Figure 1.7.
· Run the program.
1. Press F5 or open the Debug menu and select Start Debugging.
2. Try out the form's minimize, maximize, and close buttons and the commands in the form's system menu. Move the form around and resize it. Marvel at the fact that you didn't need to write any code!
· Find the program's executable, copy it to the desktop, and run it there.
1. Start File Explorer and navigate to the location that you specified when you created the new program.
2. There you should find a folder named after the program. Open that folder and examine the files inside. Notice the .sln file that you can double-click to reopen the solution in Visual Studio. Notice also the bin, obj, and .vs directories.
3. Enter the bin directory and move into its Debug subdirectory. It contains several files including the executable, named after the program but with the .exe extension. Right-click the executable and select Copy.
4. Right-click the desktop and select Paste to copy the executable to the desktop.
5. Double-click the copy of the executable on the desktop.
· Copy the project folder to a new location and make changes to the copy.
1. In File Explorer, go to the directory that contains the project folder.
2. Right-click the project's folder and select Copy.
3. Right-click the desktop and select Paste to copy the project folder.
4. Open the copied project folder and double-click the .sln file to open the copied project in Visual Studio. If the form doesn't open in the Form Designer (#4 in Figure 1.7), look in Solution Explorer and double-click the file Form1.cs.
5. In the Form Designer, grab the handle on the form's lower-right corner and resize the form to make it tall and skinny.
6. Run the modified program. Then go back to the original project (which should still be running in another instance of Visual Studio) and run it. Notice that the two versions display forms of different sizes.
· Compress the project folder to make a backup.
1. In Visual Studio, close the project. (Or close Visual Studio.)
2. In File Explorer, return to the project's folder and delete the bin, obj, and .vs directories. (Note that you can't delete the bin directory if Visual Studio has the project open.)
3. Move up one level to the directory that contains the project folder. Right-click the folder, expand the Send To submenu, and select Compressed (Zipped) Folder.
4. E-mail copies of your first project to all of your friends and relatives. I'm sure they'll thank you!
Exercises
1. Build a solution that contains two projects. (Create a project named Project1. Check the Create Directory for Solution box and name the solution TwoProjects. Then open the File menu, expand the Add submenu, and select New Project to add a new project named Project2.)
2. This lesson explains only a tiny fraction of the ways you can customize Visual Studio. Try another one by making your own toolbar. Select the Tools menu's Customize command. On the Toolbars tab, click the New button, and name the new toolbar MyTools. On the Commands tab, select the Toolbar radio button and then select the new toolbar from the dropdown list. Now use the Add Commands button to add some commands to the toolbar.
3. This lesson also describes only a few of the windows Visual Studio offers. Use the menus to find and display the Output, Immediate, Error List, and Task List windows. Put them all in tabs at the bottom of Visual Studio (#8 in Figure 1.7).
4. Some tools are available only when Visual Studio is in a certain state. Look in the Debug menu's Windows submenu. Then start the program and look there again. Most of those windows are useful only when the program is running and you are debugging it. (I talk about some of them in later lessons.)
5. [WPF] Create a new WPF application. Run it side by side with a Windows Forms application. What are the differences? (Hint: There shouldn't be many and they should be cosmetic. You learn about more important but less obvious differences in later lessons.)
NOTE
Please select the videos for Lesson 1 online at www.wrox.com/go/csharp24hourtrainer2evideos.