C# 24-Hour Trainer (2015)
Section I
The Visual Studio IDE and Controls
Lesson 10
Building Custom Dialogs
The standard dialogs described in Lesson 8 make it easy to perform typical chores such as picking files, folders, colors, and fonts. Those dialogs can get you pretty far, but sometimes you may want a dialog that is customized for your application.
For example, you might want to display a dialog where the user can enter a new customer’s contact information (name, address, phone number, and hat size). It’s unlikely that any predefined standard dialog could ever handle that situation.
Fortunately, it’s easy to build custom dialogs. All you need to do is build a new form as described in Lesson 9, add a few buttons, and set a few properties.
In this lesson you learn how to build custom dialogs and make them as easy to use as the standard dialogs that come with C#.
Making Custom Dialogs
Building a custom dialog is pretty easy. Simply add a new form to your project as described in Lesson 9 and give it whatever controls you need.
To allow the user to finish using the dialog, add one or more buttons. Some dialogs have a single OK button. Others have OK and Cancel buttons or some other combination of buttons. Because you’re creating the dialog, you can give it whatever buttons you like.
By convention, the buttons should go in the dialog’s lower-right corner. Figure 10.1 shows a very simple dialog that contains a single textbox where the user can enter a name.
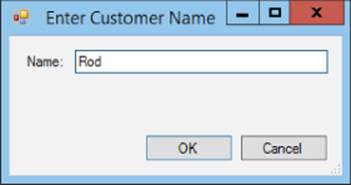
Figure 10.1
To make using the dialog easier, you can set the form’s AcceptButton and CancelButton properties. These determine which button is triggered if the user presses Enter and Esc, respectively. Typically the AcceptButton triggers the dialog’s OK or Yes button and theCancelButton triggers the Cancel or No button.
NOTE
Often dialogs set other properties to make them behave more like standard dialogs. Some of these include:
· Setting FormBorderStyle to FixedDialog so the user cannot resize the dialog.
· Setting MinimumSize and MaxiumSize to keep the dialog a reasonable size. (If you give the dialog a resizable border.)
· Setting MinimizeBox and MaximizeBox to False so the user cannot minimize or maximize the dialog.
· Setting ShowInTaskbar to False so the dialog doesn’t clutter up the taskbar.
NOTE
You can make the dialog even easier to use if you set the tab order so the focus starts at the top of the form and works its way down. For example, if the dialog contains Name, Street, City, State, and ZIP textboxes, the focus should move through them in that order.
The user can press Tab to move between fields and can press Enter or Esc when all of the values are filled in. An experienced user can fill in this kind of dialog very quickly.
Setting the Dialog Result
A program uses the ShowDialog method to display a dialog. This method returns a value that indicates which button the user clicked. As explained in Lesson 8, the program can check that return value to see what it should do with the dialog’s results. The examples inLesson 8 checked that ShowDialog returned the value DialogResult.OK before processing the user’s selections.
The dialog form’s DialogResult property determines what value the call to ShowDialog returns. For example, you could use the following code to make the dialog’s OK Button set the form’s DialogResult property to DialogResult.OK to tell the calling program that the user clicked the OK button:
// Return OK to ShowDialog.
private void okButton_Click(object sender, EventArgs e)
{
DialogResult = DialogResult.OK;
}
Setting the form’s DialogResult property not only determines the return result but also closes the dialog so the call to ShowDialog returns and the calling code can continue.
That means you can set the dialog’s return result and close the dialog in a single line of code. Typing one line of code should be no real hardship, but believe it or not, there’s an even easier way to close the dialog.
If you set a Button’s DialogResult property, the Button automatically sets the form’s DialogResult property when it is clicked. For example, suppose you set the cancelButton’s DialogResult property to DialogResult.Cancel. When the user clicks the Button, it automatically sets the form’s DialogResult property to DialogResult.Cancel so the form automatically closes. That lets you set the return value and close the form without typing any code at all.
If you think setting one Button property is still too much work, you can even avoid that, at least for the Cancel button. When you set a form’s CancelButton property, C# automatically sets that Button’s DialogResult property to DialogResult.Cancel.
Note that when you set the form’s AcceptButton property, C# does not automatically set the Button’s DialogResult property. The assumption is that the OK Button might need to validate the data the user entered on the form before it decides whether to close the dialog. For example, if the user doesn’t fill in all required fields, the OK Button might display a message asking the user to fill in the remaining fields instead of closing the dialog.
NOTE
Actually these methods hide the dialog so control returns to the calling code, but they don’t call its Close method. That means the dialog isn’t destroyed so the calling code can look at values entered on the dialog by the user.
If you don’t want to perform any validation, you can simply set the OK Button’s DialogResult property to DialogResult.OK.
Using Custom Dialogs
A program uses a custom dialog in exactly the same way that it uses a standard dialog. It creates, initializes, and displays the dialog. It checks the return result and takes whatever action is appropriate.
There’s a slight difference in how the program creates the dialog because you can add standard dialogs to a form at run time and you can’t do that with custom dialogs. To use a custom dialog, the code needs to create a new instance of the dialog’s form as described inLesson 9.
The following code shows how a program might display a new customer dialog:
// Let the user create a new customer.
private void newCustomerButton_Click(object sender, EventArgs e)
{
// Create and display a NewCustomerDialog.
NewCustomerDialog newCustomerDialog;
newCustomerDialog = new NewCustomerDialog();
if (newCustomerDialog.ShowDialog() == DialogResult.OK)
{
// … Create the new customer here …
}
}
The code declares a variable to refer to the dialog and makes a new instance of the dialog. It displays the dialog by using its ShowDialog method and checks the return result. If the user clicks OK, the program takes whatever steps are needed to create the new customer, such as adding a record to a database.
Try It
In this Try It, you build and use the simple custom dialog shown in Figure 10.2. The dialog lets you enter a name. If you enter a non-blank value and click OK, the main form adds the name you entered to a ListBox.
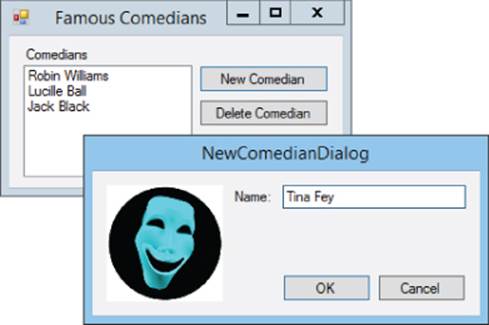
Figure 10.2
This Try It also gives you a little practice using the ListBox control, showing how to add and remove items.
Lesson Requirements
In this lesson, you:
· Create the main form shown in the upper left in Figure 10.2. Make the New Comedian Button be the form’s AcceptButton and the Delete Comedian Button be the form’s CancelButton.
· Create the dialog shown in the lower right in Figure 10.2. Set the AcceptButton and CancelButton properties in the obvious way.
· Make the New Comedian Button display the dialog. If the dialog returns DialogResult.OK, add the new comedian’s name to the ListBox.
· Make the Delete Comedian Button remove the currently selected comedian from the ListBox.
· When the user clicks the dialog’s Cancel Button, hide the dialog and return DialogResult.Cancel.
· When the user clicks the dialog’s OK Button, check the entered name’s length. If the length is 0, display a message asking the user to enter a name. If the length is greater than 0, hide the dialog and return DialogResult.OK.
NOTE
You can download the code and resources for this lesson from the website at www.wrox.com/go/csharp24hourtrainer2e.
Hints
· Use the ListBox’s Items.Add method to add a new item to the ListBox.
· Use the ListBox’s Items.Remove method to remove the selected item (which is identified by the SelectedItem property).
· Check nameTextBox.Text.Length == 0 to see whether the name entered on the dialog is blank. You can use code similar to the following to take one action if the length is 0 and another if it is not. Notice the new else part of the if statement. If the condition is true, the statements after the if clause are executed. If the condition is false, the statements after the else clause are executed. (Lesson 18 covers if and else in more detail.)
·if (nameTextBox.Text.Length == 0)
·{
· … Display a message here …
·}
·else
·{
· … Return DialogResult.OK here …
}
· Don’t forget to set the nameTextBox control’s Modifiers property to Public so the main form’s code can use it.
Step-by-Step
· Create the main form shown in the upper left in Figure 10.2. Make the New Comedian Button be the form’s AcceptButton and the Delete Comedian Button be the form’s CancelButton.
1. Start a new project and add a Label, ListBox, and two Buttons roughly as shown in Figure 10.2.
2. Set the ListBox’s Anchor property to Top, Bottom, Left, Right. Set the Buttons’ Anchor properties to Top, Right.
3. Set the form’s AcceptButton property to the New Comedian Button. Set its CancelButton property to the Delete Comedian Button.
· Create the dialog shown in the lower right in Figure 10.2. Set the AcceptButton and CancelButton properties in the obvious way.
1. Open the Project menu and select Add Windows Form. Enter the name NewComedianDialog and click Add.
2. Add a Label, TextBox, PictureBox, and two Buttons roughly as shown in Figure 10.2.
3. Set the TextBox’s Anchor property to Top, Left, Right. Set the Buttons’ Anchor properties to Bottom, Right.
4. Place an image of your choosing in the PictureBox and set its Anchor property to Top, Bottom, Left. Set its SizeMode property to Zoom.
5. Set the dialog’s AcceptButton property to the OK Button. Set its CancelButton property to the Cancel Button.
6. Set the dialog’s FormBorderStyle property to FixedDialog, set its ControlBox property to False, and set its ShowInTaskbar property to False.
NOTE
Setting the controls’ Anchor properties makes it easier to size the form so you like it. Once you have everything arranged, setting FormBorderStyle equal to FixedDialog prevents the user from resizing the form, so the Anchor properties don’t really do anything at run time.
· Make the New Comedian Button display the dialog. If the dialog returns DialogResult.OK, add the new comedian’s name to the ListBox.
1. Create an event handler for the New Comedian Button. Use code similar to the following:
2. // Create a new comedian entry.
3. private void newComedianButton_Click(object sender, EventArgs e)
4. {
5. NewComedianDialog newComedianDialog;
6. newComedianDialog = new NewComedianDialog();
7. if (newComedianDialog.ShowDialog() == DialogResult.OK)
8. {
9. // Add the new comedian.
10. comedianListBox.Items.Add(
11. newComedianDialog.nameTextBox.Text);
12. }
}
· Make the Delete Comedian Button remove the currently selected comedian from the ListBox.
1. Create an event handler for the Delete Comedian Button. Use code similar to the following:
2. // Remove the currently selected comedian.
3. private void deleteComedianButton_Click(object sender, EventArgs e)
4. {
5. comedianListBox.Items.Remove(comedianListBox.SelectedItem);
}
This makes the ListBox remove the currently selected item. Fortunately if there is no selected item, the ListBox does nothing instead of crashes.
· When the user clicks the dialog’s Cancel Button, hide the dialog and return DialogResult.Cancel.
1. You don’t need to do anything else to make this work. When you set the dialog’s CancelButton property to this Button, C# sets the Button’s DialogResult property to DialogResult.Cancel so the button automatically sets the return result and closes the dialog.
· When the user clicks the dialog’s OK Button, check the entered name’s length. If the length is 0, display a message asking the user to enter a name. If the length is greater than 0, hide the dialog and return DialogResult.OK.
1. Create an event handler for the dialog’s OK Button. Use code similar to the following:
2. // Make sure the comedian's name isn't blank.
3. private void okButton_Click(object sender, EventArgs e)
4. {
5. if (nameTextBox.Text.Length == 0)
6. {
7. MessageBox.Show("Please enter a comedian's name");
8. }
9. else
10. {
11. DialogResult = DialogResult.OK;
12. }
}
Exercises
1. [WPF] Repeat the Try It with a WPF application. Hints:
· To see if the user clicked OK on the dialog, see if the ShowDialog method returns True as in this code:
· if (newComedianDialog.ShowDialog().Value)
· {
· …
}
2. To define the Accept Button, set the Button’s IsDefault property to True.
3. To define the Cancel Button, set the Button’s IsCancel property to True.
4. To close the dialog, the OK Button’s code should set DialogResult = true.
5. To prevent the user from resizing the dialog, set ResizeMode to NoResize.
6. To prevent the dialog from appearing in the taskbar, set ShowInTaskbar to False.
7. It’s usually better to prevent the user from performing invalid actions than to allow the user to perform the action and then complain. In the Try It, the user can click the Delete Comedian Button even if no comedian is selected. To fix that, copy the program you built for the Try It and add the following event handler to enable or disable the button when the ListBox’s selection changes:
8. // Enable the Delete Comedian button if an entry is selected.
9. private void comedianListBox_SelectedIndexChanged(
10. object sender, EventArgs e)
11. {
12. deleteComedianButton.Enabled =
13. (comedianListBox.SelectedIndex >= 0);
}
Hint: Don’t forget to disable the Button initially.
14.[WPF] Repeat Exercise 2 with the WPF program you built for Exercise 1. (Hint: In WPF a Button has an IsEnabled property instead of an Enabled property.)
15.Copy the program you built for Exercise 2. To further help the user avoid making mistakes, modify the dialog so the OK Button is enabled when the text in the TextBox is non-blank. Hints:
· Use the TextBox’s TextChanged event handler.
· Because the user can’t click the OK Button when the text is blank, the OK Button doesn’t need a Clicked event handler. Just set its DialogResult property to OK.
16.[WPF] Repeat Exercise 4 with the WPF program you built for Exercise 3. (Hint: In WPF Buttons don’t have a DialogResult property. The OK Button still needs a Click event handler, but all it needs to do is set the form’s DialogResult property.)
17.Make a program that has First Name, Last Name, Street, City, State, and ZIP Labels as shown on the Contact Information form in Figure 10.3. When the user clicks the Edit Button, the program should display the Edit Contact dialog shown in Figure 10.3 to let the user change the values. If the user clicks OK, the copy the new values back into the main form’s Labels.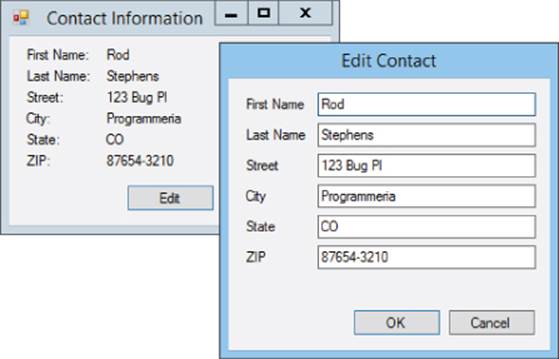
Figure 10.3
18.[WPF] Repeat Exercise 6 with a WPF application.
19.Sometimes the standard message box given by MessageBox.Show is almost perfect but you’d like to change the Buttons’ text. Create a program that defines the message dialog shown in Figure 10.4.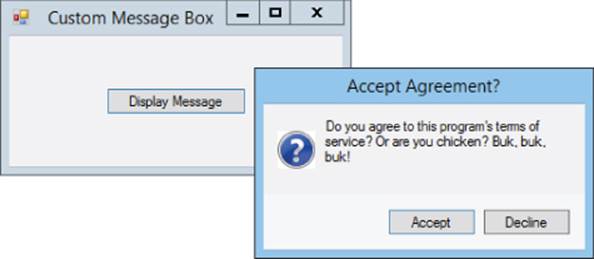
Figure 10.4
The main program should set the Label’s text, the dialog’s title, and the Buttons’ text. Make the Accept Button return DialogResult.OK and make the Decline Button return DialogResult.Cancel. Make the main form display different messages depending on whether the user clicked Accept or Decline.
Hints:
· The question mark icon is displayed in a PictureBox.
· Set the dialog’s properties: FormBorderStyle =FixedDialog, ControlBox =False, and ShowInTaskbar = False.
20.[WPF] Repeat Exercise 8 with a WPF program. Hints:
· To set the dialog’s title, set its Title property.
· The WPF Label control doesn’t support word wrapping. To let the dialog wrap text, use a TextBlock with TextWrapping set to Wrap.
21.Create a color selection dialog like the one shown in Figure 10.5. The main program’s Buttons should display the same dialog to let the user select foreground and background colors. Only update the main form’s colors if the user clicks OK. Don’t worry about initializing the dialog to show the current values before displaying it. (Hint: You built a program that lets the user select colors with scrollbars for Lesson 4’s Try It.)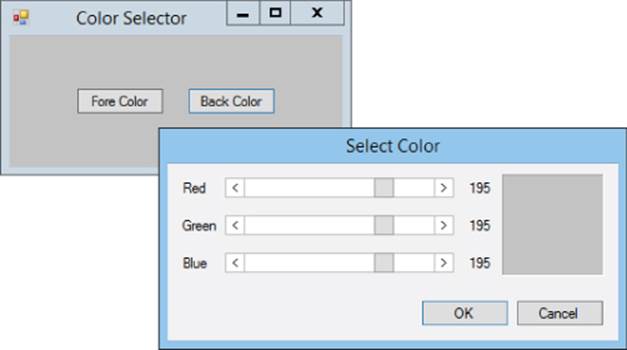
Figure 10.5
22.[WPF] Repeat Exercise 10 with a WPF program. Hints:
· Display the color sample in a Border control.
· Make the ScrollBars share the following event handler:
· // Display the color sample.
· private void redScrollBar_Scroll(object sender,
· System.Windows.Controls.Primitives.ScrollEventArgs e)
· {
· redLabel.Content = redScrollBar.Value.ToString("0");
· greenLabel.Content = greenScrollBar.Value.ToString("0");
· blueLabel.Content = blueScrollBar.Value.ToString("0");
· Color color = Color.FromRgb(
· (byte)redScrollBar.Value,
· (byte)greenScrollBar.Value,
· (byte)blueScrollBar.Value);
· sampleBorder.Background = new SolidColorBrush(color);
}
23.Make a background selection dialog like the one shown in Figure 10.6. When the user clicks the main form’s Select Background Button, the form displays the dialog. When the user clicks one of the thumbnail images, the dialog displays a border around that image’s PictureBox. If the user clicks OK, the dialog closes and the main form displays the selected image at full scale.
Figure 10.6
Hints:
· When the user clicks an image, set the BorderStyle property to Fixed3D for that PictureBox and None for the others.
· To remember which image was selected, place a hidden PictureBox on the dialog and set its Image property equal to that of the clicked PictureBox.
· Use the techniques described for Lesson 9, Exercise 18 to use a single event handler for all four PictureBoxes.
· Only allow the user to click the dialog’s OK Button if a picture has been selected.
· If the user clicks OK, resize the main form to fit its new background image.
· Set the Cancel Button’s TabStop property to False. (To see why, set it equal to True, run the program, select a picture, and press Enter.)
24.Repeat Exercise 12 with a WPF application. Hints:
· Place an Image control on the main window and display the selected picture in it.
· Don’t worry about sizing the main window to fit the selected picture.
· In WPF Image controls don’t have a BorderStyle property. Indicate the selected Image control by setting its Opacity property to 1. Set the other Image controls’ Opacity properties to 0.5.
NOTE
Please select the videos for Lesson 10 online at www.wrox.com/go/csharp24hourtrainer2evideos.