C# 24-Hour Trainer (2015)
Section II
Variables and Calculations
Lesson 13
Understanding Scope
A variable's scope is the code that can “see” or access that variable. It determines whether a piece of code can read the variable's value and give it a new value.
In this lesson you learn what scope is. You learn why restricting scope is a good thing and how to determine a variable's scope.
Scope within a Class
A C# class (and note that Form types are classes, too) contains three main kinds of scope: class scope, method scope, and block scope. (If you have trouble remembering what a class is, review Lesson 9's section “Understanding Classes and Instances.”)
Variables with class scope are declared inside the class but outside of any of its methods. These variables are visible to all of the code throughout the instance of the class and are known as fields.
Variables with method scope are declared within a method. They are usable by all of the code that follows the declaration within that method.
Variables with block scope are declared inside a block defined by curly braces {} nested inside a method. The section “Block Scope” later in this lesson says more about this.
For example, consider the following code that defines the form's constructor (Form1), a field, and some variables inside event handlers:
namespace VariableScope
{
public partial class Form1 : Form
{
public Form1()
{
InitializeComponent();
}
// A field.
int a = 1;
private void clickMeButton_Click(object sender, EventArgs e)
{
// A method variable.
int b = 2;
MessageBox.Show("a = " + a.ToString() +
"\nb = " + b.ToString());
}
private void clickMeTooButton_Click(object sender, EventArgs e)
{
// A method variable.
int c = 3;
MessageBox.Show("a = " + a.ToString() +
"\nc = " + c.ToString());
}
}
}
The field a is declared outside of the three methods (Form1, clickMeButton_Click, and clickMeTooButton_Click) so it has class scope. That means the code in any of the methods can see and use this variable. In this example, the two Click event handlers can each display the value.
The variable b is declared within clickMeButton_Click so it has method scope. Only the code within this method that comes after the declaration can use this variable. In particular, the code in the other methods cannot see it.
Similarly, the code in the clickMeTooButton_Click event handler that comes after the c declaration can see that variable.
Two variables with the same name cannot have the same scope. For example, you cannot create two variables named a at the class level nor can you create two variables named b inside the same method.
Same Named Variables
Although you cannot give two variables the same name within the same scope, you can give them the same name if they are in different methods or one is a field and the other is declared inside a method. For example, the following code defines three variables all named count:
// A field.
int count = 0;
private void clickMeButton_Click(object sender, EventArgs e)
{
// A method variable.
int count = 1;
MessageBox.Show(count.ToString());
}
private void clickMeTooButton_Click(object sender, EventArgs e)
{
// A method variable.
int count = 2;
MessageBox.Show(count.ToString());
}
In this example, the method-level variable hides the class-level variable with the same name. For example, within the clickMeButton_Click event handler, its local version of count is visible and has the value 1. The class-level field with value 0 is hidden.
NOTE
You can still get the class-level value if you prefix the variable with the executing object. Recall that the special keyword this means “the object that is currently executing this code.” That means you could access the class-level field while inside theclickMeButton_Click event handler like this:
private void clickMeButton_Click(object sender, EventArgs e)
{
// A method variable.
int count = 1;
MessageBox.Show(count.ToString());
MessageBox.Show(this.count.ToString());
}
Usually it's better to avoid potential confusion by giving the variables different names in the first place.
Method Variable Lifetime
A variable with method scope is created when its method is executed. Each time the method is called, a new version of the variable is created. When the method exits, the variable is destroyed. If its value is referenced by some other variable, it might still exist, but this variable is no longer available to manipulate it.
One consequence of this is that the variable's value resets each time the method executes. For example, consider the following code:
private void clickMeButton_Click(object sender, EventArgs e)
{
// A method variable.
int count = 0;
count++;
MessageBox.Show(count.ToString());
}
Each time this code executes, it creates a variable named count, adds 1 to it, and displays its value. The intent may be to have the message box display an incrementing counter but the result is actually the value 1 each time the user clicks the button.
To save a value between method calls, you can change the variable into a field declared outside of any method. The following version of the preceding code displays the values 1, 2, 3, and so on when the user clicks the button multiple times:
// A field.
int count = 0;
private void clickMeButton_Click(object sender, EventArgs e)
{
count++;
MessageBox.Show(count.ToString());
}
Note that a parameter declared in a method's declaration counts as having method scope. For example, the preceding event handler has two parameters named sender and e. That means you cannot declare new variables within the method with those names.
Block Scope
A method can also contain nested blocks of code that define other variables that have scope limited to the nested code. This kind of variable cannot have the same name as a variable declared at a higher level of nesting within the same method.
Later lessons explain some kinds of nesting used to make decisions (Lesson 18), loops (Lesson 19), and error handlers (Lesson 21).
One type of nested block simply uses braces to enclose code. The scope of a variable declared within this kind of block includes only the block, and the variable is usable only later in the block.
For example, consider the following code:
private void clickMeTooButton_Click(object sender, EventArgs e)
{
// A method variable.
int count = 1;
MessageBox.Show(count.ToString());
// A nested block of code.
{
int i = 2;
MessageBox.Show(i.ToString());
}
// A second nested block of code.
{
int i = 3;
MessageBox.Show(i.ToString());
}
}
This method declares the variable count at the method level and displays its value.
The code then makes a block of code surrounded by braces. It declares the variable i and displays its value. Note that the code could not create a second variable named count inside this block because the higher-level method code contains a variable with that name.
After the first block ends, the code creates a second block. It makes a new variable i within that block and displays its value. Because the two inner blocks are not nested (neither contains the other), it's okay for both blocks to define variables named i.
Accessibility
A field's scope determines what parts of the code can see the variable. So far I've focused on the fact that all of the code in a class can see a field declared at the class level, outside of any methods. In fact, a field may also be visible to code running in other classes depending on its accessibility.
A field's accessibility determines which code is allowed to access the field. For example, a class might contain a public field that is visible to the code in any other class. It may also define a private field that is visible only to code within the class that defines it.
Accessibility is not the same as scope, but the two work closely together to determine what code can access a field.
Table 13.1 summarizes the field accessibility values. Later when you learn how to build properties and methods, you'll be able to use the same accessibility values to determine what code can access them.
Table 13.1
|
Accessibility Value |
Meaning |
|
public |
Any code can see the variable. |
|
private |
Only code in the same class can see the variable. |
|
protected |
Only code in the same class or a derived class can see the variable. For example, if the Manager class is derived from the Person class, a Manager object can see a Person object's protected variables. (You learn more about deriving one class from another in Lesson 23.) |
|
internal |
Only code in the same assembly can see the variable. For example, if the variable's class is contained in a library (which is its own assembly), a main program that uses the library cannot see the variable. |
|
protected internal |
The variable is visible to any code in the same assembly or any derived class in another assembly. |
If you omit the accessibility value for a field, it defaults to private. You can still include the private keyword, however, to make the field's accessibility obvious.
NOTE
You may remember from earlier lessons that you needed to set a control's Modifiers property to public to allow a program's main form to get and set the values of that control's properties. For example, suppose you build a custom dialog with aTextBox where the user can enter a name. Now you know why you need to set the TextBox's Modifiers property to public. If you don't, the main form can't see the TextBox's Text property.
There's one aspect of private accessibility that sometimes confuses people. A private field is visible to any code in any instance of the same class, not just to the same instance of the class.
For example, suppose you build a Person class with a private field named Salary. Not only can all of the code in an instance see its own Salary value, but any Person object can see any other Person object's Salary value.
NOTE
Note that public fields are considered to be bad programming style. It's better to make a public property instead. Lesson 23 explains why and tells how to make properties. Public fields do work, however, and are good enough for this discussion on accessibility.
Restricting Scope and Accessibility
It's a good programming practice to restrict scope and accessibility as much as possible to limit the code that can access it. For example, if a piece of code has no business using a particular field, there's no reason to give it the opportunity. This not only reduces the chances that you will use the variable incorrectly but also removes the variable from IntelliSense so it's not there to clutter up your choices and confuse things.
If you can use a variable declared locally inside an event handler or other method, do so. In fact, if you can declare a variable within a block of code inside a method, such as in a loop, do so. That gives the variable very limited scope so it won't get in the way when you're working with unrelated code.
If you need multiple methods to share the same value or you need to keep track of a value between method calls, store the value in a private field. Only make a variable public if code in another form (or other class) needs to use it.
Try It
In this Try It, you build the program shown in Figure 13.1. You use fields to allow two forms to communicate and to perform simple calculations. You also get to try out a new control: ListView.
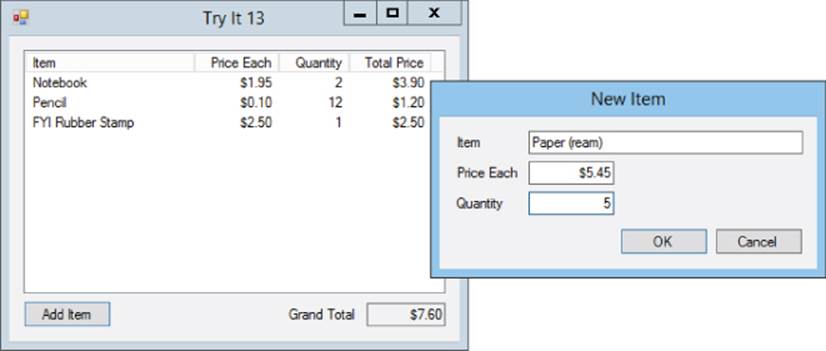
Figure 13.1
Lesson Requirements
In this lesson, you:
· Create the NewItemForm shown on the right in Figure 13.1.
· Provide public fields to let the main form get the data entered by the user.
· When the user clicks the OK button, copy the item name, price each, and quantity values into the public fields.
· Create the main form shown on the left in Figure 13.1.
· When the user clicks the main form's Add Item button, make the program display the NewItemForm. If the user enters data and clicks the OK button, display the entered values in the main form's ListView control and update the grand total.
NOTE
You can download the code and resources for this lesson from the website at www.wrox.com/go/csharp24hourtrainer2e.
Hints
· Remember to set the NewItemForm's AcceptButton, CancelButton, FormBorderStyle, and ControlBox properties appropriately.
· Because the main form's grand total must retain its value as the user adds items, it must be a field.
· To allow the main form to see the values entered by the user on the NewItemForm, use public fields.
Step-by-Step
· Create the NewItemForm shown on the right in Figure 13.1.
1. Arrange the controls as shown in Figure 13.1.
2. Set the form's AcceptButton property to the OK button and its CancelButton property to the Cancel button. The OK button will always close the form so set its DialogResult property to OK.
3. Set the form's FormBorderStyle property to FixedDialog. Set its ControlBox property to False.
§ Provide public fields to let the main form get the data entered by the user.
a. Declare public fields for the program to use in its calculations. Use code similar to the following placed outside of any methods:
b. // Public fields. (They should really be properties.)
c. public string ItemName;
public decimal PriceEach, Quantity;
§ When the user clicks the OK button, copy the item name, price each, and quantity values into the public fields.
a. Copy the values entered by the user into the fields you created in the preceding step.
· Create the main form shown on the left in Figure 13.1.
1. Create the ListView, Button, Label, and TextBox. Set their Anchor properties and make the TextBox read-only.
2. To make the ListView display its items in a list as shown:
a. Set its View property to Details.
b. Select its Columns property and click the ellipsis to the right to open the ColumnHeader Collection Editor shown in Figure 13.2. Click the Add button four times to make the four columns. Use the property editor on the right to set each column's Name and Textproperties and to set TextAlign to Right for the numeric columns.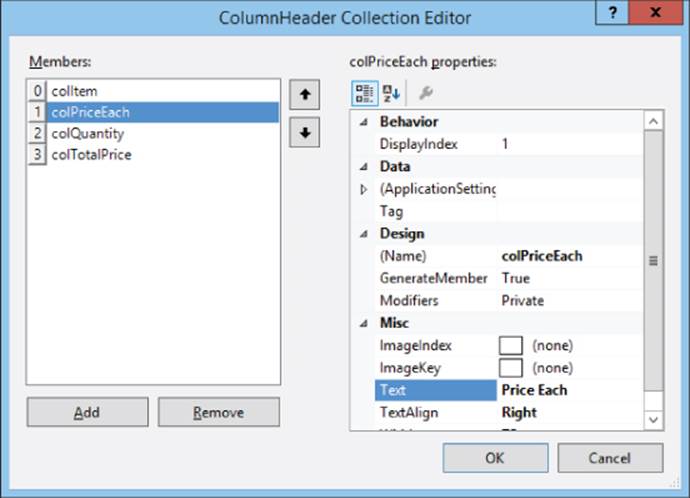
Figure 13.2
· When the user clicks the main form's Add Item button, make the program display a NewItemForm. If the user enters data and clicks OK, display the entered values in the main form's ListView control and update the grand total.
1. The button's Click event handler should use code similar to the following:
2. // A private field to keep track of grand total
3. // across multiple calls to the event handler.
4. private decimal GrandTotal = 0;
5. // Let the user add a new item to the list.
6. private void addItemButton_Click(object sender, EventArgs e)
7. {
8. NewItemForm frm = new NewItemForm();
9. if (frm.ShowDialog() == DialogResult.OK)
10. {
11. // Get the new values.
12. decimal priceEach = frm.PriceEach;
13. decimal quantity = frm.Quantity;
14. decimal totalPrice = priceEach * quantity;
15. // Add the values to the ListView.
16. ListViewItem lvi = itemsListView.Items.Add(frm.ItemName);
17. lvi.SubItems.Add(priceEach.ToString("C"));
18. lvi.SubItems.Add(quantity.ToString());
19. lvi.SubItems.Add(totalPrice.ToString("C"));
20. // Add to the grand total and display the new result.
21. GrandTotal += totalPrice;
22. grandTotalTextBox.Text = GrandTotal.ToString("C");
23. }
}
NOTE
If one form's code tries to directly access a field in another form and do something with the value in the same statement, you may get a design time error. For example, suppose the Try It's main form uses the following code:
MessageBox.Show(frm.Quantity.ToString());
Here frm is the variable referring to an instance of the NewItemForm dialog and Quantity is a field in the dialog. In that case Visual Studio issues the following warning at design time:
Accessing a member on ‘NewItemForm.Quantity’ may cause a runtime exception because it is a field of a marshal-by-reference class
The problem here is obscure and happens only if the program is using the dialog across process or machine boundaries, for example, if your program tries to display a dialog defined on another programming thread.
This warning may not be as important as a low oil pressure warning in your car, but it's generally not good to ignore warnings. Fortunately it's easy to make this warning go away. Simply copy the returned result into a local variable and then manipulate that variable instead of work with the dialog's field directly. For example, you could use the following code:
decimal quantity = frm.Quantity;
MessageBox.Show(quantity.ToString());
Exercises
1. Copy the program you built for the Try It and modify the New Item form so its OK button is enabled only if its three TextBoxes contain non-blank text.
2. [Hard] Copy the program you built for Exercise 1 and add a new Delete Item button to the main form that deletes the currently selected item. Hints:
· Set the ListView control's MultiSelect property to False and set its FullRowSelect property to True.
· Enable the button Only when an item is selected in the ListView control.
· The ListView control's SelectedIndices property is a collection of the items that are currently selected. Use the collection's Count property to determine whether any items are selected.
· Use the following code to remove the selected item from the ListView control:
· // Delete the selected item.
· private void deleteItemButton_Click(object sender, EventArgs e)
· {
· // Get the selected item.
· ListViewItem item = itemsListView.SelectedItems[0];
· // Get the item's Total Price.
· decimal totalPrice =
· decimal.Parse(item.SubItems[2].Text, NumberStyles.Any);
· // Subtract from the grand total and display the new result.
· GrandTotal -= totalPrice;
· grandTotalTextBox.Text = GrandTotal.ToString("C");
· // Remove the item from the ListView.
· itemsListView.Items.Remove(item);
}
3. If you typed the code shown for Exercise 2 correctly, then your program contains a bug. (To see it, add an item and then delete it.) Use the debugger to fix the program.
4. Use a design similar to the one used in Exercise 3 to let the user fill out an appointment calendar. The main form should contain a ListView with columns labeled Subject, Date, Time, and Notes. The NewAppointmentForm should provide TextBoxes for the user to enter these values and should have public fields AppointmentSubject, AppointmentDate, AppointmentTime, and AppointmentNotes to let the main form get the entered values. Instead of a grand total, the main form should display the number of appointments. Enable the New Appointment form's OK button Only if the Subject, Date, and Time are non-blank.
5. Build a form that contains a ListBox, TextBox, and Button. When the user clicks the Button, display a dialog that lets the user enter a number. Give the dialog a public field to return the value to the main form.
If the user enters a value and clicks OK, the main form should add the number to its ListBox. It should then display the average of its numbers. To do that, use a private field containing the numbers' total. Add the new number to the total and divide by the number of values.
6. [WPF] Repeat Exercise 5 with a WPF program.
7. Copy the program you wrote for Exercise 5 and add a Delete Item Button to the main form. Enable the button Only when an item is selected in the list. When the user clicks the button, remove the selected item from the list and display the new average.
8. [WPF] Repeat Exercise 7 with the program you built for Exercise 6.
9. [Hard] Build the conference schedule designer shown in Figure 13.3.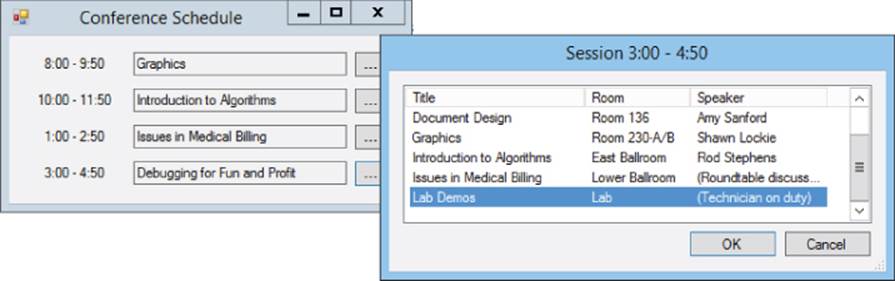
Figure 13.3
Give the main form (on the left in Figure 13.3) the following features:
· Create private fields named SessionIndex1, SessionIndex2, and so forth to hold the indexes of the user's choices.
· When the user clicks an ellipsis button, display the session selection dialog shown on the right in Figure 13.3.
· After creating the dialog but before displaying it, set its Text property to indicate the session time as shown in the figure.
· Also before displaying the dialog, use code similar to the following to tell the dialog about the user's previous selection for this session. (The SessionIndex and SessionTitle variables are public fields defined by the dialog and discussed shortly.)
frm.SessionIndex = SessionIndex1;
· If the user clicks OK, use code similar to the following to save the index of the user's choice and to display the session's title:
· // Save the new selection.
· SessionIndex1 = frm.SessionIndex;
choice1TextBox.Text = frm.SessionTitle;
Give the dialog the following features:
· Set the ListView's FullRowSelect property to True and set its MultiSelect property to False.
· Use the Properties window to define the ListView's column headers. Select the ListView, click its Columns property, click the ellipsis to the right, and use the editor to define the headers.
· Use the Properties window's editors to define the ListView's items. Select the ListView, click its Items property, click the ellipsis to the right, and use the editor to define the items. Set the Text property to determine an item's text. Click the SubItems property and then click the ellipsis to the right to define the sub-items (Room and Speaker).
· Use the following code to create public fields to communicate with the main form:
· // Public fields to communicate with the main form.
· public int SessionIndex;
public string SessionTitle;
· Create a Load event handler that uses the following code to initialize the dialog. This code selects the proper session in the ListView control and then makes the control scroll if necessary so that session is visible:
· // Initialize the selection.
· private void PickSessionForm_Load(object sender, EventArgs e)
· {
· sessionsListView.SelectedIndices.Add(SessionIndex);
· // Ensure that the selection is visible.
· sessionsListView.SelectedItems[0].EnsureVisible();
}
· In the OK button's Click event handler, use the following code to save the selected item's index and title for the main form to use:
· // Save the user's selection.
· private void okButton_Click(object sender, EventArgs e)
· {
· SessionIndex = sessionsListView.SelectedIndices[0];
· SessionTitle = sessionsListView.SelectedItems[0].Text;
}
10.[WPF, Hard] Repeat Exercise 9 with a WPF application. It's harder to use a ListView in WPF than it is in Windows Forms, so for this exercise use a ListBox instead.
NOTE
Please select the videos for Lesson 13 online at www.wrox.com/go/csharp24hourtrainer2evideos.