C# 24-Hour Trainer (2015)
Section V
System Interactions
Lesson 30
Printing
Most of the programs described in earlier lessons display output on the computer's screen. Lesson 29 explained how to save output in files.
This lesson explains a third method for producing output: printing. Using the techniques described in this lesson, you can print text, shapes, images—just about anything you want.
WARNING
Before you start a printing project, however, be warned that printing in C# isn't trivial. It's easy enough to display some text or a few lines in a printout, but producing a complex formatted document can be a lot of work.
If you need to produce a nicely formatted résumé, graph, or grid of values, you should ask yourself whether there's an easier way. For example, Microsoft Word and Google Docs are great at producing nicely formatted text documents. Similarly, Microsoft Excel does a wonderful job of making charts and graphs. You can certainly generate these sorts of printouts using C#, but it may be a lot faster and easier if you use another tool.
Windows Forms Printing
Windows Forms and WPF applications handle printing in very different ways. A Windows Forms application responds to events and makes method calls to draw text, shapes, and images on the printed page. In contrast, a WPF application uses objects such as theLabel and TextBox controls to represent text, shapes, and images that you can print.
The following sections explain how a Windows Forms application prints. The sections after those explain how a WPF application prints.
Getting Started
The PrintDocument component sits at the center of the Windows Forms printing process. To print, a program creates an instance of this class either at design time or at run time. It adds event handlers to catch the object's events and then lets the object do its thing. As the object generates pieces of the printout, it raises events to let the program supply graphics for it to print.
The PrintDocument object raises four key events:
· BeginPrint—Raised when the object is about to start printing to let the program do whatever it must to get ready to print.
· QueryPageSettings—Raised when the object is about to start printing a page to let the program modify the upcoming page's settings. For example, it might adjust the margins so odd pages have bigger margins on the left and even pages have bigger margins on the right to allow room for a staple in a double-sided document.
· PrintPage—Raised when the object needs to generate contents for a page. This is where the program does its drawing. The event handler should set the its e.HasMorePages value to false after it draws its last page.
· EndPrint—Raised after the object has finished printing to let the program clean up if necessary.
The BeginPrint, QueryPageSettings, and EndPrint event handlers are optional. For simple printouts, you often only need the PrintPage event handler.
The PrintPage event handler gives you a parameter named e of type PrintPageEventArgs. This object contains:
· The HasMorePages parameter that you use to tell the PrintDocument whether this is the last page
· A PageBounds property that tells you how big the page is
· A MarginBounds property that tells you where the page's margins are
· A Graphics object that you use to draw the page's contents
The following section explains how a program starts the printing process. The sections after that give simple examples that show how to draw shapes and text.
Starting a Printout
The easiest way to generate a printout using the PrintDocument object is to place the object on a form at design time and give the object a PrintPage event handler to generate the pages. When you're ready to print, simply call the PrintDocument object's Print method. The object raises its PrintPage event, the event handler generates graphics, and the object sends the results to the default printer.
TIP
The Form Designer's Toolbox has a Printing section that makes it easy to find the printing-related components.
Once you've built a PrintPage event handler, it's practically trivial to add a print preview capability to the program. Add a PrintPreviewDialog object to the form and set its Document property to the PrintDocument object that you already created. To display a print preview, simply call the dialog's ShowDialog method. When you do, the dialog uses the associated PrintDocument object to generate the necessary preview and displays the result.
TIP
The PrintPreviewDialog contains a print button, so for simple programs you may not really need a print command. The program can display a preview and the user can click the button to print.
Drawing Shapes
You've seen in previous lessons how to use a Graphics object's methods to draw. To draw shapes on a printout, you use the same methods with the PrintPage event handler's e.Graphics parameter.
Figure 30.1 shows the Print Shapes example program displaying a preview that contains a rectangle and an ellipse.
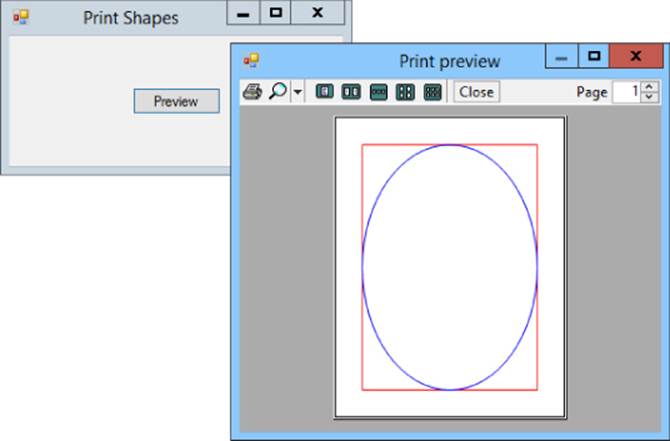
Figure 30.1
The following code shows the program's PrintPage event handler:
// Draw some shapes.
private void shapesPrintDocument_PrintPage(object sender,
System.Drawing.Printing.PrintPageEventArgs e)
{
e.Graphics.SmoothingMode = SmoothingMode.AntiAlias;
// Draw a rectangle around the page margin.
e.Graphics.DrawRectangle(Pens.Red, e.MarginBounds);
// Draw an ellipse inside the page margin.
e.Graphics.DrawEllipse(Pens.Blue, e.MarginBounds);
// There are no more pages.
e.HasMorePages = false;
}
This code sets the Graphics object's SmoothingMode property. It then draws a rectangle and an ellipse around the page's margins. It finishes by setting HasMorePages to false to tell the PrintDocument object to not raise its PrintPage event again.
The following code shows how the program displays print previews and generates printouts:
// Print immediately.
private void printButton_Click(object sender, EventArgs e)
{
shapesPrintDocument.Print();
}
// Display a print preview.
private void previewButton_Click(object sender, EventArgs e)
{
shapesPrintPreviewDialog.ShowDialog();
}
NOTE
Unfortunately, there isn't room in this lesson to really get into the drawing routines that you use to generate fancier printouts. For a more complete introduction to graphics programming in C#, see my PDF-format Wrox Blox C# Graphics Programming available at www.wrox.com/WileyCDA/WroxTitle/productCd-0470343494.html.
Drawing Text
To draw shapes, the Print Shapes program described in the preceding section calls the e.Graphics object's DrawRectangle and DrawEllipse methods. Printing text is similar except you use the DrawString method.
Example program Print Text uses the following code to print the page number centered on four pages:
// Print immediately.
private void printButton_Click(object sender, EventArgs e)
{
PageNumber = 1;
shapesPrintDocument.Print();
}
// Display a print preview.
private void previewButton_Click(object sender, EventArgs e)
{
PageNumber = 1;
shapesPrintPreviewDialog.ShowDialog();
}
// The page number.
private int PageNumber;
// Draw some shapes.
private void shapesPrintDocument_PrintPage(object sender,
System.Drawing.Printing.PrintPageEventArgs e)
{
e.Graphics.SmoothingMode = SmoothingMode.AntiAlias;
// Draw the page number centered on the form.
using (Font font = new Font("Helvitca", 400))
{
using (StringFormat format = new StringFormat())
{
format.Alignment = StringAlignment.Center;
format.LineAlignment = StringAlignment.Center;
int x = e.MarginBounds.Left + e.MarginBounds.Width / 2;
int y = e.MarginBounds.Top + e.MarginBounds.Height / 2;
e.Graphics.DrawString(PageNumber.ToString(),
font, Brushes.Blue, x, y, format);
}
}
// If this is page 4, we're done.
e.HasMorePages = (++PageNumber <= 4);
}
The Print and Print Preview buttons' event handlers first set the class-level variable PageNumber to 1 to indicate that the next page to print is page 1. The button event handlers then start the printing or preview process.
The PrintPage event handler sets the Graphics object's SmoothingMode property and creates a really big font. It then creates a StringFormat object, which it can use to arrange text. In this example, it sets the object's Alignment and LineAlignment properties to center the text vertically and horizontally.
The code then finds the center of the printed page and calls DrawString to draw the page number. The code finishes by incrementing PageNumber and setting HasMorePages to true if the new value of PageNumber is less than or equal to 4. Figure 30.2 shows the program's preview displaying four pages at a time.
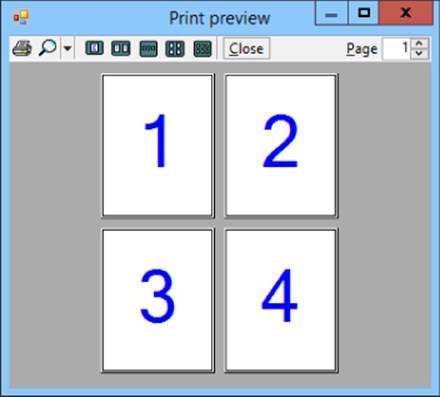
Figure 30.2
WPF Printing
To print in a Windows Forms application, a program catches a PrintDocument object's PrintPage event handler and uses its e.Graphics parameter to generate graphics for each page of the printout. WPF uses a different printing model that many programmers find more intuitive. Instead of responding to PrintPage events, a WPF program's code can directly print visual objects that it draws using WPF controls such as Label and TextBox. You create some sort of container; place Label, TextBox, and other controls on it; and then print the container.
In addition to being easier to understand, this approach has a couple of other benefits. For example, it lets the program use the same kind of code to display and print data. In Windows Forms, a program uses controls such as TextBox and Label to display text on the screen but it uses a Graphics object's DrawString method to draw text on a printout. WPF uses the same kinds of TextBox and Label objects for both display and printing.
WPF also allows you to zoom in as much as you like without creating a pixelated result. That means, for example, you can enlarge a window as much as you like for a printout and you'll still see a smooth result.
The following sections give more details explaining how to print in WPF applications.
Printing Visuals
In WPF, a PrintDialog object starts the printing process. This object can display a printer selection dialog and provides a PrintVisual method that prints visual objects.
Although your code can simply call PrintVisual to send output to the default printer immediately, most programs first display the dialog so the user can select a printer. To do that, the program creates a PrintDialog object and calls its ShowDialog method. If the user selects a printer and clicks Print, ShowDialog returns true and the program can then call the dialog's PrintVisual method, passing it the visual object to print.
For example, the Print Window program shown in Figure 30.3 uses the following code to print an image of its main window:
// Print the window.
private void printButton_Click(object sender, RoutedEventArgs e)
{
// Display the print dialog and
check the result.
PrintDialog printDialog =
new PrintDialog();
if (printDialog.ShowDialog() == true)
{
// Print.
printDialog.PrintVisual(this, "Print Window Image");
}
}
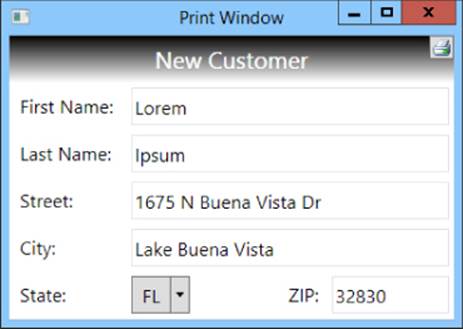
Figure 30.3
The code creates a PrintDialog object and calls its ShowDialog method. If ShowDialog returns true (indicating that the user clicked the dialog's Print button), the code calls the dialog's PrintVisual method, passing it the parameter this (indicating that it should print the current window). It also passes PrintVisual a descriptive title for the printer to display in its user interface.
This code is simple and produces a high-resolution result, but it has a big drawback: the result appears in the page's upper-left corner. It might be nice to center the image and possibly scale it to use more of the paper.
The simplicity of the previous code may make it seem like fixing these problems would be hard. Where in that code is there room for these sorts of changes?
Fortunately, WPF provides two features that make this problem much easier to solve than you might think:
· First, it provides transformations that let you scale, rotate, and translate images easily.
· Second, it lets you easily place most graphical objects inside other graphical objects.
Instead of trying to modify the window's image, you can place the image inside other controls such as a Grid or Viewbox. Then you can transform those controls to fit properly on the printed page.
Example program Print Window Centered uses the following code to print an image of the window centered on the page. Admittedly this code is a lot longer than the previous version, but it's not as complicated as it seems at first glance.
// Print an image of the window centered.
private void printButton_Click(object sender, RoutedEventArgs e)
{
PrintDialog printDialog = new PrintDialog();
if (printDialog.ShowDialog() == true)
{
PrintWindowCentered(printDialog, this, "New Customer", null);
}
}
// Print a Window centered on the printer.
private void PrintWindowCentered(PrintDialog printDialog, Window win,
String title, Thickness? margin)
{
// Make a Grid to hold the contents.
Grid drawingGrid = new Grid();
drawingGrid.Width = printDialog.PrintableAreaWidth;
drawingGrid.Height = printDialog.PrintableAreaHeight;
// Make a Viewbox to stretch the result if necessary.
Viewbox viewbox = new Viewbox();
drawingGrid.Children.Add(viewbox);
viewbox.HorizontalAlignment = HorizontalAlignment.Center;
viewbox.VerticalAlignment = VerticalAlignment.Center;
if (margin == null)
{
// Center without resizing.
viewbox.Stretch = Stretch.None;
}
else
{
// Resize to fit the margin.
viewbox.Margin = margin.Value;
viewbox.Stretch = Stretch.Uniform;
}
// Make a VisualBrush holding an image of the Window's contents.
VisualBrush br = new VisualBrush(win);
// Make a Rectangle the size of the Window.
Rectangle windowRect = new Rectangle();
viewbox.Child = windowRect;
windowRect.Width = win.Width;
windowRect.Height = win.Height;
windowRect.Fill = br;
windowRect.Stroke = Brushes.Black;
windowRect.Effect = new DropShadowEffect();
// Arrange to produce output.
Rect rect = new Rect(0, 0,
printDialog.PrintableAreaWidth, printDialog.PrintableAreaHeight);
drawingGrid.Arrange(rect);
// Print it.
printDialog.PrintVisual(drawingGrid, title);
}
NOTE
This code adds a DropShadowEffect behind the grid. That class is defined in the System.Windows.Media.Effects namespace, so to make using it easier, the program includes the following using directive:
using System.Windows.Media.Effects;
When you click the Print button, the program displays a PrintDialog as before. If you select a printer and click Print, the program calls the PrintWindowCentered method, passing it the PrintDialog object and the Window to print. It also passes the method a title to use for the printout and a margin (which can be null).
The PrintWindowCentered method makes a Grid that fills the printer's printable area. Inside the Grid it places a Viewbox named viewbox. A Viewbox displays a single object that it can optionally stretch in various ways.
If the method receives a margin parameter, the program sets the Viewbox's margin appropriately and makes the control stretch its contents so they are as large as possible without changing shape. If the margin parameter is null, the code makes the Viewbox not stretch its contents.
Next the code makes a VisualBrush from the Window. A VisualBrush fills an area with the image of some visual object such as a control or, in this case, the program's main Window. The code creates a Rectangle, places it inside the Viewbox, and fills it with the brush.
At this point, all of the objects needed to display the Window appropriately sized and centered on the printed page are in place. The code only needs to perform two more steps.
First, it calls the Grid's Arrange method to make its children arrange themselves. Second, the code calls the PrintDialog's PrintVisual method to print the Grid.
Figure shows a preview of the result. To make this figure, I printed the Window into an XML Paper Specification (XPS) file by selecting the Microsoft XPS Document Writer from the PrintDialog. I then double-clicked the XPS file to display it in the XPS Viewer shown inFigure 30.4. You can see in the figure that the Window's image is centered.
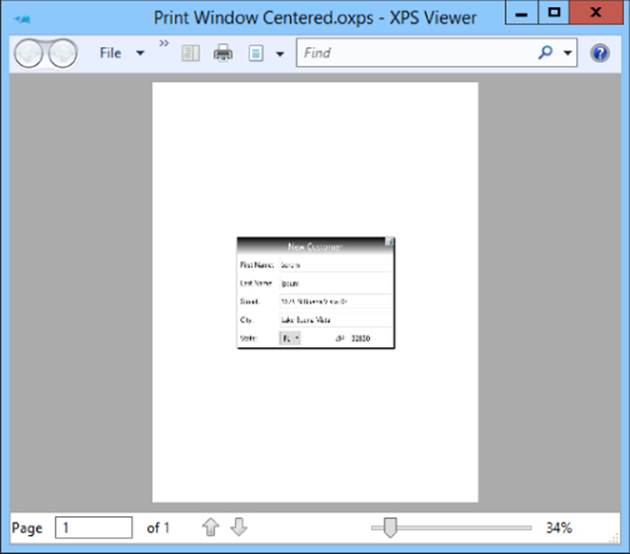
Figure 30.4
In Figure 30.4 the image of the window looks a bit grainy and pixelated, but that's caused by the way the XPS Viewer displays the document. The document itself was generated at a very high resolution. In Figure 30.5 the viewer has enlarged the document by 265 percent, so you can see that the result is actually very smooth and the final printout can take advantage of the printer's relatively high resolution.

Figure 30.5
The Print Window Enlarged example program is similar to the Print Window Centered program except it uses the following code to pass a Thickness object to the PrintWindowCentered method to use as a margin. That makes the method stretch the Window's image to fill the printable area minus a 50-pixel margin.
// Print an image of the window centered and stretched to fill the page.
private void printButton_Click(object sender, RoutedEventArgs e)
{
PrintDialog printDialog = new PrintDialog();
if (printDialog.ShowDialog() == true)
{
PrintWindowCentered(printDialog, this, "New Customer",
new Thickness(50));
}
}
Figure 30.6 shows the result. Notice that the Window's image is centered and enlarged to fill most of the printable area.

Figure 30.6
In addition to the PrintVisual method, the PrintDialog class provides a PrintDocument method that prints multipage output or document objects such as FlowDocuments or FixedDocuments. Unfortunately these topics are fairly complex, so they're not described here. If you need those capabilities, you can find more information online at:
· PrintDocument—msdn.microsoft.com/library/system.windows.controls.printdialog.printdocument.aspx
· FixedDocument—msdn.microsoft.com/library/system.windows.documents.fixeddocument.aspx
· FlowDocument—msdn.microsoft.com/library/system.windows.documents.flowdocument.aspx
Try It
In this Try It, you build a program that prints and displays a preview of the table shown in Figure 30.7. You build an array of Student objects and then loop through them, displaying their values as shown in the figure.

Figure 30.7
Lesson Requirements
In this lesson, you:
· Start a new Windows Forms project and create the program's main form. Add PrintDocument and PrintPreviewDialog components to do the printing and previewing.
· Add Print and Preview buttons with appropriate event handlers.
· Add a Student class with FirstName and LastName properties. Also give it a TestScores property that is an array of integers.
· Create the PrintPage event handler.
· Create an array of Student objects. Initialize them using array and object initializers.
· Loop through the Student objects, printing them.
· Draw a rectangle around the table.
NOTE
You can download the code and resources for this lesson from the website at www.wrox.com/go/csharp24hourtrainer2e.
Hints
· Don't forget to set the PrintPreviewDialog's Document property, to the PrintDocument component.
· This example doesn't do anything fancy with Student properties, so they can be auto-implemented.
· It might help to define variables x0, x1, and so on to keep track of where each column should begin.
Step-by-Step
· Start a new Windows Forms project and create the program's main form. Add PrintDocument and PrintPreviewDialog components to do the printing and previewing.
1. This is reasonably straightforward.
· Add Print and Preview buttons with appropriate event handlers.
1. Use code similar to the following:
2. // Display a print preview.
3. private void previewButton_Click(object sender, EventArgs e)
4. {
5. textPrintPreviewDialog.ShowDialog();
6. }
7. // Print.
8. private void printButton_Click(object sender, EventArgs e)
9. {
10. textPrintDocument.Print();
}
· Add a Student class with FirstName and LastName properties. Also give it a TestScores property that is an array of integers.
1. Use code similar to the following:
2. class Student
3. {
4. public string FirstName { get; set; }
5. public string LastName { get; set; }
6. public int[]TestScores { get; set; }
}
· Create the PrintPage event handler.
· Create an array of Student objects. Initialize them using array and object initializers.
· Loop through the Student objects, printing them.
· Draw a rectangle around the table.
4. Use code similar to the following:
5. // Print the table.
6. private void textPrintDocument_PrintPage(object sender,
7. System.Drawing.Printing.PrintPageEventArgs e)
8. {
9. // Make some data.
10. Student[] students =
11. {
12. new Student() {FirstName="Ann", LastName="Archer",
13. TestScores=new int[] {91, 92, 93, 94}},
14. new Student() {FirstName="Bob", LastName="Blarth",
15. TestScores=new int[] {81, 82, 83, 84}},
16. new Student() {FirstName="Cyd", LastName="Carter",
17. TestScores=new int[] {71, 72, 73, 74}},
18. new Student() {FirstName="Dan", LastName="Deever",
19. TestScores=new int[] {61, 62, 63, 64}},
20. };
21. // Set the coordinates for the first row and the columns.
22. int y = e.MarginBounds.Top;
23. int x0 = e.MarginBounds.Left;
24. int x1 = x0 + 200;
25. int x2 = x1 + 100;
26. int x3 = x2 + 100;
27. int x4 = x3 + 100;
28. // Make a font to use.
29. using (Font font = new Font("Times New Roman", 20))
30. {
31. // Draw column headers.
32. e.Graphics.DrawString("Name", font, Brushes.Black, x0, y);
33. e.Graphics.DrawString("Test 1", font, Brushes.Black, x1, y);
34. e.Graphics.DrawString("Test 2", font, Brushes.Black, x2, y);
35. e.Graphics.DrawString("Test 3", font, Brushes.Black, x3, y);
36. e.Graphics.DrawString("Test 4", font, Brushes.Black, x4, y);
37. // Move Y down for the first row.
38. y += 30;
39. // Loop through the Students displaying their data.
40. foreach (Student student in students)
41. {
42. // Display the Student's values.
43. e.Graphics.DrawString(student.FirstName + " " +
44. student.LastName, font, Brushes.Black, x0, y);
45. e.Graphics.DrawString(student.TestScores[0].ToString(),
46. font, Brushes.Black, x1, y);
47. e.Graphics.DrawString(student.TestScores[1].ToString(),
48. font, Brushes.Black, x2, y);
49. e.Graphics.DrawString(student.TestScores[2].ToString(),
50. font, Brushes.Black, x3, y);
51. e.Graphics.DrawString(student.TestScores[3].ToString(),
52. font, Brushes.Black, x4, y);
53. // Move Y down for the next row.
54. y += 30;
55. }
56. }
57. // Draw a box around it all.
58. e.Graphics.DrawRectangle(Pens.Black,
59. x0, e.MarginBounds.Top,
60. x4 - x0 + 100,
61. y - e.MarginBounds.Top);
62. // We're only printing one page.
63. e.HasMorePages = false;
}
Exercises
1. Copy the program you built in this lesson's Try It and add lines between the rows and columns.
2. Make a program that prints a bar chart similar to the one shown in Figure 30.8. (Hint: Pick some “random” values for the bars.)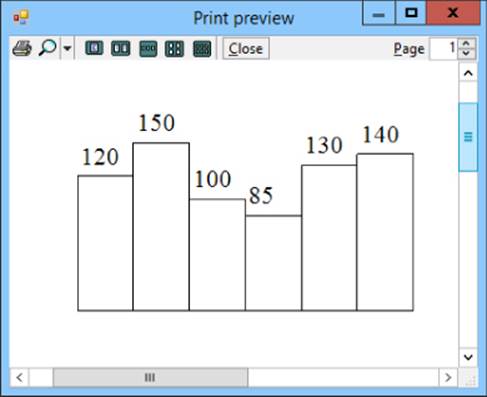
Figure 30.8
3. Copy the program you built for Exercise 2 and modify it so the textual values are centered over their bars. (Hint: Use a StringFormat object.)
4. Build a program that contains a DataGridView control with the columns Item, Quantity, Unit price, and Total. Make Print and Preview menu items that display the data in the grid.
Add PrintDocument and PrintPreviewDialog controls as usual. The PrintPage event handler should:
a. Call the grid's EndEdit method to commit the current edit (if there is one).
b. Loop through the grid's Columns collection, displaying the column headers. Add each column's Width value to the X coordinate for the next column.
c. Loop through the grid's Rows collection. For each row, loop through the row's Cells collection, displaying the cells' FormattedValue property.
5. Copy the program you built for Exercise 4, add lines between the rows and columns, and draw a box around the table.
6. Copy the Print Window Enlarged program described in this lesson (and available in this lesson's downloads). Modify it so it prints the Window sideways to fill more of the printed page.
Hints: This is a lot easier than it sounds. Modify the PrintWindowCentered method so it uses the page's printable width and height for the drawing grid's height and width, respectively. Then set the grid's LayoutTransform property to a RotateTransform object that rotates it by 90°. The code that creates the grid should look like this:
Grid drawingGrid = new Grid();
drawingGrid.Width = printDialog.PrintableAreaHeight;
drawingGrid.Height = printDialog.PrintableAreaWidth;
drawingGrid.LayoutTransform = new RotateTransform(90);
7. [WPF] The WPF examples described in this lesson print images of a Window, but similar techniques work with any visual object such as a Grid, StackPanel, or TextBox.
For this exercise, build a WPF program that contains a TabControl. Give that control three TabItem children. Set each TabItem's Header property and place a Grid inside it. Place some Labels, TextBoxes, and other controls inside the Grids. Finally, give each tab a Print button. (If you don't want to build the controls yourself, download the Exercise 30-7a program available in this lesson's downloads as a starting point. That project defines the user interface but none of the code.)
To print, use the PrintWindowCentered method used by the earlier example programs with a few changes:
· Change the method's name to PrintGridCentered.
· Make the method take a Grid as a parameter instead of a Window.
· The Grid control doesn't have a set width or height, so its Width and Height properties don't return meaningful values. Use the ActualWidth and ActualHeight properties instead.
· To avoid repeating code, write a PrintGrid method that takes as parameters a Grid, title string, and Thickness. It should display a PrintDialog and, if the user clicks Print, it should call PrintGridCentered to do the actual printing.
8. Make a Windows Forms program that previews and prints four pages containing the following shapes outlined in 10-pixel wide lines:
· Red rectangle
· Green ellipse
· Blue triangle
· Purple diamond
Make the shapes as large as possible inside the page's margins and outline the page's margins with a dashed black line.
Hints: To draw the triangle and diamond, use the DrawPolygon method with an array of Point. You can use a single Pen for all of the drawing by changing its Color and DashStyle properties as needed.
9. [Hard] Suppose you're making a booklet and you want to indent odd numbered pages on the left and even pages on the right to make room for the stapled binding. (That extra alternating indentation is called a “gutter.”) Make a Windows Forms program that prints or previews 10 pages with a 100-unit gutter. Draw boxes around the pages' margins and display the page number just inside the margins in the upper corner on the side opposite the gutter.
Hints:
· Use the PrintDocument's QueryPageSettings event to set the margins. It should handle three cases:
§ For the first page, add 100 to e.PageSettings.Margins.Left.
§ For subsequent odd pages, add 100 to the left margin and subtract 100 from the right margin.
§ For even pages, subtract 100 from the left margin and add 100 to the right margin.
· Use a StringFormat object's Alignment and LineAlignment properties to position the page numbers.
Keep in mind that QueryPageSettings works with margins, not bounds. For example, adding 100 to the right margin moves the right edge of the margin bounds 100 units farther from the edge of the page. (Yes, this can be confusing.)
NOTE
Please select the videos for Lesson 30 online at www.wrox.com/go/csharp24hourtrainer2evideos.