C# 24-Hour Trainer (2015)
Section VII
Specialized Topics
Most of the lessons so far have dealt with general programming topics. For example, every desktop application needs to use controls and most also need to use variables, classes, and files.
The lessons in this section explain more specialized topics. They describe ideas and techniques that you won't need for every program you write, although you will still find them useful under many circumstances.
· Lesson 33: Localizing Programs
· Lesson 34: Programming Databases, Part 1
· Lesson 35: Programming Databases, Part 2
· Lesson 36: LINQ to Objects
· Lesson 37: LINQ to SQL
Lesson 33
Localizing Programs
Many programmers write applications that are used only in their countries. It's easy enough to find plenty of customers for a small application without looking for customers long distance.
However, the world has grown smaller in the past few decades, and it's not too hard to provide programs for people all over the world. Customers can download your software over the Internet and pay for it using online payment systems in a matter of minutes. Web applications that run in a browser are even more likely to be used by people all over the world.
With such a potentially enormous market, it makes sense in some cases to make programs accessible to people in different countries, particularly since C# and Visual Studio make it relatively easy.
In this lesson, you learn how to make a program accessible to customers in other countries with different cultures. You learn how to make multiple interfaces for a program so users can work in their own languages. You also learn how to work with values such as currencies and dates that have different formats in different locales.
WARNING
Localization is a huge topic so there isn't room to cover everything there is to know about it here. In particular, you should always get a native of a particular locale to help in localizing your application whenever possible. Unless you are extremely well versed in a locale's language, customs, and idioms, it's very easy to make sometimes embarrassing mistakes. (For examples, search the Internet for “funny translation mistakes” to see hundreds if not thousands of cases where someone thought they didn't need help from a native speaker. One of my favorites is, “Do not disturb. Tiny grass is dreaming.”)
Note that I am not fluent in all of the locales that this lesson uses. I used the Babel Fish automatic translation tool at www.babelfish.com to make the simple translations shown here. You can use Babel Fish or a similar tool for practice and for this lesson's exercises, but you should get human help before releasing a program to users.
Understanding Localization
A computer's locale is a setting that defines the user's language, country, and cultural settings that determine such things as how dates and monetary values are formatted. For example, the Format Values example program shown in Figure 33.1 (and available in this lesson's downloads) displays the same values in American, British, German, and French locales.
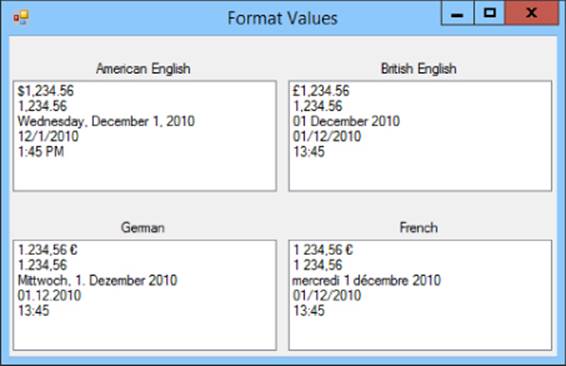
Figure 33.1
If you look closely at Figure 33.1, you can see that the same values produce very different results in the different locales. For example, the value 1234.56 displayed as currency appears variously as:
· $1,234.56
· £1,234.56
· 1.234,56 €
· 1 234,56 €
Not only do these results use different currency symbols, but they even use different decimal and thousands separators.
NOTE
Globalization is the process of building an application that can be used by users from different cultures.
Localization is the process of customizing a globalized application for a specific culture.
Localizing an application involves two main steps: building a localized user interface and processing locale-specific values.
Building Localized Interfaces
At first this may seem like a daunting task. How do you build completely separate interfaces for multiple locales? Fortunately this is one thing that C# and Visual Studio do really well (at least for Windows Forms applications).
To build a globalized program, start by creating the form as usual. Add controls and set their properties as you want them to appear by default.
After you've defined the program's default appearance, you can localize it for other locales. To do that, set the form's Localizable property to true. Then select a new locale from the dropdown list provided by the form's Language property. Now modify the form to handle the new locale. You can change control properties such as the text they display. You can also move controls around and change their sizes, which is particularly important because the same text may take up a different amount of room in different languages.
At run time, the program automatically checks the computer's locale settings and picks the program's localization that gives the closest match.
Note that many languages have several sub-locales. For example, English comes in the varieties used in India, Ireland, New Zealand, and more than a dozen other locales.
There's also locale listed simply as “English.” If the user's computer is set up for one of the English locales that the program doesn't support, the program falls back to the generic English locale. If the program can't support that locale either, it uses the default locale that you used when you initially created the form.
The Localized Weekdays example program (available in this lesson's code download) is localized for English (the form's default) and German. Figure 33.2 shows the form's English interface and Figure 33.3 shows its German interface.
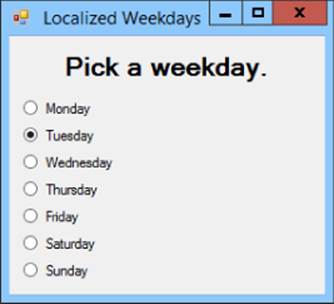
Figure 33.2
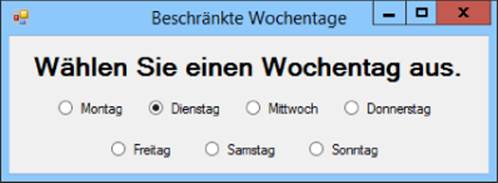
Figure 33.3
Testing Localizations
Having the program check the computer's locale automatically at run time is convenient for the user but it makes testing different locales tricky.
One way to force the program to pick a particular locale so you can test it is to select the locale in code. You must do this before the form is initialized because after that point the form's text and other properties are already filled in and setting the locale won't reload the form.
When you create a form, Visual Studio automatically creates a constructor for it that calls the InitializeComponent function. Place your code before the call to InitializeComponent.
The following code shows how the Localized Weekdays program explicitly selects either the English or the German locale:
using System.Threading;
using System.Globalization;
...
public Form1()
{
// English.
//Thread.CurrentThread.CurrentCulture =
// new CultureInfo("en-US", false);
//Thread.CurrentThread.CurrentUICulture =
// new CultureInfo("en-US", false);
// German.
Thread.CurrentThread.CurrentCulture =
new CultureInfo("de-DE", false);
Thread.CurrentThread.CurrentUICulture =
new CultureInfo("de-DE", false);
InitializeComponent();
}
This code contains statements that set the locale to English or German. Simply comment out the one that you don't want to use for a given test.
NOTE
For a list of more than 100 culture values that you can use in code, such as en-US and de-DE, see msdn.microsoft.com/library/ee825488.aspx.
Setting the CurrentCulture makes the program use locale-specific methods when processing dates, currency, numbers, and other values in the code. Setting the CurrentUICulture makes the program load the appropriate user interface elements for the form.
NOTE
After you finish testing a form's localized version, be sure to remove the code that selects the culture so the program can use the system's settings. Otherwise you may end up with some very confused users.
Processing Locale-Specific Values
Inside C# code, variables are stored in American English formats. To avoid confusion, Microsoft decided to pick one locale for code values and stick with it.
When you move data in and out of the program, however, you need to be aware of the computer's locale. For example, suppose the program uses the following code to display an order's due date:
dueDateTextBox.Text = dueDate.ToString("MM/dd/yy")
If the date is November 20, 2010, this produces the result “11/20/10,” which makes sense in the United States but should be “20/11/10” in France and “20.11.10” in Germany.
The problem is that the program uses a custom date format that is hard-coded to use an American-style date format. To produce a format appropriate for the user's system, you should use standard date, time, and other formats whenever possible. The following code uses the standard short date format:
dueDateTextBox.Text = dueDate.ToString("d")
This produces “11/20/2010” on an American system and “20/11/2010” on a French system.
You can run into the same problem if you assume the user will enter values in a particular format. For example, suppose you want to get the whole number part of the value 1,234.56 entered by the user. If you assume the decimal separator is a period and just use whatever comes before it as the integer part, then you'll get the answer 1 when a German user enters “1.234,56” and the program will crash when a French user enters the value “1 234.56.”
To avoid this problem, use locale-aware functions such as the numeric classes' Parse methods to read values entered by the user. In this example, a good solution is to use float.Parse to read the value and then truncate it as shown in the following code:
value = (int)float.Parse(valueTextBox.Text);
For a list of standard numeric formats, see msdn.microsoft.com/library/dwhawy9k.aspx.
For a list of standard date and time formats, see msdn.microsoft.com/library/az4se3k1.aspx.
For more information on parsing strings, see msdn.microsoft.com/library/b4w53z0y.aspx.
NOTE
Previous lessons have shown how to use Parse methods to parse currency values. For example, the following statement parses a currency value entered by the user:
value = decimal.Parse(valueLabel.Text, NumberStyles.Any);
This isn't completely foolproof. If the user has a German system but types a value in a French format, the program will crash, but it seems reasonable to ask a German user to enter German values.
The Localized Parsing example program shown in Figure 33.4 (and available in this lesson's code download) parses currency values displayed in labels in different languages, doubles the parsed decimal values, and displays the results. For each language, it selects the appropriate culture so it can parse and display the correct formats.
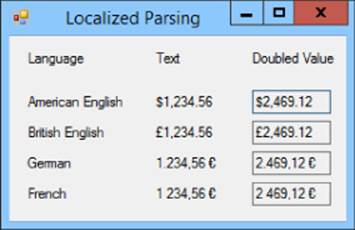
Figure 33.4
Try It
In this Try It, you write the program shown in Figures 33.5 and 33.6, which lets you select foreground and background colors in American English and Mexican Spanish.
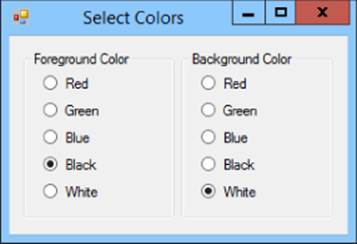
Figure 33.5
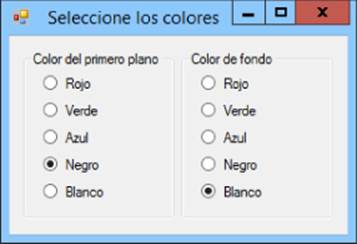
Figure 33.6
Lesson Requirements
In this lesson, you:
· Build the default interface.
· Add code to handle the RadioButtons' Click events.
· Localize the application for Mexican Spanish.
· Add code to let you test the form for either locale.
NOTE
You can download the code and resources for this lesson from the website at www.wrox.com/go/csharp24hourtrainer2e.
Hints
· There's no need to build a separate event handler for each RadioButton. Use one event handler for all of the foreground buttons and one for all of the background buttons.
· These event handlers must figure out which button was clicked, but they cannot use the buttons' text because that will change depending on which locale is selected. They could use the buttons' names because they don't change, but it's even easier to store the corresponding colors' names in their Tag properties and then use the Color class's FromName method to get the appropriate Color.
Step-by-Step
· Build the default interface.
1. Build a form that looks like the one shown in Figure 33.5.
2. Store the color names (red, green, blue, and so forth) in the RadioButtons' Tag properties.
· Add code to handle the RadioButtons' Click events.
1. Write an event handler similar to the following:
2. // Set the foreground color.
3. private void Foreground_Click(object sender, EventArgs e)
4. {
5. // Get the sender as a RadioButton.
6. RadioButton rad = sender as RadioButton;
7. // Use the color.
8. Color clr = Color.FromName(rad.Tag.ToString());
9. this.ForeColor = clr;
10. fgGroupBox.ForeColor = clr;
11. bgGroupBox.ForeColor = clr;
}
This code converts the sender object into a RadioButton and uses its Tag property to get the corresponding color. It then applies that color to the form and the two GroupBoxes.
12.Connect the foreground RadioButtons to this event handler.
13.Repeat these steps for the background RadioButtons.
· Localize the application for Mexican Spanish.
1. Set the form's Localizable property to true. Click the Language property, click the dropdown arrow to the right, and select “Spanish (Mexico).”
2. Change the controls' Text properties so they have the values shown in Figure 33.6.
· Add code to let you test the form for either locale.
1. Use code similar to the following in the form's constructor:
2. // Select a locale for testing.
3. public Form1()
4. {
5. // English.
6. //Thread.CurrentThread.CurrentCulture =
7. // new CultureInfo("en-US", false);
8. //Thread.CurrentThread.CurrentUICulture =
9. // new CultureInfo("en-US", false);
10. // Spanish.
11. Thread.CurrentThread.CurrentCulture =
12. new CultureInfo("es-MX", false);
13. Thread.CurrentThread.CurrentUICulture =
14. new CultureInfo("es-MX", false);
15. InitializeComponent();
}
Exercises
1. Copy this lesson's Try It and add support for Italian (it-IT) as shown in Figure 33.7. Don't forget to add code to let you test it.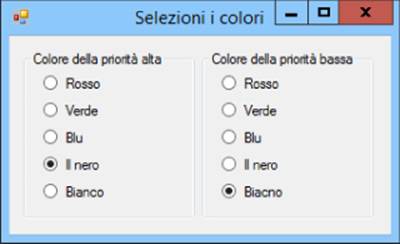
Figure 33.7
2. When a program reads data from a file, it must use the correct locale. Download the files Dutch.txt, German.txt, and English.txt from the book's website and make a program that can read them. The program should let the user select a file, check the filename to see which locale it should use, and select the correct locale. It should read and parse the values into appropriate data types and then display the values in a DataGridView control. Hints:
· Use locale names en-US for English, de-DE for German, and nl-NL for Dutch. Use code similar to the following to select the proper locale before you parse the values:
· Thread.CurrentThread.CurrentCulture =
new CultureInfo("en-US", false);
· The values within a line in the file are separated by tabs, so use File.ReadAllLines to get the lines and Split to break each line into fields.
The following text shows the values in the file Dutch.txt:
Potlood ? 0,10 12 ? 1,20
Blocnote ? 1,10 10 ? 11,00
Laptop ? 1.239,99 1 ? 1.239,99
3. [Hard] Actually you can change a form's localization after it is loaded: it's just somewhat complicated. The following method sets the locale for a form and makes its controls reload their localizable properties:
4. // Set the form's culture.
5. private void SetFormCulture(Form form, string culture)
6. {
7. // Make the CultureInfo.
8. CultureInfo cultureInfo = new CultureInfo(culture);
9. // Make a ComponentResourceManager.
10. ComponentResourceManager resourceManager =
11. new ComponentResourceManager(form.GetType());
12. // Apply resources to the form.
13. resourceManager.ApplyResources(form, "$this", cultureInfo);
14. // Apply resources to the form and its controls.
15. SetControlCulture(form, cultureInfo, resourceManager);
}
The SetFormCulture method creates a CultureInfo object to represent the desired culture. It then creates a ComponentResourceManager for the form and uses it to load the form's localized resources. Resources for use by the form are identified by the special name $this.
The method then calls the following SetControlCulture method for the form:
// Set the control's culture using the indicated
// CultureInfo and ComponentResourceManager.
private void SetControlCulture(Control control,
CultureInfo cultureInfo,
ComponentResourceManager resourceManager)
{
// Apply resources to the control.
resourceManager.ApplyResources(
control, control.Name, cultureInfo);
// Apply resources to the control's children.
foreach (Control child in control.Controls)
SetControlCulture(child, cultureInfo, resourceManager);
}
The SetControlCulture method uses the resource manager to load culture-specific resources for the control. The method uses the control's name to identify the resource values to use. (When SetFormCulture calls this method, it first sets properties for the form. However, the form's resources are stored with the special name $this, so that first call to ApplyResources doesn't do anything.)
After making the control reload its resources, the code loops through the control's children and calls SetControlCulture to reload their resources. This is necessary to handle controls inside containers such as GroupBoxes or TabControls.
Copy the program you wrote for Exercise 1, remove the testing code that selects a locale, and add English, Español, and Italiano RadioButtons to the top of the form. When the user selects one of them, use the SetFormCulture and SetControlCulture methods to make the form use the appropriate localization. (Hint: Store the locale name in the RadioButtons' Tag properties.)
16.Unfortunately some properties are not localizable. For example, you can't localize a PictureBox's Image property. (I asked people at Microsoft about this and they said, “Gee, we never thought anyone would want to localize that.”)
Copy the program you wrote for Exercise 3 and add a PictureBox to display an image of the selected country's flag. Add code to the RadioButtons' Clicked event handler to display the correct flag. (Hint: Add the flag images to the project's resources by selecting Project ![]() Properties, clicking the Resources tab, opening the Add Resource dropdown, and selecting Add Existing File. Then make the code set the PictureBox's Image property to a value such as Properties.Resources.MexicanFlag.)
Properties, clicking the Resources tab, opening the Add Resource dropdown, and selecting Add Existing File. Then make the code set the PictureBox's Image property to a value such as Properties.Resources.MexicanFlag.)
17.[WPF, Hard] To localize a WPF application, follow these steps:
a. Create a new application. In Solution Explorer, expand the Properties entry and double-click Resources.resx.
b. In the resources editor shown in Figure 33.8, create the resources that you want to localize. For example in Figure 33.8, I created a string resource named LeftHeader and set its value to “Foreground Color.”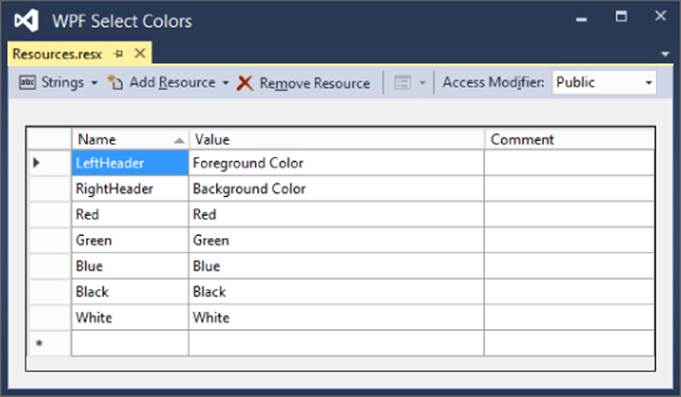
Figure 33.8
c. Set the resource file's Access Modifier (in the upper-right corner in Figure 33.8) to Public.
d. Build the program's XAML code as usual, but use the resources for the values that you want to localize. To make that easier:
i. Add the following statement with the other namespace statements at the top of the XAML code:
xmlns:res=”clr-namespace:WPF_Select_Colors.Properties”
This statement lets you use the name res to represent the application's properties. (In this example, the application's root namespace is WPF_Select_Colors.)
ii. Use code similar to the following to use a resource. The code in bold makes this GroupBox use the value of the LeftHeader resource:
iii. <GroupBox Grid.Row=”0” Grid.Column=”0”
Header="{x:Static res:Resources.LeftHeader}">
To make a resource file for another locale, follow these steps:
i. In Solution Explorer, use Ctrl+C and Ctrl+V to copy and paste the Resources.resx file. Rename it to include the locale identifier as in Resources.es-MX.resx.
ii. Place the localized values in the new resource file.
When the program runs, it will select the appropriate resource file. You can test the program by setting its CurrentCulture and CurrentUICulture in the main window's constructor just as you would for a Windows Forms application.
For this exercise, create a WPF program similar to the program you built for Exercise 1.
Hints:
· Use code similar to the following to convert a color name into a brush:
· Color clr = (Color)ColorConverter.ConvertFromString("Red");
Brush brush = new SolidColorBrush(clr);
· To set the foreground color, you only need to set the window's Background property.
· To set the background color, set the GroupBoxes' Background properties. Then loop through Children collections of the controls (probably StackPanels) that hold the RadioButtons and set the children's Background properties.
18.[WPF, Hard] I have not found a good way to reload a WPF project's resources at run time, but there is a straightforward albeit verbose way. Simply set the application's CurrentCulture and CurrentUICulture as usual. Then use code similar to the following to reload all of the localized properties:
19. fgGroupBox.Header = Properties.Resources.LeftHeader;
20. redFgButton.Content = Properties.Resources.Red;
21. greenFgButton.Content = Properties.Resources.Green;
...
You can place all of those statements in a method to make them easier to call.
Copy the program you wrote for Exercise 5 and modify it so it allows the user to change locales at run time (much as you did for Exercise 3).
22.[WPF] Loading images from resources into WPF controls at run time is relatively difficult, but there's an easy way to localize images. Create multiple Image controls holding the pictures you want to display and then change their Visibility properties at run time. Copy the program you wrote for Exercise 6 and modify it so it displays appropriate flag images when the user changes locales (much as you did for Exercise 4).
NOTE
Please select the videos for Lesson 33 online at www.wrox.com/go/csharp24hourtrainer2evideos.
All materials on the site are licensed Creative Commons Attribution-Sharealike 3.0 Unported CC BY-SA 3.0 & GNU Free Documentation License (GFDL)
If you are the copyright holder of any material contained on our site and intend to remove it, please contact our site administrator for approval.
© 2016-2026 All site design rights belong to S.Y.A.