Microsoft® Visual C#® 2012 Step by Step (2012)
Chapter 1. Welcome to C#
After completing this chapter, you will be able to
§ Use the Microsoft Visual Studio 2012 programming environment.
§ Create a C# console application.
§ Explain the purpose of namespaces.
§ Create a simple graphical C# application.
This chapter provides an introduction to Visual Studio 2012, the programming environment and toolset designed to help you build applications for Microsoft Windows. Visual Studio 2012 is the ideal tool for writing C# code, and it provides many features that you will learn about as you progress through this book. In this chapter, you will use Visual Studio 2012 to build some simple C# applications and get started on the path to building highly functional solutions for Windows.
Beginning Programming with the Visual Studio 2012 Environment
Visual Studio 2012 is a tool-rich programming environment containing the functionality that you need to create large or small C# projects running on Windows 7 and Windows 8. You can even construct projects that seamlessly combine modules written in different programming languages such as C++, Visual Basic, and F#. In the first exercise, you will open the Visual Studio 2012 programming environment and learn how to create a console application.
NOTE
A console application is an application that runs in a command prompt window rather than providing a graphical user interface (GUI).
Create a console application in Visual Studio 2012
§ If you are using Windows 8, on the Start screen click the Visual Studio 2012 tile.
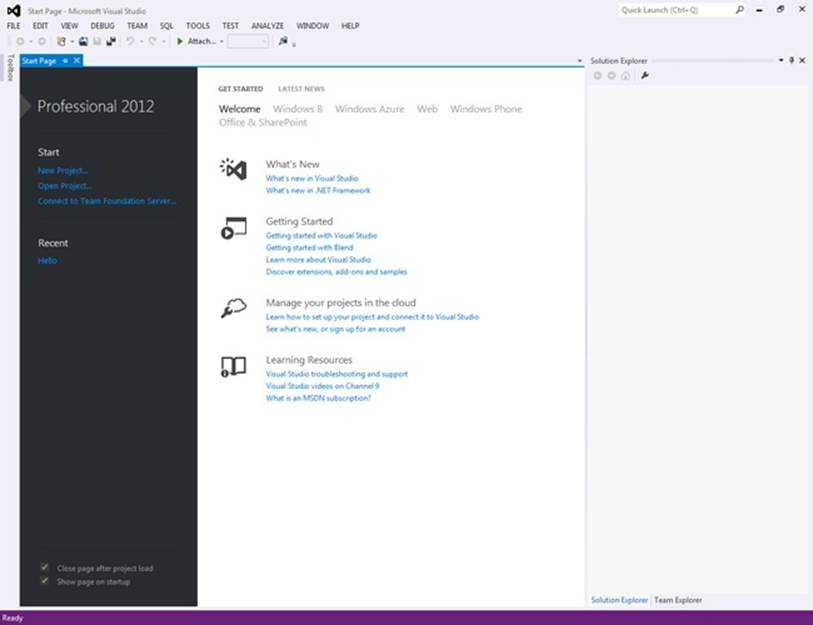
Visual Studio 2012 starts and displays the Start page, like this (your Start page may be different, depending on the edition of Visual Studio 2012 you are using):
NOTE
If this is the first time you have run Visual Studio 2012, you might see a dialog box prompting you to choose your default development environment settings. Visual Studio 2012 can tailor itself according to your preferred development language. The various dialog boxes and tools in the integrated development environment (IDE) will have their default selections set for the language you choose. Select Visual C# Development Settings from the list, and then click the Start Visual Studio button. After a short delay, the Visual Studio 2012 IDE appears.
§ If you are using Windows 7, perform the following operations to start Visual Studio 2012:
1. On the Microsoft Windows taskbar, click the Start button, point to All Programs, and then click the Microsoft Visual Studio 2012 program group.
2. In the Microsoft Visual Studio 2012 program group, click Visual Studio 2012.
§ Visual Studio 2012 starts and displays the Start page.
NOTE
To avoid repetition, throughout this book, I will simply state “Start Visual Studio” when you need to open Visual Studio 2012, regardless of the operating system you are using.
§ Perform the following tasks to create a new console application:
1. On the FILE menu, point to New, and then click Project.
§ The New Project dialog box opens. This dialog box lists the templates that you can use as a starting point for building an application. The dialog box categorizes templates according to the programming language you are using and the type of application.
2. In the left pane, under Templates, click Visual C#. In the middle pane, verify that the combo box at the top of the pane displays the text .NET Framework 4.5, and then click the Console Application icon.
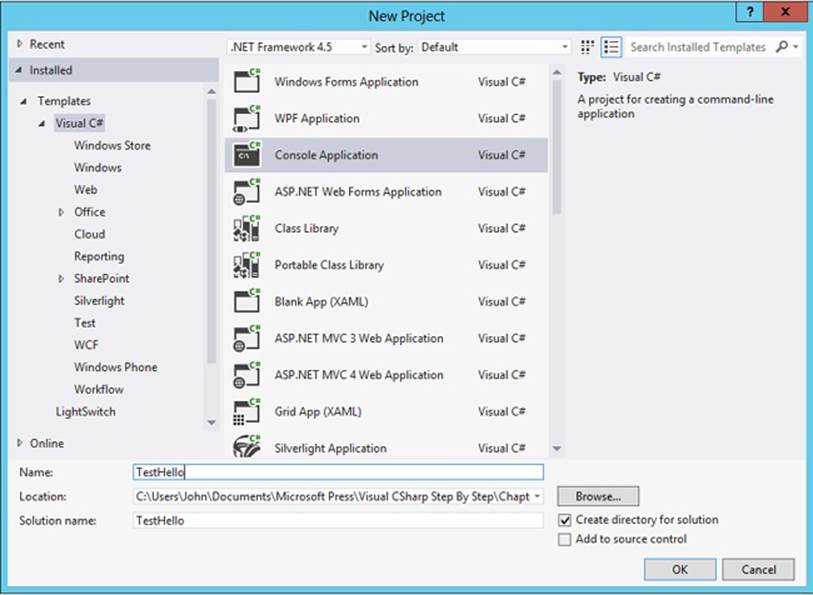
3. In the Location field, type C:\Users\YourName\Documents\Microsoft Press\Visual CSharp Step By Step\Chapter 1. Replace the text YourName in this path with your Windows username.
NOTE
To save space throughout the rest of this book, I will simply refer to the path C:\Users\YourName\Documents as your Documents folder.
TIP
If the folder you specify does not exist, Visual Studio 2012 creates it for you.
4. In the Name field, type TestHello (overtype the existing name, ConsoleApplication1).
5. Ensure that the Create Directory for Solution check box is selected, and then click OK.
Visual Studio creates the project using the Console Application template and displays the starter code for the project, like this:
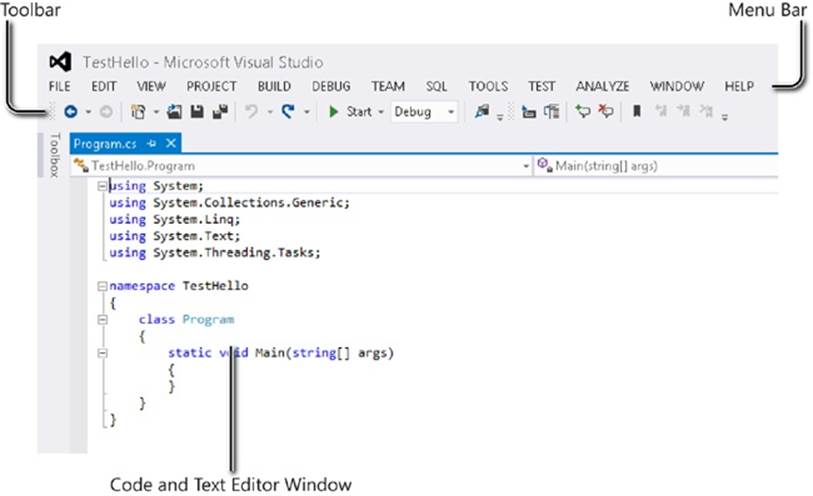
The menu bar at the top of the screen provides access to the features you’ll use in the programming environment. You can use the keyboard or the mouse to access the menus and commands exactly as you can in all Windows-based programs. The toolbar is located beneath the menu bar and provides button shortcuts to run the most frequently used commands.
The Code and Text Editor window occupying the main part of the screen displays the contents of source files. In a multifile project, when you edit more than one file, each source file has its own tab labeled with the name of the source file. You can click the tab to bring the named source file to the foreground in the Code and Text Editor window.
The Solution Explorer pane appears on the right side of the dialog box:
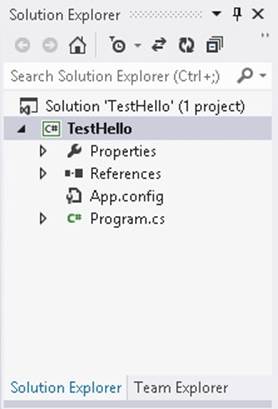
Solution Explorer displays the names of the files associated with the project, among other items. You can also double-click a file name in the Solution Explorer pane to bring that source file to the foreground in the Code and Text Editor window.
Before writing the code, examine the files listed in Solution Explorer, which Visual Studio 2012 has created as part of your project:
o Solution ‘TestHello’. This is the top-level solution file. Each application contains a single solution file. A solution can contain one or more projects, and Visual Studio 2012 creates the solution file to help organize these projects. If you use Windows Explorer to look at your Documents\Microsoft Press\Visual CSharp Step By Step\Chapter 1\TestHello folder, you’ll see that the actual name of this file is TestHello.sln.
o TestHello. This is the C# project file. Each project file references one or more files containing the source code and other artifacts for the project, such as graphics images. All the source code in a single project must be written in the same programming language. In Windows Explorer, this file is actually called TestHello.csproj, and it is stored in the \Microsoft Press\Visual CSharp Step By Step\Chapter 1\TestHello\TestHello folder under your Documents folder.
o Properties. This is a folder in the TestHello project. If you expand it (click the arrow next to the text Properties), you will see that it contains a file called AssemblyInfo.cs. AssemblyInfo.cs is a special file that you can use to add attributes to a program, such as the name of the author, the date the program was written, and so on. You can specify additional attributes to modify the way in which the program runs. Explaining how to use these attributes is beyond the scope of this book.
o References. This folder contains references to libraries of compiled code that your application can use. When your C# code is compiled, it is converted into a library and given a unique name. In the .NET Framework, these libraries are called assemblies. Developers use assemblies to package useful functionality that they have written so they can distribute it to other developers who might want to use these features in their own applications. If you expand the References folder, you can see the default set of references that Visual Studio 2012 adds to your project. These assemblies provide access to many of the commonly used features of the .NET Framework and are provided by Microsoft with Visual Studio 2012. You will learn about many of these assemblies as you progress through the exercises in this book.
o App.config. This is the application configuration file. It is optional, and it may not always be present. You can specify settings that your application can use at runtime to modify its behavior, such as the version of the .NET Framework to use to run the application. You will learn more about this file in later chapters of this book.
o Program.cs. This is a C# source file, and it is displayed in the Code and Text Editor window when the project is first created. You will write your code for the console application in this file. It also contains some code that Visual Studio 2012 provides automatically, which you will examine shortly.
Writing Your First Program
The Program.cs file defines a class called Program that contains a method called Main. In C#, all executable code must be defined inside a method, and all methods must belong to a class or a struct. You will learn more about classes in Chapter 7, and you will learn about structs in Chapter 9
The Main method designates the program’s entry point. This method should be defined in the manner specified in the Program class, as a static method, otherwise the .NET Framework may not recognize it as the starting point for your application when you run it. (You will look at methods in detail in Chapter 3, and Chapter 7 provides more information on static methods.)
IMPORTANT
C# is a case-sensitive language. You must spell Main with an uppercase M.
In the following exercises, you write the code to display the message “Hello World!” to the console window; you build and run your Hello World console application; and you learn how namespaces are used to partition code elements.
Write the code by using Microsoft IntelliSense
1. In the Code and Text Editor window displaying the Program.cs file, place the cursor in the Main method immediately after the opening brace, {, and then press Enter to create a new line.
2. On the new line, type the word Console; this is the name of another class provided by the assemblies referenced by your application. It provides methods for displaying messages in the console window and reading input from the keyboard.
As you type the letter C at the start of the word Console, an IntelliSense list appears.
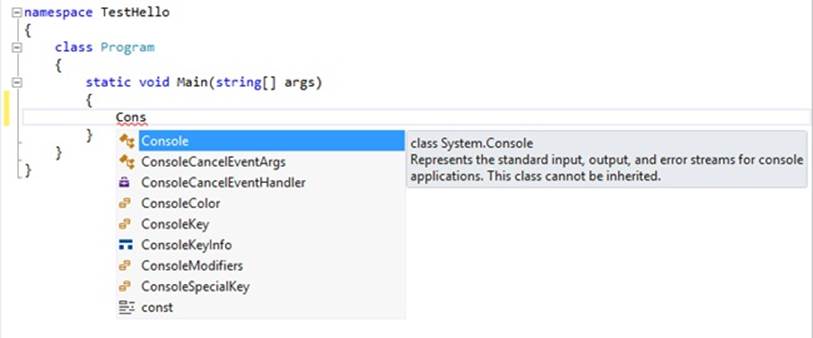
This list contains all of the C# keywords and data types that are valid in this context. You can either continue typing or scroll through the list and double-click the Console item with the mouse. Alternatively, after you have typed Cons, the IntelliSense list automatically homes in on theConsole item, and you can press the Tab or Enter key to select it.
Main should look like this:
static void Main(string[] args)
{
Console
}
NOTE
Console is a built-in class.
3. Type a period immediately after Console. Another IntelliSense list appears, displaying the methods, properties, and fields of the Console class.
4. Scroll down through the list, select WriteLine, and then press Enter. Alternatively, you can continue typing the characters W, r, i, t, e, L until WriteLine is selected, and then press Enter.
The IntelliSense list closes, and the word WriteLine is added to the source file. Main should now look like this:
static void Main(string[] args)
{
Console.WriteLine
}
5. Type an opening parenthesis, (. Another IntelliSense tip appears.
This tip displays the parameters that the WriteLine method can take. In fact, WriteLine is an overloaded method, meaning that the Console class contains more than one method named WriteLine—it actually provides 19 different versions of this method. Each version of the WriteLinemethod can be used to output different types of data. (Chapter 3 describes overloaded methods in more detail.) Main should now look like this:
static void Main(string[] args)
{
Console.WriteLine(
}
TIP
You can click the up and down arrows in the tip to scroll through the different overloads of WriteLine.
6. Type a closing parenthesis, ), followed by a semicolon, ;.
Main should now look like this:
static void Main(string[] args)
{
Console.WriteLine();
}
7. Move the cursor, and type the string “Hello World!”, including the quotation marks, between the left and right parentheses following the WriteLine method.
Main should now look like this:
static void Main(string[] args)
{
Console.WriteLine("Hello World!");
}
TIP
Get into the habit of typing matched character pairs, such as ( and ) and { and }, before filling in their contents. It’s easy to forget the closing character if you wait until after you’ve entered the contents.
INTELLISENSE ICONS
When you type a period after the name of a class, IntelliSense displays the name of every member of that class. To the left of each member name is an icon that depicts the type of member. Common icons and their types include the following:
|
Icon |
Meaning |
|
|
Method (discussed in Chapter 3) |
|
|
Property (discussed in Chapter 15) |
|
|
Class (discussed in Chapter 7) |
|
|
Struct (discussed in Chapter 9) |
|
|
Enum (discussed in Chapter 9) |
|
|
Extension method (discussed in Chapter 12) |
|
|
Interface (discussed in Chapter 13) |
|
|
Delegate (discussed in Chapter 17) |
|
|
Event (discussed in Chapter 17) |
|
|
Namespace (discussed in the next section of this chapter) |
You will also see other IntelliSense icons appear as you type code in different contexts.
You will frequently see lines of code containing two forward slashes, //, followed by ordinary text. These are comments. They are ignored by the compiler but are very useful for developers because they help document what a program is actually doing. For example:
Console.ReadLine(); // Wait for the user to press the Enter key
The compiler skips all text from the two slashes to the end of the line. You can also add multiline comments that start with a forward slash followed by an asterisk (/*). The compiler skips everything until it finds an asterisk followed by a forward slash sequence (*/), which could be many lines lower down. You are actively encouraged to document your code with as many meaningful comments as necessary.
Build and run the console application
1. On the BUILD menu, click Build Solution.
This action compiles the C# code, resulting in a program that you can run. The Output window appears below the Code and Text Editor window.
TIP
If the Output window does not appear, on the VIEW menu, click Output to display it.
In the Output window, you should see messages similar to the following indicating how the program is being compiled:
1>------ Build started: Project: TestHello, Configuration: Debug Any CPU ------
1> TestHello -> C:\Users\John\Documents\Microsoft Press\Visual CSharp Step By Step\
Chapter 1\TestHello\TestHello\bin\Debug\TestHello.exe
========== Build: 1 succeeded, 0 failed, 0 up-to-date, 0 skipped ==========
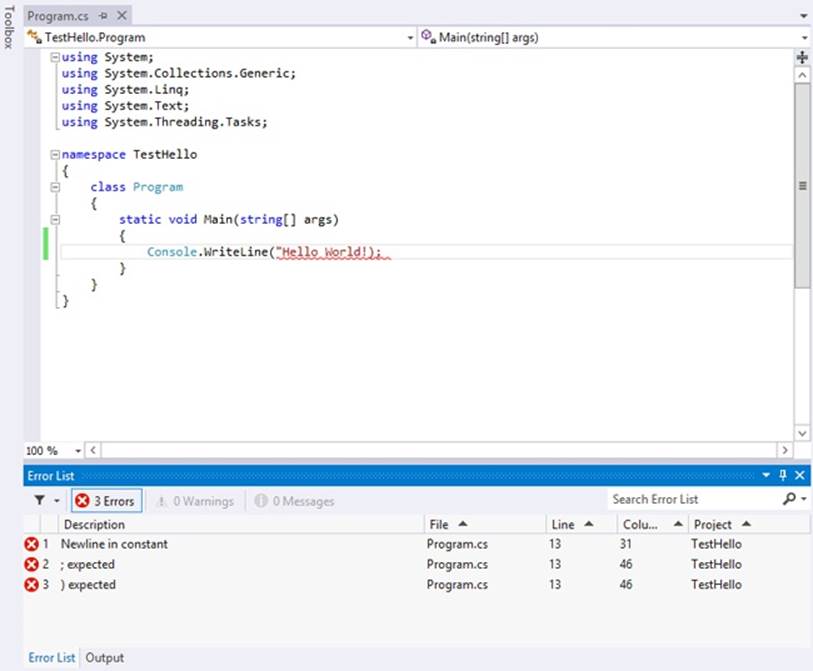
If you have made any mistakes, they will be reported in the Error List window. The following image shows what happens if you forget to type the closing quotation marks after the text Hello World in the WriteLine statement. Notice that a single mistake can sometimes cause multiple compiler errors.
TIP
You can double-click an item in the Error List window, and the cursor will be placed on the line that caused the error. You should also notice that Visual Studio displays a wavy red line under any lines of code that will not compile when you enter them.
If you have followed the previous instructions carefully, there should be no errors or warnings, and the program should build successfully.
TIP
There is no need to save the file explicitly before building because the Build Solution command automatically saves the file.
An asterisk after the file name in the tab above the Code and Text Editor window indicates that the file has been changed since it was last saved.
2. On the DEBUG menu, click Start Without Debugging.
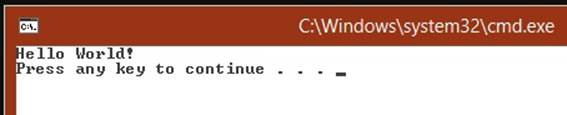
A command window opens, and the program runs. The message “Hello World!” appears, and then the program waits for you to press any key, as shown in the following graphic:
NOTE
The prompt “Press any key to continue . . .” is generated by Visual Studio; you did not write any code to do this. If you run the program by using the Start Debugging command on the DEBUG menu, the application runs, but the command window closes immediately without waiting for you to press a key.
3. Ensure that the command window displaying the program’s output has the focus, and then press Enter.
The command window closes, and you return to the Visual Studio 2012 programming environment.
4. In Solution Explorer, click the TestHello project (not the solution), and then click the Show All Files toolbar button on the Solution Explorer toolbar. Note that you may need to click the >> button on the right edge of the Solution Explorer toolbar to make this button appear.
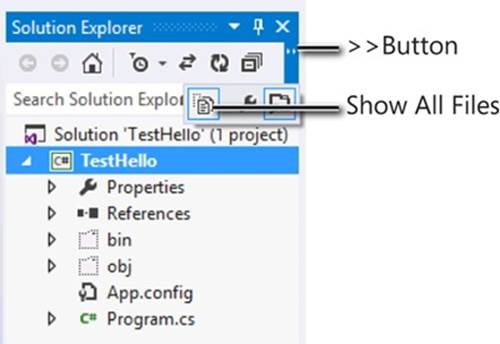
Entries named bin and obj appear above the Program.cs file. These entries correspond directly to folders named bin and obj in the project folder (Microsoft Press\Visual CSharp Step By Step\Chapter 1\TestHello\TestHello). Visual Studio creates these folders when you build your application, and they contain the executable version of the program together with some other files used to build and debug the application.
5. In Solution Explorer, expand the bin entry.
Another folder named Debug appears.
NOTE
You might also see a folder called Release.
6. In Solution Explorer, expand the Debug folder.
Several more items appear, including a file named TestHello.exe. This is the compiled program, and it is this file that runs when you click Start Without Debugging on the DEBUG menu. The other files contain information that is used by Visual Studio 2012 if you run your program in debug mode (when you click Start Debugging on the DEBUG menu).
Using Namespaces
The example you have seen so far is a very small program. However, small programs can soon grow into much bigger programs. As a program grows, two issues arise. First, it is harder to understand and maintain big programs than it is to understand and maintain smaller ones. Second, more code usually means more classes, with more methods, requiring you to keep track of more names. As the number of names increases, so does the likelihood of the project build failing because two or more names clash; for example, you might try and create two classes with the same name. The situation becomes more complicated when a program references assemblies written by other developers who have also used a variety of names.
In the past, programmers tried to solve the name-clashing problem by prefixing names with some sort of qualifier (or set of qualifiers). This is not a good solution because it’s not scalable; names become longer, and you spend less time writing software and more time typing (there is a difference), and reading and rereading incomprehensibly long names.
Namespaces help solve this problem by creating a container for items such as classes. Two classes with the same name will not be confused with each other if they live in different namespaces. You can create a class named Greeting inside the namespace named TestHello by using thenamespace keyword like this:
namespace TestHello
{
class Greeting
{
...
}
}
You can then refer to the Greeting class as TestHello.Greeting in your programs. If another developer also creates a Greeting class in a different namespace, such as NewNamespace, and you install the assembly that contains this class on your computer, your programs will still work as expected because they are using the TestHello.Greeting class. If you want to refer to the other developer’s Greeting class, you must specify it as NewNamespace.Greeting.
It is good practice to define all your classes in namespaces, and the Visual Studio 2012 environment follows this recommendation by using the name of your project as the top-level namespace. The .NET Framework class library also adheres to this recommendation; every class in the .NET Framework lives inside a namespace. For example, the Console class lives inside the System namespace. This means that its full name is actually System.Console.
Of course, if you had to write the full name of a class every time you used it, the situation would be no better than prefixing qualifiers or even just naming the class with some globally unique name such SystemConsole. Fortunately, you can solve this problem with a using directive in your programs. If you return to the TestHello program in Visual Studio 2012 and look at the file Program.cs in the Code and Text Editor window, you will notice the following lines at the top of the file:
using System;
using System.Collections.Generic;
using System.Linq;
using System.Text;
using System.Threading.Tasks;
These lines are using directives. A using directive brings a namespace into scope. In subsequent code in the same file, you no longer have to explicitly qualify objects with the namespace to which they belong. The five namespaces shown contain classes that are used so often that Visual Studio 2012 automatically adds these using statements every time you create a new project. You can add further using directives to the top of a source file if you need to reference other namespaces.
The following exercise demonstrates the concept of namespaces in more depth.
Try longhand names
1. In the Code and Text Editor window displaying the Program.cs file, comment out the first using directive at the top of the file, like this:
//using System;
2. On the BUILD menu, click Build Solution.
The build fails, and the Error List window displays the following error message:
The name 'Console' does not exist in the current context.
3. In the Error List window, double-click the error message.
The identifier that caused the error is highlighted in the Program.cs source file.
4. In the Code and Text Editor window, edit the Main method to use the fully qualified name System.Console.
Main should look like this:
static void Main(string[] args)
{
System.Console.WriteLine("Hello World!");
}
NOTE
When you type the period after System, the names of all the items in the System namespace are displayed by IntelliSense.
5. On the BUILD menu, click Build Solution.
The project should build successfully this time. If it doesn’t, make sure that Main is exactly as it appears in the preceding code, and then try building again.
6. Run the application to make sure it still works by clicking Start Without Debugging on the DEBUG menu.
7. When the program runs and displays “Hello World!”, press Enter in the console window to return to Visual Studio 2012.
NAMESPACES AND ASSEMBLIES
A using directive simply brings the items in a namespace into scope and frees you from having to fully qualify the names of classes in your code. Classes are compiled into assemblies. An assembly is a file that usually has the .dll file name extension, although strictly speaking, executable programs with the .exe file name extension are also assemblies.
An assembly can contain many classes. The classes that the .NET Framework class library comprises, such as System.Console, are provided in assemblies that are installed on your computer together with Visual Studio. You will find that the .NET Framework class library contains thousands of classes. If they were all held in the same assembly, the assembly would be huge and difficult to maintain. (If Microsoft updated a single method in a single class, it would have to distribute the entire class library to all developers!)
For this reason, the .NET Framework class library is split into a number of assemblies, partitioned by the functional area to which the classes they contain relate. For example, a “core” assembly (actually called mscorlib.dll) contains all the common classes, such as System.Console, and further assemblies contain classes for manipulating databases, accessing web services, building GUIs, and so on. If you want to make use of a class in an assembly, you must add to your project a reference to that assembly. You can then add using statements to your code that bring the items in namespaces in that assembly into scope.
You should note that there is not necessarily a 1:1 equivalence between an assembly and a namespace. A single assembly can contain classes defined in many namespaces, and a single namespace can span multiple assemblies. For example, the classes and items in the System namespace are actually implemented by several assemblies, including mscorlib.dll, System.dll, and System.Core.dll, among others. This all sounds very confusing at first, but you will soon get used to it.
When you use Visual Studio to create an application, the template you select automatically includes references to the appropriate assemblies. For example, in Solution Explorer for the TestHello project, expand the References folder. You will see that a console application automatically contains references to assemblies called Microsoft.CSharp, System, System.Core, System.Data, System.Data.DataExtensions, System.Xml, and System.Xml.Linq. You may be surprised to see that mscorlib.dll is not included in this list; this is because all .NET Framework applications must use this assembly, as it contains fundamental runtime functionality. The References folder lists only the optional assemblies; you can add or remove assemblies from this folder as necessary.
You can add references for additional assemblies to a project by right-clicking the References folder and clicking Add Reference—you will perform this task in later exercises. You can remove an assembly by right-clicking the assembly in the References folder and then clicking Remove.
Creating a Graphical Application
So far, you have used Visual Studio 2012 to create and run a basic console application. The Visual Studio 2012 programming environment also contains everything you need to create graphical applications for Windows 7 and Windows 8. You can design the user interface of a Windows application interactively. Visual Studio 2012 then generates the program statements to implement the user interface you’ve designed.
Visual Studio 2012 provides you with two views of a graphical application: the design view and the code view. You use the Code and Text Editor window to modify and maintain the code and program logic for a graphical application, and you use the Design View window to lay out your user interface. You can switch between the two views whenever you want.
In the following set of exercises, you’ll learn how to create a graphical application using Visual Studio 2012. This program will display a simple form containing a text box where you can enter your name and a button that when clicked displays a personalized greeting.
IMPORTANT
In Windows 7, Visual Studio 2012 provides two templates for building graphical applications: the Windows Forms Application template and the WPF Application template. Windows Forms is a technology that first appeared with the .NET Framework version 1.0. WPF, or Windows Presentation Foundation, is an enhanced technology that first appeared with the .NET Framework version 3.0. It provides many additional features and capabilities over Windows Forms, and you should consider using WPF instead of Windows Forms for all new Windows 7 development.
You can also build Windows Forms and WPF applications in Windows 8. However, Windows 8 provides a new style of user interface, referred to as the Windows Store style, and applications that use this style of user interface are called Windows Store applications (or apps). Windows 8 has been designed to operate on a variety of hardware, including computers with touch-sensitive screens and tablet computers or slates. These computers enable users to interact with applications by using touch-based gestures—for example, users can swipe applications with their fingers to move them around the screen and rotate them, or “pinch” and “stretch” applications to zoom out and back in again. Additionally, many slates include sensors that can detect the orientation of the device, and Windows 8 can pass this information to an application, which can then dynamically adjust the user interface to match the orientation (it can switch from landscape to portrait mode, for example). If you have installed Visual Studio 2012 on a Windows 8 computer, you are provided with an additional set of templates for building Windows Store apps.
To cater to both Windows 7 and Windows 8 developers, I have provided instructions in many of the exercises for using the WPF templates if you are running Windows 7, or Windows 8 if you want to use the Windows Store style of user interface. Of course, you can follow the Windows 7 and WPF instructions on Windows 8 if you prefer.
If you want more information about the specifics of writing Windows 8 applications, the chapters in Part IV of this book provide more detail and guidance.
Create a graphical application in Visual Studio 2012
§ If you are using Windows 8, perform the following operations to create a new graphical application:
1. Start Visual Studio 2012 if it is not already running.
2. On the FILE menu, point to New, and then click Project.
§ The New Project dialog box opens.
3. In the left pane, under Installed Templates, expand the Visual C# folder if it is not already expanded, and then click the Windows Store folder.
4. In the middle pane, click the Blank App (XAML) icon.
NOTE
XAML stands for Extensible Application Markup Language, the language that Windows Store apps use to define the layout for the GUI of an application. You will learn more about XAML as you progress through the exercises in this book.
5. Ensure that the Location field refers to the \Microsoft Press\Visual CSharp Step By Step\Chapter 1 folder under your Documents folder.
6. In the Name field, type Hello.
7. In the Solution field, ensure that Create New Solution is selected.
§ This action creates a new solution for holding the project. The alternative, Add to Solution, adds the project to the TestHello solution, which is not what you want for this exercise.
8. Click OK.
§ If this is the first time that you have created a Windows Store app, you will be prompted to apply for a developer license. You must agree to the terms and conditions indicated in the dialog box before you can continue to build Windows Store apps. If you concur with these conditions, click I Agree. You will be prompted to sign into Windows Live (you can create a new account at this point if necessary), and a developer license will be created and allocated to you.

9. After the application has been created, look in the Solution Explorer window.
§ Don’t be fooled by the name of the application template—although it is called Blank App, this template actually provides a number of files and contains a significant amount of code. For example, if you expand the Common folder in Solution Explorer, you will find a file named StandardStyles.xaml. This file contains XAML code defining styles that you can use to format and present data for display. Part IV, describes the purpose of these styles in more detail, so don’t worry about them for now. Similarly, if you expand the MainPage.xaml folder, you will find a C# file named MainPage.xaml.cs. This file is where you add the code that runs when the user interface defined by the MainPage.xaml file is displayed.
10.In Solution Explorer, double-click MainPage.xaml.
§ This file contains the layout of the user interface. The Design View window shows two representations of this file:
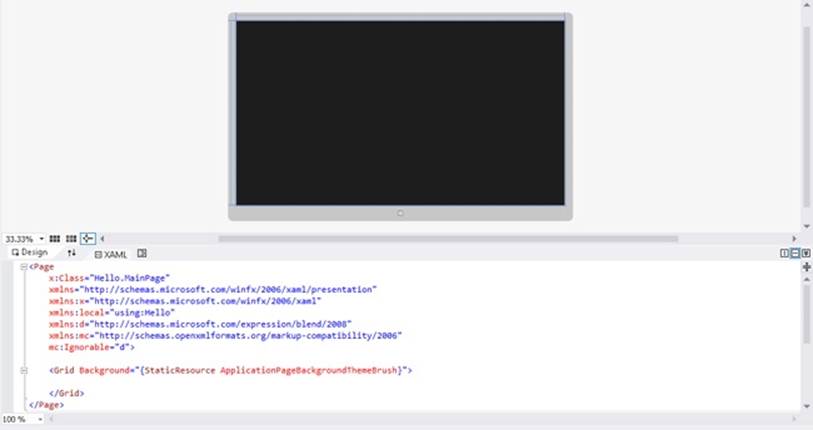
§ At the top is a graphical view depicting the screen of a tablet computer. The lower pane contains a description of the contents of this screen using XAML. XAML is an XML-like language used by Windows Store apps and WPF applications to define the layout of a form and its contents. If you have knowledge of XML, XAML should look familiar.
§ In the next exercise, you will use the Design View window to lay out the user interface for the application, and you will examine the XAML code that this layout generates.
§ If you are using Windows 7, perform the following tasks:
1. Start Visual Studio 2012 if it is not already running.
2. On the FILE menu, point to New, and then click Project.
§ The New Project dialog box opens.
3. In the left pane, under Installed Templates, expand the Visual C# folder if it is not already expanded, and then click the Windows folder.
4. In the middle pane, click the WPF Application icon.
5. Ensure that the Location field refers to the \Microsoft Press\Visual CSharp Step By Step\Chapter 1 folder under your Documents folder.
6. In the Name field, type Hello.
7. In the Solution field, ensure that Create New Solution is selected.
8. Click OK.
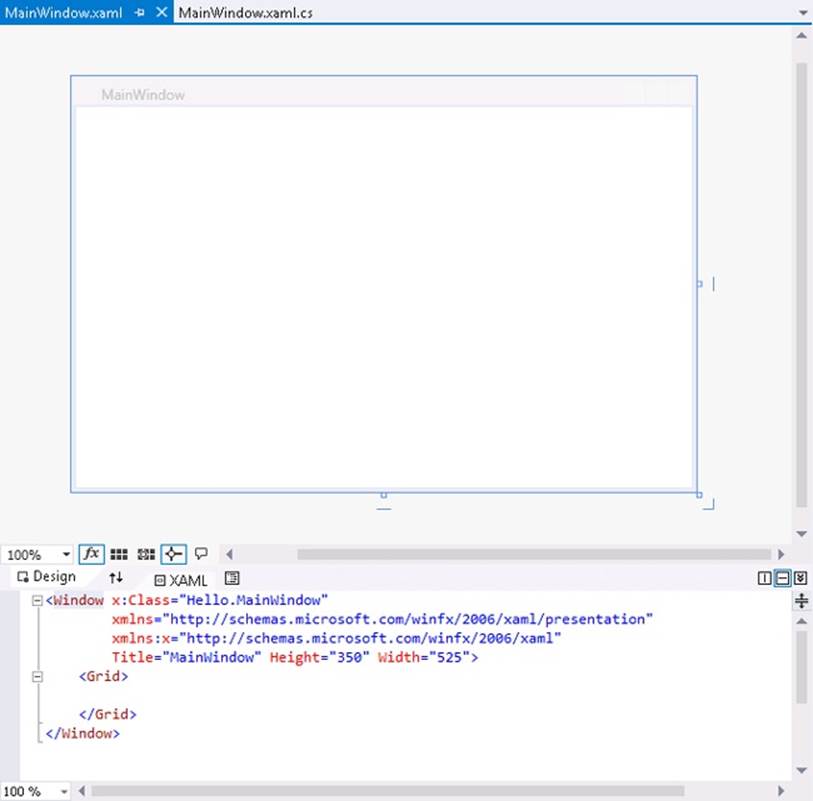
§ The WPF Application template generates fewer items than the Windows Store Blank App template; it contains none of the styles generated by the Blank App template as the functionality that these styles embody is specific to Windows 8. However, the WPF Application template does generate a default window for your application. Like a Windows Store app, this window is defined by using XAML, but in this case it is called MainWindow.xaml by default.
9. In Solution Explorer, double-click MainWindow.xaml to display the contents of this file in the Design View window.
TIP
Close the Output and Error List windows to provide more space for displaying the Design View window.
NOTE
Before going further, it is worth explaining some terminology. In a typical WPF application, the user interface consists of one or more windows, but in a Windows Store app the corresponding items are referred to as pages (strictly speaking, a WPF application can also contain pages, but I don’t want to confuse matters further at this point). To avoid repeating the rather verbose phrase “WPF window or Windows Store app page” repeatedly throughout this book, I will simply refer to both items by using the blanket term form. However, I will continue to use the word window to refer to items in the Visual Studio 2012 IDE, such as the Design View window.
In the following exercises, you use the Design View window to add three controls to the form displayed by your application, and you examine some of the C# code automatically generated by Visual Studio 2012 to implement these controls.
NOTE
The steps in the following exercises are common to Windows 7 and Windows 8, except where any differences are explicitly called out.
Create the user interface
1. Click the Toolbox tab that appears to the left of the form in the Design View window.
The Toolbox appears, partially obscuring the form, and displays the various components and controls that you can place on a form.
2. If you are using Windows 8, expand the Common XAML Controls section.
If you are using Windows 7, expand the Common WPF Controls section.
This section displays a list of controls that are used by most graphical applications.
TIP
The All XAML Controls section (Windows 8) or All WPF Controls section (Windows 7) displays a more extensive list of controls.
3. In the Common XAML Controls section or Common WPF Controls section, click TextBlock, and then drag the TextBlock control onto the form displayed in the Design View window.
TIP
Make sure you select the TextBlock control and not the TextBox control. If you accidentally place the wrong control on a form, you can easily remove it by clicking the item on the form and then pressing Delete.
A TextBlock control is added to the form (you will move it to its correct location in a moment), and the Toolbox disappears from view.
TIP
If you want the Toolbox to remain visible but not to hide any part of the form, click the Auto Hide button to the right in the Toolbox title bar. (It looks like a pin.) The Toolbox appears permanently on the left side of the Visual Studio 2012 window, and the Design View window shrinks to accommodate it. (You might lose a lot of space if you have a low-resolution screen.) Clicking the Auto Hide button once more causes the Toolbox to disappear again.
4. The TextBlock control on the form is probably not exactly where you want it. You can click and drag the controls you have added to a form to reposition them. Using this technique, move the TextBlock control so that it is positioned toward the upper-left corner of the form. (The exact placement is not critical for this application.) Notice that you may need to click away from the control and then click it again before you are able to move it in the Design View window.
The XAML description of the form in the lower pane now includes the TextBlock control, together with properties such as its location on the form, governed by the Margin property, the default text displayed by this control in the Text property, the alignment of text displayed by this control specified by the HorizontalAlignment and VerticalAlignment properties, and whether text should wrap if it exceeds the width of the control.
If you are using Windows 8, the XAML code for the TextBlock will look similar to this (your values for the Margin property may be slightly different, depending on where you have positioned the TextBlock control on the form):
<TextBlock HorizontalAlignment="Left" Margin="400,200,0,0" TextWrapping="Wrap"
Text="TextBlock" VerticalAlignment="Top"/>
If you are using Windows 7, the XAML code will be much the same, except that the units used by the Margin property operate on a different scale due to the finer resolution of Windows 8 devices.
The XAML pane and the Design View window have a two-way relationship with each other. You can edit the values in the XAML pane, and the changes will be reflected in the Design View window. For example, you can change the location of the TextBlock control by modifying the values in the Margin property.
5. On the VIEW menu, click Properties Window.
If it was not already displayed, the Properties window appears at the lower-right of the screen, under Solution Explorer. You can specify the properties of controls by using the XAML pane under the Design View window, but the Properties window provides a more convenient way for you to modify the properties for items on a form, as well as other items in a project.
The Properties window is context sensitive in that it displays the properties for the currently selected item. If you click the form displayed in the Design View window, outside of the TextBlock control, you can see that the Properties window displays the properties for a Grid element. If you look at the XAML pane, you should see that the TextBlock control is contained within a Grid element. All forms contain a Grid element that controls the layout of displayed items; you can define tabular layouts by adding rows and columns to the Grid, for example.
6. Click the TextBlock control in the Design View window. The Properties window displays the properties for the TextBlock control again.
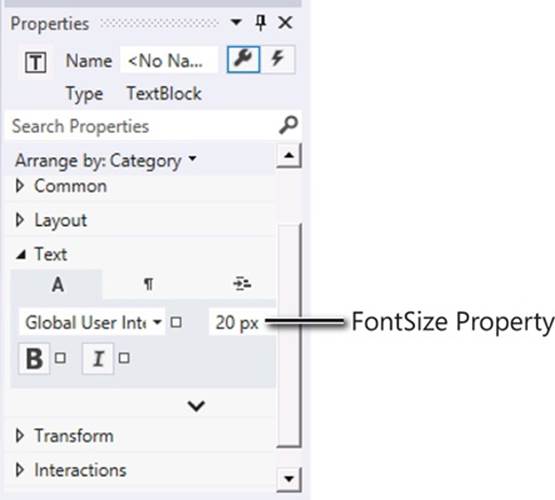
7. In the Properties window, expand the Text property. Change the FontSize property to 20 px and then press Enter. This property is located next to the drop-down list box containing the name of the font, which will be different for Windows 8 (Global User Interface) and Windows 7 (Segoe UI):
NOTE
The suffix px indicates that the font size is measured in pixels.
8. In the XAML pane below the Design View window, examine the text that defines the TextBlock control. If you scroll to the end of the line, you should see the text FontSize=“20”. Any changes that you make using the Properties window are automatically reflected in the XAML definitions and vice versa.
Overtype the value of the FontSize property in the XAML pane, and change it to 24. The font size of the text for the TextBlock control in the Design View window and the Properties window changes.
9. In the Properties window, examine the other properties of the TextBlock control. Feel free to experiment by changing them to see their effects.
Notice that as you change the values of properties, these properties are added to the definition of the TextBlock control in the XAML pane. Each control that you add to a form has a default set of property values, and these values are not displayed in the XAML pane unless you change them.
10.Change the value of the Text property of the TextBlock control from TextBlock to Please enter your name. You can do this either by editing the Text element in the XAML pane or by changing the value in the Properties window (this property is located in the Common section in the Properties window).
Notice that the text displayed in the TextBlock control in the Design View window changes.
11.Click the form in the Design View window, and then display the Toolbox again.
12.In the Toolbox, click and drag the TextBox control onto the form. Move the TextBox control so that it is directly underneath the TextBlock control.
TIP
When you drag a control on a form, alignment indicators appear automatically when the control becomes aligned vertically or horizontally with other controls. This gives you a quick visual cue for making sure that controls are lined up neatly.
13.In the Design View window, place the mouse over the right edge of the TextBox control. The mouse pointer should change to a double-headed arrow to indicate that you can resize the control. Click the mouse and drag the right edge of the TextBox control until it is aligned with the right edge of the TextBlock control above; a guide should appear when the two edges are correctly aligned.
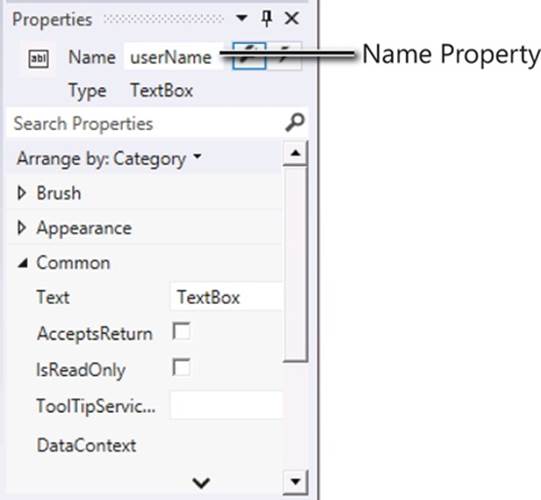
14.While the TextBox control is selected, change the value of the Name property displayed at the top of the Properties window from <No Name> to userName:
NOTE
You will learn more about naming conventions for controls and variables in Chapter 2
15.Display the Toolbox again, and then click and drag a Button control onto the form. Place the Button control to the right of the TextBox control on the form so that the bottom of the button is aligned horizontally with the bottom of the text box.
16.Using the Properties window, change the Name property of the Button control to ok and change the Content property (in the Common section) from Button to OK and press Enter. Verify that the caption of the Button control on the form changes to display the text OK.
17.If you are using Windows 7, click the title bar of the form in the Design View window. In the Properties window, change the Title property (in the Common section again) from MainWindow to Hello.
NOTE
Windows Store apps do not have a title bar.
18.If you are using Windows 7, in the Design View window, click the title bar of the Hello form. Notice that a resize handle (a small square) appears in the lower-right corner of the Hello form. Move the mouse pointer over the resize handle. When the pointer changes to a diagonal double-headed arrow, click and drag the pointer to resize the form. Stop dragging and release the mouse button when the spacing around the controls is roughly equal.
IMPORTANT
Click the title bar of the Hello form and not the outline of the grid inside the Hello form before resizing it. If you select the grid, you will modify the layout of the controls on the form but not the size of the form itself.
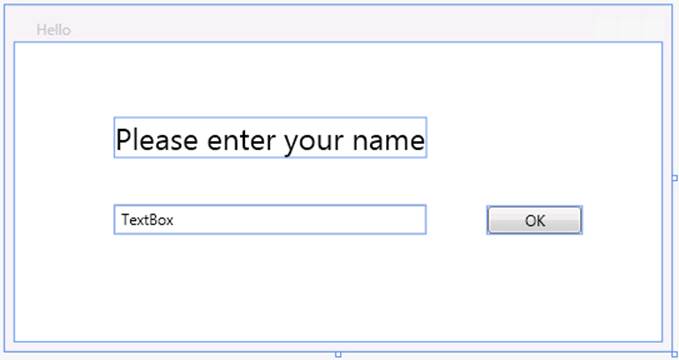
The Hello form should now look similar to the following figure.
NOTE
Pages in Windows Store apps cannot be resized in the same way as Windows 7 forms; when they run, they automatically occupy the full screen of the device. However, they can adapt themselves to different screen resolutions and device orientation, and present different views when they are “snapped.” You can easily see what your application looks like on a different device by clicking Device Window on the DESIGN menu and then selecting from the different screen resolutions available in the Display drop-down list. You can also see how your application appears in portrait mode or when snapped by selecting the Portrait orientation or Snapped view from the list of available views.
19.On the BUILD menu, click Build Solution, and verify that the project builds successfully.
20.On the DEBUG menu, click Start Debugging.
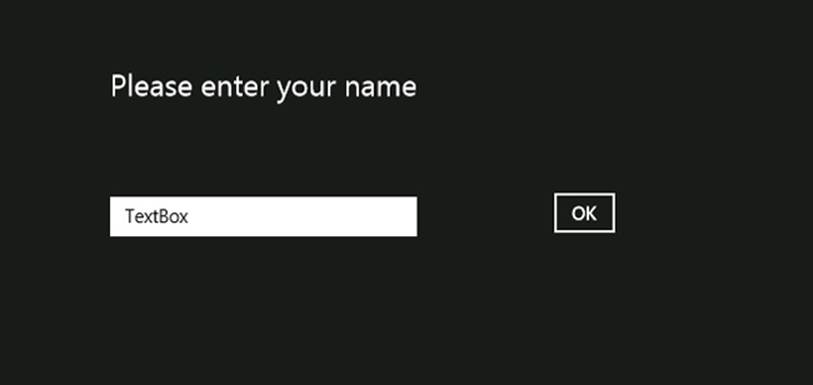
The application should run and display your form. If you are using Windows 8, the form occupies the entire screen and looks like this:
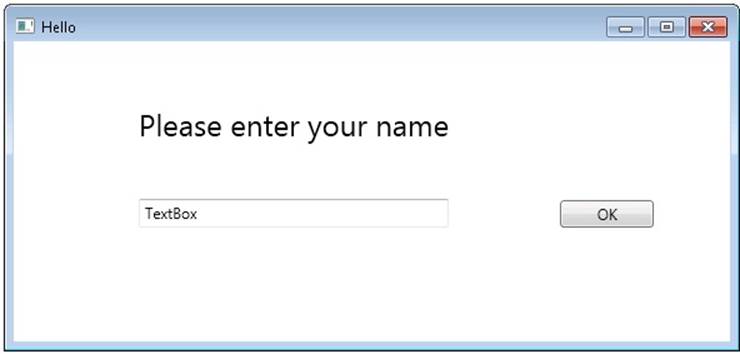
If you are using Windows 7, the form looks like this:
You can delete the text TextBox, type your name in the text box, and click OK, but nothing happens yet. You need to add some code to indicate what should happen when the user clicks the OK button, which is what you will do next.
21.Return to Visual Studio 2012, and on the DEBUG menu click Stop Debugging. Alternatively, if you are using Windows 7, click the close button (the X in the upper-right corner of the form) to close the form and return to Visual Studio.
CLOSING A WINDOWS STORE APP
If you are using Windows 8 and you clicked Start Without Debugging on the DEBUG menu to run the application, you will need to forcibly close it. This is because unlike console applications, the lifetime of a Windows Store app is managed by the operating system rather than the user. Windows 8 suspends an application when it is not currently displayed, and it will terminate the application when the operating system needs to free the resources occupied by the application. The most reliable way to forcibly stop the Hello application is to click (or place your finger if you have a touch-sensitive screen) at the top of the screen, and then click and drag (or swipe) the application to the bottom of the screen. This action closes the application and returns you to the Windows Start screen, where you can switch back to Visual Studio. Alternatively, you can perform the following tasks:
1. Click, or place your finger, in the top-right corner of the screen and then drag the image of Visual Studio to the middle of the screen (or press the Windows key and the B key at the same time).
2. Right-click the Windows taskbar at the bottom of the desktop and then click Task Manager.
3. In the Task Manager window, click the Hello application, and then click End Task.
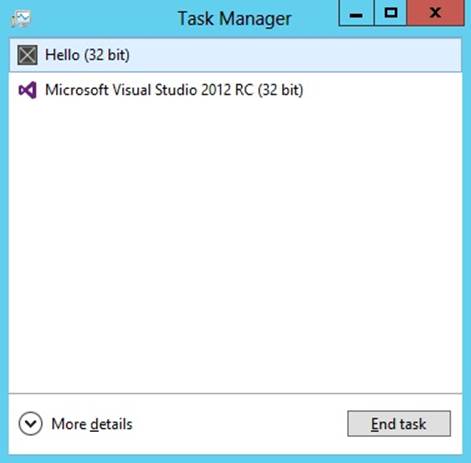
4. Close the Task Manager window.
You have managed to create a graphical application without writing a single line of C# code. It does not do much yet (you will have to write some code soon), but Visual Studio 2012 actually generates a lot of code for you that handles routine tasks that all graphical applications must perform, such as starting up and displaying a window. Before adding your own code to the application, it helps to have an understanding of what Visual Studio has produced for you. The structure is slightly different between a Windows Store app and a Windows 7 WPF application, and the following sections summarize these application styles separately.
Examining the Windows Store App
If you are using Windows 8, in Solution Explorer, click the arrow adjacent to the MainPage.xaml file to expand the node. The file MainPage.xaml.cs appears; double-click this file. The following code for the form is displayed in the Code and Text Editor window:
using System;
using System.Collections.Generic;
using System.IO;
using System.Linq;
using Windows.Foundation;
using Windows.Foundation.Collections;
using Windows.UI.Xaml;
using Windows.UI.Xaml.Controls;
using Windows.UI.Xaml.Controls.Primitives;
using Windows.UI.Xaml.Data;
using Windows.UI.Xaml.Input;
using Windows.UI.Xaml.Media;
using Windows.UI.Xaml.Navigation;
// The Blank Page item template is documented at http://go.microsoft.com/fwlink/?LinkId=234238
namespace Hello
{
/// <summary>
/// An empty page that can be used on its own or navigated to within a Frame.
/// </summary>
public sealed partial class MainPage : Page
{
public MainPage()
{
this.InitializeComponent();
}
/// <summary>
/// Invoked when this page is about to be displayed in a Frame.
/// </summary>
/// <param name="e">Event data that describes how this page was reached. The Parameter
/// property is typically used to configure the page.</param>
protected override void OnNavigatedTo(NavigationEventArgs e)
{
}
}
}
In addition to a good number of using directives bringing into scope some namespaces that most Windows Store apps use, the file contains the definition of a class called MainPage but not much else. There is a little bit of code for the MainPage class known as a constructor that calls a method called InitializeComponent. A constructor is a special method with the same name as the class. It is executed when an instance of the class is created and can contain code to initialize the instance. You will learn about constructors in Chapter 7.
The class also contains a method called OnNavigatedTo. This is an example of a method that is invoked by an event, and the code in this method runs when the window is displayed. You can add your own code to this method to configure the display if necessary. You will learn more about events in Chapter 17, and Chapter 25, provides more information about the NavigatedTo event.
The class actually contains a lot more code than the few lines shown in the MainPage.xaml.cs file, but much of it is generated automatically based on the XAML description of the form, and it is hidden from you. This hidden code performs operations such as creating and displaying the form, and creating and positioning the various controls on the form.
TIP
You can also display the C# code file for a page in a Windows Store app by clicking Code on the VIEW menu when the Design View window is displayed.
At this point, you might be wondering where the Main method is and how the form gets displayed when the application runs. Remember that in a console application, Main defines the point at which the program starts. A graphical application is slightly different.
In Solution Explorer, you should notice another source file called App.xaml. If you expand the node for this file, you will see another file called App.xaml.cs. In a Windows Store app, the App.xaml file provides the entry point when the application starts running. If you double-click App.xaml.cs in Solution Explorer, you should see some code that looks similar to this:
using System;
using System.Collections.Generic;
using System.IO;
using System.Linq;
using Windows.ApplicationModel;
using Windows.ApplicationModel.Activation;
using Windows.Foundation;
using Windows.Foundation.Collections;
using Windows.UI.Xaml;
using Windows.UI.Xaml.Controls;
using Windows.UI.Xaml.Controls.Primitives;
using Windows.UI.Xaml.Data;
using Windows.UI.Xaml.Input;
using Windows.UI.Xaml.Media;
using Windows.UI.Xaml.Navigation;
// The Blank Application template is documented at http://go.microsoft.com/fwlink/?LinkId=234227
namespace Hello
{
/// <summary>
/// Provides application-specific behavior to supplement the default Application class.
/// </summary>
sealed partial class App : Application
{
/// <summary>
/// Initializes the singleton application object. This is the first line of authored
/// executed, and as such is the logical equivalent of main() or WinMain().
/// </summary>
public App()
{
this.InitializeComponent();
this.Suspending += OnSuspending;
}
/// <summary>
/// Invoked when the application is launched normally by the end user. Other entry
/// will be used when the application is launched to open a specific file, to display
/// search results, and so forth.
/// </summary>
/// <param name="args">Details about the launch request and process.</param>
protected override void OnLaunched(LaunchActivatedEventArgs args)
{
Frame rootFrame = Window.Current.Content as Frame;
// Do not repeat app initialization when the Window already has content,
// just ensure that the window is active
if (rootFrame == null)
{
// Create a Frame to act as the navigation context and navigate to the first
rootFrame = new Frame();
if (args.PreviousExecutionState == ApplicationExecutionState.Terminated)
{
//TODO: Load state from previously suspended application
}
// Place the frame in the current Window
Window.Current.Content = rootFrame;
}
if (rootFrame.Content == null)
{
// When the navigation stack isn't restored navigate to the first page,
// configuring the new page by passing required information as a navigation
// parameter
if (!rootFrame.Navigate(typeof(MainPage), args.Arguments))
{
throw new Exception("Failed to create initial page");
}
}
// Ensure the current window is active
Window.Current.Activate();
}
/// <summary>
/// Invoked when application execution is being suspended. Application state is saved
/// without knowing whether the application will be terminated or resumed with the
/// of memory still intact.
/// </summary>
/// <param name="sender">The source of the suspend request.</param>
/// <param name="e">Details about the suspend request.</param>
private void OnSuspending(object sender, SuspendingEventArgs e)
{
var deferral = e.SuspendingOperation.GetDeferral();
//TODO: Save application state and stop any background activity
deferral.Complete();
}
}
}
Much of this code consists of comments (the lines beginning “///”) and other statements that you don’t need to understand just yet, but the key elements are located in the OnLaunched method, highlighted in bold. This method runs when the application starts, and the code in this method causes the application to create a new Frame object, display the MainPage form in this frame, and then activate it. It is not necessary at this stage to fully comprehend how this code works or the syntax of any of these statements, but simply appreciate that this is how the application displays the form when it starts running.
Examining the WPF Application
If you are using Windows 7, in Solution Explorer, click the arrow adjacent to the MainWindow.xaml file to expand the node. The file MainWindow.xaml.cs appears; double-click this file. The code for the form is displayed in the Code and Text Editor window. It looks like this:
using System;
using System.Collections.Generic;
using System.Linq;
using System.Text;
using System.Windows;
using System.Windows.Controls;
using System.Windows.Data;
using System.Windows.Documents;
using System.Windows.Input;
using System.Windows.Media;
using System.Windows.Media.Imaging;
using System.Windows.Navigation;
using System.Windows.Shapes;
namespace Hello
{
/// <summary>
/// Interaction logic for MainWindow.xaml
/// </summary>
public partial class MainWindow : Window
{
public MainWindow()
{
InitializeComponent();
}
}
}
This code looks similar to that for the Windows Store app, but there are some significant differences. First, there is no OnNavigatedTo method; this is because the way in which a WPF application moves between forms is different from a Windows Store app. Second, many of the namespaces referenced by the using directives at the top of the file are different. For example, WPF applications make use of objects defined in namespaces that begin with the prefix System.Windows, whereas Windows Store apps use objects defined in namespaces that start with Windows.UI. This difference is not just cosmetic. These namespaces are implemented by different assemblies, and the controls and functionality that these assemblies provide are different between WPF and Windows Store apps, although they may have similar names. Going back to the earlier exercise, you added TextBlock, TextBox, and Button controls to the WPF form and the Windows Store app. Although these controls have the same name in each style of application, they are defined in different assemblies: Windows.UI.Xaml.Controls for Windows Store apps and System.Windows.Controlsfor WPF applications. The controls for Windows Store apps have been specifically designed and optimized for touch interfaces, whereas the WPF controls are intended primarily for use in mouse-driven systems.
As with the code in the Windows Store app, the constructor in the MainWindow class initializes the WPF form by calling the InitializeComponent method. Again, as before, the code for this method is hidden from you, and it performs operations such as creating and displaying the form, and creating and positioning the various controls on the form.
The way in which a WPF application specifies the initial form to be displayed is different from that of a Windows Store app. Like a Windows Store app, it defines an App object defined in the App.xaml file to provide the entry point for the application, but the form to display is specified declaratively as part of the XAML code rather than programmatically. If you double-click the App.xaml file in Solution Explorer (not App.xaml.cs), you can examine the XAML description. One property in the XAML code is called StartupUri, and it refers to the MainWindow.xaml file, as shown in bold in the following code example:
<Application x:Class="Hello.App"
xmlns="http://schemas.microsoft.com/winfx/2006/xaml/presentation"
xmlns:x="http://schemas.microsoft.com.winfx/2006/xaml"
StartupUri="MainWindow.xaml">
<Application.Resources>
</Application.Resources>
</Application>
In a WPF application, the StartupUri property of the App object indicates which form to display.
Adding Code to the Graphical Application
Now that you know a little bit about the structure of a graphical application, the time has come to write some code to make your application actually do something.
Write the code for the OK button
1. Open the MainPage.xaml file (Windows 8) or MainWindow.xaml file (Windows 7) in the Design View window (double-click MainPage.xaml or MainWindow.xaml in Solution Explorer).
2. In the Design View window, click the OK button on the form to select it.
3. In the Properties window, click the Event Handlers for Selected Element button. This button displays an icon that looks like a bolt of lightning.
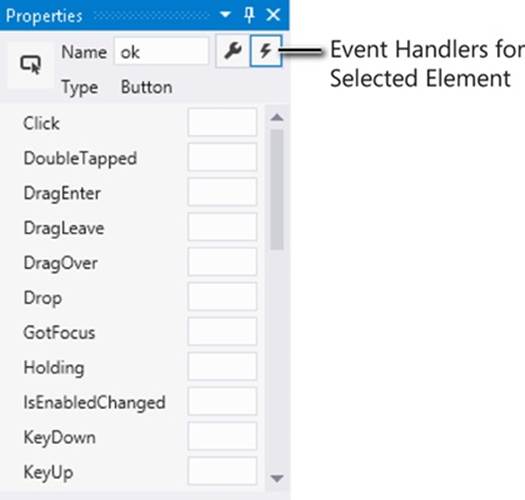
The Properties window displays a list of event names for the Button control. An event indicates a significant action that usually requires a response, and you can write your own code to perform this response.
4. In the box adjacent to the Click event, type okClick and then press Enter.
The MainPage.xaml.cs file (Windows 8) or MainWindow.xaml.cs file (Windows 7) appears in the Code and Text Editor window, and a new method called okClick is added to the MainPage or MainWindow class. The method looks like this:
private void okClick(object sender, RoutedEventArgs e)
{
}
Do not worry too much about the syntax of this code just yet—you will learn all about methods in Chapter 3.
5. If you are using Windows 8, perform the following tasks:
a. Add the following using directive shown in bold to the list at the top of the file (the ellipsis character, ..., indicates statements that have been omitted for brevity):
b. using System;
c. ...
d. using Windows.UI.Xaml.Navigation;
using Windows.UI.Popups;
e. Add the following code shown in bold to the okClick method:
f. void okClick(object sender, RoutedEventArgs e)
g. {
h. MessageDialog msg = new MessageDialog("Hello " + userName.Text);
i. msg.ShowAsync();
}
6. This code will run when the user clicks the OK button. Again, do not worry too much about the syntax, just make sure you copy it exactly as shown; you will find out what these statements mean in the next few chapters. The key things to understand are that the first statement creates aMessageDialog object with the message “Hello <YourName>”, where <YourName> is the name that you type into the TextBox on the form. The second statement displays the MessageDialog, causing it to appear on the screen. The MessageDialog class is defined in theWindows.UI.Popups namespace, which is why you added it in step a.
7. If you are using Windows 7, just add the single statement shown in bold to the okClick method:
8. void okClick(object sender, RoutedEventArgs e)
9. {
10. MessageBox.Show("Hello " + userName.Text);
}
This code performs a similar function to that of the Windows Store app, except that it uses a different class called MessageBox. This class is defined in the System.Windows namespace, which is already referenced by the existing using directives at the top of the file, so you don’t need to add it yourself.
11.Click the MainPage.xaml tab or the MainWindow.xaml tab above the Code and Text Editor window to display the form in the Design View window again.
12.In the lower pane displaying the XAML description of the form, examine the Button element, but be careful not to change anything. Notice that it now contains an element called Click that refers to the okClick method:
<Button x:Name="ok" ... Click="okClick" />
13.On the DEBUG menu, click Start Debugging.
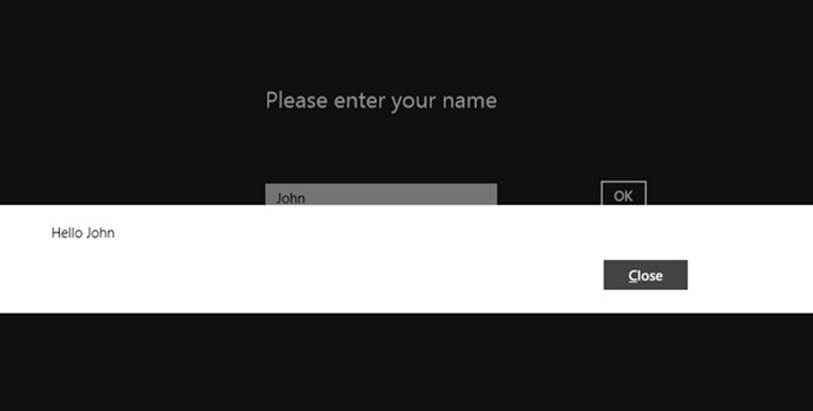
14.When the form appears, in the text box overtype the text TextBox with your name and then click OK.
If you are using Windows 8, a message dialog appears across the middle of the screen, welcoming you by name:
If you are using Windows 7, a message box appears displaying the following greeting:
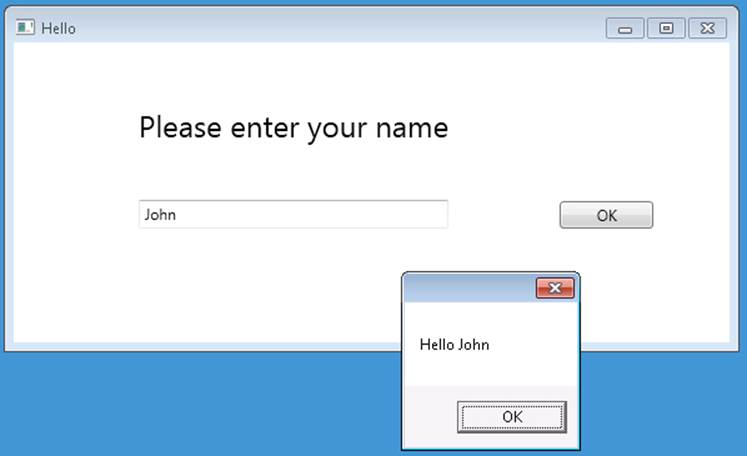
15.Click Close in the message dialog (Windows 8) or OK (Windows 7) in the message box.
16.Return to Visual Studio 2012, and on the DEBUG menu click Stop Debugging.
Summary
In this chapter, you have seen how to use Visual Studio 2012 to create, build, and run applications. You have created a console application that displays its output in a console window, and you have created a WPF application with a simple GUI.
§ If you want to continue to the next chapter
Keep Visual Studio 2012 running, and turn to Chapter 2.
§ If you want to exit Visual Studio 2012 now
On the FILE menu, click Exit. If you see a Save dialog box, click Yes and save the project.
Chapter 1 Quick Reference
|
To |
Do this |
|
Create a new console application using Visual Studio 2012 |
On the FILE menu, point to New, and then click Project to open the New Project dialog box. In the left pane, under Installed Templates, click Visual C#. In the middle pane, click Console Application. Specify a directory for the project files in the Location box. Type a name for the project. Click OK. |
|
Create a new Windows Store blank graphical application for Windows 8 using Visual Studio 2012 |
On the FILE menu, point to New, and then click Project to open the New Project dialog box. In the left pane, under Installed Templates, expand Visual C# and then click Windows Store. In the middle pane, click Blank App (XAML). Specify a directory for the project files in the Location box. Type a name for the project. Click OK. |
|
Create a new WPF graphical application for Windows 7 using Visual Studio 2012 |
On the FILE menu, point to New, and then click Project to open the New Project dialog box. In the left pane, under Installed Templates, expand Visual C# and then click Windows. In the middle pane, click WPF Application. Specify a directory for the project files in the Location box. Type a name for the project. Click OK. |
|
Build the application |
On the BUILD menu, click Build Solution. |
|
Run the application in debug mode |
On the DEBUG menu, click Start Debugging. |
|
Run the application without debugging |
On the DEBUG menu, click Start Without Debugging. |
All materials on the site are licensed Creative Commons Attribution-Sharealike 3.0 Unported CC BY-SA 3.0 & GNU Free Documentation License (GFDL)
If you are the copyright holder of any material contained on our site and intend to remove it, please contact our site administrator for approval.
© 2016-2025 All site design rights belong to S.Y.A.