Microsoft® Visual C#® 2012 Step by Step (2012)
Chapter 17. Introducing Generics
After completing this chapter, you will be able to
§ Explain the purpose of generics.
§ Define a type-safe class by using generics.
§ Create instances of a generic class based on types specified as type parameters.
§ Implement a generic interface.
§ Define a generic method that implements an algorithm independent of the type of data on which it operates.
In Chapter 8, you learned how to use the object type to refer to an instance of any class. You can use the object type to store a value of any type, and you can define parameters by using the object type when you need to pass values of any type into a method. A method can also return values of any type by specifying object as the return type. Although this practice is very flexible, it puts the onus on the programmer to remember what sort of data is actually being used and can lead to run-time errors if the programmer makes a mistake. In this chapter, you will learn about generics, a feature that has been designed to help you prevent this kind of mistake.
The Problem with the object Type
To understand generics, it is worth looking in detail at the problem they are designed to solve.
Suppose that you needed to model a first-in, first-out structure such as a queue. You could create a class such as the following:
class Queue
{
private const int DEFAULTQUEUESIZE = 100;
private int[] data;
private int head = 0, tail = 0;
private int numElements = 0;
public Queue()
{
this.data = new int[DEFAULTQUEUESIZE];
}
public Queue(int size)
{
if (size > 0)
{
this.data = new int[size];
}
else
{
throw new ArgumentOutOfRangeException("size", "Must be greater than zero");
}
}
public void Enqueue(int item)
{
if (this.numElements == this.data.Length)
{
throw new Exception("Queue full");
}
this.data[this.head] = item;
this.head++;
this.head %= this.data.Length;
this.numElements++;
}
public int Dequeue()
{
if (this.numElements == 0)
{
throw new Exception("Queue empty");
}
int queueItem = this.data[this.tail];
this.tail++;
this.tail %= this.data.Length;
this.numElements--;
return queueItem;
}
}
This class uses an array to provide a circular buffer for holding the data. The size of this array is specified by the constructor. An application uses the Enqueue method to add an item to the queue and the Dequeue method to pull an item off the queue. The private head and tail fields keep track of where to insert an item into the array and where retrieve an item from the array. The numElements field indicates how many items are in the array. The Enqueue and Dequeue methods use these fields to determine where to store or retrieve an item from and perform some rudimentary error checking. An application can create a Queue object and call these methods, as shown in the following code example. Notice that the items are dequeued in the same order that they are enqueued:
Queue queue = new Queue(); // Create a new Queue
queue.Enqueue(100);
queue.Enqueue(-25);
queue.Enqueue(33);
Console.WriteLine("{0}", queue.Dequeue()); // Displays 100
Console.WriteLine("{0}", queue.Dequeue()); // Displays -25
Console.WriteLine("{0}", queue.Dequeue()); // Displays 33
Now, the Queue class works well for queues of ints, but what if you want to create queues of strings, or floats, or even queues of more complex types such as Circle (see Chapter 7), or Horse, or Whale (see Chapter 12)? The problem is that the way in which the Queue class is implemented restricts it to items of type int, and if you try and enqueue a Horse, you will get a compile-time error:
Queue queue = new Queue();
Horse myHorse = new Horse();
queue.Enqueue(myHorse); // Compile-time error: Cannot convert from Horse to int
One way around this restriction is to specify that the array in the Queue class contains items of type object, update the constructors, and modify the Enqueue and Dequeue methods to take an object parameter and return an object, like this:
class Queue
{
...
private object[] data;
...
public Queue()
{
this.data = new object[DEFAULTQUEUESIZE];
}
public Queue(int size)
{
...
this.data = new object[size];
...
}
public void Enqueue(object item)
{
...
}
public object Dequeue()
{
...
object queueItem = this.data[this.tail];
...
return queueItem;
}
}
Remember that you can use the object type to refer to a value or variable of any type. All reference types automatically inherit (either directly or indirectly) from the System.Object class in the Microsoft .NET Framework (in C#, object is an alias for System.Object). Now, because the Enqueueand Dequeue methods manipulate objects, you can operate on queues of Circles, Horses, Whales, or any of the other classes you have seen in earlier exercises in this book. However, it is important to notice that you have to cast the value returned by the Dequeue method to the appropriate type because the compiler will not perform the conversion from the object type automatically:
Queue queue = new Queue();
Horse myHorse = new Horse();
queue.Enqueue(myHorse); // Now legal – Horse is an object
...
Horse dequeuedHorse =(Horse)queue.Dequeue(); // Need to cast object back to a Horse
If you don’t cast the returned value, you will get the compiler error “Cannot implicitly convert type ‘object’ to ‘Horse.’” This requirement to perform an explicit cast denigrates much of the flexibility afforded by the object type. Furthermore, it is very easy to write code such as this:
Queue queue = new Queue();
Horse myHorse = new Horse();
queue.Enqueue(myHorse);
...
Circle myCircle = (Circle)queue.Dequeue(); // run-time error
Although this code will compile, it is not valid and throws a System.InvalidCastException exception at run time. The error is caused by trying to store a reference to a Horse in a Circle variable when it is dequeued, and the two types are not compatible. This error is not spotted until run time because the compiler does not have enough information to perform this check at compile time. The real type of the object being dequeued becomes apparent only when the code runs.
Another disadvantage of using the object approach to create generalized classes and methods is that it can consume additional memory and processor time if the runtime needs to convert an object to a value type and back again. Consider the following piece of code that manipulates a queue ofint values:
Queue queue = new Queue();
int myInt = 99;
queue.Enqueue(myInt); // box the int to an object
...
myInt = (int)queue.Dequeue(); // unbox the object to an int
The Queue data type expects the items it holds to be objects, and object is a reference type. Enqueueing a value type, such as an int, requires it to be boxed to convert it to a reference type. Similarly, dequeueing into an int requires the item to be unboxed to convert it back to a value type. See the sections titled Boxing and Unboxing in Chapter 8 for more details. Although boxing and unboxing happen transparently, they add performance overhead because they involve dynamic memory allocations. This overhead is small for each item, but it adds up when a program creates queues of large numbers of value types.
The Generics Solution
C# provides generics to remove the need for casting, improve type safety, reduce the amount of boxing required, and make it easier to create generalized classes and methods. Generic classes and methods accept type parameters, which specify the types of objects that they operate on. In C#, you indicate that a class is a generic class by providing a type parameter in angle brackets, like this:
class Queue<T>
{
...
}
The T in this example acts as a placeholder for a real type at compile time. When you write code to instantiate a generic Queue, you provide the type that should be substituted for T (Circle, Horse, int, and so on). When you define the fields and methods in the class, you use this same placeholder to indicate the type of these items, like this:
class Queue<T>
{
...
private T[] data; // array is of type 'T' where 'T' is the type parameter
...
public Queue()
{
this.data = new T[DEFAULTQUEUESIZE]; // use 'T' as the data type
}
public Queue(int size)
{
...
this.data = new T[size];
...
}
public void Enqueue(T item) // use 'T' as the type of the method parameter
{
...
}
public T Dequeue() // use 'T' as the type of the return value
{
...
T queueItem = this.data[this.tail]; // the data in the array is of type 'T'
...
return queueItem;
}
}
The type parameter, T, can be any legal C# identifier, although the lone character T is commonly used. It is replaced with the type you specify when you create a Queue object. The following examples create a Queue of ints, and a Queue of Horses:
Queue<int> intQueue = new Queue<int>();
Queue<Horse> horseQueue = new Queue<Horse>();
Additionally, the compiler now has enough information to perform strict type-checking when you build the application. You no longer need to cast data when you call the Dequeue method, and the compiler can trap any type mismatch errors early:
intQueue.Enqueue(99);
int myInt = intQueue.Dequeue(); // no casting necessary
Horse myHorse = intQueue.Dequeue(); // compiler error:
// cannot implicitly convert type 'int' to 'Horse'
You should be aware that this substitution of T for a specified type is not simply a textual replacement mechanism. Instead, the compiler performs a complete semantic substitution so that you can specify any valid type for T. Here are more examples:
struct Person
{
...
}
...
Queue<int> intQueue = new Queue<int>();
Queue<Person> personQueue = new Queue<Person>();
The first example creates a queue of integers, while the second example creates a queue of Person values. The compiler also generates the versions of the Enqueue and Dequeue methods for each queue. For the intQueue queue, these methods look like this:
public void Enqueue(int item);
public int Dequeue();
For the personQueue queue, these methods look like this:
public void Enqueue(Person item);
public Person Dequeue();
Contrast these definitions with those of the object-based version of the Queue class shown in the preceding section. In the methods derived from the generic class, the item parameter to Enqueue is passed as a value type that does not require boxing. Similarly, the value returned by Dequeue is also a value type that does not need to be unboxed. A similar set of methods is generated for the other two queues.
NOTE
The System.Collections.Generics namespace in the .NET Framework class library provides an implementation to the Queue class that operates in a similar manner to the class just described. This namespace also includes several other collection classes, and they are described in more detail in Chapter 18
The type parameter does not have to be a simple class or value type. For example, you can create a queue of queues of integers (if you should ever find it necessary) like this:
Queue<Queue<int>> queueQueue = new Queue<Queue<int>>();
A generic class can have multiple type parameters. For example, the generic Dictionary class defined in the System.Collections.Generic namespace in the .NET Framework class library expects two type parameters: one type for keys and another for the values (this class is described in more detail in Chapter 18).
NOTE
You can also define generic structures and interfaces by using the same type-parameter syntax as generic classes.
Generics vs. Generalized Classes
It is important to be aware that a generic class that uses type parameters is different from a generalized class designed to take parameters that can be cast to different types. For example, the object-based version of the Queue class shown earlier is a generalized class. There is a singleimplementation of this class, and its methods take object parameters and return object types. You can use this class with ints, strings, and many other types, but in each case, you are using instances of the same class and you have to cast the data you are using to and from the object type.
Compare this with the Queue<T> class. Each time you use this class with a type parameter (such as Queue<int> or Queue<Horse>), you cause the compiler to generate an entirely new class that happens to have functionality defined by the generic class. This means that Queue<int> is a completely different type from Queue<Horse>, but they both happen to have the same behavior. You can think of a generic class as one that defines a template that is then used by the compiler to generate new type-specific classes on demand. The type-specific versions of a generic class (Queue<int>, Queue<Horse>, and so on) are referred to as constructed types, and you should treat them as distinctly different types (albeit ones that have a similar set of methods and properties).
Generics and Constraints
Occasionally, you will want to ensure that the type parameter used by a generic class identifies a type that provides certain methods. For example, if you are defining a PrintableCollection class, you might want to ensure that all objects stored in the class have a Print method. You can specify this condition by using a constraint.
By using a constraint, you can limit the type parameters of a generic class to those that implement a particular set of interfaces, and therefore provide the methods defined by those interfaces. For example, if the IPrintable interface defined the Print method, you could create thePrintableCollection class like this:
public class PrintableCollection<T> where T : IPrintable
When you build this class with a type parameter, the compiler checks to ensure that the type used for T actually implements the IPrintable interface, and if not, it stops with a compilation error.
Creating a Generic Class
The System.Collections.Generic namespace in the .NET Framework class library contains a number of generic classes readily available for you. You can also define your own generic classes, which is what you will do in this section. Before you do this, let’s cover a bit of background theory.
The Theory of Binary Trees
In the following exercises, you will define and use a class that represents a binary tree.
A binary tree is a useful data structure used for a variety of operations, including sorting and searching through data very quickly. Volumes have been written on the minutiae of binary trees, but it is not the purpose of this book to cover this topic in detail. Instead, you’ll look at just the pertinent facts. If you are interested in learning more, consult a book such as The Art of Computer Programming, Volume 3: Sorting and Searching, 2nd Edition by Donald E. Knuth (Addison-Wesley Professional, 1998). Despite its age, this is the recognized, seminal work on sort and search algorithms.
A binary tree is a recursive (self-referencing) data structure that can either be empty or contain three elements: a datum, which is typically referred to as the node, and two subtrees, which are themselves binary trees. The two subtrees are conventionally called the left subtree and the right subtree because they are typically depicted to the left and right of the node, respectively. Each left subtree or right subtree is either empty or contains a node and other subtrees. In theory, the whole structure can continue ad infinitum. The following image shows the structure of a small binary tree.

The real power of binary trees becomes evident when you use them for sorting data. If you start with an unordered sequence of objects of the same type, you can construct an ordered binary tree and then walk through the tree to visit each node in an ordered sequence. The algorithm for inserting an item I into an ordered binary tree B is shown here:
If the tree, B, is empty
Then
Construct a new tree B with the new item I as the node, and empty left and
right subtrees
Else
Examine the value of the current node, N, of the tree, B
If the value of N is greater than that of the new item, I
Then
If the left subtree of B is empty
Then
Construct a new left subtree of B with the item I as the node, and
empty left and right subtrees
Else
Insert I into the left subtree of B
End If
Else
If the right subtree of B is empty
Then
Construct a new right subtree of B with the item I as the node, and
empty left and right subtrees
Else
Insert I into the right subtree of B
End If
End If
End If
Notice that this algorithm is recursive, calling itself to insert the item into the left or right subtree depending on how the value of the item compares with the current node in the tree.
NOTE
The definition of the expression greater than depends on the type of data in the item and node. For numeric data, greater than can be a simple arithmetic comparison, and for text data, it can be a string comparison; however, other forms of data must be given their own means of comparing values. You will learn more about this when you implement a binary tree in the upcoming section titledBuilding a Binary Tree Class by Using Generics.
If you start with an empty binary tree and an unordered sequence of objects, you can iterate through the unordered sequence, inserting each object into the binary tree by using this algorithm, resulting in an ordered tree. The next image shows the steps in the process for constructing a tree from a set of five integers.
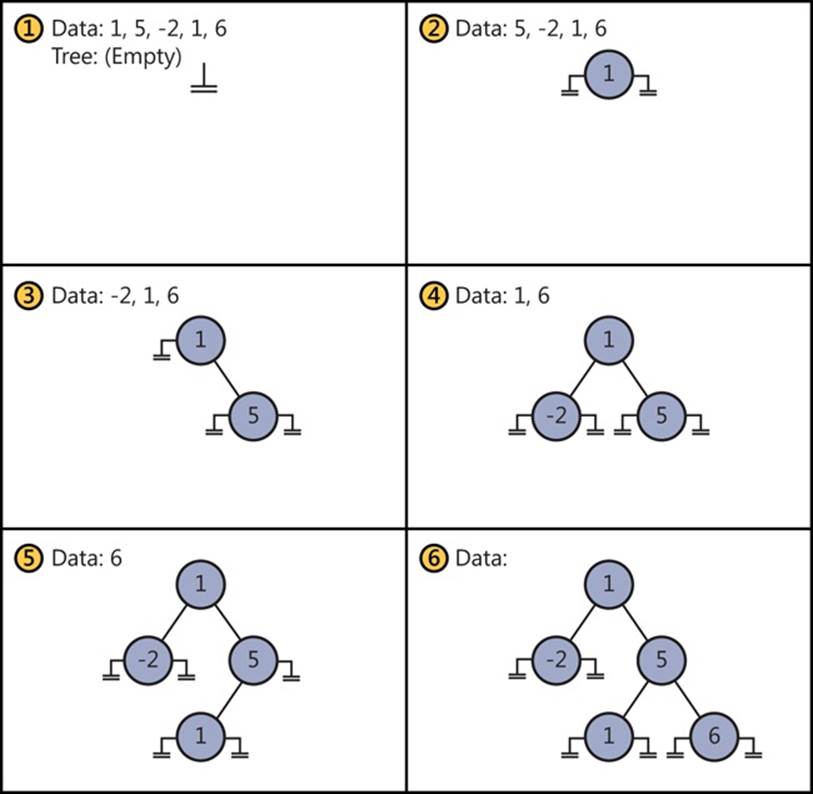
After you have built an ordered binary tree, you can display its contents in sequence by visiting each node in turn and printing the value found. The algorithm for achieving this task is also recursive:
If the left subtree is not empty
Then
Display the contents of the left subtree
End If
Display the value of the node
If the right subtree is not empty
Then
Display the contents of the right subtree
End If
The following image shows the steps in the process for outputting the tree. Notice that the integers are now displayed in ascending order.

Building a Binary Tree Class by Using Generics
In the following exercise, you will use generics to define a binary tree class capable of holding almost any type of data. The only restriction is that the data type must provide a means of comparing values between different instances.
The binary tree class is a class that you might find useful in many different applications. Therefore, you will implement it as a class library rather than as an application in its own right. You can then reuse this class elsewhere without having to copy the source code and recompile it. A class library is a set of compiled classes (and other types such as structures and delegates) stored in an assembly. An assembly is a file that usually has the .dll suffix. Other projects and applications can make use of the items in a class library by adding a reference to its assembly and then bringing its namespaces into scope with using statements. You will do this when you test the binary tree class.
THE SYSTEM.ICOMPARABLE AND SYSTEM.ICOMPARABLE<T> INTERFACES
The algorithm for inserting a node into a binary tree requires you to compare the value of the node that you are inserting against nodes already in the tree. If you are using a numeric type, such as int, you can use the <, >, and == operators. However, if you are using some other type, such as Mammal or Circle described in earlier chapters, how do you compare objects?
If you need to create a class that requires you to be able to compare values according to some natural (or possibly unnatural) ordering, you should implement the IComparable interface. This interface contains a method called CompareTo, which takes a single parameter specifying the object to be compared with the current instance and returns an integer that indicates the result of the comparison, as summarized by the following table.
|
Value |
Meaning |
|
Less than 0 |
The current instance is less than the value of the parameter. |
|
0 |
The current instance is equal to the value of the parameter. |
|
Greater than 0 |
The current instance is greater than the value of the parameter. |
As an example, consider the Circle class that was described in Chapter 7 and is reproduced here:
class Circle
{
public Circle(int initialRadius)
{
radius = initialRadius;
}
public double Area()
{
return Math.PI * radius * radius;
}
private double radius;
}
You can make the Circle class “comparable” by implementing the System.IComparable interface and providing the CompareTo method. In this example, the CompareTo method compares Circle objects based on their areas. A circle with a larger area is considered to be greater than a circle with a smaller area.
class Circle : System.IComparable
{
...
public int CompareTo(object obj)
{
Circle circObj = (Circle)obj; // cast the parameter to its real type
if (this.Area() == circObj.Area())
return 0;
if (this.Area() > circObj.Area())
return 1;
return -1;
}
}
If you examine the System.IComparable interface, you will see that its parameter is defined as an object. However, this approach is not type-safe. To understand why this is so, consider what happens if you try to pass something that is not a Circle to the CompareTo method. The System.IComparable interface requires the use of a cast to be able to access the Area method. If the parameter is not a Circle but some other type of object, this cast will fail. However, the System namespace also defines the generic IComparable<T> interface, which contains the following method:
int CompareTo(T other);
Notice that this method takes a type parameter (T) rather than an object and, therefore, it is much safer than the nongeneric version of the interface. The following code shows how you can implement this interface in the Circle class:
class Circle : System.IComparable<Circle>
{
...
public int CompareTo(Circle other)
{
if (this.Area() == other.Area())
return 0;
if (this.Area() > other.Area())
return 1;
return -1;
}
}
The parameter for the CompareTo method must match the type specified in the interface, IComparable<Circle>. In general, it is preferable to implement the System.IComparable<T> interface rather than the System.IComparable interface. You can also implement both, just as many of the types in the .NET Framework do.
Create the Tree<TItem> class
1. Start Microsoft Visual Studio 2012 if it is not already running.
2. On the FILE menu, point to New, and then click Project.
3. In the New Project dialog box, in the Templates pane on the left, click Visual C#. In the middle pane, select the Portable Class Library template. In the Name text box, type BinaryTree. In the Location text box, specify \Microsoft Press\Visual CSharp Step By Step\Chapter 17 under your Documents folder, and then click OK.
NOTE
The Portable Class Library template enables you to create assemblies that can be incorporated into managed applications running on any platform that uses the .NET Framework, including Windows Store apps, Silverlight applications (for the web), Windows Phone 7 applications, and Xbox 360 applications. An assembly generated by using the Portable Class Library template is actually binary-portable: you do not have to recompile it to run on different platforms. As a result, this template restricts you to types and methods that are available across every target platform.
4. In the Add Portable Class Library dialog box, accept the default target platforms and click OK.
5. In Solution Explorer, right-click Class1.cs, click Rename, and change the name of the file to Tree.cs. Allow Visual Studio to change the name of the class as well as the name of the file when prompted.
6. In the Code and Text Editor window, change the definition of the Tree class to Tree<TItem>, as shown in bold type in the following code:
7. public class Tree<TItem>
8. {
}
9. In the Code and Text Editor window, modify the definition of the Tree<TItem> class to specify that the type parameter TItem must denote a type that implements the generic IComparable<TItem> interface. The changes are highlighted below in bold.
The modified definition of the Tree<TItem> class should look like this:
public class Tree<TItem> where TItem : IComparable<TItem>
{
}
10.Add three public, automatic properties to the Tree<TItem> class: a TItem property called NodeData and two Tree<TItem> properties called LeftTree and RightTree, as follows in bold type:
11.public class Tree<TItem> where TItem : IComparable<TItem>
12.{
13. public TItem NodeData { get; set; }
14. public Tree<TItem> LeftTree { get; set; }
15. public Tree<TItem> RightTree { get; set; }
}
16.Add a constructor to the Tree<TItem> class that takes a single TItem parameter called nodeValue. In the constructor, set the NodeData property to nodeValue, and initialize the LeftTree and RightTree properties to null, as shown in bold type in the following code:
17.public class Tree<TItem> where TItem : IComparable<TItem>
18.{
19. public Tree(TItem nodeValue)
20. {
21. this.NodeData = nodeValue;
22. this.LeftTree = null;
23. this.RightTree = null;
24. }
25. ...
}
NOTE
Notice that the name of the constructor does not include the type parameter; it is called Tree, not Tree<TItem>.
26.Add a public method called Insert to the Tree<TItem> class as shown in bold type in the following code. This method will insert a TItem value into the tree.
The method definition should look like this:
public class Tree<TItem> where TItem: IComparable<TItem>
{
...
public void Insert(TItem newItem)
{
}
...
}
The Insert method implements the recursive algorithm described earlier for creating an ordered binary tree. The programmer will have used the constructor to create the initial node of the tree (there is no default constructor), so the Insert method can assume that the tree is not empty. The part of the algorithm after checking whether the tree is empty is reproduced here to help you understand the code you will write for the Insert method in the following steps:
...
Examine the value of the node, N, of the tree, B
If the value of N is greater than that of the new item, I
Then
If the left subtree of B is empty
Then
Construct a new left subtree of B with the item I as the node, and empty
left and right subtrees
Else
Insert I into the left subtree of B
End If
...
27.In the Insert method, add a statement that declares a local variable of type TItem, called currentNodeValue. Initialize this variable to the value of the NodeData property of the tree, as shown in bold:
28.public void Insert(TItem newItem)
29.{
30. TItem currentNodeValue = this.NodeData;
}
31.Add the following if-else statement shown in bold type to the Insert method after the definition of the currentNodeValue variable. This statement uses the CompareTo method of the IComparable<T> interface to determine whether the value of the current node is greater than the new item is:
32.public void Insert(TItem newItem)
33.{
34. TItem currentNodeValue = this.NodeData;
35. if (currentNodeValue.CompareTo(newItem) > 0)
36. {
37. // Insert the new item into the left subtree
38. }
39. else
40. {
41. // Insert the new item into the right subtree
42. }
}
43.After the // Insert the new item into the left subtree comment, add the following block of code:
44.if (this.LeftTree == null)
45.{
46. this.LeftTree = new Tree<TItem>(newItem);
47.}
48.else
49.{
50. this.LeftTree.Insert(newItem);
}
These statements check whether the left subtree is empty. If so, a new tree is created using the new item and it is attached as the left subtree of the current node; otherwise, the new item is inserted into the existing left subtree by calling the Insert method recursively.
51.After the // Insert the new item into the right subtree comment, add the equivalent code that inserts the new node into the right subtree:
52.if (this.RightTree == null)
53.{
54. this.RightTree = new Tree<TItem>(newItem);
55.}
56.else
57.{
58. this.RightTree.Insert(newItem);
}
59.Add another public method called WalkTree to the Tree<TItem> class after the Insert method. This method walks through the tree, visiting each node in sequence, and generates a string representation of the data that the tree contains.
The method definition should look like this:
public string WalkTree()
{
}
60.Add the following statements shown in bold to the WalkTree method. These statements implement the algorithm described earlier for traversing a binary tree. As each node is visited, the node value is returned by the method to the string:
61.public string WalkTree()
62.{
63. string result = "";
64.
65. if (this.LeftTree != null)
66. {
67. result = this.LeftTree.WalkTree();
68. }
69.
70. result += String.Format(" {0} ", this.NodeData.ToString());
71.
72. if (this.RightTree != null)
73. {
74. result += this.RightTree.WalkTree();
75. }
76.
77. return result;
}
78.On the BUILD menu, click Build Solution. The class should compile cleanly, but correct any errors that are reported and rebuild the solution if necessary.
In the next exercise, you will test the Tree<TItem> class by creating binary trees of integers and strings.
Test the Tree<TItem> class
1. In Solution Explorer, right-click the BinaryTree solution, point to Add, and then click New Project.
NOTE
Make sure you right-click the BinaryTree solution rather than the BinaryTree project.
2. Add a new project using the Console Application template. Name the project BinaryTreeTest. Set the Location to \Microsoft Press\Visual CSharp Step By Step\Chapter 17 under your Documents folder, and then click OK.
NOTE
A Visual Studio 2012 solution can contain more than one project. You are using this feature to add a second project to the BinaryTree solution for testing the Tree<TItem> class.
3. Ensure that the BinaryTreeTest project is selected in Solution Explorer. On the PROJECT menu, click Set as Startup Project.
The BinaryTreeTest project is highlighted in Solution Explorer. When you run the application, this is the project that will actually execute.
4. Ensure that the BinaryTreeTest project is still selected in Solution Explorer. On the PROJECT menu, click Add Reference. In the left pane of the Reference Manager - BinaryTreeTest dialog box, click Solution. In the middle pane, select the BinaryTree project, and then click OK.
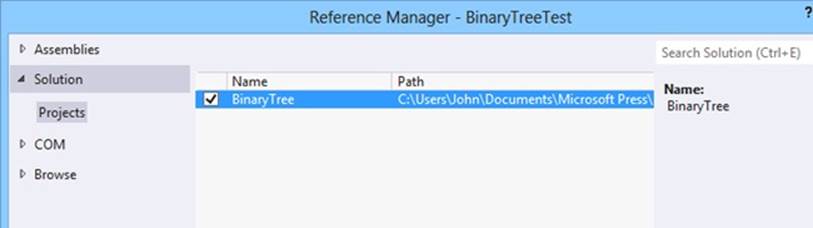
The BinaryTree assembly is added to the list of references for the BinaryTreeTest project in Solution Explorer. If you examine the References folder for the BinaryTreeTest project in Solution Explorer, you should see the BinaryTree assembly listed at the top. You will now be able to create Tree<TItem> objects in the BinaryTreeTest project.
NOTE
If the class library project is not part of the same solution as the project that uses it, you must add a reference to the assembly (the .dll file) and not to the class library project. You can do this by browsing for the assembly in the Reference Manager dialog box. You will use this technique in the final set of exercises in this chapter.
5. In the Code and Text Editor window displaying the Program class, add the following using directive to the list at the top of the class:
using BinaryTree;
6. Add the statements in bold type in the following code to the Main method:
7. static void Main(string[] args)
8. {
9. Tree<int> tree1 = new Tree<int>(10);
10. tree1.Insert(5);
11. tree1.Insert(11);
12. tree1.Insert(5);
13. tree1.Insert(-12);
14. tree1.Insert(15);
15. tree1.Insert(0);
16. tree1.Insert(14);
17. tree1.Insert(-8);
18. tree1.Insert(10);
19. tree1.Insert(8);
20. tree1.Insert(8);
21.
22. string sortedData = tree1.WalkTree();
23. Console.WriteLine("Sorted data is: {0}", sortedData);
}
These statements create a new binary tree for holding ints. The constructor creates an initial node containing the value 10. The Insert statements add nodes to the tree, and the WalkTree method generates a string representing the contents of the tree, which should appear sorted in ascending order when this string is displayed.
NOTE
Remember that the int keyword in C# is just an alias for the System.Int32 type; whenever you declare an int variable, you are actually declaring a struct variable of type System.Int32. The System.Int32 type implements the IComparable and IComparable<T> interfaces, which is why you can create Tree<int> objects. Similarly, the string keyword is an alias for System.String, which also implements IComparable and IComparable<T>.
24.On the BUILD menu, click Build Solution. Verify that the solution compiles, and correct any errors if necessary.
25.On the DEBUG menu, click Start Without Debugging.
Verify that the program runs and displays the values in the following sequence:
–12 –8 0 5 5 8 8 10 10 11 14 15
26.Press the Enter key to return to Visual Studio 2012.
27.Add the following statements shown in bold type to the end of the Main method in the Program class, after the existing code:
28.static void Main(string[] args)
29.{
30. ...
31. Tree<string> tree2 = new Tree<string>("Hello");
32. tree2.Insert("World");
33. tree2.Insert("How");
34. tree2.Insert("Are");
35. tree2.Insert("You");
36. tree2.Insert("Today");
37. tree2.Insert("I");
38. tree2.Insert("Hope");
39. tree2.Insert("You");
40. tree2.Insert("Are");
41. tree2.Insert("Feeling");
42. tree2.Insert("Well");
43. tree2.Insert("!");
44.
45. sortedData = tree2.WalkTree();
46. Console.WriteLine("Sorted data is: {0}", sortedData);
}
These statements create another binary tree for holding strings, populate it with some test data, and then print the tree. This time, the data is sorted alphabetically.
47.On the BUILD menu, click Build Solution. Verify that the solution compiles, and correct any errors if necessary.
48.On the DEBUG menu, click Start Without Debugging.
Verify that the program runs and displays the integer values as before, followed by the strings in the following sequence:
! Are Are Feeling Hello Hope How I Today Well World You You

49.Press the Enter key to return to Visual Studio 2012.
Creating a Generic Method
As well as defining generic classes, you can create generic methods.
With a generic method, you can specify the types of the parameters and the return type by using a type parameter in a manner similar to that used when defining a generic class. In this way, you can define generalized methods that are type-safe and avoid the overhead of casting (and boxing, in some cases). Generic methods are frequently used in conjunction with generic classes; you need them for methods that take generic types as parameters or that have a return type that is a generic type.
You define generic methods by using the same type parameter syntax that you use when creating generic classes. (You can also specify constraints.) For example, the following generic Swap<T> method swaps the values in its parameters. Because this functionality is useful regardless of the type of data being swapped, it is helpful to define it as a generic method:
static void Swap<T>(ref T first, ref T second)
{
T temp = first;
first = second;
second = temp;
}
You invoke the method by specifying the appropriate type for its type parameter. The following examples show how to invoke the Swap<T> method to swap over two ints and two strings:
int a = 1, b = 2;
Swap<int>(ref a, ref b);
...
string s1 = "Hello", s2 = "World";
Swap<string>(ref s1, ref s2);
NOTE
Just as instantiating a generic class with different type parameters causes the compiler to generate different types, each distinct use of the Swap<T> method causes the compiler to generate a different version of the method. Swap<int> is not the same method as Swap<string>—both methods just happen to have been generated from the same generic template, so they exhibit the same behavior, albeit over different types.
Defining a Generic Method to Build a Binary Tree
In the previous exercise, you created a generic class for implementing a binary tree. The Tree<TItem> class provides the Insert method for adding data items to the tree. However, if you want to add a large number of items, repeated calls to the Insert method are not very convenient. In the following exercise, you will define a generic method called InsertIntoTree that you can use to insert a list of data items into a tree with a single method call. You will test this method by using it to insert a list of characters into a tree of characters.
Write the InsertIntoTree method
1. Using Visual Studio 2012, create a new project by using the Console Application template. In the New Project dialog box, name the project BuildTree. Set the Location to \Microsoft Press\Visual CSharp Step By Step\Chapter 17 under your Documents folder, select Create New Solution from the Solution drop-down list, and then click OK.
2. On the PROJECT menu, click Add Reference. In the Reference Manager - BuildTree dialog box, click the Browse button (not the Browse tab in the left pane).
3. In the Select the Files to Reference dialog box, move to the folder \Microsoft Press\Visual CSharp Step By Step\Chapter 17\BinaryTree\BinaryTree\bin\Debug under your Documents folder, click BinaryTree.dll, and then click Add.
4. In the Reference Manager – BuildTree dialog box, verify that the BinaryTree.dll assembly is listed and then click OK.
The BinaryTree assembly is added to the list of references shown in Solution Explorer.
5. In the Code and Text Editor window displaying the Program.cs file, add the following using directive to the top of the Program.cs file:
using BinaryTree;
This namespace contains the Tree<TItem> class.
6. Add a method called InsertIntoTree to the Program class after the Main method. This should be a static void method that takes a Tree<TItem> parameter and a params array of TItem elements called data. The tree parameter should be passed by reference, for reasons that will be described in a later step.
The method definition should look like this:
static void InsertIntoTree<TItem>(ref Tree<TItem> tree, params TItem[] data)
{
}
TIP
An alternative way of implementing this method is to create an extension method of the Tree<TItem> class by prefixing the Tree<TItem> parameter with the this keyword and defining the InsertIntoTree method in a static class, like this:
public static class TreeMethods
{
public static void InsertIntoTree<TItem>(this Tree<TItem> tree,
params TItem[] data)
{
...
}
...
}
The primary advantage of this approach is that you can invoke the InsertIntoTree method directly on a Tree<TItem> object rather than pass the Tree<TItem> in as a parameter. However, for this exercise, you will keep things simple.
7. The TItem type used for the elements being inserted into the binary tree must implement the IComparable<TItem> interface. Modify the definition of the InsertIntoTree method and add the where clause shown in bold type in the following code:
8. static void InsertIntoTree<TItem>(ref Tree<TItem> tree,
9. params TItem[] data) where TItem : IComparable<TItem>
10.{
}
11.Add the following statements shown in bold type to the InsertIntoTree method. These statements iterate through the params list, adding each item to the tree by using the Insert method. If the value specified by the tree parameter is null initially, a new Tree<TItem> is created; this is why the tree parameter is passed by reference.
12.static void InsertIntoTree<TItem>(ref Tree<TItem> tree,
13. params TItem[] data) where TItem : IComparable<TItem>
14.{
15. foreach (TItem datum in data)
16. {
17. if (tree == null)
18. {
19. tree = new Tree<TItem>(datum);
20. }
21. else
22. {
23. tree.Insert(datum);
24. }
25. }
}
Test the InsertIntoTree method
1. In the Main method of the Program class, add the following statements shown in bold type that create a new Tree for holding character data, populate it with some sample data by using the InsertIntoTree method, and then display it by using the WalkTree method of Tree:
2. static void Main(string[] args)
3. {
4. Tree<char> charTree = null;
5. InsertIntoTree<char>(ref charTree, 'M', 'X', 'A', 'M', 'Z', 'Z', 'N');
6. string sortedData = charTree.WalkTree();
7. Console.WriteLine("Sorted data is: {0}", sortedData);
}
8. On the BUILD menu, click Build Solution. Verify that the solution compiles, and correct any errors if necessary.
9. On the DEBUG menu, click Start Without Debugging.
The program runs and displays the character values in the following order:
A M M N X Z Z
10.Press the Enter key to return to Visual Studio 2012.
Variance and Generic Interfaces
In Chapter 8, you learned that you can use the object type to hold a value or reference of any other type. For example, the following code is completely legal:
string myString = "Hello";
object myObject = myString;
Remember that in inheritance terms, the String class is derived from the Object class, so all strings are objects.
Now consider the following generic interface and class:
interface IWrapper<T>
{
void SetData(T data);
T GetData();
}
class Wrapper<T> : IWrapper<T>
{
private T storedData;
void IWrapper<T>.SetData(T data)
{
this.storedData = data;
}
T IWrapper<T>.GetData()
{
return this.storedData;
}
}
The Wrapper<T> class provides a simple wrapper around a specified type. The IWrapper interface defines the SetData method that the Wrapper<T> class implements to store the data and the GetData method that the Wrapper<T> class implements to retrieve the data. You can create an instance of this class and use it to wrap a string like this:
Wrapper<string> stringWrapper = new Wrapper<string>();
IWrapper<string> storedStringWrapper = stringWrapper;
storedStringWrapper.SetData("Hello");
Console.WriteLine("Stored value is {0}", storedStringWrapper.GetData());
The code creates an instance of the Wrapper<string> type. It references the object through the IWrapper<string> interface to call the SetData method. (The Wrapper<T> type implements its interfaces explicitly, so you must call the methods through an appropriate interface reference.) The code also calls the GetData method through the IWrapper<string> interface. If you run this code, it outputs the message “Stored value is Hello”.
Now look at the following line of code:
IWrapper<object> storedObjectWrapper = stringWrapper;
This statement is similar to the one that creates the IWrapper<string> reference in the previous code example, the difference being that the type parameter is object rather than string. Is this code legal? Remember that all strings are objects (you can assign a string value to an object reference, as shown earlier), so in theory this statement looks promising. However, if you try it, the statement will fail to compile with the message “Cannot implicitly convert type ‘Wrapper<string>’ to ‘IWrapper<object>’.”
You can try an explicit cast such as this:
IWrapper<object> storedObjectWrapper = (IWrapper<object>)stringWrapper;
This code compiles, but will fail at run time with an InvalidCastException exception. The problem is that although all strings are objects, the converse is not true. If this statement was allowed, you could write code like this, which ultimately attempts to store a Circle object in a string field:
IWrapper<object> storedObjectWrapper = (IWrapper<object>)stringWrapper;
Circle myCircle = new Circle();
storedObjectWrapper.SetData(myCircle);
The IWrapper<T> interface is said to be invariant. You cannot assign an IWrapper<A> object to a reference of type IWrapper<B>, even if type A is derived from type B. By default, C# implements this restriction to ensure the type safety of your code.
Covariant Interfaces
Suppose you defined the IStoreWrapper<T> and IRetrieveWrapper<T> interfaces shown next in place of IWrapper<T> and implemented these interfaces in the Wrapper<T> class, like this:
interface IStoreWrapper<T>
{
void SetData(T data);
}
interface IRetrieveWrapper<T>
{
T GetData();
}
class Wrapper<T> : IStoreWrapper<T>, IRetrieveWrapper<T>
{
private T storedData;
void IStoreWrapper<T>.SetData(T data)
{
this.storedData = data;
}
T IRetrieveWrapper<T>.GetData()
{
return this.storedData;
}
}
Functionally, the Wrapper<T> class is the same as before, except that you access the SetData and GetData methods through different interfaces:
Wrapper<string> stringWrapper = new Wrapper<string>();
IStoreWrapper<string> storedStringWrapper = stringWrapper;
storedStringWrapper.SetData("Hello");
IRetrieveWrapper<string> retrievedStringWrapper = stringWrapper;
Console.WriteLine("Stored value is {0}", retrievedStringWrapper.GetData());
Now, is the following code legal?
IRetrieveWrapper<object> retrievedObjectWrapper = stringWrapper;
The quick answer is no, and it fails to compile with the same error as before. But if you think about it, although the C# compiler has deemed that this statement is not type safe, the reasons for assuming this are no longer valid. The IRetrieveWrapper<T> interface only allows you to read the data held in the IWrapper<T> object by using the GetData method, and it does not provide any way to change the data. In situations such as this where the type parameter occurs only as the return value of the methods in a generic interface, you can inform the compiler that some implicit conversions are legal and that it does not have to enforce strict type-safety. You do this by specifying the out keyword when you declare the type parameter, like this:
interface IRetrieveWrapper<out T>
{
T GetData();
}
This feature is called covariance. You can assign an IRetrieveWrapper<A> object to an IRetrieve Wrapper<B> reference as long as there is a valid conversion from type A to type B, or type A derives from type B. The following code now compiles and runs as expected:
// string derives from object, so this is now legal
IRetrieveWrapper<object> retrievedObjectWrapper = stringWrapper;
You can specify the out qualifier with a type parameter only if the type parameter occurs as the return type of methods. If you use the type parameter to specify the type of any method parameters, the out qualifier is illegal and your code will not compile. Also, covariance works only with reference types. This is because value types cannot form inheritance hierarchies. So, the following code will not compile because int is a value type:
Wrapper<int> intWrapper = new Wrapper<int>();
IStoreWrapper<int> storedIntWrapper = intWrapper; // this is legal
...
// the following statement is not legal - ints are not objects
IRetrieveWrapper<object> retrievedObjectWrapper = intWrapper;
Several of the interfaces defined by the .NET Framework exhibit covariance, including the IEnumerable<T> interface, which you will meet in Chapter 19
NOTE
Only interface and delegate types (which you will meet in Chapter 18) can be declared as covariant. You do not specify the out modifier with generic classes.
Contravariant Interfaces
Contravariance follows a similar principle to covariance except that it works in the opposite direction; it enables you to use a generic interface to reference an object of type B through a reference to type A as long as type B derives type A. This sounds complicated, so it is worth looking at an example from the .NET Framework class library.
The System.Collections.Generic namespace in the .NET Framework provides an interface called IComparer, which looks like this:
public interface IComparer<in T>
{
int Compare(T x, T y);
}
A class that implements this interface has to define the Compare method, which is used to compare two objects of the type specified by the T type parameter. The Compare method is expected to return an integer value: zero if the parameters x and y have the same value, negative if x is less than y, and positive if x is greater than y. The following code shows an example that sorts objects according to their hash code. (The GetHashCode method is implemented by the Object class. It simply returns an integer value that identifies the object. All reference types inherit this method and can override it with their own implementations.)
class ObjectComparer : IComparer<Object>
{
int IComparer<Object>.Compare(Object x, Object y)
{
int xHash = x.GetHashCode();
int yHash = y.GetHashCode();
if (xHash == yHash)
return 0;
if (xHash < yHash
return -1;
return 1;
}
}
You can create an ObjectComparer object and call the Compare method through the IComparer<Object> interface to compare two objects, like this:
Object x = ...;
Object y = ...;
ObjectComparer objectComparer = new ObjectComparer();
IComparer<Object> objectComparator = objectComparer;
int result = objectComparator.Compare(x, y);
That’s the boring bit. What is more interesting is that you can reference this same object through a version of the IComparer interface that compares strings, like this:
IComparer<String> stringComparator = objectComparer;
At first glance, this statement seems to break every rule of type safety that you can imagine. However, if you think about what the IComparer<T> interface does, this approach makes sense. The purpose of the Compare method is to return a value based on a comparison between the parameters passed in. If you can compare Objects, you certainly should be able to compare Strings, which are just specialized types of Objects. After all, a String should be able to do anything that an Object can do—that is the purpose of inheritance.
This still sounds a little presumptive, however. How does the C# compiler know that you are not going to perform any type-specific operations in the code for the Compare method that might fail if you invoke the method through an interface based on a different type? If you revisit the definition of the IComparer interface, you can see the in qualifier prior to the type parameter:
public interface IComparer<in T>
{
int Compare(T x, T y);
}
The in keyword tells the C# compiler that either you can pass the type T as the parameter type to methods or you can pass any type that derives from T. You cannot use T as the return type from any methods. Essentially, this enables you to reference an object either through a generic interface based on the object type or through a generic interface based on a type that derives from the object type. Basically, if a type A exposes some operations, properties, or fields, then if type B derives from type A, it must also expose the same operations (which might behave differently if they have been overridden), properties, and fields. Consequently, it should be safe to substitute an object of type B for an object of type A.
Covariance and contravariance might seem like fringe topics in the world of generics, but they are useful. For example, the List<T> generic collection class (in the System.Collections.Generic namespace) uses IComparer<T> objects to implement the Sort and BinarySearch methods. AList<Object> object can contain a collection of objects of any type, so the Sort and BinarySearch methods need to be able to sort objects of any type. Without using contravariance, the Sort and BinarySearch methods would need to include logic that determines the real types of the items being sorted or searched and then implement a type-specific sort or search mechanism. However, unless you are a mathematician, it can be quite difficult to recall what covariance and contravariance actually do. The way I remember, based on the examples in this section, is as follows:
§ Covariance example. If the methods in a generic interface can return strings, they can also return objects. (All strings are objects.)
§ Contravariance example. If the methods in a generic interface can take object parameters, they can take string parameters. (If you can perform an operation by using an object, you can perform the same operation by using a string because all strings are objects.)
NOTE
As with covariance, only interface and delegate types can be declared as contravariant. You do not specify the in modifier with generic classes.
Summary
In this chapter, you learned how to use generics to create type-safe classes. You saw how to instantiate a generic type by specifying a type parameter. You also saw how to implement a generic interface and define a generic method. Finally, you learned how to define covariant and contravariant generic interfaces that can operate with a hierarchy of types.
§ If you want to continue to the next chapter
Keep Visual Studio 2012 running, and turn to Chapter 18.
§ If you want to exit Visual Studio 2012 now
On the FILE menu, click Exit. If you see a Save dialog box, click Yes and save the project.
Chapter 17 Quick Reference
|
To |
Do this |
|
Instantiate an object by using a generic type |
Specify the appropriate generic type parameter. For example: Queue<int> myQueue = new Queue<int>(); |
|
Create a new generic type |
Define the class using a type parameter. For example: public class Tree<TItem> { ... } |
|
Restrict the type that can be substituted for the generic type parameter |
Specify a constraint by using a where clause when defining the class. For example: public class Tree<TItem> where TItem : IComparable<TItem> { ... } |
|
Define a generic method |
Define the method by using type parameters. For example: static void InsertIntoTree<TItem> (Tree<TItem> tree, params TItem[] data) { ... } |
|
Invoke a generic method |
Provide types for each of the type parameters. For example: InsertIntoTree<char>(charTree, 'Z', 'X'); |
|
Define a covariant interface |
Specify the out qualifier for covariant type parameters. Reference the covariant type parameters only as the return types from methods and not as the types for method parameters: interface IRetrieveWrapper<out T> { T GetData(); } |
|
Define a contravariant interface |
Specify the in qualifier for contravariant type parameters. Reference the contravariant type parameters only as the types of method parameters and not as return types: public interface IComparer<in T> { int Compare(T x, T y); } |
All materials on the site are licensed Creative Commons Attribution-Sharealike 3.0 Unported CC BY-SA 3.0 & GNU Free Documentation License (GFDL)
If you are the copyright holder of any material contained on our site and intend to remove it, please contact our site administrator for approval.
© 2016-2025 All site design rights belong to S.Y.A.