Beginning Windows 8 Data DevelopmentUsing C# and JavaScript (2013)
6. Local Data Access III: SQLite
Vinodh Kumar1
(1)
NY, US
Abstract
In the last two chapters we looked at how to read and write data locally using the Jet API, application storage, and IndexedDB. In this chapter, we discuss yet another local storage option for Windows 8 apps, SQLite. This chapter starts with an introduction to SQLite, and then we will look into various setup procedures needed to include SQLite in a project. We also learn to use sqlite-net, a SQLite wrapper. As always, we end this chapter by developing a Windows 8 app using SQLite as the data storage option. We use MVVM Light as our MVVM framework for this Bill Reminder app, and by doing so we learn to integrate and use MVVM Light, one of the most popular MVVM frameworks, in the project.
In the last two chapters we looked at how to read and write data locally using the Jet API, application storage, and IndexedDB. In this chapter, we discuss yet another local storage option for Windows 8 apps, SQLite. This chapter starts with an introduction to SQLite, and then we will look into various setup procedures needed to include SQLite in a project. We also learn to use sqlite-net, a SQLite wrapper. As always, we end this chapter by developing a Windows 8 app using SQLite as the data storage option. We use MVVM Light as our MVVM framework for this Bill Reminder app, and by doing so we learn to integrate and use MVVM Light, one of the most popular MVVM frameworks, in the project.
Introduction to SQLite
SQLite is a software library that implements a self-contained, serverless, zero-configuration, transactional SQL database engine. It’s a file-based database that can be used without any need for a database engine like SQLServer, Oracle, and so on. SQLite is a relational database management system that is contained in a small C programing library. SQLite is the most widely deployed SQL database engine in the world and its source code exists in the public domain. It is free for use for both private and commercial purposes.
SQLite is very similar to SQL Server Compact in its characteristics, but unlike SQL Server Compact, which in most cases is part of the operating system (Windows Phone OS, Windows Mobile OS), SQLite is an embedded database that should be included explicitly within the app and run in-process within the app. Any SQLite database file can be copied from one platform to another regardless of the CPU’s byte-ordering.
Integrating SQLite
Now we will see how to integrate SQLite. The SQLite Development Team made intergrating SQLite within a Windows 8 app simple and straightforward by packaging the binaries in such a way that it pulls the right DLLs, depending on the CPU architecture. To install SQLite from the Visual Studio Tools menu, select the Extensions and Updates menu. This opens an Extension and Update dialog window. Search for sqlite in the search term. This displays the SQLite for Windows Runtime package as shown in Figure 6-1.
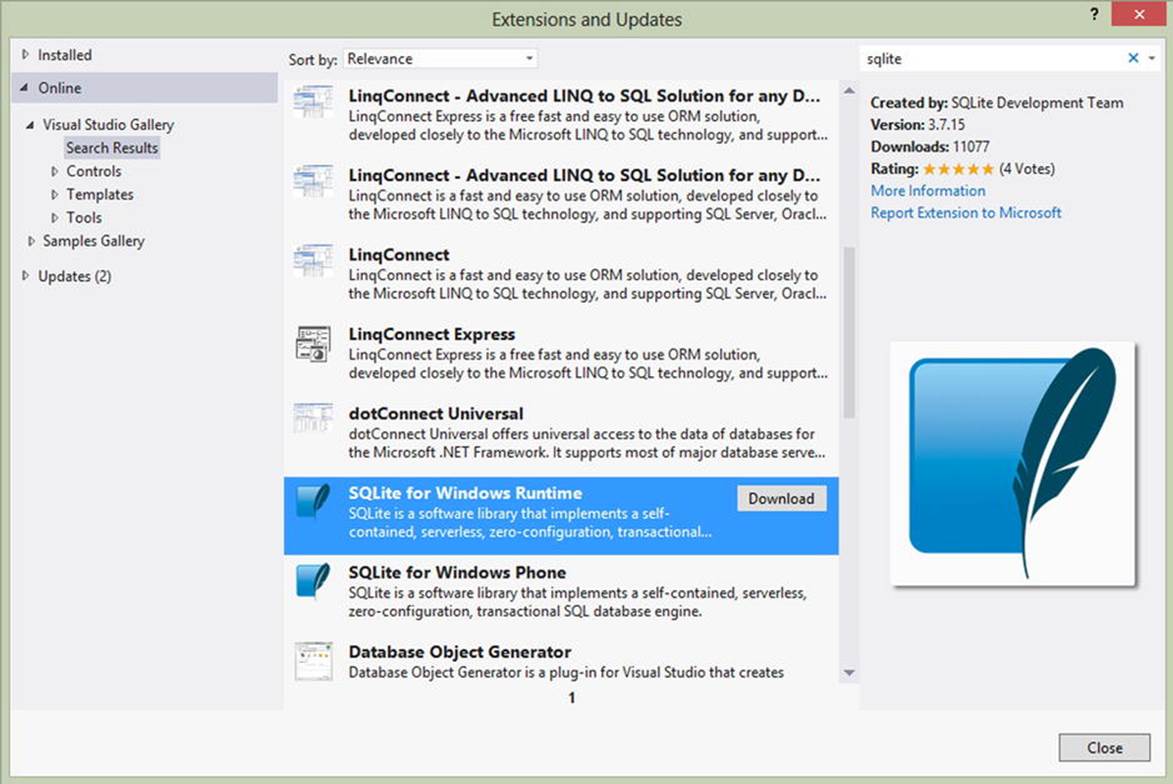
Figure 6-1.
Search result shows SQLite for Windows Runtime package
Clicking the Download button installs the SQLite runtime and restarts Visual Studio. Once it is installed, you can reference SQLite in the project using the Reference Manager. SQLite will show up in Extensions under the Windows section as shown in Figure 6-2.
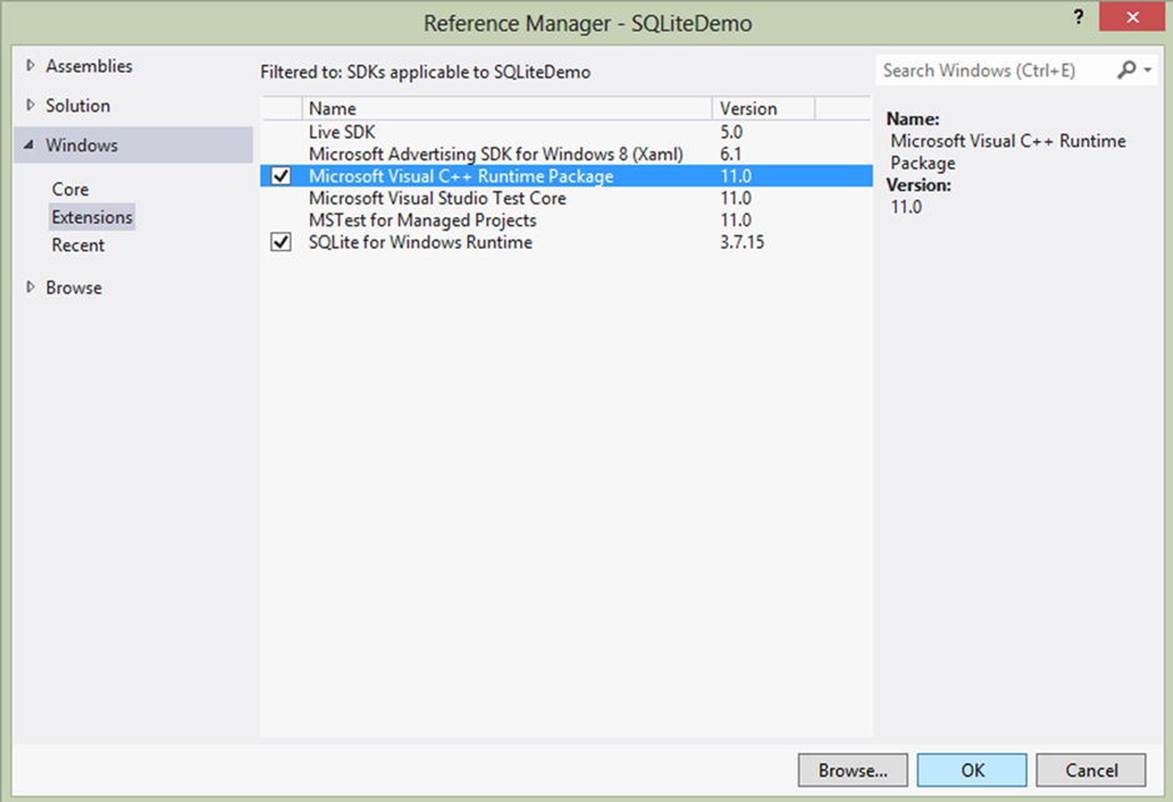
Figure 6-2.
Adding project reference to SQLite for Windows Runtime
We should also reference the Microsoft Visual C++ Runtime Package because SQLite for Windows Runtime depends on this. In fact, all native libraries require the Visual C++ Runtime package.
Now when you compile the project there will be a compile time error as we can’t build the project to target Any CPU; hence we need to go to Project’s Configuration Manager Dialog box to change the targeted platform to X86 as shown in Figure 6-3. To target multiple architectures like X86, x64, and ARM we need to create three separate packages—one targeting each architecture—and then upload the packages to the Windows Stores, as shown in Figures 6-4 and 6-5.

Figure 6-3.
Changing the targeted platform from Visual Studio Configuration Manager
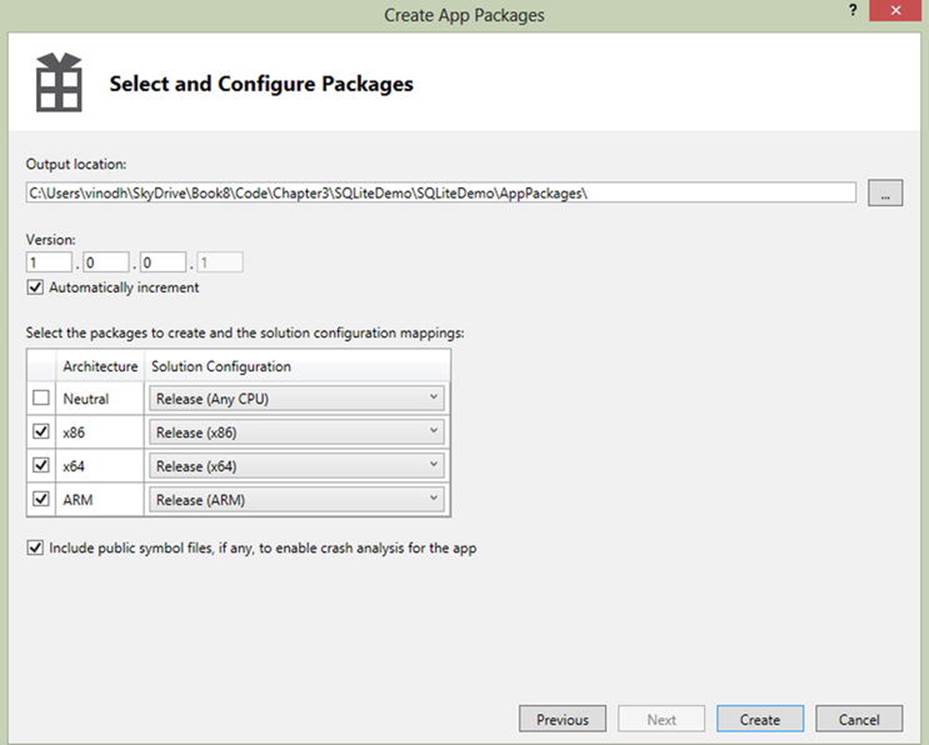
Figure 6-4.
Creating packages targeting all three architectures
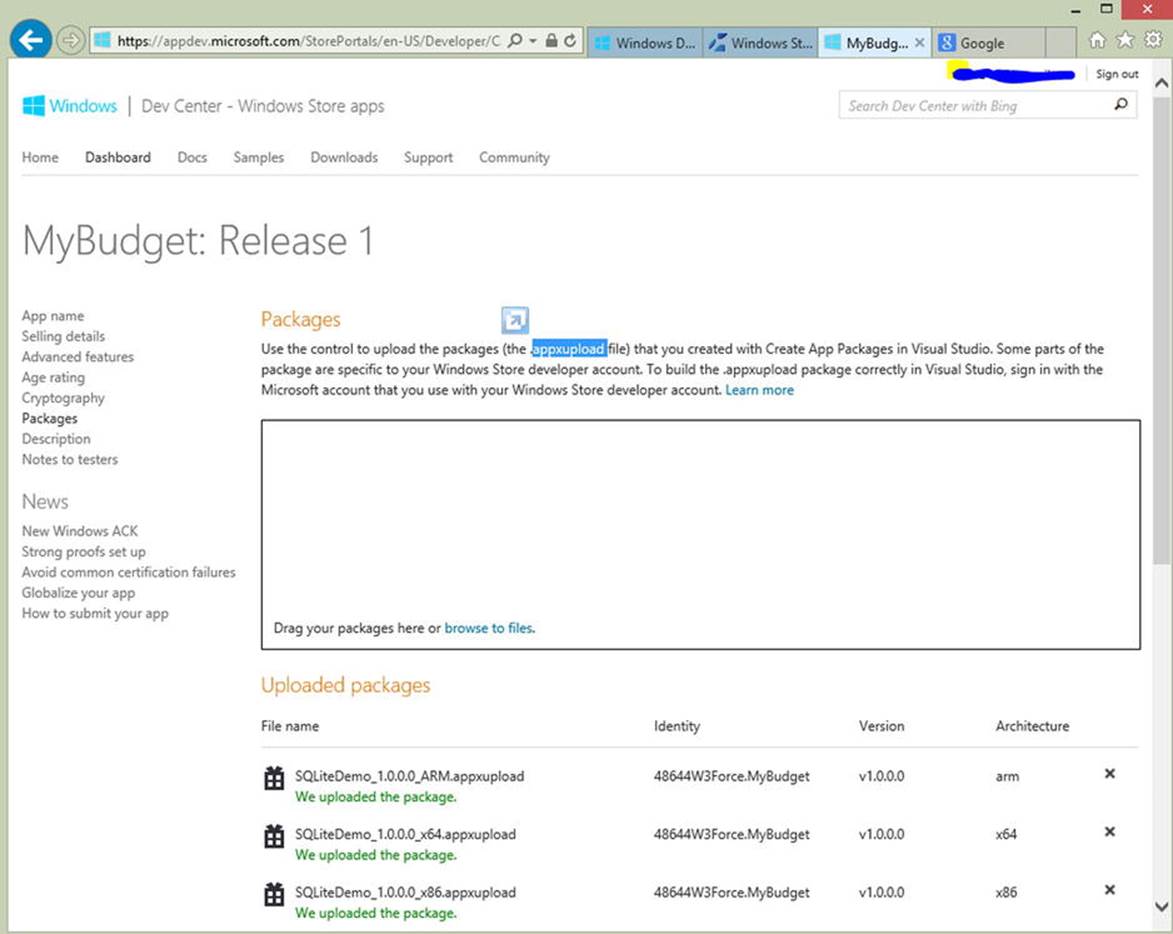
Figure 6-5.
Adding all three packages to the Windows Store App Submission Wizard
At this point the SQLite library becomes a part of the project but we need a managed wrapper in C# for interacting with the C++ library. Because writing something similar is not within the scope of this book, we use an open source LINQ-based wrapper, sqlite-net, that we will be able to get from NuGet (see Figure 6-6).
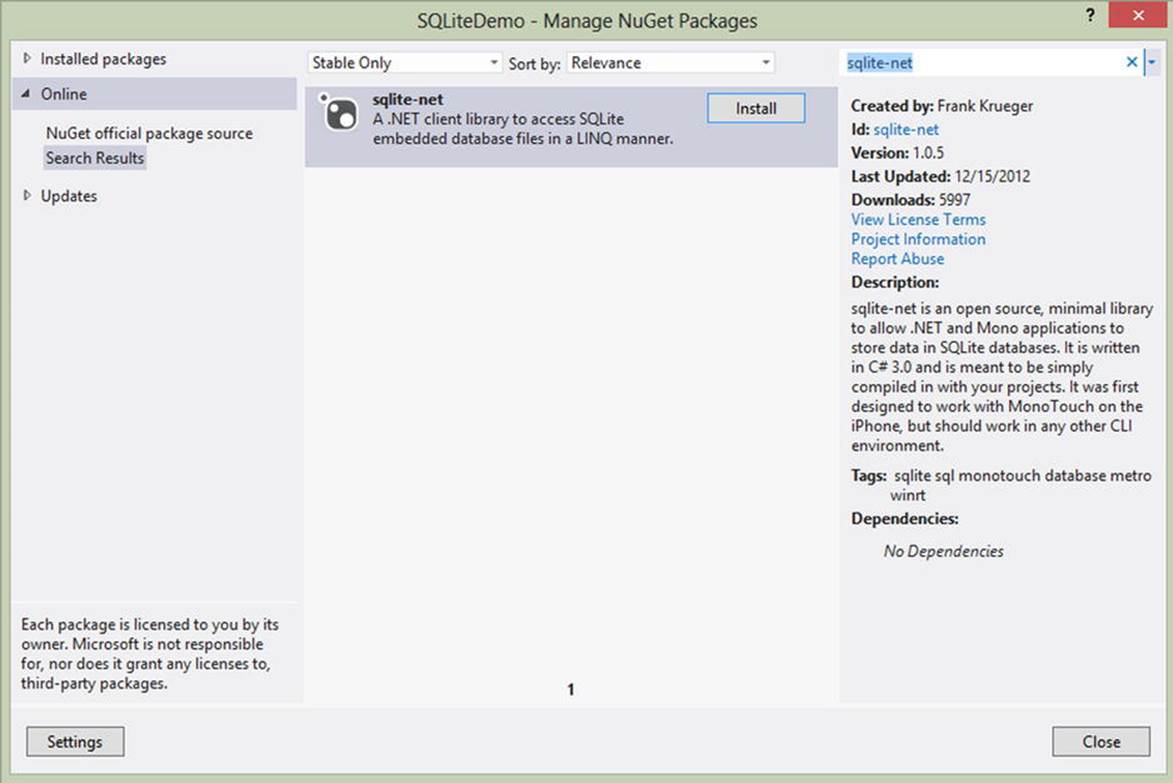
Figure 6-6.
Adding sqlite-net library to the project
Introduction to MVVM Light Toolkit
One of the most popular MVVM frameworks is MVVM Light Toolkit, which is a versatile framework that allows you to construct customized applications. It provides help getting around some of the main points in building MVVM applications. MVVM Light was developed by Laurent Bugnion initially for Silverlight and Windows Phone, and later was ported to Windows 8 apps. MVVM Light Toolkit consists of several components that make writing MVVM applications easier, including the following.
· ObservableObject: This class basically implements INotifyPropertyChanged and can be used in the places where ViewModelBase is not necessary but the INotifyPropertyChanged functionality is still required.
· ViewModelBase: This class can be used as the base class for ViewModels and it implements INotifyPropertyChanged.
· Messenger: This class is used to communicate within the application.
· RelayCommand: This implements the ICommand interface that a button control needs to pass the calls on to a function in the ViewModel.
· Visual Studio Project Templates.
MVVM Light Toolkit for Visual Studio 2012 can be downloaded from http://mvvmlight.codeplex.com/ .
After installing the toolkit you will see that there is a new project template available in the Visual Studio 2012 New Project dialog box, as shown in Figure 6-7.
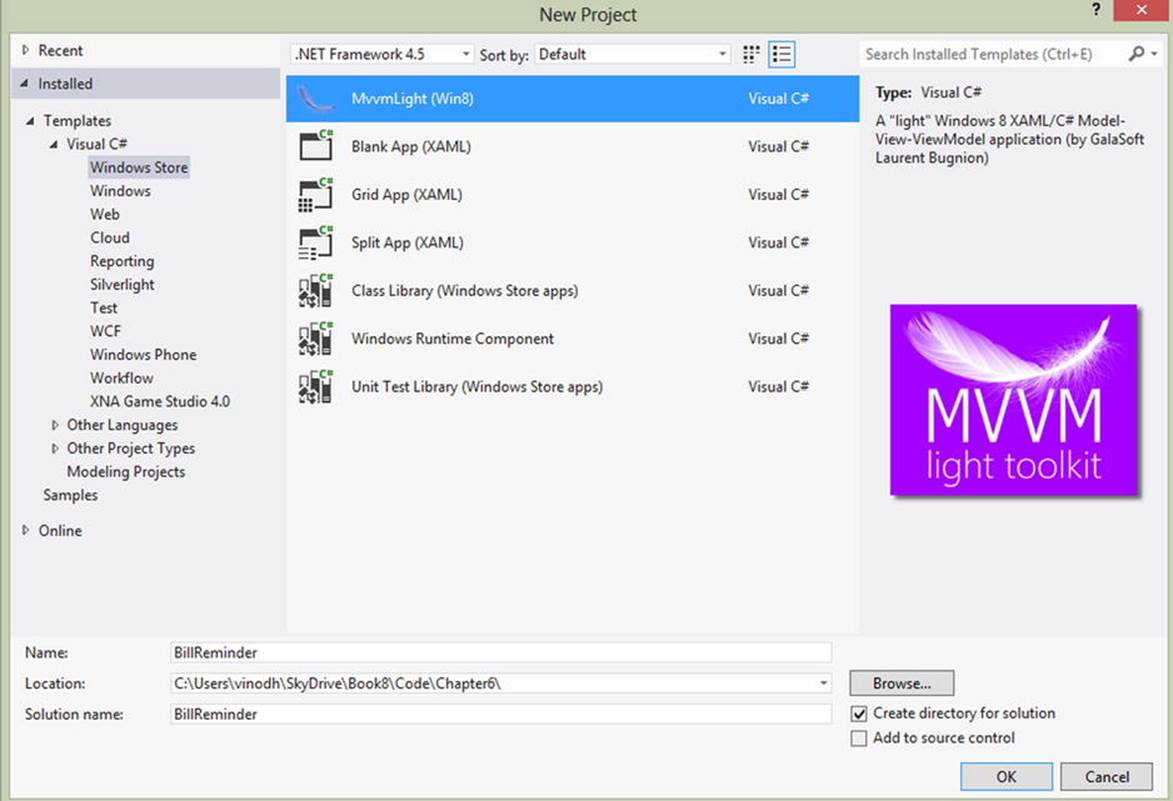
Figure 6-7.
MVVM Light Windows Store app project template
We can also include the MVVM Light in an existing project by getting it from NuGet as shown in Figure 6-8.
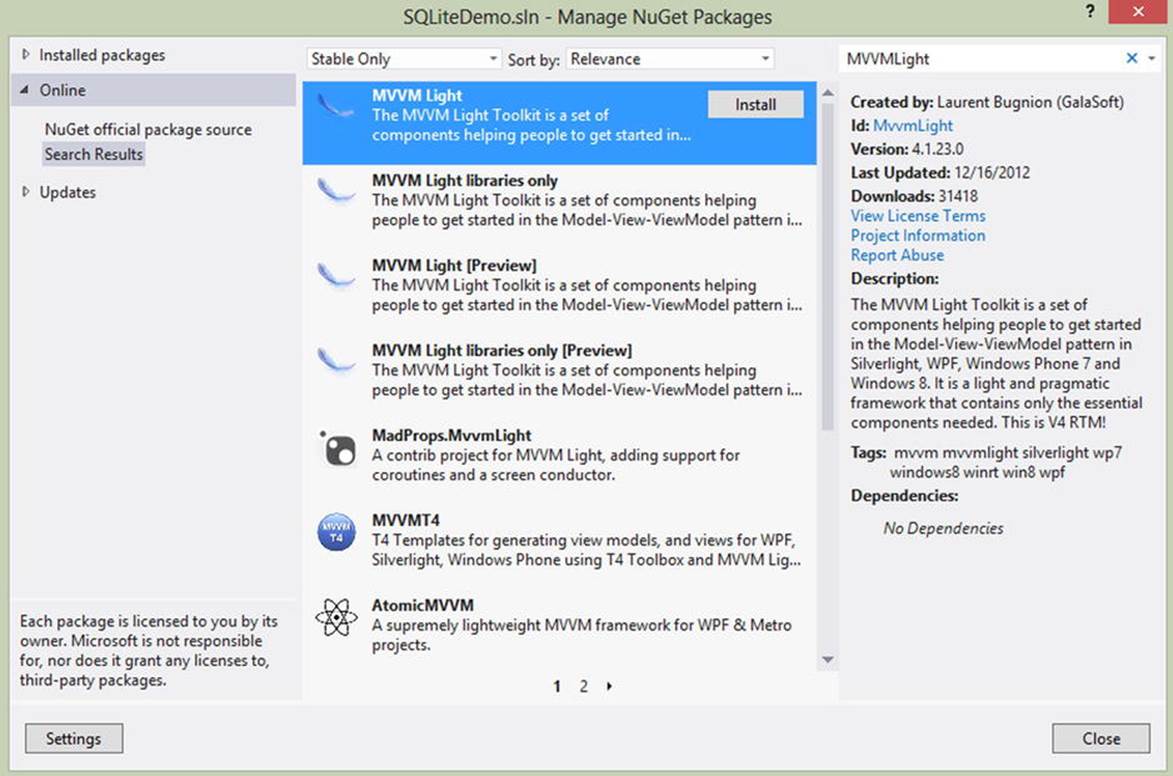
Figure 6-8.
Referencing MVVM Light from NuGet Packages
Building a Bill Reminder Windows 8 App
Now that we understand the fundementals of SQLite and MVVM Light, we will use these skills in building a simple Bill Reminder Windows 8 app. By building this app, you will learn to integrate SQLite and use it as a local database within a Windows 8 app. You will also learn to apply some of the MVVM and XAML techniques like ViewModelLocator, IOC, EventAggregator, RelayCommand, and ValueConverters. Knowing these techiniques will help you understand some of the common MVVM implementation practices that can also be applied when using the other MVVM Frameworks like Caliburn.Micro and Prism.
Our Bill Reminder app is a personal finance application that helps to keep track of one’s bills. Using this app, the user can create a bill reminder. As shown in Figure 6-9, this app displays the recent bills on the start page with an option to mark a bill as paid.
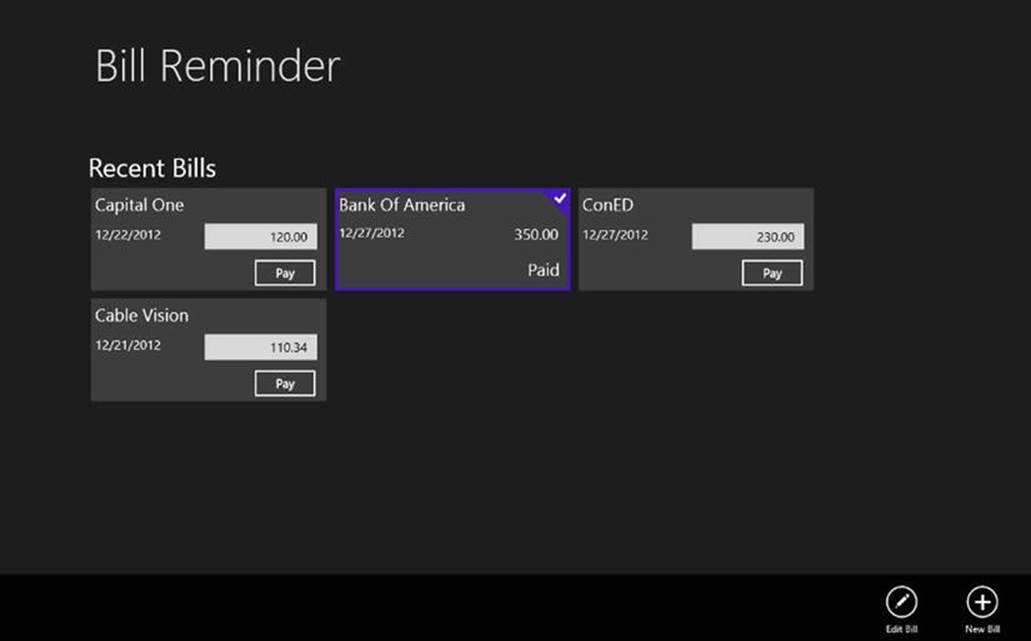
Figure 6-9.
The Bill Reminder app start page lists the recent bills
Project Structure
The project has three main folders corresponding to Model, ViewModel, and View. The project structure shown in Figure 6-10 is very similar to the New York Times Best Seller MVVM sample that we created in Chapter 1.
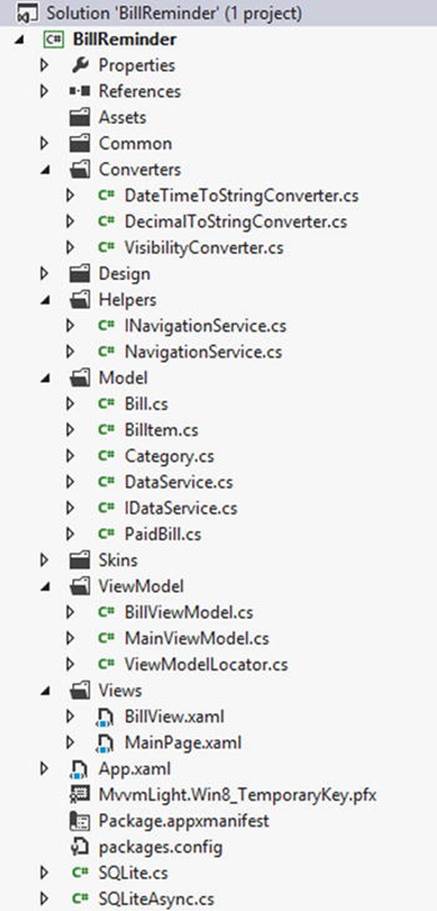
Figure 6-10.
Bil lReminder app project structure
Creating Database Tables
The main functionality of our Bill Reminder app is to help keep track of the bills. In this app we can create a new bill, edit a bill, and mark a bill paid. We create three SQLite database tables for this purpose.
· Category: This is a lookup table for grouping bills into various categories, such as credit card, loan, and so on.
· Bill: This table stores the bill details.
· Paid Bill: This table is used to track the paid bill details.
The sqlite-net approach is similar to other ORM-based databases like SQLCE for Windows Phone. Hence we will create a class for every table that we need to create and will augment the properties with attributes (see Figure 6-11). That will let sqlite-net assign matching column properties when generating the table in SQLite.
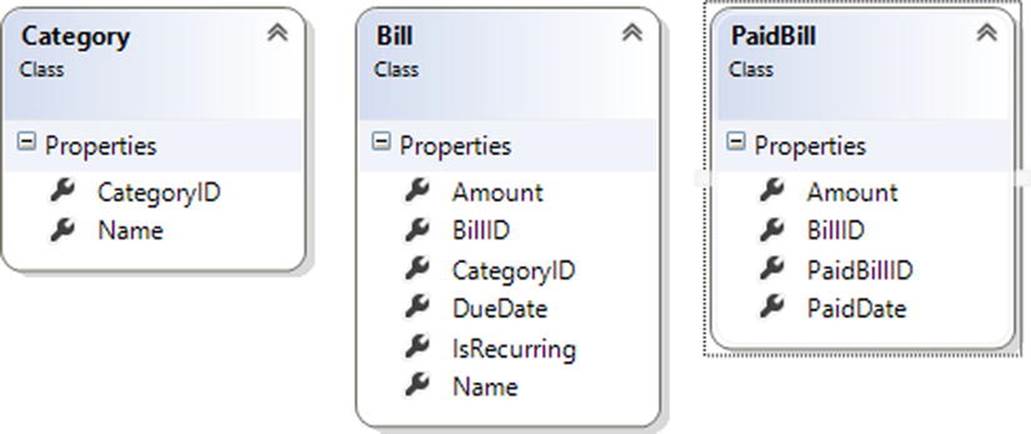
Figure 6-11.
Class diagram of the Bill Reminder SQLite tables
These classes, shown in Listing 6-1, are enhanced with attributes that are supported by the sqlite-net library. Let’s briefly look into the funtionality of each one of these attributes.
· PrimaryKey: Used to uniquely identify each record in a table.
· AutoIncrement: Used in conjection with the PrimaryKey column to create a value automatically every time a new row is inserted.
· MaxLength: Used to specify the maximum number of characters that can be stored in the column.
· Indexed: Used in a column that will most likely be the WHERE clause, ORDER BY, or JOIN in the queries. An index on the appropriate columns can improve performance.
Listing 6-1. Category, Bill, and PaidBill Classes
public class Category
{
[PrimaryKey, AutoIncrement]
public int CategoryID { get; internal set; }
[MaxLength(50)]
public string Name { get; internal set; }
}
public class Bill
{
[PrimaryKey, AutoIncrement]
public int BillID { get; internal set; }
[MaxLength(150)]
public string Name { get; internal set; }
public DateTime DueDate { get; internal set; }
public bool IsRecurring { get; internal set; }
public int CategoryID{get; internal set; }
public Decimal Amount { get; internal set; }
}
public class PaidBill
{
[PrimaryKey]
public int PaidBillID { get; internal set; }
[Indexed]
public int BillID { get; internal set; }
public DateTime PaidDate { get; internal set; }
public Decimal Amount { get; internal set; }
}
Note
We intentionally left out some of the code like Value Converters in this chapter to simplify the explanations improve readability. The source code that you can download from the APress web site has the complete implementation.
As mentioned earlier, the SQLite database is a single file database. Let’s name it billreminder.sqlite and store the file in the app’s local folder. To create the database, add the code shown in Listing 6-2 to the APP.xaml OnLaunched method.
Listing 6-2. Creating SQLite Database with Three Tables
private string dBPath = string.Empty;
public string DBPath
{
get
{
return dBPath;
}
set
{
if (dBPath == value)
{
return;
}
dBPath = value;
}
}
protected override void OnLaunched(LaunchActivatedEventArgs args)
{
Frame rootFrame = Window.Current.Content as Frame;
// Do not repeat app initialization when the window already has content,
// just ensure that the window is active
if (rootFrame == null)
{
// Create a frame to act as the navigation context and navigate to the first page
rootFrame = new Frame();
dBPath = Path.Combine(
Windows.Storage.ApplicationData.Current.LocalFolder.Path,
"billreminder.sqlite");
// Initialize the database
using (var db = new SQLite.SQLiteConnection(dBPath))
{
// Create the tables if they don't exist
db.CreateTable<Category>();
db.CreateTable<Bill>();
db.CreateTable<PaidBill>();
LoadDefaultData();
}
// Place the frame in the current window
Window.Current.Content = rootFrame;
}
if (rootFrame.Content == null)
{
if (!rootFrame.Navigate(typeof(MainPage), args.Arguments))
{
throw new Exception("Failed to create initial page");
}
}
// Ensure the current window is active
Window.Current.Activate();
DispatcherHelper.Initialize();
}
The code in Listing 6-2 creates the database and tables if they are not yet created and will call the LoadDefaultData method to insert default values in to the Category table. We have used the sqlite-net SQLLiteConnection class to create the table. The CreateTable method of theSQLLiteConnection class that takes a class as a parameter is used to create a table in the database based on the properties and attributes of the class (see Listing 6-3).
Listing 6-3. Loading Default Data into the Category Table
private void LoadDefaultData()
{
using (var db = new SQLite.SQLiteConnection(dBPath))
{
if (!db.Table<Category>().Any())
{
db.Insert(new Category()
{
Name = "Credit Card"
});
db.Insert(new Category()
{
Name = "Loan"
});
db.Insert(new Category()
{
Name = "Utilities"
});
}
}
}
Model
Apart from the ORM class files (Category, Bill, and PaidBill) that we already discussed, the Model folder also includes the IDataService interface and DataService class. The DataService class is the central repository for all the database interactions, like methods for Create, Read, Update, and Delete (CRUD) actions. Listing 6-4 shows three methods that are in the DataService class to insert, update, and read bills. In each of these methods, after establishing a connection using SQLiteConnection, we use the Insert, Update, or Get method to add, update, or read bill data.
Listing 6-4. Methods for Adding, Updating, and Retrieving Bills
public void AddBill(Bill bill)
{
using (var db = new SQLite.SQLiteConnection(DBPath))
{
db.Insert(bill);
}
}
public void UpdateBill(Bill bill)
{
using (var db = new SQLite.SQLiteConnection(DBPath))
{
db.Update(bill);
}
}
public Bill GetBillByID(int billID)
{
using (var db = new SQLite.SQLiteConnection(DBPath))
{
return db.Get<Bill>(billID);
}
}
The DataService class also includes a GetBills method that takes date as a parameter. This method gets all the bills for a given month by executing a SQL query using the SQLiteConnection object’s Query method (see Listing 6-5). The generic parameter to the Query method specifies the type of object to create for each row. It can be one of your table classes, or any other class with public properties that match the column returned by the query.
Listing 6-5. The GetBills Method Gets All the Bills for a Given Month
public ObservableCollection<Billtem> GetBills(DateTime month)
{
DateTime fromDate = new DateTime(month.Year, month.Month, 1);//first day of the month
DateTime toDate = fromDate.AddMonths(1).AddDays(-1);// last day of the month
string sql = string.Format("SELECT b.BillID,b.Name, c.Name as Category, b.DueDate, p.PaidDate, b.Amount, p.Amount as PaidAmount FROM Bill b Join Category c on b.CategoryID= c.CategoryID LEFT JOIN PaidBill p on (p.BillID = b.BillID ) WHERE (b.IsRecurring = 1 or b.DueDate BETWEEN '{0}' AND '{1}')", fromDate.ToString("MM/dd/yyy"), toDate.ToString("MM/dd/yyy"));
var bills = new ObservableCollection<Billtem>();
using (var db = new SQLite.SQLiteConnection(DBPath))
{
var query = db.Query<Billtem>(sql);
foreach (var item in query)
{
Billtem bi = new Billtem(this);
bi.BillID = item.BillID;
bi.Name = item.Name;
bi.Category = item.Category;
bi.DueDate = item.DueDate;
bi.Amount = item.Amount;
bi.PaidAmount = item.PaidAmount;
bi.PaidDate = item.PaidDate;
if (bi.PaidAmount > 0 && bi.PaidDate > DateTime.MinValue)
{
bi.IsPaid = true;
}
bills.Add(bi);
}
}
return bills;
}
To match the query public property, we create a new class, Billtem, as shown in Listing 6-6. This class inherits MVVM Light ObservableObject, which in turn implements INotifyPropertyChanged.
Listing 6-6. Properties of the BillItem Class That Holds the Bill Information
public class Billtem : ObservableObject
{
private readonly IDataService _dataService;
public Billtem() { }
public Billtem(IDataService dataService)
{
_dataService = dataService;
}
public int BillID { get; set; }
private string _name = string.Empty;
public string Name
{
get
{
return _name;
}
set
{
if (_name == value)
{
return;
}
_name = value;
RaisePropertyChanged("Name");
}
}
private string _category = string.Empty;
public string Category
{
get
{
return _category;
}
set
{
if (_category == value)
{
return;
}
_category = value;
RaisePropertyChanged("Category");
}
}
private DateTime _dueDate = System.DateTime.Today;
public DateTime DueDate
{
get
{
return _dueDate;
}
set
{
if (_dueDate == value)
{ return; }
_dueDate = value;
RaisePropertyChanged("DueDate");
}
}
private DateTime _paidDate = System.DateTime.Today;
public DateTime PaidDate
{
get
{
return _paidDate;
}
set
{
if (_paidDate == value)
{ return; }
_paidDate = value;
RaisePropertyChanged("PaidDate");
}
}
private Decimal _amount = 0;
public Decimal Amount
{
get
{
return _amount;
}
set
{
if (_amount == value)
{ return; }
_amount = value;
RaisePropertyChanged("Amount");
}
}
private Decimal _paidAmount = 0;
public Decimal PaidAmount
{
get
{
return _paidAmount;
}
set
{
if (_paidAmount == value)
{ return; }
_paidAmount = value;
RaisePropertyChanged("PaidAmount");
}
}
private bool _isPaid ;
public bool IsPaid
{
get
{
return _isPaid;
}
set
{
if (_isPaid == value)
{ return; }
_isPaid = value;
RaisePropertyChanged("IsPaid");
}
}
}
The BillItem class also includes a RelayCommand that gets invoked when a bill is marked as paid by pressing the Pay button as shown in Figure 6-9. RelayCommand passes the call to the ExecutePayCommand method, which in turn calls the MarkPaid method in the DataService class, as shown in Listing 6-7.
Listing 6-7. RelayCommand Within the BillItem Class Calls the ExecutePayCommand Method
private RelayCommand _payCommand;
public RelayCommand PayCommand
{
get
{
return _payCommand
?? (_payCommand = new RelayCommand(ExecutePayCommand));
}
}
private void ExecutePayCommand()
{
PaidAmount = Amount;
_dataService.MarkPaid(BillID, PaidAmount);
IsPaid = true;
}
The MarkPaid method then inserts a row in the PaidBill table by using the SQLiteConnection object’s Execute method, as shown in Listing 6-8.
Listing 6-8. MarkPaid Method Inserts a Row in the PaidBill Table
public void MarkPaid(int billID, decimal amount)
{
using (var db = new SQLite.SQLiteConnection(DBPath))
{
db.Execute("INSERT INTO PaidBill (BillID, PaidDate, Amount) values (?,?,?)"
, billID
, DateTime.Today.ToString("MM/dd/yyyy")
, amount);
}
}
ViewModel
The ViewModel folder consists of ViewModelLocator and two ViewModels: MainViewModel and BillViewModel. ViewModelLocator is a repository of ViewModels enabled by MVVM Light that locates the ViewModel from inside XAML and connects it to the View DataContent.
The App.xaml defines a global instance of the locator as shown in Listing 6-9, and individual views can bind their DataContent to properties of the locator that serve up the individual ViewModels.
Listing 6-9. Global Instance of the ViewModelLocator in App.xaml
<Application.Resources>
<vm:ViewModelLocator x:Key="Locator"
d:IsDataSource="True" />
</Application.Resources>
MVVM Light also made it simple to register Services and ViewModels by including a simple IOC container along with the framework, as shown in Listing 6-10.
Listing 6-10. SimpleIOC Container Registers DataService, NavigationService, MainViewModel, and BillViewModel
public class ViewModelLocator
{
static ViewModelLocator()
{
ServiceLocator.SetLocatorProvider(() => SimpleIoc.Default);
SimpleIoc.Default.Register<IDataService, DataService>();
SimpleIoc.Default.Register<INavigationService>(() => new NavigationService());
SimpleIoc.Default.Register<MainViewModel>();
SimpleIoc.Default.Register<BillViewModel>();
}
[System.Diagnostics.CodeAnalysis.SuppressMessage("Microsoft.Performance",
"CA1822:MarkMembersAsStatic",
Justification = "This non-static member is needed for data binding purposes.")]
public MainViewModel Main
{
get
{
return ServiceLocator.Current.GetInstance<MainViewModel>();
}
}
[System.Diagnostics.CodeAnalysis.SuppressMessage("Microsoft.Performance",
"CA1822:MarkMembersAsStatic",
Justification = "This non-static member is needed for data binding purposes.")]
public BillViewModel Bill
{
get
{
return ServiceLocator.Current.GetInstance<BillViewModel>();
}
}
}
As shown in Listing 6-11, the ViewModels are exposed as properties of the ViewModelLocator and can be databound in XAML to the View DataContext.
Listing 6-11. MainViewModel Databound to the MainPage.xaml Datacontext
<Page x:Class="BillReminder.MainPage" xmlns=" http://schemas.microsoft.com/winfx/2006/xaml/presentation "
xmlns:x=" http://schemas.microsoft.com/winfx/2006/xaml "
xmlns:d=" http://schemas.microsoft.com/expression/blend/2008 "
xmlns:mc=" http://schemas.openxmlformats.org/markup-compatibility/2006 "
xmlns:ignore=" http://www.ignore.com "
mc:Ignorable="d ignore"
d:DesignHeight="768"
d:DesignWidth="1366"
DataContext="{Binding Main, Source={StaticResource Locator}}">
MainViewModel
The MainViewModel constructor takes an IDataService and an INavigationService as parameters, as the SimpleIoc container creates all the objects automatically. This ViewModel containes BillItem ObservableCollection as one of the property named Bills. This property retrieves recent bills using the DataService GetBills method and it will be bound to the GridView control in the MainPage.xaml. MainViewModel also has two additional properties.
· SelectedBill: This property is to see if any bill is selected in the MainPage.xaml GridView control and it is bound to the GridView SelectedItem element property.
· ShowAppBar: The purpose of this property is to open the MainPage.xaml app bar when we select a Bill from the GridView. The AppBar contains a Button control to edit the selected Bill. ShowAppBar is bound to the AppBar IsOpen element property (see Listing 6-12).
Listing 6-12. ShowAppBar Property Is Bound to the MainPage.xaml AppBar IsOpen Property
<AppBar IsOpen="{Binding ShowAppBar, Mode=TwoWay}">
<Grid>
<Grid.ColumnDefinitions>
<ColumnDefinition/>
<ColumnDefinition/>
</Grid.ColumnDefinitions>
<StackPanel Orientation="Horizontal"/>
<StackPanel Grid.Column="1" HorizontalAlignment="Right" Orientation="Horizontal">
<Button x:Name="EditButton"
Style="{StaticResource EditAppBarButtonStyle}"
Command="{Binding EditCommand, Mode=OneWay}"
/>
<Button x:Name="AddButton"
Style="{StaticResource AddAppBarButtonStyle}"
Command="{Binding AddCommand, Mode=OneWay}"
/>
</StackPanel>
</Grid>
</AppBar>
MainViewModel also implements two RelayCommands that can be invoked by the user for adding new bill or editing a selected bill, as shown in Listing 6-13. AddCommand passes the call to the ExecuteAddCommand method, which in turn navigates to the Bill.xaml page. EditCommand is also used for navigating to Bill.xaml, but it also sends the selected Bill object using the MVVM Light Messaging event aggregator.
Listing 6-13. The MainViewModel Class
public class MainViewModel : ViewModelBase
{
private readonly IDataService _dataService;
private readonly INavigationService _navigationService;
public MainViewModel(IDataService dataService, INavigationService navigationService)
{
_dataService = dataService;
_navigationService = navigationService;
}
public ObservableCollection<Billtem> Bills
{
get
{
return _dataService.GetBills(DateTime.Now);
}
}
private Billtem _selectedBill = null;
public Billtem SelectedBill
{
get
{
return _selectedBill;
}
set
{
_selectedBill = value;
ShowAppBar = true;
RaisePropertyChanged("SelectedBill");
}
}
private bool _showAppBar;
public bool ShowAppBar
{
get
{
return _showAppBar;
}
set
{
_showAppBar = value;
RaisePropertyChanged("ShowAppBar");
}
}
private RelayCommand _addCommand;
public RelayCommand AddCommand
{
get
{
return _addCommand
?? (_addCommand = new RelayCommand(ExecuteAddCommand));
}
}
private RelayCommand _editCommand;
public RelayCommand EditCommand
{
get
{
return _editCommand
?? (_editCommand = new RelayCommand(ExecuteEditCommand));
}
}
private void ExecuteAddCommand()
{
_navigationService.Navigate(typeof(BillView));
}
private void ExecuteEditCommand()
{
_navigationService.Navigate(typeof(BillView));
Messenger.Default.Send<Billtem>(SelectedBill);
}
}
BillViewModel
BillViewModel (see Listing 6-14) is the ViewModel for Bill.xaml. BillViewModel has properties that are bound to the controls in Bill.xaml, which is then used to add or edit a bill.
Listing 6-14. Properties in the BillViewModel Class
public class BillViewModel : ViewModelBase
{
public int BillID { get; set; }
private string _title = string.Empty;
public string Title
{
get
{
return _title;
}
set
{
if (_title == value)
{
return;
}
_title = value;
RaisePropertyChanged("Title");
}
}
private string _name = string.Empty;
public string Name
{
get
{
return _name;
}
set
{
if (_name == value)
{
return;
}
_name = value;
RaisePropertyChanged("Name");
}
}
private Category _selectedCategory = null;
public Category SelectedCategory
{
get
{
return _selectedCategory;
}
set
{
_selectedCategory = value;
RaisePropertyChanged("SelectedCategory");
}
}
private DateTime _dueDate = System.DateTime.Today;
public DateTime DueDate
{
get
{
return _dueDate;
}
set
{
if (_dueDate == value)
{ return; }
_dueDate = value;
RaisePropertyChanged("DueDate");
}
}
private Decimal _amount = 0;
public Decimal Amount
{
get
{
return _amount;
}
set
{
if (_amount == value)
{ return; }
_amount = value;
RaisePropertyChanged("Amount");
}
}
private bool _isrecurring = true;
public bool Isrecurring
{
get
{
return _isrecurring;
}
set
{
_isrecurring = value;
RaisePropertyChanged("Isrecurring");
}
}
public IList<Category> Categories
{
get
{
return _dataService.GetCategories();
}
}
}
In the BillViewModel Constructor we register the MVVM Light Messenger event aggregator so that the Bill object sent from the MainViewModel EditCommand (see Listing 6-15) can be received here.
Listing 6-15. The Private Fields and the Constructor of BillViewModel
private readonly IDataService _dataService;
private readonly INavigationService _navigationService;
public BillViewModel(IDataService dataService, INavigationService navigationService)
{
_dataService = dataService;
_navigationService = navigationService;
Title = "Bill Reminder";
Messenger.Default.Register<Billtem>(this, message =>
{
Bill bill = _dataService.GetBillByID(message.BillID);
BillID = bill.BillID;
Name = bill.Name;
Amount = bill.Amount;
DueDate = bill.DueDate;
Isrecurring = bill.IsRecurring;
SelectedCategory = _dataService.GetCategoryByID(bill.CategoryID);
});
}
Also we have two RelayCommands, shown in Listing 6-16. One is SaveCommand that is used to save the bill by calling AddBill or UpdateBill from the DataService class depending on the action. BackCommand helps to navigate back to MainPage.xaml.
Listing 6-16. The RelayCommands of the BillViewModel
private RelayCommand _saveCommand;
public RelayCommand SaveCommand
{
get
{
return _saveCommand
?? (_saveCommand = new RelayCommand(ExecuteSaveCommand));
}
}
private void ExecuteSaveCommand()
{
if (BillID > 0)
{
_dataService.UpdateBill(new Bill()
{
BillID = BillID,
Name = _name,
Amount = _amount,
IsRecurring = _isrecurring,
CategoryID = _selectedCategory.CategoryID,
DueDate = _dueDate
});
}
else
{
_dataService.AddBill(new Bill()
{
Name = _name,
Amount = _amount,
IsRecurring = _isrecurring,
CategoryID = _selectedCategory.CategoryID,
DueDate = _dueDate
});
}
_navigationService.Navigate(typeof(MainPage));
}
private RelayCommand _backCommand;
public RelayCommand BackCommand
{
get
{
return _backCommand
?? (_backCommand = new RelayCommand(ExecuteBackCommand));
}
}
private void ExecuteBackCommand()
{
_navigationService.GoBack();
}
Views
MainPage.xaml is the starting page of the Bill Reminder Windows 8 app. Its code is shown in Listing 6-17. This view has a GridView control and two app bar buttons for navigating to the Bill.xaml page. The GridView control binds to the Bill property in the MainViewControl and displays the recent bills. We use a data template to customize the way we showcase our bill information in the GridView. The displayed bill information has two modes, depending on the status of the Bill object’s IsPaid property. If the IsPaid property is false then we display a Textbox for entering the bill amount and a Button to mark the bill as paid. This button command is bound to the PaidCommand in the MainViewModel. But if the bill is paid instead then this control’s Visibility property is set to Collapsed using a ValueConverter BoolToValueConverter.
Listing 6-17. The MainPage.Xaml
<Page x:Class="BillReminder.MainPage"
mc:Ignorable="d ignore"
d:DesignHeight="768"
d:DesignWidth="1366"
xmlns:converters="using:BillReminder.Converters"
DataContext="{Binding Main, Source={StaticResource Locator}}">
<Page.Resources>
<ResourceDictionary>
<!--Converters declaration-->
<converters:DateTimeToStringConverter
x:Key="DateTimeToStringConverter"/>
<converters:DecimalToStringConverter
x:Key="DecimalToStringConverter"/>
<converters:VisibilityConverter
x:Key="VisibilityConverter"
TrueValue="Collapsed"
FalseValue="Visible"/>
<converters:VisibilityConverter
x:Key="InverseVisibilityConverter"
TrueValue="Visible" FalseValue="Collapsed"/>
<!--Data Template to display bill info-->
<DataTemplate x:Key="BillDataTemplate">
<Grid
Background="{StaticResource ListViewItemPlaceholderBackgroundThemeBrush}">
<Grid.ColumnDefinitions>
<ColumnDefinition Width="195*"/>
<ColumnDefinition Width="97*"/>
</Grid.ColumnDefinitions>
<Grid.RowDefinitions>
<RowDefinition Height="34*"/>
<RowDefinition Height="42*"/>
<RowDefinition Height="51*"/>
</Grid.RowDefinitions>
<TextBlock
Text="{Binding Name}"
Grid.ColumnSpan="2"/>
<StackPanel Grid.Row="1" Grid.ColumnSpan="2">
<TextBlock
Text="{Binding DueDate, Mode= TwoWay, Converter={StaticResource DateTimeToStringConverter}}"/>
<TextBox
Visibility="{Binding IsPaid,Converter={StaticResource VisibilityConverter}}"
Text="{Binding Amount, Mode=TwoWay, Converter={StaticResource DecimalToStringConverter}}" />
<TextBlock
Visibility="{Binding IsPaid,Converter={StaticResource InverseVisibilityConverter}}"
Text="{Binding PaidAmount, Mode=TwoWay, Converter={StaticResource DecimalToStringConverter}}"/>
</StackPanel>
<StackPanel Grid.Row="2" Grid.Column="1">
<TextBlock
Visibility="{Binding IsPaid,Converter={StaticResource InverseVisibilityConverter}}"
Text="Paid" />
<Button
Content="Pay"
Visibility="{Binding IsPaid,Converter={StaticResource VisibilityConverter}}"
Command="{Binding PayCommand, Mode=OneWay}"/>
</StackPanel>
</Grid>
</DataTemplate>
<ResourceDictionary.MergedDictionaries>
<ResourceDictionary Source="../Skins/MainSkin.xaml" />
</ResourceDictionary.MergedDictionaries>
</ResourceDictionary>
</Page.Resources>
<Page.BottomAppBar>
<AppBar
IsOpen="{Binding ShowAppBar, Mode=TwoWay}">
<Grid>
<Grid.ColumnDefinitions>
<ColumnDefinition/>
<ColumnDefinition/>
</Grid.ColumnDefinitions>
<StackPanel Grid.Column="1">
<!--Edit Appbar Button-->
<Button x:Name="EditButton"
Style="{StaticResource EditAppBarButtonStyle}"
Command="{Binding EditCommand, Mode=OneWay}" />
<!--Add Appbar Button-->
<Button x:Name="AddButton"
Style="{StaticResource AddAppBarButtonStyle}"
Command="{Binding AddCommand, Mode=OneWay}"/>
</StackPanel>
</Grid>
</AppBar>
</Page.BottomAppBar>
<Grid
Background="{StaticResource ApplicationPageBackgroundThemeBrush}">
<Grid.RowDefinitions>
<RowDefinition Height="140"/>
<RowDefinition Height="*"/>
</Grid.RowDefinitions>
<Grid>
<Grid.ColumnDefinitions>
<ColumnDefinition Width="Auto"/>
<ColumnDefinition Width="*"/>
</Grid.ColumnDefinitions>
<TextBlock x:Name="PageTitle"
Text="Bill Reminder"
Grid.Column="1"
Style="{StaticResource PageHeaderTextStyle}"/>
</Grid>
<!--GridView to display the recent bills-->
<GridView x:Name="BillGridView"
Grid.Row="1"
Margin="110,50,0,0"
Foreground="White"
SelectionMode="Single"
IsSwipeEnabled="True"
IsItemClickEnabled="True"
ItemsSource="{Binding Bills}"
Header="Recent Bills"
FontSize="32"
ItemTemplate="{StaticResource BillDataTemplate}"
SelectedItem ="{Binding SelectedBill, Mode=TwoWay}" >
<GridView.ItemsPanel>
<ItemsPanelTemplate>
<WrapGrid
Orientation="Horizontal" />
</ItemsPanelTemplate>
</GridView.ItemsPanel>
</GridView>
</Grid>
</Page>
Note
We intentionally left out the most of the XAML code related to styling and positioning of the controls in this chapter to simplify the explanations and for easier rediability. The source code that you can download from the APress web site has the complete implementation.
BillView.xaml is used to create and edit a bill. This page, shown in Figure 6-12, has controls like TextBox, ComboBox, and CheckBox that binds to the properties of the BillViewModel .

Figure 6-12.
BillView.xaml displays a bill’s details
Also on the page we have two buttons. The Save button is used to save the Bill object to the database and this button command property is bound to the BillViewModel’s SaveCommand. The BackButton is used to navigate back to MainPage.xaml. This page has a ComboBox that allows the user to pick a bill category. This ComboBox is bound to the Categories property of the ViewModel, and the SelectedItem is bound two-way to the SelectedCategory property (see Listing 6-18).
Listing 6-18. The Bill.xaml
<Page x:Class="BillReminder.Views.BillView"
x:Name="pageRoot"
xmlns:converters="using:BillReminder.Converters"
mc:Ignorable="d ignore"
d:DesignHeight="768"
d:DesignWidth="1366"
DataContext="{Binding Bill, Source={StaticResource Locator}}">
<Page.Resources>
<ResourceDictionary>
<converters:DateTimeToStringConverter
x:Key="DateTimeToStringConverter"/>
<converters:DecimalToStringConverter
x:Key="DecimalToStringConverter"/>
</ResourceDictionary>
</Page.Resources>
<Page.BottomAppBar>
<AppBar IsOpen="True">
<Grid>
<Grid.ColumnDefinitions>
<ColumnDefinition/>
<ColumnDefinition/>
</Grid.ColumnDefinitions>
<StackPanel Orientation="Horizontal"/>
<StackPanel Grid.Column="1">
<!--Bill Edit button-->
<Button x:Name="EditButton"
Style="{StaticResource SaveAppBarButtonStyle}"
Command="{Binding SaveCommand, Mode=OneWay}" />
</StackPanel>
</Grid>
</AppBar>
</Page.BottomAppBar>
<Grid Background="{StaticResource ApplicationPageBackgroundThemeBrush}">
<Grid.RowDefinitions>
<RowDefinition Height="140"/>
<RowDefinition Height="*"/>
</Grid.RowDefinitions>
<Grid>
<Grid.ColumnDefinitions>
<ColumnDefinition Width="Auto"/>
<ColumnDefinition Width="*"/>
</Grid.ColumnDefinitions>
<Button
x:Name="backButton"
Command="{Binding BackCommand, Mode=OneWay}"
Style="{StaticResource BackButtonStyle}"/>
<TextBlock x:Name="pageTitle"
Text="Bill Reminder"
Style="{StaticResource PageHeaderTextStyle}"
Grid.Column="1"/>
</Grid>
<!--Controls for inputting Bill details-->
<StackPanel Grid.Row="1">
<StackPanel>
<TextBlock
Text="{Binding Title}"/>
</StackPanel>
<StackPanel Orientation="Horizontal">
<TextBlock
Text="Bill Name"/>
<TextBox
Text="{Binding Name, Mode=TwoWay}"/>
</StackPanel>
<StackPanel Orientation="Horizontal">">
<TextBlock Text="Category"/>
<ComboBox
ItemsSource="{Binding Categories}"
DisplayMemberPath="Name"
SelectedItem="{Binding SelectedCategory, Mode=TwoWay}"/>
</StackPanel>
<StackPanel Orientation="Horizontal">
<TextBlock
Text="Due Date"/>
<TextBox
Text="{Binding DueDate, Converter={StaticResource DateTimeToStringConverter}, Mode=TwoWay}"/>
</StackPanel>
<StackPanel Orientation="Horizontal">
<TextBlock
Text="Amount"/>
<TextBox
Text="{Binding Amount, Converter={StaticResource DecimalToStringConverter}, Mode=TwoWay}"/>
</StackPanel>
<StackPanel Orientation="Horizontal">
<TextBlock
Text="Recurring?"/>
<CheckBox
IsChecked="{Binding IsRecurring, Mode=TwoWay}"/>
</StackPanel>
</StackPanel>
</Grid>
</Page>
Now with all the codes in place, when we run the Bill Reminder app the user will be able to create bills and also mark a recent bill paid, as the one shown in Figure 6-9.
Ideas for Improvement
The Bill Reminder app can be worked on and improved to make it a fully functional financial management app. The following are some of the features that can be added.
· Extend the app by adding support for registering income and expenses to make it a full-fledged personal finance app.
· Localize the app by supporting different languages, currencies, and formats.
· Incude spending analysis tools with dynamic graphs and reports.
· Support live tiles and bill reminder notifications.
Conclusion
This chapter introduced you to SQLite, SQLite wrapper sqlite-net, and MVVM Light and discussed how this framework is used in building a real-world Windows 8 app. Specifically, it discussed integrating SQLite into a Windows 8 app and using it as a local database to store data, building an app that is based on the MVVM pattern.
With this chapter we conclude Part 2 of this book, which explained the various Windows 8 app local storage options. In the next section we look at various remote data access options, including Windows Azure Mobile Services.
Vinodh KumarBeginning Windows 8 Data DevelopmentUsing C# and JavaScript10.1007/978-1-4302-4993-1_7
© Vinodh Kumar 2013