Beginning Windows 8 Data DevelopmentUsing C# and JavaScript (2013)
7. ASP.NET Web API
Vinodh Kumar1
(1)
NY, US
Abstract
In the last three chapters, we saw some of the local storage options that can be used to store data locally and have also built apps that are best suited for storing data locally. Storing data locally will not be a best option in many cases especially when we build line of business (LOB) applications. There are times when our app needs to interact with a very large quantity of data stored in the database servers like SQL Server, Oracle, and so on. As of now we don’t have the necessary APIs similar to ADO.NET in WinRT to communicate directly with the database, so we need to build a server-side async/services infrastructure that exposes the data by connecting to the database, which can then be consumed by the Windows 8 app.
In the last three chapters, we saw some of the local storage options that can be used to store data locally and have also built apps that are best suited for storing data locally. Storing data locally will not be a best option in many cases especially when we build line of business (LOB) applications. There are times when our app needs to interact with a very large quantity of data stored in the database servers like SQL Server, Oracle, and so on. As of now we don’t have the necessary APIs similar to ADO.NET in WinRT to communicate directly with the database, so we need to build a server-side async/services infrastructure that exposes the data by connecting to the database, which can then be consumed by the Windows 8 app.
In the next three chapters we learn about a few such service infrastructures that can be used to store or retrieve data within Windows 8 apps. To start with, in this chapter we learn to set up a CRUD ASP.NET Web API Rest service and consume this service from a Windows Store JavaScript app by building a Party Planner app.
Introduction to ASP.NET Web API
ASP.NET Web API introduced with ASP.NET MVC 4.0 and .NET 4.5 is a new addition to the ASP.NET stack that allows you to create RESTful and AJAX APIs that lets you build web or HTTP-based client or server endpoints.
Why Should We Use Web API?
ASP.NET Web API is Microsoft’s answer to a modern programming landscape for building a service layer that can be easily consumed by most clients. Web API is an ideal platform for building pure HTTP-based services that can be useful while building a multiplatform applications like apps for desktop applications, HTML5, iOS, Android, Windows 8, and Windows Phone, as all these clients can make GET, PUT, POST, and DELETE requests and get the Web API response.
Building the Party Planner Windows 8 App
Organizing a party is a tedious job that involves lot of planning, like creating a guest list, making a shopping list, and so on. With our Party Planner Windows 8 app we no longer have to write these lists on a scrap of paper. This app will help to manage and track various parties by maintaining guest lists and records of party supplies. We create this app using HTML5 and JavaScript with SQL Server as the database. We also build a service layer for data interaction between the HTML client and SQL Server using ASP.NET Web API. EntityFramework Code First will be used as data access layer.
Getting Started
To start with, let’s create a new Windows Store Blank App (JavaScript) project and name the project PartyPlanner.App and the solution PartyPlanner. We add two new pages to the project: home.html and manageparty.html. Next we add a new Visual C# ASP.NET MVC 4 Web Application to the solution (see Figure 7-1) and name it PartyPlanner.Web.

Figure 7-1.
Visual Studio template for adding new ASP.NET MVC 4 application
In the New ASP.NET MVC 4 Project dialog box (see Figure 7-2), select Web API and click OK to add the PartyPlanner.Web project to the solution.
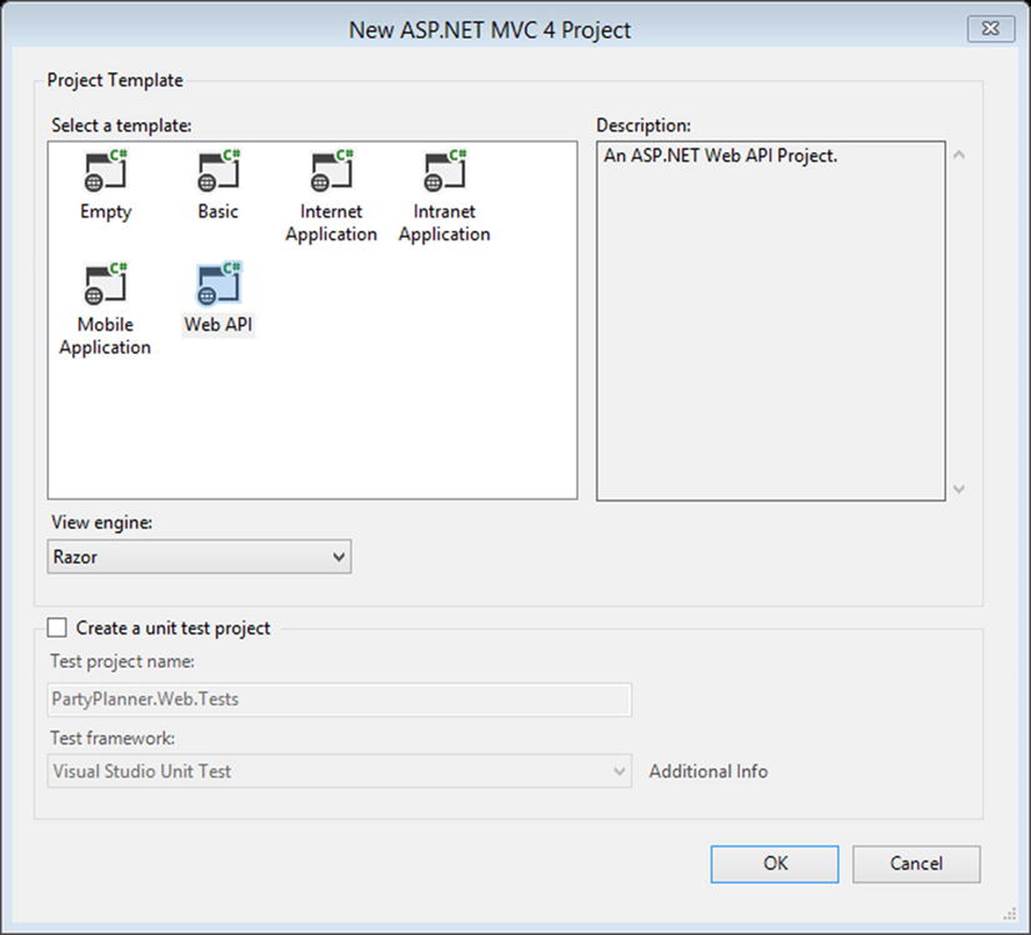
Figure 7-2.
Selecting WebAPI template as project template
This adds the necessary files and DLL references to the PartyPlanner.Web project. With this addition the PartyPlanner solution will look like the one shown in Figure 7-3.
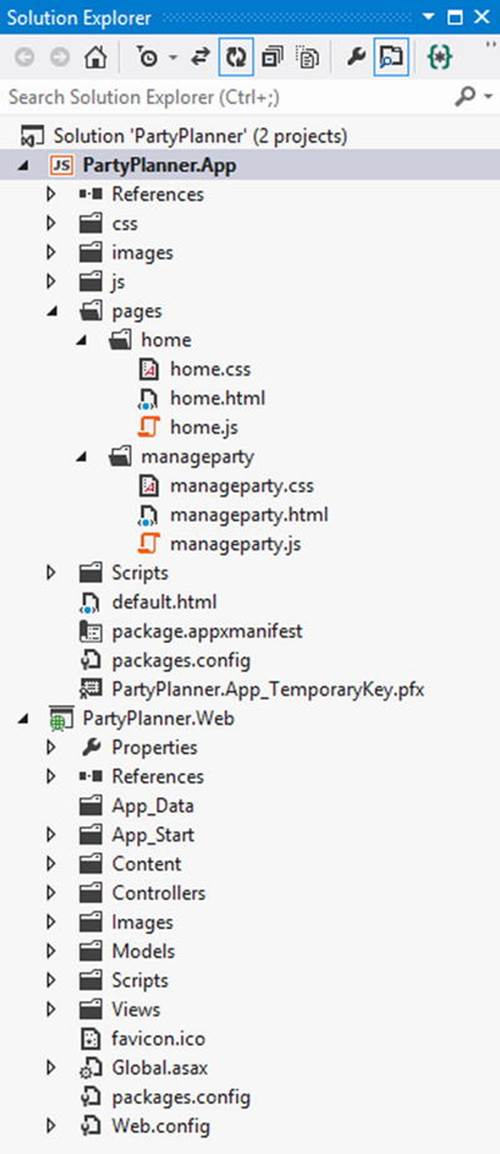
Figure 7-3.
Party Planner project structure
Creating Database Tables
The main functionality of the Party Planner app is to help keep track of the shopping lists and guest lists for parties. For this purpose, we create three SQL Server databases with tables using the EntityFramework Code First approach.
· Party: Stores the party details.
· Guest: Stores the guest list for the party.
· ShoppingItem: Stores the list of items that has to be purchased for the party.
EntityFramework Code First
EntityFramework Code First is introduced with EntityFramework. This enables a code-centric approach in building the model instead of working with the designer or XML mapping file. The following are some of the advantages of using Code First.
· It defines an object model using the POCO (plain old CLR object) class with no base class or attributes, so there is no more autogenerated code to work with.
· It supports data persistence without complex configuration.
· It’s simple, as there is no edmx model to update or maintain.
· Code-First handles creation and modification of the database schema such that a database is just storage with no logic.
To enable EntityFramework we reference the library in the project using the NuGet package as shown in Figure 7-4 along with JSON.NET.
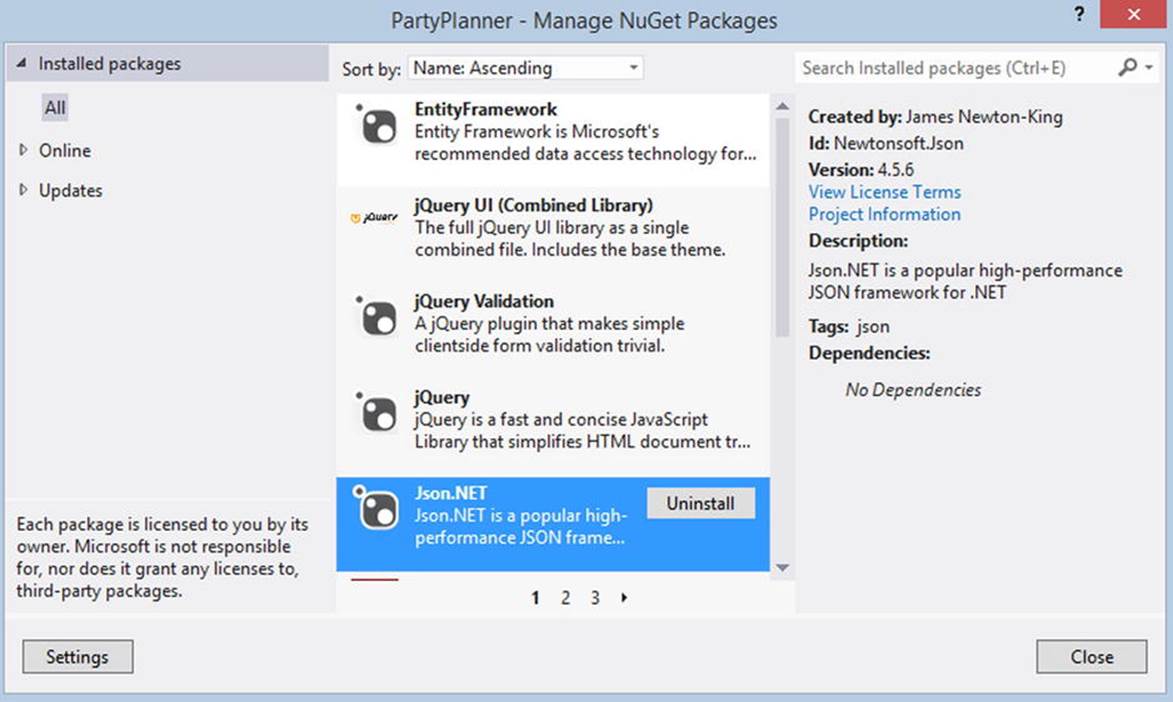
Figure 7-4.
Adding a reference to EntityFramework using the NuGet package
Next we add the file PartyPlanner.cs to the Models folder in the PartyPlanner.Web project. This file holds three POCO classes that represent the three database tables, Party, Guest, and ShoppingItem, as shown in Listing 7-1.
Listing 7-1. The PartyPlanner EntityFrame Classes
namespace PartyPlanner.Models
{
public class Party
{
public int PartyID { get; set; }
public string PartyName { get; set; }
public string DateTime { get; set; }
public bool Completed { get; set; }
public virtual ICollection<Guest> Guests { get; set; }
public virtual ICollection<ShoppingItem> ShoppingList { get; set; }
}
public class Guest
{
public int GuestID { get; set; }
public string FamilyName { get; set; }
public int NumberOfPeople { get; set; }
[JsonIgnore]
public Party Party { get; set; }
}
public class ShoppingItem
{
public int ShoppingItemID { get; set; }
public string ItemName { get; set; }
public int Quantity { get; set; }
[JsonIgnore]
public Party Party { get; set; }
}
}
These are Entity classes that act as model objects that represent the data; they are very simple and have no dependency from EntityFramework. The properties of these classes represent columns of the database table and are of two types: scalar properties like PartyName, ItemName, and navigation properties like Guests and ShoppingList that are used for finding the relationship between the classes.
We add the virtual keyword to the navigation properties to enable lazy loading feature of the entity framework. Lazy loading, also called deferred loading, is a term used to load dependent objects only when we try to access that property. Finally, we use the JsonIgnoreAttribute that is part of JSON.NET (Newtonsoft.Json namespace) to ignore the Party property in the ShoppingItem class from being serialized. JSON.NET has a range of built-in options to fine-tune what gets written from a serialized object.
Note
JSON.NET is a popular high-performance JSON framework for the .NET Framework that has a range of built-in options to fine-tune what gets written from a serialized object. Please visit www.json.net to learn more about JSON.NET
Web API Controller
With the models in place, next we add an ASP.NET Web API Controller, PartyPlannerController to the project. This controller handles HTTP requests from the client. To add a controller, right-click the Controllers folder in Solution Explorer and then select Add context menu and the Controller to open the Add Controller Wizard. Set the options as shown in Figure 7-5.
Note
Build the project before adding a controller so that the PartyPlanner Models show up in the Add Controller Wizard.
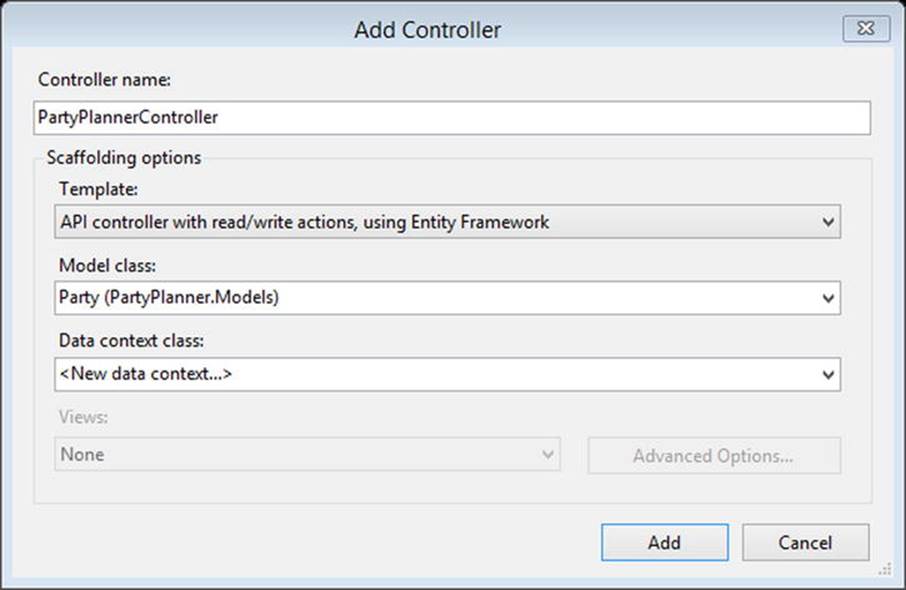
Figure 7-5.
Controller template for creating a WebAPI controller from the model
After you click Add, you are prompted to enter the name of the new data context, as shown in Figure 7-6. Once the name is entered, the Visual Studio controller template creates two classes, PartyPlannerController and PartyPlannerContext.
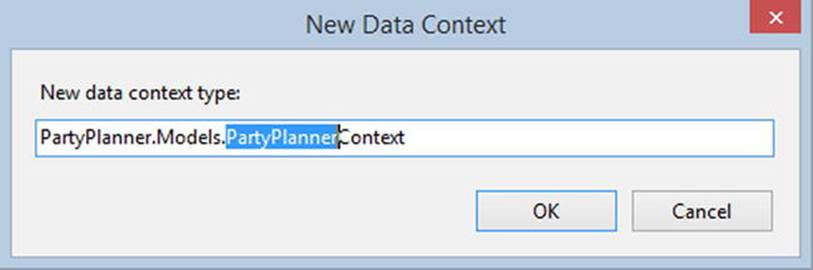
Figure 7-6.
Input window for entering the data context class name
The controller template will also update the Web.config (see Listing 7-2) by adding a connectionString that points the PartyPlannerContext to a LocalDB database called PartyPlannerContext.
Listing 7-2. Updated Web.config File with the Connection String
<connectionStrings>
<add name="PartyPlannerContext"
connectionString="Data Source=(localdb)\v11.0; Initial Catalog=PartyPlannerContext-20130115012310; Integrated Security=True; MultipleActiveResultSets=True; AttachDbFilename=|DataDirectory|PartyPlannerContext-20130115012310.mdf"
providerName="System.Data.SqlClient" />
</connectionStrings>
Add Controller
The generated PartyPlannerController is derived from the base ApiController class instead of the standard MVC controller base. This controller has the necessary methods to do the basic CRUD operations.
The HTTP/1.1 protocol defines a set of common methods like GET, POST, PUT, and DELETE, and for each of these methods, the ASP.NET Web API framework decides which controller receives the request by consulting the route table. In our case, we are using the default route that is mapped as mentioned follows in the global.asax page.
· GET /api/GetParties: Get a list of all parties.
· GET /api/GetParty /id: Get party by ID.
· PUT /api/PartyPlanner/id: Update a party.
· POST /api/PartyPlanner: Create a new party.
· DELETE /api/PartyPlanner/id: Delete a party.
As this code is good enough only to store and retrieve information from the Party table, we will be including additional methods in this controller to store and retrieve Guest and ShoppingList information along with the party information in the later part of this chapter. As of now, though, Listing 7-3 shows the code generated by the template.
Listing 7-3. PartyPlannerController Code Generated by the Controller Template
public class PartyPlannerController : ApiController
{
private PartyPlannerContext db = new PartyPlannerContext();
// GET api/PartyPlanner
public IEnumerable<Party> GetParties()
{
return db.Parties.AsEnumerable();
}
// GET api/PartyPlanner/5
public Party GetParty(int id)
{
Party party = db.Parties.Find(id);
if (party == null)
{
throw new HttpResponseException(Request.CreateResponse(HttpStatusCode.NotFound));
}
return party;
}
// PUT api/PartyPlanner/5
public HttpResponseMessage PutParty(int id, Party party)
{
if (ModelState.IsValid && id == party.PartyID)
{
db.Entry(party).State = EntityState.Modified;
try
{
db.SaveChanges();
}
catch (DbUpdateConcurrencyException)
{
return Request.CreateResponse(HttpStatusCode.NotFound);
}
return Request.CreateResponse(HttpStatusCode.OK);
}
else
{
return Request.CreateResponse(HttpStatusCode.BadRequest);
}
}
// POST api/PartyPlanner
public HttpResponseMessage PostParty(Party party)
{
if (ModelState.IsValid)
{
db.Parties.Add(party);
db.SaveChanges();
HttpResponseMessage response = Request.CreateResponse(HttpStatusCode.Created, party);
response.Headers.Location = new Uri(Url.Link("DefaultApi", new { id = party.PartyID }));
return response;
}
else
{
return Request.CreateResponse(HttpStatusCode.BadRequest);
}
}
// DELETE api/PartyPlanner/5
public HttpResponseMessage DeleteParty(int id)
{
Party party = db.Parties.Find(id);
if (party == null)
{
return Request.CreateResponse(HttpStatusCode.NotFound);
}
db.Parties.Remove(party);
try
{
db.SaveChanges();
}
catch (DbUpdateConcurrencyException)
{
return Request.CreateResponse(HttpStatusCode.NotFound);
}
return Request.CreateResponse(HttpStatusCode.OK, party);
}
protected override void Dispose(bool disposing)
{
db.Dispose();
base.Dispose(disposing);
}
}
Add DataContext
The template also creates a DataContext PartyPlannerContext, as shown in Listing 7-4, that is derived from the EntityFramework base type DbContext. DbContext automatically generates the database using the Entity Class schema and also represents a session with the database and allows it to query the database. The context contains a property DbSet that represents the POCO type Party from our model.
Listing 7-4. PartyPlannerContext Created by the Controller Template
public class PartyPlannerContext : DbContext
{
public PartyPlannerContext() : base("name=PartyPlannerContext")
{
}
public DbSet<Party> Parties { get; set; }
}
With the service layer in place, we can integrate it with the Windows 8 app by building the Party Planner app.
As mentioned earlier, the Party Planner app has two pages: home.html and manageparty.html.
Designing the App Start Page
Home.html is the start page of this app. It displays the Parties within a grid layout as shown in Figure 7-7 using the WinJS.UI.ListView element by binding to a collection in Home.js. We also define an item template that contains the markup to display the details of each party. This page also has an app bar button that allows us to create a new party (see Listing 7-5).
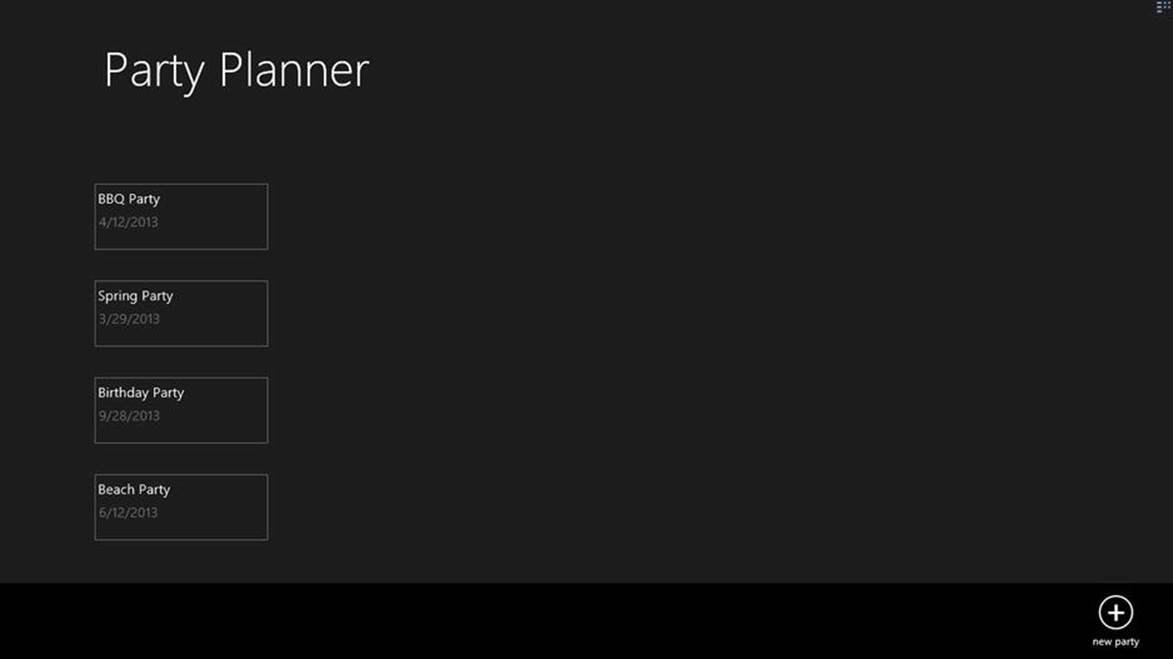
Figure 7-7.
The home.html shows list of Parties
Note
We deleted the default.html page and made home.html the default start page by updating the start page under the Application UI section of the package.appmanifest.
Listing 7-5. home.html with a ListView and App Bar Button
<!DOCTYPE html>
<html>
<head>
<meta charset="utf-8" />
<title>homePage</title>
<!-- WinJS references -->
<link href="//Microsoft.WinJS.1.0/css/ui-dark.css" rel="stylesheet" />
<script src="//Microsoft.WinJS.1.0/js/base.js"></script>
<script src="//Microsoft.WinJS.1.0/js/ui.js"></script>
<link href="/css/default.css" rel="stylesheet" />
<link href="/pages/home/home.css" rel="stylesheet" />
<script src="/pages/home/home.js"></script>
</head>
<body>
<!--ListView Item Template-->
<div id="dbItemtemplate"
class="itemtemplate"
data-win-control="WinJS.Binding.Template">
<div class="item">
<div class="item-content">
<h2
class="item-title win-type-x-small win-type-ellipsis"
data-win-bind="innerHTML: PartyName" />
<h4
class="item-subtitle win-type-x-small win-type-ellipsis"
data-win-bind="innerHTML: DateTime"></h4>
</div>
</div>
</div>
<!-- The content that will be loaded and displayed. -->
<div class="fragment homepage">
<header
aria-label="Header content"
role="banner">
<button
class="win-backbutton"
aria-label="Back"
disabled
type="button"></button>
<h1 class="titlearea win-type-ellipsis">
<span class="pagetitle">Party Planner</span>
</h1>
</header>
<section aria-label="Main content" role="main">
<div id="listView"
class="resultslist win-selectionstylefilled"
aria-label="My Party"
data-win-control="WinJS.UI.ListView"
data-win-options="{
itemTemplate: select('#dbItemtemplate'),
}">
}"></div>
</section>
</div>
<!--App bar-->
<div
data-win-control="WinJS.UI.AppBar"
class="appBar"
id="appBar">
<button
data-win-control="WinJS.UI.AppBarCommand"
data-win-options="{id:'newButton', label:'new party', icon:'add',section:'global'}">
</button>
</div>
</body>
</html>
Home.js
Home.js is the JavaScript file for the home.html page and most of the activities in this file happen in the page ready function. Inside this function we call the PartyPlanner service GetParties using the WinJS.xhr function. WinJS.xhr abstracts all the complexity of the XMLHttpRequest and provides a simple interface that uses Promises to handle the asynchronous responses. GetParties returns an HTTP response in a JSON format that is then parsed to a JSON object. This JSON object is then bound to the ListView. This page also has an itemInvoked function that is attached to theListView and is called when an item is selected from the ListView. Once called, this function navigates to manageParty.html using the WinJS.Navigation.navigate function. This function takes the detail page location and selected Party object as parameter (see Listing 7-6).
Listing 7-6. Home.js Gets the List of Parties by Calling the ASP.NET Web API Service
(function () {
"use strict";
var partiesLV;
WinJS.UI.Pages.define("/pages/home/home.html", {
ready: function (element, options) {
partiesLV = document.getElementById('listView').winControl;
partiesLV.oniteminvoked = this._itemInvoked;
partiesLV.element.focus();
document.getElementById("newButton")
.addEventListener("click", doClickNew, false);
//update the port of the below URL to the one assigned by Visual Studio
var createurl = " http://localhost:21962/api/PartyPlanner/ ";
WinJS.xhr({
type: "GET",
url: createurl,
headers: { "Content-type": "application/json; charset=utf-8" }
}).then(success, error);
}, _itemInvoked: function (args) {
args.detail.itemPromise.done(function itemInvoked(item) {
//Navigating to the manageparty.html on ListItem click
WinJS.Navigation.navigate("/pages/manageparty/manageparty.html", { partyDetail: item.data });
});
}
});
function success(arg) {
//HTTP Response binds to the ListView
var parties = [];
parties = JSON.parse(arg.responseText);
partiesLV.itemDataSource = new WinJS.Binding.List(parties).dataSource;
}
function error(arg) {
//Display Error
}
function doClickNew() {
//App bar button click
WinJS.Navigation.navigate("/pages/manageparty/manageparty.html", null);
}
})();
Retrieving the List of Parties
As shown in Listing 7-6, to display the list of parties in the home page, we call the GetParties method that resides in the PartyPlannerController. When this method is called for the first time, the EntityFramework Code First uses a set of conventions to determine the schema and creates the database and necessary tables and referential integrity between the tables. It uses the database connection information from the Web.config file. Once this is created, we will be able to see the database in the VS.NET SQL Server Object Explorer (click Ctrl + \, Ctrl + S), as shown in Figure 7-8.
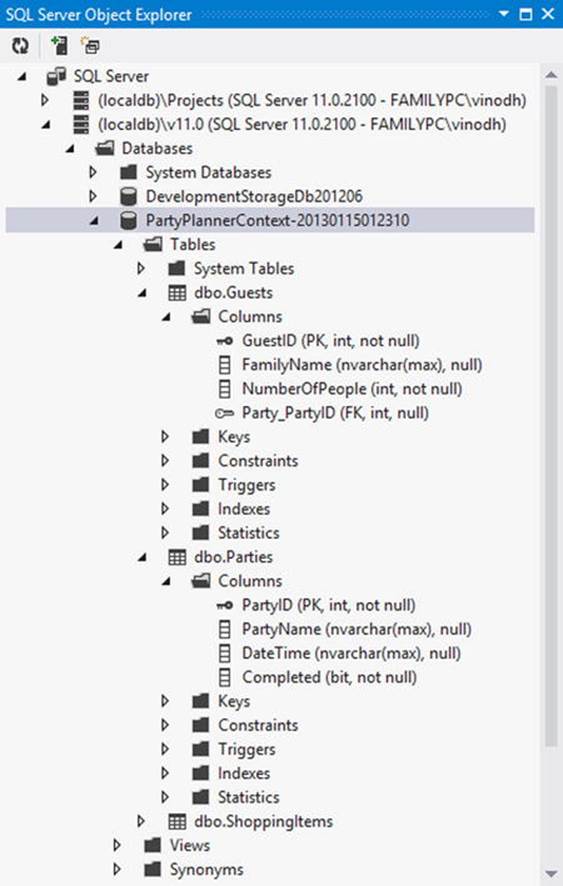
Figure 7-8.
Database created using EntityFramework Code First
The default code generated for GetParties in PartyPlannerController (see Listing 7-3) will only return the Party entity and will not get the related entities like Guests and ShoppingList for each party. To get that we add three lines of code, as shown in Listing 7-7.
Listing 7-7. GetParties includes Guests and ShoppingList
public IEnumerable<Party> GetParties()
{
db.Configuration.LazyLoadingEnabled = false;
return db.Parties.Include(g => g.Guests)
.Include(s => s.ShoppingList)
.AsEnumerable();
}
First we disable the lazy loading option and then include those entities that have to be returned along with the Party entity using EntityFramework’s Include method.
Designing the Page to Manage a Party
The manageparty.html page helps to create a new party or update an existing party. It can also be used to add a new guest or a shopping item to an existing party. This page has two sections (see Listing 7-8): The left side is where we have HTML elements for creating a party and these HTML elements are bound to the properties of the Party object using WinJS data-win-bind property. On the right we have two ListView controls, one below the other, that display the Guests and Shopping Items. At the bottom of the page, we have two app bar buttons that on click display two different Flyout UIs: one for adding the guests and the other for adding items to the shopping list.
Listing 7-8. The manageparty.html with Left and Right Columns
<body>
<!--Item Templates for ShoppingItem ListView-->
<div id="shoppingTemplate" data-win-control="WinJS.Binding.Template">
<div class="item">
<div class="item-content">
<h2
class="item-title win-type-x-small win-type-ellipsis"
data-win-bind="innerHTML: ItemName"></h2>
<h4
class="item-subtitle-shoppingitem win-type-x-small win-type-ellipsis"
data-win-bind="innerHTML: Quantity"></h4>
</div>
</div>
</div>
<!--Item Templates for Guest ListView-->
<div id="guestTemplate" data-win-control="WinJS.Binding.Template">
<div class="item">
<div class="item-content">
<h2
class="item-title win-type-x-small win-type-ellipsis"
data-win-bind="innerHTML: FamilyName"></h2>
<h4
class="item-subtitle-guests win-type-x-small win-type-ellipsis"
data-win-bind="innerHTML: NumberOfPeople"></h4>
</div>
</div>
</div>
<div class="manageparty fragment">
<header aria-label="Header content" role="banner">
<button
class="win-backbutton"
aria-label="Back"
disabled
type="button"></button>
<h1 class="titlearea win-type-ellipsis">
<span class="pagetitle">Add/Edit Party Details</span>
</h1>
</header>
<section aria-label="Main content" role="main">
<!—Leftside - Party HTML Elements-->
<div id="divDetail" class="leftColumn">
<label for="partyName">Party Name</label>
<input
type="text"
id="partyName"
name="partyName"
data-win-bind="value: PartyName Binding.Mode.twoway">
<br />
<label for="datetime">Date Time:</label>
<input
type="text"
id="datetime"
name="datetime"
data-win-bind="value: DateTime Binding.Mode.twoway">
<br />
<label for="completed">IsCompleted?</label>
<input
type="checkbox"
id="completed"
name="completed"
class="boxes"
data-win-bind="checked: Completed Binding.Mode.twoway" />
<br />
<input
type="button"
name="saveParty"
id="saveParty"
value="Save Party Details" />
</div>
<!--Right Side-->
<div class="rightColumn">
<h2>Guest List</h2>
<div class="item">
<label class="labelMessage" id="lblGuestMessage"/> </div>
<div
id="guestListView"
data-win-control="WinJS.UI.ListView"
data-win-options="{itemTemplate:select('#guestTemplate')}">
</div>
<br />
<h2>Shopping List</h2>
<div class="item"> <label class="labelMessage" id="lblItemMessage"/></div>
<div
id="shoppingListView"
data-win-control="WinJS.UI.ListView"
data-win-options="{itemTemplate:select('#shoppingTemplate')}">
</div>
</div>
<!--Shopping Flyout UI-->
<div id="shoppingItemFlyout" data-win-control="WinJS.UI.Flyout">
<p>
<label for="Item">
Name
<br />
</label>
<input type="text" id="shopppingItem" />
</p>
<p>
<label for="Item">
Quantity
<br />
</label>
<input type="text" id="quantity" />
</p>
<button id="addToShoppingList">
Add</button>
</div>
<!--Guest Flyout UI-->
<div id="guestFlyout" data-win-control="WinJS.UI.Flyout">
<p>
<label for="guestName">
Family Name
<br />
</label>
<input type="text" id="guestName" />
</p>
<p>
<label for="Item">
No of Guest
<br />
</label>
<input type="text" id="noofguest" />
</p>
<button id="addToGuestList">
Add</button>
</div>
</section>
</div>
<!--App bar-->
<div data-win-control="WinJS.UI.AppBar" class="appBar" id="appBar">
<button
data-win-control="WinJS.UI.AppBarCommand"
data-win-options="{id:'showGuest', label:'Add Guest', icon:'add',section:'global'}">
</button>
<button
data-win-control="WinJS.UI.AppBarCommand"
data-win-options="{id:'showShopping', label:'Add Item', icon:'add',section:'global'}">
</button>
</div>
</body>
manageparty.js
The manageParty.js is the JavaScript page for manageparty.html. This page’s ready function has the event handler for all the buttons in manageparty.html. This function also handles the Party object passed from home.html by assigning the Party object to a local variable and calling the functionUpdateUI. UpdateUI binds the Guests and ShoppingItems properties of the Party object to the corresponding ListView controls (see Listing 7-9).
Listing 7-9. Page Ready Sets the Event Handler for the Buttons and Binds the Party Object to the HTML Elements
WinJS.UI.Pages.define("/pages/manageparty/manageparty.html", {
ready: function (element, options) {
//Hide right column on page ready
$('.rightColumn').hide();
//assign the event handler for the buttons
document.getElementById("saveParty").addEventListener("click", onSaveParty, false);
document.getElementById("showShopping").addEventListener("click", onShowShopping, false);
document.getElementById("showGuest").addEventListener("click", onShowGuest, false);
document.getElementById("addToShoppingList").addEventListener("click", onAddToShoppingList, false);
document.getElementById("addToGuestList").addEventListener("click", onAddToGuestList, false);
//ListView control to local variable
shoppingLV = document.getElementById('shoppingListView').winControl;
guestLV = document.getElementById('guestListView').winControl;
//Get the Party object as parameter and update the listview
if (options != null && options.partyDetail != null) {
party = options.partyDetail;
UpdateUI();
}
else {
party = { PartyID: 0, PartyName: "", DateTime: "", Completed: "false" };
}
var src = WinJS.Binding.as(party);
var form = document.getElementById("divDetail");
WinJS.Binding.processAll(form, src);
},
});
function UpdateUI() {
//Check to see if Party is already created
if (party.PartyID > 0) {
$('.rightColumn').show();
if (party.Guests == null) {
$("#lblGuestMessage").text('No guest is invited to this party!')
} else {
$("#lblGuestMessage").text('');
}
if (party.ShoppingList == null) {
$("#lblItemMessage").text('No item to the shoppinglist is added.')
} else {
$("#lblItemMessage").text('');
}
}
//binding Guests and ShoppingItem to ListViews
shoppingLV.itemDataSource = new WinJS.Binding.List(party.ShoppingList).dataSource;
guestLV.itemDataSource = new WinJS.Binding.List(party.Guests).dataSource;
}
Creating a New Party
To create a party, party information is entered as shown in Figure 7-7. one the information is entered and you click Save Party Details, we invoke the onSaveParty function in the manageparty.js, which in turn calls another function sendPartyToService, which posts the Party JavaScript object to the PartyPlanner Web API service using the WinJS.xhr function (see Listing 7-10), which is then handled by the PartyPlannerController’s PostParty method.
Listing 7-10.onSaveParty Creates or Updates a Party
function onSaveParty() {
sendPartyToService("POST")
}
function sendPartyToService(method) {
var createurl = " http://localhost:21962/api/PartyPlanner/ " + party.PartyID;
WinJS.xhr({
type: method,
url: createurl,
headers: { "Content-type": "application/json; charset=utf-8" },
data: JSON.stringify(party)
}).then(success, error);
}
function success(arg) {
party = JSON.parse(arg.responseText);
UpdateUI();
}
function error(arg) {
//Display error
}
The PostParty method (see Listing 7-11) is used to add or update party details. In this method we first check to see if the PartyID is zero; if so, we insert the Party object into the data context by calling the Add method; otherwise we update the entity state to Modified. Once done, we call the data context SaveChanges method to permanently save the party information in to the database. Once saved, we then return the Party object as an HTTP response.
Listing 7-11. PostParty Sets the Entity State before Saving the Changes
public HttpResponseMessage PostParty(Party party)
{
if (ModelState.IsValid)
{
if (party.PartyID == 0)
db.Parties.Add(party);
else
{
db.Entry(party).State = EntityState.Modified;
}
db.SaveChanges();
HttpResponseMessage response = Request.CreateResponse(HttpStatusCode.Created, party);
response.Headers.Location = new Uri(Url.Link("DefaultApi", new { id = party.PartyID }));
return response;
}
else
{
return Request.CreateResponse(HttpStatusCode.BadRequest);
}
}
Add Guest or Shopping Item
A Guest or a ShoppingItem is added when the user clicks Add in the Flyout UI as shown in Figure 7-9. The information entered by the user is used to construct a Guest or ShoppingItem array and is added to the Party object’s Guests or ShoppingItems collection (see Listing 7-12). The PartyJavaScript object is then PUT to the PartyPlanner Web API service, PutParty.
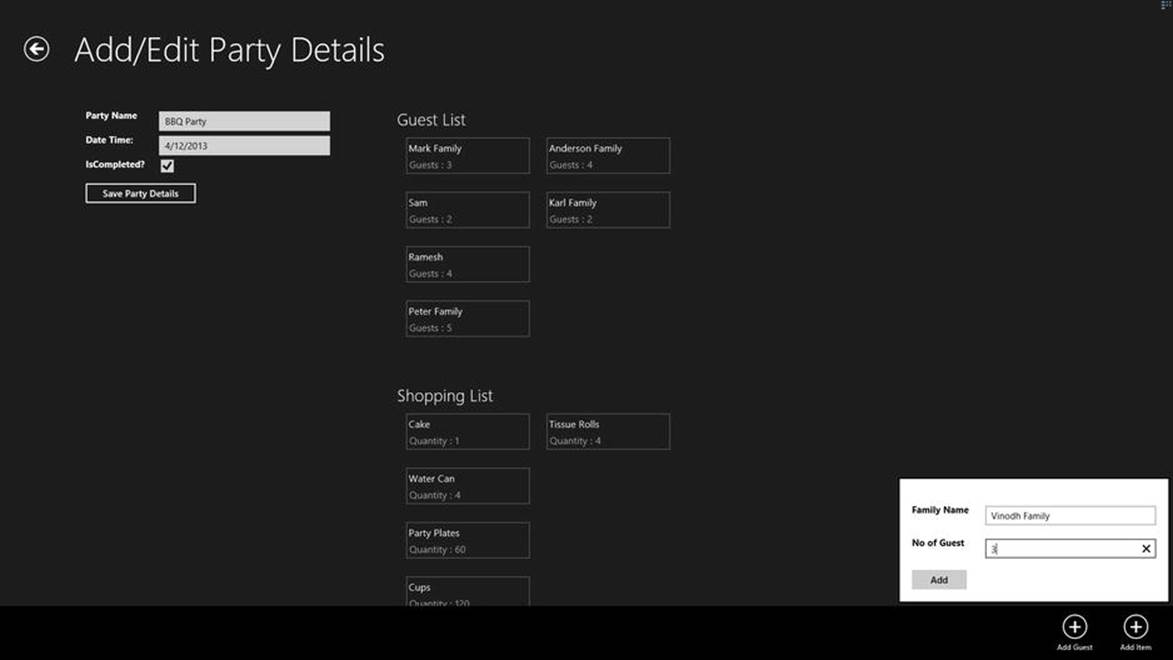
Figure 7-9.
Party details with Flyout UI for adding new Guest to the Party
Listing 7-12. Add Guest and ShoppingItem to the Database
function onAddToShoppingList() {
if (party.ShoppingList == null) {
party.ShoppingList = [];
}
party.ShoppingList.push(
{ShoppingItemID:"0", ItemName: $("#shopppingItem").val() , Quantity: $("#quantity").val()}
);
sendPartyToService("PUT");
document.getElementById("shoppingItemFlyout").winControl.hide();
}
function onAddToGuestList() {
if (party.Guests == null) {
party.Guests = [];
}
party.Guests.push(
{GuestID:"0", FamilyName: $("#guestName").val() , NumberOfPeople: $("#noofguest").val()}
);
sendPartyToService("PUT");
document.getElementById("guestFlyout").winControl.hide();
}
The PutParty method resides in the PartyPlannerController and loops through the items in the Guests and ShoppingList collections to update the Entity State before calling the SaveChanges context method to permanently update the changes in the database (see Listing 7-13).
Listing 7-13. Updating the Entity State before Saving to Database
public HttpResponseMessage PutParty(int id, Party party)
{
if (ModelState.IsValid )
{
db.Entry(party).State = EntityState.Modified;
if (party.ShoppingList != null)
{
foreach (var item in party.ShoppingList)
{
if (item.ShoppingItemID == 0)
{
item.Party = party;
db.Entry(item).State = EntityState.Added;
}
else
{
db.Entry(item).State = EntityState.Modified;
}
}
}
if (party.Guests != null)
{
foreach (var item in party.Guests)
{
if (item.GuestID == 0)
{
item.Party = party;
db.Entry(item).State = EntityState.Added;
}
else
{
db.Entry(item).State = EntityState.Modified;
}
}
}
try
{
db.SaveChanges();
}
catch (DbUpdateConcurrencyException)
{
return Request.CreateResponse(HttpStatusCode.NotFound);
}
HttpResponseMessage response = Request.CreateResponse(HttpStatusCode.Created, party);
response.Headers.Location = new Uri(Url.Link("DefaultApi", new { id = party.PartyID }));
return response;
}
else
{
return Request.CreateResponse(HttpStatusCode.BadRequest);
}
}
Now with all the codes in place, when we run the Party Planner app the user will be able to create a party and also will be able to add guests and items to the shopping list as the one shown in Figure 7-9 .
Ideas for Improvement
The Party Planner app can be worked on and improved to make it a feature-rich app. The following are some of the features that can be added.
· Importing the guest list from the People app using the Contact Picker contract.
· Integrating with social network options to add the party as a Facebook event and import guests from Facebook.
· Supporting live tiles and sending party reminder notifications.
Conclusion
In this chapter we learned to use SQL Server as the database for storing and retrieving data from a Windows 8 app by building a Service layer using ASP.NET Web API. ASP.NET Web API is a flexible, extendable, and straightforward way to build an HTTP endpoint that can be consumed within Windows 8 app. Also in this chapter we learned to use the EntityFramework Code First approach as our data access framework.
In the next chapter we learn to use WCF services with Windows 8 apps by building yet another app. Also in the next chapter we learn to use Prism for Windows Runtime.
Vinodh KumarBeginning Windows 8 Data DevelopmentUsing C# and JavaScript10.1007/978-1-4302-4993-1_8
© Vinodh Kumar 2013