Beginning Windows 8 Data DevelopmentUsing C# and JavaScript (2013)
9. Windows Azure Mobile Services
Vinodh Kumar1
(1)
NY, US
Abstract
In the last two chapters, we have seen two different approaches to consuming data from SQL Server, one using ASP.NET Web API and the other using WCF. In this chapter we learn to use Windows Azure Mobile Services to leverage data in a Windows 8 app. Windows Azure Mobile Services allows us to quickly connect any mobile client like Windows 8, Windows Phone, iOS, Android, or HTML5 apps to a cloud-based back end hosted on Windows Azure.
In the last two chapters, we have seen two different approaches to consuming data from SQL Server, one using ASP.NET Web API and the other using WCF. In this chapter we learn to use Windows Azure Mobile Services to leverage data in a Windows 8 app. Windows Azure Mobile Services allows us to quickly connect any mobile client like Windows 8, Windows Phone, iOS, Android, or HTML5 apps to a cloud-based back end hosted on Windows Azure.
This chapter begins by helping us get started with Windows Azure Mobile Services using the Windows Azure Mobile Service setup. We learn to integrate Live SDK for user authentication, storing data in Windows Azure storage. We learn these steps by developing an Instagram-inspired app called Instashots that allows users to edit and add filters to the photos in a way similar to Instagram by using the Aviary SDK and storing data in Windows Azure storage.
Introduction to Windows Azure Mobile Services
Windows Azure Mobile Services is a new addition to Windows Azure. The idea behind it is to allow developers to build a scalable services for multiple mobile platforms. Windows Azure Mobile Services currently provides support through the client libraries that are available for Windows 8, Windows Phone, iOS, Android, and HTML5 apps. This service provides the necessary infrastructure to quickly create back-end services by enabling some common scenarios like storing data, authentication, app notification, monitoring and logging for services.
· Data : With Windows Azure, we are able to store data in the Windows Azure SQL database as tables. One of the best features of Windows Azure Mobile Services is the ability to work with a dynamic schema to automatically insert new columns for fields that it has never received before.
· Authentication : Windows Azure Mobile Services has built-in support for various third-party identity providers like Microsoft Account, Facebook Login, Twitter Login, and Google Login.
· Notification : Windows Azure Mobile Services supports push notification and can be integrated with the notification services of iOS, Android, Windows 8, and Windows Phones to deliver push notifications.
· Monitoring and logging : Windows Azure Mobile Services provides a dashboard that displays a usage timeline, usage overview, and logging information (see Figure 9-1).
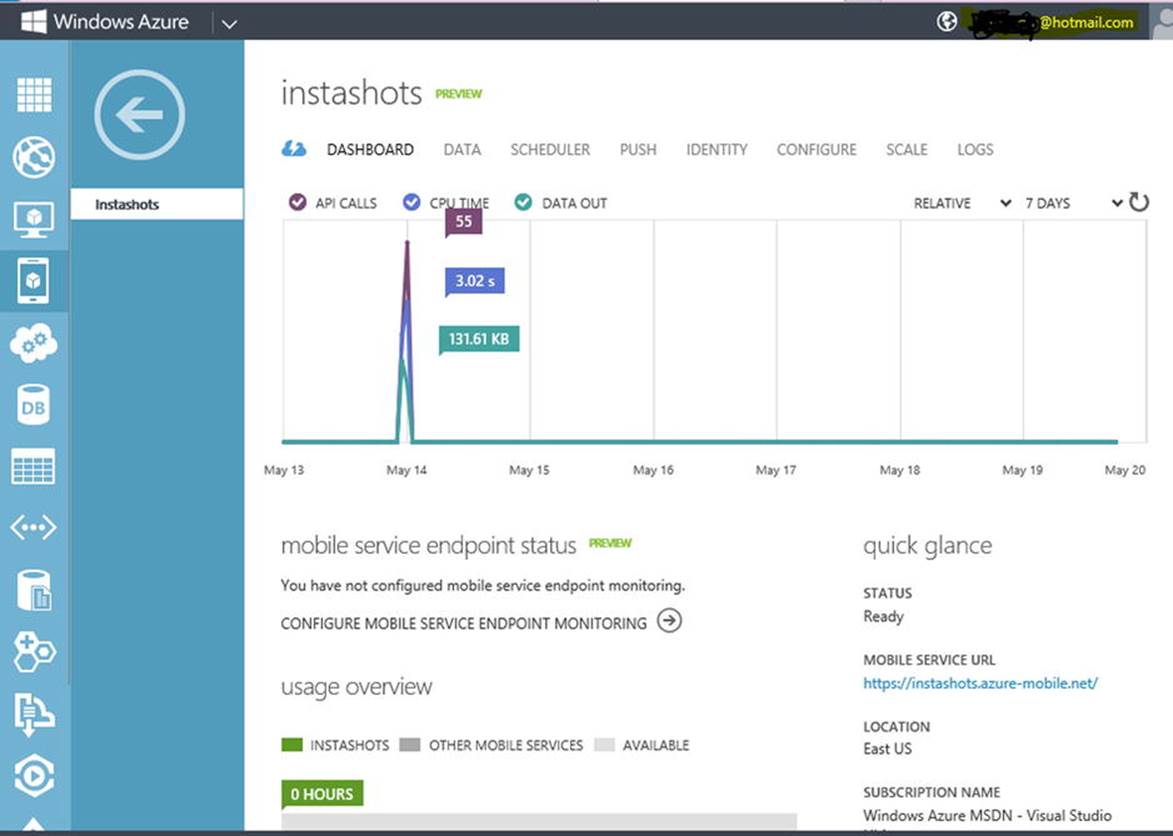
Figure 9-1.
Windows Azure Mobile Services Dashboard displays API Call count, CPU usage and Data Out
Note
Similar to Windows Azure Mobile Services, Amazon also provides a cloud-based solution called Amazon Web Services (AWS) for storing structured information in the cloud. AWS has a .NET SDK that has support for both Windows 8 and Windows Phone 8 app development. You can download the SDK at http://aws.amazon.com/sdkfornet/ .
Creating the Instashots App
The Instashots app is an Instagram-inspired online photo sharing service that enables its users to add filters to photos and post them online. By building this service we learn how to do the following.
· Create and manage Windows Azure Mobile Services.
· Store data in a Windows Azure SQL database.
· Store images in the Windows Azure storage.
· Integrate Live SDK and use it to authenticate users.
· Integrate Aviary SDK for photo editing.
Creating Windows Azure Mobile Services in the Management Portal
To enable Windows Azure Mobile Services in our app we need to sign up for the Windows Azure services. Microsoft provides a trial version for people who like to experiment with it beforehand. Once registered, log in to the Windows Azure Management Portal (http://manage.windowsazure.com ) and click the +New button at the bottom left of the page to create a new Mobile Service named Instashots, as shown in Figure 9-2.
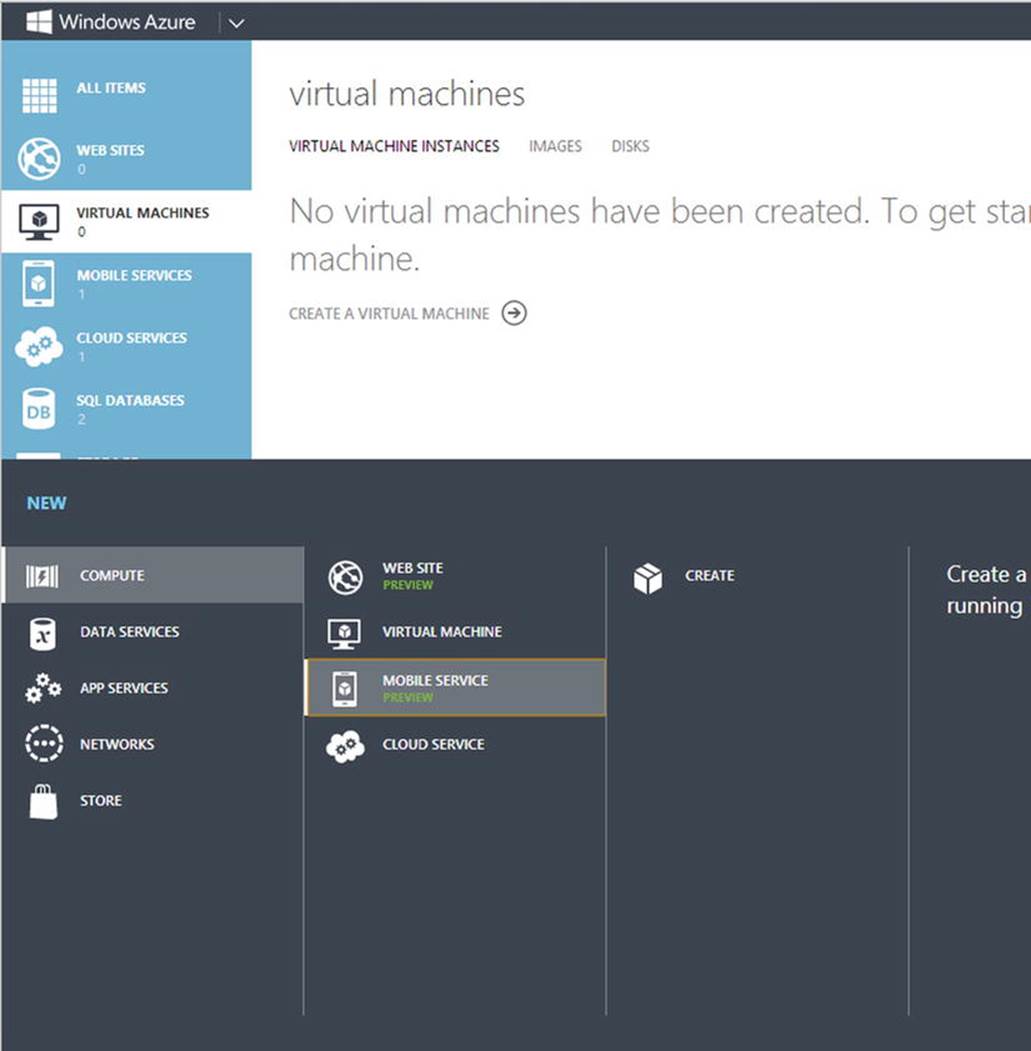
Figure 9-2.
Creating back end services for the Instashots app
On the Create a Mobile Service page shown in Figure 9-3, type Instashots as the subdomain name . The URL for our Windows Azure Mobile Services will be http://instashots.azure-mobile.net/ .
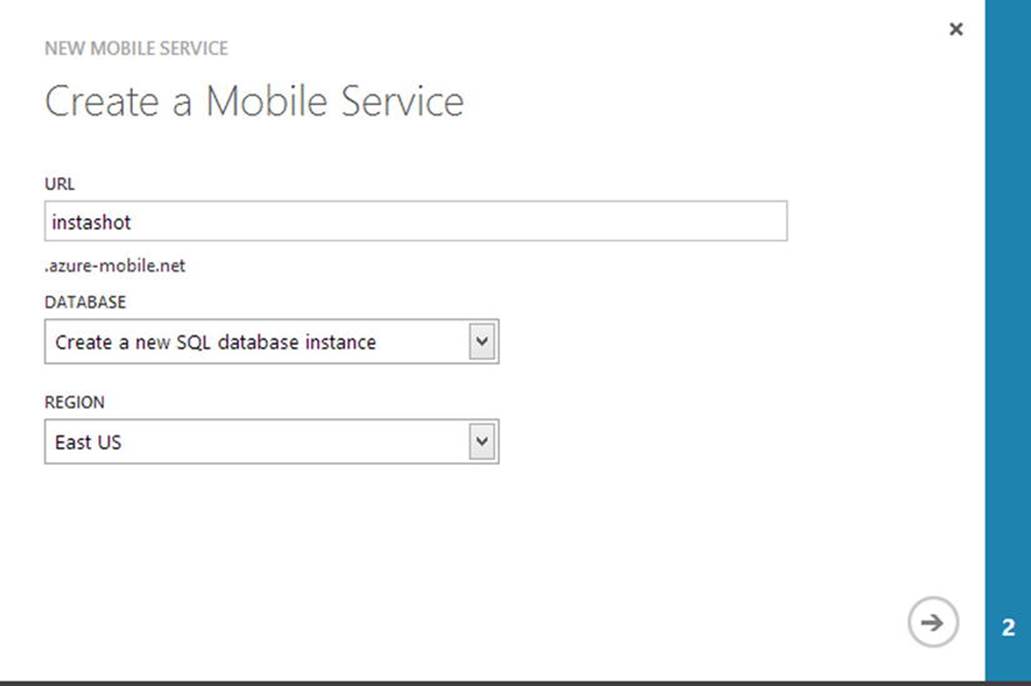
Figure 9-3.
Creating the Mobile Services for Instashots app
With the Mobile Service created, next the wizard takes us to the Specify Database Settings page shown in Figure 9-4. Here we create a new database and name it instashot_db. Figure 9-5 shows the Instashots mobile service ready for the app to use.
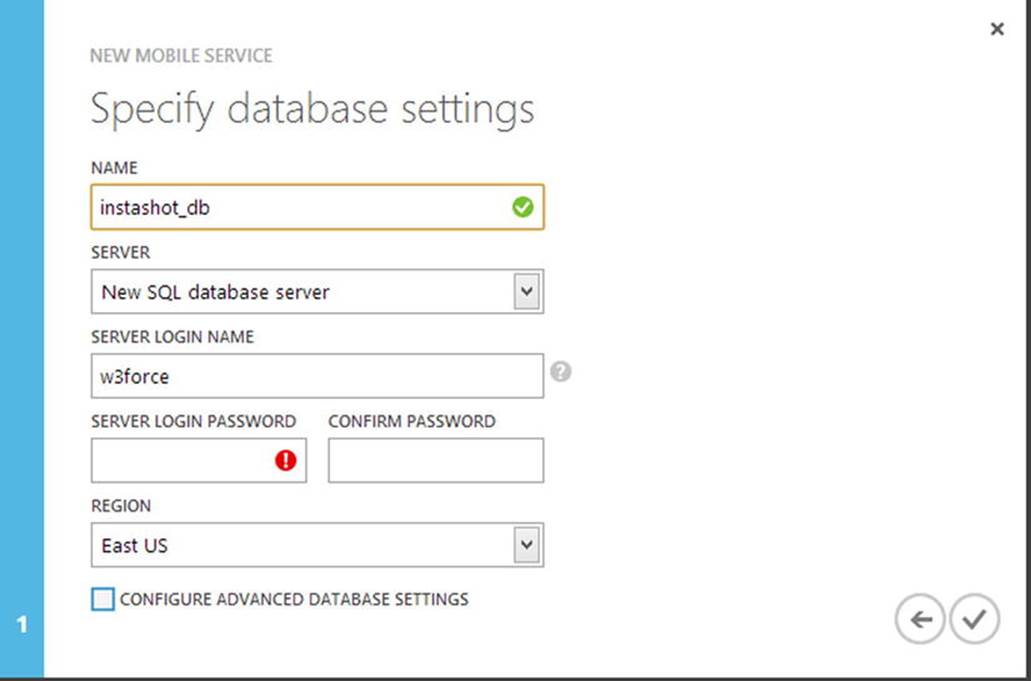
Figure 9-4.
Setting up the database for the Instashots Mobile Service
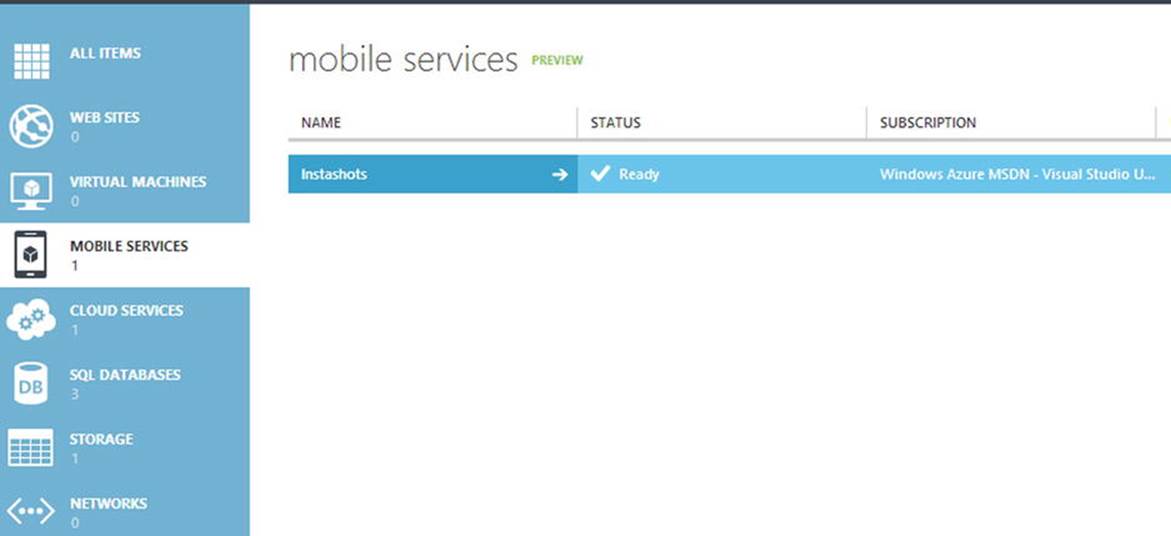
Figure 9-5.
Instashots mobile service is ready for the Windows 8 app to use
Creating Mobile Services Tables
With the mobile service in place, we add new tables in the SQL Database instance instashot_db that we created along with the Mobile Services. The main functionality of the Instashots app is to allow users to log in to the app using a Microsoft account and upload photos, add comments to a photo, and follow users. For that, we create four Mobile Services tables.
· User : Stores the user information.
· Pictures : Stores the URI of the picture uploaded to the Windows Azure storage.
· Comments : Stores the comments of the pictures.
· Follow : Stores the information of those who are followed and followers.
To create tables, go to the Start page for Mobile Services Instashots by clicking the Right arrow shown in Figure 9-5. Navigate to the DATA tab to create new tables. To do so, click the Create + button (see Figure 9-6).
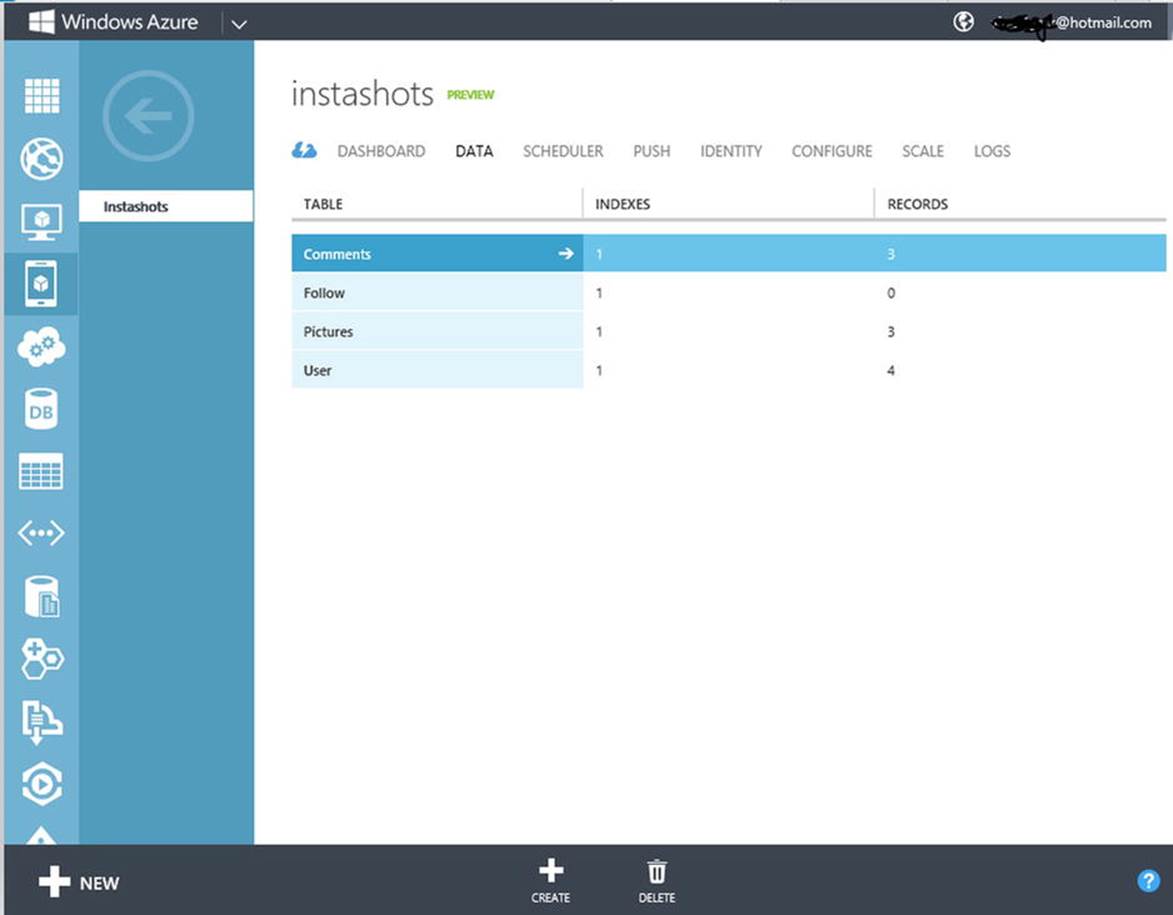
Figure 9-6.
Creating a new table interface in the Windows Azure Management Portal
The Pictures table is essential, as it stores photo data to the mobile services. When the Instashots app tries to perform any of the CURD operations like inserting, updating, deleting, or reading, we can specify what permission the user needs to perform this operation. In our case we will allow only authenticated users to perform insert, update, and delete operations, but everyone can read the data (see Figure 9-7). Now the table is locked and it will not be possible for anyone to insert, update, or delete without proper authorization. Similar to the Pictures table, we also create tables to store user data, comments, and follower information. Once created, the DATA tab will look like the one shown in Figure 9-6.
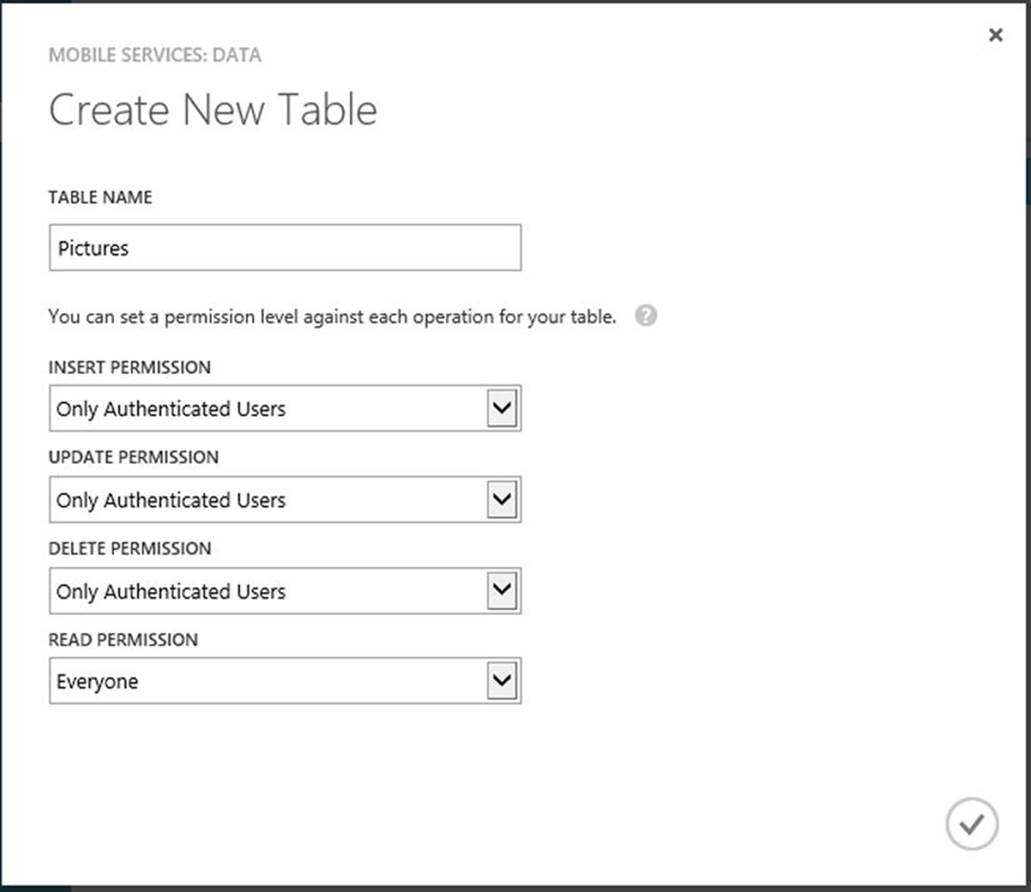
Figure 9-7.
Creating a new storage table Pictures for storing photo data
Creating Windows Azure Storage
Even though a photo’s information, like title and uploaded date, are stored in the Picture table, the image files will be stored in the Windows Azure Storage. For this we need to create a Windows Azure storage (see Figure 9-8) and a container within that storage to store the pictures that we upload from the Instashots app.
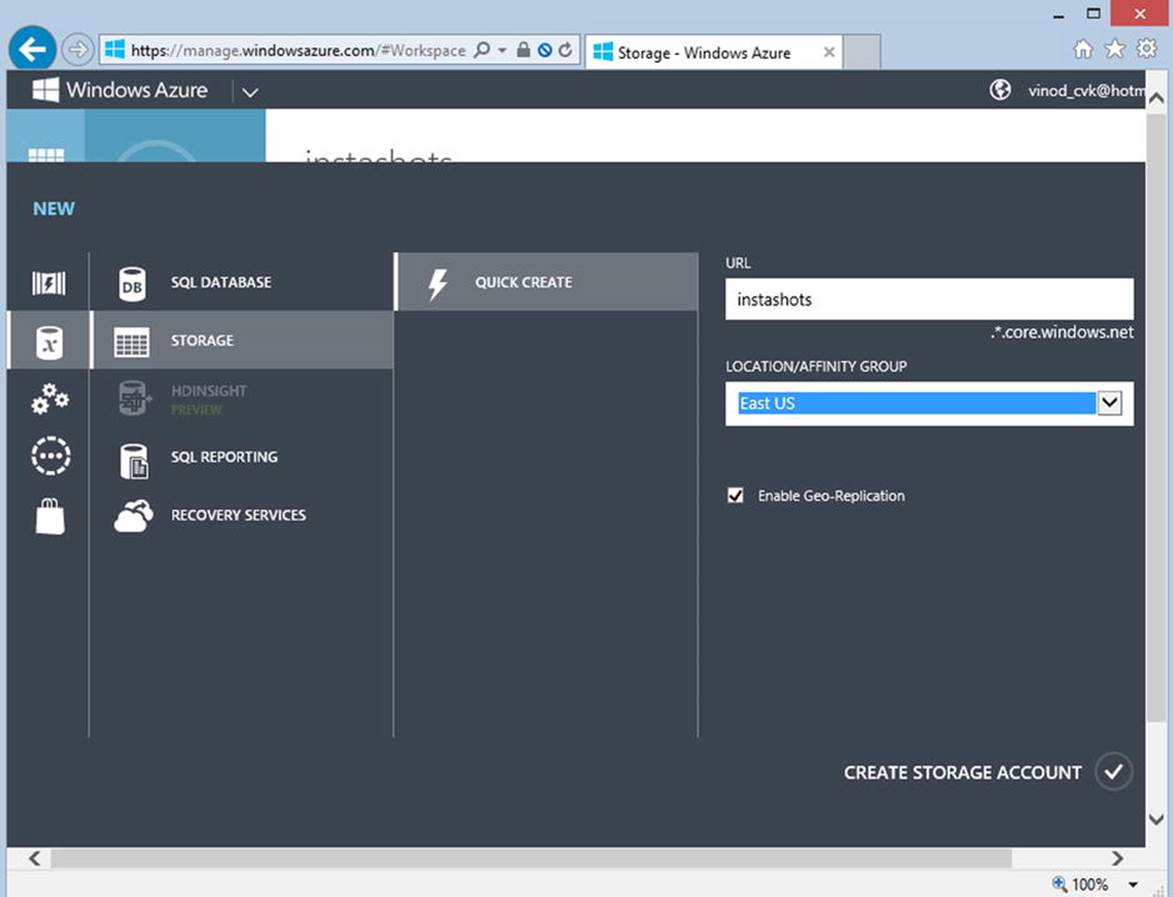
Figure 9-8.
New Windows Azure Storage account created with the name Instashots
Next we create a container within the storage account. This container provides a logical grouping for blobs stored in the Windows Azure storage service. When we upload the photo to the Instshots app, we should specify the name of the container, as shown in Figure 9-9.
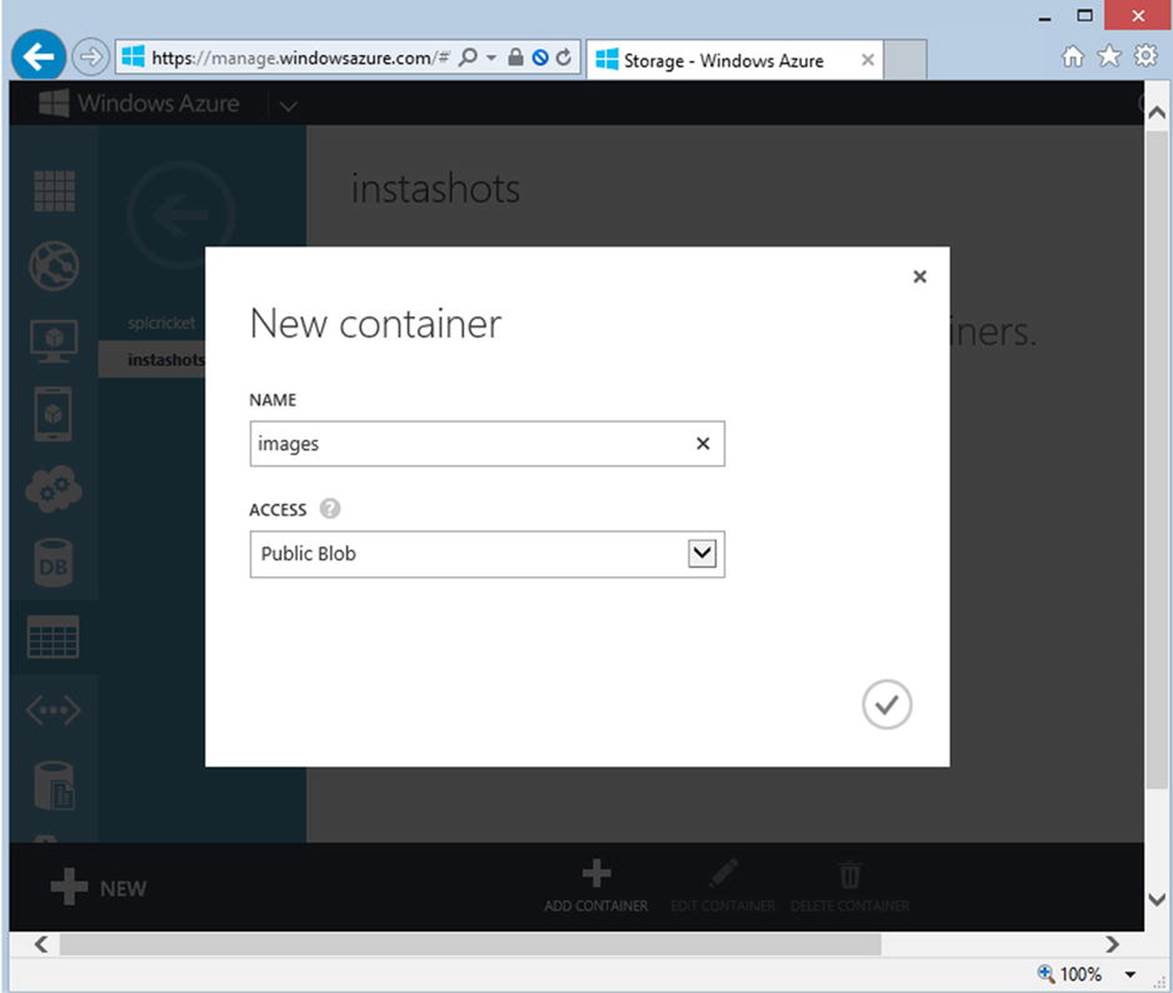
Figure 9-9.
Container within the storage account is created to store the images
Setting Up the Development Environment
The mobile service Start screen generates a Windows 8 app that can be downloaded. This app is preconfigured to access the Instashots back end and is ready to run. WinJS (HTML5/JavaScript) or C# (.NET/XAML) can be chosen for download. We’ll choose C# here and include the following reference from the NuGet packages.
· MVVM Light
· Windows Azure Mobile Services
· Windows Azure storage
We also add references to the Live SDK and the Aviary Photo Editing SDK as shown in Figure 9-10. The Aviary Photo Editing SDK provides us with an intuitive photo editing tool for everything from quick fixes and one-tap autoenhance to stylistic effects, cropping, red eye removal, and adding filters, frames, and stickers to the photos.
Note
Aviary SDK for Windows 8 can be downloaded from http://www.aviary.com/w8 . As of now this SDK is compatible only with C++/XAML and C#/XAML.
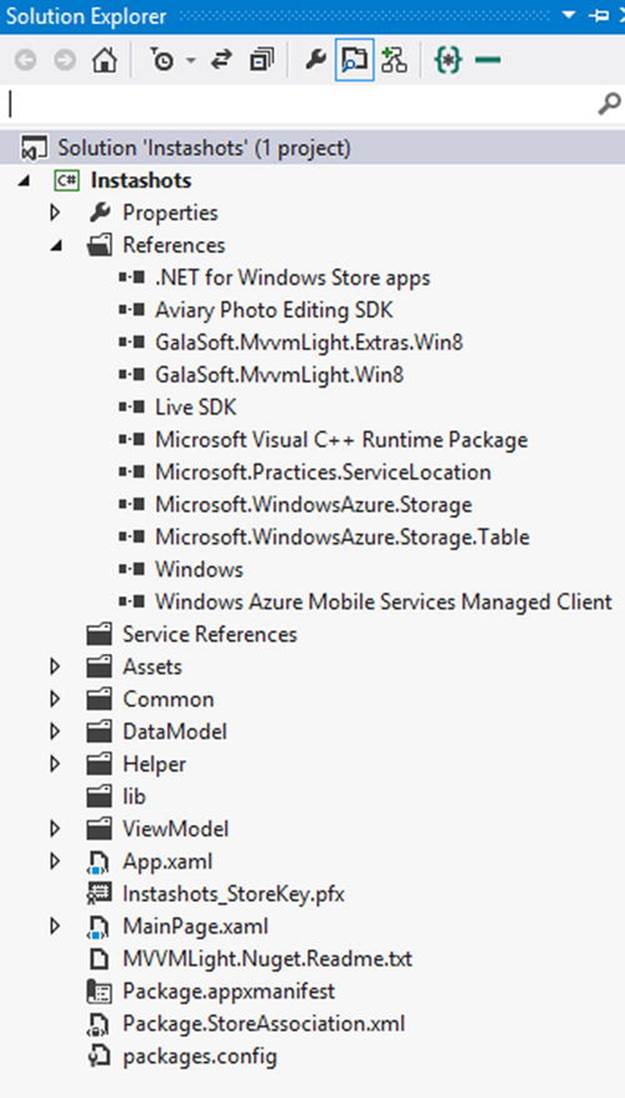
Figure 9-10.
Instashots Windows 8 App project structure
Drilling into the Solution Explorer we notice two files, App.xaml and MainPage.xaml, and a little bit of stub code that is already added to App.xaml as shown in Listing 9-1. This helps the Client component of the app to talk to the mobile services.
Listing 9-1. A Simpler Key URL That Will Map to the Instashots Mobile Services, Which Helps the App Talk to the Mobile Services
// This MobileServiceClient has been configured to communicate with Mobile Service's url
// and application key. You're all set to start working with your Mobile Service!
public static MobileServiceClient MobileService = new MobileServiceClient(
" https://instashots.azure-mobile.net/ ",
"TVqTZaDDCuvOKGPMmKwrJhdAFCTECy75"
);
We create four classes: User, Comment, Picture, and Follow (see Listing 9-2) that models the entities that we created in Windows Azure table storage using the Management console. We add the DataTable attributes to all these classes to specify that this class represent Mobile Services tables.
Listing 9-2. Table Classes That Model the Entities of the Windows Azure Table Storage
using Microsoft.WindowsAzure.MobileServices;
using System;
using System.Runtime.Serialization;
[DataTable(Name = "User")]
public class User
{
public int Id { get; set; }
[DataMember(Name = "username")]
public string UserName { get; set; }
[DataMember(Name = "userid")]
public string UserID { get; set; }
[DataMember(Name = "lastaccessed")]
public DateTime? LastAccessed { get; set; }
}
[DataTable(Name = "Pictures")]
public class Picture
{
public int Id { get; set; }
[DataMember(Name = "name")]
public string Name { get; set; }
[DataMember(Name = "title")]
public string Title { get; set; }
[DataMember(Name = "userid")]
public string UserId { get; set; }
[DataMember(Name = "imageurl")]
public string Imageurl { get; set; }
[DataMember(Name = "sasQueryString")]
public string sasQueryString { get; set; }
[DataMember(Name = "likes")]
public int Likes { get; set; }
[IgnoreDataMember]
public List<Comment> Comments { get; set; }
}
[DataTable(Name = "Comments")]
public class Comment
{
public int Id { get; set; }
[DataMember(Name = "text")]
public string CommentText { get; set; }
[DataMember(Name = "userid")]
public int UserId { get; set; }
[DataMember(Name = "pictureid")]
public int PictureId { get; set; }
[DataMember(Name = "createdDate")]
public DateTime? CreatedDate { get; set; }
[IgnoreDataMember]
public User CommentedBy { get; set; }
}
[DataTable(Name = "Follow")]
public class Follow
{
public int Id { get; set; }
[DataMember(Name = "followeruserid")]
public int FollowerUserId { get; set; }
[DataMember(Name = "followinguserid")]
public int FollowingUserId { get; set; }
[DataMember(Name = "lastUpdated")]
public DateTime? LastUpdatedDate { get; set; }
}
Designing Instashots User Interface
The Instashots app is a single-page UI (MainPage.xaml) as shown in Listing 9-3, which is divided into four sections via Header section, which contains the App name and a sign-out button. The Feed section is at the left and will display photos posted by the logged-in user and all of the users that the logged-in user is following. The next section is above the Feed section and displays the selected photo from the feed list. From this section users are able to link the picture, view comments, and add comments to the picture. On the right side we can display the Instashots users who are following and whom the user follows, but considering the length of this chapter, we do not discussing this implementation. Readers are encouraged to explore this as a further exercise.
Listing 9-3. MainPage.xaml View Defined in the XAML
<Grid Background="White">
<Grid Margin="50,50,10,10">
<Grid.ColumnDefinitions>
<ColumnDefinition Width="653*" />
<ColumnDefinition Width="427*" />
<ColumnDefinition Width="226*"/>
</Grid.ColumnDefinitions>
<Grid.RowDefinitions>
<RowDefinition Height="Auto" />
<RowDefinition Height="*" />
</Grid.RowDefinitions>
<!--Header Section-->
<Grid Grid.Row="0"
Grid.ColumnSpan="2"
Margin="0,0,0,20">
<StackPanel>
<TextBlock>
<Run Text="Instashots"/>
</TextBlock>
</StackPanel>
</Grid>
<StackPanel Grid.Row="1">
<StackPanel>
<local:QuickStartTask
Number="1"
Title="Photo Feed"
Description="Photos posted by you and your followers" />
<!--Selected Photo Section-->
<StackPanel
Margin="10,20,0,20"
Visibility="{Binding ShowSelectedPhoto}">
<StackPanel
Margin="2,0,0,0"
Orientation="Horizontal">
<TextBlock
Text="{Binding SelectedTitle}"/>
<TextBlock
Text="{Binding SelectedLikeCount}"
VerticalAlignment="Center"
Foreground="{StaticResource
SliderTrackDecreasePressedBackgroundThemeBrush}"
/>
<Button
Command="{Binding LikeCommand, Mode=OneWay}"
Content="Like"
/>
</StackPanel>
<Border>
<Image
Source="{Binding SelectedPicture,
Converter={StaticResource UrlToBitmapImageConverter}}"
Stretch="UniformToFill"/>
</Border>
<StackPanel
Margin="22,10,0,0"
Orientation="Vertical">
<StackPanel Orientation="Horizontal">
<TextBlock/>
<Button
Command="{Binding ShowCommentCommand, Mode=OneWay}"
Content="Add Comment"/>
</StackPanel>
<!--ListView the loads the comment of the selected picture-->
<ListView
ItemsSource="{Binding PictureComments}"
SelectionMode="None"
IsSwipeEnabled="false"
IsItemClickEnabled="True"
ItemTemplate="{StaticResource CommentTemplate}" />
</StackPanel>
</StackPanel>
<!--Feed List-->
<StackPanel
Orientation="Horizontal"
Margin="10,0,0,0">
<ListView
ItemsSource="{Binding MyPictures}"
SelectedItem="{Binding SelectedItem, Mode=TwoWay}"
IsSwipeEnabled="false"
IsItemClickEnabled="True"
ItemTemplate="{StaticResource 80PxTemplate}"
SelectionMode="Single">
<ListView.ItemsPanel>
<ItemsPanelTemplate>
<WrapGrid Orientation="Horizontal" />
</ItemsPanelTemplate>
</ListView.ItemsPanel>
</ListView>
</StackPanel>
</StackPanel>
</StackPanel>
<Grid Grid.Row="1" Grid.Column="1" Grid.ColumnSpan="2">
<Grid.RowDefinitions>
<RowDefinition Height="Auto" />
<RowDefinition />
</Grid.RowDefinitions>
<!-- Users list to follow-->
<StackPanel>
<local:QuickStartTask
Number="2"
Title="Instashots Users"
Description="Follow or unfollow a user from the list" />
</StackPanel>
<ListView
x:Name="ListItems"
Margin="62,10,0,0" Grid.Row="1">
<ListView.ItemTemplate>
<DataTemplate>
<StackPanel Orientation="Horizontal">
<CheckBox
x:Name="CheckBoxComplete"
IsChecked="{Binding Complete, Mode=TwoWay}"
Content="{Binding Text}" Margin="10,5"
VerticalAlignment="Center"/>
</StackPanel>
</DataTemplate>
</ListView.ItemTemplate>
</ListView>
</Grid>
<StackPanel Margin="0,0,0,20" Grid.Column="2">
<TextBlock
x:Name="txtWelcome"/>
<Button Margin="72,0,0,0"
x:Name="btnSignOut"
Command="{Binding SignoutCommand}"
Content="Sign Out"/>
</StackPanel>
</Grid>
MainViewModel
We add a ViewModel class MainViewModel. MVVM Light’s ViewModelBase class is used as the base class for this ViewModel and this ViewModel exposes methods and commands to accomplish various functionalities, like authenticating users against a Microsoft Account, uploading photos to the Windows Azure storage services, and getting the photos and user details from Windows Azure Mobile Services.
MainViewModel Commands
In MainViewModel(see Listing 9-4) we add commands that will be bound to the elements of the user interfaces in MainPage.xaml. These commands will be associated with methods that are called when the command is invoked.
Listing 9-4. Commands to Bind User Interface with Logic
public RelayCommand SignoutCommand { get; private set; }
public RelayCommand EditPhotoCommand { get; private set; }
public RelayCommand UploadPhotoCommand { get; private set; }
public RelayCommand AddCommentCommand { get; private set; }
public RelayCommand ShowCommentCommand { get; private set; }
public RelayCommand LikeCommand { get; private set; }
public MainViewModel()
{
if (!IsInDesignMode)
{
this.SignoutCommand = new RelayCommand(this.SignOutAction, CanSignOut);
this.UploadPhotoCommand = new RelayCommand(this.UploadAction, CanUpload);
this.EditPhotoCommand = new RelayCommand(this.EditPhotoAction , CanEditPhoto);
this.AddCommentCommand = new RelayCommand(this.AddCommentAction);
this.ShowCommentCommand = new RelayCommand(this.ShowCommentAction);
this.LikeCommand = new RelayCommand(this.LikeAction);
Authenticate();
}
}
MainViewModel Properties
We will add various properties to the MainViewModel and these properties are responsible for holding the photo feeds, changing the visible state of the controls, and editing the photo details. Listing 9-5 shows all the properties in MainViewModel with comments above each that detail the purpose of that property.
Listing 9-5. MainViewModel Properties That Hold the Information
//User welcome text
public string WelcomeTitle
{
get
{
return welcomeTitle;
}
set
{
welcomeTitle = value;
RaisePropertyChanged("WelcomeTitle");
}
}string welcomeTitle;
//Uploading Photo Title
public string PhotoTitle
{
get
{
return photoTitle;
}
set
{
photoTitle = value;
RaisePropertyChanged("PhotoTitle");
}
}string photoTitle;
//Photo Like count
public string SelectedLikeCount
{
get
{
return selectedLikeCount;
}
set
{
selectedLikeCount = value;
RaisePropertyChanged("SelectedLikeCount");
}
}string selectedLikeCount;
//Show popup UI to entry title and upload
public bool ShowUploadPopup
{
get
{
return showUploadPopup;
}
set
{
showUploadPopup = value;
RaisePropertyChanged("ShowUploadPopup");
}
}bool showUploadPopup;
//Show popup UI to add comment
public bool ShowCommentPopup
{
get
{
return showCommentPopup;
}
set
{
showCommentPopup = value;
RaisePropertyChanged("ShowCommentPopup");
}
}bool showCommentPopup;
//Selected Photo from the Feed
public Picture SelectedItem
{
get
{
return selectedItem;
}
set
{
selectedItem = value;
SelectedTitle = selectedItem.Title;
SelectedPhoto = SelectedItem.Imageurl ;
ShowSelectedPhoto = Visibility.Visible;
SelectedLikeCount = string.Format("{0} {1}"
, SelectedItem.Likes, SelectedItem.Likes > 1 ? "Likes" : "Like");
RaisePropertyChanged("SelectedItem");
LoadComment();
}
}Picture selectedItem;
//Set visibility of the Selected Photo section
public Visibility ShowSelectedPhoto
{
get
{
return showSelectedPhoto;
}
set
{
showSelectedPhoto = value;
RaisePropertyChanged("ShowSelectedPhoto");
}
}Visibility showSelectedPhoto = Visibility.Collapsed;
//Selected Photo title from the feed
public string SelectedTitle
{
get
{
return selectedTitle;
}
set
{
selectedTitle = value;
RaisePropertyChanged("SelectedTitle");
}
}string selectedTitle;
//Comment to be added to the selected photo
public string CommentText
{
get
{
return commentText;
}
set
{
commentText = value;
RaisePropertyChanged("CommentText");
}
}string commentText;
//Azure storage URL of the selected photo from the feed
public string SelectedPhoto
{
get
{
return selectedPhoto;
}
set
{
selectedPhoto = value;
RaisePropertyChanged("SelectedPhoto");
}
}string selectedPhoto;
//WritableBitmap of the edited photo from Aviary UI
public WriteableBitmap EditedImage
{
get
{
return editedImage;
}
set
{
editedImage = value;
RaisePropertyChanged("EditedImage");
}
}WriteableBitmap editedImage;
Authentication with Live SDK
Windows Azure Mobile Services has bulit-in functionality to authenticate and authorize users by using a variety of identity providers, like Microsoft Accounts, Facebook, Twitter, and Google.
To configure Instashots to use the Microsoft account for authentication, we have to update the settings on the Mobile Services IDENTITY tab in the Windows Azure Management Portal. On this tab we can configure for Microsoft Account, Facebook, Twitter, and Google; for the Instashots app, though, we configure only the Microsoft account. Navigate to the Live Portal ( http://manage.dev.live.com ) and register the application as shown in Figure 9-11. Get the Client ID and Client Secret key and update them in the Microsoft Account settings as shown in Figure 9-12. Finally, set the redirect domain in Live Connect, which is essentially our Windows Azure Mobile Service URL, https://instashots.azure-mobile.net/ .
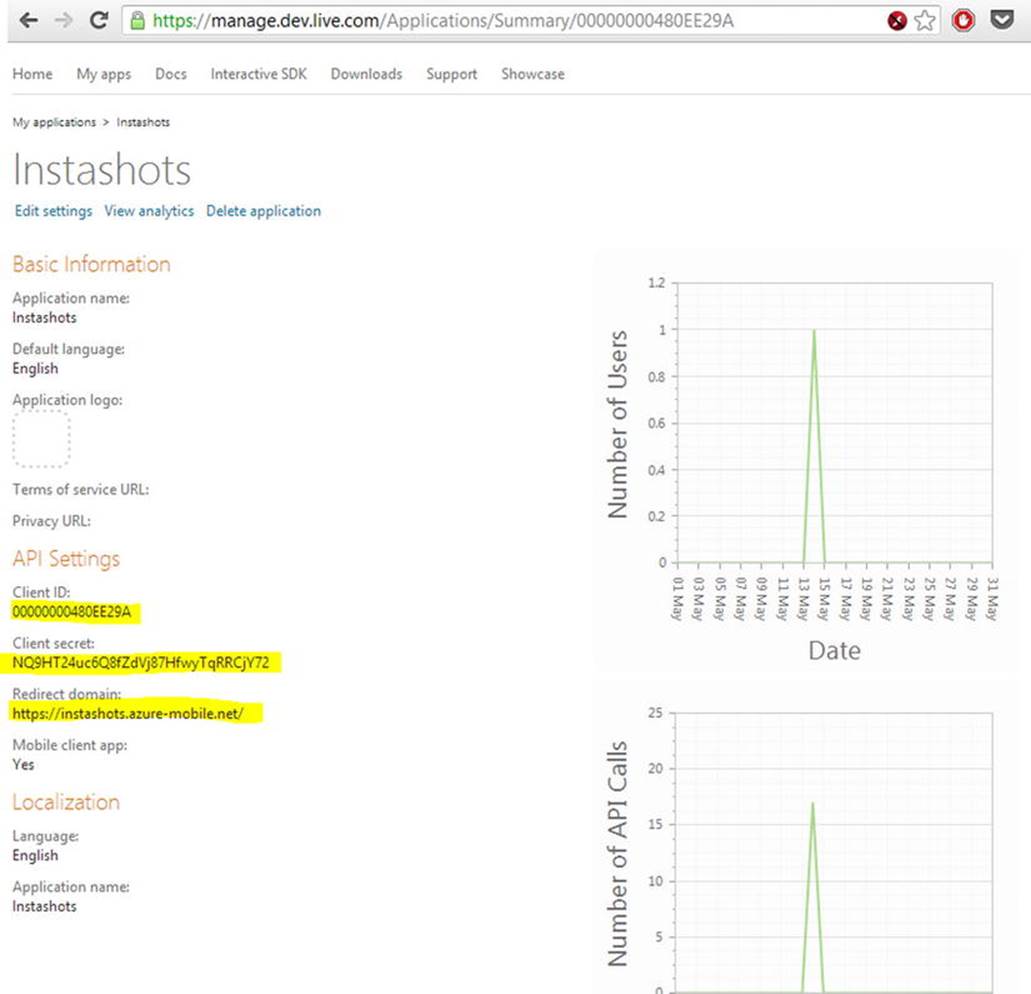
Figure 9-11.
Live developer portal to register an app to support Microsoft Account
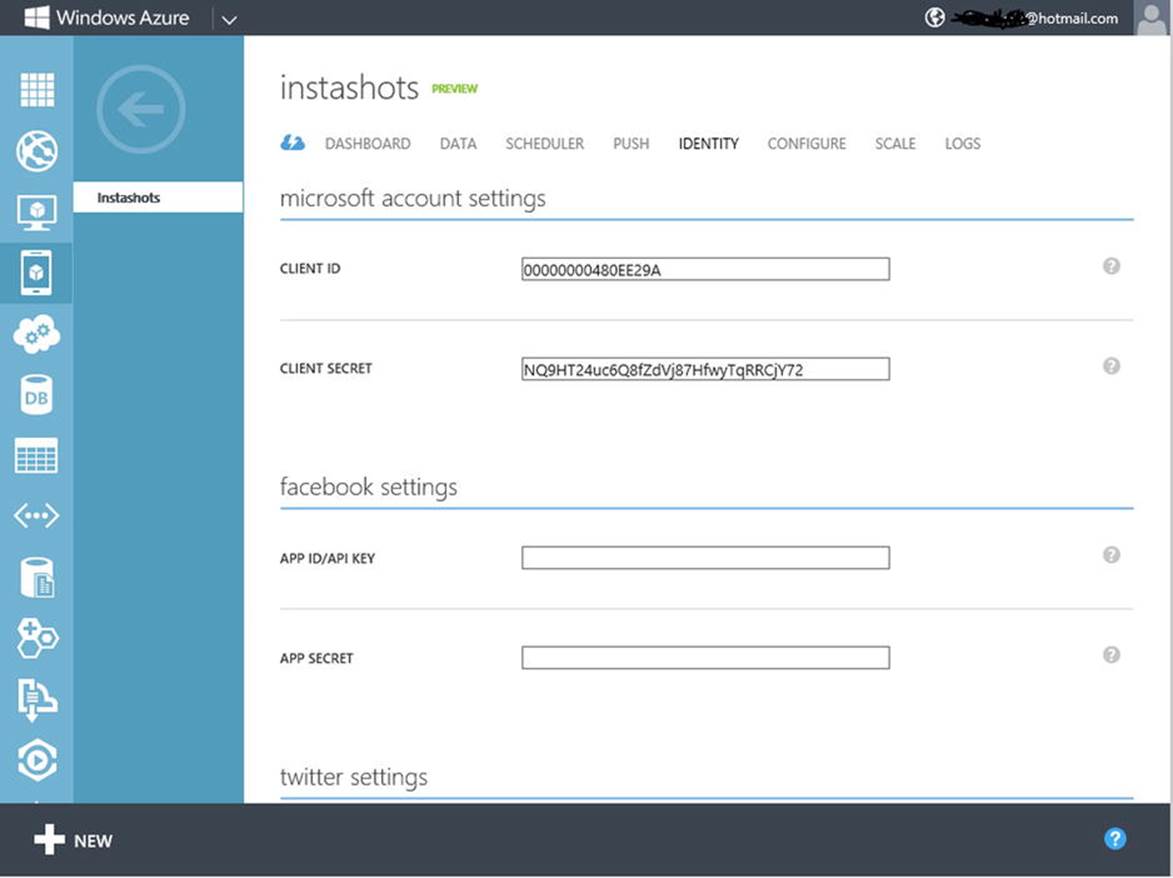
Figure 9-12.
Setting up Microsoft Account for authentication
As of now, the Mobile Services API only provides very basic information about logged in users, like username, but we would like to get some more information, like the logged-in user’s first name, so that we can provide a customized greeting for the user when he or she logs into the app. To achieve that, instead of using the Mobile Services API for authenticating a user, we use Live SDK APIs to authenticate and then assign the token to the Mobile Services User object as shown in Listing 9-6. We will have all this logic in an asyn method, Authenticate. This method resides inside the MainViewModel and will be invoked when the user launches the app. This method authenticates the user, and once authenticated it will check to see if the user is an existing user. If so, it then gets the User object for that user; otherwise, it creates a new User object and saves the information to the Mobile Services storage table.
Listing 9-6. Authenticating the User Using Live SDK
LiveAuthClient liveIdClient = new LiveAuthClient(" https://instashots.azure-mobile.net/ ");
private LiveConnectSession session;
private async System.Threading.Tasks.Task Authenticate()
{
while (session == null)
{
// Force a logout to make it easier to test with multiple Microsoft Accounts
if (liveIdClient.CanLogout)
liveIdClient.Logout();
LiveLoginResult result = await liveIdClient.LoginAsync(new[] { "wl.basic" });
if (result.Status == LiveConnectSessionStatus.Connected)
{
session = result.Session;
LiveConnectClient client = new LiveConnectClient(result.Session);
LiveOperationResult meResult = await client.GetAsync("me");
//assigning the token generated by LiveConnectClient to the MobileServiceUser
MobileServiceUser loginResult = await App.MobileService.LoginAsync(result.Session.AuthenticationToken);
var results = await userTable.ToListAsync();
if (results.Count == 0)
{
var user = new User { LastAccessed = DateTime.Now, UserName = meResult.Result["first_name"].ToString() };
}
else
{
CurrentUser = results.First();
}
WelcomeTitle = string.Format("Welcome {0}!", meResult.Result["first_name"]);
//Get the photos uploaded by logged in user.
var getPictures = await GetMyPhotos();
foreach (var p in getPictures)
{
myPictures.Add(p);
}
RaisePropertyChanged("MyPictures");
}
else
{
session = null;
var dialog = new MessageDialog("You must log in.", "Login Required");
dialog.Commands.Add(new UICommand("OK"));
await dialog.ShowAsync();
}
}
}
Windows Azure Mobile Services enables us to define custom business logic that is run on the server. This logic is provided as a JavaScript function that is registered to an insert, read, update, or delete operation on a given table. In our case before inserting a row in the User table, we get the authenticated user ID from the User parameter of the insert script and set it to the User table userid column as shown in Figure 9-13.
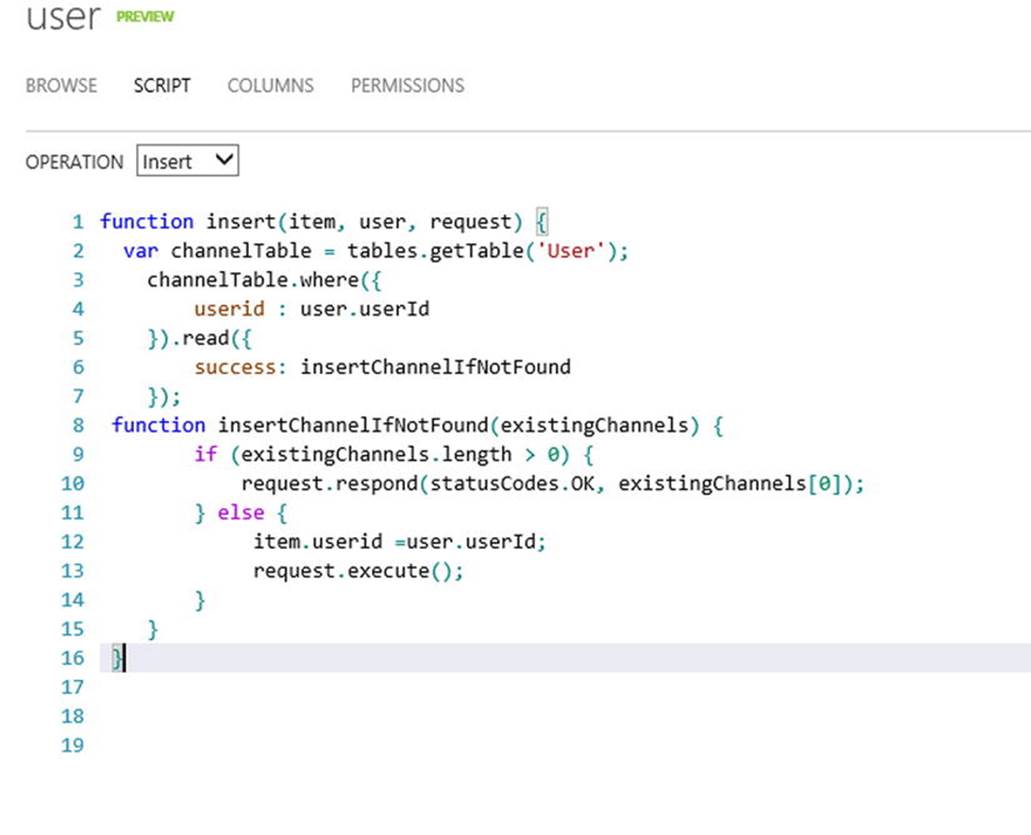
Figure 9-13.
Insert script to get the UserID and update the table
Retrieving the Photo Feed
Once the user is authenticated, the Authenticate method will call the GetMyPhotos (see Listing 9-7) method to get the Pictures and populate them into the MyPictures collection. This collection is bound to the ListView as shown earlier in Listing 9-3.
Listing 9-7. Retrieving the PhotoFeed from the Pictures Table
private async Task<List<Picture>> GetMyPhotos()
{
return await pictureTable.ToListAsync();
}
Uploading Photos to Windows Azure Storage
As mentioned before, the Instashots app allows a logged-in user to add filters to a photo and upload it to the Windows Azure Storage and update the Photo table with the photo title and Windows Azure Storage URI. To upload a photo, the user will click the Upload button on the app bar, which invokes the EditPhotoAction command that calls the EditPhotoAction method. This method calls the FileOpenPicker class for the user to pick a photo for editing. Once picked, the photo is sent to the Aviary Photo Editor by calling the LaunchAviarySDK method as shown in Listing 9-8 to add the filters to the photo as shown in Figure 9-14. Once the photo is edited by the user, the PhotoEditCompleted method is invoked by the AviaryEditor. In the PhotoEditCompleted method we assign the edited photo to EditedImage property, and display a pop-up window (see Figure 9-15) to add a title to the photo with an option to upload by clicking the Upload button in the pop-up window.
Listing 9-8. Editing the Photo Using the Aviary SDK
public async void EditPhotoAction()
{
editedImage = null;
PhotoTitle = null;
FileOpenPicker openPicker = new FileOpenPicker();
openPicker.ViewMode = PickerViewMode.Thumbnail;
openPicker.SuggestedStartLocation = PickerLocationId.PicturesLibrary;
openPicker.FileTypeFilter.Add(".jpg");
openPicker.FileTypeFilter.Add(".jpeg");
openPicker.FileTypeFilter.Add(".png");
StorageFile file = await openPicker.PickSingleFileAsync();
if (file != null)
{
selectedFileName = file.Name;
m_aviaryPhotoStream = await file.OpenReadAsync();
await LaunchAviarySDK();
}
}
private async System.Threading.Tasks.Task LaunchAviarySDK()
{
if (m_aviaryPhotoStream == null)
{
return;
}
//Load editor with IRandomAccessStream from a picture file
AviaryEditorTask.SetAviaryEditorAccentColor(Windows.UI.Colors.LightGray, true);
AviaryEditorTask task = await AviaryEditorTask.FromRandomAccessStream(m_aviaryPhotoStream, true);
task.Completed += PhotoEditCompleted;
task.Show();
}
private void PhotoEditCompleted(object sender, AviaryTaskCompletedEventArgs e)
{
//check the Result to see if editing was successfully completed before accessing the Edited Photo
if (e.Result == AviaryTaskResult.Completed)
{
EditedImage = e.EditedPhoto.Image;
ShowUploadPopup = true;
}
}
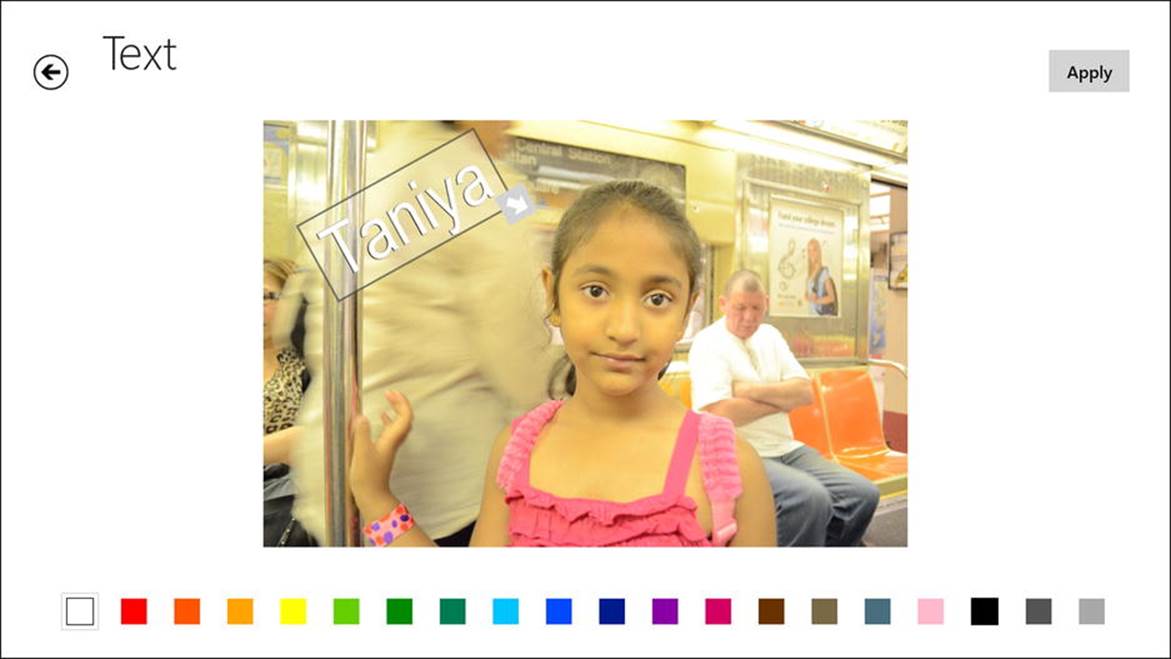
Figure 9-14.
Photo edited using the Aviary Editor
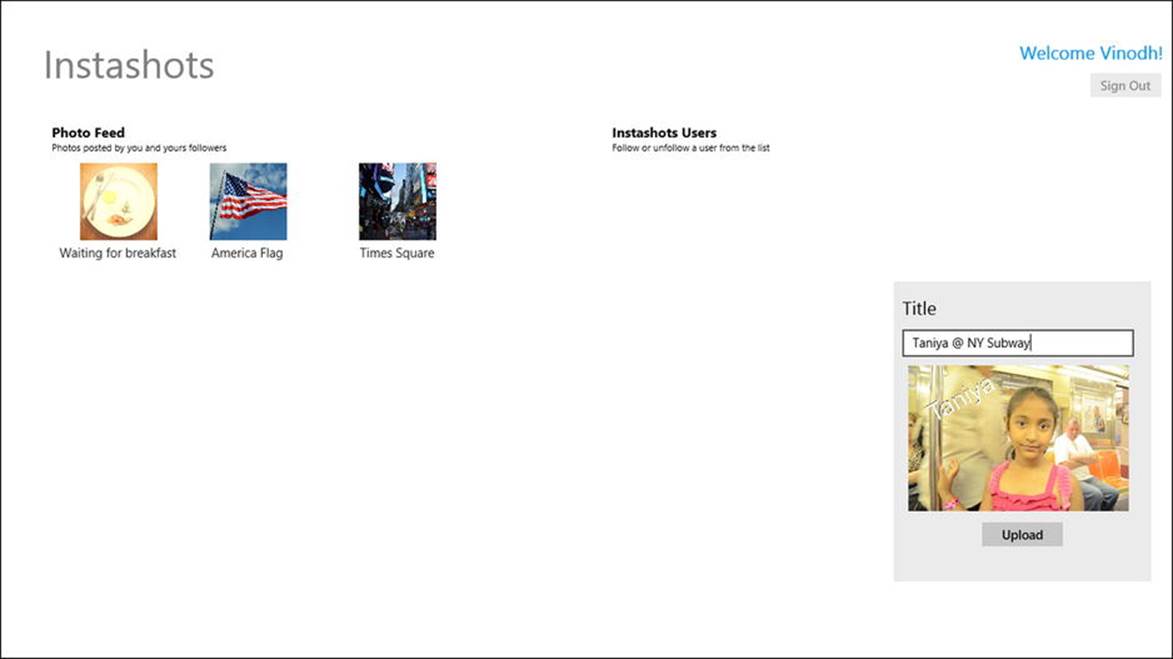
Figure 9-15.
Adding a title to the photo before uploading
When the user clicks the Upload button, UploadCommand (see Listing 9-9) is invoked. This calls the UploadAction method. The very first thing we do is save the photo temporarily in a local storage location. Next, we insert the photo information in the Pictures table and upload the photo to the Windows Azure storage. For that we create the Picture object and insert it into the table.
Listing 9-9. Uploading Photo to the Windows Azure Storage
public async void UploadAction()
{
string fileName = string.Format("{0}_{1}"
, Guid.NewGuid()
, selectedFileName);
var picture = new Picture { Name = fileName
, Title= PhotoTitle };
await App.MobileService.GetTable<Picture>().InsertAsync(picture);
string container = "instashots";
string imageUrl = string.Format(" http://{0}.blob.core.windows.net/{1}/{2} "
, "splcricket"
, container
, fileName);
StorageCredentials cred = new StorageCredentials(picture.sasQueryString);
var imageUri = new Uri(picture.Imageurl);
// Instantiate a Blob store container based on the info in the returned item.
CloudBlobContainer cloudcontainer = new CloudBlobContainer(
new Uri(string.Format(" https://{0}/{1} "
, imageUri.Host
, container))
, cred);
CloudBlockBlob blobFromSASCredential =
cloudcontainer.GetBlockBlobReference(fileName);
//Save File to local folder.
await EditedImage.SaveToFile(
ApplicationData.Current.LocalFolder,
fileName,
CreationCollisionOption.GenerateUniqueName);
var localFolder = Windows.Storage.ApplicationData.Current.LocalFolder;
var savedFile = await localFolder.GetFileAsync(fileName);
using (var fileStream = await savedFile.OpenStreamForReadAsync())
{
await blobFromSASCredential.UploadFromStreamAsync(fileStream.AsInputStream());
}
MyPictures.Add(picture);
}
To upload photo to Windows Azure storage, we need to generate the upload URI with Shared Access Signature (SAS). SAS is a secure URI that we can use to upload file in a Windows Azure storage account without providing the storage credential. The upload URI will be generated within the Photo table Insert script as shown in Figure 9-16. With the SAS URI in place, we instantiate a Blob store container (using the CloudBlockBlob class) based on SAS URI and upload the saved file using the UploadFromStreamAsync method in the CloudBlockBlob class. Finally, we add the photo object to the MyPhotos collection so that the uploaded photo will display in the Feed ListView.
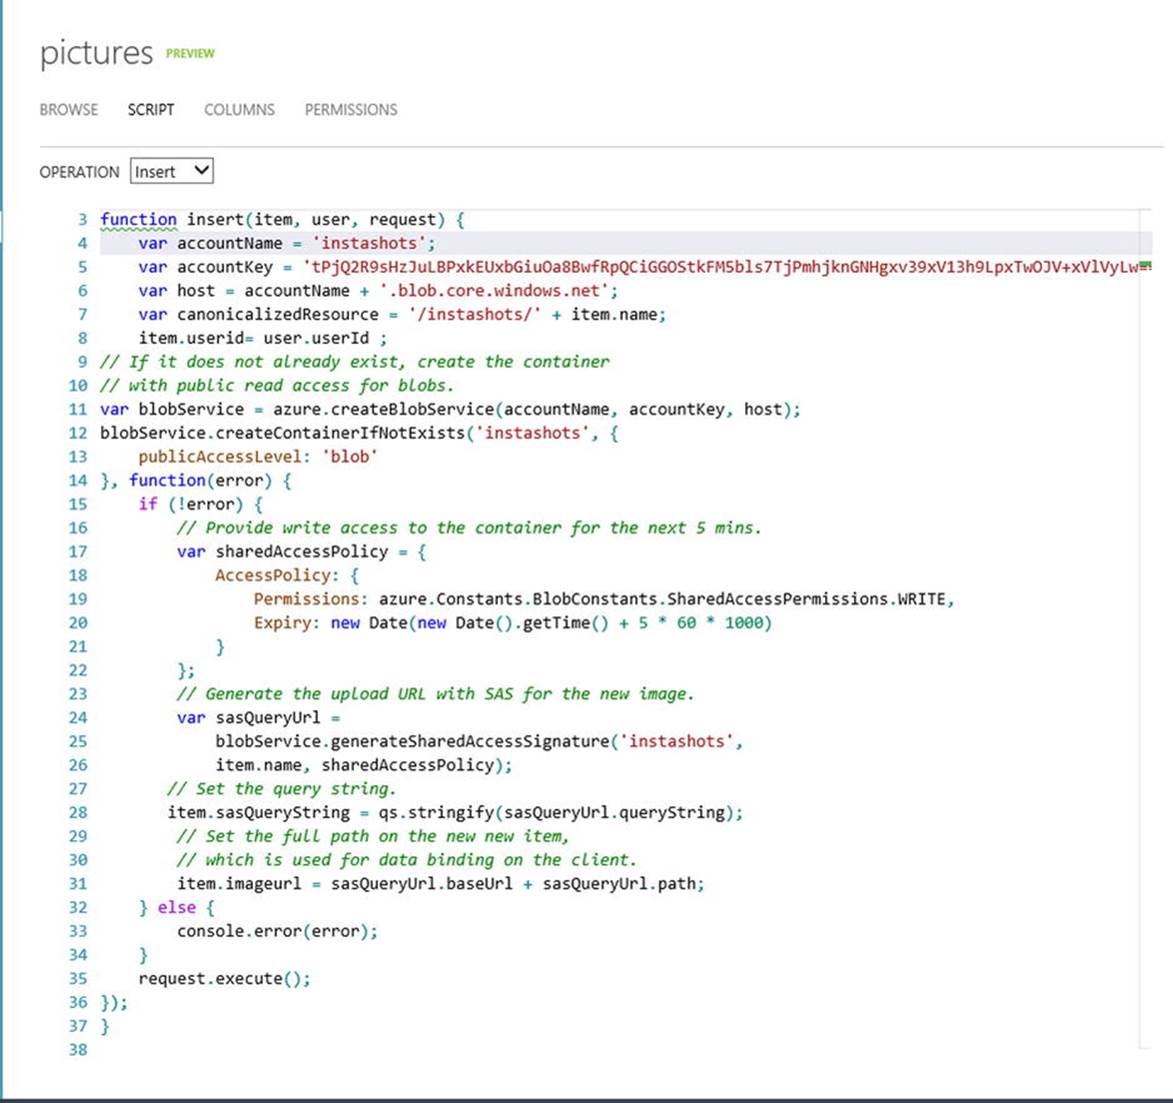
Figure 9-16.
Insert script to get the SAS URI and update it to the Picture table
Implementing Comments and Likes Functionality
Displaying comments, adding comments, and liking a selected photo is a straightforward task, as shown in Listing 9-10. On selecting a photo from the feed, we can display a larger version of the photo along with the list of comments entered for that photo. We also have two buttons: one to add a comment and another to like the photo. When a user clicks the Add Comment button, a pop-up window will display (see Figure 9-17) for entering a comment. On submission, the comment will be saved to the Comment storage table.
Listing 9-10. Implementing Comments and Likes
public void ShowCommentAction()
{
showCommentPopup = true;
RaisePropertyChanged("ShowCommentPopup");
}
private async void LoadComment()
{
var comments = await commentTable
.Where(b => b.PictureId == SelectedItem.Id)
.OrderByDescending(c => c.CreatedDate)
.ToListAsync();
pictureComments.Clear();
foreach (var c in comments)
{
c.CommentedBy = await userTable.LookupAsync(c.UserId);
pictureComments.Add(c);
}
RaisePropertyChanged("PictureComments");
}
public async void AddCommentAction()
{
var comment = new Comment { CommentText = commentText
, PictureId = SelectedItem.Id
,UserId=CurrentUser.Id
, CreatedDate= DateTime.Now };
await App.MobileService.GetTable<Comment>().InsertAsync(comment);
pictureComments.Add(comment);
}
public async void LikeAction()
{
await App.MobileService.GetTable<Picture>().UpdateAsync(SelectedItem);
}
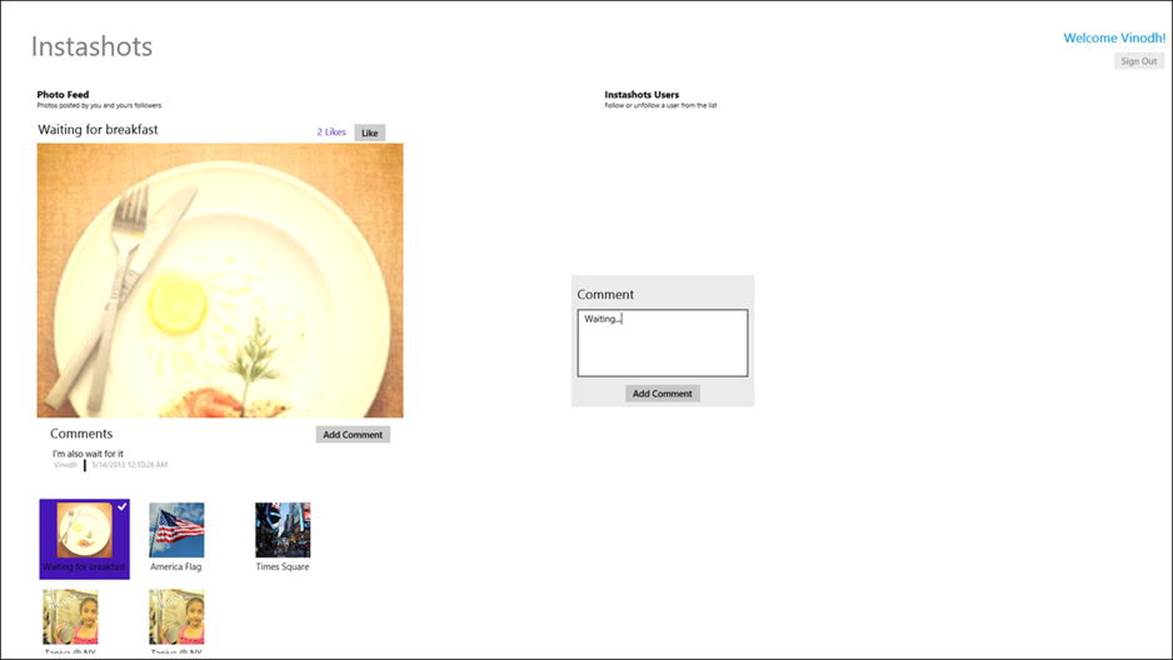
Figure 9-17.
Adding a comment to the Instashots app
Now with all the codes in place, when we run the Instashots app, the user will be now able to authenticate against the Microsoft Account and will be able to upload photos, add comments, and like photos. The final app will be linked the one shown in Figure 9-17.
Ideas for Improvement
The Instashots app can be worked on and improved to make it a fully functional photo-sharing social app. The following are some of the features that can be added.
· As mentioned before, the user section can be created by displaying the list of users that you are following with an option to unfollow them.
· Add an option to share photos using the Share charm feature of Windows 8.
· Search for new users to follow using the Search charm.
· Enable the Windows 8 PlayTo functionality to stream photos to devices, also providing an option to share it using NFC (Tap and Send).
· Extend the authentication to include Facebook, Google, and Twitter logins as support for this is already in built into Windows Azure Mobile Services.
Conclusion
In this chapter we learned about Windows Azure and how to set up and use Windows Azure Mobile Services as a service layer, integrate Live SDK for user authentication, store data in the Windows Azure SQL database, and upload images to the Windows Azure storage. We learned all these by creating a real-world Windows 8 app that uses some of the Windows Azure services. This app can be further extended to make it more feature rich, as mentioned earlier, and made available in the Windows Store. With this chapter we conclude Part 3 of this book, which overviewed the various Windows 8 app remote storage options. In the next and final chapter we learn to create yet another data-driven app that targets both Windows 8 and Windows Phone platforms.
Vinodh KumarBeginning Windows 8 Data DevelopmentUsing C# and JavaScript10.1007/978-1-4302-4993-1_10
© Vinodh Kumar 2013
All materials on the site are licensed Creative Commons Attribution-Sharealike 3.0 Unported CC BY-SA 3.0 & GNU Free Documentation License (GFDL)
If you are the copyright holder of any material contained on our site and intend to remove it, please contact our site administrator for approval.
© 2016-2026 All site design rights belong to S.Y.A.