Beginning Windows 8 Data DevelopmentUsing C# and JavaScript (2013)
8. WCF Services
Vinodh Kumar1
(1)
NY, US
Abstract
In Chapter 7 we learned to build a service infrastructure using ASP.NET Web API to connect to the SQL Server using Entity Framework Code First. Continuing, in this chapter we learn to build the service infrastructure using Windows Communication Framework (WCF).
In Chapter 7 we learned to build a service infrastructure using ASP.NET Web API to connect to the SQL Server using Entity Framework Code First. Continuing, in this chapter we learn to build the service infrastructure using Windows Communication Framework (WCF).
This chapter begins by briefly looking into building Business Apps for WinRT and then provides introduction to Prism for Windows Runtime, which is used to implement the Model-View-ViewModel (MVVM) pattern with navigation through a loosely coupled communication mechanism called PubSub events and app lifecycle management. We learn these concepts by developing a Bill of Material (BOM) Windows 8 app using XAML/C#, Prism, and Entity Framework Code First with WCF as the Service layer.
Business Apps for WinRT
Business Apps for WinRT can be broadly categorized into two different types of application: business to consumer (B2C) and the line of business (LOB) application. B2C applications are the kind of application that allows people outside the company, mostly consumers, to access the product and services of the company like a reservation system, utility app, and so on, that lets us manage and pay our bills. LOB applications generally facilitate a precise customer transaction or business need, and they could be consumer service apps, Enterprise CRM, invoicing systems, or inventory systems.
Prism Overview
Prism for Windows Runtime is a set of guidance principles for building business applications on WinRT using XAML and C#. Prism is based on various architectural goals like loose coupling, separation of concerns, maintainability, testability, and leveraging WinRT platform features with MVVM. Prism for WinRT provides a couple of downloadable, reusable infrastructure class libraries.
Note
The Prism for Windows 8 app can be downloaded from http://prismwindowsruntime.codeplex.com/ .
The first library that we briefly see is Microsoft.Practices.Prism.StoreApps. This library provides the following features:
· MVVM support by including base classes for Views and ViewModel.
· Navigation.
· Application state management.
· Command support as part of MVVM pattern.
· Validation.
· Support for WinRT platform features like the Search/Setting charm and flyouts.
Next we’ll see Microsoft.Practices.Prism.PubSubEvents, a library that encapsulates PubSub functionality. The Pubsub event in Prism is based on the EventAggregator pattern, which helps in achieving loosely coupled communications between ViewModels and Client Services. The general idea of this pattern is that when the components within the system want to communicate between each other, instead of coupling them by type or lifetime, they will be loosely coupled. This is achieved by placing a middle man (i.e., EventAggregator) in between the Publisher and Subscriber; instead of directly depending on each other, they will be dependent on the middle man. The EventAggregator is a container for event objects and these event objects are the ones that do the lion’s share of the work. The event objects are subscribed to by the subscribers and published to by the publisher.
Getting Started with Prism
We use Prism for Windows Runtime’s guidance from Microsoft Patterns & Practices. Microsoft Patterns & Practices is a group that provides guidance on best practices and design patterns for Microsoft development technologies. Some of their popular offerings are Enterprise Library and Prism 4. These guidelines help us to write business applications that can be easily maintained,8extended, and tested.
The Microsoft Patterns & Practices project web site includes numerous projects and sample applications that showcase best practices. You can find it at http://pnp.azurewebsites.net/en-us/projects.htm .
Building a Bill of Material Windows 8 App
A bill of material (BOM) is used to list the parts or items needed to build a component, which can be industrial equipment, software, or physical building materials, by associating each individual item with the component. A BOM app helps to maintain a centralized and accurate record of items for manufacturing, production, and a just-in-time environment. Using this kind of app helps to improve material management, control inventory, and reduce manufacturing costs.
We will create the BOM app (see Figure 8-1) using XAML and C# with SQL Server as the database and display the components and its corresponding parts. Using this app, a user can add new component and part and can also associate one or more parts with the component.
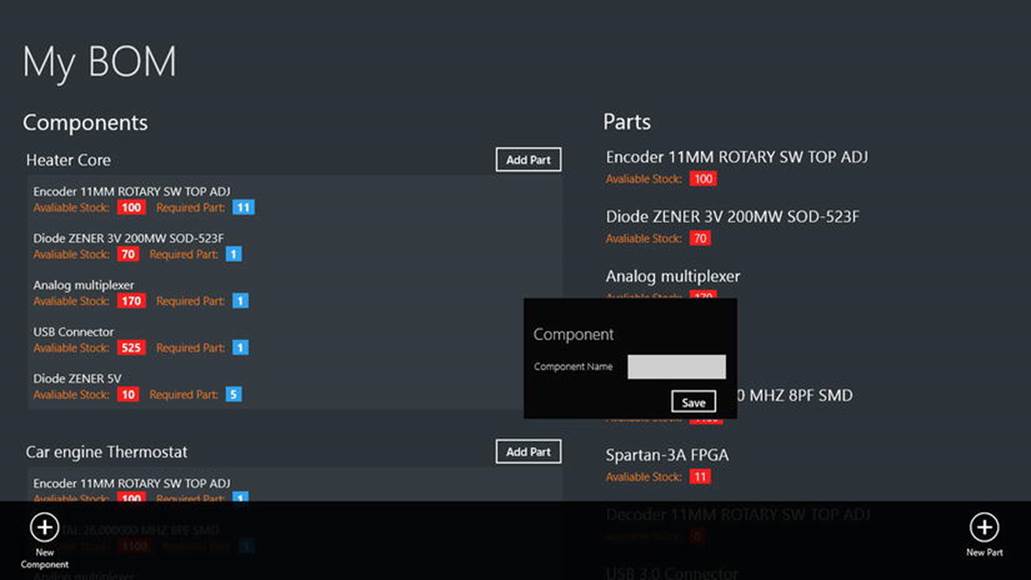
Figure 8-1.
Bill of Material app displaying components and parts
We also create a service layer for data interaction between the BOM app and SQL Server using WCF. Just like the Party Planner app in Chapter 6, here also we use Entity Framework Code First as the data access layer.
Getting Started
To start, let’s create a new Windows Store Blank App (XAML) project and name it BOM.App. We add the Microsoft.Practices.Prism.StoreApps and Microsoft.Practices.Prism.PubSubEvents projects that are part of the Prism for Windows Runtime download and add them as project references in BOM.App.
Next we add a new WCF Service Application to the solution, as shown in Figure 8-2, and name it BOM.Services.
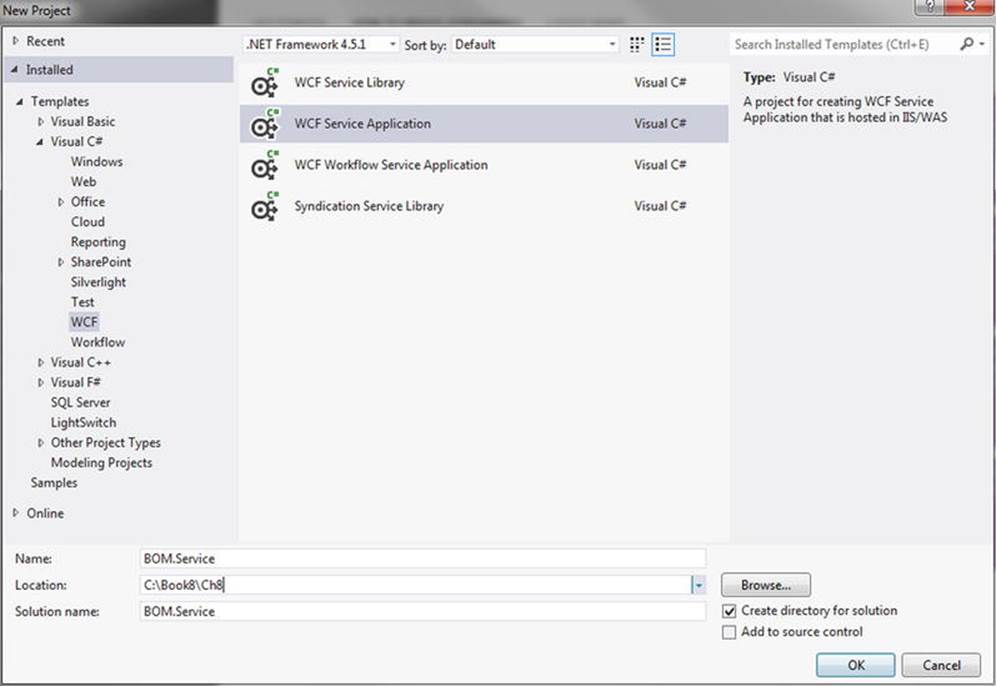
Figure 8-2.
Visual Studio template for adding a new WCF Service Application
To enable Entity Framework, reference the library in the BOM.Services project using the NuGet package as shown in Figure 8-3.
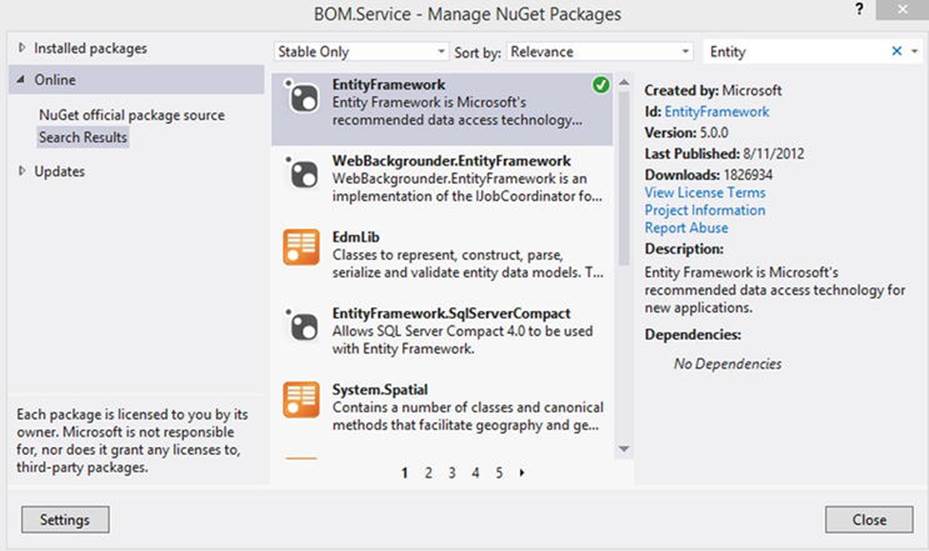
Figure 8-3.
Adding a reference to Entity Framework using NuGet package
The next step is to create a folder named Models in the BOM.Services project and add a file named BillOfMaterial.cs to it. The BOM Solution project structure will look like the one shown in Figure 8-4.
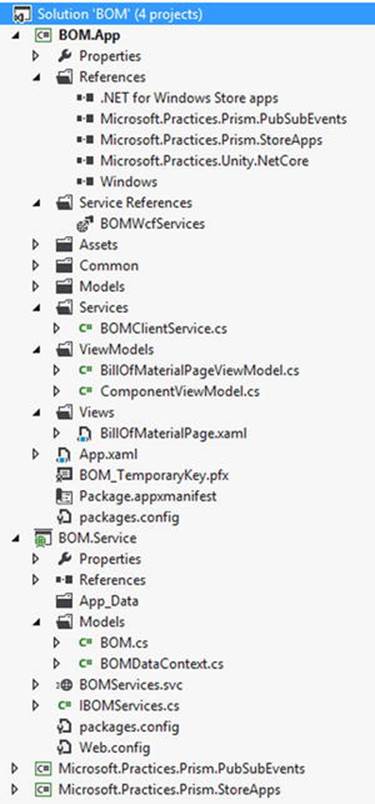
Figure 8-4.
BOM project structure
BillOfMaterial.cs holds three POCO classes that represents the three database tables: Component, Part, and BillOfMaterial.
· Component: Stores the component details.
· Part: Stores the part details.
· BillOfMaterial: Stores the BOM information like ComponentID and PartID.
These classes are very simple Entity classes and have no dependency on Entity Framework. The properties of these classes represent columns of the database table. We decorate the classes with the DataContract attribute and properties within the classes with the DataMember (see Listing 8-1) attribute to serialize and transmit data to the WCF Client.
Listing 8-1. BOM Entity Classes
using System;
using System.Collections.Generic;
using System.ComponentModel.DataAnnotations;
using System.ComponentModel.DataAnnotations.Schema;
using System.Linq;
using System.Runtime.Serialization;
using System.Web;
namespace BOM.Service.Models
{
[DataContract(IsReference = true)]
public class Part
{
[Key]
[DataMember]
public int PartID { get; set; }
[DataMember]
public string PartName { get; set; }
[DataMember]
public int StockCount { get; set; }
[DataMember]
public virtual ICollection<BillOfMaterial> BOMParts { get; set; }
}
[DataContract(IsReference = true)]
public class Component
{
[Key]
[DataMember]
public int ComponentID { get; set; }
[DataMember]
public string ComponentName { get; set; }
[DataMember]
public virtual ICollection<BillOfMaterial> BOMComponents { get; set; }
}
[DataContract(IsReference = true)]
public class BillOfMaterial
{
[Key]
[DataMember]
public int BOMID { get; set; }
[DataMember]
public int ComponentID { get; set; }
[DataMember]
public int PartID { get; set; }
[DataMember]
public int Quantity { get; set; }
[ForeignKey("PartID"), Column(Order = 0)]
[DataMember]
public virtual Part BOMPart { get; set; }
[ForeignKey("ComponentID"), Column(Order = 1)]
[DataMember]
public virtual Component BOMComponent { get; set; }
}
}
Adding DataContext
We create the tailored database context class BOMDataContext inside the Models folder as shown in Listing 8-2. This class is derived from the Entity Framework base type DbContext. DbContext automatically generates the database using the Entity Class schema and also represents a session with the database and allows it to query the database. The context contains property DbSet, which represents the POCO type classes from our model. We also override the OnModelCreating method to set the required fields and relationship between models.
Listing 8-2. BOMDataContext Class Has Properties That Represent the Model
using System;
using System.Collections.Generic;
using System.Configuration;
using System.Data.Entity;
using System.Linq;
using System.Web;
namespace BOM.Service.Models
{
public class BOMDataContext : DbContext
{
public BOMDataContext()
{
Configuration.AutoDetectChangesEnabled = true;
Configuration.LazyLoadingEnabled = true;
Configuration.ProxyCreationEnabled = true;
Configuration.ValidateOnSaveEnabled = true;
}
protected override void Dispose(bool disposing)
{
Configuration.LazyLoadingEnabled = false;
base.Dispose(disposing);
}
public DbSet<Part> Parts { get; set; }
public DbSet<Component> Components { get; set; }
public DbSet<BillOfMaterial> BillOfMaterials { get; set; }
protected override void OnModelCreating(DbModelBuilder modelBuilder)
{
modelBuilder.Entity<Part>()
.Property(s => s.PartName)
.IsRequired();
modelBuilder.Entity<Component>()
.Property(s => s.ComponentName)
.IsRequired();
modelBuilder.Entity<Part>()
.HasMany<BillOfMaterial>(e => e.BOMParts);
modelBuilder.Entity<Component>()
.HasMany<BillOfMaterial>(e => e.BOMComponents);
modelBuilder.Entity<BillOfMaterial>()
.Property(s => s.ComponentID)
.IsRequired();
modelBuilder.Entity<BillOfMaterial>()
.Property(s => s.PartID)
.IsRequired();
}
}
}
Adding a Web Service
With the Model and DataContext in place, we now add a WCF Web service BOMServices.svc that handles HTTP requests from the app. This WCF Service has the necessary methods that provide basic CRUD operations as shown in Listing 8-3.
Listing 8-3. The WCF Contract Interface That Defines a Service Contract for the BOM WCF Service
using System;
using System.Collections.Generic;
using System.Linq;
using System.Runtime.Serialization;
using System.ServiceModel;
using System.ServiceModel.Web;
using System.Text;
using BOM.Service.Models;
namespace BOM.Service
{
[ServiceContract]
public interface IBOMServices
{
[OperationContract]
IList<Part> GetAllParts();
[OperationContract]
IList<Component> GetAllComponents();
[OperationContract]
void AddComponent(Component component);
[OperationContract]
void DeleteComponent(Component component);
[OperationContract]
void AddPart(Part part);
[OperationContract]
void DeletePart(Part part);
[OperationContract]
void AddBOM(BillOfMaterial bom);
[OperationContract]
void RemoveBOM(BillOfMaterial bom);
}
}
To begin with, we define a service contract using an interface marked with the ServiceContractAttribute and the OperationContractAttribute attributes. Let’s look at the web methods in detail by implementing the service contract as shown in Listing 8-4.
· GetAllComponents: This method retrieves all the components from the Component table along with corresponding navigation properties like Parts and BOM by using the Entity Framework’s Include method.
· GetAllParts: Retrieves all the parts along with the corresponding BOM.
· AddComponent: Adds a row to the Component table.
· DeleteComponent: Deletes a component from the table along with all the corresponding rows for that component from the BOM table.
· AddPart: Adds a row to the Part table.
· DeletePart: Deletes a row from the Part table along with all the corresponding rows for that part from BOM table.
· AddBOM: This method first checks to see if there is a matching BOM with a similar ComponentID and PartID. If this exists, it then updates the Quantity for that BOM; otherwise, it will add a new row to the BOM table.
· RemoveBOM: Removes a row from the BOM table.
Listing 8-4. Implementing BOMService Methods
using System;
using System.Collections.Generic;
using System.Linq;
using System.Runtime.Serialization;
using System.ServiceModel;
using System.ServiceModel.Web;
using System.Text;
using BOM.Service.Models;
namespace BOM.Service
{
public class BOMServices : IBOMServices
{
public IList<Part> GetAllParts()
{
using (var ctx = new BOMDataContext())
{
ctx.Configuration.ProxyCreationEnabled = false;
var parts = ctx.Parts
.Include("BOMParts")
.ToList();
ctx.Configuration.ProxyCreationEnabled = true;
return parts;
}
}
public IList<Component> GetAllComponents()
{
using (var ctx = new BOMDataContext())
{
ctx.Configuration.ProxyCreationEnabled = false;
var components = ctx.Components
.Include("BOMComponents")
.Include("BOMComponents.BOMPart")
.ToList();
ctx.Configuration.ProxyCreationEnabled = true;
return components;
}
}
public void AddComponent(Component component)
{
using (var ctx = new BOMDataContext())
{
ctx.Components.Add(component);
ctx.SaveChanges();
}
}
public void DeleteComponent(Component component)
{
using (var ctx = new BOMDataContext())
{
foreach (var bom in component.BOMComponents)
{
ctx.BillOfMaterials.Remove(bom);
}
ctx.Components.Remove(component);
ctx.SaveChanges();
}
}
public void AddPart(Part part)
{
using (var ctx = new BOMDataContext())
{
ctx.Parts.Add(part);
ctx.SaveChanges();
}
}
public void DeletePart(Part part)
{
using (var ctx = new BOMDataContext())
{
foreach (var bom in part.BOMParts)
{
ctx.BillOfMaterials.Remove(bom);
}
ctx.Parts.Remove(part);
ctx.SaveChanges();
}
}
public void AddBOM(BillOfMaterial bom)
{
using (var ctx = new BOMDataContext())
{
var bomv = ctx.BillOfMaterials.Where(b => b.ComponentID == bom.ComponentID && b.PartID == bom.PartID);
if (bomv.Any())
{
var oldBOM = bomv.First();
oldBOM.Quantity = oldBOM.Quantity + bom.Quantity;
}
else
{
ctx.BillOfMaterials.Add(bom);
}
ctx.SaveChanges();
}
}
public void RemoveBOM(BillOfMaterial bom)
{
using (var ctx = new BOMDataContext())
{
ctx.BillOfMaterials.Remove(bom);
ctx.SaveChanges();
}
}
}
}
When any one of the methods in Listing 8-4 is called for the first time, the Entity Framework Code First uses a set of conventions to determine the schema and creates the database and necessary tables and referential integrity between the tables. It uses the database connection information from the web.config file. Once this is created, we are able to see the database in the VS.NET SQL Server Object Explorer (Ctrl + \, Ctrl + S).
Consuming the WCF Service
Consuming the BOM.Services WCF service from the BOM.App is very simple and it’s like adding a DLL reference to the project. To consume the service, we first have to add a service reference, which can be done by right-clicking Reference in the the BOM.App project section of the Solution Explorer and selecting Add Service Reference. This displays the Add Service Reference page shown in Figure 8-5. Give the WCF service a logical namespace, BOMWcfServices, and then select OK. This action generates a managed source code file of a client proxy class that we will be using in a client service class BOMClientServices (see Listing 8-5).
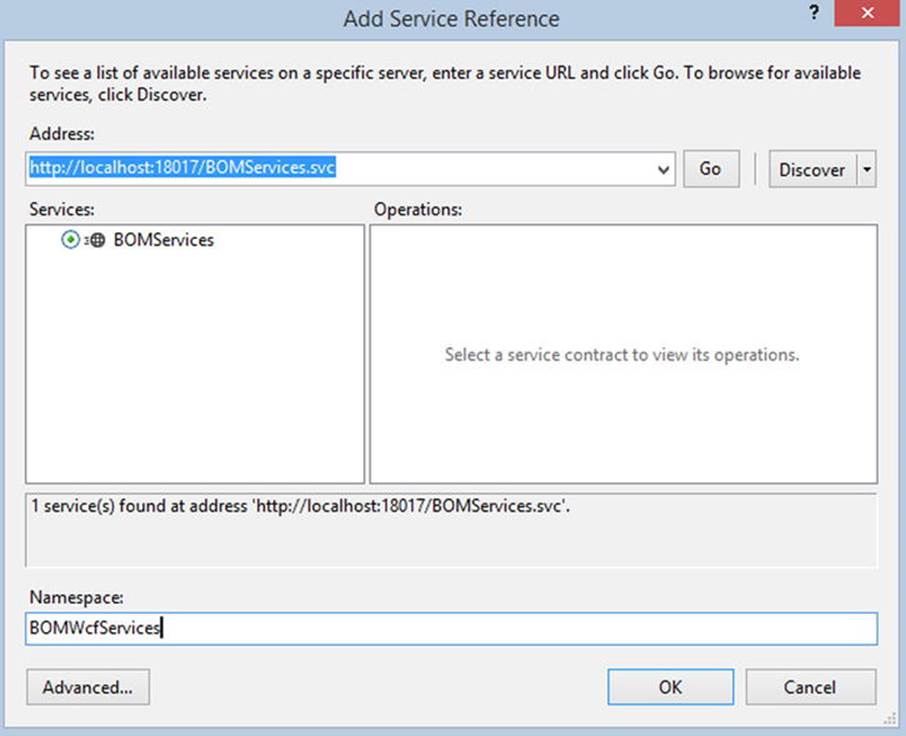
Figure 8-5.
Creating Proxy class using Visual Studio Add Service Reference page
Listing 8-5. BOMClientService Encapsulates WCF Service Methods
using System;
using System.Collections.ObjectModel;
using System.Threading.Tasks;
using BOM.BOMWcfServices;
using Microsoft.Practices.Prism.PubSubEvents;
using BOM.Models;
namespace BOM.Services
{
public interface IBOMClientService
{
Task<ObservableCollection<Component>> GetComponentsAsync();
Task<ObservableCollection<Part>> GetAllPartsAsync();
void AddComponentAsync(Component component);
void AddPartAsync(Part part);
void AddBOMAsync(BillOfMaterial bom);
}
public class BOMClientService : IBOMClientService
{
private IEventAggregator _eventAggregator;
public BOMClientService(IEventAggregator eventAggregator)
{
_eventAggregator = eventAggregator;
}
public Task<ObservableCollection<Component>> GetComponentsAsync()
{
var client= new BOMServicesClient();
return client.GetAllComponentsAsync();
}
public Task<ObservableCollection<Part>> GetAllPartsAsync()
{
var client = new BOMServicesClient();
return client.GetAllPartsAsync();
}
public async void AddComponentAsync(Component component)
{
var client = new BOMServicesClient();
await client.AddComponentAsync(component);
_eventAggregator.GetEvent<ComponentSaveEvent>().Publish(null);
}
public async void AddPartAsync(Part part)
{
var client = new BOMServicesClient();
await client.AddPartAsync(part);
_eventAggregator.GetEvent<PartSaveEvent>().Publish(null);
}
public async void AddBOMAsync(BillOfMaterial bom)
{
var client = new BOMServicesClient();
await client.AddBOMAsync(bom);
_eventAggregator.GetEvent<ComponentSaveEvent>().Publish(null);
}
}
}
BOMClientServices is a client service class that is injected into the ViewModel through dependency injection. This class encapsulates the creation and operations of BOM.Services’s WCF Service and uses EventAggregator service to publish the events, which is handled in the ViewModel.
Integrating Prism in the Windows 8 App
The first step in integrating Prism into the BOM.App project is to add references to the libraries Microsoft.Practices.Prism.StoreApps and Microsoft.Practices.Prism.PubSubEvent. Next, we need to update the App.Xaml App class. The App class is updated to derive from the MvvmAppBase class from the Microsoft.Practices.Prism.StoreApps library to get support for MVVM and the core services required by Windows Store apps.
We then override MVVMAppBase’s OnLaunchApplication abstract method in the App class and add the start page navigation code. As the BOM app will have only one page, BillOfMaterialPage.xaml, we add code to navigate to that page, as shown in Listing 8-6.
Listing 8-6. The App Class with Prism Integration
using System;
using System.Globalization;
using BOM.Services;
using Microsoft.Practices.Prism.PubSubEvents;
using Microsoft.Practices.Prism.StoreApps;
using Microsoft.Practices.Prism.StoreApps.Interfaces;
using Microsoft.Practices.Unity;
using Windows.ApplicationModel;
using Windows.ApplicationModel.Activation;
using Windows.ApplicationModel.Resources;
using Windows.UI.Notifications;
using Windows.UI.Xaml;
using Windows.UI.Xaml.Controls;
namespace BOM
{
sealed partial class App : MvvmAppBase
{
// Create the singleton container that will be used for type resolution in the app
private readonly IUnityContainer _container = new UnityContainer();
//Bootstrap: App singleton service declarations
private IEventAggregator _eventAggregator;
public App()
{
InitializeComponent();
Suspending += OnSuspending;
}
protected override void OnLaunchApplication(LaunchActivatedEventArgs args)
{
NavigationService.Navigate("BillOfMaterial", null);
}
protected override void OnInitialize(IActivatedEventArgs args)
{
_eventAggregator = new EventAggregator();
_container.RegisterInstance(NavigationService);
_container.RegisterInstance(_eventAggregator);
_container.RegisterType<IBOMClientService, BOMClientService>(new ContainerControlledLifetimeManager());
ViewModelLocator.SetDefaultViewTypeToViewModelTypeResolver((viewType) =>
{
var viewModelTypeName = string.Format(CultureInfo.InvariantCulture
, "BOM.ViewModels.{0}ViewModel"
, viewType.Name);
var viewModelType = Type.GetType(viewModelTypeName);
return viewModelType;
});
}
private void OnSuspending(object sender, SuspendingEventArgs e)
{
SuspendingDeferral deferral = e.SuspendingOperation.GetDeferral();
deferral.Complete();
}
protected override object Resolve(Type type)
{
return _container.Resolve(type);
}
}
}
Next we add a reference to the Unity library to the project using the NuGet packages as shown in Figure 8-6. Unity Application Block (Unity) is a lightweight extensible dependency injection container with support for constructor, property, and method call injection. Using Unity helps us make code more maintainable, expandable, and testable.
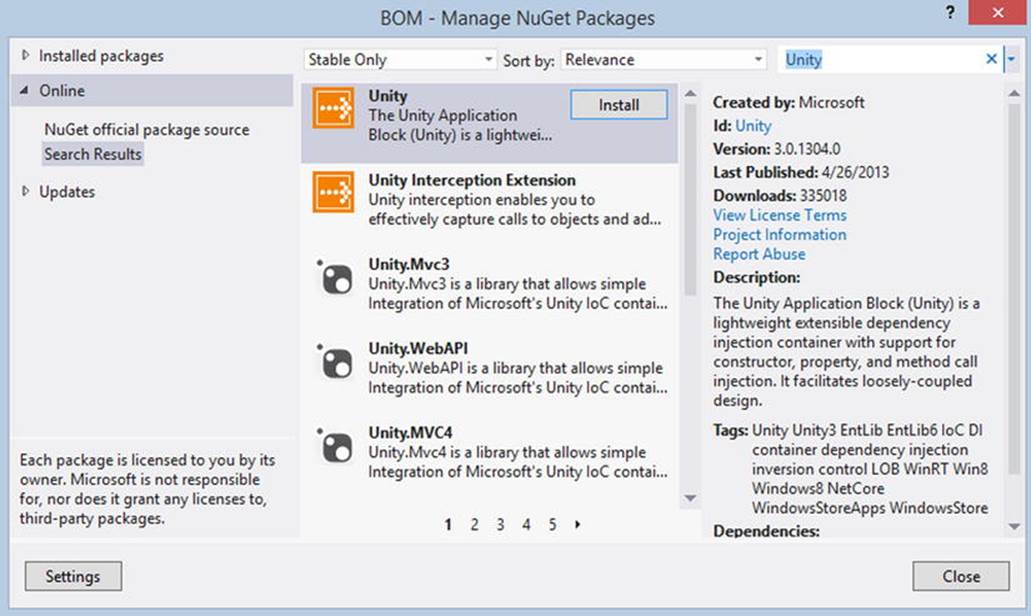
Figure 8-6.
Adding reference to Unity using NuGet package
Now, with the Unity library in place, we create an instance of the UnityContainer class in the App class (see Listing 8-5), and use the Unity dependency injection container to register and resolve types and instances.
Finally, we override the OnInitialize method in the App class and register types for the Unity container. Here we register the following types.
· NavigationService: Helps to navigate between the Views by replacing one view with another within the applications.
· IEventAggregator: The EventAggregator class is offered as a service in the container and can be retrieved through the IEventAggregator interface. The event aggregator is responsible for locating or building events and for keeping a collection of the events in the system.
· BOMClientService: As mentioned before, the BOMClientService class (see Listing 8-5) is a client service within the container that can be retrieved through IBOMService. This service exposes some of the BOM.Services WCF methods to the app by communicating with the BOM WCF service using the proxy class that we generate by adding Service References to the WCF Service as shown in Figure 8-5.
Designing the BOM App User Interface
The BOM app is a single-page (BillOfMaterialPage.xaml) UI that is divided in to two sections. The left side of the app will list all the components and their corresponding parts as shown in Figure 8-1. This section hosts a ListView control that is bound to a ComponentViewModel collection. The right section lists all the parts for lookup. Apart from these two sections, we also have an app bar at the bottom that holds two buttons for adding new components and parts. BillOfMaterialPage.xaml also has three pop-up controls that hold the interface for adding a Component, Part, and BOM (see Listing 8-7).
Listing 8-7. BillOfMaterialPage.xaml with ListViews, Popup Controls, and App Bar Buttons
<Infrastructure:VisualStateAwarePage
x:Name="pageRoot"
x:Class="BOM.Views.BillOfMaterialPage"
DataContext="{Binding DefaultViewModel, RelativeSource={RelativeSource Self}}"
xmlns=" http: //schemas.microsoft.com/winfx/2006/xaml/presentation "
xmlns:x=" http: //schemas.microsoft.com/winfx/2006/xaml "
xmlns:local="using:BOM.Views"
xmlns:Infrastructure="using:Microsoft.Practices.Prism.StoreApps"
xmlns:d=" http: //schemas.microsoft.com/expression/blend/2008 "
xmlns:mc=" http://schemas.openxmlformats.org/markup-compatibility/2006 "
Infrastructure:ViewModelLocator.AutoWireViewModel="true"
mc:Ignorable="d">
<Page.Resources>
<x:String x:Key="AppName">Bill of Material</x:String>
<!--Bill of Material Data Template-->
<DataTemplate x:Key="BOMDataTemplate">
<StackPanel>
<TextBlock
Text="{Binding BOMPart.PartName}"/>
<StackPanel
Orientation="Horizontal">
<TextBlock
Text="Avaliable Stock: "/>
<Border>
<TextBlock
Text="{Binding BOMPart.StockCount}"/>
</Border>
<TextBlock
Text=" Required Part: "/>
<Border>
<TextBlock
Text="{Binding Quantity}"/>
</Border>
</StackPanel>
</StackPanel>
</DataTemplate>
<!--Component Data Template-->
<DataTemplate x:Key="ComponentDataTemplate">
<StackPanel>
<Grid>
<Grid.ColumnDefinitions>
<ColumnDefinition/>
<ColumnDefinition/>
</Grid.ColumnDefinitions>
<StackPanel
Orientation="Horizontal">
<TextBlock
Text="{Binding ComponentName}"/>
</StackPanel>
<StackPanel
Grid.Column="1"
Orientation="Horizontal">
<Button
Content="Add Part"
Command="{Binding AddPartsCommand, Mode=OneWay}"/>
</StackPanel>
</Grid>
<!--ListBox to display Parts of the Componement-->
<ListBox
ItemsSource="{Binding BOMComponents}"
ItemTemplate="{StaticResource BOMDataTemplate}"/>
</StackPanel>
</DataTemplate>
<!--Part Data Template-->
<DataTemplate x:Key="PartDataTemplate">
<StackPanel>
<TextBlock
Text="{Binding PartName}"/>
<StackPanel
Orientation="Horizontal">
<TextBlock
Text="Avaliable Stock: "/>
<Border>
<TextBlock
Text="{Binding StockCount}"/>
</Border>
</StackPanel>
</StackPanel>
</DataTemplate>
</Page.Resources>
<Infrastructure:VisualStateAwarePage.BottomAppBar>
<AppBar>
<Grid>
<Grid.ColumnDefinitions>
<ColumnDefinition/>
<ColumnDefinition/>
</Grid.ColumnDefinitions>
<StackPanel Orientation="Horizontal">
<!-- Button to add component-->
<Button x:Name="AddComponent"
Command="{Binding OpenComponentCommand, Mode=OneWay}"
Style="{StaticResource AddComponentAppBarButtonStyle}"/>
</StackPanel>
<StackPanel Grid.Column="1">
<!-- Button to add part-->
<Button x:Name="AddPart"
Command="{Binding OpenPartCommand, Mode=OneWay}"
Style="{StaticResource AddPartAppBarButtonStyle}"/>
</StackPanel>
</Grid>
</AppBar>
</Infrastructure:VisualStateAwarePage.BottomAppBar>
<Grid
Style="{StaticResource LayoutRootStyle}">
<Grid.ColumnDefinitions>
<ColumnDefinition Width="769*"/>
<ColumnDefinition Width="597*"/>
</Grid.ColumnDefinitions>
<Grid.RowDefinitions>
<RowDefinition Height="140"/>
<RowDefinition Height="12*"/>
<RowDefinition Height="145*"/>
</Grid.RowDefinitions>
<!-- Popup control to get Component information to add -->
<Popup x:Name="AddComponentPopup"
x:Uid="AddComponentPopup"
AutomationProperties.AutomationId="AddComponentPopup"
IsLightDismissEnabled="True"
IsOpen="{Binding IsAddComponentPopupOpened, Mode=TwoWay}"
Grid.RowSpan="3"
Grid.ColumnSpan="2">
<Border>
<Grid>
<Grid.RowDefinitions>
<RowDefinition Height="Auto" />
<RowDefinition Height="Auto" />
<RowDefinition Height="38"/>
</Grid.RowDefinitions>
<Grid.ColumnDefinitions>
<ColumnDefinition Width="Auto" />
<ColumnDefinition Width="*" />
</Grid.ColumnDefinitions>
<TextBlock Grid.Column="0"
Grid.Row="0"
Text="Component"
Grid.ColumnSpan="2"
Style="{StaticResource HeaderTextStyle}"/>
<TextBlock
Grid.Column="0"
Grid.Row="1"
Text="Component Name"
Style="{StaticResource ResourceKey=SubheaderTextStyle}" />
<TextBox
Grid.Column="1"
Grid.Row="1" x:Name="txtComponentName"
Text="{Binding ComponentName, Mode=TwoWay}"/>
<Button
Command="{Binding AddComponentCommand, Mode=OneWay}"
Content="Save"
Grid.Row="2"
Grid.Column="1"/>
</Grid>
</Border>
</Popup>
<!-- Popup control to get Part information to add -->
<Popup x:Name="AddPartPopup"
x:Uid="AddPartPopup"
AutomationProperties.AutomationId="AddPartPopup"
IsLightDismissEnabled="True"
IsOpen="{Binding IsAddPartPopupOpened, Mode=TwoWay}" Grid.RowSpan="3" Grid.ColumnSpan="2">
<Border>
<Grid x:Name="addPart">
<Grid.RowDefinitions>
<RowDefinition Height="Auto" />
<RowDefinition Height="Auto" />
<RowDefinition Height="Auto" />
<RowDefinition Height="38"/>
</Grid.RowDefinitions>
<Grid.ColumnDefinitions>
<ColumnDefinition Width="Auto" />
<ColumnDefinition Width="*" />
</Grid.ColumnDefinitions>
<TextBlock
Grid.Column="0"
Grid.Row="0"
Text="Part"
Grid.ColumnSpan="2"
Style="{StaticResource HeaderTextStyle}" />
<TextBlock
Grid.Column="0"
Grid.Row="1"
Text="Part Name"
Style="{StaticResource ResourceKey=SubheaderTextStyle}" />
<TextBox
Grid.Column="1"
Grid.Row="1"
Text="{Binding PartName, Mode=TwoWay}"/>
<TextBlock
Grid.Column="0"
Grid.Row="2"
Text="Quantity"
Style="{StaticResource ResourceKey=SubheaderTextStyle}"/>
<TextBox
Grid.Column="1"
Grid.Row="2"
Text="{Binding StockCount, Mode=TwoWay}"/>
<Button
Command="{Binding AddPartCommand, Mode=OneWay}"
Content="Save"
Grid.Row="3"
Grid.Column="1"/>
</Grid>
</Border>
</Popup>
<!-- Popup control to select a Part to add it to Component as BOM -->
<Popup x:Name="AddBOMPopup"
x:Uid="AddBOMPopup"
AutomationProperties.AutomationId="AddBOMPopup"
IsLightDismissEnabled="True"
IsOpen="{Binding IsShowBOMPopupOpened, Mode=TwoWay}"
Grid.RowSpan="3"
Grid.ColumnSpan="2">
<Border>
<Grid>
<Grid.RowDefinitions>
<RowDefinition Height="Auto" />
<RowDefinition Height="Auto" />
<RowDefinition Height="Auto" />
<RowDefinition Height="38"/>
</Grid.RowDefinitions>
<Grid.ColumnDefinitions>
<ColumnDefinition Width="Auto" />
<ColumnDefinition Width="*" />
</Grid.ColumnDefinitions>
<TextBlock
Grid.Column="0"
Grid.Row="0"
Text="Add to BOM"
Grid.ColumnSpan="2"
Style="{StaticResource HeaderTextStyle}" />
<ListView
Grid.Row="1"
ItemsSource="{Binding Parts}"
SelectedItem="{Binding SelectedPart, Mode=TwoWay}"
ItemTemplate="{StaticResource PartDataTemplate}"
Grid.Column="0"
Grid.ColumnSpan="2">
<TextBlock
Grid.Column="0"
Grid.Row="2"
Text="Quantity"
Style="{StaticResource ResourceKey=SubheaderTextStyle}"/>
<TextBox
Grid.Column="1"
Grid.Row="2"
Text="{Binding BOMQuantity, Mode=TwoWay}"/>
<Button
Command="{Binding AddBOMCommand, Mode=OneWay}"
Content="Save"
Grid.Row="3"
Grid.Column="1"/>
</Grid>
</Border>
</Popup>
<Grid Grid.ColumnSpan="2">
<Grid.ColumnDefinitions>
<ColumnDefinition Width="Auto"/>
<ColumnDefinition Width="*"/>
</Grid.ColumnDefinitions>
<TextBlock
Grid.Column="1"
Text="{Binding HeaderLabel}"
Style="{StaticResource PageHeaderTextStyle}"/>
</Grid>
<!--ListView Control to disply the Components-->
<ListView
Grid.Row="2"
ItemsSource="{Binding Components}"
ItemTemplate="{StaticResource ComponentDataTemplate}"/>
<TextBlock
Grid.Row="1"
Text="Components" />
<TextBlock
Grid.Row="1"
Text="Parts"
Grid.Column="1"/>
<!--ListView Control to disply the Parts-->
<ListView
Grid.Row="2"
ItemsSource="{Binding Parts}"
ItemTemplate="{StaticResource PartDataTemplate}"
Grid.Column="1"/>
</Grid>
</Infrastructure:VisualStateAwarePage>
Note
We intentionally left out most of the XAML code related to styling and positioning of the controls in this chapter to simplify the explanations and promote readability. The source code that you can download from the APress web site has the complete implementation.
ViewModel
The BOM.App has two ViewModels: BillOfMaterialPageViewModel and ComponentViewModel, which resides inside the ViewModel folder. The BillOfMaterialPageViewModel is bound to BillOfMaterialPage.xaml using the AutoWireViewModel attached property as shown in Listing 8-7. TheAutoWireViewModel attached property tells Prism’s ViewModelLocator object to create an instance of the view model that corresponds to this view and set it into the view’s DataContext property. The ViewModelLocator object uses a default convention where it looks in the ViewModels namespace for a type with a name that starts with the name of the view and ends with “ViewModel”.
BillOfMaterialPageViewModel
BillOfMaterialPageViewModel (see Listing 8-8) is derived from the ViewModel class of the Microsoft.Practices.Prism.StoreApps library to get support for MVVM. In this ViewModel NavigationService, EventAggregator, and BOMService are inserted through the constructor. Also in the constructor we add code to subscribe to the EventAggregator events. Apart from this, the ViewModel exposes methods and commands to accomplish various functionality like displaying components and parts, adding new components and parts to the database, and associating a part with a component.
Listing 8-8. The BillOfMaterialPageViewModel Class
using System;
using System.Collections.Generic;
using System.Collections.ObjectModel;
using System.Linq;
using System.Text;
using System.Threading.Tasks;
using System.Windows.Input;
using BOM.BOMWcfServices;
using BOM.Services;
using Microsoft.Practices.Prism.StoreApps;
using Microsoft.Practices.Prism.StoreApps.Interfaces;
using Microsoft.Practices.Prism.PubSubEvents;
using BOM.Models;
namespace BOM.ViewModels
{
public class BillOfMaterialPageViewModel : ViewModel
{
private readonly INavigationService _navigationService;
private readonly IBOMService _bomservice;
private IEventAggregator _eventAggregator;
private string _headerLabel;
private bool _isAddComponentPopupOpened;
private bool _isAddPartPopupOpened;
private bool _isShowBOMPopupOpened;
private int _selectedComponentID;
private Part _selectedPart;
private string _componentName;
private string _partName;
private int _stockCount = 0;
private int _bomQuantity = 0;
private ObservableCollection<ComponentViewModel> _components;
private ReadOnlyCollection<Part> _parts;
public ICommand OpenComponentCommand { get; private set; }
public ICommand OpenPartCommand { get; private set; }
public ICommand AddComponentCommand { get; private set; }
public ICommand AddPartCommand { get; private set; }
public ICommand AddBOMCommand { get; private set; }
public BillOfMaterialPageViewModel(INavigationService navigationService
,IEventAggregator eventAggregator
, IBOMService bomservice)
{
_navigationService = navigationService;
_eventAggregator = eventAggregator;
_bomservice = bomservice;
OpenComponentCommand = new DelegateCommand(OpenComponentFlyout);
OpenPartCommand = new DelegateCommand(OpenPartFlyout);
AddComponentCommand = new DelegateCommand(AddComponentAsync);
AddPartCommand = new DelegateCommand(AddPartAsync);
AddBOMCommand = new DelegateCommand(AddBOMAsync);
if (eventAggregator != null)
{
eventAggregator.GetEvent<ComponentSaveEvent>().Subscribe(RefreshComponentListAsync);
eventAggregator.GetEvent<PartSaveEvent>().Subscribe(RefreshPartListAsync);
eventAggregator.GetEvent<AddBOMEvent>().Subscribe(OpenBOMFlyout);
}
}
//Methods that display the pop-up
private void OpenComponentFlyout()
{
ComponentName = string.Empty;
IsAddComponentPopupOpened = true;
}
private void OpenPartFlyout()
{
PartName = string.Empty;
StockCount = 0;
IsAddPartPopupOpened = true;
}
public async void OpenBOMFlyout(object componentID)
{
_selectedComponentID=(int) componentID;
IsShowBOMPopupOpened = true;
}
//Properties that are bound to the Popup IsOpen property
public bool IsAddComponentPopupOpened
{
get { return _isAddComponentPopupOpened; }
set { SetProperty(ref _isAddComponentPopupOpened, value); }
}
public bool IsAddPartPopupOpened
{
get { return _isAddPartPopupOpened; }
set { SetProperty(ref _isAddPartPopupOpened, value); }
}
public bool IsShowBOMPopupOpened
{
get { return _isShowBOMPopupOpened; }
set { SetProperty(ref _isShowBOMPopupOpened, value); }
}
//App Header
public string HeaderLabel
{
get { return _headerLabel; }
private set { SetProperty(ref _headerLabel, value); }
}
//Properties bound to the Popup controls for capturing user input
public string ComponentName
{
get { return _componentName; }
set { SetProperty(ref _componentName, value); }
}
public string PartName
{
get { return _partName; }
set { SetProperty(ref _partName, value); }
}
public int StockCount
{
get { return _stockCount; }
set { SetProperty(ref _stockCount, value); }
}
public int BOMQuantity
{
get { return _bomQuantity; }
set { SetProperty(ref _bomQuantity, value); }
}
public int SelectedComponentID
{
get { return _selectedComponentID; }
set { SetProperty(ref _selectedComponentID, value); }
}
public Part SelectedPart
{
get { return _selectedPart; }
set { SetProperty(ref _selectedPart, value); }
}
//Properties that are bound to the ListViews
public ObservableCollection<ComponentViewModel> Components
{
get { return _components; }
private set { SetProperty(ref _components, value); }
}
public ReadOnlyCollection<Part> Parts
{
get { return _parts; }
private set { SetProperty(ref _parts, value); }
}
//Fires on ViewLoad
public override async void OnNavigatedTo(object navigationParameter,
Windows.UI.Xaml.Navigation.NavigationMode navigationMode,
System.Collections.Generic.Dictionary<string, object> viewModelState)
{
HeaderLabel = "My BOM";
GetComponentsAsync();
GetPartsAsync();
}
private async void GetComponentsAsync()
{
var components = await _bomservice.GetComponentsAsync();
var vmComponents = new ObservableCollection<ComponentViewModel>();
foreach (Component item in new ObservableCollection<Component>(components.ToList()))
{
ComponentViewModel cvm = new ComponentViewModel(_eventAggregator);
cvm.ComponentID = item.ComponentID;
cvm.ComponentName = item.ComponentName;
cvm.BOMComponents = item.BOMComponents;
vmComponents.Add(cvm);
}
Components = vmComponents;
}
private async void GetPartsAsync()
{
var items = await _bomservice.GetAllPartsAsync();
Parts = new ReadOnlyCollection<Part>(items.ToList());
}
private async void AddComponentAsync()
{
_bomservice.AddComponentAsync(new Component { ComponentName = _componentName });
IsAddComponentPopupOpened = false;
}
private async void AddPartAsync()
{
_bomservice.AddPartAsync(new Part { PartName = _partName, StockCount = _stockCount });
IsAddPartPopupOpened = false;
}
private async void AddBOMAsync()
{
_bomservice.AddBOMAsync(new BillOfMaterial { ComponentID = _selectedComponentID
, PartID = _selectedPart.PartID
, Quantity = _bomQuantity });
IsShowBOMPopupOpened = false;
}
public async void RefreshComponentListAsync(object notUsed)
{
GetComponentsAsync();
}
public async void RefreshPartListAsync(object notUsed)
{
GetPartsAsync();
}
}
}
BillOfMaterialPageViewModel Commands
In BillOfMaterialPageViewModel we add commands that will be bound to the elements of the UI in BillOfMaterialPage.xaml. These commands will be associated with methods that are called when the command is invoked.
BillOfMaterialPageViewModel Properties
We add various properties to the BillOfMaterialPageViewModel and these properties are responsible for holding the components, parts, selected components and parts to add to BOM and properties to set the open status of the pop-ups in the UI. Listing 8-7 lists all the properties inBillOfMaterialPageViewModel with comments above each that detail the purpose of that property.
BillOfMaterialPageViewModel Events
As mentioned earlier, this ViewModel subscribes to three events (see Listing 8-9).
· ComponentSaveEvent: When fired, this event calls the RefreshComponentListAsync method, which in turn calls GetComponentsAsync to refresh the Component list.
· PartSaveEvent: This event is called when a new part is added. This event calls the RefreshPartListAsync method, which in turn calls the GetPartsAsync method to refresh the Parts list.
· AddBOMEvent: This event is fired from the ComponentViewModel and upon receipt is handled by the OpenBOMFlyout method, which sets the IsShowBOMPopupOpened property to true to display the Pop-up to pick a part for a component.
Listing 8-9. The BillOfMaterialPageViewModel Events
using Microsoft.Practices.Prism.PubSubEvents;
using System;
using System.Collections.Generic;
using System.Linq;
using System.Text;
using System.Threading.Tasks;
namespace BOM.Models
{
public class ComponentSaveEvent : PubSubEvent<object>
{
}
public class PartSaveEvent : PubSubEvent<object>
{
}
public class AddBOMEvent : PubSubEvent<object>
{
}
}
BillOfMaterialPageViewModel Methods
We have already discussed the properties, events, and commands of the BillOfMaterialPageViewModel, so that leaves us with methods. Let’s look at some of the important methods in the ViewModel.
· GetComponentsAsync: This method calls the GetComponentsAsync method from BOMService for retrieving all the Components from the database. Using this, it builds an ObservableCollection based on ComponentViewModel (see Listing 8-8) and assigns the collection to theComponents property.
· GetPartsAsync: This method calls the GetAllPartsAsync method from BOMService for retrieving all the parts from the database and assigns that to the Parts property.
· AddComponentAsync: This method builds a component object and passes it as a parameter to the BOMService’s AddComponentAsync method to add a component to the database table. This method also sets the IsAddComponentPopupOpened property to false to hide the pop-up used to add the component.
· AddPartAsync: This method creates a Part object and passes it as a parameter to the BOMService’s AddPartAsync method to add a row to the Part table. This method also sets the IsAddPartPopupOpenedproperty to false to hide the pop-up control used to add the part.
· AddBOMAsync: Similar to AddComponentAsync and AddBOMAsync, this method creates a BOM object and passes it as a parameter to the BOMService’s AddBOMAsync method to add a row to the BOM table. To hide the pop-up, this method sets the IsShowBOMPopupOpened property to false.
Apart from these methods, we also override the OnNavigatedTo method of the ViewModel. This method will be fired when the View loads and in this method we set the Header of the app and then call the methods GetComponentsAsync and GetPartsAsync. As mentioned earlier, these methods, when called, set the Components, Parts properties, which in turn bind to the ListView controls in the View to display the Components and Parts information as shown in Figure 8-1.
ComponentViewModel
This ViewModel is also derived from the ViewModel class. It has three properties: ComponentID, ComponentName, and BOMComponents. It also has a DelegateCommand AddPartsCommand as shown in Listing 8-10.
Listing 8-10. The ComponentViewModel Class
using System;
using System.Collections.Generic;
using System.Collections.ObjectModel;
using System.Linq;
using System.Text;
using System.Threading.Tasks;
using System.Windows.Input;
namespace BOM.ViewModels
{
public class ComponentViewModel : ViewModel
{
private int _componentID;
private string _ComponentName;
private ObservableCollection<BillOfMaterial> _bOMComponents;
public ICommand AddPartsCommand { get; private set; }
private IEventAggregator _eventAggregator;
public ComponentViewModel(IEventAggregator eventAggregator)
{
_eventAggregator = eventAggregator;
AddPartsCommand = new DelegateCommand(RaiseAddBOM);
}
public int ComponentID
{
get { return _componentID; }
set { SetProperty(ref _componentID, value); }
}
public string ComponentName
{
get { return _ComponentName; }
set { SetProperty(ref _ComponentName, value); }
}
public ObservableCollection<BillOfMaterial> BOMComponents
{
get { return _bOMComponents; }
set { SetProperty(ref _bOMComponents, value); }
}
private void RaiseAddBOM()
{
_eventAggregator.GetEvent<AddBOMEvent>().Publish(ComponentID);
}
}
}
When bound to the ListBox in BillOfMaterialPage.xaml, this command publishes an AddBOM Event that is subscribed in the BillOfMaterialPageViewModel that sets a flag IsShowBOMPopupOpened to true, which is bound to the pop-up control’s IsOpen property. Setting this property opens the pop-up control to display the list of parts to pick as a BOM to the component as shown in Figure 8-7.
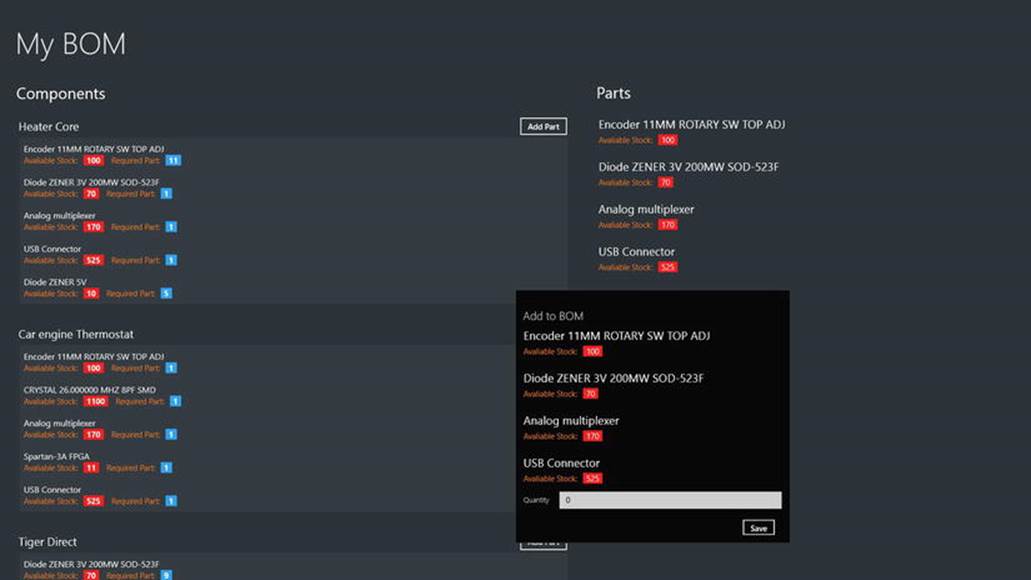
Figure 8-7.
The Parts list to be picked to add it to BOM
Conclusion
In this chapter we learned to use SQL Server as the database for storing and retrieving data from a Windows 8 app by building a service layer using WCF Services. WCF Services is widely used and makes it easier to expose and consume WCF services. Also in this chapter we learned to use Prism, as it helps to easily design and build rich, flexible, and easy to maintain Windows 8 apps.
In the next chapter we will learn to use SQL Azure as a data storage option with Windows Azure Mobile Services as the service layer by building an Instagram-inspired Windows 8 app.
Vinodh KumarBeginning Windows 8 Data DevelopmentUsing C# and JavaScript10.1007/978-1-4302-4993-1_9
© Vinodh Kumar 2013