Exam Ref 70-484: Essentials of Developing Windows Store Apps Using C# (2013)
Chapter 4. Program the user interaction
The Windows 8 Start screen is a collection of tiles. Some tiles are updated regularly with new text or images, and they can contain a badge that informs the user of the status of an action or update. A tile on the Start screen launches an app. Your app’s tile is a way to communicate with the user when it is not running. Therefore, you should use your app’s tile to show fresh content and the latest status with badges. Users often like to bookmark items. Secondary tiles in Windows 8 are used to pin a shortcut to an item or a page in your app on the Start screen.
Your app might need to draw the user’s attention to perform a critical task by launching it when it is not running. Live tiles are not adequate for this purpose when the user is inside another app. In such cases, your app can send a toast notification that pops up on the top right of the screen. Tapping the toast launches your application. Toast notifications can be initiated from within your app or by a remote service. You can schedule notifications to be shown in the future, for example, to show a reminder for a task. A toast typically consists of text and an image, and you can optionally play a sound when it is displayed.
A well-designed Windows Store app should work properly irrespective of the device on which it is running. Your app might be used with a touchscreen, a hardware or software keyboard, or a pen/stylus device (generally referred to as a “stylus” throughout the chapter). The behavior of your app when used with different input devices should not change. You can implement custom gestures in your app to manipulate content and interact in a variety of ways. Windows 8 apps support stylus device input, along with inking support for drawing, capturing, rending, selecting, and deleting ink strokes.
Most Windows Store apps consist of multiple pages. Windows provides a navigation framework that is helpful for implementing navigation in an app. Microsoft Visual Studio provides developers with application templates that contain support for caching data for a page and integration between navigation and session state. Designing and implementing navigation is an important phase in the development of your app. Microsoft provides a set of guidelines to help developers implement navigation. In applications with grouped data, Semantic Zoom can be implemented to navigate among groups in a simple yet powerful way.
Objectives in this chapter:
§ Objective 4.1: Create and manage tiles
§ Objective 4.2: Notify users by using toast
§ Objective 4.3: Manage input devices
§ Objective 4.4: Design and implement navigation in an app
Objective 4.1: Create and manage tiles
When a Windows Store app is installed on a Windows 8 PC or device, a tile is created on the Start screen. An app’s tile is like an icon in a list of programs, but it is lot more powerful than a simple icon. A tile is useful for communicating with the user even when the associated app is not visible on the screen. A tile can display the latest content from a news website, weather updates, or the latest stock prices. In addition, badges convey status information from apps (for example, whether a remote service is available or the number of unread news articles in a newsreader application). Notifications can be delivered through an app’s tile by the app itself, or the app can add the notification to be delivered according to a schedule or even periodically with an expiry date. Remote services can send push notifications to apps for communicating status and other data.
NOTE
This objective covers how to:
§ Create and update tiles and tile contents.
§ Create and update badges using the TileUpdateManager class.
§ Respond to notification requests.
§ Choose an appropriate tile update schedule based on app requirements.
Creating and updating tiles and tile contents
Every Windows Store app displays on the Start screen as a tile. This tile, which is a shortcut for launching the app, is known as the primary tile. The tile appears on the Start screen as soon as an app finishes installing. A sample of Windows Store apps and their tiles are shown in Figure 4-1.

Figure 4-1. Primary tiles of some Windows Store apps in the Windows 8 Start screen
Some of the tiles shown in Figure 4-10 are static; others display updates such as the Weather app. Some of the tiles are rectangular and others are square. The default static tile in Visual Studio is a 150 × 150 pixel logo. In addition, you can create a 310 × 150 pixel logo for the wide static tile. A wider tile provides more area to display content. Users can select between the square tile and the wide tile of your application to be displayed on the Start screen if you specify a logo for the wide tile.
Working with primary tiles
You set logos in the package manifest file of the app. Using Visual Studio, you specify the 150 × 150 pixel logo in the “Logo” section on the Application UI tab, and the 310 × 150 pixel logo in the “Wide logo” section. See Figure 4-2.
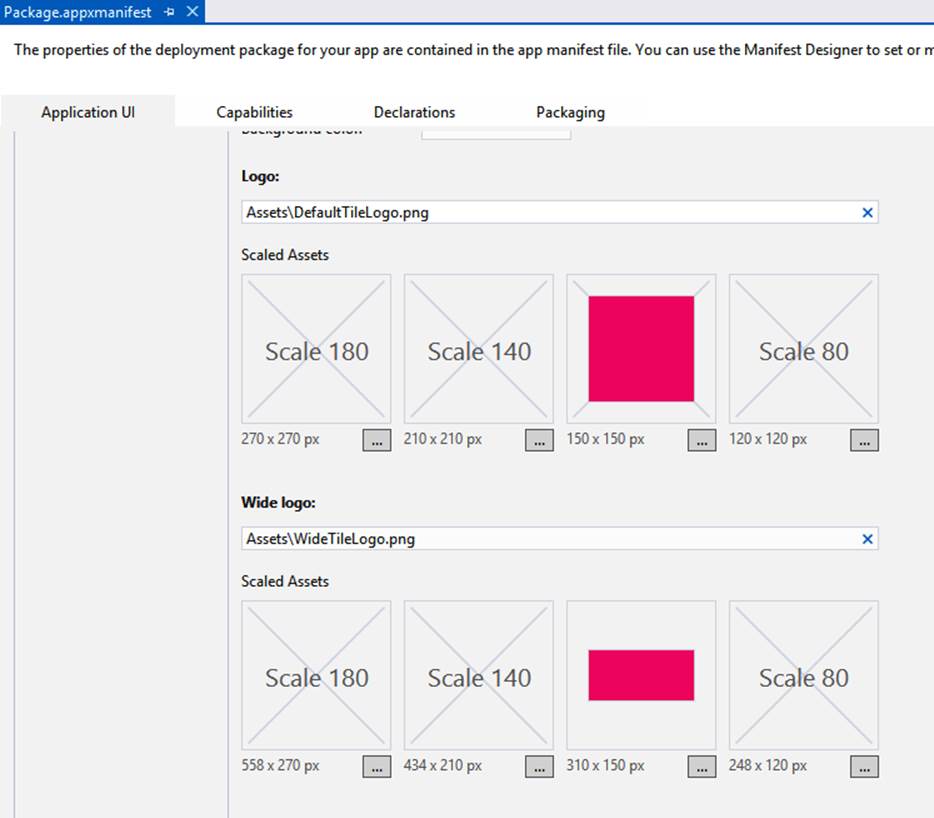
Figure 4-2. Visual Studio configuration for the logos of a Windows Store app
The primary tile for your application defined in the package manifest is visible until it is updated through a tile notification. It changes back to its default specification when there is no notification to display. A notification expires after a period of time, after which it is no longer visible on the tile.
Windows Store apps can update their tiles with dynamic content using tile notifications. A tile notification can be delivered in several ways:
§ Delivered when the app is running
§ Scheduled for delivery at a future date
§ Retrieved periodically from a remote web service
§ Sent by a cloud-based service through the Windows Push Notification Services (WNS)
A tile with dynamically updating content is commonly known as a live tile. By default, tile notifications delivered by the app do not expire, so an expiry date should be set before they are delivered. Tile notifications delivered by one of the other methods, as listed in the previous bulleted list, expire after three days. With this feature, old and outdated content is removed from your app’s live tile.
A tile notification is prepared using an XML template. Windows provides a large number of XML templates that contain a mix of images and text for both square and wide tiles. Note that any image you select for your tile notification should not be larger than 1024 × 1204 pixels in dimensions and should not be larger than 200 kilobytes (KB) in size. If you use an image larger than these specifications, the notification is not delivered to the tile. The TileUpdateManager (in the Windows.UI.Notifications namespace) can be used to deliver a local notification. To prepare a tile notification, select an XML template and update it with your own content.
MORE INFO THE TILE TEMPLATE CATALOG
Microsoft provides a catalog of XML templates for use with tile notifications. This catalog is available at http://msdn.microsoft.com/en-US/library/windows/apps/xaml/hh761491. You can select a tile template in code with one of the values of the TileTemplateType enumeration listed at http://msdn.microsoft.com/en-us/library/windows/apps/xaml/windows.ui.notifications.tiletemplatetype.aspx.
If your application is configured with a wide tile, you should include both a square tile and a wide tile in the notification. This is achieved by inserting the XML template for the square tile into the root XML element, as shown in the C# code in Including both a square tile and a wide tile in the tile notification.
INCLUDING BOTH A SQUARE TILE AND A WIDE TILE IN THE TILE NOTIFICATION
public void SendLocalTileNotification()
{
// Create and populate the wide tile
XmlDocument wideImageAndTextTileXml =
TileUpdateManager.GetTemplateContent(TileTemplateType.TileWideImageAndText01);
XmlNodeList wideTileTextAttributes =
wideImageAndTextTileXml.GetElementsByTagName("text");
wideTileTextAttributes[0].InnerText = "Awesome cats make Windows 8 awesomer!!";
XmlElement tileImage = wideImageAndTextTileXml.GetElementsByTagName("image")[0]
as XmlElement;
tileImage.SetAttribute("src", "ms-appx:///Assets/Cat-1.JPG");
tileImage.SetAttribute("alt", "Awesome Cats");
// Create and populate the square tile
XmlDocument squareTileXml =
TileUpdateManager.GetTemplateContent(TileTemplateType.TileSquareText04);
XmlNodeList squareTileTextAttributes = squareTileXml.GetElementsByTagName("text");
squareTileTextAttributes[0].AppendChild(squareTileXml.CreateTextNode(
"Awesome cats make Windows 8 awesomer!"));
// Import the XML template for the square tile into the wide tile
IXmlNode node = wideImageAndTextTileXml.ImportNode(
squareTileXml.GetElementsByTagName("binding").Item(0), true);
wideImageAndTextTileXml.GetElementsByTagName("visual").Item(0).AppendChild(node);
TileNotification tileNotification = new TileNotification(wideImageAndTextTileXml);
// Add an expiration time of 30 minutes
tileNotification.ExpirationTime = DateTimeOffset.UtcNow.AddSeconds(1800);
// Send the local tile notification
TileUpdateManager.CreateTileUpdaterForApplication().Update(tileNotification);
}
The XAML configured for the wide and square tile is shown as follows:
<tile>
<visual>
<binding template="TileWideImageAndText01">
<image id="1" src=" ms-appx:///Assets/Cat-1.JPG" alt="Awesome Cats"/>
<text id="1">Awesome cats make Windows 8 awesomer!!</text>
</binding>
<binding template="TileSquareText04">
<text id="1">Awesome cats make Windows 8 awesomer!! #cats</text>
</binding>
</visual>
</tile>
An example of a tile notification delivered to the wide tile of an application using the XAML code is shown in Figure 4-3.
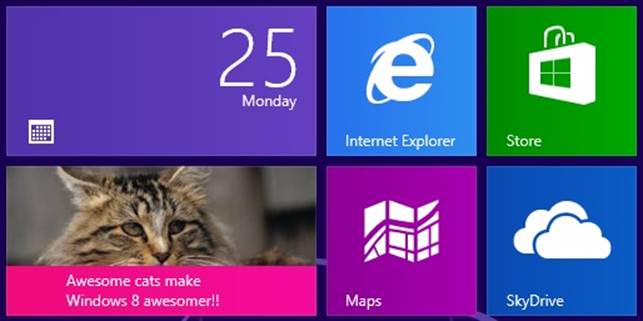
Figure 4-3. A local tile notification with an image and text (photo courtesy of Microsoft Office Imagery)
It can often be challenging to load the XML template and prepare it for use with the TileUpdater of your app. The NotificationExtensions library provides strongly typed objects for preparing tile notifications.
MORE INFO NOTIFICATIONEXTENSIONS LIBRARY
More information about the NotificationExtensions library is available at http://msdn.microsoft.com/en-us/library/windows/apps/hh969156.aspx.
To clear the notifications in your application’s tile, use the following C# code:
public void ClearTileNotifications()
{
// Clear all notification and set the tile to display default content
TileUpdateManager.CreateTileUpdaterForApplication().Clear();
}
Users can choose to turn off the live tile of your application or they can choose the square tile instead of the wide tile. The system provides this option when your application’s tile is selected by the user, as shown in Figure 4-4.
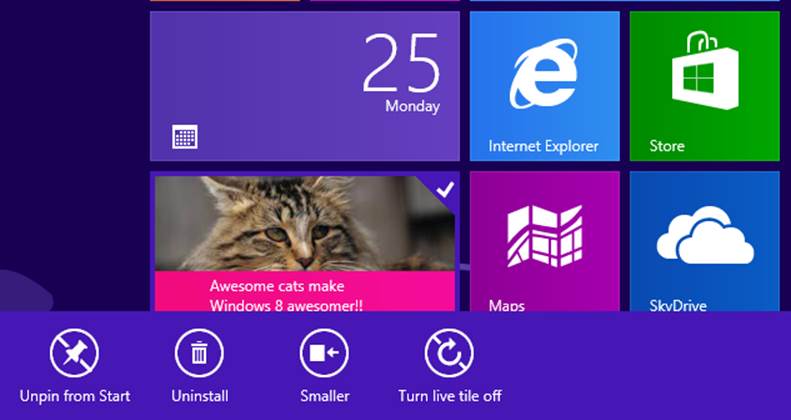
Figure 4-4. Users can choose to turn live tiles on or off for an application and select the square tile instead of the wide tile (Photo courtesy of Microsoft Office Imagery)
EXAM TIP
You are not expected to know the names of common tile templates for the exam. You should be familiar with setting up a tile notification, delivering it through the TileUpdater, and clearing tile notifications.
If you choose to use live tiles in a Windows Store app, the content of tile notifications should encourage users to launch your app. In addition, selecting the right method of delivering tile notifications and regularly updating the contents creates a good user experience. Freshly delivered content such as the latest news headlines, traffic updates based on the user’s current location, or new movie releases matching the user’s tastes make a live tile compelling.
MORE INFO GUIDELINES FOR TILES AND BADGES
Microsoft provides a set of guidelines for developers to use live tiles and badges in their applications at http://msdn.microsoft.com/en-us/library/windows/apps/hh465403.aspx.
Working with secondary tiles
In a Windows Store app, users might open a certain item more frequently, such as a page showing a preferred category of movies or a page showing the weather forecast of a city they will visit soon. In such cases, instead of letting the user navigate to the page in the traditional way, you can provide secondary tiles that are pinned on the Start screen and act as shortcuts to these pages. A secondary tile enables direct access to a specific page or experience within an app. When the user taps or clicks the secondary tile, the app is launched with the pinned content visible on the screen. You can create a secondary tile with the SecondaryTile class (in the Windows.UI.StartScreen namespace).
Although the content that can be pinned to a secondary tile is controlled by an app, the action of pinning content is controlled by the user. Your app cannot pin content on behalf of the user. The action to pin a page to the Start screen is usually presented as a Pin to Start context menu when the button in the app bar is clicked or tapped by the user. A secondary tile can be removed either through the Start screen or while the user is in the parent app.
Secondary tiles are similar to primary and live tiles. They must include a 150 × 150 pixel logo and, optionally, a wide 310 × 150 pixel logo. Tile notifications can be delivered using tile templates and they can be rearranged on the Start screen. They are removed from the Start screen when the app is uninstalled. There are some differences between primary tiles and secondary tiles. Secondary tiles can be deleted at any time without deleting the parent app. They can be created at runtime, unlike primary tiles, which can be created only once during installation.
To create a secondary tile for a page in your Windows Store app, start by adding the styles for the app bar buttons and declaring the bottom app bar, as shown in Creating a secondary tile—XAML.
CREATING A SECONDARY TILE—XAML
<Page.Resources>
<Style x:Key="PinAppBarButtonStyle" TargetType="Button"
BasedOn="{StaticResource AppBarButtonStyle}">
<Setter Property="AutomationProperties.AutomationId" Value="PinAppBarButton"/>
<Setter Property="AutomationProperties.Name" Value="Pin to Start"/>
<Setter Property="Content" Value=""/>
</Style>
<Style x:Key="UnpinAppBarButtonStyle" TargetType="Button"
BasedOn="{StaticResource AppBarButtonStyle}">
<Setter Property="AutomationProperties.AutomationId" Value="UnpinAppBarButton"/>
<Setter Property="AutomationProperties.Name" Value="Unpin from Start"/>
<Setter Property="Content" Value=""/>
</Style>
</Page.Resources>
<Page.BottomAppBar>
<AppBar x:Name="SecondaryTileAppBar" Padding="10,0,10,0" >
<Grid>
<Grid.ColumnDefinitions>
<ColumnDefinition Width="30*"/>
</Grid.ColumnDefinitions>
<StackPanel x:Name="RightPanel" Orientation="Horizontal"
Grid.Column="1" HorizontalAlignment="Right">
</StackPanel>
</Grid>
</AppBar>
</Page.BottomAppBar>
In the code-behind of the page, the app bar button is added based on whether the page is not pinned or already pinned on the Start screen, and the button click event handler is set up as shown in Creating a secondary tile—the code-behind.
CREATING A SECONDARY TILE—THE CODE-BEHIND
using Windows.UI.StartScreen;
using Windows.UI.Xaml.Controls;
public sealed partial class AwesomeCatPage : LayoutAwarePage
{
// Unique Id for the page
public const string appbarTileId = "SecondaryTile.AwesomeCatPage";
public AwesomeCatPage()
{
this.InitializeComponent();
InitializeAppBar();
}
// Initialize the app bar by checking whether the page is already
// pinned on the Start page. Set up the event handler for the app
// bar button click event.
private void InitializeAppBar()
{
this.BottomAppBar.IsOpen = true;
StackPanel rightPanel = this.FindName("RightPanel") as StackPanel;
this.BottomAppBar.IsOpen = false;
if (rightPanel != null)
{
Button pinToAppBar = new Button();
ToggleAppBarButton(!SecondaryTile.Exists(appbarTileId));
pinToAppBar.Click += PinToAppBar_Click;
this.BottomAppBar.Opened += BottomAppBar_Opened;
rightPanel.Children.Add(pinToAppBar);
}
}
// Apply the correct style for the app bar button based on whether
// the page is pinned to the Start screen or not. The styles are defined in the
// Page.Resources section in the XAML of the page.
private void ToggleAppBarButton(bool showPinButton)
{
if (pinToAppBar != null)
{
pinToAppBar.Style = (showPinButton) ?
(this.Resources["PinAppBarButtonStyle"] as Style) :
(this.Resources["UnpinAppBarButtonStyle"] as Style);
}
}
// Once the button is pinned, update the style of the app bar button.
private void BottomAppBar_Opened(object sender, object e)
{
ToggleAppBarButton(!SecondaryTile.Exists(appbarTileId));
}
// Event handler for the app bar button.
private async void PinToAppBar_Click(object sender, RoutedEventArgs e)
{
this.BottomAppBar.IsSticky = true;
if (SecondaryTile.Exists(appbarTileId))
{
SecondaryTile secondaryTile = new SecondaryTile(appbarTileId);
bool isUnpinned = await
secondaryTile.RequestDeleteForSelectionAsync(
GetElementRect((FrameworkElement)sender),
Windows.UI.Popups.Placement.Above);
ToggleAppBarButton(isUnpinned);
}
else
{
Uri logo = new Uri("ms-appx:///Assets/Cat-Sec-1.JPG");
string tileActivationArguments = appbarTileId + " was pinned at " +
DateTime.Now.ToLocalTime().ToString();
SecondaryTile secondaryTile = new SecondaryTile(appbarTileId,
"Awesome Cats",
"Awesome cats make Windows 8 awesomer!!",
tileActivationArguments,
TileOptions.ShowNameOnLogo | TileOptions.ShowNameOnWideLogo,
logo);
secondaryTile.ForegroundText = ForegroundText.Dark;
secondaryTile.SmallLogo =
new Uri("ms-appx:///Assets/Cat-Sec-2.JPG");
secondaryTile.WideLogo = new Uri("ms-appx:///Assets/Cat-Sec-1.JPG");
bool isPinned = await secondaryTile.RequestCreateForSelectionAsync(
GetElementRect((FrameworkElement)sender),
Windows.UI.Popups.Placement.Above);
ToggleAppBarButton(!isPinned);
}
this.BottomAppBar.IsSticky = false;
}
// Gets the rectangle of the element
public static Rect GetElementRect(FrameworkElement element)
{
GeneralTransform buttonTransform = element.TransformToVisual(null);
Point point = buttonTransform.TransformPoint(new Point());
return new Rect(point, new Size(element.ActualWidth, element.ActualHeight));
}
}
When users are in the page that they want to pin to the Start screen, they do so by opening the app bar and clicking the Pin to Start button in the context menu, as shown in Figure 4-5.
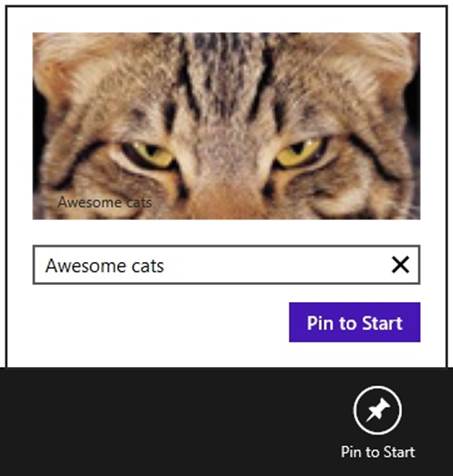
Figure 4-5. A page in a Windows Store app that can be pinned to the Start screen (photo courtesy of Microsoft Office Imagery)
After the page is pinned on the Start screen, the user can change the size of the secondary tile or unpin the tile by selecting it, as shown in Figure 4-6.
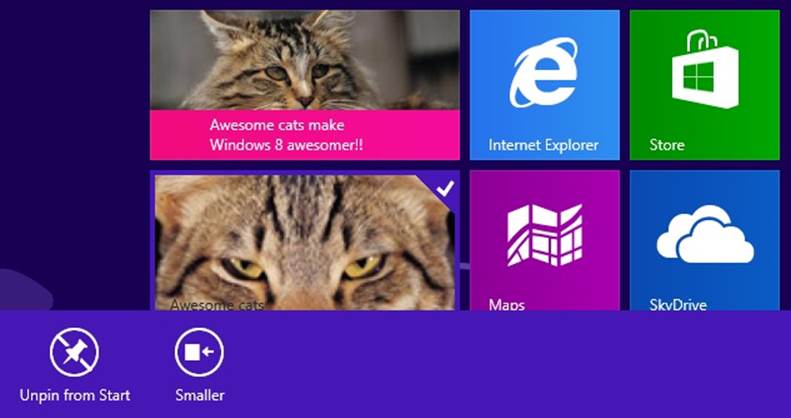
Figure 4-6. A secondary tile can be unpinned from the Start screen or its size can be changed by the user (photo courtesy of Microsoft Office Imagery)
Windows expects some properties of a secondary tile to be set before it is pinned. Each secondary tile is assigned a unique ID to distinguish it from other tiles. If you provide the unique ID of an existing secondary tile, that tile will be overwritten. If you provide a wide logo in addition to the mandatory small logo, you can set the name of the logo to be visible when the wide tile is shown. This is set through the tile options, as shown in Creating a secondary tile—the code-behind (TileOptions.ShowNameOnLogo for the name to be displayed on the square tile, andTileOptions.ShowNameOnWideLogo for the name to display on the wide tile). You can also include CopyOnDeployment in the tile options, which ensures that the tile is pinned to the Start screen on any other computer with the same Microsoft account when the parent app is installed.
The code in Changing the logo of a secondary tile changes the logo of a secondary tile after it is available on the Start screen. In addition, tile notifications can be delivered to secondary tiles similar to that of primary tiles.
CHANGING THE LOGO OF A SECONDARY TILE
private void UpdateSecondaryTileLogo()
{
SecondaryTile tileToUpdate = new SecondaryTile(appbarTileId);
tileToUpdate.Logo =
new Uri("ms-appx:///Assets/NewSecondaryTileDefaultImage.jpg");
tileToUpdate.WideLogo =
new Uri("ms-appx:///Assets/NewSecondaryTileDefaultWideImage.jpg");
tileToUpdate.UpdateAsync();
}
private void SendNotificationToSecondaryTile()
{
// Define the notification content.
XmlDocument tileXml =
TileUpdateManager.GetTemplateContent(TileTemplateType.TileWideText04);
XmlNodeList tileTextAttributes = tileXml.GetElementsByTagName("text");
tileTextAttributes[0].AppendChild(tileXml.CreateTextNode("Hello from awesome cat"));
// Provide a square version of the notification.
XmlDocument squareTileXml =
TileUpdateManager.GetTemplateContent(TileTemplateType.TileSquareText04);
XmlNodeList squareTileTextAttributes = squareTileXml.GetElementsByTagName("text");
squareTileTextAttributes[0].AppendChild(squareTileXml.CreateTextNode("Hello
from awesome cat"));
// Add the square tile to the notification.
IXmlNode node =
tileXml.ImportNode(squareTileXml.GetElementsByTagName("binding").Item(0), true);
tileXml.GetElementsByTagName("visual").Item(0).AppendChild(node);
// Update the secondary tile.
TileNotification tileNotification = new TileNotification(tileXml);
TileUpdater secondaryTileUpdater =
TileUpdateManager.CreateTileUpdaterForSecondaryTile(appbarTileId);
secondaryTileUpdater.Update(tileNotification);
}
Creating and updating badges using the TileUpdateManager class
The live tile of a Windows Store app is commonly used to deliver new content to the user. In some cases, you might want to notify the user with a status or summary of new items that are ready for viewing. Badges display the status at the bottom-right corner in the tile of the application (on the bottom-left corner on a computer set to right-to-left language). A badge is either a glyph, which indicates status such as an alert or attention (available as a fixed set of glyphs) or a number between 1 and 99. Badges can display on both square and wide tiles.
To send a badge update to the tile of your app, you need to select the type of badge the tile should display. This is one of the two values of the BadgeTemplateType enumeration, which has the following members:
§ BadgeGlyph. A glyph image provided by the system.
§ BadgeNumber. A numerical value between 1 and 99. Values greater than 99 are displayed as 99+.
You can update the value of the badge element in the XML template of a badge and use the Update method of the BadgeUpdater class to update the badge in the tile. An instance of the BadgeUpdater class is obtained from the BadgeUpdateManager static class with theCreateBadgeUpdaterForApplication method for the live tile of the app and CreateBadgeUpdaterForSecondaryTile method for the secondary tile. The code in Sending badge updates for the primary tile and clearing badge updates shows how to send a badge update for the primary tile as a number or a glyph and to clear all badge updates.
SENDING BADGE UPDATES FOR THE PRIMARY TILE AND CLEARING BADGE UPDATES
private void SendBadgeUpdateAsNumber()
{
XmlDocument badgeXml =
BadgeUpdateManager.GetTemplateContent(BadgeTemplateType.BadgeNumber);
XmlElement badgeElement = (XmlElement)badgeXml.SelectSingleNode("/badge");
badgeElement.SetAttribute("value", "23");
BadgeNotification badge = new BadgeNotification(badgeXml);
BadgeUpdateManager.CreateBadgeUpdaterForApplication().Update(badge);
}
private void SendBadgeUpdateAsGlyph()
{
XmlDocument badgeXml =
BadgeUpdateManager.GetTemplateContent(BadgeTemplateType.BadgeGlyph);
XmlElement badgeElement = (XmlElement)badgeXml.SelectSingleNode("/badge");
badgeElement.SetAttribute("value", "attention");
BadgeNotification badge = new BadgeNotification(badgeXml);
BadgeUpdateManager.CreateBadgeUpdaterForApplication().Update(badge);
}
private void ClearBadgeUpdates()
{
BadgeUpdateManager.CreateBadgeUpdaterForApplication().Clear();
}
Figure 4-7 shows a badge update containing a number (set to 23) delivered to a Windows Store app using the code in Sending badge updates for the primary tile and clearing badge updates.
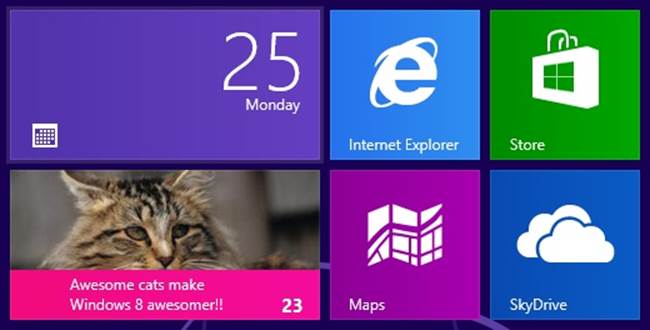
Figure 4-7. Badge update in the live tile of a Windows Store app in the Start screen (photo courtesy of Microsoft Office Imagery)
Badges have many features in common with live tiles. You can periodically update badges, schedule a future update, and use push notifications to update the glyph or number displayed. You can set an ExpirationTime on a badge update when you create it, and your app can clear badges programmatically.
MORE INFO BADGE CONTENT OPTIONS
Microsoft provides a set of glyphs that can be used in a badge notification. For the full list of glyphs, refer to this page: http://msdn.microsoft.com/en-us/library/windows/apps/xaml/hh779719.aspx.
Responding to notification requests
Tile notification and badge updates in a Windows Store app are delivered in one of the following ways:
§ Local. The app creates local updates to a live tile and delivers them using the Update method of the TileUpdater class. These updates do not expire if the expiration time is not set in the update.
§ Scheduled. The app can schedule an update to be delivered at a later date and time. Scheduled updates expire three days after they are delivered or at a time set by your app. After a tile update is scheduled, your app does not have to be running.
§ Periodic. Periodic updates poll a remote URL and fetch the XML for the tile at intervals from every half hour to every day. After it is configured, your app does not have to be running for the periodic updates to be delivered.
§ Push. Push notifications, which are delivered through the WNS, can update tiles and badges.
Push notifications offer an ideal solution for Windows Store apps that provide regular updates to the user as they occur. For example, a weather app needs to show severe weather warnings through the live tile. Although scheduled or periodic updates fetch data at specific time intervals, to be effective, an app should use push notifications to update its tile and badges. Microsoft provides developers with the free WNS to help integrate push notifications in apps. The service handles the communication with your application and can handle millions of users. The following steps illustrate how to set up push notifications for tile and badge updates and other notifications:
1. The Windows Store app requests a push notification channel from WNS. The service returns a channel with a uniform resource identifier (URI) that is unique to the app and the device.
2. Your app sends this URI to a cloud service or a remote web service. It is important to ensure that this URI is not compromised by a third party, so you should encrypt the communication between your app and the cloud service.
3. When the remote service has an update for your app, the service notifies WNS using the channel URI obtained by your app. This is carried out by sending a HTTP POST operation with the notification payload, which typically consists of the XML for the tile or badge update.
4. WNS receives the request and routes the notification to the appropriate device.
The remote service uses one of the standard templates for a tile or badge, and sends a request to the WNS for the notification to be delivered. When the notification arrives in your app, the live tile is updated with the received tile or badge update. All classes for push notifications are defined in the Windows.Networking.PushNotifications. The code in Setting up push notifications shows how push notifications are typically set up in a Windows Store app.
SETTING UP PUSH NOTIFICATIONS
using Windows.UI.Notifications;
using Windows.Networking.PushNotifications;
using Windows.Security.Cryptography;
using System.Net.Http;
using Windows.Networking.Connectivity;
private async void SetupPushNotifications()
{
var profile = NetworkInformation.GetInternetConnectionProfile();
// Check for internet connectivity and register for push notifications
if (profile.GetNetworkConnectivityLevel() ==
NetworkConnectivityLevel.InternetAccess)
{
PushNotificationChannel channel = null;
try
{
// Obtain a PushNotificationChannel from WNS
channel = await
PushNotificationChannelManager.CreatePushNotificationChannelForApplicationAsync();
var buffer = CryptographicBuffer.ConvertStringToBinary(channel.Uri,
BinaryStringEncoding.Utf8);
var uri = CryptographicBuffer.EncodeToBase64String(buffer);
var client = new HttpClient();
// Update the cloud service with the PushNotificationChannel URI
var response = await client.GetAsync(new
Uri("http://awesomecatsapp.cloudapp.net?uri" + uri + "&type=tile"));
if (!response.IsSuccessStatusCode)
{
// Record the problem in a log
}
}
catch (Exception ex)
{
//
}
}
}
Your app can update a secondary tile using push notifications. Instead of using CreatePushNotificationChannelForApplicationAsync, you should use the CreatePushNotificationChannelForSecondaryTileAsync method of the PushNotificationChannelManager class with the secondary tile’s unique ID.
You might want to intercept a push notification in your app and respond to it with some application logic before it updates a tile or a badge. For example, a specific value in a badge update can be used to trigger a background task. You can also suppress the display of the tile or badge update. You can set up an event handler for the PushNotificationReceived event provided by the PushNotificationChannel class. Within the event handler, you can check for the type of push notification and examine the contents of the notification. The code in Subscribing to the PushNotificationReceived event and handling push notifications shows how to subscribe to the PushNotificationReceived event and handle various types of push notifications.
SUBSCRIBING TO THE PUSHNOTIFICATIONRECEIVED EVENT AND HANDLING PUSH NOTIFICATIONS
private async void SetupPushNotifications()
{
// Code removed for brevity
// Obtain a PushNotificationChannel from WNS
channel = await PushNotificationChannelManager.
CreatePushNotificationChannelForApplicationAsync();
channel.PushNotificationReceived += OnPushNotification;
}
// This event handler is used to intercept the push notification, examine its
// contents and suppress the display of the tile or badge update
private async void OnPushNotification(
PushNotificationChannel sender, PushNotificationReceivedEventArgs e)
{
string notificationContent = string.Empty;
switch (e.NotificationType)
{
case PushNotificationType.Badge:
notificationContent = e.BadgeNotification.Content.GetXml();
break;
case PushNotificationType.Tile:
notificationContent = e.TileNotification.Content.GetXml();
break;
case PushNotificationType.Toast:
notificationContent = e.ToastNotification.Content.GetXml();
break;
case PushNotificationType.Raw:
notificationContent = e.RawNotification.Content;
break;
}
if (!string.IsNullOrEmpty(notificationContent))
{
// Process the content and take action
}
// Cancel the delivery of the tile or badge update
e.Cancel = true;
}
Configuring tile and badge updates for the lock screen
The lock screen is displayed when the user locks a device or when the device is switched on, rebooted, or wakes up from sleep. If your Windows Store app needs to keep the user up to date with the status of a task or deliver information in a text event when the screen is locked, tile and badge updates can be delivered on the lock screen. Up to seven Windows Store apps can be present on the lock screen, and one of these apps can show the text of the latest tile notification. A Windows Store has to request lock screen access from the user and then choose to display a badge update and, optionally, the text from their last tile notification. This process is configured in the package manifest, as shown in Figure 4-8.
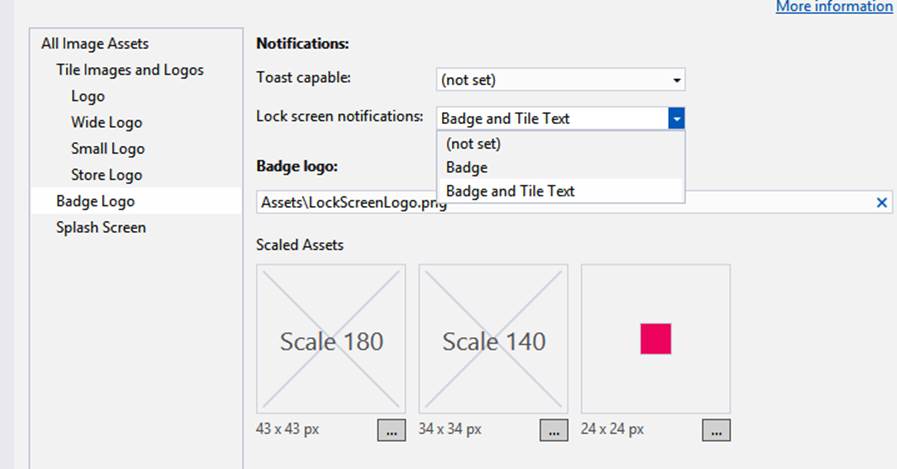
Figure 4-8. Configuring the package manifest for tile and badge updates to be delivered in the lock screen of an app
If you choose to display the tile text, you must provide a wide logo for your app, or else your manifest will be invalid. In addition, if your app displays a badge in the in the lock screen, you must provide a badge logo. An app with lock screen presence must declare a background task, which can be a Control Channel, a Timer, or Push Notification. If your app has secondary tiles, content from the tiles can be displayed on the lock screen. If you choose to display a logo for the secondary tile, you should set that with the LockScreenBadgeLogo property of the SecondaryTile class. You can also set the LockScreenDisplayBadgeAndTileText property to True to make the secondary tile eligible for display in the lock screen’s detailed status slot.
Before your app has access to the lock screen, it must seek permission from the user. This step is available only once for your app. After your app has been granted access to the lock screen by the user, it can update the lock screen with badge updates and, optionally, tile text updates using the same code used for updating your app’s tile. The BackgroundExecutionManager class in the Windows.ApplicationModel.Background namespace provides ways for an app to be added and removed from the lock screen, and to query its current access to the background task and badge updates on the lock screen. The code in Adding and removing an app from the lock screen provides this functionality.
ADDING AND REMOVING AN APP FROM THE LOCK SCREEN
using Windows.UI.Notifications;
using Windows.ApplicationModel.Background;
// Event handler for button that requests access to the lock screen
private async void RequestLockScreenAccess_Click(object sender, RoutedEventArgs e)
{
BackgroundAccessStatus status = await
BackgroundExecutionManager.RequestAccessAsync();
switch (status)
{
case BackgroundAccessStatus.AllowedWithAlwaysOnRealTimeConnectivity:
// App is on the lock screen, has access to Always-On Real Time Connectivity
break;
case BackgroundAccessStatus.AllowedMayUseActiveRealTimeConnectivity:
// App is on the lock screen, has access to Active Real Time Connectivity
break;
case BackgroundAccessStatus.Denied:
// App is not on the lock screen
break;
case BackgroundAccessStatus.Unspecified:
// User has not yet taken any action
break;
default:
break;
}
}
// Clear badge of all notifications
private void ClearBadge_Click(object sender, RoutedEventArgs e)
{
BadgeUpdateManager.CreateBadgeUpdaterForApplication().Clear();
}
// Send a badge update to the lock screen
// Note: You can optionally check for the lock screen access status by calling
// BackgroundExecutionManager.GetAccessStatus() and evaluating the returned
// BackgroundAccessStatus value as seen in the event handler above.
private void SendBadgeUpdateOnLockScreen_Click(object sender, RoutedEventArgs e)
{
string badgeXmlString = "<badge value='6'/>";
Windows.Data.Xml.Dom.XmlDocument badgeDOM = new Windows.Data.Xml.Dom.XmlDocument();
badgeDOM.LoadXml(badgeXmlString);
BadgeNotification badge = new BadgeNotification(badgeDOM);
BadgeUpdateManager.CreateBadgeUpdaterForApplication().Update(badge);
rootPage.NotifyUser("Badge notification sent", NotifyType.StatusMessage);
}
When your app requests access to run in the background and use the lock screen to deliver badge and tile updates, the user is presented with the dialog box shown in Figure 4-9.
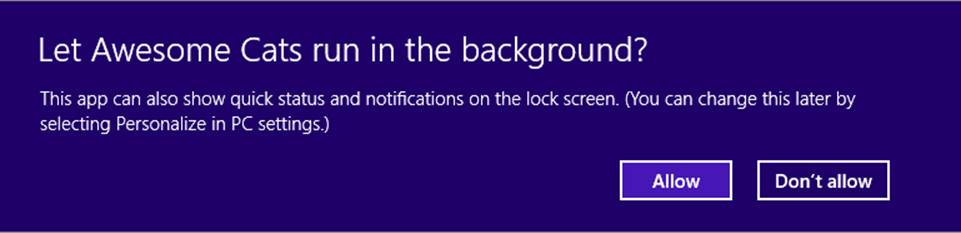
Figure 4-9. A Windows Store app requesting access to run in the background and access the lock screen
When a badge update arrives, it is delivered on the lock screen, as shown in Figure 4-10.
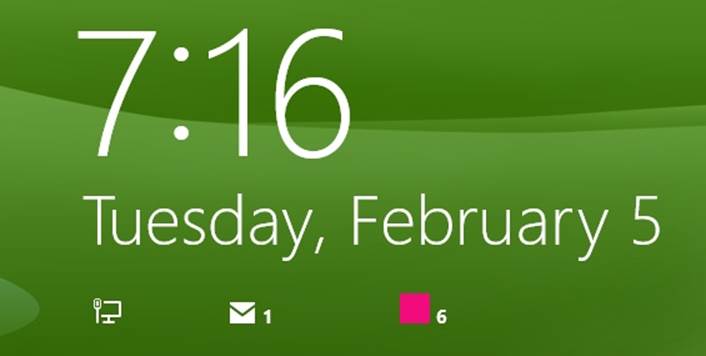
Figure 4-10. Badge updates seen in the lock screen of a device
Using PC Settings to remove an app from the lock screen
Users can remove your app from the lock screen and add it later through the lock screen section in the PC Settings, as shown in Figure 4-11.
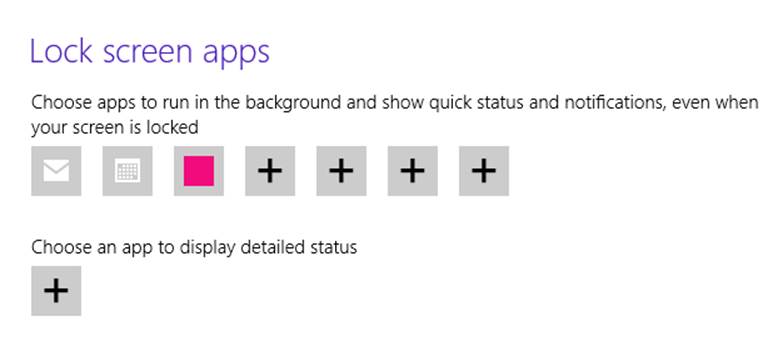
Figure 4-11. List of apps available in the lock screen
If your app has been removed from the lock screen, it is not allowed to request lock screen access again. If you use the RequestAccessAsync method of the BackgroundExecutionManager class after the user has removed your app from the lock screen, the request is ignored. However, if the seven slots available in the lock screen are all occupied by other apps, and the user does not replace an existing app in the lock screen with your app, a call to RequestAccessAsync from your app will display the dialog box shown in Figure 4-9. Your app can provide a command in the Settings charm for the user to remove it from the lock screen. The RemoveAccess method of the BackgroundExecutionManager class removes your app from the lock screen.
Choosing an appropriate tile update schedule based on app requirements
Windows Store apps can deliver local notifications through live tiles and badges when they are running. Push notifications enable remote servers to communicate with Windows Store apps and update their tiles and badges. Both options are powerful and are often adequate to meet your app’s requirements. Sometimes, however, your app might need to update its tile at a specific time or regularly poll a remote URL for data that can be delivered to the user through a tile or badge update.
A Windows Store app can display up to five notifications in a cycle. The default behavior of a live tile on the Start screen is to display a single notification until the next notification arrives when the tile’s contents are updated. Windows provides the option to enable a notification queue that can maintain up to five notifications, and the tile cycles through them until they expire. The notification queue can cycle tiles delivered locally from within the app via push notifications, via a schedule, or periodically.
The amount of time each notification in the queue is displayed and the order in which it appears on the tile is determined by the system. When the queue reaches its capacity of five notifications, the next new notification replaces the oldest notification in the queue. You can control this behavior by specifying a tag with the notification delivered. Windows examines the tag on a new notification, looks for a notification in the queue with a matching tag, and, if one is found, replaces that notification in the queue. If no notification with the tag is found, it uses the first-in, first-out (FIFO) rule to replace notifications with new ones. It is easy to enable the notification queue and use it in your app, as follows:
public void SendLocalTileNotification()
{
// The following code is an addition to the code
// shown previously for creating and updating tiles.
TileNotification tileNotification = new TileNotification(wideImageAndTextTileXml);
tileNotification.Tag = "FirstCatTile";
// Enable notification queue
TileUpdateManager.CreateTileUpdaterForApplication().EnableNotificationQueue(true);
// Send the local tile notification
TileUpdateManager.CreateTileUpdaterForApplication().Update(tileNotification);
}
Periodic notifications in Windows Store apps update tiles and badges at a fixed interval by downloading content from a remote server or a cloud service. You need the following to set up periodic notifications in an app:
§ A URI of a cloud service that provides the content of a notification as correctly formatted XML of the tile to be shown.
§ The frequency at which the URI should be polled and the tile or badge updated with new content.
§ Optionally, you can specify the time at which the periodic updates will commence. If you do not specify this value, the updates will begin immediately.
Periodic updates can be used to deliver content among a large number of users without a significant investment in the infrastructure. The StartPeriodicUpdate method is provided with a URI and a time interval specified by the PeriodicUpdateRecurrence enumeration, which has the following members:
§ HalfHour. Poll the URI every 30 minutes.
§ Hour. Poll the URI every hour.
§ SixHours. Poll the URI every 6 hours.
§ TwelveHours. Poll the URI every 12 hours.
§ Daily. Poll the URI once per day.
The StartPeriodicUpdate method is available for both the TileUpdater and BadgeUpdater classes, used to deliver updates for tiles and badges, respectively. The content returned from the URI should contain both wide and square versions of the tile. The following code shows how periodic updates are created for tiles (the same approach can be used for badges):
private void StartPeriodicUpdatesForUri(Uri uriToPoll)
{
// Code removed for brevity
// Poll every hour
PeriodicUpdateRecurrence recurrence = PeriodicUpdateRecurrence.Hour;
// Start the periodic updates
TileUpdateManager.CreateTileUpdaterForApplication().StartPeriodicUpdate(
uriToPoll, recurrence);
}
When used with the notification queue, you can provide an array of up to five unique URIs, one for each notification. The content from each URI should contain the expiration time for the notification and a unique tag value, which is a string of up to 16 characters. TheStartPeriodicUpdateBatch method is available in the TileUpdater class for updating the tile of an app and is used as follows:
private void StartPeriodicUpdatesForUris(IEnumerable<Uri> urisToPoll)
{
// Code removed for brevity
// Poll every hour
PeriodicUpdateRecurrence recurrence = PeriodicUpdateRecurrence.SixHours;
// Enable notification queue
TileUpdateManager.CreateTileUpdaterForApplication().EnableNotificationQueue(true);
// Send the local tile notification
TileUpdateManager.CreateTileUpdaterForApplication().StartPeriodicUpdateBatch(
urisToPoll, recurrence);
}
When a Windows Store app needs to cancel the periodic updates for the tile or badge the updater is bound to, it should call the StopPeriodicUpdate method (available in both the TileUpdater and BadgeUpdater classes).
Windows Store apps that use live tiles can update users with information leading to a future event by scheduling tile notifications in advance. Scheduled tile notifications are similar to local notifications that are created by an app when it is running, except that they can be specified with a precise time when they should update the tile. The content for the future event is known when the scheduled notification is set up. Your app can schedule up to 4,096 notifications in advance. Scheduled notifications do not expire by default; however, it is a good practice to set their expiration time using the ExpirationTime property of the ScheduledTileNotification class. The code in Creating and cancelling a scheduled notification shows how to create a scheduled notification and cancel it.
CREATING AND CANCELLING A SCHEDULED NOTIFICATION
// Create a new scheduled notification
private void CreateScheduledNotificationForEvent(string eventName)
{
// Prepare notification
// Code removed for brevity
// Schedule tile update three hours from now
DateTime dueTime = DateTime.Now.AddHours(3);
// Create a scheduled tile and assign a unique ID
ScheduledTileNotification notification = new ScheduledTileNotification(
tileXml, dueTime);
notification.Id = eventName;
// Schedule the notification
TileUpdateManager.CreateTileUpdaterForApplication().AddToSchedule(notification);
}
// Remove a scheduled notification from the schedule
private void RemoveScheduledNotificationForEvent(string eventName)
{
TileUpdater updater = TileUpdateManager.CreateTileUpdaterForApplication();
var scheduledNotifications = updater.GetScheduledTileNotifications();
for (int i = 0; i < scheduledNotifications.Length; i++)
{
if (scheduledNotifications[i].Id = eventName)
updater.RemoveFromSchedule(scheduledNotifications[i]);
}
}
THOUGHT EXPERIMENT
Using notifications in a board game
In this thought experiment, apply what you’ve learned about this objective. You can find answers to these questions in the “Answers” section at the end of this chapter.
You have developed a Windows Store app that enables users to select a board game and play with opponents they can invite from their list of contacts or via email. What are three ways to use notifications and tile updates in your app to make it compelling for the user to buy a game and play it?
Objective summary
§ A Windows Store app can use tiles and badges to communicate with the user even when the app is not running. Live tiles encourage users to launch your app and interact with it.
§ You can enable users to create shortcuts to specific pages within your app by using secondary tiles. Secondary tiles help users bookmark their favorite content or experience from your app on the Start screen.
§ Live tiles can be updated locally by your app when it is running by periodically polling one or more remote URIs for tile content, via a scheduled update, or by push notifications. Updates deliver fresh content to the tiles.
§ Badges provide a number or a glyph on the live tile when a status or a summary of items need to be displayed. When used with live tiles, badges provide the user with a concise picture of various events or updates your app is receiving.
§ Badges and text of tiles can be shown in the lock screen of the user’s device if the user allows your app to access the lock screen. Your app need to be configured with at least one background task declared in the manifest.
§ Tiles and badges can be updated periodically by polling a remote server or a cloud service. Periodic updates are useful for delivering updates to a large number of users without a significant investment in the infrastructure.
§ You can schedule an update to be delivered in the future when the content for the update is known. This helps when the user needs to be informed of an event at a specific date and time.
§ A Windows Store app can display up to five notifications in a cycle if the notifications contain a unique tag. Notifications can use this feature to continuously deliver fresh content that is displayed in a cycle by Windows.
Objective review
Answer the following questions to test your knowledge of the information in this objective. You can find the answers to these questions and explanations of why each answer choice is correct or incorrect in the “Answers” section at the end of this chapter.
1. You are preparing to enhance a Windows Store music explorer app with live tiles. The app displays album categories, albums, popular artists, concerts, and the user’s favorite items in the main page. What is the best approach for delivering a rich, live tile experience?
a. Use push notifications to deliver new artists to inform users when a new album is released.
b. Set up periodic notifications to poll for latest albums, popular artists, or concerts, for example. Update the live tile with this data.
c. Schedule updates to be shown every hour with the favorite items of the user.
d. Whenever a user runs the app, display pertinent information on the live tiles, such as artists or concerts.
2. You have developed a weather app for the Windows Store. You are working on an enhancement that will allow users to create shortcuts into your app for specific cities. What are the benefits of using secondary tiles in your app? (Choose all that apply.)
a. Secondary tiles can be updated with the latest information for the city the user is interested in.
b. Secondary tiles make it easier for the user to launch your app and browse to the page they are interested in.
c. After you have created a secondary tile, you can delete the application’s tile, thereby freeing up space on the Start screen.
d. For the same Microsoft account, if your app is installed on a new device, the secondary tiles will be available on it. This helps the user to start using your app without re-creating the secondary tiles.
e. Secondary tiles can be resized to any size the user prefers thereby saving screen area.
3. Your Windows Store app helps users manage and monitor their stock portfolio. What is the best way to implement live tiles in your app?
a. Use push notifications to display the price of stocks in the user’s portfolio every time their price changes.
b. Use periodic updates to poll for the price of up to five stocks at regular intervals.
c. Create scheduled updates that download and display the stock price at specific times during the day.
d. Create a Windows service that obtains the stock price and use your app to create local notifications to update the live tile.
e. Set up scheduled updates to remind the user to launch your app and view the current prices.
Objective 4.2: Notify users by using toast
Toast notifications are transient notifications sent by Windows Store apps to inform the user of an event such as new email or a friend request. A toast notification appears in the top-right corner of the primary monitor (top-left corner for right-to-left languages) for a specific period of time with an optional audio tone that can be customized. Toasts contain text with images in some cases and their duration can be controlled when they are configured for delivery. Toasts can be created locally when your application is running, they can be scheduled for delivery at a specific date and time in the future, or they can delivered via push notifications. Users can turn off notifications from apps from the PC Settings for a specific period of time or they can turn off toast notifications for all the apps.
NOTE
This objective covers how to:
§ Enable an app for toast notifications.
§ Populate toast notifications with images and text using the ToastUpdateManager class.
§ Control toast duration.
§ Play sounds with toast notifications.
§ Respond to toast events.
Enabling an app for toast notifications
Toast notifications are messages that appear for a short duration from a Windows Store app. They can appear even when the app is not running. They invite the user to access your app and carry out an action or view content. Users are provided with an opportunity to opt out of toast notifications if they do not want to be notified by your app. Toast notifications are expected to be used with other notification methods such as tile notifications and badge updates.
If you plan to implement toast notifications in your Windows Store app, you should configure your app’s package manifest with the option to show toast notifications. You can configure your app for toast notifications using the manifest editor in Visual Studio, as shown in Figure 4-12.
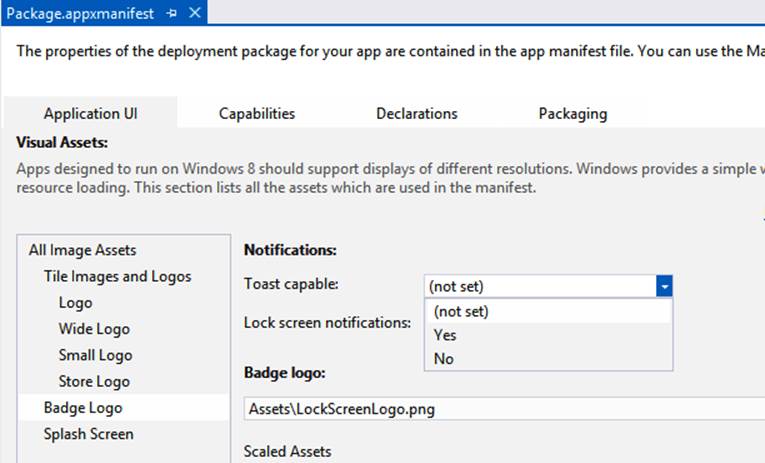
Figure 4-12. Configuring a Windows Store app for toast notifications using the package manifest editor in Visual Studio
After you have added support for toast notifications in your Windows Store app, the user can turn them off using the Settings charm of your app, as shown in Figure 4-13.
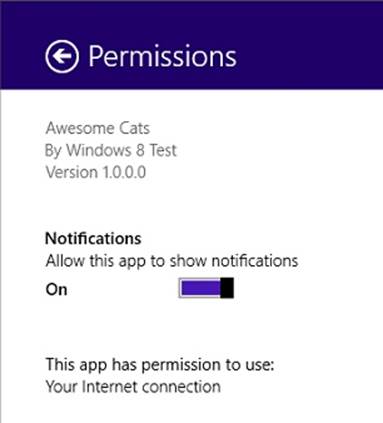
Figure 4-13. The Permissions section of the Settings charm of a Windows Store app can be used to turn off toast notifications
Windows provides users with the option to hide all notifications for a specific period of time from all apps that are capable of sending notifications. This option is available in the Settings charm, as shown in Figure 4-14.
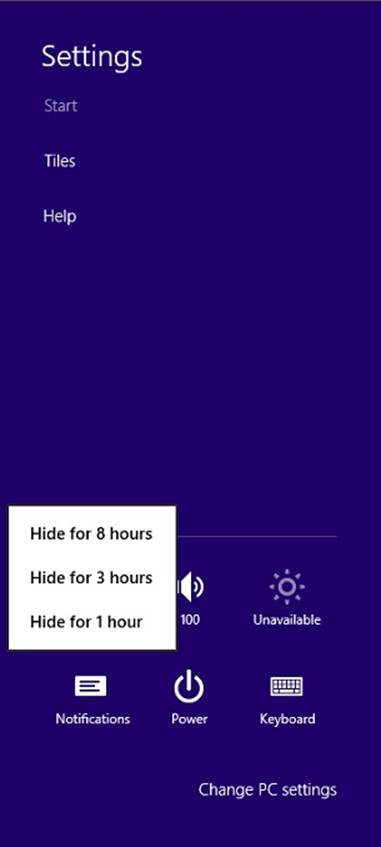
Figure 4-14. The Settings charm in Windows can be used to hide notifications from all Windows Store apps for a specific period of time
Users can use their PC Settings to control notifications that can be shown by apps, choose whether they can appear on the lock screen, and choose whether apps are allowed to play notification sounds (see Figure 4-15).
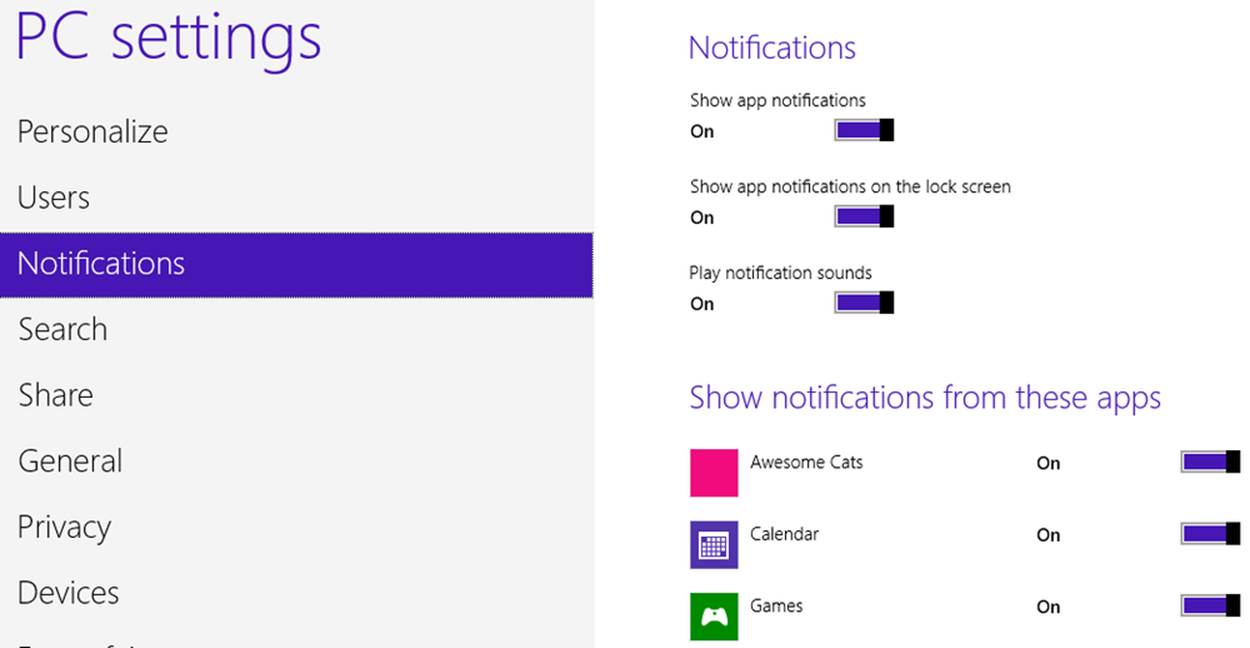
Figure 4-15. PC Settings enables users to turn on or off notifications from apps, choose whether they appear on the lock screen, and choose whether sounds can be played with the notification
Populating toast notifications with images and text using the ToastUpdateManager class
After you have configured your app’s package manifest file for toast notifications, you can set up toast notifications to be created and delivered when your app is running, schedule them for delivery at a future date and time, or use a remote cloud service and WNS to deliver toast notifications.
Microsoft provides developers with the option to add text, and optionally an image and sound, for a toast notification. You can choose from one of the eight standard templates listed in the toast template catalog. The template type can be specified with the ToastTemplateType enumeration (available in the Windows.UI.Notifications namespace).
MORE INFO TOAST TEMPLATE CATALOG
The toast template catalog is available at http://msdn.microsoft.com/en-us/library/windows/apps/xaml/hh761494.aspx.
You should load the XML of the template you have chosen, set the values of the image and text elements, and use the ToastNotificationManager to display the toast. See Displaying a toast notification with text and an image.
DISPLAYING A TOAST NOTIFICATION WITH TEXT AND AN IMAGE
using Windows.UI.Notifications;
using Windows.Data.Xml.Dom;
private void ShowImageAndTextToastNotification()
{
ToastTemplateType toastTemplate = ToastTemplateType.ToastImageAndText01;
XmlDocument toastXml = ToastNotificationManager.GetTemplateContent(toastTemplate);
XmlNodeList toastTextElements = toastXml.GetElementsByTagName("text");
toastTextElements[0].AppendChild(toastXml.CreateTextNode(
"Hello! I am an awesome cat… awesome cats make Windows 8 awesomer!!"));
XmlElement tileImage = toastXml.GetElementsByTagName("image")[0] as XmlElement;
tileImage.SetAttribute("src", "ms-appx:///Assets/Cat-2.JPG");
tileImage.SetAttribute("alt", "awesome cat");
ToastNotification toast = new ToastNotification(toastXml);
ToastNotificationManager.CreateToastNotifier().Show(toast);
}
Figure 4-16 shows the toast notification created with the code in Displaying a toast notification with text and an image.
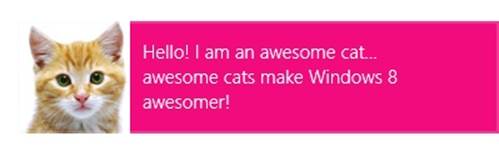
Figure 4-16. A toast notification with an image and some text (photo courtesy of Microsoft Office Imagery)
A Windows Store app might need to deliver a toast notification as a reminder for an event or to complete a task. In such cases, a toast notification can be scheduled for delivery at a future date and time. You can also create toast notifications that repeat at a specific interval; for example, a single toast notification can be shown four times, each five minutes apart, starting in one hour. It is recommended that a unique ID be added to toast notifications that are scheduled for delivery at a future time to cancel them if needed. The code in Scheduling toast notifications shows how to schedule a toast notification for delivery at a specific time and also schedule a number of toasts to be delivered in the future.
SCHEDULING TOAST NOTIFICATIONS
using Windows.UI.Notifications;
using Windows.Data.Xml.Dom;
private void ScheduleTextToastNotification()
{
ToastTemplateType toastTemplate = ToastTemplateType.ToastText01;
XmlDocument toastXml = ToastNotificationManager.GetTemplateContent(toastTemplate);
XmlNodeList toastTextElements = toastXml.GetElementsByTagName("text");
toastTextElements[0].AppendChild(toastXml.CreateTextNode(
"Message from a cat: Windows 8 is awesome"));
DateTime dueTime = DateTime.Now.AddMinutes(2);
ScheduledToastNotification toast = new ScheduledToastNotification(toastXml,
dueTime);
toast.Id = "scheduled-toast";
ToastNotificationManager.CreateToastNotifier().AddToSchedule(toast);
}
private void ScheduleRecurringTextToastNotification()
{
ToastTemplateType toastTemplate = ToastTemplateType.ToastImageAndText01;
XmlDocument toastXml = ToastNotificationManager.GetTemplateContent(toastTemplate);
XmlNodeList toastTextElements = toastXml.GetElementsByTagName("text");
toastTextElements[0].AppendChild(toastXml.CreateTextNode(
"Message from a cat: Feed me please…"));
XmlElement tileImage = toastXml.GetElementsByTagName("image")[0] as XmlElement;
tileImage.SetAttribute("src",
"ms-appx:///images/awesome-cats-message.png");
tileImage.SetAttribute("alt", "awesome cat");
DateTime startTime = DateTime.Now.AddMinutes(2);
// Create a scheduled toast notification that is shown five
// times, each at an interval of two minutes
ScheduledToastNotification toast = new ScheduledToastNotification(toastXml,
startTime,
new TimeSpan(0, 0, 2 * 60 * 1000), 5);
toast.Id = " recur-toast-1";
ToastNotificationManager.CreateToastNotifier().AddToSchedule(toast);
}
When you are scheduling a toast notification to be delivered at a future time and repeated a few times, note that the interval between each toast notification should not be less than 60 seconds or longer than 60 minutes, and the toast notification can displayed up to five times.
WNS can deliver toast notifications in a Windows Store app. After your app receives a push notification channel and notifies the cloud service, your app can send a push notification request to WNS, with XML prepared from a toast template and with the X-WNS-Type header in the HTTP POST message set to wns/toast. WNS parses the request and delivers a toast to your app.
Your app might need to cancel some or all scheduled notifications. The GetScheduledToastNotifications method in the ToastNotifier class provides a read-only list of ScheduledToastNotification objects. You should then use the RemoveFromSchedule method of the ToastNotifier class to remove toast notifications. You have the option to check the Id of the ScheduledToastNotification object before removing it. The code in Removing scheduled toast notifications shows how to remove a scheduled toast with a specific Id and clear all scheduled toast notifications.
REMOVING SCHEDULED TOAST NOTIFICATIONS
using Windows.UI.Notifications;
using Windows.Data.Xml.Dom;
// Remove all scheduled notifications
private void ClearScheduledToastNotifications()
{
var toastNotifier = ToastNotificationManager.CreateToastNotifier();
foreach (var scheduledNotification in
toastNotifier.GetScheduledToastNotifications())
{
toastNotifier.RemoveFromSchedule(scheduledNotification);
}
}
// Remove a scheduled notification with a specified Id
private void ClearScheduledToastNotifiction(string id)
{
var toastNotifier = ToastNotificationManager.CreateToastNotifier();
foreach (var scheduledNotification in
toastNotifier.GetScheduledToastNotifications())
{
if (scheduledNotification.Id == id)
{
toastNotifier.RemoveFromSchedule(scheduledNotification);
}
}
}
Controlling toast duration
Toast notifications are events that draw the attention of a user toward a message or reminder for an event. By default, these notifications remain on the screen for up to seven seconds set by the system. However, you can set the toast element’s duration attribute in the XML template to long, which ensures that the toast is visible for at least 25 seconds. See Setting a toast notification’s duration.
SETTING A TOAST NOTIFICATION’S DURATION
using Windows.UI.Notifications;
using Windows.Data.Xml.Dom;
private void ShowLongDurationToastNotification()
{
ToastTemplateType toastTemplate = ToastTemplateType.ToastImageAndText01;
XmlDocument toastXml = ToastNotificationManager.GetTemplateContent(toastTemplate);
XmlNodeList toastTextElements = toastXml.GetElementsByTagName("text");
toastTextElements[0].AppendChild(toastXml.CreateTextNode(
"Hello! I am an awesome cat… Awesome cats make Windows 8 awesomer!!"));
XmlElement tileImage = toastXml.GetElementsByTagName("image")[0] as XmlElement;
tileImage.SetAttribute("src",
"http://placekitten.com/256/256");
tileImage.SetAttribute("alt", "awesome cat");
// Display the toast for 25 seconds. If you want the toast to be displayed for
// 7 seconds, do not set the duration attribute to any value. The default value is
// 'short' and the duration will be 7 seconds.
XmlNode toastNode = toastXml.SelectSingleNode("/toast");
((XmlElement)toastNode).SetAttribute("duration", "long");
ToastNotification toast = new ToastNotification(toastXml);
ToastNotificationManager.CreateToastNotifier().Show(toast);
}
You should use a longer duration toast to notify users of an important message or event. However, keep in mind that allowing a toast to remain visible for too long might not provide a good user experience, even if the user dismisses the toast.
Playing sounds with toast notifications
Windows Store apps can play sounds when a toast notification is delivered. Windows plays the Notification.Default sound when an option to play audio is not specified in the toast’s XML template. You can turn off audio playback for a toast by setting the silent attribute in the audio element of the toast’s XML template to True.
MORE INFO TOAST AUDIO OPTIONS CATALOG
You can add a sound to a toast notification from the toast audio options catalog available at http://msdn.microsoft.com/en-us/library/windows/apps/xaml/hh761492.aspx.
In case of long-duration toast notifications, you can set up the sound to loop until the notification expires or the user dismisses it. This is configured by setting the loop attribute of the audio element in the toast’s XML template to True. The code in Configuring sound for a toast notificationconfigures the XML template for a toast notification to play a sound and loop it as long as the toast notification is visible on the screen.
CONFIGURING SOUND FOR A TOAST NOTIFICATION
using Windows.UI.Notifications;
using Windows.Data.Xml.Dom;
private void ShowLongDurationToastNotificationWithLoopingSound()
{
ToastTemplateType toastTemplate = ToastTemplateType.ToastImageAndText01;
XmlDocument toastXml = ToastNotificationManager.GetTemplateContent(toastTemplate);
XmlNodeList toastTextElements = toastXml.GetElementsByTagName("text");
toastTextElements[0].AppendChild(toastXml.CreateTextNode(
"Hello! I am an awesome cat… Awesome cats make Windows 8 awesomer!!"));
XmlElement tileImage = toastXml.GetElementsByTagName("image")[0] as XmlElement;
tileImage.SetAttribute("src",
"http://placekitten.com/256/256");
tileImage.SetAttribute("alt", "awesome cat");
// Display the toast for 25 seconds
XmlElement toastNode = (XmlElement)toastXml.SelectSingleNode("/toast");
toastNode.SetAttribute("duration", "long");
// Add a looping sound
XmlElement audio = toastXml.CreateElement("audio");
audio.SetAttribute("src", "ms-winsoundevent:Notification.Looping.Call");
audio.SetAttribute("loop", "true");
toastNode.AppendChild(audio);
ToastNotification toast = new ToastNotification(toastXml);
ToastNotificationManager.CreateToastNotifier().Show(toast);
}
Responding to toast events
Toast notifications draw the attention of the user when your app is running and when it is not visible on the screen. Windows provides developers with events to handle toast notifications and associated user actions. You can use these events to implement business logic in your Windows Store app.
When a toast notification is raised with your application running, you can respond to any or all of the following three events (provided by the ToastNotification class):
§ Activated. This event is raised if the user clicks or taps the toast notification when the app is running. If your app is not running when the user clicks or taps the notification, your app is launched, and the OnLaunched event is raised.
§ Dismissed. This event is raised when a toast notification is dismissed. You can determine the reason for dismissal by examining the Reason property of ToastDismissedEventArgs object received with the event. The value of the Reason property is specified by the ToastDismissalReasonenumeration. A toast can be canceled by the user by clicking the X button (UserCanceled), the application can hide it (ApplicationHidden), or it can timeout after 7 or 25 seconds (TimedOut).
§ Failed. This event is raised when Windows fails to deliver the toast notification. One of the common reasons for this event to be raised is when notifications for the app are blocked in the settings by the user. You should check the Setting property of the ToastNotifier class to see whether toast notifications can be shown. The value of this property is specified by the NotificationSetting enumeration. Its members are Enabled, DisabledByManifest, DisabledByGroupPolicy, DisabledForUser, and DisabledForApplication. If toast notifications are disabled both by the user and by the Group Policy, this property returns DisabledByGroupPolicy.
The code in Handling Activated, Dismissed, and Failed events associated with toast notifications shows various event handlers being set up before a toast notification is displayed.
HANDLING ACTIVATED, DISMISSED, AND FAILED EVENTS ASSOCIATED WITH TOAST NOTIFICATIONS
using Windows.UI.Notifications;
using Windows.Data.Xml.Dom;
private void ShowLongDurationToastNotificationWithLoopingSound()
{
ToastTemplateType toastTemplate = ToastTemplateType.ToastImageAndText01;
XmlDocument toastXml = ToastNotificationManager.GetTemplateContent(toastTemplate);
XmlNodeList toastTextElements = toastXml.GetElementsByTagName("text");
toastTextElements[0].AppendChild(toastXml.CreateTextNode(
"Hello! I am an awesome cat… Awesome cats make Windows 8 awesomer!!"));
XmlElement tileImage = toastXml.GetElementsByTagName("image")[0] as XmlElement;
tileImage.SetAttribute("src",
"http://placekitten.com/256/256");
tileImage.SetAttribute("alt", "awesome cat");
// Display the toast for 25 seconds
XmlElement toastNode = (XmlElement)toastXml.SelectSingleNode("/toast");
toastNode.SetAttribute("duration", "long");
// Add a looping sound
XmlElement audio = toastXml.CreateElement("audio");
audio.SetAttribute("src", "ms-winsoundevent:Notification.Looping.Call");
audio.SetAttribute("loop", "true");
toastNode.AppendChild(audio);
ToastNotification toast = new ToastNotification(toastXml);
// ToastNotification events
toast.Activated += ToastNotification_Activated;
toast.Dismissed += ToastNotification_Dismissed;
Toast.Failed += ToastNotification_Failed;
ToastNotificationManager.CreateToastNotifier().Show(toast);
}
// This event is raised when the app is running. You should use the OnLaunched event
// if your app is activated when it is not running.
private void ToastNotification_Activated(ToastNotification sender, object args)
{
// XML content
var toastXml = sender.Content;
// Take action based on content
}
private void ToastNotification_Dismissed(ToastNotification sender,
ToastDismissedEventArgs args)
{
// Check the reason for dismissal
switch (args.Reason)
{
case ToastDismissalReason.ApplicationHidden:
// Application hid the toast with ToastNotifier.Hide
break;
case ToastDismissalReason.UserCanceled:
// User dismissed the toast
break;
case ToastDismissalReason.TimedOut:
// Toast has expired
break;
}
}
private void ToastNotification_Failed(ToastNotification sender,
ToastFailedEventArgs args)
{
// Check the error code
var errorCode = args.ErrorCode;
}
When an application is not running, and the user taps a toast notification delivered through the application, the system launches the application. The application cannot distinguish how it is launched because the system does not provide an event when it launches the app via toast notifications. You can add a context specific to your app in the toast notification payload. This context information can be used by your app to decide the action to take when it is launched. For example, if a toast delivered through push notification launches your app, it can examine the payload and navigate to the appropriate page to display the news item. The size of the payload must not exceed 5 KB. The code in Adding a launch attribute for a toast notification adds a launch attribute to the XML template of a toast notification and handles the toast notification in an app’s OnLaunchedevent.
ADDING A LAUNCH ATTRIBUTE FOR A TOAST NOTIFICATION
using Windows.UI.Notifications;
using Windows.Data.Xml.Dom;
private void ShowLongDurationToastNotification()
{
ToastTemplateType toastTemplate = ToastTemplateType.ToastImageAndText01;
XmlDocument toastXml = ToastNotificationManager.GetTemplateContent(toastTemplate);
XmlNodeList toastTextElements = toastXml.GetElementsByTagName("text");
toastTextElements[0].AppendChild(toastXml.CreateTextNode(
"Hello! I am an awesome cat… Awesome cats make Windows 8 awesomer!!"));
XmlElement tileImage = toastXml.GetElementsByTagName("image")[0] as XmlElement;
tileImage.SetAttribute("src",
"http://placekitten.com/256/256");
tileImage.SetAttribute("alt", "awesome cat");
// Display the toast for 25 seconds
XmlElement toastNode = (XmlElement)toastXml.SelectSingleNode("/toast");
toastNode.SetAttribute("duration", "long");
// Add a launch attribute. Note you must use "launch" as the attribute. The system
// will ignore any other attribute name
toastNode.SetAttribute("launch",
"{\"type\":\"toast\",\"param1\":\"showNews\",\"itemId\":\"3898192\"}");
ToastNotification toast = new ToastNotification(toastXml);
ToastNotificationManager.CreateToastNotifier().Show(toast);
}
// Note: This method is defined in the Application class of the app
protected override void OnLaunched(LaunchActivatedEventArgs args)
{
if (!string.IsNullOrEmpty(args.Arguments))
{
// Parse the launch attribute and navigate to appropriate page
}
}
THOUGHT EXPERIMENT
Designing an app that uses toast notifications
In this thought experiment, apply what you’ve learned about this objective. You can find answers to these questions in the “Answers” section at the end of this chapter.
Your personal fitness trainer is impressed by your new Windows 8 devices. After you show her some apps and how you use them, she is interested in exploring the idea of building a Windows Store app that will be used by her customers.
Armed with your experience of developing Windows 8 apps, you start working on the requirements of such an app. To engage the customers in the best way possible, the app needs to communicate regularly with users. How can you use toast notifications in your app to provide users with a nice experience and encourage them to train at the fitness center?
Objective summary
§ Windows 8 provides toast notifications for delivering transient messages to users. These messages are delivered even when the app is not running and can contain text and (optionally) images.
§ Toast notifications can be scheduled for delivery at a future time. Up to five notifications can be shown, with a fixed interval between each toast notification ranging from 6 seconds to 60 minutes. Scheduled notifications can be canceled by your app.
§ Toast notifications can be delivered through the WNS.
§ Toast notifications can be configured to be visible for a longer duration (25 seconds instead of the default 7 seconds).
§ You can configure the sound played with a toast notification by choosing one of the options from the toast template audio catalog. The sound can be set up to loop for a long-duration toast notification.
§ When your app is running, it can respond to a toast notification’s Activated, Dismissed, and Failed events. It can invoke an action based on the content of the toast notification in the Activated event. The Dismissed event arguments contain the reason for dismissal; the Failed event contains an ErrorCode that provides the reason for the error.
§ Your app is launched when it is not running and a toast notification arrives. You can add a payload in the XML template of the toast notification and parse the information in the payload in the OnLaunched event of your app.
Objective review
Answer the following questions to test your knowledge of the information in this objective. You can find the answers to these questions and explanations of why each answer choice is correct or incorrect in the “Answers” section at the end of this chapter.
1. You have developed a calendar and reminder Windows Store app. It synchronizes with various online task- and calendar-management services. It also helps the user create new tasks, and edit and delete existing tasks. You are now ready to implement an important feature: showing reminders for tasks. What is the best way of delivering reminders to the user?
a. Create a reminder event for each task and synchronize it with your own cloud service. Configure the cloud service to send push notifications when the reminder is due.
b. Create scheduled toast notifications for the reminders. When they are delivered, and the user clicks the toast, open the item if the app is running, or launch the app and open the item otherwise.
c. Create and send reminder events to the online services; let them send notifications to the user.
d. The user is expected to keep the app running while it delivers toast notifications when the tasks are due.
2. A Windows Store app enables users to share voice messages of up to 30 seconds with their friends through the app. When a new message arrives at their friend’s device, you want the app to inform the user that a new voice message has arrived. What is the best way to implement the feature?
a. Deliver the voice message as an MP3 file in the toast notification payload. Configure the toast to be persistent for a duration longer than 30 seconds and use the MP3 file as the sound of the notification.
b. Create a push notification with the details of the voice message. Deliver a toast notification with the default sound or that of a new email. Let the user tap the toast and launch the app if it is not running. Fire an action to download the voice message and play it as soon as it is downloaded.
c. Create a push notification request with WNS; include the voice message as a payload. When the toast notification is delivered, play the voice message.
d. Create a Windows service that checks the server for new messages. Whenever there is a new message, display a toast notification and let the Windows service play back the voice message.
3. You have been asked to present a proposal for developing a Windows Store app that enterprises will use for collaboration, messaging, tasks, and calendaring. You decide to include support in the app for toast notifications to communicate and interact with the users. Which toast notification features can you use in the app? (Choose all that apply.)
a. Toast notifications can be configured to run other Windows Store apps when they arrive in a device.
b. Reminders for calendar events can be delivered through toast notifications for a user.
c. New messages from other users of the app can be delivered as toast notifications.
d. Voice messages can be delivered through toast notifications as a recorded MP3 file.
e. Toast notifications can be configured to launch your app and navigate the user to the page based on a type embedded in the toast notification payload.
Objective 4.3: Manage input devices
Windows Store apps are installed and used on a variety of devices. Windows 8 and Windows RT support a number of input modes such as touch, mouse, keyboard, and stylus. A large portion of the user experience in Windows 8 and Windows RT is delivered through Windows Store apps. Therefore, apps should interact with users consistently with all the available input modes.
Windows abstracts low-level events raised when users start their interaction with a Windows Store app via touch. The gesture recognizer raises additional events when it recognizes standard gestures and complex manipulation events. The default behavior of these events can be overridden, and you can add new events to the gesture recognizer based on the manipulations performed by the users.
Windows Store apps respond to a mouse attached to a PC with the same events used for touch and stylus input. Developers are not required to write separate code to handle mouse events and touch gestures, but they programmatically detect a mouse and use its special capabilities, such as the mouse wheel, to perform manipulations. In addition to supporting touch, mouse, and keyboard input, a Windows Store app can support stylus input. The input data that consists of pressure, angle, and velocity is used to represent geometric shapes on a device and saved to storage. The ink manager also supports handwriting recognition and various modes such as draw and erase.
NOTE
This objective covers how to:
§ Capture gesture library events.
§ Create custom gesture recognizers.
§ Listen to mouse events or touch gestures.
§ Manage stylus input and inking.
Capturing gesture library events
Touch is a primary mode of interaction with Windows and Windows Store apps. Modern PCs and devices feature a touch screen, and users find it comfortable to use touch gestures for interactions. Therefore, supporting touch interactions in your app is likely to greatly enhance the user experience. Traditional input modes such as mouse, keyboard, and stylus are fully supported and are functionally consistent with the user experience.
The built-in controls provided by Windows are optimized for touch interactions while providing consistent interaction experience with other input modes. Touch gestures such as press and hold, tap, slide, swipe, pinch, stretch, and twist; and direct manipulations such as pan, zoom, rotate, and drag are supported by these built-in controls. Windows 8 provides the Pointer class in the Windows.UI.Xaml.Input namespace for representing low-level input devices such as mouse, stylus, and touch contact. Pointer events are the lowest-level events raised by these devices. Gestures are events representing actions such as press and hold, whereas manipulation events are higher-level events representing swipe, rotate, and pinch to zoom. These events are provided by the UIElement class, and the gesture events are managed by the gesture recognizer.
MORE INFO TOUCH INTERACTION DESIGN
You can read more about touch interaction design at http://msdn.microsoft.com/en-US/library/windows/apps/xaml/hh465415.
To effectively use events managed by the gesture recognizer of a UIElement, you should understand the role of the Pointer class and its associated classes:
§ Pointer. The Pointer class represents a single, unique input contact from an input device such as a mouse, stylus, or single/multiple fingers; in other words, a coordinate on the screen. This class is defined in the Windows.UI.Xaml.Input namespace.
§ PointerDevice. This class is used to obtain low-level properties of the hardware attached to a device. This class is defined in the Windows.Devices.Input namespace.
§ PointerPoint. This class represents a single coordinate on the screen and provides its extended information. This class is defined in the Windows.UI.Input namespace.
§ PointerPointProperties. This class represents extended properties of the PointerPoint class such as the bounding rectangle of the contact area from touch input, orientation of the pointer device, and the pressure exerted by a pointer device. This class is defined in the Windows.UI.Inputnamespace.
The Pointer class exposes four properties: PointerId, PointerDeviceType, IsInRange, and IsInContact. In most cases, you will use the PointerId (a uint data type) property to obtain the unique identifier for the input contact. It is useful when you need to detect and track multiple fingers on the screen, for example. The PointerDeviceType property with the same information is available in the PointerDevice class. The PointerPoint class provides basic properties for the input device; for example, it provides the IsInContact property, which is used to determine whether the input device is pressed down on the screen. The PointerPointProperties class provides extended properties for the input device; for example, it provides the IsInRange property, which indicates whether the input device is in close proximity to the screen or digitizer.
The PointerDevice class provides details of the hardware that are connected to the device and their low-level properties. You can get a list of all the PointerDevices connected to the system with the GetPointerDevices method. Alternatively, you can obtain information about a specificPointerDevice attached to the system with the GetPointerDevice method by provided the input pointer ID for the specific Pointer. The MaxContacts property is useful for determining the maximum number of simultaneous pointers supported by the input device (for example, MaxContacts is 1 for a mouse and 5 for many touch screens). The PointerDeviceType property has one of these three values: Touch, Mouse, or Pen.
The PointerPoint class provides the GetCurrentPoint static method that is useful for obtaining the current PointerPoint for a specific pointer ID. The GetIntermediatePoints method retrieves a collection of PointerPoint objects for a Pointer as the input device moves around the screen. This is used for high-resolution input devices such as touch screens and stylus digitizers. The PointerPoint class has the following properties:
§ Position. The location of the pointer input in client coordinates.
§ RawPosition. The raw location of the pointer input as reported by the input device in client coordinates. Input prediction can be used to compensate for hardware latency and set the value of the location of the pointer in the Position property correctly. For example, while reading a news article, you want to click a link, but your fingers do not hit the link precisely. In such cases, the system will set the correct value of the location of the pointer input in the Position property while providing the original value in the RawPosition property.
§ IsInContact. Boolean flag that indicates whether the input device is pressed down on the screen.
§ Properties. An instance of the PointerPointProperties class with extra information about the input pointer.
§ PointerDevice. An instance of the PointerDevice class containing information about the device associated with the input device.
§ PointerId. The unique identifier for the pointer.
The PointerPointProperties class, which is available through the Properties property of the PointerPoint class, provides detailed information about input devices. Some properties of this class are specific to a stylus, whereas others are relevant for the mouse, if attached to the device. Some of the important properties of this class are these:
§ IsInRange. Indicates whether the pointer device is within close proximity to a sensor in the device or a digitizer. Set to True if it is within the detection range.
§ IsPrimary. Indicates whether the input is from the primary pointer. This property is useful when multiple input devices are attached to the device; for example, a mouse attached to a touch-enabled PC.
§ IsCanceled. Indicates whether the input was canceled by the pointer device. Input can be canceled for various reasons; for example, by the palm of the user or if the input device is removed.
§ ContactRect. The bounding rectangle of the contact area in client window coordinates.
§ ContactRectRaw. The bounding rectangle of the contact area as reported by the input device. In some cases, input prediction can be used to compensate for hardware latency, and the system can provide the correct value through the ContactRect property while providing the original value through the ContactRectRaw property.
Pointer events
The standard set of controls provided by Windows supports multiple input devices and raise events based on user interaction. These events should be used to handle pointer input in your Windows Store app. In some circumstances, you might need to obtain the pointer input in your application and apply your own logic in the event. Pointer events are eight low-level routed events raised by a UIElement control:
§ PointerEntered. This event is raised when a pointer enters a UIElement’s bounding area. For example, this event is raised when the mouse cursor enters a rectangle.
§ PointerExited. This event is raised when a pointer leaves a UIElement’s bounding area, but only if the pointer was initially in the UIElement’s bounding area. For example, this event is raised when the mouse cursor leaves a rectangle.
§ PointerMoved. This event is raised when a pointer that has entered a UIElement’s bounding area moves within it. For example, this event is raised when the mouse cursor is moved within a rectangle.
§ PointerPressed. This event is raised when the pointer makes its first contact within a UIElement’s bounding area. For example, this event is raised when the user clicks within a rectangle using a mouse.
§ PointerReleased. This event is raised when the pointer that previously initiated a PointerPressed event is released while within the UIElement. You should note that other events such as PointerCanceled or PointerCaptureLost can fire instead of this event.
§ PointerCanceled. This event is raised when the pointer that was previously in contact with the UIElement loses contact abnormally (for example, if a mouse is detached while the left key is pressed on a Canvas).
§ PointerCaptureLost. This event is raised when the pointer is lost from the UIElement while the user is carrying out an action (for example, in a drag-and-drop operation, if users raise their finger when holding an element and moving it).
§ PointerWheelChanged. This event is raised when a pointer wheel (for example, in a mouse) changes value.
The pointer events contain a PointerRoutedEventArgs object (defined in the Windows.UI.Xaml.Input namespace) that provides information about the pointer that raised the event (through the Pointer property). You can retrieve the PointerPoint object for the event by using theGetCurrentPoint method. The GetIntermediatePoints method provides a collection of PointerPoint objects that represent the history of pointer from the last pointer event up to the current pointer event. If you handle a pointer event for a UIElement and do not expect it to be passed to its parents, you should set the Handled property of the PointerRoutedEventArgs object to True.
Gesture events
The set of pointer events in UIElement can be used to implement actions in Windows Store apps using the pointer input. However, to detect gestures in a Windows Store app, you might need to implement complex logic in the pointer event handlers. In addition, there is a chance that your own implementation for detecting a gesture is inconsistent with other apps.
Windows has a gesture recognizer that abstracts low-level pointer events and raises high-level events when it recognizes standard gestures. These events are raised after users finish their interaction with the device. For example, when the user taps a UIElement, PointerPressed andPointerReleased are raised in quick succession. Windows provides a Tapped event when the user taps a UIElement; you should use this event instead of implementing your own logic through pointer events. The GestureRecognizer class provides the following gesture events:
§ Tapped. This event is raised when the user taps the screen.
§ RightTapped. This event is raised for when the user right-taps an item in the screen; this is the press and hold gesture for selecting an item.
§ Holding. This event is raised when the user presses and holds an item in the screen while in the process of moving it or selecting it. Note that this event is fired twice: once when the holding starts, and once again when the holding ends.
§ CrossSliding. This event is raised while the user swipes on a UIElement in a direction perpendicular to the scroll direction.
§ Dragging. This event is raised when the user is sliding or swiping on a UIElement.
The events raised by the GestureRecognizer class contain an event argument which has a PointerDeviceType property that indicates if the input device is a touch device, stylus, or mouse. It also contains the current location of the pointer contact in the Position property of the argument.
MORE INFO HANDLING GESTURERECOGNIZER EVENTS
To handle events raised by the gesture recognizer, you should set the Settings property of the GestureRecognizer object to one or a combination of values provided by the GestureSettings enumeration (the various members of this enumeration is listed here: http://msdn.microsoft.com/en-us/library/windows/apps/windows.ui.input.gesturesettings.aspx).
The code in Handling events raised by the GestureRecognizer class shows a page in a Windows Store app configured to handle the Tapped, RightTapped, Holding, CrossSliding, and Dragging events of the GestureRecognizer class.
HANDLING EVENTS RAISED BY THE GESTURERECOGNIZER CLASS
using Windows.UI.Input;
using Windows.UI.Xaml.Controls;
using Windows.UI.Xaml.Input;
public sealed partial class GestureSamplePage : LayoutAwarePage
{
public GestureSamplePage(Windows.UI.Xaml.Shapes.Rectangle target,
Windows.UI.Xaml.UIElement parent)
{
this.InitializeComponent();
// Configure gesture recognizer
GestureRecognizer gestureRecognizer = new GestureRecognizer();
gestureRecognizer.GestureSettings = GestureSettings.HoldWithMouse |
GestureSettings.RightTap |
GestureSettings.Tap |
GestureSettings.CrossSlide | GestureSettings.Drag;
// Register event handlers for gestures
gestureRecognizer.Holding += OnHolding;
gestureRecognizer.RightTapped += OnRightTapped;
gestureRecognizer.Tapped += OnTapped;
gestureRecognizer.CrossSliding += OnCrossSliding;
gestureRecognizer.Dragging += OnDragging;
}
// In each of these event handlers, you can find out the input
// device by checking the PointerDeviceType property of the event arguments.
// This event is raised for the press and hold gesture.
private void OnHolding(GestureRecognizer recognizer, HoldingEventArgs args)
{
// Application logic
}
// This event is raised for the right-tap gesture.
private void OnRightTapped(GestureRecognizer recognizer, RightTappedEventArgs args)
{
// Application logic
}
// This event is raised for a tap gesture.
private void OnTapped(GestureRecognizer recognizer, TappedEventArgs args)
{
// Application logic
}
// This event is raised for a slide or swipe gesture within a content area that
// supports panning along the perpendicular direction of the gesture.
private void OnCrossSliding(GestureRecognizer recognizer,
CrossSlidingEventArgs args)
{
// Application logic
}
// This event is raised for a slide or swipe
// gesture
private void OnDragging(GestureRecognizer recognizer,
DraggingEventArgs args)
{
// Application logic
}
}
In Handling events raised by the GestureRecognizer class, notice that the HoldWithMouse value from the GestureSettings enumeration is used in the GestureSettings property of the GestureRecognizer, along with other values from the GestureSettings enumeration. This is required to support the press-and-hold interaction with the mouse as well as with touch and stylus input. If you do not require the press-and-hold interaction with the mouse, you should use the Hold value of the GestureSettings enumeration. There is no event for a double-tap gesture, often used in applications for zooming an item on the screen. The GestureSettings enumeration has a member DoubleTap that you could add to the GestureSettings property of the GestureRecognizer. In the Tapped event, you can then use the CanBeDoubleTap method available in the GestureRecognizer class to determine whether the tap that raised this event can be interpreted as the second tap of a double-tap gesture.
Manipulation events
In addition to the gesture events provided by the system, some additional events are available for more-complex gestures. These gestures include panning, zooming, and turning elements in the user interface. These gestures raise their events when the interaction is still under way, unlike the events from standard gestures that are raised at the end of the interaction. The UIElement class provides the following events for manipulation gestures:
§ ManipulationStarting. This event is raised when the pointer interacts with a UIElement and it enables manipulation of the UIElement. Gestures such as tap or hold cause this event to be raised.
§ ManipulationStarted. This event is raised when the system has detected a movement in the pointer. It usually follows the ManipulationStarting event.
§ ManipulationCompleted. This event is raised when the manipulation of a UIElement is complete.
§ ManipulationInertiaStarting. The event is raised when the input device loses contact with the UIElement while manipulation is under way, and the velocity of manipulation is high enough to start inertia behavior. For example, translation of a UIElement can continue after the finger is lifted from a swipe gesture.
§ ManipulationDelta. This event is raised when the input device changes its position while a manipulation is under way.
The GestureRecognizer class provides the ManipulationStarted, ManipulationCompleted, ManipulationInertiaStarting, and ManipulationUpdated events. The ManipulationUpdated event is raised when one or more input points have started a manipulation and the resulting motion (for example, translation) is under way. You can use the ManipulationInertiaStarting event handler to set the desired deceleration value of an element being manipulated.
In your Windows Store app, if you plan to use the manipulation events raised by the UIElement and handle them, you should set the value of the ManipulationMode property of the user interface element to All, to a single value, or to a combination of values of the ManipulationModesenumeration.
MORE INFO MANIPULATIONMODES ENUMERATION
The various members of the ManipulationModes enumeration are listed at http://msdn.microsoft.com/en-US/library/windows/apps/xaml/windows.ui.xaml.input.manipulationmodes.
The default value of the ManipulationMode property is System, which enables the control to use the built-in manipulation logic in the system to handle manipulation events. If your application chooses to handle manipulation events, you should set the ManipulationMode property of theUIElement object to a value other than System or None. See Handling manipulation gestures.
HANDLING MANIPULATION GESTURES
using Windows.UI.Input;
using Windows.UI.Xaml.Controls;
using Windows.UI.Xaml.Input;
public sealed partial class ManipulationSamplePage : LayoutAwarePage
{
public ManipulationSamplePage(Windows.UI.Xaml.Shapes.Rectangle target,
Windows.UI.Xaml.UIElement parent)
{
// Configure gesture recognizer
GestureRecognizer gestureRecognizer = new GestureRecognizer();
gestureRecognizer.GestureSettings = GestureSettings.ManipulationRotate |
GestureSettings.ManipulationScale |
GestureSettings.ManipulationRotateInertia |
GestureSettings.ManipulationScaleInertia;
// Register event handlers for the manipulation gestures
gestureRecognizer.ManipulationInertiaStarting += OnManipulationInertiaStarting;
gestureRecognizer.ManipulationStarted += OnManipulationStarted;
gestureRecognizer.ManipulationUpdated += OnManipulationUpdated;
gestureRecognizer.ManipulationCompleted += OnManipulationCompleted;
}
// In each of these event handlers, you can find out the input
// device by checking the PointerDeviceType property of the event arguments.
// This event is raised for both the scale and rotate manipulation gestures
// when inertia is involved.
private void OnManipulationInertiaStarting (GestureRecognizer recognizer,
ManipulationInertiaStartingEventArgs args)
{
// Application logic
}
// This event is raised for the right-tap gesture.
private void OnManipulationStarted(GestureRecognizer recognizer,
ManipulationStartedEventArgs args)
{
// Application logic
}
// This event is raised for a tap gesture.
private void OnManipulationUpdated(GestureRecognizer recognizer,
ManipulationUpdatedEventArgs args)
{
// Application logic
}
// This event is raised for a slide or swipe geture within a content area that
// supports panning along the perpendicular direction of the gesture.
private void OnManipulationCompleted(GestureRecognizer recognizer,
ManipulationCompletedEventArgs args)
{
// Application logic
}
}
One of the gestures not included in the GestureSettings enumeration is the edge gesture. This gesture is used to show or hide the bottom bar and the top app bar in a Windows Store app, whenever available. The edge gesture is managed by its own class: EdgeGesture (in the Windows.UI.Inputnamespace). It internally uses the GestureRecognizer to detect a vertical swipe from the top or bottom edge of the screen. (Note that the swipes from the left and right edges of the screen are reserved for app switching and the charms bar, respectively.)
If you need to use the edge gesture in your app, obtain an instance of the EdgeGesture class using the static GetForCurrentView method. You can then add event handlers for the following events of the EdgeGesture class:
§ Starting. This event is raised when the user initiates a gesture to show or hide the edge-based user interface.
§ Completed. This event is raised when the gesture has successfully completed (when the finger has lifted off the screen or the mouse key has been pressed).
§ Canceled. This event is raised when the edge gesture turns out to be some other gesture; for example, a swipe can start from the bottom edge and end at the top edge.
The code in Handling events of the EdgeGesture class shows a page in a Windows Store app configured to handle the Starting, Completed, and Canceled events of the EdgeGesture class.
HANDLING EVENTS OF THE EDGEGESTURE CLASS
using Windows.UI.Input;
using Windows.UI.Xaml.Controls;
using Windows.UI.Xaml.Input;
public sealed partial class EdgeGestureSamplePage : LayoutAwarePage
{
public EdgeGestureSamplePage()
{
this.InitializeComponent();
// Configure the EdgeGesture class
EdgeGesture edgeGesture = EdgeGesture.GetForCurrentView();
// Register event handlers for gestures
edgeGesture.Starting += OnEdgeGestureStarting;
edgeGesture.Completed += OnEdgeGestureCompleted;
edgeGesture.Canceled += OnEdgeGestureCanceled;
}
// This event is raised when the user initiates a show or hide action.
private void OnEdgeGestureStarting(EdgeGesture eg, EdgeGestureEventArgs args)
{
// Application logic
}
// This event is raised when edge-based gesture has successfully completed.
private void OnEdgeGestureCompleted(EdgeGesture eg, EdgeGestureEventArgs args)
{
// Application logic
}
// This event is raised when the user cancels a show or hide action.
private void OnEdgeGestureCanceled(EdgeGesture eg, EdgeGestureEventArgs args)
{
// Application logic
}
}
Creating custom gesture recognizers
The support for gestures and manipulations available in the Windows platform provides developers with methods to build gesture-friendly Windows Store apps. In some cases, you might need to customize and enhance your app’s interaction experience by extending the built-in set of gestures. For example, you need to support a gaming mouse with extra keys for invoking commands in your game when the user is playing a specific level or stage in the game. In such cases, you can use the low-level pointer events and implement your own application logic along with the events available from the GestureRecognizer class.
The Windows Runtime platform provides a number of application programming interfaces (APIs) to help you build custom gesture recognizers:
§ Windows.UI.Xaml. This namespace provides classes such as UIElement, a base class for most user interface elements with a visual appearance that can process basic input.
§ Windows.UI.Xaml.Input. This namespace provides classes, delegates, and enumerations required for input support in apps and UI elements.
§ Windows.Devices.Input. This namespace provides the infrastructure for identifying the connected input devices and their properties.
§ Windows.UI.Input.Inking. This namespace provides support for the Windows 8 inking system.
Before you proceed with the development of a custom gesture recognizer, consider whether customizing the behavior of user interaction with the commonly available input modes will lead to confusion and inconsistency in the experience. For example, in a contacts manager app, you feel that users want to multi-select items in a GridView with a single custom gesture. It might cause confusion, however, because the Start screen and other Windows Store apps use the cross-slide gesture to select an item individually and perform operations on them.
If you decide to develop your own gesture recognizer, you should derive your own gesture recognizer class from GestureRecognizer or use it to process the pointer and other gesture events. In the event handlers of the pointer events, you can carry out your own processing and invoke one of the methods of the GestureRecognizer class to complete an action. For example, when the pointer is pressed, your app can do some processing on the data available from the event arguments and pass the event to the GestureRecognizer, as shown in Event handler for the PointerPressed event of the GestureRecognizer class.
EVENT HANDLER FOR THE POINTERPRESSED EVENT OF THE GESTURERECOGNIZER CLASS
private void OnPointerPressed(object sender, PointerRoutedEventArgs args)
{
// Check the device type; if a mouse, check if it is a horizontal mouse wheel.
Pointer currentPointer = args.Pointer;
if (currentPointer.PointerDeviceType == PointerDeviceType.Mouse)
{
PointerPoint currentPoint = args.GetCurrentPoint(parentElement);
if (currentPoint.Properties.IsHorizontalMouseWheel)
{
// Custom processing for application logic
}
}
// Route the event to the gesture recognizer. Note that _gestureRecognizer is a
// page level variable of the type Windows.UI.Input.GestureRecognizer.
this._gestureRecognizer.ProcessDownEvent(
args.GetCurrentPoint(parentElement));
// Capture the pointer associated to this event. _target is the element being
// manipulated. Once the pointer is captured, only the element that has the pointer
// will raise the pointer-related events.
this._target.CapturePointer(args.Pointer);
// Mark event handled, to prevent execution of default event handlers
args.Handled = true;
}
MORE INFO WINDOWS 8 GESTURES SAMPLE
To understand the details of how you can use the GestureRecognizer class in your app and customize the behavior of gestures, check out the Windows 8 gestures sample at http://code.msdn.microsoft.com/windowsapps/Input-Windows-8-gestures-62c6689b.
Listening to mouse events or touch gestures
Windows provides a set of events that are generic for input devices such as a mouse or stylus, or for touch. You can implement input features in your Windows Store apps without writing code for each input device. You can choose to implement code to take into account special features of a device such as a mouse with a horizontal wheel.
To use pointer events in your application, you should provide event handlers for the pointer events originating from the UIElement you are interested in and handle manipulation of that UIElement in the event handlers. A sample scenario is a Windows Store app that enables users to draw figures on the screen by selecting a color. You can set up a Canvas control and provide event handlers for its PointerPressed and PointerReleased events. The XAML code in Providing pointer event handlers in XAML sets up a Canvas and TextBox.
PROVIDING POINTER EVENT HANDLERS IN XAML
<Grid Grid.Row="1">
<Grid.ColumnDefinitions>
<ColumnDefinition Width="*" />
<ColumnDefinition Width="200" />
</Grid.ColumnDefinitions>
<Canvas x:Name="DrawingCanvas" Margin="120,0,0,0"
Grid.Column="0" Background="White" />
<TextBlock Style="{StaticResource BasicTextStyle}" Grid.Column="1" Margin="5,5,0,0"
x:Name="EventName" HorizontalAlignment="Left" TextWrapping="NoWrap"/>
</Grid>
In the code-behind, the PointerPressed, PointerMoved, and PointerReleased events are used to draw a stroke when the user moves the pointer after pressing on the screen. The code in Providing pointer event handlers in the code-behind shows the event handlers for these events.
PROVIDING POINTER EVENT HANDLERS IN THE CODE-BEHIND
public sealed partial class PointerEventsSamplePage : LayoutAwarePage
{
public PointerEventsSamplePage()
{
this.InitializeComponent();
DrawingCanvas.PointerPressed += new
PointerEventHandler(DrawingCanvas_PointerPressed);
DrawingCanvas.PointerMoved += new PointerEventHandler(DrawingCanvas_PointerMoved);
DrawingCanvas.PointerReleased += new
PointerEventHandler(DrawingCanvas_PointerReleased);
}
// PointerPressed event handler (code removed for brevity)
privatee void DrawingCanvas_PointerPressed(object sender, PointerRoutedEventArgs e)
{
Windows.UI.Input.PointerPoint pt = e.GetCurrentPoint(DrawingCanvas);
// Pointer pressed by user, record position
e.Handled = true;
}
// PointerMoved event handler (code removed for brevity)
private void DrawingCanvas_PointerMoved(object sender, PointerRoutedEventArgs e)
{
Windows.UI.Input.PointerPoint pt = e.GetCurrentPoint(DrawingCanvas);
// Draw a line with a color
e.Handled = true;
}
private void DrawingCanvas_PointerReleased(object sender, PointerRoutedEventArgs e)
{
Windows.UI.Input.PointerPoint pt = e.GetCurrentPoint(DrawingCanvas);
// Finished with drawing
e.Handled = true;
}
}
Figure 4-17 shows two lines being drawn on the Canvas and the associated events.
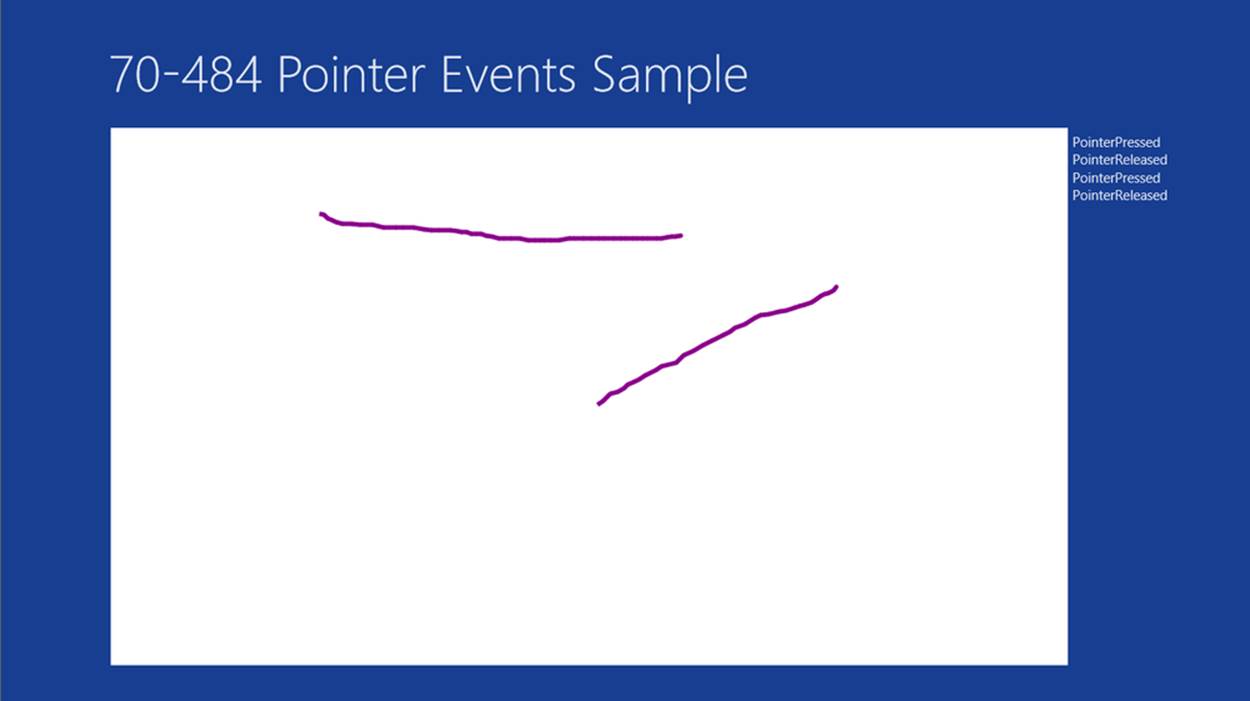
Figure 4-17. Windows Store app that enables users to draw lines on a canvas and the associated pointer events
In the simple application shown in Figure 4-17, the pointer is not captured by the application when the user draws the stroke on the canvas. In some apps, you might want to ensure that the pointer remains captured while the user executes the action (dragging a card in a game, for example). If the user moves a finger very fast, the pointer can be separated from the element. You can use the CapturePointer method to capture the pointer in the PointerPressed event handler and call ReleasePointerCapture to release the pointer after the user completes the action in the PointerReleasedevent handler.
Managing stylus input and inking
A Windows Store app can use the extensive support for stylus input through the pointer classes discussed previously, such as Pointer, PointerDevice, PointerPoint, and PointerPointProperties. Your app can use a stylus to capture handwritten notes, diagrams, and annotations in existing documents. In devices with a screen that supports input from a stylus, a digitizer is embedded beneath the screen. The digitizer translates various actions of the stylus into data—such as pressure, angle, and velocity—into a data structure available in Windows Store apps.
Although you can use the pointer events discussed previously in applications that accept input from a stylus, some of the properties in the PointerPointProperties class are specifically made available for the stylus input:
§ IsBarrelButtonPressed. This property is True if the user presses the button along the side of the pen’s body. Some apps use this property to open a context menu as a pop-up.
§ IsEraser. This property is True if the user is using the eraser at the back of the stylus on the screen.
§ IsInRange. This property is True if the stylus is close to the digitizer but has not touched the screen.
§ IsInverted. This property is True if the rear of the stylus is being used instead of the front.
§ Pressure. This property is a float value (in the range 0.0 to 1.0) that indicates the force exerted by the stylus on the digitizer.
§ Twist. This property is a float value that represents an angle in degrees that indicates the amount of rotation of the stylus by the user in the clockwise direction along the major axis, for example, when the user is rotating it by spinning it in their fingers.
§ Orientation. This property is a float value that represents the angle in degrees at which the stylus is being held perpendicular to the surface of the digitizer.
§ XTilt. This property is a float value that represents the angle in degrees at which the stylus is tilted toward the left or right of the screen’s surface.
§ YTilt. This property is a float value that represents the angle in degrees at which the stylus is tilted to the top or bottom of the screen’s surface.
The Windows.UI.Input.Inking namespace provides inking support for Windows Store apps. It provides the infrastructure for managing data structures used while an app is using the stylus of a device for tasks such as drawing or handwriting recognition.
The InkStroke class represents a single ink stroke, the fundamental unit represented on the screen when the stylus is in touch with the digitizer and the user is drawing on the screen. The InkStrokeBuilder class is used to build ink strokes from the raw input of a stylus. It provides methods such as BeginStroke, CreateStroke, AppendToStroke, and EndStroke to create InkStroke objects from the user’s actions with the stylus. The InkStrokeContainer class provides support for input, processing, and manipulation of one or more InkStroke objects.
Inking in Windows supports handwriting recognition through the InkRecognizer class. The InkRecognitionResult class provides properties and methods to manage one or more InkStroke objects used for handwriting recognition. The GetStrokes method of the InkRecognitionResult class retrieves the InkStroke collection for handwriting recognition; the GetTextCandidates method retrieves the potential matches for each word returned by handwriting recognition.
The InkManager class provides the core features for inking support in Windows Store apps that are used for obtaining input from the digitizer and their manipulation and processing. It also provides methods for handwriting recognition. Some methods that are important for inking support in Windows Store apps are these:
§ AddStroke. This method adds one or more InkStroke objects to a collection managed by InkManager.
§ DeleteSelected. This method deletes a selected InkStroke from a collection managed by the InkManager.
§ MoveSelected. This method moves one or selected ink strokes in a bounding rectangle to a new position.
§ ProcessPointerUp and ProcessPointerDown. These methods process information about the position and features of the contact point of the stylus with the digitizer, such as pressure and tilt when the stylus is taken up after an initial contact and when the stylus is placed on the digitizer, respectively.
§ ProcessPointerUpdate. This method processes the position, pressure, and tilt for a stylus from the last pointer event up to and including the current pointer event.
§ SaveAsync. This method is used to asynchronously save all InkStroke objects managed by the InkManager in a specified stream.
§ LoadAsync. This method is used to asynchronously load all InkStroke objects from a specified stream to a collection of InkStroke objects managed by the InkManager.
The InkManager class has an important property called Mode. The value of this property determines whether the InkManager is doing the following:
§ Appending InkStroke objects to its collection
§ Checking for InkStroke objects to be removed from its collection or an InkStrokeContainer
§ Checking whether all the points are being selected for the creation of a polyline
MORE INFO INK INPUT SAMPLE
A sample Windows Store app that illustrates ink stroke capturing and manipulation is available in the Windows 8 code gallery. Visit http://code.msdn.microsoft.com/windowsapps/Windows-8-Input-Ink-sample-12876398.
THOUGHT EXPERIMENT
Creating an app for touch, gestures, and inking
In this thought experiment, apply what you’ve learned about this objective. You can find answers to these questions in the “Answers” section at the end of this chapter.
The mathematics curriculum of a primary school has a module in which children learn about geometric shapes and how to draw them. Students are often encouraged to identify a geometric shape and write their name next to it.
Each classroom has several PCs with touch-enabled screens for students as well as a handheld tablet for the teacher. The school board supports the idea of implementing a Windows 8 application that fulfills the requirements of the mathematics curriculum. List three features of touch, gestures, and inking support in Windows 8 that you can use to build the app.
Objective summary
§ Windows Runtime APIs abstract input devices into pointers and provide events that do not depend on the type of input device. The Pointer class and its associated classes can be used by developers in a Windows Store app for gestures provided by the system.
§ Gesture and manipulation events should be used instead of low-level pointer events for a consistent experience across all applications.
§ Custom gesture recognizers can be created for implementing gestures that are not available in the standard set of gestures.
§ Pointer events can be used with touch gestures and a mouse to implement application logic.
§ Windows provides extensive inking support that includes drawing of geometric shapes and handwriting recognitions.
Objective review
Answer the following questions to test your knowledge of the information in this objective. You can find the answers to these questions and explanations of why each answer choice is correct or incorrect in the “Answers” section at the end of this chapter.
1. You are building a simple proof-of-concept for your Windows Store app that will help young artists learn how to draw. In your proof-of-concept app, you want to show how easy it is to draw a stroke on a canvas. Which pointer events should you use to build this proof-of-concept application? (Choose all that apply.)
a. PointerExited
b. PointerPressed
c. PointerMoved
d. PointerCanceled
e. PointerReleased
2. You are developing a card game application for the Windows Store. You have built the functionality that enables users to pause a game they are playing and then refer to previous games and strokes they used. What is the correct way to implement this feature without requiring them to leave the game?
a. Use the swipe-from-left gesture to open a pop-up dialog box and display the history in it.
b. Use the swipe-from-right gesture to open a pop-up dialog box and display the history in it.
c. Use the tap-and-hold gesture to open a dialog box to display the history; dismiss it with a button provided within the dialog box.
d. Use a tap gesture to open a dialog box to display the history; tap in the dialog box to close it.
3. In a Windows Store app, users can use a stylus to draw simple shapes after choosing a color and thickness for the stroke. A feature request from many users is to be able to store shapes present in the drawing canvas and load them in the future for editing. How will you implement this feature in the app?
a. As soon as an InkStroke object is added to a collection in the InkManager class, save it to a stream. When the user requests saved data to be loaded, use the InkStroke objects to re-create the shapes.
b. Use the SaveAsync and LoadAsync methods of the InkManager class to save and load the InkStroke objects from and to a stream.
c. Whenever pointer events are raised, save the shape into a stream. Shapes can then be loaded on demand.
d. Convert the drawing canvas into a bitmap and save it. Load the bitmap into the canvas to enable the user to continue drawing shapes on it.
Objective 4.4: Design and implement navigation in an app
In its simplest form, a Windows Store app consists of a single page with a number of controls. All the functionality is embedded within the single page. However, many Windows Store apps consist of multiple pages with well-defined navigation architecture. The user navigates through such apps using shortcuts and buttons present in the pages and, in some cases, using a navigation control in the top app bar.
Microsoft provides guidance for implementing navigation in Windows Store apps to ensure consistency in the experience as well as to leverage the navigation framework built in the system. Developers can use the hub design to implement hierarchical navigation or use the flat system when there are no hierarchical levels in their app. The hub design is often combined with app bar navigation to help the user navigate through sections in the hierarchy. Visual Studio provides application templates with support for the hierarchical pattern of navigation.
In a hierarchical navigation design, the main page can contain a number of categories and a large number of items in every category. This makes browsing through the categories and selecting an item of interest difficult for the user. To help with the navigation, Semantic Zoom can be implemented in the main page to navigate through categories, enabling the user to select a category of interest and browse to the category page.
NOTE
This objective covers how to:
§ Design navigation to meet app requirements.
§ Handle navigation events, check navigation properties, and call navigation functions by using the navigation framework.
§ Use Semantic Zoom in your app.
Designing navigation to meet app requirements
One of the key principles in the Microsoft design style is the importance of content in an app. Presentation of content using a clean layout and typography, animations, and carefully selected UI elements are some key features of great Windows Store apps. For apps that consist of multiple pages, it is very important to design and implement a navigation pattern that matches well with other important features of a great app.
In most Windows Store apps, a hierarchical pattern with a number of levels is used to implement navigation. In this pattern, there is a main page with a set of groups, each containing a number of items. In the next level, there are number of pages, each representing a group. Each page in this level contains a list of items belonging to a group. Finally, there is a page for an individual item. The user can navigate through the hierarchy of pages in an app by clicking the back button that appears in the top-left corner of the screen. An example of hierarchical navigation in the Store app in Windows 8 is shown in Figure 4-18.
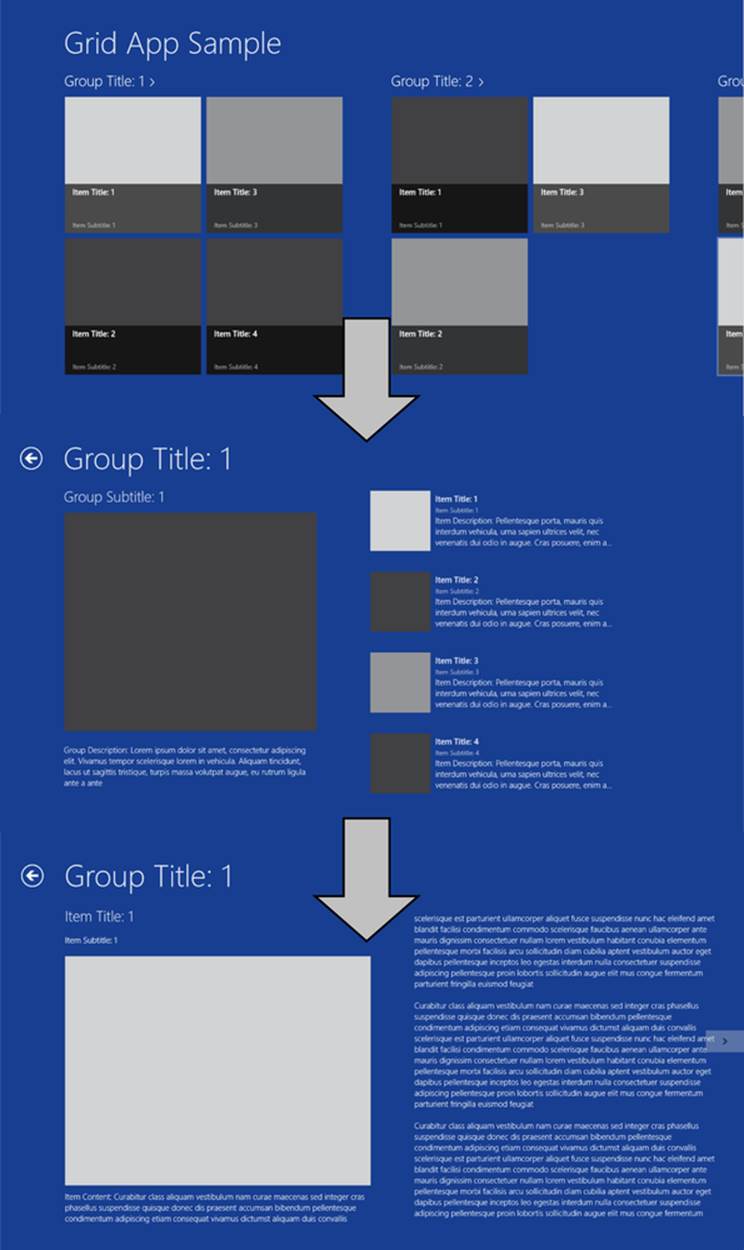
Figure 4-18. Hierarchical navigation in a Windows Store app built with the Grid App template in Visual Studio
In hierarchical navigation, the main page (also called the hub page or the hub) has items laid out in a virtually wide page that users can view only if they swipe or scroll to explore the items. To make it easy for users to navigate through the various groups of items, Semantic Zoom can be used to zoom in or zoom out of a page with lots of items. Sematic Zoom supports the pinch-to-zoom gesture, as well as the Ctrl+ and Ctrl- key combinations to zoom in and out, respectively. In addition, Semantic Zoom supports the Ctrl and mouse wheel scroll for zooming in and out of the page. Alternatively, the user can click the zoom icon on the bottom-right corner of the screen to apply Semantic Zoom to the visible items in the page. The Weather app in Windows 8 uses Semantic Zoom in the main page to list the various sections of the app, as shown in Figure 4-19.
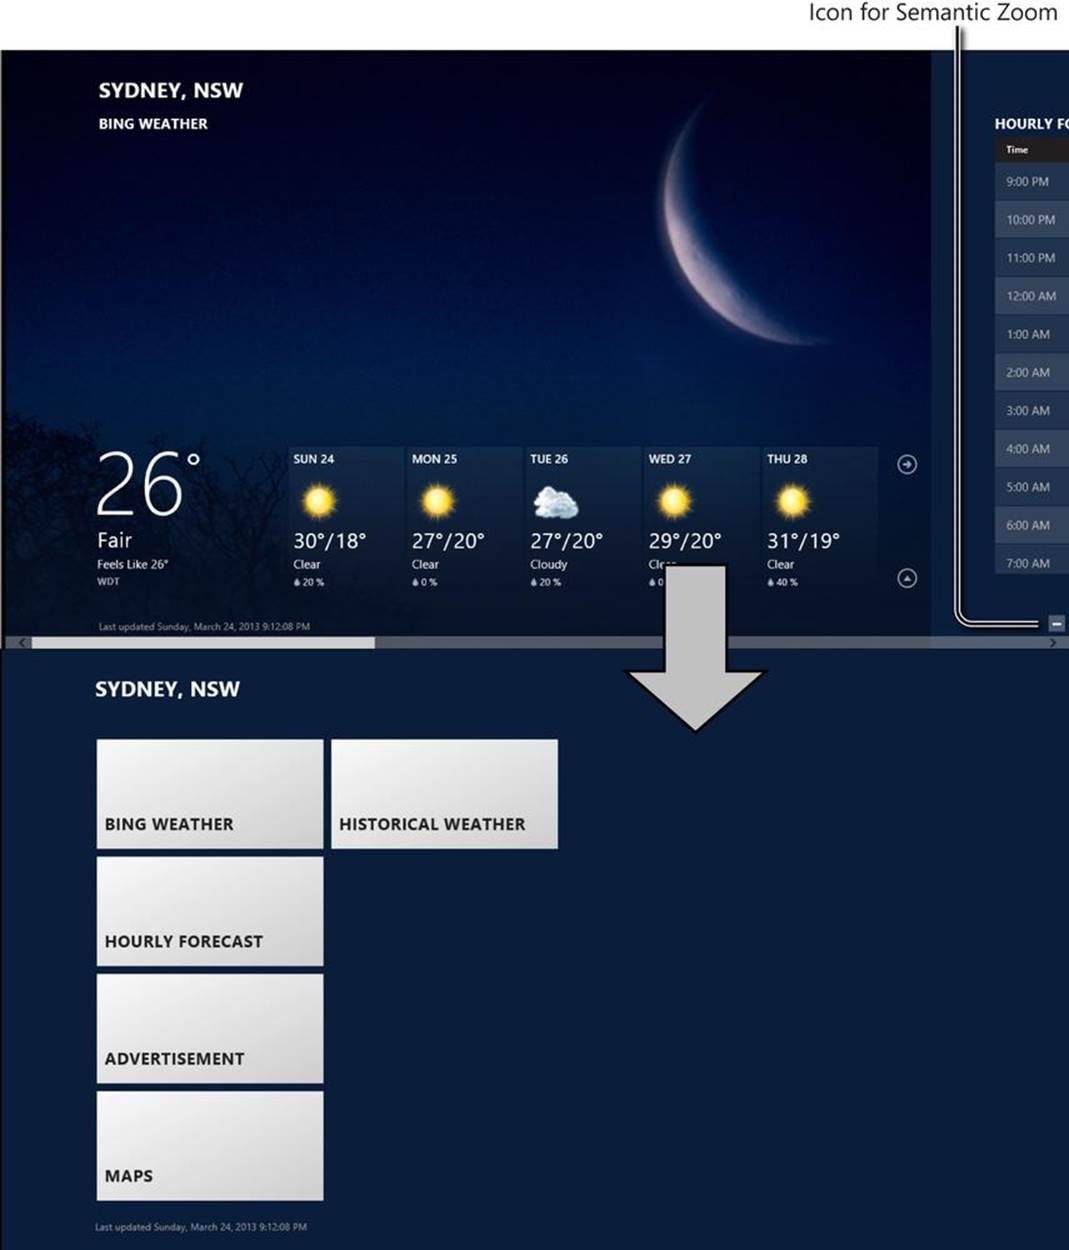
Figure 4-19. Semantic Zoom in the Weather app in Windows 8 is used to list various sections of the app in the zoomed-out view
In many Windows Store apps—such as games, browsers, and utility apps such as Weather—a flat system of navigation is used, in which where all the pages reside in the same hierarchical level. This pattern of navigation is useful for apps that require quick switching between a few pages. An example of this type of navigation is seen in the Weather app, shown in Figure 4-20.
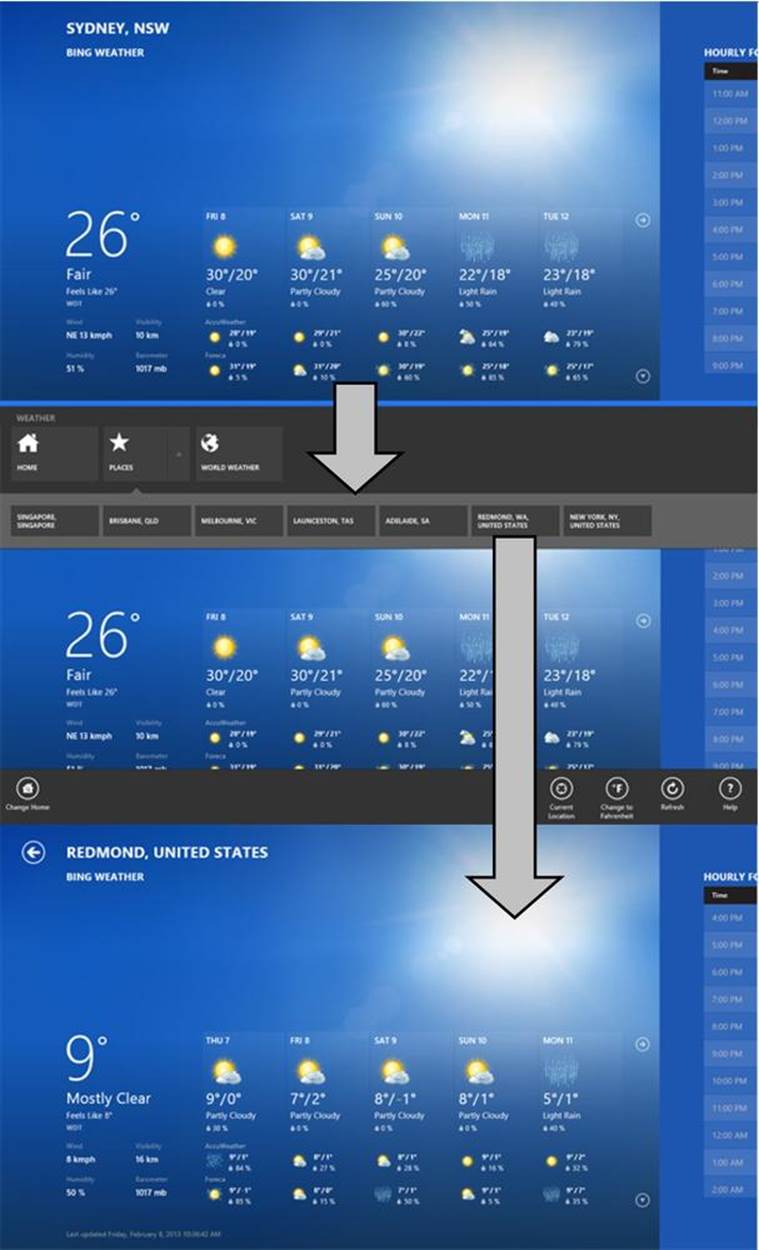
Figure 4-20. Flat navigation pattern implemented in the Weather app
Visual Studio provides developers with Windows Store application templates that contain the infrastructure required to implement hierarchical navigation. You can use these templates as the starting point of your app, and later enhance or modify the default navigation to implement your app’s requirements. For example, you can use the top app bar in addition to the Semantic Zoom for navigating between categories and subcategories if they all fit in the app bar. Figure 4-21 shows a Windows Store app created with the Grid App template provided by Visual Studio.
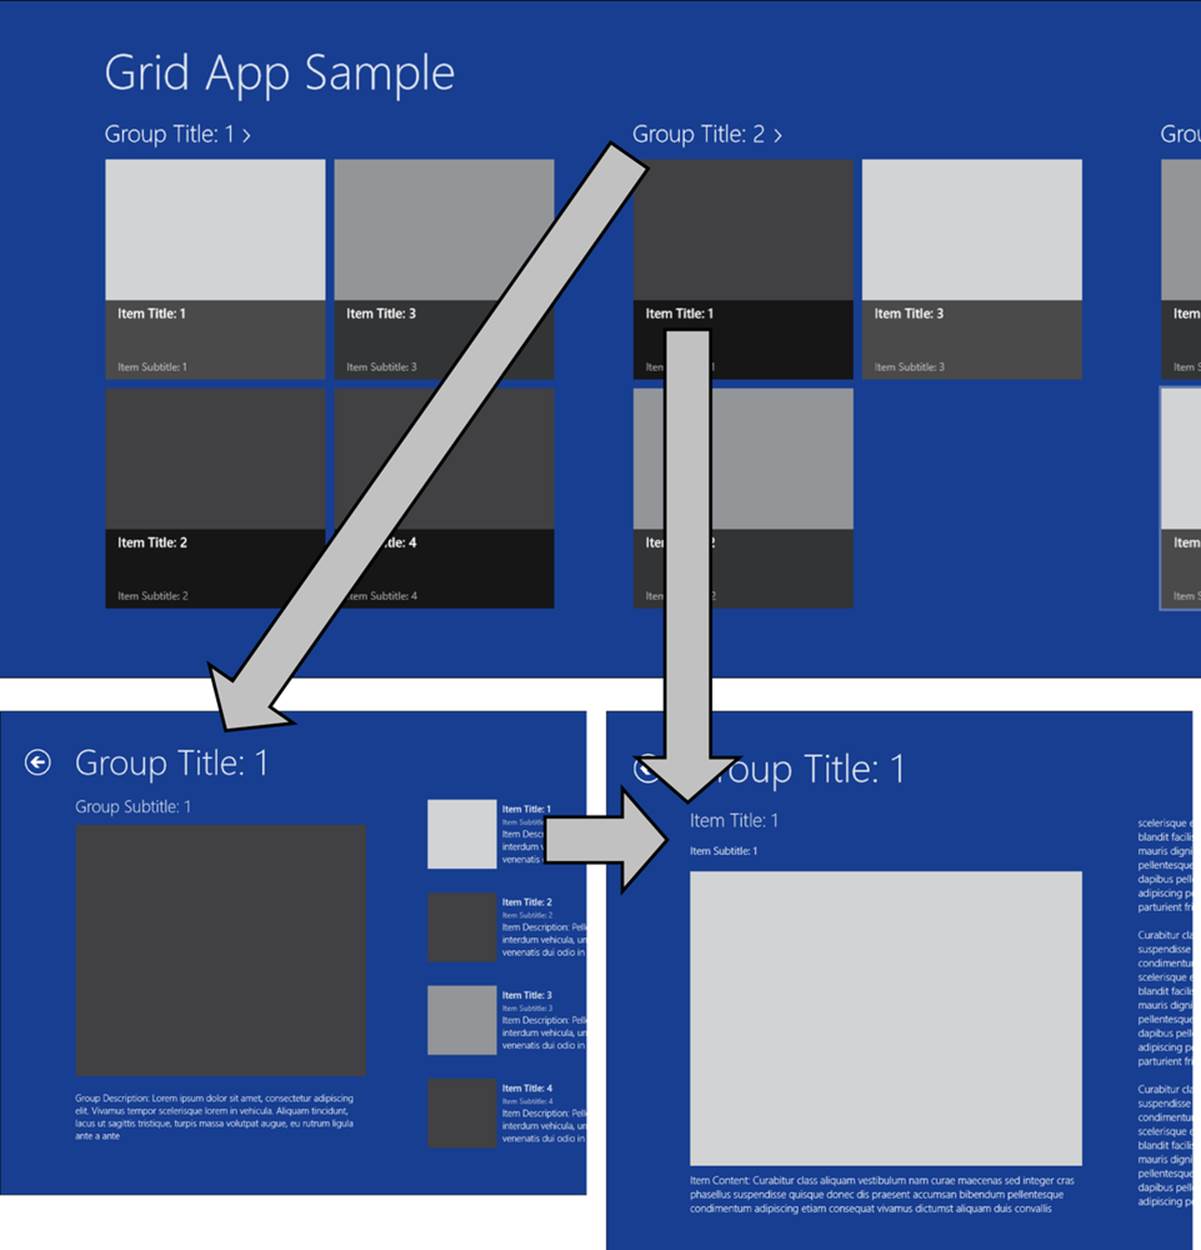
Figure 4-21. Hierarchical navigation implemented in a Windows Store app created using the Grid App template provided by Visual Studio
In some Windows Store apps, all the items in a group are displayed in a group details page, and there is no item details page. For such applications, Visual Studio provides the Split App template with navigation support, as shown in Figure 4-22.
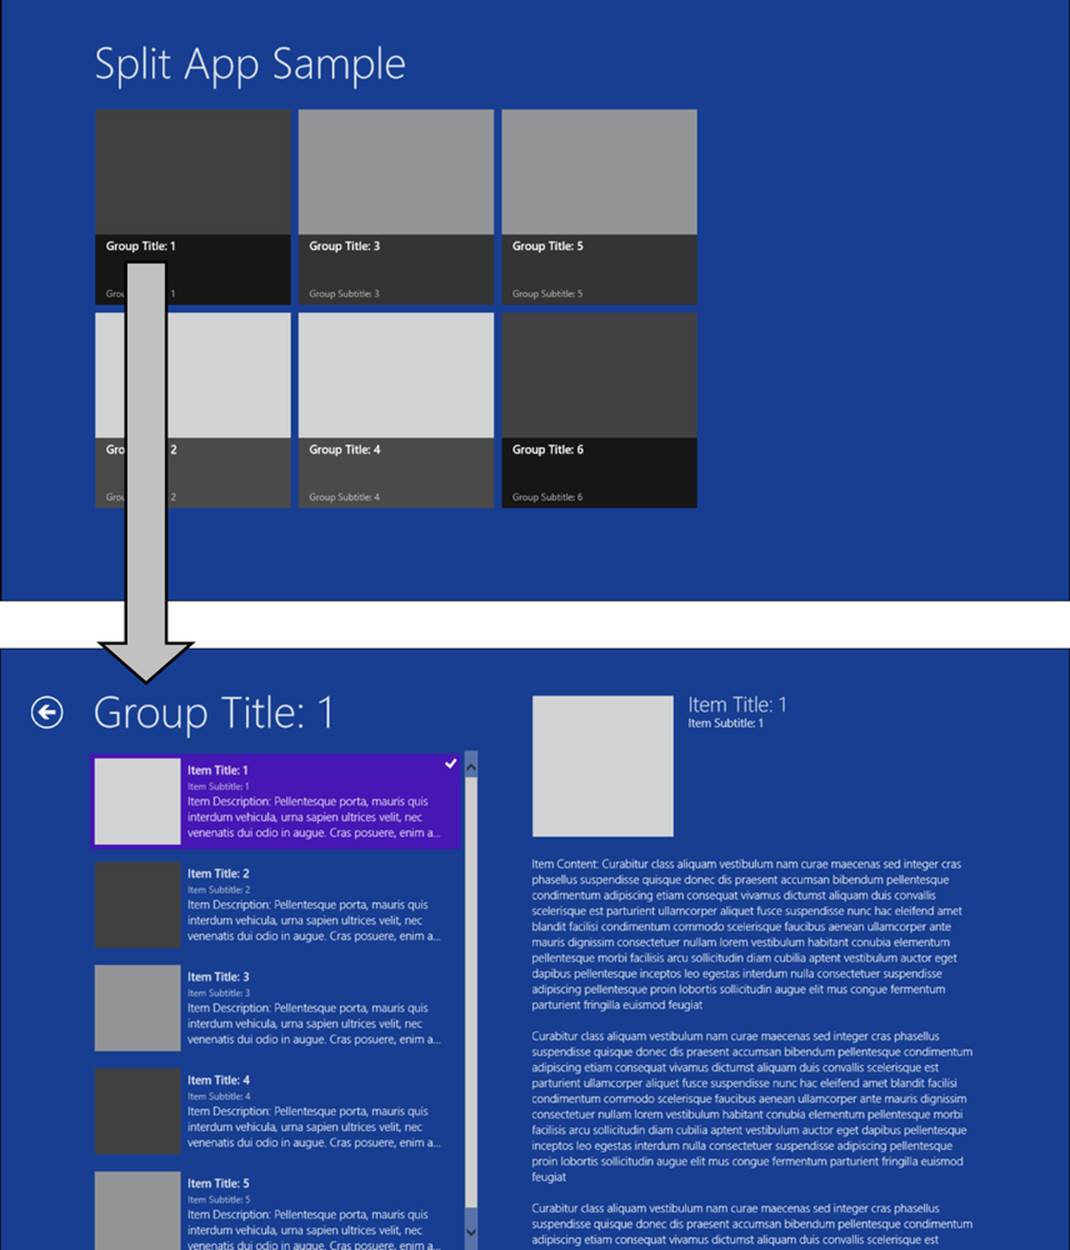
Figure 4-22. Hierarchical navigation implemented in a Windows Store app created using the Split App template provided by Visual Studio
The templates discussed provide support for state management for the application’s lifecycle, the included pages are built with a layout that supports different visual states and orientation, and they have a sample data source to help with designing through the Visual Studio XAML designer.
MORE INFO LAYOUT AND NAVIGATION IN APPS
There are articles prepared by Microsoft for developers requiring guidance and inspiration in developing Windows Store apps. You can read these articles on designing great productivity apps (http://msdn.microsoft.com/en-us/library/windows/apps/hh868273.aspx) and designing great news apps (http://msdn.microsoft.com/en-au/library/windows/apps/hh868272.aspx) to understand how you can build Windows Store apps using the templates provided by Visual Studio.
Working with navigation events, properties, and functions
When building a Windows Store app, you have the option to add any number of pages necessary to implement its business requirements. An app is composed of a frame used to host multiple pages and help with the navigation between these pages. A page consists of XAML used to define its layout and code-behind for implementing logic. A page derives from the Page control that in turn derives from a UIElement (they all belong to the Windows.UI.Xaml.Controls namespace). When an app is launched, an instance of the Frame class is created, which is then used to host one or more pages.
The Frame class has a number of properties and methods that are useful for navigation among pages in a Windows Store app. The CanGoBack and CanGoForward properties are commonly used with navigation buttons to enable or disable them (through the Button’s IsEnabled property) based on whether a page is available in the requested direction of navigation. The Navigate method of the Frame class is used to navigate to a specific page in an app. You can optionally provide a parameter to this method, which is passed to the page being navigated to. This is helpful in cases when your app is launched through a toast notification or a search result. You can use the Background property to specify the brush used to set an image, or a pattern or a solid color as the background of the Frame. In Windows Store apps, a page is created every time you navigate to it and destroyed when you navigate away from it. In some cases, you might need to use the same instance of a page multiple times. The Frame class has the capability to cache a number of pages set via the CacheSize property. The value of the CacheSize property indicates the total number of pages that will be cached by the Frame class.
Use the Page class to compose a Windows Store app that requires support for navigation among the pages. You can create a number of pages in your application and navigate to those pages from the frame. The Page class has a number of properties and methods you can use in your app. If you expect users to navigate to the same page instance multiple times, you should set the NavigationCacheMode property of the Page object to either Enabled or Required. When the NavigationCacheMode property is set to Required, the page is cached even if the cache size of the Framespecified through its CacheSize property is exceeded. Figure 4-23 shows how three pages are hosted in a single frame and navigation is carried out between them.
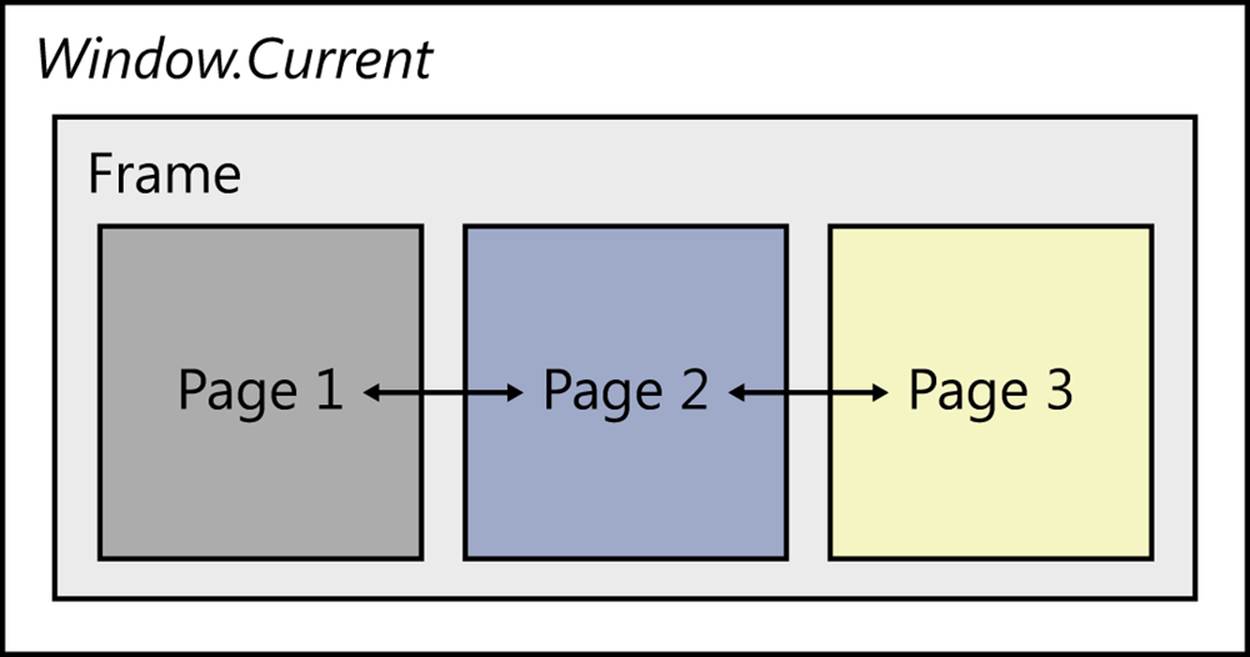
Figure 4-23. A Frame object is used to host three pages in a Windows Store app
When a Windows Store app is launched by the user, a new instance of the Frame class is created. The Navigate method of the Frame class is used to navigate to the default initial Page of an application, and the content of the app window is set to the new Frame. This is usually carried out in the OnLaunched event of the application, as shown in the C# code in Creating the Frame class for navigation.
CREATING THE FRAME CLASS FOR NAVIGATION
sealed partial class App : Application
{
protected override void OnLaunched(LaunchActivatedEventArgs args)
{
Frame rootFrame = Window.Current.Content as Frame;
if (rootFrame == null)
{
// Create a Frame to act as the navigation context and navigate
// to the first page
rootFrame = new Frame();
SuspensionManager.RegisterFrame(rootFrame, "AppFrame");
// Code removed for brevity
// Place the frame in the current Window
Window.Current.Content = rootFrame;
}
if (rootFrame.Content == null)
{
if (!rootframe.Navigate(typeof(MainPage), "AllGroups"))
{
throw new Exception("Failed to create initial page");
}
}
// Ensure current window is active
Window.Current.Activate();
}
}
When the Navigate method of the Frame class is used to navigate between pages in a Windows Store app, a series of events is raised both by the Frame class and by the page being navigated to. The Frame class raises two events:
§ Navigating. This event is raised when a new navigation is initiated by the system or user.
§ Navigated. This event is raised when the page being navigated to is available, although the page might not have finished loading.
The Page class provides a set of virtual methods that can be used to implement application logic when the page is being navigated and when the user is navigating away from the page. These methods are useful for initializing the page or performing operations to save data when the user navigates away from it. The three virtual methods of the Page class that are useful for navigation are the following:
§ OnNavigatedFrom. This method is invoked when the user has navigated away from the page and the page is no longer visible in the screen.
§ OnNavigatingFrom. This method is invoked when the user has initiated an action to navigate away from the page, but the page is still visible in the screen.
§ OnNavigatedTo. This method is invoked when the page is loaded and is visible in the screen.
The events raised by the Frame object in a Windows Store app and the methods invoked by a Page object when it participates in navigation are all arranged in a certain order. Figure 4-24 shows the events raised in an app with two pages with the user clicking a navigation link in Page 1 that leads her to Page 2.
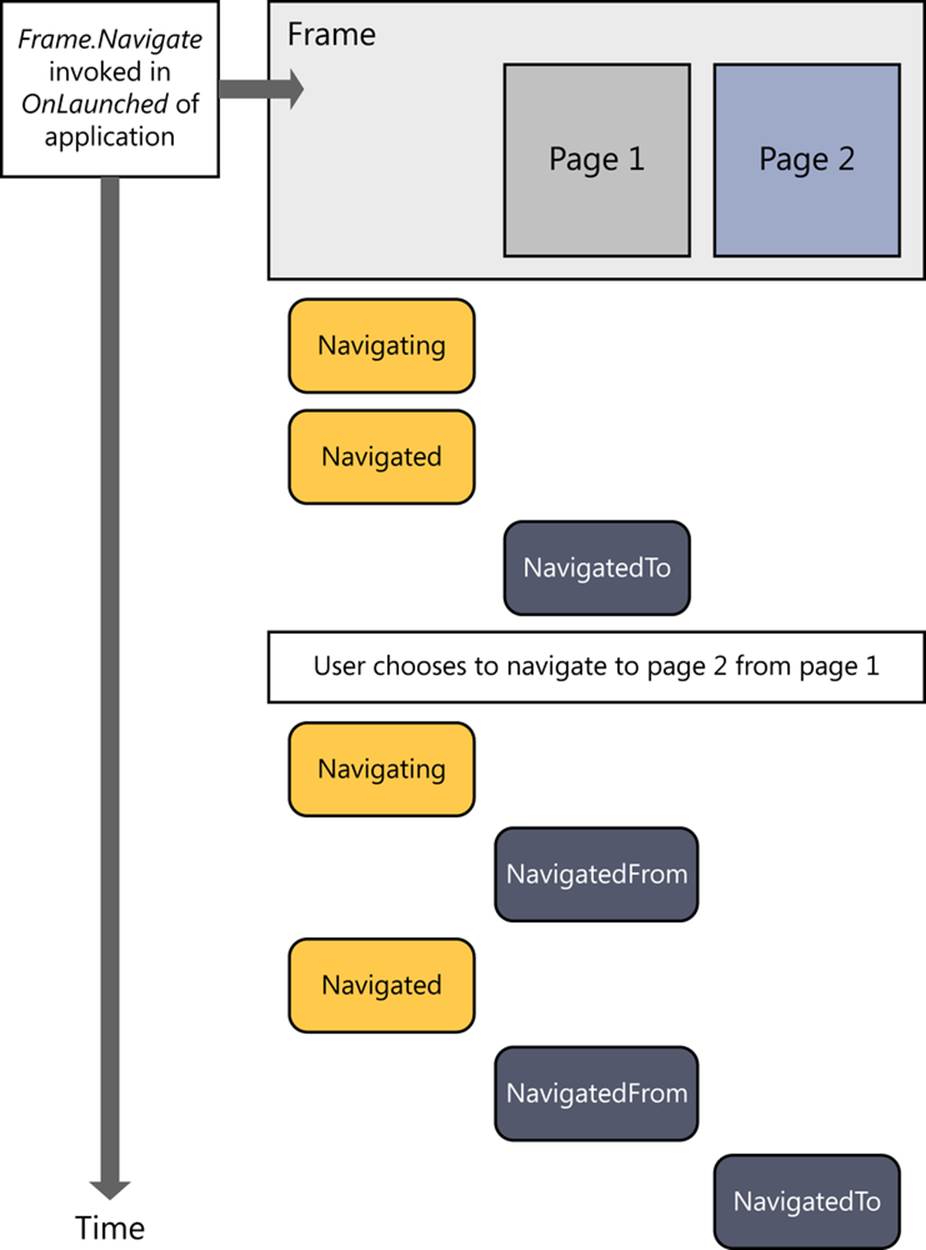
Figure 4-24. Sequence of events raised by the Frame class and methods invoked by the Page class in a Windows Store app
Your app might need to pass data while navigating between pages. The Navigate method of the Frame class has an overload that accepts a System.Object parameter. This parameter can be used to pass data between pages. The target page receives this parameter through the OnNavigatedTomethod in its NavigationEventArgs instance (the value passed during navigation is available in its Parameter property).
In some situations, your app might need to cancel the navigation to avoid loss of data or avoid aborting an upload operation. The NavigatingCancelEventArgs instance available in the Navigating event of the Frame class has a property called Cancel that cancels the navigation when set toTrue. If the navigation is not canceled by the user, any one of the three events is raised in the Frame. If the navigation completes successfully, the Navigated event is raised. If the navigation fails, the NavigationFailed event is raised; and if Navigate is invoked before the current navigation completes, the NavigationStopped event is raised. Within a page, the OnNavigatingFrom method can be used to cancel the navigation by setting the Cancel property of the NavigatingCancelEventArgs instance to True.
While navigating through pages, Page instances are created as the user moves forward or backward in the navigation. If you need to maintain state within a page in your app, you must remember to do it manually. The system provides a way to change this behavior to suit your app’s requirements via the NavigationCacheMode property of the Page class. Caching is defined page by page, and the default behavior for a page is that it is never cached. You can change this behavior to either Required, which keeps the instance in the cache irrespective of the size of the cache; or Enabled, which caches the page but it is discarded as soon as the size of the cache for the frame is exceeded. The default limit of the number of pages a Frame can cache is 10; it can be changed by setting the CacheSize property to a different value. You should note that increasing theCacheSize can cause the consumption of memory to increase, and the system can shut down your app.
Pages in a Windows Store app are added and removed from the navigation history as the user navigates in the app. The Frame class provides two methods to navigate among pages in the navigation history. The GoBack method navigates the user to the previous item in the navigation history; the GoForward method navigates to the next item in the navigation history. The following code checks the value of the properties CanGoBack and CanGoForward to determine whether there are pages in the navigation history with respect to the current position in the navigation history:
private void GoBack()
{
if (this.Frame != null && this.Frame.CanGoBack)
{
this.Frame.GoBack();
}
}
private void GoForward()
{
if (this.Frame != null && this.Frame.CanGoForward)
{
this.Frame.GoForward();
}
}
There is no support for passing data when navigating backward or forward through the navigation history using the GoBack or GoForward methods. You should implement your own solution to store data in a shared place so that both pages can access this data.
The NavigationEventArgs instance available in the OnNavigatedTo and OnNavigatedFrom virtual methods of the Page class has a property called NavigationMode that tells you the direction of movement during navigation. NavigationMode has one of the values from the NavigationModeenumeration, as described in Table 4-1.
Table 4-1. NavigationMode enumeration members
|
MEMBER |
VALUE |
DESCRIPTION |
|
New |
0 |
Navigation is being carried out to a new instance of a page. |
|
Back |
1 |
Navigation is being carried out toward the back of the navigation stack. |
|
Forward |
2 |
Navigation is being carried out toward the front of the navigation stack. |
|
Refresh |
3 |
Navigation is being carried out to the current page, perhaps with a different set of data. |
In Visual Studio, if you choose the Grid App template or the Split App template to create a Windows Store app, the pages contained in the app use the LayoutAwarePage class as their base class. This class extends the Page class, which is the default class that a page in a Windows Store app extends to override the virtual methods. The LayoutAwarePage provides developers with a number of features:
§ It provides a GoHome method that a page can use to return to the first item in the navigation stack while traversing backward.
§ It implements the GoBack and GoForward methods with the logic to check CanGoBack and CanGoForward, respectively.
§ It overrides the OnNavigatedTo method to check the value of the NavigationMode property of the page being navigated to. If a new page is loading, the LayoutAwarePage class clears any session state stored by the SuspensionManager and adds the new page to the navigation stack.
§ It overrides the OnNavigatedFrom method to save the session state for the page being navigated away from.
In Windows Store apps, you should implement utility functions, such as GoBack and GoForward, in a base class for every page. When you add a new page to a Windows Store app using Visual Studio, the page automatically derives from the LayoutAwarePage class. These pages are highlighted in the Add New Item dialog box of Visual Studio, shown in Figure 4-25.
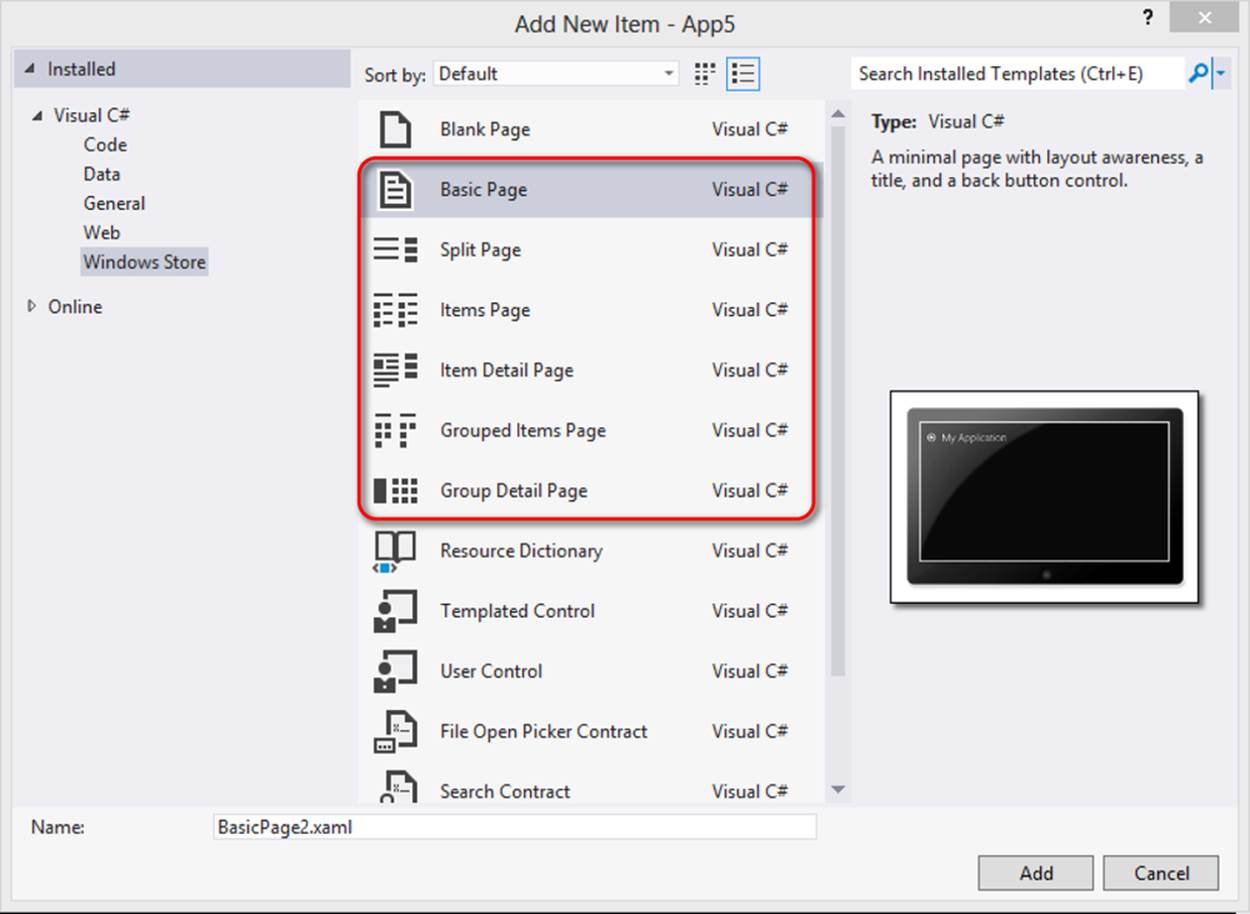
Figure 4-25. Pages that derive from the LayoutAwarePage class and are available in Visual Studio for Windows Store projects
Using Semantic Zoom in your app
In many Windows Store apps that employ hierarchical navigation, there are several categories with a variable number of items in each category. The user is expected to swipe horizontally to reveal more categories and items. This action is common in most apps and in the Start screen. When the number of categories and items is large, it can deter the user from swiping on the screen and finding items of interest. In such cases, Semantic Zoom can be used to combine a zoomed-out summary view of the hub page and a zoomed-in detailed view of the hub page. Windows supports pinch-to-zoom gestures, the Ctrl with Plus Sign (+) and Minus Sign (-) keys in the keyboard to zoom in and out, and Control+scroll wheel action to switch between the two views. For example, the zoomed-out view could be a list of movie categories with thumbnails of top-rated movies, whereas the zoomed-in view can contain top-rated movies as well as new titles.
Support for Semantic Zoom in Windows Store apps is available through the SemanticZoom control. To use it in your application, you need to provide a data control (for example, a GridView or a ListView) for the ZoomedOutView and one for the ZoomedInView. The data controls are then bound to their CollectionViewSource. The following is XAML for the SemanticZoom control:
<SemanticZoom>
<ZoomedOutView>
<!-- Zoomed out view content -->
</ZoomedOutView>
<ZoomedInView>
<!-- Zoomed out view content -->
</ZoomedInView>
</SemanticZoom>
MORE INFO SEMANTICZOOM SAMPLE
You can learn more about the SemanticZoom control and how it can be used in a Windows Store app in the SemanticZoom sample available at http://code.msdn.microsoft.com/windowsapps/GroupedGridView-77c59e8e.
When using SemanticZoom in your app, you might be restricted by the limitation of using the GridView and ListView controls for displaying data semantically. However, you can add semantic behavior in controls such as Grid by implementing the ISemanticZoomInformation interface and using it as a data control in the ZoomedInView and ZoomedOutView properties. You do not need to implement all the methods of the interface except the IsActiveView, IsZoomedInView, and SemanticZoomOwner properties, for which the default implementation added by Visual Studio is sufficient. The code in Implementing the ISemanticZoomInformation interface shows an example of a user control that implements the ISemanticZoomInformation interface.
IMPLEMENTING THE ISEMANTICZOOMINFORMATION INTERFACE
using Windows.UI.Xaml.Controls;
namespace Appreciate.Controls
{
public class SemanticGrid : Grid, ISemanticZoomInformation
{
#region ISemanticZoomInformation interface
public void CompleteViewChange()
{
// Provide your own implementation
}
public void CompleteViewChangeFrom(SemanticZoomLocation source,
SemanticZoomLocation destination)
{
// Provide your own implementation
}
public void CompleteViewChangeTo(SemanticZoomLocation source,
SemanticZoomLocation destination)
{
// Provide your own implementation
}
public void InitializeViewChange()
{
// Provide your own implementation
}
public bool IsActiveView
{
get;
set;
}
public bool IsZoomedInView
{
get;
set;
}
public void MakeVisible(SemanticZoomLocation item)
{
// Provide your own implementation
}
public SemanticZoom SemanticZoomOwner
{
get;
set;
}
public void StartViewChangeFrom(SemanticZoomLocation source,
SemanticZoomLocation destination)
{
// Provide your own implementation if the source view is the
// implementing view and destination view is the a different view
}
public void StartViewChangeTo(SemanticZoomLocation source,
SemanticZoomLocation destination)
{
// Provide your own implementation if the source view is a different
// and destination view is the implementing view
}
#endregion
}
}
THOUGHT EXPERIMENT
Following best practices for app navigation
In this thought experiment, apply what you’ve learned about this objective. You can find answers to these questions in the “Answers” section at the end of this chapter.
You have been asked to build a Windows Store app as a reference for other apps that your colleagues will design and develop. What are the top three best practices you will highlight while implementing navigation in your reference app?
Objective summary
§ A great Windows Store app provides a smooth, simple, and intuitive navigation experience. You should follow one of the navigation patterns recommended by Microsoft design style.
§ Visual Studio provides Windows Store app templates that contain support for hierarchical navigation.
§ The Frame class hosts one or more pages, and provides events and the Navigate method to help in navigation. The Page class provides methods that are useful in passing data during navigation.
§ Pages in an app can be cached or created afresh every time the app navigates to a page. The Frame class can cache a number of pages that can be configured in the app.
§ In Windows Store apps with number of categories and items, the SemanticZoom control can be used to provide a summary view, making it easier for users to navigate among categories.
Objective review
Answer the following questions to test your knowledge of the information in this objective. You can find the answers to these questions and explanations of why each answer choice is correct or incorrect in the “Answers” section at the end of this chapter.
1. A Windows Store app lists the latest movies playing in all the theaters in a city (determined via the ZIP code or the user’s location). The hub page consists of a grouped list of items with the title of each item set to the name of the theater. Each grouped item also contains thumbnails of the movies currently being screened. The local theaters are complaining about users not being able to browse the list and select a movie of their choice. How can you enhance the app so the user can view all the theaters at a glance and navigate to any theater to view the movies currently playing? (Choose all that apply.)
a. Display the list of all theaters in a GridView and let the user tap an item that opens the theater’s show times page.
b. Use the top app bar to display all the theaters; when the user taps a theater, open the theater’s show times page.
c. Use the SemanticZoom control with two GridView controls, one for the existing view and the other for a summary view in which all the theaters are listed. Tapping an item in the summary view opens the theater’s show times page.
d. After the user is on a theater’s show times page, use the top app bar to show the start times of movies, thereby enabling the user to select a time that lists all the movies that start at that time and display them in a list within the same page.
e. Enable users to mark a theater as their favorite, with a maximum of up to 10 theaters. Use the top app bar in the hub screen to show this list of favorites to enable users to navigate to their favorite theaters.
2. You have recently enhanced an app that helps users learn about the medicinal values of plants commonly found by implementing search and toast notifications (when new information about plants you have already read is available). Users have reported that they cannot bookmark a page when the app is opened through search or a search notification. You have found the problem to be the missing name of the plant from the page used for bookmarking it. What should you do to solve the problem?
a. Whenever the app is launched, save a copy of the data in the local settings; use the data in the page used for bookmarking.
b. Pass the data received through the OnLaunched method to the page used for bookmarking by using the Navigate method of the Frame class.
c. Implement a data-caching mechanism to store the data available through the OnLaunched method; use the caching mechanism in the page used for bookmarking to retrieve the data.
d. Remove the bookmarking feature from the application.
3. You have built an app that is used by your customers to upload photos for their custom manufacturing orders. In a typical session, a user uploads two or more high-resolution photos and fills a number of details of the order they are about to place. You need to ensure that they do not navigate away before the order is complete. What is the best way to implement a feature in your app that prevents users from losing their order details by navigating away from the page by mistake?
a. Check to see whether an order is still in process and prevent users from navigating away by canceling the navigation.
b. Check to see whether is still in progress; if users navigate away from the page, show a dialog box and ask for their confirmation before navigating away from the page.
c. When users navigate away, complete the order on their behalf, assuming they want to carry on with their order.
d. Save a copy of the order and list them all in the hub page prominently. This will help the user remember the orders they are yet to complete.
Chapter summary
§ Live tiles and badges in a Windows Store app helps with the popularity of the application. Live tiles can be updated regularly by your app or by using push notifications to deliver fresh content.
§ Secondary tiles enable users to launch your app for a specific purpose; they can be enhanced by live tile updates, thereby making them very attractive and useful.
§ Badges can provide a summary of new items available or the status from an app. Badges can be displayed on the lock screen, which helps with communication from your app with the users.
§ Toast notifications deliver transient messages to the user, even when your app is not running. Toast notifications can be configured for the duration in which they are visible and the sound played when they arrive.
§ Windows Runtime provides a combination of low-level pointer events and higher-level gesture and manipulation events that can be used in Windows Store apps.
§ Inking and handwriting support is available for Window Store apps.
§ Microsoft provides design guidelines for implementing a great navigation experience in Windows Store apps. Windows Store project templates provided by Visual Studio have built-in hierarchical navigation.
§ Navigation events can be used to implement features that help with the user experience such as warning a user before they navigate away from a page.
Answers
This section contains the solutions to the thought experiments and answers to the lesson review questions in this chapter.
Objective 4.1: Thought experiment
1. Live tile updates for the highest scores. Whenever you finish a game and post a high score, the five highest scores can be displayed in the live tile as a queue.
2. Badge updates for player invitations. If a friend sends an invitation to you for a game they want you to join, the app displays a number that indicates pending invitations. Badge updates can be shown on the lock screen if enabled by the user, so the user has the latest information about invitations.
3. Push notifications to update tiles. Push notifications can update tiles and deliver information on new games that are available for download (or for high scores achieved by friends, for example).
Objective 4.1: Review
1. Correct answer: B
a. Incorrect: Although push notifications can deliver this information, infrastructure requirements might be prohibitive to deliver the data to a large number of users. The complexity in the infrastructure includes the requirement of preparing content based on each user’s preference and delivering content through push notifications.
b. Correct: Periodic notifications can be configured to download data based on recommendations available from a server considering the user’s interests; or if users have specific categories of music they like, this information can be used to fetch the data.
c. Incorrect: New information m not be available every hour, which can cause an unnecessary load on the server.
d. Incorrect: If live tiles are updated with the latest information, such as artists or albums, whenever the app is run, the updates will stop after three hours, and no updates will be available until the app is run again.
2. Correct answers: A, B, D
a. Correct: Live tile updates can be delivered to secondary tiles in addition to primary tiles, so weather updates for a specific city can be delivered through a secondary tile.
b. Correct: When the user taps a secondary tile, it launches the app and the user is taken to the page that was bookmarked. This makes it easy for the user to open a specific page in the app.
c. Incorrect: Although the primary tile of the app can be removed from the Start screen, the user can always add it back from the All apps view.
d. Correct: When a secondary tile is created, it can be configured so that whenever the same user signs in on a different device and installs the app, the associated secondary tiles are also available.
e. Incorrect: Secondary tiles can be resized to either wide or narrow; users cannot resize them to arbitrary dimensions.
3. Correct answer: B
a. Incorrect: A stock’s price usually changes frequently, so push notifications have to be delivered to several users for a variety of stocks several times within a short duration. This procedure causes issues with infrastructure requirements and is not a valid solution.
b. Correct: Periodic updates help balance the load over time and across requests. Therefore, multiple users can issue periodic updates for stock prices from different PCs without causing scalability issues.
c. Incorrect: Stock prices change frequently, so downloading updates for stock prices at a specific time of day is not very useful.
d. Incorrect: Although a Windows service can download the latest stock prices, local live tile updates are issues only when the application runs, and they expire after 3 hours.
e. Incorrect: Scheduled updates can be created for intervals that are no shorter than 30 minutes. If users are forced to open the app, they do not have a good user experience.
Objective 4.2: Thought experiment
1. Reminders for workouts. The user or the user’s trainer can create reminders for upcoming workout sessions. This helps the user avoid missing any workout sessions.
2. New fitness report available. When a trainer prepares a report for a user, the user can be notified through a toast notification of the availability of the report. Clicking the toast opens the application, which then displays the report.
3. User joining a training session. When the user signs in at the fitness center, the trainer can be notified through a toast notification and can proceed to the session.
Objective 4.2: Review
1. Correct answer: B
a. Incorrect: Although cloud services can deliver reminders, you would ideally like the user to use your app as much as possible. Therefore, you should implement reminders within your app.
b. Correct: Scheduled toast notifications delivered by your app help users to manage their tasks and other activities. It is the best option to implement reminders in your app.
c. Incorrect: Similar to option A, if the reminders are created by the user through your app but delivered via cloud services, your app is never involved in the delivery of reminders.
d. Incorrect: A Windows Store app occupies the whole screen when it is running, so, you cannot assume that the user will keep the app running all the time.
2. Correct answer: B
a. Incorrect: A toast notification cannot remain on the screen for longer than 25 seconds, and the sound file should be chosen from the toast template audio catalog.
b. Correct: The payload in a toast notification can contain the name of the file and the URL where it is available. It can be downloaded by the Windows Store app and played. The user can choose to save the voice mail file in the app for future reference.
c. Incorrect: A MP3 file cannot be embedded in the payload of a push notification. It can only contain text, for example, the URL and name of the file with the voice mail.
d. Incorrect: Voice mail for a user might not be delivered frequently, so a Windows service polling the server for voice mail causes an unnecessary load on the server. A toast notification can be created locally only with a Windows Store app.
3. Correct answers: B, C, E
a. Incorrect: A toast notification, when tapped or clicked on by the user, opens the Windows Store app that it is supposed to activate; it cannot be used to launch just any app.
b. Correct: Toast notifications can be scheduled for events to remind users of those events.
c. Correct: Toast notifications can be created and dispatched by the WNS. If a message is available for the user, a push notification can be used to deliver the message as a toast.
d. Incorrect: Toast notifications can contain audio only from the toast notification template audio catalog.
e. Correct: Launch parameters can be embedded in the XML used to set up the toast notification. The type or name of the page can be extracted from the parameters available through the OnLaunched event and used for navigating to the desired page.
Objective 4.3: Thought experiment
1. Stylus input. Stylus input can be used to implement drawing of shapes on a screen with a digitizer. This feature of a stylus can be used to draw various shapes on the screen by the students and the teacher.
2. Handwriting recognition. Students can write their answers for questions during a practice session or test, and teachers can writes notes about their students using the stylus. Handwriting can be used to recognize the text and convert it into text.
3. Saving drawings. As a teacher aid, diagrams drawn by students can be saved as InkStrokes for help with assessment and preparation of progress reports.
Objective 4.3: Review
1. Correct answers: B, C, E
a. Incorrect: PointerExited is raised when the pointer exits the canvas. For the purpose of the proof-of-concept app, there is no need to use this event.
b. Correct: The PointerPressed event is used to detect when the input device is on the digitizer surface and initialize the app to prepare for drawing on the canvas.
c. Correct: The PointerMoved event is used to detect movement of the input device after drawing on the canvas has commenced. This event is useful for drawing the stroke on the canvas.
d. Incorrect: PointerCanceled is raised when the pointer loses contact with the canvas abnormally; for example if the mouse is disconnected when the left key is pressed on the canvas. Because this is a proof-of-concept application, you do not need to use this event.
e. Correct: The PointerReleased event is raised when the input device loses contact with the digitizer. It can be used to finalize the drawing on the canvas.
2. Correct answer: C
a. Incorrect: This gesture is reserved by the system and used for switching apps, so it cannot be used in any app.
b. Incorrect: This gesture is reserved by the system and used for opening the charms bar, so it cannot be used in any app.
c. Correct: Windows provides an event for this gesture, and it can be used to open a dialog box. The tap-and-hold gesture is distinct from a single tap, which should be avoided because the user can tap the pause button.
d. Incorrect: The user might accidentally tap the pause button and restart the game.
3. Correct answer: B
a. Incorrect: Although InkStroke objects can be saved and retrieved independently of InkManager, custom code needs to be written that might be error-prone and provide an experience different from other apps.
b. Correct: The SaveAsync method can be used to save a collection of InkStrokes, and the LoadAsync method can be used to load a collection of InkStrokes.
c. Incorrect: You need to write fair amount of application logic to react to the pointer events and capture the data, followed by its serialization.
d. Incorrect: A drawing can be saved into a bitmap, but it cannot be converted back into InkStrokes. Therefore, if a bitmap is used to save the InkStrokes, the app cannot edit the saved InkStrokes.
Objective 4.4: Thought experiment
1. Simple, intuitive navigation is fundamental in an excellent user experience. If users feel comfortable using an app after the first few times, it means they are likely to continue using it.
2. Semantic information about data. Providing semantic information helps the user decide which section of data to browse if there is a lot of data present in the user interface.
3. Leveraging the navigation framework. Features such as page caching, forward/backward navigation, and passing navigation parameters using the navigation framework help to implement navigation in a great Windows Store app.
Objective 4.4: Review
1. Correct answers: C, D, E
a. Incorrect: A GridView can display only a limited number of items in the visible area of the screen, so this is not an ideal solution.
b. Incorrect: A top app bar might not be adequate to accommodate all the theaters in a city, so this is not an ideal solution.
c. Correct: A SemanticZoom control provides semantic information about the data, so it should be used to display the list of theaters in a city with minimal details. The user can tap an item to browse the movies being screened.
d. Correct: The top app bar can be used very effectively to list a set of buttons, one for each start time. Whenever the user taps a button, the list of movies is automatically scrolled to the point that lists the movies starting at the selected time.
e. Correct: Unless users travel to a different city or a faraway location to watch a movie, they will prefer to visit a specific theater. Adding support for shortcuts helps with navigation to the specific theater.
2. Correct answer: B
a. Incorrect: This is not an efficient way of passing data to the page concerned. It is recommended that parameters should be passed around pages using the methods provided in the Frame and Page classes.
b. Correct: The launch event arguments contain the parameter that the user should know. This parameter can be passed to the page for bookmarking the information.
c. Incorrect: Caching is not an efficient way of passing data across pages.
d. Incorrect: The requirements of the app do not permit this.
3. Correct answer: B
a. Incorrect: This solution is likely to annoy users because they might use the back button to navigate away from the page and cancel their order in the process.
b. Correct: A dialog box prevents navigation until it is closed. Therefore, the app enables users to decide whether they indeed want to discard the order and return to the previous page.
c. Incorrect: This solution is likely to annoy users because they might use the back button to navigate away from the page without approving the app to process their order.
d. Incorrect: Every time an order is discarded, adding it to a list in the hub page will annoy the user. The app can provide this as an option.