Exam Ref 70-484: Essentials of Developing Windows Store Apps Using C# (2013)
Chapter 5. Manage security and data
An important aspect of the design and implementation of a Windows Store app is how it handles data in various forms, such as its own settings, user-specific data, and, data from remote services. Many apps depend on a remote source of data to be fully functional, whereas some apps require data to be persisted locally. Data access in a Windows Store app can be implemented based on its requirements. The WinRT application programming interface (API) provides support for both local and remote data storage for Windows Store apps.
Some Windows Store apps depend on data from remote web-based services. Such apps require a connection over the network to access the web services. Modern web services are designed using Representational State Transfer (REST) architecture, which requires apps to use the appropriate HTTP verb while sending a request for data or to invoke an operation on the data.
Windows Store apps that display and manipulate data can utilize data binding, a flexible yet powerful technique. Data binding can connect a data model with the app’s presentation layer using declarations in XAML instead of code. Dependency properties can be used in the data model to support data binding.
Securing data access by Windows Store apps is important to prevent data from being compromised by third parties. It is particularly important to protect the user’s credentials. The WinRT APIs provide methods to secure sensitive data within a Windows Store application. Windows Store apps should use single sign-on (SSO) whenever an authentication provider is available.
Objectives in this chapter:
§ Objective 5.1: Choose an appropriate data access strategy
§ Objective 5.2: Retrieve data remotely
§ Objective 5.3: Implement data binding
§ Objective 5.4: Manage Windows Authentication
§ Objective 5.5: Manage web authentication
Objective 5.1: Choose an appropriate data access strategy
Choosing a data access strategy is an important step in the development of a Windows Store app. An app might need to store its own settings as well as settings configured by its users. It might also need to connect to the Internet and download data to present to the user, or upload user information to a remote web service. If the user has your app installed on multiple devices, each instance of the app might need to synchronize the data and present the settings as updated by the user.
You have a wide range of data access options available to help develop your app. You should consider extensibility of your app for enhancements in the future so that your app does not need to be modified heavily to support new requirements. Your app can use the local, roaming, or temporary data store for settings and application-specific data; it can use file access APIs for storing and retrieving files on the device; and it can connect to remote services for downloading data and displaying it.
NOTE
This objective covers how to:
§ Choose the appropriate data access strategy (file based, web service, remote storage, including Windows Azure storage) based on app requirements.
Choosing the appropriate data access strategy based on app requirements
Storage and retrieval of data is a fundamental feature in most Windows Store apps. Windows Store apps can interact with data in a variety of ways. In some cases, the user is involved in this interaction; in other cases, the app stores and retrieves data. The choice of a data access strategy depends on the type of data and data storage available to your app, and the way users create and access their data.
When users interact with a Windows Store app, the app usually requires one or more of the following types of data:
§ Settings that are created by the app and are not controlled by the user. These are often specific to the device (for example, the last time the app was launched).
§ Settings that are created by the app and are not controlled by the user; however, these settings need to be synchronized across multiple devices.
§ Settings that are configured by the user according to their preferences. Your application provides a set of default values, and the user has the option to change these values, usually through the Settings charm. These settings might need to be synchronized across multiple devices of the user.
§ Data created by the app on a device while it is being used. This includes cached data stored between application sessions to support situations when the device is not connected to the Internet.
§ Data created by the app and cached temporarily on a device to help with the performance of the application. This type of data usually has a lifetime of its own and it can be deleted by the app.
§ Data created by the user and imported in your application and saved in the local device or a remote service. An example is an app used to manipulate photos and store them afterwards.
WinRT APIs provide a number of options for developers to work with data in their Windows Store apps. These options relate to the pattern of interaction between the data and the app or the user, and they can be broadly classified into the following types:
§ Local application data. This option should be used to store settings and device-specific temporary files—data that does not affect the app’s operations on other devices and will not be required by the user on other devices. There is no restriction on the size of data that can be stored in the local application data store.
§ Roaming application data. When users configure your application’s settings to suit their preferences, they expect the settings to be available across all their devices. The roaming application data store automatically synchronizes such data across multiple devices for the same user account. There is a restriction on the size of data that can be stored in the roaming application store.
§ Temporary application data. The temporary application data store can be used to store transient data that can be deleted by the system at any time. This might include data created by the user or from a remote web service that is not likely to change frequently and does not affect the functionality of the app.
§ Local and remote files. Your app can store data in a file and save it in one of the folders it has access to. A folder in the user’s Microsoft SkyDrive account can also be used to save files. In addition, an app can access files in the device or in a remote service, manipulate them, and save them.
The application data store is available to an app on a per-user basis for storing settings and files. The Windows.Storage namespace provides a number of classes that are useful for data management in the application data store as well as for file storage. The ApplicationData class provides events, methods, and properties that Windows Store apps can use to incorporate the application data store.
Local application data
A Windows Store app should store information locally that is required whenever the application is running and need not be available across multiple devices. This includes settings internal to the app as well as any files created by the app. There is no size restriction on the local data store.
The LocalSettings property of the ApplicationData class provides an instance of the ApplicationDataContainer class, which represents a container for the application’s settings. The ApplicationDataContainer class helps in the creation, deletion, and updates of settings for a Windows Store app. The Locality property of the ApplicationDataContainer class can be used to obtain the type of data store (local, roaming, or temporary) associated with the container. The value of the Locality property is a member of the ApplicationDataLocality enumeration. The CreateContainermethod is used to create a container to store values for settings with a unique name along with a creation option. The creation option is specified using the ApplicationDataCreateDisposition enumeration. Table 5-1 describes the ApplicationDataCreateDisposition enumeration members.
Table 5-1. ApplicationDataCreateDisposition enumeration members
|
Member |
Value |
Description |
|
Always |
0 |
This value indicates the data container should be created if it does not exist. If the container exists, a new container is not created. |
|
Existing |
1 |
This value indicates the data container should be opened if it already exists. If the requested container does not exist, it will not be created. |
The C# code in Storing settings locally shows how to save a simple setting, a composite setting, and a setting in a container, and then retrieve them.
STORING SETTINGS LOCALLY
using Windows.Storage;
public sealed partial class LocalSettingsSamplePage : LayoutAwarePage
{
private void SaveApplicationSettings()
{
ApplicationDataContainer localSettings = ApplicationData.Current.LocalSettings;
// Store simple setting
localSettings.Values["simpleSetting"] = "Simple Settings Example";
// Store composite setting
ApplicationDataCompositeValue compositeSetting = new
ApplicationDataCompositeValue();
compositeSetting["intVal"] = 44;
// You can use the Add method to add a setting
compositeSetting.Add("strVal", "Composite Settings Example");
localSettings.Values["compositeSetting"] = compositeSetting;
// Store settings in a container, create container if it doesn't exist
ApplicationDataContainer container =
localSettings.CreateContainer("localSettingsContainer",
ApplicationDataCreateDisposition.Always);
if (localSettings.Containers.ContainsKey("localSettingsContainer"))
{
localSettings.Containers["localSettingsContainer"].Values["containerSetting"]
= "Hello Windows";
}
}
private void ReadApplicationSettings()
{
ApplicationDataContainer localSettings = ApplicationData.Current.LocalSettings;
// Read data from simple setting
object simpleSetting = localSettings.Values["simpleSetting"];
if (simpleSetting == null)
{
// Settings not found
}
else
{
// Settings found, read it
}
// Remove simple setting
localSettings.Values.Remove("simpleSetting");
// Read data composite settings
ApplicationDataCompositeValue compositeSettingValue =
(ApplicationDataCompositeValue)localSettings.Values["compositeSetting"];
if (compositeSettingValue == null)
{
// No data
}
else
{
// Access data in compositeSettingValue["intVal"] and
// compositeSettingValue["strVal"]
// Remove a specific key/value pair
compositeSettingValue.Remove("intVal");
}
// Read settings from container
bool hasContainer =
localSettings.Containers.ContainsKey("localSettingsContainer");
if (hasContainer)
{
bool hasSetting =
localSettings.Containers["localSettingsContainer"].Values.ContainsKey(
"containerSetting");
if (hasSetting == true)
{
// Read the setting
}
// Delete the container
localSettings.DeleteContainer("localSettingsContainer");
}
}
}
Application settings require a string key and support many different types of values, such as Boolean, byte, integer, unsigned integer, double, float, and string, and others. If your app needs to store binary data or it generates large amount of data, you should consider writing it to a file in the local application data folder. The LocalFolder property of the ApplicationData class provides the StorageFolder that can be used to create, save, and retrieve files from the local storage folder. Creating, writing to, and reading from a file in the local application data folder shows an example of how to create a file in the local application data folder, write to it, and read the data from the file.
CREATING, WRITING TO, AND READING FROM A FILE IN THE LOCAL APPLICATION DATA FOLDER
using Windows.Storage;
public sealed partial class LocalFolderSamplePage : LayoutAwarePage
{
private async void SaveApplicationDataInLocalFolder()
{
StorageFolder localFolder =
ApplicationData.Current.LocalFolder;
try
{
// Create a new file and store data
StorageFile lastRunFile = await localFolder.CreateFileAsync("dataFile.bin",
CreationCollisionOption.ReplaceExisting);
if (lastRunFile != null)
{
await FileIO.WriteBufferAsync(lastRunFile, GetBufferToWrite());
}
}
catch (Exception)
{
// Handle any exception
}
}
// Use the WriteBuffer method of the DataWriter class to prepare the buffer
private IBuffer GetBufferToWrite()
{
return null;
}
private async void ReadApplicationFromLocalFolder()
{
StorageFolder localFolder =
ApplicationData.Current.LocalFolder;
try
{
StorageFile lastRunFile = await localFolder.GetFileAsync("dataFile.bin");
if (lastRunFile != null)
{
IBuffer buffer = await FileIO.ReadBufferAsync(lastRunFile);
using (DataReader dataReader = DataReader.FromBuffer(buffer))
{
// Use the data to perform additional tasks
}
}
}
catch (Exception)
{
// Handle any exception
}
}
}
Roaming application data
In some Windows Store apps, data created by the app or by the user while interacting with the apps needs to be available on all the devices where the app is installed. Windows provides support for synchronizing this data across multiple devices of the user without the need of building an online data synchronization service. Windows provides a roaming application data store that is synchronized across all a user’s devices on which the app is installed. If your app relies on a critical setting that is roamed, you can receive a notification of any changes to this data by creating an event handler for the DataChanged event of the ApplicationData class and refreshing the data in your app. Your app can signal a change in the data stored in the roaming data store by invoking the SignalDataChanged method of the ApplicationData class.
Although the roaming data store makes it easy for developers to implement synchronization of important data across all a user’s devices, the system does not guarantee that this data is synchronized instantaneously. When the user is offline or is on an unreliable Internet connection, synchronization of roamed data can be delayed. Windows provides a setting that can be configured so that the data stored in the setting is synchronized with a higher priority. You can mark this setting with a key of HighPriority and set the value so it is not larger than 8 kilobytes (KB). You can even add a composite setting with this key so that more than one setting is available across all devices.
Windows limits the amount of data that can be stored in the roaming data store by an app. This is to ensure synchronization is quick and does not fail unless there is a loss of Internet connectivity from a device. After a Windows Store app reaches the limit on the amount of data that can be stored in the roaming data store, synchronization of data is halted until the total size of the roamed data is less than the limit. Therefore, you should use the roaming application data store to store user preferences and small files only. You can use the RoamingStorageQuota property of theApplicationData class to obtain the maximum size of data that can be synchronized to the cloud from the roaming data store.
The system preserves the roaming data of an app for a specific period of time. If the user does not launch the app or uninstalls the app within this period of time, the data is still preserved. If the user reinstalls the app within this period, the roaming data is synchronized from the cloud. This period is set to 30 days by the system.
If the roaming data of an app is updated to a new version when the user installs an update, the updated data is copied to the cloud. However, the updated roaming data is not synchronized with the application running on other devices until the user updates the app to the current version.
The roaming settings are again an instance of the ApplicationDataContainer class and are accessed using the RoamingSettings property of the ApplicationData class. Writing settings to the roaming application data store shows how to write settings to the roaming application data store, including a HighPriority setting, and read them from the store.
WRITING SETTINGS TO THE ROAMING APPLICATION DATA STORE
using Windows.Storage;
public sealed partial class RoamingSettingsSamplePage : LayoutAwarePage
{
public RoamingSettingsSamplePage()
{
this.InitializeComponent();
// Subscribe to the DataChanged event
ApplicationData.Current.DataChanged +=
new TypedEventHandler<ApplicationData, object>(OnDataChanged);
}
private void OnDataChanged(ApplicationData appData, object o)
{
// Roaming data has changed, refresh your data
}
private void SaveRoamingSettings()
{
ApplicationDataContainer roamingSettings =
ApplicationData.Current.RoamingSettings;
// Store simple setting
roamingSettings.Values["simpleSetting"] = "Roaming Settings Example";
// Store a high priority setting, for example, the last
// newsitem read by the user
roamingSettings.Values["HighPriority"] = "itemId=344";
// Store composite setting
ApplicationDataCompositeValue compositeSetting = new
ApplicationDataCompositeValue();
compositeSetting["intVal"] = 44;
// You can use the Add method to add a setting
compositeSetting.Add("strVal", "Composite Settings Example");
roamingSettings.Values["compositeSetting"] = compositeSetting;
// Store settings in a container, create container if it doesn't exist
ApplicationDataContainer container =
roamingSettings.CreateContainer("roamingSettingsContainer",
ApplicationDataCreateDisposition.Always);
if (roamingSettings.Containers.ContainsKey("roamingSettingsContainer"))
{
roamingSettings.Containers["roamingSettingsContainer"].
Values["containerSetting"] = "Hello Windows";
}
}
private void ReadRoamingSettings()
{
ApplicationDataContainer roamingSettings =
ApplicationData.Current.RoamingSettings;
// Read data from simple setting
object simpleSetting = roamingSettings.Values["simpleSetting"];
if (simpleSetting == null)
{
// Settings not found
}
else
{
// Settings found, read it
}
// Remove simple setting
roamingSettings.Values.Remove("simpleSetting");
// Read the high priority value
object highPriorityValue = roamingSettings.Values["HighPriority"];
// Read data composite settings
ApplicationDataCompositeValue compositeSettingValue =
(ApplicationDataCompositeValue)roamingSettings.Values["compositeSetting"];
if (compositeSettingValue == null)
{
// No data
}
else
{
// Access data in compositeSettingValue["intVal"] and
// compositeSettingValue["strVal"]
// Remove a specific key/value pair
compositeSettingValue.Remove("intVal");
}
// Read settings from container
bool hasContainer =
roamingSettings.Containers.ContainsKey("roamingSettingsContainer");
if (hasContainer)
{
bool hasSetting =
roamingSettings.Containers["roamingSettingsContainer"].
Values.ContainsKey("containerSetting");
if (hasSetting == true)
{
// Read the setting
}
// Delete the container
roamingSettings.DeleteContainer("roamingSettingsContainer");
}
}
}
The roaming application data folder can be used to store files that are synchronized across multiple devices. Due to the limited space available in this store, you should store files that are essential in the operation of the app across multiple devices. For example, if the profile picture of the user is available from a location on the Internet, you should not store it in the roaming app data store because the file can be downloaded from the Internet. You can store the message being composed or the steps in a game in a file and roam it across multiple devices. The RoamingFolder property of the ApplicationData class provides the StorageFolder which can be used to create, save, and retrieve files in the roaming data folder. Creating, writing to, and reading from a files in the roaming application data store shows how you can use the roaming application data store to create files, store them, and retrieve data from them.
CREATING, WRITING TO, AND READING FROM A FILES IN THE ROAMING APPLICATION DATA STORE
using Windows.Storage;
public sealed partial class RoamingFolderSamplePage : LayoutAwarePage
{
private async void SaveApplicationDataInRoamingFolder()
{
StorageFolder roamingFolder = ApplicationData.Current.RoamingFolder;
// Create a new file and store data
try
{
StorageFile lastMovesFile = await
roamingFolder.CreateFileAsync("lastMoves.xml",
CreationCollisionOption.ReplaceExisting);
if (lastMovesFile != null)
{
await FileIO.WriteBufferAsync(lastMovesFile, GetBufferToWrite());
}
}
catch (Exception)
{
// Handle any exception
}
}
// Use the WriteBuffer method of the DataWriter class to prepare the buffer
private IBuffer GetBufferToWrite()
{
return null;
}
private async void ReadApplicationFromRoamingFolder()
{
StorageFolder roamingFolder =
ApplicationData.Current.RoamingFolder;
try
{
StorageFile lastMovesFile = await
roamingFolder.GetFileAsync("lastMoves.xml");
if (lastMovesFile != null)
{
IBuffer buffer = await FileIO.ReadBufferAsync(lastMovesFile);
using (DataReader dataReader = DataReader.FromBuffer(buffer))
{
// Use the data to perform additional tasks
}
}
}
catch (Exception)
{
// Handle any exception
}
}
}
Temporary application data
The temporary application data folder is used to store transient data in files. Files stored in this location are not roamed and they can be removed at any time by the system. Alternatively, the user can clear files from this folder by running the Disk Cleanup utility. This data store should be used to store data used during an application session, such as caching photos and video clips in a social event sharing application. This helps with the responsiveness of the application because the data is readily available after it is downloaded once.
The TemporaryFolder property of the ApplicationData class provides the StorageFolder, which can be used to create, save, and retrieve temporary files. This is shown in Creating, saving, and retrieving temporary files.
CREATING, SAVING, AND RETRIEVING TEMPORARY FILES
using Windows.Storage;
public sealed partial class TemporaryFolderSamplePage : LayoutAwarePage
{
private async void SaveApplicationDataInTemporaryFolder()
{
StorageFolder temporaryFolder =
ApplicationData.Current.TemporaryFolder;
try
{
// Create a new file and store data
StorageFile profilePictureFile = await
temporaryFolder.CreateFileAsync("ProfilePicture-Large.png",
CreationCollisionOption.ReplaceExisting);
if (profilePictureFile != null)
{
await FileIO.WriteBufferAsync(profilePictureFile, GetBufferToWrite());
}
}
catch (Exception)
{
// Handle any exception
}
}
// Use the WriteBuffer method of the DataWriter class to prepare the buffer
private IBuffer GetBufferToWrite()
{
return null;
}
private async void ReadApplicationFromTemporaryFolder()
{
StorageFolder temporaryFolder =
ApplicationData.Current.TemporaryFolder;
try
{
StorageFile profilePictureFile = await
temporaryFolder.GetFileAsync("ProfilePicture-Large.png");
if (profilePictureFile != null)
{
IBuffer buffer = await FileIO.ReadBufferAsync(profilePictureFile);
using (DataReader dataReader = DataReader.FromBuffer(buffer))
{
// Use the data to perform additional tasks
}
}
}
catch (Exception)
{
// Handle any exception
}
}
}
Managing application data
Your application can load files that are packaged with the app by specifying a uniform resource identifier (URI) and it can load files created in the application data folder by specifying a URI. The StorageFile class provides the GetFileFromApplicationUriAsync method to load files using URIs. Loading files from within an app package and from local, roaming, and temporary folders shows an app loading files from within the app package as well from the local, roaming, and temporary settings folders.
LOADING FILES FROM WITHIN AN APP PACKAGE AND FROM LOCAL, ROAMING, AND TEMPORARY FOLDERS
using Windows.Storage;
using Windows.Foundation;
public sealed partial class FolderUriSamplePage : LayoutAwarePage
{
private async void ReadFileFromApplicationPackage()
{
// data.xml is packaged with the application
Uri uri = new Uri("ms-appx:///Assets/data.xml");
// Load the file
StorageFile file = await StorageFile.GetFileFromApplicationUriAsync(uri);
if (file != null)
{
var stream = file.OpenReadAsync();
// Deserialize the XML
}
}
private async void ReadFileFromApplicationDataStore()
{
// Read a file from the local application data store
StorageFile lastRunFile = await StorageFile.GetFileFromApplicationUriAsync(
new Uri("ms-appdata:///local/dataFile.bin"));
// Read a file from the roaming application data store
StorageFile detailedSettingsFile = await
StorageFile.GetFileFromApplicationUriAsync(
new Uri("ms-appdata:///roaming/lastMoves.xml"));
// Read a file from the temporary application data store
StorageFile cachedImageFile = await StorageFile.GetFileFromApplicationUriAsync(
new Uri("ms-appdata:///temp/images/ProfilePicture
-Large.png"));
}
}
The StorageFile class also provides a GetFileFromPathAsync method that loads a file from the specified path. Be careful when using this method with the local, temporary, and roaming stores because the user can move the file from the location you specify.
Windows Store apps sometimes need to clear all the data stored in the local, roaming, and temporary data stores. For example, if your app is launched after a prolonged period, it will initialize by clearing stored data. You can use the ClearAsync method of the ApplicationData class to remove all the data stored by your app in the local, roaming, and temporary application data store. If your app selectively needs to clear data from only one store, you can use the ApplicationDataLocality enumeration to specify the type of application data store to clear. Table 5-2 describes theApplicationDataLocality enumeration members.
Table 5-2. ApplicationDataLocality enumeration members
|
Member |
Value |
Description |
|
Local |
0 |
The data stored in the local application data store |
|
Roaming |
1 |
The data stored in the roaming application data store |
|
Temporary |
2 |
The data stored in the temporary application data store |
To avoid any conflict between currently stored data and the data stored by future releases of your app, you can use data versioning, which enables future versions of the app to change the format of application data and avoid compatibility problems. If the version of data detected by the updated app is an older version, the app should update the application data to the new format and store the version number. You can use the Version property of the ApplicationData class to obtain the version number of the application data and the SetVersionAsync method to set the version number of the application data.
Application data is stored in the package folder of the app, with a clear hierarchy separating the local, roaming, and temporary application data stores. The local, roaming, and temporary data stores are located in the LocalState, RoamingState, andTemporaryState folders. The root directory of these data store folders is located in %userprofile%\AppData\Local\Packages\{PackageFamilyName}\. The PackageFamilyName of the app is available from the Packaging tab of Visual Studio’s package manifest editor from the field named Package family name. Your application does not have permission to access the data store of other applications and it cannot access other folders on the user’s device unless it is granted permissions through the capabilities declaration in the app’s package manifest.
Local and remote files
When adding to settings and files stored in the application data stores, a Windows Store app can interact with files that are present on a device or PC and is managed by other Windows Store apps. For example, a photo viewer app should be able to access the user’s Pictures library, or an app might download videos from a remote location and save them in the user’s Videos library.
A Windows Store app can access the user’s Downloads folder, application data folders, and some locations in the file system. Apps can access additional locations with the file open picker and file save picker, and by declaring capabilities in the package manifest. An app can access the following locations by default:
§ User’s Downloads folder. Your app can programmatically access the folders and files it created in the user’s Downloads folder. In addition, it can access other folders and files in the Downloads folder by using a file picker so the user can navigate through them for access within the app. The system prevents programmatic access to folders and files created by other apps or by the user in the Downloads folder. The DownloadsFolder class provides the CreateFolderAsync and CreateFileAsync methods for creating a new subfolder and a new file, respectively, in the Downloads folder located at %userprofile%/Downloads.
§ Application data locations. Whenever an app is installed, the system creates the local, roaming, and temporary application data stores. It can access files and folders in these locations by using the properties of the ApplicationData class. The methods provided by the StorageFolder object returned for the app’s folders can be used to work with folders and files. Alternatively, your app can access a file in its data folders by using the ms-appdata:/// prefix in the URI and the GetFileFromApplicationUriAsync method of the StorageFile class. The prefix of the LocalFolderfolder URI is ms-appdata:///local, the prefix for the RoamingFolder URI is ms-appdata:///roaming, and the prefix for the TemporaryFolder URI is ms-appdata:///temp. Your app does not have access to the data folders for other Windows Store apps.
§ Application install location. Your app can access its install location and obtain a StorageFolder object using the Windows.ApplicationModel.Package.Current.InstalledLocation property. It can access files and folders with methods and properties provided by the StorageFolder object. Alternatively, your app can access a file using the ms-appx:/// prefix in the URI, which refers to the app’s install directory, and the GetFileFromApplicationUriAsync method of the StorageFile class. The app’s install location provides read-only access to your app and the file picker cannot be used to access this location. In addition, your app cannot access the install location of other Windows Store apps.
A Windows Store app can access folders and files on removable devices, such as a USB drive or a camera, using a file picker. If your app uses the AutoPlay extension, it can be launched automatically whenever an external device is connected. An app is restricted to file types that are specified through the File Type association declaration in its package manifest.
Your app can access additional locations for files and folders by declaring capabilities in its package manifest. The KnownFolders class provides read-only access to these locations through its properties, described as follows:
§ DocumentsLibrary. This is used to access the Documents library in the user’s device. The app must be configured with the Documents Library capability in the package manifest.
§ PicturesLibrary. This is used to access the Pictures library in the user’s device. The app must be configured with the Pictures Library capability in the package manifest.
§ MusicLibrary. This is used to access the Music library in the user’s device. The app must be configured with the Music Library capability in the package manifest.
§ VideosLibrary. This is used to access the Videos library in the user’s device. The app must be configured with the Videos Library capability in the package manifest.
§ HomeGroup. This is used to access the HomeGroup folder on the user’s device. The app must be configured with the Music Library, Pictures Library, or Videos Library capability in the package manifest.
§ RemovableDevices. This is used to access the Removable Devices section in My Computer of the user’s device and includes devices such as USB flash drives and external portable drives. The app must be configured with the Removable Storage capability.
§ MediaServerDevices. This is used to access the media server devices folder on the user’s device or PC. The app must be configured with the Music Library, Pictures Library, or Videos Library capability in the package manifest.
Figure 5-1 shows the list of capabilities available in the package manifest of a Windows Store app.

Figure 5-1. Options available in the package manifest of a Windows Store app to configure file and folder and file access
File pickers
In addition to programmatically accessing the folders and files, your app can use the FileOpenPicker and FileSavePicker to access files in the system. You should add the File Open Picker and File Save Picker declarations (as well as the File Type Associations declaration if your app accesses files in removable devices and UNC locations) for your app to be able to use the pickers. This is shown in Figure 5-2.
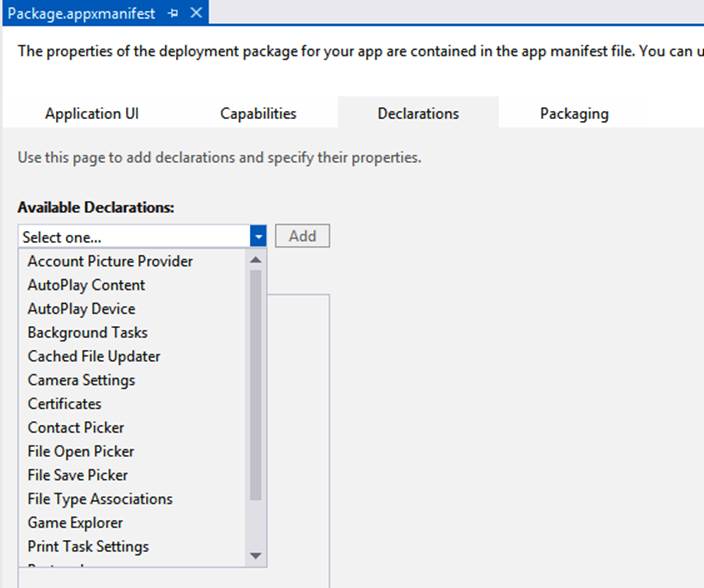
Figure 5-2. Options available in the package manifest of a Windows Store app to configure declarations for file pickers and file type associations
A StorageFolder object returned by the DocumentsLibrary, MusicLibrary, PicturesLibrary, or VideosLibrary property of the KnownFolders class can be used to obtain a list of all items (folders and files) in a folder, or it can be used to obtain a list of all the files or the folders stored in a location. Accessing items in DocumentsLibrary and saving a text file shows how to access the items in the DocumentsLibrary of the device and save a new text file.
ACCESSING ITEMS IN DOCUMENTSLIBRARY AND SAVING A TEXT FILE
using Windows.Storage;
public sealed partial class FileAccessSamplePage : LayoutAwarePage
{
private async void ReadAllItemsInDocumentsLibraryAsync()
{
StorageFolder documentsFolder = KnownFolders.DocumentsLibrary;
StringBuilder outputText = new StringBuilder();
IReadOnlyList<IStorageItem> itemsList = await documentsFolder.GetItemsAsync();
foreach (var item in itemsList)
{
if (item is StorageFolder)
{
outputText.Append(item.Name + " folder\n");
}
else
{
outputText.Append(item.Name + "\n");
}
}
// Display the list
itemsListTextBlock.Text = outputText.ToString();
}
private async void ReadAllFilesInDocumentsLibraryAsync()
{
StorageFolder documentsFolder = KnownFolders.DocumentsLibrary;
StringBuilder outputText = new StringBuilder();
IReadOnlyList<IStorageItem> filesList = await documentsFolder.GetFilesAsync();
foreach (var item in filesList)
{
outputText.Append(item.Name + " file\n");
}
// Display the list of files
filesListTextBlock.Text = outputText.ToString();
IReadOnlyList<IStorageItem> foldersList = await
documentsFolder.GetFoldersAsync();
foreach (var item in foldersList)
{
outputText.Append(item.Name + " folder\n");
}
// Display the list of folders
foldersListTextBlock.Text = outputText.ToString();
}
private async Task<string> ReadFriendsListFromDocumentsLibraryAsync()
{
StorageFolder storageFolder = KnownFolders.DocumentsLibrary;
StorageFile friendsListFile =
await storageFolder.GetFileAsync("friends-list.txt");
string text = await FileIO.ReadTextAsync(friendsListFile);
return text;
}
private async void WriteFriendsListIntoDocumentsLibraryAsync(string friendsList)
{
StorageFolder storageFolder = KnownFolders.DocumentsLibrary;
StorageFile friendsListFile =
await storageFolder.CreateFileAsync("friends-list.txt");
await FileIO.WriteTextAsync(friendsListFile, friendsList);
}
}
In certain cases, your app might need to apply a filter on a folder to group the folders and files in blocks. A folder can be queried with a filter set to one of the members of the enumeration CommonFolderQuery after checking whether filtering is allowed on that folder with the specified filter. As an example of filtering, Grouping pictures by using a filter shows how to group pictures by their creation month.
GROUPING PICTURES BY USING A FILTER
using Windows.Storage;
public sealed partial class FileAccessSamplePage : LayoutAwarePage
{
private async void ListItemsInPicturesLibraryByMonth()
{
StorageFolder picturesFolder = KnownFolders.PicturesLibrary;
if (picturesFolder.IsCommonFolderQuerySupported(CommonFolderQuery.GroupByMonth))
{
StorageFolderQueryResult queryResult =
picturesFolder.CreateFolderQuery(CommonFolderQuery.GroupByMonth);
StringBuilder outputText = new StringBuilder();
IReadOnlyList<IStorageItem> folderList = await
queryResult.GetFoldersAsync();
foreach (StorageFolder folder in folderList)
{
IReadOnlyList<StorageFile> fileList = await folder.GetFilesAsync();
// Print the month and number of files in this group.
outputText.AppendLine(folder.Name + " (" + fileList.Count + ")");
foreach (StorageFile file in fileList)
{
// Print the name of the file.
outputText.AppendLine(" " + file.Name);
}
}
// Display the list
itemsListTextBlock.Text = outputText.ToString();
}
}
}
MORE INFO MEMBERS OF THE COMMONFOLDERQUERY ENUMERATION
A list of members of the CommonFolderQuery enumeration is available at http://msdn.microsoft.com/en-us/library/windows/apps/xaml/windows.storage.search.commonfolderquery.aspx.
Your app might need to provide an option to users to pick a location for importing files into your app or for saving files created using your app. File pickers let users pick folders and files from within your app if it is set up with the appropriate permissions. The FolderPicker presents a user interface (UI) element to the user for picking a folder to save a file. The FileOpenPicker class is used to present a UI element to the user for choosing and opening one or more files, and the FileSavePicker class is used to specify the name and location where they will save content from your app. An important thing to note for file pickers is they cannot be opened when your app is in the snapped state. Therefore, it is important to check the current view state of an app and attempt to unsnap it. Using the FileOpenPicker and FileSavePicker shows how to use the FileOpenPicker to open a photo from the PicturesLibrary and the FileSavePicker to save text in a file in the user’s DocumentsLibrary.
USING THE FILEOPENPICKER AND FILESAVEPICKER
using Windows.Storage;
using Windows.Storage.Pickers;
public sealed partial class FilePickerSamplePage : LayoutAwarePage
{
// FilePicker APIs will not work if the application is in a snapped state.
// If an app wants to show a FilePicker while snapped, it must attempt
// to unsnap first
private bool EnsureUnsnapped()
{
bool unsnapped = ((ApplicationView.Value != ApplicationViewState.Snapped) ||
ApplicationView.TryUnsnap());
if (!unsnapped)
{
// Inform the user the application cannot be unsnapped
}
return unsnapped;
}
// Note: Your app must declare "Pictures Library" in the capabilities
// of your app's package manifest
private async void OpenPhotoFromPicturesLibraryAsync()
{
if (this.EnsureUnsnapped())
{
FileOpenPicker openPicker = new FileOpenPicker();
openPicker.ViewMode = PickerViewMode.Thumbnail;
openPicker.SuggestedStartLocation = PickerLocationId.PicturesLibrary;
openPicker.FileTypeFilter.Add(".jpg");
openPicker.FileTypeFilter.Add(".jpeg");
openPicker.FileTypeFilter.Add(".png");
StorageFile file = await openPicker.PickSingleFileAsync();
if (file != null)
{
// Application now has read/write access to the picked file
}
else
{
// User canceled the operation
}
}
}
// Note: Your app must declare "Documents Library" in the capabilities
// of your app's package manifest
private async void WriteTextToFileAsync(string text)
{
if (this.EnsureUnsnapped())
{
FileSavePicker savePicker = new FileSavePicker();
savePicker.SuggestedStartLocation = PickerLocationId.DocumentsLibrary;
// Dropdown of file types the user can save the file as
savePicker.FileTypeChoices.Add("Plain Text", new List<string>() { ".txt" });
// Default file name if the user does not type one in
// or select a file to replace
savePicker.SuggestedFileName = "New Document";
// Show the picker
StorageFile file = await savePicker.PickSaveFileAsync();
if (file != null)
{
// Prevent updates to the remote version of the file until
// the app finishes making changes and call CompleteUpdatesAsync.
CachedFileManager.DeferUpdates(file);
// write to file
await FileIO.WriteTextAsync(file, text);
// Let Windows know that the app is finished changing the file
// so the other app can update the remote version of the file.
// Completing updates might require Windows to ask for user input.
FileUpdateStatus status = await
CachedFileManager.CompleteUpdatesAsync(file);
if (status == FileUpdateStatus.Complete)
{
// File was saved
}
else
{
// File couldn't be saved
}
}
else
{
// File save operation was canceled
}
}
}
}
Most recently used and future access lists
A Windows Store app can track a list of files it accesses frequently by adding them to the most recently used (MRU) list or the future access list. The MRU list can hold up to 25 items and is automatically managed by Windows for the app. The future access list can hold up to 1,000 items and is managed by the app.
You can use the MostRecentlyUsedList property of the StorageApplicationPermissions class (in the Windows.Storage.AccessCache namespace) to access the most recently accessed list of files and folders. Files and folders can be added for tracking and items can be retrieved from the list. An item already in the list can be updated with a more recent version; for example, a file accessed recently by the user and updated. A file or folder can be added to this list with optional metadata. A token is available after the file is added to the MRU list, which is used later to retrieve the item.
The FutureAccessList property of the StorageApplicationPermissions class provides support for Windows Store apps to add files to the future access list and remove them. You should use this list in your app when you do not want the system to remove items from the list.
Adding and removing items from the recently accessed list and the future access list shows how to add and remove items from both the lists.
ADDING AND REMOVING ITEMS FROM THE RECENTLY ACCESSED LIST AND THE FUTURE ACCESS LIST
using Windows.Storage;
using Windows.Storage.Pickers;
using Windows.Storage.AccessCache;
public sealed partial class FilePickerSamplePage : LayoutAwarePage
{
string profilePicToken = string.Empty;
string futureAccessListToken = string.Empty;
// FilePicker APIs will not work if the application is in a snapped state.
// If an app wants to show a FilePicker while snapped, it must
// attempt to unsnap first
private bool EnsureUnsnapped()
{
bool unsnapped = ((ApplicationView.Value != ApplicationViewState.Snapped) ||
ApplicationView.TryUnsnap());
if (!unsnapped)
{
// Inform the user the application cannot be unsnapped
}
return unsnapped;
}
// Note: Your app must declare "Pictures Library" in the capabilities
// of your app's package manifest
private async void OpenPhotoFromPicturesLibrary()
{
if (this.EnsureUnsnapped())
{
FileOpenPicker openPicker = new FileOpenPicker();
openPicker.ViewMode = PickerViewMode.Thumbnail;
openPicker.SuggestedStartLocation = PickerLocationId.PicturesLibrary;
openPicker.FileTypeFilter.ReplaceAll([".jpg", ".jpeg", ".png"]);
StorageFile file = await openPicker.PickSingleFileAsync();
if (file != null)
{
// Application now has read/write access to the picked file
// Add the picked file to the MRU list and store token for future access
profilePicToken =
StorageApplicationPermissions.MostRecentlyUsedList.Add(file, file.Name);
// Add the picked file to the future access list and
// store token for future access
futureAccessListToken =
StorageApplicationPermissions.FutureAccessList.Add(file, file.Name);
}
else
{
// User canceled the operation
}
}
}
private async void OpenProfilePhotoFromMRUListAsync()
{
StorageFile profilePicFile = await
StorageApplicationPermissions.MostRecentlyUsedList.GetFileAsync(profilePicToken);
if (profilePicFile != null)
{
// Use it in your app
}
else
{
// File not in MRU list, pick a file from the Photos library
OpenPhotoFromPicturesLibrary();
}
}
private async void OpenProfilePhotoFromFutureListAsync()
{
StorageFile profilePicFile = await
StorageApplicationPermissions.FutureAccessList.GetFileAsync(futureAccessListToken);
if (profilePicFile != null)
{
// Use it in your app
}
else
{
// File not in future access list, pick a file from the Photos library
OpenPhotoFromPicturesLibrary();
}
}
}
Storing and retrieving data from a remote location
Application data of a Windows Store app is removed whenever it is uninstalled by the user. Therefore, your app should not use the application data store for storing valuable and irreplaceable information. This includes the roaming store, which is also removed after a period of time when the user removes the app from all his devices. A web service or remote data store can be one of the following:
§ The user’s SkyDrive account
§ Windows Azure blob storage
§ Windows Azure Mobile Services
§ Any other service that provides an API or your own application that stores data from the Windows Store app
When you use file pickers in your application, users are given the option to open files from their SkyDrive account and select a location in SkyDrive to save files created with your application. The files accessed by your app and saved in the user’s SkyDrive account are not deleted even after the app is removed.
MORE INFO SKYDRIVE API AND SOFTWARE DEVELOPMENT KIT (SDK)
You can read more about the SkyDrive API at http://msdn.microsoft.com/en-us/library/live/hh826521. Learn how to reference the Live Connect APIs at http://msdn.microsoft.com/en-us/library/live/hh826551.aspx. Download the sample Windows 8 application published by the Microsoft Live Services team at https://github.com/liveservices/LiveSDK/tree/master/Samples/Windows8/XAML.
Windows Store app developers can use Windows Azure to build their own data storage and retrieval service. Windows Azure provides blob storage for apps to store files of any type and size. Blob storage can be programmatically accessed using classes in the Microsoft.WindowsAzure.Storagenamespace.
MORE INFO WINDOWS AZURE BLOB STORAGE
A walkthrough of how you can create, download, and delete blobs is available at http://www.windowsazure.com/en-us/develop/net/how-to-guides/blob-storage/.
Windows Azure supports storage and manipulation of structured nonrelational data with its table storage service. If your app needs to store large amounts of structured data, you should consider using Windows Azure table storage. A table consists of one or more entities that represent a row in a traditional database, except that tables do not enforce a schema on them. An entity is a set of properties of up to 1 megabyte (MB) in size, and a property is a name-value pair. Each entity holds up to 252 properties to store data. Table storage can be programmatically accessed using classes in the Microsoft.WindowsAzure.Storage namespace.
MORE INFO WINDOWS AZURE TABLE STORAGE
A walkthrough of how you can use Windows Azure table storage in Windows Store apps is available at http://www.windowsazure.com/en-us/develop/net/how-to-guides/table-services/.
Windows Azure Mobile Services is a Windows Azure service providing Windows Store apps to rapidly and easily include storage, push notifications, and integration with other cloud services. You can use Windows Azure Mobile Services in your app to store structured, nonrelational data using classes available in the Microsoft.WindowsAzure.MobileServices namespace.
MORE INFO USING MOBILE SERVICES TO STORE DATA
A detailed walkthrough of storing data in a table using Mobile Services is available at http://www.windowsazure.com/en-us/develop/mobile/tutorials/get-started-with-data-dotnet/.
THOUGHT EXPERIMENT
Developing a data access strategy for a Windows Store app
In this thought experiment, apply what you’ve learned about this objective. You can find answers to these questions in the “Answers” section at the end of this chapter.
An application deployed in a rugged laptop is used by technicians to analyze faults in data centers. The technicians use the app to refer to a knowledge base of previous faults and their remedies, and use the app to write reports of the faults they find and fix while onsite. The technicians occasionally copy data using the application on a USB flash drive and use the app on the servers. In some cases, log files are copied to a flash drive and uploaded to a central repository using the app.
You have been asked to investigate the feasibility of developing a Windows Store app to incorporate the current set of features and possibly enhance them. What data access strategy would you develop for this app?
Objective summary
§ A well-planned data access strategy implemented in a Windows Store app helps with the overall quality and usability of the app.
§ Windows Store apps can use local and roaming application data stores for storing settings and files and the temporary data store for caching files.
§ WinRT provides APIs for creating and accessing files on the users’ devices and their SkyDrive accounts. Windows Store apps can use file and folder pickers to select the location where files can be stored and accessed.
§ A set of capabilities and declaration must be configured in the package manifest for an application to access the folders in the user’s device.
§ Windows Azure provides blob storage for various types of files and table storage for structured, nonrelational data. Windows Store apps can use Windows Azure APIs to store data in the cloud storage.
§ Windows Azure Mobile Services can be used to easily integrate table storage, push notifications, and integration with other cloud services in Windows Store apps.
Objective review
Answer the following questions to test your knowledge of the information in this objective. You can find the answers to these questions and explanations of why each answer choice is correct or incorrect in the “Answers” section at the end of this chapter.
1. You are developing a Windows Store app that enables users to download their photos from social networking sites; manipulate them; and share them with friends through email, Twitter, and Facebook. Your app shows a list of photos that the user viewed recently as well as their modified versions. Which file storage options should you use? (Choose all that apply.)
a. Use the roaming application data store to save the processed files so that they are available on all devices.
b. Use the temporary application data store to save a copy of the original and processed files.
c. Use Windows Azure to store processed files and access these files on other devices owned by the user.
d. Use the roaming application data store to store the list of files accessed recently.
e. Use your application’s install location to store all the files.
2. You have developed a Windows Store app for authors to help them publish their books using various publication services. An author has one or more titles under development at any time. In your application’s hub page, a list of recently accessed files is displayed. They are optionally grouped by title and date. What should you implement in your app so that users can quickly access their work?
a. Use a local database with your application to store the list of files recently accessed.
b. Use the MRU list and the future access list to store the list of files recently accessed.
c. Use the roaming application data store to store the list of files recently accessed.
d. Use the temporary application data store to store the list of files recently accessed.
3. You have developed a Windows Store app that enables a user to read news items. The app uses a subscription-based news feed to fetch news items after the user provides his or her credentials for the service. What is the correct way to use the roaming application data store in such an app?
a. Store the user’s credentials in a file so the app can use it across multiple devices.
b. Store the most recently read article so that it opens if the reader closed the application while reading the article.
c. Store the ID of the article being read currently so the ID can be accessed on any other device to open the news item.
d. Store the top news articles for the day so they are available in all the user’s devices.
Objective 5.2: Retrieve data remotely
Many Windows Store apps require content from the web to be available for various features. A connected behavior is important in presenting regular updates from social networks, for example, or for downloading new items from a subscription site.
The HttpClient class is useful in implementing features that require data to be transferred in to and out of a Windows Store app. The class supports web services that expect REST verbs to be used in the requests as well as the standard set of HTTP status codes. The HttpClient class can be used for secure connections to protect the data being transferred. Windows Communication Foundation (WCF) provides a runtime environment for web services that expose business logic. Simple Object Access Protocol (SOAP) is often used as the communications protocol with these services. WinRT APIs provide support for applications to integrate with such web services. WebSockets provide a mechanism for transporting messages and binary data over HTTP. The protocol implements a two-way handshake which makes it suitable for use in Windows Store apps. WebSockets can be used for server-application communication that involves a simple exchange of data. The HttpClient class provides methods for data transfers as well as cancelling all ongoing transfers. For transferring large files and chunks of data that consume significant amount of time, background transfers can be used in Windows Store apps.
NOTE
This objective covers how to:
§ Use HttpClient to retrieve data from web services.
§ Set the appropriate HTTP verb for REST.
§ Consume SOAP/WCF services.
§ Use WebSockets for bidirectional communication.
§ Handle the progress of data requests.
Using HttpClient to retrieve data from web services
WinRT APIs provide networking features for Windows Store apps with the HttpClient class, which is in the System.Net.Http namespace. You can use this class to retrieve data from servers located on the Internet or in an intranet. HttpClient has a number of methods that help with the implementation of features in Windows Store. In its simplest form, HttpClient can be used to read a string, a stream, or an array of bytes from a remote location whose address is specified through a URI. Using the GetStringAsync method with HttpClient to retrieve a string remotely shows the GetStringAsync method being used to retrieve a string from a remote location.
USING THE GETSTRINGASYNC METHOD WITH HTTPCLIENT TO RETRIEVE A STRING REMOTELY
using System.Net.Http;
public sealed partial class HttpClientSamplePage : LayoutAwarePage
{
private async void ReadStringFromRemoteSite(string url)
{
try
{
// Prepare a HttpClient and issue a request
HttpClient httpClient = new HttpClient();
string response = await httpClient.GetStringAsync(url);
// Display the string
responseTextBlock.Text = response;
}
catch (catch (HttpRequestException hEx)
{
statusTextBlock.Text = hEx.ToString();
}
catch (Exception ex)
{
statusTextBlock.Text = ex.ToString();
}
}
}
The code does not check for the status of the response received from the remote location. The HttpResponseMessage class provides a number of properties and methods that can be used to examine the status of the response received from the remote site. If a failure occurs, you can find out more about it by examining the HTTP status code and reason phrase. The HttpResponseMessage object obtained as a result of an HTTP request contains a number of properties that can be used to examine the metadata of the response:
§ Content. This property represents an object of type HttpContent. It provides properties to read the content as an array of bytes, a stream, or a string.
§ Headers. The HTTP response headers can be examined with this property.
§ StatusCode. This property indicates the HTTP status code of the HTTP response. Its value is set to a member of the HttpStatusCode enumeration.
§ IsSuccessStatusCode. This property indicates whether the HTTP request was successful.
§ ReasonPhrase. This property is used to send the reason for a failure of the HTTP request along with the appropriate status code.
Using HttpResponseMessage and HttpClient to download remote data shows how the StatusCode and ReasonPhrase properties of the HttpResponseMessage class can be used with the HttpClient class to download data from a remote location.
USING HTTPRESPONSEMESSAGE AND HTTPCLIENT TO DOWNLOAD REMOTE DATA
using System.Net.Http;
public sealed partial class HttpClientSamplePage : LayoutAwarePage
{
private async void ReadStringFromRemoteSite(string url)
{
try
{
// Prepare a HttpClient and issue a request
HttpClient httpClient = new HttpClient();
HttpResponseMessage response = await httpClient.GetAsync(url);
// Raise an exception if the remote server returned an
// HTTP error status code.
response.EnsureSuccessStatusCode();
// Display the status code and reason phrase
statusTextBlock.Text = response.StatusCode + ", " +
response.ReasonPhrase;
string responseBody = await response.Content.ReadAsStringAsync();
// Display the string
responseTextBlock.Text = responseBody;
}
catch (HttpRequestException hEx)
{
statusTextBlock.Text = hEx.ToString();
}
catch (Exception ex)
{
statusTextBlock.Text = ex.ToString();
}
}
}
In many situations, requests for fetching from remote servers require customizations before they can be sent using the HttpClient class. An overload of the constructor of the HttpClient class accepts an object of the type HttpMessageHandler. Some of the message handlers that can be used with the HttpClient class are:
§ HttpClientHandler. This is the default message handler used by HttpClient.
§ MessageProcessingHandler. This class is used as a base type for HTTP message handlers and should be used to create custom message handlers.
§ DelegatingHandler. This class is used as a base type for HTTP handlers that are used to delegate the processing of HTTP response messages to another handler. These types of handlers are useful for testing.
The HttpClientHandler class, which is in the System.Net.Http namespace, has a number of useful properties:
§ Proxy. This property is used to specify a proxy present in the network that all HTTP requests should use. If specified, the requests bypass the proxy set in the local computer or application’s configuration file.
§ Credentials. This property specifies the authentication information if the remote server requires authentication.
§ UseDefaultCredentials. This property (a Boolean) is used to force the default credentials to always be sent to the remote server.
§ CookieContainer. This property provides an instance of the CookieContainer class that contains the cookies associated with the handler. The app can set custom cookies through this property before the request is sent to the server.
§ UseCookies. This property (a Boolean) is used to indicate whether the handler uses the CookieContainer property to store server cookies and use them when it sends requests. The default value is True.
§ SupportsAutomaticDecompression. This property (a Boolean) is used to specify whether the handler supports automatic decompression of the content in the response.
§ AutomaticDecompression. This property is used to specify the decompression method used by the handler for automatic decompression of the content in the HTTP response. The value of this property is set to a member of the DecompressionMethods enumeration. TheDecompressionMethods enumeration enables a bitwise combination of the values None, GZip, and Deflate. The default value of AutomaticDecompression property is set to None.
§ AllowAutoRedirect. This property is specified if the handler follows the request from the remote service for redirection. The default value is True.
In addition to the properties available in the HttpClientHandler class, some properties of the HttpClient class can be used to further customize an HTTP request:
§ DefaultRequestHeaders. This property is used to specify the HTTP request headers in the request sent with the HttpClient. A user-agent header can be added using this property to avoid errors when the remote server expects a user-agent header to be set in the HTTP request.
§ MaxResponseContentBufferSize. This property is used to specify the maximum number of bytes to buffer when reading the content in the HTTP response message. The default value is 2 gigabytes (GB).
§ Timeout. This property is used to specify the duration in milliseconds that the HTTP request waits before it times out. The default value is 100 seconds.
Using HttpClientHandler and HttpClient to configure an HTTP request shows how properties of the HttpClientHandler and HttpClient are used to configure an HTTP request.
USING HTTPCLIENTHANDLER AND HTTPCLIENT TO CONFIGURE AN HTTP REQUEST
using System.Net.Http;
public sealed partial class HttpClientSamplePage : LayoutAwarePage
{
private async void ReadStringFromRemoteSite(string url,
string username, string password)
{
try
{
// Prepare an HttpClientHandler
HttpClientHandler httpHandler = new HttpClientHandler();
httpHandler.Credentials = new NetworkCredential(username, password);
httpHandler.UseDefaultCredentials = false;
httpHandler.AllowAutoRedirect = false;
// Prepare an HttpClient and issue a request
HttpClient httpClient = new HttpClient(httpHandler);
// Set a timeout of 60 seconds
httpClient.Timeout = new Timespan(0, 0, 60);
// Set up the request header
httpClient.MaxResponseContentBufferSize = 256000;
// Add a user-agent header
httpClient.DefaultRequestHeaders.Add("user-agent",
"Mozilla/5.0 (compatible; MSIE 10.0;
Windows NT 6.2; WOW64; Trident/6.0)");
HttpResponseMessage response = await httpClient.GetAsync(url);
// Raise an exception if the remote server returned an
// HTTP error status code.
response.EnsureSuccessStatusCode();
// Display the status code and reason phrase
statusTextBlock.Text = response.StatusCode + ", " +
response.ReasonPhrase;
string responseBody = await response.Content.ReadAsStringAsync();
// Display the string
responseTextBlock.Text = responseBody;
}
catch (HttpRequestException hEx)
{
statusTextBlock.Text = hEx.ToString();
}
catch (Exception ex)
{
statusTextBlock.Text = ex.ToString();
}
}
}
A Windows Store app that uses the HttpClient class to connect to a remote server must declare network capabilities in its package manifest. If the app connects to a remote server on the Internet, it must declare the Internet (Client) capability in the manifest. In addition, if the app connects to web services on the home or corporate network, it needs to declare the Private Networks (Client & Server) capability in the manifest. Figure 5-3 shows how to declare the capabilities in Visual Studio.
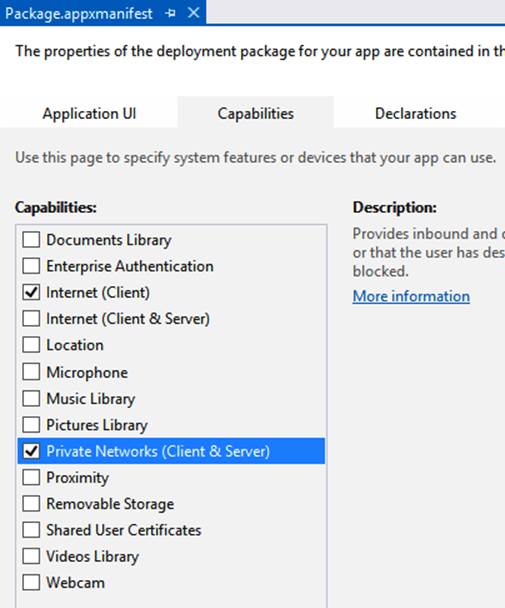
Figure 5-3. Capabilities required for supporting HttpClient in a Windows Store app
Setting the appropriate HTTP verb for REST
Representational State Transfer (REST) is an architectural style based on HTTP for exposing data in the web where they can be consumed by a variety of clients on different platforms. REST uses common HTTP verbs such as GET, POST, PUT, and DELETE to access resources on a server and interact with them. An HTTP web service designed in a RESTful way consists of a collection of URIs, each representing a resource with a set of actions defined on them. These actions are specified with an HTTP verb in the outgoing request. Unlike SOAP and other web service implementations, a RESTful web service does not require XML in the request messages.
The SendAsync method of the HttpClient class can be used to send an HTTP request to a remote web service that implements a RESTful interface. This method requires an HttpRequestMessage object that specifies the HTTP verb to use with the request as well as the HTTP headers configured with various items, such as the user-agent. The verb used for preparing the HttpRequestMessage is specified as one of the static properties of the HttpMethod class:
§ Get. This represents the HTTP GET verb and is used with HTTP requests to obtain an object from the remote service.
§ Head. This represents the HTTP HEAD verb and is used to obtain the details of an object with only the headers in the response.
§ Delete. This represents the HTTP DELETE verb and is used to delete an existing object in the remote service.
§ Post. This represents the HTTP POST verb and is used to create an object that does not exist in the remote service.
§ Put. This represents the HTTP PUT verb and is used to update an existing object in the remote service.
§ Options. This represents the HTTP OPTIONS verb and is used to obtain a list of methods the remote service supports.
§ Trace. This represents the HTTP TRACE verb and is used to echo the request received by the remote service so that a client can see whether any changes have been made to the original request by servers on the path of the request.
In most cases, you will be working with the GET, POST, PUT, and DELETE HTTP verbs. You should remember that RESTful interfaces define their API for resources. Therefore, if your app must obtain an object from the resource, it should use an HTTP request with the GET verb. If it needs to update an existing object, it has to issue an HTTP request with the PUT verb to a URI that is the location of the object on the server. Using GET in an HTTP request shows an HTTP request with the GET verb used to obtain an item from the recipes collection of a remote service.
USING GET IN AN HTTP REQUEST
using System.Net.Http;
public sealed partial class HttpClientSamplePage : LayoutAwarePage
{
private async void GetRecipeForRecipeIDAsync(string url, string ID)
{
try
{
// The URL is http://www.contosorecipes.com/recipes/,
// the ID needs to be appended
HttpRequestMessage httpRequestMessage = new
HttpRequestMessage(HttpMethod.Get, url + ID);
// Prepare an HttpClient and issue a request
HttpClient httpClient = new HttpClient();
// Set up the request header
httpClient.MaxResponseContentBufferSize = 256000;
// Add a user-agent header
httpClient.DefaultRequestHeaders.Add("user-agent",
"Mozilla/5.0 (compatible; MSIE 10.0; Windows NT 6.2; WOW64;
Trident/6.0)");
HttpResponseMessage response = await
httpClient.SendAsync(httpRequestMessage);
// Raise an exception if the remote server returned an
// HTTP error status code
response.EnsureSuccessStatusCode();
// Display the status code and reason phrase
statusTextBlock.Text = response.StatusCode + ", " +
response.ReasonPhrase;
string responseBody = await response.Content.ReadAsStringAsync();
// Display the recipe
responseTextBlock.Text = responseBody;
}
catch (HttpRequestException hEx)
{
statusTextBlock.Text = hEx.ToString();
}
catch (Exception ex)
{
statusTextBlock.Text = ex.ToString();
}
}
}
EXAM TIP
To use remote services built with RESTful interfaces, it is important to understand the HTTP verbs and how they are used in HTTP requests. Although you are not expected to write code to show how to use the verbs, you should be familiar with the way they are supposed to be used in a Windows Store app with the HttpClient API.
WinRT APIs provide a number of utility methods in the HttpClient class that can be used for HTTP GET, POST, PUT, and DELETE requests:
§ GetAsync. This method is used to send an HTTP GET request.
§ DeleteAsync. This method is used to send an HTTP DELETE request.
§ PostAsync. This method is used to send an HTTP POST request.
§ PutAsync. This method is used to send an HTTP PUT request.
These methods make it simpler to prepare and send the most common HTTP requests to RESTful web services. There are several overloads for each of these methods. Using the GetAsync method to retrieve remote data shows how the GetAsync method is used to obtain a recipe from a remote service.
USING THE GETASYNC METHOD TO RETRIEVE REMOTE DATA
using System.Net.Http;
public sealed partial class HttpClientSamplePage : LayoutAwarePage
{
private async void GetRecipeForRecipeIDAsync(string url, string ID)
{
try
{
// Prepare an HttpClient and issue a request
HttpClient httpClient = new HttpClient();
// Set up the request header
httpClient.MaxResponseContentBufferSize = 256000;
// Add a user-agent header
httpClient.DefaultRequestHeaders.Add("user-agent",
"Mozilla/5.0 (compatible; MSIE 10.0; Windows NT 6.2; WOW64;
Trident/6.0)");
// The URL is http://www.contosorecipes.com/recipes/,
// the ID needs to be appended
HttpResponseMessage response = await
httpClient.GetAsync(url + ID);
// Raise an exception if the remote server returned an
// HTTP error status code.
response.EnsureSuccessStatusCode();
// Display the status code and reason phrase
statusTextBlock.Text = response.StatusCode + ", " +
response.ReasonPhrase;
string responseBody = await response.Content.ReadAsStringAsync();
// Display the recipe
responseTextBlock.Text = responseBody;
}
catch (HttpRequestException hEx)
{
statusTextBlock.Text = hEx.ToString();
}
catch (Exception ex)
{
statusTextBlock.Text = ex.ToString();
}
}
}
Consuming SOAP/WCF services
WCF is a framework for developing web services that can be located in the Internet or within an intranet. WCF services use SOAP to exchange messages usually formatted in XML over HTTP or Transmission Control Protocol (TCP) with their interface described in a Web Services Description Language (WSDL) file. Windows Store apps can send asynchronous requests over HTTP to WCF service endpoints.
Visual Studio makes it simple to consume WCF services in Windows Store apps. You can right-click your app, select Add Service Reference from the menu, and add the location of the WCF service, as shown in Figure 5-4.
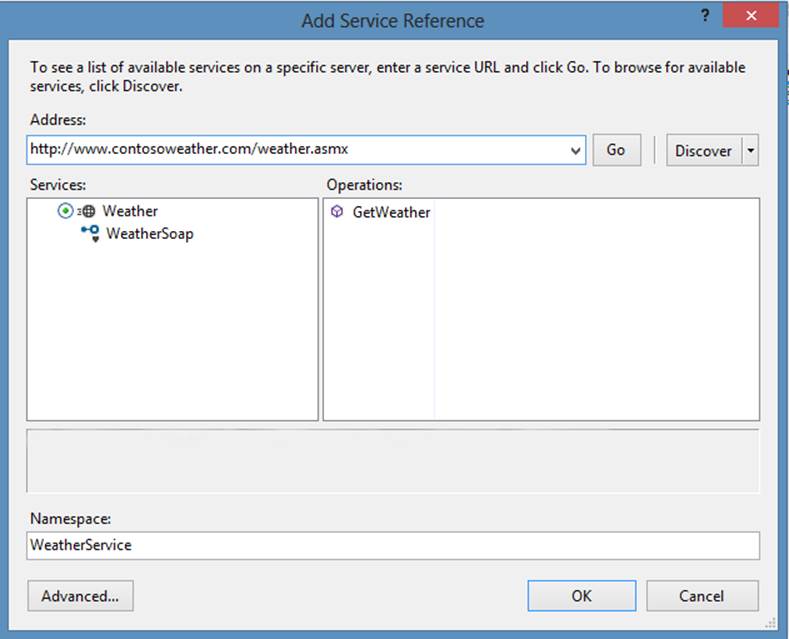
Figure 5-4. Adding a reference to a WCF service that provides the weather conditions for a city
After the reference to the WCF service is added successfully, Visual Studio adds the code required to invoke the web service in the Service References folder. The following code queries the weather for a city and displays it in the XAML:
protected override async void OnNavigatedTo(NavigationEventArgs e)
{
WeatherService.WeatherSoapClient client = new WeatherService.WeatherSoapClient();
WeatherService.GetWeatherResponse response =
await client.GetWeatherAsync("New York");
Response.Text = response.Body.GetWeatherResult;
}
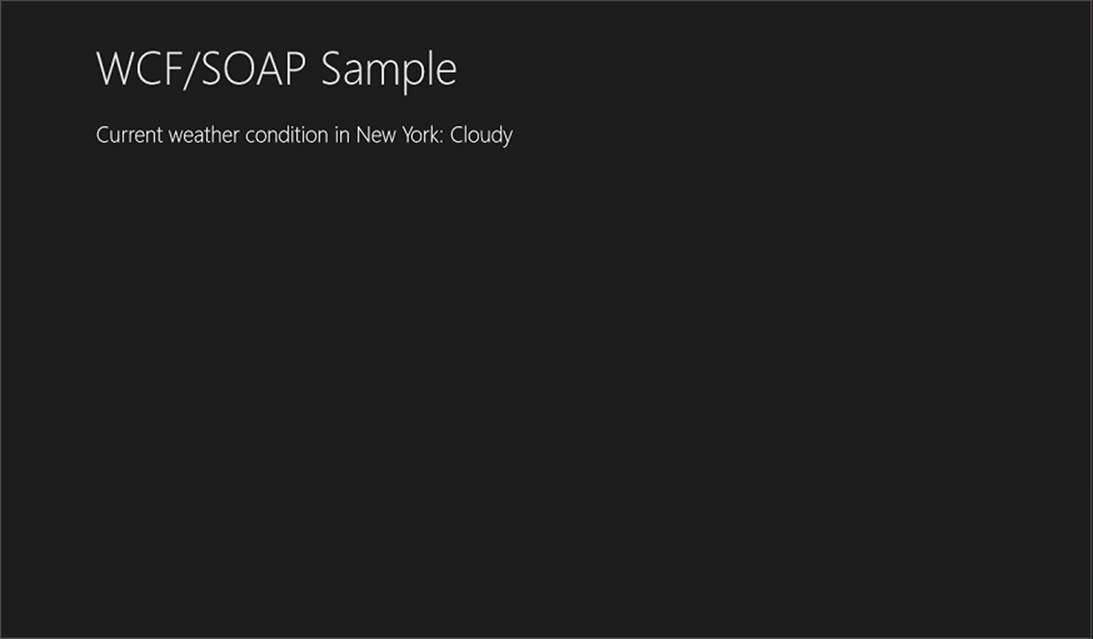
The response received from the weather service is shown in Figure 5-5.
 New York: Cloudy.”" width="1093" height="639" />
Figure 5-5. A Windows Store app showing the weather prediction received from a WCF service
The code generated by Visual Studio when the service reference is added supports only asynchronous requests to the remote service. This ensures the UI remains responsive while data is being fetched.
Using WebSockets for bidirectional communication
In traditional Windows applications requiring network connectivity with a server that stays alive, transporting data over sockets used to be the popular mechanism. With the increasing popularity of web services and the use of HTTP with REST for developing clients to access them, the WebSocket protocol was created to use HTTP to set up the initial connection and use sockets for exchanging data over TCP. Although accessing remote servers over HTTP using a RESTful interface is easier than other options, it does not guarantee that a large amount of data can be reliably delivered to the client or to the server.
The WebSocket protocol specifies a method to exchange data over a fast and secure two-way communications channel in the network between a client and a server. Data can be transferred between the client and server in real time over a single socket in both directions. Examples of Windows Store apps that benefit from WebSockets are games and dashboards displaying stock quotes or weather information.
In the setup stage of the connection between the client and a server, an HTTP-based handshake is exchanged between the two parties. If the handshake is successful, WebSockets is used as the application protocol instead of HTTP using the same TCP connection. After the WebSockets connection is established, HTTP is no longer involved. Either party can close the WebSockets connection at any time. To use WebSockets, the server must support WebSockets.
WinRT APIs provide two types of WebSocket classes: the MessageWebSocket and StreamWebSocket in the Windows.Networking.Sockets namespace. The MessageWebSocket class is useful when the data exchanged is not large, and the message can be either in the UTF-8 or binary format. It also provides a notification that an entire WebSocket message has been received. The StreamWebSocket class is useful when a large amount of data, such as photos or movies, needs to be transferred. It supports messages in the binary format only, and sections of a message can be read with each read operation.
The WebSocket protocol specifies two URI schemes: ws: for all unencrypted communications, and wss: for all secure communications that should be encrypted. The ConnectAsync method of both the WebSocket classes expect the URI of the remote server to be specified with the ws: as the URL prefix for unencrypted connections and wss: as the URL prefix for encrypted connections. The C# code in Using the MessageWebSocket class to send data to a server and receive confirmation shows how the MessageWebSocket class can be used to send data to the server and be notified that the message sent was received by the server.
USING THE MESSAGEWEBSOCKET CLASS TO SEND DATA TO A SERVER AND RECEIVE CONFIRMATION
using Windows.Networking.Sockets;
using Windows.Storage.Streams;
using Windows.Web;
public sealed partial class WebSocketsSamplePage : LayoutAwarePage
{
private MessageWebSocket messageWebSocket;
private DataWriter messageWriter;
private async void SendMessageToRemoteServer(string url, string message)
{
try
{
// Make a local copy to avoid races with Closed event. This avoids the
// socket from being closed when the app is trying to send a message
// to the server.
MessageWebSocket webSocket = messageWebSocket;
if (webSocket == null)
{
// Set up connection
Uri server = new Uri(url);
webSocket = new MessageWebSocket();
// Set up the MessageWebSocket to UTF-8 format
webSocket.Control.MessageType = SocketMessageType.Utf8;
// Set up callbacks
webSocket.MessageReceived += MessageReceived;
webSocket.Closed += Closed;
// Connect and store a copy of the websocket
await webSocket.ConnectAsync(server);
messageWebSocket = webSocket;
messageWriter = new DataWriter(webSocket.OutputStream);
}
// Buffer the data being sent
messageWriter.WriteString(message);
// Send the data as one complete message
await messageWriter.StoreAsync();
}
catch (Exception ex)
{
WebErrorStatus status =
WebSocketError.GetStatus(ex.GetBaseException().HResult);
// Handle the error
}
}
private void MessageReceived(MessageWebSocket sender,
MessageWebSocketMessageReceivedEventArgs args)
{
try
{
using (DataReader reader = args.GetDataReader())
{
reader.UnicodeEncoding = Windows.Storage.Streams.UnicodeEncoding.Utf8;
string read = reader.ReadString(reader.UnconsumedBufferLength);
}
}
catch (Exception ex) // For debugging
{
WebErrorStatus status =
WebSocketError.GetStatus(ex.GetBaseException().HResult);
// Handle the error
}
}
private void Closed(IWebSocket sender, WebSocketClosedEventArgs args)
{
// This is invoked on another thread so use Interlocked.Exchange
// to avoid race conditions with the Start/Close/Reset methods.
MessageWebSocket webSocket = Interlocked.Exchange(ref messageWebSocket, null);
if (webSocket != null)
{
webSocket.Dispose();
}
}
}
The StreamWebSocket class can be used to exchange large files in the binary format. It provides a Closed event when a close packet is received as part of closing the socket after the exchange. Using the StreamWebSocket class to exchange data with a server shows how a StreamWebSocketclass is used to exchange data with the server.
USING THE STREAMWEBSOCKET CLASS TO EXCHANGE DATA WITH A SERVER
using Windows.Networking.Sockets;
using Windows.Web;
public sealed partial class WebSocketsSamplePage : LayoutAwarePage
{
private StreamWebSocket streamWebSocket;
private byte[] readBuffer;
private async void SendMessageToRemoteServer(string url, string message)
{
try
{
// Make a local copy to avoid races with the Closed event. This avoids the
// socket from being closed when the app is trying to send a message
// to the server.
StreamWebSocket webSocket = streamWebSocket;
if (webSocket != null)
{
// Set up connection
Uri server = new Uri(url);
webSocket = new StreamWebSocket();
webSocket.Closed += Closed;
// Connect and store a copy of the websocket
await webSocket.ConnectAsync(server);
streamWebSocket = webSocket;
readBuffer = new byte[2048];
// Start a background task to continuously read for incoming data
Task receiving = Task.Factory.StartNew(ReceiveData,
webSocket.InputStream.AsStreamForRead(),
TaskCreationOptions.LongRunning);
// Start a background task to continuously write outgoing data
Task sending = Task.Factory.StartNew(SendData,
webSocket.OutputStream, TaskCreationOptions.LongRunning);
}
}
catch (Exception ex)
{
WebErrorStatus status =
WebSocketError.GetStatus(ex.GetBaseException().HResult);
// Handle the error
}
}
// Send data to the server
private async void SendData(object state)
{
int dataSent = 0;
byte[] data = new byte[] { 0×00, 0×01, 0×02, 0×03, 0×04,
0×05, 0×06, 0×07, 0×08, 0×09 };
try
{
IOutputStream writeStream = (IOutputStream)state;
// Send until the socket gets closed/stopped
while (true)
{
// using System.Runtime.InteropServices.WindowsRuntime;
await writeStream.WriteAsync(data.AsBuffer());
dataSent += data.Length;
// Display the data in the DataSentField TextBlock
MarshalText(DataSentField, dataSent.ToString(), false);
// Delay so the user can watch what's going on.
await Task.Delay(TimeSpan.FromSeconds(1));
}
}
catch (ObjectDisposedException)
{
// Display a message that the write has stopped, or take a specific action
}
catch (Exception ex)
{
WebErrorStatus status =
WebSocketError.GetStatus(ex.GetBaseException().HResult);
// Handle the error
}
}
// Read data received from the server
private async void ReceiveData(object state)
{
int bytesReceived = 0;
try
{
Stream readStream = (Stream)state;
while (true) // Until closed and ReadAsync fails.
{
int read = await readStream.ReadAsync(readBuffer, 0, readBuffer.Length);
bytesReceived += read;
// Display the data in the DataReceivedField TextBlock
MarshalText(DataReceivedField, bytesReceived.ToString(), false);
// Do something with the data.
}
}
catch (ObjectDisposedException)
{
// Display a message that the read has stopped, or take a specific action
}
catch (Exception ex)
{
WebErrorStatus status =
WebSocketError.GetStatus(ex.GetBaseException().HResult);
// Handle the error
}
}
private void Closed(IWebSocket sender, WebSocketClosedEventArgs args)
{
// This is invoked on another thread so use Interlocked
// to avoid races with the Start/Close/Reset methods.
StreamWebSocket webSocket = Interlocked.Exchange(ref streamWebSocket, null);
if (webSocket != null)
{
webSocket.Dispose();
}
}
// When operations happen on a background thread, need to
// marshal UI updates back to the UI thread.
private void MarshalText(TextBox output, string value, bool append)
{
var ignore =
output.Dispatcher.RunAsync(Windows.UI.Core.CoreDispatcherPriority.Normal, () =>
{
if (append)
{
output.Text += value;
}
else
{
output.Text = value;
}
});
}
}
Exceptions raised during data exchange by either the MessageWebSocket or StreamWebSocket class can be examined to determine the type of error. The WebSocketError class (in the Windows.Networking.Sockets namespace) provides the method GetStatus, which returns a member of theWebErrorStatus enumeration to indicate the type of error.
MORE INFO MEMBERS OF THE WEBERRORSTATUS ENUMERATION
The list of members of the WebErrorStatus enumeration is available at http://msdn.microsoft.com/en-au/library/windows/apps/windows.web.weberrorstatus.
Some Windows Store apps require secure WebSocket connections with Transport Layer Security (TLS)/Secure Sockets Layer (SSL) for exchanging data. To encrypt a WebSocket connection, you should use the wss: URI scheme as shown in the following C# example:
private async void SendDataToServer(string message)
{
webSocket = new MessageWebSocket();
await WebSocket.ConnectAsync("wss://www.example.com");
}
Both the MessageWebSocket and StreamWebSocket classes have companion classes (MessageWebSocketControl and StreamWebSocketControl, respectively) that provide properties for advanced configuration of the WebSocket classes such as the size of the buffer to be used for sending data, the credential to use for authentication with a proxy and the credential to use for authentication with the server. You can use the Control property in the WebSocket classes to access and set these properties to the values you require.
MORE INFO ADVANCED CONTROL OF THE WEBSOCKET CLASSES
You can read more about advanced control of the WebSocket classes at http://msdn.microsoft.com/library/windows/apps/hh994400.
To use either the MessageWebSocket class or the StreamWebSocket class in your Windows Store app, you must ensure that the right set of capabilities is declared in the package manifest file. The capabilities required for WebSocket communications are Internet (Client & Server) for bidirectional communications with servers in the Internet, and Private Networks (Client & Server) for bidirectional communications with servers located in the user’s trusted places, such as home and work.
Handling the progress of data requests
Some Windows Store apps need to control the progress of data requests sent to remote web services. Whereas some apps examine the HTTP response headers before they use the content in them, other apps cancel, HTTP requests before any response is received.
An overload of the GetAsync and SendAsync methods of the HttpClient class accepts a parameter of type HttpCompletionOption. HttpCompletionOption is an enumeration with the following members:
§ ResponseHeadersRead. This specifies that the HttpClient object will return a response as soon as the HTTP headers have been read before the payload is read.
§ ResponseContentRead. This specifies that the HttpClient object will return a response as soon as the HTTP headers and the payload are both available.
By adding the ResponseHeadersRead option in the HttpClient object, an HttpResponseMessage is available as soon as the HTTP readers have been read before the payload is available. You can examine the HTTP headers for the content type and size before consuming the payload. An app can start preparing for the content to be displayed after the headers have been examined. Using the GetAsync method with the HttpCompletionOption shows how the HttpCompletionOption is used with the GetAsync method in C#.
USING THE GETASYNC METHOD WITH THE HTTPCOMPLETIONOPTION
using System.Net.Http;
public sealed partial class HttpClientSamplePage : LayoutAwarePage
{
private async void ReadMessageFromServer(string url)
{
try
{
// Prepare a HttpClient and issue a request
HttpClient httpClient = new HttpClient();
// Add a user-agent header
httpClient.DefaultRequestHeaders.Add("user-agent",
"Mozilla/5.0 (compatible; MSIE 10.0;
Windows NT 6.2; WOW64; Trident/6.0)");
HttpResponseMessage response = await httpClient.GetAsync(url,
HttpCompletionOption.ResponseHeadersRead);
// Raise an exception if the remote server returned an
// HTTP error status code.
response.EnsureSuccessStatusCode();
// You can prepare the UI for displaying the content
// Payload is available now
string responseBody = await response.Content.ReadAsStringAsync();
// Display the string, content is available
responseTextBlock.Text = responseBody;
}
catch (HttpRequestException hEx)
{
statusTextBlock.Text = hEx.ToString();
}
catch (Exception ex)
{
statusTextBlock.Text = ex.ToString();
}
}
}
The HttpClient class provides the Timeout property, which can be used to set a timeout on the outgoing HTTP request, the default being 100 seconds. An instance of HttpClient can cancel all pending requests with the CancelPendingRequests method, and the same instance can still create and send new HTTP requests. The GetAsync, DeleteAsync, PostAsync, PutAsync, and SendAsync methods can be provided with a CancellationToken that enables calling objects to receive a notification if an HTTP request is canceled.
MORE INFO CANCELLATION OF ASYNCHRONOUS OPERATIONS
You can read more about cancellation of asynchronous operations in the article at http://msdn.microsoft.com/en-au/library/dd997364.aspx.
THOUGHT EXPERIMENT
Designing an enterprise app’s architecture
In this thought experiment, apply what you’ve learned about this objective. You can find answers to these questions in the “Answers” section at the end of this chapter.
A digital media publications company with multiple offices around the world is developing a Windows Store app. It will be used by employees in their offices as well as from temporary locations.
Employees create digital media and store them in the server. They can access the work of their colleagues by browsing the internal collaboration site. A user in the system is authenticated over a secure connection before they can perform any activities. The server fully supports WebSockets for communications and exposes a RESTful HTTP web services for access to the resources.
What are your recommendations for implementing the following features in the organization’s Windows Store app?
1. Users must be authenticated with the system over a secure connection to the server.
2. Users can examine the media created by their colleagues by browsing through various lists.
3. Users can upload and download media files over a secure connection to the server.
Objective summary
§ You can use the HttpClient class to retrieve data from remote servers. You can set additional properties in the request to control its behavior.
§ HTTP verbs such as GET, POST, PUT, and DELETE can be used to retrieve and update resources in a remote server.
§ Windows Store apps can reference WCF services and use methods exposed by the services to carry out operations such as requesting data.
§ WebSockets provide a simple yet powerful method of communications between a Windows Store app and a server that supports WebSockets.
§ You can use MessageWebSockets in scenarios where relatively small messages in either UTF-8 or binary format are exchanged between the client and server.
§ You can use StreamWebSockets for exchanging large messages in the binary format between the client and the server.
§ The progress of data requests can be controlled by examining the HTTP headers first and then reading the payload; requests can be canceled if necessary.
Objective review
Answer the following questions to test your knowledge of the information in this objective. You can find the answers to these questions and explanations of why each answer choice is correct or incorrect in the “Answers” section at the end of this chapter.
1. You are developing a Windows Store app that requires data to be downloaded from a remote server. The server enables secure connections from browsers and other clients only with the user-agent present in the request header. The data is a string never exceeding 1 KB. What is the best way to implement this requirement in your app?
a. Use Windows sockets over TCP to create and send requests to the server.
b. Create a request, encrypt it, and send it to the server using Windows sockets over TCP.
c. Use an HttpClient with its user-agent set in its DefaultRequestHeaders property and a URL with https:// prefix.
d. Use a StreamWebSocket to send the request to a URL with the https:// prefix.
2. A Windows Store app requires data to be downloaded from a remote server and displayed as content. The app has to be responsive while content is being downloaded. The server can send various types of messages with varying sizes on a connection that is prone to timeouts. It uses HTTP response headers to provide the meta information on the payload contained in the response. How will you implement this requirement in your app? (Choose all that apply.)
a. Use the HttpCompletionOption of the HttpClient class set to ResponseHeadersRead, read the headers, and then decide whether the expected content type is present in the payload.
b. Use the MaxResponseContentBufferSize in the HttpClient object to set a maximum size on the buffer while reading the payload.
c. Use sockets over TCP for an always-on connection. This will allow your app to parse every response from the server and use the ones that are required.
d. Set a timeout value to control the time your app needs to wait before the request times out.
e. Use MessageWebSockets to receive data from the server. Parse the data in the MessageReceived handler and use it in your app.
3. A popular multi-player game available in other platforms is being ported to Windows 8. You are asked to implement the features that will enable the app to exchange various kinds of data with a high-performance gaming server. Which options will you use to implement this requirement in the app? (Choose all that apply.)
a. Use the HttpClient with a long timeout to download all data after authentication.
b. Use sockets over TCP with data encrypted by your app.
c. Use HttpClient to authenticate the user over SSL using a URL with an https:// prefix.
d. Use a MessageWebSocket to exchange player moves and scores with the server.
e. Use a StreamWebSocket to download updates for the game whenever they are available on the server.
Objective 5.3: Implement data binding
Data binding is a powerful technique that simplifies the process of adding data to the presentation layer of a Windows Store. Traditionally, applications would iterate through a collection of data items and add each item to a control in the UI using code. This meant regular updates to code as requirements of the UI changed or the dataset itself changed. Data binding decouples the data model from the view, enabling updates in the data to appear in the view and vice versa.
WinRT APIs support data binding in common controls through markup extensions in XAML. The connection between a control and its data source is expressed as a declaration in the XAML of the user interface. Data binding enables data from controls within the same page to be bound to other controls. It also supports binding of a control to a specific property or path within a collection or data context. Item controls enable a collection of items to be bound so that they are displayed as a list in the user interface. ItemsControl can be used to bind collections and customize the way the data is displayed in the user interface. ItemsControl provides a good starting point to create your own data controls for Windows Store apps.
Items in a data collection that are bound to a data control can be modified using value converters. In addition, values entered by a user in a data control can be converted to suit the format supported by the data source. Typically, a class is created by implementing the IValueConverter interface to convert the format of data between the source and the target. Value converters are handy for modifying data for specific source-target pairs, such as the visibility of a control based on the value of a Boolean.
Dependency properties are central in the data binding mechanism. A dependency property is a special type of property, the value of which is obtained from other sources. These sources can include values of controls, user input, values from parent-child relationships in the user interface, and similar items. Dependency properties extend basic properties by providing a property wrapper instead of a private field that usually backs a basic property. You can create your own dependency properties and use them in data binding of controls through XAML.
Validation of data entered by the user is an important step before the data is used in the data model. Validation is typically implemented in the viewmodel in the Model-View-ViewModel (MVVM) architecture. The INotifyDataErrorInfo interface can be used to implement custom synchronous and asynchronous validation for user input. Filtering, grouping, and data sorting can be implemented through the data collection that is bound to a data collection in the user interface. The CollectionViewSource class supports filtering, grouping, and data sorting for presentation in the user interface.
NOTE
This objective covers how to:
§ Choose and implement data-bound controls.
§ Bind collections to items controls.
§ Implement the IValueConverter interface.
§ Create and set dependency properties.
§ Validate user input.
§ Enable filtering, grouping, and sorting data in the user interface.
Choosing and implementing data-bound controls
Data binding is a method available for Windows Store apps to display and interact with data. It provides a connection between a binding source, usually a data source, and a binding target, which is a UI element in the presentation layer. The connection is made with an object of the typeBinding, which implements the logic to move data between the target and source, and is modified with an optional converter.
A binding source can be a simple common language runtime (CLR) object including the target element as well as other UI elements. Classes defined in C# and Visual Basic produce CLR objects, so they can act as the binding source. In addition, WinRT objects that implement theICustomPropertyProvider or have a BindableAttribute can be a source for data binding.
A binding target is a DependencyProperty of a FrameworkElement, a class that helps with the behavior and layout of UI elements. The dependency property framework provides a way to express the value of a property of an object that depends on the value of one or more other properties. In WinRT, classes that participate in the dependency property system must derive from the DependencyObject base class. Classes that derive from the DependencyObject class can define one or more dependency properties that help in data binding.
The data binding framework obtains information from the Binding object about the source and target objects; the direction of the data flow between the source and target; and a value converter, if used. Data binding is commonly set up in XAML or with the SetBinding method of theFrameworkElement class.
The Binding class provides a number of properties commonly used to declare the data binding in a UI element through XAML:
§ ElementName. This property is used to set the source for the binding to an element in the UI.
§ Source. This property is used to set the data source for the binding.
§ RelativeSource. This property is used to set the source for the binding, specifying a location that is relative to the location of the binding target.
§ Path. This property is used to specify a property in the data source as the binding’s source. For example, if the data source is specified with the Source property in the binding, the Path property can be used to refer to a property in the data source. You can omit this in the XAML declaration of the binding, as shown in Using the default OneWay and OneTime binding modes.
§ Converter. This property is used to specify a converter object that is used by the binding framework to modify the data as it flows between the target and the source.
§ ConverterParameter. This property is used to specify a parameter used by the converter specified for the binding.
§ ConverterLanguage. This property is used to specify a language for the converter object, if specified for the binding with the Converter property. The default value of this property is the current language of the application context.
§ Mode. This property is used to specify the direction of the data flow in the binding. The value of the property is set to one of the members of the BindingMode enumeration.
Setting up the data binding in the UI of a Windows Store app requires the details of the data source as well as the direction of the flow of data. In some UI elements, you expect data to be presented as a read-only value; in other elements, you expect the user to interact with the data and update it. The direction of data flow in binding is specified with the BindingMode enumeration, which has the following members:
§ OneWay. In this mode, the target property is set with the value from the source when the binding is created and updated when the source changes. This is the default value for the Mode property of a Binding object.
§ OneTime. In this mode, the target property is set with the value from the source when the binding is created. The target property is not updated after the binding is created.
§ TwoWay. In this mode, the target property is set with the value from the source when the binding is created. Data binding updates the target or the source when either the source or target changes.
The XAML code in Using the default OneWay and OneTime binding modes shows the Text property of a TextBlock control set to the FirstName property of a binding object in the default OneWay binding mode. It also shows the Foreground property set to the UserName property of aBinding object with the mode set to OneTime.
USING THE DEFAULT ONEWAY AND ONETIME BINDING MODES
<TextBlock x:Name="FirstNameTextBlock" Text="{Binding FirstName}"
Foreground="{Binding UserNameBrush, Mode=OneTime}"/>
An important concept in data binding is data context. If a data source is set as the data context of a UI element, all its children inherit the data context. In Using the default OneWay and OneTime binding modes, the Binding object is set in the code-behind through the data context. The data context of a FrameworkElement is specified using an object of the type DataContext. The children and descendants of the FrameworkElement inherit the value of the DataContext. For example, in a grid with a number of controls, their DataContext property is set to the data context of the grid. Setting a value in the DataContext is particularly useful when a collection of objects needs to bind to a control.
Changes in the source of a data-bound control are propagated to the target if the direction of the data flow is either OneWay or TwoWay. For the changes in the source to propagate to the target, the source must implement the INotifyPropertyChanged interface. The INotifyPropertyChangedinterface has a single event: PropertyChanged. This event is used by the source to notify targets that the value of the property has changed. Implementing the INotifyPropertyChanged interface shows a sample implementation of the INotifyPropertyChanged interface.
IMPLEMENTING THE INOTIFYPROPERTYCHANGED INTERFACE
using System.ComponentModel;
using Windows.UI.Xaml.Media;
// Create a class that implements INotifyPropertyChanged.
public class ForegroundColorBrush : INotifyPropertyChanged
{
private SolidColorBrush _userNameBrush;
// Declare the PropertyChanged event.
public event PropertyChangedEventHandler PropertyChanged;
// Create the property that will be the source of the binding.
public SolidColorBrush UserNameBrush
{
get { return _userNameBrush; }
set
{
if (_userNameBrush != value)
{
_userNameBrush = value;
// Call NotifyPropertyChanged when the source property
// is updated.
NotifyPropertyChanged("UserNameBrush");
}
}
}
// NotifyPropertyChanged will raise the PropertyChanged event,
// passing the source property that is being updated.
private void NotifyPropertyChanged(string propertyName)
{
if (PropertyChanged != null)
{
PropertyChanged(this,
new PropertyChangedEventArgs(propertyName));
}
}
}
An instance of the ForegroundColorBrush class can be used as the data source for the Foreground property of a TextBlock, as shown in the XAML. The data context for the TextBlock is set up in the code-behind of the page where the UI element is laid out. This is shown in the following C# code:
using Windows.UI.Xaml.Media;
public sealed partial class XAMLBindingDemoPage : LayoutAwarePage
{
public XAMLBindingDemoPage()
{
ForegroundColorBrush textBlockBrush = new ForegroundColorBrush();
textBlockBrush.UserNameBrush = new SolidColorBrush(Colors.Blue);
FirstNameTextBlock.DataContext = textBlockBrush;
}
}
In addition to binding to objects that implement the INotifyPropertyChanged interface, UI elements can bind to properties of other UI elements in a page of a Windows Store app. In the following XAML code, a text block’s Text property is bound to the Value property of a Slider control:
<StackPanel Orientation="Vertical">
<Slider x:Name="sliderTwoWayDataSource" Width="180"
Minimum="1" Maximum="100" Value="50" />
<TextBox x:Name="tbTwoWayDataBound" Width="150"
Text="{Binding ElementName=sliderTwoWayDataSource,
Path=Value, Mode=TwoWay}" />
</StackPanel>
Binding collections to items controls
In addition to the controls that can be data bound to a dependency property of a FrameworkElement, WinRT APIs provide controls that can be bound to a collection of data. The data source in such cases is a list that implements the IEnumerable interface. These controls are commonly called items controls. They derive from the ItemsControl class.
The ItemsControl can be used in XAML as a control to display a list of items. You can use its Items property to specify a collection of objects that contains text blocks and buttons, for example. The following sample XAML shows the Items property of an ItemsControl used to arrange collection of other UI elements:
<ItemsControl Width="400" HorizontalAlignment="Left">
<ItemsControl.Items>
<TextBlock Text="Collection of items" Style="{StaticResource
GroupHeaderTextStyle}" />
<Rectangle Height="40" Width="360" Fill="Red" Margin="0,20,0,0"
HorizontalAlignment="Left"/>
<TextBox Text="Input here" Margin="0,20,0,0" FontSize="28" Height="50"
Width="360" HorizontalAlignment="Left"/>
<Button Content="Submit" FontSize="22" Margin="0,20,0,0"
HorizontalAlignment="Center" />
</ItemsControl.Items>
</ItemsControl>
Figure 5-6 shows the UI elements laid out in the ItemsControl control as set up in the XAML sample.
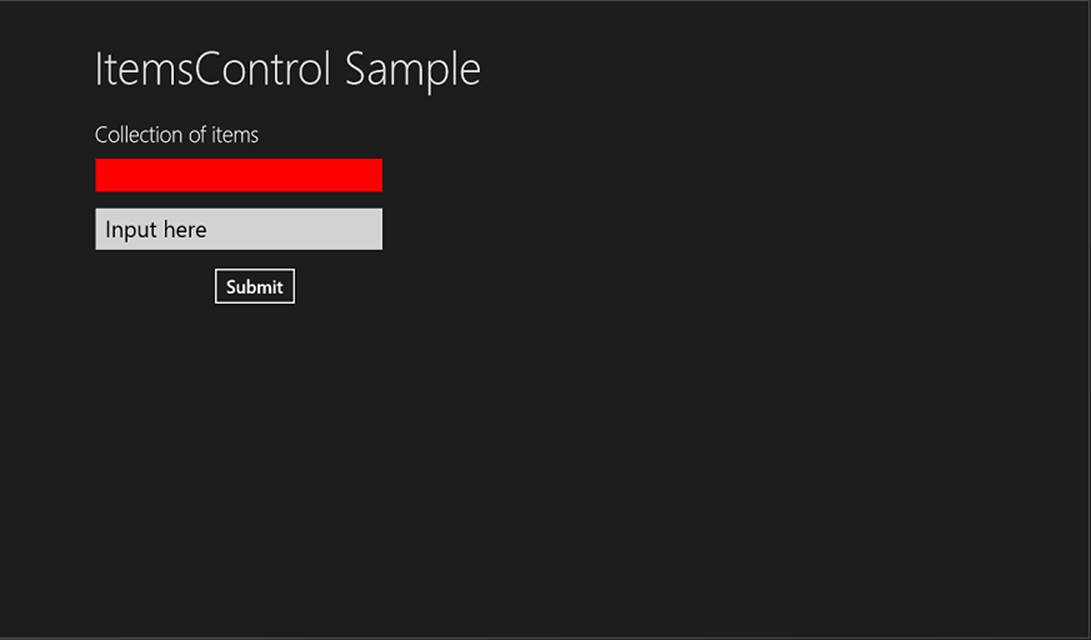
Figure 5-6. A Windows Store app with a list of UI elements laid out in an ItemsControl
The Items property of the ItemsControl class specifies the collection of items used to generate the content of the control. The Items property is of the type ItemCollection class, which holds a list of items.
MORE INFO ITEMCOLLECTION CLASS
You can read more about the ItemCollection class at http://msdn.microsoft.com/en-us/library/windows/apps/xaml/windows.ui.xaml.controls.itemcollection.aspx.
You can use the ItemsSource property of the ItemsControl class to set a collection of data as the data source for the control. The collection is an instance of a class that implements the IEnumerable interface. Note that you can use either the Items property or the ItemsSource property only. If you use the ItemsSource property, you cannot modify the collection using the Items property. When you bind a control to a whole object in the code-behind, there is no need to specify a value for the Path property. A simple example of an ItemsControl used to display a list of persons is shown in the following XAML code:
<ItemsControl x:Name="PersonsList" ItemsSource="{Binding}" />
ItemsControl is a useful control that can display a static collection of items. In many Windows Store apps, you want the user to interact with the items in a collection. For example, a user can select one or more items from a collection and mark them as favorite items. Users can also choose an item from a collection to view details typically displayed in a details page. In such cases, controls that derive from the Selector class are used to display a collection of items. The Selector class derives from the ItemsControl class and adds the SelectionChanged event. This event is raised whenever the user selects an item from the collection.
There are a number of controls that bind to a collection and enable users to select one or more items from the collection:
§ ComboBox. This control displays a list of items in a collection, with only one item visible at any time. The user can select a single item from the collection.
§ ListBox. This control displays items in a collection to fill its dimensions. If all the items cannot be displayed within the bounds of the control, the user can scroll and view the collection. The ListBox control supports multiple selections of items from the displayed list. Users can use the Shift key on their keyboard to select multiple items in sequence or the Control key to select multiple items from anywhere within the list.
§ ListView. This control is similar to the ListBox control. It is friendlier for touch-based devices with the support for the cross-slide gesture as well as the right-tap to select an item from the list. Items in a ListView are laid out vertically with a scrollbar visible in certain conditions.
§ GridView. This control is identical to the ListView control, except it lays out items in a horizontal direction. They both derive from the ListViewBase class.
§ FlipView. This control is designed to show one item at a time from a collection. The FlipView control provides users with the effect of flipping through the collection, similar to reading a book or viewing a photo album.
The ItemsControl class provides a number of properties to customize the layout and display of items in the item controls listed previously:
§ ItemContainerStyle. This property sets the style for rendering an item in the collection. The value of this property is set to a style that is used to customize the visual properties of the item container. For example, the Style property of a GridView control is set through theItemContainerStyle, which is meant to customize each GridViewItem that displays an item from the collection.
§ ItemContainerStyleSelector. This property sets the logic to select a specific ItemContainerStyle based on the characteristics of the item being displayed from the collection.
§ ItemsPanel. This property sets the panel that is used to lay out the items from the collection. The value of this property is an ItemsPanelTemplate object, which can have one or more child elements that define the panel layout.
§ ItemTemplate. This property sets the data template to display an item from the collection. A DataTemplate object has one or more child elements that are used to define the visual appearance of an item. For example, in a GridView that binds to a collection of movies, it can consist of anImage control for the thumbnail and a TextBlock control to display the title of the movie.
§ ItemTemplateSelector. This property sets the logic to select a specific DataTemplate data template based on the characteristics of the item being displayed.
To bind a collection to an ItemsControl object, you should use the ItemTemplate property to specify the data template used in binding of each piece of data from the binding source and the ItemsPanel property to specify the layout of items in the user interface. The following XAML code shows a GridView control used to display a collection of items with its ItemTemplate and ItemsPanel properties used to configure the data binding of each item and their layout:
<GridView ItemsSource="{Binding}" MaxHeight="500">
<GridView.ItemTemplate>
<DataTemplate>
<StackPanel Margin="20">
<TextBlock Text="{Binding Name}" FontWeight="Bold" />
<TextBlock Text="{Binding BirthDate}"/>
</StackPanel>
</DataTemplate>
</GridView.ItemTemplate>
<GridView.ItemsPanel>
<ItemsPanelTemplate>
<WrapGrid ItemWidth="145" ItemHeight="70"
MaximumRowsOrColumns="1"
VerticalChildrenAlignment="Center" />
</ItemsPanelTemplate>
</GridView.ItemsPanel>
</GridView>
The data source of an item control can change over time. The user expects the UI to update automatically instead of having to click a refresh button on the app bar or on the screen. In such cases, instead of binding to a collection that implements the IEnumerable interface, the item control should bind to an ObservableCollection or an object that implements the IList and INotifyCollectionChanged interfaces. The CollectionChanged event of the ObservableCollection class can be used to inform the user when an item is added, removed, changed, or moved; or if the collection is refreshed.
In some data sources, items can be added progressively or, to optimize the loading process, the business logic of a Windows Store app can request data to be loaded in the collection incrementally. In such cases, the ObservableCollection class can be extended with your own class that implements the ISupportIncrementalLoading interface. For example, the response from a remote web service can contain a certain number of items as well as a flag to indicate whether there are more items available. In addition, you have to implement the HasMoreItems property that returns a Boolean to indicate whether there are more items to load and the LoadMoreItemsAsync method to load the specified number of items from the source, for the ISupportIncrementalLoading interface. The item control uses the HasMoreItems property to find out whether there are more items to be loaded. If this property is False, it does not invoke the LoadMoreItemsAsync method to load more data.
Implementing the IValueConverter interface
Think of data binding as the glue that binds the source of data with a target. In some cases, there is a need to control the connection between the source and the target (for example, when the value of a data member crosses a threshold, the control bound to the data member can show a different color). Although it seems that the connection between the source and the data is very rigid, there is a way to control this connection.
WinRT APIs provide the IValueConverter interface that, when implemented in a class, enables the conversion of data between the source and the target. The IValueConverter interface defines two methods that must be implemented in a converter class:
§ Convert. This method is called before the data from the source is passed to the target for displaying it in the user interface.
§ ConvertBack. This method is called before the data from the UI is passed to the source for storage or updates. This method is called only in TwoWay data bindings.
Using the ConverterParameter XAML binding property for a converter, you can provide a parameter for both the Convert and ConvertBack methods. This parameter is useful when the conversion requires an additional value such as the format of a date for the target or a value such as a threshold to compare the source with.
Using a converter class to implement the IValueConverter interface shows a converter class that converts a DateTime object to a value displayed in the user interface.
USING A CONVERTER CLASS TO IMPLEMENT THE IVALUECONVERTER INTERFACE
public class BirthDateFormatter : IValueConverter
{
// This method converts the date of birth of the user to
// a format specified by the ConverterParameter in XAML.
public object Convert(object value, Type targetType,
object parameter, string language)
{
// Retrieve the format string and use it to format the value.
string formatString = parameter as string;
if (!string.IsNullOrEmpty(formatString))
{
return string.Format(
new CultureInfo(language), formatString, value);
}
// If the format string is null or empty, simply call ToString()
// on the value.
return value.ToString();
}
// Implementing one-way binding, no need to implement this method
public object ConvertBack(object value, Type targetType,
object parameter, string language)
{
throw new NotImplementedException();
}
}
The converter class in Using a converter class to implement the IValueConverter interface formats the date of birth of employees in the language of the app’s context. This value is not modified, so the ConvertBack method is not implemented. The format of the string displayed in the UI is specified in XAML in Formatting a string in an app using a converter class.
FORMATTING A STRING IN AN APP USING A CONVERTER CLASS
<Grid x:Name="LayoutRoot">
<Grid.Resources>
<!-- "local" is the namespace of value converter class -->
<local:BirthDateFormatter x:Key="birthDateFormatter" />
</Grid.Resources>
<ListView x:Name="EmployeeList">
<ListView.ItemTemplate>
<DataTemplate>
<StackPanel>
<TextBlock Text="{Binding Path=Name}" Mode="OneWay"
Style="{StaticResource BasicTextStyle}"
HorizontalAlignment="Center" />
<TextBlock Text="{Binding Path=DateOfBirth, Mode=OneWay,
Converter={StaticResource birthDateFormatter},
ConverterParameter=\{0:d\}}"
Style="{StaticResource BasicTextStyle}"
HorizontalAlignment="Center" />
<TextBlock
</StackPanel>
</DataTemplate>
</ListView.ItemTemplate>
</ListView>
</Grid>
In addition to a parameter, you can specify a language for the conversion, which is important when the conversion is applicable for a specific region and language. You can also specify the data type of the target for which the data is being converted.
Creating and setting dependency properties
WinRT APIs provide a dependency property framework that helps in data binding of a UI element with a data source. A dependency property is a special kind of property that depends on multiple providers for determining its value at any time. It provides a notification to interested parties whenever its value changes. Consider a dependency property as an extension of the concept of a class property.
Unlike the traditional properties of a class that use a private member as their backing store, dependency properties use a property store that backs the property. A property store consists of a set of property identifiers and associated values that exist for an object. A property in this store is identified by an instance of DependencyProperty instead of its name. A dependency property is registered and owned by an object of the type DependencyObject. The DependencyObject class is located high in the class hierarchy, and most classes that are used in the UI of a Windows Store app inherit from the DependencyObject class.
Dependency properties are important in custom controls where they are used to implement features required in the user interface. The base class of a custom control (such as the Control class) inherits from DependencyObject. The DependencyObject class provides the following wrapper methods that are used with dependency properties:
§ SetValue. This method is used to set the local value of a dependency property to the value provided.
§ GetValue. This method is used to get the current value of a dependency property.
§ ReadLocalValue. This method is used to read the local value of a dependency property if a local value is set.
§ ClearValue. This method is used to clear the local value of a dependency property.
You can set a local value for a dependency property to an attribute or property element in XAML. When you set a current value to a dependency property, it enables you to change the value of the property without overwriting the source of a previous value; that is, the binding is left as is.
To create a DependencyProperty in a custom control, the property needs to be registered with the dependency property framework using the static Register method. You can provide metadata for the dependency property or specify it as null. A DependencyProperty identifier as a public static read-only member of the custom control is also required. A wrapper property with the name set to the value used with the Register method is required. You can implement the get and set accessors to connect the wrapper property with the dependency property it wraps. Creating a DependencyProperty in a custom control shows C# code for a custom control that uses an image with a label.
CREATING A DEPENDENCYPROPERTY IN A CUSTOM CONTROL
using Windows.UI.Xaml;
using Windows.UI.Xaml.Controls;
using Windows.UI.Xaml.Media;
public sealed class ImageWithLabelControl : Control
{
public ImageWithLabelControl()
{
this.DefaultStyleKey = typeof(ImageWithLabelControl);
}
// Wrapper property
public ImageSource ImagePath
{
get { return (ImageSource)GetValue(ImagePathProperty); }
set { SetValue(ImagePathProperty, value); }
}
// Using a DependencyProperty as the backing store for ImagePath.
// This enables animation, styling, binding, etc.
public static readonly DependencyProperty ImagePathProperty =
DependencyProperty.Register("ImagePath", typeof(ImageSource),
typeof(ImageWithLabelControl), null);
// Wrapper property
public string Label
{
get { return (string)GetValue(LabelProperty); }
set { SetValue(LabelProperty, value); }
}
// Using a DependencyProperty as the backing store for Label.
// This enables animation, styling, binding, etc.
public static readonly DependencyProperty LabelProperty =
DependencyProperty.Register("Label", typeof(string),
typeof(ImageWithLabelControl), null);
}
The custom control is declared in XAML as shown in Declaring a custom control with a DependencyProperty.
DECLARING A CUSTOM CONTROL WITH A DEPENDENCYPROPERTY
<common:LayoutAwarePage
x:Class="DPSample.DPSample"
xmlns=http://schemas.microsoft.com/winfx/2006/xaml/presentation
xmlns:x=http://schemas.microsoft.com/winfx/2006/xaml
xmlns:local="using:DPSample"
xmlns:common="using:SDKTemplate.Common"
xmlns:d=http://schemas.microsoft.com/expression/blend/2008
xmlns:mc=http://schemas.openxmlformats.org/markup-compatibility/2006
mc:Ignorable="d">
<Grid x:Name="LayoutRoot">
<Grid.Resources>
<Style TargetType="local:ImageWithLabelControl">
<Setter Property="Template">
<Setter.Value>
<ControlTemplate TargetType="local:ImageWithLabelControl">
<Border Background="LightBlue" BorderBrush="Black"
BorderThickness="2" HorizontalAlignment="Center"
Width="140" Height="150">
<StackPanel HorizontalAlignment="Center">
<Image Stretch="Uniform" Width="100" Height="100"
Source="{TemplateBinding ImagePath}"
Margin="5" />
<TextBlock TextAlignment="Center"
Text="{TemplateBinding Label}"
FontFamily="Seqoe UI" FontWeight="Light"
FontSize="26.667" Foreground="Black" />
</StackPanel>
</Border>
</ControlTemplate>
</Setter.Value>
</Setter>
</Style>
</Grid.Resources>
<StackPanel Orientation="Horizontal">
<local:ImageWithLabelControl ImagePath="Assets/Fruit1.png"
Label="Orange" Margin="0,0,20,0" />
<local:ImageWithLabelControl ImagePath="Assets/Fruit2.png"
Label="Strawberry" />
</StackPanel>
</Grid>
</common:LayoutAwarePage>
Figure 5-7 shows the custom control in a Windows Store app.
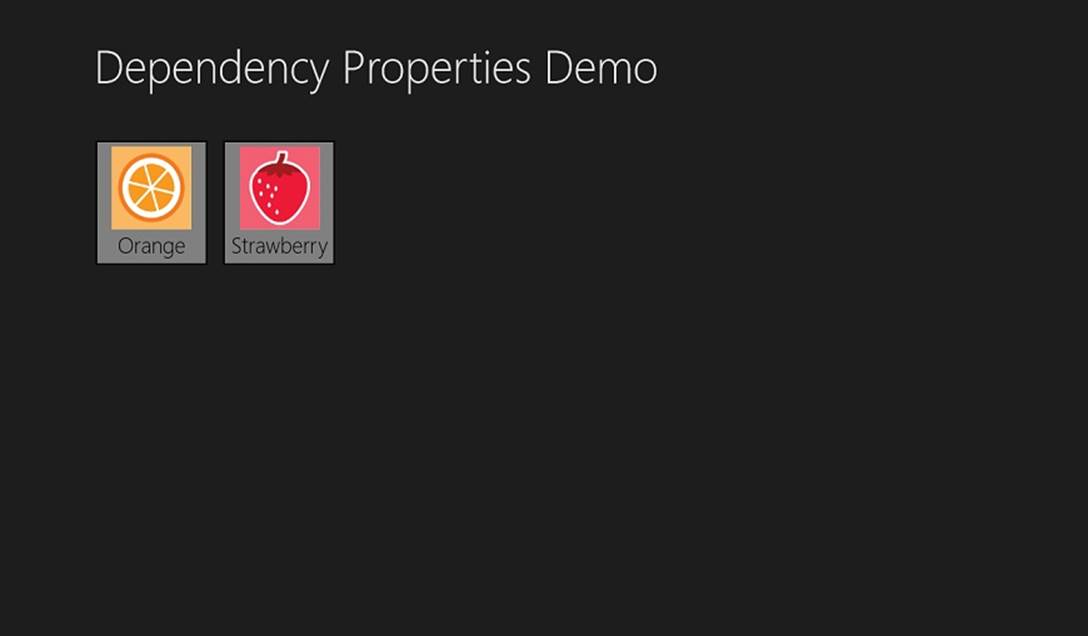
Figure 5-7. A Windows Store app with a custom control that has two dependency properties used to set up the visual appearance
Validating user input
Data entered by the user through the UI of a Windows Store app requires validation before its current value is updated. Data binding does not carry out the validation on behalf of the user. As a developer, you should implement user input validation of the data entered by the user. TheINotifyDataErrorInfo interface can be used to implement custom synchronous and asynchronous validation support in data classes.
In the data class, validation is carried when the value of a property is being set. If there is an error in validating the input data, the property name is used with the ErrorsChanged event to notify the target about the error, and it is up to the target to display them correctly to the user. The data binding framework uses the GetErrors method to obtain a list of errors encountered during the validation for a specific property or the entire data entity. The HasErrors property indicates whether there are validation errors for the data entity.
In the C# code in Implementing the INotifyDataErrorInfo interface with a data model class, a data model class implements the INotifyDataErrorInfo interface. The validation rule checks the age of the player and sets the value in the source only if it is in a certain range.
IMPLEMENTING THE INOTIFYDATAERRORINFO INTERFACE WITH A DATA MODEL CLASS
using System.ComponentModel;
public class PlayerDataModel : INotifyPropertyChanged, INotifyDataErrorInfo
{
private int age;
private Dictionary<string, List<string>> errors =
new Dictionary<string, List<string>>();
public int Age
{
get { return age; }
set
{
if (IsAgeValid(value))
{
age = value;
OnPropertyChanged();
}
}
}
// Age validation
public bool IsAgeValid(int value)
{
bool isValid = true;
if (value < 18)
{
AddError("Age", "Too young to play this game!");
isValid = false;
}
else if (value > 50)
{
AddError("Age", "Too old to play this game!");
isValid = false;
}
return isValid;
}
// INotifyPropertyChanged members
public event PropertyChangedEventHandler PropertyChanged;
// Notifies listeners that a property has changed
protected void OnPropertyChanged([CallerMemberName]string propertyName = null)
{
var eventHandler = this.PropertyChanged;
if (eventHandler != null)
{
eventHandler(this, new PropertyChangedEventArgs(propertyName));
}
}
// Validation error management
// Adds the specified error to the collection if it is not already present.
// Raise the ErrorsChanged event if the collection changes
private void AddError(string propertyName, string error)
{
if (!errors.ContainsKey(propertyName))
errors[propertyName] = new List<string>();
if (!errors[propertyName].Contains(error))
{
errors[propertyName].Add(error);
// Raise the ErrorsChanged event, if available
if (ErrorsChanged != null)
ErrorsChanged(this, new DataErrorsChangedEventArgs(propertyName));
}
}
// Remove an error from the collection if it is present.
// Raise the ErrorsChanged event if the collection changes
private void RemoveError(string propertyName, string error)
{
if (errors.ContainsKey(propertyName) &&
errors[propertyName].Contains(error))
{
errors[propertyName].Remove(error);
if (errors[propertyName].Count == 0) errors.Remove(propertyName);
// Raise the ErrorsChanged event, if available
if (ErrorsChanged != null)
ErrorsChanged(this, new DataErrorsChangedEventArgs(propertyName));
}
}
// INotifyDataErrorInfo members
public event EventHandler<DataErrorsChangedEventArgs> ErrorsChanged;
public System.Collections.IEnumerable GetErrors(string propertyName)
{
if (String.IsNullOrEmpty(propertyName) ||
!errors.ContainsKey(propertyName)) return null;
return errors[propertyName];
}
public bool HasErrors
{
get { return errors.Count > 0; }
}
}
Enabling data filtering, grouping, and sorting in the user interface
When data-binding controls to collections, many Windows Store apps display data grouped into categories or types. For example, a collection of photos in a photo sharing app can be grouped by date taken, tags, or the location where the photos were taken. In addition, users can choose to filter their photos by a data range or by selecting only a set of tags. Filtering limits the data that is displayed in the screen, enabling users to easily select the items they are interested in. The user can choose to sort the data so that the items are displayed in a certain order (for example, the most recent photos are displayed first).
In many cases, altering the format of the data obtained from a source to make it suitable for binding is not feasible. Creating a custom view of the data and using it between the data source and the target data-bound control is often the best solution. The ICollectionView interface supports manipulation of the data before it is presented to the user.
MORE INFO THE ICOLLECTIONVIEW INTERFACE
You can read more about the ICollectionView interface at http://msdn.microsoft.com/en-us/library/windows/apps/windows.ui.xaml.data.icollectionview.
If your Windows Store apps needs to display data in groups with headers for each group clearly highlighted, you can use the GridView control because it supports data binding with collections that contain grouped data. WinRT APIs provide the CollectionViewSource class that wraps a data collection and presents it in a way suitable for binding with a data control such as a GridView. In other words, it helps you to create a custom view for the data and have it available for binding. The main properties of the CollectionViewSource class are these:
§ Source. This property is used in the code-behind to set the collection that provides the data for the view. The collection can be a list of items retrieved from a remote web service or local database, for example.
§ IsSourceGrouped. This property is used to indicate whether the source of data is grouped.
§ ItemsPath. This property specifies the path to follow in the data source to find groups within the CollectionViewSource.
A CollectionViewSource is declared in XAML and is set as the ItemsSource of the data control. It provides a custom view of the original data, grouped per the requirements for the app. With the GroupStyle property of a data control such as the GridView, you can customize the header, the control used for laying out items of each group, and so on. Declaring a CollectionViewSource in XAML shows an example of the CollectionViewSource and the GridView control in XAML code.
DECLARING A COLLECTIONVIEWSOURCE IN XAML
<Page>
<Page.Resources>
<CollectionViewSource x:Name="employeesList" IsSourceGrouped="True"
ItemsPath="Employees"/>
</Page.Resources>
<Grid x:Name="LayoutRoot">
<GridView ItemsSource="{Binding Source={StaticResource employeesList}}"
Margin="120,20,10,20">
<GridView.ItemTemplate>
<DataTemplate>
<StackPanel Margin="20">
<TextBlock Text="{Binding Name}" FontWeight="Bold"
Style="{StaticResource ItemTextStyle}"/>
<TextBlock Text="{Binding Designation}" TextWrapping="NoWrap"
Style="{StaticResource BodyTextStyle}" />
</StackPanel>
</DataTemplate>
</GridView.ItemTemplate>
<GridView.GroupStyle>
<GroupStyle HidesIfEmpty="True">
<GroupStyle.HeaderTemplate>
<DataTemplate>
<Grid Background="LightGray" Margin="0">
<TextBlock Text='{Binding Department}'
Foreground="Black" Margin="30"
Style="{StaticResource HeaderTextStyle}"/>
</Grid>
</DataTemplate>
</GroupStyle.HeaderTemplate>
<GroupStyle.ContainerStyle>
<Style TargetType="GroupItem">
<Setter Property="MinWidth" Value="600"/>
<Setter Property="BorderBrush" Value="DarkGray"/>
<Setter Property="BorderThickness" Value="2"/>
<Setter Property="Margin" Value="3,0"/>
</Style>
</GroupStyle.ContainerStyle>
<GroupStyle.Panel>
<ItemsPanelTemplate>
<VariableSizedWrapGrid Orientation="Horizontal"/>
</ItemsPanelTemplate>
</GroupStyle.Panel>
</GroupStyle>
</GridView.GroupStyle>
</GridView>
</Grid>
</Page>
In the Declaring a CollectionViewSource in XAML, the items in the data sources are grouped by a key (the key is the Department in this case) and used as the source for the CollectionViewSource. This is shown in C# code in Creating a grouped source of data.
CREATING A GROUPED SOURCE OF DATA
var employees = EmployeeService.GetEmployeesAsync();
var groupedEmployees = from employee in employees
group employee by employee.Department into g
select g;
employeesList.Source = groupedEmployees;
When you create a grouped source of data, as shown in Creating a grouped source of data, a view object (of the type ICollectionView) is created. When set as the source of data for a CollectionViewSource, the data control bound to the CollectionViewSource updates itself. The ICollectionViewclass does not provide built-in support for data sorting and filtering. Therefore, if you need to provide data sorting and filtering in a data control such as the GridView, the Source property of the CollectionViewSource associated with the GridView needs to be updated. It is recommended you use Language-Integrated Queries (LINQ) to perform the data sorting and filtering from the source into a collection view and use it as a source for the CollectionViewSource.
THOUGHT EXPERIMENT
Using data binding in an app
In this thought experiment, apply what you’ve learned about this objective. You can find answers to these questions in the “Answers” section at the end of this chapter.
You are building a Windows Store app that will be used by tourists to explore attractions in various cities around the world. How would you use data controls, multiple layout and language format support, and value converters provided by the WinRT APIs in your app?
Objective summary
§ WinRT APIs provide a data binding framework for building Windows Store apps. Data binding helps with the implementation of a presentation layer that is loosely coupled to its data model.
§ The UI of an app is composed of visual elements that provide dependency properties for binding with data sources. Data binding for a visual element can be configured in XAML using various properties of the Binding class.
§ Item controls such as ComboBox, ListBox, ListView, GridView, and FlipView are particularly useful for binding collections of items.
§ A value converter can modify the value of a binding between a source and target through a value converter. A value converter implements the IValueConverter interface.
§ Dependency properties can be used in custom controls to create properties that can be bound with data.
§ UI input validation requires the implementation of the INotifyDataErrorInfo interface, which provides methods for notifying validation errors.
§ The CollectionViewSource class provides support for data grouping. Controls such as the ListView and GridView can be styled to highlight groups of data provided through a CollectionViewSource object.
Objective review
Answer the following questions to test your knowledge of the information in this objective. You can find the answers to these questions and explanations of why each answer choice is correct or incorrect in the “Answers” section at the end of this chapter.
1. You are implementing a Windows Store app in which the hub details page displays a list of popular recipes. Recipes are grouped by their categories, ingredients, or popularity. You want to show the list of groups and items in each group. What is the best way to implement this feature?
a. Use a ComboBox to show the list of groups and a StackPanel that is populated in the code-behind with controls based on the selection.
b. Use a ListBox to show the list of groups and a GridView to show the items for the group selected with the ListBox.
c. Use a ComboBox to show the list of groups and a GridView to show the items for the group selected with the ComboBox.
d. Use a StackPanel to arrange the items in the list of groups and a ListBox to show the items for the group selected.
2. You are creating a data entity class for representing data received from a remote web service. Your app will use this class for data binding in the user interface. Some members of the entity are expected to be updated by users. Before the remote web service is updated, these entities should be validated for the data entered by the user. How will you implement the class?
a. The data binding framework provided by the WinRT APIs support data binding including validation of the entered data. Binding the entity class in the UI is adequate.
b. Implement the INotifyPropertyChanged interface for property change notifications and the INotifyDataErrorInfo interface for notifying the user of any errors in the entered data.
c. Implement the INotifyPropertyChanged interface for property change notifications and the INotifyDataError interface for notifying the user of any errors in the entered data.
d. Although data binding support provided by the WinRT APIs are adequate, the INotifyDataErrorInfo should be implemented for notifying the user of any errors in the entered data.
3. You have been asked to implement a data control that displays photos from an album with a grouping option selected by the user. In future releases, you are expected to support photo filtering and sorting from the user’s photo collection. What are the steps required to implement this feature? (Choose all that apply.)
a. Use a GridView control in the UI and bind the GridView with the collection of albums.
b. Use a GridView control in the UI and bind the GridView to a CollectionViewSource object.
c. Prepare an ICollectionView view by using LINQ to group items from the collection of albums, use this view as the Source of the CollectionViewSource.
d. Set the IsSourceGrouped property of the CollectionViewSource to true.
e. Create a custom DataTemplateSelector for the GridView and use the selector for displaying the items for various grouping options.
Objective 5.4: Manage Windows Authentication
Windows Store apps often require user authorization before they can carry out an action or access resources. However, the currently authenticated user might belong to a certain group of users or a domain that does not grant access to certain features of the app. An app could be used in multiple locations, including an intranet or corporate environment, in a home or public network, and so on. Therefore, user authorization based on a user name and password is not adequate. The implementation of authorization in Windows Store apps requires a technology that provides the identity of a user and roles while on the intranet of an organization or on the public Internet. Claims-based identity provides a common way to obtain the identity information of users irrespective of their location. The ClaimsPrincipal class provides methods to obtain users’ claims and check the roles they belong to.
Windows Store apps that require users to provide their user name and password for authentication should not store them using their own implementation for storing credentials. The PasswordVault class can be used to securely store user credentials and retrieve them whenever required. These credentials can be removed at any time. User credentials stored with the PasswordVault class are available across multiple devices when the user logs in to these devices using the same Microsoft account. The CredentialPicker class provides a simple way to show a dialog box to obtain a user’s credentials. The credentials can then be stored using the PasswordVault class. The dialog box provided by the CredentialPicker class can be customized to suit an application’s requirements.
NOTE
This objective covers how to:
§ Retrieve a user’s roles and claims.
§ Store and retrieve credentials with the PasswordVault class.
§ Implement the CredentialPicker class.
Retrieving a user’s roles and claims
User authentication and authorization in Windows Store apps can be implemented in several different ways. You can implement your own mechanism within your app or as a service hosted in the cloud, for example. The process of identifying the user is an important step before an app enables the user to use various features; this is the step of authenticating users with their credentials. Users then attempt to access a set of features restricted to only a certain group of users, usually identified by a role; this is the step of authorizing users to one or more roles they belong to. An authenticated user belongs to one or more roles, with specific features assigned to each role.
Role-based access to features in a Windows Store app, including the ability to interact with online services, requires users’ authorization after they are authenticated by the app. A custom method of authorization in an app is often not flexible whenever it needs to be extended to include a new set of roles or a new set of features accessible by one or more roles. To make the process of authorizing a user easier, a user authenticated by an app or service can be identified with a set of claims. Claims can carry information about the authenticated user, such as email address and full name.
A claims-based model of authorizing users is useful for decoupling user authentication and authorization for a set of roles. In addition, a user identified with a set of claims can be granted access to resources across multiple domains, provided these domains trust each other. In such cases, the need for credential synchronization does not arise at all. When the user needs to be removed from a domain, it does not require the user’s account to be deleted from the domain. Instead, it is sufficient to remove the claims of the user from the domain. This model of identifying a user based on a set of claims is useful for implementing SSO in Windows Store apps. A token created as part of the sign-on process can be used to authorize the user.
A claims-based token can be obtained from a token issuer for a user providing valid credentials. During the authentication process, the token issuer determines the roles available to the user for authorization based on the user’s claims. In many cases, the token issuer delegates this process to a third-party service such as Windows Live Services. Users are required to provide their Windows Live credentials and to trust the application from which they are logging on. The token is then passed to the application. In all future authentication requests, this token is used by the application to recognize the user as genuine. The process of obtaining a token with a third-party provider is shown in Figure 5-8.
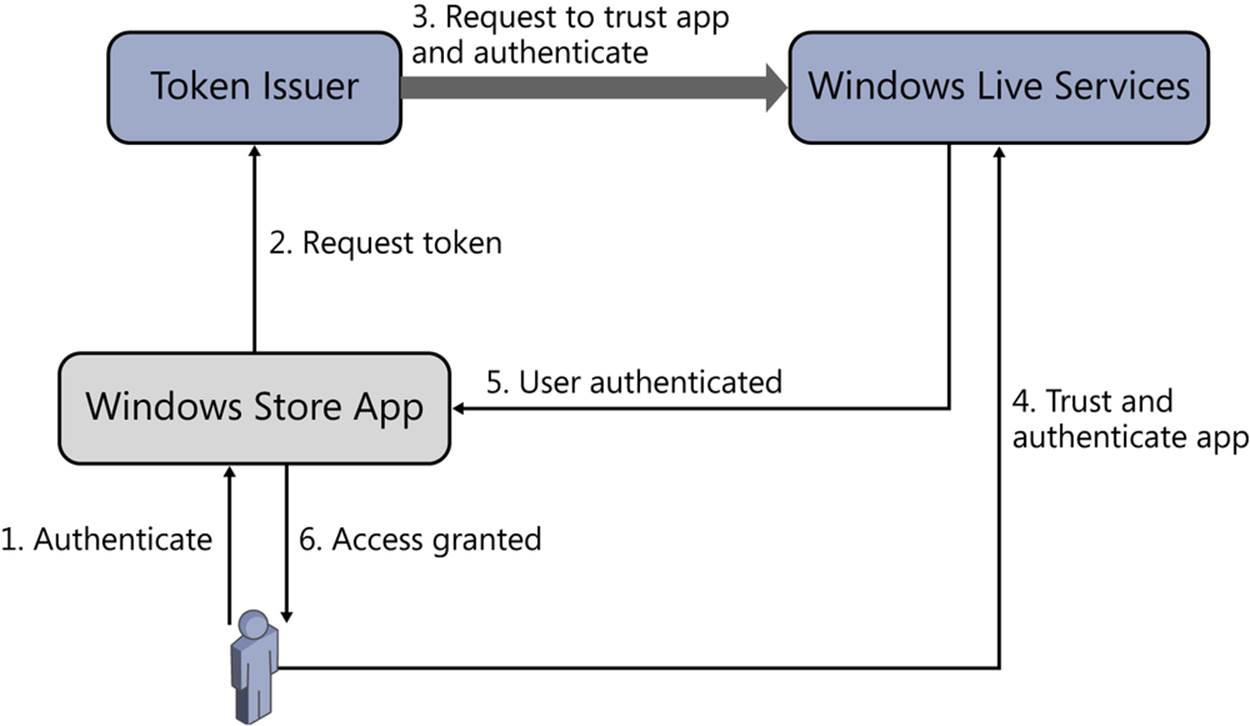
Figure 5-8. Steps involved in authorizing a user based on claims
In traditional Windows applications, claims-based user authentication and authorization is performed using the Windows Identity Foundation (WIF), part of the .NET Framework since version 4.5. WinRT APIs provide a set of interfaces and an enumeration in the System.Security.Principalnamespace to help with tokens, user identification, roles, and more.
The IIdentity interface is used in the implementation of an identity object that represents a user in an app. It has the following properties:
§ Name. This property is used to obtain the name of the user as a string. Note that the name is not available if the user has not been authenticated yet.
§ AuthenticationType. This property is used to obtain the type of authentication used in the app as a string. For example, the app might use EncryptMessage (NTLM) or Kerberos for authenticating a user that belongs to a domain in a corporate network.
§ IsAuthenticated. This property is used to check whether the user is already authenticated.
The identity of users, along with the roles they are associated with in an app, is available as a security principal. A security principal object implements the IPrincipal interface. The Identity property of this interface provides the user’s identity through an identity object associated with the principal; the identity object implements the IIdentity interface. In addition, a Windows Store app can check whether the user represented by the principal belongs to a certain role with the IsInRole method that expects a string for the role being queried. The method returns True if the user belongs to the role queried, otherwise, the result is False.
MORE INFO CLAIMS-BASED IDENTITY AND ACCESS CONTROL
You can read more about claims-based identity and access control at http://msdn.microsoft.com/en-us/library/ff423674.aspx.
Storing and retrieving credentials with the PasswordVault class
A Windows Store app can obtain the user’s user name and password for authentication within the app or for authentication with a remote web service. In some cases, the credentials are required every time the user needs to access a resource or carry out an action. The user can choose to run an app on multiple devices, so it is not ideal for the app to force the user to enter credentials on multiple devices.
The PasswordVault class in the Windows.Security.Credentials namespace enables Windows Store apps to securely store the credentials of a user and have them available across all the devices where the app is installed and accessed with the user’s Microsoft account. You can add a credential with a resource name that your app can later use to retrieve the stored credential.
The PasswordVault class stores the credentials of a user as a PasswordCredential object. An instance of the PasswordCredential class is created with the user name and password provided by the user along with the resource name to identify the credentials. The following example shows how the PasswordVault and PasswordCredential classes are used to store user credentials:
using Windows.Security.Credentials;
public sealed partial class PasswordVaultSamplePage : LayoutAwarePage
{
// Provide a resource which will be used to access the credentials later
private void SaveUserCredentials(string username, string password, string resource)
{
try
{
PasswordVault vault = new PasswordVault();
PasswordCredential cred = new PasswordCredential(resource,
username, password);
vault.Add(cred);
}
catch (Exception ex)
{
// Handle the error
}
}
}
The PasswordVault class provides the following methods to retrieve and search credentials stored in the password vault:
§ FindAllByResource. This method provides a read-only collection of PasswordCredential objects that are associated with a specific app matching the resource name specified. Note that the PasswordCredential objects in the list do not contain passwords; the password should be retrieved with the Password property of the PasswordCredential object after calling the object’s RetrievePassword method .
§ FindAllByUserName. This method provides a read-only collection of PasswordCredential objects that are associated with a specific app matching the user name specified. Note that the PasswordCredential objects in the list do not contain passwords; the password should be retrieved with the Password property of the PasswordCredential object after calling the object’s RetrievePassword method.
§ Retrieve. This method provides the PasswordCredential object associated with an app for the specified resource name and user name. The returned object contains all the data for the credential.
§ RetrieveAll. This method provides a read-only list of all PasswordCredential objects stored in the device.
Retrieving credentials using the PasswordVault class shows how to retrieve the PasswordCredential object for a user with a specified resource using the FindAllByResource method of the PasswordVault class.
RETRIEVING CREDENTIALS USING THE PASSWORDVAULT CLASS
using Windows.Security.Credentials;
// This method shows how to use the FindAllByResource method. To retrieve the
// credentials of a single user, you can use the Retrieve method too.
public sealed partial class PasswordVaultSamplePage : LayoutAwarePage
{
// Find the PasswordCredential for a user with a specified resource
private PasswordCredential FindCredentialsForResourceAndUsername(string resource,
string username)
{
try
{
PasswordVault vault = new PasswordVault();
IReadOnlyList<PasswordCredential> credentials =
vault.FindAllByResource(resource);
foreach (var credential in (IEnumerable<PasswordCredential>)credentials)
{
if (credential.UserName.Equals(username))
{
return credential;
}
}
}
catch (Exception ex)
{
// Handle the error
}
return null;
}
}
A Windows Store app might need to delete all the credentials saved in the password vault. The PasswordVault class provides the Remove method to remove a PasswordCredential object from the password vault. Using the Remove method in the PasswordVault class to clear passwords shows the Remove method being used to clear the password vault.
USING THE REMOVE METHOD IN THE PASSWORDVAULT CLASS TO CLEAR PASSWORDS
using Windows.Security.Credentials;
public sealed partial class PasswordVaultSamplePage : LayoutAwarePage
{
// Remove all the credentials stored in the password vault
private void RemoveAllCredentials()
{
try
{
PasswordVault vault = new PasswordVault();
IReadOnlyList<PasswordCredential> credentials =
vault.RetrieveAll();
foreach (var credential in credentials)
{
vault.Remove(credential);
}
}
catch (Exception Error)
{
// Handle the error
}
}
}
Implementing the CredentialPicker class
Windows Store apps often require users to submit their credentials to access resources or interact with data obtained from remote sources that require authentication with credentials. In traditional desktop apps, the typical approach for enabling users to enter their credentials is through a custom dialog box with fields chosen by the developer. While building a Windows Store app, you can use a custom dialog box to enable users to submit their credentials. Ideally, you want the user experience of your custom dialog box to be similar to other apps.
To provide a consistent experience to users submitting their credentials for authentication, WinRT APIs provide the CredentialPicker class in the Windows.Security.Credentials.UI namespace. This class has a single method, PickAsync, that shows a dialog box in which users can enter their credentials. Although the dialog box can be customized to a certain extent, the overall user experience is consistent wherever it is used.
In its simplest form, the PickAsync method accepts two parameters: a target name used to identify the application or service for which the credentials are required, and a message that is displayed in the dialog box. An overload of the PickAsync method accepts a third parameter that can be used to display a caption in the dialog box. A further overload of the PickAsync method can be used with an object of the type CredentialPickerOptions that enables additional customization of the dialog box. For example, the Save Credentials check box can be selected when the dialog box is shown. The properties of the CredentialPickerOptions class that you will typically use in Windows Store apps are as follows:
§ Caption. This property is used to set the caption of the dialog box to be visible to the user.
§ Message. This property is used to set a message to the user in the dialog box.
§ CredentialSaveOption. This property is used to configure the Remember My Credentials option shown in the dialog box and it is used to indicate whether the user wishes to save the credentials. The value of this property is set to a member of the CredentialSaveOption enumeration, such as Hidden to hide the option, Selected to show the check box as selected, and Unselected to show the check box cleared. The default value of the CredentialSaveOption property is Unselected.
§ CallerSavesCredential. This property is used to specify whether the application will save the credential of the user if the user has opted through the Remember My Credentials check box. The default value of the CallerSavesCredential property is False.
§ AuthenticationProtocol. This property is used to specify the type of authentication protocol that will be used with the credentials for user authentication. The value of this property is set to a member of the AuthenticationProtocol enumeration. The default value for this property isNegotiate.
§ CustomAuthenticationProtocol. This property is used to specify the name of the custom authentication protocol that will be used with the credentials for user authentication. To use a custom authentication protocol, you must set the value of the AuthenticationProtocol property toAuthenticationProtocol.Custom.
§ PreviousCredential. This property is used to specify the credential of the user previously stored by the application and to prefill the fields in the CredentialPicker dialog box.
MORE INFO AUTHENTICATIONPROTOCOL ENUMERATION
You can read about the AuthenticationProtocol enumeration at http://msdn.microsoft.com/en-us/library/windows/apps/windows.security.credentials.ui.credentialpickeroptions.authenticationprotocol.aspx.
The PickAsync method returns an object of the type CredentialPickerResults. This class has the following read-only properties:
§ Credential. This property contains the credentials entered by the user using the dialog box in a buffer of bytes. If the user canceled the authentication, a valid but empty IBuffer object is returned in this property.
§ CredentialDomainName. This property contains the domain name of the user logged on to the device. If a domain name is not available, this property contains an empty string.
§ CredentialUsername. This property contains the user name entered by the user in the dialog box. If the user cancels authentication or does not provide a user name, this property contains an empty string.
§ CredentialPassword. This property contains the password entered by the user. If the user does not enter a password or cancels authentication, this property contains an empty string.
§ CredentialSaved. This property indicates whether the credentials of the user were saved successfully.
§ CredentialSaveOption. This property indicates whether the Remember My Credentials check box, if visible, was set by the user to save the credentials. The value of this property is a member of the CredentialSaveOption enumeration. If the dialog box was configured to hide the option, the value of this property is Hidden.
§ ErrorCode. This property contains the value of the error code returned from the credential input operation. If the operation completed with the user adding credentials, the value of this property is zero. A nonzero value indicates a failure.
The result from the credential input operation can be saved as buffer in the roaming store, usually after it is encrypted. Alternatively, the recommended approach for roaming credentials is through the PasswordVault class. A new PasswordCredential object is created using the credentials obtained using a CredentialPicker dialog box, and it is added to the password vault. Adding passwords to a vault using the CredentialPicker class and PasswordCredential object illustrates this process.
ADDING PASSWORDS TO A VAULT USING THE CREDENTIALPICKER CLASS AND PASSWORDCREDENTIAL OBJECT
using Windows.Security.Credentials;
using Windows.Security.Credentials.UI;
private async void Button_Click(object sender, RoutedEventArgs e)
{
CredentialPickerOptions options = new CredentialPickerOptions()
{
CallerSavesCredential = true,
AlwaysDisplayDialog = true,
AuthenticationProtocol = AuthenticationProtocol.Ntlm,
TargetName = "MyApp",
Message = "Please login to Awesome App",
Caption = "Awesome App"
};
var credPickerResults = await CredentialPicker.PickAsync(options);
if (credPickerResults.ErrorCode == 0)
{
string username = credPickerResults.CredentialUserName;
string password = credPickerResults.CredentialPassword;
// Authenticate the user here.
// If the username and password are available and the user was authenticated
// successfully, store the credentials in the
// password vault
if (!string.IsNullOrEmpty(username) && !string.IsNullOrEmpty(password))
{
PasswordVault vault = new PasswordVault();
PasswordCredential credential = new PasswordCredential("MyApp", username,
password);
vault.Add(credential);
}
}
}
The CredentialPicker dialog box produced by Adding passwords to a vault using the CredentialPicker class and PasswordCredential object is shown in Figure 5-9.
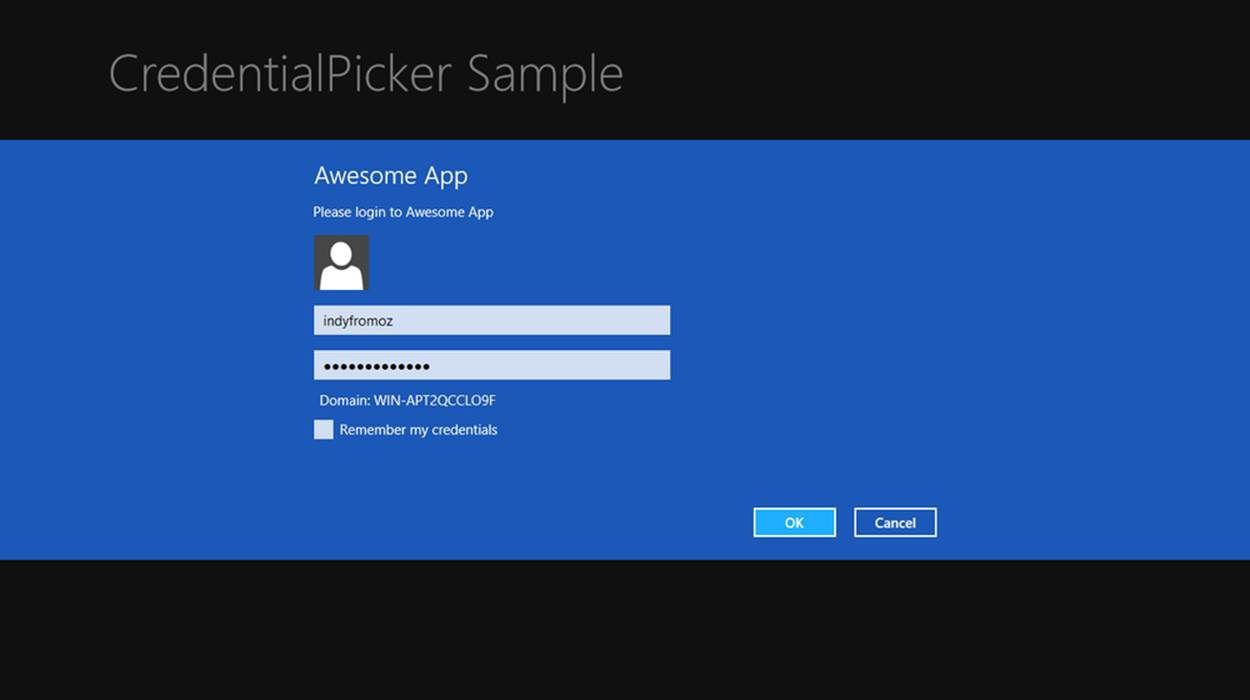
Figure 5-9. Dialog box shown to request the user’s credentials
If the user enters enterprise credentials, they can’t be roamed across devices for the user.
THOUGHT EXPERIMENT
Implementing credentials and role management in a Windows Store app
In this thought experiment, apply what you’ve learned about this objective. You can find answers to these questions in the “Answers” section at the end of this chapter.
A large organization has employees located in multiple offices around the world. To access the organization’s intranet, employees must use their credentials to log on. The organization is planning to invest in employee productivity by building a Windows Store app, and the app will require employees to use their intranet logon credentials to access the app.
For confidential data, employees use a smart card that contains their credentials. Access to various resources is usually based on the roles assigned to employees. What are your recommendations for the organization to implement credential and role management in its Windows Store app?
Objective summary
§ Windows Store apps can use identity providers such as Windows Live Services to authenticate and authorize users. A user identified with claims is issued a token whenever the user needs to be authenticated.
§ The PasswordVault class can be used to securely store the credentials of a user in an app and have it roam across all devices for the same user. The PasswordVault contains PasswordCredential objects identified by their resource name.
§ Windows Store apps should use the CredentialPicker class to retrieve user credentials. The CredentialPicker class provides a dialog box that is consistent with the user experience across Windows Store apps.
Objective review
Answer the following questions to test your knowledge of the information in this objective. You can find the answers to these questions and explanations of why each answer choice is correct or incorrect in the “Answers” section at the end of this chapter.
1. You need to implement user authentication in your Windows Store app that enables messaging between logged-on users and their friends. A user expects to be logged on to the app and have access to messages from multiple devices. How should you implement this feature?
a. Show a dialog box to request credentials every time the user needs to check the account for messaging.
b. Authenticate the user when the app is installed and save the credentials in the roaming app data store.
c. Use the CredentialPicker to retrieve the credentials if the credentials are not available in the PasswordVault. Save the credentials in the PasswordVault whenever the user enters them.
d. Authenticate the user when the app is installed and save the credentials in the temporary app data store.
2. In the next release of your Windows Store app, you will include user authentication after users register for premium access. You will provide the option to your users to save their credentials and to log out from the app. A fully featured desktop version of the app is already available and it uses a simple dialog box for obtaining the credentials. How should you implement the authentication dialog box for your Windows Store app? (Choose all that apply.)
a. Create a custom control that embeds a dialog box in which users enter their credentials.
b. Use the Settings charm to log on users with simple text fields to obtain their credentials.
c. Use the CredentialPicker class with the CredentialSaveOption property set to Selected.
d. Use the PasswordVault class to store user credentials if the user opted to have them saved.
e. Use the Settings charm to provide an option to the user to log out from the app. When the user logs out, remove the credential from the password vault.
3. The owner of a popular wholesale coffee bean store has a website that enables users to order beans. Regular customers are rewarded for their loyalty when they sign in using their Windows Live account. Signed-in users can view their orders and participate in forum discussions, for example. Some users can act as moderators. You have been asked to implement the authentication and authorization portion of the Windows Store app being built for the business. How should you implement this feature? (Choose all that apply.)
a. Use the CredentialPicker class to obtain the user’s Facebook credentials and use it to sign in the user.
b. Use the PasswordVault object to save the credentials because users shouldn’t sign out of the application again.
c. Obtain a token from the Facebook identity property based on the claims of the user.
d. Examine the users’ roles while enabling them to access various sections of the app, including moderation of forum posts.
e. Provide an option in the Settings pane that enables the user to revoke access to the app and delete the saved token.
Objective 5.5: Manage web authentication
Windows Store apps can implement a custom authentication and authorization mechanism for users to log on and access resources as well as to interact with specific content. With the popularity of online services many users access every day—such as Windows Live, Twitter, Facebook, Flicker, and others—Windows Store apps can authenticate users using these services. This is more relevant when the content from these services is being accessed with the Windows Store app. An app should be able to log on the user without requiring them to provide their credentials in the app itself.
WinRT APIs provide the Windows.Security.Authentication.Web namespace for supporting authentication of Windows Store apps with remote web services. The WebAuthenticationBroker class helps with the authentication of a Windows Store app with a remote web service without requiring the user to leave the application.
The WebAuthenticationBroker class can be used to connection to identify providers on the web using protocols such as OAuth and OpenID. Most modern web services use the OAuth2 protocol for authenticating applications. The same class can used to implement SSO, a process of authenticating the user within multiple Windows Store apps without users having to enter their credentials for the remote web service.
The CredentialPicker class can be used to retrieve the credentials with a consistent user experience across Windows Store apps. It provides a number of options for the developer to configure the standard dialog box in which users insert their credentials. When used with the PasswordVaultclass, the user credentials can be roamed across multiple devices for the same Microsoft account.
NOTE
This objective covers how to:
§ Use the Windows.Security.Authentication.Web namespace.
§ Implement the WebAuthenticationBroker class.
§ Set up OAuth2 for authentication.
§ Set up single sign-on (SSO).
§ Implement the CredentialPicker class.
§ Implement credential roaming.
Using the Windows.Security.Authentication.Web namespace
Windows Store apps that require content from remote web services often require the user to be authenticated. Instead of implementing authentication using traditional methods, apps can utilize authentication protocols such as OAuth, which in many cases is the only acceptable option. Most web services expect the user to enter their credentials in an area that is provided by the service itself. The user authentication process might consist of a number of steps the user needs to perform before access is granted to the Windows Store app.
The Windows.Security.Authentication.Web namespace provides the WebAuthenticationBroker class that sets up the authentication of a Windows Store app with a remote web service. This class provides two methods for carrying out authentication in a Windows Store app with a remote web service:
§ AuthenticateAsync. This method sets up the authentication process with the remote web service specified with a URI. In its simplest form, this method accepts a set of options specified through a WebAuthenticationOptions object and the URI of the web service. An overload of this method accepts a third parameter, which is the callback URI used to extract the access token returned by the remote service as a result of successful authentication. The URI for the AuthenticateAsync method should use the https:// prefix; otherwise, the method fails to start the authentication process with an invalid parameter error.
§ GetCurrentApplicationCallbackUri. This method is used to obtain the app’s implicit callback URI and register with the remote web service for SSO support. The URI is of the form ms-app://[application package SID].
The response from the AuthenticateAsync method is an object of type WebAuthenticationResult. It has the following read-only properties:
§ ResponseData. This property contains the data, including the entire URL returned by the remote web service after the authentication completes.
§ ResponseStatus. This property contains the result of the authentication operation. The value is a member of the WebAuthenticationStatus enumeration.
§ ResponseErrorDetail. This property contains the HTTP status code if the authentication failed with the remote service.
The status of the authentication process with the AuthenticateAsync method is represented in the WebAuthenticationResult ResponseStatus property with the WebAuthenticationStatus enumeration. Table 5-3 describes WebAuthenticationStatus enumeration members.
Table 5-3. WebAuthenticationStatus enumeration members
|
Member |
Value |
Description |
|
Success |
0 |
The authentication was successful, and the result is available in the ResponseData property. |
|
UserCancel |
1 |
The user canceled the authentication. |
|
ErrorHttp |
2 |
The authentication failed because an HTTP error was encountered. The ResponseErrorDetail property contains the HTTP status code indicating the type of error. |
The AuthenticateAsync method that carries out the authentication with the remote web service can be configured using the WebAuthenticationOptions enumeration. Table 5-4 describes WebAuthenticationOptions enumeration members.
Table 5-4. WebAuthenticationOptions enumeration members
|
Member |
Value |
Description |
|
None |
0 |
There are no options specified for the method. |
|
SilentMode |
1 |
This option is used to set up the WebAuthenticationBroker without showing the UI. It is used in apps in which SSO is implemented. |
|
UseTitle |
2 |
This option is used to specify that WebAuthenticationBroker should return the title of the webpage at the end of the authentication process in ResponseData property. |
|
UseHttpPost |
4 |
This option is used to specify that WebAuthenticationBroker should return the body of the webpage at the end of the authentication process in ResponseData property. This option is used in apps in which SSO is implemented. |
|
UseCorporateNetwork |
8 |
This option is used to set up the WebAuthenticationBroker for accessing an authentication provider within a corporate network. The app should be set up with the Internet (Client & Server), Enterprise Authentication, and Shared User Certificates capabilities in the package manifest. |
Implementing the WebAuthenticationBroker class
A Windows Store app can incorporate authentication with a remote web service with the WebAuthenticationBroker class. The following steps are required to use the WebAuthenticationBroker class for authenticating a user in a Windows Store app:
1. Register your app for a client ID and, optionally, a redirect URL where the remote web service will redirect your app at the end of a successful authentication process.
2. Use the WebAuthenticationOptions to provide any options to the WebAuthenticationBroker based on your app’s requirements.
3. Set up the URI for the AuthenticateAsync method to send the authentication request.
4. When the AuthenticateAsync method returns a WebAuthenticationResult object, examine its ResponseStatus property to check whether the authentication was successful.
5. If authentication was successful, use the ResponseData property of the WebAuthenticationResult object to obtain the access token.
6. Requests to access content from the remote service should contain the access token obtained as a result of the authentication.
The following C# code sample illustrates how to set up the WebAuthenticationBroker to authenticate users to their Facebook account:
private async void Button_Click(object sender, RoutedEventArgs e)
{
try
{
string facebookAppID = "426372210771029";
string redirectUrl = "https://www.facebook.com/connect/login_success.html";
// This is a basic example of setting up a URL for Facebook authentication
// of the user. Refer the Facebook API to request specific permissions in the
// URL to post updates on the user's timeline, for example.
string facebookUrl = "https://www.facebook.com/dialog/oauth?client_id=" +
Uri.EscapeDataString(facebookAppID) +
"&redirect_uri=" + Uri.EscapeDataString(redirectUrl) +
"&display=popup&response_type=token";
Uri startUri = new Uri(facebookUrl);
Uri endUri = new Uri(redirectUrl);
WebAuthenticationResult result = await
WebAuthenticationBroker.AuthenticateAsync(WebAuthenticationOptions.None,
startUri, endUri);
if (result.ResponseStatus == WebAuthenticationStatus.Success)
{
// Parse the ResponseData property for the access token
}
else if (result.ResponseStatus == WebAuthenticationStatus.ErrorHttp)
{
// Parse the ResponseErrorDetail property to obtain the HTTP status code
}
else if (result.ResponseStatus == WebAuthenticationStatus.UserCancel)
{
// User canceled authentication
}
}
catch (Exception ex)
{
// Handle the exception
// Note: If an HTTPS URL is not used for the authentication, an invalid
// parameter error is raised
}
}
Figure 5-10 shows a Windows Store app set up for authentication with Facebook.
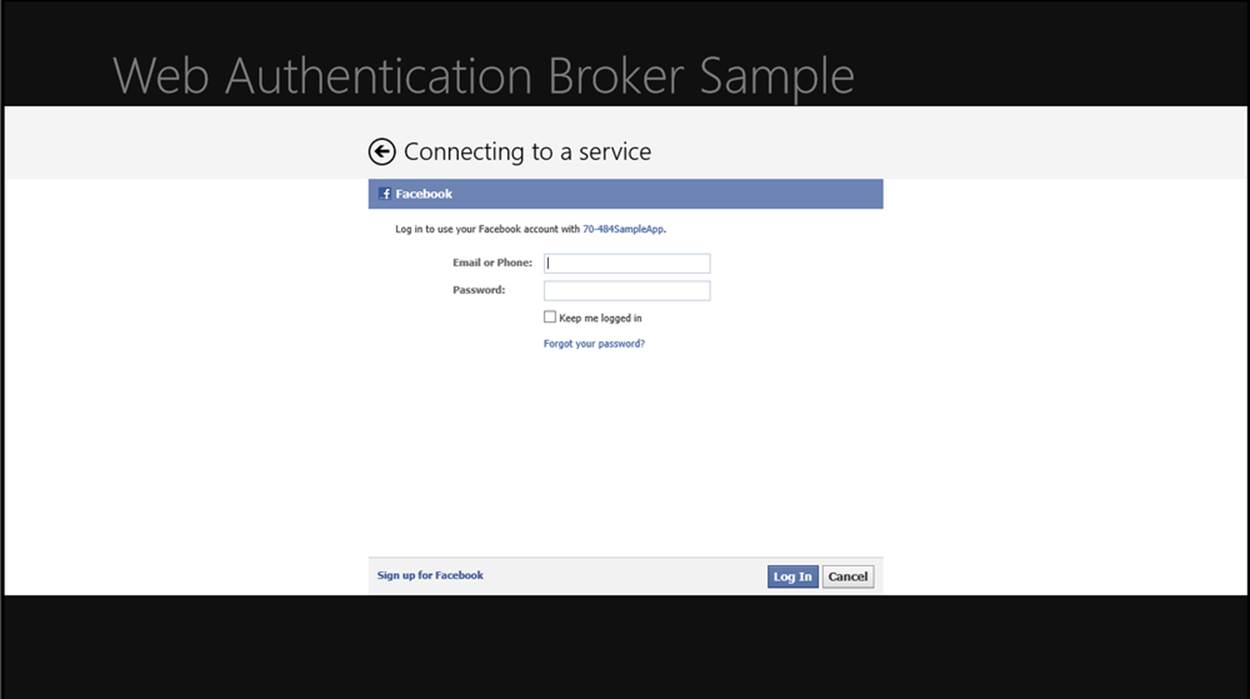
Figure 5-10. Windows Store app with WebAuthenticationBroker used for authenticating the user with Facebook
MORE INFO HOW THE WEB AUTHENTICATION BROKER WORKS
You can read about the details of the web authentication broker works at http://msdn.microsoft.com/library/windows/apps/Hh750286.aspx.
Setting up OAuth2 for authentication
The WebAuthenticationBroker class is useful for Windows Store apps planning to use OpenID- and OAuth-based online identity providers. The authentication mechanism in the app is delegated to a third-party service that the user already has access to and has a valid set of credentials with the service.
The OAuth2 open standard provides a simple mechanism to authenticate a user with an identity provider and authorize the requesting application to gain access to resources such as social media updates and blog posts. An access token is provided at the end of a successful authentication to the app, which is used in all future requests from the app to the remote service. The OAuth2 standard does not provide backward compatibility with the OAuth1 standard, which implemented a complex mechanism of authenticating a user and authorizing the user for access to resources.
You can use OAuth2 in your Windows Store app to authenticate users with an identity provider that implements the OAuth2 standard. Most modern web services implement the OAuth2 standard. The following steps are required to set up the WebAuthenticationBroker class for OAuth2 authentication:
1. Register a new application with the remote web service that enables applications to authenticate users with the OAuth2 standard. Most services provide an application or client ID along with a client secret key when you register a new application. The client secret key is not required during the authentication process. Some web services require you to register a redirect URI, which is used to redirect your application at the end of a successful authentication. The access token is added to the URI in a query parameter.
2. Prepare a URI required for authentication with the base URI from the remote service. This URI will specify the client ID as well as the redirect URI and, optionally, the requested scope of access for resources by the user logging on.
3. Use the AuthenticateAsync method of the WebAuthenticationBroker class with the URI prepared for authentication along with the redirect URI.
4. If the response from the web service is successful (the user was authenticated successfully), the redirect URI can be retrieved using the GetCurrentApplicationCallbackUri method of the WebAuthenticationBroker class.
5. The redirect URI contains the access token that should be used for accessing the user’s resources on the remote service.
The access token issued by the remote service usually has a finite lifetime; the duration is dependent on the service implementing the OAuth2 standard. The user can revoke the rights granted by the remote service to your application, which will cancel all access tokens granted to your app.
The remote service can provide a URI that your application can use to determine if the access token can still be used. If the access token has expired, your app can request a new token without going through the authentication process again by sending a request to the remote service to refresh the token by providing the client ID and, in some cases, the client secret key.
Setting up single sign-on (SSO)
User authentication with OAuth and OpenID in Windows Store apps enables users to log on with an online identity provider. Users remain authenticated for a session or as long as the access token obtained from the remote service is valid. Users have to log on to an app in their PC or device whenever the apps require the user to be authenticated. SSO enables a user to log on to an app using an online identity provider and remain logged on across multiple devices. It usually provides an option to the user through a check box in the logon dialog box to enable them to remain logged on to the service.
SSO requires cookies to be stored in an application. Although the default behavior of the WebAuthenticationBroker class does not allow cookie storage, when the WebAuthenticationBroker class is set up for SSO authentication, cookies received during the authentication steps can remain in a special SSO application container. To support SSO, the online identity provider must allow the registration of URLs with the format ms-app://[Application SID]. The application’s package ID (also called the SID) can be obtained from the application’s page in the Windows Store.
The following steps are required to set up SSO with WebAuthenticationBroker in Windows Store apps:
1. Register your application with the identity provider and obtain a client ID and secret key. Request the provider to register a redirect URL of the form ms-app://[Application SID].
2. Use the SilentMode and UseHttpPost members of the WebAuthenticationOptions enumeration in the AuthenticateAsync method; do not specify the redirect URL.
3. If authentication was successful, the online identity provider redirects the app to the redirect URL configured with an access token as a query parameter.
4. If the redirect URL matches with the application’s SID, the WebAuthenticationBroker class returns the token to the app. The whole URL is kept in a cookie stored in a special app container so that future authentication requests do not require the user to log on with the credentials.
The cookies used for SSO in a Windows Store app are not shared with Internet Explorer, other browsers, or other apps. If an app attempts to misuse a cookie for an app in which the user is already logged on, it will fail authentication because the redirect URL of the two apps will never match.
MORE INFO SINGLE SIGN-ON WITH MICROSOFT LIVE SERVICES
You can read more about implementing SSO with the Live Software Development Kit (SDK) for Microsoft accounts in the article at http://blogs.msdn.com/b/windowsappdev/archive/2012/03/14/bring-single-sign-on-and-skydrive-to-your-windows-8-apps-with-the-live-sdk.aspx. The Microsoft Live Services team provides an interactive portal in which you can explore the Live SDK athttp://isdk.dev.live.com/isdk.aspx.
Implementing the CredentialPicker class
Windows Store apps can use the CredentialPicker class in the Windows.Security.Credentials.UI namespace to implement a logon dialog box. The CredentialPicker class provides a consistent user experience for authentication of Windows Store apps with remote web services. The dialog box presented by the CredentialPicker class can be customized with the CredentialPickerOptions class.
MORE INFO CREDENTIALPICKER CLASS
For details about the implementation of the CredentialPicker class in Windows Store apps, refer to Objective 5.4.
Implementing credential roaming
After a user logs on to a Windows Store app on a device, the user can access the same app on a different device. If the app expects the user to log on again with their credentials, it results in a poor user experience. The PasswordVault class provides support for credential roaming. One or morePasswordCredential objects with the user’s credentials can be stored in the PasswordVault of an app and the credentials of the user are synchronized for a user logged on to multiple devices with the same Microsoft account.
MORE INFO CREDENTIAL ROAMING IN WINDOWS STORE APPS
For details on credential roaming in Windows Store apps, refer to Objective 5.4.
THOUGHT EXPERIMENT
Improving the authentication experience
In this thought experiment, apply what you’ve learned about this objective. You can find answers to these questions in the “Answers” section at the end of this chapter.
You have developed a Windows Store app that is popular among your users. You regularly receive feature requests from your users, and a common one concerns improving the authentication experience.
Several users have requested access to their Facebook and Flickr accounts through your app so that they can post their photos. How can you enhance your app to address the requests from your users?
Objective summary
§ The Windows.Security.Authentication.Web namespace enables developer to implement user authentication in the Windows Store apps through online identity providers.
§ The WebAuthenticationBroker class supports authentication in Windows Store apps with identity providers such as Windows Live Services.
§ The WebAuthenticationBroker class supports the OAuth2 standard for user authentication in Windows Store apps.
§ The WebAuthenticationBroker class also supports SSO by enabling the access token to be stored with the redirect URL in a special container.
Objective review
Answer the following questions to test your knowledge of the information in this objective. You can find the answers to these questions and explanations of why each answer choice is correct or incorrect in the “Answers” section at the end of this chapter.
1. By popular demand, you have decided to implement sharing photos using your photo mosaic Windows Store app with Facebook. You need to allow users to post photos to their Facebook timeline. What are the steps required to implement this feature? (Choose all that apply.)
a. Authenticate the user by requesting Facebook credentials in a custom dialog box.
b. Register your app with Facebook to obtain a client ID; configure a redirect URL to obtain an access token.
c. Set up the WebAuthenticationBroker with a URL that contains the client ID, redirect URL, and the permissions requested.
d. Use the AuthenticateAsync method of the WebAuthenticationBroker class to authenticate the user and use the access token from the result for posting photos to Facebook using the recommended APIs.
e. After the user is logged on, post photos to Facebook using the methods available for desktop apps.
2. You are investigating the feasibility of implementing OAuth2 authentication using an online identity provider. To provide a consistent user experience to your users, you decide to use the WebAuthenticationBroker class in your app. Which of the following is a correct statement for the WebAuthenticationBroker about OAuth2 support?
a. The WebAuthenticationBroker class supports OAuth2 authentication with only those identity providers that are located in the domain in which the user has joined with the app.
b. The WebAuthenticationBroker class supports OAuth2 authentication with online identity providers that implement the OAuth2 standard and it also supports SSO.
c. The WebAuthenticationBroker class must be used every time the user wishes to log on because it does not support SSO.
d. The WebAuthenticationBroker class is suitable for use with online identity providers that support only the http:// prefix.
3. To improve the employee productivity in an organization that provides a Windows Store to its employees, you recommend it uses SSO in the app. Which of the following is true of SSO?
a. Implementation of SSO requires the application’s SID to be present in a URL that is used as the redirect URL.
b. Every time an update for the app is released, users need to log on again because the cookie is no longer available as the SID changes with every update.
c. SSO works with both http:// and https://. Therefore, if the employee is logged on to the corporate network through VPN, they do not require http:// for the authentication.
d. A user can use SSO to log on to any app along with the organization’s app using the same set of credentials; this is one of the major benefits of using SSO.
Chapter summary
§ WinRT APIs provide developers with local, roaming, and temporary data stores for data storage and manipulation. In addition, when configured with the appropriate capabilities and declarations, apps can access files and folders on users’ devices.
§ Windows Azure can be used to store files such as photos and documents; as well as structured, nonrelational data in tables. Windows Azure Mobile Services provides a simple way to integrate Windows Azure storage in Windows Store apps.
§ The HttpClient class can be used to retrieve data from remote servers. Common HTTP verbs can be used in these requests to perform operations such as create, restore, update, and delete on resources in the remote server.
§ Windows Store apps can use WebSockets to exchange short messages and stream large messages with a server that supports WebSockets.
§ WinRT APIs provide a data binding framework that is used to data-bind UI elements with their data source. Most controls support data binding with item controls providing support for binding with collections.
§ Value converters can be used to modify the data exchanged between the source and the target to modify the data format.
§ Dependency properties are used in custom controls for data binding with data sources.
§ The INotifyDataErrorInfo interface can be used to implement user input validation in a data entity class.
§ The CollectionViewSource class provides a view for a data source that can be bound with item controls such as the ListView and GridView. Data in the view can be sorted, filtered, and grouped with LINQ.
§ Windows Store apps can use online identity providers to authenticate users based on their claims. User roles provide the authorization required to access various resources and carry out actions.
§ The PasswordVault class can be used to securely store a user’s credentials and have them available across multiple devices where the user is logged on with the same Microsoft account.
§ The Windows.Security.Authentication.Web namespace provides developers with APIs to implement authentication via OpenID and OAuth identity providers.
§ The WebAuthenticationBroker class can be used to implement OAuth2 authentication along with SSO in Windows Store apps.
Answers
This section contains the solutions to the thought experiments and answers to the lesson review questions in this chapter.
Objective 5.1: Thought experiment
A Windows Store app can use a number of options to store and retrieve data based on its requirements. For an app used in the field requiring access to a document repository, or data transferred in and out of removable USB flash devices, for example, there are a number of options that can be implemented:
§ Windows Azure Storage for log files. When a technician copies a log file for diagnosis and analysis, it can be saved into Windows Azure Storage. These files can be accessed from any location at any time by any technician.
§ Temporary application data store for knowledge base. While in the field, the technician might need to refer to knowledge base articles several times. The technician can download these articles and save them in the temporary store for quick access.
§ MRU and future access list for reports created. The technician might spend a considerable amount of time writing a report, and refer to previously written reports frequently. Using the MRU list and future access list for providing the most recently accessed files helps improve the technicians’ productivity.
§ Accessing removable devices. The app can be configured so that data can be copied and saved to a removable USB flash device.
Objective 5.1: Review
1. Correct answers: B, C, D
a. Incorrect: The roaming application data store has restrictions on the amount of data that can be stored in it. It is meant to be used for storing data that can be rapidly synchronized with other devices.
b. Correct: The temporary application data store can be used to cache files while the application is running. The system periodically removes files from this store, so an app doesn’t need to manage the data stored in a temporary store.
c. Correct: The photos modified and saved by the user need to be available across multiple devices. Therefore, the photos can be stored as blobs in Windows Azure and accessed from any device.
d. Correct: The roaming application data store can be used to store a list of recently accessed files with the files stored in Windows Azure or any other remote store. Because this list is available across multiple devices, the app can use the list to access the files from a remote service from any device.
e. Incorrect: Although the install location is available to all applications, when the app is removed by the user, all the files in the install location are deleted. Therefore, the install location is not suitable for storing files.
2. Correct answer: B
a. Incorrect: An app requires a custom implementation to use a local database for storing the MRU list. It is better to use the WinRT APIs instead of maintaining custom code for the feature.
b. Correct: The MRU and future access lists can be easily used to implement the feature. The future access list can hold up to 1,000 items, which is adequate for such an app.
c. Incorrect: The roaming application data store has limitations on its size, and the same file cannot be accessed by the user on multiple devices. Therefore, this is not a valid option.
d. Incorrect: Files stored in the temporary application data store can be removed by the system at any time. There is a risk of the file with the most recently accessed items being deleted, so it is best not to use the temporary store for such data.
3. Correct answer: C
a. Incorrect: It is not a good practice to store the credentials of a user in a file in any data store.
b. Incorrect: An article saved in the roaming data store can cause issues with synchronization because changes in the store are propagated across multiple devices. An article can be downloaded on any device if the user accesses it.
c. Correct: The ID of the article can be used to download it and have it ready for viewing by the user. Therefore, roaming the ID of the last read article helps with improved usability.
d. Incorrect: Use the roaming store to store data required by the app to function properly, such as the ID of the article being read or a list of IDs of the top news articles.
Objective 5.2: Thought experiment
1. User authentication over a secure connection. The Windows Store app can use HttpClient with a URL that has an https:// prefix to authenticate users of the organization over a secure connection.
2. HTTP verbs for RESTful requests. The app can use HTTP verbs such as GET to browse through various items in the system. When they need to upload a new piece of work, a new item can be created with an HTTP request with its verb set to POST. They can delete their work by sending an HTTP request with its verb set to DELETE and also update an item with an HTTP request in which the verb is set to PUT.
3. StreamWebSocket for uploading and downloading media. StreamWebSockets help with the exchange of binary data between the client and server over a secure connection when the URL begins with a prefix wss://. Because the server supports WebSockets, the app should use StreamWebSockets for exchanging media created by the members of the organization.
Objective 5.2: Review
1. Correct answer: C
a. Incorrect: Although sockets can be used to create a client to exchange data with the server, it requires a fair amount of work to implement such a client.
b. Incorrect: Similar to option A, encrypting the traffic manually requires effort and the server might not be able to decrypt the data.
c. Correct: The DefaultRequestHeaders property is used to set up the HTTP headers, and a request is sent over SSL if the remote server supports it through an https:// prefix.
d. Incorrect: A server supporting StreamWebSockets accepts only a ws:// or wss:// prefix.
2. Correct answers: A, B, D
a. Correct: Your app can decide whether to use the payload or discard it without processing it. This helps to improve client performance.
b. Correct: This helps with buffering content while the response is being read by the client. This helps to improve client performance.
c. Incorrect: An always-on connection might be useful for receiving data continuously, but the client has no control over the type of the data it expects to parse and use.
d. Correct: Setting a realistic timeout ensures that the app does not have to wait until the server times out the connection. This helps to improve client performance.
e. Incorrect: MessageWebSockets are used to exchange small amounts of data between the client and the server. Because the data from the server can vary in size, MessageWebSockets is not a suitable option.
3. Correct answer: C, D, E
a. Incorrect: Although the HttpClient can be used for secure authentication using a URL with a https:// prefix, setting a long timeout to download all data will make the game unresponsive while it waits for the data to arrive in scenarios where it takes long for the data to arrive.
b. Incorrect: Sockets over TCP can be used to implement the requirements, but it will require fair amount of work to manually authenticate, control the download requests, and so on.
c. Correct: The user can be securely authenticated using a URL with an https:// prefix before any data is exchanged between the client and the server.
d. Correct: MessageWebSockets are useful in exchanging small amounts of data between the server and the client. The client can use a URL with a wss:// prefix for SSL security.
e. Correct: StreamWebSockets are useful for downloading large amounts of binary data such as game content from a server. The client can use a URL with a wss:// prefix for SSL security.
Objective 5.3: Thought experiment
WinRT APIs provide developers with a number of features that can be used to develop Windows Store apps that target multiple geographies, and they can be used in any location in the world. Windows Store apps can benefit from these features as follows:
1. Data controls. Tourists can view information about a destination or an attraction in various ways. If similar items are grouped together, data controls along with the CollectionViewSource can be used to group, sort, and filter them. This provides a convenient feature in such an app.
2. Multiple layout and language format support. Data controls support right-to-left layouts as well as right-to-left languages. This feature helps users from anywhere in the world to use the app.
3. Value converters. Value converters are very useful for customizing data presentation to a specific category of users. The language parameter available in the converter methods can be used to specify the language for the data conversion. This is useful when formatting data specific to the geography in which the app is being used.
Objective 5.3: Review
1. Correct answer: C
a. Incorrect: A StackPanel is used to arrange a list of items in a layout, so it is not ideal to use it for displaying a collection of items.
b. Incorrect: A ListBox is used to show a list of items with a scrollbar visible that exceeds its bounds. A ListBox is not ideal for showing a small fixed list of items.
c. Correct: A ComboBox is ideal for showing a fixed list of items with only one item visible at any time. A GridView is suitable for displaying a collection.
d. Incorrect: Although a StackPanel can be used to display a small fixed list of items, a ListBox is not ideal to display a collection that the user can interact with, such as selecting a recipe.
2. Correct answer: B
a. Incorrect: The data binding framework does not provide support for validating data; you need to implement the INotifyDataErrorInfo interface in the data entity class.
b. Correct: The INotifyPropertyChanged interface enables property changed notifications to update the target of data binding whenever the source changes. The INotifyDataErrorInfo interface adds support for validating user input.
c. Incorrect: INotifyDataError interface is not supported by the WinRT APIs. Instead, you should use the INotifyDataErrorInfo interface.
d. Incorrect: To update the target of data binding with any changes in the source, the INotifyPropertyChanged interface should be implemented.
3. Correct answers: B, C, D
a. Incorrect: Any updates in the collection are not visible in the GridView when it is bound to the collection. A CollectionViewSource or an ObservableCollection should be used.
b. Correct: The GridView control supports displaying grouped items present in a CollectionViewSource object. Therefore, the ItemsSource property of the GridView should be set to the CollectionViewSource object.
c. Correct: You should group items from the data source using LINQ and use the view as the source of data for the CollectionViewSource object.
d. Correct: Setting the IsSourceGrouped to True indicates that the data in CollectionViewSource is grouped and adequate for display in groups in a GridView.
e. Incorrect: A DataTemplateSelector is useful for customizing individual items in a data control such as a GridView; it is not adequate for displaying items in groups.
Objective 5.4: Thought experiment
WinRT APIs support secure credentials storage, credential roaming, and claims-based authentication. The CredentialPicker and PasswordVault classes can be used along with claims-based authentication to implement these requirements:
§ Use the CredentialPicker class for a consistent user experience. Because employees of an organization can use the app on a desktop PC or on a handheld device, it is important that a consistent user experience is considered for retrieving the users’ credentials. The CredentialPicker class should be used to show the dialog box in which users can enter their credentials.
§ Support multiple sources of credentials. Users need their smart cards to provide their credentials for accessing specific resources, and the CredentialPicker class can be used for this feature. When a removable device such as a smart card is available in the device, the CredentialPickerclass shows a list of options available for obtaining the credentials including the smart card.
§ Consider using claim-based authentication. If the infrastructure enables an identity provider to be available, the app should consider using claims-based authentication for the user wherever possible. Users can be authorized for a set of roles based on their claims available through a token issued by the identity provider. These roles can be used to grant user access to resources and sections of the intranet.
Objective 5.4: Review
1. Correct answer: C
a. Incorrect: If users often access your app, requesting their credentials results in a poor user experience. In addition, incorporating a custom dialog box in a Windows Store app does not provide a consistent experience compared with other apps.
b. Incorrect: Although the roaming data store is restricted for access and tampering, it is not a good option when security and data synchronization are considered. Roaming might stop if the quota for the roaming storage available for the app exceeds the limit.
c. Correct: The CredentialPicker class provides a consistent user experience for retrieving a user’s credentials when compared with other apps. The PasswordVault class can be used to save the user credentials and have them roamed.
d. Incorrect: The temporary app data store can be cleared at any time by the system, so credentials saved in the temporary store can be deleted.
2. Correct answers: C, D, E
a. Incorrect: A custom control with a dialog box used for entering credentials does not provide consistent user experience compared with other apps. Custom controls are created for reusability across apps.
b. Incorrect: Using a Settings pane accessible via the Settings charm is not the correct way to obtain the user’s credentials. The Settings charm should be used with default values for most settings, but this is not the case for logging on the user. The Settings charm can be used for providing a link to log off the user.
c. Correct: The CredentialPicker class provides a consistent user experience for retrieving the credentials of the user. Users can opt for their credentials to be saved.
d. Correct: The PasswordVault class provides a secure way of storing a user’s credentials and having them roam across multiple devices.
e. Correct: The Settings charm can be used for actions that require minimal user interaction, such as clicking a button. The user can log off of the app through a button placed in the Settings charm.
3. Correct answers: C, D, E
a. Incorrect: Users probably will not provide their Facebook account credentials in your app because they might not trust your app to use their credentials properly. Therefore, the app should not request their Facebook credentials.
b. Incorrect: The PasswordVault class should be used to save the credentials of the user, but the user should be able to log off of the app, which should remove the saved credentials from the PasswordVault.
c. Correct: A token obtained from an online identity provider identifies the user and provides the roles. The app does not have to authorize the user separately to obtain these roles.
d. Correct: Moderating forum posts requires users to belong to a specific role. Therefore, by examining the roles of the user, the app should be able to grant the user access to various features.
e. Correct: The Settings charm should be used to provide an option for the user to revoke access to the app.
Objective 5.5: Thought experiment
WinRT APIs help developers easily incorporate authentication with online identity providers through APIs in the Windows.Security.Authentication.Web namespace. Several features of the app can be enhanced with these APIs:
§ Improve the authentication experience. The WebAuthenticationBroker class can be used with an online identity provider to authenticate users in your app. The dialog box presented for authentication provides a consistent user experience among other Windows Store apps.
§ Request the correct set of permissions from the remote service. Your app can request a set of permissions in the scope during the authentication process. These permissions are attached to the access token obtained at the end of authentication process. Your app can use these permissions to access the remote web service and post items on behalf of the user.
§ Implement SSO in your app. The WebAuthenticationBroker can be used to implement SSO if the remote identity provider supports SSO. With SSO, users do not need to authenticate through your app every time they use various devices. This improves the authentication experience of your app.
Objective 5.5: Review
1. Correct answers: B, C, D
a. Incorrect: Users might never enter their user names and passwords from third-party sites into an app’s custom dialog box due to lack of trust and the fear of having their credentials compromised.
b. Correct: Registration of a new app with a remote service provides your app with a client ID, secret key, and option to set up the redirect URL.
c. Correct: The URL used by the WebAuthenticationBroker class needs to contain the client ID, redirect URI, and in most cases the scope for the permissions requested.
d. Correct: If the AuthenticateAsync is successful in authenticating the user, the response contains the access token. The app is expected to use the access token with all future requests.
e. Incorrect: An app is expected to use well-defined APIs for accessing resources on the user’s behalf and carrying out actions such as posting photos. These require an access token that is available only through authentication using OAuth2.
2. Correct answer: B
a. Incorrect: The WebAuthenticationBroker class supports identity providers that implement the OAuth2 standard and are located on an intranet or the Internet.
b. Correct: The WebAuthenticationBroker can be configured for SSO with OAuth2 providers. SSO requires a redirect URL containing the app’s SID to be set up with the identity provider.
c. Incorrect: The WebAuthenticationBroker supports SSO for Windows Store apps.
d. Incorrect: The WebAuthenticationBroker can only be used with URLs that support the https:// prefix.
3. Correct answer: A
a. Correct: The WebAuthenticationBroker class uses a custom URL that contains the SID of the app to ensure the access token contained in a cookie in the SSO app container is belongs to the app.
b. Incorrect: The SID of an application does not change with updates, so the user will be automatically signed in after the app has been updated.
c. Incorrect: The WebAuthenticationBroker can be used only with URLs that support the https:// prefix.
d. Incorrect: SSO enables users to log on to an app on a device and automatically log on to the same app on different devices, provided they are logged on to the device with the same Microsoft account.