eXist: A NoSQL Document Database and Application Platform (2015)
Chapter 15. System Administration
When you’re using eXist day to day and eventually deploying it into a production environment, there are several topics that are useful to understand, both for those in a developer role and (even more so) for those in a system administration or DevOps role. In this chapter, we’ll look at some of the tools provided by or used with eXist that aid in ensuring stable and performant operation.
Logging
eXist uses Apache log4j as its mechanism for logging information and issues. Log4j provides a logging hierarchy that is configurable without changing the eXist code. Understanding how log4j works and how to configure it can help you get the most out of your eXist logfiles. Log4j provides several levels of logging. When eXist wishes to log a message, it decides at which level to log the message, and your log4j configuration then decides how that message is handled. The levels that log4j provides and at which eXist logs various messages are displayed inTable 15-1, with the most fine-grained at the top.
|
Level |
Description |
|
Trace |
Used for tracing the execution of complex parts of the eXist code. It is very unlikely that you will need to receive log messages at this level, unless debugging a serious issue. |
|
Debug |
Similar to Trace, but less fine-grained. Again, it is very unlikely that you will need to receive log messages at this level unless you are investigating an issue with eXist. |
|
Info |
Used for logging status information about eXist for the information of users and system administrators. This is the default logging level in eXist. |
|
Warn |
Used for reporting unexpected or nonoptimal behavior that is noncritical; that is, your operation or query will most likely still perform correctly. |
|
Error |
Used for reporting errors while performing a database or query operation. These messages indicate that something failed and the user or system administrator may need to take action. |
|
Fatal |
Used for reporting critical failures within eXist. Rarely used in eXist, but can report a corruption in the database or an index. |
|
Table 15-1. Log4j logging levels |
|
Levels in log4j are inherited upward, meaning that logging at the most fine-grained Trace level will log all message levels (i.e., also the Debug, Info, Warn, Error, and Fatal levels); likewise, logging at the Info level would actually log messages from the Info, Warn, Error, and Fatal levels.
In eXist the log4j configuration file is $EXIST_HOME/log4j.xml, and it is configured to log at the Info level by default. If you wish to adjust this, you can change the priority levels in the log4j configuration file as follows:
<root>
<priority value="debug"/>
<appender-ref ref="exist.core"/>
</root>
Log4j allows you to direct log messages from different parts of the database to different receivers. By default, in eXist all of the receivers are files, and the logfiles are written into the directory $EXIST_HOME/webapp/WEB-INF/logs. See Table 15-2.
|
Logfile |
Description |
|
exist.log |
The main logfile of eXist; all messages that are not directed to any of the other logfiles end up here. It contains details of the database server, the database and index status and health, and XQuery execution. |
|
xacml.log |
The logfile for the XACML (eXtensible Access Control Markup Language) engine in eXist. XACML support in eXist is deprecated. |
|
xmldb.log |
The logfile for XML:DB API operations; typically these log messages also appear in exist.log. |
|
urlrewrite.log |
The logfile for the XQuery URL rewriting engine. When you are developing XQuery apps that use URL rewriting, it can be useful to study both exist.log and this file when you have issues. |
|
profile.log |
If you switch on XQuery profiling using util:enable-profiling or the profiling pragma, the results of the profiling can be logged to this file at the Trace level. This approach is deprecated in favor of the profiling tool in the Admin Web Application (see “Checking Index Usage”). |
|
scheduler.log |
This file logs messages related to scheduled tasks in eXist. These include the database flush-to-disk tasks and also your own XQuery or Java scheduled jobs. If you are having trouble running your own scheduled jobs, this is the place to look for feedback. |
|
ehcache.log |
When using Ehcache with eXist, the Ehcache log messages are redirected to this file. Ehcache in eXist at this time is not recommended for general use. |
|
betterform.log |
When using betterFORM as your XForms engine in eXist, the log messages of betterFORM are redirected to this logfile. It can be useful for assisting in developing and debugging XForms applications. |
|
restxq.log |
If you are using RESTXQ in eXist, then all operations of the RESTXQ framework and server are logged here, including any issues with compiling your XQuery. Note that when your XQuery runs, any log messages it produces will be sent to exist.log. |
|
backup.log |
All log messages related to creating database backups or restoring database backups are written to this file. |
|
mdStorage.log |
If you are using the new metadata storage module, then any log messages generated by this module will be written to this file. For more information on the metadata module, see metadata. |
|
Table 15-2. eXist logfiles |
|
The logfiles in eXist are all plain text, so you may view them with any plain-text editor. If you prefer a GUI tool with colored highlighting of the log levels, then Apache Chainsaw may be worth a look.
TIP
On Unix/Linux/Mac systems, you can monitor log messages by tailing and following the appropriate logfile. For example:
tail -f $EXIST_HOME/webapp/WEB-INF/logs
On Windows systems, you can configure log4j to log to the Windows Event Log if you wish by using org.apache.log4j.nt.NTEventLogAppender. See the log4j documentation for the exact configuration details.
JMX
Java Management Extensions (JMX) is a Java technology that allows an application to expose monitoring information and management options to other applications. eXist acts as a JMX server and can service requests from any JMX client. At present, eXist mainly exposes monitoring information and very little in the way of management services via JMX. To use eXist with JMX, you must enable and configure JMX via options passed to the JVM when you start eXist.
If you are using either $EXIST_HOME/startup.sh or $EXIST_HOME/startup.bat for starting eXist, you can just pass the additional -j argument with a TCP port number for the JMX server to listen on. For example:
$EXIST_HOME/startup.sh -j 1099
WARNING
When you enable JMX using the -j setting in eXist, it disables JMX authentication and does not transport JMX over SSL. Thus, this approach should be used only in a secure, controlled environment! It is perfectly possible to use eXist’s JMX with authentication and SSL. For details of the JVM options, refer to the JMX documentation and make the necessary changes to either $EXIST_HOME/bin/batch.d/check_jmx_status.bat on Windows, or $EXIST_HOME/bin/functions.d/jmx-settings.sh on other platforms.
You can then connect using any JMX client, such as the simple command-line client provided with eXist or JConsole (which is provided with your JDK and shown in Figure 15-1). The eXist documentation for JMX is itself very reasonable, and rather than reproduce it here, we recommend you consult it for further information.
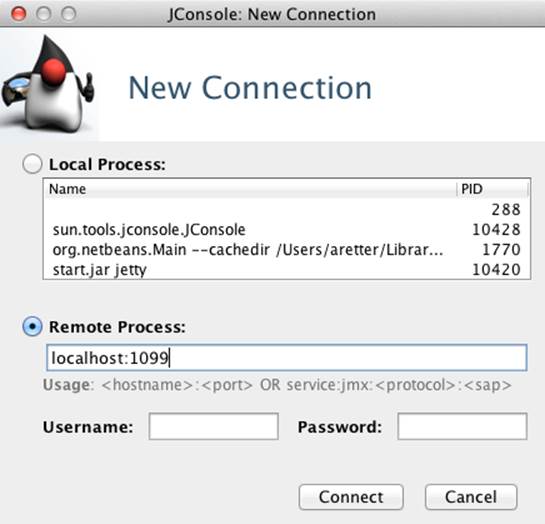
Figure 15-1. Connecting to eXist’s JMX server using JConsole
NOTE
When you are browsing eXist with JConsole, it is not always obvious how to view the monitoring information. As Figure 15-2 shows, you need to select the collection of attributes from the navigation tree under the service that you are interested in.
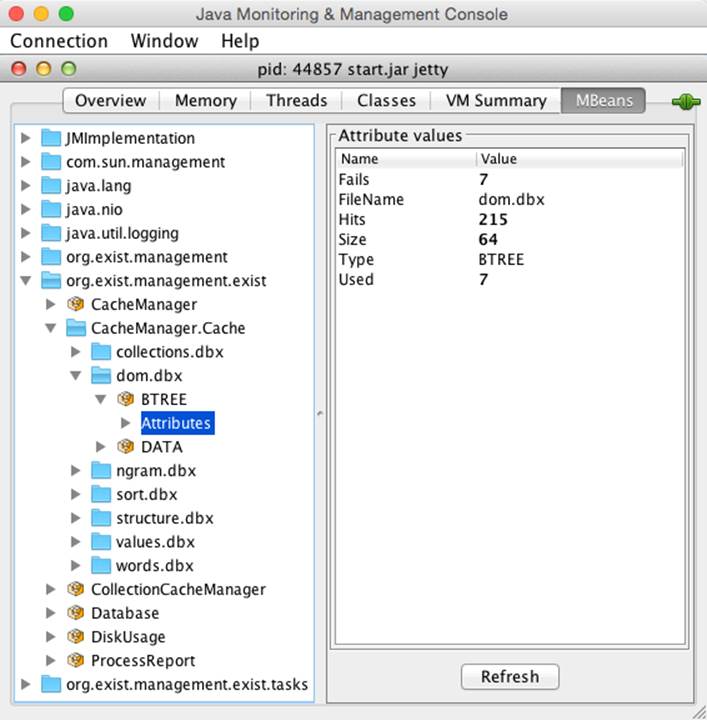
Figure 15-2. Examining eXist’s cache utilization using JConsole
Memory and Cache Tuning
The total memory available to eXist is set through the Java JVM’s -Xmx setting. This setting determines the maximum heap size available to a Java application when a JVM is started. If a Java application attempts to use more memory than is available, it receives the dreadedOutOfMemoryError from the JVM. While an application may not crash immediately, it is more than likely impossible to continue running successfully after receiving an OutOfMemoryError!
In eXist, all memory is allocated on the heap, so it is important to ensure that you have enough memory allocated for your database. It is very difficult for us to guide you in establishing the best -Xmx setting, as every dataset and query workload is different. If you used the eXist installer, then you will have configured the maximum memory available to eXist during installation (see “Things to Decide Before Installing”). If you did not use the installer, the -Xmx setting will be present in the script that you use to start up eXist.
Understanding Memory Use
As well as maintaining the stability of your database, ensuring you have enough memory available also has an impact on the performance of your queries. If there is not enough memory available, then queries may run slowly as old objects are garbage-collected by the JVM. Because your database size and query profiles may change over time, it is important to monitor eXist’s memory use. Unfortunately, monitoring a JVM process with tools provided by your operating system (such as taskmgr.exe on Windows or top on Unix/Linux) rarely gives you a detailed understanding of Java memory usage. However, there are several tools available for monitoring memory use of a JVM and eXist.
Web Admin Status
The somewhat antiquated Web Admin Application shipped with eXist provides a quick overview at the bottom of its status page, which you can access from http://localhost:8080/exist/admin/admin.xql?panel=status (see Figure 15-3).
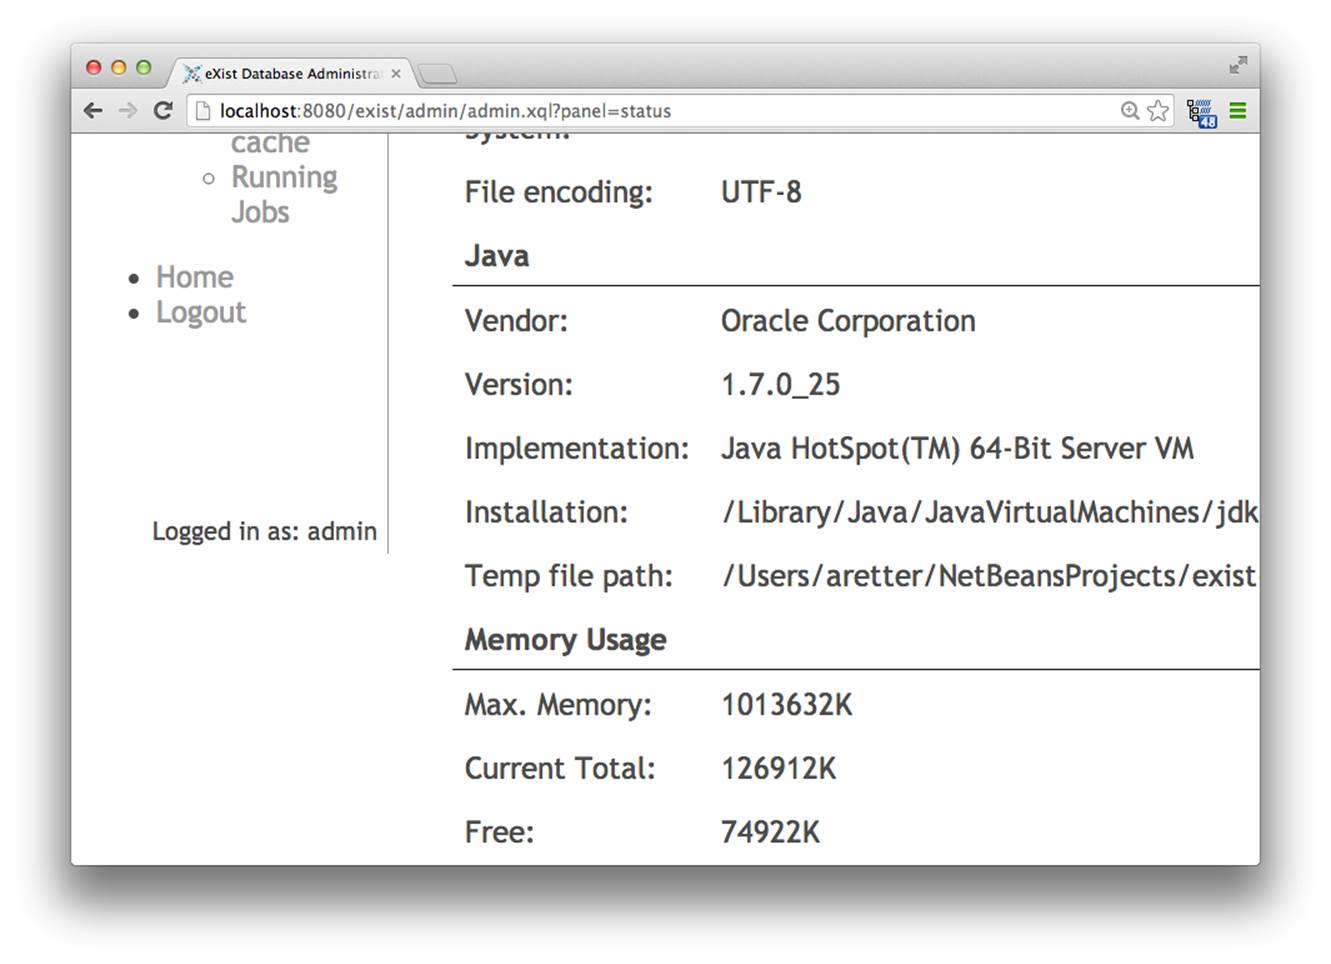
Figure 15-3. eXist Web Admin Status page
At first glance, the memory status reported by the Web Admin Status page may look confusing. This is in part because it is a direct reflection of how Java reports and allocates its memory; however, once you understand how to interpret it, it is relatively simple. These figures are the result of calling some XQuery functions from eXist’s system module; to understand how to interpret these, see “XQuery”.
XQuery
eXist provides three XQuery functions that may be used to interrogate the JVM in its system extension module (see system). The functions are:
system:get-memory-max
Reports the maximum memory available to the JVM running eXist (i.e., the value of the -Xmx setting).
system:get-memory-free
Reports memory that is allocated, but free and available for reuse.
system:get-memory-total
Reports the currently allocated memory within the JVM. This is made up of both memory that is in use and memory that is free for reuse. Subtracting system:get-memory-free from this tells you exactly how much memory eXist is using.
The following simple XQuery reports on the memory status:
xquery version "3.0";
declare function local:human-units($bytes) {
let $unit := if($bytes > math:pow(1024, 3)) then
(math:pow(1024, 3), "GB")
else if($bytes > math:pow(1024, 2)) then
(math:pow(1024, 2), "MB")
else
(1024, "KB")
return
format-number($bytes div $unit[1], ".00") || " " || $unit[2]
};
<memory>
<max>{local:human-units(system:get-memory-max())}</max>
<allocated>
<in-use>{
local:human-units(
system:get-memory-total()
- system:get-memory-free()
)
}</in-use>
<free>{local:human-units(system:get-memory-free())}</free>
<total>{local:human-units(system:get-memory-total())}</total>
</allocated>
<available>{
local:human-units(
system:get-memory-max()
- system:get-memory-total()
- system:get-memory-free()
)
}</available>
</memory>
The figures of interest here are really max and available. These report how much memory eXist may use in total before it receives an OutOfMemoryError and the amount of remaining memory available to eXist, respectively, while allocated gives a breakdown of the current memory use.
VisualVM
VisualVM is a truly excellent GUI tool (built with the NetBeans platform) that allows you to connect to any JVM and peer inside it to see exactly what is happening. VisualVM can provide a great deal of information about a running JVM; however, as this is not a book on VisualVM, we will just look at the memory statistics that it can provide.
If you have a modern JDK (version 7 or later) from Oracle, then VisualVM is provided with it; otherwise, VisualVM may be available as a package for your system or can be downloaded from https://visualvm.java.net. Once you have VisualVM installed, you start it by simply running the jvisualvm command.
If you are running VisualVM on the same machine as eXist, VisualVM can directly connect to any local Java process. Thus, upon starting VisualVM, you will see a list of running Java processes, from which you can simply select org.exist.start.Main (see Figure 15-4).
Conversely, if you wish to connect to a remote eXist instance with VisualVM, you can either install jstatd on your eXist server and then connect remotely using VisualVM, or connect remotely from VisualVM via JMX (see “JMX”).
Java Mission Control
Java Mission Control (JMC), which is built on the Eclipse rich client platform and shown in Figure 15-5, is another project that in some ways is similar to VisualVM. It was added to Oracle’s JDK in JDK 7 update 40 (quite some time after VisualVM). While it is likely that VisualVM will be adopted in the OpenJDK in the future, it is unlikely that the same will happen for JMC, as it contains technology from what was previously known as JRockit and is not open source. Therefore, JMC can be considered proprietary to Oracle JDKs at present.
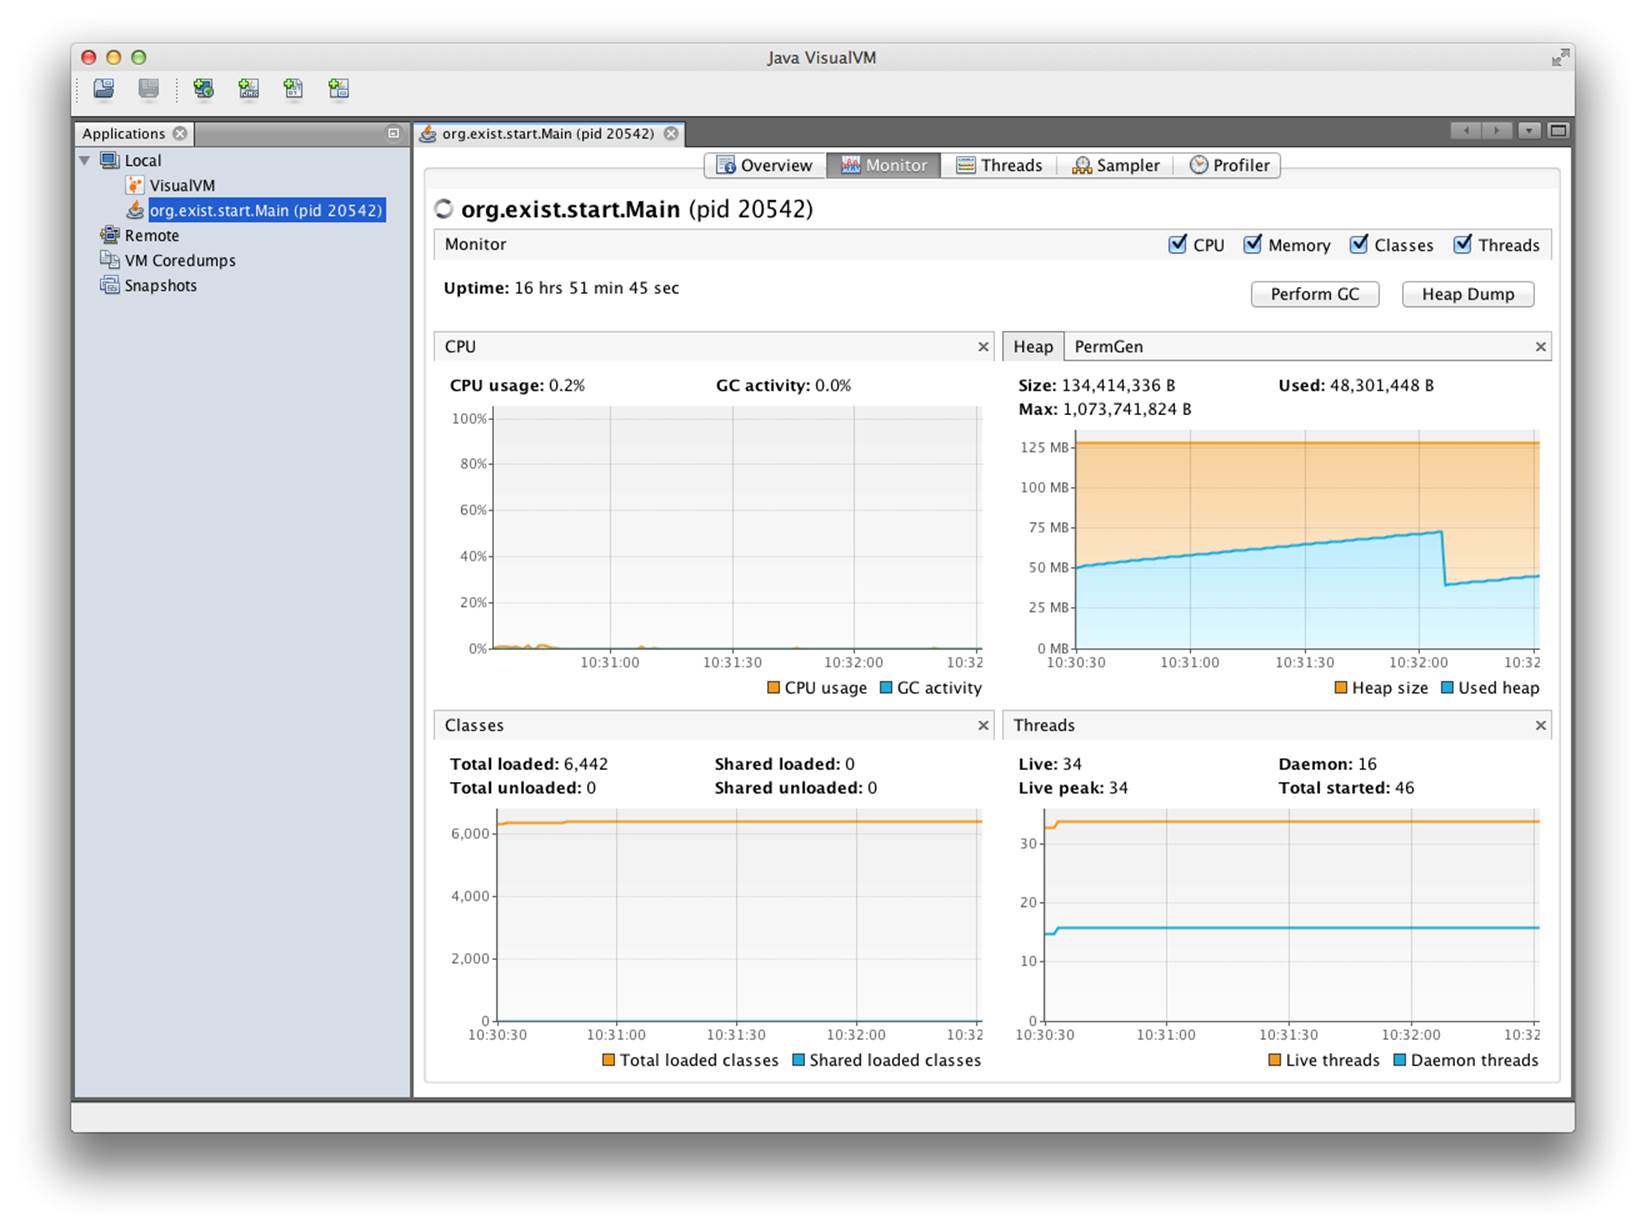
Figure 15-4. VisualVM inspecting eXist memory use
JMC includes a facility called the Java Flight Recorder (JFR) that can record and report information about events emitted by the JVM and applications running on the JVM. At present, as JFR is very new technology, eXist does not emit any specific events, but much can be gathered from the standard events emitted by the JVM itself. As with VisualVM, JMC can monitor local or remote JVMs (through the use of JMX).
If you have Oracle JDK 7u40 or later installed, you can start JMC simply by running the jmc command from the bin folder of the JDK.
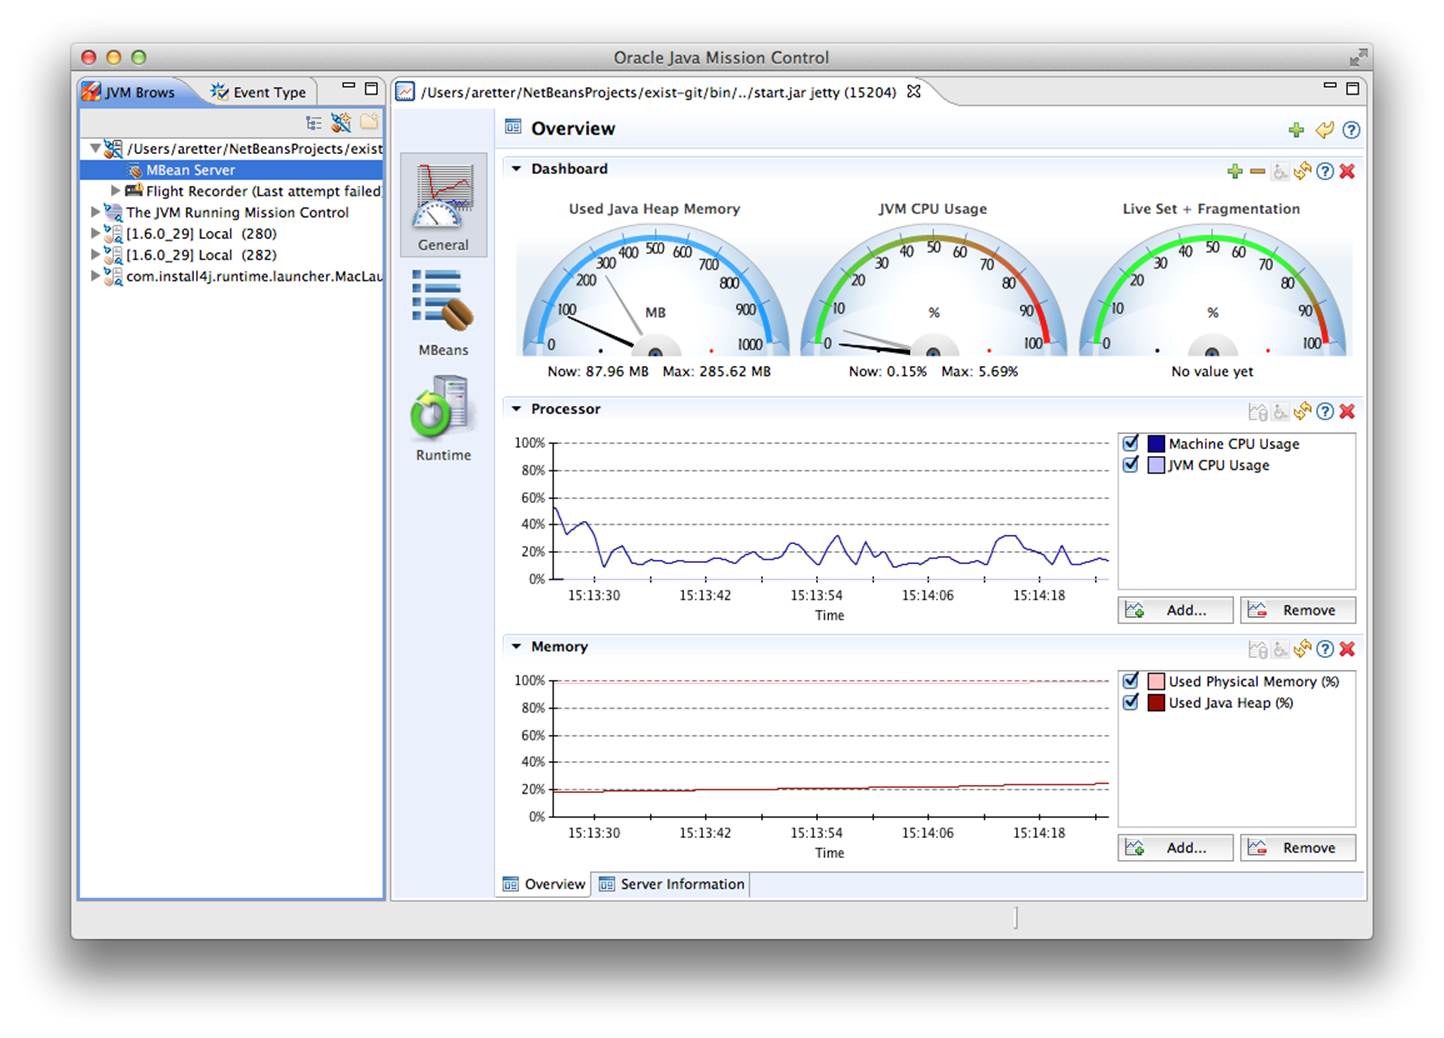
Figure 15-5. Java Mission Control inspecting eXist
Cache Tuning
When the database is operating optimally, all caches will be completely filled with data relevant to the most frequent node retrievals (and therefore query results). For further background on how caching works in eXist, “Paging and Caching” is recommended preliminary reading. As eXist attempts to fill the entire cache space, and this memory is taken away from the memory available to the rest of eXist, administrators must be careful not to allocate caches that are sized in such a way that they starve the rest of eXist of memory; this potentially leads to out-of-memory errors and database crashes.
As Figure 15-6 shows, it is recommended that the combined size of the general cache (cacheSize) and collections cache (collectionCache) should not exceed one-third of the total memory available to eXist, unless you are working in environments where the total memory is greater than 8 GB. Even then, you should take care to ensure that eXist is not memory-starved by its caches. A large cache does not automatically result in better performance!
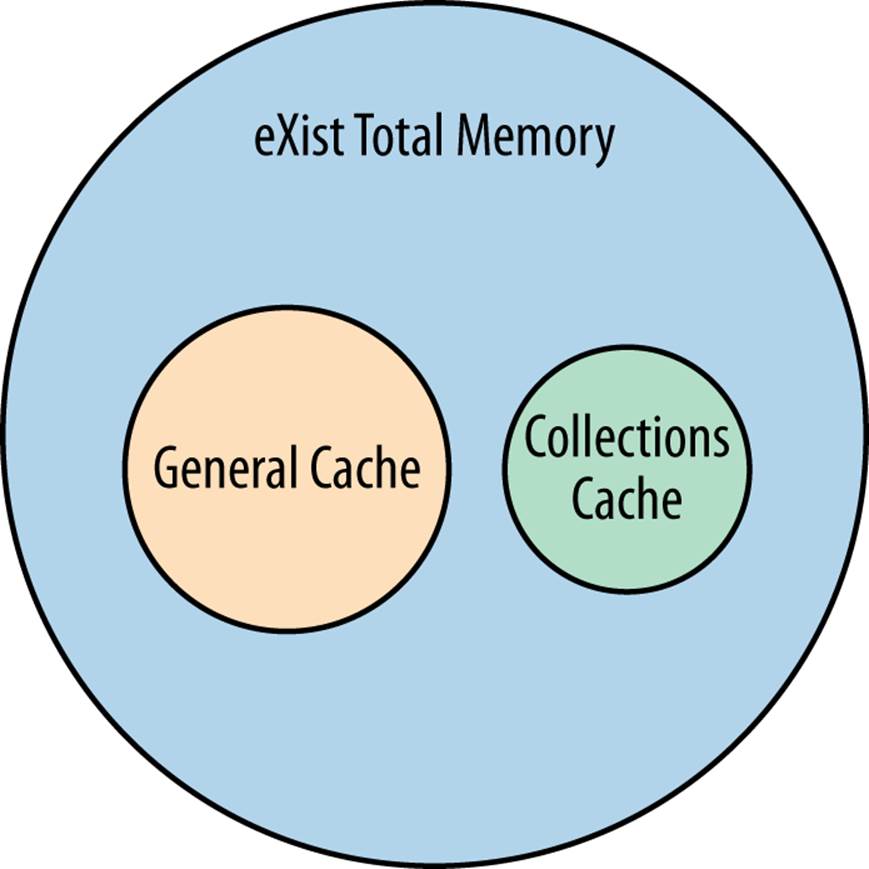
Figure 15-6. How eXist’s caches take from memory available to eXist
TIP
The collections cache should be large enough to keep the metadata of frequently queried collections in memory. The default cache settings in eXist are far too conservative for all but local development with small datasets. To determine if increasing the collections cache size will make a difference for you, you can record the time it takes to execute the simple querycollection("/db")/someRootElem before and after changing the size. Remember that you must restart eXist after changing any memory or cache settings in order for them to take effect!
A common warning sign that a cache in eXist has become too small (due to more intensive querying or storing and querying a larger dataset) is a sudden drop in query performance and/or a noticeable increase in disk I/O when you’re uploading large sets of documents into the database. This is caused by cache thrashing; increasing the memory available to the Cache Manager and restarting eXist may resolve the issue.
WARNING
When testing query performance, remember that a query may be slower the first time it runs, as the relevant pages may not yet be cached in memory. When testing performance or profiling a query in eXist, you should run it several times and average the best run-times to eliminate both cache warm-up times and JVM JIT compilation.
You can view the real-time behavior of the caches in eXist by either connecting to eXist using a JMX client such as JConsole, which is provided with the JVM (see “JMX”), or from an XML feed of the JMX output by accessing the URI http://localhost:8080/exist/status/.
During normal operation, the reported number of cache hits should always exceed the misses (fails) by an order of magnitude. Remember that the caches need to warm up by filling before you will see the optimum cache hits! You can determine cache capacity by comparing the reported cache size against the used size of the cache. If the number of cache misses starts approaching the number of cache hits, it is a sure sign that the cache size needs to be increased.
Backup and Restore
One of the most important aspects of managing any database system is to ensure that you have a robust backup policy in place. Should your server fail from a hardware or software issue, it is often essential that you can rebuild the server and restore a backup of your data. eXist provides two different types of backup:
Data copy
This is simply a copy of all files from eXist’s data folder (typically $EXIST_HOME/webapp/WEB-INF/data) to some other location. The data must always be copied when the database is in a consistent state, and the files are not being written to. You can do this either manually (including via a system scheduler such as cron on Unix systems or as a Windows scheduled task) when the database is shut down, or automatically by using eXist’s scheduler.
The eXist scheduled job org.exist.storage.DataBackup can be enabled in $EXIST_HOME/conf.xml and will attempt to create a copy of the database every time it is run; it will also ensure that the database is in a consistent state when it is run by switching into protected mode.
Data export
This is an export of the database, which means that all XML documents are serialized from the binary database files back into individual XML files, and a copy is made of all binary documents. A data export is a serialized copy of the database collection hierarchy and may target either a destination folder or a ZIP file.
WARNING
On some combinations of operating system and JRE, eXist may have trouble creating data export backups to ZIP files that are larger than 4 GB. In this scenario, it is recommended that you export to a destination folder instead of a ZIP file.
While the data copy variety of backup is always performed server-side, the data export backup may be performed either client-side or server-side.
Client-Side Data Export Backup
When backups are executed by a client of the database over the network, the database is not switched to protected mode. This means that the database may be accessed and modified during the backup. While individual documents will be consistent at the time of serialization, consistency across documents is not guaranteed! The advantage here is that the database continues functioning normally and servicing users while the backup is occurring, but the backup is not a snapshot of the database at a single point in time. The other disadvantage is that a client-side backup will not attempt to back up documents or collections that may be damaged in some way; rather, they will be skipped. Client-side backups are always initiated via the XML:DB API. For more rigorous backup options, see “Server-Side Data Export Backup”.
Java Admin Client backup
The Java Admin Client (see “Java Admin Client”) provides a convenient way to perform a client-side data export backup of the database. The Java Admin Client allows you to choose the collection hierarchy to back up. By choosing the /db collection, you can back up the entire database, which includes all users and collection configurations (indexes, triggers, etc.). Alternatively, you may choose just to back up a specific data collection hierarchy. You can open the Backup dialog in the Java Admin Client either from the toolbar, by clicking the Backup icon, or by selecting the Tools→Backup menu item (see Figure 15-7).
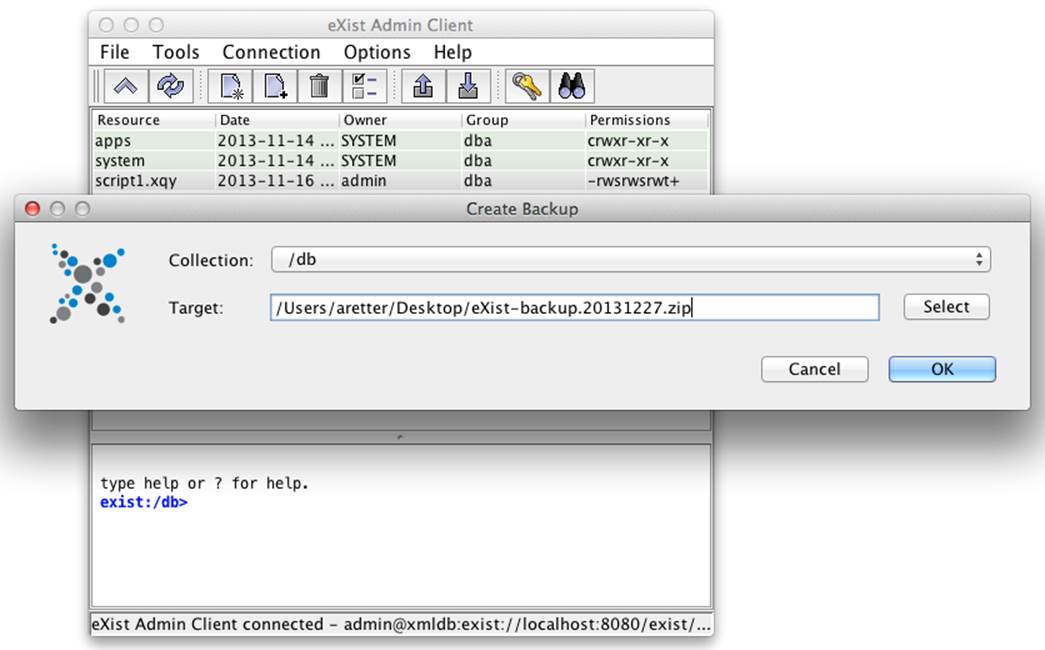
Figure 15-7. Java Admin Client Backup dialog
Restoring a backup with the Java Admin Client is even simpler: you just need to open the Restore Backup dialog by clicking the Restore icon or choosing the Tools→Restore menu item, and then selecting the previous backup that you created.
Command-line backup
Command-line scripts for performing a client-side data export backup (and restore) of the database are provided with eXist in the form of the $EXIST_HOME/bin/backup.sh file (for Unix, Linux, and Mac platforms) and $EXIST_HOME/bin/backup.bat file (for Windows platforms). These scripts take several arguments, which are demonstrated in Example 15-1 and explained in Table 15-3.
Example 15-1. Backing up the entire database (in ZIP format) from the command line
$EXIST_HOME/bin/backup.sh --user admin --password some-password --backup /db
--destination /export/backups/exist-db.201312271159.zip
|
Argument |
Description |
Mandatory/optional |
|
-u or --user |
The username for connecting to the database. Typically, must be a dba user when performing a backup. |
Mandatory, but if omitted, the default username admin is used |
|
-p or --password |
The password for the user connecting to the database. |
Mandatory, unless the user does not have a password |
|
-b or --backup |
The collection hierarchy to back up (e.g., /db). |
Mandatory |
|
-d or --destination |
The destination for the backup. Either a folder path, or a filename ending with .zip to create a ZIP file backup. |
Mandatory |
|
-o or --option |
Any additional options for the backup client that are needed to connect to the eXist server. For example, if using SSL: -ossl-enable=true -ouri=xmldb:exist://localhost:8443/exist/xmlrpc. |
Optional |
|
Table 15-3. Command-line backup arguments |
||
When you’re restoring a backup from the command line, the same scripts take slightly different arguments, as you can see in Example 15-2 and Table 15-4.
Example 15-2. Restoring a database backup (in ZIP format) from the command line
$EXIST_HOME/bin/backup.sh --user admin --password some-password
--restore /export/backups/exist-db.201312271159.zip
|
Argument |
Description |
Mandatory/optional |
|
-u or --user |
The username for connecting to the database. Typically, must be a dba user when performing a backup. |
Mandatory, but if omitted, the default username admin is used |
|
-p or --password |
The password for the user connecting to the database. |
Mandatory, unless the user does not have a password |
|
-r or --restore |
The location of the backup to restore. Either a folder path, or a filename ending with .zip to restore a ZIP file backup. |
Mandatory |
|
-P or --dba-password |
The password of the admin user in the database backup that you are restoring. |
Mandatory, if the backup includes the collection /db/system/security/exist |
|
-o or --option |
Any additional options for the backup client that are needed to connect to the eXist server. For example, if using SSL: -ossl-enable=true -ouri=xmldb:exist://localhost:8443/exist/xmlrpc. |
Optional |
|
Table 15-4. Command-line restore arguments |
||
Ant backup task
You can use the Ant extension tasks for eXist (see “Using Ant with eXist”) for performing client-side data export backup and restore of the database.
Once you have the Ant extensions configured in your Ant script (typically build.xml), then you can configure the Ant backup extension using the Ant code shown in Example 15-3. Its parameters are listed in Table 15-5.
Example 15-3. Backing up the entire database with Ant
<xdb:backup user="admin" password="some-password"
uri="xmldb:exist://localhost:8080/exist/xmlrpc/db"
dir="/export/backups/exist-db.201312271206.zip"/>
|
Parameter |
Description |
|
user |
The username for connecting to the database. Typically, must be a dba user when performing a backup. |
|
password |
The password for the user connecting to the database. |
|
uri |
The XML:DB API URI to the database collection that you wish to back up. For example, xmldb:exist://localhost:8080/exist/xmlrpc/db would back up the entire database, while xmldb:exist://localhost:8080/exist/xmlrpc/db/my-collection would back up the /db/my-collection collection hierarchy. |
|
dir |
The destination for the backup. Either a folder path, or a filename ending with .zip to create a ZIP file backup. |
|
Table 15-5. Ant backup task parameters |
|
Conversely, you can configure the Ant restore extension using the Ant code shown in Example 15-4. Its parameters are outlined in Table 15-6.
Example 15-4. Restoring a database backup with Ant
<xdb:restore user="admin" password="some-password"
uri="xmldb:exist://localhost:8080/exist/xmlrpc"
file="/export/backups/exist-db.201312271206.zip"/>
|
Parameter |
Description |
Mandatory/optional |
|
user |
The username for connecting to the database. Typically, must be a dba user when restoring a backup. |
Mandatory |
|
password |
The password for the user connecting to the database. |
Mandatory |
|
uri |
The XML:DB API URI to the database server (e.g., xmldb:exist://localhost:8080/exist/xmlrpc/db). |
Mandatory |
|
dir |
The location of the backup to restore if it is a folder. |
Mandatory, if the restore source is a folder |
|
file |
The location of the backup to restore if it is a ZIP file. |
Mandatory, if the restore source is a ZIP file |
|
restorePassword |
The password of the admin user in the database backup that you are restoring. |
Mandatory, if the backup includes the collection /db/system/security/exist |
|
Table 15-6. Ant restore task parameters |
||
Server-Side Data Export Backup
Server-side backups in eXist are always performed by the eXist Scheduler (see “Scheduled Jobs”), which executes the backup as a system task. Whether the job is scheduled in advance as a one-off or repeatable operation, or is triggered directly at some point, it will always be managed by the Scheduler.
System tasks always ensure that the database is in protected mode. This means that the database is in a consistent state because all pending transactions have completed, the database journal has been flushed to persistent storage, and the system task will execute in isolation, which blocks and queues all incoming transactions until the task has finished executing.
As a server-side backup is executed in protected mode, the database is unavailable for general use while the backup is performed. Server-side backups initially perform a consistency and sanity check against the database, and this information is used to inform the backup content. The consistency and sanity check can detect problems in the database storage and still allow collections and documents that may have become damaged to be exported in the backup, thus ensuring the most rigorous backup of your data.
NOTE
Documents that still exist in the database but through some issue have become detached from a collection—and so are effectively invisible—may still be exported as part of the backup content. These documents will be placed into the special collection /db/lost_and_found. Details of the consistency check are logged into the same folder as the destination of the backup.
Scheduled backups
If you wish to create a scheduled backup—either as a one-off task or a periodic operation—you can configure this in eXist’s configuration file ($EXIST_HOME/conf.xml) within the scheduler element indicated by the XPath /exist/scheduler, by enabling and configuring theorg.exist.storage.ConsistencyCheckTask scheduled job (see Example 15-5 and Table 15-7). For more information on scheduling jobs and the job configuration syntax, see “Scheduling Jobs”. This configuration has to be set before the eXist server is started, or you have to restart eXist after making changes. If you wish to schedule a new backup job without restarting eXist, you can do so using the XQuery scheduler extension module (see scheduler). Any scheduled backup will back up the entire database.
Example 15-5. Scheduled backup configuration: daily 1 a.m., fortnightly incremental backup
<job type="system" name="daily-backup" class="org.exist.storage.ConsistencyCheckTask"
cron-trigger="0 0 01 * * ?">
<parameter name="output" value="/export/backups"/>
<parameter name="backup" value="yes"/>
<parameter name="incremental" value="yes"/>
<parameter name="incremental-check" value="yes"/>
<parameter name="max" value="14"/>
</job>
|
Parameter |
Description |
Mandatory/optional |
|
output |
The destination folder for the logfiles of the Consistency Check task; if performing a backup, also the location for backup files. If you’re using a relative path, it is interpreted relative to $EXIST_HOME/webapp/WEB-INF/data. |
Mandatory |
|
backup |
After the consistency check, should a backup of the database be performed? Either yes or no. |
Optional, default is no |
|
incremental |
If performing a backup, should a full backup or an incremental backup (just documents that have changed since the last backup) be performed? Either yes for an incremental backup, or no for a full backup. |
Optional, default is no |
|
incremental-check |
If performing an incremental backup, should a consistency check be performed first? Disabling the Consistency Check task for incremental backups can lead to faster backup times, but has the downside of creating a less rigorous backup of the database. Either yes or no. |
Optional, default is yes |
|
max |
The maximum number of incremental backups before another full backup should be created. |
Optional, default is 5 |
|
zip |
Should the backup be written to a ZIP file? Either yes for a ZIP file or no for a full folder export. |
Optional, default is yes |
|
Table 15-7. Scheduled consistency check and backup job parameters |
||
Backups from XQuery
It is also possible to almost immediately request a server-side data export backup of the database on an ad hoc basis from XQuery, by triggering the Consistency Check system task. We describe this as almost immediately because, as you may recall from earlier, server-side backups are always scheduled, and the database may need to finish processing any other current requests before it can enter protected mode to perform the backup. You can trigger the Consistency Check system task from XQuery by using the system:trigger-system-task function (seeExample 15-6). For further details of the system XQuery extension module, see system. The function takes the same parameters as described in Table 15-7.
Example 15-6. Triggering a full server-side data export backup from XQuery
let $parameters :=
<parameters>
<param name="output" value="/export/backups"/>
<param name="backup" value="yes"/>
<param name="incremental" value="no"/>
<param name="zip" value="no"/>
</parameters>
return
system:trigger-system-task("org.exist.storage.ConsistencyCheckTask", $parameters)
Conversely, you can restore a database backup from XQuery by calling the system:restore function, as Example 15-7 shows.
Example 15-7. Restoring a backup from XQuery
system:restore("/export/backups/full20131228-1035", "some-password", "some-password")
Dashboard Backup app
Recently, a simple backup application has been added to the eXist dashboard that allows you to see previously created backups, and also to trigger a new immediate backup (see Figure 15-8). The backend of this application is written in XQuery and uses the same underlying functions as discussed in the previous section.
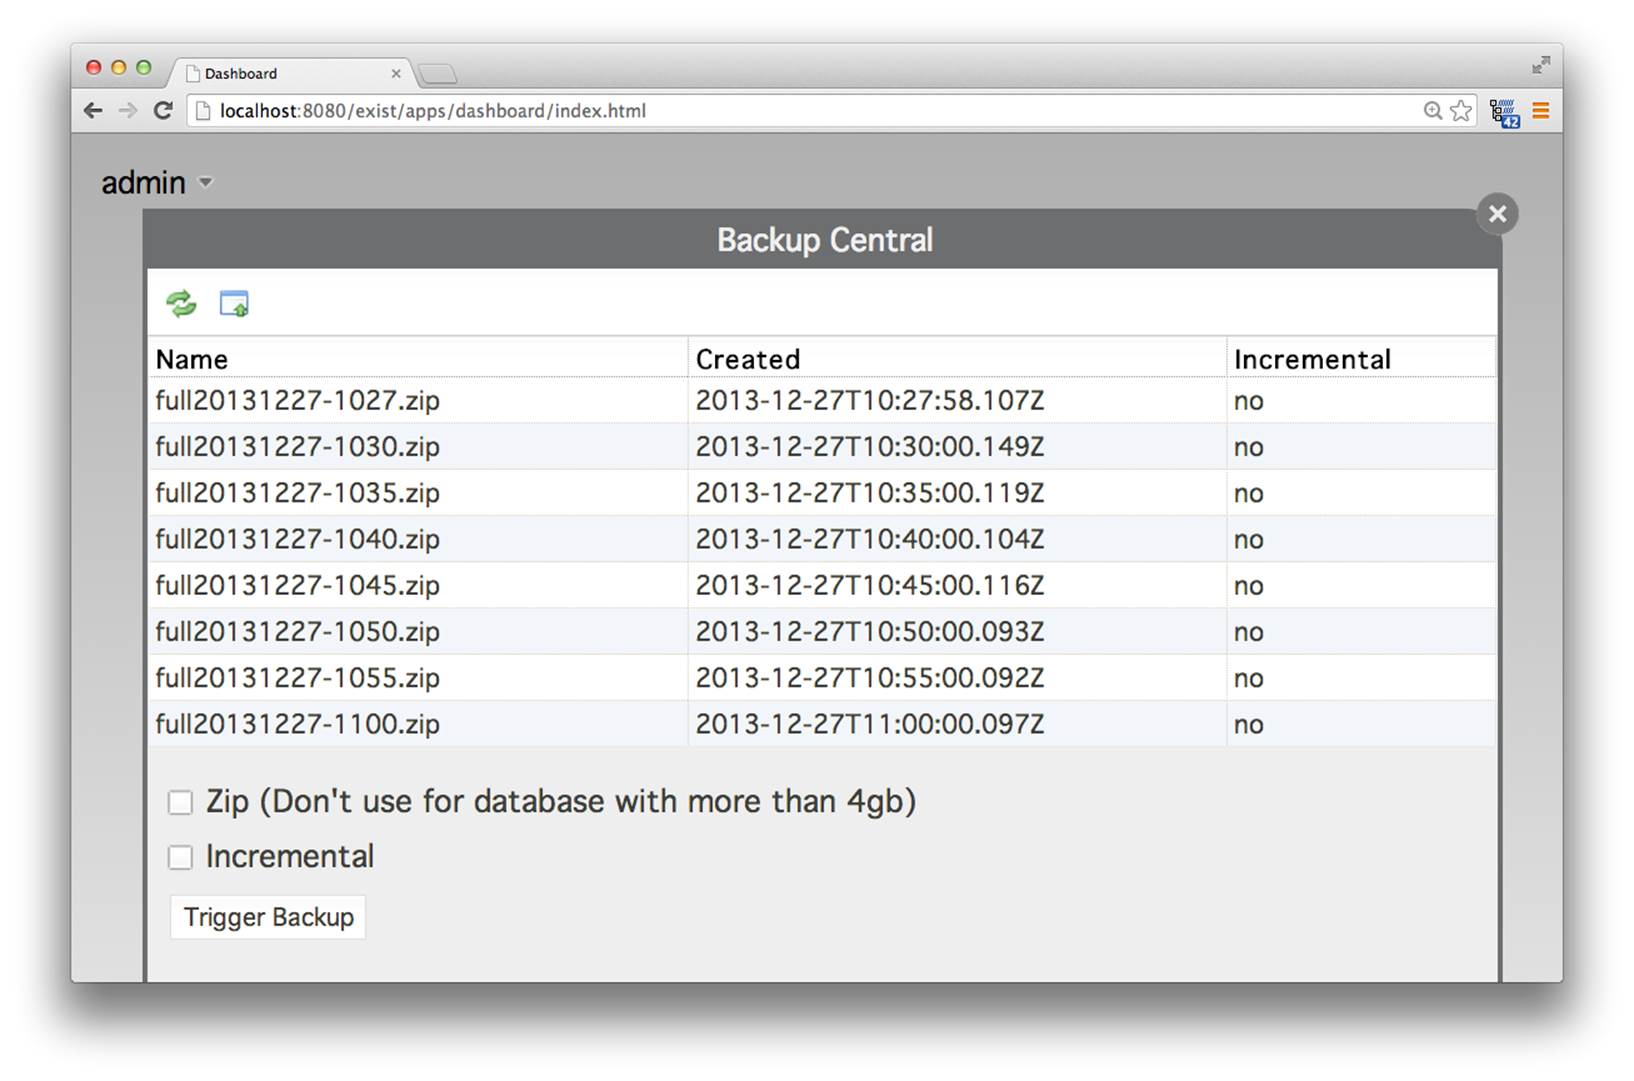
Figure 15-8. Dashboard Backup application
Restoring a Clean Database
When you are restoring a backup of a database in eXist, documents and collections in the existing database (before the restore is performed) are not overwritten unless they also exist in the backup that is being restored. This behavior is intentional, as it allows you to back up individual collection hierarchies and manage them independently. You can then choose to restore different collection hierarchies at different times.
If you wish to start with an empty database and then restore your backup so that the database contains only the data of your backup, then you need to first shut down eXist and remove the database files. Remember, this will cause you to lose all of your data! To remove the database, simply delete all the files and folders (excluding README, RECOVERY, and export) from your eXist data directory and journal directory: unless you have reconfigured this, they are one and the same directory, and located at $EXIST_HOME/webapp/WEB-INF/data. When you then restart eXist you will have an empty database, and you may restore your backup as normal.
Emergency Export Tool
The eXist database storage subsystem is designed in such a way that it should protect the integrity of your data during the vast majority of hardware or software failures. However, sometimes in the real world unexpected and unexplained events do take place. After a crash, when restarting, eXist will try to recover if necessary by examining its database journal. Under rare circumstances, however, eXist may not be able to automatically recover, at which point it will refuse to start up to avoid causing further damage to the database.
Should eXist refuse to start, there are two steps that you must take. First and most importantly, assuming that your data is important to you, you must ensure that you have a recent copy of your database. If you do not have a recent backup, then you can use the Emergency Export tool to examine the consistency of the database and create a backup (see Figure 15-9).
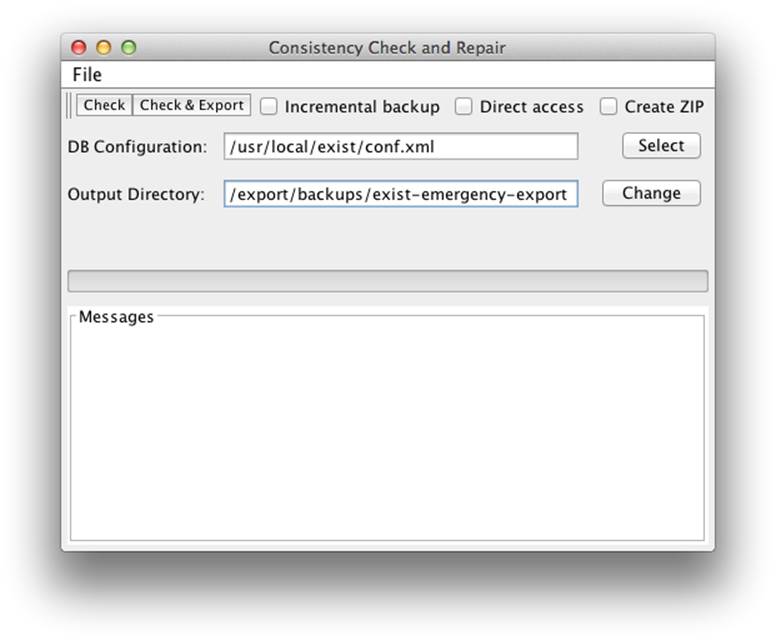
Figure 15-9. Emergency Export tool GUI
Caution
You must ensure that eXist is completely shut down (even if it refused to start properly) before running the Emergency Export tool, because the tool is independent of eXist and accesses the database files directly.
You can start the Emergency Export tool as a GUI tool by executing:
java -jar $EXIST_HOME/start.jar org.exist.backup.ExportGUI
Alternatively, you can run the Emergency Export tool as a command-line utility without the GUI by executing:
java -jar $EXIST_HOME/start.jar org.exist.backup.ExportMain
When run from the command line, the Emergency Export tool has a number of parameters that may be specified (these are also mirrored in the GUI); these are detailed in Table 15-8.
|
Argument |
Description |
|
-d or --dir |
The destination folder for the logfiles of the Consistency Check task; if performing an export (backup), also the location for exported files. |
|
-c or --config |
The $EXIST_HOME/conf.xml config file for the eXist instance you wish to perform the emergency export on. |
|
-D or --direct |
Uses a more aggressive approach to directly access nodes in the database without examining some indexes. Can be useful if there is also index corruption! |
|
-x or --export |
Performs a full data export backup from the database files. |
|
-i or --incremental |
If performing an export, and an existing backup is present in the destination folder, this specifies that only an incremental backup will be performed. |
|
-n or --nocheck |
Skips performing a consistency check, and just attempts to export all data. |
|
-z or --zip |
If performing an export, then this indicates that the database content should be exported to a ZIP file as opposed to a folder. |
|
Table 15-8. Emergency Export tool command-line arguments |
|
If the first step was to ensure that you have a backup of your data, then the second step is obviously to seek support in getting your database server running again.
If you have a complete backup of your database and are certain that all your data is present, you can simply restore the backup to a clean database, as discussed in the previous section. If you do not have a complete backup of your database and are having trouble recovering your data or restarting eXist, then you should refer to “Getting Support”. Obviously, if you have Consistency Check reports available from running the Emergency Export tool, then you should consider submitting the most relevant of these as part of your supporting documentation when requesting assistance.
Installing eXist as a Service
In “Downloading and Installing eXist” we looked at installing eXist in a development or desktop environment, through use of the eXist installer. In this section we look at how you install eXist into a server environment, where eXist is configured to integrate with your operating system’s service management, so that eXist is started and stopped correctly when your server powers up or shuts down.
When you are installing eXist into a server environment that is servicing real users, one of your major concerns should be security, so we would suggest Chapter 8 as prerequisite reading.
Regardless of your operating system, you first need to place a copy of the eXist distribution onto your server, which you can do using either:
§ The eXist IzPack installer, as discussed in “Downloading and Installing eXist”, and typically running it in headless (non-GUI) mode, as shown in “Installing eXist”. If you are using a Windows server or X graphics environment, then you may instead opt to use the GUI mode.
§ The source code, and compiling either the develop branch if you want the absolute bleeding edge of eXist development, or one of the release tags (such as eXist-2.1) if you want a stable release. This is discussed in “Building eXist from Source”.
You may, of course, place eXist anywhere you wish on your system, but it is common for eXist to be installed into C:\Program Files\eXist on Windows systems and /usr/local/exist or /opt/exist on Linux/Unix/Mac systems.
Solaris
We will discuss installing eXist as a service on the Solaris operating system first, as the approach for service management on Solaris is unique, whereas the same tool is used for all other supported platforms.
Since version 10, Solaris has included a facility called the Service Management Framework (SMF), which is responsible for starting and stopping all services on the system and reporting on service errors. To a certain extent, SMF can also be configured to automatically restart failing service trees as part of Solaris’s predictive self-healing technologies.
eXist can be installed into Solaris’s SMF and be controlled through the standard Solaris service management commands: svccfg, svcadm, and svcs. eXist has been tested with SMF on Solaris 10 and 11, OpenSolaris, and OpenIndiana, but it is likely it will also work with any Illumos-based distribution that uses SMF and provides Java 1.6 or newer.
Manifests and service scripts for SMF are shipped with eXist and provided in the $EXIST_HOME/tools/Solaris folder. As comprehensive documentation for integrating eXist with SMF is already provided in the file $EXIST_HOME/tools/Solaris/README.txt, we will not attempt to reproduce it here.
Windows Linux and Other Unix
eXist ships with a third-party tool from Tanuki Software called the Java Service Wrapper. eXist uses the open source GPLv2 version of the Java Service Wrapper, which is written in C and Java. The C component provides native integration with specific operating systems, while the Java component provides abstractions atop the C component to allow you to use the same configuration and management options across all platforms.
eXist provides configuration files and scripts for the Java Service Wrapper that allow you to easily install eXist as a service on any platform that the tool supports—i.e., Windows, Linux (x86), and Mac OS X. The Java Service Wrapper can also support IBM AIX (PPC), z/OS, z/Linux, FreeBSD (x86), HPUX, and Linux (PPC, ARM) by way of a Delta Pack that can be downloaded from the Tanuki Software website. While the Java Service Wrapper also supports Solaris, eXist provides its own solution for the Solaris platform, as discussed in “Solaris”.
A preconfigured Java Service Wrapper ships with eXist and is provided in the $EXIST_HOME/tools/wrapper folder. Before installing eXist as a service, you should consider the access rights that eXist has to your system and the security concerns of running eXist as a service, as discussed in “Reducing Collateral Damage”.
To install eXist as a service on Windows platforms, you can execute the following command from a Windows console (cmd.exe):
C:\> %EXIST_HOME%\tools\wrapper\bin\install.bat
After successful installation as a service on Windows, eXist will show up in the Windows Services as “eXist Native XML Database.”
To install eXist on Linux, Mac OS X, and other Unix platforms, you can execute the following command from a terminal as root or an equally privileged user:
# $EXIST_HOME/tools/wrapper/bin/install.sh
After successful installation as a service, eXist will be installed as the named service eXist-db. You should then be able to manage the service with your platform’s service management tools. On Linux this would typically be the service and/or chkconfig commands; for example, running service eXist-db status should report the running status of eXist.
NOTE
When you are installing on Linux, if your distribution uses the Upstart event-based startup system (e.g., Ubuntu, Linux Mint, ChromeOS, RHEL/CentOS 6, Scientific Linux, and Oracle Linux), you should edit $EXIST_HOME/tools/wrapper/bin/install.sh before running it and set the flag USE_UPSTART to true.
Hosting and the Cloud
The eXist developers are often asked what is needed to host eXist on a third-party server and where users can find hosting companies or cloud providers that support or enable eXist to be used. The basic requirements from a hosting provider are the same as those needed to run eXist on your own computer or server: you simply need a system that offers a JRE (or JDK, if you wish to build eXist from source code) of at least version 6, and allows you remote console access to install eXist.
Unfortunately, full access to a remote host (physical or virtualized) usually comes at a higher cost than shared application server solutions where you can just upload some PHP or ASP code. However, eXist should be viewed as an application server platform in its own right, as it offers far more functionality and convenience through XQuery, XSLT, XProc, and XForms than lower-level programming languages such as PHP or ASP, which must also be coupled with database access to even begin to approach what eXist offers. In this section, we will examine some of the options available for hosting eXist.
Entic
Entic is a virtual private server (VPS) provider in San Jose, California that has provided the VPSes that have powered the eXist Solutions website and Adam Retter’s own websites since 2008.
Entic provides very reasonably priced Solaris zones. These are billed monthly, depending on the resources allocated to them. With Entic you purchase a pool of RAM, CPU, and disk space, which you can then allocate between as many or as few VPSes as you wish. The VPSes can be dynamically allocated and resized on the fly from the Entic website with zero downtime.
eXist has support for running within the Service Management Framework (SMF) of Solaris systems (see $EXIST_HOME/tools/Solaris/README.txt). Entic was initially chosen for eXist due to eXist’s excellent performance on Sun (now Oracle) JVMs running on Sun Solaris atop Sun x64 servers. Whether this performance metric still stands remains to be tested.
Two final points in favor of Entic are that it’s directly connected to the Internap Internet backbone, therefore providing plenty of low-latency bandwidth, and that its support staff are fantastic, being both personal and very flexible in their approach.
Amazon EC2
Amazon is probably the largest and best known of all the cloud providers and offers a plethora of services, including virtual machines. Amazon’s Elastic Compute Cloud (or EC2, as it is better known) is a cloud computing platform where virtual machines can easily be created and destroyed.
EC2 supports a wide choice of operating systems, including Solaris, various Linux distributions (including EC2’s own Amazon Linux), FreeBSD, NetBSD, and Windows. Amazon EC2 virtual machine instances are created from Amazon machine images (AMIs), which contain the operating system and any preinstalled software. A wide variety of AMIs are available from the AWS Marketplace. The cost of running a virtual machine on EC2 is typically calculated by the hour and depends on four main factors:
Instance sizing
Amazon offers a variety of virtual machine instance sizes. Some are optimized for CPU processing, others for large memory use, and still others for storage and I/O performance. Which to use with eXist will depend entirely on your use of eXist, the database size, and the queries that you are performing. It is entirely feasible with EC2 to start on one type of instance, and then at a later stage create an image of your virtual machine and migrate to a larger or smaller instance as necessary.
Instance location
Amazon has several data centers located in the US, South America, Europe, and Asia. Amazon charges differently depending on which data center you wish to run your instance in. The cheapest data center is usually on the East Coast of the US, but it may make more sense to locate your servers closer to your customers to reduce latency, or you may be required to stay within a political region to comply with governmental data protection laws.
On-demand or reserved instances
If you are running servers on EC2 for production purposes or over a longer time frame than a few weeks, it could be cheaper to prepurchase reserved CPU compute hours rather than paying EC2’s on-demand rate.
Software
Depending on the AMI that you choose to use to create your virtual machine instance, there may be an extra cost associated with provided and/or preconfigured software packages.
One of the nice things about EC2 is that it provides a free tier. If you qualify, then the free tier gives you access to a micro virtual machine instance for one year that you can use for gaining experience and also for trying out different software on EC2. The current t2.micro instance at the time of writing provides:
§ Linux (Amazon, Red Hat, or SLES) or Windows
§ One vCPU (equivalent to one Hyper-Thread of an Intel Xeon processor operating at 2.5 GHz burstable to 3.3 GHz)
§ 1 GB of RAM
§ 30 GB of Elastic block storage
§ Basic security group firewall
It is entirely possible to install and run eXist (and even compile it) on the EC2 free-tier micro instance; this has been tested with Amazon Linux, but other operating systems should also work. Obviously the free tier is not going to allow you to run a huge or busy eXist service, but for very small applications, low-traffic websites, or experimentation it is perfectly fine.
WARNING
Make sure to correctly configure your EC2 instance types, and be aware of the associated costs! If you are expecting to use the free tier, we would recommend that you verify you are actually receiving the service for free. Amazon’s free-tier arrangement is subject to change, and we cannot be held responsible for unexpected costs incurred from using EC2.
eXist AMI
You may be wondering how you install eXist onto an Amazon EC2 instance. For your convenience, Adam Retter has created an EC2 AMI that can be used for easily starting your own eXist server on Amazon EC2. The AMI is based on Amazon Linux with eXist 2.1 and NGINX installed. It is available from the AWS Marketplace free of charge /TBD: https://aws.amazon.com/marketplace/seller-profile/ref=dtl_pcp_sold_by?id=7a9e551e-66bf-4093-bf25-a34318b5fec5.
NOTE
eXist Solutions is planning to make available Amazon EC2 AMIs for eXist LTS (Long-Term Support edition), but these are not yet available (see “Commercial Support”).
Installation
eXist has been cloned directly from its GitHub repository into /usr/local/exist and compiled using OpenJDK 7. eXist has been configured so that it stores its database files and journal into /exist-data. This means that should you wish to, at any point in the future you can easily update to a newer version of eXist from GitHub and recompile because the application code and its data are stored in separate directory trees.
Service
eXist has been configured to be started and stopped when the instance starts and stops; it has been integrated into the system upstart via eXist’s Java Service Wrapper integration. If you wish to start or stop eXist, you can run sudo service eXist-db start or sudo service eXist-db stop.
eXist will run under the exist user account on the machine, and the folders /usr/local/exist and /exist-data must have appropriate read/write permissions for the exist user. By default, these are set up and configured correctly for you. If you want to access or modify files in those folders, it is best to su to the exist user.
eXist has been configured to listen on the standard 8080 TCP port, but for security the EC2 firewall has been enabled to allow access to the machine instance only on ports 80 (HTTP) and 22 (SSH). Thus, if you want to access eXist from the Web, be aware that it has been proxied behind the Nginx web server on port 80, as described in “Reverse proxying”. The Nginx configuration file is located at /etc/nginx/nginx.conf. It is currently configured to forward just the REST Server interface; however, commented out in that same file is an example of forwarding the RESTXQ Server interface. If you wish to start or stop Nginx, you can run sudo service nginx start or sudo service nginx stop.
Administering
As only the REST Server is accessible from the Web on the EC2 instance, you may wonder how you can work with your eXist server and administer it using all of the functionality that you are used to. The answer is to forward a TCP port from your own development/admin machine to your eXist server when you need to get at the full eXist server. You can do so by making use of port tunneling in SSH.
For example, consider the following OpenSSH client command:
ssh -i ~/ec2-keys/aretter.pem -L8181:localhost:8080
ec2-user@ec2-107-22-152-27.compute-1.amazonaws.com
This command would connect by SSH to your EC2 instance (in this example, the EC2 host is ec2-107-22-152-27.compute-1.amazonaws.com) and forward the TCP port 8181 on your local machine to port 8080 (the port that eXist is listening on) on the remote EC2 instance. This means that you can use the hostname localhost and the port 8181 on your local machine to connect to the remote eXist using your web browser, the Java Admin Client, WebDAV, and so on.
NOTE
The eXist admin user password for the EC2 instance that you create, will be set to the ID of your instance the first time it is run. It is strongly recommended that your first task should be to change this!
The SSH command shown is for Unix, Linux, and Mac systems, but you can achieve the same result from Windows systems using an SSH client for Windows (e.g., PuTTY, shown in Figure 15-10).
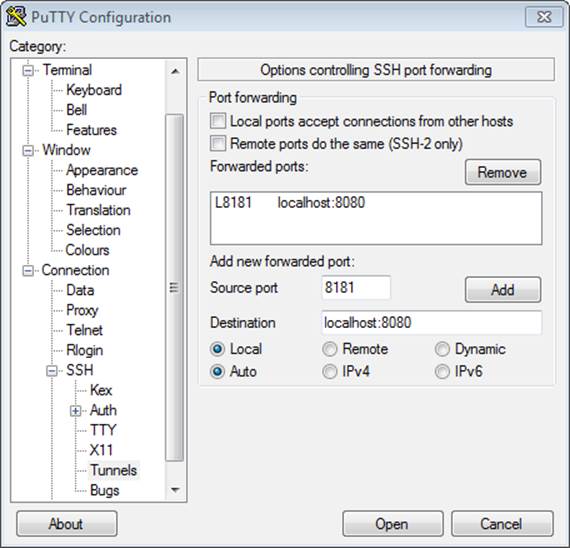
Figure 15-10. Port tunneling with PuTTY on Windows
Other Cloud Providers
There are literally hundreds of hosting and cloud providers out there, each offering different server infrastructures, resources, and pricing models. It would take far too much time to evaluate them all for use with eXist. The good news, however, is that many of these platforms provide either complete virtual servers or Java application containers in which eXist can be installed. To round off this section, we will mention just two more cloud providers that we think are interesting and offer something special.
GreenQloud
GreenQloud is based in Iceland, as are its data centers, and this enables its cloud service to be powered by 100% renewable energy. Energy is taken from hydroelectric and geothermal power sources, and GreenQloud’s servers are cooled by the local naturally cold air. GreenQloud’s compute and storage clouds offer seriously green options, and its innovative dashboard application allows you to closely monitor your energy use, savings, and carbon footprint.
Although they have comparable price points, depending on your server requirements, GreenQloud can be cheaper than Amazon EC2. Amazon EC2 offers far more storage than almost any other cloud provider, but with GreenQloud you get more RAM and CPU. GreenQloud also offers an API that is compatible with Amazon’s EC2 API so that you can easily migrate from EC2 to GreenQloud, or more easily run a hybrid mixed cloud if you don’t want to keep all your eggs in one basket.
eXist operates perfectly well in the GreenQloud environment, and if Earth-friendly credentials are important to your business it is an excellent choice. Evolved Binary Ltd is currently evaluating GreenQloud for its virtualized servers.
Digital Ocean
Digital Ocean is a relatively new cloud provider based in New York City. Apart from services that offer great value for money when compared to Amazon EC2 and others, it offers two features of particular interest for eXist users.
The first is that all of Digital Ocean’s servers provide 100% Solid State Disk (SSD) storage, which is great news for databases such as eXist where SSD can dramatically improve performance when data is accessed from disk.
The second feature is Digital Ocean’s built-in support for Docker. Docker is an application container technology, which means that any application, such as eXist, packaged via Docker can be deployed onto any physical, virtual, or cloud service that supports Docker. Digital Ocean allows you to spin up new machines using Docker applications. As there is also already support for Docker on Amazon EC2, it would be really interesting to see a Docker container for eXist that could then be used to deploy eXist to almost anywhere.
Getting Support
Even though you have an excellent book available on the topic, sometimes when you’re working with eXist—either as a developer, a system administrator, or somewhere in between—you may need to seek additional support by asking a question, reporting and getting a fix for a bug, or requesting help to understand a particular feature. You have two main options for getting support with eXist: community or commercial.
Whether you look to the community for support or seek some sort of commercial support arrangement, when you’re reporting problems or a bug, there are several pieces of supporting information that you should consider submitting with your request:
§ Include the exact version of eXist that you are using—either the release version number or, if you’re using a version compiled from source code, the Git commit revision number. You can obtain the Git revision by running the command git show --summary –abbrev-commit.
§ Indicate which operating system you are using, and the version, (e.g., Windows XP Service Pack 3a). Also include whether the operating system is 32-bit or 64-bit. Specify the vendor, version, and CPU architecture of the Java JRE or JDK that you are using as well. The Java version can be obtained by running the command java -version, and vendor information by examining the java.vm properties when running java -XshowSettings:properties -version.
§ Be sure to report how much memory is available to the operating system, including how much is allocated to eXist (i.e., the -Xmx setting), and how much is allocated to the general cache and to the collections cache in $EXIST_HOME/conf.xml.
§ When reporting errors or bugs with eXist, make sure to include any pertinent WARN- or ERROR-level log messages from the logfiles, in particular $EXIST_HOME/webapp/WEB-INF/logs/exist.log.
§ If you believe that eXist has frozen in some way (deadlock/livelock) and is not correctly responding to incoming requests, then a thread dump of the eXist process can be invaluable to the developers. You can obtain a thread dump through one of several methods, such as:
§ Using the jstack tool that comes with your JRE. For example, by running jstack -l 51617 > exist-jstack.txt, where 51617 is the process ID (PID) of eXist, you can get a file exist-jstack.txt containing a thread dump. You can find out the PID of eXist by running the command jps.
§ By sending the QUIT signal using the kill command on Unix/Linux/Mac systems. For example, by running kill -s QUIT 19241 > exist-dump.txt, where 19241 is the PID of eXist, you can get a file exist-dump.txt containing a thread dump.
§ If the JVM running eXist has crashed, then a file whose name starts with hs_err_pid will be created. You should keep a copy in case it’s requested by the eXist developers when you’re reporting a problem. Ultimately, you may be asked to send a copy to the JRE/JDK vendor if the file reveals a bug in the JVM.
§ Remember, when reporting bugs, you need to be able to explain how to reproduce the issue to the community. If a developer cannot reproduce your issue easily, then it becomes hard or impossible for her to assist you. This is particularly important when reporting problems with your XQuery scripts. You should be concerned with creating an absolutely minimal example XQuery script that isolates and reproduces the problem you are experiencing. The easier you can make it for a developer to reproduce your issue, the more likely you will be to get a quick fix. Simply sending several thousand lines of XQuery code and saying that there is a problem somewhere will most likely not result in a solution to your problem anytime soon!
Community Support
As discussed in “Contributing to the Community”, eXist has an excellent open source community, with developers and users supporting each other. Should you have a problem you need help with, we would recommend first looking for a solution in an existing report in the eXist mailing list archive, and if you do not find anything there, then posting to the eXist-open mailing list.
If you believe you have found a bug in eXist, it is good practice to discuss it on the mailing list, and to have it confirmed. Once you have a confirmed bug, or if you have a new feature request, then we would encourage you to log it in the GitHub issue tracker for eXist. In this manner, issues are accounted for and managed publicly.
Commercial Support
Commercial support for eXist is available from eXist Solutions. eXist Solutions comprises many of the core developers of eXist and contributes the vast majority of its resources and funding back into advancing the eXist open source project.
eXist Solutions offers an LTS (Long Term Support) version of eXist, which is a stable version supported for at least two years, with significant bug fixes and new features backported from newer versions of eXist. With the LTS version of eXist, you can also purchase a commercial support contract that allows your organization to email or telephone eXist Solutions staff directly when the need arises. While there are several ready-made support contracts available, eXist Solutions is always happy to provide a custom-tailored contract for your organization’s needs.
It is also worth mentioning that eXist Solutions can provide developers to assist you should you need additional resources when building your eXist applications, and consultancy services to help improve and/or tune your eXist applications for production use.