eXist: A NoSQL Document Database and Application Platform (2015)
Chapter 14. Tools
Working with eXist often means working with various tools that help ease development. For instance, writing code in an integrated development environment (IDE) like eXide or oXygen is far easier than hacking in Notepad or vi. Other tools, such as the eXist Ant extensions, are useful for automating tasks.
This chapter explores some of the common tools that you can use to work with eXist. Undoubtedly there are many more, so be warned: our personal preferences are shining through!
Java Admin Client
eXist comes with a small program called the Java Admin Client. It allows you to do maintenance work on the database like backups and restores, imports and exports, checking and setting properties, creating collections, and more. It’s a standard Java Swing GUI application and its functionality mostly speaks for itself.
NOTE
The Java Admin Client has a lot of functionality hidden underneath right mouse clicks, which is very useful to know if you can’t immediately figure out how to do things.
The Java Admin Client has already popped up in this book in several places. See, for instance, “The Java Admin Client”, and “User and Group Management with the Java Admin Client”.
eXide
One of the additional packages you can install in your eXist installation is eXide (Figure 14-1). eXide is a complete development environment for working with eXist. You can do a lot with eXide, from editing a single file (as long as it’s stored in the database) to creating and maintaining complete applications.
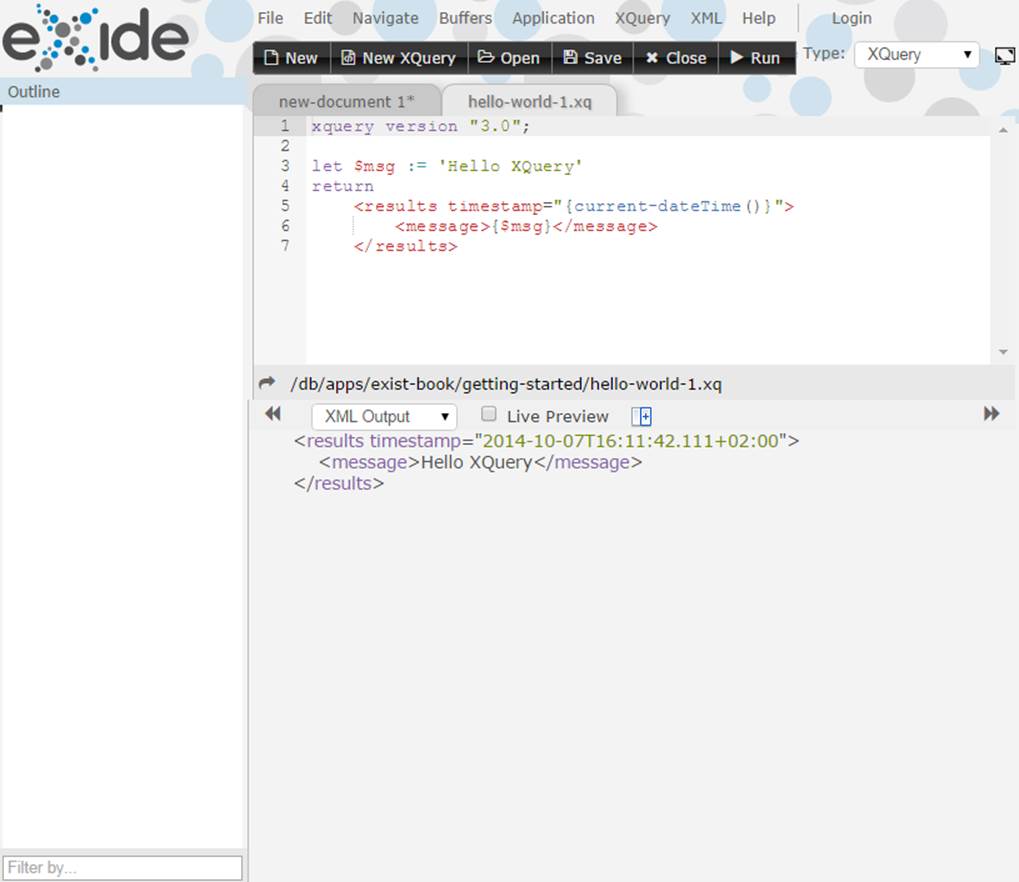
Figure 14-1. The eXide IDE
Some interesting features of eXide are:
Application outline
The lefthand pane shows you an outline of your application/module and lets you jump to a declaration with a single click.
Content completion
Type the beginning of what you want (e.g., a function name or a variable) and press Ctrl-Space (or Cmd-Space on a Mac) to see a list of possible completions.
Refactoring
Highlight a block of code and press Ctrl-Shift-X (or Cmd-Ctrl-X on a Mac) to extract the block into a function. You can also extract a code block into a variable by pressing Ctrl-Shift-E (or Cmd-Ctrl-E on a Mac).
Quick function navigation
Put your cursor in a function name and press Ctrl-F3 (or Cmd-F3 on a Mac) to go to its definition, even if it’s in another module.
Inserting code snippets
There is a variety of easily inserted code snippets available. For instance, type for-return and press Ctrl-Space (or Cmd-Space on a Mac). A basic for $item in $inseq return $item code snippet will pop up. Press Tab to select all the variables in this template one by one, so you can easily replace them with your own code (press Esc to stop this behavior). You’ll find the available code snippets in /db/apps/eXide/templates/snippets.xml.
Working with applications
The Application menu gives you access to working with complete applications. You can create a shiny new one from a template, synchronize it with a version on disk, download it into an eXist package file (see “Packaging”), and more.
One of the features of eXide is that you can jump-start development of an application. Choose “New application” from the Application menu and fill in the forms, and eXide will generate an application framework for you. If you’ve installed the eXist documentation package, information about this is available at http://localhost:8080/exist/apps/doc/development-starter.xml.
The generated applications use what is called the HTML Templating Framework. This framework lets you separate out:
§ The page template (the surrounding HTML code that defines the fixed parts of the page)
§ The body of the page
§ The code that generates the dynamic parts of the page
For further information, all of this is documented in http://localhost:8080/exist/apps/doc/templating.xml on your local installation, or in the eXist documentation online.
oXygen
The oXygen XML Editor is likely the most popular XML IDE in professional XML circles. It provides extensive support for editing XML and related files in general; adds features like visual editing of schemas and author mode (for those who don’t want to see angle brackets); and can connect to databases, both SQL and NoSQL, including eXist. While oXygen is a commercial product, you can request a free trial license to try it out before purchasing.
A large proportion of this book was actually written and edited using oXygen version 15.0. As these things go, the information here might already be outdated because a newer version of oXygen may have been released since this book’s publication. If you can’t relate what we say here to what you see on your screen, please refer to the corresponding oXygen documentation.
Connecting with oXygen Using WebDAV
The most basic way of connecting oXygen with eXist is by using WebDAV. It allows you to work with the collections and resources in the database as if they were directories and files on the filesystem. To open a WebDAV connection, do the following:
1. Go to the Options→Preferences menu and look for the Data Sources section. You’ll see something like Figure 14-2.
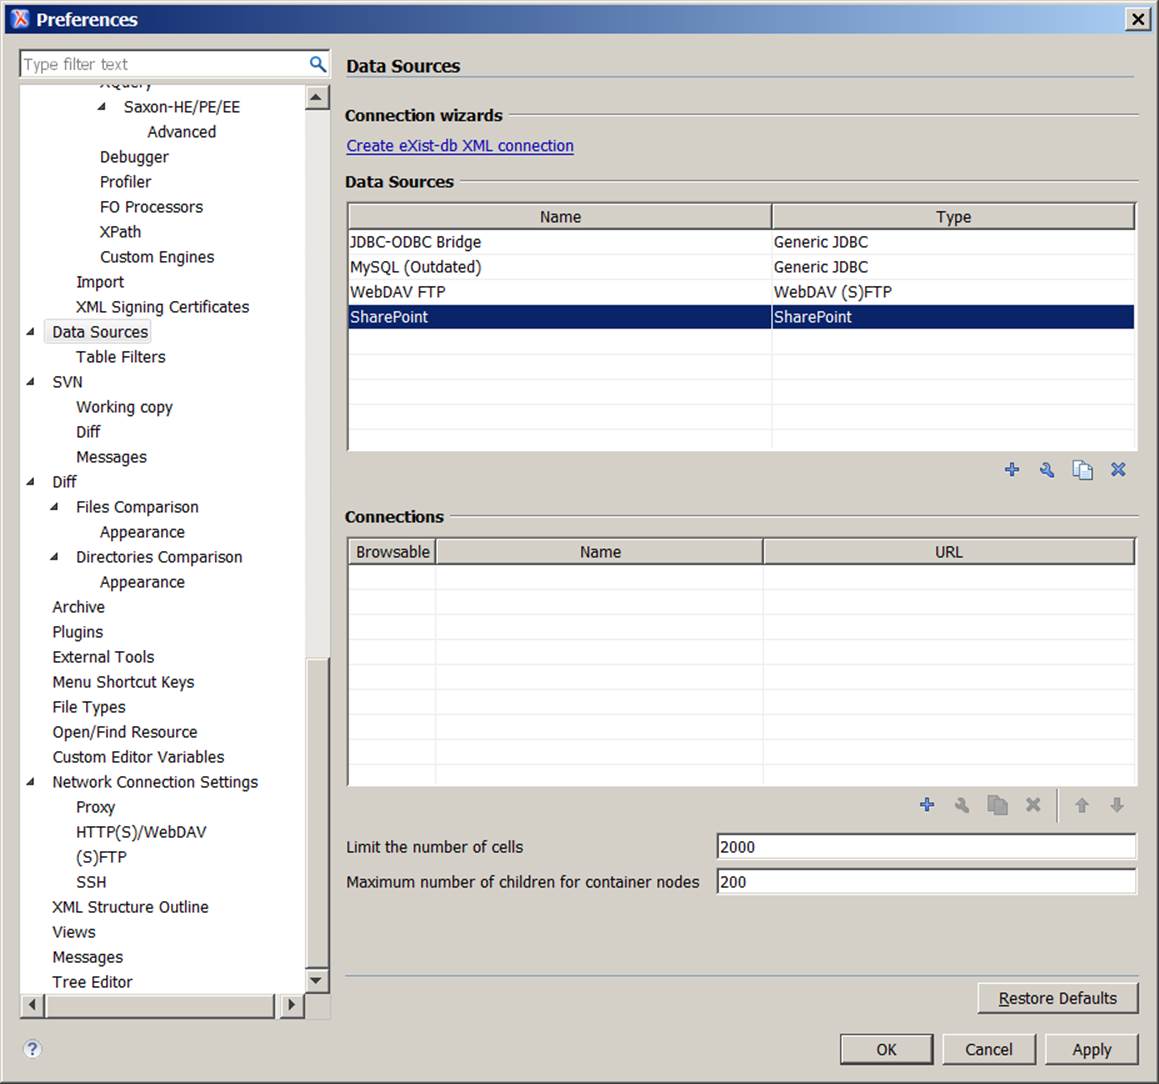
Figure 14-2. The virgin oXygen Data Sources dialog
2. Click the + icon under the Connections table and fill in the dialog, choosing WebDAV (S)FTP as the data source. The URL to use in a default installation is http://localhost:8080/exist/webdav/db/. When you’re developing, it’s probably easiest to connect as the admin user, as shown in Figure 14-3.
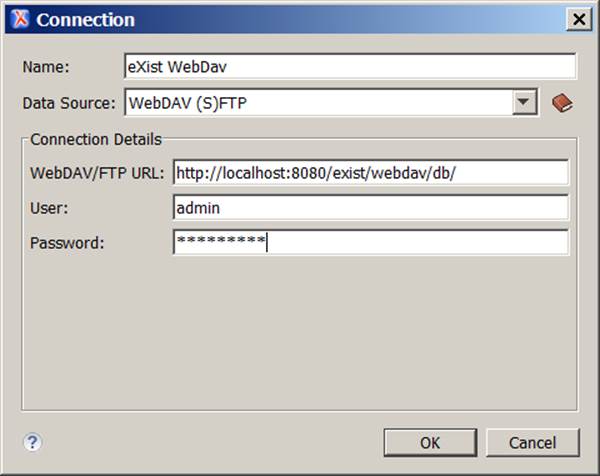
Figure 14-3. Configuring a WebDAV connection in oXygen
3. Click the OK button on all dialogs and open the Data Source Explorer (the Window→Show View→Data Source Explorer menu item). And hey presto! There is your eXist database, exposed to you in all its beautiful detail.
Natively Connecting with oXygen
Besides going in through WebDAV, you can also connect oXygen to eXist natively. This gives you many benefits, like the ability to get lists of available extension module functions in your editor, validate queries with eXist (eXist’s XQuery dialect is checked, not straight XQuery), and even execution of XQuery files directly from within the editor.
Setting up a native connection with eXist is extremely simple:
1. Go to the Options→Preferences menu and look for the Data Sources section. Refer back to Figure 14-2.
2. Click the link at the top of the dialog box labeled “Create eXist-db XML connection.”
3. For a default setup (see Figure 14-4), you only have to change the user to admin and fill in the password. Then click the OK button.
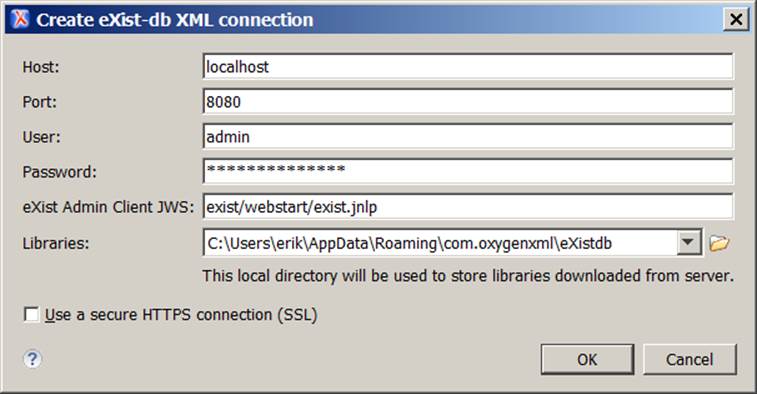
Figure 14-4. Adding an eXist-db XML connection to oXygen
As you can see when you’re back on the Data Sources setup screen, oXygen created not only a data source for eXist but also an accompanying connection. So, we’re ready to go!
4. Click the OK button on all dialogs and open the Data Source Explorer (the Window→Show View→Data Source Explorer menu item). And there it is: your native eXist connection, also called eXist-db localhost.
Now, this looks like you’ve opened another WebDAV connection to eXist. However, a native connection allows you to do much more (in describing this, we assume you know the basics of oXygen, like creating validation and transformation scenarios; if not, refer to its excellent help facilities):
§ As soon as you’ve created an eXist connection, you’ll notice your XQuery editor has become more intelligent: for instance, type xmldb: and press Ctrl-Space, and the list of eXist XMLDB XQuery extension module functions pops up.
§ You can validate an XQuery file using the eXist validator instead of the Saxon one used by default in oXygen. This gives you the benefit of the validator knowing, for instance, all eXist XQuery extension functions and so it will not show your file as invalid when it makes use of those. To do this, open an XQuery file and create a validation scenario that uses the eXist native connection you just created as its validation engine (see Figure 14-5).
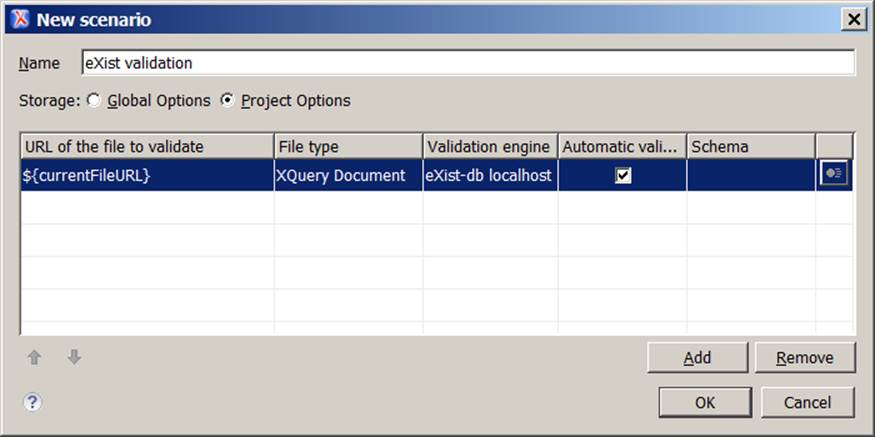
Figure 14-5. Creating a validation scenario for use with eXist
§ To execute an XQuery script directly from oXygen, create a transformation scenario that uses your eXist connection as its transformer. Transform the XQuery script using this scenario and it will run inside eXist, returning the results to oXygen.
Ant and eXist
Many Java programmers know the Ant build tool. It is used for automating build processes, including maintenance work like creating files and directories, as well as creating zip files.
eXist contains a library that extends Ant so you may work with the database from inside your Ant scripts. This is useful for automating common tasks like backups, restores, and data import/export. More advanced capabilities include running XQueries and user management.
For simple scripts, Ant and the eXist Ant extensions are sufficient. However, if you need more complicated functionality, like iterating over collections and resources, you also need Ant-Contrib, a library containing generic extensions for common Ant functionality.
Trying the Ant Examples
There is an example build.xml script in the folder chapters/tools of the book-code Git repository (see “Getting the Source Code”). It contains several targets that illustrate what you can do with Ant and eXist together. To try it, do the following:
1. Make sure you have Ant installed and that the ant command is in your path (type ant -version to check).
2. Open the build.xml file and check if the properties listed under the heading BASE INFORMATION apply to your situation. You will have to change at least the admin password property for the examples to work.
3. Open a command window and navigate to the directory where you stored the build.xml file.
4. The command ant -p will give you an overview of the targets defined.
5. ant targetname will execute a target (e.g., ant ListMainCollections).
Preparing an eXist Ant Build Script
If you would like to use the eXist Ant extensions inside your Ant build script, follow these steps:
1. Define the http://exist-db.org/ant namespace. The recommended namespace prefix is xdb. The easiest way to do this is to add the namespace definition to the root project element of your Ant build file (usually called build.xml):
<project xmlns:xdb="http://exist-db.org/ant">
2. Before you use the extension in your build script, you must tell Ant where it can find the eXist extension libraries. The following code example assumes that on the operating system level the EXIST_HOME environment variable is set and points to the directory where you have installed eXist:
3. <property environment="Env"/>
4. <fail unless="Env.EXIST_HOME">Environment variable EXIST_HOME not set
5. </fail>
6.
7. <path id="classpath.core">
8. <fileset dir="${Env.EXIST_HOME}/lib/core">
9. <include name="*.jar"/>
10. </fileset>
11. <pathelement path="${Env.EXIST_HOME}/exist.jar"/>
12. <pathelement path="${Env.EXIST_HOME}/exist-optional.jar"/>
13. <pathelement path="${Env.EXIST_HOME}"/>
</path>
14.If you want to use Ant-Contrib as well, add the following code:
15.<taskdef resource="net/sf/antcontrib/antlib.xml">
16. <classpath>
17. <pathelement
18. location="$EXIST_HOME/tools/ant/lib/ant-contrib-1.0b3.jar"/>
19. </classpath>
</taskdef>
All eXist’s Ant tasks share the following attributes, so you might want to put the values in Ant properties:
uri
This must be an XMLDB URI (see “XMLDB URIs”) that points to the database and collection you want to work with. For example, to point to the main /db collection for a default eXist installation:
xmldb:exist://localhost:8080/exist/xmlrpc/db
user and password
The credentials of the eXist user for accessing the database. You will most likely want to use an account with admin privileges. If you don’t specify these attributes, the default guest account will be used.
failonerror
Whether or not an error should stop the build script (default: true).
The first three attributes are the most important ones. For example, at the top of the build.xml file in the accompanying book example code, you’ll find properties defined for them:
<property name="BaseUri" value="xmldb:exist://localhost:8080/exist/xmlrpc/db"/>
<property name="Username" value="admin"/>
<property name="Password" value="secret"/>
Using Ant with eXist
The eXist Ant extension contains a large number of tasks to work with the database. We’re not going to list them all here as they are already well documented in the eXist online documentation. Instead, we will leave you with a few tantalizing examples. All examples given assume the preparations described in the previous section are in the script also. These will not be repeated in every listing.
Basic example: Listing the main collections
The following basic (and probably un-useful) example serves as the “Hello World” into the Ant extension—it lists the collections on the /db level:
<target name="ListMainCollections" description="Lists all collection in /db">
<xdb:list uri="${BaseUri}"
user="${Username}" password="${Password}" collections="true"
outputproperty="Collections"/>
<echo>Main collections: ${Collections}</echo>
</target>
Backup and shutdown
This target creates a full backup of your database, zips it, and then shuts down eXist:
<target name="BackupShutdown"
description="Back up the full database and shut down">
<delete dir="backup"/>
<mkdir dir="backup"/> ![]()
<xdb:backup uri="${BaseUri}"
user="${Username}" password="${Password}" dir="backup"/> ![]()
<zip destfile="backup.zip" basedir="backup"/> ![]()
<delete dir="backup"/> ![]()
<xdb:shutdown uri="${BaseUri}" user="${Username}" password="${Password}"/> ![]()
</target>
From top to bottom, this code does the following:
![]()
Makes sure we have an empty backup directory by first deleting and then (re)creating it.
![]()
Makes eXist back up into this directory. If you look inside after the backup you’ll find a directory/file structure much like your database’s collection/resource structure. Added are __contents__.xml files that contain important eXist properties (like security settings).
![]()
Zips this directory into a backup.zip file (this is easier to handle, and you can restore directly from such a ZIP file).
![]()
Removes the backup directory (since everything is in the ZIP now)
![]()
Shuts down eXist.
The preceding example performs a full database backup, but you can just as easily make partial backups—for instance, from your extremely important project collection. Simply have the uri attribute point to the right collection, like so:
<xdb:backup uri="${BaseUri}/apps/myimportantproject" ...
Of course, there is also an xdb:restore task that lets you restore a backup. This task can use a backup ZIP file directly (no need to unpack it first).
Create separate backups for all subcollections
The following example shows you how to iterate over lists returned by some of eXist’s Ant tasks using the Ant-Contrib extension. It extends the previous example by not creating a full backup, but a separate backup of each subcollection of /db:
<target name="SeparateBackups"
description="Make separate backups of all subcollections of /db">
<xdb:list uri="${BaseUri}" user="${Username}" password="${Password}"
collections="true" outputproperty="SubCollections"/>
<echo>Subcollections to backup: ${SubCollections}</echo>
<foreach list="${SubCollections}" param="SubCollection"
target="BackupCollection"/>
</target>
<target name="BackupCollection">
<echo>Backup of /db/${SubCollection}</echo>
<property name="BackupTempDir" value="backup-${SubCollection}"/>
<delete dir="${BackupTempDir}"/>
<mkdir dir="${BackupTempDir}"/>
<xdb:backup uri="${BaseUri}/${SubCollection}" user="${Username}"
password="${Password}" dir="${BackupTempDir}"/>
<zip destfile="backup-${SubCollection}.zip" basedir="${BackupTempDir}"/>
<delete dir="${BackupTempDir}"/>
</target>
Ant-Contrib’s foreach task iterates over a comma-separated list of values and then calls the BackupCollection task for each one of them.
Run an XQuery from Ant
You can run an XQuery script from within Ant and return the results in a property. For instance:
<target name="RunXQuery" description="Run an XQuery from Ant">
<xdb:xquery uri="${BaseUri}" user="${Username}" password="${Password}"
outputproperty="QueryOutput" query="system:get-exist-home()"/>
<echo>Query result: ${QueryOutput}</echo>
</target>
This little task will run the query in the query attribute and, in this case, return the home directory of eXist. If your query gets more complicated, it will probably be easier to store it in a separate file and run it from there. You can accomplish this using the standard Ant loadfiletask:
<loadfile property="XQueryScript" srcFile="myscript.xq"/>
<xdb:xquery uri="${BaseUri}" user="${Username}" password="${Password}"
outputproperty="QueryOutput" query="${XQueryScript}"/>