eXist: A NoSQL Document Database and Application Platform (2015)
Chapter 2. Getting Started
This chapter takes you through the first steps in using eXist. It handles subjects like downloading and installing, starting and stopping, running the examples, and demonstrates some of eXist’s capabilities on a “Hello World” level. In other words, like the chapter title says, it will get you started.
If you have used eXist before, you may like to skip over this chapter.
Downloading and Installing eXist
This section takes you through the steps necessary for getting eXist up and running on a standalone development system. That is to say, we keep things simple and don’t spend time on more advanced subjects such as database security, tuning, performance, embedded mode operation, and the like. Those subjects and more are covered in the chapters to come.
WARNING
Be aware that installing eXist for production purposes (e.g., as the engine behind a public website) requires much more thought and planning. Security, especially, requires attention in those kinds of more public situations. Also, if you plan to use eXist with some really huge datasets, you probably need a different setup than that described here. For information on installing eXist in a server environment, see “Installing eXist as a Service”.
Preconditions
eXist can be installed on almost all versions of Linux, Windows, and Mac OS X. The deciding factor is whether or not your OS (operating system) supports at least Java version 1.6 (1.7 is recommended). If it does, then eXist should run.
In order to run the eXist installer, you must have a working JRE (Java Runtime Environment) or JDK (Java Development Kit), version 1.6 or newer. The eXist team regularly tests eXist with the Oracle and OpenJDK JRE and JDKs, but the community reports that the IBM JDK (among others) also works.
You can download the Oracle JDK from http://www.oracle.com/technetwork/java/javase/downloads/index.html.
NOTE
To check whether you have the right Java version (and have installed it correctly), open a terminal/command-line window and type java -version. You should see a message telling you which version of Java you’re running.
Downloading eXist
Downloading eXist is easy. Go to http://www.exist-db.org, navigate to the download section, pick the right distribution, and download it. For getting started, pick the latest stable distribution. The filename will probably look like eXist-db-setup-<version>-rev<XXXXX>.jar.
NOTE
This book was based on the 2.1 release of eXist (eXist-db-setup-2.1-rev18721.jar), but by the time you read this, a newer version may be available.
Things to Decide Before Installing
Of course, you can go ahead now and run the installer using the defaults provided. However, there are probably a number of things you want to decide before firing up the installer:
Installation directory
Where are you going to install eXist? For a “getting started” installation, this is not extremely important; you can use the default suggested by the installer or any other location you like (provided it is writable by the installer).
However, there are a number of reasons why the installation directory matters more than is usual for a software installation. Firstly, the default for the data directory (where eXist stores its data) is inside the installation directory, as described shortly. Secondly, logging and temporary directories are also inside the installation directory.
Having frequently written locations inside a software installation might be problematic because security sometimes does not allow this, or it causes performance degradation. When you start to do more serious work, make sure the important locations are included in your backup.
We will refer to the installation directory as $EXIST_HOME throughout this book.
Data directory
This is the directory where eXist stores the content of its database. The installer will propose a default that’s inside eXist’s installation directory ($EXIST_HOME/webapp/WEB-INF/data, to be precise). If you just plan to play around a bit or do some development work, keep the default. You can always change it later.
However, if things get serious, like on a production server, make sure that this directory is writable, located on a volume that is sufficiently fast for updates, and backed up (which is not always the case for program file directories).
Administrator password
The installer will ask you to provide an administrator password. This is not your operating system’s administrator password, but the initial password used for eXist’s administrator’s account (called admin). You are strongly encouraged to set an administrator password on all installations of eXist. If you don’t, eXist will use an empty password, so anyone who tries an empty password would have full access to your eXist instance.
Memory settings
The installer allows you to set the amount of memory reserved for eXist’s JVM and its internal cache. Common settings are shown in Table 2-1.
|
Max memory |
Cache memory |
Remarks |
|
512 MB |
64 MB |
Don’t go any lower than this, or eXist will not run properly. |
|
1,024 MB |
128 MB |
This is the default setting and is fine for small development use. |
|
2,048 MB |
256 MB |
If your machine has enough memory to spare, then use at least this. |
|
Table 2-1. eXist installation memory settings |
||
Packages/apps to install
For getting started purposes, we recommend keeping everything checked (this book assumes that you did!).
Installing eXist
Start the installer in one of the following ways:
For desktop-driven systems
If Java is set up correctly, on many systems that provide a GUI, double-clicking the downloaded eXist-db-setup-<version>-rev<XXXXX>.jar file will fire up the graphical installer.
On all GUI systems, from the command line
Open a terminal/command-line window and enter the following command: java –jar eXist-db-setup-<version>-rev<XXXXX>.jar (of course, the name of the file you just downloaded). This will launch the graphical installer.
On non-GUI systems, from the command line
If you are on a system that does not provide a GUI environment—for example, a remote server—you can entirely install eXist from the terminal. At the terminal/command-line window, enter the following command: java –jar eXist-db-setup-<version>-rev<XXXXX>.jar -console (using the name of the file you just downloaded).
As usual with installers, follow the instructions on the screen to complete the installation. You’ll be asked to enter the information prepared in the previous section. Let the installer run its course, and that’s it!
Post-Installation Checks
By default, eXist uses two TCP ports:
Port 8080
This port is used for all the normal HTTP communication.
Port 8443
This port is used for the confidential HTTPS communication. By default, eXist uses a self-signed certificate, which, while more secure than using no certificate, should not be considered for production use. You may also see a warning about the self-signed certificate when accessing this from a web browser.
If one of these ports is used by another application on your system, you either have to make this other application change its ports or change the port settings for eXist.
The easiest way to find out if something is using these ports is, before starting eXist, to visit http://localhost:8080/ and https://localhost:8443/. If nothing happens, the ports are probably free and you can go ahead.
Changing eXist’s TCP port usage is explained in “Changing Jetty Settings: Port Number and URL Prefix”.
NOTE
This book assumes eXist is running on localhost using the standard TCP port numbers 8080 and 8443, so you’ll see URLs like http://localhost:8080/… throughout the book.
Starting and Stopping eXist with a GUI
If you’re on a system with a GUI, the installer will have created a menu entry and/or a desktop icon called eXist database. If you’re on a command-line-only system, go to “Starting and Stopping eXist from the Command Line”.
Clicking the eXist database icon starts eXist and also fires up a little control application that should be visible in the system tray (or its equivalent on your system) as a dotted X. For instance, on a Windows 7 machine it looks like Figure 2-1.
![]()
Figure 2-1. The eXist control application in a Windows 7 system tray
Clicking it opens a little menu that gives you further control of eXist (like stopping the server) and lets you do a few other useful things, as shown in Figure 2-2.
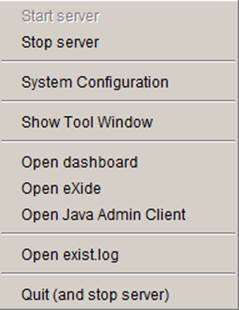
Figure 2-2. The menu of the eXist control application
If for some reason this doesn’t work, open a command window in $EXIST_HOME and type java -jar start.jar. This should fire up the control application and the database. If this works, you’re probably best off creating a shortcut or menu entry for it manually. If still nothing happens, read the next section.
After starting the database, open your browser and visit http://localhost:8080/exist. If a nicely tiled screen appears (like in “The Dashboard”), you’ve succeeded!
Starting and Stopping eXist from the Command Line
If you don’t want to or can’t work with the GUI niceties, you can also start eXist from the command line. For this, open up a command-line window and navigate to $EXIST_HOME/bin. There you’ll find several command files in both the Windows (*.bat versions) and Unix/Linux/Mac (*.sh versions) variants. For starting and stopping, do the following:
startup
This will fire up eXist.
shutdown -p adminpassword
This will stop the running eXist instance. It needs the administrator password.
A First Tour Around Town
This section will give you a quick tour of eXist’s highlights and attractions, including the user interface and what’s on your disk.
The Dashboard
The home screen of eXist since 2.1, http://localhost:8080/exist, is called the dashboard; it is a set of tiles linking to various applications and utilities. The initial set shows the default tiles provided with eXist. You may install additional ones via the Package Manager, or if you start developing applications of your own with the Packaging System (see “Packaging”), those can appear here too.
Now, most of the functionality provided through the dashboard—stuff like eXide and the function documentation—is important, and you will probably use it often. It is therefore well worth your time to familiarize yourself with the smorgasbord offered (see Figure 2-3).
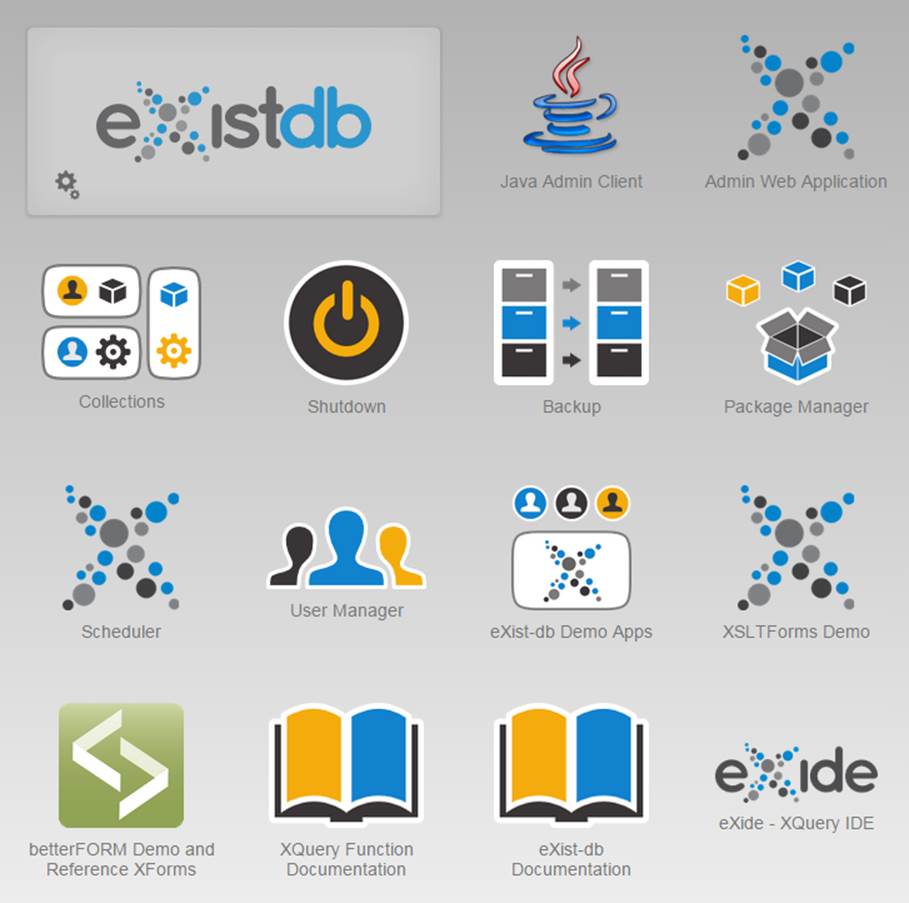
Figure 2-3. The eXist dashboard
The tiles provided by default are:
Java Admin Client
This tile provides a Java Web Start, a.k.a. JNLP (Java Network Launching Protocol), link to eXist’s Java Admin Client application. Use this if you want to access an eXist installation remotely, from a system that does not have eXist installed. For local use you’re better off starting the Java Admin Client directly (e.g., through the control application’s menu, as shown in Figure 2-2). Read more about the Java Admin Client in “The Java Admin Client”.
WARNING
JNLP does not work well with all browsers. You might just get a “Save downloaded file” dialog when pressing this tile.
Admin Web Application
This tile gives access to the original (pre-2.x) administrator web client application. There is still some functionality there that has not yet appeared in the new interface, such as profiling queries and index overview.
Collections
This tile starts a collection browser that enables you to control the contents of the database.
Shutdown, Backup
These applications do what their titles suggest.
Package Manager
A package is a set of related files that together provide some kind of functionality—for instance, an application or library. The Package Manager allows you to manage (view, install, and uninstall) packages in your eXist database. When you open it, you can see that most of the functionality behind the tiles of the dashboard is provided by separate packages.
Packages can come from the eXist public repository—you can see the packages available there by selecting the available option at the top of the Package Manager—or they can be distributed as separate package files with the extension .xar.
It is also possible (and even advised!) to design your own applications for use with the Package Manager and distribute them using .xar package files. You’ll learn how to do this in “Packaging”.
User Manager
This tile allows you to control the user population of the eXist database. You can create, edit, and delete users and groups.
betterFORM Feature Explorer, betterFORM Demos, XSLTForms Demo
eXist has two built-in ways of doing XForms: betterFORM™ and XSLTForms™. These applications provide you with demos and overviews. Find more information in “XForms”.
eXist-db Demo Apps
This tile is a collection of applications that demonstrate some of eXist’s capabilities.
XQuery Function Documentation
This is an application you’ll probably use very often. It provides an overview of all the functions available and their documentation in both the standard eXist extension modules and your own XQuery modules. There’s more about modules in Chapter 7.
eXist-db Documentation App
This app provides access to the eXist documentation.
eXide
eXide is a cool, handy, fully integrated editor for working with XQuery, XML, and other resources stored in eXist. You can use it for a multitude of activities, from writing complete applications to fiddling around and experimenting. Don’t miss it. Find more information in“eXide”.
Playing Around
If you’re like us, at this point you’ll want to play around, try some XQuery, store some XML, and perform other familiarization rituals. Get your feet wet and splash around (without going into the deep end). Here is the quick recipe:
1. Open the dashboard: http://localhost:8080/exist.
2. Click on the eXide tile.
3. Click Login and log in as admin with the password set during installation.
4. Directly type some XQuery and run it.
5. If you want to see what’s in the database, click File→Manage (or press Ctrl-Shift-M).
6. If you want to save your work or put some related files together, create a collection for this underneath /db.
What’s in Your Database
You can look inside the database using, among others, the Collections app in the dashboard or the eXist Java Admin Client (see “The Java Admin Client”). You’ll see something that looks like a disk directory structure (but of course isn’t). To explain the terminology, what you might think of inside your database as a directory is called a collection in XML database geek speak (more about this in “Terminology”). Here are the most important collections:
/db
The root collection in the database is always /db. You can’t change this.
/db/system
This is where eXist stores important configuration information (e.g., about users, groups, and versioning). You shouldn’t change any of this information by hand or programmatically, with the exception of what’s inside /db/system/config.
/db/system/config
This collection is used to store the collection-specific configuration for eXist, like validation, indexes, and triggers. If you look underneath, you’ll find a (partial) copy of the existing database structure with collection.xconf files here and there. These (XML) files contain the collection configuration. Read more about this in “Implicit Validation” and “Configuring Indexes”.
/db/apps/*
These are the root collections for the packages, installed during installation and manually later. Underneath these is their code and data. If you’re ever going to write applications yourself (Chapter 9), you’ll create your own subcollections here.
What’s on Your Disk
Now let’s look at some interesting and/or important locations on your disk for eXist.
WARNING
There are rumors on the grapevine that the basic file structure will change in future versions, so be aware if you use this book with a later version than 2.1.
$EXIST_HOME/
This is eXist’s home directory.
$EXIST_HOME/conf.xml
This is eXist’s main configuration file. If you peek inside (it’s well documented), you’ll find entries for, for instance, all kinds of default behavior, the location of the database (in db-connection/@files), cache sizes, the indexer, and the built-in XQuery modules.
$EXIST_HOME/tools/jetty/etc/jetty.xml
This is the Jetty web server’s configuration file (eXist uses Jetty to communicate with the world). There are several interesting things you might want to change using this file, like the TCP port numbers and the default URL prefix exist/.
$EXIST_HOME/webapp/WEB-INF/
This location defines the eXist web application. It holds several important configuration files and is the default base location for the database and the logfiles.
$EXIST_HOME/webapp/WEB-INF/controller-config.xml
This tells eXist what to do when a request with a certain URL is entered. There’s more information in “The controller-config.xml Configuration File”.
$EXIST_HOME/webapp/WEB-INF/data/
This is the default location for eXist’s database (unless you specified somewhere else during the installation process).
If you peek inside this directory, you’ll find underneath the fs subdirectory all the non-XML files stored in the database. However, your XML files are not there; they have seemingly disappeared. Don’t despair: they’re absorbed into the *.dbx files you see in the root of the database directory. You’ll find more information about this in “Help: Where Is My XML?”.
WARNING
You might be tempted to change the non-XML content underneath the fs subdirectory directly. Don’t do this. It will ruin the database’s internal administration. Use only the normal mechanisms for this, like WebDAV, the dashboard, or the Java Admin Client tool.
$EXIST_HOME/webapp/WEB-INF/logs/
Here you’ll find several logfiles that can help you find out what’s going on underneath eXist’s hood.
The Java Admin Client
Through the eXist controller application (visible in the system tray), you can start the Java Admin Client. This pops up a small and, admittedly, rather old-fashioned-looking program. It allows you to do maintenance work on the database like backups and restores, imports and exports, checking and setting properties, and creating collections. Figure 2-4 shows how it looks on a freshly installed database.
The eXist Client tool is a standard GUI application, and its functionality speaks for itself.
Most of this tool’s functionality is also present in the new dashboard application, so there’s a good chance you’ll never need it. However, there are circumstances in which it can be useful, such as when you’re working on a production server where you don’t want the dashboard to bepresent.
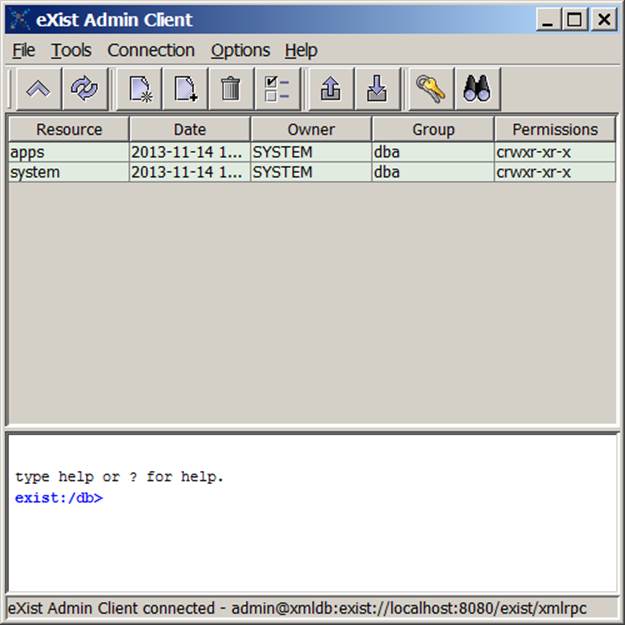
Figure 2-4. The main screen of the eXist Java Admin Client tool
Getting Files into and out of the Database
eXist is an XML database. Its primary storage concern is XML documents. It can also hold your XQuery files, and any other resources needed by your application. So how do you get files in and out of it?
Collections app
Browse to eXist’s Collections application (available through the dashboard). This allows you to look through the contents of your database and maintain the collections and resources.
eXide
eXist’s built-in native IDE, called eXide, has facilities for uploading and downloading files. Click File→Manage (or press Ctrl-Shift-M).
WebDAV
eXist’s WebDAV (Web-based Distributed Authoring and Versioning protocol) interface allows you to access the contents of the database just like it was any other file store available to your OS. The address to use is http://localhost:8080/exist/webdav/db/ or, when your OS requires safe URLs (like Windows 7), https://localhost:8443/exist/webdav/db/.
Exactly how to work with a WebDAV server and which client tool to use is platform-specific. Some operating systems, like Windows, will allow you to integrate it more or less into the normal file browsing capabilities, while others need special client tools. Read more about this in “WebDAV”.
Java Admin Client
eXist’s Java Admin Client tool (see “The Java Admin Client”) also has some basic facilities for getting files into and out of the database.
External IDE
Some external IDEs, such as oXygen, provide you with the option to work with eXist natively. This includes importing/exporting files. Find more information in “oXygen”.
Programmatically
Of course, you can import and export files programmatically by writing some XQuery code that performs what you want on the database. That’s okay within applications, but a bit cumbersome for now. For more information, see “Controlling the Database from Code” andChapter 13.
Ant
eXist provides a library for the Ant build tool to automate common tasks like backup/restore or importing a bunch of files. This method is recommended if you need to repeat batch tasks on your database. There’s more information in “Ant and eXist”.
Hello eXist!
This section performs a first exploration of the fundamental mechanisms in eXist; that is, how you get it to actually do something—store/retrieve/filter information, show a web page, transform XML, and more. In other words, this section is an extended “Hello world” example in which, in a (very) shallow way, we touch upon the important processing features of the platform.
For most of the examples, the output is not shown because we want to encourage you to try this yourselves using the provided example code. We assume you’ve installed the example code and know how to access it, as described in “Accompanying Source Code”.
Hello Data
In the example code for this book, there is an XML file in /db/apps/exist-book/getting-started/xml-example.xml that looks like Example 2-1.
Example 2-1. XML file
<?xml version="1.0" encoding="UTF-8"?>
<Items>
<Item name="Bogus item">This is a complete bogus item</Item>
<Item name="Funny item">Ha, ha, very funny indeed!</Item>
</Items>
Accessing data (and also scripts) is done through the eXist REST interface. To see it in action, fire up your browser and visit http://localhost:8080/exist/rest/apps/exist-book/getting-started/xml-example.xml.
The result is that you see exactly the file from Example 2-1. Not impressive, maybe, but hey, this is only the beginning.
The REST interface allows you to directly query this file. For instance, assume you’re interested in the first item only. You can access it by adding a _query parameter:
http://localhost:8080/exist/rest/apps/exist-book/getting-started/
xml-example.xml?_query=//Item[1]
The result will be:
<exist:result xmlns:exist="http://exist.sourceforge.net/NS/exist" exist:hits="1"
exist:start="1" exist:count="1">
<Item name="Bogus item">This is a complete bogus item</Item>
</exist:result>
Because it’s a query, eXist wraps the result in an exist:result element with additional information in its attributes. There are other query parameters that will let you limit the size of the result set and even retrieve the results block by block. More information about the REST interface can be found in “Querying the Database Using REST”.
Hello XQuery
Of course, the main language when you are dealing with eXist is XQuery, which is the language to access XML databases. Put your XQuery script in a file (or database document) with the extension .xq. Example 2-2 shows you a basic way to output some XML.
Example 2-2. Basic XQuery code returning XML
xquery version "3.0";
let $msg := 'Hello XQuery'
return
<results timestamp="{current-dateTime()}">
<message>{$msg}</message>
</results>
Now what if you want to show the result as an HTML page instead? That’s called serialization, and Example 2-3 shows one of the ways to do it.
Example 2-3. Basic XQuery code returning HTML
xquery version "3.0";
declare option exist:serialize "method=html media-type=text/html";
let $msg := 'Hello XQuery'
return
<html>
<head>
<title>Hello XQuery</title>
</head>
<body>
<h3>It is now {current-dateTime()} and so {$msg}!</h3>
</body>
</html>
XQuery-initiated readers might have noticed that we did not declare the exist namespace prefix. eXist has most eXist-specific namespace prefixes predeclared for you, so you don’t have to explicitly mention them in your code.
Hello XSLT
XSLT is built into eXist using (by default) the Saxon XSLT processor. The examples contain a simple stylesheet to show you how this works. The stylesheet in Example 2-4 takes the XML from Example 2-1 and turns it into an HTML page.
Example 2-4. Transformation of the example XML into HTML
<?xml version="1.0" encoding="UTF-8"?>
<xsl:stylesheet xmlns:xsl="http://www.w3.org/1999/XSL/Transform" version="1.0">
<xsl:template match="/">
<html>
<head>
<title>Hello XSLT</title>
</head>
<body>
<h1>Item overview</h1>
<ul>
<xsl:for-each select="//Item">
<li>
<xsl:value-of select="@name"/>:
<xsl:value-of select="."/>
</li>
</xsl:for-each>
</ul>
</body>
</html>
</xsl:template>
</xsl:stylesheet>
To run an XSLT stylesheet over some XML from within XQuery, you need to use an extension module. Extension modules are, well, extensions to the basic XQuery capabilities. eXist has lots of them, and we devote all of Chapter 7 to the subject. An overview (and all function documentation) is accessible through the XQuery Function Documentation app, available through the dashboard.
Transforming documents with XSLT is done with the transform extension module. A little XQuery script that performs this transformation is shown in Example 2-5, and its result in Figure 2-5.
Example 2-5. Using XSLT with the transform extension module
xquery version "3.0";
declare option exist:serialize "method=html media-type=text/html";
transform:transform(
doc("/db/apps/exist-book/getting-started/xml-example.xml"),
doc("/db/apps/exist-book/getting-started/convert-items.xslt"),
()
)
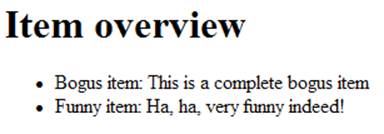
Figure 2-5. Result of the XSLT transformation
Notice that the transform extension module was not explicitly declared in the XQuery script. eXist does this implicitly for you. The third parameter of transform:transform, which here is passed an empty sequence, can contain parameters for the stylesheet.
More about using XSLT transformations within eXist can be found in “XSLT”.
Hello XInclude
eXist can also do XInclude processing for you. This means that on the way out, when the final results of an XQuery operation are serialized, they are inspected for xi:include elements. When found, these references are expanded.
An interesting feature of the XInclude processing is that you can also refer to XQuery scripts. The script is executed and the result included. Example 2-6 demonstrates this.
Example 2-6. XInclude
<?xml version="1.0" encoding="UTF-8"?>
<XIncludeEnvelope xmlns:xi="http://www.w3.org/2001/XInclude">
<xi:include href="xinclude-content.xml"/>
<xi:include href="hello-world-1.xq"/>
</XIncludeEnvelope>
hello-world-1.xq is the XQuery script presented in Example 2-3. The included XML file contains the fragment shown in Example 2-7.
Example 2-7. XML fragment to include with XInclude
<XIncludeContent>This element was included by the XInclude processing
in eXist. Yes!</XIncludeContent>
Now if you retrieve xinclude-envelope.xml from the database, the XInclude references are resolved, resulting in Example 2-8.
Example 2-8. The result of the XInclude processing
<XIncludeEnvelope xmlns:xi="http://www.w3.org/2001/XInclude">
<XIncludeContent>
This element was included by the XInclude processing in eXist. Yes!
</XIncludeContent>
<results timestamp="2013-02-21T13:12:21.399+01:00">
<message>Hello XQuery</message>
</results>
</XIncludeEnvelope>
There are more features to XInclude processing, like fallback instructions and the ability to pass parameters to XInclude-d XQuery scripts. Read more about this in “XInclude”.
Hello XForms
XForms is a W3C standard that defines declaratively the contents of a form on a web page, its behavior, and its result. It’s neither a thick nor a complicated standard. However, trying to fully understand what’s going on, and all the details (like forms submission), can be challenging!
eXist has two third-party XForms processors built in that you may choose between: betterFORM and XSLTForms. They allow you to create pages that contain XForms logic and have them rendered and executed as the XForms specification describes. To see this in action, take a look at Example 2-9, which will be rendered using betterForm.
Example 2-9. A simple XForms example
<?xml version="1.0" encoding="UTF-8"?>
<html xmlns="http://www.w3.org/1999/xhtml"
xmlns:ev="http://www.w3.org/2001/xml-events"
xmlns:xf="http://www.w3.org/2002/xforms">
<head>
<title>Hello XForms</title>
<!-- The XForms data model: -->
<xf:model id="xforms-data-model">
<xf:submission action="hello-xforms-submit.xq" id="submit-id"
method="post"/>
<xf:instance xmlns="">
<Data>
<Name/>
<Date/>
</Data>
</xf:instance>
<xf:bind id="NameBind" nodeset="/Data/Name" required="true()"
type="xs:string"/>
<xf:bind id="DateBind" nodeset="/Data/Date" required="true()"
type="xs:date"/>
</xf:model>
</head>
<!-- -->
<body>
<h1>Hello XForms</h1>
<xf:group>
<xf:input bind="NameBind">
<xf:label>Name</xf:label>
</xf:input>
<xf:input bind="DateBind">
<xf:label>Date</xf:label>
</xf:input>
<xf:submit submission="submit-id">
<xf:label>Submit</xf:label>
</xf:submit>
</xf:group>
</body>
</html>
This example will let you fill in a simple form. Notice that because we bound the /Data/Date field to the data type xs:date, the form will automatically show a date picker for the date input field! Have a look at the underlying HTML code. As you can see, betterForm adds lots of functionality to make all this happen.
When you press the submit button (after filling in the values), the posted XML will show through the hello-xforms-submit.xq page, as Example 2-10 demonstrates.
Example 2-10. Getting the results of an XForm
xquery version "1.0" encoding "UTF-8";
<XFormsResult>
{request:get-data()}
</XFormsResult>
You can find more on XForms in “XForms”.