eXist: A NoSQL Document Database and Application Platform (2015)
Chapter 3. Using eXist 101
This chapter contains an introduction to actually using eXist to build software. It will take you by the hand and guide you step by step along the winding XPath roads, through the XQuery meadows, along some RESTful paths, over the index mountain, and to many, many other wonderful places—all in a quest for the golden ring of an understanding that binds it all (which will definitely not be thrown into some volcano by Gollum).
This chapter guides you through building a simple web application that uses, analyzes, and enables searching of some Shakespeare plays. We start at the very beginning (creating the application’s collections, adding data), and end with a simple but usable piece of software. Along the way, we will tell you where to find more information about the subjects covered. Everything is done natively through eXist; no external IDE is required.
To make ourselves clear: the goal of this chapter is not to teach you XQuery. We assume you have at least a basic understanding of this language, including some experience with XPath. However, we do try to explain what we’re doing with some of the XQuery, so if you don’t know any XQuery yet, do not despair!
Preparations and Basic Application Setup
The application we’re going to build needs a set of data to work with. eXist comes with an example application (one of the eXist-db demo apps, available through the dashboard) that contains a nice, consistent, and large enough set of example data to be useful for us. So we’re going to reuse this and, in doing so, show you how to export and import files.
The tools provided alongside eXist for working with the database’s content (see “The Dashboard”) have the ability to copy content from one database collection to another. For instance, if you look at the database through the dashboard’s collection browser, you’ll find copy and paste facilities. However, sometimes you have to export and import content from the filesystem, so that’s a good place to start our quest.
eXist Terminology
To prevent you from getting confused, let’s introduce some eXist terms to you first:
Collections
What you may typically think of as a directory or folder in the filesystem world, is actually called a collection inside eXist’s database. There are some subtle and important differences with collections that you will learn about shortly.
Resources
What is called a file in the filesystem world is called a resource inside eXist’s database. Resources can be anything you usually store in a file: images, CSS files, XQuery scripts, and, of course, XML documents.
Documents
A resource containing well-formed XML is called a document.
See also “Terminology”.
Exporting Documents from eXist
First, we’re going to export the documents from eXist (afterward, we’ll pretend they came from somewhere else). If you have a WebDAV connection set up (see “Getting Files into and out of the Database”), this is really easy: just drag and drop the necessary files from the eXist collection to somewhere on your filesystem. If you don’t (yet) have WebDAV working, you can use the Java Admin Client as follows:
1. Start the Java Admin Client by clicking the eXist application icon in your system tray (see “Starting and Stopping eXist with a GUI”) and choose Open Java Admin Client. You’ll see the screen shown in Figure 3-1.
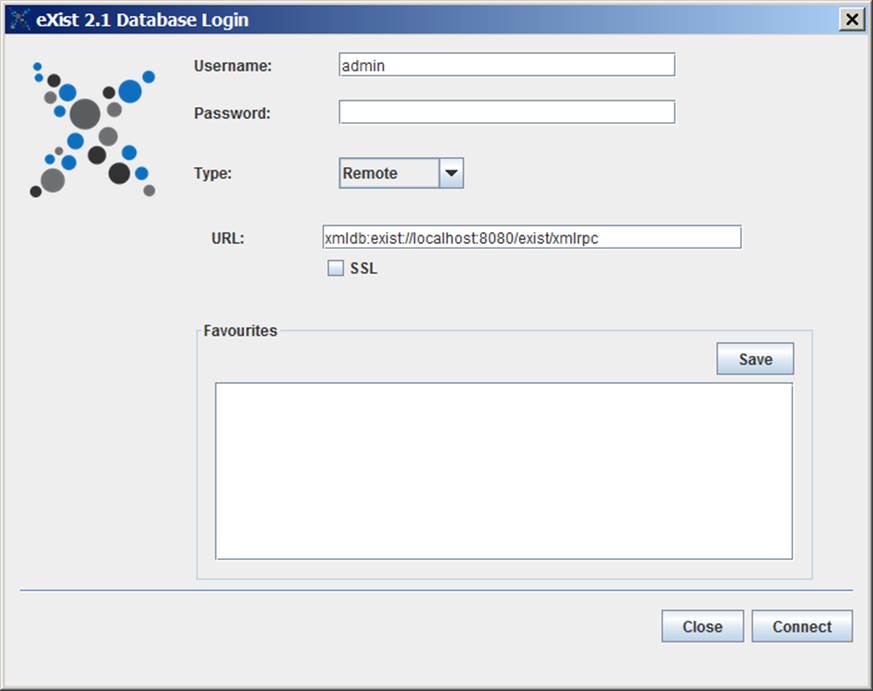
Figure 3-1. The opening screen of the Java Admin Client
2. Log in as admin (using the password you set when you installed eXist, as described in “Downloading and Installing eXist”) with the URL xmldb:exist://localhost:8080/exist/xmlrpc.
3. After a successful login, the screen shown in Figure 2-4 appears. Navigate to the collection apps/demo/data.
4. Select hamlet.xml and click the menu command File→Export a resource to a file…. Dump it on your disk somewhere. Repeat this for macbeth.xml and r_and_j.xml (guess what: Romeo and Juliet!).
5. Change the filename of the Romeo and Juliet play from r_and_j.xml to r and j.xml (replace the underscores with spaces). This will illustrate an important property of eXist later on.
So now we have three Shakespeare plays in XML markup on our disk. Let’s pretend these files came from somewhere else and import them into our database.
Designing an Application’s Collection Structure and Importing Data
When you write an application in eXist (or anywhere else), you need a place to store your code and the accompanying data. Now, in eXist you can design any collection structure you like, but it is customary to store applications underneath the /db/apps collection. So, that is where we’re going to put our 101 application.
NOTE
In this example, we’ll consider our data, the plays, static (immutable) data. However, most applications also have dynamic data (data your application creates, updates, uploads, etc.). There is a debate as to whether (a subcollection of) /db/apps/<yourapp> is a good location for this data. Some application designers argue that you should be consistent and keep everything in one place. But storing your dynamic data somewhere else (e.g., in /db/data/<yourapp>) has benefits of its own. For instance, you can more easily update your application’s code without losing the accumulated dynamic data. We won’t worry about this in our 101 course, but make sure to give it some thought if you’re going to build a real application.
You could use the Java Admin Client again to create the necessary collections and import the plays (there’s an Import Files button in the toolbar), but let’s check out another useful tool. Close the Java Admin Client, open a web browser, and follow these steps:
1. Browse to the dashboard (http://localhost:8080/exist/).
2. Log in as admin (click on “Not logged in” in the upper-left corner).
3. Click on the Collections tile.
4. Navigate to /db/apps.
5. Create a fresh /db/apps/exist101 collection (the New Collection command is in the toolbar).
6. Navigate into the /db/apps/exist101 collection and create the /db/apps/exist101/data collection.
7. Navigate to the /db/apps/exist101/data collection and click “Upload resources” in the toolbar.
8. Upload the plays we just downloaded into the collection.
The collection browser should now look like Figure 3-2.
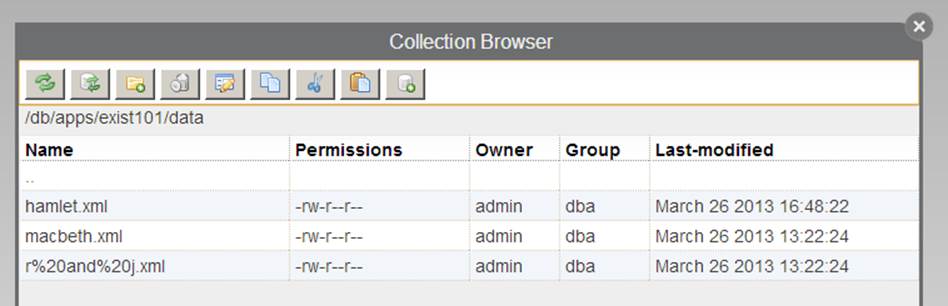
Figure 3-2. The collection browser after we upload the plays
Look at the name of the Romeo and Juliet file. Instead of r and j.xml, it is now called r%20and%20j.xml. What happened? Well, names of collections and resources inside eXist are always URL-encoded URIs. Reserved characters, according to the URL encoding rules, are percent-encoded. A space character is one of these, so that explains the %20 codes. More about this can be found in “Use URIs”. We’ll come back to how to handle these names later.
Viewing the Data
Let’s pretend for a moment we did not have the data on our disk before we imported it into the database. Instead of viewing a file on disk, how can we view XML (and other) resources stored in eXist?
The easiest and most versatile way of working with stored data is through an editor that is connected with eXist. Luckily for us, eXist has a built-in IDE, eXide, which we can use to view and edit files as follows:
1. Browse to the dashboard (http://localhost:8080/exist/).
2. If you’re not already logged in, log in as admin (click on “Not logged in” in the upper-left corner).
3. Click on the “eXide - XQuery IDE” tile. eXide will open in a new browser window or tab.
4. Click Open, navigate to /db/apps/exist101/data, and open hamlet.xml (Figure 3-3).
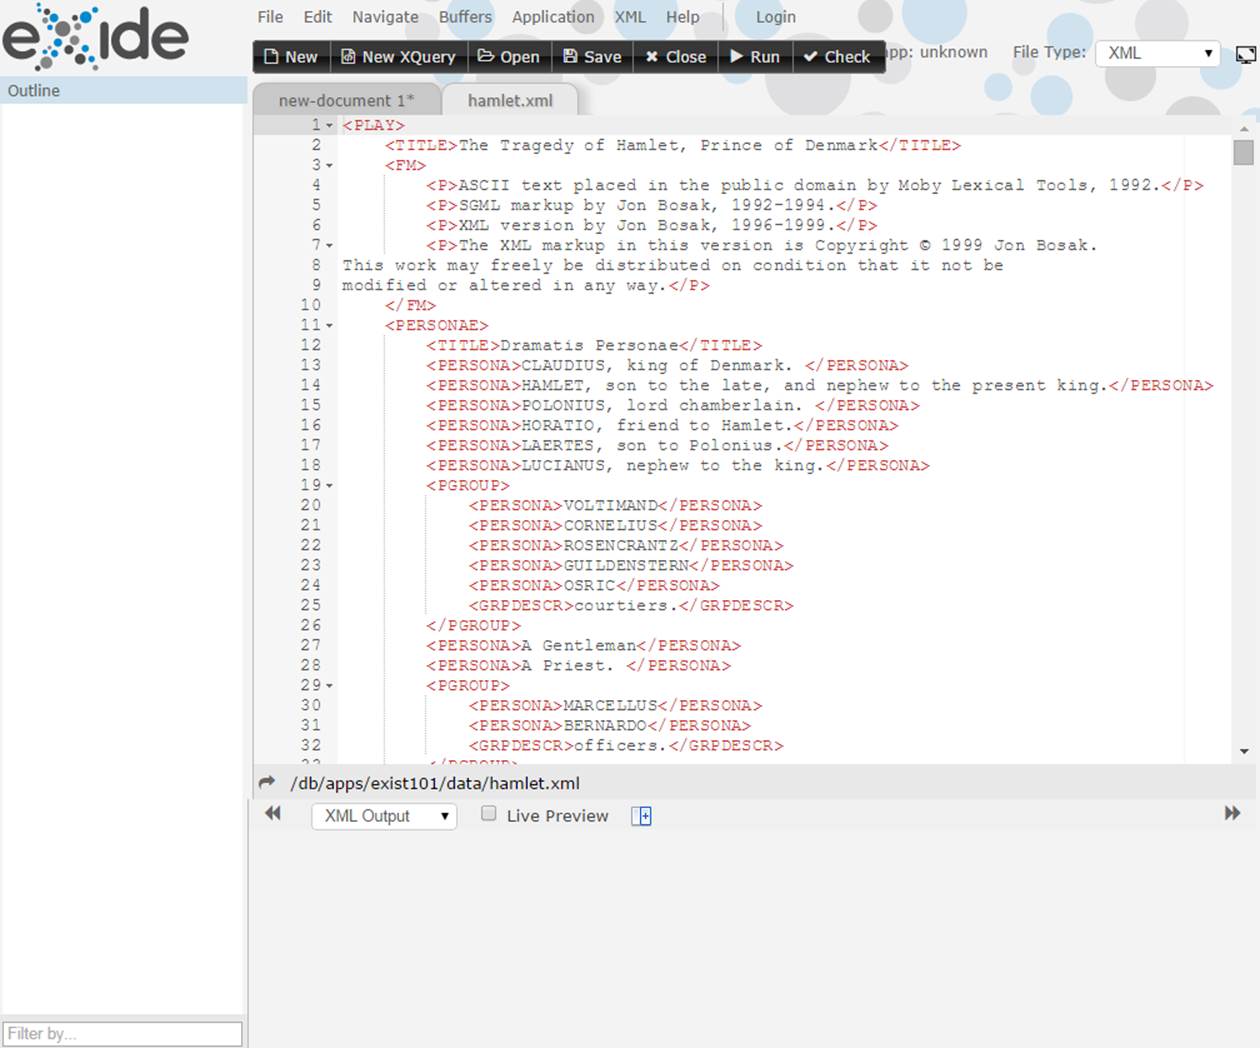
Figure 3-3. Hamlet opened in eXide
Alternatively, you can view the XML file in a browser through eXist’s REST interface (see “Querying the Database Using REST”). Simply visit http://localhost:8080/exist/rest/db/apps/exist101/data/hamlet.xml.
But wait, it’s not working! You should get an error message about a shakes.xsl stylesheet not being found. Crime doesn’t pay: it’s our punishment for being a data thief! The problem is that the XML files we started with were part of an application and were coupled to an XSL stylesheet by a processing instruction. This stylesheet, meant to create an HTML version of the play, was not copied by us and therefore, alas, could not be found. There’s more about using XSLT via processing instructions in “Invoking XSLT by Processing Instruction”.
Fear not; the problem is easily solved. Open hamlet.xml (again) in eXide and look at the first line. It begins with:
<?xml-stylesheet href="shakes.xsl" type="text/xsl"?>
Remove this processing instruction using eXide, save the file, and try the URL again. You should now see hamlet.xml in all its XML glory.
If you feel bold enough, you could also try this: do not remove the processing instruction (or use one of the other files) and copy the shakes.xsl file from /db/apps/demo/data to /db/apps/exist101/data, like we did with the plays. When you now open the document in your browser (with the URL given before), you’ll see a nicely rendered HTML page.
Listing the Plays (XML)
Let’s write our first XQuery script and have it find out which plays we have in the /db/apps/exist101/data collection. For now we’ll return the result as an XML fragment, and in the next section we’ll create a nice-looking HTML page from this. There is more than one way to do this (where have I heard that line before?), and we’ll show you a few.
First, perform the following preparations:
1. Browse to the dashboard (http://localhost:8080/exist/).
2. If you’re not already logged in, log in as admin (click on “Not logged in” in the upper-left corner).
3. Click on the “eXide - XQuery IDE” tile. eXide will open in a new browser window or tab.
4. Click on New XQuery. A new tab opens with an empty XQuery script.
5. Click Save and save the script as /db/apps/exist101/playlist.xq.
Listing with the collection Function
In our first version of the solution, we will use the XPath collection function to iterate over all the resources in our data collection. Enter the following code and press Run:
for $resource incollection("/db/apps/exist101/data")
return
base-uri($resource)
The collection function returns a sequence of documents (document-node items) for all the resources found in the given collection and its subcollections (for details, see “The collection Function”). The XPath base-uri function returns the URI for a document-node, which in eXist is the path leading to the resource.
Running this should return (in the bottom window) a list with the plays, including each one’s full path in the database.
Turning this list of strings into a well-formed XML fragment is simple:
<plays>
{
for $resource incollection("/db/apps/exist101/data")
return <play uri="{base-uri($resource)}"/>
}
</plays>
This should return:
<plays>
<play uri="/db/apps/exist101/data/hamlet.xml"/>
<play uri="/db/apps/exist101/data/macbeth.xml"/>
<play uri="/db/apps/exist101/data/r%20and%20j.xml"/>
</plays>
Now let’s tweak this a little more. Later on we’re going to present a list of available plays to the user, and it would be nice if we could display the name of the document (without a collection path) and, more importantly, the name of the play.
To get the name of the file, we have to do some string munging on the URI we already have. For this, XPath’s regular expressions come in handy. Regular expressions are expressions to parse and work with strings. We won’t explain them here because that would take too much ink (in fact, there are whole books devoted to them). For now, just accept that the following expression returns the part of a filename after the last / character:
replace(base-uri($resource), '.+/(.+)$', '$1')
There is one more thing about the name: we don’t want the URI encodings, like %20, to show up in them. For this, we use a native eXist function from one of its extension modules (extension modules are covered in Chapter 7): util:unescape-uri. It needs two parameters: the name to unescape and the character encoding, which is nowadays almost always UTF-8. With this, the full code to get a nicely formatted filename becomes:
util:unescape-uri(
replace(base-uri($resource), '.+/(.+)$', '$1'),
'UTF-8'
)
To get the name of the play, we have to dive into the XML of the play itself. It’s always in the /PLAY/TITLE element, and since we already have the root document-node, retrieving this is a piece of cake:
$resource/PLAY/TITLE/text()
Using the /text function will ensure we get the result as a text node. If we didn’t use this, the TITLE element itself would be returned (try it out if you want to).
With all this, our full code becomes what you see in Example 3-1.
Example 3-1. The full code to get the play information
xquery version "3.0";
<plays>
{
for $resource incollection("/db/apps/exist101/data")
return
<play uri="{base-uri($resource)}"
name="{util:unescape-uri(replace(base-uri($resource),
".+/(.+)$", "$1"), "UTF-8")}">
{
$resource/PLAY/TITLE/text()
}
</play>
}
</plays>
And, with some slight improvements (using variables to store repeating data), it looks like Example 3-2.
Example 3-2. Improved version of the code that gets the play information
xquery version "3.0";
<plays>
{
let $data-collection := "/db/apps/exist101/data"
for $resource incollection($data-collection)
let $uri := base-uri($resource)
return
<play uri="{$uri}"
name="{util:unescape-uri(replace($uri, ".+/(.+)$",
"$1"), "UTF-8")}">
{
$resource/PLAY/TITLE/text()
}
</play>
}
</plays>
Don’t forget to save your code. After that, you can also try it from the browser. Try the URL http://localhost:8080/exist/rest/db/apps/exist101/playlist.xq. You should see the following:
<plays>
<play uri="/db/apps/exist101/data/hamlet.xml" name="hamlet.xml">
The Tragedy of Hamlet, Prince of Denmark</play>
<play uri="/db/apps/exist101/data/macbeth.xml" name="macbeth.xml">
The Tragedy of Macbeth</play>
<play uri="/db/apps/exist101/data/r%20and%20j.xml" name="r and j.xml">
The Tragedy of Romeo and Juliet</play>
</plays>
Listing with the xmldb Extension Module
Another way to return a list is by using one of eXist’s extension modules, xmldb (see “Controlling the Database from Code”). An extension module contains functions that perform actions that are difficult or impossible to do in standard XQuery. eXist has quite a lot of them, andAppendix A lists the most important ones. If you want to explore the wonderful features that extension modules have to offer, you can access their documentation through the dashboard’s XQuery Function Documentation tile.
Instead of the code entered in the previous section, try the following:
xmldb:get-child-resources("/db/apps/exist101/data")
Your result window should now show a list of the play’s resource names (but without their paths). So, where the collection function returned a document-node sequence, xmldb:get-child-resources returns a string sequence. To get from a string to inside the XML (to get the name of the play), we have to resolve a document-node from this string. For this we use the XPath doc function (see “The doc Function”).
So, without further ado, Example 3-3 shows a piece of code that returns exactly the same results as the code in Example 3-2, but by a different means.
Example 3-3. Getting the play information using an extension function
xquery version "3.0";
<plays>
{
let $data-collection := "/db/apps/exist101/data"
for $resource-name inxmldb:get-child-resources($data-collection)
let $uri := concat($data-collection, '/', $resource-name)
return
<play uri="{$uri}"
name="{util:unescape-uri($resource-name, "UTF-8")}">
{
doc($uri)/PLAY/TITLE/text()
}
</play>
}
</plays>
Listing the Plays (HTML)
As a next step, let’s present this information to the user as a nicely formatted HTML page. For this we have to (you might have guessed) create the HTML ourselves, including pieces like headers. For now we won’t bother to make it look fancy by using CSS and the like, but of course you can add that too if you want.
First, let’s set up a basic HTML (or more precisely, XHTML) page without much content to see how this works. Enter the code in Example 3-4 and save it as plays-home.xq.
Example 3-4. Basic HTML page code
xquery version "3.0";
<html>
<head>
<meta HTTP-EQUIV="Content-Type" content="text/html; charset=UTF-8"/>
<title>Our Shakespeare plays</title>
</head>
<body>
<h1>Our Shakespeare plays</h1>
</body>
</html>
Now run it. In the bottom part of the eXide screen, you’ll see the same unexciting piece of XHTML as you entered. Running it from the browser (http://localhost:8080/exist/rest/db/apps/exist101/plays-home.xq) doesn’t make it look any better. So what’s missing?
What’s missing here is that you have to tell eXist that this is XHTML and that it should serialize it as such. There is more than one way to do this (see “Serialization”), but the easiest is to add an exist:serialize option in the XQuery prolog to tell eXist to serialize the query result as XHTML and send it to the browser as an HTML page and not as a bare piece of XML:
declare option exist:serialize "method=xhtml media-type=text/html";
While we’re changing things anyway, let’s also get rid of the double entry for the page’s title and put this in a global variable. Example 3-5 shows our improved basic HTML page.
Example 3-5. Improved version of the basic HTML page code
xquery version "3.0";
declare option exist:serialize "method=xhtml media-type=text/html";
declare variable $page-title := "Our Shakespeare plays";
<html>
<head>
<meta HTTP-EQUIV="Content-Type" content="text/html; charset=UTF-8"/>
<title>{$page-title}</title>
</head>
<body>
<h1>{$page-title}</h1>
</body>
</html>
When you run this from within eXide nothing too exciting happens, but when you try it from the browser, you see the result shown in Figure 3-4.

Figure 3-4. The exciting output of our first basic HTML page
OK, now we’re getting somewhere! Now let’s use the output from “Listing the Plays (XML)” to display a list of plays (we’ll use the code with the collection function here, but the code that uses the xmldb:get-child-resources function is also fine). With a little copy and pasting, the code in Example 3-6 is constructed quickly.
Example 3-6. Code for the HTML page that returns a list of plays (plays-home.xq)
xquery version "3.0";
declare option exist:serialize "method=xhtml media-type=text/html";
declare variable $page-title := "Our Shakespeare plays";
let $play-info :=
<plays>
{
for $resource incollection('/db/apps/exist101/data')
return
<play uri="{base-uri($resource)}"
name="{util:unescape-uri(replace(base-uri($resource),
".+/(.+)$", "$1"), "UTF-8")}">
{
$resource/PLAY/TITLE/text()
}
</play>
}
</plays>
return
<html>
<head>
<meta HTTP-EQUIV="Content-Type" content="text/html; charset=UTF-8"/>
<title>{$page-title}</title>
</head>
<body>
<h1>{$page-title}</h1>
<ul>
{
for $play in$play-info/play
return
<li>{string($play)} ({string($play/@name)})</li>
}
</ul>
</body>
</html>
And in the browser, you should see the output in Figure 3-5.
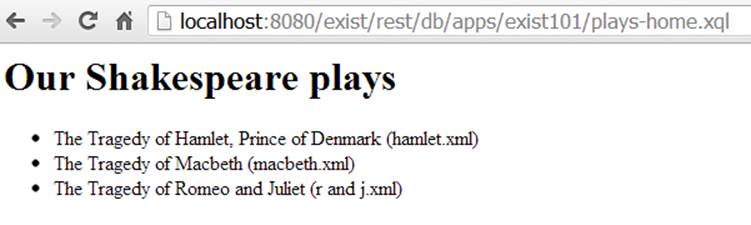
Figure 3-5. Our HTML page with a list of plays
Those new to XQuery might wonder why on earth our HTML code (the part that starts with <html>) is now suddenly underneath a return statement. This is because we introduced a local variable (let $play-info := …). As soon as you do this, your code becomes an XQuery FLWOR expression and needs a return statement for the part you want to return.
Analyzing the Plays
Now assume we’re a famous play director and in need of some data about the play. Among the many, many questions directors struggle with are “Which character has the most lines?” and “How many actors do I need?” Let’s find out the answers using XQuery.
Assume we have the document-node for the play’s XML to analyze in a variable called $play-document. Subproblems to solve for our analysis are:
§ We need a list of characters who speak. If you look inside the play’s XML, you’ll see that everything said is inside a SPEECH element with a SPEAKER subelement. So, to get a list of different speakers, all you have to do is get all the different values of SPEECH/SPEAKER and filter them for uniqueness:
distinct-values($play-document//SPEECH/SPEAKER)
§ To show totals and compute percentages for each speaker, we need the full set of spoken lines in the play:
let $all-lines := $play-document//SPEECH/LINE
§ We need the lines spoken by each speaker. Assuming the name of the speaker is in $speaker, we can get these with:
$speaker-lines := $play-document//SPEECH[SPEAKER eq$speaker]/LINE
§ Given a sequence of LINE elements in a variable $elms (the sequence of LINE elements we retrieved in one of the previous two bullets), how many words are spoken? A rough but usable approximation for this can be calculated by tokenizing everything said using whitespace boundaries and couningt/aggregating the results:
sum($elms ! count(tokenize(., '\s+')))
This might need a little further explanation:
§ The exclamation mark after the $elms expression is an XQuery 3.0 “bang” or “simple map” operator (see “The simple map operator”). It performs the operation on the right for all members of the sequence on the left.
You could have done this in several other (and probably more customary) ways (e.g., using a FLWOR expression), but this seemed a useful way to introduce one of the new XQuery 3.0 capabilities.
§ The tokenize function tokenizes (breaks up) strings on boundaries given by a regular expression. The regular expression '\s+' signifies a sequence of whitespace characters, so that gives us the words (more or less, sometimes punctuation gets in the way, but let’s forget about that for now).
§ We’re not interested in the words themselves but only in how many there are. So we simply count them.
§ The outer sum function sums the numeric results of what’s inside, returning the total of all words spoken in the elements in $elms.
As a last step, let’s put this functionality into a local function (because we’re going to use it twice in our code: once for the full play and once for every speaker):
declare function local:word-count($elms as element()*) as xs:integer
{
sum($elms ! count(tokenize(., '\s+')))
};
Now let’s put this all together and create a page that shows us the results of our analysis (just for Hamlet) in a table. The code for this is shown in Example 3-7.
Example 3-7. Code to analyze Hamlet
xquery version "3.0";
declare option exist:serialize "method=xhtml media-type=text/html";
declare variable $page-title as xs:string := "Play analysis";
declare variable $play-uri as xs:string := "/db/apps/exist101/data/hamlet.xml";
declare function local:word-count($elms as element()*) as xs:integer
{
sum($elms ! count(tokenize(., "\W+")))
};
let $play-document := doc($play-uri)
let $play-title := string($play-document/PLAY/TITLE)
let $speakers := distinct-values($play-document//SPEECH/SPEAKER)
let $all-lines := $play-document//SPEECH/LINE
let $all-word-count := local:word-count($all-lines)
return
<html>
<head>
<meta HTTP-EQUIV="Content-Type" content="text/html; charset=UTF-8"/>
<title>{$page-title}</title>
</head>
<body>
<h1>{$page-title}: {$play-title}</h1>
<p>Total lines: {count($all-lines)}</p>
<p>Total words: {$all-word-count}</p>
<p>Total speakers: {count($speakers)}</p>
<br/>
<table border="1">
<tr>
<th>Speaker</th>
<th>Lines</th>
<th>Words</th>
<th>Perc</th>
</tr>
{
for $speaker in$speakers
let $speaker-lines :=
$play-document//SPEECH[SPEAKER eq$speaker]/LINE
let $speaker-word-count := local:word-count($speaker-lines)
let $speaker-word-perc :=
($speaker-word-count div $all-word-count) * 100
order by $speaker
return
<tr>
<td>{$speaker}</td>
<td>{count($speaker-lines)}</td>
<td>{$speaker-word-count}</td>
<td>{format-number($speaker-word-perc, "0.00")}%</td>
</tr>
}
</table>
</body>
</html>
Save this code as analyze-play.xq. In the browser (http://localhost:8080/exist/rest/db/apps/exist101/analyze-play.xq), the result looks like Figure 3-6.
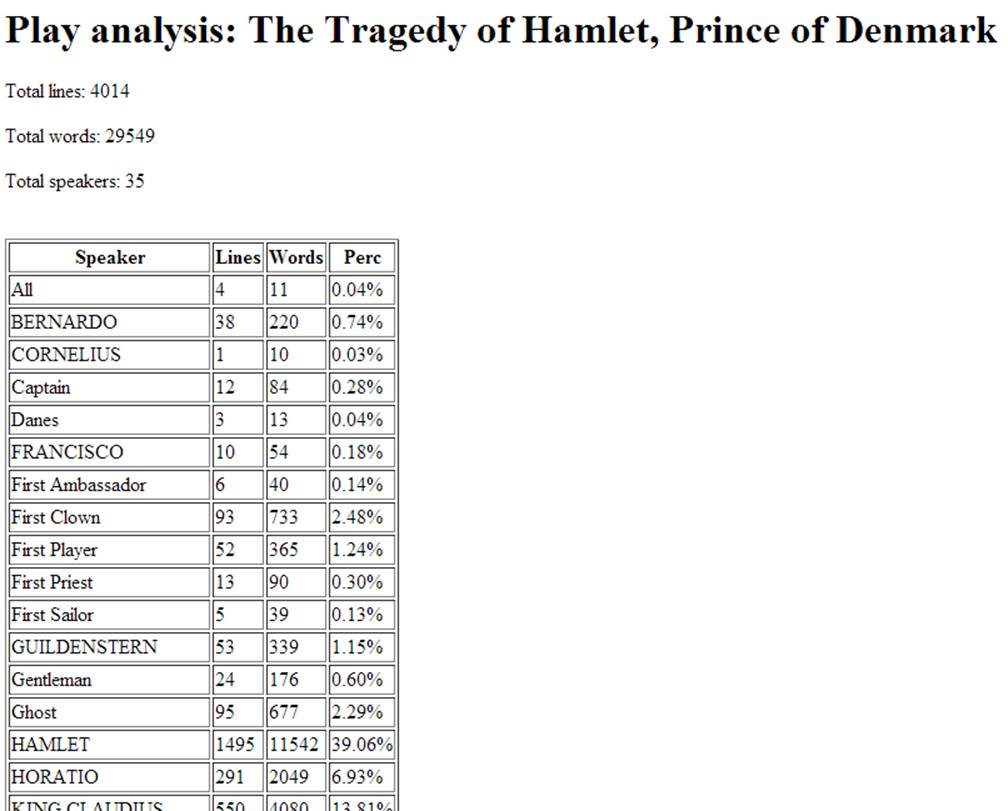
Figure 3-6. Partial output of the analysis for Hamlet
Well, that wasn’t too hard, was it? The analysis itself was almost laughably easy; most of the code is actually dedicated to creating a nicely formatted page.
NOTE
As you might have noticed, we used a different approach here than in Example 3-6. There, we first created an XML fragment and later used it to create the HTML. In the analysis page, we put the FLWOR expressions directly inside the HTML. This was done intentionally, to show you two different approaches.
By the way: maybe you shouldn’t go for the role of Hamlet—almost 1,500 lines with 11,500 words is a lot to learn by heart. And have mercy on the director: finding and directing 35 actors is not exactly a walk in the park!
Linking the Analysis to the Play Overview
At this moment our application still consists of two different pages: an overview and an analysis page for Hamlet. So how can we tie these together and use the analysis page for every play?
To do this, we first need to link from our overview to our analysis page and pass the URI of the play to analyze in the link. Go back to our basic home page (Example 3-6) and change the line starting with <li> as follows:
<li>{string($play)} ({string($play/@name)})
<a href="analyze-play.xq?uri={encode-for-uri($play/@uri)}">analysis</a>
</li>
The a element (that produces an HTML link) links to the analysis page and passes the URI of the play in the uri parameter. The encode-for-uri function is necessary here because the URI passed contains characters that are misinterpreted if we pass them straight: encode-for-uri creates % encodings for them, e.g., %2F for a slash (/) character.
NOTE
An interesting phenomenon occurs when you use this technique for Romeo and Juliet. Remember, the URI for this play already contains URI-escaped characters (the spaces in the resource name: r%20and%20j.xml). Passing this URI through the encode-for-uri function means the URI will become double URI encoded! The resource name is passed asr%2520and%2520j.xml.
The second thing we have to do is change our analysis page to retrieve the URI in the uri parameter and act on this. For this, change the declaration of the $play-uri variable to:
declare variable $play-uri as xs:string := request:get-parameter('uri', ());
request:get-parameter is an extension function from the request extension module (see “The request Extension Module”) that returns the value of a parameter passed in the URL (or of a control in an HTML form−driven request). The second parameter, which in this example is the empty sequence (), can be used to pass a default value.
After making these changes you can analyze not only Hamlet, but all three of the plays (and assuming you can provide the data, then many more). Neat, isn’t it?
Searching the Plays
The next two enhancements add search functionality to our little play application. One uses straight XQuery (actually as an example of how not to do it), and the other uses eXist’s full-text indexing capabilities.
Searching Using Straight XQuery
Let’s assume we need to search the plays for certain words or phrases. A first naive approach could be to use just straight XQuery. The searching is not hard at all. For instance, try the following surprisingly short code snippet, which searches all the plays for the word fantasy (and adds a play attribute to tell us which play the results came from):
for $line in
collection('/db/apps/exist101/data')//SPEECH/LINE[contains(., 'fantasy')]
return
<LINE play="{base-uri($line)}">{string($line)}</LINE>
This shows that Hamlet is three times as fantastic as Romeo and Juliet, and there’s no fantasy in Macbeth (for the Shakespearians: that was a joke):
<LINE play="/db/apps/exist101/data/hamlet.xml">
Horatio says 'tis but our fantasy,</LINE>
<LINE play="/db/apps/exist101/data/hamlet.xml">
Is not this something more than fantasy?</LINE>
<LINE play="/db/apps/exist101/data/hamlet.xml">
That, for a fantasy and trick of fame,</LINE>
<LINE play="/db/apps/exist101/data/r%20and%20j.xml">
Begot of nothing but vain fantasy,</LINE>
Although the searching itself is simple to program, we do need some code to tie it all together. First, add a search form to the main page. Reopen plays-home.xq (Example 3-6) and add the following lines between the </ul> and </body> closing elements:
<br/>
<h3>Search using XQuery:</h3>
<form method="POST" action="search-1.xq">
<input type="text" name="searchphrase" size="40"/>
<input type="submit" value="Search!"/>
</form>
When you reopen the page in your browser (http://localhost:8080/exist/rest/db/apps/exist101/plays-home.xq) you’ll see a nice little search form with a Search! button.
Now we have to create an XQuery script that does something with the search request and displays the results. Open a new XQuery file in eXide, save it as search-1.xq, and enter the code shown in Example 3-8.
Example 3-8. Search page that uses straight XQuery
xquery version "3.0";
declare option exist:serialize "method=xhtml media-type=text/html";
declare variable $page-title := "Search results with XQuery";
declare variable $searchphrase := request:get-parameter("searchphrase", ());
<html>
<head>
<meta HTTP-EQUIV="Content-Type" content="text/html; charset=UTF-8"/>
<title>{$page-title}</title>
</head>
<body>
<h1>{$page-title}</h1>
<p>Search phrase: "{$searchphrase}"</p>
<ul>
{
for $line incollection("/db/apps/exist101/data")//SPEECH/LINE
[contains(., $searchphrase)]
return
<li>
from: {string(root($line)/PLAY/TITLE)}<br/>
<i>{string($line)}</i>
</li>
}
</ul>
</body>
</html>
When you now enter fantasy as a search phrase and press Search!, the result shown in Figure 3-7 should appear.
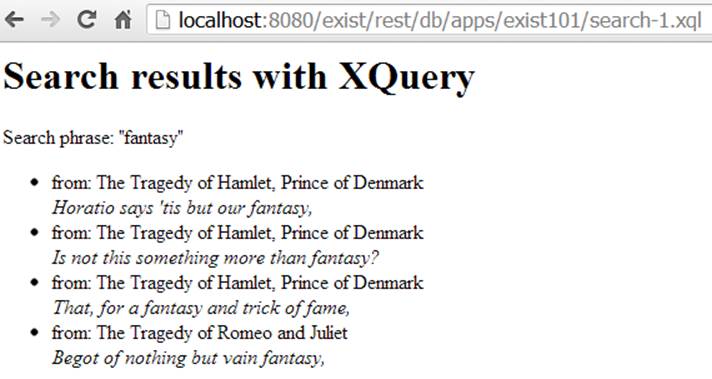
Figure 3-7. Results of searching the plays for “fantasy”
Well, that’s not a bad result for a fairly minimal amount of code. But, we can do better:
§ This solution doesn’t scale well. Searching like this works by comparing the query string with each word in the text: all LINE elements are string-searched for the search phrase. When you get more and more data, the searches will become slower and slower.
§ It searches for literal strings, which means it’s case-sensitive and will also return results where the search phrase is part of a word (e.g., searching for faun will also return lines with fauna).
§ It cannot handle search expressions (e.g., searching for lines with fantasy and Macbeth).
So, let’s add a second search facility with some enhancements.
Searching Using an Index
An index in a database is comparable to the index in a book: it allows you to quickly find something based on an index key. Although useful and often even necessary, using indexes is not without disadvantages: it slows down creating and updating data and consumes (a little bit of) disk space. However, indexes make searching much faster, especially for large collections of documents.
eXist supports several types of indexes, which we will elaborate on in Chapters Chapter 11 and Chapter 12. In this example we’re going to use a full-text index.
To illustrate things, let’s first add all the code before creating the index. Again, we have to change plays_home.xq and add a new search form. Reopen plays-home.xq (Example 3-6) and add the following lines right before the closing </body> element:
<br/>
<h3>Search using index:</h3>
<form method="POST" action="search-2.xq">
<input type="text" name="searchphrase" size="40"/>
<input type="submit" value="Search!"/>
</form>
Now create search-2.xq, as shown in Example 3-9. It’s almost the same as search-1.xq (Example 3-8), so copy, paste, and fiddle is probably a good option here.
Example 3-9. Search page that uses indexed search
xquery version "3.0";
declare option exist:serialize "method=xhtml media-type=text/html";
declare variable $page-title := "Search results with XQuery using full-text index";
declare variable $searchphrase := request:get-parameter("searchphrase", ());
<html>
<head>
<meta HTTP-EQUIV="Content-Type" content="text/html; charset=UTF-8"/>
<title>{$page-title}</title>
</head>
<body>
<h1>{$page-title}</h1>
<p>Search phrase: "{$searchphrase}"</p>
<ul>
{
for $line incollection("/db/apps/exist101/data")//SPEECH/LINE
[ft:query(., $searchphrase)]
return
<li>
from: {string(root($line)/PLAY/TITLE)}<br/>
<i>{string($line)}</i>
</li>
}
</ul>
</body>
</html>
Its main difference from search-1.xq is the way the search expression is formulated:
collection('/db/apps/exist101/data')//SPEECH/LINE[ft:query(., $searchphrase)]
The ft:query function looks for an index on the elements in its first argument. However, since this index is not yet there, the result set will currently still be empty (which we can easily prove by searching on fantasy using the indexed search). So, let’s define this index.
Index definitions (and some other content) are kept in what is best described as a “shadow” database collection structure underneath /db/system/config. If you go there (using, for instance, the collection browser of the dashboard), you’ll see parts of the main database collection structure there too, starting with /db.
To add our play index definition, create the collection /db/system/config/db/apps/exist101/data. In this collection create an XML document called collection.xconf with the contents shown in Example 3-10.
Example 3-10. The index definition collection.xconf document
<collection xmlns="http://exist-db.org/collection-config/1.0">
<index xmlns:tei="http://www.tei-c.org/ns/1.0">
<lucene>
<text qname="LINE"/>
</lucene>
</index>
</collection>
We’re almost done. After defining a new collection, you’ll have to reindex. Use the collection browser to go to /db/apps/exist101/data and click “Reindex collection” (the second button from the left). This will take a few seconds. After this initial reindex you’ll never have to do any manual maintenance again; eXist now knows the index and will keep it up to date for you when the dataset changes.
Our indexed search is ready to go. Try it by searching on fantasy again, and you should now see the same results as in our straight XQuery search (Figure 3-7).
So, have we gained anything? Yes, we have!
§ Search on FANTASY: the search is now case-insensitive.
§ Search on fantasy horatio. You’ll get a long list with lines in which one or both of the two words are present.
§ Search on fantasy AND horatio. Now there is only one line: the only one with both words.
§ But perhaps most importantly: this search is faster (although you might not notice on modern hardware with this small dataset), and it scales! Add more plays, and it will stay fast.
This was the just tip of the iceberg in terms of what you can do with indexes. For example, in “Full-Text Index and KWIC Example”, you’ll learn about sorting by relevance and how to use eXist’s keywords in context feature to highlight the matching words in the search results. Adding such capabilities to our eXist 101 application is not difficult once you have progressed further through the book, and we’ll leave this to you as an independent exercise.
Creating a Log
The last capability we’re going to add to our application is having it maintain a logfile, showing you how you can update the database from XQuery. Since we’ll probably want to use this feature from more than one XQuery script, we’re going to put the code for it into an XQuerymodule and show you a little about modularization. While testing, we’ll also run into some interesting security problems and show you how to solve them.
By way of preparation, create the collection /db/apps/exist101/log to hold our log information.
We require our logging to write strings to a logfile and add a timestamp. If the logfile does not exist, it should be created. The logfile should be easy to use and callable from all our existing XQuery scripts without code duplication.
This functionality calls for a design that uses an XQuery module. The module should contain an XQuery function that performs the logging. To make it easy to use, this function must return zilch (a.k.a. the empty sequence in XPath lingo), so we can simply call it from anywhere without influencing our output. Example 3-11 is a module that does exactly this. Create this module and save it as /db/apps/exists101/log-module.xqm.
Example 3-11. The logging module log-module.xqm
xquery version "3.0" encoding "UTF-8";
module namespace x101log = "http://www.exist-db.org/book/namespaces/exist101"; ![]()
declare function x101log:add-log-message($message as xs:string)
as empty-sequence() ![]()
{
![]() let $logfile-collection := "/db/apps/exist101/log"
let $logfile-collection := "/db/apps/exist101/log"
![]() let $logfile-name := "exist101-log.xml"
let $logfile-name := "exist101-log.xml"
![]() let $logfile-full := concat($logfile-collection, '/', $logfile-name)
let $logfile-full := concat($logfile-collection, '/', $logfile-name)
![]() let $logfile-created :=
let $logfile-created :=
if(doc-available($logfile-full))then
$logfile-full
else
xmldb:store($logfile-collection, $logfile-name, <eXist101-Log/>)
return ![]()
update insert
<LogEntry timestamp="{current-dateTime()}">{$message}</LogEntry>
into doc($logfile-full)/*
};
![]()
The module namespace definition at the top defines the code as an XQuery module. A module must have a namespace, and it’s customary to use something that starts with a URL you own (to avoid name clashes). What comes after that is up to you. Don’t let the startinghttp:// fool you: it’s just a string without any further special meaning.
![]()
We declare a function that returns empty-sequence()?. In other words: nothing.
![]()
![]()
![]()
The first three let statements in the function simply define the logfile’s location, name, and full name.
![]()
let $logfile-created := ... checks whether or not the logfile exists. If not, it uses the xmldb:store extension function to create a new logfile with an empty <eXist101-Log/> root element. If the logfile already exists, it simply emulates the return value ofxmldb:store by returning the logfile’s name.
Have a look at the rest of the code. We never actually use this $logfile-created variable, so if eXist did lazy evaluation (computing values only when needed), the logfile would never get created. Lucky for us, eXist always evaluates variable assignments from top to bottom, which we exploit here to allow side effects. Read more about this in “XQuery Execution”.
![]()
The return part of the function’s FLWOR expression contains an eXist update insert statement that inserts a LogEntry element, with a timestamp and the given text, as a child of the root element of our logfile. An update statement always returns an empty sequence, so that takes care of our required empty return value. More about eXist XQuery update functionality can be found in “Updating Documents”.
Let’s call this logging function from our home page. To do this, first add the following import module statement at the top of plays-home.xq (see Example 3-6), directly after the xquery version "3.0"; declaration:
import module namespace x101log=
"http://www.exist-db.org/book/namespaces/exist101"
at "log-module.xqm";
Now plays-home.xq “knows” about the logging module. To call the logging function, add the following line directly before the let $play-info :=... part (don’t forget the finishing comma!):
x101log:add-log-message('Visited plays-home'),
Let’s test our changes. You might be logged in as admin, but to make a point we would like you to do this without being logged in. Please log out and close your browser, reopen it, and run plays-home.xq by visiting http://localhost:8080/exist/rest/db/apps/exist101/plays-home.xq. Oops—you get an error stating, “Write permission is not granted on the Collection.” Why is that?
eXist has a strict security system. When you’re logged in as admin you can do anything, but when you’re not it’s a different game. All access to collections and resources must abide by the strict eXist security rules, which look, not at all by accident, remarkably like those in a Unix environment.
To view the relevant security settings, open the collection browser in the dashboard and navigate to /db/apps/exist101. The permissions on your log collection (db/apps/exist101/log) should read crwxr-xr-x (that is, if you haven’t changed any defaults). You’ll find a complete explanation of what this means in Chapter 8. For now, we’ll focus on what’s important for us.
When you visit eXist without being logged in, you’re using a built-in account called guest. This is, as we can see, not the owner or the group the collection belongs to, so the relevant security settings are the last three characters of the permissions: r-x. This means anybody can list and open the collection, but not write to it. Let’s change this so we can at least write to the collection and create our logfile.
Use the collection browser or the Java Admin Client to set the permissions to crwxr-xrwx—that is, set the Write permission for Other. Figure 3-8 shows how this looks in the collection browser.
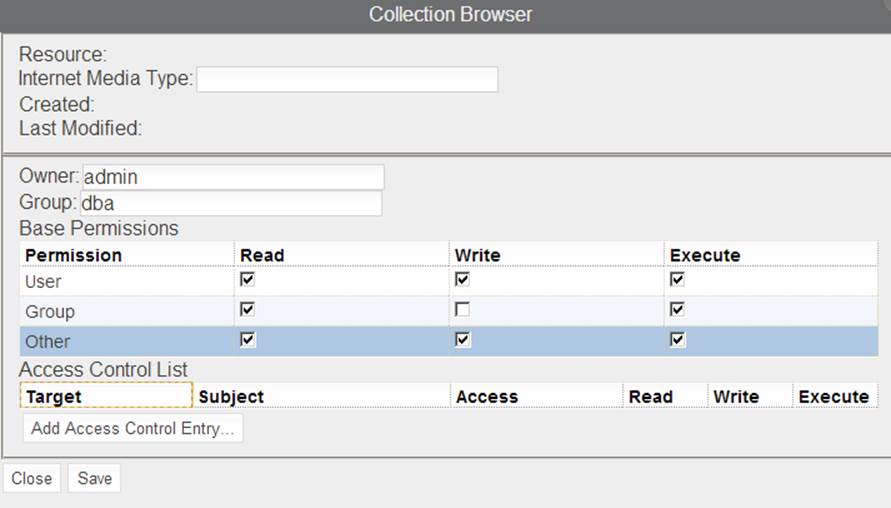
Figure 3-8. Changing the permissions of the log collection
After that, log out and close your browser (to stop being admin), open it again, and revisit the plays-home.xq page. This should now run smoothly. Look inside the log collection, and there it is: our exist101-log.xml document. It contains something like:
<eXist101-Log>
<LogEntry timestamp="2013-04-09T20:51:27.205+02:00">Visited plays-home
</LogEntry>
</eXist101-Log>
And yes, every time you revisit the plays-home.xq page, a new LogEntry element is added. I’ll leave it up to you to add the logging code to the other pages of our small but beautiful application.
NOTE
The x permission on a collection means something different than the x permission on a resource. For a resource it means execute rights, and this is important for XQuery scripts. Try this out by, for instance, revoking the x permissions on our plays-home.xq file. You should now get a security warning when you try to run it.
What’s Next?
Although we could go on (and on and on), this is the end of our 101 course. We hope it gave you at least a taste of what’s possible, and some pointers on how to start out with eXist. There is still much more to learn (that’s why there are chapters after this one)! Here are some suggestions for further exploration:
§ Explore eXist’s extension modules’ functionality using the information in Chapter 7 and through the dashboard’s XQuery Function Documentation browser.
§ Tighten security to a specific set of users with the information in Chapter 8.
§ Change our little demo application into a real one using RESTXQ or URL rewriting. This will give you much more control over the URLs needed to visit the pages, security, error handling, and so on. More information can be found in Chapter 9.
§ Explore other index types and settings, as described in Chapters Chapter 11 and Chapter 12.
§ Use one of the other supported XML technologies from Chapter 10—for instance, creating a PDF version of our analysis report with XSL-FO.
§ Integrate the application with the rest of the world using the technologies described in Chapter 13.
But most of all, remember to have fun!
All materials on the site are licensed Creative Commons Attribution-Sharealike 3.0 Unported CC BY-SA 3.0 & GNU Free Documentation License (GFDL)
If you are the copyright holder of any material contained on our site and intend to remove it, please contact our site administrator for approval.
© 2016-2026 All site design rights belong to S.Y.A.