Learning Heroku Postgres (2015)
Chapter 4. PG Backups
Backups are important at any level. Failures are possible to occur at any system that uses the database. It may be an accidental failure, data corruption, or hardware-related. You need to perform actions anticipating failures and take steps to ensure data integrity. Therefore, Heroku offers an add-on called PG Backups that allows you to create and restore backups of your Postgres database hosted on Heroku, and also to import and export data.
In this chapter, you will learn how to use the features that this add-on provides.
This chapter will cover the following topics:
· Plans
· Installing the add-on
· Changing the plan
· Creating a backup
· Listing backups
· Downloading a backup
· Deleting backups
· Restoring from a backup
· Importing databases
· Exporting databases
· Removing the add-on
Plans
Before installing the PG Backups add-on, it is important to understand the plans offered and identify which one is the best for your application.
Currently, the add-on provides three different plans; all of them are free and the main difference is the period of data retention.
The Plus plan is recommended if you want to generate backups manually or in automated routines. This plan isn't recommended for new users as the responsibility for creating backups is yours. The Auto – One Week Retention and Auto – One Month Retentionplans will create automated backups weekly or monthly, and you don't need do anything in order to make it happen.
In the following table you can compare the plans offered:
|
Plan |
Manual backups retained |
Weekly backups retained |
Daily backups retained |
Automatic daily backups |
Intended for databases up to 20 GB |
|
Plus |
7 |
0 |
0 |
Unavailable |
Yes |
|
Auto – One Month Retention |
2 |
5 |
7 |
Available |
Yes |
|
Auto – One Week Retention |
2 |
0 |
7 |
Available |
Yes |
Plans
Tip
For new users, it is recommended to use the Auto - One Month Retention plan. This plan offers one month of data retention.
All the plans that are offered are available at https://addons.heroku.com/pgbackups.
Installing the add-on
After choosing the plan that suits you best, you can install the add-on in your Heroku application. This installation can be done in two different ways: via the Heroku client and via the web interface.
The PG Backups add-on is free with all plans, but Heroku requires that you enter your credit card information to install the add-on. For this visit the URL https://dashboard.heroku.com/account/billing.
Via the Heroku client
The command to install via the Heroku client will depend on the chosen plan. For the Plus plan, you should enter the following command in your operating system Terminal:
$ heroku addons:add pgbackups --app your-app-name
Adding pgbackups on your-app-name... done, v22 (free)
You can now use "pgbackups" to backup your databases or import an external backup.
Use `heroku addons:docs pgbackups` to view documentation.
For the Auto – One Month Retention plan, enter the following command:
$ heroku addons:add pgbackups:auto-month --app your-app-name
Adding pgbackups:auto-month on your-app-name... done, v24 (free)
You can now use "pgbackups" to backup your databases or import an external backup.
Use `heroku addons:docs pgbackups` to view documentation.
And finally, for the Auto – One Week Retention plan, enter the following command:
$ heroku addons:add pgbackups:auto-week --app your-app-name
Adding pgbackups:auto-week on your-app-name... done, v26 (free)
You can now use "pgbackups" to backup your databases or import an external backup.
Use `heroku addons:docs pgbackups` to view documentation.
Basically, the difference between the commands is just the kind of plan used: pgbackups, pgbackups:auto-month, or pgbackups:auto-week.
Via the web interface
To install via the web interface, you must access the PG Backups add-ons page at https://addons.heroku.com/pgbackups. Choose the best plan for you; at the bottom of the page select the app name and click on the Add [Plan Name] for Free button.
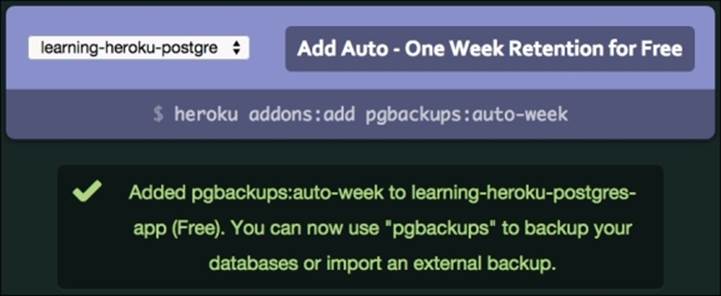
Installing the PG Backups add-on via the web interface
Tip
A confirmation message will appear informing you whether the installation was successful.
Changing the plan
The PG Backups add-on allows you to change the type of plan whenever it's more convenient for you. This way you can easily change the retention period of your backups: for weekly, monthly, or focusing more on manual backups.
To do this, visit the dashboard of your application in https://dashboard.heroku.com/apps, click on the Edit button, select the plan you want to change beside the PG Backups add-on, and click on the Save button to confirm.

Changing the PG Backups plan
Creating a backup
By default, PG Backups take backups of your primary database, available via the DATABASE_URL configuration variable.
To generate a new backup, you must enter the command manually:
$ heroku pgbackups:capture --app your-app-name
HEROKU_POSTGRESQL_COBALT_URL (DATABASE_URL) ----backup---> b002
Capturing... done
Storing... done
Tip
Backups are always compressed, and are always smaller than the size of your database.
If you have another database in your app, you can specify the database to take the back up through this configuration variable:
$ heroku pgbackups:capture HEROKU_POSTGRESQL_[COLOR]_URL --app your-app-name
Tip
Automated backups are always performed on the primary database, available via the DATABASE_URL configuration variable.
Each plan has a limit for manual backups, so, if you have already reached this limit, you will need to delete the previous backup so that you can take a new manual backup. You can do it through the --expire flag:
$ heroku pgbackups:capture --expire --app your-app-name
There is another way to perform backups; you can take backups through the GUI (graphical user interface) provided to manage your Postgres databases in https://postgres.heroku.com/databases. For this, click on the name of your database; after this, click on the gear icon on the right-hand side and select the New Snapshot option.
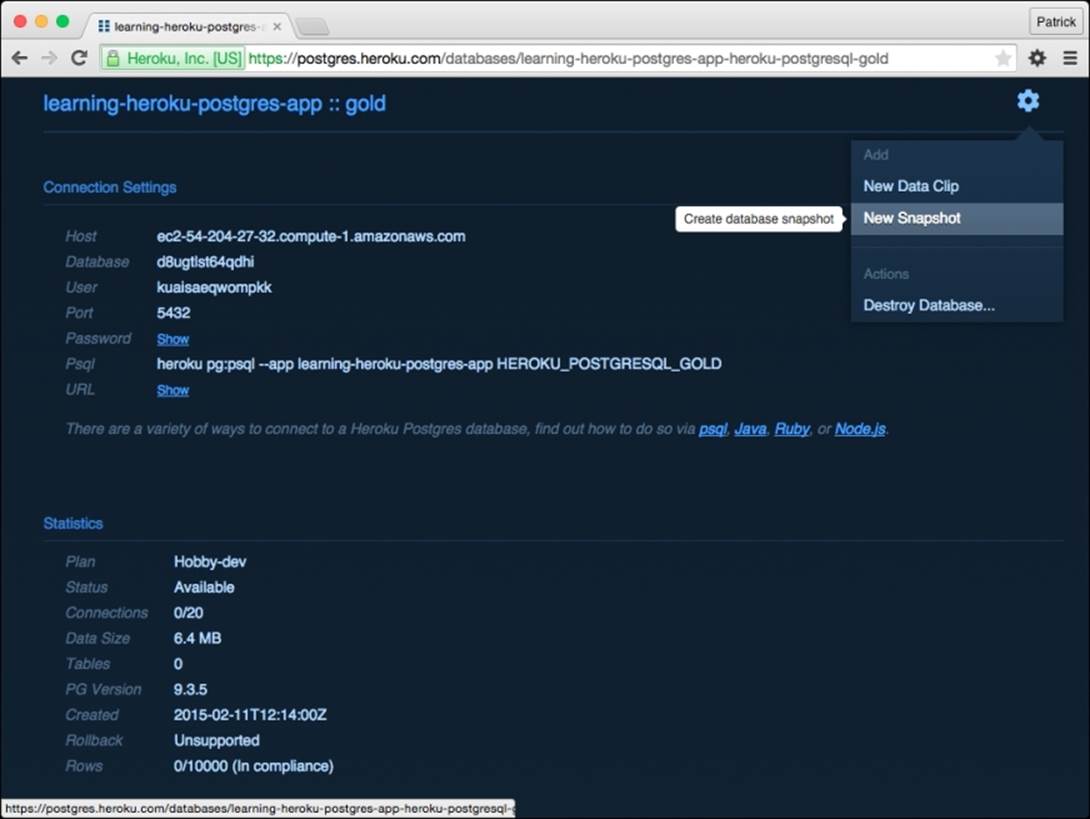
Taking a new snapshot
The backup process adds overhead to your database during the process. This overhead can vary according to the size of your database, but it doesn't block other operations on the database while a backup is ongoing. In Chapter 6, Rollback, Followers, and Forks, you will learn another way to improve this process through the use of followers.
Listing backups
There are two ways to view a list of backups; the first one is via the Heroku client and the second is via the web interface. The information provided is the backup ID and also the data, status, size, and which database was backed up.
Via the Heroku client
To see a list of backups via the Heroku client, you must enter the following command:
$ heroku pgbackups --app your-app-name
Tip
Backups with an ID starting with the letter a are automatic backups and backups starting with the letter b are manual backups.
Via the web interface
To view a list of backups via the web interface, you must access https://postgres.heroku.com. Click on the database name and, at the bottom of the page, you will find information about all the existing backups.

Backups listed
Tip
In this interface, the backups are called snapshots.
Downloading a backup
Downloading backups is a very common action when you want to migrate data between applications, upgrade plans, or simply export data.
The simplest way to download a backup is via the web interface at Heroku Postgres in https://postgres.heroku.com. In the backup list, there is a link to download each backup, but it's also very common to download the backup via the Heroku client with thepgbackups:url command:
$ heroku pgbackups:url --app your-app-name
"https://s3.amazonaws.com/hkpgbackups/app25633057@heroku.com/b004.dump?AWSAccessKeyId=AKIAJNFEZJDWEFCGIL7A&Expires=1406498011&Signature=fICrkAEAQUxClStvBKgMM%2FspYkI%3D"
This command will always provide the appropriate URL to download the most recent backup. If you want another backup, you can pass the backup ID:
$ heroku pgbackups:url b002 --app your-app-name
And finally, to download you can use commands such as curl or wget with the pgbackups:url command:
$ curl -o latest.dump `heroku pgbackups:url --app your-app-name`
Deleting backups
Similar to downloading backups, you can also delete backups via the web interface at Heroku Postgres https://postgres.heroku.com. Select a database and click on the Delete link in the list.
You can delete a backup via the client through the pgbackups:destroy command. This command expects you to pass the backup ID to perform the deletion:
$ heroku pgbackups:destroy b004 --app your-app-name
Destroying b004... done
Restoring from a backup
The backup restore process is a destructive operation. The existing data is deleted and replaced with the data in the backup. You can do this process via the Heroku client through the pgbackups:restore command. It expects you to enter the database configuration variable and the backup ID to perform the restore:
$ heroku pgbackups:restore DATABASE_URL a001 --app your-app-name
HEROKU_POSTGRESQL_COBALT_URL (DATABASE_URL) <---restore--- a001 DATABASE_URL
2014/07/27 04:21.28 +0000
1.4KB
! WARNING: Destructive Action
! This command will a
ffect the app: your-app-name
! To proceed, type " your-app-name " or re-run this command with --confirm your-app-name
> your-app-name
Retrieving... done
Restoring... done
Tip
This is a destructive action; you are prompted to enter the name of your app to confirm the process.
Importing databases
You can use the PG Backups add-on to import database dumps from other databases to your Heroku Postgres database. This can be done using the pgbackups:restore command through a dump database generated by the pg_dump tool.
Note
If your environment is Windows, you must first create the variables that indicate the user and password of PostgreSQL locally. For working on Windows, execute the following commands in the Command Prompt:
SET PGUSER=your_postgres_username_locally
SET PGPASSWORD=your_postgres_password_locally
The pg_dump tool is present by default in the PostgreSQL installation on your computer or other web servers. To generate a new dump, you must enter this command for Linux and Mac OS X:
$ PGPASSWORD=your-db-password pg_dump -Fc --no-acl --no-owner -h localhost -U your-db-username your-database-name > mydb.dump
For Window users, enter the following command:
$ pg_dump -Fc --no-acl --no-owner -h localhost -U your-db-username your-database-name > mydb.dump
Importing in Heroku Postgres
To import the dump of your database to Heroku, the first step is to upload the file somewhere accessible via an HTTP URL; after that, you can restore the backup through the pgbackups:restore command:
$ heroku pgbackups:restore DATABASE_URL 'http://your-server.com/mydb.dump' --app your-app-name
Tip
You have to add the dump file on your website and include the URL in the preceding command. It is highly recommended to remove the dump file generated after the backup restore.
Exporting databases
Exporting a database from Heroku Postgres and restoring it on your computer or on another server is a simple process. The first step is to generate a new backup, download it, and finally restore the backup using the pg_restore tool.
Downloading the backup
As you learned earlier, it's possible to generate a new backup and download it:
$ heroku pgbackups:capture --app your-app-name
$ curl -o latest.dump `heroku pgbackups:url --app your-app-name`
Restoring to local database
A restore operation uses the pg_restore tool. It is installed by default during the PostgreSQL installation locally. For restoring the database, enter the following command:
$ pg_restore --verbose --clean --no-acl --no-owner -h localhost -U your-db-username -d your-database-name latest.dump
Removing the add-on
Removing an add-on should always be done with great care, especially in the case of the PG Backups add-on as all backups are deleted after being excluded. So it is recommended that you download or restore backups before performing this action.
As with the installation, it is possible to remove the add-on in two different ways: via the Heroku client or via the web interface. You can choose which ever method is more convenient for you.
Via the Heroku client
Irrespective of the selected plan, you can remove the PG Backups add-on with one command:
$ heroku addons:remove pgbackups --app your-app-name
! WARNING: Destructive Action
! This command will affect the app: your-heroku-app-name
! To proceed, type " your-app-name " or re-run this command with --confirm your-app-name
> your-app-name
Removing pgbackups on your-heroku-app-name... done, v27 (free)
Tip
This is a destructive action, so you are prompted to enter the name of your app to confirm the process.
Via the web interface
Actions via the web interface are the favorite of new users in the Heroku platform, although not all actions can be performed via the web interface.
The add-on removal is a functionality available and commonly used via the GUI in Heroku. For this, visit your app dashboard at https://dashboard.heroku.com/apps/, select the application, click on the Edit button, click on the – (less) button beside the name of thePG Backups add-on, and confirm the deletion by clicking on the Save button.
Self-test Questions
Answer true or false:
1. Is it only possible to do automated backups on Heroku via the PG Backups add-on?
2. Are the backups done by default on the primary database, available via the DATABASE_URL configuration variable?
3. Are all PG Backups plans paid?
4. Can you download a backup via the web interface?
5. Are you only able to delete backups via the client?
6. Is the heroku pgbackups:restore command used to restore backups?
7. Is the heroku pgbackups:url command used to change the URL connection to the database?
8. Isn't it possible to restore a Heroku Postgres database locally?
9. Can you remove the PG Backups add-on at any time?
10. When the Heroku Postgres add-on is removed, are the backups kept?
Summary
In this chapter, you learned the differences between PG Backups add-on plans and learned how to choose the best plan according to your need, how to use the main features provided by the add-on in order to create backups, and perform a database restore. In addition, you learned how to import database to Heroku and how to export your Heroku Postgres database.
Backup routines are important for the safety and integrity of your data; always remember to configure backups according to your need as failures can occur in any project.
In the next chapter, you will learn how to use Dataclips. Basically, this function allows you to write queries in SQL and share the results with your colleagues; they are able to view the data and download it in many formats. Besides that, you will also learn about security and some limitations.
All materials on the site are licensed Creative Commons Attribution-Sharealike 3.0 Unported CC BY-SA 3.0 & GNU Free Documentation License (GFDL)
If you are the copyright holder of any material contained on our site and intend to remove it, please contact our site administrator for approval.
© 2016-2026 All site design rights belong to S.Y.A.