Learning Heroku Postgres (2015)
Chapter 3. Postgres Add-on
In this chapter, you will learn about the Postgres add-on, how to configure your local development environment, how to use the add-on, how to create your database, and how to connect using different programming languages. In addition, you will learn about connection permissions, how to connect in the database, and how to use databases that are not hosted on Heroku. You will also learn the first concepts of monitoring, information logs, and how to remove the add-on.
In this chapter, we will cover the following topics:
· Local setup
· Creating a new app
· Adding the add-on and creating the first database
· The Heroku Postgres web interface
· Using the Heroku client with Postgres
· Connecting with Java
· Connecting with Ruby
· Connecting with Python
· Connecting with Node.js
· Connection permissions
· External connections
· Connecting to databases from outside Heroku
· Monitoring and logging
· Removing the add-on
Local setup
You need to install PostgreSQL on your computer; this installation is recommended because some commands of the Postgres add-on require PostgreSQL to be installed. Besides that, it's a good idea for your development database to be similar to your production database; this avoids problems between these environments.
Next, you will learn how to set up PostgreSQL on Mac OS X, Windows, and Linux. In addition to pgAdmin, this is the most popular and rich feature in PostgreSQL's administration and development platform.
The versions recommended for installation are PostgreSQL 9.4.0 and pgAdmin 1.20.0, or the latest available versions.
Setting up PostgreSQL on Mac OS X
The Postgres.app application is the simplest way to get started with PostgreSQL on Mac OS X, it contains many features in a single installation package:
· PostgreSQL 9.4.0
· PostGIS 2.1.4
· Procedural languages: PL/pgSQL, PL/Perl, PL/Python, and PLV8 (JavaScript)
· Popular extensions such as hstore, uuid-ossp, and others
· Many command-line tools for managing PostgreSQL and convenient tools for GIS
The following screenshot displays the postgresapp website:
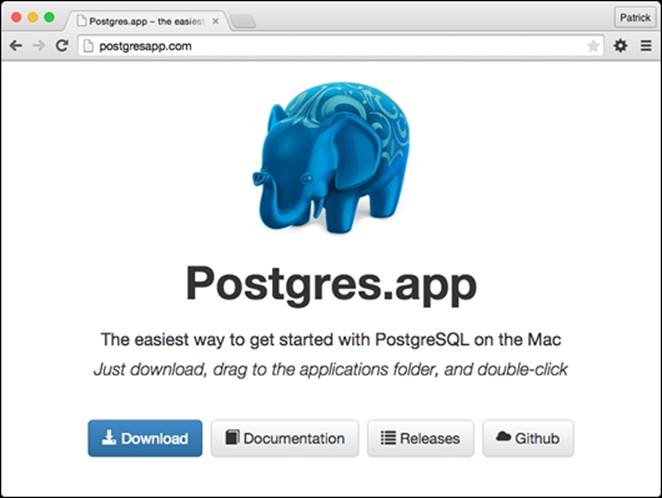
For installation, visit the address http://postgresapp.com/, carry out the appropriate download, drag it to the applications directory, and then double-click to open.
The other alternatives for installing PostgreSQL are to use the default graphic installer, Fink, MacPorts, or Homebrew. All of them are available at http://www.postgresql.org/download/macosx.
To install pgAdmin, you should visit http://www.pgadmin.org/download/macosx.php, download the latest available version, and follow the installer instructions.
Setting up PostgreSQL on Windows
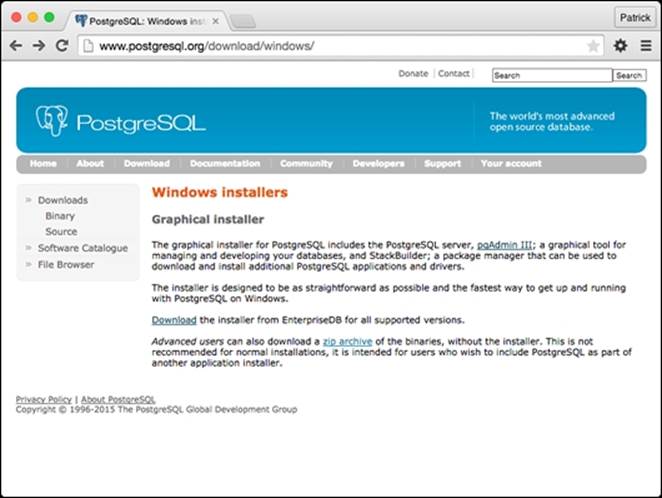
PostgreSQL on Windows is provided using a graphical installer that includes the PostgreSQL server, pgAdmin, and the package manager that is used to download and install additional applications and drivers for PostgreSQL.
To install PostgreSQL, visit http://www.postgresql.org/download/windows, click on the download link, and select the the appropriate Windows version: 32 bit or 64 bit. Follow the instructions provided by the installer.
After installing PostgreSQL on Windows, you need to set the PATH environment variable so that the psql, pg_dump and pg_restore commands can work through the Command Prompt. Perform the following steps:
1. Open My Computer.
2. Right-click on My Computer and select Properties.
3. Click on Advanced System Settings.
4. Click on the Environment Variables button.
5. From the System variables box, select the Path variable.
6. Click on Edit.
7. At the end of the line, add the bin directory of PostgreSQL: c:\Program Files\PostgreSQL\9.4\bin;c:\Program Files\PostgreSQL\9.4\lib.
8. Click on the OK button to save.
Note
The directory follows the pattern c:\Program Files\PostgreSQL\VERSION\..., check your PostgreSQL version.
Setting up PostgreSQL on Linux
The great majority of Linux distributions already have PostgreSQL in their package manager. You can search the appropriate package for your distribution and install it. If your distribution is Debian or Ubuntu, you can install it with the following command:
$ sudo apt-get install postgresql
If your Linux distribution is Fedora, Red Hat, CentOS, Scientific Linux, or Oracle Enterprise Linux, you can use the YUM package manager to install PostgreSQL:
$ sudo yum install postgresql94-server
$ sudo service postgresql-9.4 initdb
$ sudo chkconfig postgresql-9.4 on
$ sudo service postgresql-9.4 start
If your Linux distribution doesn't have PostgreSQL in your package manager, you can install it using the Linux installer. Just visit the website http://www.postgresql.org/download/linux, choose the appropriate installer, 32-bit or 64-bits, and follow the install instructions.
You can install pgAdmin through the package manager of your Linux distribution; for Debian or Ubuntu you can use the following command:
$ sudo apt-get install pgadmin3
For Linux distributions that use the YUM package manager, you can install through the following command:
$ sudo yum install pgadmin3
If your Linux distribution doesn't have pgAdmin in its package manager, you can download and install it following the instructions provided at http://www.pgadmin.org/download/.
Creating a local database
For the examples in this chapter, you will need to have a local database created. You will create a new database called my_local_database through pgAdmin.
To create the new database, perform the following steps:
1. Open pgAdmin.
2. Connect to the database server through the access credentials that you chose in the installation process.
3. Click on the Databases item in the tree view.
4. Click on the menu Edit -> New Object -> New database.
5. Type the name my_local_database for the database.
6. Click on the OK button to save.
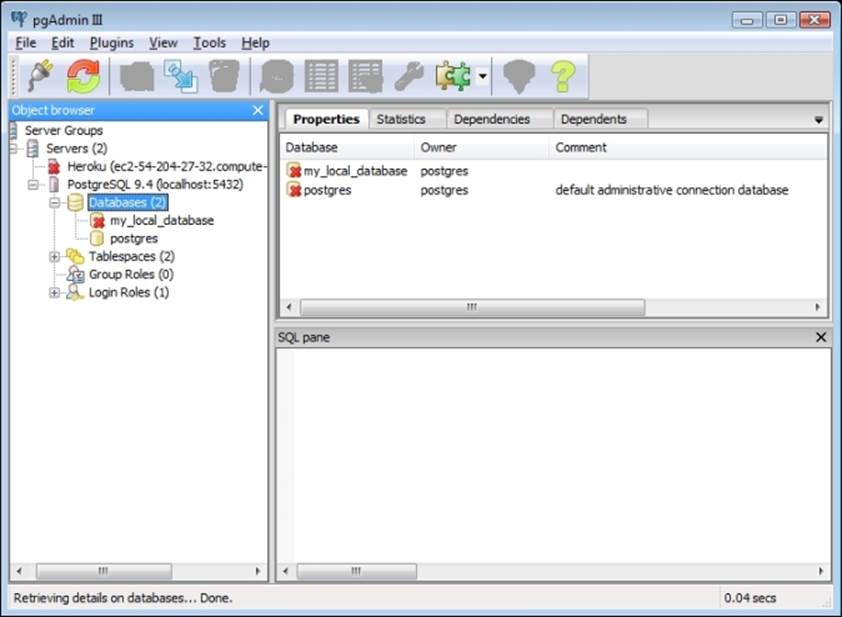
Creating a new local database called my_local_database
Creating a new app
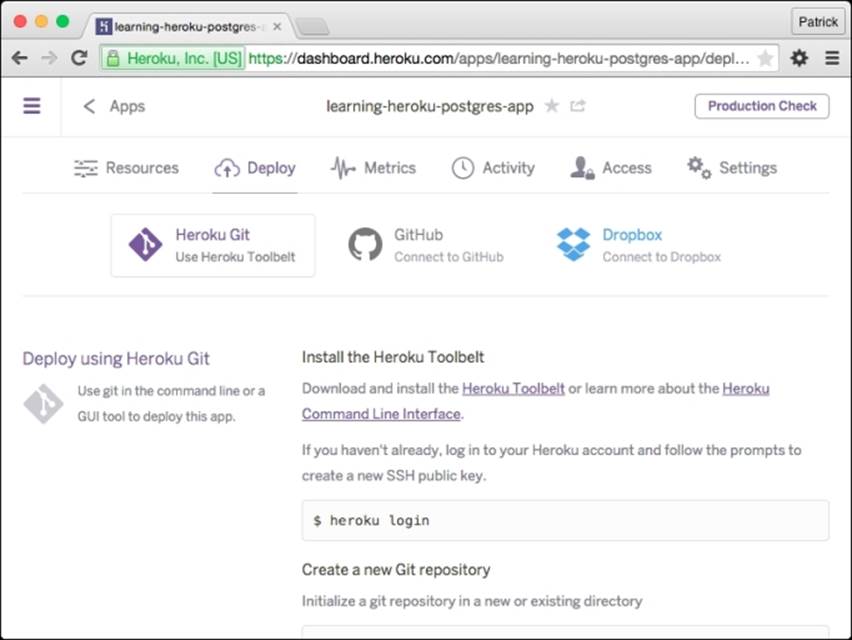
Many features in Heroku can be implemented in two different ways; the first is via the Heroku client, which is installed through the Heroku Toolbelt, and the other is through the web Heroku dashboard.
In this section, you will learn how to use both of them.
Via the Heroku dashboard
Access the website https://dashboard.heroku.com and login. After that, click on the plus sign at the top of the dashboard to create a new app and the following screen will be shown:
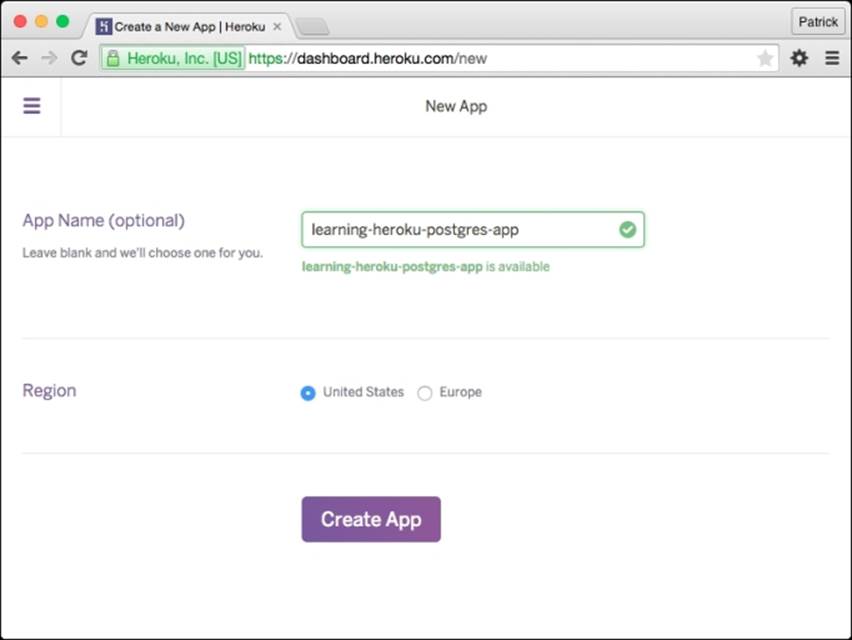
Creating an app
In this step, you should provide the name of your application. In the preceding example, it's learning-heroku-postgres-app. You can choose a name you prefer. Select which region you want to host it on; two options are available: United States or Europe.
Note
Heroku doesn't allow duplicated names for applications; each application name supplied is global and, after it has been used once, it will not be available for another person. It can happen that you choose a name that is already being used. In this case, you should choose another name.
Choose the best option for you, it is usually recommended you select the region that is closest to you to decrease server response time. Click on the Create App button.
Then Heroku will provide some information to perform the first deploy of your application. The website URL and Git repository are created using the following addresses: http://learning-heroku-postgres-app.herokuapp.com and git@heroku.com/learning-heroku-postgres-app.git.
learning-heroku-postgres-app created
Next you will create a directory in your computer and link it with Heroku to perform future deployments of your source code. Open your terminal and type the following commands:
$ mkdir your-app-name
$ cd your-app-name
$ git init
$ heroku git:remote -a your-app-name
Git remote heroku added
Finally, you are able to deploy your source code at any time through these commands:
$ git add .
$ git commit –am "My updates"
$ git push heroku master
Via the Heroku client
Creating a new application via the Heroku client is very simple. The first step is to create the application directory on your computer. For that, open the Terminal and type the following commands:
$ mkdir your-app-name
$ cd your-app-name
$ git init
After that you need to create a new Heroku application through the command:
$ heroku apps:create your-app-name
Creating your-app-name... done, stack is cedar-14
https://your-app-name.herokuapp.com/ | HYPERLINK "https://git.heroku.com/your-app-name.git" https://git.heroku.com/your-app-name.git
Git remote heroku added
Finally, you are able to deploy your source code at any time through these commands:
$ git add .
$ git commit –am "My updates"
$ git push heroku master
Tip
Another very common case is when you already have a Git repository on your computer with the application's source code and you want to deploy it on Heroku. In this case, you must run the heroku apps:create your-app-name command inside the application directory and the link with Heroku will be created.
Adding the add-on and creating the first database
Heroku Postgres is accessible via any programming language by the connection driver of PostgreSQL; this includes all languages and frameworks supported by Heroku, such as Java, Ruby, Python, Scala, Play, Node.js, and Clojure.
Adding the Heroku Postgres add-on
You can add the Heroku Postgres add-on in two different ways: via the Heroku add-ons gallery or the Heroku client.
Via the Heroku add-ons gallery
Heroku offers a gallery of add-ons for your applications, this gallery is available at https://addons.heroku.com/.
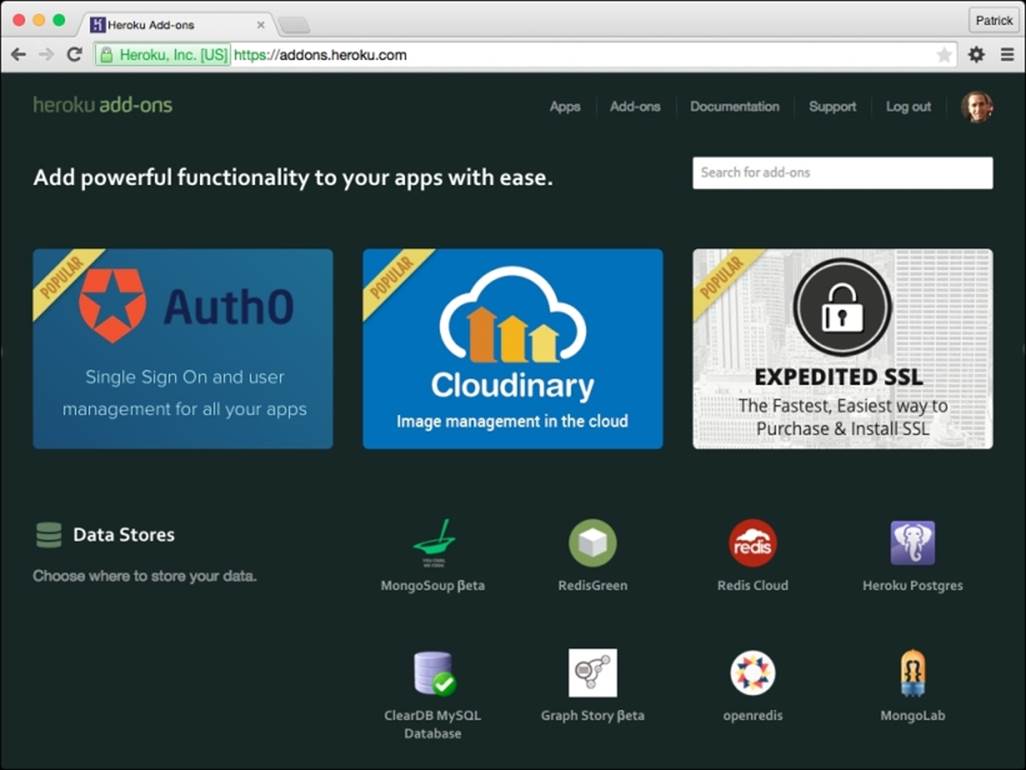
Heroku add-ons gallery
In the Data Stores area, you can find the Heroku Postgres add-on or you can find it at https://addons.heroku.com/heroku-postgresql.
Tip
Before installing the Heroku Postgres add-on, you must log in to Heroku.
As shown in the first chapter, this add-on has many plans that change according to the functionality of the cache size, storage limit, the simultaneous connection limit, high availability, and the ability to work with forks and followers. You can choose the best plan for yourself, but if you prefer jumping straight in it's advisable to choose the Hobby Dev plan, which is free and ideal for small data sets with a maximum of 10,000 lines.
At the bottom of the website, choose the application and click on the Add Hobby Dev for Free button so that you can add the Heroku Postgres add-on in your application.
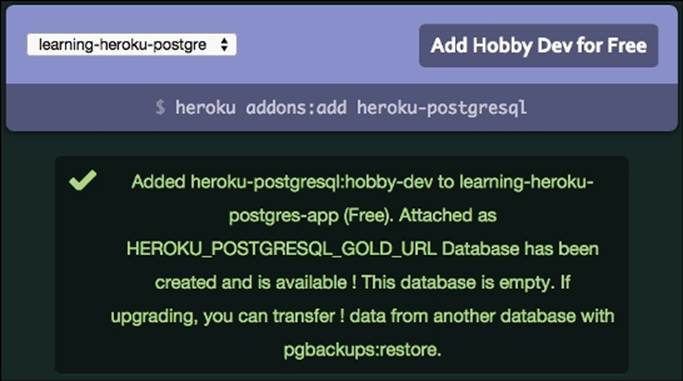
Add Heroku Postgres add-on
Via the Heroku client
Adding the Heroku Postgres add-on via the Heroku client is simple and fast.
Tip
You can use the --app flag to always specify which application you are working with. This flag is optional; if you are inside the application directory in your computer, you don't need to use it.
Open a terminal in your computer and type the following command:
$ heroku addons:add heroku-postgresql:hobby-dev --app your-app-name
Adding heroku-postgresql:hobby-dev on your-app-name... done, v4 (free)
Attached as HEROKU_POSTGRESQL_GOLD_URL
Database has been created and is available
! This database is empty. If upgrading, you can transfer
! data from another database with pgbackups:restore.
Use `heroku addons:docs heroku-postgresql` to view documentation.
Creating the first database
Now you have the Heroku Postgres add-on installed in your application and the first database was automatically created by the HEROKU_POSTGRESQL_GOLD_URL environment variable on Heroku and is available; this variable points the connection string to the database.
Tip
The name of the HEROKU_POSTGRESQL_GOLD_URL variable follows the pattern HEROKU_POSTGRESQL_[COLOR]_URL, so don't worry if a different name appears.
Heroku allows you to add the Heroku Postgres add-on more than once in the same application; it allows you to have many PostgreSQL databases in the same application. In this case, you will have many configuration variables to connect to the database, one for each database.
Tip
There is an environment variable called DATABASE_URL; this variable always points to the primary database.
If you want to view all the available environment variables, you must use the following command:
$ heroku config --app your-app-name
=== your-app-name Config Vars
DATABASE_URL: postgres://username:password@host:5432/database
HEROKU_POSTGRESQL_GOLD_URL: postgres://username:password@host:5432/database
In this case, you have the DATABASE_URL and HEROKU_POSTGRESQL_GOLD_URL variables that point to the same database connection.
If you visit the Heroku dashboard, you will see the Heroku Postgres add-on added in the Hobby Dev plan.
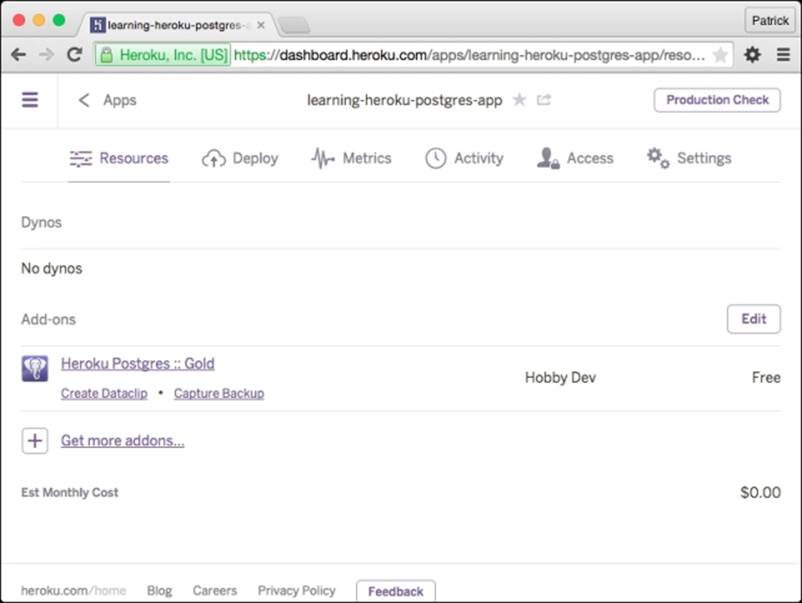
The Heroku Postgres add-on added in your application
Heroku Postgres web interface
Heroku provides a web interface that allows you to view and manage your database. It is available by clicking on the link Heroku Postgres :: Gold in the dashboard or visiting the address https://postgres.heroku.com.
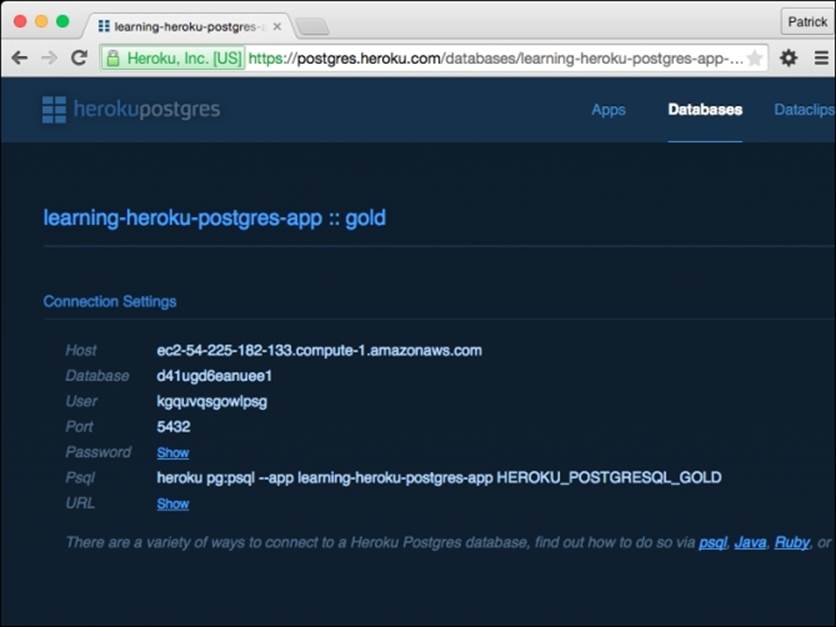
Web interface for managing your PostgreSQL database
In this interface, you have information about the database, such as host, database, user, port, password, how to access psql, and other statistics about the database. In addition, you can perform sophisticated tasks that you will learn later in this book.
Using the Heroku client with Postgres
The Heroku Postgres add-on is integrated with the Heroku client, which provides commands that allow you to automate and perform tasks to manage your PostgreSQL database hosted on Heroku.
All these commands are available through the namespace pg. You will get an overview of each of these commands in upcoming sections. Open a Terminal and type the following commands.
The pg:info command
This command provides the following statistics and information on your database:
· The connection variable
· The current database plan
· The number of connections
· The PostgreSQL version
· The database's creation date
· The database size
· The number of tables
· The number of available lines if the database plan is Hobby tier
It also informs whether Fork/Follow/Rollback are enabled for this database.
$ heroku pg:info --app your-app-name
=== HEROKU_POSTGRESQL_GOLD_URL (DATABASE_URL)
Plan: Hobby-dev
Status: Available
Connections: 0
PG Version: 9.3.3
Created: 2014-05-25 14:03 UTC
Data Size: 6.4 MB
Tables: 0
Rows: 0/10000 (In compliance)
Fork/Follow: Unsupported
Rollback: Unsupported
The pg:psql command
The psql is the PostgreSQL interactive terminal that allows you to type queries interactively as well as see the results. You can also send files to be processed, and provide a number of meta-commands and shell-like features to facilitate script writing and automating tasks.
Tip
You must have PostgreSQL installed on your computer to be able to use this command.
The following command uses the pg:psql command:
$ heroku pg:psql --app your-app-name
---> Connecting to HEROKU_POSTGRESQL_GOLD_URL (DATABASE_URL)
psql (9.3.4, server 9.3.3)
SSL connection (cipher: DHE-RSA-AES256-SHA, bits: 256)
Type "help" for help.
your-app-name::GOLD=>
Note
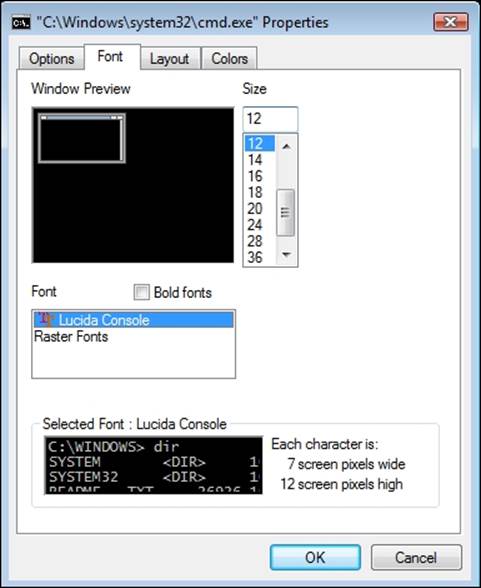
For Windows users, psql was built to be a console application and by default the Windows Command Prompt uses a different encoding for the rest of the system. When psql detects a code page that returns an error, it generates a warning at startup.
To set the correct console code page, two actions are necessary:
First, set the appropriate code page through the command cmd.exe /c chcp 1252.
After that, apply the font Lucida Console to the Command Prompt. Right-click on the title bar and select Properties, then click on the Font tab, and finally select the Lucida Console font.
If you have more than one database in your application and want to connect to it, it is necessary to inform the connection variable. By default, the pg:psql command will always connect the main database and set in the DATABASE_URL variable.
$ heroku pg:psql HEROKU_POSTGRESQL_[COLOR]_URL --app your-app-name
---> Connecting to HEROKU_POSTGRESQL_[COLOR]_URL
psql (9.3.4, server 9.3.3)
SSL connection (cipher: DHE-RSA-AES256-SHA, bits: 256)
Type "help" for help.
your-app-name::[COLOR]=>
The pg:push command
This command sends the structure and data from a local database your computer to the database application on Heroku. This command expects you to supply the name of your local database and the name of the database on Heroku.
Note
If your environment is Windows, you must first create the variables that indicate the user and password of PostgreSQL locally. For working on Windows, execute the following commands in the Command Prompt:
$ SET PGUSER=your_postgres_username_locally
$ SET PGPASSWORD=your_postgres_password_locally
$ heroku pg:push my_local_database DATABASE_URL --app your-app-name
Tip
You must enter the password of your local PostgreSQL if your operating system is Windows. A prompt asking for the password will appear:
Password: your_postgres_password_locally
For Linux and Mac OS X, in some cases it is necessary to specify the username and password to access your PostgreSQL locally. In this case, you can proceed in this way:
$ PGUSER=your_postgres_username_locally PGPASSWORD=your_postgres_password_locally heroku pg:push my_local_database DATABASE_URL --app your-app-name
The DATABASE_URL variable is the default database of your application, if you want to send to another database, you must provide the appropriate URL:
$ heroku pg:push my_local_database HEROKU_POSTGRESQL_[COLOR]_URL --app your-app-name
The pg:pull command
The pg:pull command copies the structure and data from a database on Heroku to a local database on your computer. This command is useful when you want to analyze data locally or perform tests with an exact copy of the database.
This command expects you to provide the URL of the Heroku database and the name of the new database that will be created on you computer.
$ heroku pg:pull DATABASE_URL my_local_database --app your-app-name
Tip
You must enter the password of your local PostgreSQL if your operating system is Windows. A prompt asking for the password will appear:
Password: your_postgres_password_locally
If the database already exists on your computer, the Heroku client displays a message stating that the database already exists and asks you to delete the database manually before performing pg:pull.
$ heroku pg:pull HEROKU_POSTGRESQL_[COLOR]_URL my_local_database --app your-app-name
! createdb: database creation failed: ERROR:database "my_local_database" already exists
! Please drop the local database (`dropdb my_local_database`) and try again.
$ dropdb my_local_database
$ heroku pg:pull HEROKU_POSTGRESQL_[COLOR]_URL my_local_database --app your-app-name
Depending on the configuration of PostgreSQL on you computer, it may be necessary in some cases to provide the PostgreSQL username and password so that you'll be able to perform the pg:pull command. In this case, you must provide PGUSER and PGPASSWORD.
For Linux and Mac OS X:
$ PGUSER=your_postgres_username_locally PGPASSWORD=your_postgres_password_locally heroku pg:pull DATABASE_URL my_local_database --app your-app-name
For Windows:
$ SET PGUSER=your_postgres_username_locally
$ SET PGPASSWORD=your_postgres_password_locally
$ heroku pg:pull DATABASE_URL my_local_database --app your-app-name
The pg:ps command
The pg:ps command checks the pg_stat_statements table and provides you a concise overview of all the queries that are currently running. It is useful for you to understand how your database is behaving before taking any decision.
$ heroku pg:ps --app your-app-name
pid | state | source |running_for | waiting | query
-----+--------+--------+-----------------+---------+------
26857| active | | -00:00:00.00103 | f | SELECT "doctors".* FROM "doctors" ORDER BY name asc LIMIT 1
(1 row)
The pg:kill command
This command is used to cancel a query through the process number (pid). You can get this number through the pg:ps command. The command calls the pg_cancel_backend function and tries to cancel the query.
$ heroku pg:kill 26857 --app your-app-name
pg_cancel_backend
-------------------
t
(1 row)
In some cases, the preceding command may fail. In these cases, you can use the --force parameter that uses the pg_terminate_backend function to bring down the entire connection of the query.
$ heroku pg:kill 26857 --force --app your-app-name
pg_terminate_backend
---------------------
t
(1 row)
Tip
Use the pg:kill command carefully, so you don't upset your customers.
The pg:killall command
The pg:killall command cancels all queries in the database. For this, the pg_terminate_backend function is used to bring down the entire connection of each query, is as follows:
$ heroku pg:killall --app your-app-name
pg_terminate_backend
----------------------
t
t
(2 rows)
The pg:promote command
This command is useful to change the default database in your application. Through it you can change which database responds to the DATABASE_URL variable. This command is used frequently when a problem occurs, and then you can restore the backup in another database and transform it to the default database.
To try this feature, you will add a new database and after that you will promote it to the primary database:
$ heroku addons:add heroku-postgresql:hobby-dev -app your-app-name
Adding heroku-postgresql:hobby-dev on your-app-name... done, v17 (free)
Attached as HEROKU_POSTGRESQL_MAROON_URL
Database has been created and is available
! This database is empty. If upgrading, you can transfer
! data from another database with pgbackups:restore.
Use `heroku addons:docs heroku-postgresql` to view documentation.
The command expects you to inform the URL about the database that will be promoted to the DATABASE_URL:
$ heroku pg:promote HEROKU_POSTGRESQL_MAROON_URL --app your-app-name
Promoting HEROKU_POSTGRESQL_MAROON_URL to DATABASE_URL... done
You can use the pg:info command to check the change in the DATABASE_URL variable:
$ heroku pg:info --app your-app-name
=== HEROKU_POSTGRESQL_GOLD_URL
Plan: Hobby-dev
Status: Available
Connections: 0
PG Version: 9.3.3
Created: 2014-05-25 14:03 UTC
Data Size: 6.9 MB
Tables: 9
Rows: 23/10000 (In compliance)
Fork/Follow: Unsupported
Rollback: Unsupported
=== HEROKU_POSTGRESQL_MAROON_URL (DATABASE_URL)
Plan: Hobby-dev
Status: Available
Connections: 0
PG Version: 9.3.3
Created: 2014-05-25 22:47 UTC
Data Size: 7.1 MB
Tables: 9
Rows: 23/10000 (In compliance)
Fork/Follow: Unsupported
Rollback: Unsupported
The pg:credentials command
The pg:credentials command supplies access credentials to the database. This command expects you to provide the database URL so that you can get the credentials. The string and connection URL are provided.
$ heroku pg:credentials DATABASE_URL --app your-app-name
Connection info string:
"dbname=dcumcl8ngtuvm host=ec2-54-225-168-181.compute-1.amazonaws.com port=5432 user=tzsbkrytsagtxv password=t6W3sUiGL4FebFF6oCqsUs4PeV sslmode=require"
Connection URL:
postgres://tzsbkrytsagtxv:t6W3sUiGL4FebFF6oCqsUs4PeV@ec2-54-225-168-181.compute-1.amazonaws.com:5432/dcumcl8ngtuvm
In some situations, you may need to change the access credentials, you can do this by adding the --reset parameter, and then a new username and password will be generated for the database connection.
$ heroku pg:credentials DATABASE_URL --reset --app your-app-name
Resetting credentials for HEROKU_POSTGRESQL_[COLOR]_URL (DATABASE_URL)... done
Promoting HEROKU_POSTGRESQL_[COLOR]_URL (DATABASE_URL)... done
Finally, you can enter the pg:credentials command again to get the new connection credentials:
$ heroku pg:credentials DATABASE_URL --app your-app-name
Connection info string:
"dbname=dcumcl8ngtuvm host=ec2-54-225-168-181.compute-1.amazonaws.com port=5432 user=fodmwtkpudycuq password=wU-H4j2eMhjYUJk7M61FvSgl33 sslmode=require"
Connection URL:
postgres://fodmwtkpudycuq:wU-H4j2eMhjYUJk7M61FvSgl33@ec2-54-225-168-181.compute-1.amazonaws.com:5432/dcumcl8ngtuvm
The pg:reset command
The pg:reset command is very useful for recreating your database and leaving it without data. If you try to run the pg:push command for a database that already has data, the Heroku client will notify you with the following message:
$ heroku pg:push my_local_database HEROKU_POSTGRESQL_[COLOR]_URL --app your-app-name
! Remote database is not empty.
! Please create a new database, or use `heroku pg:reset`
This command expects you to provide the specific URL of the database on which you'd like to perform the pg:reset command. You can use the DATABASE_URL command for the default database or another URL in the pattern HEROKU_POSTGRESQL_[COLOR]_URL.
$ heroku pg:reset HEROKU_POSTGRESQL_[COLOR]_URL --app your-app-name
! WARNING: Destructive Action
! This command will affect the app: your-app-name
! To proceed, type "your-app-name" or re-run this command with --confirm your-app-name
This is a destructive action and Heroku client asks you to confirm the action by typing the application name. Only after this, the pg:reset process will succeed.
> your-app-name
Resetting HEROKU_POSTGRESQL_[COLOR]_URL... done
Connecting with Java
There are many ways to connect to the database using Java, the most common way is through the parameters contained in the database connection URL. It provides you with the information postgres://[username]:[password]@[host]/[database name].
JDBC
You can connect via JDBC using the DATABASE_URL variable or using another database URL provided by Heroku. The JDBC connection is performed through the database URL parsing and extracting the necessary parameters. The following is just a code sample to help you understand the concept:
URI connectionParams = new URI(System.getenv("DATABASE_URL"));
String jdbcUrl = "jdbc:postgresql://" + connectionParams.getHost() + connectionParams.getPath();
Properties properties = new Properties();
properties.setProperty("username", connectionParams.getUserInfo().split(":")[0]);
properties.setProperty("password", connectionParams.getUserInfo().split(":")[1]);
Connection connection = DriverManager.getConnection(jdbcUrl, properties);
Spring/XML
The following code allows Spring XML connection. It configures BasicDataSource through the DATABASE_URL variable and can be used with Hibernate, JPA, and others. The following is just a code sample to help you understand the concept:
<bean class="java.net.URI" id="connectionParams">
<constructor-arg value="#{systemEnvironment['DATABASE_URL']}"/>
</bean>
<bean class="org.apache.commons.dbcp.BasicDataSource" destroy-method="close" id="dataSource">
<property name="driverClassName" value="org.postgresql.Driver" />
<property name="username" value="#{@connectionParams.getUserInfo().split(':')[0]}" />
<property name="password" value="#{@connectionParams.getUserInfo().split(':')[1]}" />
<property name="url" value="#{'jdbc:postgresql://' + @connectionParams.getHost() + @connectionParams.getPath()}" />
</bean>
Connecting with Ruby
In order to use PostgreSQL as a database in Ruby applications, it is necessary to install gem pg in your Gemfile.
gem 'pg'
After that, run the bundle install command to download and install the necessary dependencies.
For applications in Ruby on Rails, it is not necessary to configure the database connection. When Heroku deploys your application, it automatically configures the database.yml file through the DATABASE_URL environment variable.
Connecting with Python
In order to use PostgreSQL as database in your Python applications it is necessary to use the psycopg2 package and add it in the dependency file called requirements.txt. The following is just a code sample to help you understand the concept;
$ pip install psycopg2
$ pip freeze > requirements.txt
Then, use the psycopg2 package to connect the DATABASE_URL variable:
import psycopg2
import urlparse
import os
try:
urlparse.uses_netloc.append("postgres")
connection_params = urlparse.urlparse(os.environ["DATABASE_URL"])
db_connection = psycopg2.connect(database = connection_params.path[1:], user = connection_params.username, password = connection_params.password, host = connection_params.hostname, port = connection_params.port)
except:
print "Database connection failed."
Connecting with Django
To connect to PostgreSQL using the Django framework it is necessary to install the dj-database-url package and add it in the dependency file called requirements.txt.
$ pip install dj-database-url
$ pip freeze > requirements.txt
Then add the following code at the bottom of settings.py file:
import dj_database_url
DATABASES['default'] = dj_database_url.config()
In the deploy process, the DATABASE_URL variable will be parsed and converted into a form that Django can understand.
Connecting with Node.js
In order to connect to PostgreSQL with Node.js it is necessary to use the pg module. To make that possible, you have to add it to the dependency file called package.json. The following is just a code sample to help you understand the concept:
"dependencies": {
"pg": "0.10.2",
"express": "latest"
}
Then use the pg module to connect to PostgreSQL through the DATABASE_URL environment variable in your code:
var pg = require('pg');
pg.connect(process.env.DATABASE_URL, function(err, client, done) {
if(err) {
return console.error('Client error.', err);
}
client.query('SELECT * FROM doctors', function(err, result) {
done();
if(err) {
return console.error('Query error.', err);
}
console.log(result.rows);
});
});
Connection permissions
When a database is created, the Heroku Postgres add-on grants all non-superuser permissions in your database; you can use SELECT, INSERT, UPDATE, DELETE, TRUNCATE, REFERENCES, TRIGGER, CREATE, CONNECT, TEMPORARY, EXECUTE, and USAGE.
You cannot create or modify database roles, because you don't have superuser permissions.
Multiple schemas
Another important point is the use of multiple schemas. Heroku Postgres doesn't limit the amount of schemas, so you can use the desired amount.
You must use the schemas in a careful way. In database instances with more than 50 schemas, a performance loss can occur in the tool's database snapshots and PG Backups.
External connections
Heroku Postgres allows you to use client software to access your database. All connections require you to use SSL. The client software used is often interesting, especially when you want to run a query using a friendlier interface.
To be able to perform the connection, you need the following connection data: the database name, host, port, user, and password. You can get this data through the pg:credentials command:
$ heroku pg:credentials DATABASE_URL --app your-app-name
Connection info string:
"dbname=dcumcl8ngtuvm host=ec2-54-225-168-181.compute-1.amazonaws.com port=5432 user=fodmwtkpudycuq password=wU-H4j2eMhjYUJk7M61FvSgl33 sslmode=require"
Connection URL:
postgres://fodmwtkpudycuq:wU-H4j2eMhjYUJk7M61FvSgl33@ec2-54-225-168-181.compute-1.amazonaws.com:5432/dcumcl8ngtuvm
Through the data contained in the connection info string, you can use pgAdmin to connect to your database. Click on the File menu, then on Add Server... and fill the fields with the data connection details:
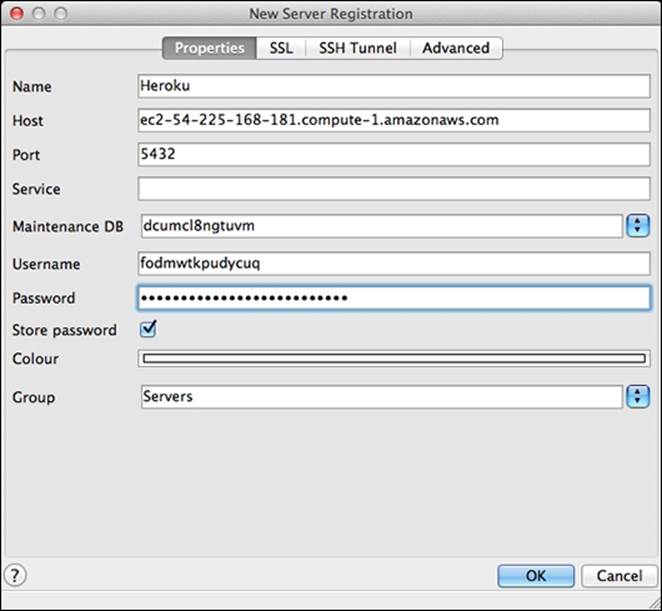
Connecting to the Heroku Postgres database with pgAdmin
Connecting to databases from outside Heroku
In some cases, you may want your application to connect to a database that isn't hosted in Heroku. You can configure this connection by overriding the DATABASE_URL command.
To override this variable, you must provide the connection parameters:
postgres://[username]:[password]@[host]/[database name]
The Heroku client has the config:set command that allows you to define or override environment variables:
$ heroku config:set DATABASE_URL=' postgres://[username]:[password]@[host]/[database name]' -your-app-name
Setting config vars and restarting your-app-name... done, v11
DATABASE_URL: postgres://[username]:[password] @[host]:5432/[database name]
Monitoring and logging
Logs are important to understand the behavior of your application and to identify problems. Heroku also offers, through its client, a way to track the logs generated:
$ heroku logs -t --app your-app-name
2014-05-25T13:16:09.958885+00:00 heroku[api]: Enable Logplex by patrickespake@gmail.com
2014-05-25T13:16:09.958885+00:00 heroku[api]: Release v2 created by patrickespake@gmail.com
You can apply a filter in the command logs to view only the logs generated by PostgreSQL using the -p postgres flag:
$ heroku logs -p postgres -t --app your-app-name
To see all the options provided by the command logs, you can use the --help flag:
$ heroku logs --help
Usage: heroku logs
display recent log output
-n, --num NUM # the number of lines to display
-p, --ps PS # only display logs from the given process
-s, --source SOURCE # only display logs from the given source
-t, --tail # continually stream logs
Tip
Chapter 7, Understanding Log Statements and Common Errors covers more information about Heroku's log system.
Removing the add-on
The most common way to remove the Heroku Postgres add-on is through the Heroku client using the environment variable in the pattern HEROKU_POSTGRESQL_[COLOR]_URL:
$ heroku addons:remove HEROKU_POSTGRESQL_[COLOR]_URL --app your-app-name
! WARNING: Destructive Action
! This command will affect the app: your-app-name
! To proceed, type "your-app-name" or re-run this command with --confirm your-app-name
> your-app-name
Removing HEROKU_POSTGRESQL_[COLOR] on your-app-name... done, v19 (free)
In order to confirm the deletion, you must enter the application name.
It's also possible to delete the Heroku Postgres add-on through the Heroku dashboard. For that, access your application via https://dashboard.heroku.com/apps. Choose your application and click on the Edit button on the right; after that, click on the minus sign and finally click on Save.
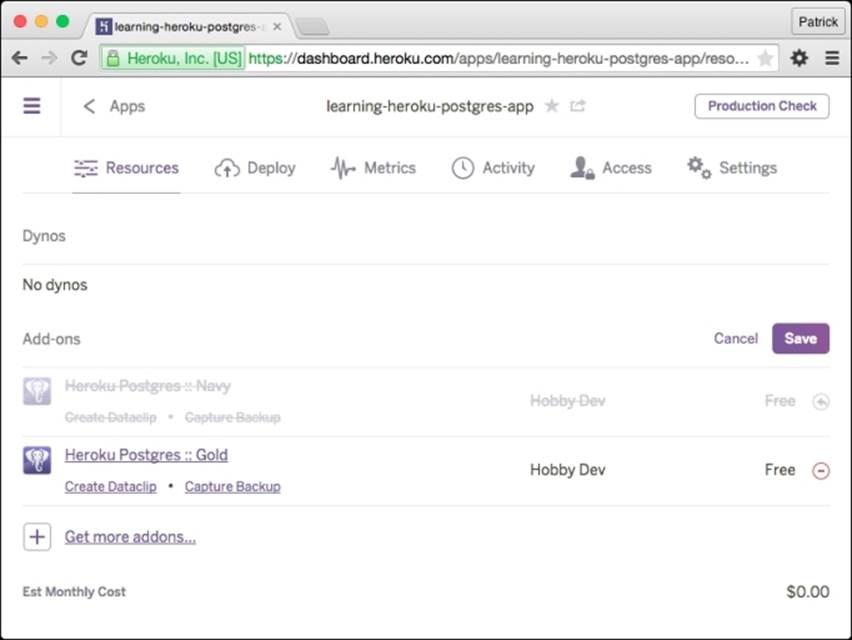
Removing the Heroku Postgres add-on
Self-test Questions
Answer true or false:
1. Does Heroku allow duplicate application names?
2. Is it possible to create an application via the Heroku Client and Heroku dashboard?
3. Is the Heroku Postgres add-on available to install the add-ons page gallery?
4. When the Heroku Postgres add-on is installed, is it necessary to manually create the first database?
5. Does the DATABASE_URL variable contain information regarding the database connection?
6. Does the Heroku Client provide commands to work with PostgreSQL?
7. Is it possible to copy the Heroku database through the heroku pg:pull command?
8. Is the heroku pg:promote command helpful to define the main database?
9. Does the Heroku Postgres add-on not allow connection with programing languages such as Java, Ruby, Python, and Node.js?
10. Does Heroku Postgres allow multiple schemas in the database?
Summary
In this chapter, you learned how to configure your local environment to work with PostgreSQL and pgAdmin. Besides that, you have also understood how to install Heroku Postgres in your application.
In addition, you have understood that the first database is created automatically when the Heroku Postgres add-on is installed in your application and there are several PostgreSQL databases as well. You also learned that the great majority of tasks can be performed in two ways: via the Heroku Client and via the Heroku dashboard.
You have also learned that Heroku Client is a very powerful tool to work with PostgreSQL; it provides a set of useful commands such as pg:info, pg:psql, pg:push, pg:pull, pg:ps, pg:kill, pg:killall, pg:promote, pg:credentials, and pg:reset.
You also looked at how to connect to your PostgreSQL database using programming and frameworks supported by Heroku, and learned how to connect to your database using pgAdmin.
Finally, you learned how to use a database that isn't hosted on Heroku application, and about monitoring, information logging, and removing the Heroku Postgres add-on.
In the next chapter, we will learn about backups, how to generate backups, and importing and exporting databases. In addition, you will also learn about data security and how to upgrade databases.
All materials on the site are licensed Creative Commons Attribution-Sharealike 3.0 Unported CC BY-SA 3.0 & GNU Free Documentation License (GFDL)
If you are the copyright holder of any material contained on our site and intend to remove it, please contact our site administrator for approval.
© 2016-2026 All site design rights belong to S.Y.A.