Hadoop MapReduce v2 Cookbook, Second Edition (2015)
Chapter 2. Cloud Deployments – Using Hadoop YARN on Cloud Environments
In this chapter, we will cover the following recipes:
· Running Hadoop MapReduce v2 computations using Amazon Elastic MapReduce
· Saving money using Amazon EC2 Spot Instances to execute EMR job flows
· Executing a Pig script using EMR
· Executing a Hive script using EMR
· Creating an Amazon EMR job flow using the AWS Command Line Interface
· Deploying an Apache HBase cluster on Amazon EC2 using EMR
· Using EMR bootstrap actions to configure VMs for the Amazon EMR jobs
· Using Apache Whirr to deploy an Apache Hadoop cluster in EC2 environment
Introduction
In this chapter, we will explore several mechanisms to deploy and execute Hadoop MapReduce v2 and other Hadoop-related computations on cloud environments.
Cloud computing environments such as Amazon EC2 and Microsoft Azure provide on-demand compute and storage resources as a service over the Web. These cloud computing environments enable us to perform occasional large-scale Hadoop computations without an upfront capital investment and require us to pay only for the actual usage. Another advantage of using cloud environments is the ability to increase the throughput of the Hadoop computations by horizontally scaling the number of computing resources with minimal additional cost. For an example, the cost for using 10 cloud instances for 100 hours equals the cost of using 100 cloud instances for 10 hours. In addition to storage, compute, and hosted MapReduce services, these cloud environments provide many other distributed computing services as well, which you may find useful when implementing your overall application architecture.
While the cloud environments provide many advantages over their traditional counterparts, they also come with several unique reliability and performance challenges due to the virtualized, multi-tenant nature of the infrastructure. With respect to the data-intensive Hadoop computations, one of the major challenges would be the transfer of large datasets in and out of the cloud environments. We also need to make sure to use a persistent storage medium to store any data that you need to preserve. Any data that is stored in the ephemeral instance storage of the cloud instances would be lost at the termination of those instances.
We will mainly be using the Amazon AWS cloud for the recipes in this chapter due to the maturity of the Linux instance support and the maturity of hosted Hadoop services compared to the other commercial cloud offerings such as Microsoft Azure cloud.
This chapter guides you on using Amazon Elastic MapReduce (EMR), which is the hosted Hadoop infrastructure, to execute traditional MapReduce computations as well as Pig and Hive computations on the Amazon EC2 infrastructure. This chapter also presents how to provision an HBase cluster using Amazon EMR and how to back up and restore the data of an EMR HBase cluster. We will also use Apache Whirr, a cloud neutral library for deploying services on cloud environments, to provision Apache Hadoop and Apache HBase clusters on cloud environments.
Tip
Sample code
The example code files for this book are available in the https://github.com/thilg/hcb-v2 repository. The chapter2 folder of the code repository contains the sample source code files for this chapter.
Running Hadoop MapReduce v2 computations using Amazon Elastic MapReduce
Amazon Elastic MapReduce (EMR) provides on-demand managed Hadoop clusters in the Amazon Web Services (AWS) cloud to perform your Hadoop MapReduce computations. EMR uses Amazon Elastic Compute Cloud (EC2) instances as the compute resources. EMR supports reading input data from Amazon Simple Storage Service (S3) and storing of the output data in Amazon S3 as well. EMR takes care of the provisioning of cloud instances, configuring the Hadoop cluster, and the execution of our MapReduce computational flows.
In this recipe, we are going to execute the WordCount MapReduce sample (the Writing a WordCount MapReduce application, bundling it, and running it using the Hadoop local mode recipe from Chapter 1, Getting Started with Hadoop v2) in the Amazon EC2 using the Amazon Elastic MapReduce service.
Getting ready
Build the hcb-c1-samples.jar file by running the Gradle build in the chapter1 folder of the sample code repository.
How to do it...
The following are the steps for executing WordCount MapReduce application on Amazon Elastic MapReduce:
1. Sign up for an AWS account by visiting http://aws.amazon.com.
2. Open the Amazon S3 monitoring console at https://console.aws.amazon.com/s3 and sign in.
3. Create an S3 bucket to upload the input data by clicking on Create Bucket. Provide a unique name for your bucket. Let's assume the name of the bucket is wc-input-data. You can find more information on creating an S3 bucket athttp://docs.amazonwebservices.com/AmazonS3/latest/gsg/CreatingABucket.html. There also exist several third-party desktop clients for the Amazon S3. You can use one of those clients to manage your data in S3 as well.
4. Upload your input data to the bucket we just created by selecting the bucket and clicking on Upload. The input data for the WordCount sample should be one or more text files:

5. Create an S3 bucket to upload the JAR file needed for our MapReduce computation. Let's assume the name of the bucket as sample-jars. Upload hcb-c1-samples.jar to the newly created bucket.
6. Create an S3 bucket to store the output data of the computation. Let's assume the name of this bucket as wc-output-data. Create another S3 bucket to store the logs of the computation. Let's assume the name of this bucket is hcb-c2-logs.
Note
Note that all the S3 users share the S3 bucket naming namespace. Hence, using the example bucket names given in this recipe might not work for you. In such scenarios, you should give your own custom names for the buckets and substitute those names in the subsequent steps of this recipe.
7. Open the Amazon EMR console at https://console.aws.amazon.com/elasticmapreduce. Click on the Create Cluster button to create a new EMR cluster. Provide a name for your cluster.
8. In the Log folder S3 location textbox, enter the path of the S3 bucket you created earlier to store the logs. Select the Enabled radio button for Debugging.
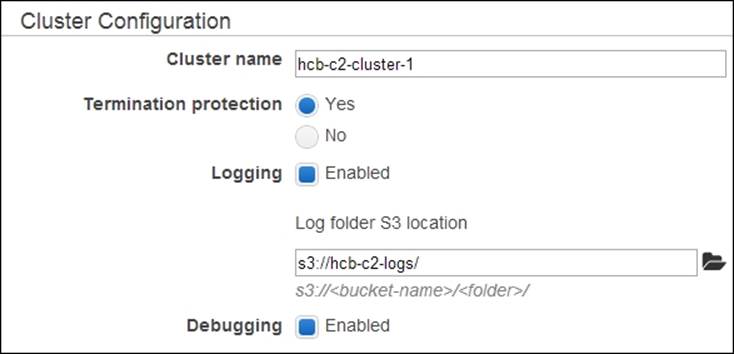
9. Select the Hadoop distribution and version in the Software Configuration section. Select AMI version 3.0.3 or above with the Amazon Hadoop distribution to deploy a Hadoop v2 cluster. Leave the default selected applications (Hive, Pig, and Hue) in theApplication to be installed section.
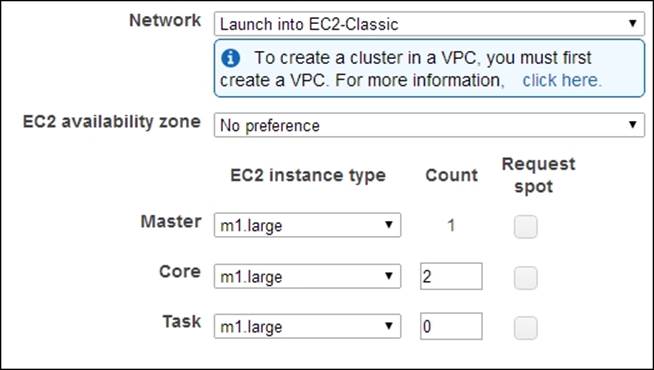
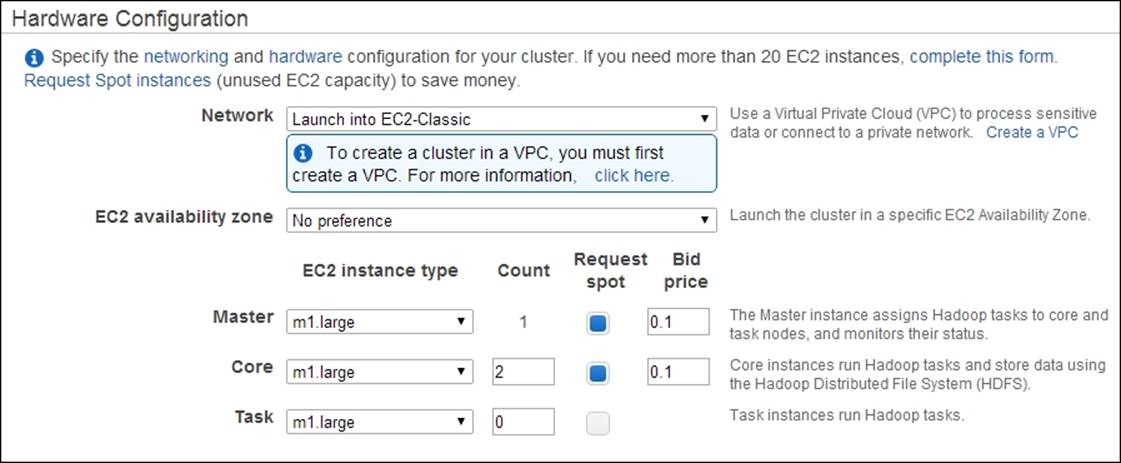
10. Select the EC2 instance types, instance counts, and the availability zone in the Hardware Configuration section. The default options use two EC2 m1.large instances for the Hadoop slave nodes and one EC2 m1.large instance for the Hadoop Master node.
11. Leave the default options in the Security and Access and Bootstrap Actions sections.
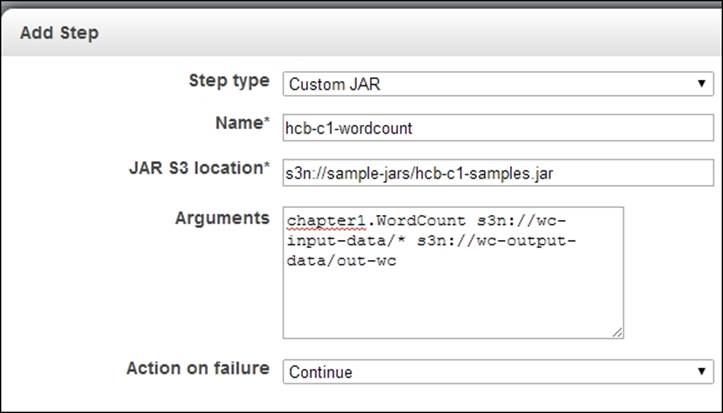
12. Select the Custom Jar option under the Add Step dropdown of the Steps section. Click on Configure and add to configure the JAR file for our computation. Specify the S3 location of hcb-c1-samples.jar in the Jar S3 location textbox. You should specify the location of the JAR in the format s3n://bucket_name/jar_name. In the Arguments textbox, type chapter1.WordCount followed by the bucket location where you uploaded the input data in step 4 and the output data bucket you created in step 6. The output path should not exist and we use a directory (for example, wc-output-data/out1) inside the output bucket you created in step 6 as the output path. You should specify the locations using the format, s3n://bucket_name/path.
13. Click on Create Cluster to launch the EMR Hadoop cluster and run the WordCount application.
Note
Amazon will charge you for the compute and storage resources you use when clicking on Create Cluster in step 13. Refer to the Saving money using Amazon EC2 Spot Instances to execute EMR job flows recipe to find out how you can save money by using Amazon EC2 Spot Instances.
Note that AWS bills you by the hour and any partial usage would get billed as an hour. Each launch and stop of an instance would be billed as a single hour, even if it takes only minutes. Be aware of the expenses when performing frequent re-launching of clusters for testing purposes.
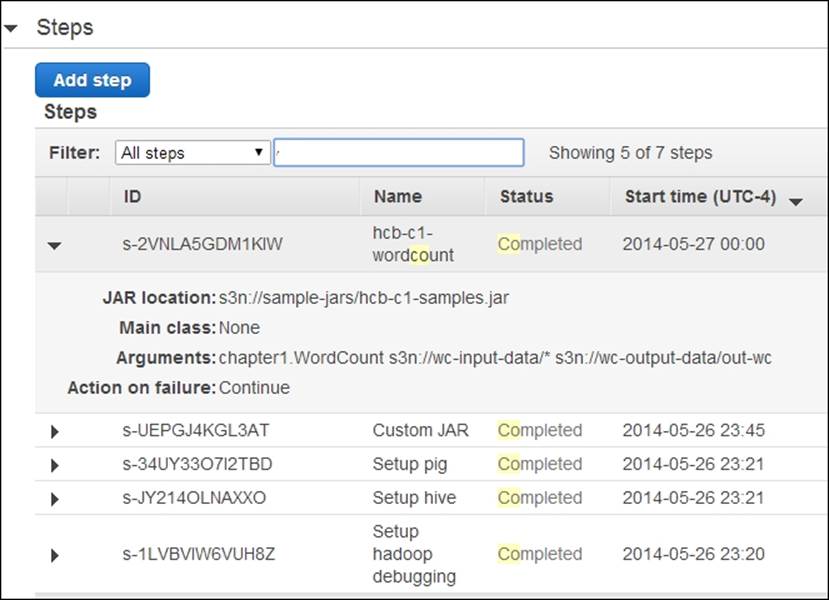
14. Monitor the progress of your MapReduce cluster deployment and the computation in the Cluster List | Cluster Details page of the Elastic MapReduce console. Expand the Steps section of the page to see the status of the individual steps of the cluster setup and the application execution. Select a step and click on View logs to view the logs and to debug the computation. Since EMR uploads the logfiles periodically, you might have to wait and refresh to access the logfiles. Check the output of the computation in the output data bucket using the AWS S3 console.
15. Terminate your cluster to avoid getting billed for the instances that are left. However, you may leave the cluster running to try out the other recipes in this chapter.
See also
· The Writing a WordCount MapReduce application, bundling it, and running it using the Hadoop local mode recipe from Chapter 1, Getting Started with Hadoop v2
· The Running the WordCount program in a distributed cluster environment recipe from Chapter 1, Getting Started with Hadoop v2
Saving money using Amazon EC2 Spot Instances to execute EMR job flows
Amazon EC2 Spot Instances allow us to purchase underutilized EC2 compute resources at a significant discount. The prices of Spot Instances change depending on the demand. We can submit bids for the Spot Instances and we receive the requested compute instances if our bid exceeds the current Spot Instance price. Amazon bills these instances based on the actual Spot Instance price, which can be lower than your bid. Amazon will terminate your instances, if the Spot Instance price exceeds your bid. However, Amazon does not charge for partial Spot Instance hours if Amazon terminated your instances. You can find more information on Amazon EC2 Spot Instances at http://aws.amazon.com/ec2/spot-instances/.
Amazon EMR supports using Spot Instances both as master as well as worker compute instances. Spot Instances are ideal to execute nontime critical computations such as batch jobs.
How to do it...
The following steps show you how to use Amazon EC2 Spot Instances with Amazon Elastic MapReduce to execute the WordCount MapReduce application:
1. Follow steps 1 to 9 of the Running Hadoop MapReduce v2 computations using Amazon Elastic MapReduce recipe.
2. Configure your EMR cluster to use Spot Instances in the Hardware Configuration section. (Refer to step 10 of the Running Hadoop MapReduce v2 computations using Amazon Elastic MapReduce recipe). In the Hardware Configuration section, select theRequest Spot checkboxes next to the instance types.
3. Specify your bid price in the Bid price textboxes. You can find the Spot Instance pricing history in the Spot Requests window of the Amazon EC2 console (https://console.aws.amazon.com/ec2).
4. Follow steps 11 to 16 of the Running Hadoop MapReduce v2 computations using Amazon Elastic MapReduce recipe.
There's more...
You can also run the EMR computations on a combination of traditional EC2 on-demand instances and EC2 Spot Instances, safe guarding your computation against possible Spot Instance terminations.
Since Amazon bills the Spot Instances using the current Spot price irrespective of your bid price, it is a good practice to not set the Spot Instance price too low to avoid the risk of frequent terminations.
See also
The Running Hadoop MapReduce v2 computations using Amazon Elastic MapReduce recipe.
Executing a Pig script using EMR
Amazon EMR supports executing Apache Pig scripts on the data stored in S3. Refer to the Pig-related recipes in Chapter 7, Hadoop Ecosystem II – Pig, HBase, Mahout, and Sqoop, for more details on using Apache Pig for data analysis.
In this recipe, we are going to execute a simple Pig script using Amazon EMR. This sample will use the Human Development Reports data (http://hdr.undp.org/en/statistics/data/) to print names of countries that have a GNI value greater than $2000 of gross national income per capita (GNI) sorted by GNI.
How to do it...
The following steps show you how to use a Pig script with Amazon Elastic MapReduce to process a dataset stored on Amazon S3:
1. Use the Amazon S3 console to create a bucket in S3 to upload the input data. Upload the resources/hdi-data.csv file in the source repository for this chapter to the newly created bucket. You can also use an existing bucket or a directory inside a bucket as well. We assume the S3 path for the uploaded file is hcb-c2-data/hdi-data.csv.
2. Review the Pig script available in the resources/countryFilter-EMR.pig file of the source repository for this chapter. This script uses the STORE command to save the result in the filesystem. In addition, we parameterize the LOAD command of the Pig script by adding $INPUT as the input file and the store command by adding $OUTPUT as the output directory. These two parameters would be substituted by the S3 input and output locations we specify in step 5.
3. A = LOAD '$INPUT' using PigStorage(',') AS
4. (id:int, country:chararray, hdi:float, lifeex:int,
5. mysch:int, eysch:int, gni:int);
6. B = FILTER A BY gni > 2000;
7. C = ORDER B BY gni;
STORE C into '$OUTPUT';
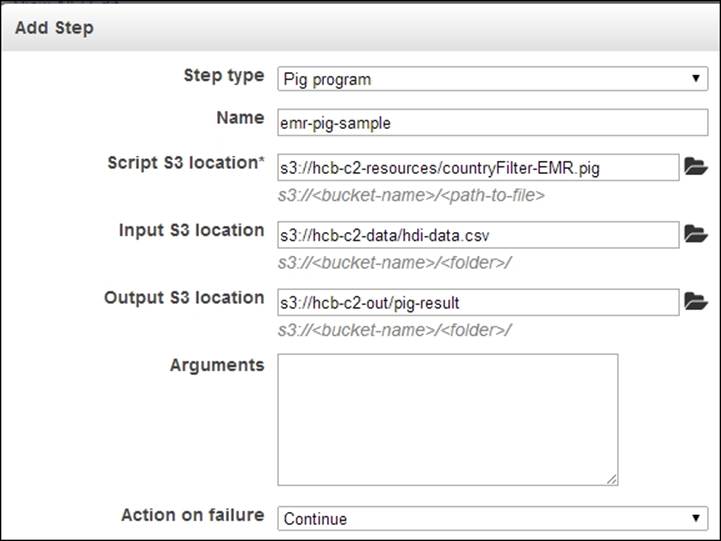
8. Use the Amazon S3 console to create a bucket in S3 to upload the Pig script. Upload the resources/countryFilter-EMR.pig script to the newly created bucket. You can also use an existing bucket or a directory inside a bucket as well. We assume the S3 path for the uploaded file as hcb-c2-resources/countryFilter-EMR.pig.
9. Open the Amazon EMR console at https://console.aws.amazon.com/elasticmapreduce. Click on the Create Cluster button to create a new EMR cluster. Provide a name for your cluster. Follow steps 8 to 11 of the Running Hadoop MapReduce v2 computations using Amazon Elastic MapReduce recipe to configure your cluster.
Note
You can reuse the EMR cluster you created in the Running Hadoop MapReduce v2 computations using Amazon Elastic MapReduce recipe to follow the steps of this recipe. To do that, use the Add Step option in the Cluster Details page of the running cluster to perform the actions mentioned in step 5.
10. Select the Pig Program option under the Add Step dropdown of the Steps section. Click on Configure and add to configure the Pig script, input, and output data for our computation. Specify the S3 location of the Pig script we uploaded in step 3, in theScript S3 location textbox. You should specify the location of the script in the format s3://bucket_name/script_filename. Specify the S3 location of the uploaded input data file in the Input S3 Location textbox. In the Output S3 Location textbox, specify an S3 location to store the output. The output path should not exist; we use a non-existing directory (for example, hcb-c2-out/pig) inside the output bucket as the output path. You should specify the locations using the format s3://bucket_name/path. Click on Add.
11. Click on Create Cluster to launch the EMR Hadoop cluster and to run the configured Pig script.
Note
Amazon will charge you for the compute and storage resources you use by clicking on Create Job Flow in step 8. Refer to the Saving money using EC2 Spot Instances to execute EMR job flows recipe that we discussed earlier to find out how you can save money by using Amazon EC2 Spot Instances.
12. Monitor the progress of your MapReduce cluster deployment and the computation in the Cluster List | Cluster Details page of the Elastic MapReduce console. Expand and refresh the Steps section of the page to see the status of the individual steps of the cluster setup and the application execution. Select a step and click on View logs to view the logs and to debug the computation. Check the output of the computation in the output data bucket using the AWS S3 console.
There's more...
Amazon EMR allows us to use Apache Pig in the interactive mode as well.
Starting a Pig interactive session
1. Open the Amazon EMR console at https://console.aws.amazon.com/elasticmapreduce. Click on the Create Cluster button to create a new EMR cluster. Provide a name for your cluster.
2. You must select a key pair from the Amazon EC2 Key Pair dropdown in the Security and Access section. If you do not have a usable Amazon EC2 key pair with access to the private key, log on to the Amazon EC2 console and create a new key pair.
3. Click on Create Cluster without specifying any steps. Make sure No is selected in the Auto-Terminate option under the Steps section.
4. Monitor the progress of your MapReduce cluster deployment and the computation in the Cluster Details page under Cluster List of the Elastic MapReduce console. Retrieve Master Public DNS from the cluster details in this page.
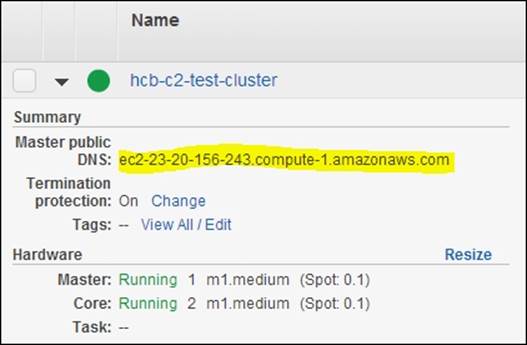
5. Use the master public DNS name and the private key file of the Amazon EC2 key pair you specified in step 2 to SSH into the master node of the cluster:
6. $ ssh -i <path-to-the-key-file> hadoop@<master-public-DNS>
7. Start the Pig interactive Grunt shell in the master node and issue your Pig commands:
8. $ pig
9. .........
10.grunt>
Executing a Hive script using EMR
Hive provides a SQL-like query layer for the data stored in HDFS utilizing Hadoop MapReduce underneath. Amazon EMR supports executing Hive queries on the data stored in S3. Refer to the Apache Hive recipes in Chapter 6, Hadoop Ecosystem – Apache Hive, for more information on using Hive for large-scale data analysis.
In this recipe, we are going to execute a Hive script to perform the computation we did in the Executing a Pig script using EMR recipe earlier. We will use the Human Development Reports data (http://hdr.undp.org/en/statistics/data/) to print names of countries that have a GNI value greater than $2000 of gross national income per capita (GNI) sorted by GNI.
How to do it...
The following steps show how to use a Hive script with Amazon Elastic MapReduce to query a dataset stored on Amazon S3:
1. Use the Amazon S3 console to create a bucket in S3 to upload the input data. Create a directory inside the bucket. Upload the resources/hdi-data.csv file in the source package of this chapter to the newly created directory inside the bucket. You can also use an existing bucket or a directory inside a bucket as well. We assume the S3 path for the uploaded file is hcb-c2-data/data/hdi-data.csv.
2. Review the Hive script available in the resources/countryFilter-EMR.hql file of the source repository for this chapter. This script first creates a mapping of the input data to a Hive table. Then we create a Hive table to store the results of our query. Finally, we issue a query to select the list of countries with a GNI larger than $2000. We use the $INPUT and $OUTPUT variables to specify the location of the input data and the location to store the output table data.
3. CREATE EXTERNAL TABLE
4. hdi(
5. id INT,
6. country STRING,
7. hdi FLOAT,
8. lifeex INT,
9. mysch INT,
10. eysch INT,
11. gni INT)
12.ROW FORMAT DELIMITED
13.FIELDS TERMINATED BY ','
14.STORED AS TEXTFILE
15.LOCATION '${INPUT}';
16.
17.CREATE EXTERNAL TABLE
18.output_countries(
19. country STRING,
20. gni INT)
21. ROW FORMAT DELIMITED
22. FIELDS TERMINATED BY ','
23. STORED AS TEXTFILE
24. LOCATION '${OUTPUT}';
25.
26.INSERT OVERWRITE TABLE
27.output_countries
28. SELECT
29. country, gni
30. FROM
31. hdi
32. WHERE
gni > 2000;
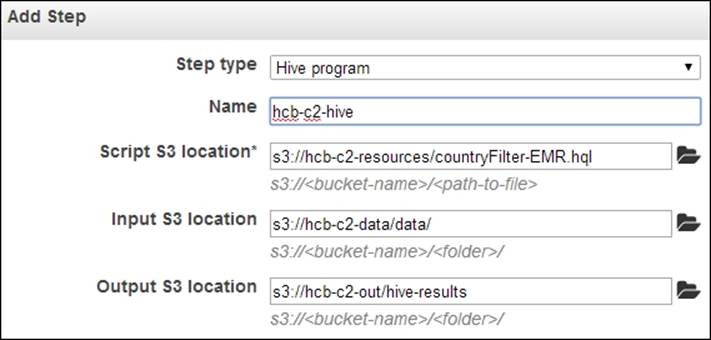
33. Use the Amazon S3 console to create a bucket in S3 to upload the Hive script. Upload the resources/countryFilter-EMR.hql script to the newly created bucket. You can also use an existing bucket or a directory inside a bucket as well. We assume the S3 path for the uploaded file is hcb-resources/countryFilter-EMR.hql.
34. Open the Amazon EMR console at https://console.aws.amazon.com/elasticmapreduce. Click on the Create Cluster button to create a new EMR cluster. Provide a name for your cluster. Follow steps 8 to 11 of the Running Hadoop MapReduce v2 computations using Amazon Elastic MapReduce recipe to configure your cluster.
Note
You can reuse an EMR cluster you created for one of the earlier recipes to follow the steps of this recipe. To do that, use the Add Step option in the Cluster Details page of the running cluster to perform the actions mentioned in step 5.
35. Select the Hive Program option under the Add Step dropdown of the Steps section. Click on Configure and add to configure the Hive script, and input and output data for our computation. Specify the S3 location of the Hive script we uploaded in step 3 in the Script S3 location textbox. You should specify the location of the script in the format s3://bucket_name/script_filename. Specify the S3 location of the uploaded input data directory in the Input S3 Location textbox. In the Output S3 Location textbox, specify an S3 location to store the output. The output path should not exist and we use a nonexisting directory (for example, hcb-c2-out/hive) inside the output bucket as the output path. You should specify the locations using the format s3://bucket_name/path. Click on Add.
36. Click on Create Cluster to launch the EMR Hadoop cluster and to run the configured Hive script.
Note
Amazon will charge you for the compute and storage resources you use by clicking on Create Job Flow in step 8. Refer to the Saving money using Amazon EC2 Spot Instances to execute EMR job flows to execute EMR job flows recipe that we discussed earlier to find out how you can save money by using Amazon EC2 Spot Instances.
37. Monitor the progress of your MapReduce cluster deployment and the computation in the Cluster Details page under Cluster List of the Elastic MapReduce console. Expand and refresh the Steps section of the page to see the status of the individual steps of the cluster setup and the application execution. Select a step and click on View logs to view the logs and to debug the computation. Check the output of the computation in the output data bucket using the AWS S3 console.
There's more...
Amazon EMR also allows us to use the Hive shell in the interactive mode as well.
Starting a Hive interactive session
Follow steps 1 to 5 of the Starting a Pig interactive session section of the previous Executing a Pig script using EMR recipe to create a cluster and to log in to it using SSH.
Start the Hive shell in the master node and issue your Hive queries:
$ hive
hive >
.........
See also
The Simple SQL-style data querying using Apache Hive recipe of Chapter 6, Hadoop Ecosystem – Apache Hive.
Creating an Amazon EMR job flow using the AWS Command Line Interface
AWS Command Line Interface (CLI) is a tool that allows us to manage our AWS services from the command line. In this recipe, we use AWS CLI to manage Amazon EMR services.
This recipe creates an EMR job flow using the AWS CLI to execute the WordCount sample from the Running Hadoop MapReduce computations using Amazon Elastic MapReduce recipe of this chapter.
Getting ready
The following are the prerequisites to get started with this recipe:
· Python 2.6.3 or higher
· pip—Python package management system
How to do it...
The following steps show you how to create an EMR job flow using the EMR command-line interface:
1. Install AWS CLI in your machine using the pip installer:
2. $ sudo pip install awscli
Note
Refer to http://docs.aws.amazon.com/cli/latest/userguide/installing.html for more information on installing the AWS CLI. This guide provides instructions on installing AWS CLI without sudo as well as instructions on installing AWS CLI using alternate methods.
3. Create an access key ID and a secret access key by logging in to the AWS IAM console (https://console.aws.amazon.com/iam). Download and save the key file in a safe location.
4. Use the aws configure utility to configure your AWS account to the AWC CLI. Provide the access key ID and the secret access key you obtained in the previous step. This information would get stored in the .aws/config and .aws/credentials files in your home directory.
5. $ aws configure
6. AWS Access Key ID [None]: AKIA….
7. AWS Secret Access Key [None]: GC…
8. Default region name [None]: us-east-1a
9. Default output format [None]:
Tip
You can skip to step 7 if you have completed steps 2 to 6 of the Running Hadoop MapReduce computations using Amazon Elastic MapReduce recipe in this chapter.
10. Create a bucket to upload the input data by clicking on Create Bucket in the Amazon S3 monitoring console (https://console.aws.amazon.com/s3). Provide a unique name for your bucket. Upload your input data to the newly-created bucket by selecting the bucket and clicking on Upload. The input data for the WordCount sample should be one or more text files.
11. Create an S3 bucket to upload the JAR file needed for our MapReduce computation. Upload hcb-c1-samples.jar to the newly created bucket.
12. Create an S3 bucket to store the output data of the computation. Create another S3 bucket to store the logs of the computation. Let's assume the name of this bucket is hcb-c2-logs.
13. Create an EMR cluster by executing the following command. This command will output the cluster ID of the created EMR cluster:
14.$ aws emr create-cluster --ami-version 3.1.0 \
15.--log-uri s3://hcb-c2-logs \
16.--instance-groups \
17.InstanceGroupType=MASTER,InstanceCount=1,\
18.InstanceType=m3.xlarge \
19.InstanceGroupType=CORE,InstanceCount=2,\
20.InstanceType=m3.xlarge
21.{
22. “ClusterId”: “j-2X9TDN6T041ZZ”
23.}
24. You can use the list-clusters command to check the status of the created EMR cluster:
25.$ aws emr list-clusters
26.{
27. “Clusters”: [
28. {
29. “Status”: {
30. “Timeline”: {
31. “ReadyDateTime”: 1421128629.1830001,
32. “CreationDateTime”: 1421128354.4130001
33. },
34. “State”: “WAITING”,
35. “StateChangeReason”: {
36. “Message”: “Waiting after step completed”
37. }
38. },
39. “NormalizedInstanceHours”: 24,
40. “Id”: “j-2X9TDN6T041ZZ”,
41. “Name”: “Development Cluster”
42. }
43. ]
44.}
45. Add a job step to this EMR cluster by executing the following. Replace the paths of the JAR file, input data location, and the output data location with the locations you used in steps 5, 6, and 7. Replace cluster-id with the cluster ID of your newly created EMR cluster.
46.$ aws emr add-steps \
47.--cluster-id j-2X9TDN6T041ZZ \
48.--steps Type=CUSTOM_JAR,Name=CustomJAR,ActionOnFailure=CONTINUE,\
49.Jar=s3n://[S3 jar file bucket]/hcb-c1-samples.jar,\
50.Args=chapter1.WordCount,\
51.s3n://[S3 input data path]/*,\
52.s3n://[S3 output data path]/wc-out
53.{
54. “StepIds”: [
55. “s-1SEEPDZ99H3Y2”
56. ]
57.}
58. Check the status of the submitted job step using the describe-step command as follows. You can also check the status and debug your job flow using the Amazon EMR console (https://console.aws.amazon.com/elasticmapreduce).
59.$ aws emr describe-step \
60.–cluster-id j-2X9TDN6T041ZZ \
61.–step-id s-1SEEPDZ99H3Y2
62. Once the job flow is completed, check the result of the computation in the output data location using the S3 console.
63. Terminate the cluster using the terminate-clusters command:
64.$ aws emr terminate-clusters --cluster-ids j-2X9TDN6T041ZZ
There's more...
You can use EC2 Spot Instances with your EMR clusters to reduce the cost of your computations. Add a bid price to your request by adding the --BidPrice parameter to the instance groups of your create-cluster command:
$ aws emr create-cluster --ami-version 3.1.0 \
--log-uri s3://hcb-c2-logs \
--instance-groups \
InstanceGroupType=MASTER,InstanceCount=1,\
InstanceType=m3.xlarge,BidPrice=0.10 \
InstanceGroupType=CORE,InstanceCount=2,\
InstanceType=m3.xlarge,BidPrice=0.10
Refer to the Saving money using Amazon EC2 Spot Instances to execute EMR job flows recipe in this chapter for more details on Amazon Spot Instances.
See also
· The Running Hadoop MapReduce computations using Amazon Elastic MapReduce recipe of this chapter
· You can find the reference documentation for the EMR section of the AWS CLI at http://docs.aws.amazon.com/cli/latest/reference/emr/index.html
Deploying an Apache HBase cluster on Amazon EC2 using EMR
We can use Amazon Elastic MapReduce to start an Apache HBase cluster on the Amazon infrastructure to store large quantities of data in a column-oriented data store. We can use the data stored on Amazon EMR HBase clusters as input and output of EMR MapReduce computations as well. We can incrementally back up the data stored in Amazon EMR HBase clusters to Amazon S3 for data persistence. We can also start an EMR HBase cluster by restoring the data from a previous S3 backup.
In this recipe, we start an Apache HBase cluster on Amazon EC2 using Amazon EMR; perform several simple operations on the newly created HBase cluster and back up the HBase data into Amazon S3 before shutting down the cluster. Then we start a new HBase cluster restoring the HBase data backups from the original HBase cluster.
Getting ready
You should have the AWS CLI installed and configured to manually back up HBase data. Refer to the Creating an Amazon EMR job flow using the AWS Command Line Interface recipe in this chapter for more information on installing and configuring the AWS CLI.
How to do it...
The following steps show how to deploy an Apache HBase cluster on Amazon EC2 using Amazon EMR:
1. Create an S3 bucket to store the HBase backups. We assume the S3 bucket for the HBase data backups is hcb-c2-data.
2. Open the Amazon EMR console at https://console.aws.amazon.com/elasticmapreduce. Click on the Create Cluster button to create a new EMR cluster. Provide a name for your cluster.
3. Provide a path in Log folder S3 location and select an AMI version with Hadoop v2 (for example, AMI version 3.1.0 with Hadoop 2.4.0).
4. Select HBase from the Additional Applications drop-down box under the Applications to be installed section. Click on Configure and add.
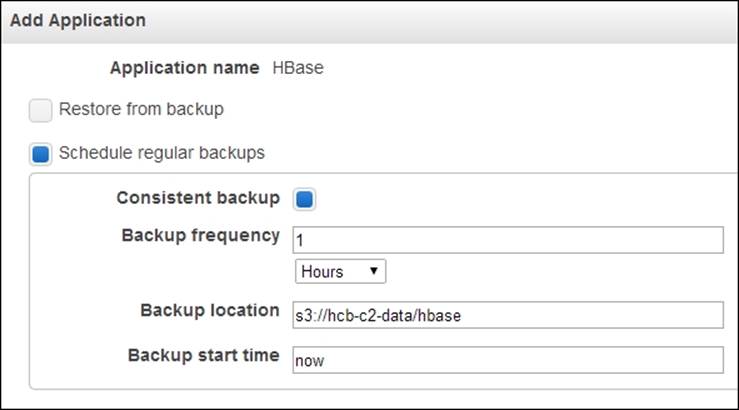
5. Make sure the Restore from backup radio button is not selected. Select the Schedule regular backups and Consistent Backup radio buttons. Specify a Backup frequency for automatic scheduled incremental data backups and provide a path inside the Blob we created in step 1 as the backup location. Click on Continue.
6. Configure the EC2 instances under the Hardware Configuration section.
7. Select a key pair in the Amazon EC2 Key Pair drop-down box. Make sure you have the private key for the selected EC2 key pair downloaded on your computer.
Note
If you do not have a usable key pair, go to the EC2 console (https://console.aws.amazon.com/ec2) to create a key pair. To create a key pair, log in to the EC2 dashboard, select a region, and click on Key Pairs under the Network and Security menu. Click on the Create Key Pair button in the Key Pairs window and provide a name for the new key pair. Download and save the private key file (in the PEM format) in a safe location.
8. Click on the Create Cluster button to deploy the EMR HBase cluster.
Note
Amazon will charge you for the compute and storage resources you use by clicking on Create Cluster in the preceding step. Refer to the Saving money using Amazon EC2 Spot Instances to execute EMR job flows recipe that we discussed earlier to find out how you can save money by using Amazon EC2 Spot Instances.
The following steps will show you how to connect to the master node of the deployed HBase cluster to start the HBase shell:
1. Go to the Amazon EMR console (https://console.aws.amazon.com/elasticmapreduce). Select the Cluster details for the HBase cluster to view more information about the cluster. Retrieve Master Public DNS Name from the information pane.
2. Use the master public DNS name and the EC2 PEM-based key (selected in step 4) to connect to the master node of the HBase cluster:
3. $ ssh -i ec2.pem hadoop@ec2-184-72-138-2.compute-1.amazonaws.com
4. Start the HBase shell using the hbase shell command. Create a table named 'test' in your HBase installation and insert a sample entry to the table using the put command. Use the scan command to view the contents of the table.
5. $ hbase shell
6. .........
7.
8. hbase(main):001:0> create 'test','cf'
9. 0 row(s) in 2.5800 seconds
10.
11.hbase(main):002:0> put 'test','row1','cf:a','value1'
12.0 row(s) in 0.1570 seconds
13.
14.hbase(main):003:0> scan 'test'
15.ROW COLUMN+CELL
16. row1 column=cf:a, timestamp=1347261400477, value=value1
17.1 row(s) in 0.0440 seconds
18.
19.hbase(main):004:0> quit
The following step will back up the data stored in an Amazon EMR HBase cluster.
20. Execute the following command using the AWS CLI to schedule a periodic backup of the data stored in an EMR HBase cluster. Retrieve the cluster ID (for example, j-FDMXCBZP9P85) from the EMR console. Replace the <cluster_id> using the retrieved job flow name. Change the backup directory path (s3://hcb-c2-data/hbase-backup) according to your backup data Blob. Wait for several minutes for the backup to be performed.
21.$ aws emr schedule-hbase-backup --cluster-id <cluster_id> \
22. --type full –dir s3://hcb-c2-data/hbase-backup \
23.--interval 1 --unit hours
24. Go to the Cluster Details page in the EMR console and click on Terminate.
Now, we will start a new Amazon EMR HBase cluster by restoring data from a backup:
25. Create a new job flow by clicking on the Create Cluster button in the EMR console. Provide a name for your cluster. Provide a path in Log folder S3 location and select an AMI version with Hadoop v2 (for example, AMI version 3.1.0 with Hadoop 2.4.0).
26. Select HBase from the Additional Applications drop-down box under the Applications to be installed section. Click on Configure and add.
27. Configure the EMR HBase cluster to restore data from the previous data backup. Select the Restore from Backup option and provide the backup directory path you used in step 9 in the Backup Location textbox. You can leave the backup version textbox empty and the EMR would restore the latest backup. Click on Continue.
28. Repeat steps 4, 5, 6, and 7.
29. Start the HBase shell by logging in to? the master node of the new HBase cluster. Use the list command to list the set tables in HBase and the scan 'test' command to view the contents of the 'test' table.
30.$ hbase shell
31..........
32.
33.hbase(main):001:0> list
34.TABLE
35.test
36.1 row(s) in 1.4870 seconds
37.
38.hbase(main):002:0> scan 'test'
39.ROW COLUMN+CELL
40. row1 column=cf:a, timestamp=1347318118294, value=value1
41.1 row(s) in 0.2030 seconds
42. Terminate your cluster using the EMR console by going to the Cluster Details page and clicking on the Terminate button.
See also
The HBase-related recipes in Chapter 7, Hadoop Ecosystem II – Pig, HBase, Mahout, and Sqoop.
Using EMR bootstrap actions to configure VMs for the Amazon EMR jobs
EMR bootstrap actions provide us a mechanism to configure the EC2 instances before running our MapReduce computations. Examples of bootstrap actions include providing custom configurations for Hadoop, installing any dependent software, distributing a common dataset, and so on. Amazon provides a set of predefined bootstrap actions as well as allowing us to write our own custom bootstrap actions. EMR runs the bootstrap actions in each instance before Hadoop cluster services are started.
In this recipe, we are going to use a stop words list to filter out the common words from our WordCount sample. We download the stop words list to the workers using a custom bootstrap action.
How to do it...
The following steps show you how to download a file to all the EC2 instances of an EMR computation using a bootstrap script:
1. Save the following script to a file named download-stopwords.sh. Upload the file to a Blob container in the Amazon S3. This custom bootstrap file downloads a stop words list to each instance and copies it to a pre-designated directory inside the instance.
2. #!/bin/bash
3. set -e
4. wget http://www.textfixer.com/resources/common-english-words-with-contractions.txt
5. mkdir –p /home/hadoop/stopwords
6. mv common-english-words-with-contractions.txt /home/hadoop/stopwords
7. Complete steps 1 to 10 of the Running Hadoop MapReduce computations using Amazon Elastic MapReduce recipe in this chapter.
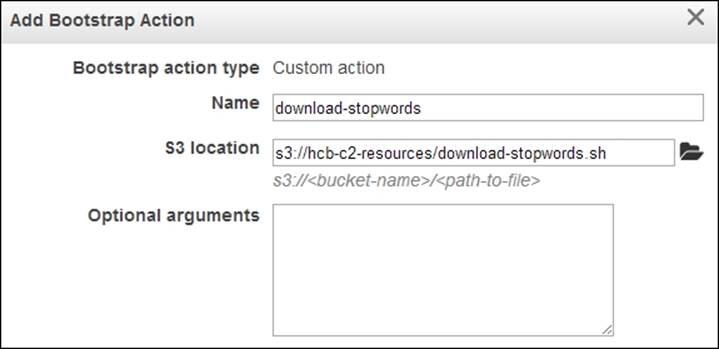
8. Select the Add Bootstrap Actions option in the Bootstrap Actions tab. Select Custom Action in the Add Bootstrap Actions drop-down box. Click on Configure and add. Give a name to your action in the Name textbox and provide the S3 path of the location where you uploaded the download-stopwords.sh file in the S3 location textbox. Click on Add.
9. Add Steps if needed.
10. Click on the Create Cluster button to launch instances and to deploy the MapReduce cluster.
11. Click on Refresh in the EMR console and go to your Cluster Details page to view the details of the cluster.
There's more...
Amazon provides us with the following predefined bootstrap actions:
· configure-daemons: This allows us to set Java Virtual Machine (JVM) options for the Hadoop daemons, such as the heap size and garbage collection behavior.
· configure-hadoop: This allows us to modify the Hadoop configuration settings. Either we can upload a Hadoop configuration XML or we can specify individual configuration options as key-value pairs.
· memory-intensive: This allows us to configure the Hadoop cluster for memory-intensive workloads.
· run-if: This allows us to run bootstrap actions based on a property of an instance. This action can be used in scenarios where we want to run a command only in the Hadoop master node.
You can also create shutdown actions by writing scripts to a designated directory in the instance. Shutdown actions are executed after the job flow is terminated.
Refer to http://docs.amazonwebservices.com/ElasticMapReduce/latest/DeveloperGuide/Bootstrap.html for more information.
Using Apache Whirr to deploy an Apache Hadoop cluster in a cloud environment
Apache Whirr provides a set of cloud-vendor-neutral set of libraries to provision services on the cloud resources. Apache Whirr supports the provisioning, installing, and configuring of Hadoop clusters in several cloud environments. In addition to Hadoop, Apache Whirr also supports the provisioning of Apache Cassandra, Apache ZooKeeper, Apache HBase, Voldemort (key-value storage), and Apache Hama clusters on the cloud environments.
Note
The installation programs of several commercial Hadoop distributions, such as Hortonworks HDP and Cloudera CDH, now support installation and configuration of those distributions on Amazon EC2 instances. These commercial-distribution-based installations would provide you with a more feature-rich Hadoop cluster on the cloud than using Apache Whirr.
In this recipe, we are going to start a Hadoop cluster on Amazon EC2 using Apache Whirr and run the WordCount MapReduce sample (the Writing a WordCount MapReduce application, bundling it, and running it using the Hadoop local mode recipe from Chapter 1, Getting Started with Hadoop v2) program on that cluster.
How to do it...
The following are the steps to deploy a Hadoop cluster on Amazon EC2 using Apache Whirr and to execute the WordCount MapReduce sample on the deployed cluster:
1. Download and unzip the Apache Whirr binary distribution from http://whirr.apache.org/. You may be able to install Whirr through your Hadoop distribution as well.
2. Run the following command from the extracted directory to verify your Whirr installation:
3. $ whirr version
4. Apache Whirr 0.8.2
5. jclouds 1.5.8
6. Export your AWS access keys to the AWS_ACCESS_KEY_ID and AWS_SECRET_ACCESS_KEY environment parameters:
7. $ export AWS_ACCESS_KEY_ID=AKIA…
8. $ export AWS_SECRET_ACCESS_KEY=…
9. Generate an rsa key pair using the following command. This key pair is not the same as your AWS key pair.
10.$ssh-keygen -t rsa -P ''
11. Locate the file named recipes/hadoop-yarn-ec2.properties in your Apache Whirr installation. Copy it to your working directory. Change the whirr.hadoop.version property to match a current Hadoop version (for example, 2.5.2) available in the Apache Hadoop downloads page.
12. If you provided a custom name for your key-pair in the previous step, change the whirr.private-key-file and the whirr.public-key-file property values in the hadoop-yarn-ec2.properties file to the paths of the private key and the public key you generated.
Tip
The whirr.aws-ec2-spot-price property is an optional property that allows us to use cheaper EC2 Spot Instances. You can delete that property to use EC2 traditional on-demand instances.
13. Execute the following command pointing to your hadoop-yarn-ec2.properties file to launch your Hadoop cluster on EC2. After the successful cluster creation, this command outputs an SSH command that we can use to log in to the EC2 Hadoop cluster.
14.$bin/whirr launch-cluster --config hadoop-yarn-ec2.properties
15. The traffic from the outside to the provisioned EC2 Hadoop cluster is routed through the master node. Whirr generates a script that we can use to start this proxy, under a subdirectory named after your Hadoop cluster inside the ~/.whirr directory. Run this in a new terminal. It will take a few minutes for Whirr to start the cluster and to generate this script.
16.$cd ~/.whirr/Hadoop-yarn/
17.$hadoop-proxy.sh
18. You can open the Hadoop web-based monitoring console in your local machine by configuring this proxy in your web browser.
19. Whirr generates a hadoop-site.xml file for your cluster in the ~/.whirr/<your cluster name> directory. You can use it to issue Hadoop commands from your local machine to your Hadoop cluster on EC2. Export the path of the generated hadoop-site.xml to an environmental variable named HADOOP_CONF_DIR. Copy the hadoop-site.xml file in this directory to another file named core-site.xml. To execute the Hadoop commands, you should have Hadoop v2 binaries installed in your machine.
20.$ cp ~/.whirr/hadoop-yarn/hadoop-site.xml ~/.whirr/hadoop-yarn/core-site.xml
21.$ export HADOOP_CONF_DIR=~/.whirr/hadoop-yarn/
22.$ hdfs dfs -ls /
23. Create a directory named wc-input-data in HDFS and upload a text dataset to that directory. Depending on the version of Whirr, you may have to create your home directory first.
24.$ hdfs dfs –mkdir /user/<user_name>
25.$ hdfs dfs -mkdir wc-input-data
26.$ hdfs dfs -put sample.txt wc-input-data
27. In this step, we run the Hadoop WordCount sample in the Hadoop cluster we started in Amazon EC2:
28.$ hadoop jar hcb-c1-samples.jar chapter1.WordCount \
29.wc-input-data wc-out
30. View the results of the WordCount computation by executing the following commands:
31.$hadoop fs -ls wc-out
32.Found 3 items
33.-rw-r--r-- 3 thilina supergroup 0 2012-09-05 15:40 /user/thilina/wc-out/_SUCCESS
34.drwxrwxrwx - thilina supergroup 0 2012-09-05 15:39 /user/thilina/wc-out/_logs
35.-rw-r--r-- 3 thilina supergroup 19908 2012-09-05 15:40 /user/thilina/wc-out/part-r-00000
36.
37.$ hadoop fs -cat wc-out/part-* | more
38. Issue the following command to shut down the Hadoop cluster. Make sure to download any important data before shutting down the cluster, as the data will be permanently lost after shutting down the cluster.
39.$bin/whirr destroy-cluster --config hadoop.properties
How it works...
The following are the descriptions of the properties we used in the hadoop.properties file.
whirr.cluster-name=Hadoop-yarn
The preceding property provides a name for the cluster. The instances of the cluster will be tagged using this name.
whirr.instance-templates=1 hadoop-namenode+yarn-resource-manager+mapreduce-historyserver, 1 hadoop-datanode+yarn-nodemanager
This property specifies the number of instances to be used for each set of roles and the type of roles for the instances.
whirr.provider=aws-ec2
We use the Whirr Amazon EC2 provider to provision our cluster.
whirr.private-key-file=${sys:user.home}/.ssh/id_rsa
whirr.public-key-file=${sys:user.home}/.ssh/id_rsa.pub
Both the properties mentioned earlier point to the paths of the private key and the public key you provide for the cluster.
whirr.hadoop.version=2.5.2
We specify a custom Hadoop version using the preceding property.
whirr.aws-ec2-spot-price=0.15
This property specifies a bid price for the Amazon EC2 Spot Instances. Specifying this property triggers Whirr to use EC2 Spot Instances for the cluster. If the bid price is not met, Apache Whirr Spot Instance requests a time out after 20 minutes. Refer to the Saving money using Amazon EC2 Spot Instances to execute EMR job flows recipe for more details.
More details on Whirr configuration can be found at http://whirr.apache.org/docs/0.8.1/configuration-guide.html.
See also
The Saving money using Amazon EC2 Spot Instances to execute EMR job flows recipe.
All materials on the site are licensed Creative Commons Attribution-Sharealike 3.0 Unported CC BY-SA 3.0 & GNU Free Documentation License (GFDL)
If you are the copyright holder of any material contained on our site and intend to remove it, please contact our site administrator for approval.
© 2016-2026 All site design rights belong to S.Y.A.