Beginning Oracle SQL: For Oracle Database 12c, Third Edition (2014)
Chapter 11. SQL*Plus Basics and Scripting
Chapter 2 introduced SQL Developer. In this chapter, we introduce SQL*Plus.
![]() Note SQL*Plus is the oldest Oracle tool still available. It was renamed from UFI (User Friendly Interface) in version 4 to SQL*Plus in Version 5 in the mid 1980s.
Note SQL*Plus is the oldest Oracle tool still available. It was renamed from UFI (User Friendly Interface) in version 4 to SQL*Plus in Version 5 in the mid 1980s.
This chapter also covers some more advanced features of SQL*Plus for reporting, as well as some advanced uses of SQL*Plus for creating scripts for automation. Knowing how to use SQL*Plus and its features will enhance your SQL writing skills, thus increasing your satisfaction and productivity.
Section 11.1 introduces the SQL*Plus tool and the most essential commands required to get started with SQL, such as the SQL*Plus editor commands (LIST, INPUT, CHANGE, APPEND, DEL, and EDIT), file management (SAVE, GET, START, and SPOOL), and other commands (HOST, DESCRIBE, and HELP).
Section 11.2 introduces various variable types supported by SQL*Plus: substitution variables, user variables, and system variables. When dealing with SQL*Plus variables, the most important commands are SET, SHOW, DEFINE, and ACCEPT.
Section 11.3 explains SQL bind variables. These bind variables are crucial when developing mission-critical database applications if high performance and scalability are important goals.
Section 11.4 introduces the concept of SQL*Plus scripts, how they are created, how they are edited, and how they are executed.
In the previous chapters, the examples illustrate how to use SQL*Plus in an interactive way—you enter the commands, press the Enter key, and wait for the results to appear on your screen. Section 11.4 shows that you can also use SQL*Plus to make program modules by using script files, or simply to store something useful for repeated use.
In Section 11.5, you will see how you can use SQL*Plus as a reporting tool by enhancing the layout of the results with SQL*Plus commands such as the TTITLE, BTITLE, COLUMN, BREAK, and COMPUTE commands. You’ll also learn how to use SQL*Plus as a batch programmingenvironment for both retrieving information from the calling environment and passing information back.
Section 11.6 focuses on various ways you can use SQL*Plus as a database tool in an HTML (browser) environment.
Section 11.7 returns to the topic of SQL*Plus scripts, showing how a script can accept parameters from a calling program, handle error conditions, pass data from one SQL statement to another, and finally return an appropriate exit status to the calling program. This is useful for automating any special operations that your application or database requires.
![]() Note For obvious reasons, listings in this chapter are all taken directly from SQL*Plus. They show the typical artifacts such as command prompts and substitution prompts that you’ll encounter during a SQL*Plus session.
Note For obvious reasons, listings in this chapter are all taken directly from SQL*Plus. They show the typical artifacts such as command prompts and substitution prompts that you’ll encounter during a SQL*Plus session.
11.1 Introduction to SQL*Plus
SQL*Plus is a tool used to enter SQL commands and display the output. It is provided with every Oracle installation, whether on Windows, Unix, or Linux. It is a command line interface and supports editing, user input, and report formatting.
![]() Note In 11g, SQL*Plus for Windows (sqlplusw.exe) is no longer part of the client or database install. The command line version (sqlplus.exe) is still available. You can use an older version of SQL*Plus for Windows to connect to an 11g database, but some functionality may not be supported. SQL Developer, covered in Chapter 2, is a GUI interface that is shipped with 11g and should be considered the replacement for SQL*Plus for Windows.
Note In 11g, SQL*Plus for Windows (sqlplusw.exe) is no longer part of the client or database install. The command line version (sqlplus.exe) is still available. You can use an older version of SQL*Plus for Windows to connect to an 11g database, but some functionality may not be supported. SQL Developer, covered in Chapter 2, is a GUI interface that is shipped with 11g and should be considered the replacement for SQL*Plus for Windows.
To start SQL*Plus, simply type ‘sqlplus’ at the command prompt or after starting a DOS command session in Windows. Under normal circumstances, SQL*Plus prompts you for a username and corresponding password. If you are able to provide a valid username/password combination, the SQL> prompt appears on your screen to indicate that you have successfully established a session.
You can also start SQL*Plus with the username and password at the command line, as shown in Figure 11-1. In this case, if the username/password are valid, the SQL> prompt will appear. If not, you will be asked to enter a valid username and password.
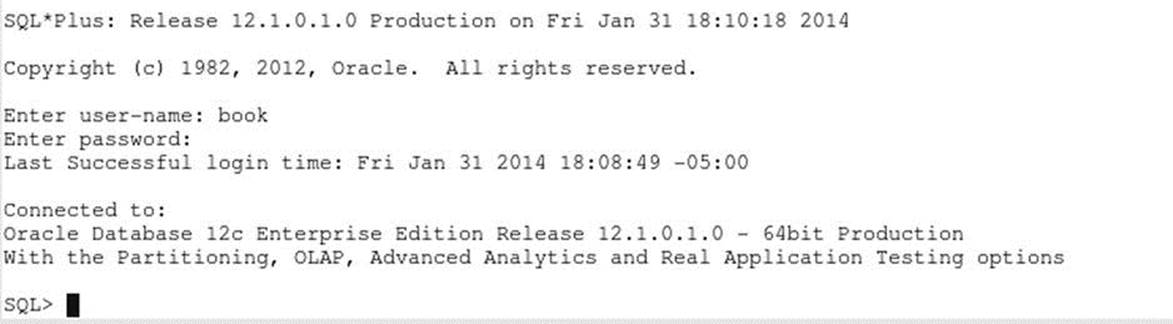
Figure 11-1. SQL*Plus screen after a successful connection using the username/password at the command line
You can leave SQL*Plus with the commands EXIT or QUIT.
Entering Commands
SQL*Plus not only “understands” the SQL language, but it also supports and recognizes several tool-specific SQL*Plus commands. You must make sure to distinguish these SQL*Plus commands from SQL commands, because SQL*Plus treats these two command types differently, as you will see.
Let’s start by entering an arbitrary (and rather simple) SQL command in SQL*Plus, as shown in Listing 11-1.
Listing 11-1. A Basic SQL SELECT Command
SQL> select *
2 from employees;
Notice that SQL commands are often spread over multiple lines and, by default, SQL*Plus automatically displays line numbers during SQL command entry. If your SQL command is fully entered and you want SQL*Plus to execute it for you, you should finish the last line with asemicolon (;) as a delimiter. If you forget the semicolon (this will probably happen quite often, initially), you can still enter that semicolon on the next (empty) line, as shown here:
SQL> select *
2 from employees
3 ;
Either way, the command will execute. SQL*Plus will return all columns and all rows of the EMPLOYEES table, since the asterisk character (*) is used to denote your desire to show all columns of this table.
EMPNO ENAME INIT JOB MGR BDATE MSAL COMM DEPTNO
----- -------- ----- -------- ----- --------- ----- ----- ------
7369 SMITH N TRAINER 7902 17-DEC-65 800 20
7499 ALLEN JAM SALESREP 7698 20-FEB-61 1600 300 30
7521 WARD TF SALESREP 7698 22-FEB-62 1250 500 30
7566 JONES JM MANAGER 7839 02-APR-67 2975 20
7654 MARTIN P SALESREP 7698 28-SEP-56 1250 1400 30
7698 BLAKE R MANAGER 7839 01-NOV-63 2850 30
7782 CLARK AB MANAGER 7839 09-JUN-65 2450 10
7788 SCOTT SCJ TRAINER 7566 26-NOV-59 3000 20
7839 KING CC DIRECTOR 17-NOV-52 5000 10
7844 TURNER JJ SALESREP 7698 28-SEP-68 1500 0 30
7876 ADAMS AA TRAINER 7788 30-DEC-66 1100 20
7900 JONES R ADMIN 7698 03-DEC-69 800 30
7902 FORD MG TRAINER 7566 13-FEB-59 3000 20
7934 MILLER TJA ADMIN 7782 23-JAN-62 1300 10
Using the SQL Buffer
SQL*Plus stores your most recent SQL command in an area called the SQL buffer. The SQL buffer is an important SQL*Plus concept. You can display the contents of the SQL buffer using a SQL*Plus command called LIST, as shown in Listing 11-2.
Listing 11-2. The SQL*Plus LIST Command
SQL> L
1 select *
2* from employees
SQL>
The ability to retrieve the last SQL statement from the SQL buffer is often very useful when you need to correct errors and re-execute the SQL statement. You will see how to do this in the subsequent sections, where we’ll also discuss some other SQL*Plus commands related to the SQL buffer.
If you enter a second SQL command, the SQL buffer is overwritten, and you lose the previous SQL command. In the “Saving Commands” section later in this chapter, you will see an easy method to save SQL commands for reuse in SQL*Plus.
Note from the example in Listing 11-2 that the SQL command returned from the SQL buffer did not include a semicolon at the end of it. The semicolon is not part of the SQL command itself, and it does not end up in the SQL buffer. If you enter a SQL command (or even a portion of a SQL command) and press the Enter key twice, without first adding a semicolon, the command will not be executed, but it will be saved in the SQL buffer.
The SQL*Plus commands you enter are not stored in the SQL buffer. You can run as many SQL*Plus commands as you like, but another SQL*Plus LIST command will display the same SQL command.
From the example in Listing 11-2, you can also note several other things about SQL*Plus commands:
· They are normally executed on a single line, unlike most SQL commands.
· You don’t need to enter a semicolon to execute SQL*Plus commands. They execute immediately when you press the Enter key.
· SQL*Plus commands can be abbreviated (L stands for LIST), whereas SQL commands cannot.
Rather than just see what is in the buffer, it is often useful to be able to edit its contents and then re-execute the SQL, so let’s now move on to discuss how to do that.
Using an External Editor
You can edit the contents of the SQL buffer in two ways:
· Use an external editor of your choice
· Use the built-in SQL*Plus editor
The main advantage of the SQL*Plus editor is that its functionality is always available in SQL*Plus, and the editor is totally independent of the underlying platform. The disadvantage of the SQL*Plus editor is its lack of user-friendliness and its very limited capabilities. This section explains how to use an external editor to edit your SQL commands. The next section will discuss the built-in SQL*Plus editor.
The default external editor under Microsoft Windows is Notepad.
You can also change or display the SQL*Plus external editor preference from the command line by using the DEFINE command, as shown in Listing 11-3.
Listing 11-3. Displaying and Changing the External Editor Preference
SQL> define _editor=Notepad
SQL> define _editor
DEFINE _EDITOR = "Notepad" (CHAR)
SQL>
![]() Note The SQL*Plus variable that holds the name of the external editor is _editor, with a leading underscore in its name.
Note The SQL*Plus variable that holds the name of the external editor is _editor, with a leading underscore in its name.
You can invoke the external editor to change the contents of the SQL buffer. For this purpose, the SQL*Plus command is EDIT. You can invoke the external editor only when your SQL buffer is not empty. An empty buffer results in the error message “nothing to save.”
Invoking the external editor starts a subprocess, which means that you cannot return to SQL*Plus until you have closed the external editor window. Alternatively, you may want to start a separate editor session from the operating system (that is, not from SQL*Plus) so you can switch between two windows. In that case, you must make sure to save the changes in your editor window before executing the changed SQL command in SQL*Plus.
Using the SQL*Plus Editor
Learning to use the SQL*Plus editing commands is key to being more proficient and efficient in scripting. Instead of starting over if you make a mistake entering a statement, you can make a quick edit and then execute the statement. The editing commands are the same in all versions of SQL*Plus on all platforms.
To explore the SQL*Plus editor, we begin with the same simple SQL SELECT command in the SQL buffer (from the “Entering Commands” section earlier in the chapter):
SQL> select *
2 from employees;
![]() Note Please follow all instructions in this section verbatim, even when you think there are some mistakes, because any mistakes are intentional.
Note Please follow all instructions in this section verbatim, even when you think there are some mistakes, because any mistakes are intentional.
It is important to realize that the SQL*Plus editor is line-oriented; that is, there is only one current line at any point in time. You can make changes only to that current line. (Perhaps you remember the good old EDLIN editor under MS-DOS?)
SQL*Plus marks the current line on screen with an asterisk (*) after the line number. Normally, it is the line you entered last; in our example, it is the second line.
If you want to change something on the first line, you must first activate that line with the L1 command. Let’s try to change the asterisk into two column names. C is an abbreviation for the SQL*Plus command CHANGE. Listing 11-4 demonstrates how to use the LIST and CHANGEcommands to make this change. SQL*Plus searches the current line for the first occurrence of an asterisk (*) and changes that character into eename, bdate.
Listing 11-4. Using the SQL*Plus LIST and CHANGE Commands
SQL> L
1 select *
2* from employees
SQL> L1
1* select *
SQL> c/*/eename, bdate/
1* select eename, bdate
SQL> L
1 select eename, bdate
2* from employees
SQL>
Instead of slashes (/), you can use any arbitrary character for the string delimiter (separator) in the CHANGE command. Also, a space character between the C and the first separator is not mandatory, and you can omit the last string delimiter, too.
Now, let’s try to execute the SQL command in the buffer again. The SQL*Plus command to execute the contents of the SQL buffer is RUN, abbreviated to R. Apparently we made a mistake; we get an Oracle error message, as shown in Listing 11-5. Observe the error message. First, it shows a line number indication (ERROR at line 1), and within that line, an asterisk (*) indicates the position where the error was detected. Listing 11-5 also shows a first attempt to correct the error and the erroneous result of our CHANGE command.
Listing 11-5. Fixing Typos with the SQL*Plus CHANGE Command
SQL> R
1 select eename, bdate
2* from employees
select eename, bdate
*
ERROR at line 1:
ORA-00904: "EENAME": invalid identifier
SQL> c/e//
1* slect eename, bdate
SQL>
We removed the first occurrence of an e on the first line, instead of the e in eename. This is the default (and only) way the CHANGE command works. This means that you must be careful with this command and be sure to specify appropriate search strings for replacement. In this case, it would have been better to issue the c/ee/e/ command instead.
You can also add text at the end of the current line using the SQL*Plus APPEND command, which is abbreviated A. Listing 11-6 demonstrates how we can first fix the mistake and then add one more column to the SELECT expression.
Listing 11-6. Appending Text with the SQL*Plus APPEND Command
SQL> L1
1* slect eename, bdate
SQL> c/slect ee/select e/
1* select ename, bdate
SQL> A , deptno
1* select ename, bdate, deptno
SQL> L
1 select ename, bdate, deptno
2* from employees
SQL>
Note that the SQL*Plus APPEND command does not insert a space by default. In this case, we don’t need a space, but otherwise you should specify a second space character after the APPEND command.
You can also add one or more additional lines to the SQL buffer with the SQL*Plus INPUT command (abbreviated I), as shown in Listing 11-7. The lines you enter are added below the current line. If the current line is the last line in the buffer, the new lines are added at the end of the statement. This also means you need a “special trick” to add lines before the first line, as you’ll learn in the next section. Notice the line numbering; SQL*Plus automatically generates appropriate line numbers while entering text. You can stop entering additional lines by pressing the Enter key twice, or by entering a semicolon when you are adding lines at the end of the buffer.
Listing 11-7. Inserting Text with the SQL*Plus INPUT Command
1 select ename, bdate, deptno
2* from employees
SQL> I
3 where deptno = 30;
ENAME BDATE DEPTNO
-------- ----------- --------
ALLEN 20-FEB-1961 30
WARD 22-FEB-1962 30
MARTIN 28-SEP-1956 30
BLAKE 01-NOV-1963 30
TURNER 28-SEP-1968 30
JONES 03-DEC-1969 30
SQL>
![]() Note The Iis an abbreviation for INPUT, not for INSERT. INSERT is an SQL command (to add rows to a table in the database).
Note The Iis an abbreviation for INPUT, not for INSERT. INSERT is an SQL command (to add rows to a table in the database).
The SQL*Plus DEL command deletes the current line from the SQL buffer. You can optionally specify a line number with the DEL command to remove a certain line from the SQL buffer without making that line the current line first or a range of line numbers to remove several lines with a single DEL command. See Listing 11-8 for an example.
Listing 11-8. Deleting Lines with the SQL*Plus DEL Command
SQL> L
1 select ename, bdate, deptno
2 from employees
3* where deptno = 30
SQL> DEL
SQL> L
1 select ename, bdate, deptno
2* from employees
SQL>
![]() Note DEL is not an abbreviation for DELETE, because DELETE is an SQL command (to remove rows from a table in the database.)
Note DEL is not an abbreviation for DELETE, because DELETE is an SQL command (to remove rows from a table in the database.)
Using SQL Buffer Line Numbers
You can make any line the current one by just entering the line number, without the L (LIST) command, as shown in Listing 11-9.
Listing 11-9. Using Line Numbers to Change the Current Line
SQL> L
1 select code, description
2 from courses
3* where category = 'DSG'
SQL> 2
2* from courses
SQL> 42
SP2-0226: Invalid line number
SQL>
Using line numbers, you can also replace any line in the SQL buffer without needing to use the SQL*Plus DEL command followed by a SQL*Plus INPUT command. Instead, simply enter the desired new line preceded by its line number. Listing 11-10 shows how to replace the first line and add a line at the end of the SQL buffer. Notice that the high line number (42) does not generate an error message, as it does in the example in Listing 11-9.
Listing 11-10. Using Line Numbers to Change the SQL Buffer
SQL> 1 select *
SQL> L
1 select *
2 from courses
3* where category = 'DSG'
SQL> 42 order by code
SQL> L
1 select *
2 from courses
3 where category = 'DSG'
4* order by code
SQL>
As explained earlier, the SQL*Plus INPUT command always inserts lines below the current line. The trick to insert extra lines before the first line is to “overwrite” the artificial line zero, as demonstrated in Listing 11-11. This is a rather trivial example; however, this trick can be quite useful when creating views. Views are discussed in Chapter 10.
Listing 11-11. Inserting Text Before the First Line of the SQL Buffer
1 select *
2 from courses
3 where category = 'DSG'
4* order by code
SQL> 0 /* this is just a comment */
SQL> L
1 /* this is just a comment */
2 select *
3 from courses
4 where category = 'DSG'
5* order by code
SQL>
Using the Ellipsis
If you are using the SQL*Plus CHANGE command, you might benefit from using three consecutive period characters, also known as the ellipsis. The examples in Listings 11-12 and 11-13 demonstrate the effect of using the ellipsis. First, we enter a new SQL command into the buffer and deliberately make a mistake.
Listing 11-12. Entering a SQL Command with a Deliberate Error
SQL> select mgr, department_name
2 from departments
3 where location = 'SCHIERMONNIKOOG';
select mgr, department_name
*
ERROR at line 1:
ORA-00904: "DEPARTMENT_NAME": invalid identifier
SQL>
Normally, the last command line you entered into the SQL buffer is automatically the current line. However, if an error condition occurs (such as in Listing 11-12), the line where the error is found becomes the current line. This allows you to correct any mistakes with the SQL*PlusCHANGE command immediately, without activating any line with the SQL*Plus LIST command. Listing 11-13 demonstrates this phenomenon; the asterisk in the L* command is used to show the current line.
Listing 11-13. Using the SQL*Plus L* Command and the Ellipsis (. . .)
SQL> L*
1* select mgr, department_name
SQL> c/d.../dname
1* select mgr, dname
SQL> 3
3* where location = 'SCHIERMONNIKOOG'
SQL> c/s...g/BOSTON
3* where location = 'BOSTON'
SQL>
The last example in Listing 11-13 demonstrates that all CHANGE command searches are case-insensitive. As you can see, the ellipsis is powerful, but it’s also dangerous. For example, the command c/d.../dname searches for the first occurrence of a d on the first line and then replaces everything to the end of the line.
SQL*Plus Editor Command Review
The SQL*Plus editor is a rather simple editor; nevertheless, it makes sense to spend some time to explore its possibilities. It might come in handy when you need to work with the Oracle DBMS in an environment that is completely unknown to you, or where you are not allowed to launch an external editor from the underlying operating system. The SQL*Plus editor is always available, and it’s identical on all platforms supported by Oracle.
Table 11-1 summarizes all the SQL*Plus editor commands covered in this chapter, so far.
Table 11-1. Some SQL*Plus Editor-Related Commands
|
Command |
Description |
|
LIST |
Show the complete SQL buffer. |
|
LIST n (or just n) |
Make line n the current line. |
|
CHANGE/old/new/ |
Change the first occurrence of old into new on the current line. |
|
APPEND txt |
Append txt to the end of the current line. |
|
INPUT |
Insert line(s) below the current line. |
|
DEL [x [y]] |
Without arguments: remove current line. One argument: remove that line. Two arguments: remove range of lines (x and y can be line numbers, *, or LAST). |
|
RUN (or /) |
Execute the contents of the SQL buffer. |
|
EDIT |
Start an external editor on the current buffer contents. |
|
DEFINE _EDITOR |
Define your preferred external editor. |
As Table 11-1 shows, you can use the forward slash (/) command as an alternative to the SQL*Plus RUN command. The difference between the two is that RUN always displays the SQL command and the results, whereas the forward slash (/) command displays the results only.
Saving Commands
As explained earlier in the chapter, the SQL buffer is overwritten with every new SQL command you enter in SQL*Plus. If you want to save the contents of the SQL buffer, you can use the SQL*Plus SAVE command. The SAVE command creates a script file containing the contents of the SQL buffer.
If a script file already exists, you can specify (with the options APPEND or REPLACE) what you want the SAVE command to do in that case. The APPEND option is useful if you want to save all your SQL commands in one single file, for example, to print that file later.
In Microsoft Windows, the options for saving the contents of the SQL buffer are also available via the File pull-down menu of SQL*Plus, as shown in Figure 11-2.
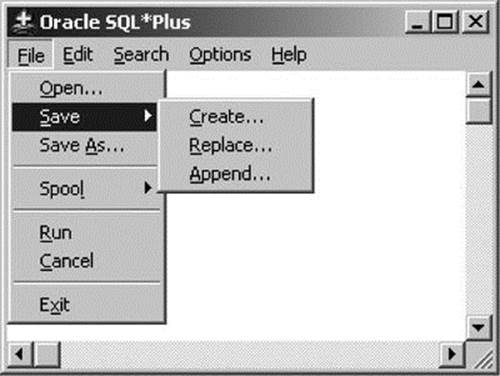
Figure 11-2. The SQL*Plus options for saving the SQL buffer contents
As an example of saving SQL commands, enter the commands shown in Listing 11-14.
Listing 11-14. The SQL*Plus SAVE Command
SQL> save result1
SQL> select * from departments;
DEPTNO DNAME LOCATION MGR
------ ---------- -------- -----
10 ACCOUNTING NEW YORK 7782
20 TRAINING DALLAS 7566
30 SALES CHICAGO 7698
40 HR BOSTON 7839
SQL> save result2
Created file result2.sql
SQL> select * from courses;
CODE DESCRIPTION CAT DURATION
---- ------------------------------ --- --------
SQL Introduction to SQL GEN 4
OAU Oracle for application users GEN 1
JAV Java for Oracle developers BLD 4
PLS Introduction to PL/SQL BLD 1
XML XML for Oracle developers BLD 2
ERM Data modeling with ERM DSG 3
PMT Process modeling techniques DSG 1
RSD Relational system design DSG 2
PRO Prototyping DSG 5
GEN System generation DSG 4
10 rows selected.
SQL> save result1
SP2-0540: File "result1.sql" already exists.
Use "SAVE filename[.ext] REPLACE".
SQL> save result1 replace
Created file result1.sql
SQL>
Note the error message after the second SAVE RESULT1 attempt; REPLACE (or APPEND) is mandatory if a file already exists. Since the SQL buffer is overwritten with each new SQL command issued, using the SAVE APPEND syntax when creating a script file can be useful if you would like any new SQL commands you issue to be added to your script file.
We have created two script files. These script files are assigned the extension, .SQL, by default. If you prefer to use a different file name extension, you can change it with the SQL*Plus SUFFIX setting.
Running SQL*Plus Scripts
You can load script files saved with the SAVE command back into the SQL buffer with the GET command, followed by the name of the script. For example, you might reload a script and then edit it. If you want to load a script file and immediately execute it, you can use the START command (to get and run the script), as shown in Listing 11-15.
Listing 11-15. Using the SQL*Plus GET and START Commands
SQL> GET result1
1* select * from courses
SQL> START result2
DEPTNO DNAME LOCATION MGR
------ ---------- -------- -----
10 ACCOUNTING NEW YORK 7782
20 TRAINING DALLAS 7566
30 SALES CHICAGO 7698
40 HR BOSTON 7839
SQL>
Listing 11-16 shows how you can also use the @ symbol shortcut for the SQL*Plus START command.
Listing 11-16. Using the SQL*Plus @ Command
SQL> L
1* select * from departments
SQL> @result1
CODE DESCRIPTION CAT DURATION
---- ------------------------------ --- --------
SQL Introduction to SQL GEN 4
OAU Oracle for application users GEN 1
JAV Java for Oracle developers BLD 4
PLS Introduction to PL/SQL BLD 1
XML XML for Oracle developers BLD 2
ERM Data modeling with ERM DSG 3
PMT Process modeling techniques DSG 1
RSD Relational system design DSG 2
PRO Prototyping DSG 5
GEN System generation DSG 4
10 rows selected.
SQL>
Specifying Directory Path Specifications
The SQL*Plus commands SAVE, GET, and START can handle full file name specifications, with directory paths. In the absence of a directory path, these commands default to the current directory. In a Microsoft Windows environment, it is relatively simple to define the directory (or folder) in which you want SQL*Plus to start. This is one of the shortcut properties, which you can set in the Start In field of the Properties dialog box, shown in Figure 11-3. Right-click the SQL*Plus icon and select Properties to open this dialog box.
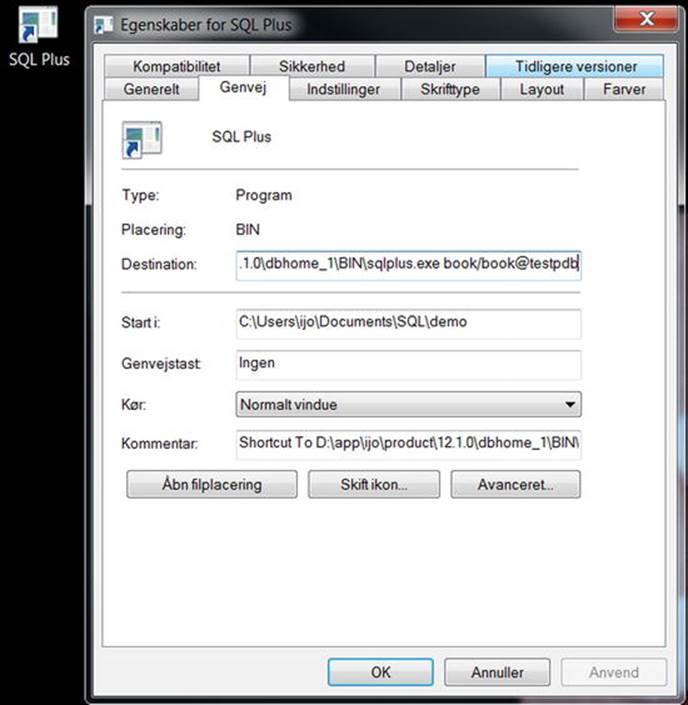
Figure 11-3. SQL*Plus shortcut properties
Through the Properties dialog box, you can also simplify the process to start SQL*Plus by specifying your username and password (such as book/book) in the Target field. In that case, the standard log on dialog will be skipped. However, this is a security risk, because anyone with access to your keyboard for more than two seconds will find out your database name and password.
![]() Tip Under Microsoft Windows, you can also set the SQLPATH Registry setting to define a default search path for all files that cannot be found in the current directory. For example, you could have this Registry setting point to a central directory where you maintain all your generic SQL scripts. Just open the Registry Editor with the REGEDIT command and search for SQLPATH. Under other operating systems, check out the SQLPATH environment variable.
Tip Under Microsoft Windows, you can also set the SQLPATH Registry setting to define a default search path for all files that cannot be found in the current directory. For example, you could have this Registry setting point to a central directory where you maintain all your generic SQL scripts. Just open the Registry Editor with the REGEDIT command and search for SQLPATH. Under other operating systems, check out the SQLPATH environment variable.
Adjusting SQL*Plus Settings
You can modify the behavior of SQL*Plus in numerous ways, based on SQL*Plus variables or settings. This section provides some simple examples to give you an idea of how this works. Listing 11-17 demonstrates using the SET command to change some SQL*Plus settings.
Listing 11-17. Changing SQL*Plus Settings with the SET Command
SQL> set pagesize 22
SQL> set pause "Hit [Enter]... "
SQL> set pause on
SQL> run
1* select * from courses
Hit [Enter]...
The effect of changing the PAUSE and PAGESIZE settings as shown in Listing 11-17 is that SQL*Plus now produces screen output per page, in this case, 22 lines at a time. The PAUSE setting is useful if the results of your SQL commands don’t fit on your screen.
![]() Tip When using the PAUSE setting, don’t just switch it on or off; make sure to specify a prompt string, too. Otherwise, SQL*Plus will just wait until you press the Enter key.
Tip When using the PAUSE setting, don’t just switch it on or off; make sure to specify a prompt string, too. Otherwise, SQL*Plus will just wait until you press the Enter key.
You can display the current values of SQL*Plus settings with the SHOW command, and you can revert to the default behavior with the SET command. Listing 11-18 shows examples of using these commands.
Listing 11-18. Displaying SQL*Plus Settings with the SHOW Command
SQL> show pages
pagesize 22
SQL> show pause
PAUSE is ON and set to "Hit [Enter]... "
SQL> set pause off
SQL> show pause
PAUSE is OFF
SQL>
Although we are discussing the SQL*Plus tool in this section, there is also another (client tool-independent) way to influence your database session ALTER SESSION. With this command, you can set several NLS (National Language Support) session parameters, a selection of which are shown in Table 11-2.
Table 11-2. Examples of NLS Session Parameters
|
Parameter |
Description |
|
NLS_DATE_FORMAT |
Default format to display dates |
|
NLS_TIME_FORMAT |
Default format to display timestamps |
|
NLS_LANGUAGE |
The language for SQL*Plus feedback and messages |
|
NLS_NUMERIC_CHARACTERS |
The decimal point and group separator characters |
|
NLS_CURRENCY |
The currency symbol |
The most important parameter in this list is probably NLS_DATE_FORMAT, because this parameter influences the way date values are interpreted and displayed by your session, which is often a source of confusion. Listing 11-19 demonstrates an example of using the ALTER SESSIONcommand to set some NLS session parameters.
Listing 11-19. Changing NLS Parameters with ALTER SESSION
SQL> alter session
2 set nls_date_format='dd-mm-yyyy'
3 nls_language=Dutch
4 nls_currency='Eur';
Sessie is gewijzigd.
SQL>
![]() Note Please note that the ALTER SESSION command, demonstrated in Listing 11-19, would work correctly only if your global database characterset, chosen during database creation, contained language settings for the Dutch language. The AL32UTF8 characterset is a universal characterset that contains, among many other language character settings, the character settings necessary for the Dutch language.
Note Please note that the ALTER SESSION command, demonstrated in Listing 11-19, would work correctly only if your global database characterset, chosen during database creation, contained language settings for the Dutch language. The AL32UTF8 characterset is a universal characterset that contains, among many other language character settings, the character settings necessary for the Dutch language.
If you change settings with the ALTER SESSION command, or if you change certain SQL*Plus settings with the SQL*Plus SET command, you lose these changes as soon as you log off. On startup, SQL* Plus will use the default values again. If you want to avoid the hassle of applying the same changes over and over again, you can store these SQL and SQL*Plus commands in a file with the special name, login.sql. This file is automatically executed when you start SQL*Plus, or even when you change connections within a SQL*Plus session with the CONNECTcommand. Note that SQL*Plus must be able to find this file in the directory it starts in or via the SQLPATH Registry setting. login.sql is an example of a SQL*Plus script.
If the rows of a result table don’t fit on a single line on your screen (and the line wrapping makes the result rather ugly), a solution might be to narrow the display of one or more columns with the SQL*Plus COLUMN command. By default, SQL*Plus displays all columns on the screen with a width derived from the corresponding column definitions found in the data dictionary. Listing 11-20 demonstrates how you can narrow (or widen) the display of alphanumeric columns on your screen by using the FORMAT option of the COLUMN command.
Listing 11-20. Changing the Width of Alphanumeric Columns
SQL> select * from courses
2 where category = 'BLD';
CODE DESCRIPTION CAT DURATION
---- ------------------------------ --- --------
JAV Java for Oracle developers BLD 4
PLS Introduction to PL/SQL BLD 1
XML XML for Oracle developers BLD 2
SQL> COLUMN description FORMAT a26
SQL> /
CODE DESCRIPTION CAT DURATION
---- -------------------------- --- --------
JAV Java for Oracle developers BLD 4
PLS Introduction to PL/SQL BLD 1
XML XML for Oracle developers BLD 2
SQL>
All SQL*Plus commands (and their optional components) can be abbreviated, as long as the abbreviation is unique. For example, the COLUMN command can be abbreviated to COL, and FORMAT can be abbreviated to FOR (see Listing 11-21).
You can influence the width of numeric columns in a similar way, as you can see in Listing 11-21.
Listing 11-21. Changing the Display of Numeric Columns
SQL> select * from salgrades
2 where grade > 3;
GRADE LOWERLIMIT UPPERLIMIT BONUS
----- ---------- ---------- -----
4 2001 3000 200
5 3001 9999 500
SQL> COL bonus FOR 9999.99
SQL> /
GRADE LOWERLIMIT UPPERLIMIT BONUS
----- ---------- ---------- --------
4 2001 3000 200.00
5 3001 9999 500.00
SQL>
If you want to save all your current SQL*Plus settings in a file (a SQL*Plus script file), use the STORE SET command. See Listing 11-22 for the syntax of this command.
Listing 11-22. SQL*Plus STORE SET Command Syntax
SQL> STORE SET <filename>[.sql] [REPLACE|APPEND]
The brackets in Listing 11-22 (around .sql and REPLACE|APPEND) are part of a common syntax notation convention to denote optional command clauses. This convention is also used in Appendix A of this book. In this convention, a vertical bar (|) can be used to separate optional choices, as in [REPLACE|APPEND]. Uppercase components such as SET and APPEND should be entered verbatim; lowercase components (such as <filename>) should be replaced (in this case) by a file name of your own choice. See Appendix A for more details.
If you have saved all SQL*Plus settings in a script file by using the STORE SET command, you can restore those settings at any time using the START (or @) command. This allows you to write SQL*Plus scripts that capture all SQL*Plus settings at the beginning, change various settings during script execution, and then restore the original settings at the end of the script.
Spooling a SQL*Plus Session
You can record the complete results (as displayed on your screen) of a SQL*Plus session in an operating system file, using the SQL*Plus SPOOL command. Listing 11-23 demonstrates this capability.
Listing 11-23. Using the SQL*Plus SPOOL Command
SQL> spool all_results.TXT [create|replace|append]
SQL> select * from employees;
...
SQL> select * from departments;
...
SQL> spool off
The ALL_RESULTS.TXT file, created in the same directory or folder where the SAVE command stores its script files, now contains a complete copy of all screen output. As Listing 11-23 shows, you can influence the behavior of the SPOOL command by specifying one of the following keywords: CREATE, REPLACE, or APPEND. With these three options, you can specify which behavior you want in case the specified file already exists. Just try these options for yourself; the error messages are self-explanatory.
Describing Database Objects
When formulating SQL commands, it is sometimes convenient to get a quick overview of the structure of a table, for example, to see the column names and the datatypes. In such cases, the SQL*Plus DESCRIBE command is what you need. See Listing 11-24 for an example.
Listing 11-24. The SQL*Plus DESCRIBE Command
SQL> descr employees
Name Null? Type
----------------------------- -------- --------------------
EMPNO NOT NULL NUMBER(4)
ENAME NOT NULL VARCHAR2(8)
INIT NOT NULL VARCHAR2(5)
JOB VARCHAR2(8)
MGR NUMBER(4)
BDATE NOT NULL DATE
MSAL NOT NULL NUMBER(6,2)
COMM NUMBER(6,2)
DEPTNO NUMBER(2)
SQL>
Executing Commands from the Operating System
The HOSTcommand (most implementations support a platform-specific shortcut, such as $ or !) allows you to temporarily leave your current SQL*Plus session to execute commands at the underlying operating system; for example, on a Microsoft Windows system, a command window is opened. Depending on the underlying operating system, you can finish the subsession and return to your SQL*Plus session with EXIT, LOGOUT, or a similar command.
Clearing the Buffer and the Screen
With the CLEAR BUFFER command, you can empty the SQL buffer in SQL*Plus. This is something you won’t need to do too often, because the SQL buffer is overwritten each time by consecutive commands.
With the CLEAR SCREEN command, you can start at the top of a new, empty SQL*Plus screen.
SQL*Plus Command Review
Table 11-3 displays an overview of all SQL*Plus commands covered in this chapter thus far (including the SQL*Plus editor commands already listed in Table 11-2).
Table 11-3. Some SQL*Plus Commands
|
Command |
Description |
|
SAVE |
Save the SQL buffer contents in a script file |
|
GET |
Read a saved script file back into the SQL buffer |
|
START or @ |
Execute the contents of a script file |
|
SPOOL |
Copy all screen output to a file |
|
SET |
Change a SQL*Plus setting |
|
SHOW |
Show the current value of SQL*Plus settings |
|
COLUMN ... FORMAT |
Change screen display attributes of a column |
|
STORE SET |
Save the current SQL*Plus settings in a script file |
|
DESCRIBE |
Provide a description of a database object |
|
HOST, $ or ! |
Start a subsession at the operating system level |
|
CLEAR BUFFER |
Empty the SQL buffer |
|
CLEAR SCREEN |
Start with an empty SQL*Plus screen |
We also introduced the following SQL command in this section: ALTER SESSION. This command changes various settings for your session, such as NLS settings.
11.2 SQL*Plus Variables
SQL*Plus supports the following three variable types:
· Substitution variables
· User-defined variables
· System variables
SQL*Plus Substitution Variables
Substitution variablesappear in SQL or SQL*Plus commands. SQL*Plus prompts for a value when you execute those commands. We have used substitution variables in earlier examples in this book (Listing 5-14, for example), to test certain commands multiple times with different literal values.
Substitution variable values are volatile; that is, SQL*Plus doesn’t remember them and doesn’t store them anywhere. This is what distinguishes substitution variables from the other two types. If you execute the same SQL or SQL*Plus command again, SQL*Plus prompts for a value again. The default character that makes SQL*Plus prompt for a substitution variable value is the ampersand (&), also known as the DEFINE character. Check out what happens in Listing 11-25.
Listing 11-25. Using the DEFINE Character (&)
SQL> select * from departments
2 where dname like upper('%&letter%');
Enter value for letter:a
old 2: where dname like upper('%&letter%')
new 2: where dname like upper('%a%')
DEPTNO DNAME LOCATION MGR
-------- ---------- -------- --------
10 ACCOUNTING NEW YORK 7782
20 TRAINING DALLAS 7566
30 SALES CHICAGO 7698
SQL>
Actually, if a substitution variable occurs twice within a single command, SQL*Plus also prompts twice for a value, as demonstrated in Listing 11-26.
Listing 11-26. Prompting Twice for the Same Variable
SQL> select ename from employees
2 where empno between &x and &x+100;
Enter value for x: 7500
Enter value for x: 7500
old 2: where empno between &x and &x+100
new 2: where empno between 7500 and 7500+100
ENAME
--------
WARD
JONES
SQL>
You can use the period character (.) to mark the end of the name of a substitution variable, as shown in Listing 11-27. The period (.) is also known as the CONCAT character in SQL*Plus.
Normally, you don’t need the CONCAT character very often, because white space is good enough to delimit variable names; however, white space in strings can sometimes be undesirable. See Listing 11-27 for an example.
Listing 11-27. Using the DEFINE and CONCAT Characters
SQL> select '&drink.glass' as result from dual;
Enter value for drink:beer
old 1: select '&drink.glass' as result from dual
new 1: select 'beerglass' as result from dual
RESULT
---------
beerglass
SQL>
Note that you can display the current settings of the DEFINE and CONCAT characters with the SQL*Plus SHOW command, and you can change these settings with the SQL*Plus SET command, as shown in Listing 11-28.
Listing 11-28. Displaying the DEFINE and CONCAT Character Settings
SQL> show define
define "&" (hex 26)
SQL> show concat
concat "." (hex 2e)
SQL>
If you don’t want SQL*Plus to display the explicit replacement of substitution variables by the values you entered (as in Listings 11-25, 11-26, and 11-27), you can suppress this display with the SQL*Plus VERIFY setting, as shown in Listing 11-29.
Listing 11-29. Switching the VERIFY Setting ON and OFF
SQL> set verify on
SQL> set verify off
SQL> show verify
verify OFF
SQL>
If you change the VERIFY setting to OFF, as shown in Listing 11-29, and you execute the SQL command (still in the SQL buffer) with the SQL*Plus RUN command, you don’t see the “old: ...” and “new: ...” lines anymore, as shown in Listing 11-30.
Listing 11-30. The Effect of VERIFY OFF
SQL> select ename from employees
2 where empno between &x and &x+100;
Enter value for x: 7500
Enter value for x: 7500
ENAME
--------
WARD
JONES
SQL>
SQL*Plus User-Defined Variables
If you want to store the value of a SQL*Plus variable (at least temporarily) so you can use it multiple times, you need the next category of SQL*Plus variables: user-defined variables.
You can use the SQL*Plus DEFINE command to declare user-defined variables and to assign values to them, as shown in Listing 11-31.
Listing 11-31. Assigning Values to User-Defined Variables with DEFINE
SQL> define x=7500
SQL> select ename from employees
2 where empno between &x and &x+100;
ENAME
--------
WARD
JONES
SQL>
The DEFINE command in Listing 11-31 stores the user-defined variable X with its value 7500. That’s why SQL*Plus doesn’t prompt for a value for X anymore in Listing 11-31.
The SQL*Plus DEFINE command not only allows you to assign values to user-defined variables, but also to display current values. Using the DEFINE command, you can display the value of a specific variable. You can also display a complete listing of all user-defined variables by not specifying a variable name and just entering the DEFINE command itself. The SQL*Plus UNDEFINE command allows you to remove a user-defined variable. Listing 11-32 demonstrates examples of DEFINE and UNDEFINE.
Listing 11-32. DEFINE and UNDEFINE Examples
SQL> def x
DEFINE X = "7500" (CHAR)
SQL> def
DEFINE _DATE = "02-FEB-2014" (CHAR)
DEFINE _CONNECT_IDENTIFIER = "orcl" (CHAR)
DEFINE _USER = "BOOK" (CHAR)
DEFINE _PRIVILEGE = "" (CHAR)
DEFINE _SQLPLUS_RELEASE = "1201000100" (CHAR)
DEFINE _EDITOR = "vim" (CHAR)
DEFINE _O_VERSION = "
Oracle Database 12c Enterprise Edition Release 12.1.0.1.0 - 64bit Production
With the Partitioning, OLAP, Advanced Analytics and Real Application Testing options" (CHAR)
DEFINE _O_RELEASE = "1201000100" (CHAR)
DEFINE X = "7500" (CHAR)
SQL> undefine x
SQL>
Implicit SQL*Plus User-Defined Variables
SQL*Plus also supports syntax allowing you to define variables implicitly. With this method, you start with substitution variables in your SQL and SQL*Plus commands, and you end up with user-defined variables; SQL*Plus prompts for a value only once. You can implement this behavior by using double ampersands (&&). Look at the experiments in Listing 11-33, showing that you start out without an ENR variable, you are prompted for a value only once, and then an implicit DEFINE is executed.
Listing 11-33. Using Double Ampersands (&&)
SQL> define enr
SP2-0135: symbol enr is UNDEFINED
SQL> select * from employees
2 where empno between &&enr and &enr+100;
Enter value for enr: 7500
EMPNO ENAME INIT JOB MGR BDATE MSAL COMM DEPTNO
----- -------- ----- -------- ----- ----------- ----- ----- ------
7521 WARD TF SALESREP 7698 22-FEB-1962 1250 500 30
7566 JONES JM MANAGER 7839 02-APR-1967 2975 20
SQL> define enr
DEFINE ENR = "7500" (CHAR)
SQL>
If you now re-execute the contents of the SQL buffer (with / or RUN), there is no prompting at all; the stored ENR value (7500) is used. So if you use this technique, make sure to end (or start) your scripts with the appropriate UNDEFINE commands.
User-Friendly Prompting
SQL*Plus provides a more user-friendly method to create user-defined variables and prompt for values, while offering some more control over the values as well. This method is especially useful with SQL*Plus scripts (discussed in Section 11.4). User-friendly prompting uses a combination of the three SQL*Plus commands: PROMPT, PAUSE, and ACCEPT. Listing 11-34 demonstrates an example.
Note that you can split a SQL*Plus command over multiple lines, as shown in Listing 11-34 in the ACCEPT command example. Normally, the newline character is a SQL*Plus command delimiter, but you can “escape” from that special meaning of the newline character by ending your command lines with a minus sign (-).
Listing 11-34. Using PROMPT, PAUSE, and ACCEPT
SQL> prompt This is a demonstration.
This is a demonstration.
SQL> pause Hit the [Enter] key...
Hit the [Enter] key...
SQL> accept x number -
> prompt "Please enter a value for x: "
Please enter a value for x: 42
SQL> define x
DEFINE X = 42 (NUMBER)
SQL>
The PROMPT command allows you to write text to the screen, the PAUSE command allows you to suspend script execution, and the ACCEPT command gives you full control over the datatype of the user-defined variable and the screen text prompting for a value. Just try to enter a nonnumeric value for variable X in Listing 11-34. You will get the following SQL*Plus error message:
Enter a value for x: monkey
SP2-0425: "monkey" is not a valid NUMBER
![]() Caution Splitting commands over multiple lines by using the minus sign as an escape character is relevant only for SQL*Plus commands, not for SQL commands.
Caution Splitting commands over multiple lines by using the minus sign as an escape character is relevant only for SQL*Plus commands, not for SQL commands.
SQL*Plus System Variables
The third category of SQL*Plus variables is system variables. The values of these system-defined SQL*Plus variables control the overall behavior of SQL*Plus. You already saw various examples of these system variables, such as PAGESIZE and PAUSE, in Section 11.1.
In the previous section, you learned that you need the SQL*Plus commands DEFINE and UNDEFINE to manage user-defined variables. For system variables, you need the SQL*Plus commands SET and SHOW to assign or retrieve values, respectively.
Listing 11-35 demonstrates some examples of system variables.
Listing 11-35. Some SQL*Plus System Variable Examples
SQL> show pagesize
pagesize 36
SQL> show pause
PAUSE is OFF
SQL> set pause '[Enter]... '
SQL> set pause on
SQL> set pagesize 10
SQL> select * from employees;
[Enter]...
EMPNO ENAME INIT JOB MGR BDATE MSAL COMM DEPTNO
----- -------- ----- -------- ----- ----------- ----- ----- ------
7369 SMITH N TRAINER 7902 17-DEC-1965 800 20
7499 ALLEN JAM SALESREP 7698 20-FEB-1961 1600 300 30
7521 WARD TF SALESREP 7698 22-FEB-1962 1250 500 30
7566 JONES JM MANAGER 7839 02-APR-1967 2975 20
7654 MARTIN P SALESREP 7698 28-SEP-1956 1250 1400 30
7698 BLAKE R MANAGER 7839 01-NOV-1963 2850 30
7782 CLARK AB MANAGER 7839 09-JUN-1965 2450 10
[Enter]...
EMPNO ENAME INIT JOB MGR BDATE MSAL COMM DEPTNO
----- -------- ----- -------- ----- ----------- ----- ----- ------
7788 SCOTT SCJ TRAINER 7566 26-NOV-1959 3000 20
7839 KING CC DIRECTOR 17-NOV-1952 5000 10
7844 TURNER JJ SALESREP 7698 28-SEP-1968 1500 0 30
7876 ADAMS AA TRAINER 7788 30-DEC-1966 1100 20
7900 JONES R ADMIN 7698 03-DEC-1969 800 30
7902 FORD MG TRAINER 7566 13-FEB-1959 3000 20
7934 MILLER TJA ADMIN 7782 23-JAN-1962 1300 10
14 rows selected.
SQL> set pause off pagesize 42
SQL> show all
...
SQL>
If you execute the last command of Listing 11-35 (SHOW ALL), you will see that the number of SQL*Plus system variables is impressive. That’s why the output in Listing 11-35 is suppressed.
Table 11-4 displays an overview of the SQL*Plus system variables, listing only the most commonly used SQL*Plus system variables. Where applicable, the third column shows the default values. In the first column, the brackets indicate abbreviations you may want to use.
Table 11-4. Some Common SQL*Plus System Variables
|
Variable |
Description |
Default |
|
COLSEP |
String to display between result columns |
“ ” (space) |
|
CON[CAT] |
Character to mark the end of a variable name |
. (period) |
|
DEF[INE] |
Character to refer to variable values |
& (ampersand) |
|
ECHO |
Display or suppress commands (relevant only for scripts) |
OFF |
|
FEED[BACK] |
Display “. . . rows selected” from a certain minimum result size |
6 |
|
HEA[DING] |
Display column names above results |
ON |
|
HEADS[EP] |
Divide column headers over multiple lines |
| (vertical bar) |
|
LIN[ESIZE] |
Line or screen width, in characters |
80 |
|
LONG |
Default width for LONG columns |
80 |
|
NEWP[AGE] |
Number of empty lines after every page break |
1 |
|
NULL |
Display of null values in the results |
|
|
NUMF[ORMAT] |
Default format to display numbers |
|
|
NUM[WIDTH] |
Default width for numeric columns, in digits |
10 |
|
PAGE[SIZE] |
Number of lines per page |
14 |
|
PAU[SE] |
Display results page by page, with pauses |
OFF |
|
RELEASE |
Release or version of the RDBMS (cannot be set) |
|
|
SQLP[ROMPT] |
SQL*Plus prompt string |
SQL> |
|
SQLT[ERMINATOR] |
SQL command delimiter (execute the command) |
; (semicolon) |
|
TAB |
Show tab characters, else display as spaces |
ON |
|
TIMI[NG] |
Show elapsed time after each command |
OFF |
|
TRIMS[POOL] |
Suppress trailing spaces in spool files |
OFF |
|
USER |
Username for the current SQL*Plus session (cannot be set) |
|
|
VER[IFY] |
Show command lines before/after variable substitution |
ON |
Let’s look at some experiments with SQL*Plus system variables, beginning with the FEEDBACK variable. This variable is a switch (you can set it to ON or OFF) and also a threshold value, as shown in Listing 11-36 where we set it to 4.
Listing 11-36. Using the FEEDBACK System Variable
SQL> select * from departments;
DEPTNO DNAME LOCATION MGR
-------- ---------- -------- --------
10 ACCOUNTING NEW YORK 7782
20 TRAINING DALLAS 7566
30 SALES CHICAGO 7698
40 HR BOSTON 7839
SQL> set feedback 4
SQL>/
DEPTNO DNAME LOCATION MGR
-------- ---------- -------- --------
10 ACCOUNTING NEW YORK 7782
20 TRAINING DALLAS 7566
30 SALES CHICAGO 7698
40 HR BOSTON 7839
4 rows selected. <<<
SQL> select * from employees;
...
SQL> set feedback off
SQL> show feedback
feedback OFF
SQL>/
...
SQL> set feedback 10
SQL>
![]() Note In order to save some trees, the listings don’t repeat the query results each time. You can easily see the effects of the various system variable values yourself.
Note In order to save some trees, the listings don’t repeat the query results each time. You can easily see the effects of the various system variable values yourself.
Using COLSEP and NUMWIDTH, as shown in Listing 11-37, the default space separating the result columns is replaced by a vertical line, and the GRADE and BONUS columns are now 10 digits wide.
Listing 11-37. Using the COLSEP and NUMWIDTH System Variables
SQL> select * from salgrades;
GRADE LOWERLIMIT UPPERLIMIT BONUS
------ ---------- ---------- ------
1 700 1200 0
2 1201 1400 50
3 1401 2000 100
4 2001 3000 200
5 3001 9999 500
SQL> set colsep " | "
SQL> set numwidth 10
SQL>/
GRADE | LOWERLIMIT | UPPERLIMIT | BONUS
---------- | ---------- | ---------- | ----------
1 | 700 | 1200 | 0
2 | 1201 | 1400 | 50
3 | 1401 | 2000 | 100
4 | 2001 | 3000 | 200
5 | 3001 | 9999 | 500
SQL>
Listing 11-38 demonstrates examples of using NULL and NUMFORMAT. The NULL system variable makes all null values more visible. The NUMFORMAT variable allows you to influence the layout of all numeric columns. It supports the same formats as the SQL*Plus COLUMN command (see Appendix A of this book or the SQL*Plus User’s Guide and Reference in the online Oracle 12c documentation for details).
Listing 11-38. Using the NULL and NUMFORMAT System Variables
SQL> set numwidth 5
SQL> set null " [N/A]"
SQL> select ename, mgr, comm
2 from employees
3 where deptno = 10;
ENAME MGR COMM
-------- ------ ------
CLARK 7839 [N/A]
KING [N/A] [N/A]
MILLER 7782 [N/A]
SQL> set numformat 09999.99
SQL> select * from salgrades;
GRADE LOWERLIMIT UPPERLIMIT BONUS
--------- ---------- ---------- ---------
00001.00 00700.00 01200.00 00000.00
00002.00 01201.00 01400.00 00050.00
00003.00 01401.00 02000.00 00100.00
00004.00 02001.00 03000.00 00200.00
00005.00 03001.00 09999.00 00500.00
SQL>
As Listing 11-39 demonstrates, you can use the DEFINE system variable as a switch (ON or OFF) and you can also change the DEFINE character, if you need the ampersand character (&) without its special meaning.
Listing 11-39. Using the DEFINE System Variable
SQL> select 'Miracle&Co' as result from dual;
Enter value for co:Breweries
RESULT
----------------
MiracleBreweries
SQL> set define off
SQL>run
1* select 'Miracle&Co' as result from dual
RESULT
----------
Miracle&Co
SQL> set define !
SQL> select 'Miracle&Co' as result from !table;
Enter value for table:dual
RESULT
----------
Miracle&Co
SQL> set define &
SQL>
![]() Tip You have changed a lot of SQL*Plus settings in this section. In order to make a “clean” start, it is a good idea to exit SQL*Plus and start a new session. This will reset all SQL*Plus variables to their default values.
Tip You have changed a lot of SQL*Plus settings in this section. In order to make a “clean” start, it is a good idea to exit SQL*Plus and start a new session. This will reset all SQL*Plus variables to their default values.
11.3 Bind Variables
The previous section discussed SQL*Plus variables, which are variables maintained by the tool SQL*Plus. The SQL*Plus client-side program replaces all variables with actual values before the SQL commands are sent to the Oracle DBMS.
This section discusses bind variables, an important component of the SQL language. To be more precise, bind variables are a component of dynamic SQL, a PL/SQL interface that allows you to build and process SQL statements at runtime. Bind variables are tool-independent.
Bind variables are extremely important if you want to develop database applications for critical information systems. Suppose you have a database application to retrieve employee details. Application users just enter an employee number in a field on their screen and then click the Execute button. For example, these SQL statements could be generated for two different database users, or for the same user using the same application twice:
SQL> select * from employees where empno = 7566;
SQL> select * from employees where empno = 7900;
These two SQL statements are obviously different, and the Oracle DBMS will also treat them as such. The optimizer will optimize them separately, and they will occupy their own memory structures (cursors). This approach can easily flood your internal memory, and it also forces the optimizer to produce execution plans over and over again. A much better approach would be to use a bind variable in the SQL command, instead of the literal employee number, and to provide values for the bind variable separately. In other words, all SQL commands coming from the application look like the following:
SQL> select * from employees where empno = :x;
Now, the Oracle DBMS is able to use cursor sharing, the optimizer can produce a single execution plan, and the SQL command can be executed many times for different values of the bind variable.
SQL*Plus offers support for bind variables with the VARIABLE and PRINTcommands. You will also use the SQL*Plus EXECUTE command, allowing you to execute a single PL/SQL statement.
Bind Variable Declaration
You can declare bind variables with the SQL*Plus VARIABLE command, and you can display bind variable values with the SQL*Plus PRINT command. Because SQL doesn’t support any syntax to assign values to bind variables, we use the SQL*Plus EXECUTE command to execute a single PL/SQL command from SQL*Plus. Listing 11-40 demonstrates examples of using these commands.
Listing 11-40. Declaring Bind Variables and Assigning Values
SQL> variable x number
SQL> variable y varchar2(8)
SQL> execute :x := 7566
PL/SQL procedure successfully completed.
SQL> execute :y := 'ADMIN'
PL/SQL procedure successfully completed.
SQL> print x y
X
------
7566
Y
--------------------------------
ADMIN
SQL> variable
variable x
datatype NUMBER
variable y
datatype VARCHAR2(8)
SQL>
As you can see, we have created two variables, we have assigned values to them, and we can display those values. Note that := is the assignment operator in PL/SQL.
Bind Variables in SQL Statements
Now let’s see whether we can retrieve the same two employees (7566 and 7900) using a bind variable. See Listing 11-41.
Listing 11-41. Using Bind Variables in SQL Commands
SQL> select * from employees where empno = :x;
EMPNO ENAME INIT JOB MGR BDATE MSAL COMM DEPTNO
------ -------- ----- -------- ----- ----------- ------ ----- ------
7566 JONES JM MANAGER 7839 02-APR-1967 2975 20
SQL> execute :x := 7900
PL/SQL procedure successfully completed.
SQL> run
1* select * from employees where empno = :x
EMPNO ENAME INIT JOB MGR BDATE MSAL COMM DEPTNO
------ -------- ----- -------- ----- ----------- ------ ----- ------
7900 JONES R ADMIN 7698 03-DEC-1969 800 30
SQL>
Because EXECUTE is a SQL*Plus command, which means it is not stored in the SQL buffer, you can assign a new value and re-execute the query from the SQL buffer with the RUN command. If you want to see some evidence of the behavior of the Oracle DBMS, take a look at Listing 11-42.
Listing 11-42. Querying V$SQLAREA to See the Differences
SQL> select executions, sql_text
2 from v$sqlarea
3 where sql_text like 'select * from employees %';
EXECUTIONS SQL_TEXT
---------- ------------------------------------------
2 select * from employees where empno = :x
1 select * from employees where empno = 7566
1 select * from employees where empno = 7900
SQL>
For more details about bind variables, refer to the PL/SQL User’s Guide and Reference.
11.4 SQL*Plus Scripts
In Section 11.1, you learned that you can save SQL commands with the SQL*Plus SAVE command. Until now, we have written only single SQL commands from the SQL buffer to a file. However, you can also create files with multiple SQL commands, optionally intermixed with SQL*Plus commands. This type of file is referred to as a SQL*Plus script.
Script Execution
You can execute SQL*Plus scripts with the SQL*Plus START command, or with its shortcut, @. Listings 11-43 and 11-44 demonstrate examples of executing scripts.
Listing 11-43. Creating and Running SQL*Plus Scripts
SQL> select *
2 from employees
3 where deptno = &&dept_number
4 and job = upper('&&job');
Enter value for dept_number: 10
Enter value for job: admin
EMPNO ENAME INIT JOB MGR BDATE MSAL COMM DEPTNO
----- -------- ----- -------- ----- ----------- ----- ----- ------
7934 MILLER TJA ADMIN 7782 23-JAN-1962 1300 10
SQL> save testscript replace
Wrote file testscript.sql
SQL> clear buffer
SQL> start testscript
...
SQL> @testscript
...
SQL>
Listing 11-44. Appending Commands to SQL*Plus Scripts
SQL> select *
2 from departments
3 where deptno = &dept_number;
DEPTNO DNAME LOCATION MGR
-------- ---------- -------- --------
10 ACCOUNTING NEW YORK 7782
SQL> save testscript append
Appended file to testscript.sql
SQL> @testscript
...
SQL>
Listing 11-45 illustrates what happens if you use the GET command and you try to execute the script from the SQL buffer. You receive an Oracle error message, because the SQL buffer now contains multiple SQL commands (as a consequence of your GET command), which is a situation SQL*Plus cannot handle.
Listing 11-45. What Happens If You Execute Scripts from the SQL Buffer
SQL> get testscript
1 select *
2 from employees
3 where deptno = &&dept_number
4 and job = upper('&&job')
5 /
6 select *
7 from departments
8* where deptno = &dept_number
SQL>/
select *
*
ERROR at line 6:
ORA-00936: missing expression
SQL>
The SQL*Plus START command (or @) actually reads a script file line-by-line, as if those lines were entered interactively. At the end of the execution of a SQL*Plus script, you will see that only the SQL statement executed last is still in the SQL buffer.
This is also the reason why the SQL*Plus SAVE command always adds a forward slash (/) after the end of the contents of the SQL buffer. Check out what happens if you manually remove that forward slash, with an editor like Notepad. The script will wait for further input from the keyboard, as if the command were not finished yet.
By the way, you can also execute SQL*Plus scripts with a double at sign (@@) command. There is a subtle difference between the @ and @@ commands, which is relevant only if you invoke SQL*Plus scripts from other scripts. In such situations, @@always searches for the (sub)script in the same folder (or directory) where the main (or calling) script is stored. This makes the syntax to call subscripts fully independent of any local environment settings, without the risk of launching wrong subscripts (with the same name, from other locations) by accident.
Script Parameters
The next feature to explore is the ability to specify parameters (values for variables) when calling scripts. You can specify up to nine command-line parameter values immediately after the SQL*Plus script name, and you can refer to these values in your script with &1, &2, . . ., &9. To test this feature, open testscript.sql (the script you just generated in Listings 11-43 and 11-44) and make the changes shown in Listing 11-46.
Listing 11-46. Contents of the Changed testscript.sql Script
select *
from employees
where deptno = &&1 -- this was &&dept_number
and job = upper('&2') -- this was &&job
/
select *
from departments
where deptno = &1 -- this was &dept_number
/
undefine 1 -- this line is added
Now you can call the script in two ways: with or without command-line arguments, as shown in Listings 11-47 and 11-48.
Listing 11-47. Calling a Script Without Command-Line Arguments
SQL> @testscript
Enter value for 1: 10
Enter value for 2: manager
EMPNO ENAME INIT JOB MGR BDATE MSAL COMM DEPTNO
----- -------- ----- -------- ----- ----------- ----- ----- ------
7782 CLARK AB MANAGER 7839 09-JUN-1965 2450 10
DEPTNO DNAME LOCATION MGR
------ ---------- -------- -----
10 ACCOUNTING NEW YORK 7782
SQL>
As you can see in Listing 11-47, if you call the script without any arguments, SQL*Plus treats &1 and &2 just like any other substitution or user-defined variables, and prompts for their values—as long as earlier script executions didn’t leave any variables defined. That’s why we have added an UNDEFINE command to the end of our script, in Listing 11-46.
Listing 11-48 demonstrates what happens if you specify two appropriate values (30 and salesrep) on the command line calling the script.
Listing 11-48. Calling a Script with Command-Line Arguments
SQL> @testscript 30 salesrep
EMPNO ENAME INIT JOB MGR BDATE MSAL COMM DEPTNO
----- -------- ----- -------- ----- ----------- ----- ----- ------
7499 ALLEN JAM SALESREP 7698 20-FEB-1961 1600 300 30
7521 WARD TF SALESREP 7698 22-FEB-1962 1250 500 30
7654 MARTIN P SALESREP 7698 28-SEP-1956 1250 1400 30
7844 TURNER JJ SALESREP 7698 28-SEP-1968 1500 0 30
DEPTNO DNAME LOCATION MGR
------ ---------- -------- -----
30 SALES CHICAGO 7698
SQL>
SQL*Plus Commands in Scripts
SQL*Plus scripts may contain a mixture of SQL commands and SQL*Plus commands. This combination makes SQL*Plus a nice report-generating tool, as you will see in the next section of this chapter. One small problem is that SQL*Plus commands (entered interactively) don’t go into the SQL buffer. Normally this is helpful, because it allows you to repeat your most recent SQL command from the SQL buffer, while executing SQL*Plus commands in between. However, this implies that you cannot add any SQL*Plus commands to your scripts with the SAVE . . . APPENDcommand.
To enter SQL*Plus commands into your scripts, you can use one of the following:
· An external editor
· A separate SQL*Plus buffer
Using an external editor is the most straightforward approach, in most cases. For example, you can use Notepad in a Microsoft Windows environment to maintain your SQL*Plus scripts. The charm of using a separate SQL*Plus buffer is that it is completely platform- and operating system-independent, and it is fully driven from the interactive SQL*Plus prompt. That’s why we discuss using a separate buffer here.
Listing 11-49 demonstrates an example of using a separate SQL*Plus buffer to generate scripts. To try this out, execute the CLEAR BUFFER and SET BUFFER CUSTOMBUFFER commands, followed by the INPUT command, and enter the following 14 lines verbatim. Exit SQL*Plus input mode by entering another new line so that you return to the SQL*Plus prompt.
Listing 11-49. Using a Separate SQL*Plus Buffer to Generate Scripts
SQL> clear buffer
SQL> set buffer custombuffer
SQL> input
1 clear screen
2 set verify off
3 set pause off
4 accept dept number -
5 prompt "Enter a department number: "
6 select *
7 from departments
8 where deptno = &dept;
9 select ename, job, msal
10 from employees
11 where deptno = &dept;
12 undefine dept
13 set pause on
14 set verify on
15
SQL>
Now you can save the script and test it, as follows:
SQL> save testscript2
Created file testscript2.sql
SQL> @testscript2
Enter a department number: 20
...
The SET BUFFER command (choose any buffer name you like) creates a nondefault SQL*Plus buffer.
![]() Note According to the SQL*Plus documentation, using additional buffers is a deprecated feature since the early 1990s, from SQL*Plus version 3.0 onward. However, it seems to be the only way to prevent the SQL*Plus SAVE command from appending a forward slash (/) at the end of the script, which would execute the last SQL command twice if you have a SQL*Plus command at the end, as in Listing 11-49.
Note According to the SQL*Plus documentation, using additional buffers is a deprecated feature since the early 1990s, from SQL*Plus version 3.0 onward. However, it seems to be the only way to prevent the SQL*Plus SAVE command from appending a forward slash (/) at the end of the script, which would execute the last SQL command twice if you have a SQL*Plus command at the end, as in Listing 11-49.
You can only manipulate the contents of nondefault SQL*Plus buffers with the SQL*Plus editor commands, and use SAVE and GET for file manipulation. You cannot execute the contents of those buffers with the START or @ command, because these commands operate only on the SQL buffer. That’s why you must save the script with the SAVE command before you can use it.
SQL*Plus commands are normally entered on a single line. If that is impossible, or if you want to make your scripts more readable, you must explicitly “escape” the newline character with a minus sign (-), as we did before with the ACCEPT command in Listing 11-34, and again inListing 11-49.
![]() Note The examples in the remainder of this chapter show only the contents of the SQL*Plus scripts. It is up to you to decide which method you want to use to create and maintain those scripts.
Note The examples in the remainder of this chapter show only the contents of the SQL*Plus scripts. It is up to you to decide which method you want to use to create and maintain those scripts.
The login.sql Script
One special SQL*Plus script must be mentioned here: login.sql. SQL*Plus automatically executes this script when you start a SQL*Plus session, as long as the login.sql script is located in the folder (or directory) from where you start SQL*Plus, or if that script can be found via the SQLPATHenvironment variable (under Linux) or Registry setting (under Microsoft Windows).
Note that there is also a global SQL*Plus glogin.sql script. This script is executed for every user, and it allows you to have a mixture of global settings and personal settings in a multiuser environment. In a single-user Oracle environment, using both scripts is useless and can be confusing. The glogin.sql script is normally located in the sqlplus/admin subdirectory under the Oracle installation directory.
![]() Caution Starting with Oracle Database 10g, SQL*Plus also executes the glogin.sql and login.sql scripts if you execute a CONNECT command, without leaving SQL*Plus. This didn’t happen with earlier releases of SQL*Plus.
Caution Starting with Oracle Database 10g, SQL*Plus also executes the glogin.sql and login.sql scripts if you execute a CONNECT command, without leaving SQL*Plus. This didn’t happen with earlier releases of SQL*Plus.
You can use the glogin.sql and login.sql scripts to set various SQL*Plus system variables, user-defined variables, and column definitions. Listing 11-50 shows an example of a login.sql script, demonstrating that you can also execute SQL commands from this script. You can test it by saving this file to the right place and restarting SQL*Plus.
Listing 11-50. Example of a login.sql Script
-- ===========================================
-- LOGIN.SQL
-- ===========================================
set pause "Enter... "
set pause on
set numwidth 6
set pagesize 24
alter session set nls_date_format='dd-mm-yyyy';
-- define_editor=Notepad /* for Windows */
-- define_editor=vi /* forUNIX or Linux */
clear screen
11.5 Report Generation with SQL*Plus
As you’ve learned in previous chapters, the SQL language enables you to write queries. Queries produce result tables. However, the default layout of those query results is often visually unappealing.
SQL*Plus offers many commands and features to enhance your query results into more readable reports. SQL*Plus is definitely the oldest and most traditional “quick-and-dirty” Oracle report generator; the original name in the 1980s was UFI (User Friendly Interface), before they renamed it to SQL*Plus. Several other Oracle reporting tools were developed and discarded over the years, but SQL*Plus is still here. Table 11-5 lists some of the SQL*Plus features you can use for enhancing your reports.
Table 11-5. SQL*Plus Features to Enhance Reports
|
Feature |
Description |
|
SET {LINESIZE|PAGESIZE|NEWPAGE} |
Adjust the page setup; set to 0 suppresses page formatting |
|
SET TRIMSPOOLON |
Suppress trailing spaces in SPOOL output |
|
COLUMN |
Adjust column layouts (header and contents) |
|
TTITLE, BTITLE |
Define top and bottom page titles |
|
REPHEADER,REPFOOTER |
Define report headers and footers |
|
BREAK |
Group rows (make sure the result is ordered appropriately) |
|
COMPUTE |
Add aggregate computations on BREAK definitions |
|
SPOOL |
Spool SQL*Plus output to a file |
The SQL*Plus SET command was elaborated upon in Section 11.2, in the discussion of SQL*Plus system variables. Now we’ll look at the other SQL*Plus commands that are useful for producing reports.
The SQL*Plus COLUMN Command
You also already saw some examples of the COLUMN command. However, the SQL*Plus COLUMN command has many additional features, as you will learn in this section.
The general syntax of the SQL*Plus COLUMN command is as follows:
SQL> column [<col-name>|<expression>] [<option>...]
If you don’t specify any arguments at all, the COLUMN command produces a complete overview of all current column settings. If you specify <col-name>, you get only the settings for that column. Note that <col-name> is mapped with column aliases in the SELECT clause; that is, with the column headings of the final query result. You can use <expression> to influence SELECT clause expressions; make sure to copy the expression verbatim from the query. For <option>, you can specify various ways to handle the column. Table 11-6 displays a selection of the valid options for the COLUMN command.
Table 11-6. Some SQL*Plus COLUMN Command Options
|
Option |
Description |
|
ALI[AS] |
Column alias; useful in BREAK and COMPUTE commands |
|
CLE[AR] |
Reset all column settings |
|
FOLD_A[FTER] |
Insert a carriage return after the column |
|
FOR[MAT] |
Format display of column values |
|
HEA[DING] |
Define (different) column title for display |
|
JUS[TIFY] |
Justify column header: LEFT, CENTER or CENTRE, RIGHT |
|
LIKE |
Copy settings over from another column |
|
NEWL[INE] |
Force a new line before this column |
|
NEW_V[ALUE] |
Substitution variable to retain the last column value |
|
NO[PRI[NT]] |
Suppress (NOPRINT) or display (PRINT) specific columns |
|
NUL[L] |
Display of null values in specific columns |
|
ON | OFF |
Toggle to activate/deactivate column settings |
|
WRA[PPED] |
Wrap too-long column values to the following line |
|
WOR[D_WRAPPED] |
Wrap too-long column values to the following line, splitting the column value between words |
|
TRU[NCATED] |
Truncate too-long column values |
The last three COLUMN options are mutually exclusive. In Table 11-6, the brackets indicate the abbreviations you can use. For example, you can abbreviate the first SQL*Plus command in Listing 11-51 as COL ENAME FOR A20 HEA LAST_NAME JUS C, if you like. If you do not specify a JUSTIFY value for a column, SQL*Plus uses the following alignment defaults:
· NUMBER column headings default to RIGHT.
· Other column headings default to LEFT.
Listings 11-51 through 11-53 demonstrate some examples of the SQL*Plus COLUMN command.
Listing 11-51. Using COLUMN FORMAT, HEADING, JUSTIFY, and LIKE
SQL> select empno, ename, bdate
2 , msal as salary
3 , comm as commission
4 from employees;
EMPNO ENAME BDATE SALARY COMMISSION
------ -------- ----------- -------- ----------
7369 SMITH 17-DEC-1965 800
7499 ALLEN 20-FEB-1961 1600 300
7521 WARD 22-FEB-1962 1250 500
...
14 rows selected.
SQL> col ename format a20 heading last_name justify center
SQL> col salary format $9999.99
SQL> col commission like salary
SQL> col salary heading month|salary
SQL> /
month
EMPNO last_name BDATE salary COMMISSION
------ -------------------- ----------- --------- ----------
7369 SMITH 17-DEC-1965 $800.00
7499 ALLEN 20-FEB-1961 $1600.00 $300.00
7521 WARD 22-FEB-1962 $1250.00 $500.00
...
14 rows selected.
SQL>
Note the effects of the vertical bar (|) in the COL SALARY command and the LIKE option for the COMMISSION column.
Listings 11-51 and 11-52 illustrate an important property of the COLUMN command: you must always specify the column alias, not the original column name, as its argument.
Listing 11-52. Using COLUMN NOPRINT, ON, OFF
SQL> col COMM NOPRINT -- Note the column name
SQL> select empno, ename, bdate
2 , msal as salary
3 , comm as commission -- and the column alias
4 from employees;
month
EMPNO last_name BDATE salary COMMISSION
------ -------------------- ----------- --------- ----------
7369 SMITH 17-DEC-1965 $800.00
7499 ALLEN 20-FEB-1961 $1600.00 $300.00
7521 WARD 22-FEB-1962 $1250.00 $500.00
...
14 rows selected.
SQL> col COMMISSION NOPRINT -- Now you use the column alias instead
SQL> /
month
EMPNO last_name BDATE salary
------ -------------------- ----------- ---------
7369 SMITH 17-DEC-1965 $800.00
7499 ALLEN 20-FEB-1961 $1600.00
7521 WARD 22-FEB-1962 $1250.00
...
14 rows selected.
SQL> col commission off
SQL> /
month
EMPNO last_name BDATE salary COMMISSION
------ -------------------- ----------- --------- ----------
7369 SMITH 17-DEC-1965 $800.00
7499 ALLEN 20-FEB-1961 $1600.00 300
7521 WARD 22-FEB-1962 $1250.00 500
...
SQL> col commission
COLUMN commission OFF
FORMAT $9999.99
NOPRINT
SQL> col commission on
SQL>
The NEW_VALUEfeature of the COLUMN command is very nice, and you can use it for various tricks in SQL*Plus scripts. As you can see in Listing 11-53, the user-defined LAST_EMPNO variable remembers the last EMPNO value for you.
Listing 11-53. Using COLUMN NEW_VALUE
SQL> col empno new_value LAST_EMPNOSQL> /
month
EMPNO last_name BDATE salary
------ -------------------- ----------- ---------
7369 SMITH 17-DEC-1965 $800.00
7499 ALLEN 20-FEB-1961 $1600.00
...
7934 MILLER 23-JAN-1962 $1300.00
14 rows selected.
SQL> def LAST_EMPNO
DEFINE LAST_EMPNO = 7934 (NUMBER)
SQL> I
5 where deptno = 30;
month
EMPNO last_name BDATE salary
------ -------------------- ----------- ---------
7499 ALLEN 20-FEB-1961 $1600.00
7521 WARD 22-FEB-1962 $1250.00
7654 MARTIN 28-SEP-1956 $1250.00
7698 BLAKE 01-NOV-1963 $2850.00
7844 TURNER 28-SEP-1968 $1500.00
7900 JONES 03-DEC-1969 $800.00
SQL> define LAST_EMPNO
DEFINE LAST_EMPNO = 7900 (NUMBER)
SQL> undefine LAST_EMPNO
SQL>
The SQL*Plus TTITLE and BTITLE Commands
As you have seen so far, the SQL*Plus COLUMN command allows you to influence the report layout at the column level, and you can influence the overall page layout with the SQL*Plus SET PAGESIZE and SET LINESIZE commands. You can further enhance your SQL*Plus reports with the SQL*Plus TTITLE and BTITLE commands, which allow you to add page headers and footers to your report. The syntax is as follows:
SQL> ttitle [<print-spec> {<text>|<variable>}...] | [OFF|ON]
SQL> btitle [<print-spec> {<text>|<variable>}...] | [OFF|ON]
As Listing 11-54 demonstrates, you can also use these commands to display their current settings (by specifying no arguments) or to enable/disable their behavior with ON and OFF.
Listing 11-54. Using TTITLE and BTITLE
SQL> set pagesize 22
SQL> set linesize 80
SQL> ttitle left 'SQL*Plus report' -
> right 'Page: ' format 99 SQL.PNO -
> skip center 'OVERVIEW' -
> skip center 'employees department 30' -
> skip 2
SQL> btitle col 20 'Confidential' tab 8 -
> 'Created by: ' SQL.USER
SQL> /
SQL*Plus report Page: 1
OVERVIEW
employees department 30
month
EMPNO last_name BDATE salary
------ -------------------- ----------- ---------
7499 ALLEN 20-FEB-1961 $1600.00
7521 WARD 22-FEB-1962 $1250.00
7654 MARTIN 28-SEP-1956 $1250.00
7698 BLAKE 01-NOV-1963 $2850.00
7844 TURNER 28-SEP-1968 $1500.00
7900 JONES 03-DEC-1969 $800.00
Confidential Created by: BOOK
SQL> btitle off
SQL> btitle
btitle OFF and is the following 66 characters:
col 20 'Confidential' tab 8 'Created by: ' SQL.USER
SQL> ttitle off
SQL>
The output in Listing 11-54 demonstrates the effects of the TTITLE and BTITLE commands. Note that we use two predefined variables: SQL.PNO for the page number and SQL.USER for the current username.
The TTITLE and BTITLE commands have several additional features. SQL*Plus also supports the REPHEADER and REPFOOTER commands, which allow you to add headers and footers at the report level, as opposed to the page level. See the SQL*Plus User’s Guide and Reference for more information about these commands.
The SQL*Plus BREAK Command
You can add “breaks” to the result of your reports with the SQL*Plus BREAK command. Breaks are locations in your report: between certain rows, between all rows, or at the end of the report. You can highlight breaks in your reports by suppressing repeating column values, by inserting additional lines, or by forcing a new page.
Breaks are also the positions within your reports where you can add subtotals or other data aggregations. You can use the SQL*Plus COMPUTE command for these purposes. Let’s investigate the possibilities of the BREAK command first.
The syntax of the SQL*Plus BREAK command is shown in Figure 11-4.
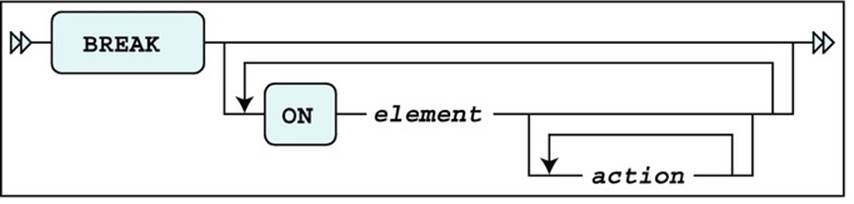
Figure 11-4. A BREAK command syntax diagram
For ELEMENT, you can specify a column name or a column expression, or a special report element, as discussed at the end of this section. The action values are listed in Table 11-7.
Table 11-7. SQL*Plus BREAK Command Actions
|
Action |
Description |
|
SKIPn |
Skip n lines |
|
SKIP PAGE |
Insert a page break |
|
[NO]DUPLICATES |
Suppress or show duplicate values; NODUPLICATES is the default |
Listing 11-55 shows an example of a BREAK command.
Listing 11-55. Using the BREAK Command
SQL> clear columns
SQL> select deptno, job, empno, ename, msal, comm
2 from employees
3 order by deptno, job;
DEPTNO JOB EMPNO ENAME MSAL COMM
-------- -------- -------- -------- -------- --------
10 ADMIN 7934 MILLER 1300
10 DIRECTOR 7839 KING 5000
10 MANAGER 7782 CLARK 2450
20 MANAGER 7566 JONES 2975
20 TRAINER 7369 SMITH 800
...
14 rows selected.
SQL> break on deptno skip 2
SQL> /
DEPTNO JOB EMPNO ENAME MSAL COMM
-------- -------- -------- -------- -------- --------
10 ADMIN 7934 MILLER 1300
DIRECTOR 7839 KING 5000
MANAGER 7782 CLARK 2450
20 MANAGER 7566 JONES 2975
TRAINER 7369 SMITH 800
...
14 rows selected.
SQL> break
break on deptno skip 2 nodup
SQL> break on deptno page
SQL> set pause "Enter... "
SQL> /
[Enter]...
DEPTNO JOB EMPNO ENAME MSAL COMM
-------- -------- -------- -------- -------- --------
10 ADMIN 7934 MILLER 1300
DIRECTOR 7839 KING 5000
MANAGER 7782 CLARK 2450
[Enter]...
DEPTNO JOB EMPNO ENAME MSAL COMM
-------- -------- -------- -------- -------- --------
20 MANAGER 7566 JONES 2975
TRAINER 7369 SMITH 800
...
14 rows selected.
SQL>
Note the ORDER BY clause in the query in Listing 11-55. You need this clause for the BREAK command to work properly. The BREAK command itself does not sort anything; it just processes the rows, one by one, as they appear in the result.
Note also that you can have only one break definition at any time. Each break definition implicitly overwrites any current break definition. This implies that if you want two breaks for your report, at different levels, you must define them in a single BREAK command; for an example, seeListing 11-56.
Listing 11-56. Multiple Breaks in a Single BREAK Command
SQL> break on deptno skip page -
> on job skip 1
SQL> /
[Enter]...
DEPTNO JOB EMPNO ENAME MSAL COMM
-------- -------- -------- -------- -------- --------
10 ADMIN 7934 MILLER 1300
DIRECTOR 7839 KING 5000
MANAGER 7782 CLARK 2450
[Enter]...
DEPTNO JOB EMPNO ENAME MSAL COMM
-------- -------- -------- -------- -------- --------
20 MANAGER 7566 JONES 2975
TRAINER 7369 SMITH 800
7902 FORD 3000
7788 SCOTT 3000
7876 ADAMS 1100
...
14 rows selected.
SQL> break
break on deptno page nodup
on job skip 1 nodup
SQL>
Note that you don’t use any commas as break definition delimiters. Additionally, though you may include the NODUP option for the BREAK command, keep in mind that even if it is not listed explicitly, suppression of duplicate values (NODUP) is the default behavior of the BREAKcommand.
As you have seen so far, you can define breaks on columns or column expressions. However, you can also define breaks on two special report elements:
· ROW forces breaks on every row of the result.
· REPORT forces a break at the end of your report.
The SQL*Plus COMPUTE Command
The SQL*Plus COMPUTE command allows you to add aggregating computations on your break definitions. The syntax of the COMPUTE command is shown in Figure 11-5.
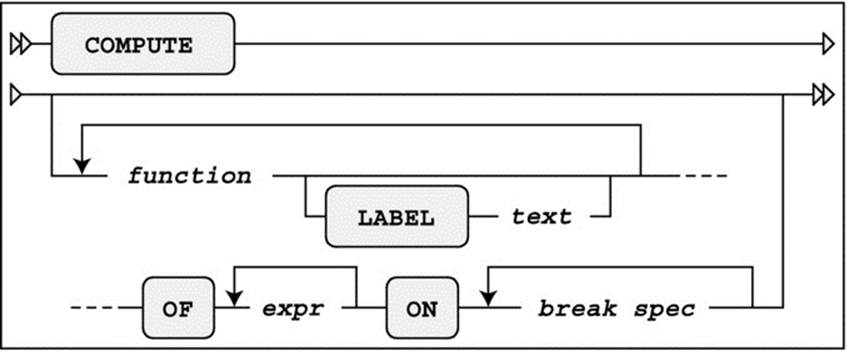
Figure 11-5. A COMPUTE command syntax diagram
Table 11-8 lists the various functions supported by the SQL*Plus COMPUTE command.
The expr indicates on which column you want the function to be applied. The break spec indicates at which points in the report you want this computation to happen. The break spec must be a column, column expression, or a report element (ROW or REPORT) on which you previously defined a BREAK.
Listing 11-57 demonstrates an example of using COMPUTE.
Table 11-8. SQL*Plus COMPUTE Functions
|
Function |
Description |
|
AVG |
The average |
|
COUNT |
The number of NOT NULL column values |
|
MAX |
The maximum |
|
MIN |
The minimum |
|
NUMBER |
The number of rows |
|
STD |
The standard deviation |
|
SUM |
The sum |
|
VAR |
The variance |
Listing 11-57. Using COMPUTE for Aggregation
SQL> set pause off
SQL> break on deptno skip page on job
SQL> compute sum label total of msal on deptno
SQL> compute count number of comm on deptno
SQL> /
DEPTNO JOB EMPNO ENAME MSAL COMM
-------- -------- -------- -------- -------- --------
10 ADMIN 7934 MILLER 1300
DIRECTOR 7839 KING 5000
MANAGER 7782 CLARK 2450
******** ******** -------- --------
count 0
number 3
total 8750
DEPTNO JOB EMPNO ENAME MSAL COMM
-------- -------- -------- -------- -------- --------
20 MANAGER 7566 JONES 2975
TRAINER 7369 SMITH 800
7902 FORD 3000
7788 SCOTT 3000
7876 ADAMS 1100
******** ******** -------- --------
count 0
number 5
total 10875
DEPTNO JOB EMPNO ENAME MSAL COMM
-------- -------- -------- -------- -------- --------
30 ADMIN 7900 JONES 800
MANAGER 7698 BLAKE 2850
SALESREP 7499 ALLEN 1600 300
7654 MARTIN 1250 1400
7844 TURNER 1500 0
7521 WARD 1250 500
******** ******** -------- --------
count 4
number 6
total 9250
14 rows selected.
SQL> compute
COMPUTE sum LABEL 'total' OF msal ON deptno
COMPUTE count LABEL 'count' number LABEL 'number' OF comm ON deptno
SQL> clear computes
SQL> clear breaks
SQL>
As Listing 11-57 shows, you can issue multiple COMPUTE commands, and you can have multiple COMPUTE definitions active at the same time. The CLEAR COMPUTES command erases all compute definitions, and the CLEAR BREAKS command clears the current break definition.
If you are happy with the final report results on screen, you can store all SQL and SQL*Plus commands in a script, and add commands to spool the output to a text file, as described in the next section.
The Finishing Touch: SPOOL
If you look at the results in Listing 11-57, you see that this mixture of SQL and SQL*Plus commands produces a rather complete report. Now you can use the SQL*Plus SPOOL command to save the report into a file; for example, to allow for printing. The syntax is as follows:
SQL> spool [<file-name>[.<ext>] [CREATE|REPLACE|APPEND] | OFF | OUT]
If you specify no arguments, the SPOOL command reports its current status. The default file name extension <ext> is LST or LIS on most platforms. SPOOL OFF stops the spooling. SPOOL OUT stops the spooling and sends the result to your default printer.
Suppose you have saved the example of Listing 11-57 in a script, containing all SQL*Plus commands and the SQL query. You can turn this script into a complete report by changing the contents as indicated in Listing 11-58. For readability, the three lines to be added are highlighted. TheTRIMSPOOL setting suppresses trailing spaces in the result, and the REPLACE option of the SPOOL command ensures that an existing file (if any) will be overwritten.
Listing 11-58. Using the SPOOL Command to Generate SQL*Plus Reports
set pause off
break on deptno skip page on job
compute sum label total of msal on deptno
compute count number of comm on deptno
>>> set trimspool on <<< added line
>>> spool report.txt replace <<< added line
-- The query
select deptno, job, empno, ename, msal, comm
from employees
order by deptno, job;
>>> spool off <<< added line
-- Cleanup section
undefine dept
clear computes
clear breaks
set pause on
If you execute this script, it generates a text file named report.txt in the current folder/directory.
11.6 HTML in SQL*Plus
SQL*Plus supports the ability to generate reports in HTML format, allowing you to display the report results in a browser environment. SQL Developer has more features than SQL*Plus in this area, because it runs in a browser environment, itself. However, this chapter provides a look at how SQL*Plus can be used to help you perform this task.
HTML in SQL*Plus
The SQL*Plus MARKUP setting is very important if you want to work with HTML. Listing 11-59 demonstrates why this is the case.
Listing 11-59. The SQL*Plus MARKUP Setting
SQL> show markup
markup HTML OFF HEAD "<style type='text/css'> body
{font:10pt Arial,Helvetica,sans-serif; color:black; background:White;} p {font:1F
SQL> set markup
SP2-0281: markup missing set option
Usage: SET MARKUP HTML [ON|OFF] [HEAD text] [BODY text]
[TABLE text] [ENTMAP {ON|OFF}] [SPOOL {ON|OFF}] [PRE[FORMAT] {ON|OFF}]
SQL>
The SQL*Plus error message in Listing 11-59 (followed by the “Usage:” text) precisely indicates what you can do to fix the problem with the incomplete SET MARKUP command:
· SET MARKUP HTML is mandatory, followed by ON or OFF.
· HEAD allows you to specify text for the HTML <header> tag, BODY for the <body> tag, and TABLE for the <table> tag, respectively.
· ENTMAP allows you to indicate whether SQL*Plus should replace some special HTML characters (such as <, >, ', and &) with their corresponding HTML representations (<, >, ", and &).
· SPOOL lets you spool output to a file, without needing to use an additional SQL*Plus SPOOL command.
· PREFORMAT allows you to write output to a <pre> tag. The default value is OFF.
The HEADERoption of the SET MARKUP command is particularly interesting, because it allows you to specify a cascading style sheet. Let’s perform some experiments, as illustrated in Listing 11-60.
Listing 11-60. Using the SQL*Plus SET MARKUP Command
SQL> set markup html on head "<title>SQL*Plus demo</title>"
SQL> select ename,init from employees where deptno = 10;
<br>
<p>
<table border='1' width='90%' align='center' summary='Script output'>
<tr>
<th scope="col">
last_name
</th>
<th scope="col">
INIT
</th>
</tr>
<tr>
<td>
CLARK
</td>
<td>
AB
</td>
</tr>
<tr>
<td>
KING
</td>
<td>
CC
</td>
</tr>
<tr>
<td>
MILLER
</td>
<td>
TJA
</td>
</tr>
</table>
<p>
SQL> set markup html off
<br>
SQL>
As you can see in Listing 11-60, the screen output is in HTML format. Obviously, the MARKUP setting becomes truly useful in combination with the SQL*Plus SPOOL command, allowing you to open the result in a browser. The usefulness of the combination of the SQL*Plus MARKUPand SPOOL commands is so obvious that you are able to specify SPOOL ON as an option in the MARKUP setting (see Listing 11-60).
![]() Tip You can also specify the MARKUP setting as a command-line argument when you launch SQL*Plus. This is useful for certain reports, because SQL*Plus then processes the <html> and <body> tags before the first command is executed.
Tip You can also specify the MARKUP setting as a command-line argument when you launch SQL*Plus. This is useful for certain reports, because SQL*Plus then processes the <html> and <body> tags before the first command is executed.
If you execute the SQL*Plus script in Listing 11-61, you will note what happens as a consequence of the SET ECHO OFF TERMOUT OFF command: the SQL*Plus screen remains empty. SQL*Plus only writes the results to a file.
Listing 11-61. Contents of the htmldemoscript.sql Script
-- ================================
-- htmldemoscript.sql
-- ================================
SET ECHO off TERMOUT OFF
set markup html on spool on -
preformat off entmap on -
head "<title>HTML Demo Report</title> -
<link rel='stylesheet' href='x.css'>"
spool htmldemo.htm replace
select empno, ename, init, msal
from employees
where deptno = 20;
spool off
set markup html off
set echo on
Figure 11-6 illustrates what happens if you open the result in a browser. The example assumes that you have an x.css cascading style sheet document in the current folder/directory.
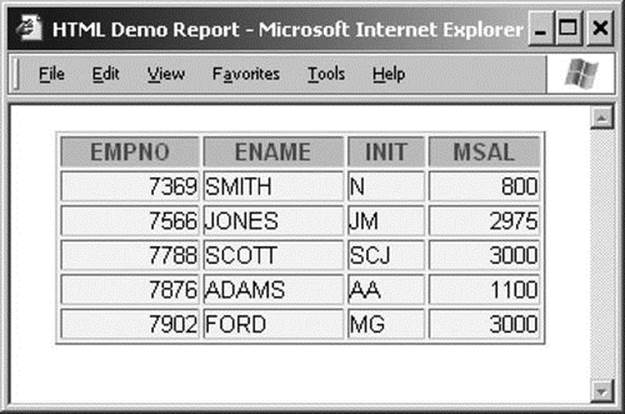
Figure 11-6. The result of the htmldemoscript.sql in a browser
One more tip: you can achieve various “special effects” by selecting HTML fragments as alphanumerical literals in your queries. Listing 11-62 demonstrates what happens if you add the following fragment to the htmldemoscript.sql script, just before the SPOOL OFF command.
Listing 11-62. Addition to the htmldemoscript.sql Script
set markup html entmap off preformat on
set heading off
select '<a href="http://www.naturaljoin.nl"> Visit this website</a>'
from dual;
11.7 Building SQL*Plus Scripts for Automation
Inevitably, as you work in SQL*Plus, you will want to create scripts containing SQL commands that do more than generate a nicely formatted report in text or HTML. You will want a script that has all the characteristics of a “batch” program: capturing input parameters, performing complex tasks, passing data values from one SQL statement to another, handling error conditions intelligently, and returning meaningful exit status codes to the calling environment. An amazing volume of these scripts exists on every database server in the world, and the power of SQL*Plus enables a developer or database administrator to do practically anything by means of SQL*Plus scripts.
What Is a SQL*Plus Script?
As introduced earlier in this chapter, a SQL*Plus script is a file containing SQL*Plus commands intermixed with SQL statements. Generally, SQL*Plus scripts have “.sql” file-extensions, but any type of file can be executed as a script using the SQL*Plus START command or its “@” abbreviation.
SQL*Plus scripts are often used simply to save useful SQL statements, to avoid having to re-type them again. But SQL*Plus scripts can also be used for automation purposes, to regularly run an important report or batch program from a job-scheduling program. This section is geared more toward learning SQL*Plus features for creating bullet-proof, automatable programs.
Besides containing one or more SQL statements, many scripts (like many batch programs) need to do one or more of the tasks listed in Table 11-9.
Table 11-9. Tasks of a SQL*Plus Script
|
Task |
Description |
|
Inputting parameters |
Capturing and using input parameters passed in from the calling environment |
|
Passing data values |
Passing data values retrieved by one SQL statement to a subsequent SQL statement |
|
Handling error conditions |
Continuing or ending the SQL*Plus script when an error is encountered |
|
Returning exit status |
Passing a “status code” back to the calling environment upon exit from the script |
|
Executing SQL or PL/SQL |
Oh yeah—the SQL or PL/SQL code that is the object of the script! |
Only the ability to execute SQL or PL/SQL statements is required—all of the other tasks are purely optional, but let’s look at them one by one, so you’ll know how to use them when you want to use them.
Capturing and Using Input Parameter Values
Input parameters are data values passed into a program when it starts. For a SQL*Plus script, data values can be specified within SQL*Plus using the START and @ commands. Listing 11-63 provides an example. Start and @ are each used to invoke a script named demoscript.sql (the .sql extension is the default). Two parameters are passed in for each invocation.
Listing 11-63. Two Input Parameters Passed in Using the START and @ Commands
start demoscript 01-FEB-2010 TRUE
@demoscript 01-FEB-2010 TRUE
Input parameter values can also be specified when SQL*Plus is started. You pass such parameters on the command line, following the name of the script. Listing 11-64 provides an example.
Listing 11-64. Passing Input Parameters to a SQL*Plus Script from a UNIX or Linux Shell or Windows Command Prompt
sqlplus book/<password> @demoscript ename 01-FEB-2010
In Listing 11-64, you see the SQL*Plus command connecting as BOOK (password BOOK or other password you may have chosen for your environment) and calling the demoscript.sql script with the two input parameter values of ENAME and 01-FEB-2010.
Inside the SQL*Plus script, these input parameters are accessed as ordinal substitution parameters. Use &1 to refer to the first parameter, &2 to refer to the second, and so forth. See Listing 11-65 for an example.
Listing 11-65. Retrieving Input Parameter Values Inside the SQL*Plus Script
select &1 from employees
where hire_date >= to_date(‘&2’, ‘DD-MON-YYYY’)
and hire_date < to_date(‘&2’,’DD-MON-YYYY’) + 1;
If you prefer more meaningful variable names, you can use the SQL*Plus DEFINE command to copy an input parameter value into a substitution variable of your choice. Listing 11-66 assigns the values from &1 and &2 to the more meaningfully named variables V_SELECTCOL andV_HIRE_DT.
Listing 11-66. Storing Input Parameter Values Within Substitution Variables
define V_SELECTCOL=”&1”
define V_HIRE_DT=”&2”
select &&V_SELECTCOL from employees
where hire_date >= to_date(‘&&V_HIRE_DT’, ‘DD-MON-YYYY’)
and hire_date < to_date(‘&&V_HIRE_DT’,’DD-MON-YYYY’) + 1;
Using meaningful variable names as shown in Listing 11-66 contributes to ease of maintenance down the road. Your SQL*Plus script is a little more readable and understandable, thus a little more maintainable.
When looking at the input parameters and how they are being used, please note that the first input parameter in the examples so far (ENAME) is not a data value, as is the second input parameter (01-FEB-2010). Instead, it is the name of a column in the EMPLOYEES table. In essence, substitution variables can be used to change the keywords, not just data values, in the SQL statement. In fact, a substitution variable can contain an entire clause or an entire SQL statement, if you so wish. Therefore, substitution variables are quite versatile in general, and they are the method by which data values and other directives are passed into a SQL*Plus script.
Passing Data Values from One SQL Statement to Another
More complex SQL*Plus scripts are likely to be comprised of several SQL statements, and sometimes it is useful to extract data from the database and pass that data to another SQL statement or SQL*Plus command. A good example of this type of data value passing might be naming an output file spooled from a script by including the name of the database instance used along with today’s date. Another example might be when data is extracted with one query and passed to anther query.
Mechanism 1: The NEW_VALUE Clause
There are two mechanisms for passing values between SQL statements; the first uses SQL*Plus substitution variables and the second uses SQL*Plus bind variables. With substitution variables, you can use the COLUMN . . . NEW_VALUE command to save the last value retrieved from aSELECT statement into a substitution variable. Listing 11-67 illustrates an example of using the NEW_VALUE clause.
Listing 11-67. Passing Data Values from One SQL Statement to Another Using Substitution Variables
define V_BDATE=”&1”
column empno new_value V_EMPNO
select empno from employees
where bdate >= to_date(‘&&V_BDATE’, ‘DD-MON-YYYY’)
and bdate < to_date(‘&&V_BDATE’,’DD-MON-YYYY’) + 1;
select ename from employees
where empno = &&V_EMPNO;
Here, the COLUMN EMPNO command specifies that the last value retrieved (NEW_VALUE) will be stored in a SQL*Plus substitution variable named V_EMPNO. So, in this example, we run the query against the EMPLOYEES table for the employees hired on the date specified by the substitution variable V_BDATE, then the last EMPNO column value retrieved is saved into the V_EMPNO substitution variable. Finally, the V_EMPNO substitution variable can be used in the WHERE clause of the subsequent SQL statement, as shown in Listing 11-67.
Obviously, there are limitations. If the first query returns more than one row, then only the value from the last row will be retained in the substitution variable and passed to the second query. So, it is far from perfect, but it has its uses. If all rows retrieved need to be passed to the second query then the best method would be either to rewrite the SQL so that both steps are performed in the same SQL statement or to “glue” the two SQL statements together within a PL/SQL program using PL/SQL collections.
Mechanism 2: Bind Variables
Another technique of passing data values between SQL statements in a SQL*Plus script involves the use of SQL*Plus bind variables. Unlike substitution variables, bind variables behave like bind variables in PL/SQL programs or other programming languages such as Java, C/C++, Perl, or others. That is, unlike substitution variables, which are resolved within SQL*Plus before a SQL statement is sent down to the database engine, bind variables are sent down to the database engine and resolved there. So, they can be used only for bind values in SQL statement SELECT,WHERE, GROUP BY, ORDER BY, SET, and VALUES clauses, and they cannot be used to replace the actual keywords or column names or table names in a SQL statement, as substitution variables can.
Bind variables must first be declared with a VARIABLE command. Once you’ve done that, you can use bind variables to generate data in one statement and use that data in another statement within a PL/SQL block, as shown in Listing 11-68.
Listing 11-68. Passing Data Values from One SQL Statement to Another Using Bind Variables
set serverout on
variable v_empno number
variable v_ename varchar2(8)
begin
select empno into :v_empno from employees
where bdate >= to_date(‘&&V_BDATE’, ‘DD-MON-YYYY’)
and bdate < to_date(‘&&V_BDATE’,’DD-MON-YYYY’) + 1;
select ename into :v_ename from employees
where empno = :v_empno;
dbms_output.put_line(‘v_empno = ‘||:v_empno||’ and v_ename = ‘||:v_ename);
end;
/
So, in Listing 11-68, we declare a bind variable named V_EMPNO with a numeric datatype and a bind variable named V_ENAME with a VARCHAR2 datatype, and then populate them using the INTO clause of each SELECT statement that queries from the EMPLOYEES table. Please note the leading full-colon (:) character used to denote a bind variable.
Handling Error Conditions
When we run SQL statements interactively in SQL*Plus or SQL Developer or any other utility, we decide how to react to an error. If an SQL statement fails from a syntax error or from an unexpected data condition such as ORA-01403: no rows found, do we want to proceed and run the next SQL statement, or do we want to simply roll back all work that has been done and exit? When executing interactively, we can decide interactively. But what about when we’re running a script?
SQL*Plus provides the WHENEVER command to direct SQL*Plus as to how to react to failures. WHENEVER is particularly useful when running a script. Table 11-10 describes two variations of the command.
Table 11-10. WHENEVER Error-Handling Conditions
|
Error condition |
Description |
|
WHENEVER OSERROR |
Triggers whenever a SQL*Plus command like CONNECT, DISCONNECT, SPOOL, HOST, START, or any other command that interacts with the operating system fails |
|
WHENEVER SQLERROR |
Triggers whenever an SQL statement like SELECT, INSERT, UPDATE, DELETE, CREATE, ALTER, DROP, TRUNCATE, GRANT, REVOKE, or any other SQL command fails |
Both of the commands in Table 11-10 have two possible directives: EXIT and CONTINUE. Each directive, in turn, implements two further directives describing how to handle an open transaction and (if necessary) which exit status to return to the operating system. Table 11-11 describes the options that you can pass to EXIT and CONTINUE.
Table 11-11. WHENEVER Error-Handling Directives
|
Error condition |
Description |
|
EXIT [ exit-status | txn-directive ] |
Exit from SQL*Plus with the specified exit status after committing or rolling back the current transaction as directed. |
|
CONTINUE [ txn-directive ] |
Continue executing SQL*Plus after committing, rolling back, or doing nothing. |
|
Exit-status |
Can be one of: [SUCCESS| FAILURE | n |substitution-variable | bind-variable ] where SUCCESS is an operating-system dependent exit status signifying successful completion, FAILURE is an operating-system dependent exit status signifying failure, and n is a number value. SQL*Plus substitution variables and SQL*Plus bind variables containing numeric values can also be used as return statuses. SUCCESS is the default. |
|
Txn-directive |
Can be one of: [ COMMIT | ROLLBACK | NONE ] where NONE can be used only with the CONTINUE directive. When used with the EXIT directive, COMMIT is the default and when used with the CONTINUE directive, NONE is the default. |
Therefore, if a SQL*Plus script contains five UPDATE statements in a row and you want the script to stop executing, roll back any work already performed, and then exit to the operating system with a failure status, your script might look something like that shown in Listing 11-69.
Listing 11-69. Error-Handling in a SQL*Plus Script
whenever oserror exit failure rollback
whenever sqlerror exit failure rollback
set echo on feedback on timing on
spool update_script
update ...
update ...
update ...
update ...
update ...
exit success commit
In Listing 11-69, we see the use of the WHENEVER command directing SQL*Plus to exit back to the operating system with a FAILURE exit status, and perform a ROLLBACK as it does so, should any OS commands (such as SPOOL) or SQL commands (such as UPDATE) fail. If all of the commands are successful and we reach the very last line of the script, then the script will EXIT back to the operating system with a SUCCESS exit status and perform a COMMIT as it does so.
SQL*Plus Error Logging
If you wish to save the error messages you receive when running an SQL script, you can choose to have them written to an error log table. Having your errors written to an error log table provides you with flexibility in that you do not have to exit a script when you encounter an error if you do not want to, yet you can review any error messages at your convenience by querying the error log table. SQL*Plus Error Logging is turned off by default; but when it is turned on, errors are recorded whether a query is run interactively or from a script. Listing 11-70 demonstrates the default employment of this functionality.
Listing 11-70. Employing Default SQL*Plus Error Logging
SQL> SET ERRORLOGGING ON
SQL> select * from department;
select * from department
*
ERROR at line 1:
ORA-00942: table or view does not exist
SQL> select first_name from employees;
select first_name from employees
*
ERROR at line 1:
ORA-00904: "FIRST_NAME": invalid identifier
SQL> select empno into :v_emp_no from employees;
EMPNO
-----
7369
.
.
.
14 rows selected.
SQL> print :v_emp_no
SP2-0552: Bind variable "V_EMP_NO" not declared.
SQL> select timestamp, statement, message
2 from sperrorlog;
TIMESTAMP STATEMENT
MESSAGE
---------------------------------------------------------------------------
17-FEB-14 06.21.02.000000 PM select * from department
ORA-00942: table or view does not exist
17-FEB-14 06.21.19.000000 PM select first_name from employees
ORA-00904: "FIRST_NAME": invalid identifier
17-FEB-14 06.23.22.000000 PM print :v_emp_no
SP2-0552: Bind variable "V_EMP_NO" not declared.
The output from Listing 11-70 illustrates the fact that when you turn on SQL*Plus error logging, if you do not already have a table in your schema called SPERRORLOG, then one is automatically created for you. Note that the example in Listing 11-70 is entirely interactive and all errors in your current session are logged to the SPERRORLOG table until you turn error logging off by issuing the command, SET ERRORLOGGING OFF, or by logging out of your current session. Such error logging capability is particularly useful for capturing errors during long-running queries and scripts. It avoids your having to capture all output using the SPOOL command.
Additionally, you may choose to use a user-defined error logging table provided the user-defined error logging table already exists and you have access to it.
11.8 Exercises
The following exercises allow you to practice using the commands covered in this chapter. See Appendix B for the answers.
1. Look at Listings 11-50 and 11-61. Apart from aesthetics, there is another important reason why the lines surrounding the script headers in those two listings switch from minus signs to equal signs. Obviously, the first two minus signs are mandatory to turn the lines into comments. What would be wrong with using only minus signs?
2. Create a SQL*Plus script to create indexes. The script should prompt for a table name and a column name (or list of column names), and then generate the index name according to the following standard: i_<tab-id>_<col-id>.
3. Create a SQL*Plus script to produce an index overview. The script should prompt for a table name, allowing you to specify any leading part of a table name. That is, the script should automatically append a % wildcard to the value entered. Then it should produce a report of all indexes, showing the table name, index name, index type, and number of columns on which the index is based.
4. Create a script that disables all constraints in your schema.
All materials on the site are licensed Creative Commons Attribution-Sharealike 3.0 Unported CC BY-SA 3.0 & GNU Free Documentation License (GFDL)
If you are the copyright holder of any material contained on our site and intend to remove it, please contact our site administrator for approval.
© 2016-2026 All site design rights belong to S.Y.A.