Learning Informatica PowerCenter 9.x (2014)
Chapter 3. Implementing SCD – Using Designer Screen Wizards
Slowly Changing Dimensions (SCD), as the name suggests, allows you to maintain changes in the Dimension table in Datawarehouse. Before you read this chapter, make sure that you have a complete understanding of data warehousing concepts, especially SCD. Also, make sure you know the SCD1, SCD2, and SCD3 types. For your reference, we have described each SCD in detail in this chapter. For more details, refer to The Data Warehouse Toolkit, Ralph Kimball, Wiley India Private Limited. Before we move ahead with the implementation of the SCD in Informatica Power Center, let's discuss the different types of SCDs.
Note that we are talking about the general SCDs in our discussion, that is, SCD1, SCD2, and SCD3. Apart from these, there will always be Hybrid SCDs, which you will come across as well. Hybrid SCDs are nothing but a combination of multiple SCDs that serve your complex business requirements.
The various types of SCDs are described as follows:
· Type 1 Dimension mapping (SCD1): This keeps only the current data and does not maintain historical data.
Note
Use SCD1 mapping when you do not want to keep the history of the previous data.
· Type 2 Dimension/Version Number mapping (SCD2): This keeps current as well as historical data in the table. SCD2 allows you to insert new records and changed records using a new column (PM_VERSION_NUMBER) by maintaining the version number in the table to track the changes. We use a new PM_PRIMARYKEY column to maintain the history.
Note
Use SCD2 mapping when you want to keep the full history of the dimension data and track the progression of changes using a version number.
· Type 2 Dimension/Flag mapping: This keeps the current as well as historical data in the table. SCD2 allows you to insert new records and changed records using a new column (PM_CURRENT_FLAG) by maintaining the flag in the table to track the changes. We use a new PRIMARY_KEYcolumn to maintain the history.
Note
Use SCD2 mapping when you want to keep the full history of dimension data and track the progression of changes using a flag.
· Type 2 Dimension/Effective date range mapping: This keeps current as well as historical data in the table. SCD2 allows you to insert new records and changed records using two new columns (PM_BEGIN_DATE and PM_END_DATE) by maintaining the date range in the table to track the changes. We use a new PRIMARY_KEY column to maintain the history.
Note
Use SCD2 mapping when you want to keep the full history of dimension data and track the progression of changes using Start Date and End Date.
· Type 3 Dimension mapping: This keeps the current as well as historical data in the table. We maintain only partial history by adding a new PM_PREV_COLUMN_NAME column; that is, we do not maintain full history.
Note
Use SCD3 mapping when you wish to maintain only partial history.
Let's take an example to understand the different SCDs.
Consider that there is a LOCATION column in the EMPLOYEE table and you wish to track the changes in the location of the employees. Consider a record for the 1001 employee ID that is present in your EMPLOYEE dimension table. STEVE was initially working in India and then was shifted to USA. We want to maintain the history in the LOCATION field.
|
EMPLOYEE_ID |
NAME |
LOCATION |
|
1001 |
STEVE |
INDIA |
Your datawarehouse table should reflect the current status of STEVE. To implement this, we have different types of SCDs.
Take a look at the following table of type SCD1:
|
PM_PRIMARY_KEY |
EMPLOYEE_ID |
NAME |
LOCATION |
|
100 |
1001 |
STEVE |
USA |
As you can see, INDIA will be replaced with USA, so we end up having only current data, and we lose historical data. Now, if STEVE is again shifted to JAPAN, the LOCATION data will be replaced from USA to JAPAN, as follows:
|
PM_PRIMARY_KEY |
EMPLOYEE_ID |
NAME |
LOCATION |
|
100 |
1001 |
STEVE |
JAPAN |
The advantage of SCD1 is that we do not consume a lot of space to maintain the data; the disadvantage is we don't have the historical data.
Take a look at the following table of type SCD2, where we have added the version number:
|
PM_PRIMARYKEY |
EMPLOYEE_ID |
NAME |
LOCATION |
PM_VERSION_NUMBER |
|
100 |
1001 |
STEVE |
INDIA |
0 |
|
101 |
1001 |
STEVE |
USA |
1 |
|
102 |
1001 |
STEVE |
JAPAN |
2 |
|
200 |
1002 |
MIKE |
UK |
0 |
As you can see, we are maintaining the full history by adding new records to maintain the history of the previous records. We add two new columns in the table, that is, PM_PRIMARYKEY to handle the issues of duplicate records in the primary key in the EMPLOYEE_ID (supposed to be the primary key) column, and PM_VERSION_NUMBER to understand the current and historical records.
The following SCD2 table has the flag column added to it:
|
PM_PRIMARYKEY |
EMPLOYEE_ID |
NAME |
LOCATION |
PM_CURRENT_FLAG |
|
100 |
1001 |
STEVE |
INDIA |
0 |
|
101 |
1001 |
STEVE |
USA |
1 |
As you can see, we are maintaining the full history by adding new records to maintain the history of the previous records. We add two new columns in the table, that is, PM_PRIMARYKEY to handle the issues of duplicate records in the primary key in the EMPLOYEE_ID column, and PM_CURRENT_FLAGto understand the current and history record.
Again, if STEVE is shifted, the data would look like this:
|
PM_PRIMARYKEY |
EMPLOYEE_ID |
NAME |
LOCATION |
PM_CURRENT_FLAG |
|
100 |
1001 |
STEVE |
INDIA |
0 |
|
101 |
1001 |
STEVE |
USA |
0 |
|
102 |
1001 |
STEVE |
JAPAN |
1 |
The following table of type SCD2 shows you the data range added to it:
|
PM_PRIMARYKEY |
EMPLOYEE_ID |
NAME |
LOCATION |
PM_BEGIN_DATE |
PM_END_DATE |
|
100 |
1001 |
STEVE |
INDIA |
01-01-14 |
31-05-14 |
|
101 |
1001 |
STEVE |
USA |
01-06-14 |
99-99-9999 |
As you can see, we are maintaining the full history by adding new records to maintain the history of the previous records. We add three new columns in the table, that is, PM_PRIMARYKEY to handle the issues of duplicate records in the primary key in the EMPLOYEE_ID column and PM_BEGIN_DATEand PM_END_DATE to understand the versions in the data.
The advantage of SCD2 is that you have the complete history of the data, which is a must for data warehouses, whereas the disadvantage of SCD2 is that it consumes a lot of space.
Take a look at the following SCD3 table:
|
PM_PRIMARYKEY |
EMPLOYEE_ID |
NAME |
LOCATION |
PM_PREV_LOCATION |
|
100 |
1001 |
STEVE |
USA |
INDIA |
As you can see, we are maintaining the history by adding a new column to maintain the history. An optional PM_PRIMARYKEY column can be added to maintain the primary key constraints. We add a new PM_PREV_LOCATION column in the table to store the changes in the data. As you can see, we added a new column to store data as against SCD2, where we added rows to maintain the history.
If STEVE is now shifted to JAPAN, the data changes to:
|
PM_PRIMARYKEY |
EMPLOYEE_ID |
NAME |
LOCATION |
PM_PREV_LOCATION |
|
100 |
1001 |
STEVE |
JAPAN |
USA |
As you can see, we lost INDIA from the data warehouse, and that is why we say we are maintaining partial history.
Note
To implement SCD3, decide how many versions of a particular column you wish to maintain. Based on this, the columns will be added in the table.
SCD3 is best when you are not interested in maintaining the complete history but are interested in maintaining only partial history. The drawback of SCD3 is that it doesn't store the full history.
At this point, you should be very clear with the different types of SCD. We need to practically implement these concepts in Informatica PowerCenter. Informatica PowerCenter provides a utility called wizard to implement the SCD. Using this wizard, you can easily implement any SCD. In the upcoming chapters, we will learn how to use the wizard to implement SCD1, SCD2, and SCD3.
Before you proceed to the next section, make sure you have a proper understanding of the transformations in Informatica PowerCenter. You should be clear about the source qualifier, expression, filter, router, lookup, update strategy, and sequence generator transformations. The wizard creates a mapping using all these transformations to implement the SCD functionality.
When we implement SCD, there will be some new records that will need to be loaded into the target table, and there will be some existing records for which we need to maintain the history.
Note
The record that appears for the first time in the table will be referred to as the NEW record, and the record for which we need to maintain the history will be referred to as the CHANGED record. Based on the comparison of the source data with the target data, we will decide which one is the NEWrecord and which one is the CHANGED record.
To start, we will use a sample file as our source and an Oracle table as our target in order to implement SCDs. Before we implement an SCD, let's talk about the logic that will serve our purpose, and then we will fine-tune the logic for each type of SCD:
1. Extract all records from the source.
2. Look up at the target table and cache all the data.
3. Compare the source data with the target data to flag the NEW and CHANGED records.
4. Filter the data based on the NEW and CHANGED flags.
5. Generate the primary key for every new row inserted into the table.
6. Load the NEW record into the table and update the existing record, if needed.
Based on the specific SCD, the preceding logic will be modified to a certain extent.
SCD1 – I hate history!
To implement SCD1 using wizard, perform the following steps:
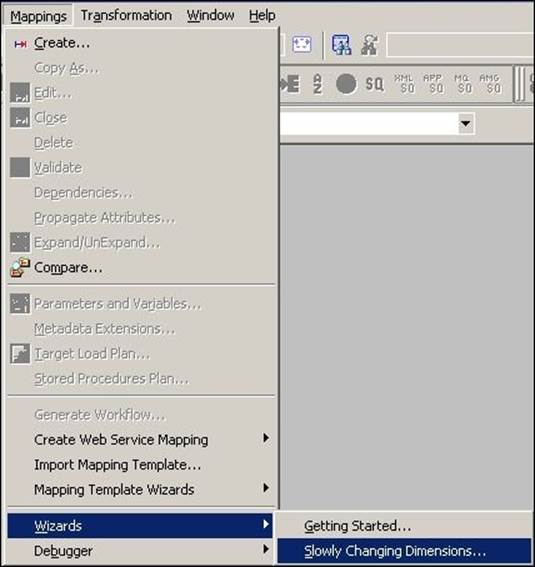
1. In the designer, navigate to Tools | Mapping Designer | Mapping | Wizard | Slowly Changing Dimensions, as shown in the following screenshot:
2. A new window will pop up, asking you the name (m_SCD1) of the new SCD mapping. Select Type 1 Dimension - keep most recent values in the target, as we are implementing SCD1. Click on Next as follows:

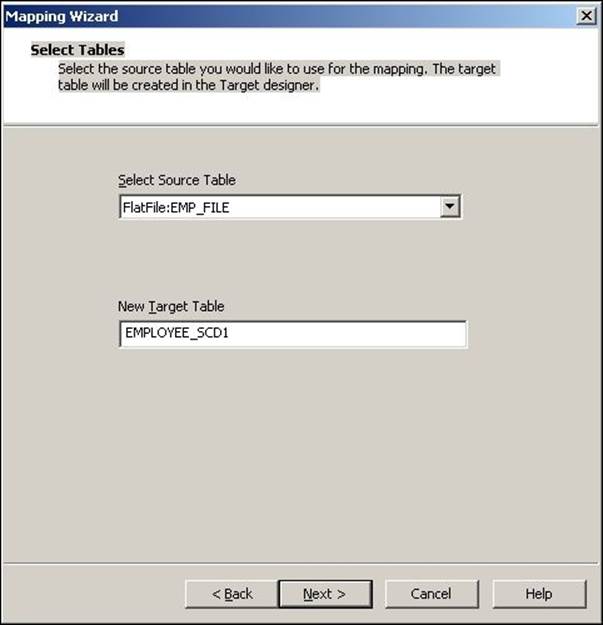
3. The next screen will ask you to select the source. Select a source from the dropdown. All the sources present in your repository will be listed in this drop-down list. We are using EMP_FILE.txt as the source file for our reference. Also, specify the name of the target you wish to create. We will name the target as EMPLOYEE_SCD1 in this book for our reference. Click on Next.
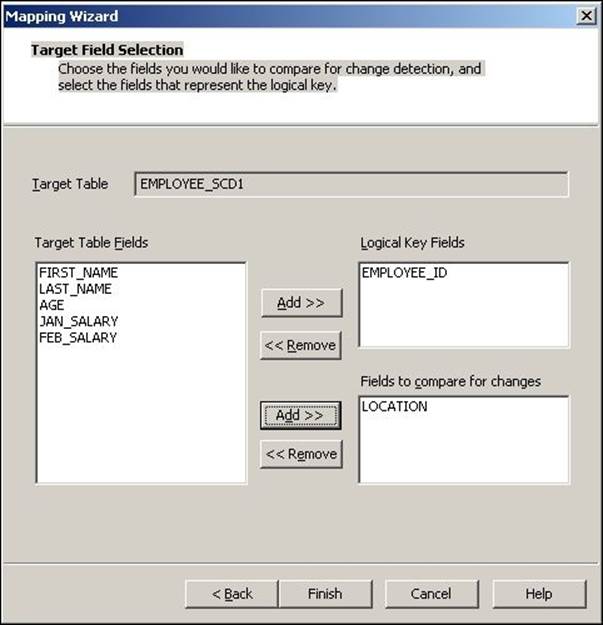
4. In the next window, select EMPLOYEE_ID as Logical Key Field. This specifies which column will be used to check for the existence of data in the target. Make sure that the column you use is the Key column of the source. Also, add LOCATION under Fields to compare the changes. This specifies the column for which you wish to maintain the history. Click on Finish.
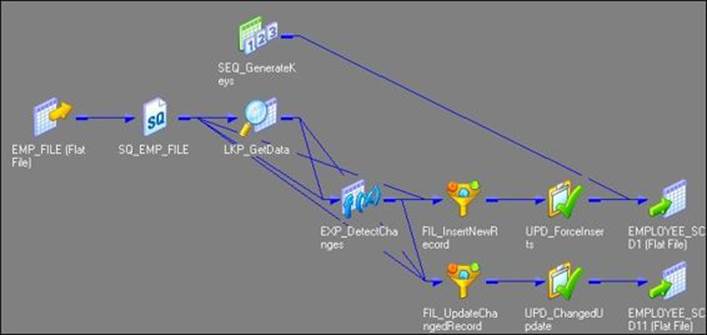
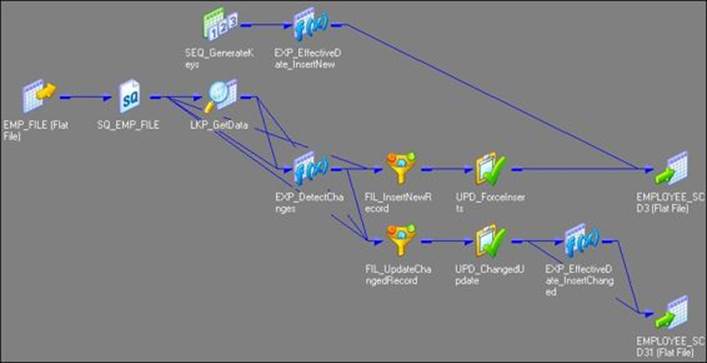
5. The wizard creates a complete mapping in your Mapping Designer Workspace. Make necessary changes to the mapping if required. An example of what your mapping could look like is as follows:
Before we proceed further, we need to make some points clear:
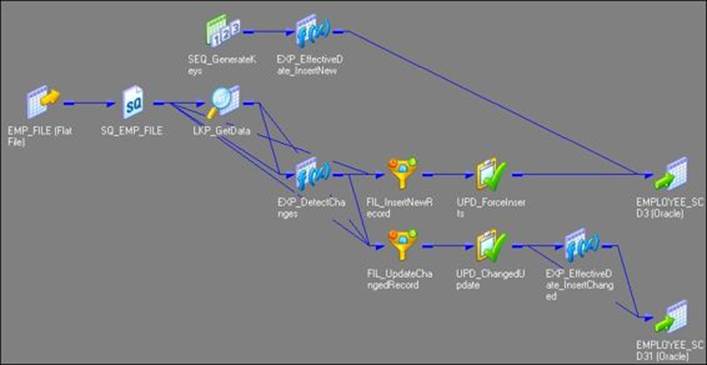
· As we have used flat file as a source, the Informatica PowerCenter wizard generates the target as a file as well. We cannot maintain SCD on files, so make sure you change the target type to the database. We will be changing this to the Oracle table as a reference. You can do this in the Target Designer. Drag the target (EMPLOYEE_SCD1) created by the wizard in the Target Designer, double-click to open the properties, and change the database type of Oracle. This will change the type of target from the file to Oracle. Once you modify the target table to the Oracle database, the mapping will look like the following figure:
· The wizard creates two instances of the same Oracle target table in the mapping. Load the data from the NEW and CHANGED flows, respectively. Understand clearly that these two structures refer to the same Oracle table EMPLOYEE_SCD1. Even though the name (EMPLOYEE_SCD1 andEMPLOYEE_SCD11) is different in the view, when you double-click on the target instances in the Table tab, you can see Table Name as EMPLOYEE_SCD1.
As we are done with the mapping, it's time to analyze it. It is very important to understand each component of the mapping.
The Informatica PowerCenter SCD1 mapping uses a lookup transformation to look up the data in the target table and uses expression transformation to compare the target data with the source data. Based on the comparison, the expression transformation marks a record as a NEW flag or aCHANGED flag. The mapping is divided into two flows:
· The FIL_InsertNewRecord filter transformation allows only the NEW record to pass further and filters the records marked as CHANGED from the first flow. It passes new records to UPD_ForceInserts, which inserts these records into the target. The sequence generator generates the primary key for each NEW record.
· The FIL_UpdateChangedRecord filter transformation allows only the CHANGED record to pass further and filters the records marked as NEW from the second flow. It passes the changed records to UPD_ChangedUpdate, which replaces existing rows in the target to reflect the latest changes.
Let's understand each transformation that is used in the SCD1 mapping:
· The source qualifier (SQ_EMP_FILE): This extracts the data from the file or table you used as the source in the mapping. It passes data to the downstream transformations, that is, lookup, expression, and filter transformation.
· Lookup (LKP_GetData): This is used to look up the target table. It caches the existing data from the EMPLOYEE_SCD1 table.
The EMPLOYEE_ID=IN_EMPLOYEE_ID condition in the Condition tab will compare the data with the source table and the target table. Based on the comparison, it passes the required data to the expression transformation.
· Expression (EXP_DetectChanges): This receives the data from the upstream transformation, and based on the comparison, it creates two flags, which are NewFlag and ChangedFlag. In our case, we are using the LOCATION field for comparison.
For every record that comes from a source, if there is no matching record in target, we can flag that record as NewFlag; that is, the EMPLOYEE_ID != EMPLOYEE_ID condition signifies NewFlag. If no matching record is present for EMPLOYEE_ID in the target, it signifies that PM_PRIMARYKEY will not be available. So, the lookup transformation will return NULL for the PM_PRIMARYKEY column.
For every record that comes from a source, if there is a matching record in the target and if the location from source does not match the location for a particular EMPLOYEE_ID from the target, we can flag that record as ChangedFlag, that is, EMPLOYEE_ID = EMPLOYEE_ID AND LOCATION != PM_PREV_LOCATION:
o The wizard created the condition for NewFlag as IIF(ISNULL(PM_PRIMARYKEY), TRUE, FALSE)
o The condition for ChangedFlag is IIF(NOT ISNULL(PM_PRIMARYKEY) AND (DECODE(LOCATION,PM_PREV_LOCATION,1,0)=0), TRUE, FALSE)
Based on the condition, it passes the data to downstream filter transformations.
· Filter (FIL_InsertNewRecord): This filters the records that come from an upstream expression transformation and are marked as ChangedFlag; it only allows records with NewFlag to get passed to the UPD_ForceInserts update strategy.
· Filter (FIL_UpdateChangedRecord): This filters the records that come from an upstream expression transformation and are marked as NewFlag; it only allows records with ChangedFlag to get passed to the UPD_ChangedUpdate update strategy.
· Update strategy (UPD_ForceInserts): This uses the DD_INSERT condition to insert data into the target, which is EMPLOYEE_SCD1.
· Update strategy (UPD_ChangedUpdate): This uses the DD_UPDATE condition to overwrite the existing LOCATION field into the EMPLOYEE_SCD11 target instance.
· Sequence generator (SEQ_GenerateKeys): This generates a sequence of values for each row marked as NewFlag, which is then incrementally loaded into the target by 1. It populates the value into PM_PRIMARYKEY in the EMPLOYEE_SCD1 target instance.
· Target (EMPLOYEE_SCD1): This is the target table instance that accepts the NewFlag records into the target table.
· Target (EMPLOYEE_SCD11): This is the target table instance that accepts the ChangedFlag records into the target table.
SCD2 (version number) – I need my ancestors!
To implement SCD2 using the wizard, perform the following steps:
1. In the Designer, navigate to Tools | Mapping Designer | Mapping | Wizard | Slowly Changing Dimensions, as shown in the following screenshot:

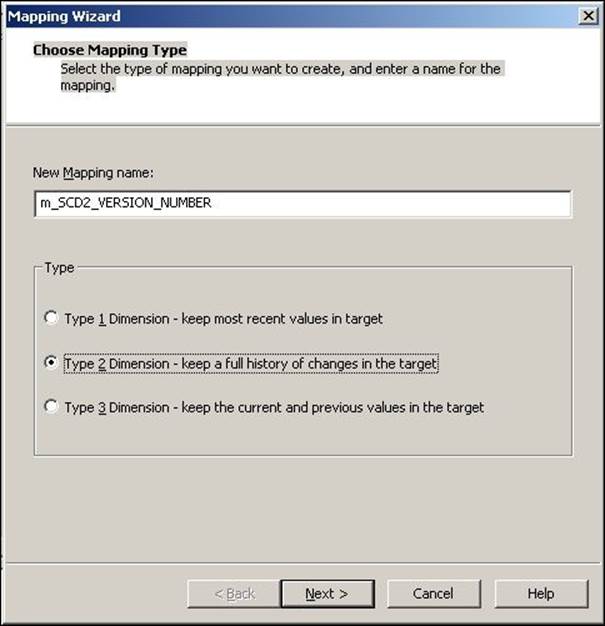
A new window will pop up, asking you the name of the new SCD mapping (m_SCD2_VERSION_NUMBER). Also, select the type of SCD you wish to implement. Select Type 2 Dimension - keep a full history of the changes in the target, as we are implementing SCD2 using a version number. Click on Next.
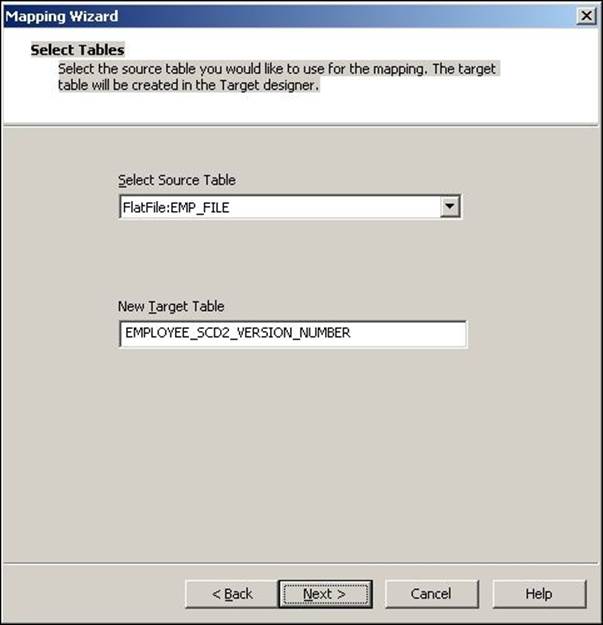
2. The next screen will ask you to select the source. Select a source from the drop-down list. We are using EMP_FILE.txt as the source file for our reference. Also, specify the name of the target you wish to create. We will name the target EMPLOYEE_SCD2_VERSION_NUMBER in this book for our reference. Then, click on Next.
3. In the next window, select EMPLOYEE_ID as Logical Key Field. Also, add LOCATION under Fields to compare the changes, and then click on Next.

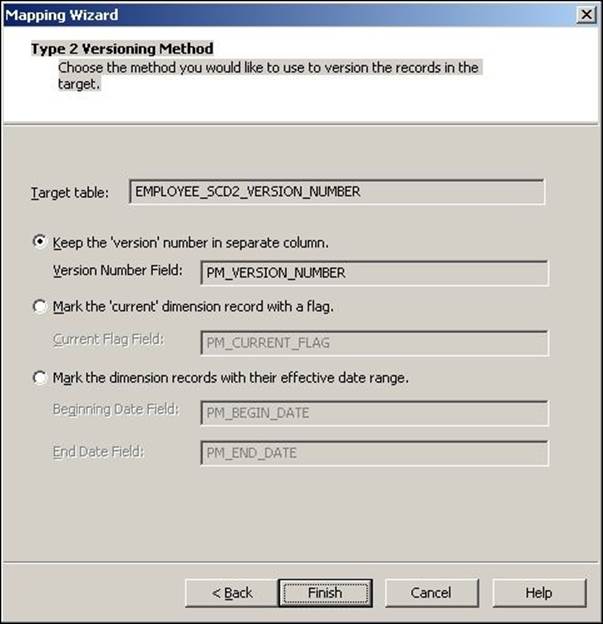
4. The next screen asks you to choose the option to maintain the history in the target. Select Keep the 'version' number in separate column and click on Finish.
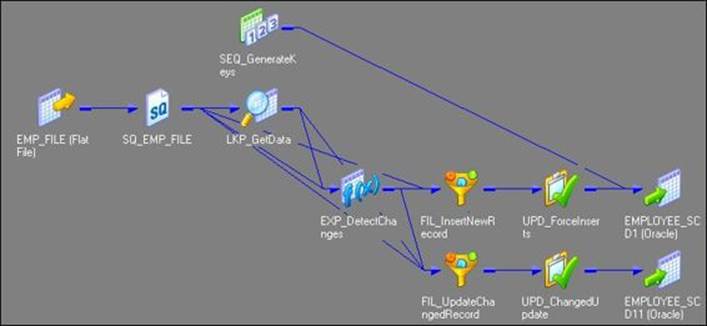
5. The wizard creates a complete mapping in your Mapping Designer Workspace. Make the necessary changes in the mapping, if required.
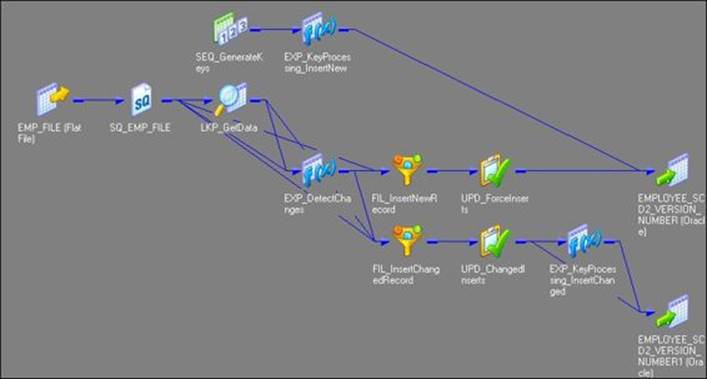
6. Change the target data type from the flat file to Oracle table, as shown in the following screenshot:
When we create an SCD2 mapping using a version number, the wizard creates two additional columns in the target table:
· PM_PRIMARY_KEY: The wizard generates the primary key for each row to be inserted into target. Note that EMPLOYEE_ID will not be the primary key in the table.
· PM_VERSION_NUMBER: The wizard generates a version number for each row inserted into table; this allows us to differentiate between current and historical records.
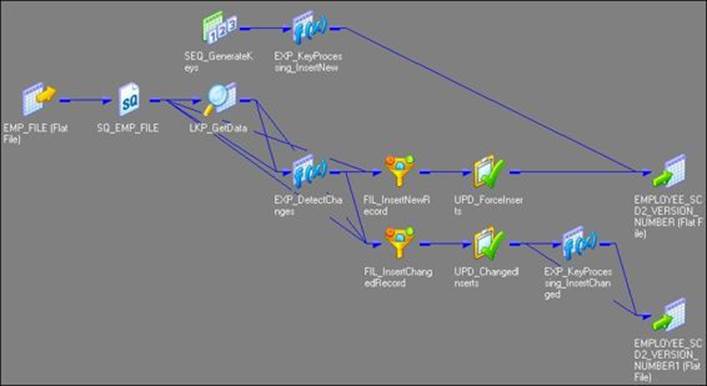
The Informatica PowerCenter SCD2 mapping uses a 0 lookup transformation to look up the data in the target table and uses the EXP_Detect_Changes expression transformation to compare the target data with the source data. Based on the comparison, the expression transformation marks a record as NewFlag or ChangedFlag using a flag. The mapping is divided into the following two flows:
· The FIL_InsertNewRecord filter transformation allows only the NewFlag record to pass further and filters the ChangedFlag record from the first flow. It passes new records to UPD_ForceInserts, which inserts these records into the target. The sequence generator, which is SEQ_generateKeys, generates the primary key for each NewFlag record. The EXP_KeyProcessing_InsertNew expression transformation multiplies the primary key value by 1000 and loads 0 as the version number for each new row into the target, which is EMPLOYEE_SCD2_VERSION_NUMBER.
· The FIL_InsertChangedRecord filter transformation allows only the ChangedFlag record to pass further and filters the records marked as NewFlag from second flow. It passes the changed records to UPD_ChangedUpdate, which replaces existing rows in the target to reflect the latest changes. The expression transformation, which is EXP_KeyProcessing_InsertChanged, increments both the primary key and version number by 1 and loads them into the target instance, which is EMPLOYEE_SCD2_VERSION_NUMBER1.
Let's work through each transformation that is used in the SCD2 mapping:
· Source qualifier (SQ_EMP_FILE): This extracts the data from the file or table that you used as a source in the mapping. It passes data to the downstream transformations, that is, lookup, expression, and filter transformation.
· Lookup (LKP_GetData): This is used to look up the target table. It caches the existing data from EMPLOYEE_SCD2_VERSION_NUMBER. The EMPLOYEE_ID=IN_EMPLOYEE_ID condition will compare the data with the source table and target table. It passes the data based on the comparison with the expression transformation.
· Expression (EXP_DetectChanges): This receives the data from an upstream transformation and based on that, it creates two flags, which are NewFlag and ChangedFlag:
o Condition for NewFlag: IIF(ISNULL(PM_PRIMARYKEY), TRUE, FALSE)
o Condition for ChangedFlag: IIF(NOT ISNULL(PM_PRIMARYKEY) AND (DECODE(LOCATION,PM_PREV_LOCATION,1,0)=0), TRUE, FALSE)
It passes the data to downstream filter transformations.
· Filter (FIL_InsertNewRecord): This filters the records that come from an upstream expression transformation and are marked as ChangedFlag; it only allows records with NewFlag to get passes to the UPD_ForceInserts update strategy.
· Filter (FIL_UpdateChangedRecord): This filters the records that come from an upstream expression transformation and are marked as NewFlag; it only allows records with ChangedFlag to get passed to the UPD_ChangedInserts update strategy.
· Update strategy (UPD_ForceInserts): This uses the DD_INSERT condition to insert data into the target, which is EMPLOYEE_SCD2_VERSION_NUMBER.
· Update strategy (UPD_ChangedInserts): This uses the DD_UPDATE condition to overwrite existing LOCATION value into the target instance, which is EMPLOYEE_SCD2_VERSION_NUMBER1.
· Sequence generator (SEQ_GenerateKeys): This generates a sequence of values for each new row marked as NewFlag, which incrementally comes into the target by 1. It populates the value into the PM_PRIMARYKEY column in the EMPLOYEE_SCD2_VERSION_NUMBER target.
· Expression (EXP_KeyProcessing_InsertNew): This multiplies NEXTVAL generated by the sequence generator by 1000 using the NEXTVAL*1000 condition. Note that you can change this number as per your requirement. Using 1000 here means that we can maintain a 1000 history of a particular record.
· Expression (EXP_KeyProcessing_InsertChanged): This is used to increment the primary key by 1 and also increment the version number by 1 for every changed record.
· Target (EMPLOYEE_SCD2_VERSION_NUMBER): This is the target table instance that accepts new records into the target table.
· Target (EMPLOYEE_SCD2_VERSION_NUMBER1): This is the target table instance that accepts changed records into the target table.
SCD2 (flag) – flag the history
To implement SCD2 by maintaining the flag, perform the following steps:
1. In the designer, navigate to Tools | Mapping Designer | Mapping | Wizard | Slowly Changing Dimensions, as shown in the following screenshot:

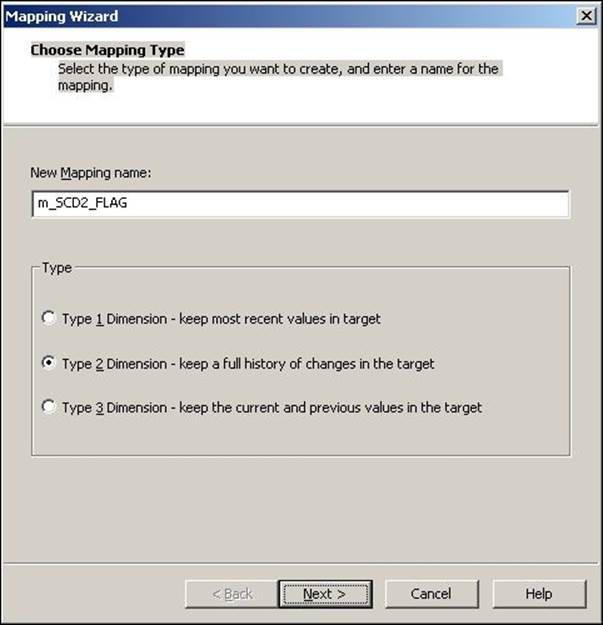
A new window will pop up, asking you the name (m_SCD2_FLAG) of the new SCD2 mapping. Select Type 2 Dimension - keep a full history of the changes in the target, as we are implementing SCD2, and click on Next.
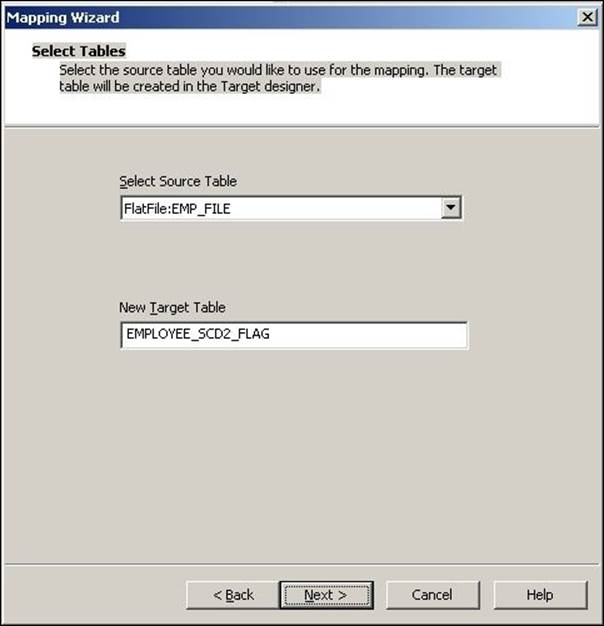
2. The next screen will ask you to select the source. Select a source from the drop-down list. We are using EMP_FILE.txt as the source file for our reference. Also, specify the name of the target you wish to create. We will name the target EMPLOYEE_SCD2_FLAG in this book for our reference. Then, click on Next.
3. In the next window, select EMPLOYEE_ID as Logical Key Field. Also, add LOCATION under Fields to compare the changes, and click on Next.
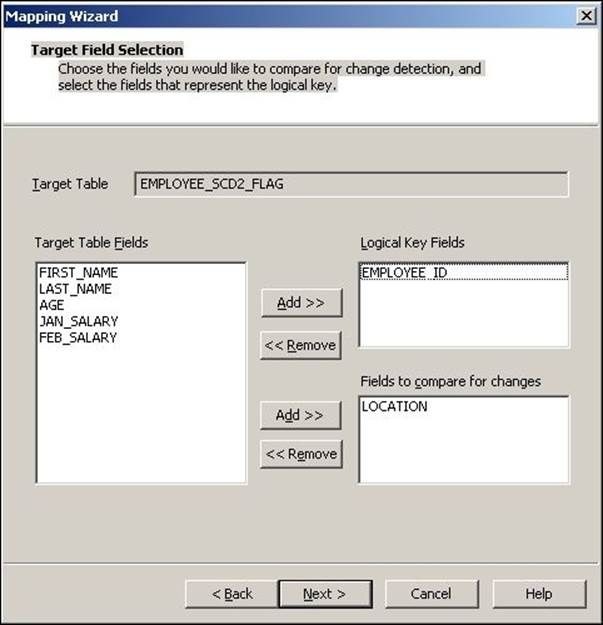
4. The next screen asks you to choose the option to maintain the history in the target. Select Mark the 'current' dimension record with a flag, and click on Finish.

5. The wizard generates a complete mapping in your Mapping Designer Workspace. Make the necessary changes to the mapping, if required.
6. Change the target data type from the flat file to Oracle table, as shown in the following figure:
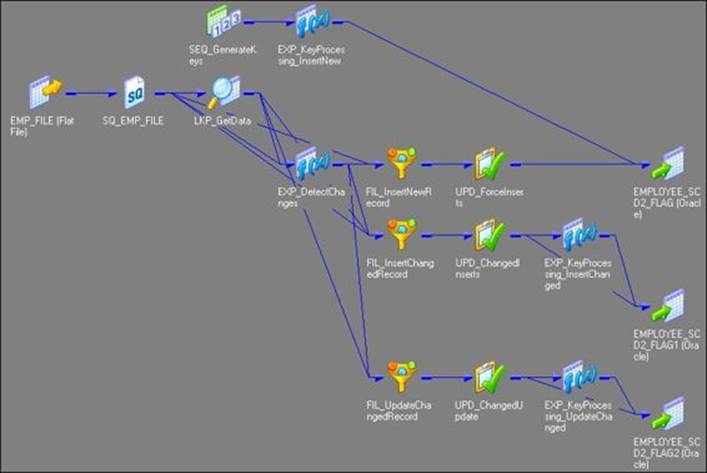
When we create a mapping using the flag option, the wizard creates the following two additional columns in the target table:
· PM_PRIMARY_KEY: The wizard generates the primary key for each row to be inserted into the target. Please note that EMPLOYEE_ID will not be the primary key in the table.
· PM_CURRENT_FLAG: The wizard loads 1 for each new record inserted into the table and marks all history records as 0; this will allow us to differentiate between current and historical records.
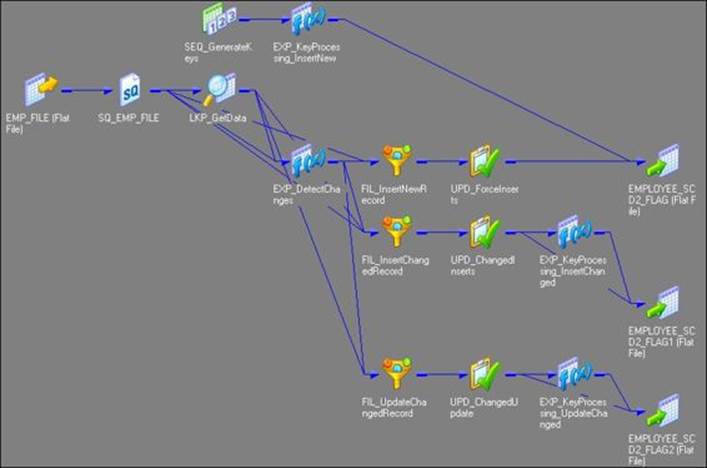
The Informatica PowerCenter SCD2 mapping uses the LKP_GetData lookup transformation to look up the data in the target table and uses the EXP_DetectChanges expression transformation to compare the data with the source data. Based on the comparison, the expression transformation marks a record as NewFlag or ChangedFlag. The mapping is divided into three flows:
· The FIL_InsertNewRecord filter transformation allows only the NewFlag record to pass further and filter the ChangedFlag record from the first flow. It passes new records to UPD_ForceInserts, which inserts these records into the target. The SEQ_GenerateKeys sequence generator generates the primary key for each NewFlag record. The EXP_KeyProcessing_InsertNew expression transformation multiplies the NEXTVAL value by 1000 and loads 1 as the current flag for each new row.
· The FIL_InsertChangedRecord filter transformation allows only the ChangedFlag record to get passed to UPD_ChangedInserts, which inserts changed records into the target, which is EMPLOYEE_SCD2_FLAG1. The EXP_KeyProcessing_InsertChanged expression transformation increments the primary key by 1 and loads the current flag as 1 to indicate that the updated row contains the current data.
· The FIL_UpdateChangedRecord filter transformation passes the primary key of the previous value for every ChangedFlag record to UPD_ChangedUpdate, which updates changed records in the target, which is EMPLOYEE_SCD2_FLAG2. The EXP_KeyProcessing_UpdateChanged expression transformation changes the current flag to 0 to indicate the row doesn't contain the current data anymore.
Let's work through each transformation that is used in the SCD2 mapping:
· Source qualifier (SQ_EMP_FILE): This extracts the data from the file or table that you used as the source in the mapping. It passes data to the downstream transformations, that is, lookup, expression, and filter transformation.
· Lookup (LKP_GetData): This is used to look up the target table. It caches the existing data from EMPLOYEE_SCD2_FLAG. The EMPLOYEE_ID=IN_EMPLOYEE_ID condition will compare the data with the source and target table. It passes the data based on the comparison with the expression transformation.
· Expression (EXP_DetectChanges): This receives the data from the upstream transformation and based on that, it creates two flags, which are NewFlag and ChangedFlag:
o Condition for NewFlag: IIF(ISNULL(PM_PRIMARYKEY), TRUE, FALSE)
o Condition for ChangedFlag: IIF(NOT ISNULL(PM_PRIMARYKEY) AND (DECODE(LOCATION,PM_PREV_LOCATION,1,0)=0), TRUE, FALSE)
Based on the condition, it passes the data to downstream filter transformations.
· Filter (FIL_InsertNewRecord): This filters the records that come from the upstream expression transformation and are marked as ChangedFlag; it only allows records as NewFlag to get passed to the UPD_ForceInserts update strategy.
· Filter (FIL_InsertChangedRecord): This filters the records that come from the upstream expression transformation and are marked as NewFlag; it only allows records as ChangedFlag to get passed to the UPD_ChangedInserts update strategy.
· Filter (FIL_UpdateChangedRecord): This filters the records that come from the upstream expression transformation and are marked as NewFlag; it only allows records marked as ChangedFlag to pass. For every record marked as ChangedFlag, the filter passes the primary key of the previous version to the UPD_ChangedUpdate update strategy.
· Update strategy (UPD_ForceInserts): This uses the DD_INSERT condition to insert the data into the EMPLOYEE_SCD2_FLAG target instance.
· Update strategy (UPD_ChangedInserts): This uses the DD_INSERT condition to insert data into target instance EMPLOYEE_SCD2_FLAG1.
· Update strategy (UPD_ChangedUpdate): This uses the DD_UPDATE condition to overwrite the existing LOCATION value into the target, which is EMPLOYEE_SCD2_FLAG2.
· Sequence generator (SEQ_GenerateKeys): This generates a sequence of values for PM_PRIMARYKEY for each row marked as NewFlag into the target, incrementing the value by 1.
· Expression (EXP_KeyProcessing_InsertNew): This multiplies NEXTVAL generated by the sequence generator by 1000 using the NEXTVAL*1000 condition. Note that you can change this number as per your requirement. Using 1000 here means that we can maintain a 1000 history of a particular record. This creates a current flag of 1 for each NewFlag record to load into the PM_CURRENT_FLAG column in the target.
· Expression (EXP_KeyProcessing_InsertChanged): This is used to increment the primary key by 1 using the PM_PRIMARYKEY + 1 condition. It also creates a current flag of 1 for each NewFlag record to load the PM_CURRENT_FLAG column in the target.
· Expression (EXP_KeyProcessing_UpdateChanged): This is used to set PM_CURRENT_FLAG to 0 for the record marked as Changed, indicating that the record is no longer current.
· Target (EMPLOYEE_SCD2_FLAG): This is the target table instance that accepts new records into the target table.
· Target (EMPLOYEE_SCD2_FLAG1): This is the target table instance that accepts changed records into the target table.
· Target (EMPLOYEE_SCD2_FLAG2): This is the target table instance that allows updates to existing records into the target table.
SCD2 (date range) – marking the dates
To implement SCD2 by maintaining flags, perform the following steps:
1. In the designer, navigate to Tools | Mapping Designer | Mapping | Wizard | Slowly Changing Dimensions, as shown in the following screenshot:
A new window will pop up, asking you the name (m_SCD2_DATE_RANGE) of the new SCD mapping. Select Type 2 Dimension - keep a full history of the changes in the target, as we are implementing SCD2, and click on Next.

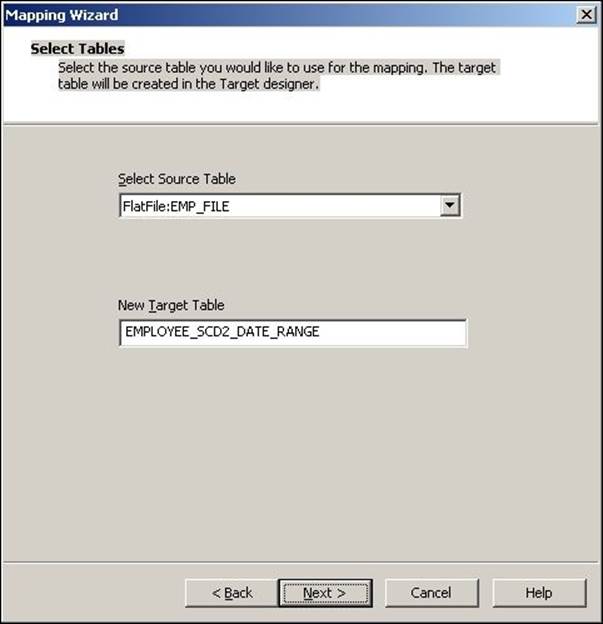
2. The next screen will ask you to select the source. Select a source from the drop-down list. We are using EMP_FILE.txt as the source file for our reference. Also, specify the name of the target you wish to create. We will name the target EMPLOYEE_SCD2_DATE_RANGE in this book for our reference. Then, click on Next.
3. In the next window, select EMPLOYEE_ID as Logical Key Field. Also, add LOCATION under Fields to compare the changes, and click on Next.
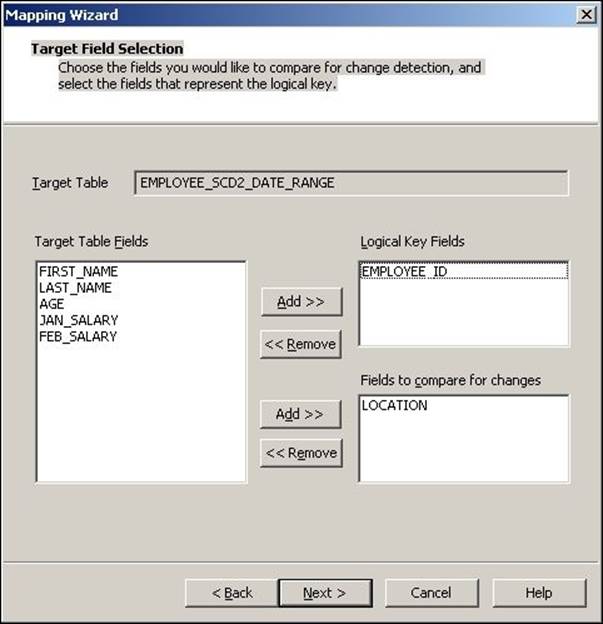
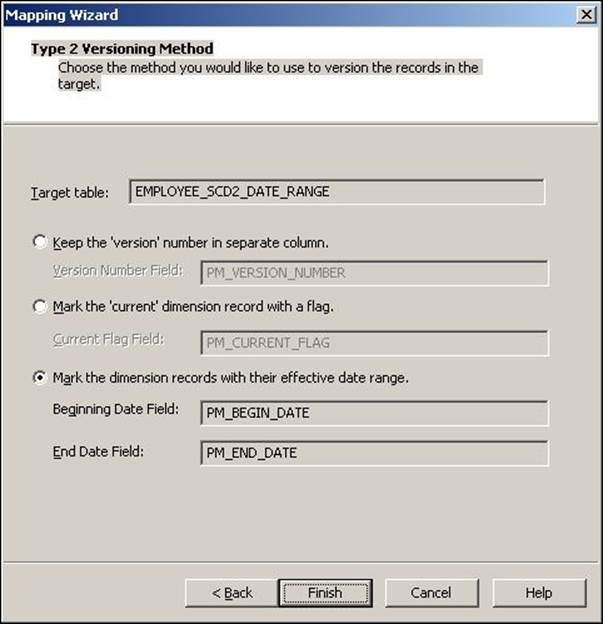
4. The next screen asks you to choose the option to maintain the history in the target. Select Mark the dimension records with their effective date range and click on Finish.
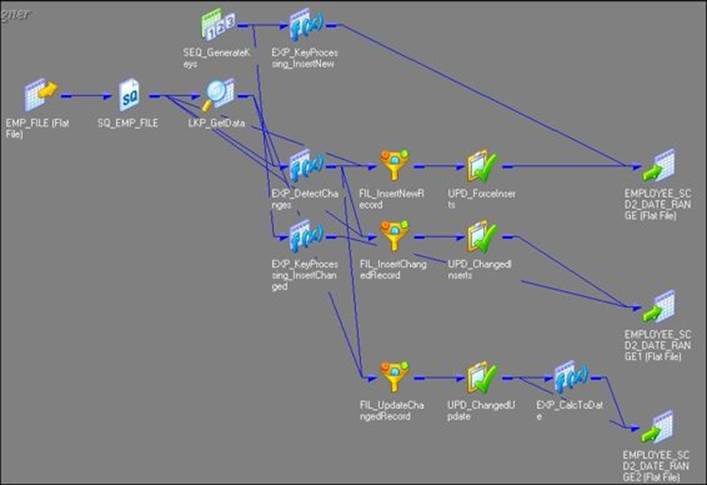
5. The wizard generates a complete mapping in your Mapping Designer Workspace. Make the necessary changes to the mapping if required.
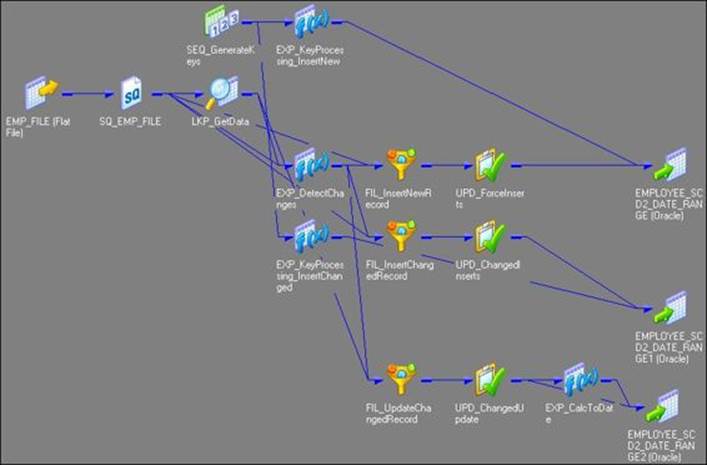
6. Change the target data type from the flat file to the Oracle table, as shown in the following figure:
When we create a mapping using this option, the wizard create three additional columns in the target table:
· PM_PRIMARY_KEY: The wizard generates the primary key for each row to be inserted into the target. Note that EMPLOYEE_ID will not be the primary key in the table.
· PM_BEGIN_DATE: The wizard loads SYSTEMDATE for each NewFlag and ChangeFlag record inserted into the table.
· PM_END_DATE: The wizard loads SYSTEMDATE for each updated record inserted into the table, indicating the end date of the record.
The Informatica PowerCenter SCD2 mapping uses the LKP_GetData lookup transformation to look up the data in the target table and uses the EXP_DetectChanges expression transformation to compare the data with the source data. Based on the comparison, the expression transformation marks a record as NewFlag or ChangedFlag. The mapping is divided into three flows:
· The FIL_InsertNewRecord filter transformation allows only the NewFlag record to pass further and filter ChangedFlag from the first flow. It passes the NewFlag records to UPD_ForceInserts, which inserts these records into the EMPLOYEE_SCD2_DATE_RANGE target instance. TheSEQ_GenerateKeys sequence generator generates the primary key for each NewFlag record. The EXP_KeyProcessing_InsertNew expression transformation loads SYSTEMDATE into the PM_BEGIN_DATE column and leaves PM_END_DATE as null. This indicates that the new record has been added from the date loaded in PM_BEGIN_DATE.
· The FIL_InsertChangedRecord filter transformation allows only the ChangedFlag record to get passed to UPD_ChangedInserts, which inserts changed records in the EMPLOYEE_SCD2_DATE_RANGE1 target instance. For every ChangedFlag record, the EXP_KeyProcessing_InsertChangedexpression transformation loads SYSTEMDATE into the PM_BEGIN_DATE column and leaves PM_END_DATE as null. This indicates that the changed record has been added, and the changed row now contains the current data.
· The FIL_UpdateChangedRecord filter transformation passes the primary key of the previous value for every ChangedFlag record to UPD_ChangedUpdate, which inserts changed records into the target, which is EMPLOYEE_SCD2_DATE_RANGE2. The EXP_CalcToDate expression transformation loadsSYSTEMDATE into PM_END_DATE to indicate that the row now contains the historical data.
Let's understand each transformation that is used in the SCD2 mapping:
· Source qualifier (SQ_EMP_FILE): This extracts the data from the file or table that you used as the source in the mapping. It passes data to the downstream transformations, that is, lookup, expression, and filter transformation.
· Lookup (LKP_GetData): This is used to look up the target table. It caches the existing data from EMPLOYEE_SCD2_DATE_RANGE. The EMPLOYEE_ID=IN_EMPLOYEE_ID condition will compare the data with the source table and target table. It passes the data based on the comparison with the expression transformation.
· Expression (EXP_DetectChanges): This receives the data from the upstream transformation and based on that, it creates two flags, which are NewFlag and ChangedFlag:
o Condition for NewFlag: IIF(ISNULL(PM_PRIMARYKEY), TRUE, FALSE)
o Condition for ChangedFlag: IIF(NOT ISNULL(PM_PRIMARYKEY) AND (DECODE(LOCATION,PM_PREV_LOCATION,1,0)=0), TRUE, FALSE)
Based on the condition, it passes the data to downstream filter transformations.
· Filter (FIL_InsertNewRecord): This filters the records that come from the upstream expression transformation and are marked as ChangedFlag; it allows records with NewFlag to get passed to the UPD_ForceInserts update strategy.
· Filter (FIL_InsertChangedRecord): This filters the records that come from the upstream expression transformation and are marked as NewFlag; it allows records with ChangedFlag to get passed to the UPD_ForceInserts update strategy.
· Filter (FIL_UpdateChangedRecord): This filters the records that come from the upstream expression transformation and are marked as NewFlag; it allows records with ChangedFlag to get passed to the UPD_ChangedUpdate update strategy. For each row marked as ChangedFlag, it passes the primary key of the previous version to UPD_ChangedUpdate.
· Update strategy (UPD_ForceInserts): This uses the DD_INSERT condition to insert data into the EMPLOYEE_SCD2_DATE_RANGE target instance.
· Update strategy (UPD_ChangedInserts): This uses the DD_INSERT condition to insert data into the EMPLOYEE_SCD2_DATE_RANGE1 target instance.
· Update strategy (UPD_ChangedUpdate): This uses the DD_UPDATE condition to overwrite the existing LOCATION value into the EMPLOYEE_SCD2_DATE_RANGE2 target instance.
· Sequence generator (SEQ_GenerateKeys): This generates a sequence of values for each new row marked as NewFlag that comes into target, getting incremented by 1. It passes the value to EXP_KeyProcessing_InsertNew.
· Expression (EXP_KeyProcessing_InsertNew): This loads the generated value in the PM_PRIMARYKEY column in the EMPLOYEE_SCD2_DATE_RANGE target instance. It loads SYSTEMDATE into the PM_BEGIN_DATE column in the target, marking the start of the record.
· Expression (EXP_KeyProcessing_InsertChanged): This loads the generated value in the PM_PRIMARYKEY column in the EMPLOYEE_SCD2_DATE_RANGE1 target instance. It loads SYSTEMDATE into the PM_BEGIN_DATE column in the target, marking the start of the record in theEMPLOYEE_SCD2_DATE_RANGE1 target instance.
· Expression (EXP_CalcToDate): This uses SYSTEMDATE to update the PM_END_DATE column in the EMPLOYEE_SCD2_DATE_RANGE2 target instance in an existing record, indicating that the record is not current anymore.
· Target (EMPLOYEE_SCD2_DATE_RANGE): This is the target table instance that accepts new records in the target table.
· Target (EMPLOYEE_SCD2_DATE_RANGE1): This is the target table instance that accepts changed records in the target table.
· Target (EMPLOYEE_SCD2_DATE_RANGE2): This is the target table instance that allows updates to existing records in the target table.
SCD3 – store something, if not everything!
To implement SCD3 using wizard, perform the following steps:
1. In the designer, navigate to Tools | Mapping Designer | Mapping | Wizard | Slowly Changing Dimensions, as shown in the following screenshot:
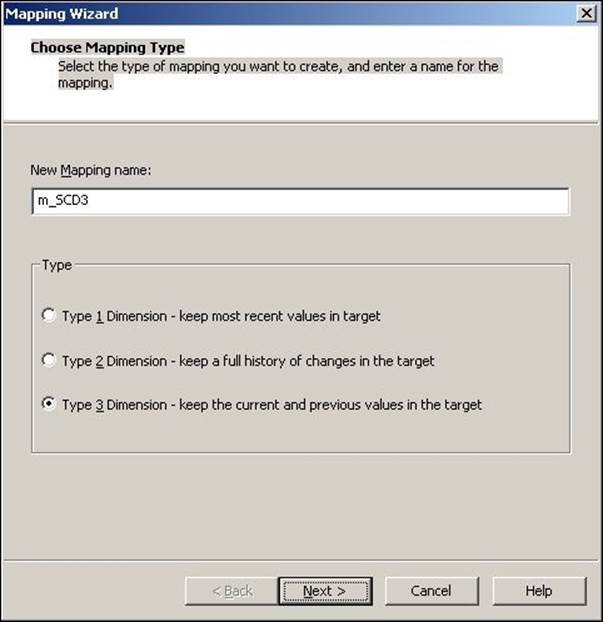
2. A new window will pop up, asking you the name (m_SCD3) of the new SCD mapping. Also, select the type of SCD you wish to implement. Select Type 3 Dimension - keep the current and previous value in the target, as we are implementing SCD3, and click on Next.
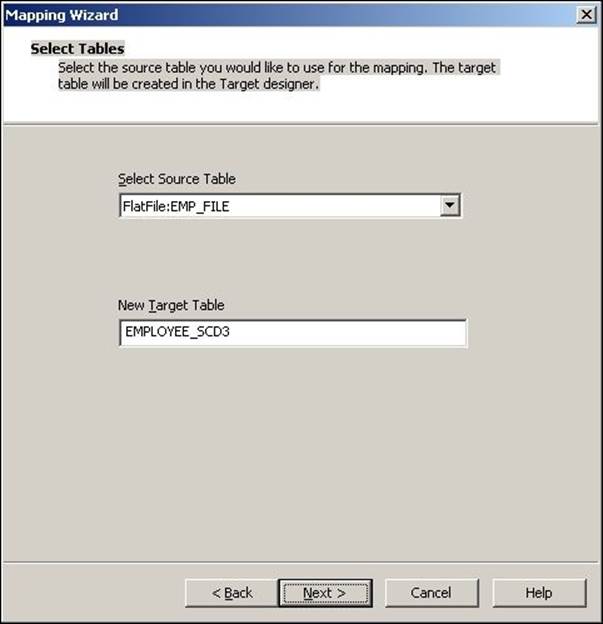
3. The next screen will ask you to select the source. Select a source from the dropdown. We are using EMP_FILE.txt as the source file for our reference. We will name the target as EMPLOYEE_SCD3 in this book for our reference. Then, click on Next.
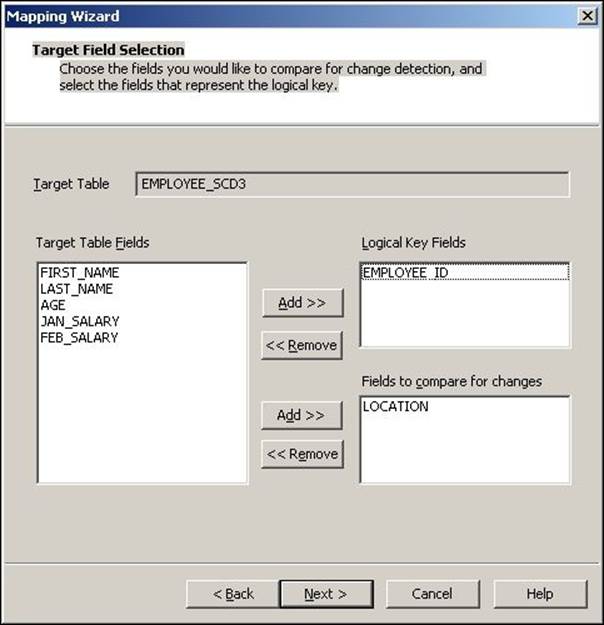
4. In the next window, select EMPLOYEE_ID as Logical Key Field. Also, add LOCATION under Fields to compare the changes and click on Next.
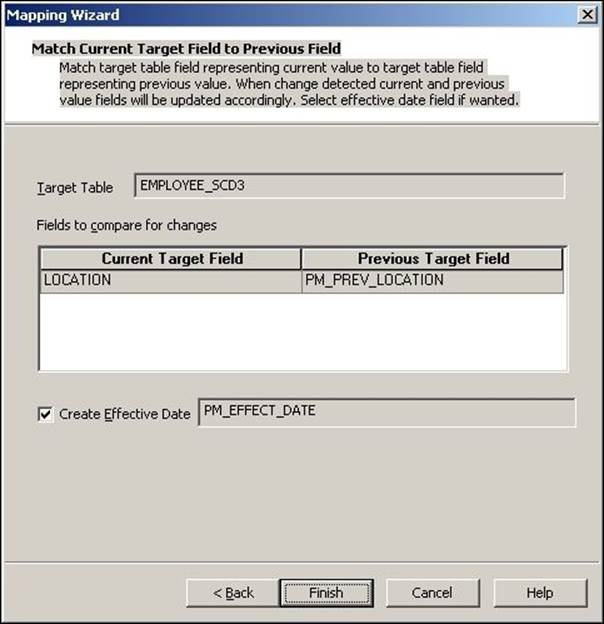
5. In the next window, select the target columns that you wish to compare in order to detect changes. In our case, the LOCATION column in the target will be compared against PM_PREV_LOCATION. You can select a PM_EFFECT_DATE optional field to understand the loading of new or changed records, and click on Finish.
6. The wizard generates a complete mapping in your Mapping Designer Workspace. Make the necessary changes to the mapping if required.
7. Change the target data type from the flat file to the Oracle table, as shown in the following figure:
When we create the mapping using this option, the wizard creates three additional columns in the target table:
· PM_PRIMARY_KEY: The wizard generates the primary key for each row to be inserted into target. Note that EMPLOYEE_ID will not be the primary key in the table.
· PM_PREV_columnName: For every column for which we maintain the history, the wizard generates a previous column. In our case, we wish to maintain the history for the LOCATION field, so the wizard creates another column, which is PM_PREV_LOCATION.
· PM_EFFECT_DATE: This is an optional field; the wizard loads SYSTEMDATE in this column to indicate insertions or updates to the record in the table.
The Informatica Power Center SCD2 mapping uses the LKP_GetData lookup transformation to look up the data in the Target table and uses the EXP_DetectChanges expression transformation to compare the target data with the source data. Based on the comparison, the expression transformation marks a record as NewFlag or ChangedFlag. The mapping is divided into two flows:
· The FIL_InsertNewRecord filter transformation allows only NewFlag record to pass further and filter the ChangedFlag record from the first flow. It passes new records to UPD_ForceInserts, which inserts these records into the target. The SEQ_GenerateKeys sequence generator generates the primary key for each NewFlag record. If you select to create the PM_EFFECT_DATE column option in the wizard, the EXP_EffectiveDate_InsertNew expression transformation loads SYSTEMDATE into the PM_EFFECT_DATE column to indicate the loading of new records.
· The FIL_UpdateChangedRecord filter transformation allows only the ChangedFlag record to pass further. The current data is passed from the SQ_EMP_FILE source qualifier, and the previous data is taken from the target by using a lookup transformation to load the data in PM_PREV_LOCATION. It passes changed records to UPD_ChangedUpdates, which updates changed records in the target. If you select to create the PM_EFFECT_DATE column in the wizard, the expression transformation EXP_EffectiveDate_InsertChanged updates SYSTEMDATE in the PM_EFFECT_DATE column to indicate that new records have been updated.
Let's work through each transformation that is used in the SCD2 mapping:
· Source qualifier (SQ_EMP_FILE): This extracts the data from the file or table that you used as the source in the mapping. It passes data to the downstream transformations, that is, lookup, expression, and filter transformation.
· Lookup (LKP_GetData): This is used to look up the target table. It caches the existing data from EMPLOYEE_SCD3. The EMPLOYEE_ID=IN_EMPLOYEE_ID condition will compare the data with the source table and target table. It passes the data based on the comparison with the expression transformation.
· Expression (EXP_DetectChanges): This receives the data from the upstream transformation and based on that, it creates two flags, which are NewFlag and ChangedFlag. The conditions for both the flags are as follows:
o NewFlag: IIF(ISNULL(PM_PRIMARYKEY), TRUE, FALSE)
o ChangedFlag: IIF(NOT ISNULL(PM_PRIMARYKEY) AND (DECODE(LOCATION,PM_PREV_LOCATION,1,0)=0), TRUE, FALSE)
Based on the condition, it passes the data to downstream filter transformations.
· Filter (FIL_InsertNewRecord): This filters the records that come from the upstream expression transformation and are marked as ChangedFlag; it allows records with NewFlag to get passed to the UPD_ForceInserts update strategy.
· Filter (FIL_UpdateChangedRecord): This filters the records that come from the upstream expression transformation and are marked as NewFlag; it allows records with ChangedFlag to get passed to the UPD_ChangedUpdate update strategy. It uses the value of the LOCATION field that is returned from LKP_GetData to load PM_PREV_LOCATION.
· Update strategy (UPD_ForceInserts): This uses the DD_INSERT condition to insert data into the EMPLOYEE_SCD3 target instance.
· Update strategy (UPD_ChangedUpdate): This uses the DD_UPDATE condition to overwrite the existing LOCATION field into the EMPLOYEE_SCD3 target instance. It passes data to EXP_EffectiveDate_insertChanged in order to load PM_PREV_LOCATION in the target.
· Sequence generator (SEQ_GenerateKeys): This generates a sequence of values for each new row marked as NewFlag that comes into the target, getting incremented by 1. It passes the generated value to EXP_KeyProcessing_InsertNew.
· Expression (EXP_EffectiveDate_InsertNew): This transformation is created by the wizard only if you selected to load the PM_EFFECT_DATE option in the wizard. It loads the generated value in the PM_PRIMARYKEY column into the target, which is EMPLOYEE_SCD3. It loads SYSTEMDATE into thePM_EFFECT_DATE column in the target, marking the start of the record.
· Expression (EXP_EffectiveDate_InsertChanged): This transformation is created by the wizard only if you selected to load the PM_EFFECT_DATE option in wizard. It loads the generated value in the PM_PRIMARYKEY column in the EMPLOYEE_SCD32 target instance. It loads SYSTEMDATE into thePM_EFFECT_DATE column in the target in order to indicate that the record has been updated.
· Target (EMPLOYEE_SCD3): This is the Target table instance that accepts new records into the target table instance.
· Target (EMPLOYEE_SCD31): This is the Target table instance that accepts updates to the existing row in the target table instance.
With this, we saw in detail how to implement the different types of SCDs. Note that we have learned how to implement SCD using wizard. You can also manually create the mapping in order to get more practice and better hands-on experience.
Summary
In this chapter, we specifically concentrated on a very important feature—SCD. We talked about the different types of SCDs, that is, SCD1, SCD2, and SCD3. We saw in detail how to use different transformations to achieve the SCD functionality. At the beginning of the chapter, we used an example to understand the different types of SCDs. We learned how to maintain only current data in SCD1. We checked for different forms of SCD2 mapping, that is, using version number, flag, and date range. We checked how SCD3 maintains partial data. We also checked how wizard creates different columns in different types of SCD mapping.
All materials on the site are licensed Creative Commons Attribution-Sharealike 3.0 Unported CC BY-SA 3.0 & GNU Free Documentation License (GFDL)
If you are the copyright holder of any material contained on our site and intend to remove it, please contact our site administrator for approval.
© 2016-2026 All site design rights belong to S.Y.A.