Learning Informatica PowerCenter 9.x (2014)
Chapter 4. Finishing the Development – Using the Workflow Manager Screen Basics
In the previous chapters, we discussed the Informatica PowerCenter Designer screen in detail. This chapter marks the beginning of another client tool called Workflow Manager. Informatica PowerCenter Workflow Manager lets you execute the Informatica code. By now, you must be clear that we create a skeleton of the data flow in the mapping that contains the source for the target flow. Workflow Manager allows us to execute the mapping; in other words, we actually make the data flow from the source to the target when we execute the process called workflow in Workflow Manager.
Basically, Workflow Manager contains a set of instructions, which we define as a workflow. The basic building block of workflow is tasks. As we have multiple transformations in designer screen, we have multiple tasks in Workflow Manager screen. When you create a workflow, you add tasks to it as per your requirement and execute the workflow to see the status in the monitor.
Using Workflow Manager
As we discussed in Chapter 1, Starting the Development Phase – Using the Designer Screen Basics, the designer client screen is divided into five sections. Similar to this, Workflow Manager Screen is also divided into five sections called navigator, toolbar, workspace, output panel, and status bar. See Chapter 1, Starting the Development Phase – Using the Designer Screen Basics for a detailed description.
Informatica PowerCenter Workflow Manager has the following tools that you can use to create and execute workflows and tasks:
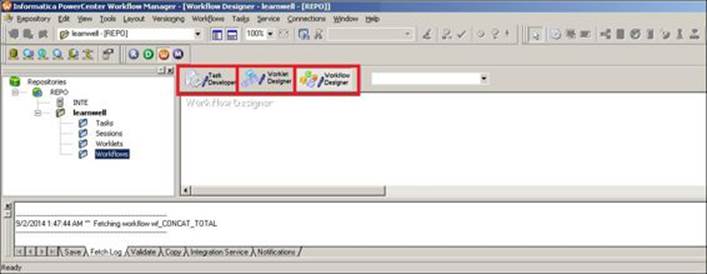
The tools are as follows:
· Task Developer: Using this component, you can create different types of tasks that you wish to add to your workflow. The tasks created in Task Developer are reusable tasks.
· Worklet Designer: A group of reusable tasks is defined as Worklet. You can create Worklet on Worklet Designer.
· Workflow Designer: A workflow can be created in Workflow Designer. Add different tasks to the workflow by connecting links.
Creating a workflow
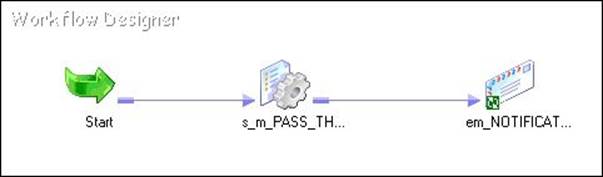
A workflow is combination of multiple tasks connected with links that trigger in a proper sequence to execute a process. Every workflow contains a start task along with other tasks. When you execute the workflow, you actually trigger the Start task, which in turn triggers other tasks that are connected in the flow.
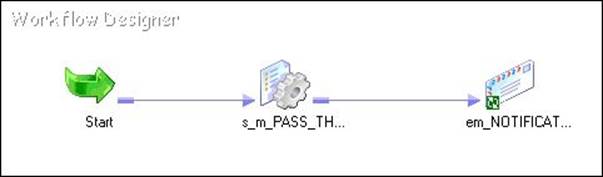
The following figure shows you a sample workflow:
Informatica PowerCenter provides options to create Workflow manually and automatically; these options are discussed in the upcoming sections.
Creating a workflow manually
To create a workflow manually, perform the following steps:
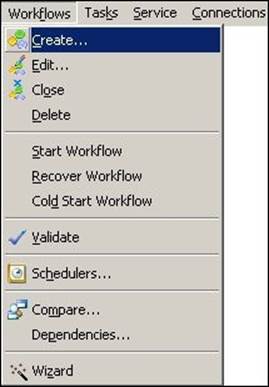
1. In the Workflow Manager, navigate to Workflows | Create.
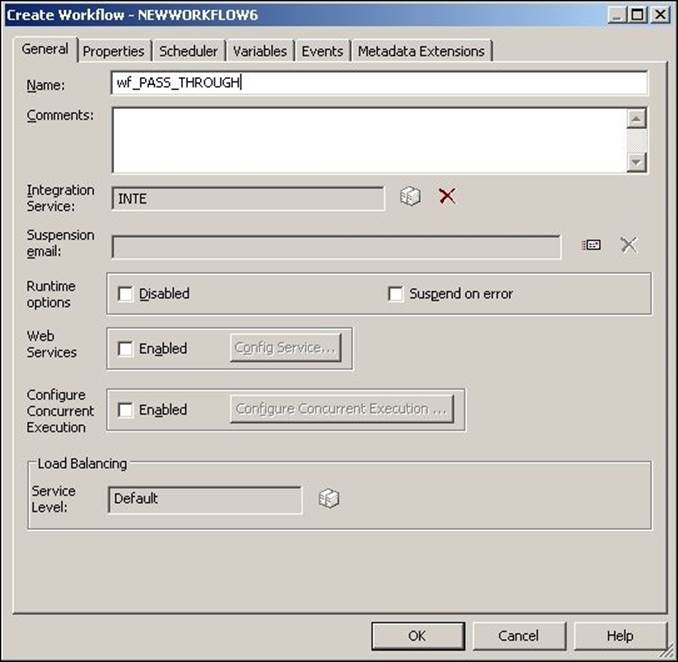
2. Specify the name of the workflow. Please read the naming conventions to be followed while working on the PowerCenter tool. Use http://dw-learnwell.com/Informatica_naming_conventions.php to download the naming convention document. The name of the workflow should bewf_WORKFLOWNAME. Then, and click on OK. We are using wf_PASS_THROUGH as the workflow name for our reference.
A start symbol appears on the screen in Workflow Manager. Also, the wf_PASS_THROUGH workflow appears under the navigator, as shown in the following screenshot:
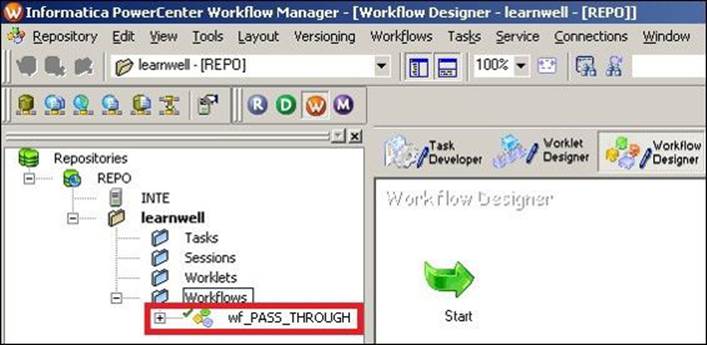
With this, we have learned how to add the start task as a first step to creating the workflow. In the next section, we will create the workflow directly from designer screen.
Creating a workflow automatically
Informatica PowerCenter provides a utility to create the workflow directly from the designer client tool. This feature lets you create a workflow for a particular mapping from designer screen. To create a workflow from designer screen, perform the following steps:
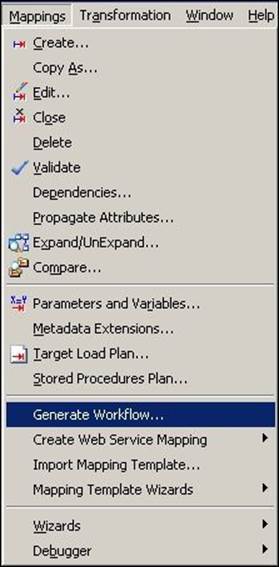
1. In the designer, open the mapping for which you wish to generate the workflow. Navigate to Mappings | Generate Workflow.
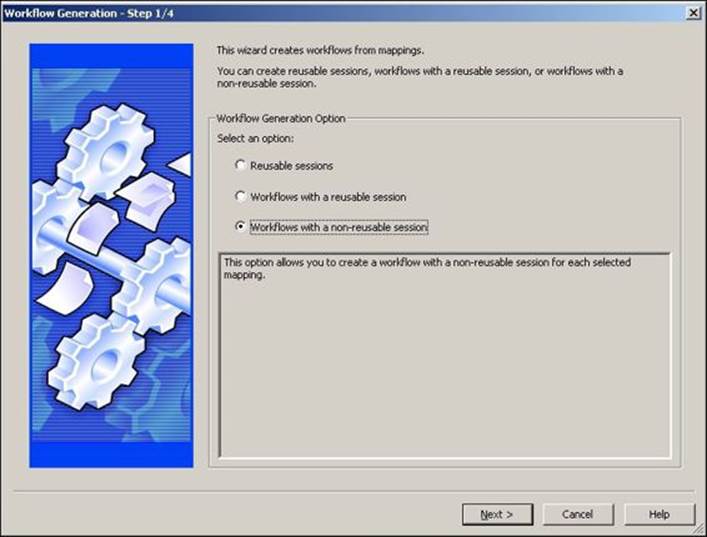
2. On the next screen, select the appropriate option for your session task that will be created. By default, you create workflows with nonreusable sessions.
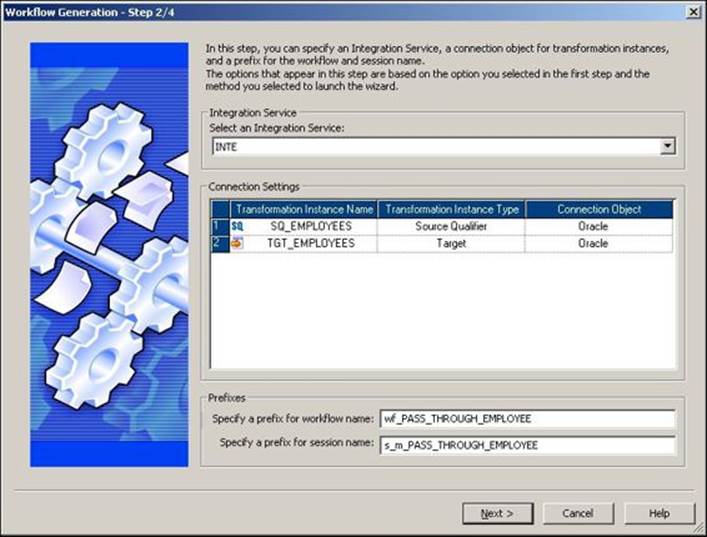
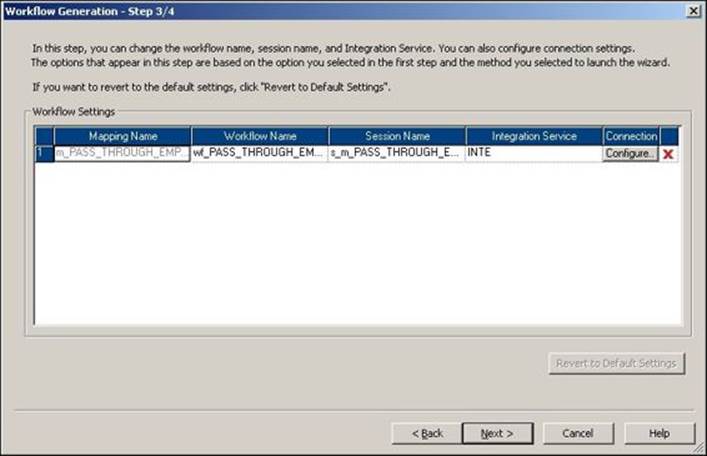
3. On the next screen, select Integration Service (if you have multiple services available) from the drop-down list. Also, specify Connection Object. For our reference, we have selected Oracle as our source and target in the mapping below the Oracle database. Specify the name of the workflow and the session task. We are using wf_PASS_THROUGH_EMPLOYEE and s_m_PASS_THROUGH_EMPLOYEE as our workflow and session task name. Now, click on Next.
4. On the next screen, you can modify the workflow and session task details. Usually, you need not change anything unless you see any conflict. Then, click on Next.
5. The next window gives you a confirmation that the workflow has been created successfully. Click on Finish.

PowerCenter will generate a workflow with a start task and session task in Workflow Manager. Open the Workflow Manager screen to check the workflow. If you are already connected to Workflow Manager, disconnect the repository and connect again to see the workflow under the navigator.
Adding tasks in a workflow
Once you create a workflow, you can add multiple tasks to the workflow. You can directly add the task by creating it in Workflow Manager, or you can create the task in the Task Developer and use it in the workflow.
Adding tasks to the workflow directly
To add a task to the workflow, perform the following steps:
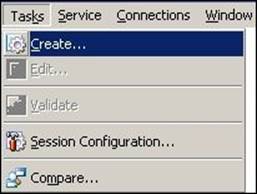
1. In Workflow Manager, navigate to Task | Create.
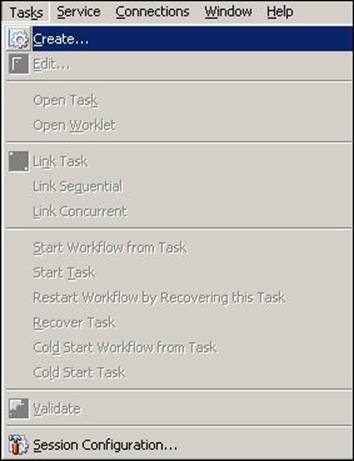
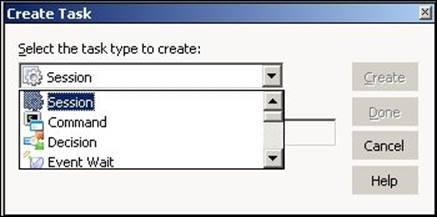
2. Select the type of task from the drop-down list you wish to add to the workflow, and specify the name of the task. The selected task will appear on the screen. Read the naming convention. For our reference, we are creating the session task. The name of the session task should bes_mappingname. Click on OK.
Note that we will discuss all the tasks in detail in the next chapter.
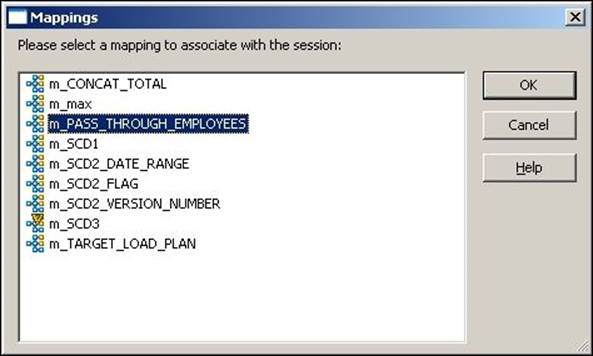
3. If you create a session task, another window will pop up, asking you to select the mapping that you wish to associate with the session. The window displays a list of all the valid mappings present in your repository. Select the appropriate mapping and click on OK.
We are selecting m_PASS_THROUGH_EMPLOYEE for our reference.
The session task appears in the workspace, as shown in the following screenshot:
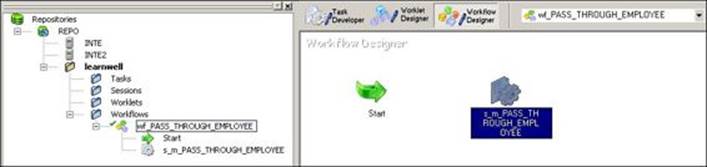
Also, as you can see in the preceding screenshot, s_m_PASS_THROUGH_EMPLOYEE is added to the navigator.
Note that every task will have a different appearance, and based on the task you select to create, the icon will appear in the workspace.
Note
You can associate only one mapping in one session. Also, you cannot change the mapping once you associate the mapping with the session. If you mistakenly associate a wrong mapping, delete the session task, create a new one, and assign the correct mapping.
Creating nonreusable tasks – Task Developer
In the preceding section, we saw how to create nonreusable tasks in Workflow Manager. As mentioned, we can create reusable tasks in Task Developer. Follow these steps to create the tasks in Task Developer:
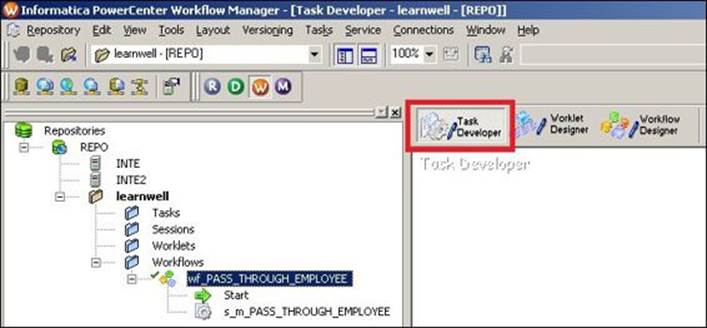
1. In Workflow Manager, click on Task Developer.
2. In Task Developer, navigate to Task | Create.
3. Select the required task from the drop-down list, provide the name of the task, click on Create, and then click on Done.
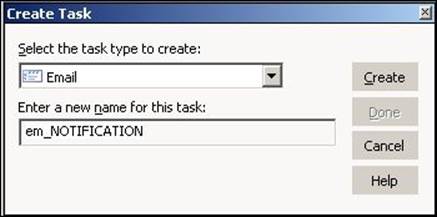
For our reference, we are using the Email task with the em_NOTIFICATION name.
The selected task will appear in Task Developer, as shown in the following screenshot:
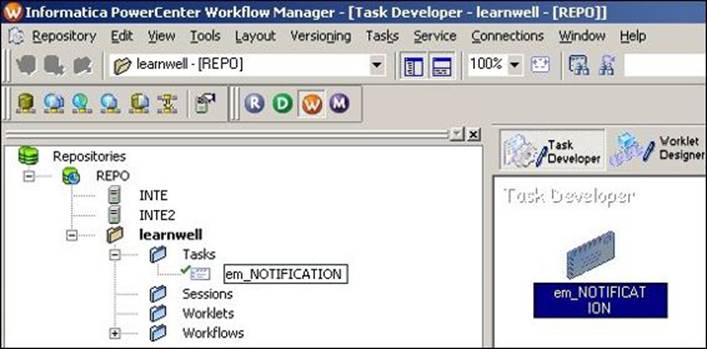
The task will also get added under Tasks in the navigator. This indicates that a reusable task is created in the repository.
Adding tasks to the workflow – Task Developer
If you have created a task earlier in Task Developer, you can use these tasks in Workflow Manager. Open the navigator and drag the appropriate task to the workspace where you workflow is already open; the task will appear in the workspace.
To add the reusable task created in the previous step to Workflow, drag-and-drop the em_NOTIFICATION task to the workspace. The task will appear in the workflow, as shown in the following screenshot:
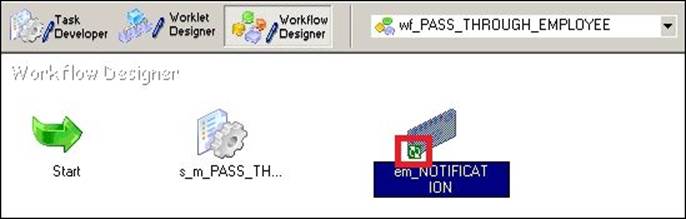
A small icon under em_NOTIFICATION indicates that this is a reusable task.
Note
Tasks created in Workflow Manager are nonreusable, and tasks created in Task Developer are reusable, that is, you can use these tasks in multiple workflows.
Working with the session task – basic properties
Before we can execute the workflow and make the data flow from the source to the target in a mapping, we need to configure some basic properties in a session task. These properties enable the session task to pick the data from the source and load it into the target.
Note
Mapping is only the structural representation of the source and target requirement; actual data movement happens with the properties we define in the session task.
To define the properties, you need to perform a series of steps. In Workflow Manager, open the workflow containing the session task. Double-click on the session task, click on Mapping, and then click on Source.
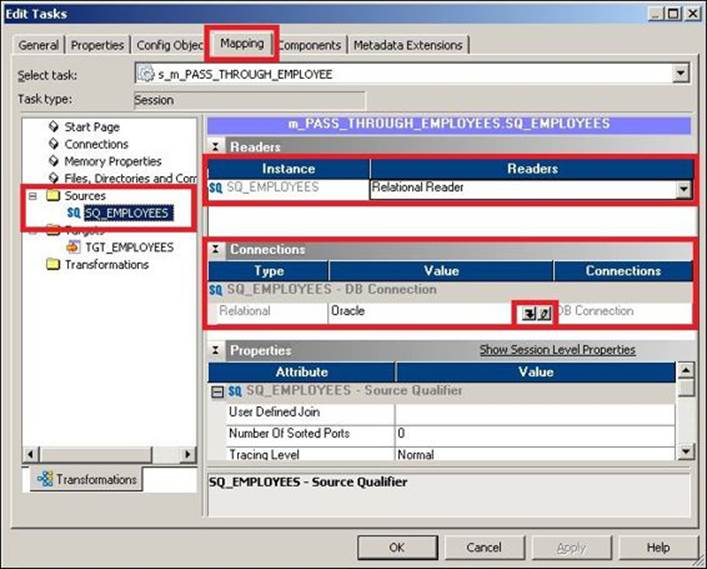
The Mapping tab of the session task lets you define the properties for the source and the target. Let's discuss the options in detail:
· Readers: As we are using the Oracle table as our source, the property is mentioned as relational reader. This signifies that our source is a table from where we are extracting the data. If your source is flat file, the property will change to File Reader.
· Connections: Assign the connection for the database, as shown in the preceding screenshot. If your source is File, the connections option will be disabled, as we need not define connections for files. Note that we will be discussing how to add connection objects later in this chapter.
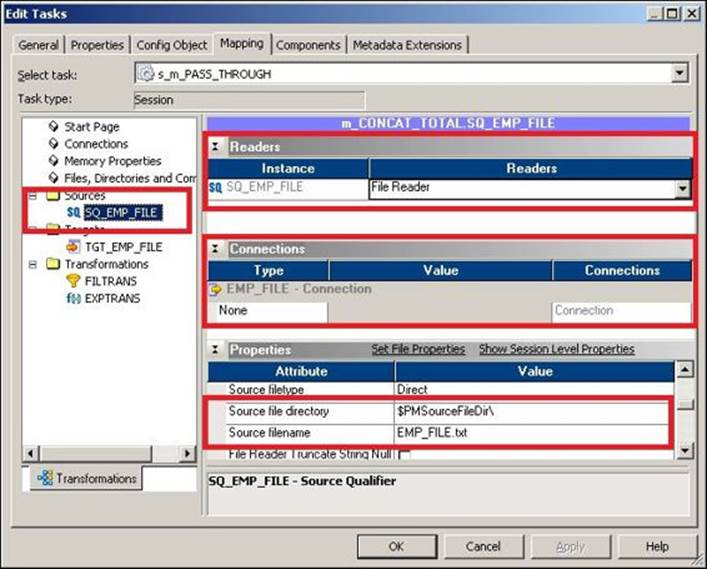
· Properties: Scroll through the properties, and make changes if required. If you are using File as Source, you need to define the location of the file in your system under the source file directory. Also, specify the name of the file under the Source filename if you use flat file as a source, as shown in the following screenshot:
Clicking on Target will bring you to the following screen:
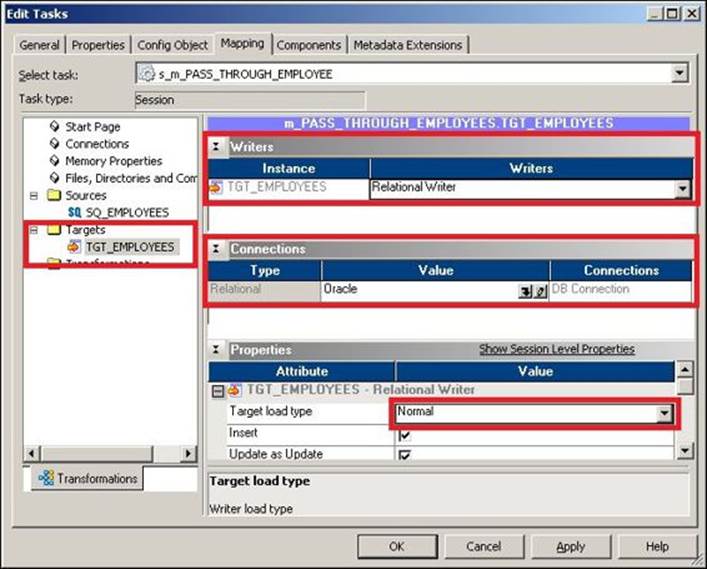
Let's discuss the options in detail:
· Writers: As we are using the Oracle table as the target, the property is mentioned as a relational writer. This signifies that our target is the table where we wish to load the data. If we use target as flat file, the property will change to File Writer.
· Connection: Assign Target Connection for the database, as shown in the preceding screenshot. If your target is File, the Connections option will be disabled, as we need not define the connection for files.
· Properties: The target load type is a very important aspect while loading the data. The target load type is of two types: Normal and Bulk. Selecting the property as bulk allows faster loading into the target. You cannot use the property as bulk if you have a primary key or other constraints in your target table. As our target table has keys defined, we are using a normal property.
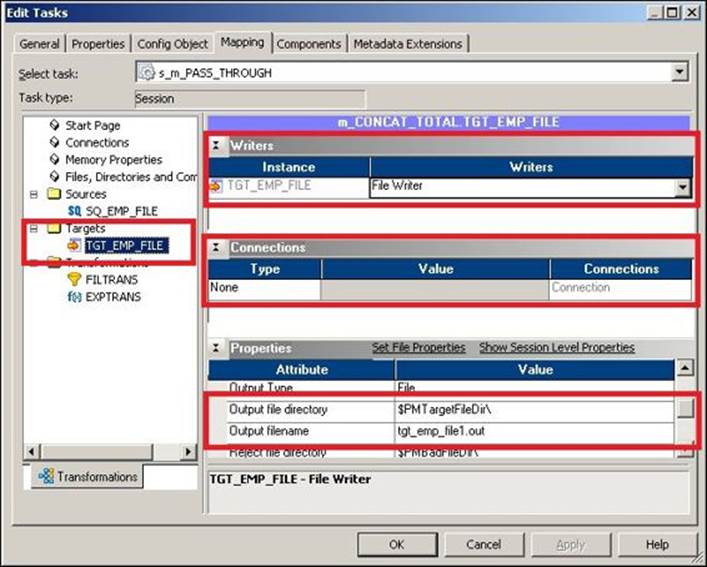
Scroll through the properties and make changes if required. If we use File as Target, we need to define the location of the file in your system under the Output file directory. Also, specify the name of the file under Output filename if you use flat file as target, as shown in the following screenshot:
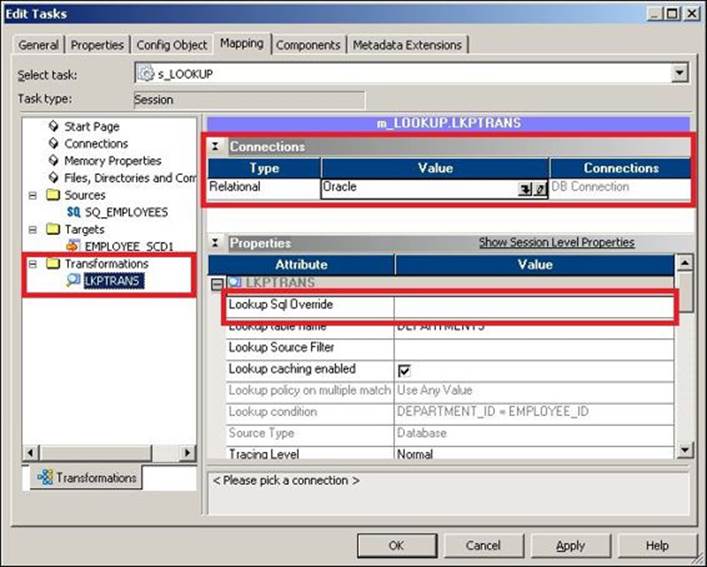
If you are using the lookup transformation in your mapping, you will need to define the file path or table connection for lookup. Click on Lookup under Transformations and define the Connection details, as shown in the upcoming screenshot.
Lookup Sql Override, as indicated in the following screenshot, is a property that is available if you are using lookup transformation to look up a table. When you use lookup transformation to look up a table, it generates a default query to extract the data from the table and bring in Informatica PowerCenter. You can modify the default query generated by the lookup transformation, which is referred to as a lookup SQL override. Using this property, you can save time by eliminating unwanted records while extracting itself.
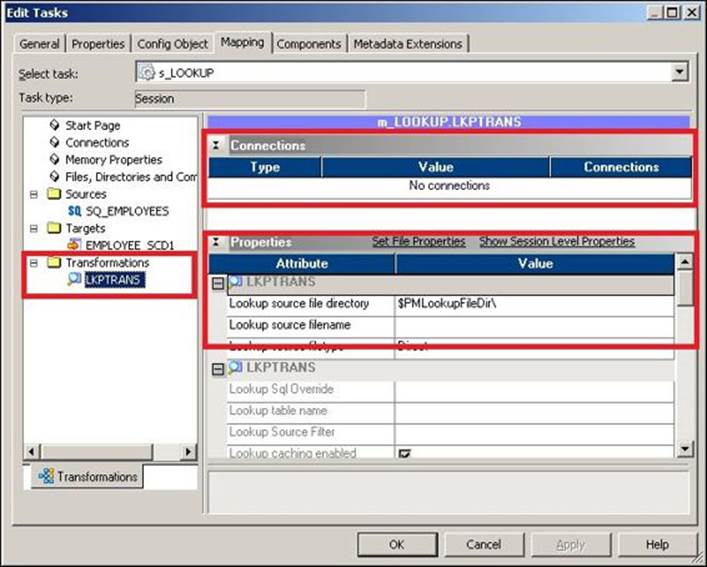
If you use lookup transformation to look up a file, you will need to define LookupFileDirectory and LookupFileName, as shown in the following screenshot:
We will discuss other properties of session tasks in detail in the next chapter.
Connecting the tasks – links
At this point, we have learned how to create the workflow and add reusable and nonreusable tasks. Before you execute the workflow, you need to connect the start task to other tasks that are present in the workflow. We use the link task to connect tasks. Link tasks are also used to define a condition if you have multiple branches in the workflow. Links control the flow of the workflow if you have multiple branches.
To use the link, perform the following steps:
1. Open Workflow Manager and navigate to Tasks | Link.
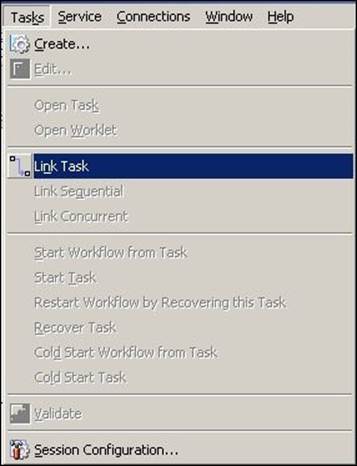
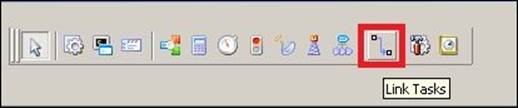
Alternatively, you can use the icon to create the link, as shown in the following screenshot:
2. In the Workflow Manager workspace, click on the Start task and drag the task you wish to connect.
This results in a link between the tasks, as shown in the preceding screenshot. Note that you can connect any two tasks using the link task.
Assigning Integration Service to a workflow
When you create a workflow, Informatica assigns an Integration Service to the workflow in order to enable the data movement from source to target. If you have created multiple Integration Services under the repository, you can change the Integration Service assigned to particular workflow. You might need to change the Integration Service if the assigned Integration Service is not available due to certain reasons. Follow these steps to assign an Integration Service:
1. In Workflow Manager, open the workflow for which you wish to assign an Integration Service.
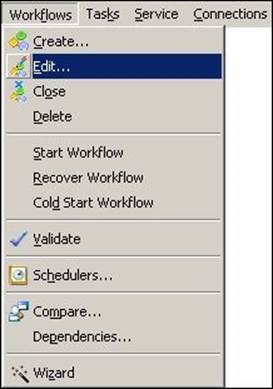
2. Navigate to Workflow | Edit.
3. A new window will pop up, as shown in the following screenshot. Click on the icon that allows you to select the Integration Service.
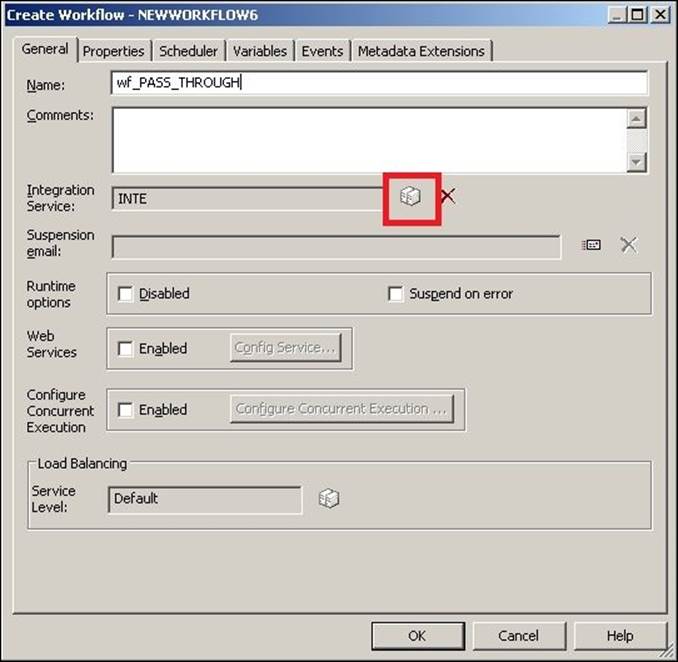
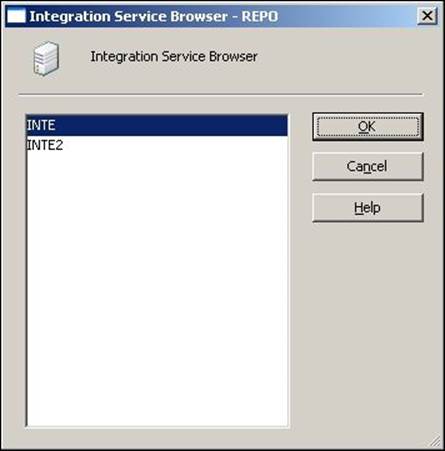
A window with a list of all the Integration Services will appear.
4. Select the Integration Service and click on OK. Click on OK again. The new service will be assigned to the workflow.
Deleting a workflow
We might need to discard some of the workflows that are not required any longer. Make sure you check the usability or dependability of the workflow you are deleting. There are various ways in which you can delete a workflow:
· To delete a workflow, select the workflow in the navigator and press the Delete button
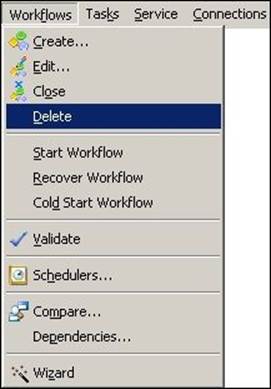
· To delete a workflow that is currently opened in a workspace, navigate to Workflow | Delete:
When you delete a workflow, all the associated nonreusable tasks are deleted from the repository. Reusable tasks remain in the repository.
Trigger – starting a workflow
Before you start the workflow, make sure the workflow is valid. Note that you can either create a complete workflow that can be executed, or you can create a part of the workflow.
Running the complete workflow
To run Workflow Manager, perform the following steps:
1. In Workflow Manager, open the workflow you wish to execute in the workspace.
2. Navigate to Workflows | Start Workflow.
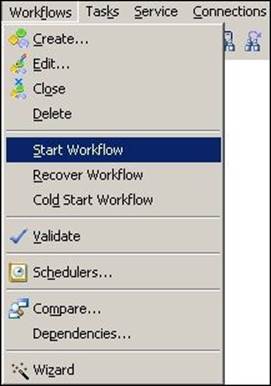
The workflow will start the execution, and the status can be checked in Workflow Manager.
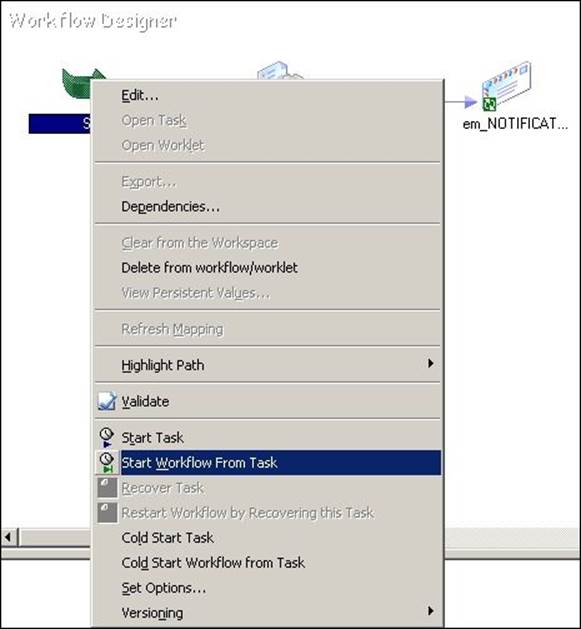
Running a part of the workflow
If you wish to execute only a part of the workflow, select the task from which you wish to execute the workflow. Right-click on the task, and click on Start Workflow from task.
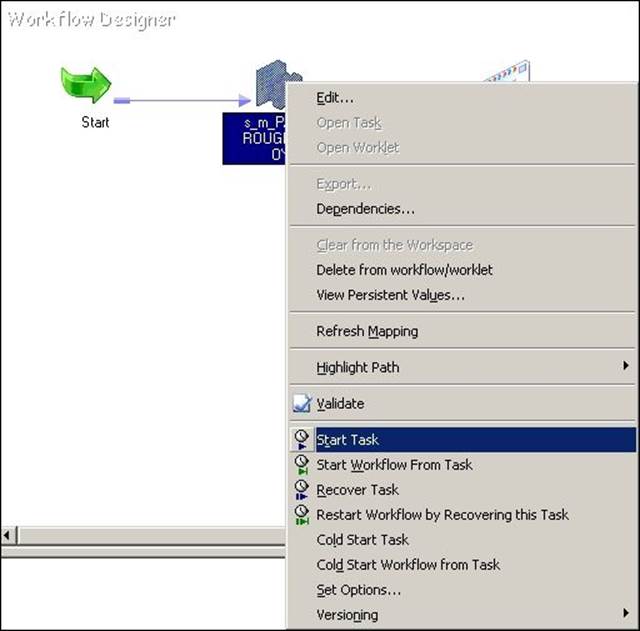
Running a task
Apart from running the workflow, Informatica PowerCenter allows you to run only a particular task. This feature is specifically important when you are in the development phase of your project and you wish to check each component before you run the complete workflow. To run a task, perform the following steps:
1. In Workflow Manager, open the workflow containing the task.
2. Right-click on the task you wish to execute and click on Start Task.
You can check the status of the task in the Workflow Monitor. You will see that only the selected task is executed.
Working with connection objects
At this stage, you must be aware that we will need to define the database connections in Workflow Manager before we can define the connection in the workflow. Defining the connection is necessary in order to make the data flow from the actual database table to Informatica.
If we use File for Source or Target, we need to define the path location for the source or file. However, if we are using the database table as our source, target, or lookup transformation, we will need to define the database connection that we discussed in the Working with session task section of this chapter. Before you can assign the connection in the session task, you need to configure the connection object in the workflow. This is similar to adding the database connection object in the PowerCenter Designer.
There are various types of connection objects that Informatica PowerCenter supports:
· Relation connection: As mentioned previously, before you can define connection values in a session task, you need to add the connection under Workflow Manager. You can create a connection for any type of relational database, such as Oracle, SQL, DB2, and so on.
· FTP connection: You can create a File Transfer Protocol connection to transfer the files.
· External loader connection: Informatica supports an external loader that directly loads the data from files to database tables. The external loader eliminates the need to run SQL commands to insert data into the table.
· Queue connection: These connections enable the processing of message queues.
· Application connection: You can create connections to enable session tasks and extract the data from or load the data into applications such as Salesforce, PeopleSoft, Siebel, and TIBCO.
Note that apart from the relational connection, all other connection objects are rarely required based on your project requirements. So, you might be more interested in learning relational database first.
Creating a connection object
To create a new connection object in Workflow Manager, click on Connections in Workflow Manager and select the type of connection you wish to create.

Configuring a relational database
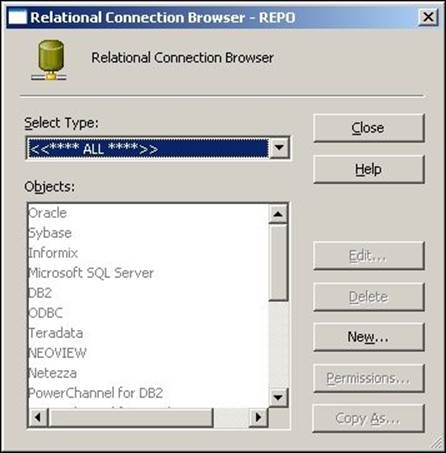
To create a new relational database connection, perform the following steps:
1. In Workflow Manager, navigate to Connections | Relational, as shown in the preceding screenshot.
2. On the next screen, click on New to add a new connection.
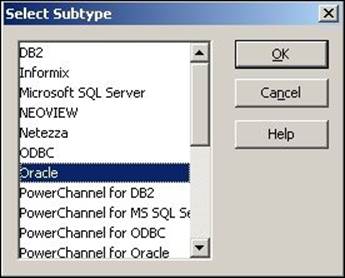
3. Select the database subtype and click on OK. For our reference, we are selecting Oracle.
4. On the next screen, you can define all the properties. Define the properties and click on OK, and then click on the close button to get the connection added to your repository.
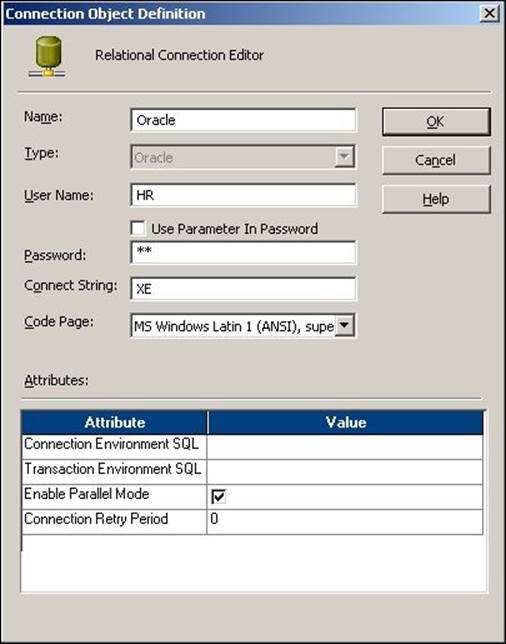
Note that you need to have all the details available with you before you can configure the relational database connection object:
· Database name: This specifies the name of the database, for example, Oracle, SQL Server, and so on. In our case, we are using Oracle.
· Database type: This specifies the type of the database, for example, Oracle, SQL Server, and so on. In our case, we are using Oracle.
· Database user name: This mentions the name of the database user who has proper authentication to read from and write into the database table. We are using HR as the username for our reference.
· Password: This mentions the password for the user you mentioned under the database username. We are using the password as HR for our reference.
· Connect string: This mentions the connection string that transfers the data to the table. For our reference, we are using XE as the connection string.
· Database code page: This selects the code page associated with your database.
The details that need to be filled in are shown in the following screenshot:
This will add the connection to your Workflow Manager screen in the repository. Now, you can use the connection in your session task.
Summary
We can summarize this chapter by saying that we learned about the complete development of Informatica, that is, we learned about designer screen and the Workflow Manager screen. By now, you should be able to create the mapping and workflows.
In this chapter, we learned how to work on the Workflow Manager screen. We learned how to create the workflow, add tasks, and link the tasks. We saw various options to create workflows and tasks. We learned how to create reusable and nonreusable tasks in Task Developer.
Then, we discussed how to run the workflow. We checked how to run a complete workflow and how to run part of a workflow and an individual task. The last section of the chapter talked about connection objects. We discussed the different types of connection objects present in Informatica. We also discussed the frequently used connection, that is, relation connection, in detail.
In the next chapter, we are going to talk about the various types of tasks and high-level properties of the Workflow Manager screen.
All materials on the site are licensed Creative Commons Attribution-Sharealike 3.0 Unported CC BY-SA 3.0 & GNU Free Documentation License (GFDL)
If you are the copyright holder of any material contained on our site and intend to remove it, please contact our site administrator for approval.
© 2016-2026 All site design rights belong to S.Y.A.