Make: 3D Printing (2014)
Part VIII. Other Ways to Make 3D Objects
Chapter 21. White Chocolate Skulls in PLA Trays
Making molds for chocolate casting with 3D printing.
Anna Kaziunas France
Every Halloween I make treats to give away. I don a costume and distribute them to everyone I meet during my Halloween travels. I call it “reverse trick-o-treating.” During October of 2012, I created a 3D-printed chocolate mold maker and individual trays in which to place the chocolates before bagging them. To cast the chocolates, I used food-safe silicone to make the final chocolate mold (Figure 21-1) from the 3D-printed mold maker.
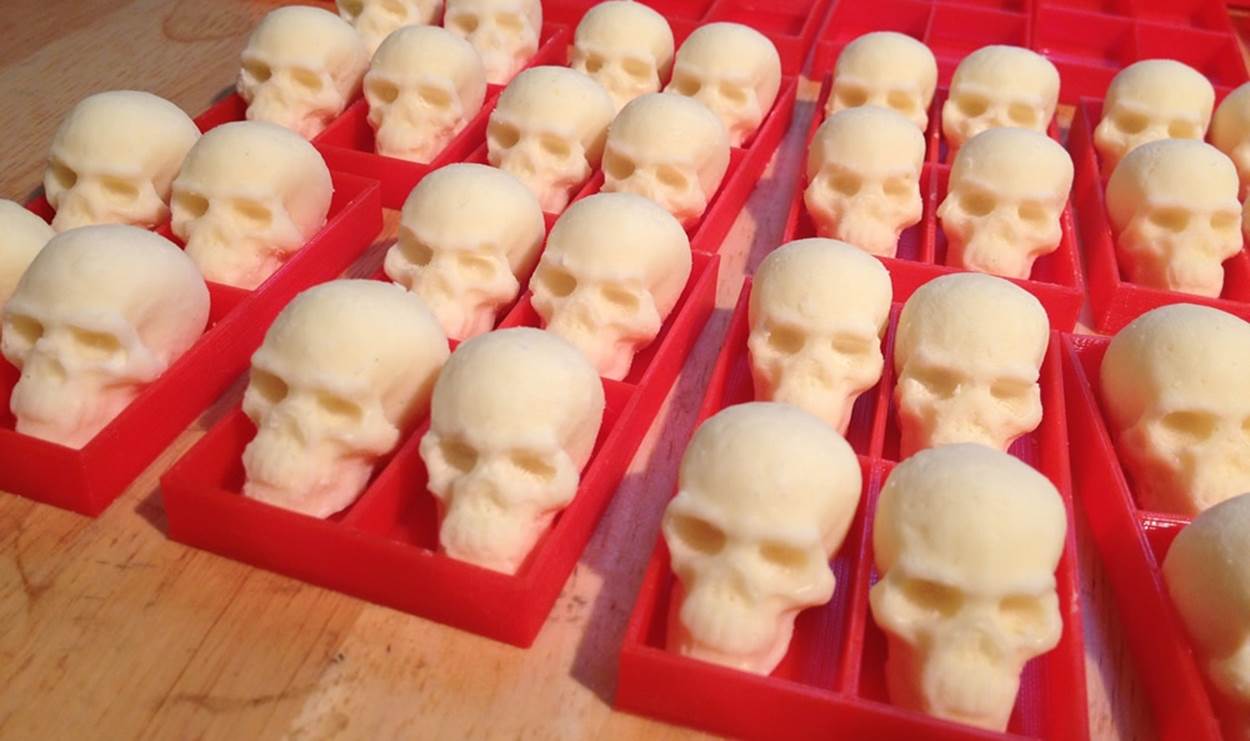
Figure 21-1. The white chocolate skulls
I had scanned the skull a few months earlier using 123D Catch and had already created a 3D-printed necklace with it for my Kali Halloween costume, which I wore (Figure 21-2) when I handed out the chocolates.

Figure 21-2. Happy Halloween 2012 from Kali and Finn & Jake!
I used an OpenSCAD script to make a mashup of a parametric box (by Thingiverse user acker) and my skull to create the mold maker. The trays for the chocolates were created using the same parametric box script.
The candy trays were printed in PLA, and were only used for presenting (not molding) the food. If you’re worried, use a layer of parchment or wax paper to separate the skulls from the tray. I cast many batches of white skull chocolates and then placed them in the PLA trays. I placed the trays in treat bags and sealed them with twist ties.
Here are the files you’ll need:
The Chocolate Skull Mold Maker
http://www.thingiverse.com/thing:33432
Skull with Pointed Teeth (cleaned and repaired scan)
http://www.thingiverse.com/thing:31998
The original skull scan (before cleanup)is available from 123D Catch
http://www.123dapp.com/obj-Catch/Skull-with-Pointed-Teeth/859975
Bill of Materials
You will need the following items in order to recreate the White Skull Chocolates. My 3D printing supplies are shown in Figure 21-4, and you can see the others in Figure 21-3.
§ Access to a 3D printer (I used a MakerBot Replicator) or use of a 3D printing service (like Ponoko or Shapeways)
§ PLA filament to print on that printer
§ Smooth On Smooth-Sil 940 food-safe silicone rubber
§ Chocolate Melts (no tempering required). I like Chocoley’s Bada Bing Bada Boom Candy & Molding Formula
§ Soy Lecithin (softgels. I found these at Whole Foods in the supplement aisle
§ Food thermometer. I find that digital ones with big letters are easiest to read; I purchased mine at my local Harbor Freight for wicked cheap.
§ Double boiler (or a tall soup pot and a small glass mixing bowl)
§ Sharp knife
§ Cutting board
§ Small spatula/spreader
Optional items:
§ Cocoa powder (I used Green & Blacks)
§ Candymaker’s cotton gloves (keep your fingers from marring the chocolate when demolding)
§ Food-safe squeeze bottles or a chocolate funnel (keeps the process from becoming overly messy)
§ Bamboo steamer (can be used in place of a double boiler or tall soup pot/glass bowl combo)
§ Plastic treat bags with twist ties (I bought mine at Joann’s Fabric)
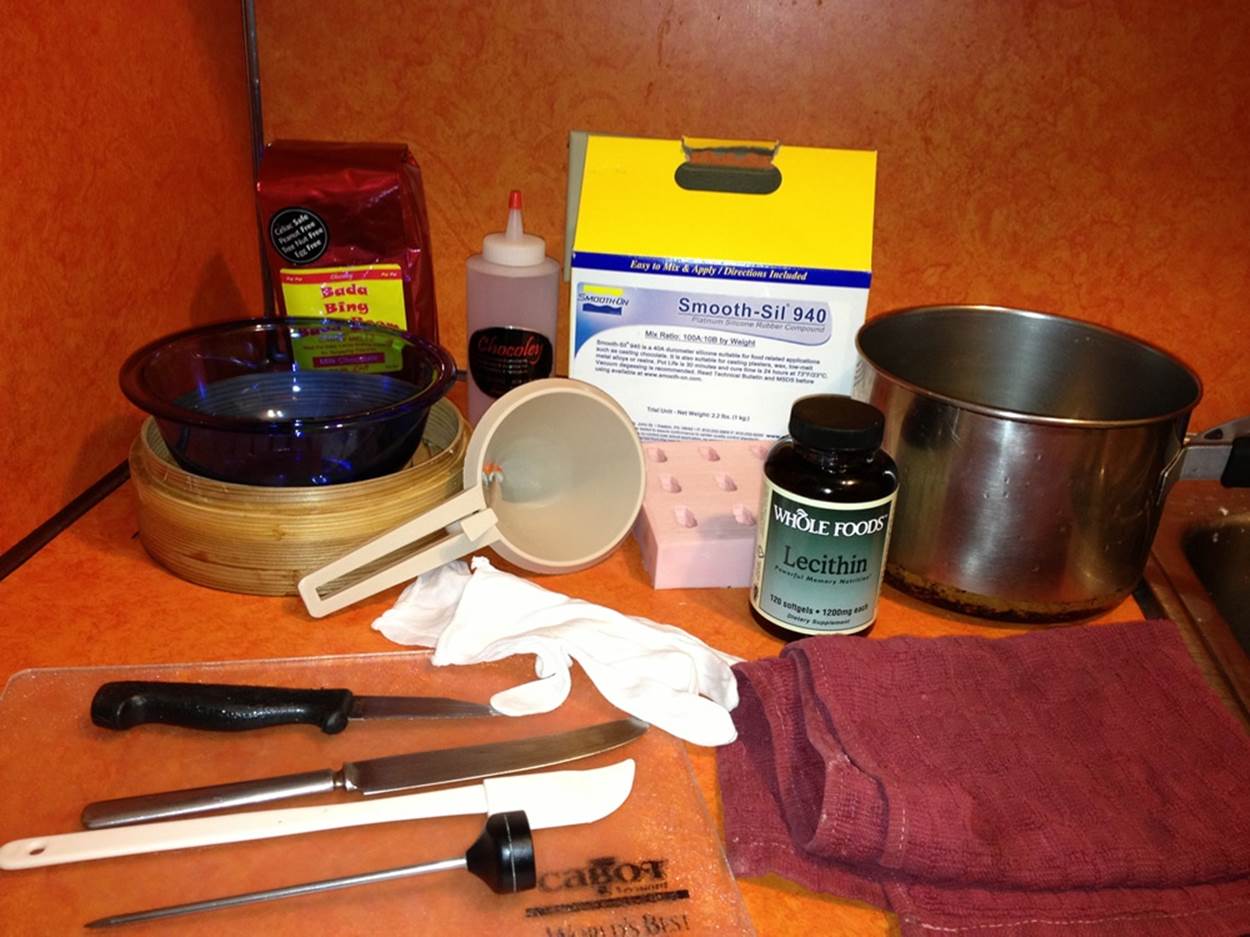
Figure 21-3. My chocolate casting supplies

Figure 21-4. My 3D printing supplies
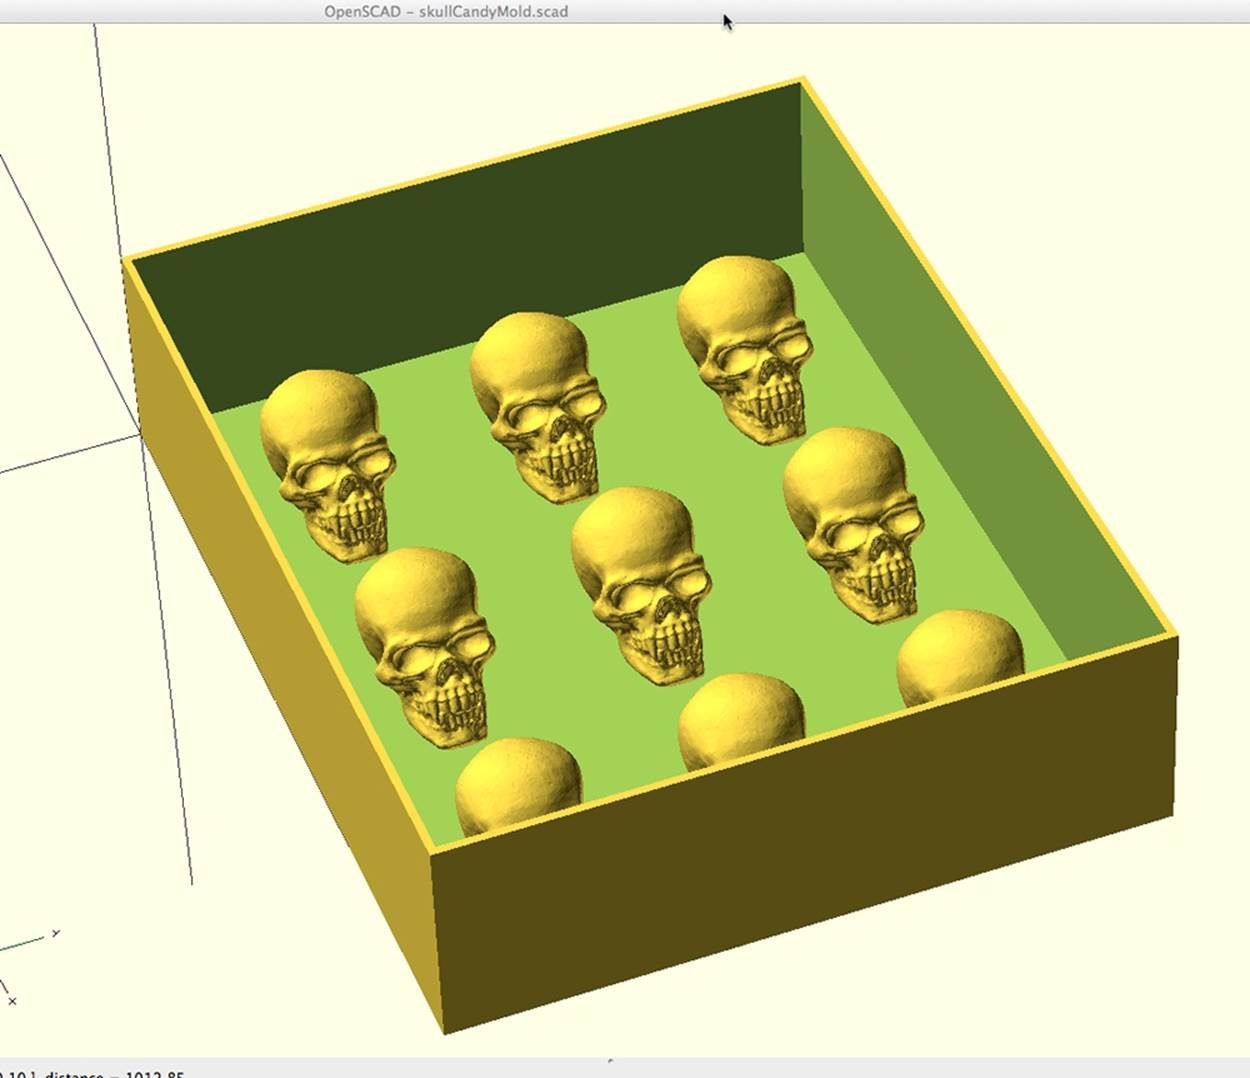
DESIGN YOUR OWN MOLD IN OPENSCAD
If you want to design your own mold instead of using the skull mold file included with the Chocolate Skull Mold Maker, you can edit skullCandyMold.scad to use your own object.
I designed this mold using a mashup of an OpenSCAD parametric box (by Thingiverse user acker) and my scanned skull.
Before you make any changes, I suggest that you play around with the mold code as is. For that to work, make sure the vampireSkull_0.2.stl is located in the same directory as the OpenSCAD file.
Once you’re sure it’s working, you can substitute your own STL for the mold: just change the “filename” variable to the name of your STL. Make sure your STL is in the same directory as the .scad file.
Here’s a render of the mold maker in OpenSCAD:
1. Print the Mold Maker on a 3D Printer
Print the mold form on a 3D printer (Figure 21-5). For people printing on their 3D printers at home, I recommend printing the Chocolate Skull Mold Maker with 13% infill and three shells. I have provided two versions of the Chocolate Mold Maker STL file, one with thin walls (1.3 mm) and one with thicker walls (2.3 mm). The one with thin walls is not completely watertight if you print it with a raft. I used liquid tape on the bottom to make it water tight, but in the end the rubber mold mix was very thick and I don’t think the liquid tape was actually necessary.
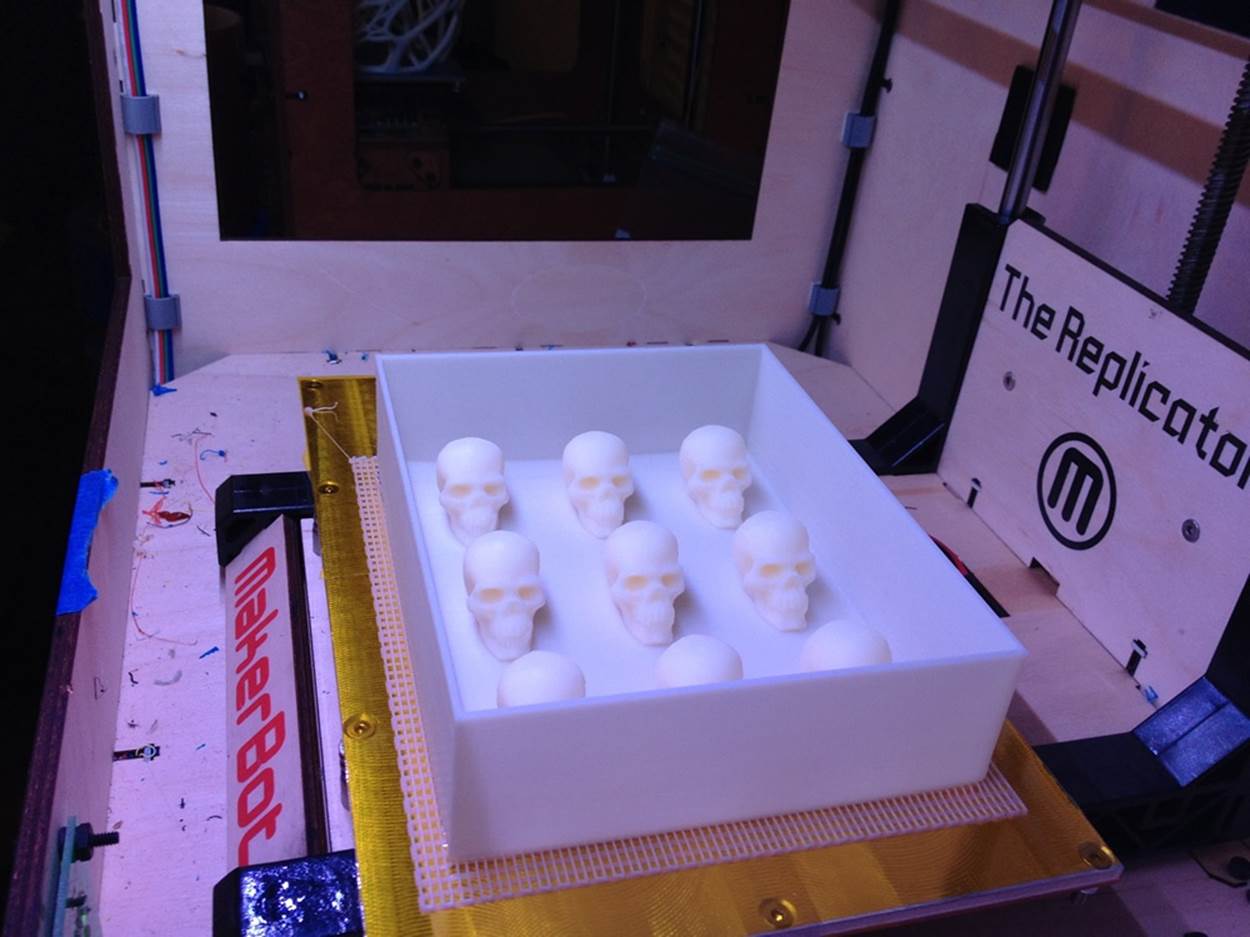
Figure 21-5. Freshly 3D-printed mold maker
The thicker one will take much longer to print. The thin-walled one should be fine to pour the silicone rubber into.
2. Mix and Pour the Smooth-Sil 940
Take the Smooth On Smooth-Sil 940 food-safe silicone rubber (Figure 21-6) and mix it according to the proportions on the package. Pour it into the 3D-printed chocolate mold maker. Fill the mold so that it covers the skulls by about a half inch, or close to the top of the mold.
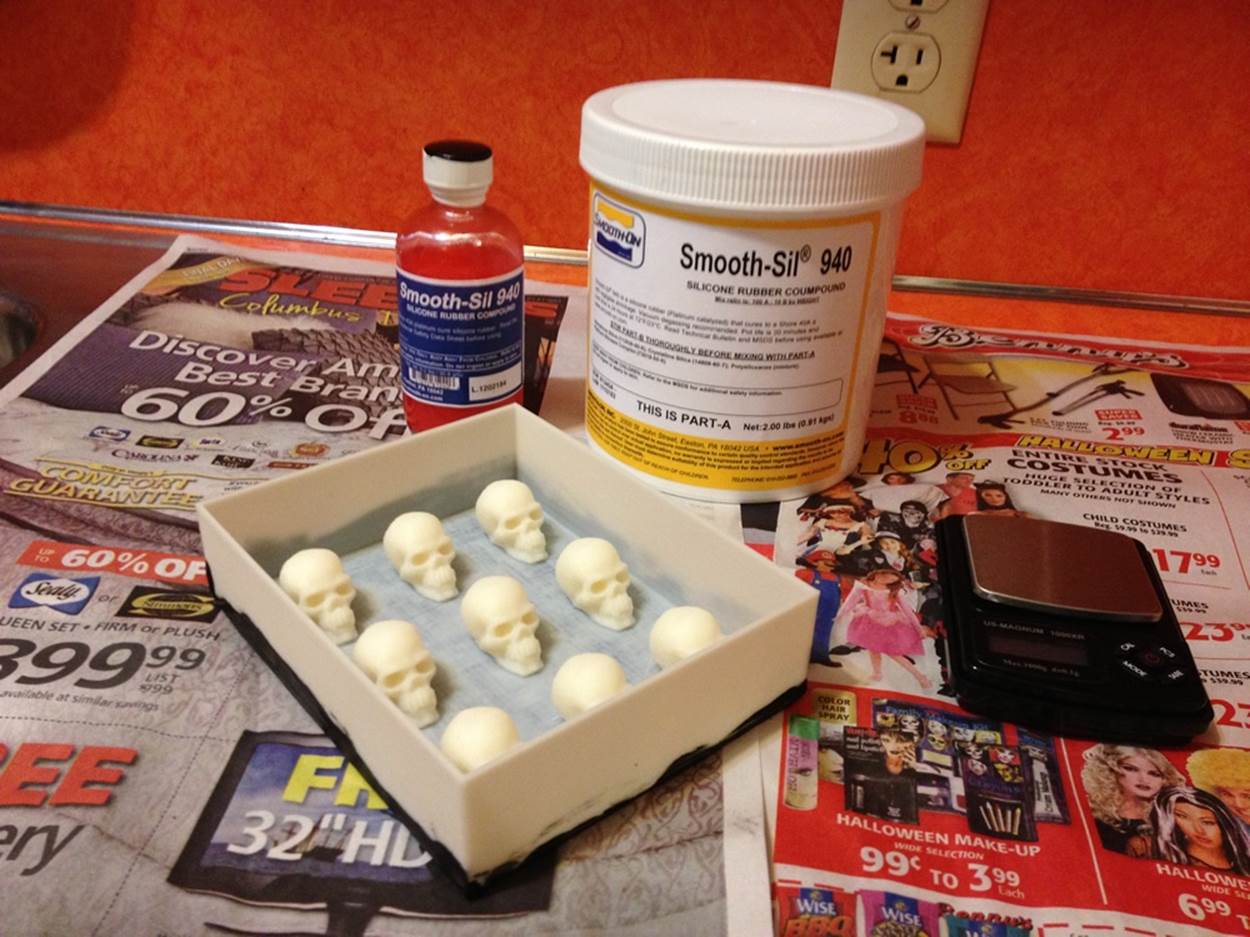
Figure 21-6. Ready to pour!
I don’t have access to a vacuum degasser (yet), so to help prevent bubbles from forming in the mold, I placed it on a subwoofer while music with heavy bass was playing (Figure 21-7). I also used an electric toothbrush without the brush head attached to vibrate the bottom and sides of the outside of the mold to get bubbles to come to the top.
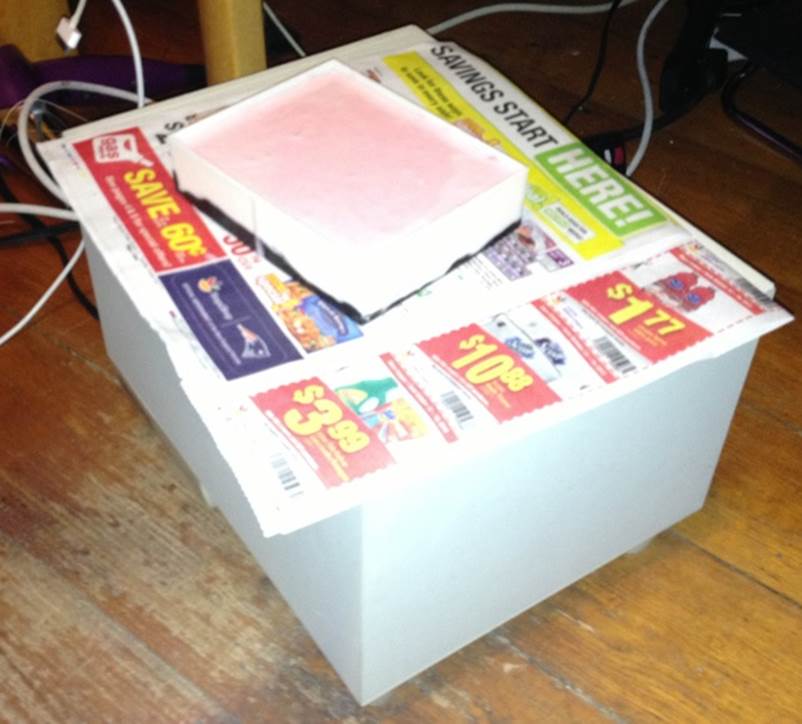
Figure 21-7. Alleviating bubbles with a subwoofer
I don’t know how effective these measures are, but I did not have any problems with bubbles or the mold material losing detail. Let the poured mold set for 24 hours and follow the heat curing instructions. Read the datasheet.
I covered the bottom of the thinner walled-mold with black liquid tape (liquid rubber), as shown in Figure 21-8. I was worried that the model was not completely watertight, but I don’t think this is actually necessary. The Smooth-Sil 940 was so thick that it wouldn’t have leaked out before setting up anyway.
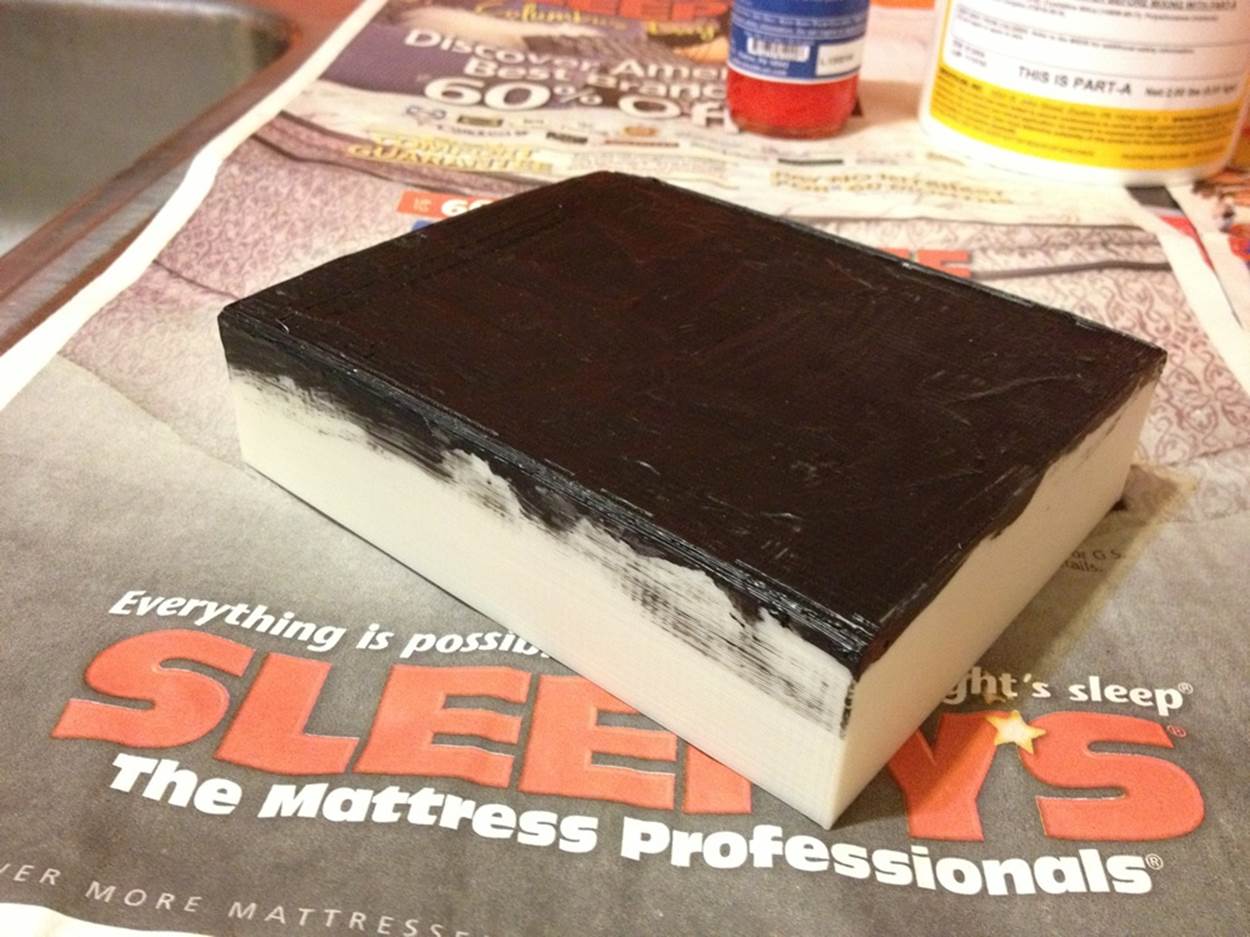
Figure 21-8. Mold form coated with “liquid tape”
3. Demold
In order to remove the silicone mold from the 3D-printed mold form, you will probably have to destroy the 3D-printed form completely. I tore mine completely apart. Some of the skulls had to be removed one by one. Overall it was pretty easy to demold, once I accepted that I was going to destroy the mold maker. Figure 21-9 and Figure 21-10 show the process.
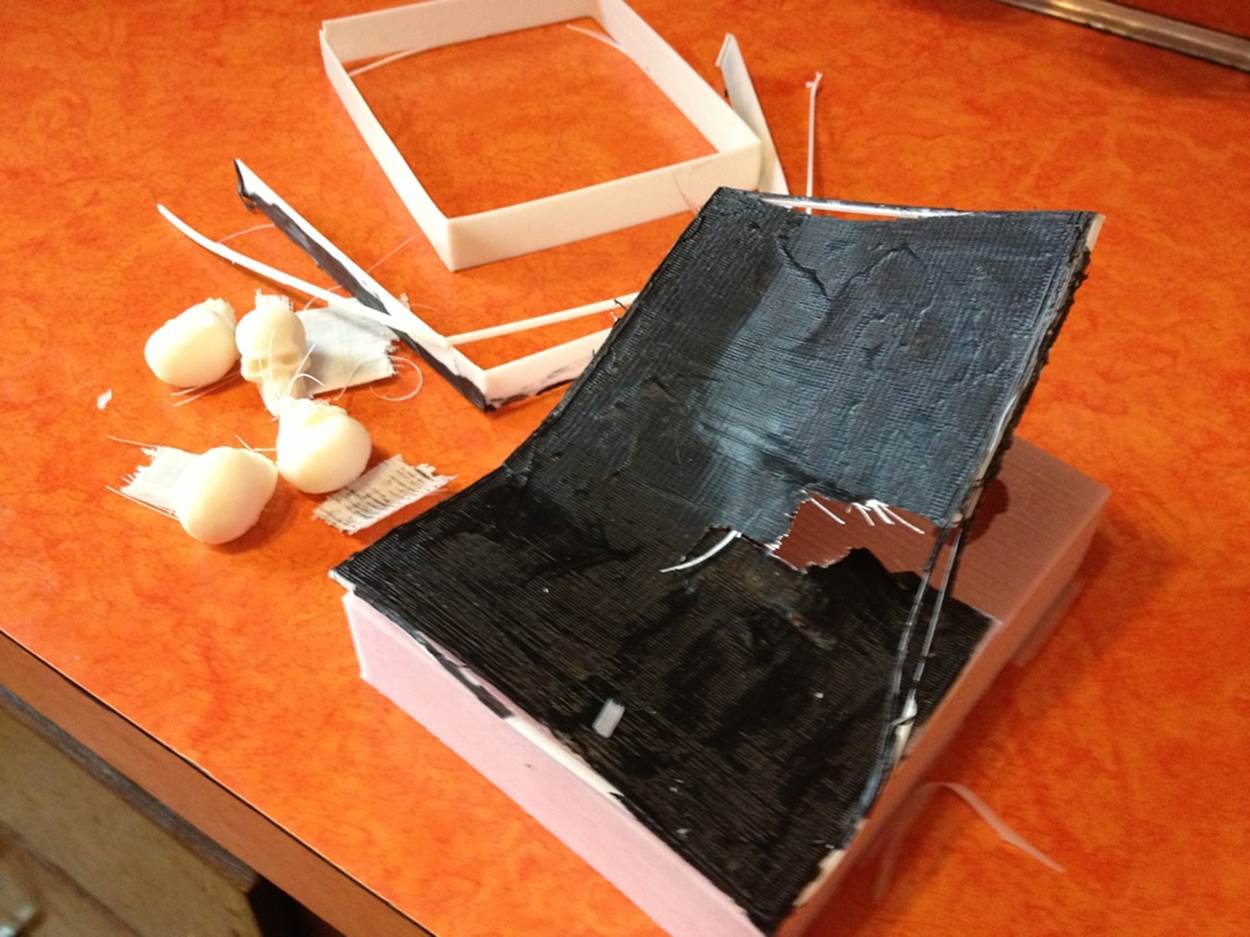
Figure 21-9. 3D-printed mold form destruction!
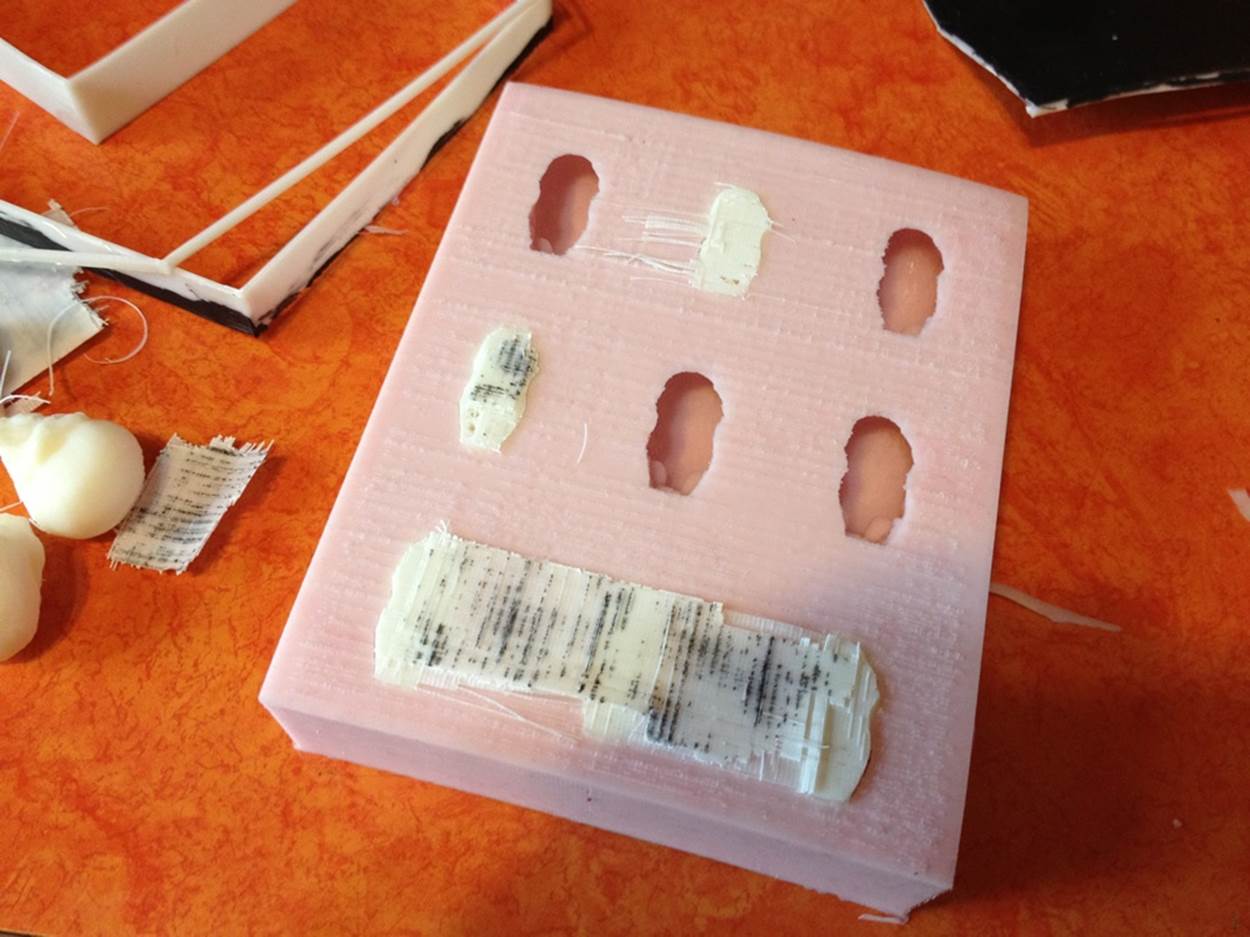
Figure 21-10. Removing the skulls from the silicone mold
Give the mold (Figure 21-11) a wash with soap and water in the sink, and I let it dry completely before attempting to cast chocolate. Water does bad things to chocolate when you are casting it.
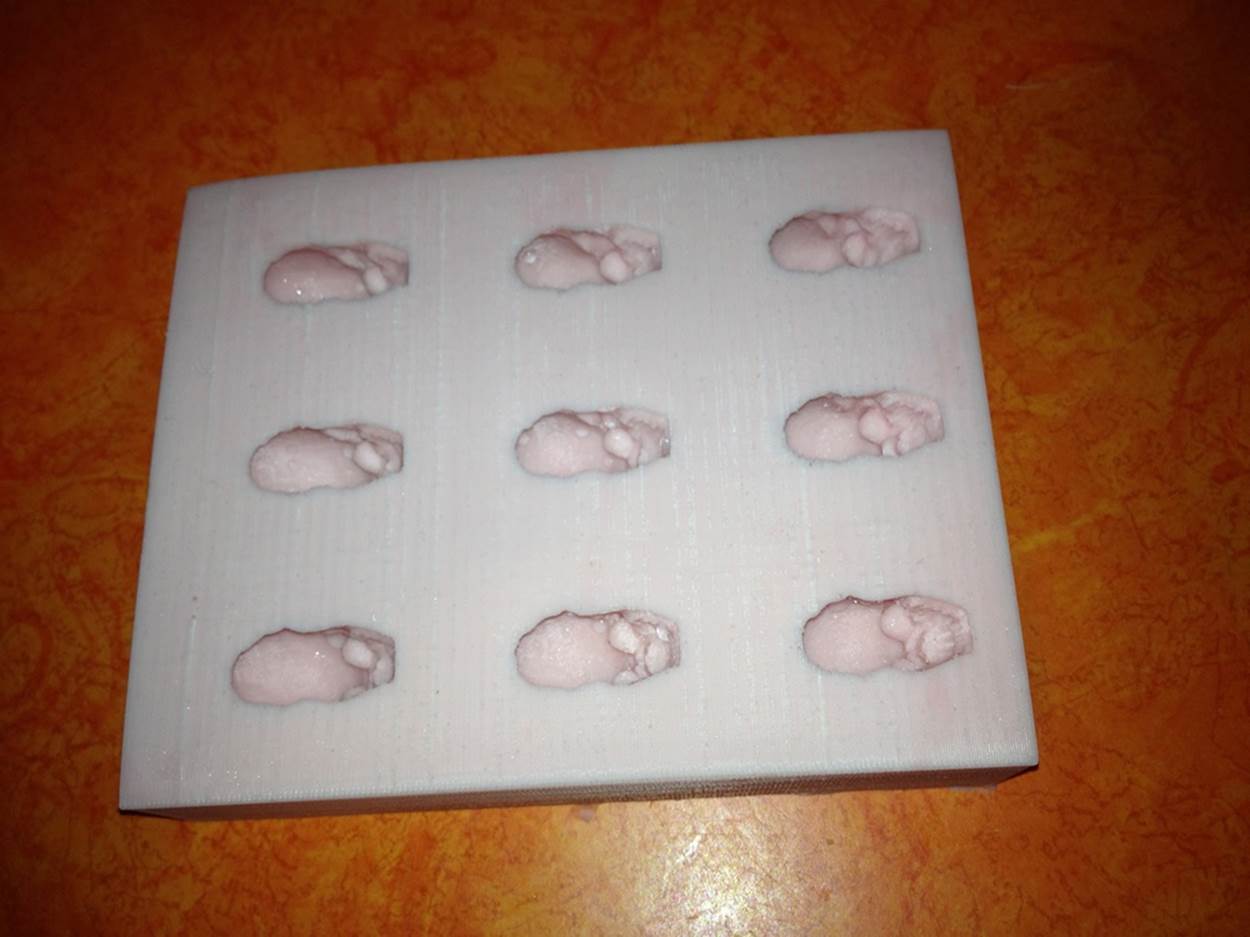
Figure 21-11. Final silicone candy mold
4. Add Slits to the Mold
Cut notches in the mold with a razor blade at the base of the skulls (see Figure 21-12). This will make it much easier to demold the chocolates.
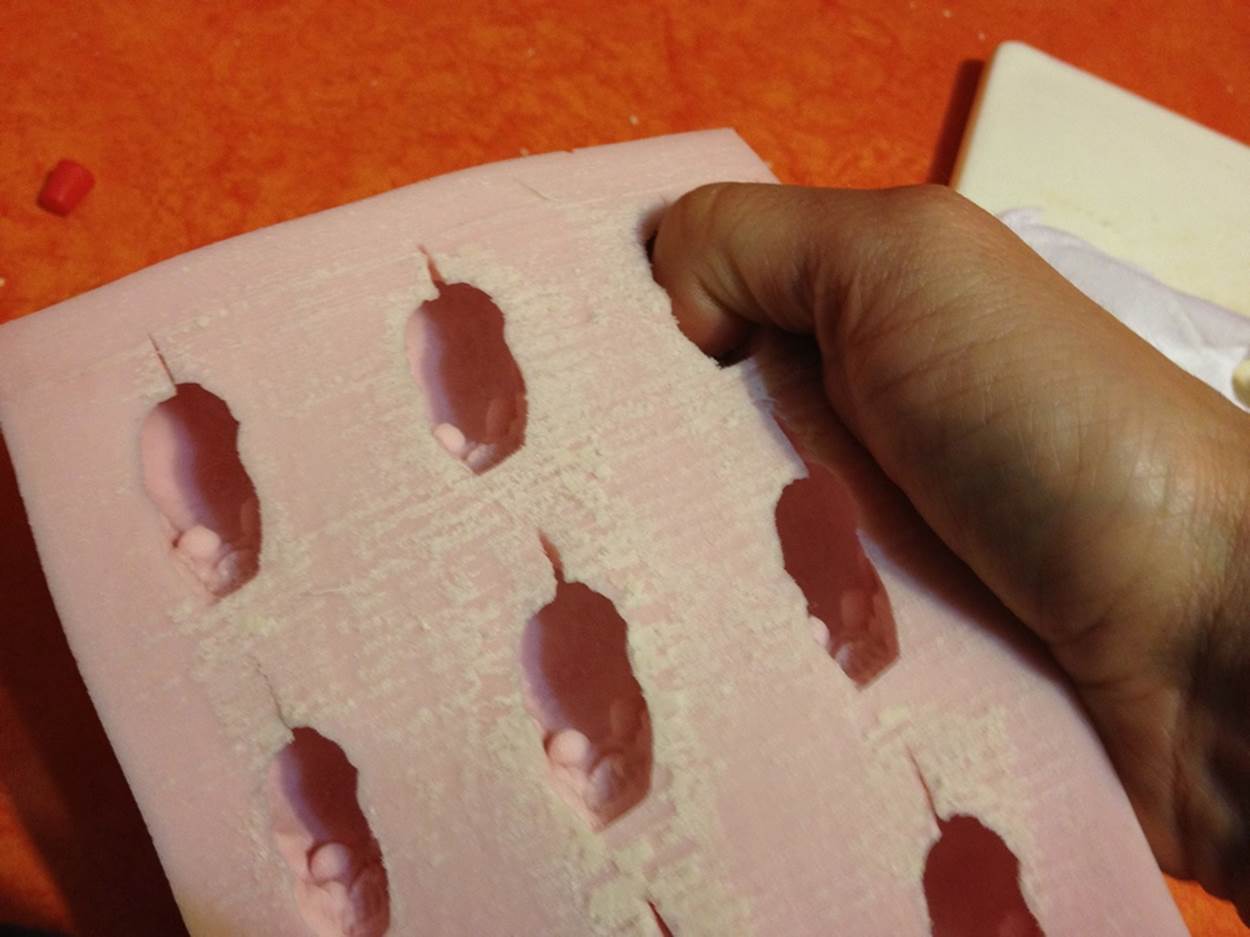
Figure 21-12. Slits added to the candy mold
I came across this by accident. After demolding many rounds of chocolates, the base of one of the skulls started to split a little from flexing the mold. I found that it had no impact on the quality of the chocolates coming out of the mold and it made it much easier to demold the chocolates. I cut little notches with a razor blade straight back perpendicular to the base of all of the skulls (the notches are only visible if I flex the mold) It makes it much easier to get them out of the mold.
5. Extract the Soy Lecithin from the Softgels
The soy lecithin will help with the demolding and has other benefits, such as acting as an emulsifier, when used in molding chocolate. I used Whole Foods soy lecithin softgels, which were available in the supplements isle.
I cut the softgels open and squeezed the oil out (Figure 21-13). I not very precisely used around two small handfuls of chocolate to the oil contained in four lecithin pills. Discard the softgels after squeezing out the oil.
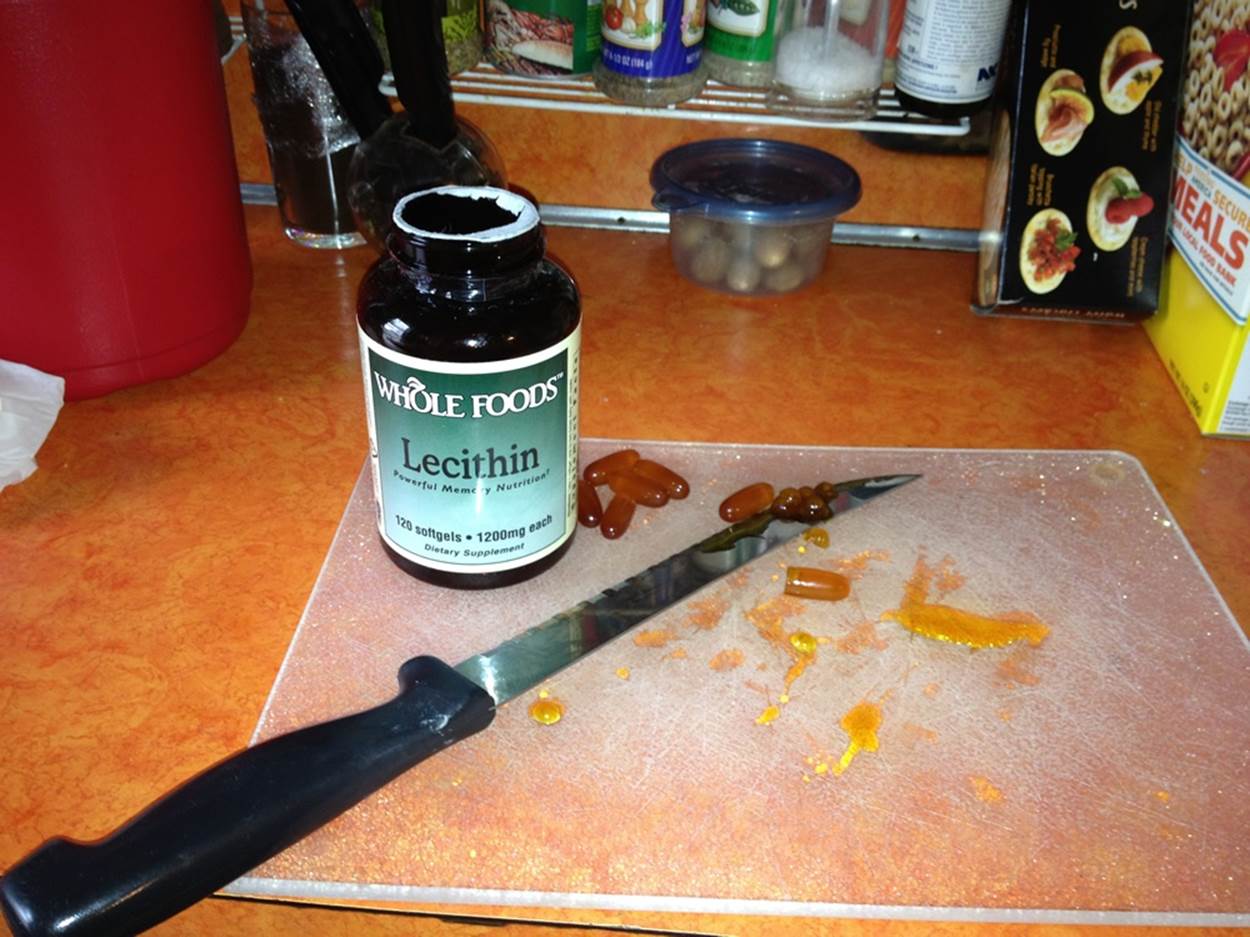
Figure 21-13. Soy lecithin softgels
6. Melt The Chocolate
I used white chocolate melts that do not require tempering. You could temper your own chocolate, but it is an extensive process in its own right and it is not covered here.
Heated chocolate melts in a double boiler. (If you have one, otherwise follow the alternate suggestions at the end of this section. I followed the detailed instructions from Chocoley.
Keep in mind that temperature is very important. While the chocolate melts, use a thermometer to measure the temperature. Heat to between 100-105° F. Do not overheat the chocolate or you will ruin it for casting!
While melting the chocolate, add the small amount of lecithin that we obtained in the last step. I used two small handfuls of chocolate (I have small hands) to the oil obtained from four lecithin softgels. Gently stir the chocolate until it is consistently melted.
I also found that a tiny bit of cocoa powder can give the chocolate a more balanced taste. Just add a sprinkle to the batch.
I made a lot of chocolates, and I don’t have a double boiler, so I experimented with several ways of melting the chocolate.
Bamboo Steamer + Glass Bowl
Fill a tall pot about halfway with water and place a bamboo steamer basket on top of the pot. Put a small glass mixing bowl on top of the bamboo steamer basket. Place your chocolate melts into the mixing bowl (Figure 21-14). I find it is best to do small batches. Add paper towels to the top of the steamer basket where it meets the glass bowl so that steam and chocolate do not mix.
Avoid getting water in the melted chocolate; it will dilute the mixture and it will not set properly when you try to cast it.
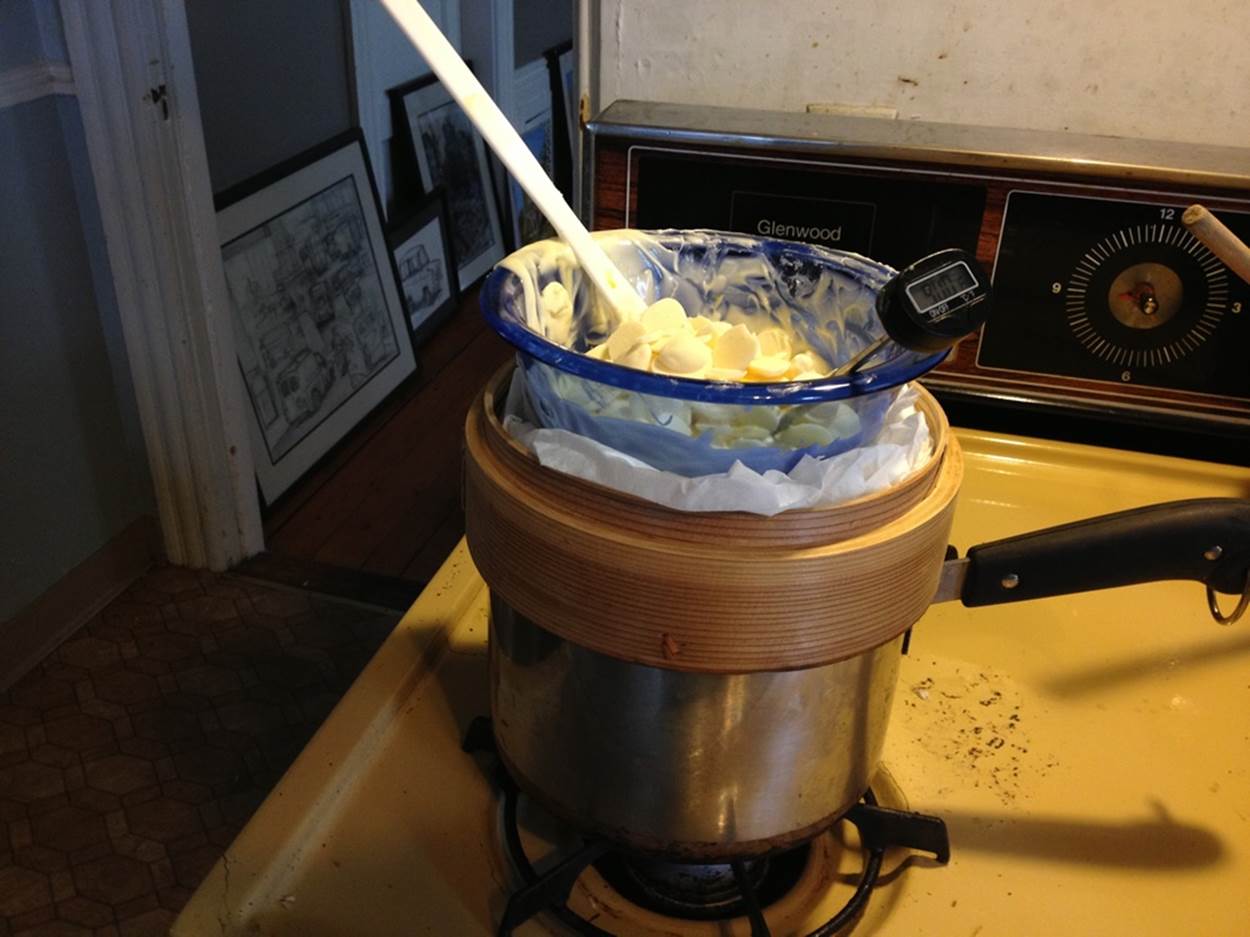
Figure 21-14. Melting chocolate in a glass bowl and a bamboo steamer.
Bamboo Steamer + Squeeze Bottle (Best Way)
After experimenting for an afternoon and melting several batches of chocolate, I found the following method to be the easiest to manage.
I kept the tall pot and the bamboo steamer set up, but switched from using a glass bowl to a chocolate squeeze bottle. I wrapped a dish towel around the bottle to block the rising steam (see Figure 21-15).

Figure 21-15. Melting chocolate in the squeeze bottle.
The squeeze bottle method made the process easier in two ways:
1. It was easy to fill the individual skulls in the mold and was much less messy than the other methods I tried.
2. After I filled the mold, I could put the squeeze bottle aside and it was easy to reheat later on top of the bamboo steamer. This eliminated messy and wasteful chocolate transfers using multiple containers and cut down on the dishes I needed to wash.
7. Let the Chocolate Cool
Before pouring the chocolate into the mold, you need to let the chocolate cool (Figure 21-16). The chocolate needs to cool down to about 96-98° F before you should start working with it. This will probably take longer than you think. Keep an eye on your thermometer and have your mold and tools ready. It pays to stand by the chocolate and wait until it cools; otherwise you may miss your window and it may cool too much to pour into the mold.
If you are going to pour the chocolate into a squeeze bottle or chocolate funnel, do it while it is cooling. Keep the thermometer in the chocolate so you can tell when it has cooled down enough to pour into the mold.
I tried a chocolate funnel before I settled on the squeeze bottle method.
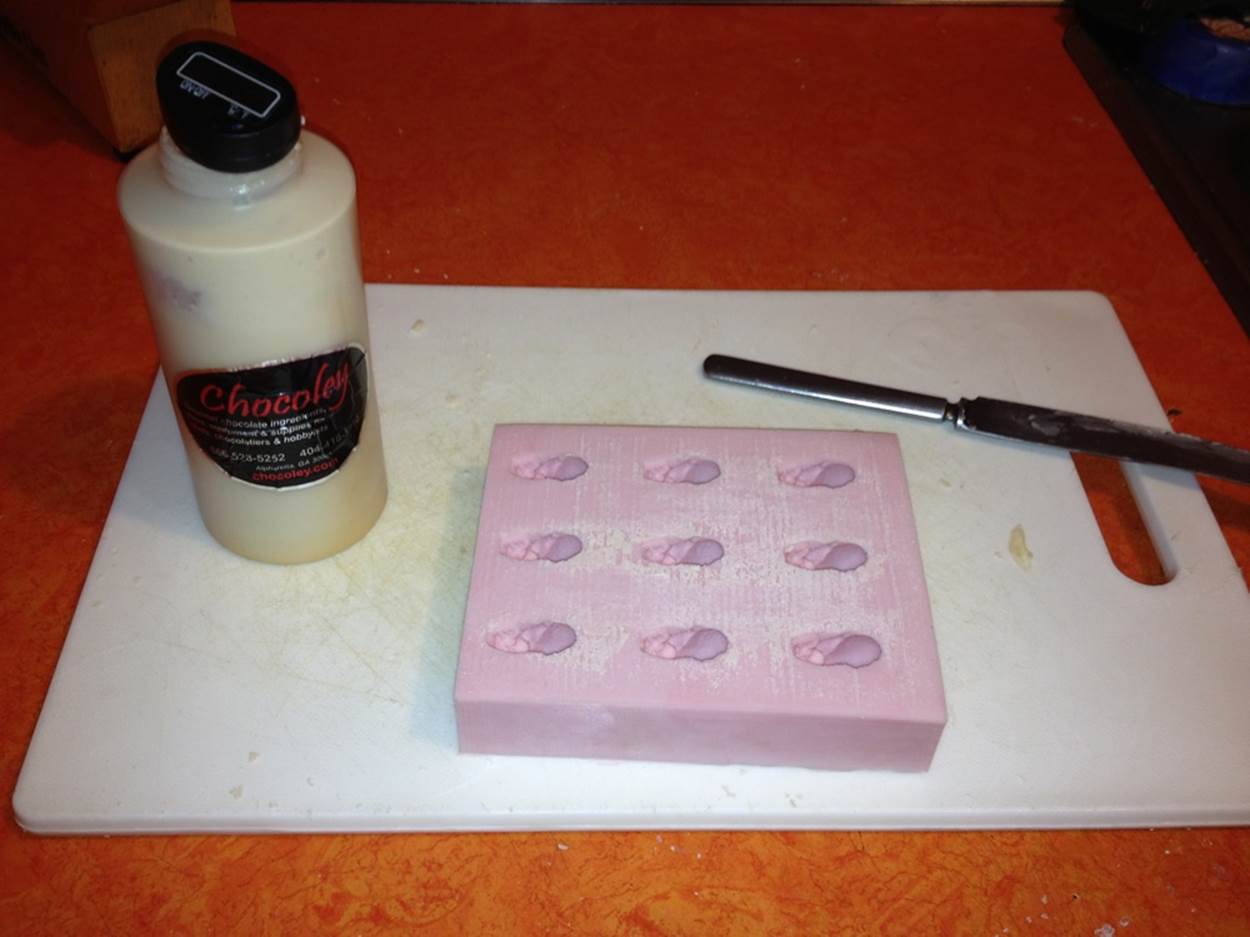
Figure 21-16. Letting the chocolate cool—keep an eye on the thermometer!
8. Pour the Chocolate into the Mold
Once the chocolate cools, you need to pour the chocolate into the mold. I recommend the squeeze bottle method (Figure 21-17), but you could also use a chocolate funnel or carefully pour the chocolate from a small bowl into the holes in the mold.
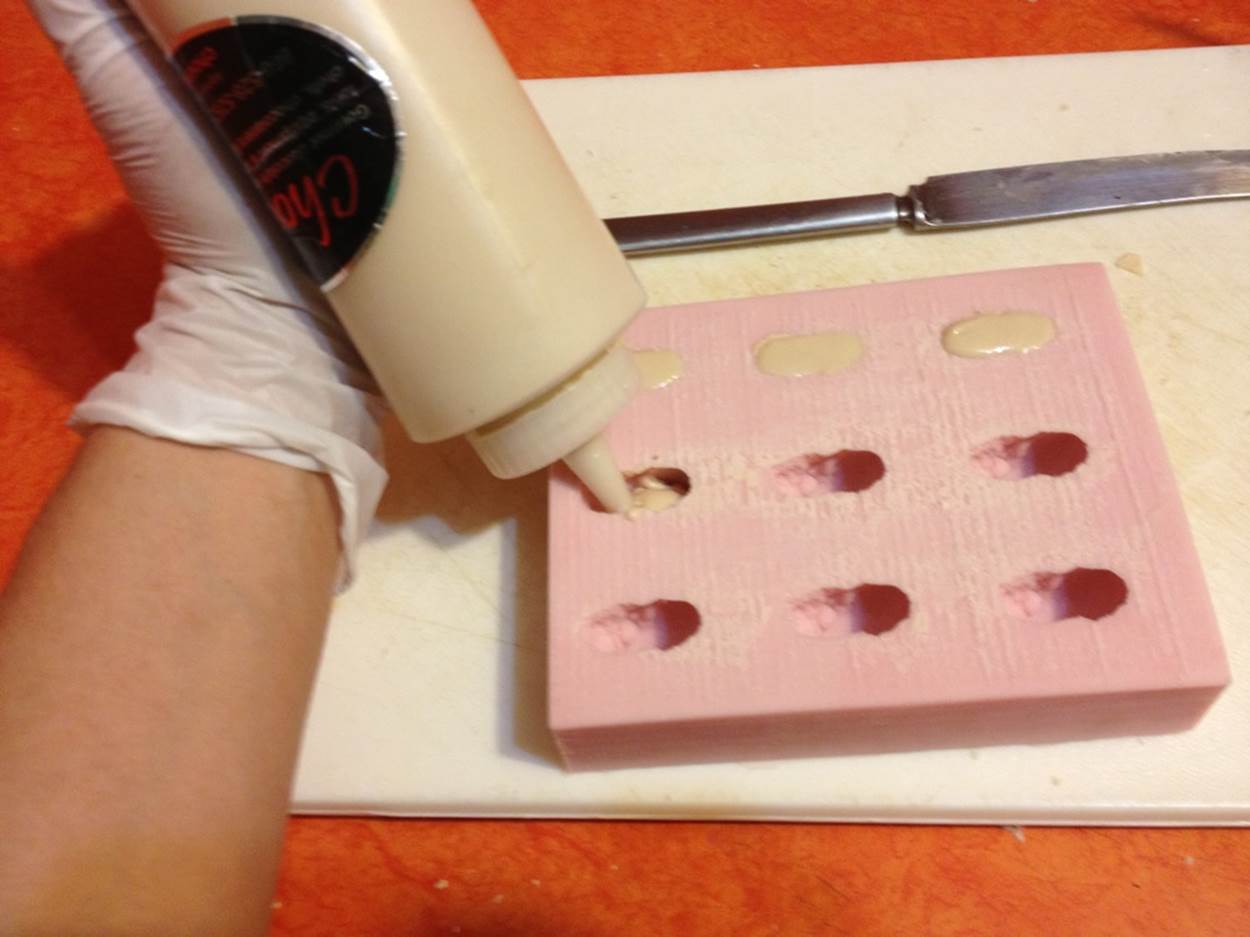
Figure 21-17. Using a squeeze bottle to pour the chocolate into the mold
After you pour the chocolate into the mold, use a spatula or butter knife to smooth out the top of the chocolate (Figure 21-18). Remove any excess on the top of the mold by scraping across the top.
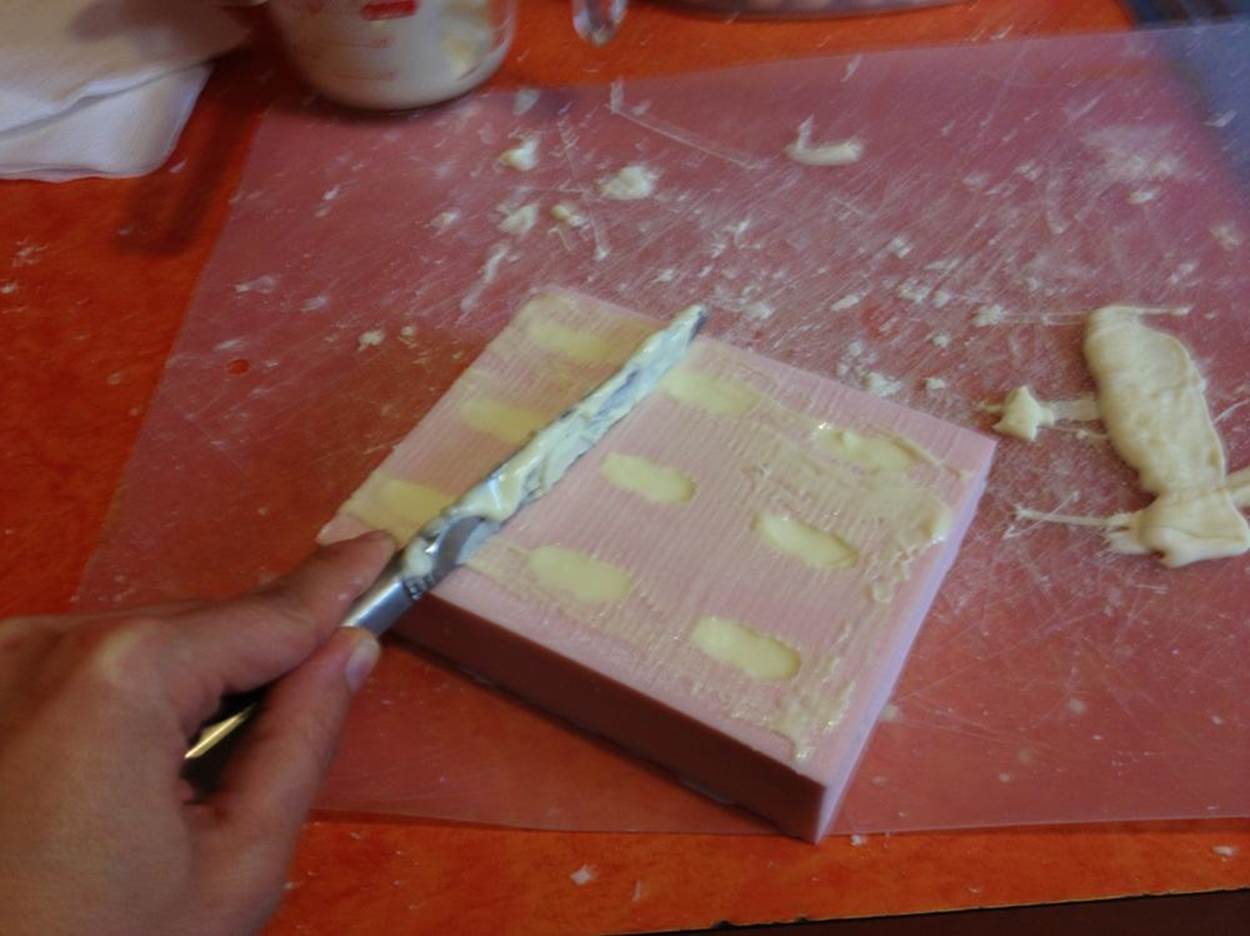
Figure 21-18. Smooth out the surface with a knife
9. Put the Mold in the Refrigerator
Put the silicone mold containing the chocolate into the refrigerator until the chocolate solidifies (Figure 21-19). This will take about 20 minutes for small chocolates. It could take longer if you are casting a larger piece.
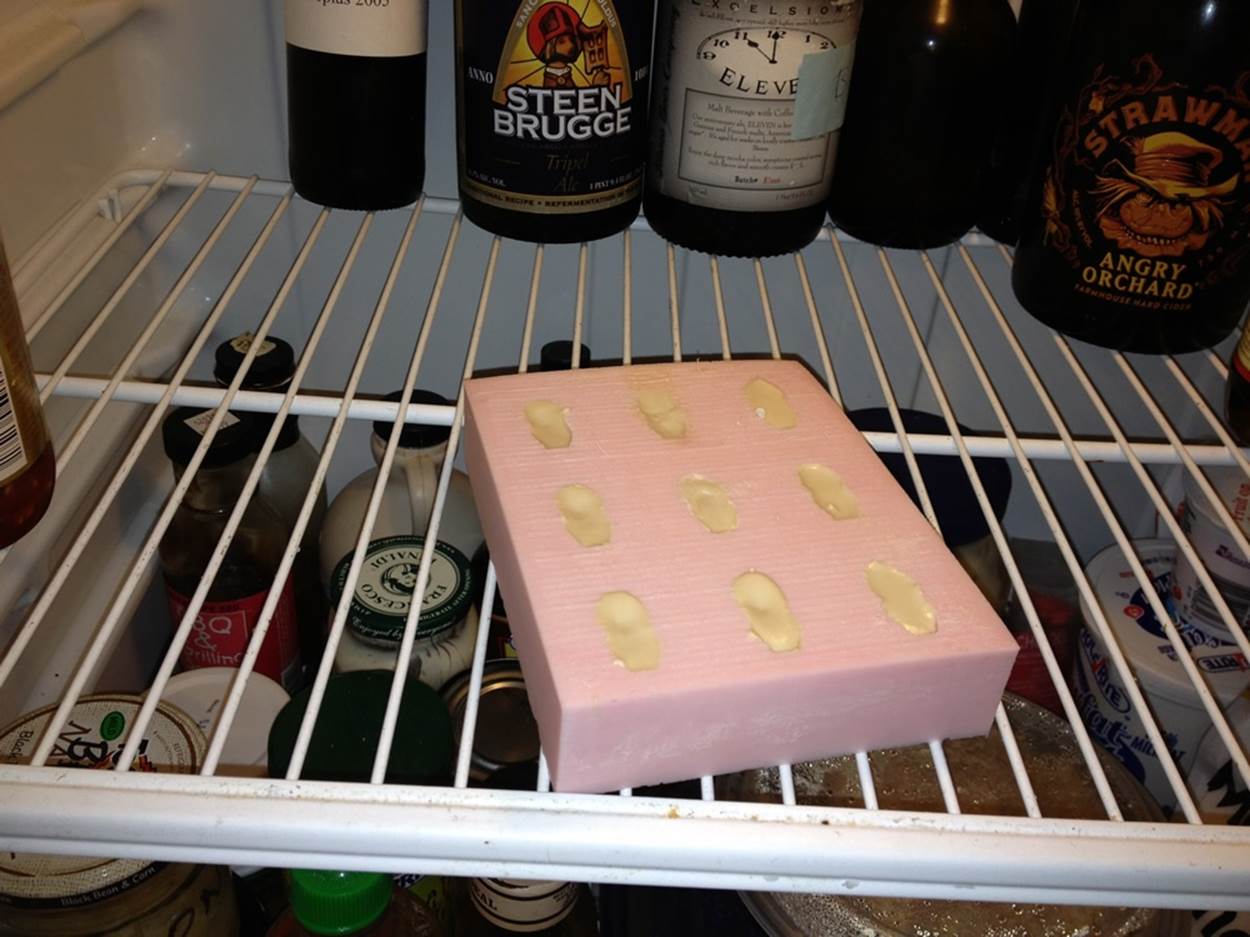
Figure 21-19. Place in the fridge for 20 minutes
10. While Waiting, Start Printing the Candy Trays
While you are waiting for the chocolate to set in the fridge, you can start printing your candy trays (Figure 21-20). If you don’t have a 3D printer, you will need to plan for this or do with out the trays. Print the trays using PLA filament.
If you are concerned about whether PLA is food-safe for storage, put a small piece of wax or parchment paper beneath each skull.
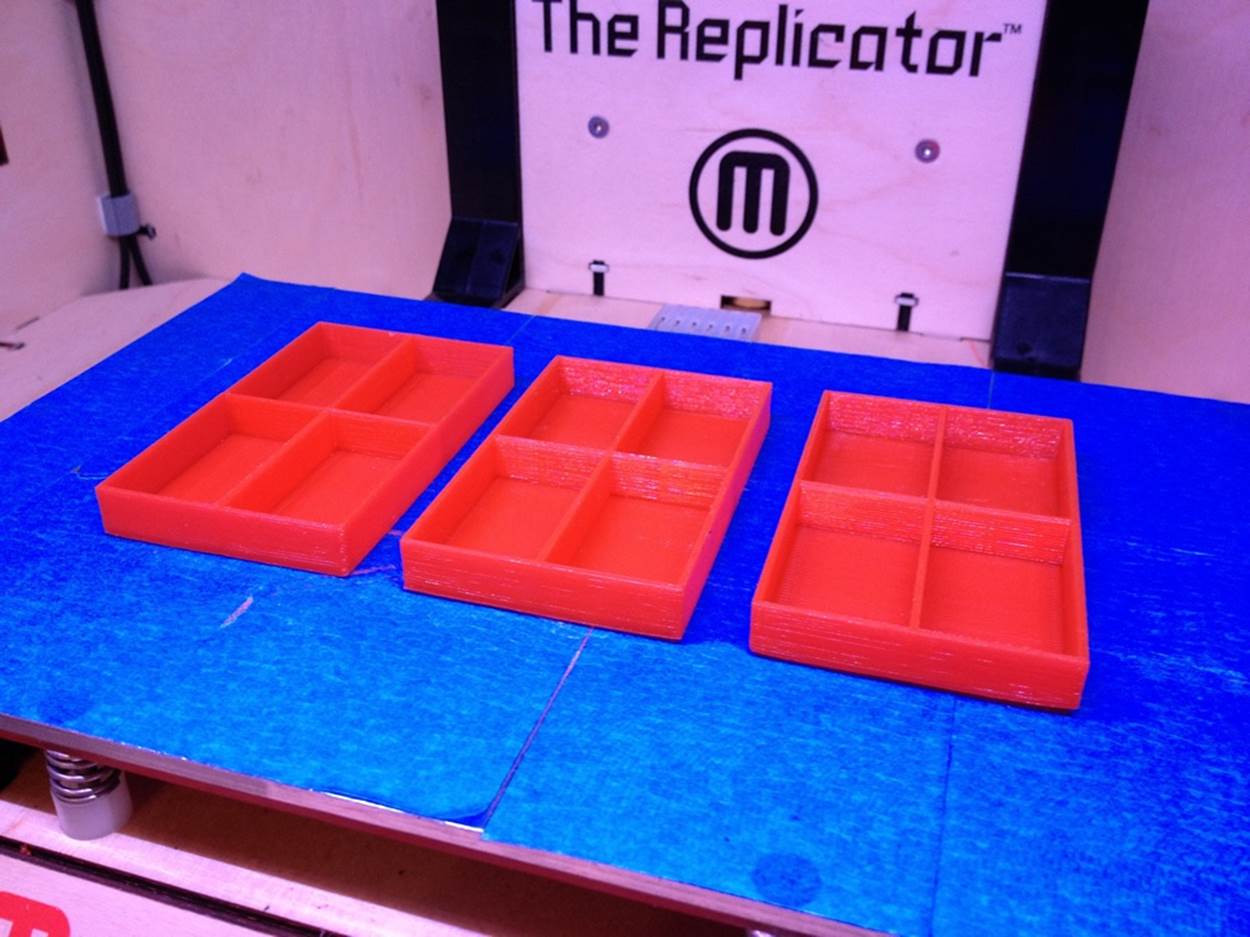
Figure 21-20. Printing PLA candy trays
Here is the link to my candy tray files with four dividers: http://www.thingiverse.com/thing:33432. This parametric tray code was written by acker, who derived it from hippiegunnut. I modified the parametric script to create a tray that would fit four of my chocolates perfectly.
11. Carefully Demold the Chocolate
The skull chocolates are a little difficult to get out of the mold. Wear candymaker’s cotton gloves (Figure 21-21) to avoid marking the chocolate with your fingers.
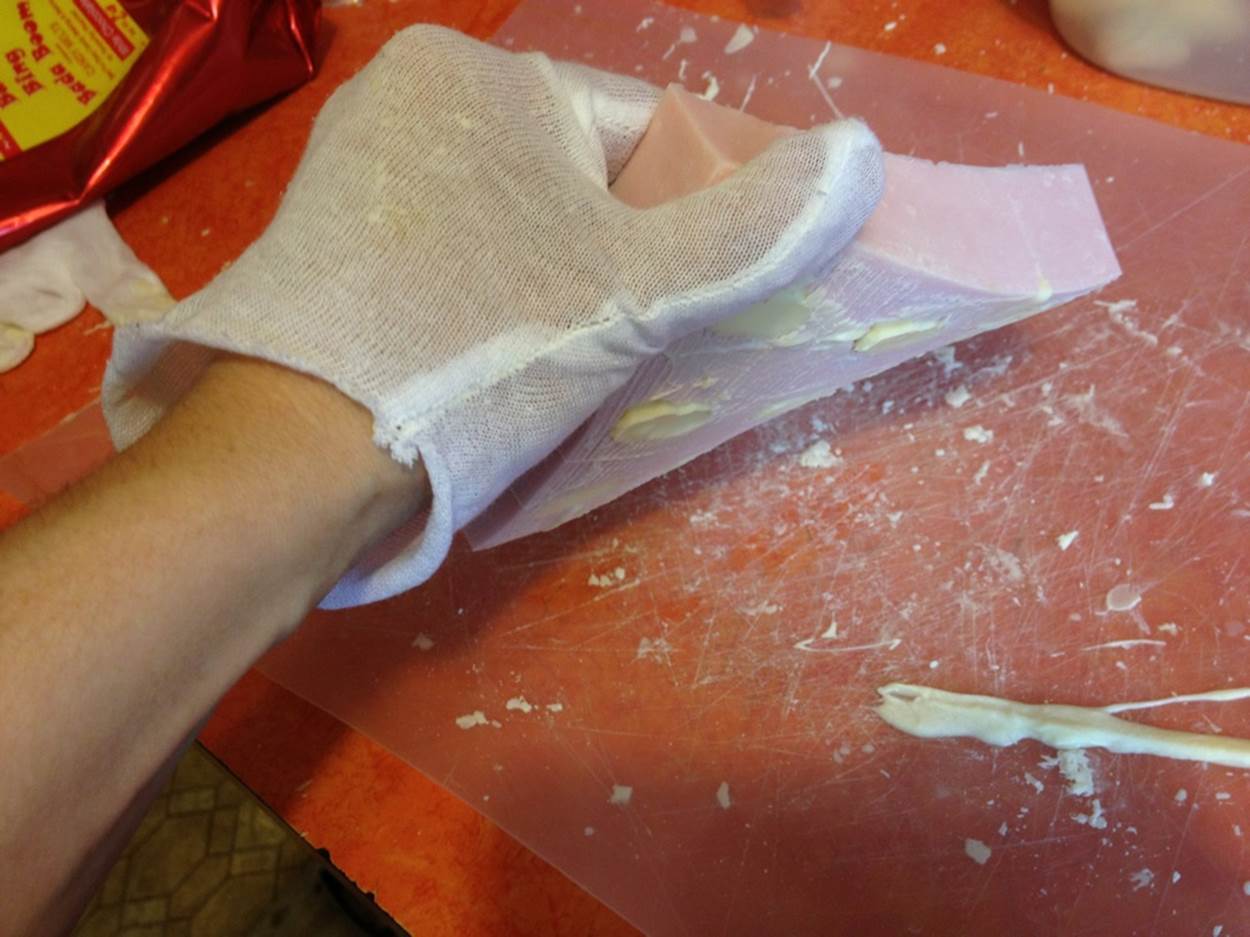
Figure 21-21. Demolding the chocolate with candymaker’s gloves
Twist the rubber mold to loosen the chocolate. It will help to have small hands (I do and I am able to remove the chocolates without destroying them). I found that after loosening the chocolate by twisting the mold, it is easiest to twist out the face and rotate it out of the mold. Then grab the face and pull to remove the rest of the skull from the mold. You may smear the teeth a little, but overall it seems to work the best.
I have made many batches so far and I managed to get all of the chocolates out of the mold without destroying any of them (Figure 21-22).
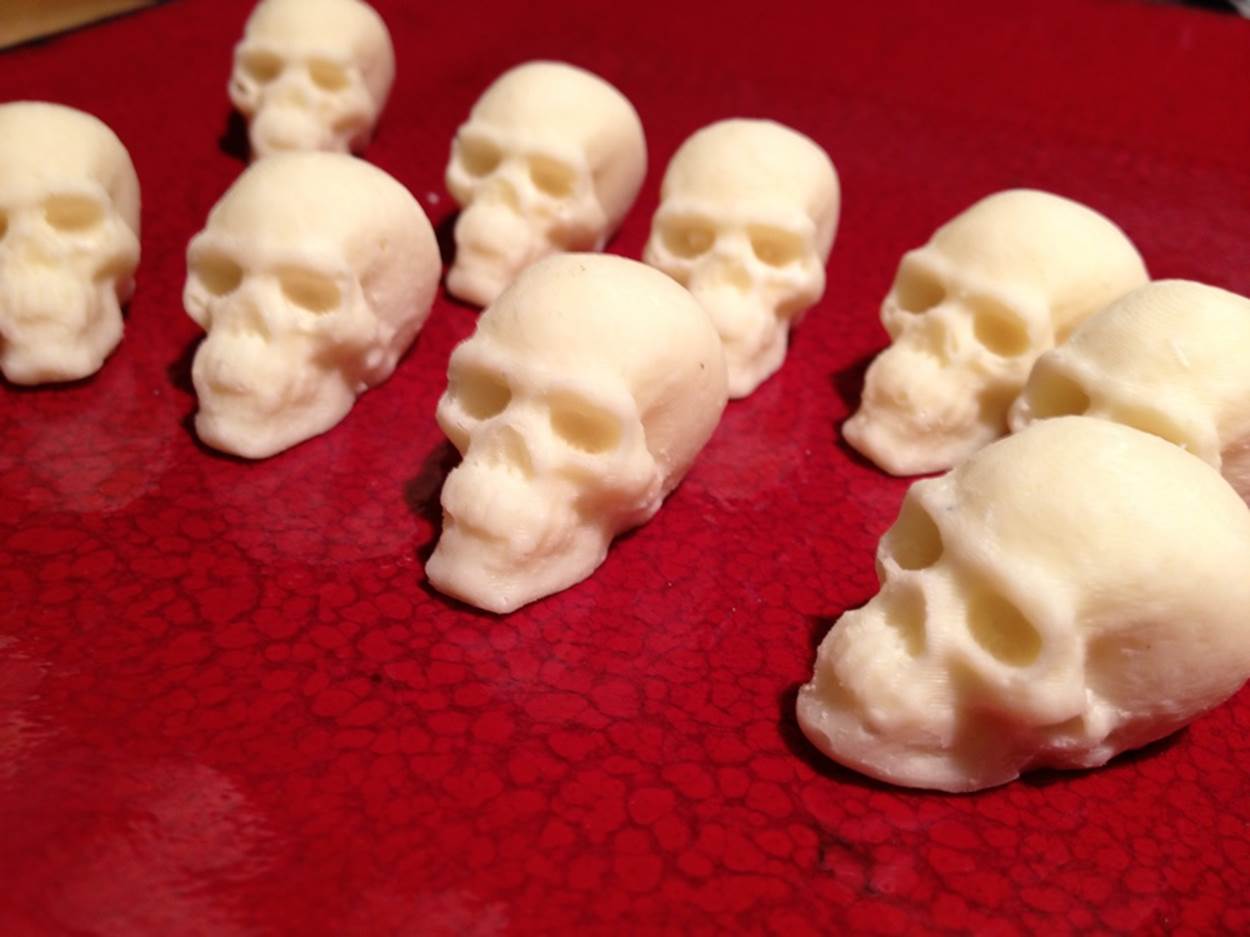
Figure 21-22. Demolded chocolates
Next, place the skulls into trays (Figure 21-23), put the trays in treat bags, and give them away to everyone!
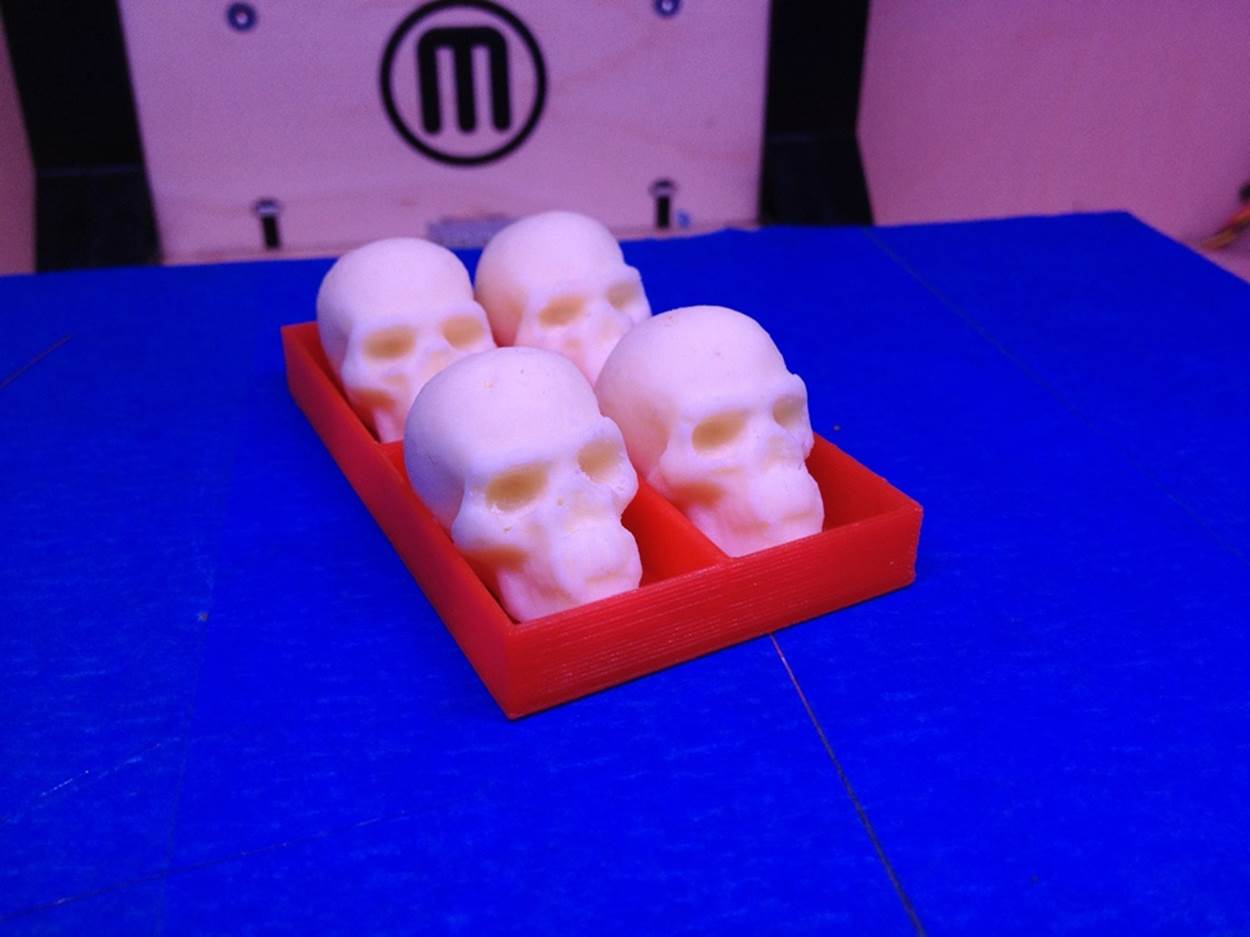
Figure 21-23. Place the chocolates in trays
Anna Kaziunas France is the Digital Fabrication Editor of Maker Media. She’s also the Dean of Students for the Global Fab Academy program and the co-author of Getting Started with MakerBot. Formerly, she taught the “How to Make Almost Anything” rapid prototyping course in digital fabrication at the Providence Fab Academy. Learn more about her at her website and check out her things at her Thingverse page.