Idiot's Guides: 3D Printing (2015)
PART 3
Setting Up and Printing
PROJECT 3
Robot
Project Time: 4 hours
For this project, you’re going to be printing a robot figurine modeled by Nathan Deas. What makes this a bit trickier than the previous projects is the print will require the use of supports. This model has a lot of overhanging features, so removable support material has to be used to hold up those features during printing. After the print has finished, however, you can remove the supports.
Load the .STL File
As usual, start by loading the model. In Repetier, click Load and select the robot.stl file, which is included in the model pack at the Idiot’s Guides website (idiotsguides.com/3dprinting). The model should load with the robot’s back facing down, but if it’s not, you can rotate it using the circular rotate button in the top-left corner.
![]()
HOT TIP
You also have the option of printing the model with the feet down. Printing it with the feet down will reduce the amount of the model that comes into contact with the support material, which should improve the surface quality of the overall print. However, because the feet are small, it will be less stable. To combat this, you’d want to print with a thick brim in order to ensure the model stays upright throughout the entire print.
Preheat the Extruder and Heated Bed, and Load the Filament
With the model loaded, it’s a good idea to set the extruder and heated bed to the temperatures you’ll use when you print. This model should turn out well in both ABS and PLA, so feel free to use either one. Just keep in mind that the extruder and heated bed need to be set at different temperatures depending on which material you use (see project 1 for the temperatures necessary for ABS versus PLA).
If your filament isn’t already loaded, you should load it once the extruder is up to temperature; project 1 can give a refresher on the steps to do this, if you need them. If you’re changing filament materials or colors, be sure to extrude at least 100mm of filament. Doing this will basically flush out the old filament.
Modify the Slicer Settings for Supports
Because this model requires supports, you need to change a few settings from the previous prints. The most important of these is turning on support generation. This tells the slicer to create supports where necessary.
Depending on the particular slicer you’re using, the support settings may vary. If there is a simple automatic setting, start with that. Otherwise, you want to tell it to generate supports for overhangs with an angle over 45°. For now, leave the rest of the support settings at their defaults. Getting good supports takes a lot of experimentation, so start with something simple and then refine the settings on future prints.
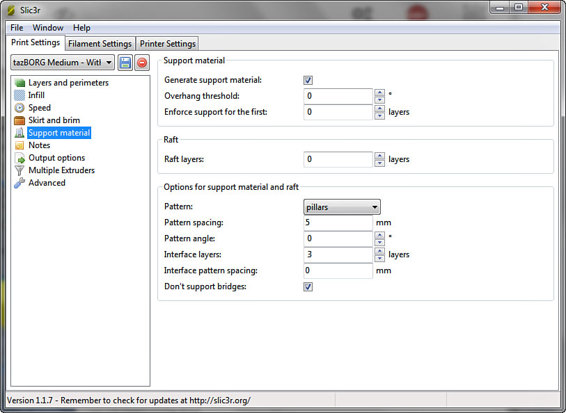
In Repetier, generating support settings is just a simple click of Generate support material.
Other than the support settings, you also want to make sure your filament diameter is set correctly in order to make sure the supports connect just well enough to the part. Filament is rarely exactly the right diameter, so it’s best to use a pair of digital calipers to measure. Even better, measure in three or four different places on the filament spool and then average the numbers. You can then change your filament diameter setting by clicking Configuration and then going to the Filament Settings tab to match the actual diameter of the filament.
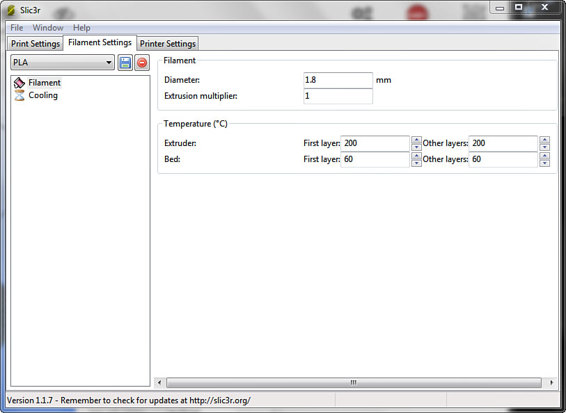
The Filament subsection of the Filament Settings tab has a place where you can adjust the filament diameter.
Also, if you’re using PLA, make sure you turn on your print fan. You’ll find the settings to turn on the fan in the Cooling subsection of the Filament Settings tab. This is always a good idea when printing PLA, but it’s especially important when using support material. Without a fan running, support material might stick too well to the model when printing in PLA.
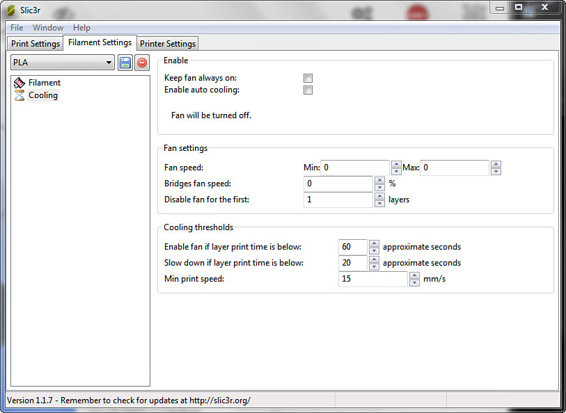
The Cooling subsection of the Filament Settings tab allows you to turn on and adjust the fan settings.
Slice the Model
Once you’ve updated your settings, you can slice the model. Go to the Slicer tab and click Slice with Slic3r. This particular model could take anywhere from 2 to 4 hours to print at its default size.
![]()
HOT TIP
If you don’t want to wait that long (who does?), you can scale down the model to something smaller. However, if you do scale the model, keep in mind that smaller features may not show up well on some printers. Luckily, this figurine doesn’t have many fine features, so you should be able to scale it to 50 percent or so without any issues. The eyes may not show up well, but everything else should.
Start the Print
After the slicing has been completed, click on the Preview tab. You should see the model of the robot on its back, as well as the supports. If you’re satisfied with the settings, support generation, and print time, go ahead and clickStart Print.
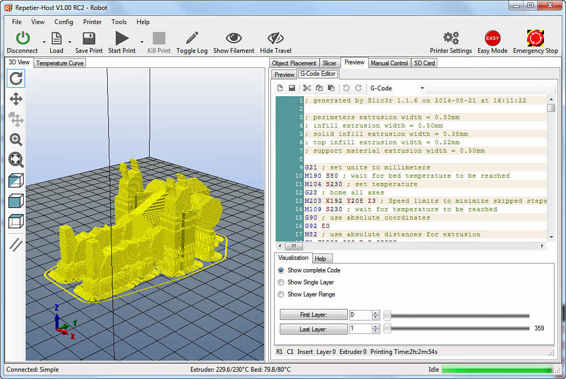
After slicing the robot model, the preview window should show you where supports will be generated.
Watch the First Layer
As always, pay close attention to the first layer to make sure you’re getting good adhesion between the filament and the bed.
The first layer for this print may look a little different than the previous two. I’m using a brim on this print to increase the surface area of the first layer to help with adhesion, which is why there is a large, flat area around the model. (For more information on brims, check out the “Print Settings” section of Chapter 13.) But you may also notice a lot of small, jagged lines of filament around. These lines are the base of the support material the slicer generated, which is normal.
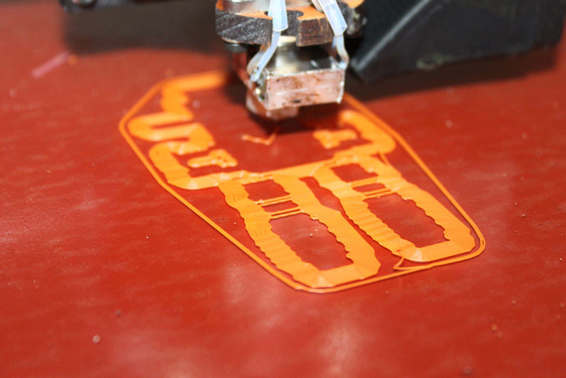
With this first layer, you can see the base of the support material.
Remove the Part
Once the print has been completed, you may notice it doesn’t really look like a robot. This is because the model is partially surrounded by support material, which has to be removed. But first, the print has to be removed from the bed.
![]()
WATCH OUT!
While the full-size model should be done after roughly three hours, you should check on how it’s doing once or twice every hour. Especially for long prints like this, you don’t want to wait until the end to discover there was some problem.
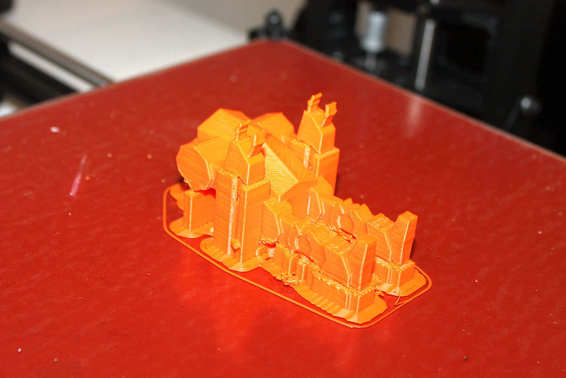
The finished print with supports should look something like this.
You can use your hands or a tool to remove the part from the bed, which should be easier to do once the part has cooled. Because there is so much support material, don’t be too concerned if parts of it break off. The support material is designed to do that, so it’s not a big deal (as long as the actual model stays intact).
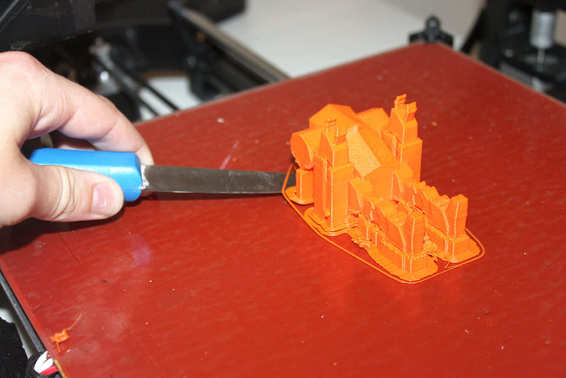
Wait for the print to cool, and then remove it from the bed.
Remove the Supports
After you’ve wrestled the print loose from the bed, it’s time to go through the somewhat tedious process of removing the supports. The supports are connected to the model, but the slicer attempts to make that connection as fragile as possible. Ideally, the supports will just pop right off. But unfortunately, the reality isn’t usually quite so simple. Instead, you’ll probably need to use some pliers to grab the supports and work them off.
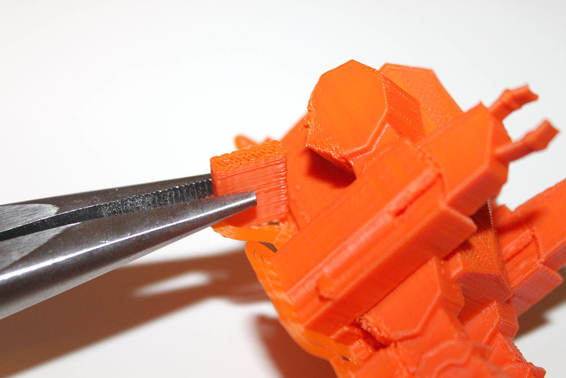
A pair of pliers can help you remove the supports from the model.
It can take some time to remove all of the support material from the model. Be careful not to damage the model, and resist the urge to use a hammer and chisel. Be patient and take your time here. Eventually, you should be able to pull off all of the support material.
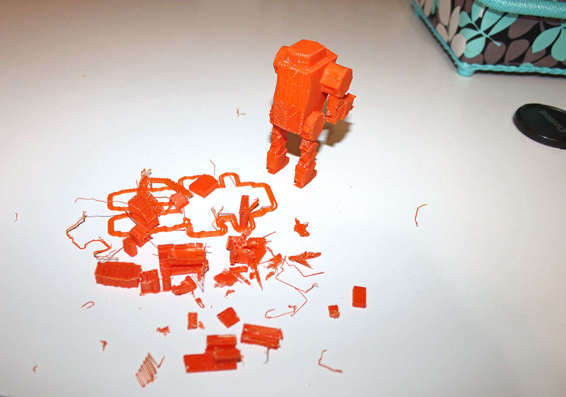
The robot figurine with all of the supports removed.
![]()
HOT TIP
With the supports removed, you may notice that the surface quality isn’t nearly as good in the areas where the supports contacted the model. This can be improved by fine-tuning your settings, but there will always be some loss of quality here. For this reason, designers generally try to reduce the dependence on the supports.
Now enjoy your freshly printed robot, which was printed by a robot! Maybe you can print a whole robot army to defend your cubicle from invading coworkers?

The finished robot figurine, ready to follow your orders.
All materials on the site are licensed Creative Commons Attribution-Sharealike 3.0 Unported CC BY-SA 3.0 & GNU Free Documentation License (GFDL)
If you are the copyright holder of any material contained on our site and intend to remove it, please contact our site administrator for approval.
© 2016-2026 All site design rights belong to S.Y.A.