Idiot's Guides: 3D Printing (2015)
PART 5
Advanced Usage and Techniques
CHAPTER 19
Modifying Your Printer
In This Chapter
![]()
· Adding fan shrouds or heated beds
· Making the switch to all-metal hot ends
· Installing extruders and extending axes
· Modifications for milling or laser cutting
· Sites for purchasing parts or finding 3D models to upgrade your printer
Once you’re comfortable with your 3D printer and have gotten bored with printing pencil holders and coasters, you’ll probably start thinking about how you can upgrade or modify your 3D printer. There are an endless number of modifications you can do to your printer to make it bigger and better, and if you’re the tinkering type (which you probably are if you’re reading this book), I’m sure you’re eager to get your hands dirty.
You can really modify everything on most printers with enough work. After all, you have a 3D printer you can use to make new parts for upgrades. But there are a handful of popular modifications that you can do to most 3D printers to improve their functionality. So in this chapter, let’s take a look at some of the more common upgrades and modifications you can do!
Adding a Fan Shroud
If your 3D printer doesn’t already come with a fan shroud, adding one is definitely the most popular 3D printer modification. In fact, it’s usually the first modification people make to their 3D printers.
![]()
WATCH OUT!
Attempting to modify your printer always carries with it the risk of damaging the printer. It’s also likely that your warranty (if you have one) will be voided by the modifications. Therefore, make any modifications and upgrades with the risks in mind.
While many manufacturers include a print fan with the printer, it’s often just a small fan blowing in the general direction of the nozzle. Fan shrouds improve the situation by acting as a funnel to direct and focus the air just below the nozzle. Doing so usually improves the cooling capabilities of the fan quite dramatically. While you shouldn’t expect miracles, a fan shroud can definitely make a difference.
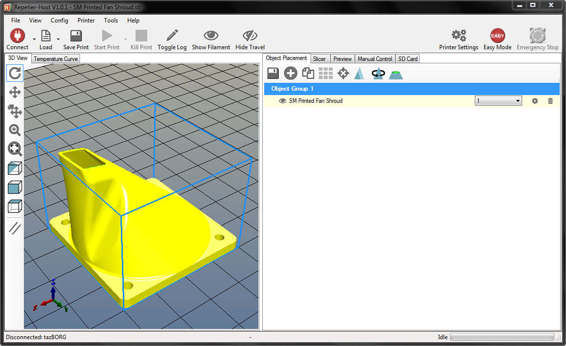
The Printrbot Simple does not come with a fan shroud, but Printrbot supplies a printable model to add one yourself.
Adding a fan shroud is usually a fairly easy job. Most 3D printer models on the market have fan shrouds already modeled and available for download. In many cases, you’ll be able to attach the shroud using the mounting screws that are already on the printer for the fan.
So all you need to do is find a fan shroud model for your 3D printer model and then just download and print it. Once it’s finished printing, you can just mount the shroud to the fan. You should immediately see a cooling improvement.
Adding a Heated Bed
If your 3D printer didn’t come with a heated bed, your material options are going to be pretty limited. PLA will be the only commonly available material you can print successfully. Now PLA is actually a really great material that prints well and is reasonably strong, but it’s always nice to have the option to use other materials.
To do that, you need to add a heated bed to your 3D printer. The difficulty of doing this depends on three major factors: how large the bed is, the control board you’re using, and the power supply you’re using.
Bed Size
Generic 3D-printed heated beds usually come in a relatively small selection of standard sizes. If your bed size is something common like 6×6 inches, finding a heated bed shouldn’t be difficult. But if you’re looking for something strange like 3×9 inches, you’re probably not going to have much luck finding one.
It is possible to make your own heated bed in whatever size you like, but it’s not easy to do. You’d essentially have to make your own printed circuit board (PCB) at the size you need, and you’d have to make sure the traces were the correct size to get the resistance right. Or you can contact a heated bed manufacturer and have them make you a custom bed, but that will be a little pricey.
![]()
HOT TIP
The heated bed doesn’t have to be exactly the same size as the build platform. As long as it covers the print area (or is close to it), it should work fine. For example, if your print bed is 150×150mm, a 6×6-inch heated bed (152.4×152.4mm) would probably work just fine.
However, that shouldn’t be an issue for most people. 3D printers generally come with pretty standard bed sizes, so finding the right size for your printer shouldn’t be too difficult.
Control Board
In order to add a heated bed, your control board has to have an output to power it and an input for the thermistor (which measures the bed’s temperature). Most modern control boards will have the output and input for the heated bed, but not all will.
If your control board doesn’t have the connections for the heated bed, you’ll need to upgrade to a control board that does. There are many control boards on the market that should be compatible with just about any 3D printer. Changing control boards will take a fair amount of rewiring work, but the process is usually well documented on websites like RepRap.org.
If the control board already has the heated bed connections, adding the heated bed will be significantly easier. However, if the bed is large (over 8×8 inches), you’ll also need to make sure it can handle the current required for the bed. For example, if the bed draws 15 amps and the control board can only handle 10 amps, you’ll have a problem. But that should only be an issue for large heated beds.
Power Supply
The final concern when adding a heated bed is whether or not the power supply can handle it. Heated beds use a lot of power, so the power supply has to be able to provide the power for the heated bed as well as the rest of the 3D printer. It’s not uncommon for the stock power supply to be inadequate once a heated bed has been added.
Luckily, upgrading the power supply is a pretty easy job. Power supplies come in a variety of styles and form factors, with all kinds of different connections. Some printers use laptop-style power supplies, which means you’ll need to make sure the jack is the right size and shape (in addition to it meeting the power requirements).
![]()
WATCH OUT!
Rewiring your printer, especially when it comes to the power supply, can be potentially dangerous. It’s possible to improperly connect the wires, which could result in electrocution or fire. Be sure you know what you’re doing and use the proper safety precautions when doing this kind of work.
Other printers use generic power supplies that have bare connectors you simple screw wires into. Those are the easiest to replace, because you just have to get a more powerful one and switch the wires over. They also tend to be relatively inexpensive.
Many people also use desktop computer ATX power supplies. They’re ideal because they’re cheap, readily available, and can put out a lot of power. However, they usually have to be jury-rigged to work with 3D printers because they have built-in switches and safety mechanisms. But they’re a great option for supplying a lot of power on a budget.
If the new power supply doesn’t have a power connector that matches the original, you’ll need to do some rewiring for this modification as well. Luckily, this is usually a simple matter of cutting off the old connectors and installing new matching connectors. Most power supplies will only have two wires (positive and negative) that are color coded (black and white or red), which just connect to the corresponding colors on the other end.
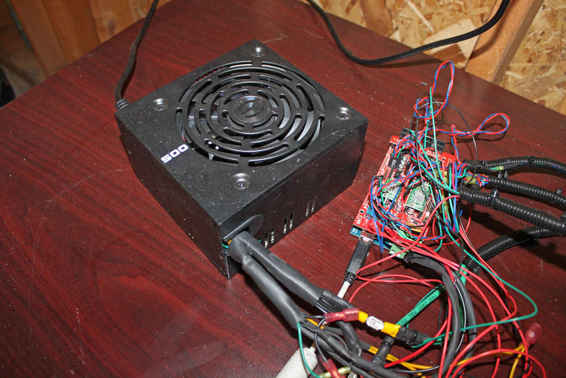
A standard ATX computer power supply converted for use with a 3D printer.
Switching to All-Metal Hot Ends
In the previous chapter, I talked about how all-metal hot ends are required for some materials because of their high temperature requirements. For that reason, it has become very popular to switch out the standard hot end for an all-metal model. Making that switch is usually pretty easy to do, but like all things it can become complicated.
Manufacturers of aftermarket all-metal hot ends purposefully make them so they’re easy to add to your printer. Obviously, it’s in their best interest to make them as universal as possible. But they’re still not quite plug-and-play.
There are two factors here: physically making the connections and mounting the hot end. Making the connections is usually as simple as just splicing four wires (two for the heating element and two for the thermistor). The smaller wires will be for the thermistor, and the polarity won’t matter. However, you’ll usually need to reconfigure your firmware for the new thermistor as well (which entails changing the thermistor model).
Actually mounting the hot end can be a little more complicated. There are a few somewhat standardized mount types, and then a handful of completely unique ways of mounting hot ends. If your printer’s hot end is one of the standard mounts, you can often just swap out the hot end. In some cases, you may need to first print some kind of adapter if the mount types are standard but different.
It only becomes a serious headache if your printer has an unusual type of hot end mount. Some manufacturers use completely proprietary hot ends that have unique mounts. In a case like that, you’ll either need to find an adapter (or entirely new extruder carriage) that’s already been modeled by someone else or model your own.
![]()
HOT TIP
Hot end compatibility is definitely something you should look into before ordering an all-metal hot end. Do some searching on the forums for your 3D printer and see what other people are doing. Is there a specific model of hot end that people prefer? Maybe some fit better than others and are easier to mount. If so, that can help you decide what hot end to order.
Installing Multiple Extruders
Adding an additional extruder to your 3D printer (or a few additional extruders) is a very exciting modification. It opens up a whole new set of possibilities when it comes to what you can print. You can print in multiple colors, in different materials, or with a dedicated support material. But it’s also a pretty difficult modification to make.
Some 3D printer manufacturers have kits available to upgrade your printer to a dual extruder setup. For example, Lulzbot has an upgrade available for dual extruders. But I’m not aware of any that currently have kits available for adding more than one additional extruder. And it’s not particularly common for them to even sell those.
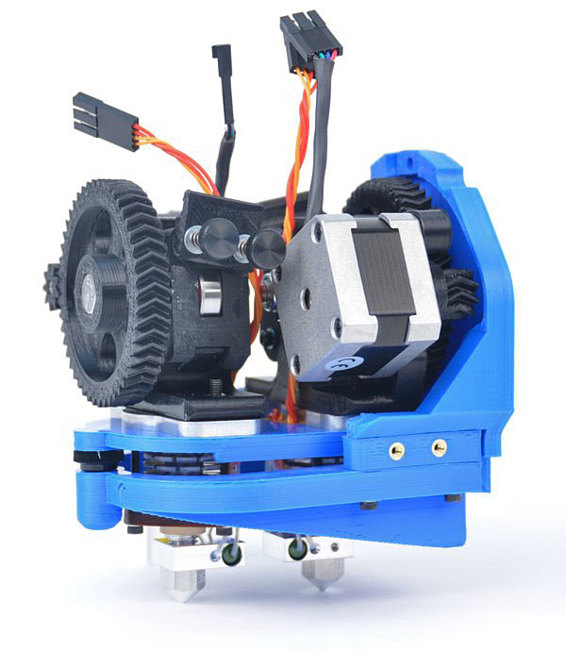
This is a drop-in dual extruder developed by Lulzbot for their TAZ 4 3D printer.
For most people, adding one or more extruders ends up being a completely custom job. You’ll need to design a new extruder carriage with mounts for the extruders, upgrade your control board to one with multiple extruder connections, and reconfigure your firmware. None of that is easy to do, and can be quite complicated. The RepRap forums (forums.reprap.org) are a good place to look for information on doing this kind of extensive modification.
Fortunately, the hobby 3D printing community is very good about sharing information and designs. If your 3D printer model is fairly popular, there is a pretty good chance that someone has already done all of that work for you. With a little searching and some luck, it’s entirely possible that you’ll be able to find the models you need to print, along with information on the control board and firmware.
But even if that information is available, you need to be very comfortable with modifying your printer. You need to take things apart and put them back together, rewire the control board and extruders, and so on. Adding extruders definitely isn’t a job for the faint of heart.
Extending Axes
While I’m on the topic of difficult modifications, let’s go ahead and talk about extending your printer’s axes. It should be readily apparent why this is a desirable modification: it makes your print area larger. Who wouldn’t want the option of printing bigger objects?
On the surface, this seems like a relatively simple job: just get some longer smooth rods and a larger build platform. And in some cases, it is that simple. However, it often turns into much more than that.
Those longer smooth rods may force you to modify the frame to fit them. If they’re especially long, they may droop, which means you’ll need to get thicker rods. Thicker rods will require new mounts and bearings. The additional weight may mean you’ll have to upgrade the stepper motors and possibly even the control board and power supply.
As you can see, this often results in a cascading effect. Some printers (like Printrbots) can have their axes extended easily and inexpensively because of the way they’re designed. There are even kits available for some Printrbot models to do just that. Other printers (especially those with fully boxed frames) will require a lot more work.
As usual, you should always start by looking at what other people have done. If others have been able to successfully upgrade their printers with extended axes, look at how they did it. If no one else has done it, that’s a bad sign. In some cases, it may not even be practical or even possible to do. In cases like that, it’s better to just purchase a larger printer.
Converting to a PCB Mill
Earlier in this book, I spent a fair amount of talking about what CNC mills do. If you recall, CNC mills make parts by cutting into a block of material. A printed circuit board (PCB) mill is basically just a type of CNC mill that’s designed to cut traces out of standard PCB sheets for electronics projects.
![]()
HOT TIP
Many people convert their CNC mills into 3D printers, but going the other way doesn’t usually work as well. The components used to build 3D printers simply aren’t as robust as those used for CNC mills. This means a 3D printer converted into a CNC mill usually won’t have the power or rigidity to mill anything but very soft materials (like plastic, machinable wax, and wood).
Being able to make PCBs at home is a pretty big deal for electronics hobbyists, making the conversion from 3D printer to PCB mill ideal. So if you’re interested in making PCBs, converting your 3D printer can be a worthwhile solution.
Converting a 3D printer into a PCB mill is very similar to converting it into a CNC mill since PCB mills and CNC mills are very similar. But the conversion to a mill strictly for PCB use is usually a little bit easier. PCB mills just need to be able to cut through the thin sheet of copper on a blank PCB, which doesn’t require a lot of force.
The low power requirements of PCB mills mean they’re easier to convert a 3D printer into. The spindle doesn’t have to be high power (a normal rotary tool will usually work), and the frame doesn’t need to be incredibly rigid. Overall, it’s a much cheaper and easier conversion.
The easiest way to accomplish this is to design a Dremel mount for your 3D printer. Ideally, you’ll replace the extruder mount with the Dremel mount. That’s all the physical modification that is really needed for the conversion. A Dremel (or other rotary tool) has all of the power needed for PCB milling.
Alterations for Laser Cutting
Maybe you’re thinking to yourself “Milling is so twentieth century; I want something more futuristic!” Well, if that’s what you’re thinking, I have a treat for you: lasers! That’s right, you can even add lasers to your 3D printer.
Laser cutting is actually a fairly mature manufacturing process at this point and has been around for quite some time. The basic process is simple: a flat sheet of material is laid out and a high-powered laser burns through it to create flat parts. Many parts are created this way, and it’s especially popular for flat parts made from wood, acrylic, and various metals.
A laser cutter only needs to move in two axes, so a 3D printer is easily capable of the necessary movements. The conversion is mostly a matter of slapping a laser on where the extruder would go and replacing the bed with a platform designed for laser cutting. The platform can be as simple as a tray with water in it, just to keep the laser from damaging whatever is below the material being cut.
The physical modifications would be very similar to those needed for PCB milling. Just remove the extruder mount and replace it with a mount which holds the cutting laser. The platform below needs to be capable of reflecting the laser, so that it doesn’t cut through.
But before you start daydreaming about opening a metal fabrication shop, you should be aware of the requirements for the laser. Cutting through metal requires a very, very powerful laser. Those lasers are expensive, and so is the equipment to adequately power it.
However, some other materials can be cut with relatively inexpensive lasers. Acrylic, for example, doesn’t require a particular high-powered laser. This is mostly due to how well it absorbs the energy from the laser (as opposed to metals, which reflect a lot of the energy). Therefore, it’s possible to convert your 3D printer into a laser cutter capable of cutting 1⁄4-inch-thick acrylic for just a few hundred dollars.
![]()
HOT TIP
If you’re interested in converting your 3D printer to a laser cutter, be sure to research what kind of laser is needed for the materials you’d like to cut. Different materials (and thicknesses) all require lasers of varying power. Some materials can be cut with relatively low-powered lasers, while others require very high-powered lasers.
Finding Parts
For most of these modifications, you’ll need to be able to source the necessary parts. Finding the specific parts you need isn’t always easy, but with the power of the internet, you shouldn’t have too much trouble. These days, there are many websites selling 3D printer parts, and a simple Google search will help you find a plethora of them. However, the following are some links to get you started:
McMaster-Carr (mcmaster.com): This is a great resource for all kinds of parts and components. They have an enormous selection of materials, fasteners, and all kinds of machinery components. They’re very popular in the engineering world, because their selection is just so comprehensive.
eBay (ebay.com): You can find all sorts of 3D printer parts through this auction and shopping site. This is especially true for inexpensive parts coming directly from China. You would be hard pressed to find better prices anywhere else, though you’ll have to be patient if your parts are being shipped from overseas.
Thingiverse (thingiverse.com): This is currently the largest repository of 3D-printable models. Aside from all of the normal knickknacks and decorative items to print, you’ll also find a lot of models for upgrading 3D printers. There is a very good chance you’ll find a handful of upgrades for your printer that people have already modeled and tested here.
The Least You Need to Know
· There are many modifications you can make to upgrade your 3D printer, some of which are more difficult and expensive than others.
· Adding a heated bed allows you to use materials beyond PLA, making it a popular modification.
· With multiple extruders, you can print in multiple colors, in different materials, or with a dedicated support material.
· McMaster-Carr and eBay are both good resources for finding 3D printer parts online. Thingiverse is the largest online repository of printable 3D models. You can often find models there for upgrading your printer.
All materials on the site are licensed Creative Commons Attribution-Sharealike 3.0 Unported CC BY-SA 3.0 & GNU Free Documentation License (GFDL)
If you are the copyright holder of any material contained on our site and intend to remove it, please contact our site administrator for approval.
© 2016-2026 All site design rights belong to S.Y.A.