Mastering the Nikon D610 (2014)
8. Metering, Exposure Modes, and Histogram

Baby Big Bear – Anthony Do (gudnuf4u)
I’ve been using Nikon cameras since way back in 1980. It seems that with each camera released by Nikon there have been improvements in its metering and exposure modes. The Nikon D610 is no exception. With this camera, Nikon has designed metering and exposure to work not only with still images, but also with moving pictures and video.
In this chapter you’ll learn how the exposure metering system and modes work. We’ll look at how each of three different light meter types is best used. We’ll examine the various modes you can use when taking pictures, including several exposure modes for when you want the camera to do most of the work while you enjoy shooting. Finally, we’ll look in detail at how the histogram works on the Nikon D610.
The histogram is a new feature to those who are coming over to digital photography from film. This little readout gives you great control over metering and will help you make the most accurate exposures you’ve ever made. It is very important that you understand the histogram, so we’ll look at it in detail.
This chapter is divided into three parts:
• Section 1 – Metering – The Nikon D610 provides three major light metering systems: Matrix, Center-weighted, and Spot.
• Section 2 – Exposure Modes – The camera’s Mode dial is simply loaded with exposure modes, such as Auto exposure (AUTO), Programmed auto (P), Shutter-priority auto (S), Aperture-priority auto (A), Manual (M), and User settings U1 and U2. In addition, there are 19 Creative Photography SCENE modes that give inexperienced users command of a certain style of shooting.
• Section 3 – Histogram – The histogram is a digital bell-curve readout that shows how well an image is exposed and the dynamic range required for proper image capture. It is an important tool for advanced photographers. This chapter discusses how to read it and use it to better control your exposures.
Let’s get started by looking into the three exposure metering systems.
Section 1 – Metering
(User’s Manual – Page 109)
The basis for the Nikon D610’s exposure meter is a 2,016-pixel RGB sensor that meters a wide area of the frame. Figure 8.1 shows a closeup of that sensor, which is used to meter the light and provide a correct exposure.
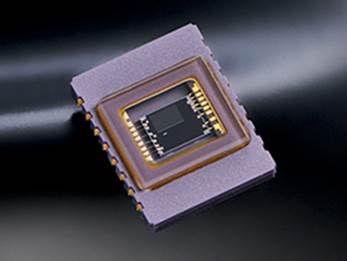
Figure 8.1 – The D610’s 2,016-pixel RGB sensor (light meter)
When it is used with a Nikkor G or D lens containing a CPU, the camera can set the exposure based on the distribution of brightness, color, distance, and composition. Most people leave their light meter set to matrix metering and enjoy excellent results.
Let’s look more closely at each of the D610’s exposure metering systems. Figure 8.2 shows the Metering button (red arrow in image 1), the Control panel readout set to Matrix metering (image 2), Spot metering (image 3), and Center-weighted metering (image 4).
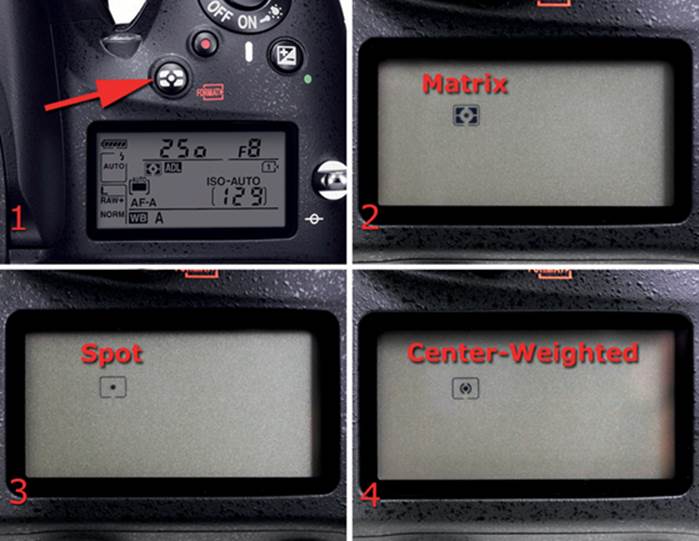
Figure 8.2 – Metering button and three meter types: Matrix, Spot, and Center-weighted
Here are the steps to change metering modes:
1. Hold down the Metering button with your index finger. You’ll see the metering icon on the Control panel while you hold it down (figure 8.2).
2. While still holding down the Metering button, turn the Main command dial until the icon for the meter you prefer to use is displayed.
3. Release the Metering button.
4. Check the Control panel (or other displays, as shown in figure 8.3) to validate that you have selected the meter you want to use.
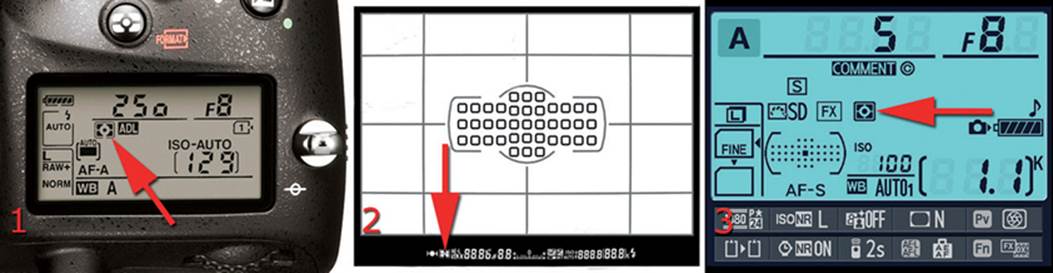
Figure 8.3 – Metering mode icons (matrix)
Figure 8.3 shows the Control panel (image 1), Viewfinder (screen 2), and Information display (screen 3) with the Metering icon and all the other icons you normally see. I have Matrix metering selected on my camera, as indicated by the icons at the red arrows.
Now, let’s examine the three meter types to see which you will use most often.
3D Color Matrix Metering II
The Nikon D610 contains a 3D Color Matrix Metering II system that’s one of the most powerful and accurate automatic exposure meters in any camera today.
In figure 8.4 you can see a closeup of the matrix metering symbol from the Control panel. This meter will be set by default from the factory.
How does matrix metering work? Through complex mathematical formulas, there are characteristics for many thousands of images stored in the camera. These characteristics are used along with proprietary Nikon software and complex evaluative computations to analyze the image that appears in your Viewfinder. The meter is then set to provide accurate exposures for the majority of your images.
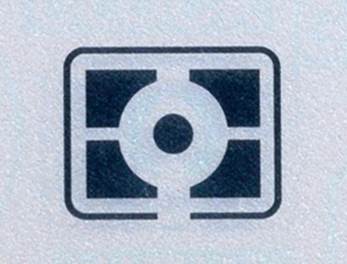
Figure 8.4 – Matrix metering symbol
A simple example is when the horizon runs through the middle of an image. The sky above is bright, and the earth below is much dimmer. The metering system evaluates this image and compares it to hundreds of similar images in the camera’s database and automatically selects and inputs a meter setting for you.
The meter examines four critical areas of each picture. It compares the levels of brightness in various parts of the scene to determine the total range of the exposure values (EVs). It then notices the color of the subject and surroundings. If you are using a G or D lens with a CPU chip, it also determines how far away your lens is focused so it can determine the distance to your subject. Finally, it looks at the compositional elements of the subject.
After it has all that information, it compares your image to tens of thousands of image characteristics in its image database, makes complex evaluations, and comes up with an exposure value that is usually right on the money, even in complex lighting situations.
Center-Weighted Metering
If you’re a bit old-fashioned, having been raised on a classic center-weighted meter and still prefer that type, the D610’s exposure meter can be transformed into a flexible center-weighted meter with a variable-sized weighting that you can control. Figure 8.5 shows the center-weighted metering symbol from the Control panel.
The center-weighted meter in the D610 evaluates the entire frame but concentrates 75 percent of the metering into an adjustable circle in the middle of the frame. The other 25 percent of the frame outside the circle provides the rest of the metering. You can make the circle as small as 8mm or as large as 20mm. You can even completely eliminate the circle and use the entire Viewfinder frame as a basic averaging meter.
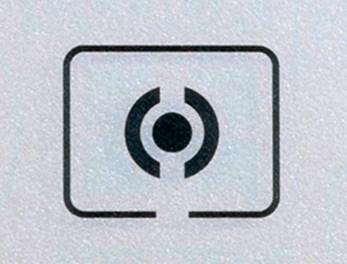
Figure 8.5 – Center-weighted metering symbol
Let’s examine the center-weighted meter more closely. Using Custom setting b4, you can change the size of the circle the camera uses to concentrate the meter reading. (See b4 Center-weighted area in the chapter titled Custom Setting Menu.)

Figure 8.6 – Center-weighted metering circles
The default circle is 12mm in the center of your Viewfinder. However, by changing Custom setting b4 Center-weighted area, you can adjust this size to one of the following:
• 8mm (0.32 inch)
• 12mm (0.47 inch)
• 15mm (0.59 inch)
• 20mm (0.79 inch)
• Average (full frame)
The center-weighted meter is a pretty simple concept, really. Whatever part of your subject that is in the center of your Viewfinder influences the meter more than the edges of the frame, on a 75/25 basis. The circle gets 75 percent importance. Figure 8.6 shows a visual approximation of the full range of metering circles.
Note: If you are using a non-CPU lens, the center-weighted meter defaults to 12mm (0.47 inch) and cannot be changed. Even if you adjust Custom Setting Menu > b Metering/exposure > b4 Center-weighted area, it has no effect.
Where’s the Circle?
You can’t actually see any indication of circles in the viewfinder, so you’ll have to imagine them, like I did in figure 8.6.
Locate your current autofocus (AF) sensor in the middle of your Viewfinder. Now imagine a 12mm circle, which at 0.47 inch is about one-half of an inch. The 15mm maximum size circle, at 0.59 inch, is a little bigger at just over one-half of an inch. This unseen circle in the center area of the viewfinder provides the most important 75 percent of the metering area.
Settings Recommendation: If I were to use the center-weighted meter often, I would stay with the default setting of 12 mm. That’s a pretty small circle (almost in the spot metering range), so it should give you good readings. It’s large enough to see more than a pure spot meter, though, so you have the best of both worlds. There is so little difference between 12mm and 15mm that it probably makes little difference which one you use. If you are concerned, experiment with the settings and see which works best for you.
Using the Averaging Meter
If you set your meter to Average (Avg) in Custom setting b4 Center-weighted area, the light values of the entire Viewfinder are averaged to arrive at an exposure value. No particular area of the frame is assigned any greater importance (figure 8.6, far right).
This is a little bit like Matrix metering, but without the extra smarts. In fact, on several test subjects, I got remarkably similar meter readings from Average and Matrix. However, Matrix metering should do better in difficult lighting situations because it has a database of image characteristics to compare with your current image, and it looks at color, distance, and where your subject is located in the frame.
Spot Metering
Often no other meter but a spot meter will do. In situations when you must get an accurate exposure for a very small section of the frame, or you must get several meter readings from various small areas, the D610 can, once again, be adjusted to fit your needs. Figure 8.7 shows the Spot metering symbol as displayed on the Control panel.

Figure 8.7 – Spot metering symbol
The D610’s Spot meter consists of a 4mm circle (0.16 inch) surrounding the currently active autofocus (AF) point, if you are using single or continuous AF modes (AF-S or AF-C). To use the Spot meter effectively, you might want to set your D610 to AF-S or AF-C mode.
The spot meter evaluates only 1.5 percent of the frame, so it is indeed a spot meter. Since the spot surrounds the currently active AF sensor, you can move the Spot meter around the Viewfinder within the 39 AF points.
Note: If you are using a non-CPU lens or Auto-area AF, the camera will meter only from the center AF point.
How big is the 4mm spot? Well, the Spot meter surrounds the currently selected AF point in your Viewfinder that is in use when you slightly press the Shutter-release button (figure 8.8). In fact, the spot meter follows the currently active AF point around the Viewfinder, so you can move the spot meter around the frame with the Multi selector.
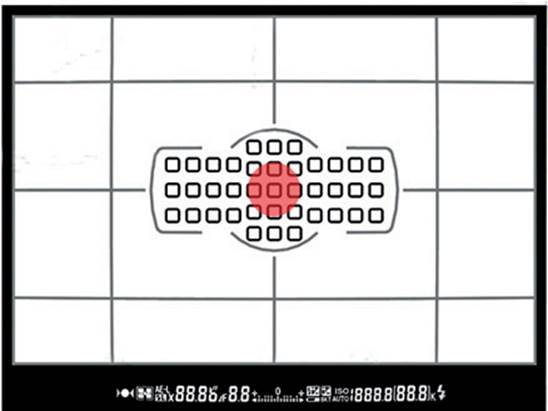
Figure 8.8 – Spot metering size
When your D610 is in Spot meter mode and you move the AF point to some small section of your subject, you can rest assured that you’re getting a true spot reading. In fact, you can use your Spot meter to determine an approximate EV range in the entire image by taking multiple manual spot readings and comparing the values. If the values exceed a range of 9 or 10 EV steps, you have to decide which part of your subject is most important to you and meter only for it.
On an overcast day, you can usually get by with no worries since the range of light values is often within the recording capability of the sensor. On a bright sunny day, the range of light exceeds what your sensor can record in some cases.
Don’t let the numbers make you nervous. Just remember that spot metering is often a trade-off. You trade the highly specific ability to ensure that a certain portion of an image is spot-on for the camera’s multiple averaging skills to generally get the correct exposure throughout the frame. The choice is yours, depending on the shooting situation.
If you spot meter a person’s face while he or she is standing in the sun, the shadows around that person may contain little or no data. The shadows will be underexposed and be solid black. Then, if you spot meter from the shadows instead, the person’s face is likely to blow out to solid white. We’ll discuss this in more detail in section 3 of this chapter, about the histogram.
Settings Recommendation: Use your Spot meter to get specific readings of small areas on and around your subject. Then make some exposure decisions yourself, and your subject should be well exposed. Just remember that the Spot meter evaluates only for the small area that it sees, so it cannot adjust the camera for anything except that one tiny area. Spot metering requires some practice, but it is a very professional way to expose images.
Section 2 – Exposure Modes
(User’s Manual – Pages 40, 73)
My first Nikon, back in 1980, was an FM. I remember it with fondness because that was when I first got serious about photography. It’s hard for me to imagine that it has already been 33 years since I last used my FM! Things were simpler back then. When I say simple, I mean that the FM had a basic center-weighted light meter, a manual exposure dial, and manual aperture settings. I had to decide how to create the image in all aspects. It was a camera with only one mode: M, or manual.
Later I bought a Nikon FE and was amazed to use its A mode, or Aperture-priority auto. I could set the aperture manually and the camera would adjust the shutter speed for me. Luxury! The FE had two modes, Manual (M) and Aperture priority (A).
A few more years went by, and I bought a Nikon F4 that was loaded with features and was much more complex. It had four modes, including the two I was used to, M and A, and two new modes, Shutter-priority auto (S) and Programmed auto (P). I had to learn even more stuff! The F4 was my first P, S, A, M camera.
Does this sound anything like your progression? If you’re over 50, maybe so; if not, you may just be getting into the digital photography realm with your D610, and I ought to stop reminiscing and get to the point.
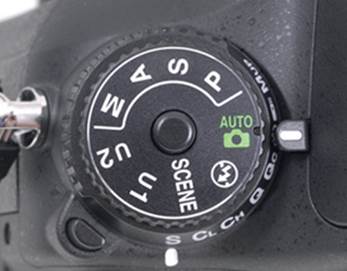
Figure 8.9 – Mode dial set to AUTO
Today’s cameras are amazingly complex compared to cameras only a few years ago. Let’s examine how we can use that flexibility for our benefit. The D610 is also a P, S, A, M camera. That’s the abbreviated progression of primary shooting modes that allow you to control the shutter speed and aperture. In addition, the D610 has 19 SCENE modes and a fully AUTO mode for when you just want to take good pictures without thinking about exposure. Let’s examine each in detail.
There is just one control on the D610 to set the AUTO, SCENE, P, S, A, M, U1, and U2 modes. It is a convenient control called the Mode dial (figure 8.9). Let’s discuss each exposure mode in detail.
Programmed Auto (P) Mode
Programmed auto (P) mode is designed for those times when you just want to shoot pictures and not think much about camera settings but still want emergency control when needed. The camera takes care of the shutter speed and aperture for you and uses your selected exposure meter to create the best pictures it can without human intervention. You can override the aperture by turning the Main command dial.
Figure 8.10 shows the Mode dial set to Programmed auto (P) mode. This mode is called Programmed auto because it uses an internal software program. It tries its best to create optimal images in most situations.
However, even the User’s Manual calls this a “snapshot” mode. P mode can handle a wide variety of situations well, but I wouldn’t depend on it for my important shooting. It can be great at a party, for example, where I want some nice snapshots. I don’t have to think about the camera and I can just enjoy the party. To me, P mode is P for Party.
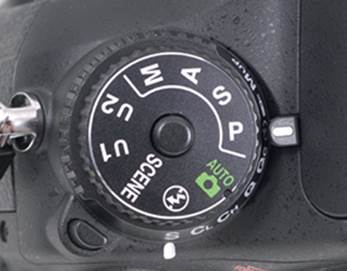
Figure 8.10 – Mode dial set to Programmed auto (P)
It’s a good mode to use when you want to let the camera control the aperture and shutter while you control the flash. In a sense, it’s like AUTO mode except that you, instead of the camera, decide when to use the popup Speedlight. It also lets you override the aperture in an emergency. You may need more depth of field and decide to use a smaller aperture, so you can take control by turning the Main command dial. When you do, the aperture is under your control, while the camera controls the shutter.
P mode comes in two parts: Programmed auto and Flexible program. Flexible program works similarly to Aperture-priority auto (A) mode. Why do I say that? Let me explain by giving an example.
Unexpected Group Shot!
You’re shooting at a family party, taking a natural-light snapshot of cousin Jane. The camera, which is in P mode, has selected f/3.5 for the aperture. Suddenly cousin Bill, aunt Millie, and five more people run to get in the picture. Where you were shooting an individual portrait—using a shallow depth of field to emphasize your subject—now you have a group with more than one row. You (being a well-trained photographer) glance down at your camera and realize that the f/3.5 aperture won’t give you enough depth of field to focus on the front row and still have a sharp image of the back row. You pop open the flash (for extra light) and turn your Main command dial clockwise to reduce the aperture size for more depth of field. When the camera senses the Main command dial being turned, it realizes that it’s being called upon to leave snapshot mode and give you some control. It displays a small P* on the Control panel (figure 8.10.1, screen 1) and Information display (figure 8.10.1, image 2) to let you know it realizes you are taking over control of the aperture. Since you are turning the dial clockwise, it obligingly starts cranking down the aperture. After a few clicks to the left, your aperture is now at f/8. You put the camera to your eye, yell “say cheeeeese!” and press the Shutter-release button. You’ve got the shot! A family memory, captured.
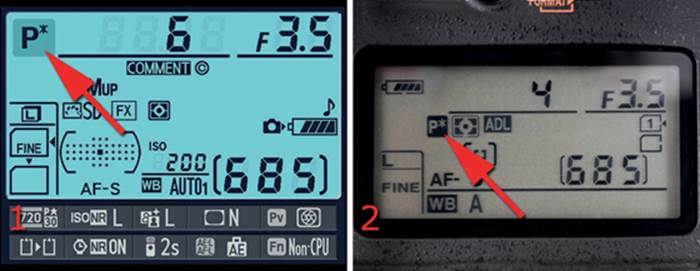
Figure 8.10.1 – P* mode on the Information display and Control panel
What you did in my imaginary scenario was invoke the Flexible program (P*) mode in your D610. How?
As soon as you turned the Main command dial, the D610 left normal P mode and switched to P* (Flexible program). Before you turned the Main command dial, the D610 was happily controlling both the shutter speed and the aperture for you. When you turned the dial, the D610 immediately switched to Flexible program mode and let you have control of the aperture. It then controlled only the shutter speed. In effect, the D610 allowed you to exercise your knowledge of photography very quickly and assisted you only from that point.
If you turn the Main command dial clockwise, the aperture gets smaller. If you turn it counterclockwise, the aperture gets larger. Nothing happens if you turn the Sub-command dial. You can take control of the aperture only in Flexible program mode. Can you see why I say Flexible program mode acts like Aperture-priority (A) mode?
Beware the Extra Clicks
If you turn the Main command dial counterclockwise until the aperture reaches its maximum size (usually f/3.5 on a kit lens), the camera starts counting clicks but does nothing else. To start making the aperture move again, you have to turn back the same number of clicks (up to 15). I have no idea why Nikon does it this way—maybe to allow for larger apertures—but it’s been like this for many years.
It’s confusing to have the camera stop letting you control the aperture just because you turned the Main command dial past wide open by several clicks—until you turn it back the same number of clicks. It’s no big deal, really. Just be aware that this will happen so you won’t think the camera is not working right.
Shutter-Priority Auto (S) Mode
Shutter-priority auto (S) is for those who need to control the shutter speed while allowing the camera to maintain the correct aperture for the available light. You’ll turn the Main command dial to adjust the shutter speed, while the camera controls the aperture. Figure 8.11 shows the Mode dial set to S for Shutter-priority auto mode.
If you find yourself shooting action, you’ll want to keep the shutter speed high enough to capture an image without excessive blurring. Shooting sports, air shows, auto races, or any quickly moving subject requires careful control of the shutter. If you shoot a bird in flight, you’ll want to use a fast shutter speed that allows for just a tiny bit of motion blur in its wings while stopping the body of the bird.
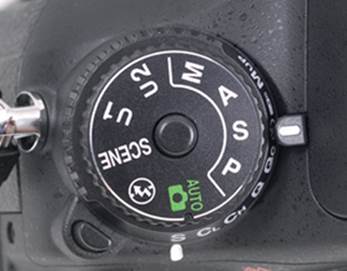
Figure 8.11 – Mode dial set to Shutter-priority auto (S)
Sometimes you’ll want to set your shutter speed to slow settings for special effects or time exposures, such as a small waterfall in a beautiful autumn stream. See figure 8.12 for both effects.
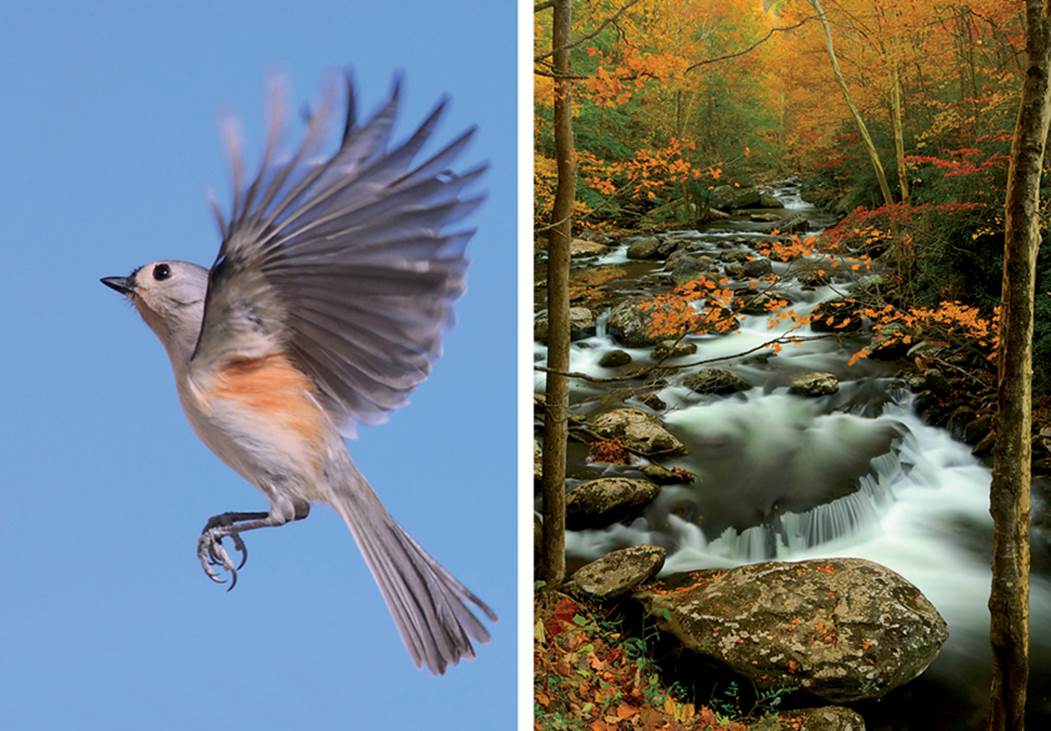
Figure 8.12 – Fast shutter speed to stop bird and slow shutter speed to blur water
If the light changes drastically and the camera cannot maintain a correct exposure with your current shutter speed setting, it will inform you by blinking the aperture setting and displaying an exposure indicator showing the amount (–/+) of under- or overexposure in the Viewfinder, Control panel, and Information display.
Figure 8.12.1 shows the Information display as an example. The aperture indicator (upper red arrow) and exposure indicator (lower red arrow) will blink when the exposure is incorrect.
To change the shutter speed, simply rotate the Main command dial to any value between 30 seconds and 1/4000 second. Turn the wheel counterclockwise for faster shutter speeds and clockwise for slower speeds. The camera will try to adjust the aperture to maintain a correct exposure; if it can’t, it will warn you by blinking.
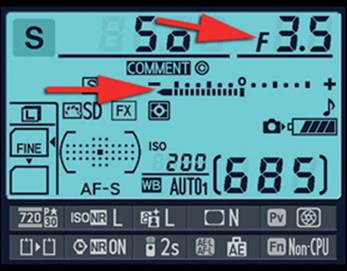
Figure 8.12.1 – Significant underexposure, items at points of arrows will blink
Watch Out for Camera Shake!
Be careful when the shutter speed is set below 1/125 second. Camera shake becomes a problem for many people at 1/60 second and slower. If you are careful to stand still, brace your arms against your chest, and spread your feet apart with one in front of the other, you’ll probably be able to make sharp images at 1/60 to 1/30 second.
Surprisingly, your heartbeat and breathing is reflected in your hands during slow shutter speed photography. If you are going to shoot at slow shutter speeds, buy yourself a nice solid tripod. You’ll make much nicer pictures.
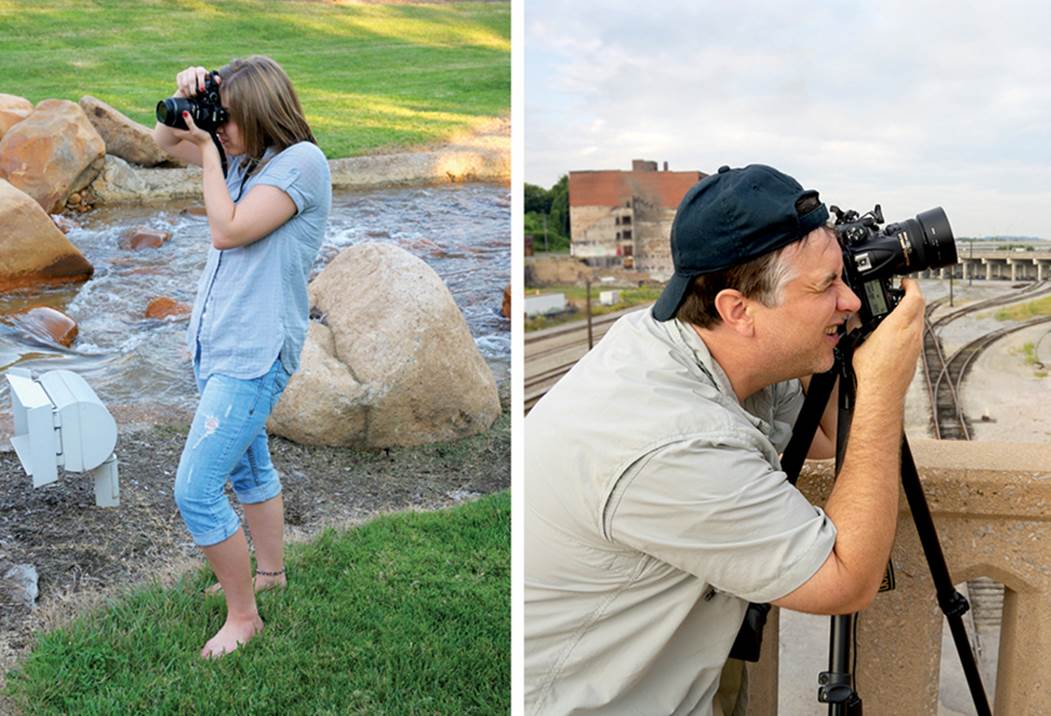
Figure 8.13 – Woman holding camera for steady shooting, and pro photographer using a tripod
Figure 8.13 shows the two main ways to steady a camera. Notice in the first picture how the young lady has her elbow tucked into her chest, her feet apart, and one foot in front of the other. She is squeezing the shutter release very slowly to prevent adding shake, and she is breathing out very slowly as she is firing the camera. This handholding technique provides maximum sharpness. In the other picture a professional photographer is using a tripod for maximum sharpness.
The picture of the small waterfall in Great Smoky Mountains National Park (figure 8.12) was taken at a shutter speed of several seconds. It is virtually impossible for a person to hold a camera perfectly still for several seconds, so a shot like this is not possible without a tripod.
Aperture-Priority Auto (A) Mode
Nature and macro shooters, and anyone concerned with carefully controlling depth of field, often leave their cameras set to Aperture-priority auto (A) mode. Figure 8.14 shows the Mode dial set to Aperture-priority auto mode.
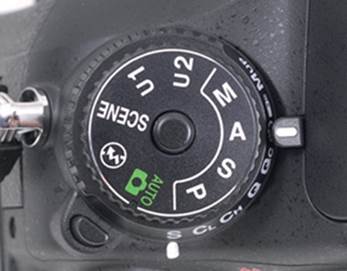
Figure 8.14 – Mode dial set to Aperture-priority auto (A)
Aperture-priority auto mode, or A mode, allows you to control the aperture while the camera takes care of the shutter speed for optimal exposures. To select an aperture, you use the Sub-command dial. Turn the wheel clockwise for smaller apertures (stopping down) and counterclockwise for larger apertures (opening up).
The minimum and maximum aperture settings are limited by the minimum and maximum aperture openings on the lens you’re using. Most consumer lenses run from f/3.5 to f/22. More expensive pro-style lenses may have apertures as large as f/1.2, but they generally start at f/2.8 and end at f/22–f/32.
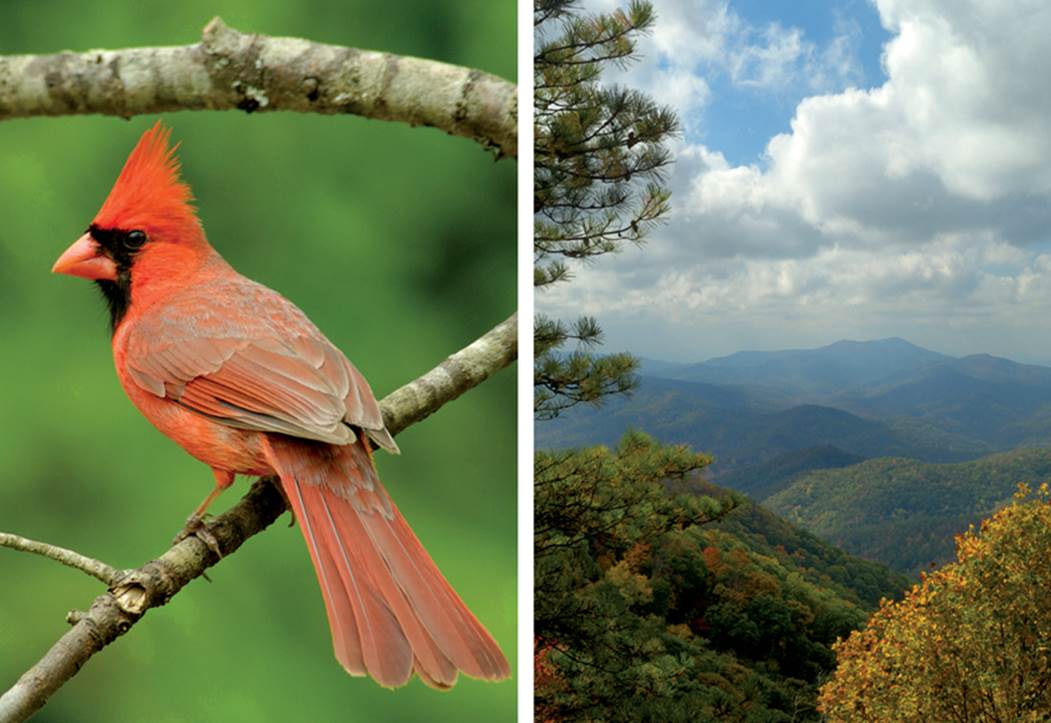
Figure 8.15 – Large aperture to blur background and small aperture for deep focus
The aperture directly controls the amount of depth of field—or zone of sharp-ness—in an image. Depth of field is an extremely important concept for photographers to understand. Simply put, it allows you to control the range or depth of sharp focus in your images. In the bird image infigure 8.15, the depth of field is very shallow, and in the scenic shot it is very deep.
Suggested Reading for Depth of Field, Aperture, and Shutter Speed Basics
Many people who use the D610 are advanced photographers, reflecting the purpose of this feature-laden camera, and they fully understand things like depth of field, shutter speed, and aperture.
However, many newer photographers have decided to go for the D610 as their first entry into serious DSLR photography. The relationship between aperture, shutter speed, and ISO sensitivity are so important for new photographers that I wrote a book titled Beyond Point-and-Shoot, published by Rocky Nook, to clearly explain it (figure 8.15.1).
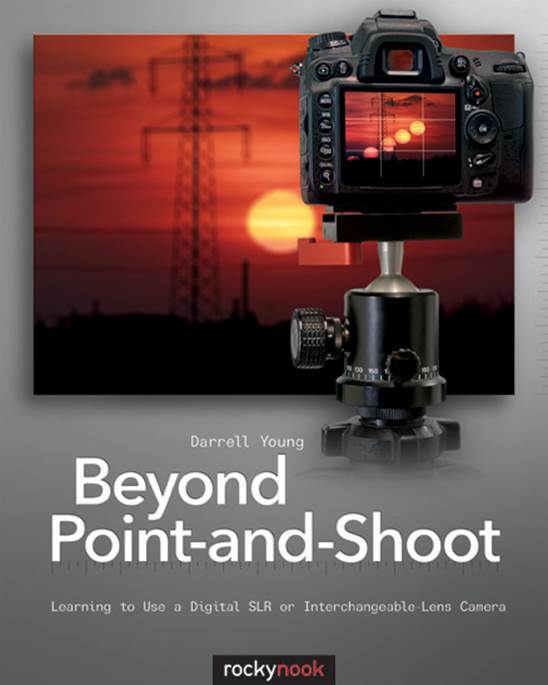
Figure 8.15.1 – Beyond Point-and-Shoot (published by Rocky Nook)
The book gives new DSLR users a way to fully understand how to use the more advanced features of their cameras and not depend so much on automatic modes. If that describes you, get the book. It will open your eyes to the best ways to control your new D610—for the best images you’ve ever taken.
Manual (M) Mode
Manual mode takes a big step backward to days of old. It gives you complete control of your shutter and aperture so you can make all the exposure decisions, with suggestions from the light meter. Figure 8.16, image 1, shows the Mode dial set to Manual.
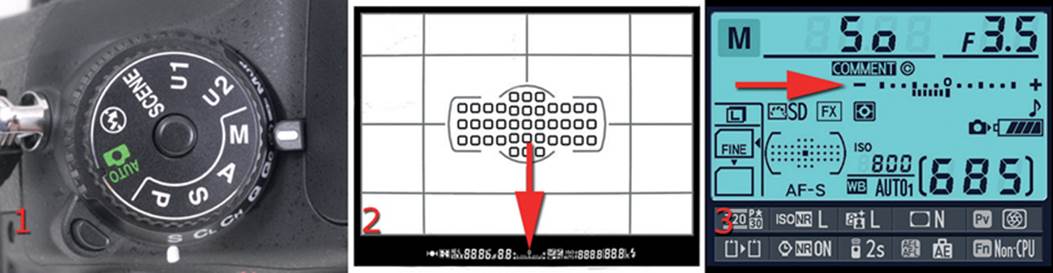
Figure 8.16 – Mode dial set to Manual (M); analog exposure display in Viewfinder and Information display screen
In figure 8.16, screens 2 and 3, notice the electronic analog exposure display at the red arrows. This display, which is visible when you look in the Viewfinder or press the Info button, has a minus sign (–) on the left and a plus sign (+) on the right. Each dot on the scale shown in screen 3 represents 1/3 EV step, and each line represents 1 EV step. My manual exposure in screen 3 shows one stop of underexposure (–1 EV). There is a miniature version of the same scale at the bottom of the Viewfinder. It’s hard to see in figure 8.16, screen 2, but it is easy to see at the bottom of the Viewfinder.
You can control how sensitive this scale is by changing Custom Setting Menu > b Metering/exposure > b2 EV steps for exposure cntrl. You can set Custom setting b2 to 1/3 EV step or 1/2 EV step. The camera defaults to 1/3 step.
When you are metering your subject, a dashed bar will show up underneath the analog exposure display and extend from the zero in the center toward the plus side to indicate overexposure, or toward the minus side to indicate underexposure. You can gauge the amount of over- or underexposure by the number of dots and lines the bar passes as it heads toward one side or the other. The goal in Manual mode is to make the bar disappear. As mentioned previously, in figure 8.16, screen 3, the bar is indicating underexposure of 1 EV step (or 1 stop).
You can adjust the aperture with the Sub-command dial and adjust the shutter speed with the Main command dial. In Manual mode you have control over the aperture (for depth of field) and the shutter speed (for motion control). If your subject needs a little more depth of field, just make the aperture smaller, but be sure to slow down the shutter speed as well (or your image may be underexposed). If you suddenly need a faster shutter speed, then set it faster, but be sure to open the aperture to compensate for it. The camera will make suggestions with the meter, but you make the final decision about how the exposure will look.
Manual mode is for taking your time and enjoying your photography. It gives you the most control of how the image looks, but you need more knowledge to get correct exposures.
Settings Recommendation for Exposure Mode Selection
As a nature photographer, I am mostly concerned with getting a nice sharp image with a deep depth of field. About 90 percent of the time my camera is set to Aperture-priority auto (A) and f/8. I started using this mode back in about 1986 when I bought my Nikon FE, and I have stayed with it since. In A mode, you control the aperture and the camera controls the shutter speed.
However, if I were shooting sports or action, I would have my camera set to Shutter-priority auto (S) most often, which would allow me to control the speed of the shutter and capture those fast-moving subjects without a lot of blur. The camera will control the aperture so I have to concentrate only on which shutter speed best fits my subject’s movement.
I use the other two modes, Programmed auto (P) and Manual (M), only for special occasions.
When I want to control the camera absolutely, I use Manual. I’ve even been known to carry a small blanket with me so when I’m shooting in Manual mode I can toss it over the back of the camera and my head. That way I can feel like Ansel Adams or another view camera artist. I do admit that people (especially kids) seem to find that hilarious. Well, I bet they don’t know how to use Manual mode!
I probably use Programmed auto (P) mode least of all. I might use it when I am at a party and just want to take nice pictures for my own use. I let the camera make most of the decisions in P mode, and I still have the ability to quickly jump into Flexible program (P*) mode when events call for a little more aperture control.
Why shouldn’t you just use AUTO mode instead? (We’ll explore it in the next section.) Well, AUTO mode controls everything, including when to use flash and which ISO sensitivity setting is best; therefore, it may not work well for maximum quality images in lower light levels. With P mode, the camera controls only the shutter speed and aperture, and you control the rest.
As mentioned, some people have recently switched from using a point-and-shoot camera to the more powerful Nikon D610. Most point-and-shoot cameras have a completely automatic mode and some SCENE modes that represent common photographic opportunities. If you have come over from the point-and-shoot world, you might enjoy using the AUTO or SCENE modes at first while learning the more advanced P, S, A, and M modes. Let’s look into how these extra modes work.
Auto Exposure (AUTO) Mode
The AUTO exposure mode (figure 8.17) is for those times when you want to get the picture with no thought as to how the camera works. All you need to be concerned about in AUTO mode is whether the battery is fully charged and how well the image is composed.
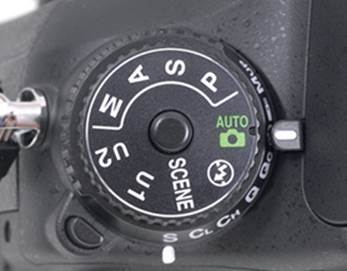
Figure 8.17 – Mode dial set to AUTO exposure mode
The D610 becomes a big point-and-shoot camera, like a heavy Nikon Coolpix. Many of its internal modes become automatic, which means you can’t change them because the camera decides what is best for each setting:
• White balance
• Active D-Lighting
• ISO sensitivity
• Picture Control
• Built-in Speedlight flash
In addition, several of the Shooting Menu settings and Custom settings are disabled in AUTO. In effect, you relinquish control of the camera’s functions for a “guarantee” that some sort of picture will be provided. In most cases, the D610 will provide its normal excellent images when you select AUTO. However, in difficult circumstances, the camera is free to turn up the ISO sensitivity and extend the Active D-Lighting range to get a picture, even at the expense of image quality.
If an alien spaceship lands in the local superstore parking lot, I might be convinced to use AUTO since I want to get a picture no matter what. I don’t have to think about anything except framing the subject and pressing the Shutter-release button. Or, if you want to loan your camera to your grandmother and she has no interest in how cameras work, the D610 will happily make nice images for her in AUTO mode. While you are learning to use the more advanced functions of the camera, you too might benefit from using this mode for a while. You’ll usually get better pictures when you control the camera, but the D610 has some very efficient software that will help you if you’re not ready to take control.
Settings Recommendation: I don’t like to admit it, but I do use AUTO mode sometimes. The D610 is such a good camera that it will make some nice images without my help. If I have reasonably good light and am not shooting for commercial work, I will switch to AUTO mode just to enjoy taking pictures. Sometimes we need to take ourselves less seriously. AUTO mode lets me do that. Try it!
SCENE Modes
SCENE modes are considered “creative photography” modes by Nikon. In fact, they allow beginning photographers to emulate the camera settings they would be inclined to use if they had more experience. These modes allow them to make consistently good images, and later, as their experience grows, they can use the P, S, A, and M modes to get more creative control over the image.
Because the Nikon D610 has thousands of images stored in its Matrix metering system, I wouldn’t be surprised if each of these SCENE modes uses a subset of stored image types that more closely match the selected subject matter. This might hold true in Matrix metering mode. I have no way to prove this, so don’t quote me!
If you choose to use SCENE modes, do so with the understanding that you can eventually learn to control the image to a finer degree with the P, S, A, and M modes. Don’t be afraid to experiment with the more powerful features of the D610. You can always fall back on the SCENE modes if you feel uncomfortable.
With the P, S, A, M, AUTO, and SCENE modes on the Mode dial, Nikon has given us the best of both worlds in one camera. Full or partial automation, or complete manual control. What flexibility!
The Nikon D610 provides no less than 19 distinct SCENE modes designed to give inexperienced users control over certain styles of photography. Let’s look at a list of the various SCENE modes and then examine each of them in more detail:
• Portrait
• Landscape
• Child
• Sports
• Close up
• Night portrait
• Night landscape
• Party/indoor
• Beach/snow
• Sunset
• Dusk/dawn
• Pet portrait
• Candlelight
• Blossom
• Autumn colors
• Food
• Silhouette
• High key
• Low key
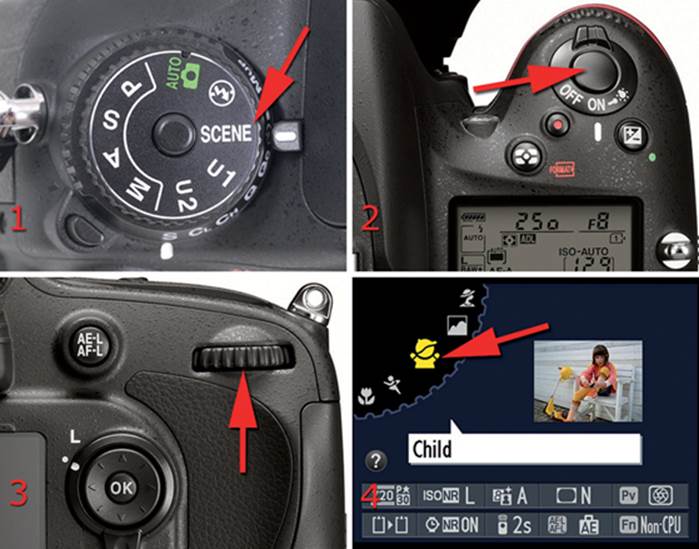
Figure 8.18 – Mode dial set to SCENE mode
Here are the steps to select a SCENE mode:
1. Set the Mode dial to SCENE (figure 8.18, image 1).
2. Make sure the light meter is active by pressing the Shutter-release button halfway, and then release the button (figure 8.18, image 2). (Nikon does not mention this step in the User’s Manual on Page 40; however, my camera does not display SCENE modes unless the meter is active.) If the light meter is already active, skip this step. Nikon suggests pressing the Info button, which also takes you to the SCENE modes.
3. Turn the Main command dial at least two clicks while examining the Monitor (figure 8.18, image 3). If you turn it only one click, the camera displays the Information display screen only for the current SCENE mode. Each click past the first one displays a different SCENE mode on theMonitor, with a small picture indicating the effect provided (figure 8.18, image 4). The SCENE mode display appears for only about two seconds before the Monitor changes to the Information display with the corresponding SCENE mode symbol displayed in the top left corner of theMonitor. Quickly turn the dial again to show more SCENE modes.
4. When you have selected the SCENE mode you want and the Monitor goes off, you are ready to shoot. If you don’t want to wait, you can press the Shutter-release button halfway to turn the Monitor off and get ready for shooting.
Settings Recommendation: It almost seems that Nikon added SCENE modes to the D610 as an afterthought. I often judge a user interface by how intuitively it works. The steps to set a SCENE mode are not intuitive at all. When I first got my D610 I noticed that nothing happens when you select SCENE from the Mode dial. I expected to see SCENE modes immediately appear on the monitor, but they don’t. That’s silly for an interface designed with inexperienced users in mind!
The following is an abbreviated version of how to get into the SCENE modes:
1. Set the Mode dial to SCENE.
2. Make sure the light meter is active.
3. Turn the rear Main command dial at least two clicks.
Now, let’s take a detailed look at the SCENE modes. In each of the following 19 sections, I have included a figure that contains two screens: (left) the screen used to select the mode, with its sample picture; and (right) the Information display screen as it will appear after you’ve chosen a particular SCENE mode or if you press the Info button with a SCENE mode active.
Portrait Scene Mode
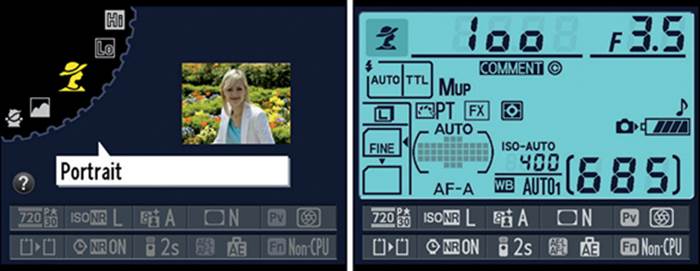
Figure 8.19 – Portrait SCENE mode
Portrait SCENE mode is best used when you are taking pictures of people or static subjects. Its sample image is a lady in a flower garden, and its icon resembles a proper lady wearing a big hat (figure 8.19). The camera tends to emphasize shallow depth of field (large apertures) so that only your subject is in sharp focus, which is a flattering way to focus attention on your subject while trying to blur out the background as much as possible. If you are taking pictures of friends (alone or in small groups), use this mode.
Landscape Scene Mode
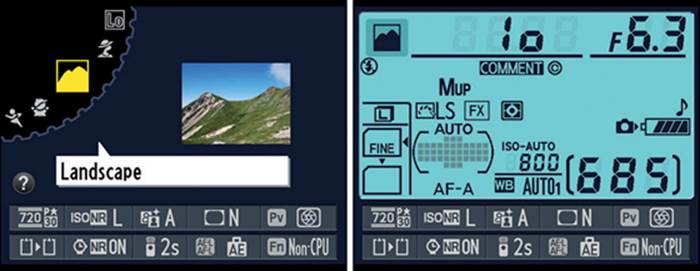
Figure 8.20 – Landscape SCENE mode
If you are spending a day in the mountains, you’ll want to use the Landscape SCENE mode. It has a sample picture of a mountain, and its icon looks like a couple of mountain peaks (figure 8.20). Landscapes are usually best photographed on a tripod at small apertures so the entire scenic view is nice and sharp. Landscape mode will emphasize smaller apertures for more depth of field. This is sort of like using Aperture-priority auto (A) mode but with much less control over the aperture, since the camera decides on the setting.
Child Scene Mode
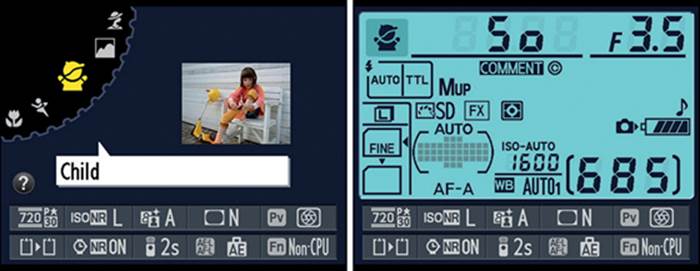
Figure 8.21 – Child SCENE mode
Child SCENE mode tries to balance the need for saturating the colors in the child’s clothes and any colorful backgrounds while not overly saturating skin tones. It has a sample picture of a young girl tying her shoe, and its icon looks like a small child with raised arms (figure 8.21). The primary emphasis of this mode seems to be making skin tones look good while providing a fast enough shutter speed to capture a moving child and a small enough aperture to have some depth of field. It seems to be a balanced mode when it comes to shutter speed and aperture.
Sports Scene Mode
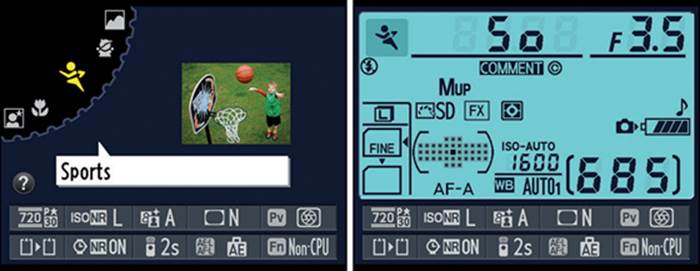
Figure 8.22 – Sports SCENE mode
Because sports usually have people or other subjects moving at a rapid pace, the Sports SCENE mode emphasizes faster shutter speeds to stop motion. It has a sample picture of a young boy shooting a basketball goal, and its icon is a person running (figure 8.22). Since you certainly don’t want slow shutter speeds at a car race or air show, the camera will attempt to use the fastest shutter speed that the light will allow, and the camera will open the aperture to keep the exposure reasonable. Expect a shallow depth of field in Sports mode. This mode is similar to using Shutter-priority auto (S) mode with less control over specific shutter speeds. Autofocus is in Continuous-servo mode (focus never locks) because sports are constantly in motion.
Close Up Scene Mode
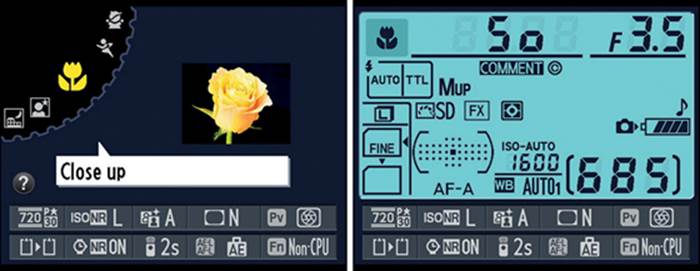
Figure 8.23 – Close up SCENE mode
Another name for Close up SCENE mode might be “flower mode,” or even “macro mode.” It has a sample picture of a beautiful yellow rose, and its icon is a flower (figure 8.23). It’s designed to let you to take closeup pictures of flowers, insects, and other small items. The mode seems a bit neutral. It tries to balance a shutter speed that is fast enough to cut down on camera shake while providing enough depth of field to sharply focus your subject. It acts somewhat like Programmed auto (P) mode. The focus locks on your subject when it is acquired.
Night Portrait Scene Mode
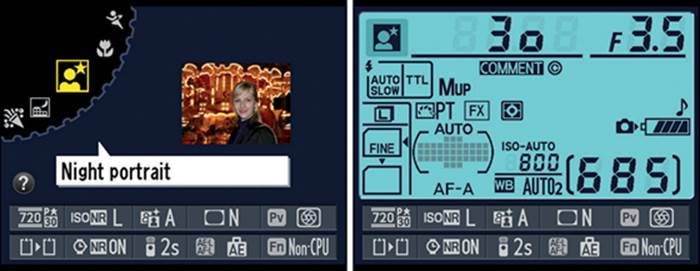
Figure 8.24 – Night portrait SCENE mode
Night portrait SCENE mode acts somewhat similar to Close up SCENE mode in that it tends to use medium apertures and shutter speeds. It has a sample picture of a smiling woman in front of a well-lit carousel, and its icon is a small person with a star on the upper right (figure 8.24). The mode seems to balance the shutter speed and aperture for handheld shots so the shutter speed is fast enough to avoid camera shake while the aperture is open as much as possible to let in dim light. It seems to emphasize large apertures over faster shutter speeds.
Night Landscape Scene Mode
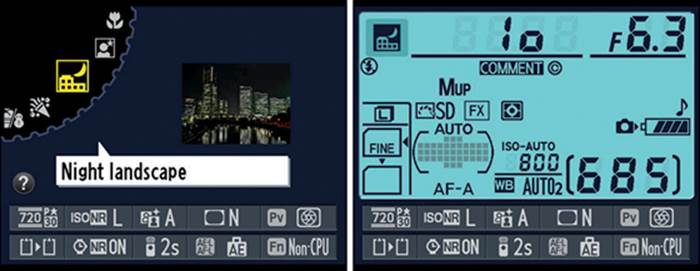
Figure 8.25 – Night landscape SCENE mode
Night landscape SCENE mode is designed to be used with a tripod for landscape exposures at night. It has a sample picture of a nighttime cityscape, and its icon is a building with a crescent moon (figure 8.25). If you want to shoot a cool moonlit landscape or a lighted city view at night, this is the mode for you.
When it’s dark outside the camera uses longer exposures, higher ISO sensitivity, and noise reduction to keep noise from being a big problem. Since various light sources have different colors, the camera tries to “reduce ... unnatural colors,” according to Nikon. The Built-in flash and the Built-in AF-assist illuminator are disabled. The camera will still fire an accessory shoe-mounted Speedlight in case you want to use flash for special effects or fill.
Party/Indoor Scene Mode
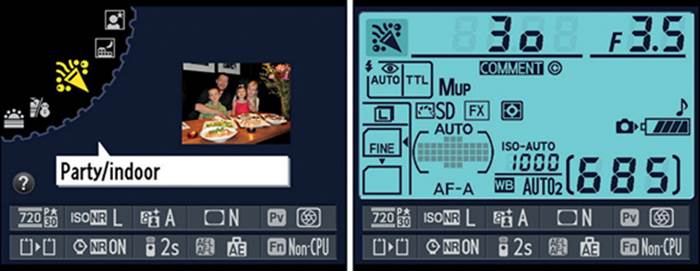
Figure 8.26 – Party/indoor SCENE mode
Party/indoor SCENE mode balances fill flash and ambient background lighting and adds red-eye reduction. Its sample picture is a family at a party meal, and its icon is a horn blowing with confetti and champagne bubbles (figure 8.26). This SCENE mode tries to overcome brightly lit people and dark backgrounds by allowing more background light to register on the sensor. It’s great for shooting at events with people! Be careful if people are moving quickly because this mode uses slower shutter speeds, usually around 1/60 second. This can cause ghosting if the subject is moving too quickly.
Beach/Snow Scene Mode

Figure 8.27 – Beach/snow SCENE mode
Beach/snow SCENE mode is optimized to work well with the often-bright expanses of water, sand, and snow. Its sample picture is a bright sandy beach scene, and its icon is a cloudy beach and snowman (figure 8.27). Use this mode when you shoot by the ocean or on a snowy day. It’s a landscape mode, so it will intensify colors, if present, and sharpen the image a little. The popup flash and focus assist light are disabled.
Sunset Scene Mode

Figure 8.28 – Sunset SCENE mode
Sunsets often provide deep colors, so Sunset SCENE mode is designed to emphasize them. Its sample picture is a horizon with a setting sun, and its icon is a setting sun with rays (figure 8.28). This mode uses small apertures and slow shutter speeds, so it may be best to use a tripod to avoid blurry images. The popup flash and focus assist light are disabled. To provide nice sharp images, it increases sharpening.
Dusk/Dawn Scene Mode
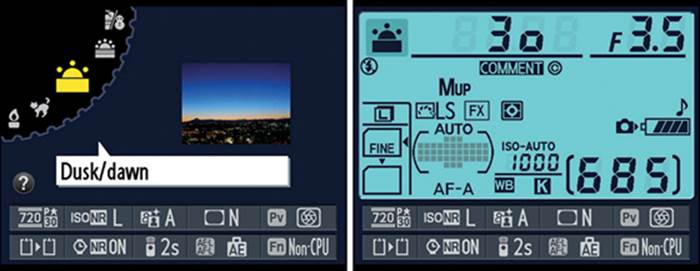
Figure 8.29 – Dusk/dawn SCENE mode
Dusk and dawn often have nice color in the sky and muted color elsewhere due to darkness, so Dusk/dawn SCENE mode saturates the color a bit. Its sample picture is a rim-lit urban area after sunset, and its icon looks like the Sunset SCENE mode icon except the sun has fewer rays (figure 8.29). This mode works like the Sunset mode, except it uses a cooler white balance of 4450K. Since the light is so low at dusk and dawn, you may want to use a tripod. The popup flash and focus assist light are disabled.
Pet Portrait Scene Mode
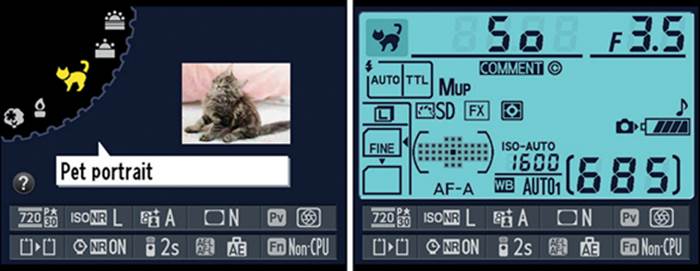
Figure 8.30 – Pet portrait SCENE mode
Pet portrait SCENE mode emphasizes faster shutter speeds to capture wiggling Fluffy and Spot. Its sample picture is a fuzzy kitten, and its icon is a proud cat with its tail raised (figure 8.30). The depth of field is shallow to better draw attention to your pet. The color saturation and contrast is normally set to medium so your pet won’t have abnormally strong colors. However, the camera retains the ability to increase saturation when there are colorful backgrounds or pet clothing. It also increases sharpening a little to bring out your pet’s lovely fur and eyes (or beak, feathers, gills, claws, scales, etc.). Autofocus continually updates to keep up with a moving pet (i.e., AF never locks). The AF-assist illuminator is disabled.
Candlelight Scene Mode
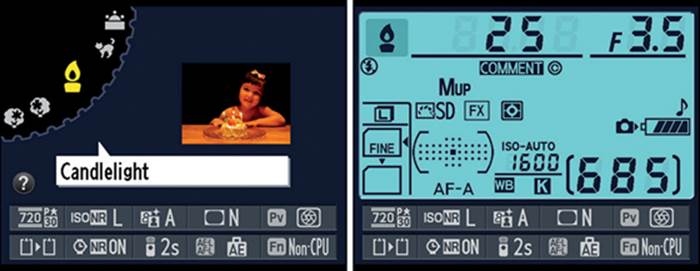
Figure 8.31 – Candlelight SCENE mode
Candlelight SCENE mode is designed to get those delightful candlelight pictures at parties and for special effects shots. Its sample picture is of a little girl about to blow out the candles on her cake, and its icon is a candle with a flame (figure 8.31). If you can, use a tripod because the shutter speeds will be low by candlelight. The camera uses a medium-cool white balance of 4350K to balance against the warmer color of candlelight. A little extra sharpening is provided in case you shake the camera a little while shooting in the dark ambient light. The popup flash and focus assist light are disabled. The focus locks on your subject when it is acquired.
Blossom Scene Mode
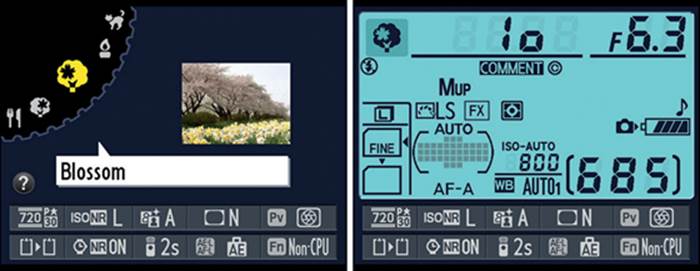
Figure 8.32 – Blossom SCENE mode
If you are a gardener or visit places with lots of flowers, you’ll enjoy Blossom SCENE mode. It tends to emphasize color saturation. The sample picture is of a field of daffodils with blossoming springtime trees in the background, and its icon is a tree with a blossom on the left side (figure 8.32). Since you need a deeper depth of field when taking pictures of landscape flower blossom shots (not closeups), the camera uses smaller apertures. Use a tripod if the ambient light is low. The popup flash and focus assist light are disabled.
Autumn Colors Scene Mode
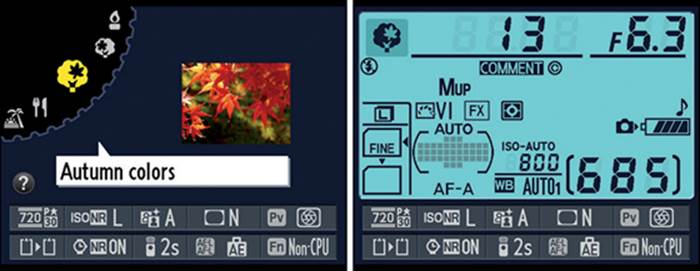
Figure 8.33 – Autumn colors SCENE mode
Who doesn’t love the beautiful reds, yellows, and oranges of autumn? Autumn colors SCENE mode tends to saturate the deep colors for lots of colorful snap. This mode’s sample picture is a beautiful red-leaved tree branch, and its icon is a tree with a leaf on the right (figure 8.33). This mode uses smaller apertures to get deeper focus for those colorful landscape shots. If the light gets low, please use a tripod because the shutter speeds will be slow. The popup flash and focus assist light are disabled.
Food Scene Mode
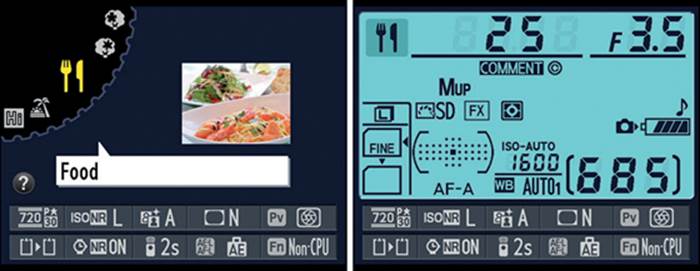
Figure 8.34 – Food SCENE mode
Food images should have nice color but not be overly saturated. Food SCENE mode uses medium color saturation and contrast to provide a natural look to food images. Its sample image is several platters of delicious-looking food, and its icon is a fork and knife (figure 8.34). This mode emphasizes smaller apertures to provide enough depth of field to get most of the food in focus. You’ll need to use a tripod if you are shooting food images in low light. The Built-in flash and the Built-in AF-assist illuminator are disabled.
Silhouette Scene Mode
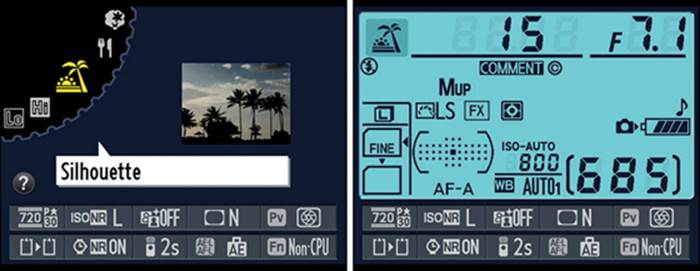
Figure 8.35 – Silhouette SCENE mode
When you take a picture of a silhouette, your subject is dark and the background is well lit. Silhouette SCENE mode is not for taking pictures of someone standing in front of a window, since the camera disables the popup flash (use Portrait or Night portrait SCENE mode for that). Instead, use this mode to take pictures of interesting foreground objects—such as trees, buildings, or people—silhouetted against a beautiful sunset or sky. Its sample image is of a row of palm trees silhouetted against a bright sky, and its icon is a sunset with a palm tree (figure 8.35). The Built-in AF-assist illuminator is disabled. The focus locks on your subject when it is acquired.
High Key Scene Mode
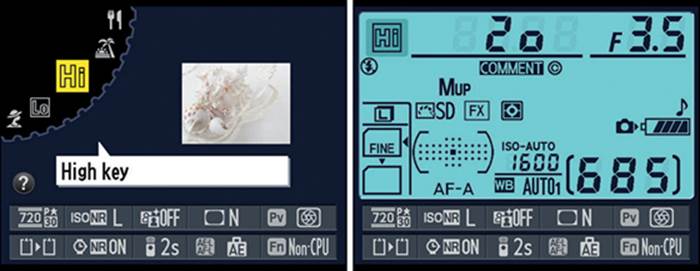
Figure 8.36 – High key SCENE mode
High key imagery is deliberately overexposed slightly to give a very bright look to the image. The image almost seems to shine with extra light, to the point that some highlight detail is lost. Its sample image is of a bright seashell still life, and its icon is the word Hi (figure 8.36). High key SCENE mode is often used with white subjects on white backgrounds for a bright, dreamy effect. The contrast is lowered slightly to save some highlights, and the brightness is raised automatically. The Built-in flash and Built-in AF-assist illuminator are disabled. The focus locks on the subject when it is acquired.
Low Key Scene Mode
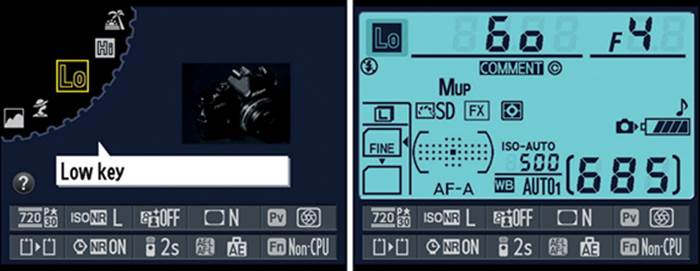
Figure 8.37 – Low key SCENE mode
Low-key photography is all about the highlights. Reflections from shiny subjects do well as low-key subjects. Its sample picture is a black Nikon FM2 camera, and the icon is the word Lo (figure 8.37). Use Low key SCENE mode when you want most of the subject to be dark and somber looking with the highlights preserved. The camera raises the contrast to deepen the shadows and automatically lowers the brightness. Since the light is low, it’s a good idea to use a tripod when shooting in this mode. Color saturation is set to medium, since dark images often do not emphasize color. The Built-in flash and Built-in AF-assist illuminator are disabled. The focus locks on the subject when it is acquired.
Using the Help System in Scene Modes
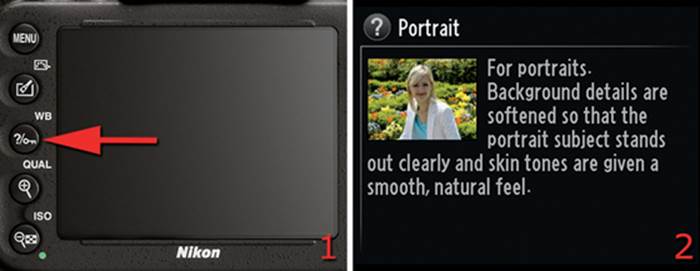
Figure 8.38 – Using the Help System in SCENE modes
If you find yourself unsure of what a certain SCENE mode does, you can use the help system to get a short tutorial. Simply select one of the SCENE modes, and when the SCENE mode selection screen or Information display is showing, press and hold the Help/protect button (figure 8.38, image 1, red arrow). A screen will display on the Monitor with information about the current SCENE mode (figure 8.38, screen 2). Portrait mode was selected when I pressed the Help/protect button, so the camera opened the help screen for that SCENE mode.
U1 and U2 User Settings
The user modes U1 and U2 on the Mode dial (figure 8.39) allow you to make adjustments to many of the camera’s settings and then save them for later use. You’ll need to configure your camera’s settings and then use Setup Menu > Save user settings > U1 (or U2) to save the configuration for that specific User setting. Please refer to the chapter titled Setup Menu and the heading called Save User Settings for a thorough discussion of the U1 and U2 User settings, including the lists of items that can and cannot be saved to a user setting.
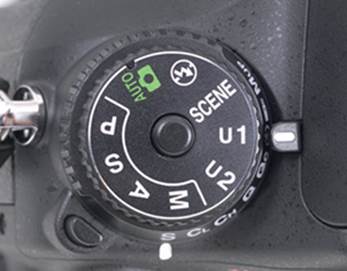
Figure 8.39 – U1 and U2 User Settings
After you have saved your configuration of settings into a User setting, you can recall them into use by simply selecting U1 or U2 from the Mode dial. This allows you to set your camera up for two very specific purposes and switch to them quickly. Very powerful!
Settings Recommendation: I set U1 for highest-quality NEF (RAW) shooting, and U2 for highest-quality JPEG shooting.
No Flash Mode
This setting, which I call the no flash mode, is basically the same as the AUTO setting we discussed earlier in this chapter (figure 8.40). All shooting functions are controlled by the camera, rendering the D610 a large, fully automatic point-and-shoot camera. The only difference between this setting and AUTO is that the flash is disabled. See the section named Auto Exposure (AUTO) Mode earlier in this chapter.

Figure 8.40 – No flash mode
Section 3 – Histogram
Back in the good old film days photographers didn’t have histograms, so we had to depend on our experience and light meter to get a good exposure. Since we couldn’t see the exposure until after we had left the scene, we measured our success by the number of correctly exposed images we created. With the exposure meter/histogram combination in the D610, and the ability to zoom in to an image with the high-resolution Monitor, our success rate is much higher than ever before.
The histogram can be as important as the exposure meter, or even more so. The meter sets the camera up for the exposure, and the histogram verifies that the exposure is a good one.
If your exposure meter stopped working, you could still get perfect exposures using only the histogram. In fact, I gauge my efforts more by how the histogram looks than anything else. The exposure meter and histogram work together to make sure you get excellent results from your photographic efforts.
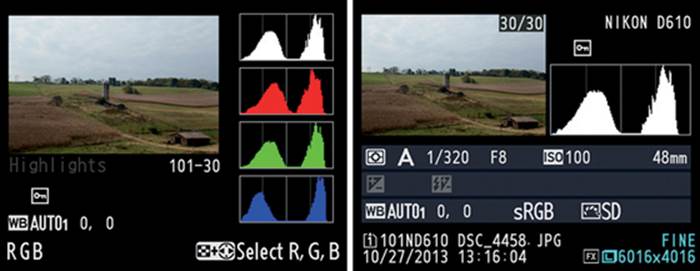
Figure 8.41 – The two histogram screens
Figure 8.41 shows the D610’s two histogram screens, each representing the brightness and color values of the picture it is shown with. The screen on the left is called the RGB histogram screen (color channels), and it shows a series of histograms. On the top is a luminance histogram (weighted brightness, shown in white), followed by the red, green, and blue (RGB) channels. In the screen on the right, the luminance histogram appears next to a small version of the picture. It works the same as the smaller luminance histogram at the top of the left screen.
If your camera does not display the RGB histogram screen, put a check in the box found at Playback Menu > Playback display options > RGB histogram. This setting enables or disables the RGB histogram screen. The basic luminance histogram is one of the camera’s main screens and can always be called into use. Both of these screens are available by scrolling up or down with the Multi selector when you have a picture displayed on the Monitor.
Now let’s discuss the use of a histogram in detail.
Understanding the Histogram
Using your histogram screens will guarantee you a much higher percentage of well-exposed images. It is well worth spending time to understand the histogram. It’s not as complicated as it looks.
I’ll try to cover this feature with enough detail to give you a working knowledge of how to use the histogram to make better pictures. If you are deeply interested in the histogram, there is a lot of research material available on the Internet. Although this overview is brief, it will present enough information to improve your technique immediately.
Light Range
The D610 sensor can record only a certain range of light values—up to 14.2 EV steps under the best of controlled conditions, according to DxO Labs. At the time of this writing, that is the third best dynamic range of a production camera in the world, bested only by the Nikon D800 and D800E.
Unfortunately, many high-contrast subjects contain more EV steps of light than even the D610 can handle in a single exposure. It is important to understand how your camera records light so you can better control how the image is captured.
The gray rectangular area in figure 8.42 represents an in-camera histogram. Examine it carefully! Think about it for a minute before reading on.
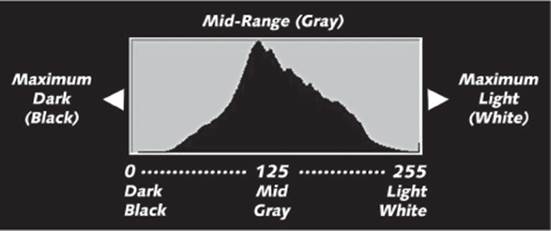
Figure 8.42 – A basic histogram
The histogram is basically a graph that represents the maximum range of light values your camera can capture, in 256 steps (0 = pure black, and 255 = pure white). In the middle of the histogram are the midrange values that represent middle colors like grays, light browns, and greens. The values from just above zero to just below 255 contain detail.
The graph often looks like a mountain peak, or a series of peaks, and the more there is of a particular color, the taller the peak is for that color (in an RGB histogram). In some cases the graph will be round on top, and in other cases it will be flat.
The left side of the histogram represents the maximum dark values that your camera can record. The right side represents the maximum bright values your camera can capture. On either end of the histogram the light values contain no detail. They are either completely black or completely white.
The height of the histogram (top of mountain peaks) represents the amount of individual colors. You cannot easily control this value in-camera, other than changing to a Picture Control with more or less saturated color, so it is for your information only. We are mostly concerned with the left- and right-side values of the histogram, since we do have much greater control over those (dark vs. light).
Simply put, the histogram’s left and right directions are related to the darkness and lightness of the image, while the up and down directions (the valleys and peaks) pertain to the amount of color information (how many pixels for each color).
The left (dark) and right (light) directions are very important for your picture taking. If the image is too dark, the histogram will show that by clipping off the light values on the left; if it’s too light, the values on the right will be clipped. This will be easier to understand when we look at well-exposed and poorly exposed images. Check out figure 8.43, and then we’ll look at things in more detail.
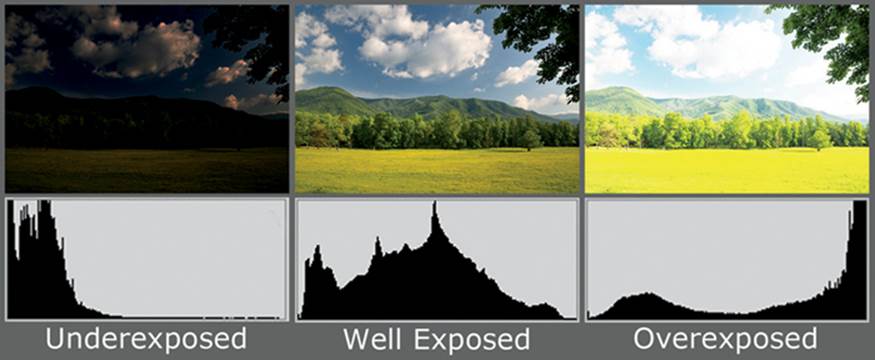
Figure 8.43 – Three histograms: one underexposed, one correctly exposed, and one overexposed
When you see the three histograms next to each other in figure 8.43, does it make more sense? The histograms on the bottom represent the images on top. Notice how the underexposed histogram is all the way to the left of the histogram window and is clipped midpeak, and there is a big gap on the right side. Then note how both edges of the well-exposed histogram just touch the edges of the histogram window on the left and right. Finally, notice how the overexposed histogram is clipped on the right. I hope this helps somewhat!
Now let’s look at some histogram details.
Histogram Shape
Look at the image in figure 8.44. It is well exposed with no serious problems. The entire dynamic light range fits within the histogram window, which means that it’s not too light or too dark and will take very little or no adjustment to view or print.
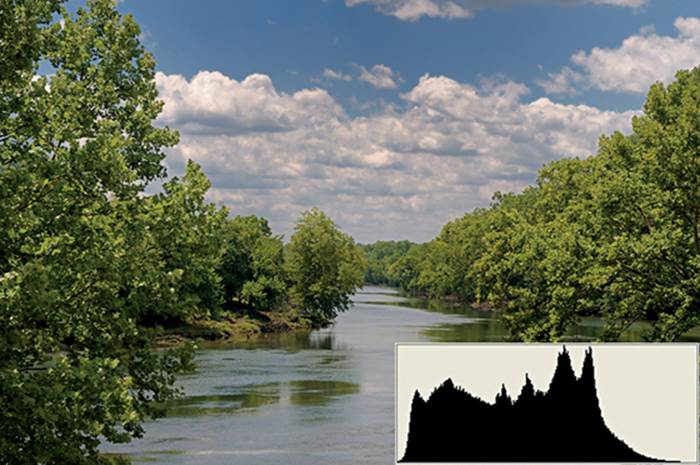
Figure 8.44 – Good image with normal histogram shape, no clipping
The image contains no more than 4 or 5 stops (EV steps) of light range. To finalize the image, I might increase the brightness in the trees a little, but otherwise it’s a good image with potential for immediate use.
Compare the histogram in figure 8.44 to the histogram in figure 8.45. Notice that the histogram in figure 8.44 is not crammed against the dark value side, but the histogram in figure 8.45 is all the way to the left. In other words, the dark values in figure 8.44 are not clipped on the left. This means that the camera recorded all the dark values in figure 8.44 with no serious loss of shadow detail.
Now look at the right side of the histogram in figure 8.44 and note that it is not completely against the right side, although it is quite close. The image contains all the available light values. Everything between the two sides is exposed quite well, with full detail. A histogram does not have to cover the entire window for the exposure to be fine. When there is a very limited range of light, the histogram may be rather narrow.
The image in figure 8.44 is relatively bland, with smooth tonal gradations, so it makes a nice smooth mountain-shaped histogram. This shape will not occur every time, since images contain quite a bit of variation in color information (peaks). Each prominent color will be represented with its own peak on the histogram (in an RGB histogram). The most prominent colors will have higher peaks, and the less prominent colors will have lower or no peaks.
As we examine images with more color or light information, we’ll see that the histogram looks quite different.
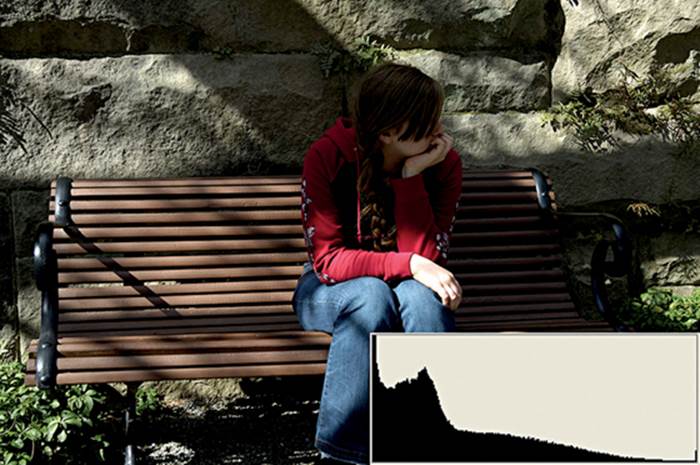
Figure 8.45 – Histogram showing underexposure (dark side)
Look at the image in figure 8.45. The dark values exceed the range of the sensor. The histogram is crammed to the left and is clipped. There are no gradual climbs like on a mountain range, from valley to peak and back to valley. Instead, the image shows up on the left side in midpeak. This is an underexposed image, and the histogram effectively reflects that.
The most important thing to understand when you see a histogram like the one in figure 8.45, with part of the peak clipped off on the left, is that some or all of the image is underexposed.
Now look at the image in figure 8.46. A larger aperture was used and more light was allowed in. We can now see much more detail. But once again the range of light is too great for the sensor, so it is clipped off on the highlight side (right). The dark side (left) is clipped, too. This image simply has more light range than the camera can capture in one image.
The image in figure 8.46 shows plenty of detail but is not professional looking and will win no awards. The range of light is simply too great to be recorded fully. Most of the sky detail is overly light, which is indicated by the clipping on the right side. Also, there are very dark shadows in the trees, so the left side is clipped. The most important thing to remember here is that when you see a histogram that is crammed all the way to the right and the left, there is a loss of detail in both the light and dark areas of the image. A good portion of the image in figure 8.46 is recorded as pure white or black and is permanently gone, or blown out.
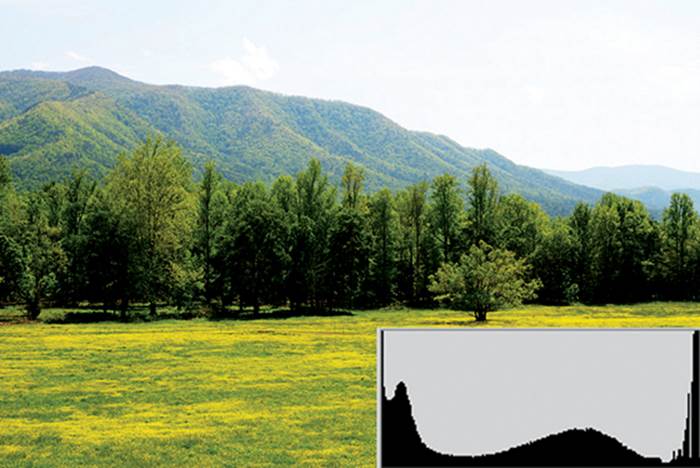
Figure 8.46 – Histogram showing excessive dynamic range
It is important that you try to center the histogram without clipping either edge, if you can. This is not always possible, as shown in figure 8.46, because the light range is often too great and the sensor can’t contain it. If you center the histogram, your images will be better exposed. If you take a picture and see that the histogram is shifted way left or right, you can retake the photograph and expose in the opposite direction.
If there is so much light that you can’t center the histogram, you must decide which part of the image is more important, the light or dark values, and expose for those values.
With an image like the one in figure 8.46 you will have to hold back some of the brightness in the sky with a graduated neutral density filter over the sky area. Or you could shoot multiple (bracketed) images at different exposures and later combine them in your computer. This is called high dynamic range (HDR) imaging.
The Nikon D610 can create a two-image HDR JPEG combination when you enable Shooting Menu > HDR (high dynamic range). You can create two JPEGS with 1 to 3 stops of exposure difference, and the camera will automatically combine them into a single HDR image.
This feature is nice for people who do not like to post-process images later in the computer. Try it out!
Note: If you are not experienced with shooting bracketed images and combining them in your computer for HDR imaging, you might want to read Practical HDRI and/or The HDRI Handbook 2.0 (figure 8.46.1).
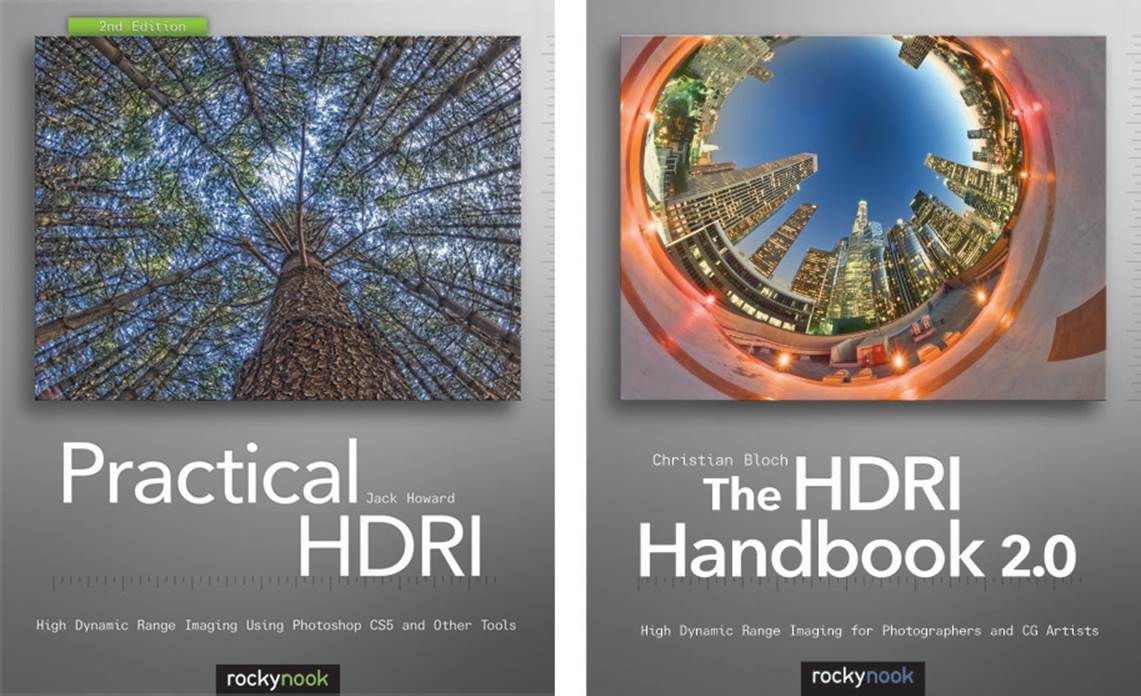
Figure 8.46.1 – Practical HDRI by Jack Howard and The HDRI Handbook 2.0 by Christian Bloch
Both of these books are excellent for learning how to do HDR imaging. I own both of them and highly recommend them.
Luminance Histogram Differences
The luminance histogram (figure 8.41, right side) is, in a sense, a combined histogram of all three RGB channels. However, it is not a direct combination. It is a weighted brightness combination.
Human vision is heavily weighted toward green since most of nature is green. Therefore, the brightness of a luminance histogram is weighted this way: 59 percent green, 30 percent red, and 11 percent blue. This closely matches the way our eyes see.
We are much better at perceiving small changes in brightness than we are small changes in color shades. Therefore, a weighted brightness, or luminance histogram, more accurately reflects the way our brain perceives the world.
Note: If you would like more detailed information on how histograms work, I recommend the following website, which has more detail:
http://www.cambridgeincolour.com/tutorials/histograms2.htm
If you spend some time reading the technical document on histograms at this site, you will have a much deeper understanding of your camera’s color system.
If you use the luminance histogram, you will generally get the best results. The only time most of us need to view the histogram from a single channel (RGB) is to see if a strong color, such as red, has blown out only that one color channel, leaving no detail in that particular color only.
The Nikon D610 offers us both RGB and luminance histograms. We have the best of both worlds!
The Histogram Represents a JPEG Image
Interestingly, the histograms presented by your Nikon D610 represent a camera-created 8-bit JPEG file. When you take a picture, the camera takes RAW image information from the sensor, moves it into a 16-bit queue, and processes it. It then takes the 12 or 14 bits of color information your camera captures and compresses the color values into an 8-bit space, dumping extra color information. Since your eyes can see small changes in brightness much more easily than small changes in color shades, the removal of 4 to 6 bits of color information does not make a lot of difference in your picture, as long as the brightness is not affected.
However, since a RAW image from a Nikon D610 contains more color information than a JPEG, there is often a little more headroom in a RAW image. That is, if a histogram shows that the light or dark sides of the histogram are clipped (no detail), that clipping is based on a compressed JPEG created by the camera. If you shot the image in NEF (RAW) mode, there would actually be a little more detail in the dark and bright regions of the image than shown on the histogram.
This is a strong argument for shooting in RAW mode for very contrasty scenes. Your images will suffer less from loss of details in light and dark areas in RAW mode. Basically, the histogram is slightly conservative in how it represents the scene captured by the camera—if you are shooting in RAW mode, that is. If you shoot only JPEGs, the histogram will be accurate.
How Does the Eye React to Light Values?
The D610, with its imaging sensor and glass lenses, is only a weak imitation of our marvelously designed eye and brain combination. There are very few situations in which our eyes cannot adjust to the available light range. As photographers, we are always seeking ways to record even a small portion of what our eye and mind can see.
Since our brain tends to know that shadows are black, and expects that, it is usually better to expose for the highlights. If you see dark shadows, that seems normal. We’re simply not used to seeing light so bright that all detail is lost. An image exposed for the dark values will look very weird because most highlight detail will be blown out.
Your eyes can see a huge range of light in comparison to your digital sensor. The only time you will ever see light values so bright that detail is lost is when you are looking directly at an overwhelmingly bright light, like the sun. Therefore, in a worst-case scenario, expose the image so the right side of the histogram just touches the right side of the histogram window, and the image will look more normal.
Settings Recommendation: Since the beginning of photography, we have always fought with being able to record only a limited range of light. But with the digital camera and its histogram, we can now see a visual representation of the light values and can immediately review the image, reshoot it with emphasis on lighter or darker values, or see that we must use a filter or HDR imaging to capture it at all. Learn to use your histogram for consistently better exposures.
Computer Adjustment of Images
Looking at the image in figure 8.47, taken in midday with the sun overhead, we see an example of a range of light that is too great to be captured by a digital sensor, but the image is exposed in such a way that we can get a usable photo later.
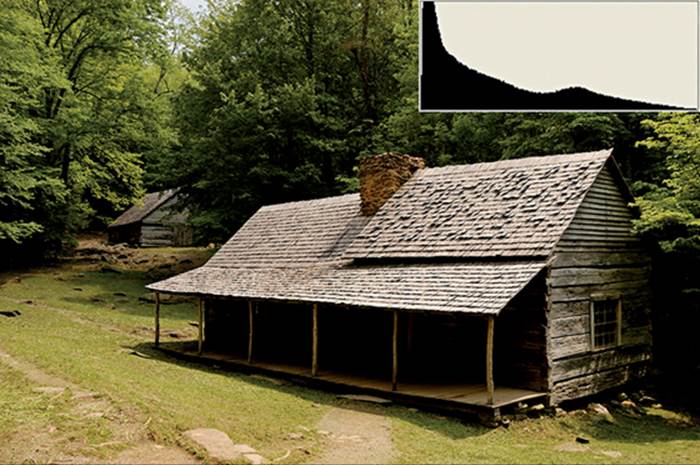
Figure 8.47 – Cabin picture with correct exposure but dark shadows, and its histogram
Notice in the histogram of the figure how the dark values are clipped and dark details appear to be lost. But on the right side of the histogram you can see that the light values are not clipped. The camera recorded all the light values but lost some dark values. This image was exposed for the light side, and the shadows remained dark.
Since our eyes see this as normal, the image looks okay. If we were standing there looking at the cabin ourselves, our eyes would be able to see much more detail in the front porch. But the camera just can’t record that much light range.
If we wanted to get a bit more detail in the shadows than this image seems to contain, we can do it. Normally a camera does not give us enough control to add light values on the fly—except maybe with some in-camera Active D-Lighting—therefore, we use the histogram to get the best possible exposure and then adjust the image later in the computer.
We need a way to take all this light and compress it into a more usable range.
We are now entering the realm of post-processing, or in-computer image manipulation. Look at the image in figure 8.48. This is the same image as in figure 8.47, but it has been adjusted in Photoshop to add more shadow detail into the histogram by compressing the midrange values. Notice that the entire histogram seems to be farther right, toward the light side. We removed some of the midrange, but since there was already a lot of midrange there, our image did not suffer greatly.
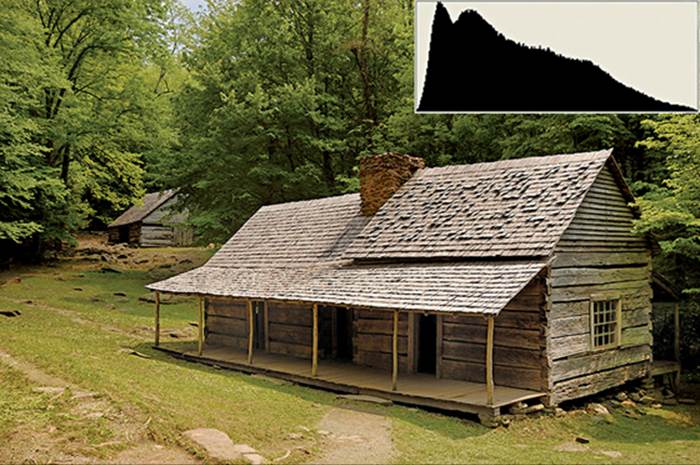
Figure 8.48 – Post-processed cabin picture and its histogram (in-computer manipulation)
How this computer post-processing was done is outside the scope of this book, but it is not very hard. Buy a program like Nikon Capture NX2, Adobe Photoshop, Adobe Photoshop Elements, Adobe Lightroom, Apple Aperture, or another fine graphics program designed for photographers.
Your digital camera and your computer are a powerful imaging combination—a digital darkroom, where you are in control from start to finish, from clicking the shutter to printing the image.
But, retreating from philosophy, let’s continue with our histogram exploration. Notice in figure 8.48 how the histogram edge is just touching the highlight side of the histogram window.
What if, instead, a small amount of clipping on the light side was allowed to take place to allow more room for shadow values? Sometimes a very small amount of clipping does not seriously harm the image. The photographer must be the judge.
The greater apparent detail in this image is the result of compressing the midrange of the light values a bit in the computer. If you compress the midrange light values (remove color detail), that will tend to pull the dark values toward the light side and the light values toward the dark side, resulting in more apparent detail in your image.
It’s like cutting a section out of the middle of a garden hose. If you pull both of the cut ends together, the other two ends of the hose will move toward the middle, and the hose will be shorter overall. If you compress or remove the midrange of the histogram, both ends of the graph will move toward the middle. If one end of the graph is beyond the edge of the histogram window (clipped), it will be less so when the midrange is compressed.
We are simply trying to make the histogram fit into the frame of its window. If we have to cut out some of the middle to bring both ends into the window, well, there is usually plenty in the middle to cut out, so the image rarely suffers.
Remember, this is done outside of the camera in a computer. You can’t really control the in-camera histogram to compress values, but you need to be aware that it can be done in the computer so you can expose accordingly with your camera’s histogram. Then you will be prepared for later post-processing of the image.
In fact, now that we have compressed the midrange values, figure 8.48 more closely resembles what our eyes normally see, so it looks more normal to us.
In many cases your progression from the shooting site to your digital darkroom can benefit if you shoot NEF (RAW) images. A RAW digital image contains an adjustable range of light. With a RAW image you can use controls in your post-processing software to select from the range of light within the big RAW image file. It’s like moving the histogram window to the left or right over all that wide range of RAW image data. You select a final resting place for the histogram window, capture the underlying RAW data, and your image is ready for use.
This is a serious oversimplification of the process, but I hope it is more understandable. In reality, the digital sensor often records a wider range of light than you can use in one JPEG image. Although you can’t get all of that range into the final image, it is there in the RAW file as a selectable range. I prefer to think of it as a built-in bracket, since it works the same way.
This bracketed light range within the image is present, to a very limited degree, in a JPEG image, but it is more pronounced in RAW images. That is why many people choose to shoot in RAW mode instead of JPEG.
Settings Recommendation: Use your camera meter only to get the initial exposure. Then look at the histogram to see if the light range is contained within the limited range of the sensor. If it is clipped to the right or the left, you may want to add or subtract light with your Exposure compensation button or shoot HDR images. For most images, you should expose for the light side of the histogram. Let your light meter get you close and then fine-tune the exposure with the histogram.
You can use other Monitor viewing modes along with the histogram, such as the Highlights (blink) mode so you can see blown-out highlights (put a check mark in the box next to Playback Menu > Playback display options > Highlights). This mode will cause your image to blink from light to dark in the highlight areas that are blown out. It is a rough representation of a histogram with clipped highlights, and it is quite useful for quick shooting. Using your light meter, histogram, and Highlights (blink) mode together is a very powerful way to control your exposures.
If you master this method, you will have a very fine degree of control over where you place the light range of your image. It is sort of like using the famous Ansel Adams black-and-white Zone System, but it is represented visually on the Monitor of your D610.
The manipulation of the histogram levels in-computer is a detailed study in itself. It’s part of having a digital darkroom. Learn to use your computer to tweak your images, and you’ll be able to produce superior results most of the time. Even more importantly, learn to use your histogram to capture a nice image in the first place!
Your histogram is simply a graph that lets you see at a glance how well your image is contained by your camera. Too far left and the image is too dark; too far right and the image is too light; clipped on both ends and there is too much light range for a single image to contain. Learn to use the histogram well and your images are bound to improve!
Author’s Conclusions
The D610 certainly gives you a lot of choices of light meters and exposure modes. You can start using this camera at whatever level of photographic knowledge you have. If you are a beginner, use the AUTO and SCENE modes. If you want to progress into partial automation, use one of the P, S, or A modes. And if you are a dyed-in-the-wool imaging fanatic, use the M mode for full manual control of the camera. You have a choice with the D610!
The next chapter is a subject of great importance to digital photographers: white balance. Understanding white balance gives you an edge over other photographers. When you have mastered those two subjects, and learned about color spaces, you will indeed be an advanced digital photographer. Let’s proceed.