Mastering the Nikon D610 (2014)
11. Live View Photography Mode
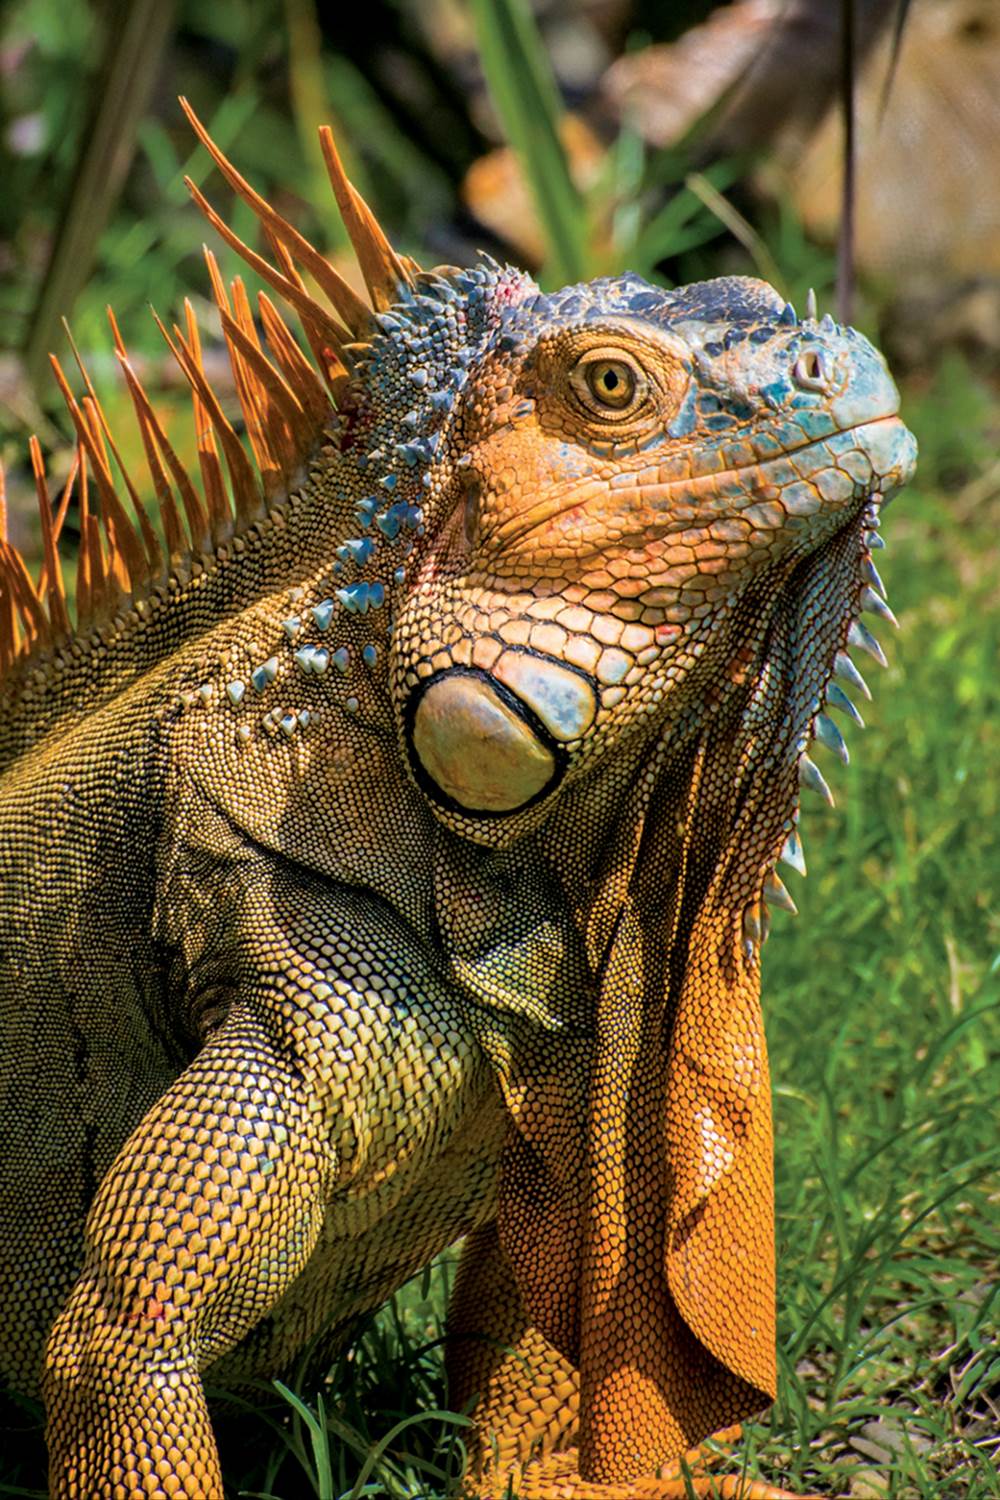
Iguana Invasion – Susan Braunhut (wife of dhmiller)
Live view photography mode in the Nikon D610 is a mature, full-featured still imaging system that’s easy to use. It allows you to take your eye away from the camera and use the Monitor as a viewfinder. If you need to shoot with your camera at arm’s length, such as in a crowd while taking pictures over the top of people’s heads, the big 3.2-inch (8.13 cm) Monitor makes it easy to see your subject. If you need to take pictures that require you to bend over, such as when shooting closeups (macros) of plants or insects, the Live view mode will save your back from a lot of pain.
The contrast-detection autofocus used by Live view photography mode detects contrast at the pixel level, providing literally microscopic focus accuracy. Additionally, you can move the focus square to any point in the Monitor that will give you the most accurate autofocus.
Live view is divided into two parts in the Nikon D610: Live view photography mode and Movie live view mode. In this chapter we will examine Live view photography mode, which is used exclusively for shooting still images. You cannot shoot video in Live view photography mode; the Movie-record button will not respond.
In the next chapter we’ll investigate Movie live view mode for special format (16:9) still images and broadcast-quality HD movies.
Using Live View Photography Mode
(User’s Manual – Page 49)
To enter Live view photography mode, flip the Live view selector lever to the top position (figure 11.1, image 1) and press the Lv button. To exit Live view photography mode, simply press the Lv button again. Figure 11.1, screen 2, shows the Live view screen you’ll see first. Normally this screen would show the subject you are about to photograph, but I left the lens cap on to provide maximum contrast for all the controls we will discuss.
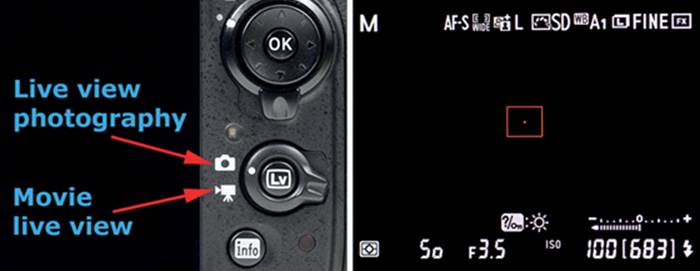
Figure 11.1 – Live view selector switch, Lv button, and Live view screen
As discussed in the previous chapter, Live view photography mode uses contrast-detection autofocus, which is activated by the Shutter-release button if you are using Single-servo AF (AF-S) mode or automatically if you selected Full-time servo AF (AF-F) mode.
You can move the red focus square to any location on the screen to select off-center subjects. When you have good focus, the red square turns green. You are not limited to the central 39-point AF area as you are when you’re looking through the Viewfinder.
Screen Blackout during Exposure
The screen doesn’t black out while autofocus is active because the camera focuses by detecting contrast changes on the imaging sensor. When you fire the shutter, the Monitor will black out briefly while the picture is taken. The blackout is necessary to allow the camera to fire the shutter, which briefly blocks light from reaching the sensor. The reflex mirror does not drop when you are taking a picture in Live view photography mode, therefore the blackout period is brief.
Extreme Focusing Accuracy
Use Live view photography mode when you need extreme autofocus accuracy. Contrast-detection AF is slower than phase-detection AF, but it is very accurate. You can zoom in to pixel-peeping levels with the Playback zoom in button before starting autofocus. This is great for macro shooting because you can select very specific sections of the subject for focusing (figure 11.1.1).
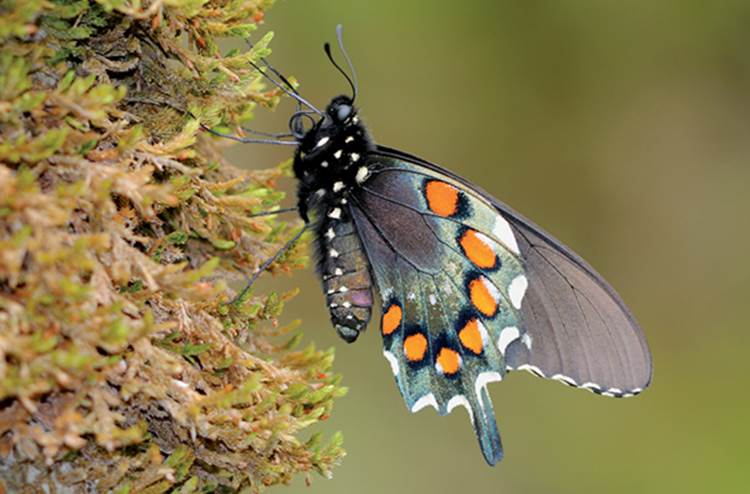
Figure 11.1.1 – Pipevine Swallowtail (Battus philenor) captured in Great Smoky Mountains National Park with a mid-1970s AI Nikkor 200mm f/4 lens on a bellows for macro, from about 6 feet (2 meters) away
Taking Pictures in Live View Photography Mode
Hold the Shutter-release button down all the way and wait a moment for the camera to take the picture. It’s usually slower than taking a picture with the Viewfinder because autofocus takes more time. When you take a picture in Live view photography mode, it appears on the Monitor. To return to Live view photography to take more pictures, just press the Shutter-release button halfway down.
According to Nikon, one important consideration in Live view photography mode is to cover the Viewfinder eyepiece when using Live view. Very bright external light coming into the eyepiece may negatively influence the exposure.
I experimented with this by shining an extremely bright LED flashlight directly into the Viewfinder eyepiece while I was metering a subject with Live view and saw absolutely no change in exposure. I then switched to standard Viewfinder-based photography mode and found that shining the flashlight into the Viewfinder eyepiece had an immediate and dramatic effect on exposure.
You may want to test this for yourself and see if your D610 reacts to light through the Viewfinder during Live view photography. Or you can play it safe and use the Eyepiece cover that comes with the camera.
Settings Recommendation: You can use Live view photography mode on or off your tripod. I normally use Live view for macro (closeup) images (figure 11.1.1), when I need the extra accuracy and focus positioning capability. With older Nikon cameras I was not all that interested in Live view photography because it didn’t feel mature or complete. However, the Nikon D610 has a very refined Live view photography mode. It can be used in almost any situation when standard Viewfinder-based photography will work.
One exception is action shooting. Live view photography is not as good for many types of action shots because the autofocus method is slower and the shutter lag seems longer. If you prefocus the camera in Live view, maybe you could capture some action, but I wouldn’t try it for action shots that require rapid autofocus.
Live view photography mode is for when you have the time and inclination to stand back from your camera and take excellent photos in a more contemplative manner. It’s like using a small view camera instead of an HD-SLR. If you have not been in the habit of using Live view, you should seriously consider giving it a try. The D610 makes it a lot more effective and easier to use.
Live View Photography Mode Screens
(User’s Manual – Pages 51–54)
There are four screen overlays available in Live view photography mode. You move between these screens by pressing the Info button repeatedly. Let’s examine each of them.
Live View Photography – Screen 1
Figure 11.2 shows numerous symbols that allow you to see how various features are configured. To help us examine the symbols, I have numbered them and provided an explanation.

Figure 11.2 – Live view photography screen 1, symbols
1. Exposure mode – Select a mode by turning the Mode dial. The available selections are P, S, A, M, U1, U2, SCENE, AUTO, and no flash mode.
2. Autofocus mode – Set the mode with the AF-mode button and Main command dial. The available settings are AF-S and AF-F.
3. AF-area mode – Set the mode with the AF-mode button and Sub-command dial. The settings are Face-priority AF, Wide-area AF, Normal-area AF, and Subject-tracking AF (uses symbols).
4. Active D-Lighting – Control this setting with Shooting Menu > Active D-Lighting. The settings are Low to Extra High and Auto or Off (L = Low, N = Normal, H = High, H* = Extra high, A = Auto).
5. Picture Control – Select a control with Shooting Menu > Set Picture Control. You can also control this setting by pressing the Retouch/Picture Control button and selecting a Picture Control from the Monitor with the Multi selector. See the upcoming section called Selecting a Picture Control in Live View for more detail.
6. White balance – Set the White balance by holding down the WB/Help/protect button and rotating the Main command dial. Select from nine white balance settings, including Auto, Incandescent, Fluorescent, Direct sunlight, Flash, Cloudy, Shade, Choose color temp., and Preset manual (uses symbols).
7. Image size – Control the size with Shooting Menu > Image size. The settings are Large (L), Medium (M), and Small (S). You can also hold down the QUAL/Playback zoom in button and rotate the Sub-command dial to select this value.
8. Image quality – Control the quality with Shooting Menu > Image quality. The settings are NEF (RAW) + JPEG; NEF (RAW); and JPEG fine, normal, or basic. You can also hold down the QUAL/Playback zoom in button and rotate the Main command dial to select this value. The abbreviations you’ll see on the Monitor for these settings are FINE, NORM, BASIC, RAW+FINE, RAW+NORM, RAW+BASIC, and RAW.
9. Image area – Control the area with Shooting Menu > Image area. You can select one of the two available image areas: FX or DX. The Monitor will display an image that is automatically cropped to the size selected in Image area. This value must be selected before you enter Live view photography mode. It cannot be changed during an active Live view photography session.
10. AF point (focus) – Move the AF point around the screen with the Multi selector to select the subject for autofocus. This focus rectangle will vary in size and color according to the AF-area mode selected (item 3 in this list) and whether the subject is in focus.
11. Guide – This control informs you of available Live view photography mode options. It shows that you can use the OK button—when in Subject-tracking AF mode only—to select the subject for tracking. It also shows that in any AF-area mode, if you press the Help/Protect/White balance button, the camera will display a Monitor brightness adjustment scale (sun symbol). See the upcoming section called Changing the Monitor Brightness.
12. Exposure indicator – The light indicates whether the image will be over- or underexposed in Manual mode (M). It blinks on and off in the other exposure modes (P, A, and S) when the camera cannot make a good exposure using the current camera settings.
13. Metering mode – Set the mode by pressing the Metering button and turning the Main command dial. The following choices are available: Matrix, Center-weighted, and Spot.
14. Shutter speed – Set the speed by turning the Sub-command dial, with settings from 30 seconds to 1/4000 second (4000). You can change this manually only in Shutter-priority auto (S) and Manual (M) modes. The camera controls it in Aperture-priority auto (A) and Programmed auto (P) modes.
15. Aperture – Set the aperture by turning the Main command dial. The aperture minimum and maximum varies according to the mounted lens. You can change it manually only in Aperture-priority auto (S), Flexible program (P*), and Manual (M) modes. The camera controls it in Shutter-priority auto (A) and Programmed-auto (P) modes.
16. Exposure compensation – This symbol will appear only when +/– exposure compensation has been dialed into the camera. Adjust this value with the +/– Exposure compensation button.
17. ISO mode – Control the mode with Shooting Menu > ISO sensitivity settings > Auto ISO sensitivity control. The choices are On and Off. You can also control this value by holding down the ISO/Playback zoom out/thumbnails button and turning the Sub-command dial to select from ISO or ISO AUTO on the Monitor. When you are not using the Auto ISO sensitivity control, it will say ISO. When the Auto ISO sensitivity control is enabled, it will say ISO AUTO.
18. ISO sensitivity – Control the setting with Shooting Menu > ISO sensitivity settings. The choice of ISO values ranges from L 1.0 (ISO 50) to H 2.0 (ISO 25,600). You can also control this value by holding down the ISO/Playback zoom out/thumbnails button and turning the Main command dial. The ISO values will change on the Monitor.
19. Frame count (remaining pictures) – The counter indicates approximately how many more pictures can be taken and stored on the currently selected memory card.
20. Flash indicator – The light blinks when the camera suggests using flash or when underexposure may result. The indicator is solid (not blinking) when the flash is ready to be used.
Live View Photography – Screen 2
Figure 11.3 shows a much cleaner screen with a blank area at the top and a single line of information along the bottom, which matches some of the descriptions for figure 11.2. This is for users who prefer an uncluttered screen while shooting still pictures.
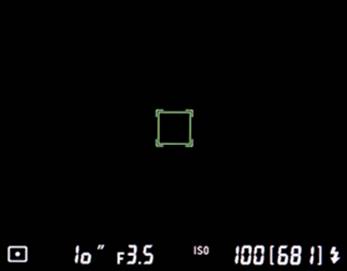
Figure 11.3 – Live view photography screen 2
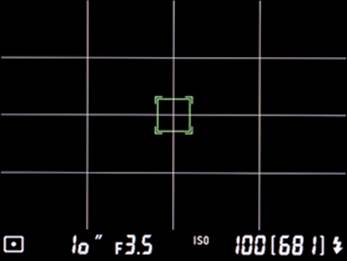
Figure 11.4 – Live view photography screen 3
Live View Photography – Screen 3
Figure 11.4 shows a screen that is similar to the previous screen, except gridlines are added. Use these gridlines to level your subject in the Viewfinder, as is necessary when photographing things like a horizon in scenic photography or buildings, doors, or walls in architectural photography.
Live View Photography – Screen 4
The final screen, shown in figure 11.5, displays a Virtual horizon that allows you to level the camera in a dual-axis horizontal and vertical direction. If you are a pilot, you’ll feel right at home with this new tool because it resembles the artificial horizon used to keep airplane wings and the nose level.
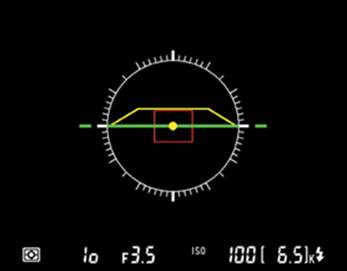
Figure 11.5 – Live view photography screen 4
Selecting a Picture Control in Live View
Picture Controls are easy to change in Live view photography mode. Interestingly, their effects on the subject are displayed on the Monitor as you select each Picture Control. You can see some samples applied to my Jeep hat in figure 11.6.

Figure 11.6 – Samples of Vivid (image 1), Neutral (image 2), and Monochrome (image 3) Picture Controls
To choose a Picture Control in Live view photography mode, you can press the MENU button and select Shooting Menu > Set Picture Control while a Live view session is active, or you can use external camera controls as described in the following steps.
The camera displays a special screen when you press the Protect/Picture Control/Help button, as seen in figure 11.6.1, screen 2.
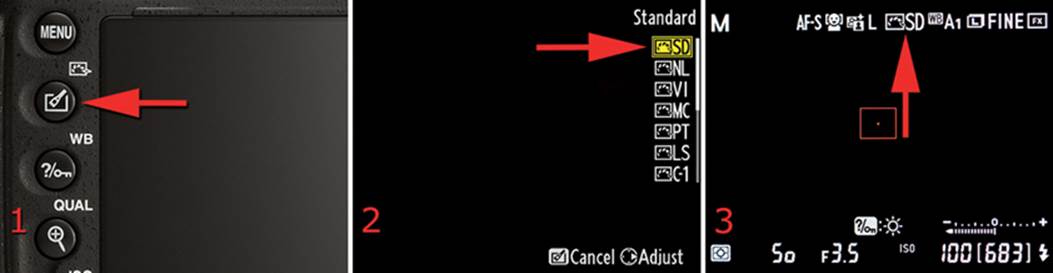
Figure 11.6.1 – Selecting a Picture Control in Live view photography mode
Use these steps to select a Picture Control during a Live view photography session:
1. With the camera already in Live view photography mode, press the Retouch/Picture Control button (figure 11.6.1, image 1, red arrow).
2. The Picture Control screen will appear while the camera is still in Live view photography mode (figure 11.6.1, screen 2). The current Picture Control in use will be highlighted in yellow. Select a different Picture Control by highlighting one of the others with the Multi selector, then press the OK button. Notice how the sharpness, contrast, brightness, saturation, and hue of the subject being viewed changes when you select different Picture Controls. (Note: You can even do a quick adjustment on the Picture Control by scrolling to the right when you have a Picture Control name highlighted, which opens the Quick adjust screen.)
3. The camera will switch back to the Live view photography screen with the new Picture Control active. It will be listed at the top of the screen (figure 11.6.1, screen 3, red arrow).
This is a very simple way to select a different Picture Control, not unlike how it is done with the same controls in normal Viewfinder-based photography.
Changing the Monitor Brightness
If you are shooting in a very bright or very dark area, you can change the brightness of the Monitor in Live view photography mode. This does nothing to the pictures you are taking and is only for your comfort while taking pictures.
Figure 11.7 shows examples of the maximum, middle, and minimum screen brightness settings. There is not a large difference between the maximum and middle settings shown in images 1 and 2. However, the difference between the middle and minimum settings, shown in images 2 and 3, is striking.
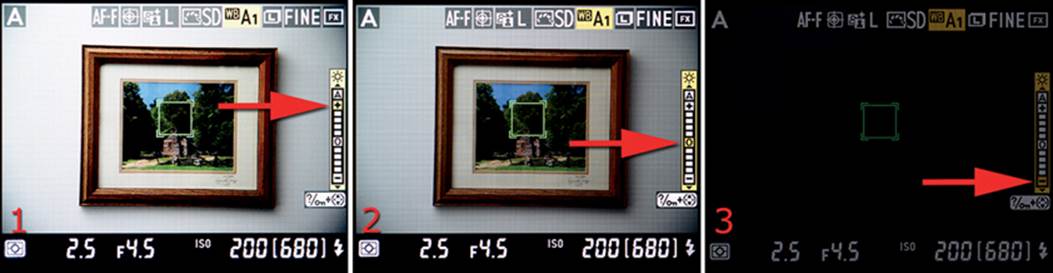
Figure 11.7 – Samples of Monitor brightness in Live view photography mode
Use the following screens and steps to adjust the Monitor brightness in Live view photography mode.
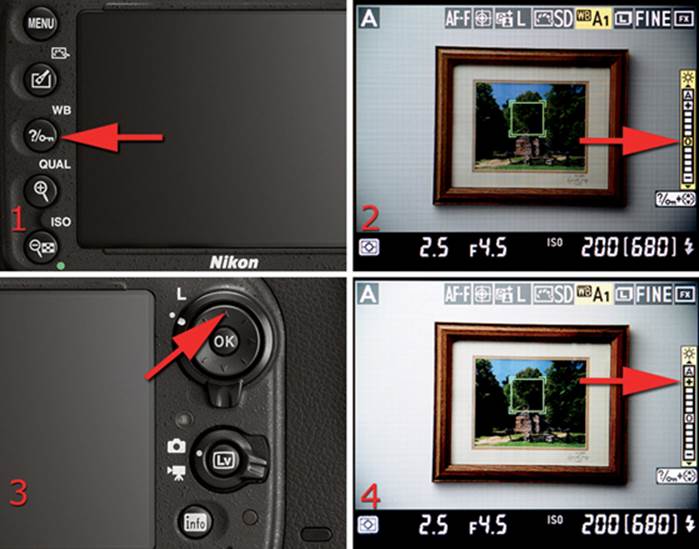
Figure 11.7.1 – Changing Monitor brightness in Live view photography mode
1. With the camera in Live view photography mode, press and hold the Help/Protect/WB button (figure 11.7.1, image 1, red arrow) and the camera will display a Monitor brightness indicator scale on the right side of the Monitor (figure 11.7.1, image 2, red arrow).
2. Press up on the Multi selector to brighten the screen and press down to dim it (figure 11.7.1, image 3).
3. Release the Help/Protect/WB button to set the brightness level. Figure 11.7.1, image 4, shows the brightness set to maximum on the brightness control (red arrow).
Closing Notes on Live View Photography Mode
Movie Live View Still Images
When you first place your camera in Movie live view mode, before you press the Movie-record button, the camera can take 20.3 MP still pictures in a 16:9 format (6016 × 3376 pixels). The Movie live view still image size matches most HD devices, so if you are shooting stills for display on HD devices that closely match the 16:9 format, use Movie live view to take some pictures.
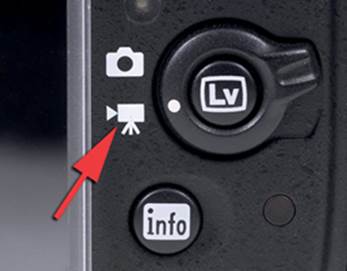
Figure 11.8 – Selecting Movie live view mode
Nearly all the information we have considered in this chapter applies to Movie live view still images. Just flip the Live view selector switch to the bottom position (figure 11.8), press the Lv button, and start taking excellent still images formatted for HD devices (e.g., tablets, HDTVs, and newer computer monitors). We will consider more about Movie live view in the next chapter.
Using Autofocus in Live View
Nikon strongly recommends using an AF-S lens when you are shooting in Live view modes. According to Nikon, “The desired results may not be achieved with other lenses or teleconverters.”
You may see darkening or brightening in the Monitor as autofocus takes place, and autofocus will be slower than it is with Viewfinder-based photography. From time to time the focus indicator square may remain green (instead of red) when the camera is not actually in focus. Simply refocus when that occurs.
There are several things that may cause the camera to have difficulty focusing in Live view (according to Nikon):
• The subject contains lines that are parallel to the long edge of the frame
• The subject lacks contrast
• The subject under the focus point contains areas of sharply contrasting brightness, or it includes spotlights, a neon sign, or another light source that changes in brightness
• There is flickering or banding under fluorescent, mercury-vapor, sodium-vapor, or similar lighting
• A cross-screen (star) filter or other special filter is being used
• The subject appears smaller than the focus point
• The subject is dominated by regular geometric patterns (e.g., window blinds or a row of windows in a skyscraper)
• The subject is moving
There are several issues that may cause focus tracking to fail in Live view mode:
• The subject is moving too fast
• Another object gets between the camera and the subject
• The subject size changes visibly
• The subject color changes
• The subject gets brighter or dimmer
• The subject gets too small, too close, or too light or dark
• The subject is the same color as the background
Live View Camera Protection System
If conditions may harm the camera in Live view—such as using Live view for extended periods on a hot day, causing the camera to overheat—the D610 will protect itself by automatically shutting down Live view. A Time remaining countdown will display on the top right of the Monitor for 30 seconds before the Live view system shuts down (User’s Manual Page 53). If conditions warrant, the countdown timer may appear immediately upon entering or reentering Live view. This countdown allows your expensive camera to protect its internal circuits from overheating and causing damage.
Author’s Conclusions
Live view photography mode in the D610 is a mature and very usable way to shoot still images. Using the Monitor is not just for point-and-shoot photographers anymore. There are several good reasons for using the Live view system, such as extreme focusing accuracy when shooting macro images and when composing the image on the Monitor will give you a better feel for the subject than the Viewfinder.
The next step in learning about the Nikon D610 is to examine Movie live view mode. This mode is used for special HD-format still images, but it’s primarily designed for shooting excellent, broadcast-quality HD movies. Let’s examine the powerful video subsystem in your D610 and see how it works.