Mastering the Nikon D610 (2014)
10. Autofocus, AF-Area, and Release Modes

Taking Prey – Rocky Fletcher (rf10956)
Autofocus (AF) and Release modes are active settings that you’ll deal with each time you use your camera. Unlike adjusting settings in the menus, which you’ll do from time to time, you’ll use Autofocus and Release modes every time you make an image or movie. You will adjust AF-area modes less often; however, these critical functions affect how and where the camera focuses on your subject.
To take pictures and make movies, you need to be very familiar with these settings, so this is a very important chapter for your mastery of the Nikon D610. Grab your camera and let’s get started!
This chapter is divided into three sections:
• Section 1 – Autofocus in Viewfinder Photography
• Section 2 – Autofocus in Live View Photography
• Section 3 – Release Modes
Section 1 – Autofocus in Viewfinder Photography
The Nikon D610 has two types of autofocus (AF) built in, with different parts of the camera controlling AF in different shooting modes (figure 10.1). When you take pictures through the Viewfinder, one type of autofocus is used, and when you shoot a picture or movie using Live view, a different type is used. They are as follows:
• TTL phase-detection autofocus – The Multi-CAM 4800 FX autofocus module provides through-the-lens (TTL) phase-detection autofocus, with 39 AF points in a grid-like array of AF points (white) in the central area of the Viewfinder (figure 10.1, image 1). This type of AF is known simply as phase-detection AF. It is a very fast type of autofocus and is used by the camera only when you are taking pictures through the Viewfinder. It does not use the CMOS sensor directly because focal-plane contrast AF uses it (next bullet). Instead, the Multi-CAM 4800 FX autofocus module is a separate internal device that controls AF directly. I used the CMOS sensor in figure 10.1, image 1, to show the area it overlays on the actual imaging sensor. This is basically what you will see when you look through the Viewfinder—a Viewfinder overlay on top of the CMOS imaging sensor.
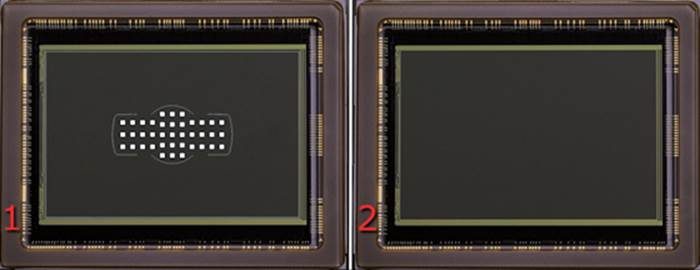
Figure 10.1 – Actual CMOS FX sensor with phase-detection AF grid in center (image 1) and contrast-detection AF area (image 2)
• Focal-plane contrast AF – The imaging sensor provides focal-plane contrast AF, which uses pixel-level contrast detection. A simple name for this is contrast-detection AF. The entire surface of the CMOS sensor can be used to detect contrast between light and dark boundaries to provide autofocus (figure 10.1, image 2). This is a relatively slow form of autofocus, but it is extremely accurate because it is done at the pixel level. This form of autofocus is used only while you are shooting in a Live view mode. Figure 10.1, image 2, shows that the whole sensor area (inside the greenish rectangle) is available for contrast-detection Live view autofocus. You are not limited to focusing with just the 39 AF points; you can move the Live view contrast-detection AF point to any area of the sensor and select an autofocus point.
What Is the Multi-CAM 4800 FX Autofocus Module?
The Multi-CAM 4800 FX autofocus module is a very accurate system that controls where and how your camera’s AF and AF-S lenses achieve the sharpest focus on your subject.
The Nikon D610 offers a significant boost in the number of Viewfinder AF points over lesser cameras, with a total of 39 points. What do we gain from all these extra AF points and more powerful modes? As we progress through this chapter, I’ll discuss these things in detail, along with how your photography will benefit most from using all the features of the Multi-CAM 4800 FX AF system.
Three Mode Groups
There are three specific mode groups that you should fully understand: Auto-focus modes, AF-area modes, and Release modes.
Many people get these modes confused and incorrectly apply functions from one mode to a completely different mode. It is a bit confusing at times, but if you read this carefully and try to wrap your brain around the different functionalities provided, you’ll have much greater control of your camera later.
First, let’s consider how autofocus works when you use the Viewfinder. The three mode groups for Viewfinder shooting are as follows:
Autofocus modes (User’s Manual – Page 97)
• Auto-servo AF (AF-A)
• Single-servo (AF-S)
• Continuous-servo (AF-C)
AF-area modes (User’s Manual – Page 99)
• Single-point AF
• Dynamic-area AF (9, 21, and 39 AF points)
• 3D-Tracking
• Auto-area AF
Release modes (User’s Manual – Page 83)
• Single frame (S)
• Continuous low speed (CL)
• Continuous high speed (CH)
• Quiet shutter-release (Q)
• Quiet continuous shutter-release (Qc)
• Self-timer
• Remote control
• Mirror-up (MUP)
What is the difference between these modes? Think of them like this: the AF-area modes are where the AF module focuses, the Autofocus modes are how it focuses, and the Release modes control when focus happens, or how often a picture is taken.
Although the Release modes are not technically Autofocus modes, it is a good idea to consider them at the same time because they control when autofocus functions.
In upcoming sections we’ll look into all of these mode types and see how they work together to make the D610’s autofocus and subject tracking system one of the world’s best.
With the controls built into the D610 body, you’ll be able to select whether the AF module uses one or many of its 39 AF points to find your subject. You’ll also select whether the camera simply locks focus on a static subject or if it continuously seeks new focus if your subject is moving, and how fast (in frames per second) it captures the images.
Settings Recommendation: If you have trouble remembering what all these modes do—join the club! I’ve written multiple books about Nikon cameras and I still get confused about what each mode does. I often refer back to my own books to remember all the details.
You’ll become familiar with the modes you use most often, and that is usually sufficient. Try to associate the type of mode with its name, and that will make it easier. Learn the difference between an AF-area mode (focus where), an Auto-focus mode (focus how), and a Release mode (focuswhen).
Custom Settings for Viewfinder AF and Live View/Movie AF
The AF module has seven configurable Custom settings, a1–a7. We examined each of these Custom settings in the chapter titled Custom Setting Menu. You may want to review them.
Using Autofocus and AF-Area Modes for Viewfinder Photography
(User’s Manual – Pages 97, 99, 328)
The D610 has distinct modes for how and where to focus. We’ll examine each of those modes as a starting point in our understanding of autofocus with the Multi-CAM 4800 FX AF module. We’ll tie together information about the AF-area modes, Autofocus modes, and Release modes since they work together to acquire and maintain good focus on your subject. Release modes are covered in the last section of this chapter because both Viewfinder and Live view photography use the same Release modes.
Figure 10.2 shows the controls we’ll use in combination to change how the camera focuses and captures images.
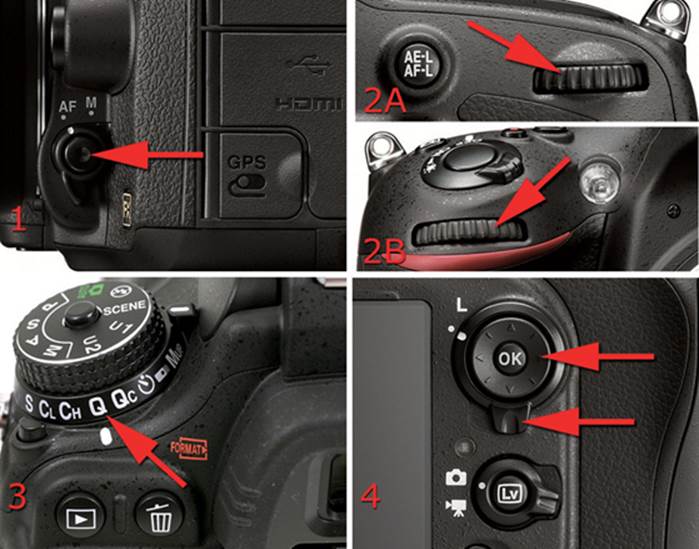
Figure 10.2 – Image 1, AF-mode button; Image 2A, Main command dial; Image 2B, Sub-command dial; Image 3, Release mode dial; Image 4, Multi selector, with AF-lock switch below
Notice in figure 10.2, image 4, that the Multi selector has a lock switch below it. You can see a white dot and an L to the left side of the switch (at about the 10 o’clock position). Move the switch to the dot setting (as shown), which unlocks the internal AF point movement capability so you can move the AF point around the Viewfinder within the 39 available points.
Settings Recommendation: I leave my AF-lock switch unlocked all the time, but I check as the camera is focusing to make sure it is using the AF point I want in nonautomatic modes. I can use the Multi selector to move a single AF point around the array of 39 available points when I use Single-point AF or a group of points in Dynamic-area AF. We’ll discuss this in more detail later.
Cross-Type AF Sensors at Various Apertures
Cross-type AF sensors will initiate autofocus in either a horizontal or a vertical direction, unlike standard AF sensors, which work only in a horizontal direction. The ability of the AF system to function properly is dependent on the maximum aperture of the lens in use (or of the lens and teleconverter combination). Lenses normally autofocus at maximum aperture and stop down to the aperture you have selected only when you press the Shutter-release button to take a picture. Most cameras are designed to autofocus with lenses that have a maximum aperture of f/5.6 or larger (e.g., f/1.4, f/2.8, f/4).
The Nikon D610 is in a special class of camera because its autofocus can work with lenses that have a maximum aperture smaller than f/5.6. The D610 can autofocus using lenses or teleconverter/lens combos that have maximum apertures from f/5.6 to f/8.
Figure 10.3 shows the various arrangements of cross-type and extra-sensitive AF sensors the camera can use when you are working with small maximum apertures. You must be sure to select one of the AF sensors shown in figure 10.3 if you are using a lens or teleconverter/lens combo that has a maximum aperture smaller than f/5.6. The camera will not warn you if you try to use an AF sensor that is not appropriate for a small maximum aperture, nor will it prevent you from using it.
You cannot select one of the overall patterns shown in figure 10.3. You simply move your active AF sensor into one of the locations in the pattern, according to how small the maximum aperture happens to be. Study this carefully if you regularly use teleconverters on telephoto lenses with autofocus.
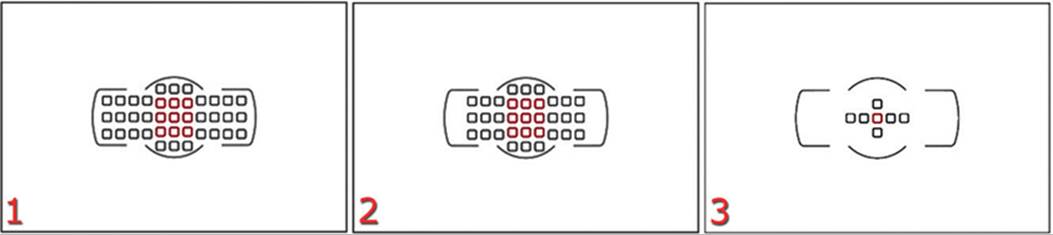
Figure 10.3 – Image 1, 39 AF-point pattern for f/5.6 or larger maximum aperture; Image 2, 33 AF-point pattern for maximum apertures between f/5.6 and f/8; Image 3, 7 AF-point pattern for maximum aperture of f/8 only
• Figure 10.3, image 1 – This shows the 39 AF points (horizontal only AF in black) that will work down to f/5.6; the 9 red points are cross-type AF points (horizontal and vertical AF)
• Figure 10.3, image 2 – This shows the 33 AF points (horizontal only AF in black) that will work between f/5.6 and f/8; the 9 red points are cross-type AF points (horizontal and vertical AF). This is identical to image 1, except that it does not have the outer three AF points on the far left or far right right of the AF point array (33 versus 39 AF points).
• Figure 10.3, image 3 – This shows the 7 AF points (horizontal only AF in black) that will work at f/8; the 1 red point is a cross-type AF point (horizontal and vertical AF).
You may be able to get the standard-sensitivity AF sensors to respond at an aperture smaller than f/8; however, you shouldn’t depend on autofocus consistency when a standard AF sensor—not in the patterns in figure 10.3, images 2 or 3—is used at a maximum aperture smaller than f/5.6. You should test these sensors and learn the patterns.
In an emergency, just remember that the center AF point is always cross-type and will work at any aperture down to f/8. You can focus with the center AF point and recompose, if necessary, if you would rather not remember the patterns at apertures less than f/5.6 to f/8.
Autofocus Modes in Detail
(User’s Manual – Page 97)
The Autofocus modes allow you to control how the autofocus works with static and moving subjects. They allow your camera to lock focus on a subject that is not moving or is moving very slowly. They also allow your camera to follow focus on an actively moving subject. Let’s consider the three servo-based Autofocus modes to see when and how you might use them best.
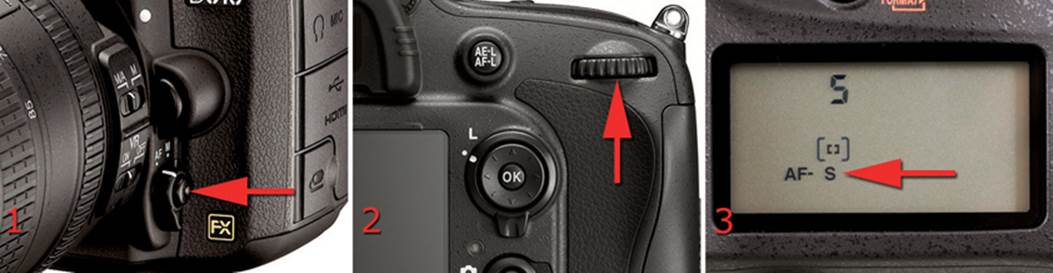
Figure 10.4 – Selecting an Autofocus mode
Here are the steps to select an Autofocus mode:
1. Hold in the AF-mode button (figure 10.4, image 1).
2. Turn the Main command dial (figure 10.4, image 2).
3. The Control panel will show each of the three modes (AF-A, AF-S, AF-C) as you turn the dial (figure 10.4, image 3).
4. Let go of the AF-mode button when the mode you want to use is displayed on the Control panel.
Auto-Servo AF (AF-A) Mode
Auto-servo AF (AF-A) is an automatic mode that pays attention to your subject’s movement. It is rather simple to use because it senses whether your subject is static or moving.
• Subject is not moving – If the subject is not moving, the camera automatically uses AF-S mode. In this mode the focus locks on the subject and does not update as long as the subject remains still. However, the focus can unlock if the camera detects subject movement, and it will switch to AF-C mode.
• Subject is moving – If the subject is moving, the camera automatically sets itself to AF-C mode. It detects the movement across the AF sensors and automatically starts focus tracking the subject.
Single-Servo AF (AF-S) Mode
Single-servo AF (AF-S) works best when your subject is stationary—like a house or a landscape. You can use AF-S on slowly moving subjects if you’d like, but you must be careful. The two scenarios listed next may help you decide:
• Subject is not moving – When you press the Shutter-release button halfway, the AF module quickly locks focus on your subject and waits for you to fire the shutter. If your subject starts moving and you don’t release pressure on the Shutter-release button to refocus, the focus will be obsolete and useless. When you have focus lock, take the picture quickly. This mode is perfect for stationary subjects or, in some cases, very slowly moving subjects.
• Subject is regularly moving – This will require a little more work on your part. Since the AF system locks focus on your subject, if the subject moves even slightly, the focus may no longer be good. You’ll have to lift your finger off the Shutter-release button and reapply pressure halfway down to refocus. If the subject continues moving, you’ll need to continue releasing and pressing the Shutter-release button halfway to keep the focus accurate. If your subject never stops moving, is moving erratically, or stops only briefly, AF-S is probably not the best mode to use. In this case, AF-C is better because it never locks focus and the camera tracks your subject’s movement, keeping it in constant focus.
Continuous-Servo AF (AF-C) Mode
Using Continuous-servo AF (AF-C) is slightly more complex since it is a focus tracking function. The camera looks carefully at whether the subject is moving, and it even reacts differently if the subject is moving from left to right, up and down, or toward and away from you. Read these three scenarios carefully:
• Subject is not moving – When the subject is standing still, Continuous-servo AF acts a lot like Single-servo AF, with the exception that the focus never locks. If your camera moves, you may hear your lens chattering a little as the autofocus motor makes small adjustments in the focus position. Since focus never locks in this mode, you’ll need to be careful that you don’t accidentally move the AF point off the subject because it may focus on something in the background instead.
• Subject is moving across the Viewfinder – If your subject moves from left to right, right to left, or up and down in the Viewfinder, you’ll need to keep your AF point on the subject when you are using Single-point AF area mode. If you are using the Dynamic-area AF or Auto-area AF modes, your camera can track the subject across a few or all of the 39 AF points. We’ll cover this in more detail in the upcoming section called AF-Area Modes in Detail.
• Subject is moving toward or away from the camera – If your subject is coming toward you, another automatic function of the camera kicks in. It is called predictive focus tracking, and it figures out how far the subject will move before the shutter fires. After you’ve pressed the Shutter-release button all the way down, predictive focus tracking moves the lens elements slightly to correspond to where the subject should be when the shutter fires a few milliseconds later. In other words, if the subject is moving toward you, the lens focuses slightly in front of your subject so the camera has time to move the mirror up and get the shutter blades out of the way. It takes 52 milliseconds for the camera to respond to a press of the Shutter-release button.
Shutter Lag
Let’s talk about the practical use of these Autofocus mode functions. If you are shooting an air show, for instance, in 52 milliseconds (0.052 second) a fastmoving airplane can move enough to slightly change the focus area by the time the shutter opens.
If you press the Shutter-release button all the way down until the shutter releases, first autofocus occurs and then the mirror moves up and the shutter starts opening. Those actions add up to about 52 milliseconds in the D610. In the time it takes for the camera to respond to your press of the Shutter-release button, the airplane has moved slightly, which just barely throws the autofocus off. With predictive focus tracking, the camera predicts where the airplane will be when the image is actually exposed, and it adjusts the focus accordingly.
Predictive Focus Tracking
How does predictive focus tracking work? Let’s say you’re playing a ballgame and you throw the ball to a running player. You would have to throw the ball slightly in front of the receiving player so the player and the ball arrive in the same place at the same time. Predictive focus tracking does something similar for you. It saves you from trying to focus your camera in front of your subject and waiting 52 milliseconds for it to arrive. The timing would be a bit difficult!
Effect of Lens Movement
Lens movement (especially with long lenses) can be misinterpreted by the camera as subject movement. In that case, predictive focus tracking follows your camera movement while simultaneously trying to track your subject.
Attempting to handhold a long lens will drive your camera crazy. Use a vibration reduction (VR) lens or a tripod for the best results. Nikon says there are special algorithms in predictive focus tracking that allow it to notice sideways or up-and-down movement, and the camera shuts down the predictive focus tracking. Therefore, predictive focus tracking is not activated by the D610 for sideways or up-and-down subject movement or panning.
Settings Recommendation: I leave my Autofocus mode set to AF-A most of the time because it is capable of automatically changing to another mode as needed. If I am shooting sports, I switch to AF-C mode so there will be no autofocus delay if the subject moves very quickly. I rarely use AF-S mode since AF-A does the same thing when the subject is static, yet the camera can change modes if the subject moves.
AF-Area Modes in Detail
(User’s Manual – Page 99)
The six AF-area modes are designed to let you control how many Viewfinder AF points are in use at any one time. Five of the six modes will track subject movement.
You can use 1 AF point in Single-point AF mode; you can use 9, 21, or 39 AF points in Dynamic-area AF mode. You can even use 3D-Tracking mode (39 AF points), which uses the color of the subject to help track it and keep it in focus while it moves around. If you don’t want to think about the autofocus area, you can let the camera automatically control the AF-area mode by selecting the Auto AF-area mode setting.
Here are the steps to choose an AF-area mode:
1. Hold in the AF-mode button (figure 10.5, image 1).
2. Turn the Sub-command dial (figure 10.5, image 2) as you watch the four available modes scroll by on the Control panel.
3. Figure 10.5, image 3, shows the camera set to Single-point AF mode (red arrow). Release the AF-mode button when the mode you want to use is displayed on the Control panel.
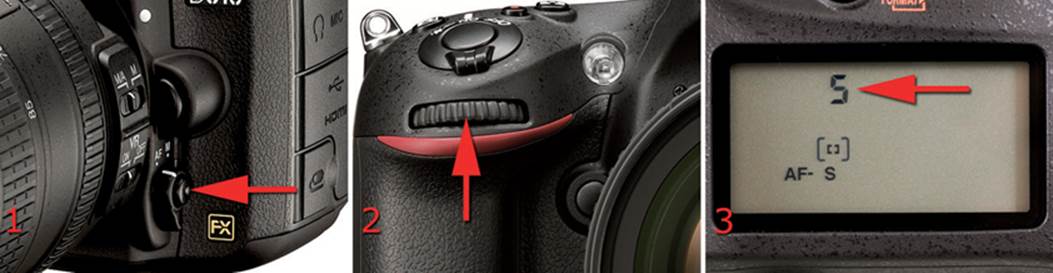
Figure 10.5 – Controls to set AF-area mode
Note: Some of the AF-area modes will not show up if you have your camera set to Single-servo autofocus (AF-S) mode, which allows only two of the six AF-area modes: Single-point AF mode and Auto-area AF mode.
You cannot use the following four AF-area modes unless you switch the Autofocus mode to Auto-servo AF (AF-A) or Continuous-servo AF (AF-C) mode: 9-point dynamic-area AF, 21-point dynamic-area AF, 39-point dynamic-area AF, and 3D-Tracking.
Remember, you adjust the autofocus mode with the rear Main command dial and the AF-area mode with the front Sub-command dial, while holding in the AF-mode button. Let’s discuss each AF-area mode.
Single-Point AF
Single-point AF uses 1 AF point out of the array of 39 points to acquire good focus. Figure 10.6, screen 1 (red arrow), shows a big S on the Control panel, signifying that the camera is in Single-point AF-area mode. In figure 10.6, image 2, notice that the center AF point is selected. It is the only one that currently provides focus information. You can move the single AF point around the 39 points in the Viewfinder with the Multi selector if you would rather use a different AF point.
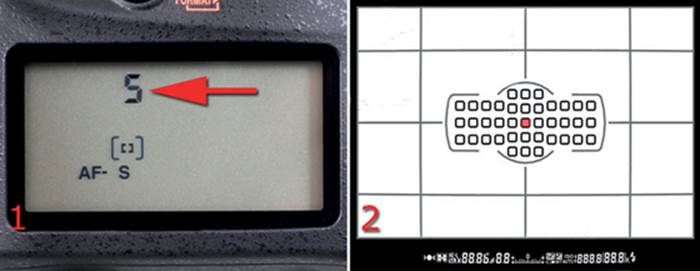
Figure 10.6 – Single-point AF-area mode
If two people are standing next to each other, with a gap in the middle, the single center AF point will examine the space between the two subjects. You can do one of two things to overcome this problem:
• You can get the focus first by moving the camera and pointing the center AF point at the face of one of the subjects, pressing the Shutter-release button halfway to focus, then holding it halfway down while recomposing the image. When you have recomposed the shot—without releasing the button—you can press the Shutter-release button the rest of the way down to take the picture.
• You can compose the picture first by centering it however you’d like, then use the Multi selector to move the single AF point until it rests on the face of one of the subjects. With the AF point repositioned, press the Shutter-release button halfway down to get good focus, then the rest of the way down to take the picture.
Either of these methods will solve the bothersome autofocus problem of having a perfectly focused background with out-of-focus subjects, caused by the center AF point concentrating on the background between the subjects.
Single-Point AF Example
If a subject is not moving—like a tree or a standing person—then Single-point AF and Single frame (S) Release mode will allow you to acquire focus. When the focus is acquired, the AF module will lock focus on the subject and the focus will not change. If the subject moves, your focus may no longer be perfect and you’ll need to recompose while releasing the Shutter-release button and pressing it halfway down again.
Often, if the subject is moving very slowly or sporadically, I don’t use Continuous low speed (CL) Release mode on the Release mode dial. Instead I leave the camera in Single frame (S) Release mode. I tap the Shutter-release button halfway to acquire focus when the subject moves, and I tap it again as needed. When I’m ready, I simply press the Shutter-release button the rest of the way down, and I’ve got the shot!
Release Priority Settings
When you switch your D610 out of Single frame (S) Release mode, you must be aware of how Custom settings a1 and a2 are configured. These two Custom settings allow you to choose focus or release priority when shooting in AF-S and AF-C Autofocus modes. It’s important that you understand these two priorities before you start using your camera on critical shoots or some of your images may not be in focus at all. I won’t cover that information in this chapter, but we’ve looked at Custom settings a1 and a2 in detail in the chapter titled Custom Setting Menu. Please be sure that you understand what they do! (Hint: Use Focus priority.)
Dynamic-Area AF
Dynamic-area AF is best used when your subject is moving. Instead of a single AF point used alone for autofocus, several sensors surrounding the one you have selected with the Multi selector are also active. The top row of figure 10.7 shows the Control panel with Dynamic-area AF selected in 9-, 21-, and 39-point modes. You must select one of the three AF point patterns using the controls shown in figure 10.5.
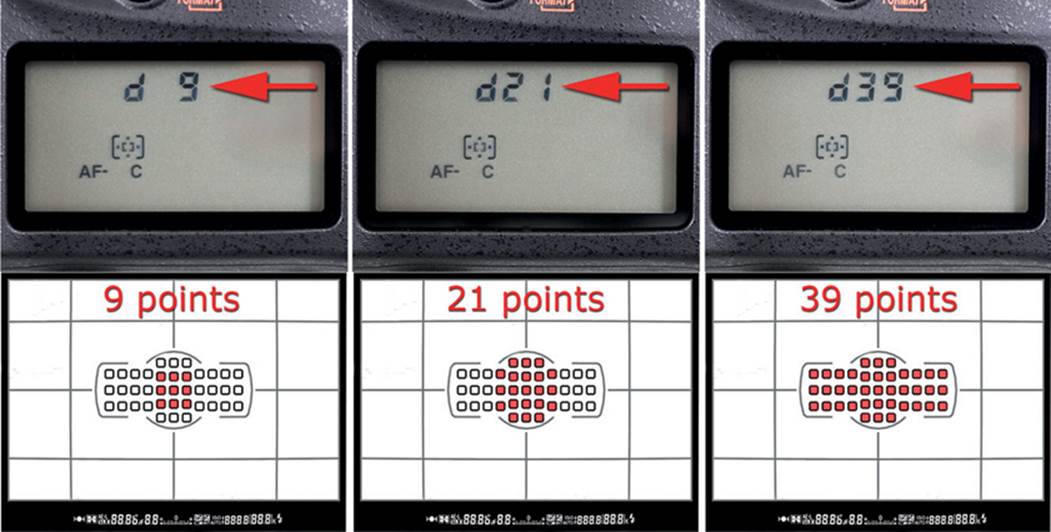
Figure 10.7 – Dynamic-area AF mode
The bottom row of figure 10.7 shows the three AF point patterns (9, 21, and 39) in the Viewfinder. While taking pictures, you normally will not see all these extra AF points light up except for when you first select a pattern (see the upcoming subsection, Viewing Autofocus Patterns). Instead, you will see only the AF point in the center of the pattern.
You can move the 9- and 21-point patterns around the Viewfinder with the Multi selector. If you hold in the AF-mode button while pressing the Multi selector, you will see the current pattern move around within the 39 points in the Viewfinder and on the Information display. If you do not hold in the AF-point button, you will see only the single AF point in the center of the pattern move around the displays.
The single AF point you can normally see in the Viewfinder provides the primary autofocus; however, the surrounding points in the pattern you’ve selected are also active. If the subject moves and the primary AF point loses focus, one of the surrounding points will quickly grab the focus.
If the subject is moving slowly or predictably, you can use a smaller pattern, such as the 9-point selection. If the subject’s movement is more erratic or unpredictable, you might want to increase the number of AF points involved. Try 21 points, or even 39, for subjects that are very unpredictable and move quickly.
One caution is that the more AF points you use, the slower the initial autofocus may be, especially in low light. However, when the initial focus is acquired, the camera can track the subject quite well with all three patterns.
Can you see how flexible Dynamic-area AF could be for you, especially when you adjust the patterns? If your subject will move only a short distance—or is moving slowly—you can simply select a pattern of 9 points. Maybe you’re doing some macro shots of a bee on a flower and the bee is moving around the blossom, where 9 points may be sufficient. Or you might be photographing a tennis game, in which case you could use 21 or 39 points to allow for more rapid side-to-side movement without losing focus. You’ll have to decide which pattern best fits your needs for the current shooting situation.
Using Dynamic-area AF, you can more accurately track and photograph all sizes and speeds of moving subjects. The initial focus reaction speed of the AF system is somewhat slower when you use 39 points because the camera needs to process a lot more information. Take that into consideration when you are shooting events. I have used 39-point Dynamic-area AF in both weddings and graduation ceremonies with great success. The D610 is quite fast at acquiring the initial focus.
Viewing Autofocus Patterns
You can see the autofocus patterns if you use the camera’s Viewfinder or Information display (Info button) while choosing the setting. Unlike with previous Nikon cameras, the pattern display on the top Control panel is not very detailed.
In the Viewfinder and on the Information display, the 9-, 21-, and 39-point patterns are accurately shown. However, the pattern for Auto-area AF is different. When viewed in the Viewfinder, the pattern shown for Auto-area AF does not actually reflect the pattern the camera uses. Instead, the camera shows an outline surrounding all 39 AF points (see upcoming figure 10.9, screen 2). In Auto-area AF, the camera chooses any combination of the 39 AF points it deems necessary to use.
When you select 3D-Tracking, which, like Auto-area AF, uses whatever AF point it needs to track the moving subject, the camera simply lights up all 39 AF points in a similar way as when 39-point AF is selected.
You may notice that the 9-, 21-, and 39-point AF-area patterns shown on the Information display have tiny + symbols on each active AF point in the pattern. The symbols represent the fact that each AF point in the pattern could actively seek focus on your subject and you can select which AF point(s) to use. On the other hand, the symbols are missing from the Auto AF-area shown on the Information display. This simply means the camera will choose which AF point(s) it likes best.
3D-Tracking AF
The mode called 3D-Tracking adds color-detection capability to the tracking system (figure 10.8). The camera will not only track by subject area, it will also remember the color of the subject and use it to track even more accurately.
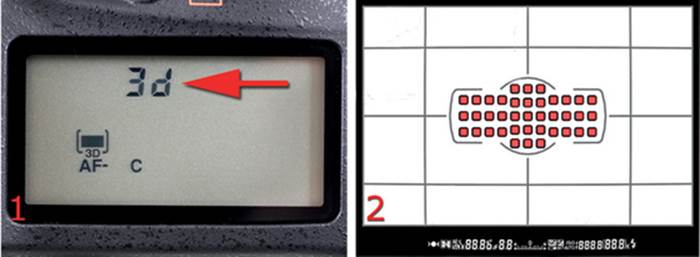
Figure 10.8 – 3D-Tracking AF
3D-Tracking works like the 39-point pattern except that it is more intelligent. Often your subject will be a different color than the background, and the D610’s color-based system will provide more accuracy in difficult conditions. Be careful if the subject is a similar color to the background because this may reduce the autofocus tracking accuracy.
3D-Tracking is a good mode for things like action sports, air shows, races, and so on. It allows the camera to become a color-sensitive subject-tracking machine.
Note: You will see 3D in the Viewfinder only when you first select 3D-Tracking AF. After that, you will just see the AF point move around the Viewfinder as it tracks your subject.
Auto-Area AF
Auto-area AF turns the D610 into an expensive point-and-shoot camera. Use this mode when you simply have no time to think and would still like to get great images. The AF module decides what the subject is and selects the AF points it thinks will work best (figure 10.9).
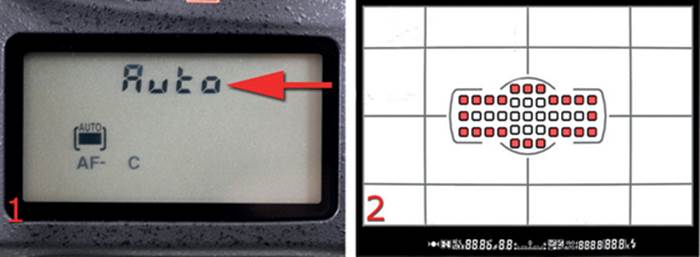
Figure 10.9 – Auto-area AF
If you are using a D or G lens, there is human recognition technology built into Auto-area AF mode. The D610 can usually detect a human face and help you avoid shots with perfectly focused backgrounds and blurry human subjects. In Live view mode the camera is downright amazing at finding and tracking multiple human faces, and I am even impressed with the camera’s ability to find and focus on faces in Viewfinder mode. Surprisingly, I found little difference whether I used AF-A, AF-S, or AF-C Autofocus modes. However, some people may not agree. I have read on forums that some people prefer one Autofocus mode over another. Take time to try each Autofocus mode and see if you think the camera does better in one mode.
Prior to the D610, I rarely used Auto-area AF for anything except snapshots. However, I have been trying it when shooting quickly in events such as weddings and graduation ceremonies and am finding that the camera quite accurately locates and exposes people. This is a great people mode. Give it a try!
Now, let’s talk about how the camera uses the mode groups in unison. See the sidebar Capturing a Bird in Flight for an example of how the camera uses the three mode groups—AF-area, Autofocus modes, and Release modes—to track a flying bird.
Capturing a Bird in Flight
Let’s imagine that you are photographing a colorful bird perched in a tree but you want some shots of it in flight. You are patiently waiting for it to fly. Your camera is set to 3D-Tracking (39-point) AF-area mode and Continuous high speed (CH) Release mode. You are using Continuous-servo (AF-C) Autofocus mode so that autofocus never locks and will track the bird instantly when it starts flying. You’ve already established focus with the AF point you selected with the Multi selector, and you are holding the Shutter-release button halfway down to maintain focus. Since you’ve set the Release mode to CH (Continuous high), you can fire off rapid bursts of images (up to four per second). Suddenly, faster than you can react, the bird takes to flight. By the time you can get the camera moving, the bird has moved to the left in the Viewfinder, and the focus tracking system has adjusted by instantly switching away from the primary AF point you used to establish focus and is now using other AF points in the pattern of 39 points to maintain focus on the bird. You press the Shutter-release button all the way down, and the images start pouring into your memory card. You are panning with the bird, firing bursts until it moves out of range. You’ve got the shot!
Settings Recommendation: Many people use Single-point AF-area mode quite often. It works particularly well for static or slowly moving subjects. When I’m shooting beautiful nature images, I use Single-point AF-area mode along with Single frame (S) Release mode almost exclusively.
If I’m shooting a wedding where the bride and groom are walking slowly up the aisle, Single-servo autofocus (AF-S) mode, Single-point AF-area mode, and Continuous low speed (CL) Release mode seem to work well for me, although recently I have been successfully experimenting with Continuous-servo autofocus (AF-C) mode, Auto-area AF mode, and Continuous high speed (CH) Release mode. The D610 is uncannily accurate at finding and tracking human faces in Auto-area AF mode. You may be safest using AF-C Release mode along with Auto-area AF mode to let the camera track a face. If you use AF-S and Auto-area, the camera will quickly find the face but not track it. That’s okay when you’re taking a group shot, but it’s not so good when you’re tracking a moving face, such as a bride walking up the aisle.
I suggest experimenting with all these modes. You will need to use them all for different types of photography, so take time to learn how each mode functions for your styles of shooting.
Now, let’s examine how the camera uses autofocus in Live view photography.
Section 2 – Autofocus in Live View Photography
(User’s Manual – Page 49)
Live view (Lv) mode is a new feature that many old-timers may not fully appreciate. New DSLR users generally like to use it because they are accustomed to composing on the LCD screen of a point-and-shoot camera.
Both types of users should reconsider Live view. An old-timer who is used to using only the Viewfinder to compose images might find that some types of shooting are easier with Live view. Point-and-shoot graduates may want to see if they can improve the sharpness of their images by using the Viewfinder.
When Lv mode first came out, my initial thought was “gimmick.” However, since I’ve been shooting macro shots with Lv mode, the ease of use has changed my thinking. When I need extreme, up-close focusing accuracy, Lv mode can be superior to using the Viewfinder. If you’re an experienced DSLR photographer, try shooting some macros with Lv mode. I think you’ll find that your work improves, and your back feels much better too.
If you’ve come over from the point-and-shoot world, use Lv mode if it makes you comfortable—at first. However, please realize that it is difficult to make sharp images when you are waving a heavy DSLR around at arm’s length while composing a picture on the Monitor, especially with the 24-megapixel D610 having such massive image resolution. Also, the extra weight of a DSLR will tire your arms needlessly. Learn to use the Viewfinder for most work and Lv mode for specialized pictures. Both image composition tools are useful.
Using Autofocus and AF-Area Modes for Live View Photography
Live view mode is a little different than using the Viewfinder when it comes to autofocus. In some ways it is simpler, and in other ways it is more complex. The Autofocus modes have only two settings, and the AF-area modes have four.
The Release modes that we will discuss in Section 3 – Release Modes are the same whether you’re using Lv mode or the Viewfinder.
The three mode groups available in Live view mode are as follows:
Autofocus modes (User’s Manual – Page 51)
• Single-servo (AF-S)
• Full-time-servo AF (AF-F)
AF-area modes (User’s Manual – Page 52)
• Face-priority AF
• Wide-area AF
• Normal-area AF
• Subject-tracking AF
Release modes (User’s Manual – Page 83)
• Single frame (S)
• Continuous low speed (CL)
• Continuous high speed (CH)
• Quiet shutter-release (Q)
• Quiet continuous shutter-release (Qc)
• Self-timer
• Remote control
• Mirror-up (MUP)
Autofocus in Live View Mode
In some instances a live view through the Monitor is quite useful. For instance, what if you want to take an image of a small flower growing very close to the ground? You could lie down on the ground and get your clothes dirty, or you could use Lv mode. Live view mode allows you to see what the lens sees without using the Viewfinder. Any time you need to take pictures up high or down low, or even on a tripod, the D610 will happily give you that power with Lv mode.
To set your camera to Live view photography mode, simply flip the Live view selector switch to the top position so the white dot lines up with the small camera icon, as shown in figure 10.10 (red arrow).
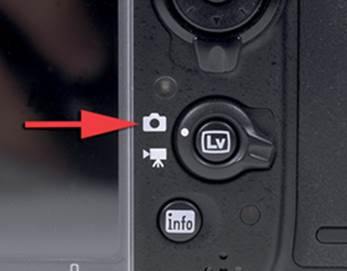
Figure 10.10 – Choosing Live view photography mode
Much of the Autofocus mode, AF-area mode, and Release mode information discussed in this chapter also applies to Movie live view mode (note the icon of the movie camera on a tripod in figure 10.10). We will discuss both Live view photography and Movie live view modes in later chapters.
After you have chosen Live view photography mode, press the Lv button. You are ready to start taking well-focused pictures.
Live View Mode Compared to Earlier Nikon Cameras
The Nikon D610 differs from previous Nikon cameras in Live view mode. Whereas previous semi-pro Nikon cameras had Handheld and Tripod modes, the D610 combines the two modes—sort of. In previous cameras, the reflex mirror would drop during an autofocus operation in Handheld mode so the camera could use standard phase-detection autofocus. The mirror stayed up in Tripod mode only with its contrast-detection autofocus.
The D610, however, raises the reflex mirror at the beginning of Live view mode and does not lower it for autofocus operations. Therefore, the Nikon D610 always uses mirror-up shooting in Live view. That means the camera cannot use the fast phase-detection autofocus provided for shooting with the Viewfinder. The primary problem is that contrast-detection AF is usually slower than phase-detection AF. However, the contrast-detection AF in the Nikon D610 is an improvement over previous Nikon cameras.
Many photographers were initially confused by the sounds coming from the D610 when taking a picture in Live view. It sounds like the mirror drops when you take a picture, but it doesn’t. The Monitor blacks out briefly, as on previous Nikon cameras, while the camera fires the physical shutter. However, the Monitor blackout happens only while the shutter is firing. It has nothing to do with movement of the reflex mirror, even though it may sound like it.
Now let’s examine the two Autofocus modes. Remember, the Autofocus modes tell the camera how to focus.
Use the following steps to change the Autofocus mode:
1. Press and hold the AF-mode button (figure 10.10.1, image 1).
2. Rotate the Main command dial (figure 10.10.1, image 2).
3. AF-S and AF-F will appear on the Monitor as you turn the dial. Release the AF-mode button when your chosen mode appears. Singe-servo AF (AF-S) is selected in figure 10.10.1, image 3.
The two Autofocus mode selections are covered next. I photographed the screen with the lens cap on so you can clearly see the selections on a black background.
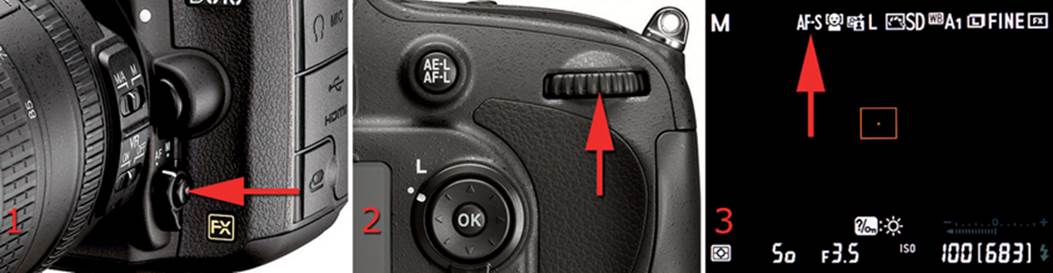
Figure 10.10.1 – Choosing an Autofocus mode in Live view photography
Single-Servo AF
Figure 10.11 has a red arrow pointing to the Single-servo AF (AF-S) mode symbol on the Live view screen. You control the focus by pressing the Shutter-release button halfway down. When focus is acquired, it locks and does not update unless you deliberately update it. You will have to refocus if you or your subject moves by releasing the Shutter-release button and reapplying pressure to refocus.
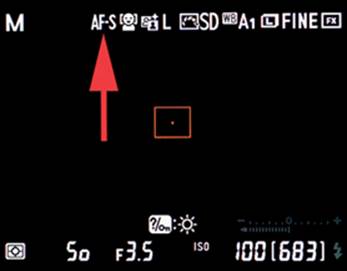
Figure 10.11 – Single-servo AF (AF-S) mode
A single red or green AF point square (with a dot) will appear in the middle of the Monitor. It will be red when the scene is not in focus and green when the scene is in good focus. You can move the square around the screen to select the area on which the camera will focus. If your subject doesn’t move or moves very slowly, use this AF mode.
Full-Time-Servo AF
Figure 10.12 has a red arrow pointing to the Full-time-servo AF (AF-F) mode symbol on the Live view screen. The red or green AF point square appears in the middle of the Monitor, as in Single-servo AF mode. It blinks on and off in red as the camera focuses, then it turns green and stops blinking when good focus is acquired. As the focus changes and is reacquired, you will see it blink green a few times. You can move the focus square around the Monitor to select a focus area.

Figure 10.12 – Full-time-servo AF (AF-F) mode
This mode provides constantly updating autofocus that is tempered by the AF-area mode (discussed next) you have selected. The size and shape of the focus square changes with the AF-area mode you have selected.
The focus doesn’t lock on the subject initially, which simply means it updates continuously (like AF-C) until you press the Shutter-release button halfway down, at which time the camera locks focus. If you release pressure from the Shutter-release button, the camera unlocks the focus and resumes continuous autofocus. The camera acts as if it is in AF-S mode when you have pressure on the Shutter-release button, and it acts as if it is in AF-C mode when you remove pressure.
Settings Recommendation: Unless I am going to do some very specialized macro shooting, I leave Live view mode’s Autofocus mode set to AF-F, or Full-time-servo AF. That way, the camera will automatically attempt to keep good focus on my subject.
If I am shooting a macro photo, I want to control exactly where the focus falls for depth of field control, so I use AF-S, or Single-servo AF.
Professional video shooters invariably use manual focus to prevent the frequent and noisy refocus operations of the camera when it detects changes in subject distance or contrast.
AF-Area Mode
The AF-area mode lets you choose where the camera senses your subject. Auto-focus works differently for each of the four AF-area modes. You can cause the camera to look for people’s faces, track a moving subject, widen out for landscapes, or pinpoint the focus on a small area of the subject.
Let’s look at how to select one of the four AF-area modes, then examine what each one does.
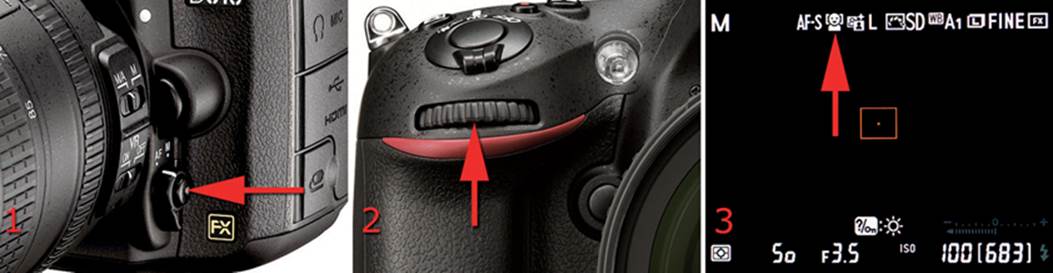
Figure 10.13 – Choosing an AF-area mode under Live view
Use the following steps to change the AF-area mode:
1. Press and hold the AF-mode button (figure 10.13, image 1).
2. Rotate the Sub-command dial (figure 10.13, image 2).
3. Various symbols will appear on the Monitor as you turn the dial. They represent four choices: Face-priority AF, Wide-area AF, Normal-area AF, and Subject-tracking AF. Release the AF-Mode button when your chosen mode appears. Face-priority AF is selected in figure 10.13, image 3 (red arrow).
Face-Priority AF
The red arrow in figure 10.14 points to the Face-priority AF symbol. When you are taking portraits in Live view mode or shooting movies with people in Movie mode, you may want to consider using Face-priority AF. The camera can track focus on the faces of several people at the same time. It is quite fun to watch as the little green and yellow AF point squares find faces and stay with them as they move—green squares are for focused faces and yellow squares are for faces that are being tracked but are not in the best focus.
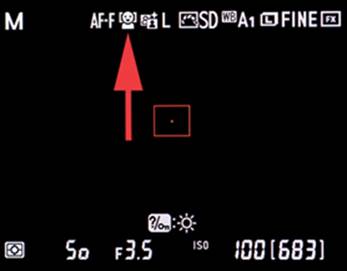
Figure 10.14 – Face-priority AF
Nikon claims the camera can detect up to 35 faces at the same time. That’s a lot of people! According to Nikon, “When multiple faces are detected, the camera will focus on the subject recognized to be the closest. Alternatively, you can also choose a different subject with the Multi selector.”
Wide-Area AF
The red arrow in figure 10.15 points to the Wide-area AF symbol. If you are a landscape shooter who likes to use Live view mode or shoot movies of beautiful scenic areas, this is your mode. The camera will display the AF point square on the Monitor, and it will be red when out of focus, green when in focus. You can move this AF point around until it rests exactly where you want the best focus to be. The camera will sense a wide area and determine the best focus, with priority on the area under the focus square.
Nikon says, “Suitable for hand-held shooting such as landscape.”
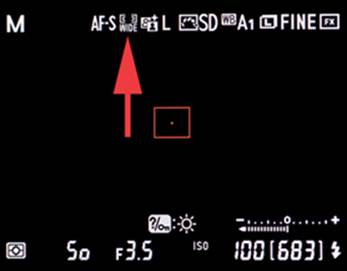
Figure 10.15 – Wide-area AF
Normal-Area AF
The red arrow in figure 10.16 points to the Normal-area AF symbol. This mode is primarily for shooters who need to get very accurate focus on a small area of the frame.
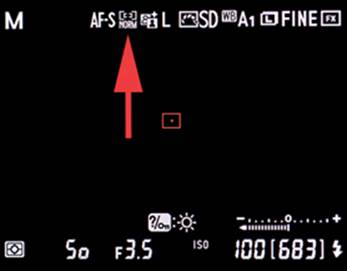
Figure 10.16 – Normal-area AF
If you are shooting a butterfly up close and want to focus on one of the antennae, use Normal-area AF. This is a great mode to use with a macro lens because it gives you a much smaller AF point square that you can move around the frame. Compare it to the AF point in Wide-area AF mode, and you’ll see that it is about 25 percent of the size. You can pinpoint the exact area of the subject that you want to have the sharpest focus.
Nikon comments, “Suitable for tripod shooting with pinpoint focus such as close up.”
Subject-Tracking AF
The red arrow in figure 10.17 points to the Subject-tracking AF symbol. When autofocus is locked in—either by using the Shutter-release button in AF-S mode or automatically in AF-F mode (discussed previously)—this mode lets you start subject tracking with the OK button. When the subject is selected (after you press the OK button), the camera locks focus on the subject and tracks it when the subject or the camera moves.
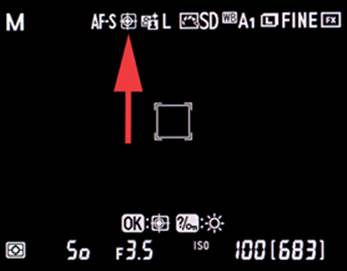
Figure 10.17 – Subject-tracking AF
If you are making a movie of a black bear in the Great Smoky Mountains, you just move the focus point to the bear, focus, and press the Multi selector center button to make the focus stay on the bear. It is amazing to watch the camera do this.
I suggest that you try AF-F, or Full-time-servo AF, with this mode. Full-time autofocus allows your camera to fully track the subject without you worrying about keeping it in focus yourself.
Nikon says, “Suitable for a moving subject.”
Settings Recommendation: Why not leave the AF-area mode set to Face-priority AF if you often photograph people? If you are using Live view for macro shooting, Normal-area AF gives you the smallest, most accurate area for detailed, up-close focusing. Landscape shooters should use Wide-area AF, and wildlife or sports shooters should use Subject-tracking AF.
Now, let’s carefully examine the Release modes, which affect the camera for Viewfinder and Live view shooting.
Using Focus Lock
Focus lock is a tool for those times when you need to lock the focus on a certain area of the subject and recompose. If the AE-L/AF-L button is configured correctly, you can lock focus on your subject whenever you want to. You can control the AE-L/AF-L button with Custom setting f4:Custom Setting Menu > f Controls > f4 Assign AE-L/AF-L button. You can choose to lock both the exposure and autofocus with AE/AF lock, or choose AF lock only so you can lock just the autofocus at any time. This is convenient when you are using the AF-C Autofocus mode, which never locks focus on the subject but keeps updating. For a picture or two, you may want to lock the focus and recompose without the focus changing. Assign AE/AF lock or AF lock only to the AE-L/AF-L button so that whenever you press the button, the focus is locked until you release it.
Section 3 – Release Modes
(User’s Manual – Page 83)
The D610 has several Release modes, which apply to both the Viewfinder and Live view photography.
You could also call them Shutter-release modes because the Release modes pertain to when images will be taken and how fast you can take them. In figure 10.18, you can see the Release mode dial (right red arrow) and the lock release button (left red arrow). Press the lock release button and turn the Release mode dial to select a mode. CH is selected in figure 10.18.
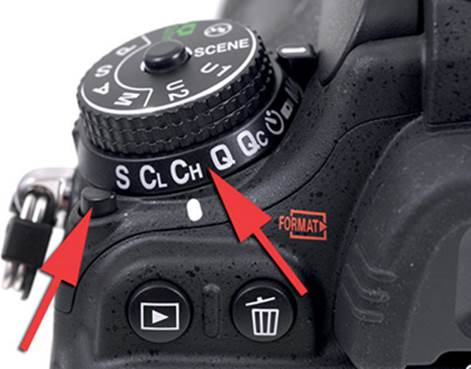
Figure 10.18 – Release mode dial and Release mode dial lock release button
Now, let’s look at each of the Release modes in more detail. Here is a list of the seven modes:
• S – Single frame
• CL – Continuous low speed
• CH – Continuous high speed
• Q – Quiet shutter-release
• Self-timer
• Remote control
• MUP – Mirror-up
In the good old film days, the first three Release modes would have been called motor-drive settings because they are concerned with how fast the camera is allowed to take pictures.
We’ve already talked about these modes to some degree in the sections on the AF-area modes.
Single Frame (S) Release Mode
Single-frame Release mode (figure 10.19) is the simplest frame rate because it takes a single picture each time you press the Shutter-release button fully. There is no speed here. This is for photographers who shoot a few frames at a time. Nature shooters often use this mode because they are more concerned with correct depth of field and excellent composition than blazing speed.
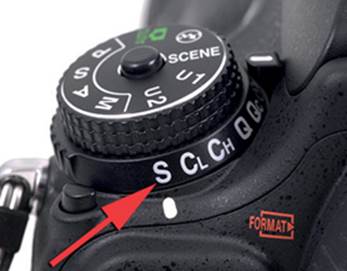
Figure 10.19 – Single frame (S) Release mode
Continuous Low Speed (CL) Release Mode
Continuous low speed Release mode allows you to select a frame rate between 1 and 5 frames per second (fps). When you hold down the Shutter-release button, the camera will fire at the chosen frame rate continuously until you let up on the button or until the internal memory buffer gets full. Choose CL on the Release mode dial to select this mode (figure 10.20).
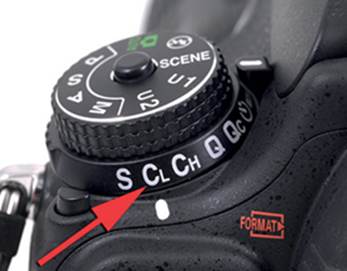
Figure 10.20 – Continuous low speed (CL) Release mode
The default CL frame rate from the factory is 3 fps. If you want more or less speed, simply open Custom Setting Menu > d Shooting/display > d5 CL mode shooting speed and select your favorite frame rate (figure 10.21). Your camera cannot exceed 5 fps in CL mode.
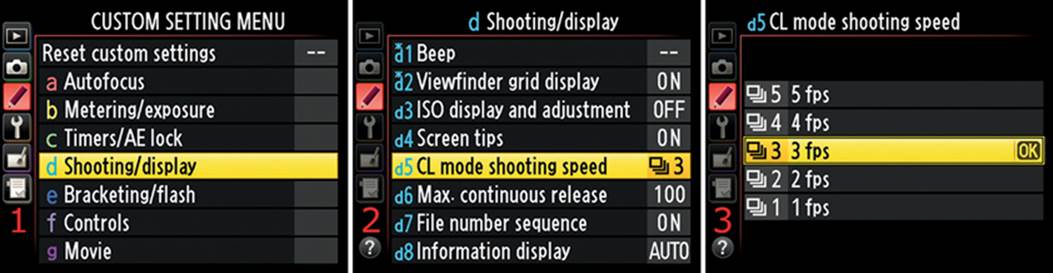
Figure 10.21 – Choosing a Continuous low speed Release mode frame rate
Continuous High Speed (CH) Release Mode
Continuous high speed Release mode is designed for when you want to shoot at the highest frame rate the camera can manage (figure 10.22). The D610 will attempt to capture 6 fps every time you hold down the Shutter-release button.
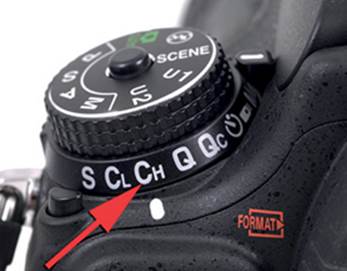
Figure 10.22 – Continuous high speed (CH) Release mode
Internal Memory Buffer
The camera’s internal memory buffer limits how many frames you can take. When you shoot in JPEG mode, you may be able to record as many as 100 frames in one burst. You can control this maximum by adjusting Custom Setting Menu > d Shooting/Display > d6 Max. continuous release.
In Lossless compressed NEF (RAW) mode, you can shoot only 16 pictures at 14 bits, or 22 pictures at 12 bits, before the memory buffer is full. You’ll have to wait for the camera to offload some buffered images to the memory card before you can shoot another long burst.
See the buffer capacity column in the Memory Card Capacity chart on Page 335 of your Nikon User’s Manual for a list of Image quality/Image size modes and buffer capacities.
When you are shooting in high-speed bursts, the areas of the Control panel and Viewfinder that are normally devoted to how many pictures are left changes to a new set of figures. Now you will see a letter r followed by a number (figure 10.22.1, screen 1, red arrow). The red arrow in figure 10.22.1, screen 2, points to where the r number will appear at the bottom right of the Viewfinder (not currently shown). This is the place where the remaining image count is usually shown.
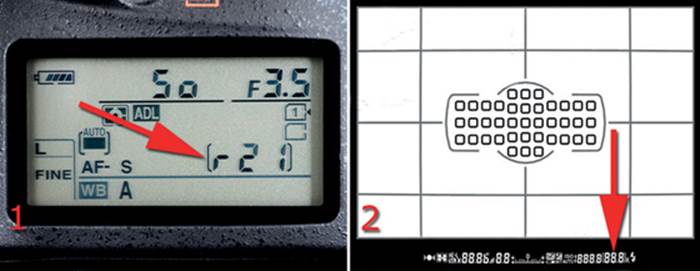
Figure 10.22.1 – Buffer capacity’s remaining images
The r stands for remaining. The number indicates how many frames you can shoot before the memory buffer is full. For instance, if you see r21, you would have only 21 frames left before the memory buffer will hold no more images. If the buffer gets full, the camera will drastically slow down as it writes images from the internal memory buffer to the memory card.
You can check the number of remaining images at any time by holding the Shutter-release button halfway down.
Requirements for Fast Frame Rates
All of the settings for fast frame rates (high fps) are based on the assumption that you are shooting with at least a 1/250 second shutter speed, have a fully charged battery, and have some buffer space left in your camera’s memory.
Quiet Shutter-Release (Q) Release Mode
Quiet shutter-release (Q) Release mode is designed to silence the camera as much as possible when you fire the shutter (figure 10.23).
Viewfinder Mode
When using Q mode in Viewfinder mode, the D610 ties the raising and lowering of the mirror to the position of the Shutter-release button, instead of raising the reflex mirror, taking the picture, then lowering the mirror in one smooth step.
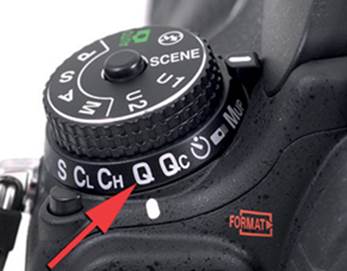
Figure 10.23 – Quiet shutter-release (Q) Release mode
When you press the Shutter-release button and take a picture in Q mode, the mirror raises and the shutter fires. However, the mirror does not lower until you fully release the Shutter-release button.
If you want to reduce noise, you can hold the Shutter-release button down longer than normal and separate the raising and lowering of the mirror into two steps. This tends to draw out the length of the mirror/shutter action and reduces the perception of noise volume. In reality, the noise is not reduced much, but since it is broken into two parts, it seems quieter.
Live View Mode
In Live view mode the mirror is always raised; therefore, Q mode does nothing special for the mirror in Live view. However, in Live view mode the focal-plane shutter is always open for viewing and closes only long enough to time the image exposure. When you press the Shutter-release button in Q mode, the shutter closes, reopens for the exact length of the selected shutter speed, then closes again. It does not reopen for viewing until you release pressure from the Shutter-release button. That breaks the shutter action into four parts when you fully press the Shutter-release button: (1) shutter closes, (2) shutter opens for shutter speed time, (3) shutter closes at the end of shutter speed time, and (4) shutter reopens for Live view. The final step happens only after you release the Shutter-release button. This quiets the shutter a tiny bit.
What makes this a little confusing is that the camera seems to act in a similar manner even when you are not using Q mode. In non-Q mode, the Monitor does not come back on when you are taking a Live view picture until you release pressure from the Shutter-release button, even though the shutter has already reopened. The only real difference between Q mode and non-Q modes is that the final click of the shutter reopening is delayed until you let go of the Shutter-release button. You’ll have to count the clicks in Q mode and non-Q modes to see what I mean.
Quiet Continuous Shutter-Release
(Qc) Release Mode
Quiet continuous shutter-release (Qc) Release mode is an additional Quiet (Q) mode with the added feature of continuous shutter firing at 3 frames per second (fps), as long as you hold the Shutter-release button down all the way.
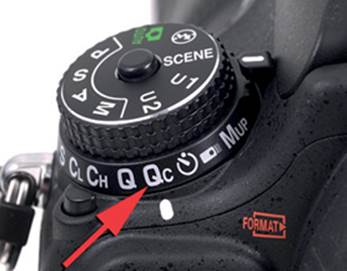
Figure 10.23.1 – Quiet continuous shutter-release (Qc) Release mode
Where the Q mode simply fires one shot when you press the Shutter-release button—allowing you to control the timing of the mirror’s return to the down position—the Qc mode lengthens the time between the mirror being raised, the shutter firing, and the mirror being dropped back down, somewhat reducing the snappiness of the sound.
If you compare the camera in CL mode at 3 fps to the Qc mode’s 3 fps, you will notice that the Qc mode produces a less noticeable sound due to the separation of the shutter and mirror slap.
Qc Mode Is Not Actually Quieter Than CL Mode
Interestingly, when firing the camera continuously in CL and Qc modes at 3 fps, I found that the Qc mode is actually louder than the CL mode. I went into a quiet area, placed my Radio Shack digital sound level meter against the camera’s monitor, set the decibel range to its lowest setting of 60, and fired the camera continuously in both CL and Qc modes. CL mode consistently averaged around 68 decibels (db), whereas Qc mode averaged about 70 db.
Therefore, don’t expect the Qc mode to actually be quieter; it’s just less distracting due to the longer shutter-release/mirror cycle and the lower frequency of the sound.
Self-Timer Release Mode
Use the Self-timer Release mode to take pictures a few seconds after you press the Shutter-release button (figure 10.24). The camera will autofocus when you press the Shutter-release button halfway down, and it will start the Self-timer when you press it all the way down.
You can use Custom Setting Menu > d Shooting/display > c3 Self-timer to set the self-timer to 2, 5, 10, or 20 seconds.
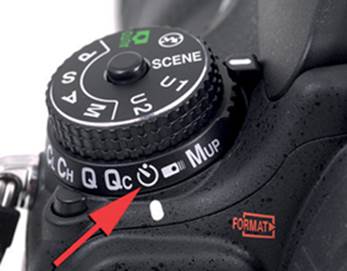
Figure 10.24 – Self-timer Release mode
If you like to hear that little beep beep beep when the Self-timer is counting down the seconds before firing the shutter, you can control it with Custom Setting Menu > d Shooting/display > d1 Beep.
After you press the Shutter-release button in Self-timer mode, the AF-assist illuminator will blink about twice per second and the beeping will start. When the last two seconds arrive, the AF-assist illuminator will shine continuously and the beeping will double in speed. You are out of time when the beeping speeds up! The image is taken about the time the beeping stops.
If you want to stop the self-timer, all you have to do is press the MENU or Playback button.
Remote Control Release Mode
If you have the optional Nikon ML-L3 remote control, Remote control Release mode lets you fire the shutter remotely (figure 10.25). Three modes are available: Delayed remote (two-second delay), Quick-response remote (immediate shutter release), and Remote mirror-up (takes two button presses to release the shutter). These three modes are available under Shooting Menu > Remote control mode. Select a mode before you use Remote control Release mode.
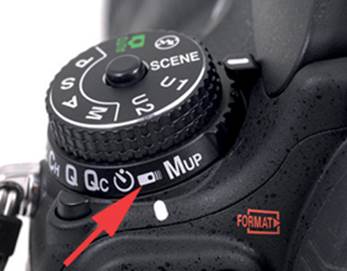
Figure 10.25 – Remote control Release mode
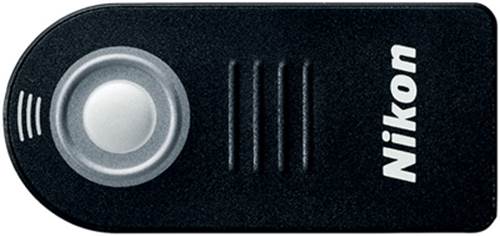
Figure 10.25.1 – Nikon ML-L3 infrared remote
Use the Remote control Release mode when you want to shoot pictures hands off. You can cut down on vibrations significantly by shooting with the remote control. The wireless ML-L3 remote is a very inexpensive item, and all D610 users should buy one (figure 10.25.1). Use it instead of the more expensive Nikon MC-DC2 electronic cable release, which is wired.
Mirror-Up (MUP) Release Mode
Use Mirror-up Release mode to raise the mirror and allow vibrations to die down before you release the shutter (figure 10.26). In a three-step operation, the camera will first autofocus when you press the Shutter-release button halfway down, then raise the mirror when you press it all the way down. You can then use a remote release to fire the shutter, or even press the Shutter-release button again (not recommended because it cancels out the benefit of using MUP mode by introducing new vibrations). If you do nothing after raising the mirror, the camera will fire by itself after about 30 seconds.

Figure 10.26 – Mirror-up (MUP) Release mode
In Live view mode, the mirror is already raised. Therefore, the primary benefit of MUP mode is that the camera delays firing the shutter until you release the Shutter-release a second time with an MC-DC2 electronic cable release or ML-L3 wireless release (not your finger, please). That means you can allow camera vibrations to die down before the final shutter release occurs, even in Live view mode.
This mode is very simple and very effective. I use it constantly when I am shooting nature photos.
Don’t Touch That Shutter Release!
Please buy a hands-off shutter release (Nikon MC-DC2 or ML-L3) so you don’t have to manually press the Shutter-release button when the camera is on a tripod and in MUP mode. Touching the camera seems a bit silly after going to all that trouble to stabilize it and raise the mirror. A finger press could shake the entire tripod!
If you do not have a wireless or cabled shutter release, simply wait 30 seconds after pressing the Shutter-release button in MUP mode and, as previously mentioned, the camera will fire on its own. This could be used as a slow but high-quality self-timer.
Custom Settings for Autofocus (a1–a7)
For a complete discussion of the autofocus-related Custom settings a1 through a7, please see the heading Custom Settings a1–a7 in the chapter titled Custom Setting Menu. When you consider autofocus issues, it is especially important that you read the information in that chapter concerning Custom settings a1 and a2. If you don’t read and understand that section, you may get quite a few out-of-focus images.
Also, consider using Focus tracking with lock-on when you use any mode that does focus tracking (9 point, 21 point, 39 point, or 3D-Tracking). This will prevent your camera from losing focus on the subject if something comes between the camera and the subject while the subject is moving. Otherwise the camera may switch the focus to the intruding object and lose the tracked subject. To enable Focus tracking with lock-on, go to Custom Setting Menu > a Autofocus > a3 Focus tracking with lock-on and choose a tracking delay time-out.
With lock-on enabled, the camera remembers the subject you are tracking for a few seconds after it loses contact with it. If the subject reappears, the camera will continue tracking it.
Author’s Conclusions
I’ve followed the development of the Nikon autofocus systems since the late 1980s. Autofocus with the Nikon D610 is a real pleasure. It has a more powerful AF system than many cameras before it, and yet it is somewhat simplified in its operation. The system can still seem complex, but if you spend time with this chapter you should come away with a much greater understanding of the D610’s AF module. You’ll have a better understanding of how you can adapt your camera to work best for your style of photography. Enjoy your D610’s excellent Multi-CAM 4800 FX autofocus system!
The next chapter will advance beyond our brief examination of Live view photography mode as it relates to autofocus by adding detailed information on how to best use the Live view photography mode controls for general photography.