Mastering the Nikon D610 (2014)
2. Playback Menu

Bountiful Harvest – Marcel Carey (mcpianoca)
In chapter 1 you configured your camera for picture-taking your way. This chapter, and the next several chapters, will consider the camera’s menu systems. The D610 has seven menus, with literally hundreds of configuration options. We’ll examine each setting in each menu.
Remember, you will press the MENU button to enter the camera’s menu system. The Playback Menu, which we’ll consider in detail in this chapter, is first in the list of menus (figure 2.0).
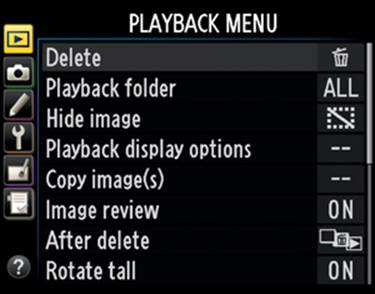
Figure 2.0 – The Playback Menu
Since this menu controls how the Monitor displays images, you’ll need to learn how to use it well. You’ll be taking thousands of pictures and will view most of them on the Monitor.
By now you may have quite a few pictures on your memory card. The Playback Menu has everything you need to control image playback, copying, and printing. They are as follows:
• Delete – Allows you to delete all or selected images from your camera’s memory card(s).
• Playback folder – Allows you to set which image folders your camera will display, if you have multiple folders on the camera’s memory card(s).
• Hide image – Lets you conceal images so they won’t display on the Monitor.
• Playback display options – Controls how many informational screens the camera will display for each image.
• Copy image(s) – Gives you functions to copy images between the two memory cards.
• Image review – Turns the camera’s postshot automatic image review on or off.
• After delete – Determines which image is displayed next when you delete an image from a memory card.
• Rotate tall – Allows you to choose whether portrait-orientation images (vertical) display in an upright position or lying on their side on the horizontal Monitor.
• Slide show – Allows you to display all the images on your camera’s memory card(s) in a sequential display, like the slide shows of olden days (pre-2002). No projector is required.
•DPOF print order – Lets you print your images directly from a PictBridge-compatible printer without using a computer—either by using digital print order format (DPOF) directly from a memory card or by connecting a USB cable to the camera.
Now, let’s examine each of these settings in detail, with full explanations on how, why, and when to configure each item.
Technical LCD Monitor Information
The D610 has a 3.2-in (8-cm) Monitor with enough resolution, size, and viewing angle to really enjoy using it for previewing images. It has VGA resolution (640 × 480), based on a 921,000 dot liquid crystal display (LCD). If anything you read says the LCD Monitor has 921,000 pixels of resolution—or is significantly higher than VGA—the writer is uninformed. Nikon lists the resolution as 921,000 dots, not pixels. Don’t let the numbers boggle your mind. The bottom line is that this three-inch screen has amazing clarity for your image previewing needs. You can zoom for review up to 38x for Large (L) images, 28x for Medium (M) images, and 19x for Small (S) images. That’s zooming in to pixel-peeping levels. Now, if you want to get technical, here’s the extra geek stuff. A pixel on your camera’s Monitor is a combination of three color dots—red, green, and blue (RGB). The three dots, when blended together, provide shades of color and are equal to one pixel. This means the Monitor is limited to onethird of 921,000 dots, or 307,000 pixels of real image resolution. The VGA standard has 307,200 pixels (640 × 480), so the resolution of the Monitor on your D610 is basically VGA resolution.
Delete
(User’s Manual – Page 190)
The Delete function allows you to selectively delete individual images from a group of images in a single folder or multiple folders on your camera’s memory card. It also allows you to clear all images in the folders without deleting the folders. This is sort of like a card format that affects only images, and not folders. However, if you have protected or hidden images, this function will not delete them.
There are three parts to the Delete menus:
• Selected – Deletes only selected images.
• Select date – Deletes all images taken on a certain date.
• All – Deletes all images in the folder you currently have selected with the Playback folder function (see the next main section). If a memory card is inserted in both slots, you can select the card from which to delete images.
Selected
Figure 2.1 shows the menu screens you’ll use to control the Delete function for selected images.
Notice in screen 3 of figure 2.1 that there is a list of images, each with a number in its lower-right corner. These numbers run in sequence from 1 to however many images you have in your current image folder or on the entire memory card. The number of images shown will vary according to how you have the Playback folder settings configured. (See the next section of this chapter, Playback Folder.)
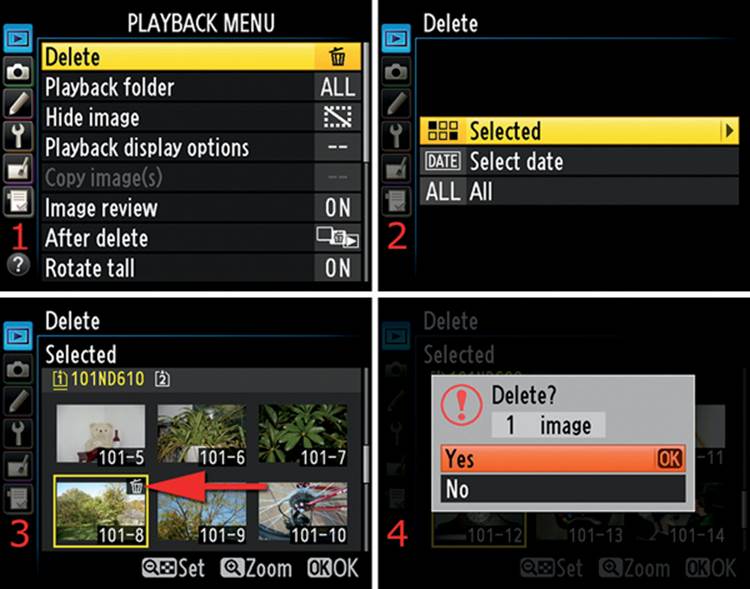
Figure 2.1 – Delete menu screens for the Selected option
If you have Playback folder set to Current (factory default), the camera will show you only the images found in your current playback folder. If you have Playback folder set to All, the D610 will display all the images it can find in all the folders on your camera’s memory card.
Here are the steps to delete one or more images:
1. Select Delete from the Playback Menu and scroll to the right (figure 2.1, screen 1).
2. Choose Selected and scroll to the right (figure 2.1, screen 2).
3. Locate the images for deletion with the Multi selector and then press the checkered Playback zoom out/thumbnails button. This button will mark or unmark images for deletion. It toggles a small trash can symbol on and off on the top right of the selected image (red arrow in figure 2.1, screen 3).
4. Select the images you want to throw away, then press the OK button. A screen will appear and ask you to confirm the deletion of the images you have selected (figure 2.1, screen 4).
5. To finish deleting the images, select Yes and press the OK button. To cancel, select No and press the OK button (figure 2.1, screen 4).
Note: Since the D610 has multiple card slots, many functions can affect multiple memory cards when Playback Menu > Playback folder > All is selected. How can you tell which memory card is being affected by the current function? Notice in figure 2.1.1 that there are two tiny SD card symbols in the top left corner (at the red arrows). Each card slot has a number: 1 or 2. If there is no memory card in one of the slots, the number for that slot will be grayed out.
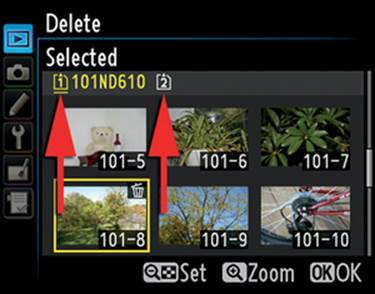
Figure 2.1.1 – Active memory card slot
As you use functions that affect displayed images, the memory card symbol will be underlined for the card that contains the image you are modifying. In figure 2.1.1, it is apparent that there two memory cards in the camera because the second card is not grayed out. The memory card in slot 1 contains the image that is currently selected, so the memory card symbol for slot 1 is underlined in yellow.
As you scroll through your images, notice that the yellow underline jumps to whichever card contains the image you are highlighting at that moment, if you have images on both memory cards. As you work through this book, pay attention to which memory card contains the picture you are working with. The one containing the currently displayed image will be underlined in yellow.
Select Date
Using the Select date method is simple. When you preview your images for deletion, you won’t be shown a list of all the images, as with the Delete option. Instead, the Select date screen (figure 2.2, screen 3) will give you a list of dates with a single representative image following each date.
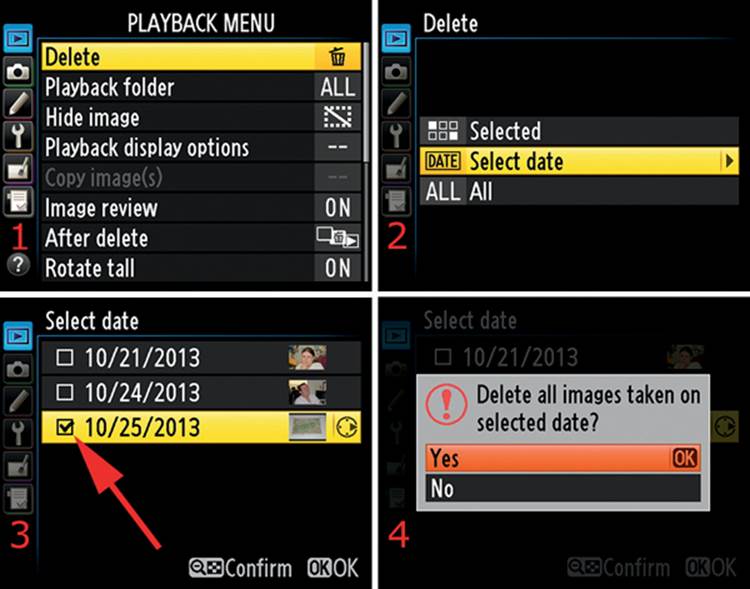
Figure 2.2 – Delete menu screens for the Select date option
Here are the steps to delete images by Select date:
1. Select Delete from the Playback Menu and scroll to the right (figure 2.2, screen 1).
2. Choose Select date and scroll to the right (figure 2.2, screen 2).
3. Notice that there’s a check box to the left of each date (figure 2.2, screen 3). Check a box by scrolling up or down to the date of your choice with the Multi selector and then scrolling to the right until you see a tiny black symbol that represents the Multi selector. This checks the box and tells the camera to delete all images that have the checked date. If the single tiny representative image next to the date is not sufficient to help you remember which images you took on that date, you can view them. Press the checkered Playback zoom out/thumbnails button, and the D610 will switch to the images for that date. If you want to examine an image more closely, you can hold in the Playback zoom in button to temporarily zoom in on individual images. When you’re satisfied that none of the images for that date are worth keeping, and while you are still examining images for a single date, press the OK button to select the date, or press the Playback zoom out/thumbnails button to return to the list of all dates.
4. Make sure the date you want to delete is checked as described in step 3, and press the OK button to start the image deletion process (figure 2.2, screen 3).
5. A final screen will ask you to confirm your deletion (figure 2.2, screen 4). This screen has a big red exclamation point and asks, Delete all images taken on selected date? If you scroll to Yes and press the OK button, the images will be deleted. Be careful! If you decide not to delete them, press the MENU button to cancel the operation.
All
This option is like formatting a card, except that it will not delete folders. It will delete only images, except for protected or hidden images (figure 2.3). Using this option is a quick way to format your card while maintaining your favorite folder structure.
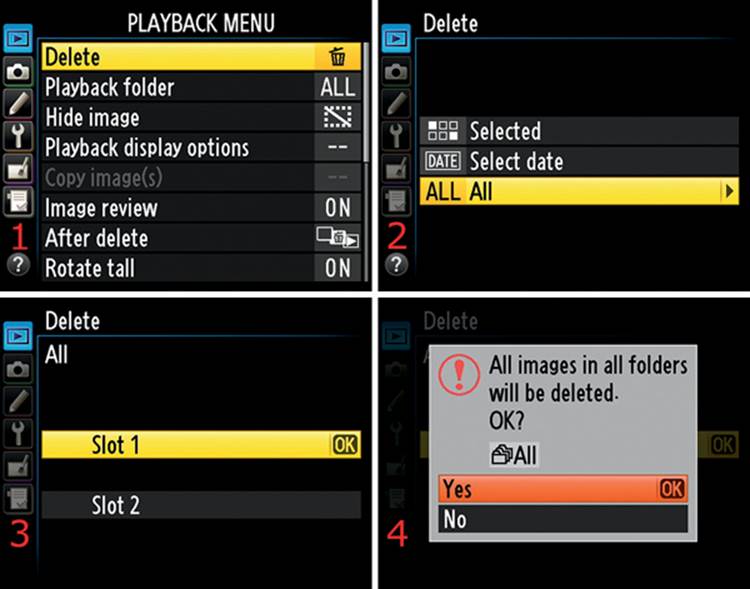
Figure 2.3 – Delete menu screens for the All option
Here are the steps to delete all images on the card (or in the current folder):
1. Select Delete from the Playback Menu and scroll to the right (figure 2.3, screen 1).
2. Choose All and scroll to the right (figure 2.3, screen 2).
3. Select the slot from which to delete images. Notice that both Slot 1 and Slot 2 are available (figure 2.3, screen 3). If there is a memory card missing from one of the slots, it will be grayed out and unavailable. Press the OK button to choose the slot.
4. Choose Yes from the next screen with the big red exclamation point and dire warning of imminent deletion (figure 2.3, screen 4). Be very careful from this point forward! If you have Playback folder set to ND610, the camera will delete all images in every folder that was created by the D610, and the warning will say, All images will be deleted. OK?, followed by ND610. If you have Playback folder set to Current, the camera will delete only the images in the folder that is currently in use, and the warning will say, All images will be deleted. OK?, followed by Current. If you have Playback folder set to All, the camera will delete all images in all folders, and the warning will say, All images in all folders will be deleted. OK?, followed by All. The camera is prepared to delete every image in every folder (created by any camera) on the selected memory card if Playback Menu > Playback folder > All is selected. (See the next main section for information on the Playback folder option). When you select Yes and press the OK button, a final screen with the word Done will pop up briefly.
Being the paranoid type, I tested this thoroughly and found that the D610 really will not delete protected and hidden images, and it will keep any folders you have created. However, if you are a worrier, maybe you should transfer the images off the card before deleting any images.
Settings Recommendation: I don’t use the All function often since I usually don’t create special folders for each type of image. If you maintain a series of folders on your memory card(s), you may enjoy using the All function. Most of the time, I just use Selected and remove particular images. Any other time I want to clear the card, I use the Format memory card function on the Setup Menu or hold down the two buttons with the red Format label next to them. We’ll discuss formatting the memory card in the chapter titled Setup Menu, under the heading Format Memory Card.
Another way I get rid of images I don’t want is to view them on the Monitor by pressing the Playback button and then press the Delete button.
Protecting Images from Deletion
The Nikon D610 will allow you to protect images from accidental deletion when you use the Delete function. Using this method will not protect images from deletion when you format the memory card.
To mark an image as protected from deletion, you will use the Help/protect button, as shown in figure 2.3.1 and the upcoming steps.

Figure 2.3.1 – Protecting images from deletion
Use the following steps to protect individual images from accidental deletion (figure 2.3.1):
1. Display an image on the Monitor (figure 2.3.1, first screen).
2. Press the Help/protect button (figure 2.3.1, middle screen, red arrow).
3. A small key symbol will appear in the upper left of the Monitor, signifying that this image is protected from the Delete function (figure 2.3.1, last screen, red arrow).
If you have several images protected from deletion and decide you want to remove the protection, you can follow the previous steps again, which will remove the key symbol and protected status.
You can also remove protection from all protected images at once by following these steps:
1. Display any image on the Monitor (in Playback mode). It does not have to be a protected image (figure 2.3.2, first screen).
2. Hold down both the Help/protect button and the Delete button for about two seconds (figure 2.3.2, middle screen).
3. A screen will appear asking you, Remove protection from all images? (figure 2.3.2, last screen). Press the Delete button, and after several seconds a screen will flash up briefly with the message, Marking removed from all images. At this point all deletion protection and key symbols have been removed from all images.

Figure 2.3.2 – Removing protection from all protected images at once
Recovering Deleted Images
If you accidentally delete an image or a group of images, or even if you format the entire memory card and then realize, with great pain, that you didn’t really mean to, all is not lost. Immediately remove the card from your camera and do not use it until you can run image recovery software on the card. Deleting or formatting doesn’t permanently remove the images from the card. It merely marks them as deleted and moves the references to the images to the memory card’s file allocation table (FAT). The images are still there and can usually be recovered as long as you don’t write any new data to the card before you try to recover them. It’s wise to have a good image recovery program on your computer at all times. Sooner or later you’ll have a problem with a card and will need to recover images. Many of the better brands of memory cards include recovery software, either on the card itself or on a separate CD that comes with the card. Make sure you install the software on your computer before you format the brand new memory card! My favorite image recovery software is File Recover by PC Tools (www.pctools.com/file-recover/). I’ve used it several times to recover lost files from damaged memory cards, and it works very well. It will also recover other standard file types, such as MP3 files, on any hard drive or memory card.
Playback Folder
(User’s Manual – Page 207)
The Playback folder setting allows your camera to display images during preview and slide shows. You can have the D610 show you images only in the current image folder that was created by the D610, in the current image folder that was created by another Nikon camera, or in all the folders on the memory card.
If you regularly use your memory card in multiple cameras, as I do, and sometimes forget to transfer images, adjusting the playback folder is a good idea. I use a D610, Df, and D7100 on a fairly regular basis. Often I grab a memory card out of one of the cameras and stick it in another one for a few shots. If I’m not careful, I’ll later transfer the images from one camera and forget that the memory card has more folders created by the other camera. It’s usually only after I have formatted the memory card that I remember the other images. The D610 comes to my rescue with itsPlayback folder > All function.
Let’s look at how the Playback folder function works by first looking at the menu screens in figure 2.4. There are three selections you can choose from:
• ND610
• All
• Current
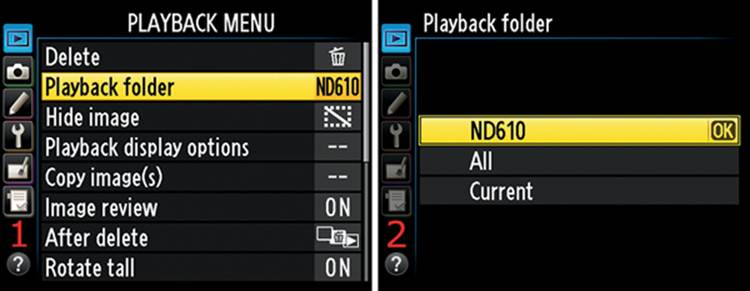
Figure 2.4 – Selecting a Playback folder source
Let’s discuss each individually.
ND610
The camera will display images created by the D610 from any folder on any memory card. If there are other folders created by a different camera, they will be ignored and no images within them will be displayed.
All
When you select All, your D610 will obligingly show you every image it can find in all folders on the memory card that were created by any Nikon camera. This maximum flexibility setting has saved me several times when I remembered to check my camera for images before I formatted a card because I could see that I had other images on the card besides D610 images.
Each camera usually creates its own unique folders, and normally the other cameras do not report that they are there, except by showing a reduced image capacity. The D610 intelligently displays its own images and other Nikon-created images on the card.
Current
This is the most limited playback mode. Images in whatever playback folder your camera is currently using will be displayed during playback, whether the images were created by the D610 or another Nikon camera. No other images in any other folders will be displayed.
Use the following steps to select the folder(s) from which your camera will display images:
1. Select Playback folder from the Playback Menu and scroll to the right (figure 2.4, screen 1).
2. Choose ND610, All, or Current and press the OK button (figure 2.4, screen 2).
Settings Recommendation: Using anything except All makes it possible for you to lose images. If you don’t have other Nikon cameras, this may not be a critical issue. However, if you have a series of older Nikon cameras around, you may switch memory cards among them.
If there’s an image on any of my memory cards, I want to see it. Until I started using the All setting, I regularly formatted cards with forgotten images on them. The images can often be recovered with file recovery software, but sometimes a few of them can’t. From my pain comes a strong recommendation: use All!
Playback Folder and Hidden Images
The display of images to select for hiding (see the next section) obeys the Playback Menu > Playback folder selection that we considered in this section. You can hide only the images you can see in the Hide image selection screen. If you don’t have All selected for Playback Menu > Playback folder, you may not see all of the images on the card. If you regularly hide images, you may want to leave your Playback folder set to All. That way, all the images on the card will appear on the Hide image screen, and you can select any of them to hide.
Hide Image
(User’s Manual – Page 208)
If you sometimes take images that would not be appropriate for others to view until you have a chance to transfer them to your computer, the Hide image setting is for you. You can hide one or many images, and when they are hidden, they cannot be viewed on the camera’s Monitor in the normal way. After they are hidden, the only way the images can be viewed again in-camera is by using the Deselect all? function shown in figure 2.5, screen 2.
There are three selections in the Hide image menu:
• Select/set
• Select date
• Deselect all?
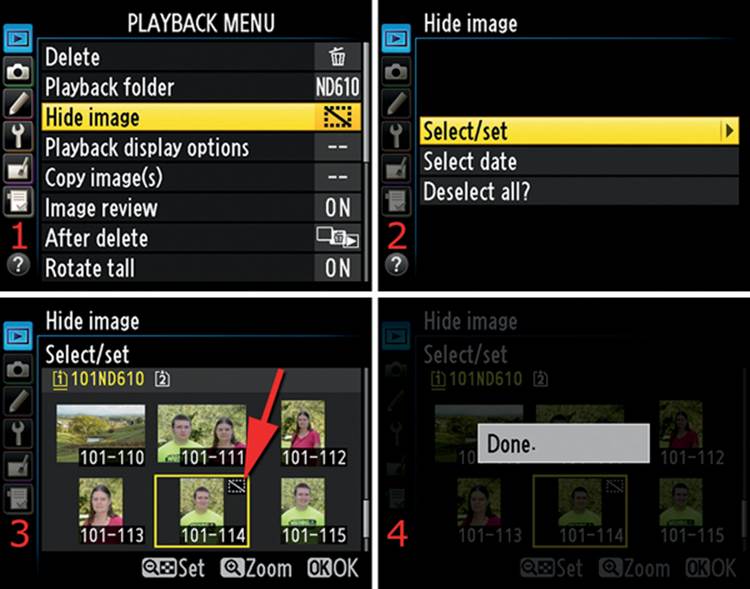
Figure 2.5 – Hide images with Select/set
Select/Set
This selection allows you to hide one or many images (figure 2.5, screen 3). Here’s how to hide an image:
1. Select Hide image from the Playback Menu and then scroll to the right (figure 2.5, screen 1).
2. Choose Select/set from the list and then scroll to the right (figure 2.5, screen 2).
3. Scroll to the image you want to hide and press the Playback zoom out/thumbnails button to Set the image. You’ll see a little dotted rectangle with a slash symbol appear in the top right corner of the image you’ve selected (red arrow in figure 2.5, screen 3). You can do this multiple times to select several images.
4. Press the OK button to hide the image(s). Done will appear on the Monitor when the hiding process is complete.
The number of images reported does not change when you hide images. If you have 50 images on the card and you hide 10, the camera still displays 50 as the number of images on the card. A clever person could figure out that there are hidden images by watching the number of images as they scroll through the viewable ones. If you hide all the images on the card and then try to view images, the D610 will tersely inform you, All images are hidden.
You can also use these steps to unhide one or many images by reversing the process described earlier. As you scroll through the images, as shown in figure 2.5, screen 3, you can deselect them with the Playback zoom out/thumbnails button and then press the OK button to unhide them.
While you are selecting or deselecting images to hide, you can use the Playback zoom in button to see a larger version of the image you currently have selected. This lets you examine the image in more detail to see if you really want to hide it.
Select Date
This function allows you to hide a series of images according to the date they were taken. You might have been shooting a nature series in the Great Smoky Mountains one day and a glamour series for a national magazine the next day. You wouldn’t mind your kids seeing the nature shots, but you might not want them to see the more glamorous ones. So you simply select the date(s) you took the glamour shots and hide them.
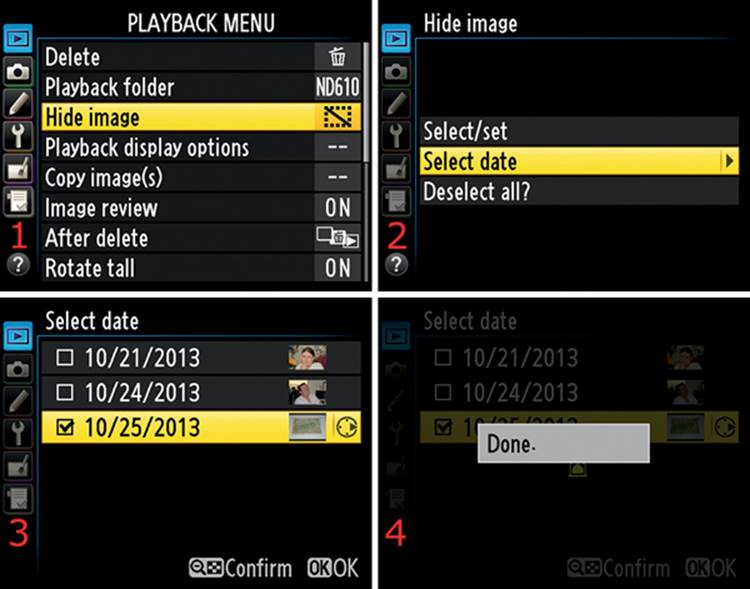
Figure 2.6 – Hide images with Select date
Use the screens shown in figure 2.6 and follow these steps:
1. Select Hide image from the Playback Menu and then scroll to the right (figure 2.6, screen 1).
2. Choose Select date from the list and then scroll to the right (figure 2.6, screen 2).
3. Now you can select the date of the images you want to hide from the list of available dates by scrolling up or down with the Multi selector (figure 2.6, screen 3). When your chosen date is highlighted, scroll to the right where you see a tiny symbol that represents the Multi selector, and a check mark will appear in the box to the left of the date (red arrow in figure 2.6, screen 3). If you’d like to review the images from a certain date before hiding them, simply select the date in question and press the Playback zoom out/thumbnails button. This will display only the images from the selected date on the Monitor. You can review individual images in detail by highlighting an image and pressing the Playback zoom in button. Or you can press the Playback zoom out/thumbnails button to return to the date screen.
4. The images taken on this date are now selected for hiding. If you press the OK button, all the images with the selected date will be hidden immediately, and the camera will return to the main Playback Menu after displaying Done (figure 2.6, screen 4).
Deselect All?
This is a much simpler way to unhide the previously hidden images on the card all at once. Here are the screens and steps used to unhide (deselect) all images marked as hidden:
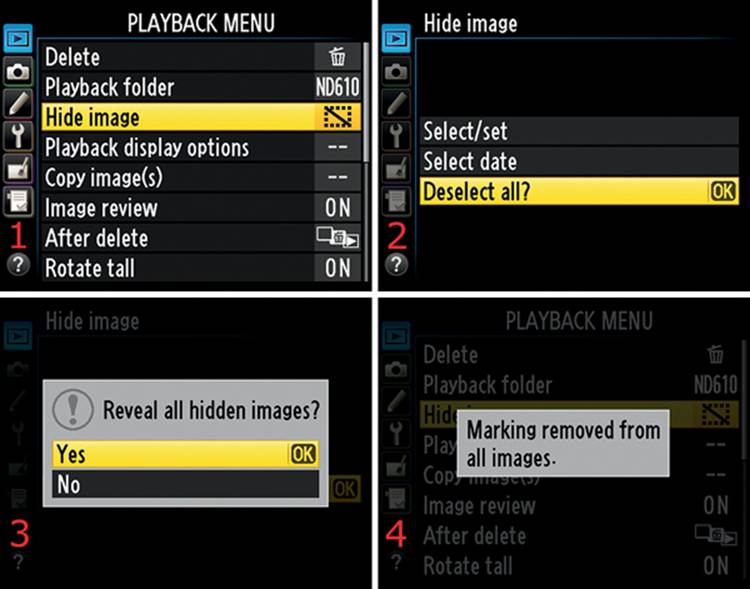
Figure 2.7 – Unhide images with Deselect all? option
1. Select Hide image from the Playback Menu and then scroll to the right (figure 2.7, screen 1).
2. Choose Deselect all? from the list and then scroll to the right or press the OK button (figure 2.7, screen 2).
3. At the Reveal all hidden images? screen, select Yes and press the OK button. An hourglass will appear for several seconds, and all hidden images on the card will then be marked as viewable (figure 2.7, screen 3).
4. After the images are unhidden, the Monitor will display Marking removed from all images (figure 2.7, screen 4).
Unhide Images Removes Protection Too
If you have images that are both hidden and protected and then you unhide them, the delete protection is removed at the same time.
Playback Display Options
(User’s Manual – Page 209)
The Playback display options selection allows you to customize how the D610 displays several histogram and data screens for each image. You get to those screens by displaying an image on the camera’s Monitor and scrolling up or down with the Multi selector.
When you want to see a lot of detailed information about each image, you can select it here. Or, if you would rather take a minimalist approach to image information, simply turn off some of the screens. The None screen is the ultimate minimalist screen because it displays nothing except the image itself with no information overlays.
If you turn off certain screens, the camera still records the information for each image, such as lens used, shutter speed, and aperture. However, with no data screens selected, you’ll see only two screens when you scroll up or down. One is the main image view, and the other is a summary screen with a luminance histogram and basic shooting information. Those two screens are the basic image display screens, and they cannot be disabled.
You get to the additional screens by using the Multi selector to scroll vertically. I leave my camera set so I can scroll through my images by pressing left or right on the Multi selector. Then I can scroll through the data screens by scrolling up or down with the Multi selector.
Following are the photo information choices in the Playback display options menu:
Basic photo info
• Focus point
Additional photo info
• None
• Highlights
• RGB histogram
• Data
When you modify these selections, be sure to scroll up to Done and press the OK button to save your settings (figure 2.8, screen 3).

Figure 2.8 – Selecting Playback display options photo info
Use the following steps to enable or disable any of the five Playback display options screens:
1. Select Playback display options from the Playback Menu and scroll to the right (figure 2.8, screen 1).
2. Choose any of the five available screens by highlighting an option with the Multi selector and scrolling to the right to put a check mark in the box for that item (figure 2.8, screen 2).
3. After you have check marks in all the boxes for the screens you want to use, scroll up to Done and press the OK button (figure 2.8, screen 3).
Now, let’s look at what each of these selections accomplishes (figures 2.9 to 2.12).
None (Image Only)
This setting is designed to give you a somewhat larger view of the current image, using all of the available Monitor screen space to show the image (figure 2.9, screen 2). There are no text overlays, just the image by itself. This is a good selection for when you want to more easily evaluate an image and zoom in to look at details.
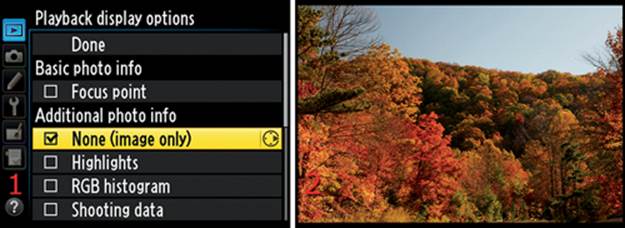
Figure 2.9 – Enabling the None (image only) display
Since only the image itself is displayed, it is easier to scroll around within it when you use the camera’s two zoom buttons (Playback zoom in and out). You can zoom all the way in to 38 × the normal image view. There is a tremendous level of detail buried inside each 24.3 MP image.
Focus Point
If you are curious about which autofocus (AF) point was focused on your subject during an exposure, use this mode to easily find out. If you used Single-point AF or Dynamic-area AF, you’ll see a single red AF indicator where the camera was focused when you took the picture.

Figure 2.9.1 – Enabling the Focus point display
Focus point is a useful function for reviewing how the camera’s AF system performs in different imaging situations. If you are using Auto-area AF you’ll see several red focus points that provided AF in your image (figure 2.9.1, screen 2). If you were using Single-point AF, Dynamic-area AF, or 3D-Tracking, you will see only one red focus point. In figure 2.9.1, screen 3, you can see the red focus point on the corner of the baby’s right eye. (We will discuss AF-area modes in detail in the chapter titled Autofocus, AF-Area, and Release Modes.)
Highlights
If you put a check mark next to the Highlights selection, as shown in figure 2.10, screen 1, you will turn on what I call the blink mode. You’ll see the words RGB Highlights at the bottom left of the image (figure 2.10, screens 2 and 3).

Figure 2.10 – Enabling the Highlights display (blinks white to black and repeats)
When you have Highlights enabled and you see a blinking white and black area in an image on the Monitor, it means that particular area of the image has turned completely white and lost all detail, or blown out (become too bright). Of course, there is no way to display a blinking image in a printed book, so screens 2 and 3 in figure 2.10 represent the white and black blinks, respectively. You can see the overexposed clouds at the red arrows near the tops of figure 2.10, images 2 and 3. Additionally, the letters RGB will be highlighted in yellow and will blink. You will need to use exposure compensation or manually control the camera to contain the exposure within the dynamic range of the camera’s sensor.
If you examine the histogram of our example image, you will note that it is a mildly overexposed image. You can see that the histogram is cut off, or clipped, on the right side (red arrow in figure 2.10.1) or is past the right edge of the window.
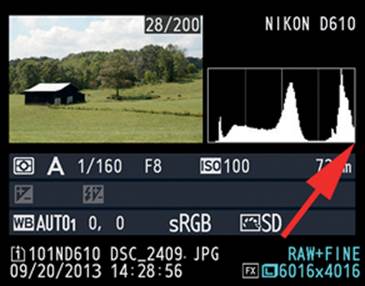
Figure 2.10.1 – Histogram is clipped on the highlight side
Current software cannot usually recover any image data from the blown-out sections. The exposure has exceeded the range of the sensor and has become completely overexposed in the blinking area. We will discuss how to deal with images that have light ranges exceeding the sensor’s recording capacity in the chapter called Metering, Exposure Modes, and Histogram.
Highlights mode conveniently warns you when you have surpassed what the sensor can capture and lets you know that portions of the image are overexposed.
Note: You should learn to use the histogram on your camera! In my opinion, it is as important as the exposure meter. It will inform you when you have over-or underexposed part or all of your image. If you faithfully evaluate your images with the histogram immediately after you take them, you will be able to judge when an image is correctly exposed and will come away with the best exposures you have ever made.
In the next section we will consider how to enable and use the histogram screens on your camera.
RGB Histogram
A histogram is a digital readout that shows the range of light and color in an image. If there is too much contrast, the histogram will be cut off. We’ll examine the histogram in great detail later. For now, let’s take a quick look at the screen that will appear if you turn this feature on.
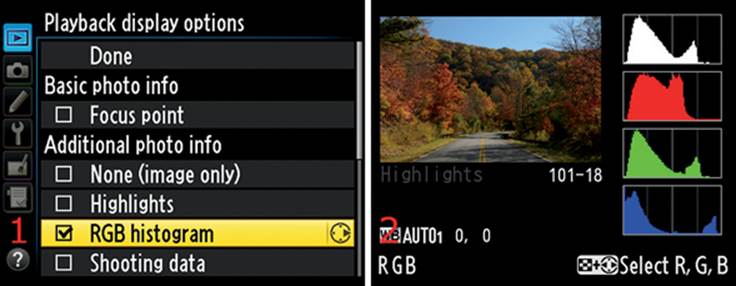
Figure 2.11 – Enabling the RGB histogram display
I like this feature because it allows me to view not just a basic luminance (brightness) histogram like some cameras, but all three color (chrominance) histograms—red, green, and blue (RGB)—and a luminance histogram on one screen (figure 2.11). The D610 stacks the four histograms on the right side of the screen, with the luminance histogram on top (white) and the RGB color histograms underneath.
It is quite useful to see each color channel in its own histogram since it is possible to overexpose, or blow out, only one color channel. The luminance histogram is usually very similar to the green channel histogram because green is the most common color.
Shooting Data
This setting will give you up to four additional image data screens to scroll through; each contains quite a bit of detail (metadata) about the image. These screens overlay a dim version of the actual picture they represent.
The data on these screens includes the following information (figure 2.12):
Shooting data, first screen(figure 2.12, screen 2)
• Light meter in use (Matrix, Spot, or Averaging), Shutter speed, and Aperture
• Exposure (shooting) mode (P, S, A, M) and ISO sensitivity
• Exposure compensation value and exposure tuning (if used)
• Focal length (e.g., 55mm)
• Lens overview (e.g., 24–85mm f/3.5–4.5)
• Focus mode (AF) and vibration reduction (VR) settings
• Flash type (e.g., Auto, Slow sync, Red-eye reduction, Fill flash) and Commander mode (e.g., CMD)
• Flash control and compensation (e.g., M:TTL +0.7)
Shooting data, second screen (figure 2.12, screen 3)
• White balance (e.g., Color temp, fine tuning, PRE)
• Color space (sRGB, AdobeRGB)
• Picture control detail (e.g., Neutral, Standard, Vivid)
• Quick adjust settings: Quick Adjust, Sharpening, Contrast, Brightness, Saturation, Hue
Shooting data, third screen (figure 2.12, screen 4)
• Noise reduction (High ISO NR and Long exposure NR)
• Active D-Lighting (Off, Low, Normal, High, Extra high, Auto)
• HDR exposure differential and smoothing settings (e.g., Auto, High)
• Vignette control settings (Off, Low, Normal, High)
• Retouch history (e.g., D-Lighting, Warm filter, Trim)
• Image Comment (you can add up to 36 characters)
Shooting data, fourth screen (figure 2.12, screen 5)
• Artist (you can add your name, up to 36 characters)
• Copyright (you can add the copyright holder, up to 54 characters)
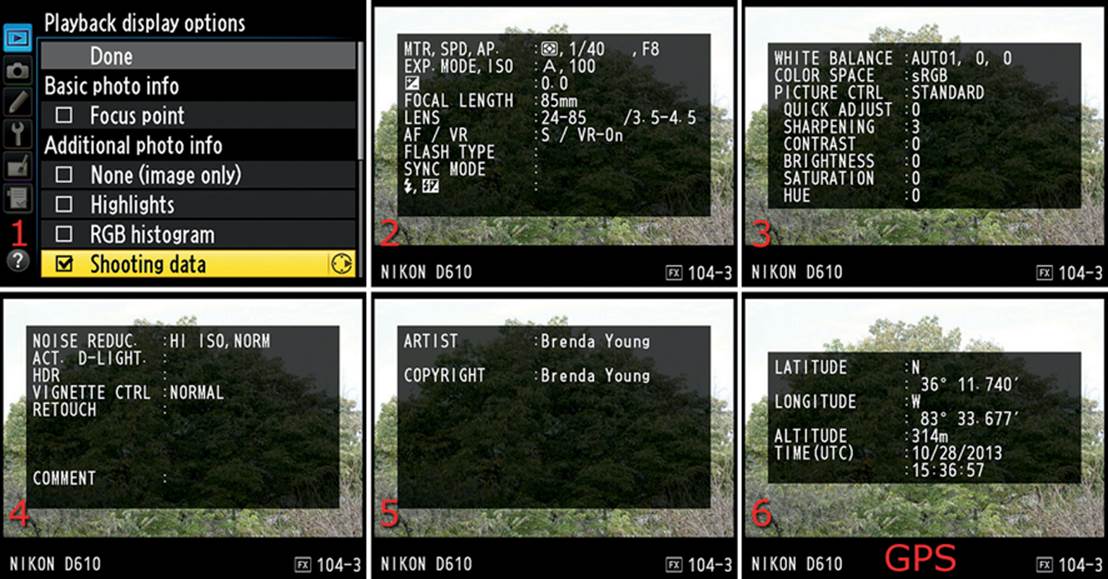
Figure 2.12 – Enabling the Shooting data display
Note: If you take a picture with a GPS unit attached and active on your D610, you’ll have an additional screen available—even if you don’t have any other Shooting data screens selected. Figure 2.12, screen 6, shows the GPS screen. The GPS data screen shows Latitude, Longitude, Altitude, and Time (UTC). The GPS screen is not controlled by the Playback display options setting. It will appear after the Shooting data screens if a GPS was mounted at the time you took a picture. It will not appear if no GPS was active.
Those are a lot of screens to scroll through, but they provide a great deal of information about the image. Look how far we’ve come from the days when cameras wrote date information on the lower right of the image (permanently marking it) or between the frames on pro-level cameras.
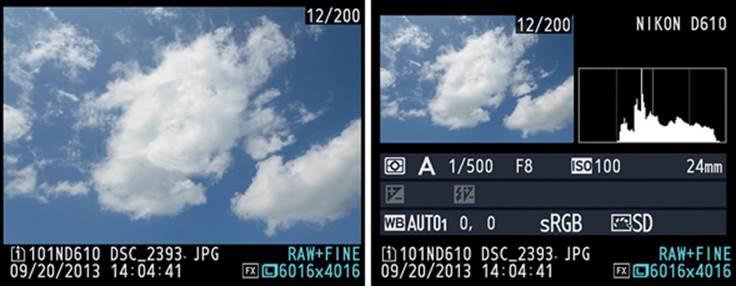
Figure 2.13 – These two display screens are always available
Including the two standard display screens shown in figure 2.13, there are eight screens just brimming with data on the D610—plus the GPS screen. You can get by with the main image display (figure 2.13, left) and one summary display (figure 2.13, right), which are always available. The summary display is a condensation of the most important shooting information. It even includes a small luminance histogram.
Settings Recommendation: I always leave the Highlights (figure 2.10) and RGB histogram (figure 2.11) displays turned on because I want to confirm that I’m not accidentally blowing out important sections of my image. The Highlights blink mode warns me when my images have overexposed areas, allowing me to adjust my exposure and reshoot the image. The RGB histogram allows me to see all the color channels in case one of them is clipped off on the light or dark sides. It also allows me to see how well I am keeping my exposure balanced for light and dark. The Shooting data screens are not very important to me because I use the summary screen (figure 2.13, screen 2) with only the most important exposure information displayed. Also, if I enable the Shooting data screens, I have to scroll through four more screens to get to my RGB histogram screen.
Copy Image(s)
(User’s Manual – Page 209)
The D610 provides a means to Copy image(s) between the camera’s two card slots. I’ll refer to the camera’s two SD/SDHC/SDXC card slots as simply the SD cards slots. If you’ve been shooting and decide you want a backup on the other card or want to give images to someone else, you can use this function to copy images between the two cards.
This convenient function has several steps: select a source card (if both cards have images) and the source folder; then select the images to copy; then select the folder on the destination card in which you want to place the images. Figure 2.14 shows the screens used to Copy image(s). First you’ll need to select an image source. If Select source is grayed out, there are two potential reasons, which are explained after the following steps.

Figure 2.14 – Selecting a source for images to copy
Refer to figure 2.14 and follow these steps to select a source card:
1. Select Copy image(s) from the Playback Menu and scroll to the right (figure 2.14, screen 1).
2. Choose Select source from the list and scroll to the right (figure 2.14, screen 2).
3. Choose one of the card slots (Slot 1 or Slot 2).
4. Press the OK button to lock in your choice.
Why is Select source grayed out? – When I first opened the menu shown in figure 2.14, I found only one item available: Select image(s). The rest of the choices were grayed out. I figured out that there are two reasons Select image(s) may be the only option available. First, there might be images on only one of the cards. If only one card contains images, it has to be the source. This is the most likely scenario. Second, the SD card’s write-lock switch might be in the on position. The switch is on the side, and sometimes when you insert the card into a card reader or a camera at a slight angle the switch accidentally gets moved from the off position to the on position. Remove the card and unlock it. See the sidebar titled Accidentally Inserting a Write-Locked Card for more information about what happens when a write-locked card is inserted into one of the camera’s memory card slots.
The following instructions assume that you have a card in each slot and images on both cards. If you have images on only one card, you can skip this process.
When you have chosen a source, it’s time to select images to copy. It’s a somewhat complex process to describe but fairly easy to use.
Accidentally Inserting a Write-Locked Card
The camera cannot write to an SD card with the write lock set to on. If the locked SD card is the only one inserted into the camera, you will see the word CArd blinking on the Control panel (yes, for some reason it has an uppercase A). Also, if you press the Shutter-release button, a message will appear on the Monitor saying, Memory card is locked. Slide lock to “write” position. If there are two memory cards in the camera and one of them is locked, a blinking card slot icon will appear on the Control panel and Information display screen (press the Info button once to see the Information display screen). The blinking card symbol on the Information display screen will have a key icon in the middle, which means the card needs to be unlocked. If you don’t notice the blinking card icons, it may take a while to realize that you’ve accidentally moved the write-lock switch to the locked position on one of the cards. The camera is smart enough to write to the other SD card when it can’t access one of them, so you may be happily snapping images, thinking they are being saved to the primary SD card (Slot 1) when they are actually being sent to the secondary card (Slot 2), or vice versa. The camera will continue displaying images found on the locked SD card if it contains images and the Playback folder is set to All in the Playback Menu. The D610 can still read the card and display images from a write-locked SD card.
First, follow these steps to choose a folder:
1. Choose Select image(s) from the list and scroll to the right (figure 2.15, screen 1).
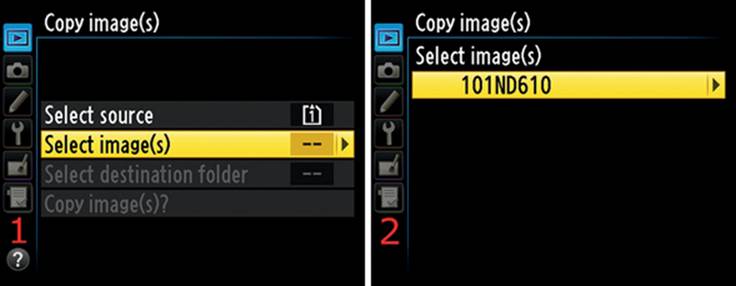
Figure 2.15 – Selecting a source folder for images to copy
2. Choose the folder that contains the images you want to copy (figure 2.15, screen 2). My camera happens to be using a folder named 101ND610. Your camera may have several folders available, or only one. After you have chosen a folder, scroll to the right.
3. There are three options for copying images: Deselect all, Select all images, and Select protected images (figure 2.16). Each option has a slightly different way of doing things. Choose only one option for your copy operation, follow the directions for your chosen option, then continue with step 4.
• Deselect all – Choose Deselect all and then scroll to the right (figure 2.16, screen 1). Deselect all opens a list of images, none of which have been selected. It sounds a little weird to select images for copying with a function named Deselect all, but this means that the camera automatically deselects all the images so you can choose which new images to copy. You’ll need to scroll around with the yellow rectangle and select images one at a time. Mark (Set) an image for copying by pressing the Playback zoom out/thumbnails button, and you’ll see a small white check mark appear in the top-right corner of the image thumbnail. Figure 2.16, screen 2 (red arrow), shows only one picture selected, number 101–11. It’s the only one with a check mark. Now move on to step 4.
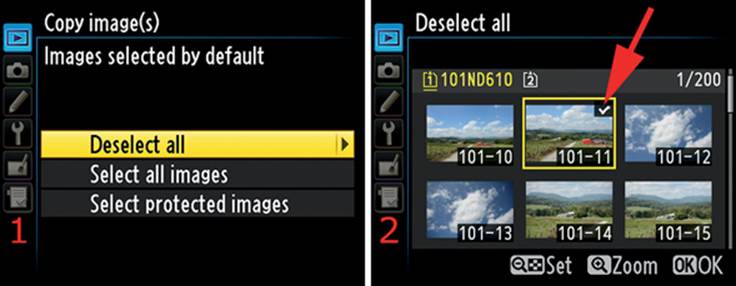
Figure 2.16 – Deselecting all images to copy
• Select all images – Choose Select all images and scroll to the right (figure 2.17, screen 1). The Select all images screen will appear, with all images selected (they all have check marks, as shown in figure 2.17, screen 2). If you want to copy all of the images, move on to step 4 now. If you want to deselect a few of them before copying, scroll to an image and press the Playback zoom out/thumbnails button. This action will remove the check mark from the image thumbnail. After you’ve unchecked the images you don’t want to copy, move on to step 4.
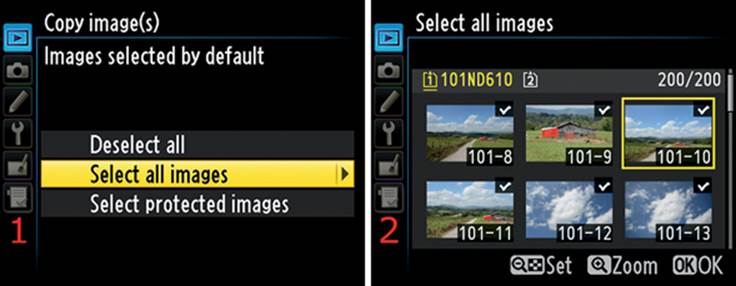
Figure 2.17 – Selecting all images to copy
• Select protected images – Choose Select protected images and scroll to the right (figure 2.18, screen 1). If you have used the Help/protect (WB) button to mark images as protected, they will appear with a key symbol and a check mark in the list of images, indicating that they are already checked for copying (red arrows in figure 2.18, screen 2). If you have many images on the card and only a few are protected, it may be hard to find the protected images. Rest assured that the camera knows which ones to copy. It will display all the images but only copy the protected ones. You can see the number of protected images that will be copied in the upper-right corner of the display (4/200). This figure shows that I will copy 4 protected images out of 200 images on the card in Slot 1 (from folder 101ND610). Now move on to step 4.
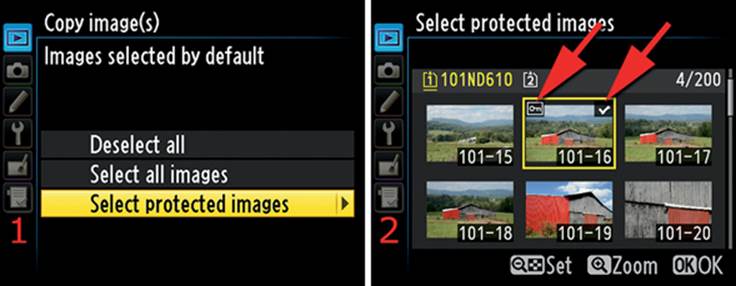
Figure 2.18 – Selecting protected images to copy
4. After you have selected all of the images you want to copy, press the OK button and the Monitor will display the Copy images(s) menu. Now it’s time to select a destination folder into which you’ll copy the images (figure 2.19).
5. Choose Select destination folder from the Copy image(s) menu and scroll to the right (figure 2.19). You will have two options: Select folder by number or Select folder from list (figure 2.20 and figure 2.21). Before we move on to step 6, let’s investigate these two options. Pick an option, follow the instructions for your option, then move on to step 6.
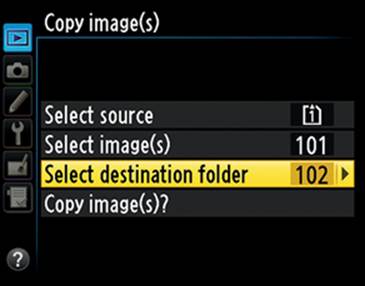
Figure 2.19 – Selecting a destination folder
• Select folder by number – Choose Select folder by number from the Select destination folder menu and scroll to the right (figure 2.20, screen 1). The next screen will display a folder number that can be changed to any number between 100 and 999 (figure 2.20, screens 2–4). If you select a number for a folder that already exists on the destination card, the images will be copied into that folder. If you select a folder number that does not exist on the destination card, the folder will be created and the source images will be copied into the new folder on the destination card.Figure 2.20, screens 2–4, represent just one Select folder by number screen, and show the different conditions you may see when selecting a folder. Screen 2 (red arrow) shows that folder 101 exists and has some images in it. The folder symbol is partially full. Screen 3 (red arrow) shows that folder 102 does not exist (there is no folder symbol) and the camera will create it if selected. Screen 4 shows that folder 103 does exist, but it is empty. Now move on to step 6.
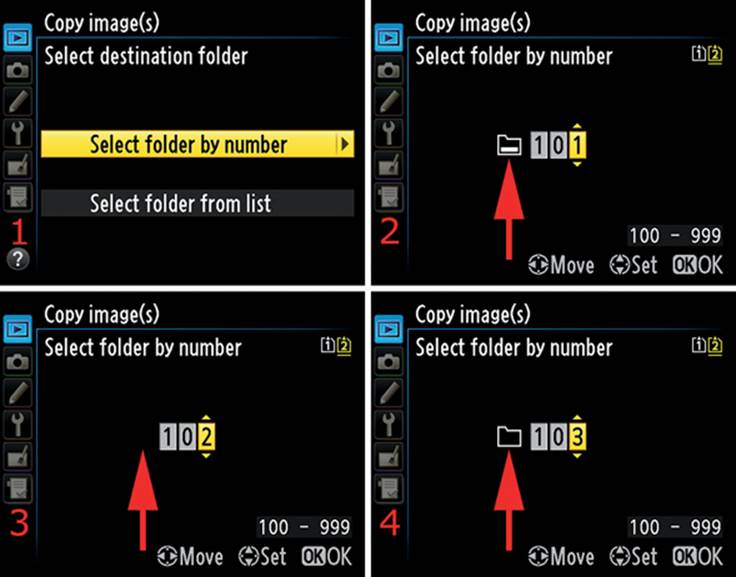
Figure 2.20 – Selecting a destination folder by number
• Select folder from list – If there are no existing folders on the destination card, this option will be grayed out. Obviously you can’t copy images to a folder that doesn’t exist, so use the Select folder by number option to create a new folder. If this option is not grayed out, choose Select folder from list and scroll to the right (figure 2.21, screen 1). The next screen will display a list of folders. My list in figure 2.21, screen 2, has three folders in it. I chose to use the folder named 104ND610. After you have selected the destination folder, move on to step 6.
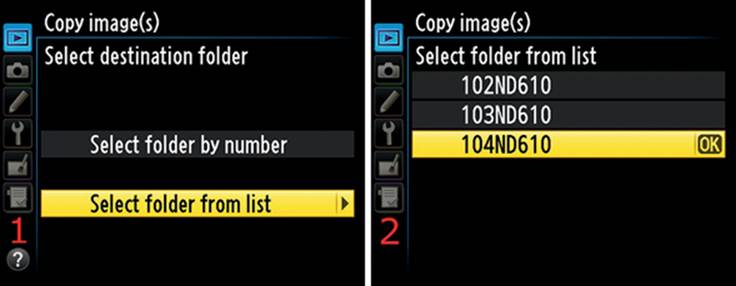
Figure 2.21 – Selecting a destination folder from a list of folders
6. Now it’s finally time to copy some images. We’ve selected a source card and folder, some images, and a destination folder. Notice that you don’t have to select a destination memory card. Since we’ve already selected a source card, the other card automatically becomes the destination. The D610 does not support copying images to the same memory card; you can copy only to the other card. All that’s left is to select Copy image(s)? and press the OK button.
7. Figure 2.22 shows the screens for this step. After you have selected Copy image(s)?, you’ll see a screen asking for verification. Mine says Copy? 3 images (figure 2.22, screen 2). Select Yes and press the OK button. Figure 2.22, screen 3, shows that the camera is Copying 1/3 pictures from the source card to the destination card. Notice that the screen shows the progress of the copy action with a green progress bar. This will take several minutes to complete if you are copying a large number of images.
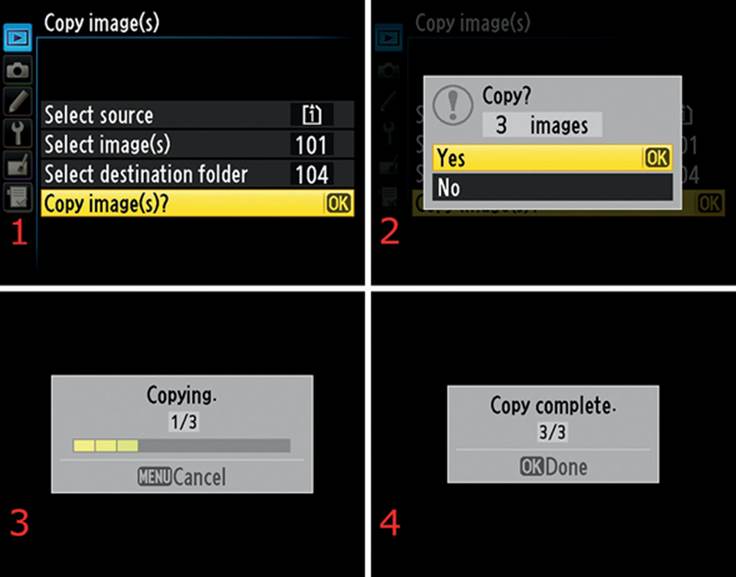
Figure 2.22 – Copying images
8. Figure 2.22, screen 4, shows the final screen in the series, signifying that the image copying process is complete. Press the OK button to return to the main menu.
There’s one more screen to be aware of, in case you try to copy images into a folder where they already exist. If an identical file name already exists in the destination folder, you may or may not want to overwrite it.
The camera will warn you with the screen shown in figure 2.23, and it will display thumbnails of both images. You can choose Replace existing image, Replace all, Skip, or Cancel.
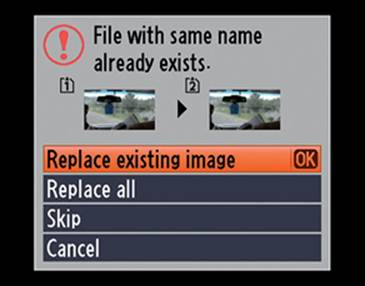
Figure 2.23 – Image overwrite warning
Image Review
(User’s Manual – Page 212)
Image review does exactly what it says: it displays an image you’ve just taken on the Monitor. With this function turned On, you’ll see each picture you take just after you take it. You can review the image for quality and usefulness.
With Image review set to Off, you won’t see each picture unless you press the Playback button after you take it. This saves battery life. However, the battery is long lived because the D610 does not use a lot of power. If you prefer to review each image after you take it, then you need to set this feature to On.
There are two Image review settings, as shown in figure 2.24:
• On shows a picture on the Monitor after each shutter release
• Off causes the Monitor to stay off when you take pictures
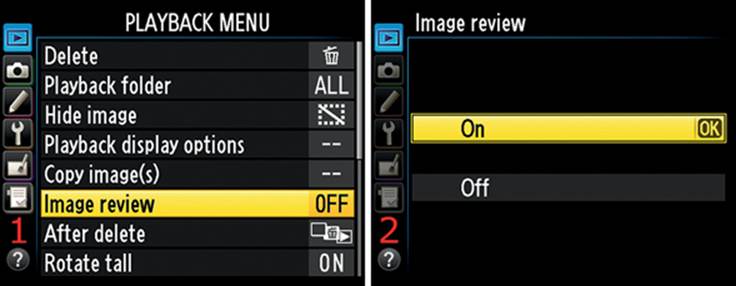
Figure 2.24 – Enabling Image review
Here are the steps to choose an Image review setting (figure 2.24):
1. Choose Image review from the Playback Menu and scroll to the right (figure 2.24, screen 1).
2. Select On or Off from the Image review screen (figure 2.24, screen 2).
3. Press the OK button to save the setting.
Most people turn this feature on right away. Otherwise the only way to view an image after you take it is to press the Playback button.
Note: You can control how long each image is displayed on the Monitor before it shuts off by adjusting Custom Setting Menu > c4 Monitor off delay > Image review. This custom Image review time can be adjusted to display pictures from 2 seconds to 10 minutes. We’ll discuss this in more detail in the chapter titled Custom Setting Menu.
Settings Recommendation: Since the battery lasts a long time, I leave Image review set to On. I am an unashamed chimper (see sidebar, Are You a Chimper Too?) and always examine each image, if there’s time. Photography is enjoyable, and one of the good things is the satisfaction you feel when you capture a really nice image. However, if you are shooting a sports event and blasting through hundreds of shots per hour, there’s not much time to view each image. It all boils down to how you shoot. If you aren’t inclined to view your images as you take them, it may be a good idea to set Image review to Off to save battery life and time.
Are You a Chimper Too?
Chimping means reviewing images on the Monitor after each shot. I guess people think you look like a monkey if you review each image. Well, I do it anyway! Saying “Oo, Oo, Oo, Ah, Ah, Ah” really fast when you’re looking at an image and are happy with it may make you sound like a monkey. That’s chimping with style, and it’s why the term was coined.
After Delete
(User’s Manual – Page 212)
If you delete an image during playback, one of your other images will be displayed on the Monitor. The After delete function lets you select which image is displayed after you delete an image. The camera can display the next image or the previous image, or it can detect which direction you were scrolling—forward or backward—and let that determine which image appears after you delete another.
The three selections on the After delete menu are Show next, Show previous, and Continue as before (figure 2.25).
• Show next – If you delete an image and it wasn’t the last image on the memory card, the camera will display the next image on the Monitor. If you delete the last image on the card, the previous image will be displayed. Show next is the factory default behavior of the D610, since most people prefer to see the next picture.
• Show previous – If you delete the first image on the memory card, the camera will display the next image. If you delete an image somewhere in the middle or at the end of the memory card, the previous image will be displayed.
• Continue as before – This weird little setting shows the flexibility of computerized camera technology in all its glory. If you are scrolling to the right (the order in which the images were taken) and decide to delete an image, the camera uses the Show next method to display the next image. If you happen to be scrolling to the left (opposite from the order in which the images were taken) when you decide to delete a picture, the camera will use the Show previous method instead.
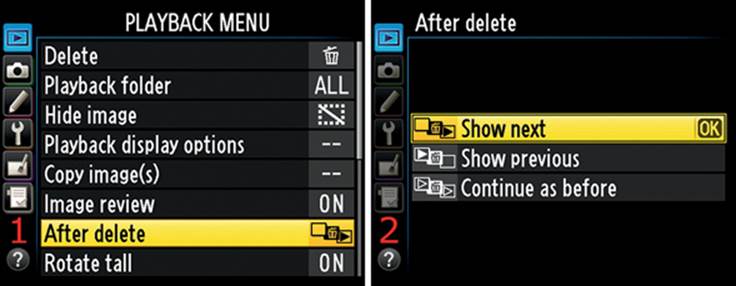
Figure 2.25 – Playback Menu – After delete
Use the following steps to choose an After delete setting (figure 2.25):
1. Choose After delete from the Playback Menu and scroll to the right (figure 2.25, screen 1).
2. Select one of the three settings from the After delete screen (figure 2.25, screen 2).
3. Press the OK button to lock in the setting.
Settings Recommendation: When I delete an image, I’m not overly concerned about which image shows next—most of the time. However, this functionality is handy in certain styles of shooting and when deleting rejects. For instance, some sports or wildlife shooters might like to move backwards through a long sequence of images, starting with the last image taken. They can then delete the images that are not usable in the sequence, and the camera will immediately show the previous image for review. When they reach the first image in the sequence, the entire series is clean and ready to use.
I leave my camera set to Continue as before. Why not use all the neat technology built into your camera?
Rotate Tall
(User’s Manual – Page 212)
Rotate tall affects how the camera displays vertical images on the Monitor. When you shoot a portrait-oriented (vertical) image, with the camera turned sideways, the image can later be viewed as a horizontal image lying on its side or as a smaller, upright (tall) image on the camera’s horizontal Monitor.
If you view the image immediately after taking it, the camera’s software assumes that you are still holding the camera in the rotated position, and the image will be displayed correctly for that angle. Later, if you are reviewing the image with the camera’s playback functionality and have Rotate tall set to On, the image will be displayed as an upright, vertical image that is smaller so it will fit on the horizontal Monitor. You can zoom in to see sharpness detail, if needed.
If you would rather have the camera leave the image lying on its side in a horizontal view, forcing you to turn the camera 90 degrees to view it, choose Off.
The following two settings are available on the Rotate tall menu (figure 2.26):
• On – When you take a vertical image, the camera will rotate it so you don’t have to turn your camera to view it naturally during playback. This resizes the view of the image so a vertical image fits in the horizontal frame of the Monitor. The image will be a bit smaller than normal. When you first view the image after taking it, the camera does not rotate it, since it assumes you are still holding the camera in a vertical orientation. It also senses which end of the camera is up—if the Shutter-release button is up or down—and displays the image accordingly.
• Off – Vertical images are left in a horizontal direction, lying on their side; turn the camera to view the images in the same orientation as when they were taken. This provides a slightly larger view of a portrait-oriented image.
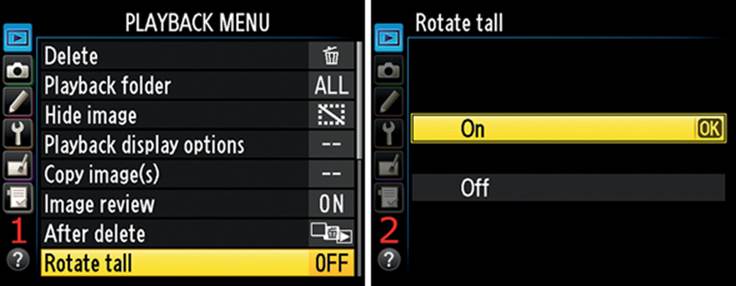
Figure 2.26 – Playback Menu – Rotate tall
Here are the steps to choose a Rotate tall setting:
1. Choose Rotate tall from the Playback Menu and scroll to the right (figure 2.26, screen 1).
2. Select On or Off from the Rotate tall screen (figure 2.26, screen 2).
3. Press the OK button to finish.
Settings Recommendation: I leave Rotate tall set to On so I can view a portrait-oriented image in its natural, vertical orientation without turning my camera. Be sure you understand the relationship between this function and Auto image rotation, which stores orientation data with the picture. I always set Rotate tall and Setup Menu > Auto image rotation to On. Those settings let me view images in the correct orientation on my Monitor and computer screen.
Rotate Tall versus Auto Image Rotation
There is another camera function that affects how image rotation works. It’s called Auto image rotation, under the Setup Menu. We’ll discuss that function more deeply in the chapter titled Setup Menu. Auto image rotation causes the camera to record the angle at which you are holding it as part of the image metadata. Auto image rotation should be set to On so an image will report how it should be displayed on the Monitor and your computer. Rotate tall and Auto image rotation work together to display your image in the correct orientation. Rotate tall gives you the choice of how the image is viewed based on the orientation information it finds in the image metadata. Auto image rotation causes the camera to store how the image was taken so it will know whether the image has a vertical or horizontal orientation. It can then report this information to the Rotate tall function.
Slide Show
(User’s Manual – Page 213)
I used to do slide shows back in the old film days. I’d set up my screen, warm up my projector, load my slides, and watch everyone fall asleep by the hundredth slide. For that reason, I hadn’t been using the Slide show functionality in my previous cameras very often. However, with the D610’s big 3.2-inch monitor and VGA resolution, it should be a satisfying viewing experience for one or two people.
If the monitor is not large enough, you can connect the camera to a high-definition television (HDTV) and do a slide show for an even larger group. Connecting to an HDTV requires the separate purchase of an HDMI (type A) to mini-HDMI (type C) cable.
When you are ready for your show, you can control how long each image is displayed with the Frame interval setting. First, let’s see how to start a Slide show (following the D610’s menu order), and then we’ll see how to change the Image type for display and Frame interval timing.
Starting a Slide Show
You can start the Slide show immediately, and it will commence with a default display time (Frame interval) of two seconds (2 s) per image, displaying the images and movies it finds on your camera’s memory card(s).
Use the following steps to start a Slide show immediately:
1. Select Slide show from the Playback Menu and scroll to the right (figure 2.27, screen 1).
2. Select Start and the Slide show will begin immediately, using the default Image type (Still images and Movies) and Frame interval timing (2 s).
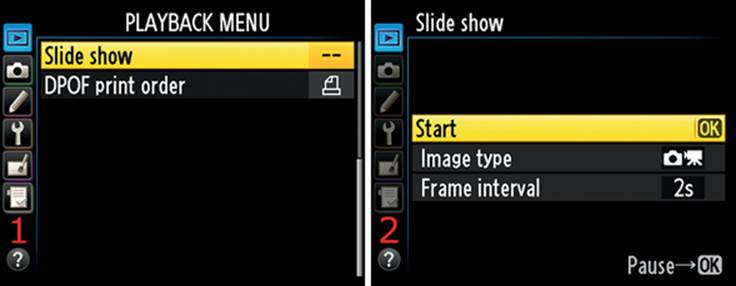
Figure 2.27 – Playback Menu – Slide show
You can easily change the way the camera chooses what Image type to display during the Slide show. The next subsection shows how.
Selecting an Image Type for a Slide Show
As you will notice in figure 2.27.1, screen 2, you can set the camera to display any Still images and movies it finds, or Still images only or Movies only.
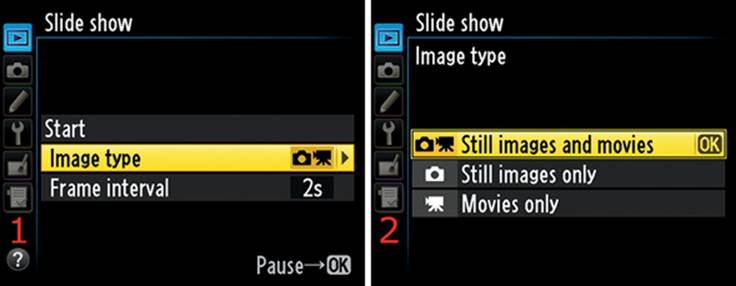
Figure 2.27.1 – Playback Menu – Slide show Image type
Use the following steps to change the Image type for display:
1. Select Image type from the Slide show screen (figure 2.27.1, screen 1).
2. Choose one of the three listed image types (figure 2.27.1, screen 2).
3. Press the OK button.
Finally, let’s consider how to change the amount of time before the camera changes to the next image or movie in the slide show.
Changing a Slide Show’s Frame Interval
If you want to allow a little more time for each Still image to display or between each Movie, you’ll need to change the Frame interval (display time). Your Frame interval choices are as follows (figure 2.28):
1. 2 s – 2 seconds
2. 3 s – 3 seconds
3. 5 s – 5 seconds
4. 10 s – 10 seconds
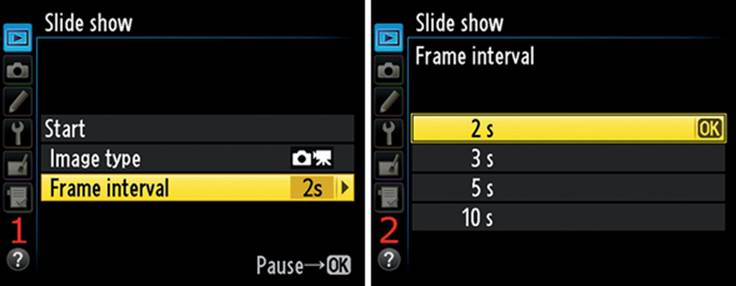
Figure 2.28 – Playback Menu – Slide show Frame interval
Use these steps to change the Slide show’s Frame interval:
1. Choose Frame interval from the Slide show menu and scroll to the right (figure 2.28, screen 1).
2. Select one of the four choices between 2 s and 10 s.
3. Press the OK button to lock in a new Frame interval.
To start the Slide show after you change the Frame interval, repeat the steps shown in the previous subsection, Starting a Slide Show. The Slide show will now run at the speed you chose.
Settings Recommendation: I usually set the Frame interval to 3 s. If the images are especially beautiful, I might set it to 5 s. I’ve found that 2 s is not quite enough, and 5 s or 10 s may be too long. I wish there were a four-second setting, but 3 s seems to work well most of the time.
There are several options that affect how the images are displayed during a slide show. None of these options are in the camera menus; they are available through the camera’s controls. Your options are as follows:
• Skip back/Skip ahead – During the slide show you can go back to the previous image for another viewing by simply pressing left on the Multi selector. You can also see the next image with no delay by pressing right on the Multi selector. This is a quick way to skip images or review previous images without stopping the slide show.
• View additional photo information – While the slide show is running, you can press up or down on the Multi selector to view the additional data screens. The screens you will see depends on how you have your camera’s Playback display options configured for Highlights, Focus point, RGB histogram, and Shooting data (see the section called Playback Display Options earlier in this chapter). If any of these screens are available, they can be used during the slide show.
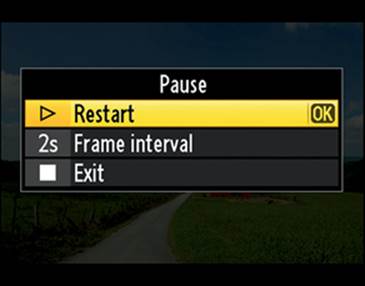
Figure 2.29 – Playback Menu – Slide show Pause and Restart
• Pause slide show – During the slide show you may want to Pause, change the Frame interval, or even Exit the show. If you press the OK button, the slide show will be suspended and you will see the Pause screen (figure 2.29).
• Restart – Selecting OK or scrolling to the right with the Multi selector when this option is highlighted continues the slide show, starting with the image following the last one that was viewed.
• Frame interval – Selecting OK or scrolling to the right with the Multi selector when this option is highlighted takes you to the screen that allows you to change the display time to one of four values: 2 s, 3 s, 5 s, or 10 s. After you choose the new Frame interval, select Restart to continue the slide show where you left off.
• Exit – This option exits the slide show.
• Exit to the Playback Menu – If you want to quickly exit the slide show, simply press the MENU button and you’ll jump directly back to the Playback Menu.
• Exit to playback mode – You can press the Playback button to stop the slide show and switch to a normal full-frame or thumbnail view of the last image seen in the slide show. This exits the show on the last image viewed.
• Exit to shooting mode – If you press the Shutter-release button halfway down, the slide show will stop. The camera is now in shooting mode, meaning that it is ready to take some pictures.
DPOF Print Order
(User’s Manual – Page 202)
At first I thought it was odd that Nikon chose to put image printing functions in the Playback Menu. Then I realized that printing is a permanent form of image playback. You play (print) the images to your printer and then view them without a camera or a computer. What a concept!
DPOF print order allows you to create a print order on a memory card and plug that card into a compatible inkjet printer, or superstore kiosk printer, and print JPEG images. The function does not work with RAW images. Let’s see how it works.
In-Camera Printing – Not for RAW Images
If you are a RAW shooter, the in-camera printing process won’t benefit you, unless you use the Retouch Menu to create JPEGs on your memory card. Not all printers can handle printing from RAW files, so Nikon chose to limit DPOF and PictBridge printing from the D610 to JPEG files.
DPOF Printing
This function is designed to create a print order on your camera’s memory card. Later this print order can be used to print directly from the memory card by inserting it into a DPOF-compatible printer. You can print to any device that supports DPOF. All you have to do is insert the memory card, select print from the printer, and wait for your pictures to print out. This is not a difficult process, and it is quite fun and satisfying.
When using DPOF you do not have to connect the camera to anything. Simply inserting a memory card that contains a digital print order on it into a DPOF compatible printer will cause the printer to detect the order and offer to fill it. Each DPOF printer’s method of doing this varies, of course. However, the entire process is automated so that a new user won’t have to do much more than select the number of prints and whether or not a border is required. These seven steps will allow you to create and print a digital print order on your DPOF-compatible printer.
Use the following steps to create a new DPOF print order on your memory card.
1. Select DPOF print order from the Playback Menu and scroll to the right (figure 2.30). You will see the screen in figure 2.31, screen 1.
2. If you don’t have any existing digital print orders on the memory card, please skip this step and go directly to step 4. If you have an existing print order that you no longer want, you’ll need to choose Deselect all? and scroll to the right (figure 2.31, screen 1). The next screen will ask you,Remove print marking from all images? Yes/No. Choose Yes and press the OK button (figure 2.31, screen 2). If there are previously marked images, a message that says, Markings removed from all images will flash on the screen (figure 2.31, screen 3), and then the Playback Menu will reappear. Otherwise, no message will appear and the camera will return to the Playback Menu.
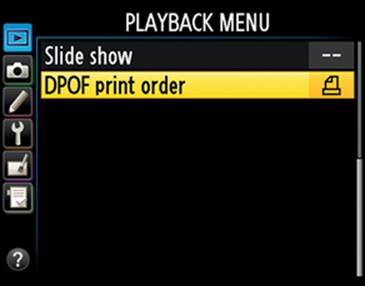
Figure 2.30 – DPOF print order

Figure 2.31 – Removing the print marking from all images
3. Since you’re going to create a new print order and save it to the memory card, choose Select/set from the DPOF print order screen and then scroll to the right (figure 2.32, screen 1).
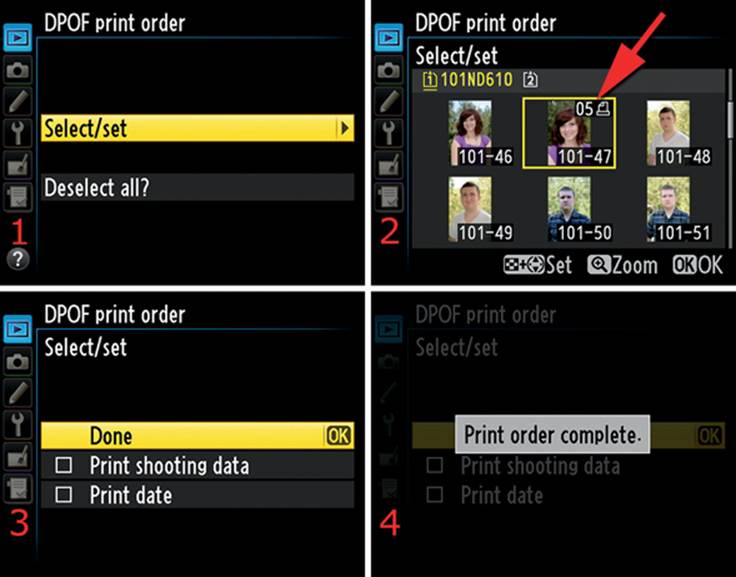
Figure 2.32 – Choosing images and number of prints
4. Now you’ll see the Select/set thumbnail list with all the JPEG images on your memory card (figure 2.32, screen 2). Select the images you want to print with the Multi selector. After you have highlighted an image, hold down the checkered Playback zoom out/thumbnails button and scroll up with the Multi selector. Each upward or downward press of the Multi selector changes the number of prints ordered for that particular image (figure 2.32, screen 2, red arrow). You can select from 1 to 99 prints for each image you highlight. I chose five prints for the image with the red arrow, which is displayed beside a printer symbol. After you have selected which images to print and how many copies you want, press the OK button.
5. The next screen allows you to add shooting data or date imprints to each of the images in the print order (figure 2.32, screen 3):
• Print shooting data – This prints the shutter speed and aperture on each print in the order
• Print date – This prints a date on each print in the order
Put check marks in the boxes next to these selections by highlighting the option you want and scrolling to the right with the Multi selector. When you have completed your choices, scroll up to Done and press the OK button (figure 2.32, screen 3). Be careful with this setting because the data will be printed on the front of the image. I leave these two selections unchecked when I print.
6. Finally you will be presented with a screen telling you that the print order is complete (figure 2.32, screen 4).
At this point, your print order has been saved to the memory card. You’ll need to remove it from the camera and insert it into the card slot of a DPOF-compatible printer or kiosk.
I have not found a way to create more than one print order on a single memory card. An existing order can be edited with the DPOF print order > Select/set function, or it can be removed with the DPOF print order > Deselect all? function. If you look at a memory card containing a print order on your computer, you’ll see a new folder named MISC. It will have a file in it named AUTPRINT.MRK. That file is the digital print order.
PictBridge Printing
Another way to print images without using a computer is to attach your camera’s USB cable to a PictBridge-compatible printer to print JPEG files (not RAW files). Most advanced amateur and professional users of the D610 will want to post-process their images in computer software (like Lightroom, Aperture, Nikon Capture NX2, or Photoshop) before printing, so this functionality is not used as often as other functions. However, it can be useful for someone who would rather simply take pictures and print them at home with little or no post-processing.
Since these seldom-used functions require multiple pages to describe, involve an external device connection, and many people do not use them, I have relegated the PictBridge printing information to a detailed document called PictBridge Printing with the Nikon D610 and included it in the downloadable resources at the following websites:
http://www.nikonians.org/NikonD610
http://rockynook.com/NikonD610
Author’s Conclusions
Wow! The Nikon D610 sure has a lot of playback screens and menus. I remember the old days when if you wanted to see your images, you’d have to find the old shoebox full of pictures or open an album and flip pages. Sometimes I miss photo albums. You know what? I’m going to run down to the superstore right now and buy several albums. Then I’ll have some images printed and put them into the albums. Better yet, I think I’ll go buy a DPOF-compatible printer so I can print my own images for the albums.
Now, let’s move on to the next menu system in the camera, the Shooting Menu. This is one of the most important menus because it affects how the camera is configured to shoot pictures. Learn the Shooting Menu’s settings well!