Mastering the Nikon D610 (2014)
1. Basic Camera Setup

Isabell and Her New Toys – Jesse Martinez (jesse101)
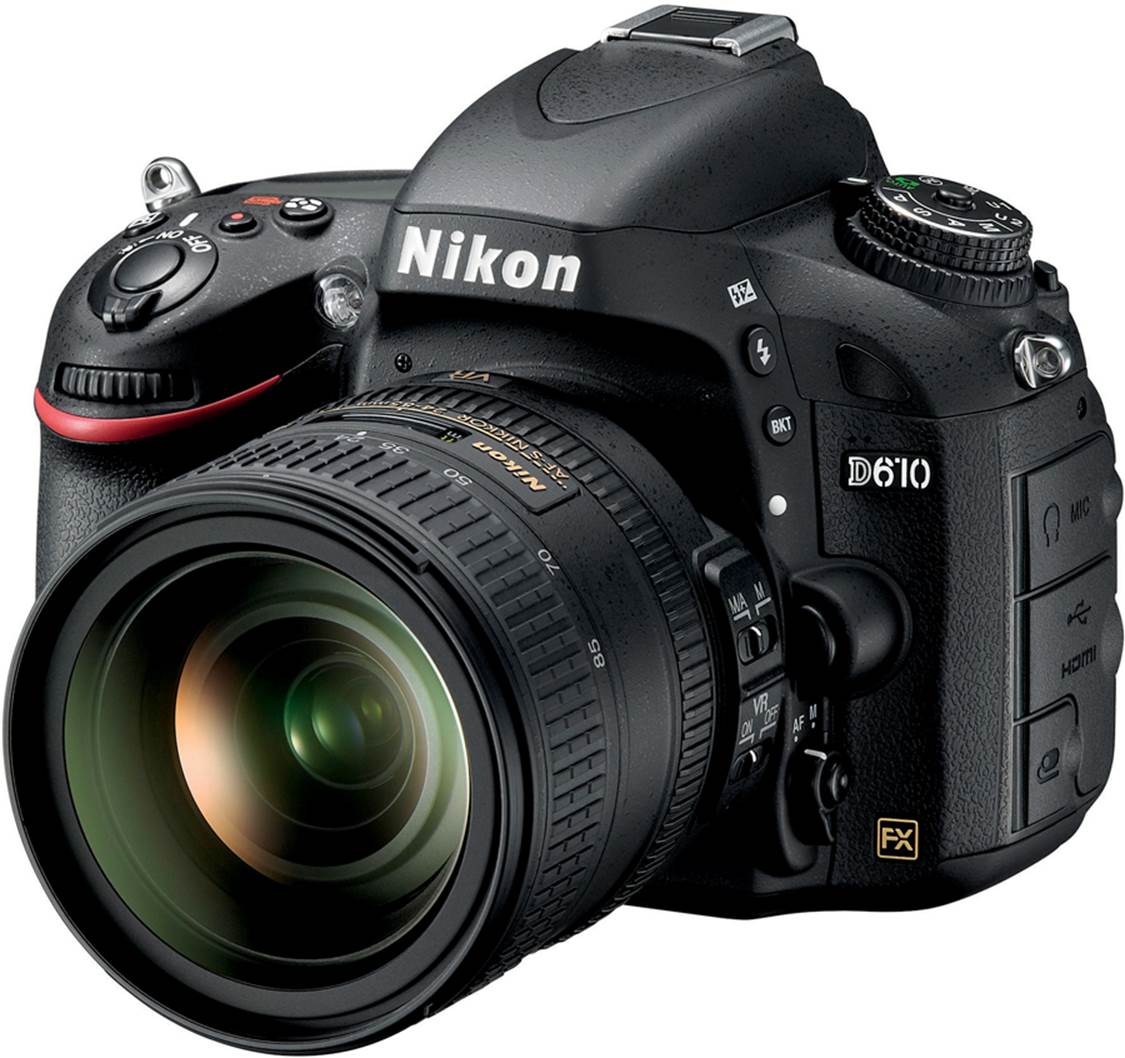
The Nikon D610 is an exciting new full-frame (FX), hybrid-digital, single-lens reflex (HD-SLR) camera in Nikon’s line of advanced digital cameras. It has a newly designed imaging sensor with even more dynamic range and image quality than the top-of-the-line Nikon D3X pro camera. With a camera body design and internal operating system based on the mature and stable Nikon D7100 and many of the same internal hardware features as in the Nikon D800—including the new, very powerful EXPEED 3 microprocessor system—the Nikon D610 is the ultimate advanced-enthusiast camera. It is the first step into the FX world, where full-frame sensors and professional lenses provide commercial-level image quality.
The D610 simply has everything an enthusiast photographer will need to bring home incredibly good images, without jumping through hoops. With the D610, digital photography has reached a level of maturity that will allow you to use your camera for a long time.
The massive resolution of the 24.3 megapixel (MP) sensor, an amazing dynamic range, and clean, broadcast-quality video make the D610 one of the world’s best digital cameras. In my opinion, the image is what counts, and the Nikon D610 can deliver some of the highest-quality images out there. It’s a robust camera body designed to last. With this camera we can return to the days when we seldom bought a new camera body and instead put our money into new Nikkor lenses. Wouldn’t you like to have some new lenses?
Sure, new Nikon cameras will come out, and, like me, you’ll be attracted to them. However, with the D610 you won’t have to buy a new camera unless you really want to. It will last for many years!
Now, let’s learn how to configure and use your new D610.
Learning about the Nikon D610
The difficulty in writing a book about a powerful camera like the Nikon D610 is balancing it for multiple types of users and their various levels of knowledge and interest. With too much technical detail, the book will read like a user’s manual. With too little technical detail, advanced users will get no benefit from the book.
Some users of the Nikon D610 HD-SLR camera have come over from the world of fully automated point-and-shoot cameras. On the other hand, many photographers have upgraded to the D610 from cameras like the Nikon D3200, D5300, and D7100. Then, there are professionals who bought a D610 to have a backup for their pro-level cameras, like the Nikon D300S, D700, D800, D800E, D3, D3S, D3X, and D4. Others have come over from the film world, drawn by the siren call of lower cost, immediate image use, and very high quality.
In Mastering the Nikon D610 I’ve tried my best to balance the needs of new and experienced users. I remember my first DSLR and my confusion about how to configure the camera compared to my old film SLR: What’s all this histogram, white balance, and color space stuff?
The bottom line is that the Nikon D610 is a rather complex camera, and it requires a careful study of resources like this book to really get a grasp on the large range of features and functions. According to Nikon, it’s an “advanced” camera, with features not found in lesser “consumer” models. It’s designed for people who really love photography and have a passion for image making that far exceeds just taking some nice pictures at a family event.
The D610 has most of the features found in cameras like the D800 and D4, which are cameras that professionals use to make a living. In fact, the Nikon D610 is becoming the camera of choice for many pros who want a backup camera or a smaller, lighter camera for pleasure use and activities like hiking, skydiving, and underwater adventures. The camera body is robust enough, with its magnesiumalloy polycarbonate frame, to take abuse and survive.
Following the publication of my books Mastering the Nikon D7100 and Mastering the Nikon D800, I compared the D7100, D800, and D610 side by side. I’m here to tell you that the Nikon D610 has all the critical functions found in the D800 and extends the feature set of the D7100.
The D610 has a full range of functions that allow you to shoot images and post-process them in the camera instead of on your computer. If you don’t like computers but want to take digital photographs and videos, the Nikon D610 is the camera for you!
Additionally, the Nikon D610 has a very powerful video subsystem, allowing you to record H.264/MPEG-4 Advanced Video Coding (AVC) compressed Full HD video movies to the camera’s memory cards, or stream uncompressed 8-bit 4:2:2 video to an external video recorder through its HDMI port.
I could rave for hours about all the cool features in the D610. In fact, I do go on raving about this camera for the next 12 chapters. I hope you can sense my enthusiasm for this impressive new imaging machine as you read this book. There are few cameras in the world with this level of capability, and you own one!
First Use of the Camera
Surprisingly, quite a few brand-new DSLR users are buying a Nikon D610 instead of a lower-cost, entry-level model. Even new users appreciate the robust high quality of the camera.
The upcoming sections and chapters are best read with your camera in hand, ready for configuration. There are literally hundreds of things to configure on this advanced DSLR. In this chapter, I’ll give new D610 users a place to start. Later, as you progress through this book, we’ll look at all the buttons, switches, dials, and menu settings in detail. That will allow you to fully master the operation of your Nikon D610.
Each menu in the camera has its own chapter or section. Plus there is additional information on how to put it all together in chapters like Metering, Exposure Modes, and Histogram; White Balance; Autofocus, AF-Area, and Release Modes; Live View Photography; and Speedlight Flash. Since the D610 has a movie mode, we’ll cover video capture in a separate chapter, Movie Live View.
First-Time HD-SLR Users
Although the D610 is an advanced enthusiasts’ camera, many brand-new HDSLR users have purchased a D610 as their first DSLR-type camera. New users may not know how to attach and remove a lens or change the battery, and they may need help with inserting and formatting memory cards.
The majority of this book’s readers, however, already know how to perform these tasks. I do not want to ask a more experienced DSLR user to read over the basics of DSLR use, so I’ve created a document called Initial Hardware Considerations that you can download from either of these websites:
http://www.nikonians.org/NikonD610
http://rockynook.com/NikonD610
There are also several other articles of interest to new Nikon D610 users on these webpages.
Now, let’s start with the initial configuration of a brand-new Nikon D610. There are five specific steps you must complete when you first turn on the camera.
Five Steps for First-Time Camera Configuration
This section is devoted to first-time configuration of the camera. There are certain settings that must be set up immediately (covered in this section) and others that should be configured before you use the camera extensively (covered in a later section, Camera Functions for Initial Configuration).
I won’t go into detail on all possible settings in this chapter. Those details are reserved for the individual chapters that cover the various menus and functions. Instead, I’ll walk you through five steps for first-time configuration of the camera. In the Camera Functions for Initial Configuration section I’ll refer you to the page numbers that provide the screens and menus for each function that should be configured before you use your camera for the first time. The later chapters will cover virtually all camera settings.
When you first configure an older Nikon, after inserting a battery into a just-out-of-the-box camera, the word CLOCK normally flashes on the camera’s upper Control panel or Information display (rear Monitor). When I first turned on my brand-new Nikon D610, I was expecting the flashing word, but it wasn’t there. Instead, the Control panel was blank, except for a battery charge indicator in the upper left corner. Other than that, nothing appeared on the Control panel until I completed the five-step initial setup, then a normal Control panel display was activated.
On page 28 of the Nikon D610 User’s Manual (English) it states that CLOCK will be flashing on the camera display if the camera’s internal time clock has not been set. It could be that some distributors set the clock on the camera before distribution. Mine certainly wasn’t flashing. Therefore, if you do see CLOCK flashing on any of the displays, be sure to set the clock before using the camera. In fact, we will review and set the clock during the final step of our five-step initial setup.
Let’s examine how to configure a new camera. You’ll see the following five screens when you first turn the camera on, and they must be set up immediately.
Setting the Language – Step 1
The D610 is multilingual or multinational. As partially shown in figure 1.1, the menus can be displayed in 28 languages. Most likely the camera will already be configured to the language spoken in your area since various world distributors have the camera somewhat preconfigured. The following is a list of the display languages available in the D610, firmware version C1.00, L1.009 (Setup Menu > Firmware version):
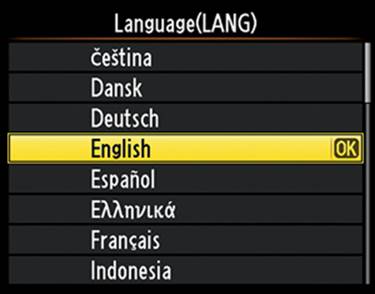
Figure 1.1 – Setup Menu Language screen
• Arabic
• Chinese (Simplified)
• Chinese (Traditional)
• Czech
• Danish
• Dutch
• English
• Finnish
• French
• German
• Greek
• Hindi
• Hungarian
• Indonesian
• Italian
• Japanese
• Korean
• Norwegian
• Polish
• Portuguese (Brazil)
• Portuguese (Portugal)
• Romanian
• Russian
• Spanish
• Swedish
• Thai
• Turkish
• Ukrainian
Here are the steps to select your language:
1. Refer to figure 1.1 for the Language list the camera presents on startup.
2. Use the circular Multi selector on the back of the camera—with arrows pointing left, right, up, and down—to scroll up or down until your language is highlighted.
3. Press the OK button in the center of the Multi selector to select your language.
The camera will now switch to the second screen in the setup series, the Time zone screen.
Setting the Time Zone – Step 2
This is an easy screen to use as long as you can recognize the area of the world in which you live. Use the map shown in figure 1.2 to find your area, then select it.
Here are the steps to select the correct Time zone for your location:
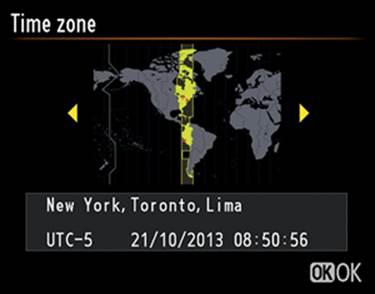
Figure 1.2 – Setup Menu Time zone screen
1. Refer to figure 1.2 for the Time zone screen. You’ll see yellow arrows pointing to the left and right on either side of the small black and gray world map.
2. With the Multi selector, scroll to the left or right until your world location is highlighted in yellow. You will see either a vertical yellow strip or a tiny yellow outline with a red dot. At the bottom of the screen you will see the currently selected Time zone. Mine is set to New York, Toronto, Lima (UTC-5), as shown in figure 1.2.
3. Press the OK button to lock in your Time zone.
The camera will now present you with the next screen in the series, the Date format screen.
Setting the Date Format – Step 3
The English-speaking world uses various date formats. The Nikon D610 allows you to choose from the most common ones. There are three date formats you can select (figure 1.3):
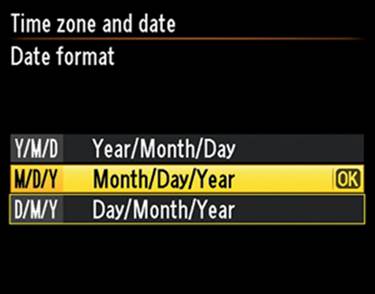
Figure 1.3 – Setup Menu Date format screen
• Y/M/D – Year/Month/Day (2013/12/31)
• M/D/Y – Month/Day/Year (12/31/2013)
• D/M/Y – Day/Month/Year (31/12/2013)
U.S. residents usually select the M/D/Y format. However, you may prefer a different format.
Here are the steps to select the Date format you like best:
1. Refer to figure 1.3 for the Date format screen.
2. Using the Multi selector, scroll up or down to the position of the date format you prefer. M/D/Y is selected in figure 1.3.
3. Press the OK button to select the format.
When you have selected a Date format, the camera will switch to the Daylight saving time screen.
Setting Daylight Saving Time – Step 4
Many areas of the United States observe daylight saving time. In the springtime, many U.S. residents set their clocks forward by one hour on a specified day each year. Then in the fall they set their clocks back, leading to the clever saying, “spring forward and fall back.”
You can use the Daylight saving time setting to adjust the time on your D610’s clock forward or back by one hour, according to whether daylight saving time is currently in effect in your area.
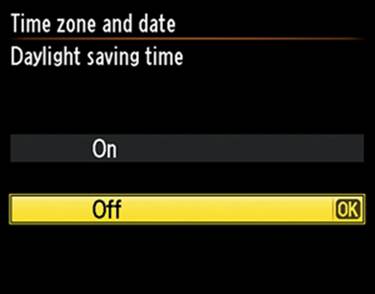
Figure 1.4 – Setup Menu Daylight saving time screen
To choose an initial Daylight saving time setting, follow these steps:
1. Refer to figure 1.4 for the Daylight saving time screen.
2. There are only two selections: On or Off. The default setting is Off. If daylight saving time is in effect in your area (spring and summer in most areas of the United States), select On. When daylight saving time ends, you will need to change this setting to Off (via the Setup Menu) to adjust the clock back by one hour.
3. Press the OK button to select your choice.
Now that you’ve made the Daylight saving time decision, the camera will move on to the last screen in the series of five setup steps, the Date and time screen.
Settings Recommendation: If you live in an area that observes daylight saving time, it’s a good idea to adjust this setting whenever daylight saving time beg ins and ends. When you set the time forward or back on your wristwatch and clocks, you will need to adjust it on your camera as well. If you don’t, your images will have metadata reflecting a time that is off by one hour for half the year. This setting allows you to adjust the camera’s clock quickly by simply selecting On or Off.
Setting the Date and Time – Step 5
This screen allows you to enter the current date and time. It is in year, month, day (Y, M, D) and hour, minute, second (H, M, S) format.
Here are the steps to set the Date and time:
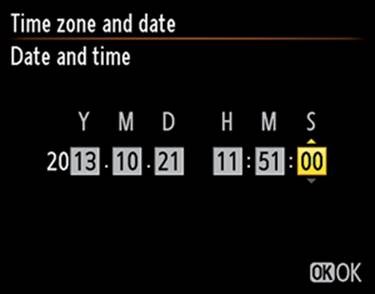
Figure 1.5 – Setup Menu Date and time screen
1. Refer to figure 1.5 for the Date and time screen.
2. Use the Multi selector to scroll to the left or right and select the various date and time sections. Scroll up or down to set the values for each one. The time values use a 24-hour clock, or military time. Use the 12- to 24-Hour Time Conversion Chart on page 270 to convert the 12-hour time you are probably using (for example, 3:00 p.m. is 15:00:00).
3. Press the OK button when you have entered the Date and time.
This completes the initial camera setup, and you are now ready to start configuring other parts of the camera in whatever order you find convenient. You’ll use the menu system, as described in the next section, to access individual configuration screens. Each configuration step described in this book is accompanied by all the screen graphics you’ll need and step-by-step instructions on configuration choices.
Let’s look at an overview of the menu system.
Accessing the Camera Menus
To access the various configurable menus in the D610, you’ll use the MENU button on the back of the camera near the top left of the Monitor. Please remember the location of this button since it will be used often in this book (figure 1.6). To avoid unnecessary repetition in the upcoming chapters, I won’t mention that you need to press the MENU button to get into the camera menus.
There are six primary menu systems in the camera, and this book has a chapter devoted to each one. Let’s take a brief look at the opening screens of the six menus, shown in figure 1.7. You get to these six menus by pressing the MENU button and scrolling up or down with the Multi selector. A selector bar with tiny icons will appear on the left side of the Monitor when you press the MENU button. You can see the selector bar at the left of each menu in figure 1.7.
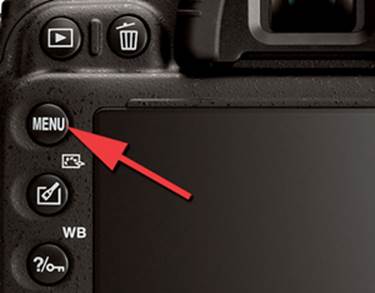
Figure 1.6 – Press the MENU button to open the menus
As you scroll up or down in the selector bar, you’ll see each menu appear on the Monitor, with its icon highlighted in yellow on the left side of the screen, and the menu on the right. The name of the menu you are currently using will be displayed at the top of the screen.
The order of the six menus in the D610 is as follows (figure 1.7):
• Playback Menu
• Shooting Menu
• Custom Setting Menu
• Setup Menu
• Retouch Menu
• My Menu or Recent Settings
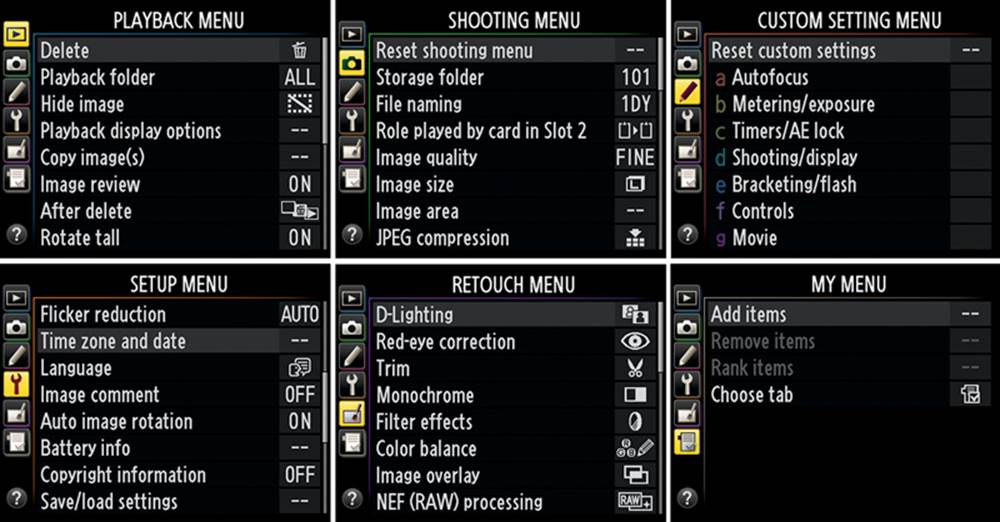
Figure 1.7 – Six primary camera menus
Notice that My Menu can be toggled with an alternate menu called Recent Settings. These two menus can’t be active at the same time. My Menu is much more functional for most people, so it is shown in figure 1.7. The chapter titled My Menu and Recent Settings covers both of these options in detail so you can choose which one you want to appear most of the time on your camera. My Menu allows you to add the most-used menu items from any of the other menus to your own personal menu, and Recent Settings shows you the last 20 menu items you’ve changed.
Camera Functions for Initial Configuration
The following is a list of functions that you may want to configure before you take many pictures. These set up the basic parameters for camera usage. Each function is covered in great detail on the page number shown, so I did not repeat the information in this chapter. Please turn to the indicated page and fully configure the function, then return here and move on to the next function. When you are done, your camera will be ready for use.
Setup Menu
• Format memory card – Page 253
• Monitor brightness – Page 258
• Auto image rotation – Page 275
• Copyright information – Page 277
Shooting Menu
• Role played by card in Slot 2 – Page 65
• Image quality – Page 67
• Image size – Page 75
• JPEG compression – Page 81
• NEF (RAW) recording – Page 83
• White balance – Page 87
• Set Picture Control – Page 90
• Color space – Page 109
• Active D-Lighting – Page 112
• Vignette control – Page 119
• Long exposure NR – Page 121
• High ISO NR – Page 124
• ISO sensitivity settings – Page 126
• Movie settings – Page 146
Playback Menu
• Playback folder – Page 25
• Playback display options – Page 30
• Image review – Page 43
• Rotate tall – Page 45
Custom Setting Menu
• a1 AF-C priority selection – Page 157
• a2 AF-S priority selection – Page 158
• a3 Focus tracking with lock-on – Page 160
• c4 Monitor off delay – Page 182
• d1 Beep – Page 185
• d2 Viewfinder grid display – Page 188
• d7 File number sequence – Page 194
• e1 Flash sync speed – Page 204
• f2 Assign Fn button – Page 227
• f3 Assign preview button – Page 227
• f4 Assign AE-L/AF-L button – Page 227
Of course, there are hundreds more functions to configure, and you may find one function more important than another; however, these are the functions that you ought to at least give a once-over before you use the camera extensively.
Personal Camera Settings Recommendations
All through the book I offer my personal recommendations for settings and how to use them. Look for the Settings Recommendation paragraph at the end of most sections. These suggestions are based on my own personal shooting style and experience with Nikon cameras in various types of shooting situations. You may eventually decide to configure things differently, according to your own needs and style. However, these recommendations are good starting points while you become familiar with your camera.
Things to Know When Reading This Book
Here are a few things that you’ll need to remember as you read this book. There are a lot of buttons and controls on the camera body. I have provided a Camera Body Reference section in the front of the book and a downloadable document titled Camera Control Reference that you can download from the website for this book. See the links to the downloadable resources in the next section.
What’s the difference between these two resources? The Camera Body Reference is a place to go when you want to locate a control, including covers and doors, and the Camera Control Reference provides a deeper discussion of each button, dial, and switch on the camera.
I use Nikon-assigned names for the controls on the camera, as found in the Nikon D610 User’s Manual. For instance, I may say something like “press the Playback zoom out/thumbnails button” to show you how to execute some function, and you’ll need to know where this button is located. Use the Camera Body Reference in the front of the book to memorize the locations of the camera controls.
I have provided page number references to the Nikon D610 User’s Manual at the beginning of most sections in case you want to refer to it for additional information about the camera settings. Using the Nikon manual is entirely optional and is not required to fully learn how to use your camera with this book. If you have no interest in using the Nikon manual, simply ignore the page number references.
Downloadable Resources Website
To keep this book small enough to carry as a reference in your camera bag, I have provided some less-used information in downloadable documents on these websites:
http://www.nikonians.org/NikonD610
http://rockynook.com/NikonD610
I will refer to these documents throughout the book when they apply to the material being discussed.