Mastering the Nikon D610 (2014)
4. Custom Setting Menu

Mesquite Flat Dunes in Death Valley – Eric Bowles (ericbowles)
Back in the early days of photography, such as pre-1999, cameras were relatively simple affairs. They were either manual or had a few semiautomatic modes.
The professional Nikon cameras had a few tricks up their sleeves with features controlled by what were called the CSM settings. The menu used a system of hard-to-remember CS numbers. CSM stood for Custom Setting Menu and CS stood for Custom Setting. Few people could easily remember what CS 3 or CS 7 meant, so they used the small, thin manuals for initial configuration or simply ignored the settings.
How things have changed! The camera you hold in your hand has a CSM too. It turns out that the early seed planted by Nikon software engineers has grown from a few sparse CSM settings to a full-blown dictionary of Custom Setting Menu settings. Little did we know that our basic cameras would turn into computerized machines of photographic automation. Where the 50-page manuals of yesterday fully sufficed, today’s cameras come with manuals more like encyclopedia volumes.
Fortunately, that massive amount of computer automation and inherent complexity provides a camera that—even in inexperienced hands—can produce excellent pictures consistently. When an advanced photographer wants to learn how to use the various features of the camera, it can take weeks of study to fully master. But then you can do things with the camera that less-experienced users can’t. A book, like this one, can compress the time it takes to complete that study by providing the real-life experience of a person who has already taken time to fully research and explain each part of your camera.
Your Nikon D610 is a truly powerful camera. It can be used as a fully automated point-and-shoot or as a master’s brush for creative photography. As we progress through the literally hundreds of choices in the Custom Setting Menu, you may discover things that you never knew your camera could do. With a little effort, you can come away with a much greater understanding of how to use your new photographic tool.
The Custom Setting Menu is the core of the camera’s configurability. Combined with the Shooting Menu (chapter 3) and the Setup Menu (chapter 5), you have complete control over how the D610 functions. Without further ado, let’s look deeply into the 50 settings found in the Custom Setting Menu and continue our journey to mastering the Nikon D610.
Using the Camera’s Help System
The D610 is complex enough that it needs a help system. Fortunately, Nikon gave us one. Whenever you have a function selected in one of the menus, you can press and hold the Help/protect button and a help screen will appear for that function.
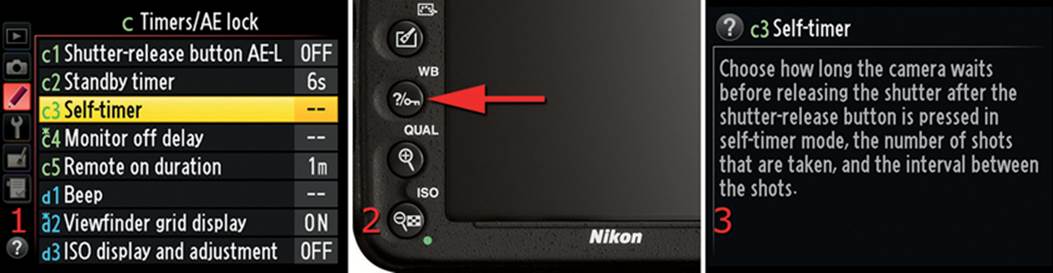
Figure 4.0 – Using the Help button to understand functions
Use the following steps to access the help system:
1. Highlight any function in any of the menus (figure 4.0, screen 1).
2. Press the Help/protect (WB) button and hold it (figure 4.0, screen 2).
3. A help screen will open that shows a brief description of what the function does (figure 4.0, screen 3).
When you are trying to use help in the Custom Setting Menu, be sure that you are not looking at the top of the menu; you should be inside the menu. For example, in figure 4.1, screen 1, help won’t work for c Timers/AE lock. You need to select one of the items below the name of the menu, such as c3 Self-timer or d1 Beep.
Check out the useful help screens. They are excellent for when you have forgotten exactly what a function does and could use a reminder. Remember, they are available for any of the menus.
The User Settings and the Custom Setting Menu
Like the Shooting Menu, the Custom Setting Menu options are stored within the user settings (U1 and U2) on the Mode dial (figure 4.0.1). Although there is no direct connection between the Shooting Menu and the Custom Setting Menu, you can make a connection by configuring both menus under one user setting.
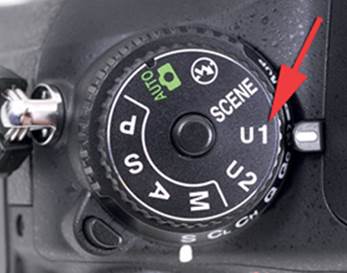
Figure 4.0.1 – U1 and U2 user settings
Maybe setting U1 will be a repository for a certain style-paired Shooting Menu and Custom Setting Menu configuration, and setting U2 will be for menus that are configured in a completely different style-based way. I did this with my D610 by configuring the Shooting Menu and Custom Settings Menu for nature photography in U1 and storing events photography settings in U2.
When you think of the Shooting Menu and the Custom Setting Menu as a paired group of settings controlled by one of the user settings, you begin to see how powerful the Nikon D610 can be.
Be absolutely sure that you save your settings in U1 before going to U2 to make changes. Otherwise you’ll lose your carefully configured settings in either the Shooting Menu or the Custom Setting Menu for that particular user setting. Save the user settings in the Setup Menu with the following function:
Setup Menu > Save user settings > Save to U1 (or U2) > Save settings
Note: Remember that the Shooting Menu and Custom Setting Menu configurations outside of U1 and U2—what I call non-user settings—are completely different camera configurations than the configurations in U1 and U2. As a result, there are three ways to configure your camera’s Shooting Menu and Custom Setting Menu: by using U1, U2, or non-user settings.
Now, let’s see how to use and configure the 50 functions of the Custom Setting Menu. You should repeat the configuration of all these functions for each user setting. This allows you to configure the camera in two completely different ways, one for U1 and another for U2. The non-user settings outside of U1 and U2 can simply be used for general everyday shooting.
Using the Custom Setting Menu
(User’s Manual – Page 219)
Figure 4.1 shows the location of the Custom Setting Menu. It’s the third menu down on the left-side icon bar, and its symbol looks like a small pencil.
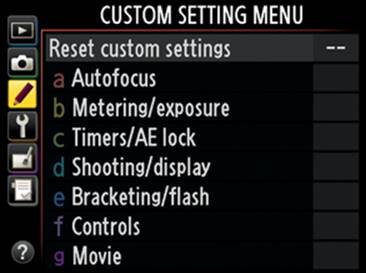
Figure 4.1 – Custom Setting Menu
There are seven Custom Setting Menu headings in the D610 (a through g). Each menu heading has several items underneath it (totaling 50 subitems). We have a lot of ground to cover, and we will do so in great detail. But first there is an initial item on the menu that we need to consider before we get into the main Custom settings.
Reset Custom Settings
If you ever want to start fresh with the Custom settings under a particular user setting, you can return the camera to the factory default configuration with Reset custom settings. Make sure you have the Mode dial set to the correct user setting (U1, U2, or the non-user setting outside U1 and U2) before you use the Reset custom settings function.
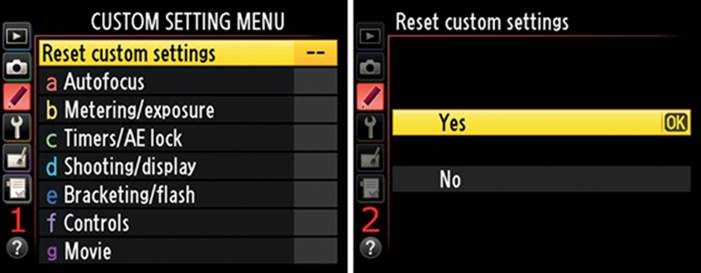
Figure 4.2 – Reset custom settings
Here are the steps to Reset custom settings that are currently active:
1. Select Reset custom settings from the Custom Setting Menu and scroll to the right (figure 4.2, screen 1).
2. Choose Yes from the menu (figure 4.2, screen 2).
3. Press the OK button to reset the custom settings under the current user setting to factory default settings.
This chapter is divided into seven distinct sections, one for each major division of the Custom Setting Menu. This will make it easy for you to find a particular setting in the large number of available choices.
Now, let’s look at each setting, starting with those found under Custom setting a Autofocus.
a Autofocus
Custom Settings a1–a7
You’ll find seven Custom settings within the a Autofocus menu:
• a1 AF-C priority selection
• a2 AF-S priority selection
• a3 Focus tracking with lock-on
• a4 AF point illumination
• a5 Focus point wrap-around
• a6 Number of focus points
• a7 Built-in AF-assist illuminator
In this section you’ll learn how to configure the autofocus system in various ways. The whole process is rather complex, yet it is important for good photography. Autofocus and related functions are important enough that I’ve included a chapter titled Autofocus, AF-Area, and Release Modes. It covers autofocus and related functions in much greater detail.
a1 AF-C Priority Selection
(User’s Manual – Page 221)
The a1 AF-C priority selection setting is designed to let you choose how autofocus works when you use Continuous-servo autofocus (AF-C) mode. If you configure this setting incorrectly for your style of shooting, it’s entirely possible that a number of your pictures will be out of focus. Why?
Notice in figure 4.3, screen 3, that there are two specific selections:
• Release (default) – If the image must be taken no matter what, you’ll need to set AF-C priority selection to Release. This allows the shutter to fire every time you press the Shutter-release button, even if the image is not in focus. Releasing the shutter has priority over autofocus. If you are aware of the consequences of shooting without a focus guarantee, then use this setting to make your camera take a picture every time you press the Shutter-release button. Your camera will shoot at its maximum frames per second (fps) rate since it is not hampered by the time it takes to validate that each picture is in correct focus. You’ll need to decide whether taking the image is more important than having it in focus. Or you will need to use zone focusing and sufficient depth of field to cover any focus discrepancies.
• Focus – This setting is designed to prevent your camera from taking a picture when the Focus indicator in the Viewfinder is off. If the picture is not in focus, the shutter will not release. It does not mean that the camera will always focus on the correct subject. It simply means that your camera must focus on something before it will allow the shutter to release. Nikon cameras do a very good job with autofocus, so you can usually depend on the AF module to perform well. The Focus setting will drastically increase the chances that your image is in focus.
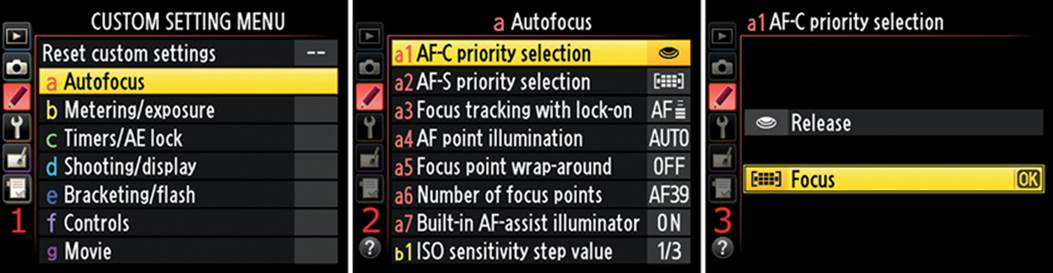
Figure 4.3 – The a1 AF-C priority selection setting
Use the following steps to select a shutter-release priority when using a1 AF-C priority selection:
1. Select a Autofocus from the Custom Setting Menu and scroll to the right (figure 4.3, screen 1).
2. Highlight a1 AF-C priority selection and scroll to the right (figure 4.3, screen 2).
3. Choose Release or Focus from the menu, with full understanding that your pictures may be out of focus if you do not choose Focus (figure 4.3, screen 3).
4. Press the OK button to select your shutter-release priority.
Settings Recommendation: Since I’m not a sports or action shooter, I choose Focus. Even if I were an action shooter I would choose Focus, but you may not agree. Read the section called Using Custom Settings a1 and a2 before you make your final choice.
If you are shooting action and are hampered by the camera refusing to take what it decides is an out-of-focus picture, set it to Release. Some of your images may be out of focus, but the majority may be in focus due to your understanding of how to use depth of field to cover focus errors.
a2 AF-S Priority Selection
(User’s Manual – Page 221)
The a2 AF-S priority selection setting is very similar to the a1 AF-C priority selection. It allows you to choose whether the camera will take a picture with something out of focus. With this setting you set the shutter-release priority for Single-servo autofocus (AF-S) mode. If you set it incorrectly for your style of shooting, many of your pictures may be out of focus. There are two modes to choose from:
• Release – A photo can be taken at any time. This can lead to images that are out of focus unless you manually focus each time you take a picture. The camera will release the shutter when you press the Shutter-release button, even if nothing is in focus.
• Focus (default) – The image must be in focus or the shutter will not release; the shutter won’t release unless the Focus indicator in the Viewfinder is on. This is the closest thing to a guarantee that your image will be in focus when you press the Shutter-release button. However, if you are focused on the wrong part of your subject, the camera will still take the picture.
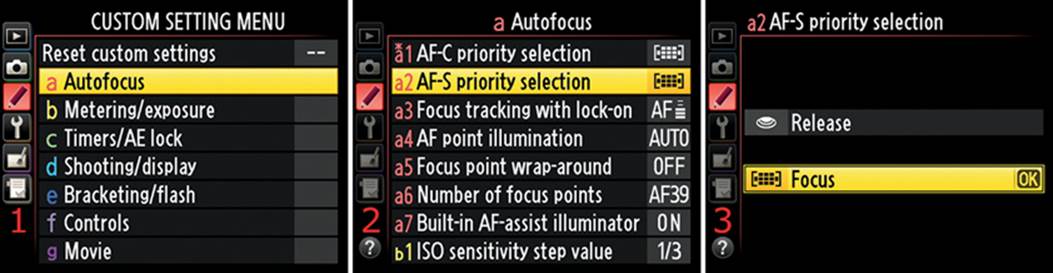
Figure 4.4 – The a2 AF-S priority selection
Use the following steps to select a shutter-release priority with a2 AF-S priority selection:
1. Select a Autofocus from the Custom Setting Menu and scroll to the right (figure 4.4, screen 1).
2. Highlight a2 AF-S priority selection and scroll to the right (figure 4.4, screen 2).
3. Choose one of the two settings from the menu, with full understanding that your pictures may be out of focus if you do not choose Focus (figure 4.4, screen 3).
4. Press the OK button to select your shutter-release priority.
Settings Recommendation: I choose Focus priority when I use AF-S. I love pictures that are in focus, don’t you? When I want to manually control focus, I just flip the switch to manual on the camera or lens.
Using Custom Settings a1 and a2
This section will help you understand why you must pay very close attention to a1 AF-C priority selection and a2 AF-S priority selection.
Focus priority simply means your camera will refuse to take a picture until it can reasonably focus on something. Release priority means the camera will take a picture when you decide to take it, whether anything is in focus or not!
You might ask yourself why there is such a setting as Release priority. Many professional photographers shoot high-speed events at high frame rates—hundreds of images—and use depth of field (or experience and luck) to compensate for less than accurate focus. They are in complete control of their camera since they have a huge amount of practice in getting the focus right where they want it to be. There are valid reasons for these photographers to not use Focus priority.
You need to ask yourself what type of photographer you are. If you are a pro shooting hundreds of pictures of fast race cars, Focus priority may not be for you. However, for average photographers taking pictures of their kids running around the yard, deer jumping a fence, beautiful landscapes, flying birds, or a bride tossing a bouquet, Focus priority is usually the best choice. For most of us, it’s better to have the camera refuse to take the picture unless it’s focused on the subject.
When you shoot at a high frame rate, Focus priority may cause your camera to skip a series of out-of-focus images. It could slow your camera’s frame rate so much that it will not reach the maximum 6 fps, in some cases. But, I have to ask, what is the point of several out-of-focus images among the in-focus pictures? Why waste the card space and then have to weed through the slightly out-of-focus images?
Settings Recommendation: I set both a1 and a2 to Focus priority. I’m not a high-speed shooter, so I don’t need my camera to take a picture, no matter what, if that means capturing a series of out-of-focus images. But if you shoot action regularly, you may not agree. We’ll discuss this even more in the chapter titled Autofocus, AF-Area, and Release Modes.
a3 Focus Tracking with Lock-On
(User’s Manual – Page 222)
The a3 Focus tracking with lock-on setting allows you to select the length of time that your camera will ignore an intruding object that blocks your subject.
Let’s say you are focused on a bird flying past you. As you pan the camera with the bird’s movement, the autofocus system tracks it and keeps it in focus. As the bird flies by, a road sign briefly interrupts the focus tracking as the bird moves behind it and then reemerges. It would be quite aggravating if the bright, high-contrast road sign grabbed the camera’s attention and you lost tracking on the bird.
The D610 provides Focus tracking with lock-on to prevent this from happening. The lock-on portion of this function helps your camera stay focused on your subject, even if something briefly comes between the camera and the subject. Without Focus tracking with lock-on, any bright object that gets between you and your subject may draw the camera’s attention and cause you to lose focus on the subject.
The camera provides a variable time-out period for the lock-on functionality. This function allows an object that stays between the camera and your subject for a predetermined length of time to attract the camera’s attention. You can adjust the length of this time-out from 1 (Short) to 5 (Long).
Test the time-out length to see which setting works best for you. You might start with the factory default, 3 (Normal), and let something get between you and your subject. If you want the camera to ignore an intruding subject for a longer time, move the setting toward 5 (Long), or for less time move it toward 1 (Short). I don’t suggest turning it Off unless you fully understand how it works and do not need focus tracking to lock on to your subject. You’ll quickly determine how long a time period you want to use.
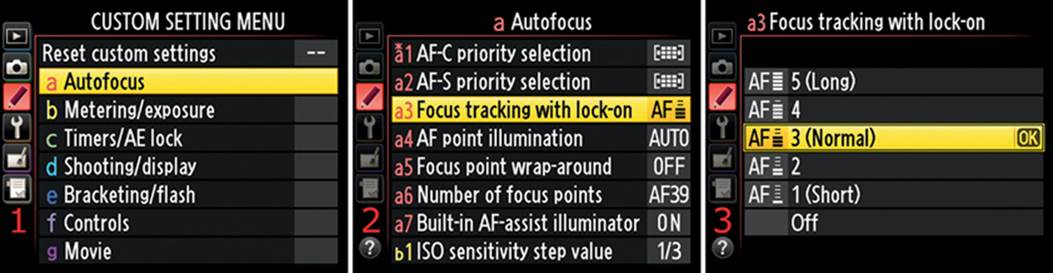
Figure 4.5 – The a3 Focus tracking with lock-on setting
Use the following steps to configure a3 Focus tracking with lock-on:
1. Select a Autofocus from the Custom Setting Menu and scroll to the right (figure 4.5, screen 1).
2. Highlight a3 Focus tracking with lock-on and scroll to the right (figure 4.5, screen 2).
3. Choose one of the five options or Off from the menu (figure 4.5, screen 3).
4. Press the OK button to select the time-out period.
With Single-point AF, the camera will start the time-out as soon as the single AF point is unable to detect the subject. With Dynamic-area AF or Auto-area AF and Focus tracking with lock-on enabled, I was amused at how adamant the camera was about staying with the current subject. I focused on a map on the wall and then covered most of the AF points with the User’s Manual. As long as I allowed at least one or two AF points to remain uncovered so the camera could see the map, the focus did not switch to the User’s Manual. I could imagine the D610 muttering, Hah, you can’t fool me. I can still see a little edge of the map, so I’m not changing focus!
Only when I placed the User’s Manual completely in front of the lens and covered all the AF points did the camera initiate the time-out for Focus tracking with lock-on. After a few seconds, the camera gave up on the map and focused on the manual instead.
Try this yourself! It’s quite fun and will teach you something about the power of your camera’s autofocus system. You will see how long each setting causes the time-out to last so you can choose your favorite setting.
Does Lock-On Cause Autofocus to Slow Down?
Some misunderstandings surround this technology. Since it causes autofocus to hesitate for a variable amount of time before seeking a new subject, it may make the camera seem sluggish. This prevents the camera from losing focus on the tracked subject. After the camera locks focus on a subject, it tries to stay with that subject, even if it briefly loses it. The camera ignores closer or higher contrast subjects while it follows your subject. It is not really slower, just adamant about sticking to your primary subject for a period of several seconds. This keeps the lens from racking in and out and searching for a new subject as soon as the original subject is no longer under an AF point. The camera is not really slower; it’s just a lot more intelligent about subject tracking when using lock-on!
Settings Recommendation: I leave Focus tracking with lock-on enabled at all times. When I’m tracking a moving subject, I don’t want my camera to be distracted by every bright object that gets between me and the subject. Nikon gives us variable time-outs so we can change how long the camera will keep seeking the original subject before it switches to a new subject. Play around with this setting until you fully understand how it works. Watch how long the camera stays locked on one subject before an intruding subject grabs its attention. This is one of those settings that people either love or hate. I find it quite useful for when I am shooting action. Try it and see what it does for you.
a4 AF Point Illumination
(User’s Manual – Page 222)
The a4 AF point illumination setting helps you see the currently active AF points when you first start autofocus. You’ve seen the little squares that represent the AF points in the Viewfinder when they briefly appear in red and then turn black. But sometimes the Viewfinder is dark and it’s difficult to see a black square.
If AF point illumination is turned Off, you’ll still have the black square that represents your selected AF point. If you set AF point illumination to Auto or On, the point will flash red when you first start autofocus or select a different AF point with the Multi selector.
There are three selections on the AF point illumination screen. These selections affect how the AF points are displayed when they are active:
• Auto – If the background of the Viewfinder is dark, the selected AF point will briefly flash red when you press the Shutter-release button to start autofocus. If the background is bright, you’ll have no trouble seeing the black AF points, so they don’t flash red when you start autofocus.
• On – The selected AF point is highlighted in red when you start autofocus, regardless of the light level of the background.
• Off – The selected AF point is not highlighted in red when you start autofocus. It always stays black.
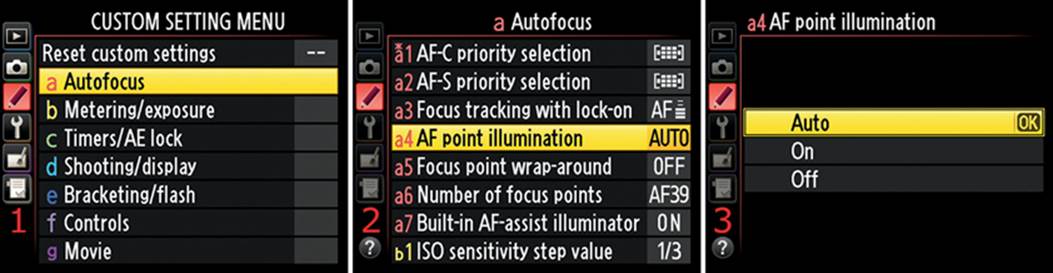
Figure 4.6 – The a4 AF point illumination setting
Use the following steps to configure a4 AF point illumination:
1. Select a Autofocus from the Custom Setting Menu and scroll to the right (figure 4.6, screen 1).
2. Highlight a4 AF point illumination and scroll to the right (figure 4.6, screen 2).
3. Choose one of the three options from the menu. In figure 4.6, screen 3, I selected Auto.
4. Press the OK button to lock in the setting.
Note: If you enable this function (set it to Auto or On) in DX mode, the Viewfinder will display a line around the DX area in the Viewfinder (figure 4.6.1, screen 1) instead of displaying a gray area (figure 4.6.1, screen 2).
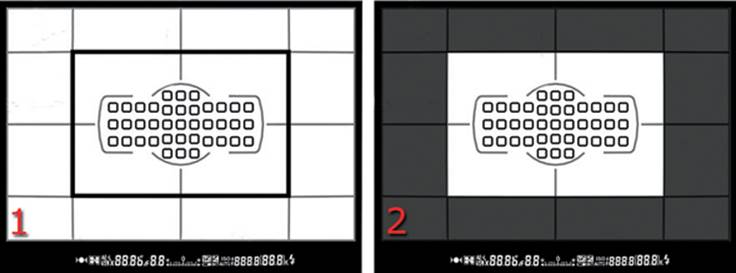
Figure 4.6.1 – The a4 AF point illumination setting in DX mode
Leaving this function set to Off restores the gray area in DX mode, but it no longer flashes the AF points in red upon initial use. I wish Nikon had separated these two functions because I prefer the gray area and having the AF points flash in red, which are mutually exclusive.
Settings Recommendation: The simplest setting to use is Auto, since that lets the camera determine if there is enough light coming through the Viewfinder for you to see the AF points at the start of autofocus. If you want to force the AF points to flash each time you start autofocus or when you select different points with the Multi selector, you can set AF point illumination to On. I wouldn’t leave this set to Off unless I were shooting in an evenly lit studio where the Viewfinder would have good contrast or unless I were a die-hard user of DX mode.
a5 Focus Point Wrap-Around
(User’s Manual – Page 222)
The a5 Focus point wrap-around setting allows you to control how AF point scrolling on the Viewfinder works. When you are scrolling horizontally or vertically to select an AF point in the array of 51 points, you will eventually come to the edge of the Viewfinder area.
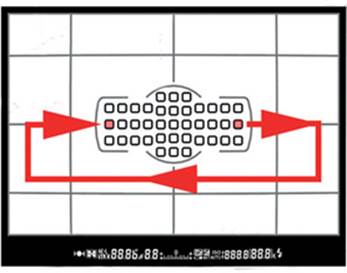
Figure 4.7 – The a5 Focus point wrap-around setting in action
The Focus point wrap-around setting allows you to set whether the AF point selector simply stops when it gets to the edge of the AF point array or scrolls to the opposite side (figure 4.7). If you turn on Focus point wrap-around and scroll to the right side of the AF point array, you can continue scrolling and the AF point will jump to the left side of the array.
This setting works the same vertically. If you scroll off the top of the sensor area, the AF point selector will reappear at the bottom.
Here is a description of the two choices:
• Wrap – This setting allows the AF point selector to scroll off the Viewfinder screen and reappear on the other side.
• No wrap (default) – If you scroll across the array of AF points and come to the edge of the screen, the AF point selector stops there. You have to move the AF point in the opposite direction, toward the middle.
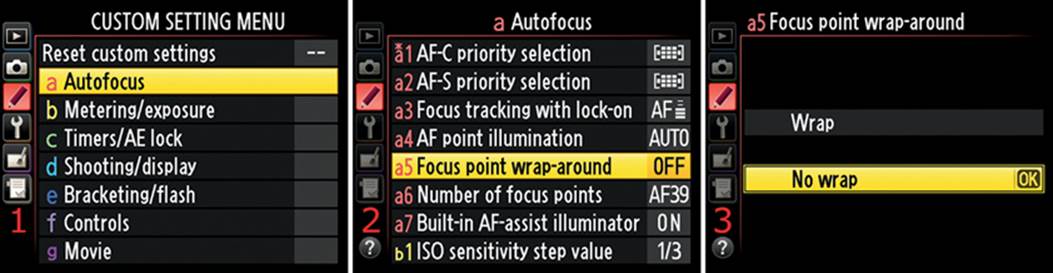
Figure 4.7.1 – The a5 Focus point wrap-around setting
Use the following steps to configure a5 Focus point wrap-around:
1. Select a Autofocus from the Custom Setting Menu and scroll to the right (figure 4.7.1, screen 1).
2. Highlight a5 Focus point wrap-around and scroll to the right (figure 4.7.1, screen 2).
3. Choose Wrap or No wrap from the menu. In figure 4.7.1, screen 3, I selected No wrap.
4. Press the OK button to lock in the setting.
Settings Recommendation: Wrapping the AF point selector from one side to the other drives me bonkers. When I reach the edge of the array, I want the selector to stop so I can scroll back the other way. However, I humbly submit that some people will simply adore having their AF point selector wrap to the other side of the Viewfinder. If that describes you, simply set it to Wrap.
a6 Number of Focus Points
(User’s Manual – Page 223)
The a6 Number of focus points setting lets you choose how many AF points you want to use when you scroll manually with the Multi selector. There are two selections available: AF39 and AF11.
If you are using any of the AF-area modes besides Auto-area AF, you can unlock the Multi selector with the small switch directly below it. If the switch is pointing at L, the Multi selector is locked; if it is pointing at the white dot, it is unlocked.
When the Multi selector is unlocked, you can use it to move the AF point selector around the Viewfinder so you can select particular areas of your subject to focus on.
Since the D610 has 39 AF points (figure 4.8), it can take time to scroll to the AF point you want to use. To make it easier to scroll from one side to the other quickly, you can select 11 points (AF11) instead of 39 points (AF39), which will cause the AF point selector to jump over several points at a time. It uses the pattern shown in figure 4.8, screen 2, for 11 points.
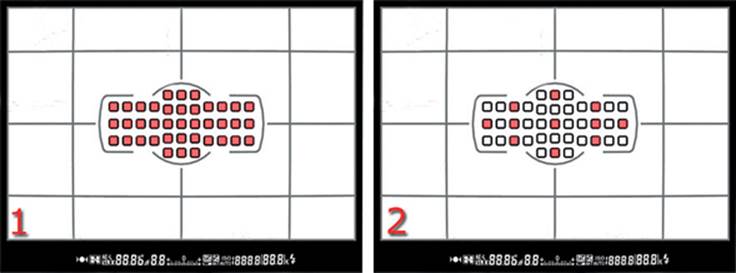
Figure 4.8 – All 39 AF points (screen 1) versus 11 AF points (screen 2)
If you are using an autofocus mode that makes use of multiple focus points, all 39 points continue being active when you select AF11. The only thing Number of focus points affects is the scrolling of the AF point selector when you look into the camera’s Viewfinder. It is merely for your rapid-scrolling convenience.
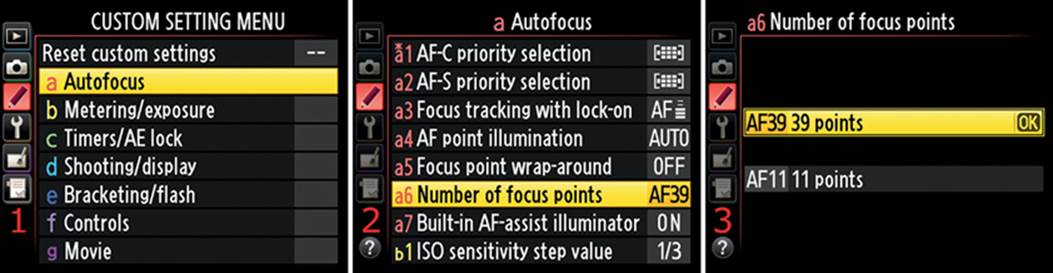
Figure 4.9 – Selecting the number of AF points
Use the following steps to change from 39 points to 11 points:
• Select a Autofocus from the Custom Setting Menu and scroll to the right (figure 4.9, screen 1).
• Highlight a6 Number of focus points and scroll to the right (figure 4.9, screen 2).
• Choose one of the two options from the menu. In figure 4.9, screen 3, I selected (AF39) 39 points.
• Press the OK button to lock in the setting.
Settings Recommendation: I don’t find it to be much trouble to scroll through 39 focus points, especially since the D610 has such a small AF point area that is based on the smaller size of a DX sensor.
I’m glad to have all those luxurious AF points so I can select my focus point accurately. However, there are times when it may be aggravating to use the 39 points setting, such as when I’m shooting a fast-moving event. It may take longer than I’d like to reselect an AF point, so I might use 11 points to speed things up.
Remember, this setting affects nothing except how the AF point selector scrolls around the Viewfinder. However, if I have the AF-area mode configured (Single-point AF, 9-point dynamic, 21-point dynamic, or 39-point dynamic), it is not affected by the Number of focus points setting. All focus points are active, depending on your configuration with the AF-mode button. We’ll discuss this further in the chapter titled Autofocus, AF-Area, and Release Modes.
a7 Built-in AF-Assist Illuminator
(User’s Manual – Page 223)
You’ve seen the AF-assist illuminator light on the front of the D610 (figure 4.10). It lights up when low-light conditions are sensed and when certain AF-area modes (not all) are used to help with autofocus. The a7 Built-in AF-assist illuminator setting allows you to control when the light comes on.
There are two choices on the a7 Built-in AF-assist illuminator menu: On and Off. It helps to know the difference between an Autofocus mode and an AF-area mode when considering this function (refer to the chapter titled Autofocus, AF-Area, and Release Modes). The following are descriptions of how the On and Off choices affect the AF-assist illuminator.
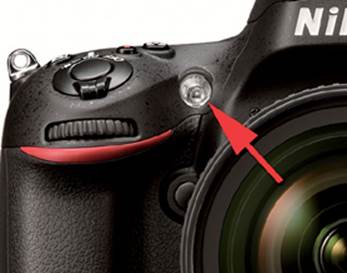
Figure 4.10 – AF-assist illuminator light
• On (default) – If the light level is low, the AF-assist illuminator comes on to help light the subject enough for autofocus. This works only in certain modes:
a) When Single-servo autofocus (AF-S) is selected and the center AF point is in use. The AF-assist illuminator will switch off if you move the AF point away from the center AF point position.
b) When Auto-servo autofocus (AF-A) is selected, the subject is not moving, and the center AF point is in use. If the subject moves, the camera may automatically switch to Continuous-servo autofocus (AF-C) and turn off the AF-assist illuminator.
c) When Auto-area AF-area mode is selected, the camera will automatically turn on the AF-assist illuminator as needed.
d) When using Single-point AF-area mode or Dynamic-area AF-area mode (9, 21, and 39 AF points) if you are using only the center AF point.
• Off – The AF-assist illuminator does not come on to help you in low-light autofocus situations. The camera may not be able to automatically focus in very low light.
Note: After writing many books on Nikon cameras, I often refer to one of my books to remember the difference between Autofocus modes and AF-area modes. That’s why I added the Autofocus, AF-Area, and Release Modes chapter to the book. Read it carefully and meditate on it until you understand the differences.
An easy way to remember when the AF-assist illuminator light will shine is simply this: when you are using the center AF point, it shines most of the time; when you move off the center AF point, it stops shining. Also, any time you are in an AUTO mode, the AF-assist light will shine when needed because the camera is selecting which focus point to use. Additionally, the AF-assist light will never shine when you are in AF-C mode (continuous autofocus mode, where the camera constantly updates the autofocus and never locks focus).
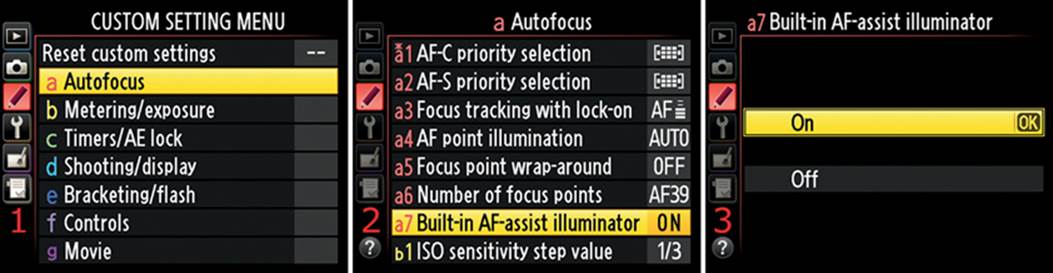
Figure 4.10.1 – The a7 Built-in AF-assist illuminator setting
Use the following steps to set the Built-in AF-assist illuminator to On or Off:
1. Select a Autofocus from the Custom Setting Menu and scroll to the right (figure 4.10.1, screen 1).
2. Highlight a7 Built-in AF-assist illuminator and scroll to the right (figure 4.10.1, screen 2).
3. Choose On or Off from the menu. In figure 4.10.1, screen 3, I selected On.
4. Press the OK button to lock in the setting.
Settings Recommendation: I leave Built-in AF-assist illuminator set to On most of the time. It is activated only when the light is low enough to need it. However, there are exceptions for specific circumstances.
If you are trying to take pictures without being noticed, such as from across the room with a zoom lens or while doing street photography, you certainly don’t want this extremely bright light drawing attention when you start autofocus. Or you may be shooting wildlife, such as a giant grizzly bear, and you sure don’t want to call attention to yourself by shining a bright light into the bear’s eyes.
Don’t use this feature if you don’t want others to notice you—especially if they are eight-feet tall with claws and fangs.
b Metering/Exposure
Custom Settings b1–b5
You’ll find five Custom settings within the b Metering/exposure menu:
• b1 ISO sensitivity step value
• b2 EV steps for exposure cntrl
• b3 Easy exposure compensation
• b4 Center-weighted area
• b5 Fine-tune optimal exposure
The first two Custom settings in the Metering/exposure menu (b1 and b2) affect how your camera views exposure steps in its exposure value (EV) range. Most people like to have their camera work very precisely, so they use the 1/3 step EV selection in b1 and b2. Others might not be as selective and prefer to change the sensitivity to 1/2 step.
b1 ISO Sensitivity Step Value
(User’s Manual – Page 224)
The b1 ISO sensitivity step value setting allows you to change the increments the camera uses for ISO sensitivity. You can set it to use either 1/3 step EV or 1/2 step EV increments.
If you are concerned with maximum ISO control, then use the 1/3 step setting. It takes a little longer to scroll through the ISO selections if you use this setting because there are more of them to choose from, but the extra fineness allows you to control exposure better. The 1/3 step setting is the factory default.
Hold down your camera’s ISO button on the back left of the camera and turn the rear Main command dial to the right. You will see the ISO sensitivity number on the Control panel, Information display, or Viewfinder change in increments. Here are the beginning steps in the pattern for 1/3 step and 1/2 step, which ranges from ISO 100 to Hi 2 (ISO 25,600):
• 1/3 step – 100, 125, 160, 200, 250, 320, 400, 500, 640, 800, etc.
• 1/2 step – 100, 140, 200, 280, 400, 560, 800, 1100, 1600, 2200, etc.

Figure 4.11 – Choosing an ISO sensitivity step value
Use the following steps to change the b1 ISO sensitivity step value:
1. Select b Metering/exposure from the Custom Setting Menu and scroll to the right (figure 4.11, screen 1).
2. Highlight b1 ISO sensitivity step value and scroll to the right (figure 4.11, screen 2).
3. Choose 1/3 step or 1/2 step. In figure 4.11, screen 3, I selected 1/3 step (factory default).
4. Press the OK button to lock in the setting.
Settings Recommendation: I like having the finest control possible of ISO sensitivity step values. I normally leave this set to the factory default of 1/3 step. This allows me to carefully fine-tune the ISO sensitivity value for precise exposures.
b2 EV Steps for Exposure Cntrl
(User’s Manual – Page 224)
The b2 EV steps for exposure cntrl setting refers to the number of steps for the shutter speed and aperture exposure controls. It also encompasses the exposure bracketing system. Just as with ISO sensitivity step value, you can control the number of steps in 1/3 step or 1/2 step EVs. This applies to shutter speed, aperture, exposure and flash compensation, and bracketing. The factory default value for EV steps for exposure cntrl is 1/3 step.
EV steps for exposure cntrl means that when you manually adjust the shutter speed, aperture, exposure and flash compensation, and bracketing, they work incrementally in the following steps (starting at a random point):
1/3 step EV
• Shutter – 1/100, 1/125, 1/160, 1/200, 1/250, 1/320, etc.
• Aperture – f/5.6, f/6.3, f/7.1, f/8, f/9, f/10, etc.
• Compensation/bracketing – 0.0, 0.3, 0.7, 1.0, 1.3, 1.7, 2.0, 2.3, 2.7, 3.0, etc.
1/2 step EV
• Shutter – 1/90, 1/125, 1/180, 1/250, 1/350, 1/500, etc.
• Aperture – f/5.6, f/6.7, f/8, f/9.5, f/11, f/13, etc.
• Compensation/bracketing – 0.0, 0.5, 1.0, 1.5, 2.0, 2.5, 3.0, etc.
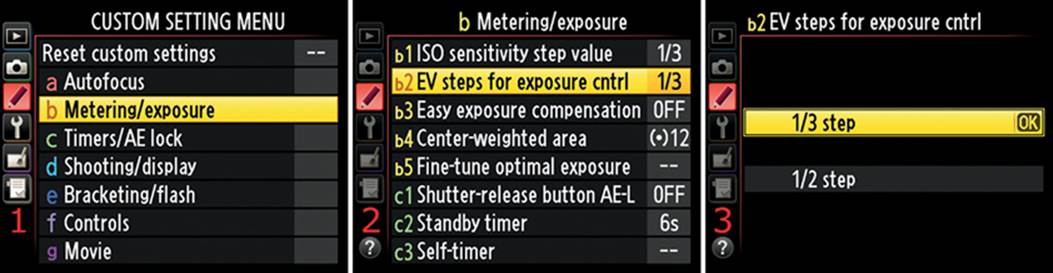
Figure 4.12 – Choosing EV steps for exposure cntrl
Use the following steps to adjust b2 EV steps for exposure cntrl:
1. Select b Metering/exposure from the Custom Setting Menu and scroll to the right (figure 4.12, screen 1).
2. Highlight b2 EV steps for exposure cntrl and scroll to the right (figure 4.12, screen 2).
3. Choose 1/3 step or 1/2 step from the menu (figure 4.12, screen 3).
4. Press the OK button to lock in the setting.
Settings Recommendation: Similar to ISO sensitivity step value, I set EV steps for exposure cntrl to 1/3 step. It’s critical to control the EV steps with fine granularity for exposure and compensation. It’s also best to increment the EV in small steps for use with the histogram.
b3 Easy Exposure Compensation
(User’s Manual – Page 225)
The b3 Easy exposure compensation setting allows you to set the camera’s exposure compensation without using the +/– Exposure compensation button. Instead, you will use a Command dial alone to add or subtract exposure.
If you set the camera to Reset On (Auto reset) or simply to On, you can use the Command dials to set exposure compensation instead of using the +/– Exposure compensation button. Off means what it says. If you use the +/– Exposure compensation button, it overrides the Easy exposure compensation settings. Each exposure mode (P, S, A, M) reacts somewhat differently to Easy exposure compensation.
In the upcoming list we’ll consider how the Programmed auto (P), Shutter-priority auto (S), and Aperture-priority auto (A) exposure modes act when you use the three available settings (figure 4.13). The Manual (M) mode does not seem to be affected by b3 Easy exposure compensation, although it does work with the +/– Exposure compensation button. The Control panel, Information display, and Viewfinder will display a +/– icon to show that compensation value has been dialed in. The three settings in Easy exposure compensation are as follows:
• On (Auto reset) – Use the Sub-command dial in Programmed auto (P) or Shutter-priority auto (S) modes, or the Main command dial in Aperture-priority auto (A) mode, to dial in exposure compensation without using the +/– Exposure compensation button. If you allow the meter to reset, or if you turn the camera off, the compensation value you dialed in is reset to 0. That’s why it’s called Auto reset. If you have already set a compensation value using the +/– Exposure compensation button, the process of dialing in exposure compensation with the Sub-command dial simply adds more compensation to what you originally put in with the +/– Exposure compensation button. When the meter resets, it returns to the compensation value you added with the +/– Exposure compensation button, not to 0.
• On – This works the same way as On (Auto reset), except the compensation you dialed in does not reset. It stays in place, even if the meter or camera is turned off.
• Off – Exposure compensation can be applied only with the +/– Exposure compensation button.
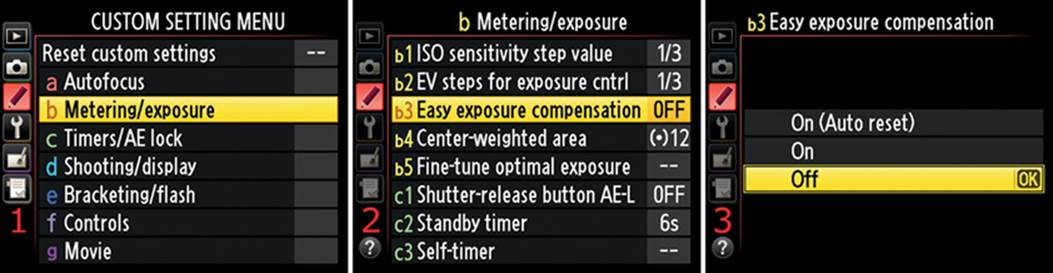
Figure 4.13 – Using Easy exposure compensation
Use the following steps to configure b3 Easy exposure compensation:
1. Select b Metering/exposure from the Custom Setting Menu and scroll to the right (figure 4.13, screen 1).
2. Highlight b3 Easy exposure compensation and scroll to the right (figure 4.13, screen 2).
3. Choose one of the three items from the menu. In figure 4.13, screen 3, I selected Off.
4. Press the OK button to lock in the setting.
Note: The granularity of the Easy exposure compensation EV is affected by whether Custom setting b2 EV steps for exposure cntrl is set to 1/3 step or 1/2 step. Also, the Command dial used to set compensation can be swapped in Custom setting f5 Customize command dials, which we will consider later in this chapter.
Settings Recommendation: I don’t use this setting often, having used the +/– Exposure compensation button for too many years to change now. However, because Nikon added this feature to the camera, I’m sure many people requested it. It certainly would come in handy when you would like to quickly add compensation without searching for the +/– Exposure compensation button. Give it a try, you may like it!
b4 Center-Weighted Area
(User’s Manual – Page 226)
The b4 Center-weighted area setting allows you to control the area on the View-finder that has the greatest weight in metering a subject when you use the Center-weighted area metering mode. Years ago cameras didn’t have Matrix metering. They had averaging or partially averaging meters, or none at all.
If you prefer not to use the D610’s built-in database of image scenes, otherwise known as Matrix metering, and you use only Spot metering as needed, you are most likely using the Center-weighted area meter. It is good that Nikon gives us a choice.
You have three types of meters in your camera that you select with the Metering button. We’ll consider each of the metering modes in greater detail in the chapter titled Metering, Exposure Modes, and Histogram.
When you hold down the Metering button (figure 4.14, top red arrow) and turn the rear Main command dial, you’ll scroll through three symbols on the Control panel on top of the camera (figure 4.14, bottom red arrow). The symbol that represents the Center-weighted area meter looks like this: (·).
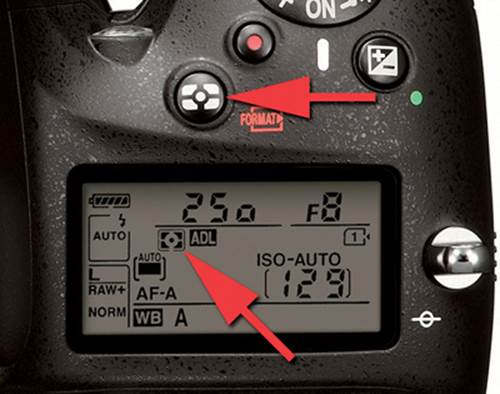
Figure 4.14 – Metering button and symbol
The Center-weighted area meter can be configured to use a central area of the Viewfinder to do most of the metering, with less attention paid to subjects outside this area, or it can be set up to simply average the entire frame.
The four size settings for the most sensitive part of the Center-weighted area meter are 8mm, 12mm, 15mm, and 20mm—or the meter can simply Average the entire frame, as shown in figure 4.14.1.

Figure 4.14.1 – Approximate Center-weighted area meter sensitivity
Figure 4.14.1 shows the approximate size of the most sensitive area in the View-finder for each step of the Center-weighted area meter. The pink circle in the center of the Viewfinder is the most sensitive area for metering, and it gets larger for each setting. You won’t actually see anything in the Viewfinder that shows the area being used by the Center-weighted meter.
In the final image of figure 4.14.1, the entire frame is equally sensitive and averages everything seen in the Viewfinder.
The Center-weighted area meter does not move around with the currently selected AF point, as the Spot meter does. Instead, it assigns the greatest weight to the center of the Viewfinder frame, and anything outside the center circle is not as important.
Each size increase from 8mm to 20mm will increase the sensitivity of the center of the Viewfinder as more emphasis is given to a larger area in the middle.
If you select the Average (Avg) setting, the entire Viewfinder frame is used to meter the scene. The camera takes an average of the entire frame by including all light and dark areas mixed together for an averaged exposure.
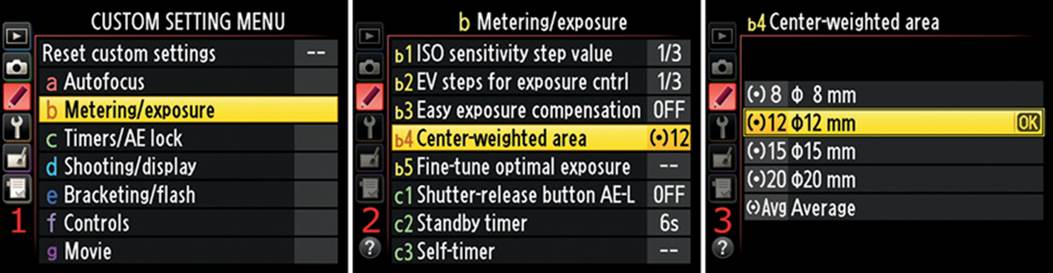
Figure 4.15 – Choosing a Center-weighted area
Use the following steps to set b4 Center-weighted area:
1. Select b Metering/exposure from the Custom Setting Menu and scroll to the right (figure 4.15, screen 1).
2. Highlight b4 Center-weighted area and scroll to the right (figure 4.15, screen 2).
3. Choose one of the five items from the menu. In figure 4.15, screen 3, I selected 12mm (default).
4. Press the OK button to lock in the setting.
Settings Recommendation: When I use the Center-weighted area meter, I generally use the 20mm setting to make the largest area in the center of the Viewfinder be the most sensitive.
I use 3D Matrix metering most of the time and have my camera’s Fn button set to switch to the Spot meter temporarily when I press it. That way I can use Nikon’s incredible 3D Color Matrix Metering II system, with its ability to consider brightness, color, distance, and composition when using type G and D Nikkor lenses.
Matrix metering gives me the best metering I’ve had with any camera! The Center-weighted area meter is still included in modern cameras for people who are used to this older-style meter. However, most people use Matrix metering these days.
b5 Fine-Tune Optimal Exposure
(User’s Manual – Page 226)
The b5 Fine-tune optimal exposure setting allows you to fine-tune the Matrix metering, Center-weighted area metering, and Spot metering systems by +/– 1 EV in 1/6 EV steps. Nikon has taken the stance that most major camera systems should allow the user to fine-tune them. The exposure system is no exception.
You can force each of the three metering systems to add or subtract from the exposure the camera would normally use to expose your subject. This stays in effect until you set the meter back to zero. It is indeed fine-tuning, since the maximum 1 EV step up or down is divided into six parts (1/6 EV). If you think your camera mildly underexposes highlights and you want it to add 1/2 step of exposure, you simply add 3/6 EV to the metering system. (Remember basic fractions: 1/2 equals 3/6.)
Fine-tune optimal exposure works like the normal compensation system, but it allows only 1 EV of compensation. As shown in figure 4.16, screen 3, an ominous-looking warning appears when you use Fine-tune optimal exposure. It lets you know that your camera will not display a compensation icon, as it does with the +/– Exposure compensation button, when you use the metering fine-tuning system. If it did display the compensation icon, it couldn’t use that same icon when you use normal compensation.
Fine-tune optimal exposure applies only to the user setting (U1, U2, or non-user setting) you are currently working with. If you are working with U1, then U2 and non-user settings are not changed. Be sure to save the user setting in the Setup Menu if you change it.
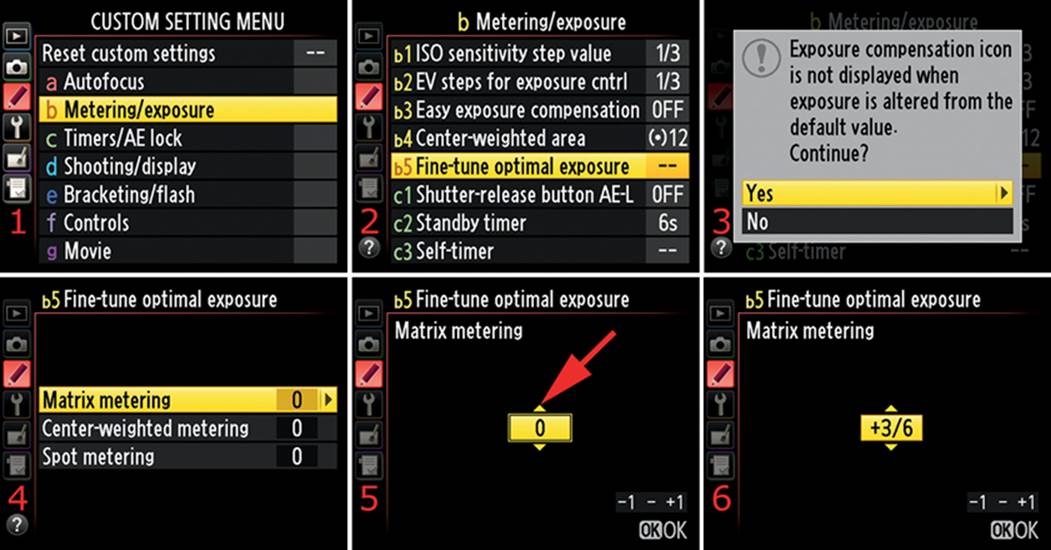
Figure 4.16 – Choosing b5 Fine-tune optimal exposure settings
Use the following steps to choose b5 Fine-tune optimal exposure settings:
1. Select b Metering/exposure from the Custom Setting Menu and scroll to the right (figure 4.16, screen 1).
2. Select b5 Fine-tune optimal exposure and scroll to the right (figure 4.16, screen 2).
3. Select Yes from the warning screen and scroll to the right (figure 4.16, screen 3).
4. Select the metering system you want to adjust. In figure 4.16, screen 4, I selected Matrix metering. Scroll to the right.
5. Scroll up or down in 1/6 EV steps until you reach the fine-tuning value you would like to use (figure 4.16, screen 5, red arrow).
6. In figure 4.16, screen 6, I selected +3/6. Press the OK button to lock in the fine-tuning value for the metering system you selected in step 4.
That’s all there is to it! Remember, when you have Fine-tune optimal exposure turned on, the camera will not remind you. Watch your histogram to make sure you’re not regularly underexposing or overexposing images when you have fine-tuning adjustment in place. If needed, adjust the fine-tuning up or down, or turn it off. You must fine-tune each metering system separately.
Settings Recommendation: I have not needed to change the default metering level on my D610. The three metering systems seem very accurate to me!
Remember that adjusting an exposure is always an experiment. If you choose to fine-tune one of the three metering systems, you should thoroughly test it before you do an important shoot. It certainly won’t hurt to play with these settings—as long as you remember to set them back to 0 if they don’t perform the way you expect.
c Timers/AE Lock
Custom Settings c1–c5
You’ll find five Custom settings within the c Timers/AE lock menu:
• c1 Shutter-release button AE-L
• c2 Standby timer
• c3 Self-timer
• c4 Monitor off delay
• c5 Remote on duration
c1 Shutter-Release Button AE-L
(User’s Manual – Page 226)
The c1 Shutter-release button AE-L setting allows you to lock the exposure when you press the Shutter-release button halfway down. Normally that type of exposure lock happens only when you press and hold the AE-L/AF-L button. However, when you have Shutter-release button AE-L set to On, your camera will respond as if you pressed the AE-L/AF-L button every time you start autofocus and take a picture.
This setting allows you to meter one area of the scene and then recompose to another area without losing the meter reading from the first area—as long as you hold the Shutter-release button halfway down.
Looking at this from another direction, when you have Shutter-release button AE-L set to Off, the exposure will lock only when you hold down the AE-L/AF-L button.
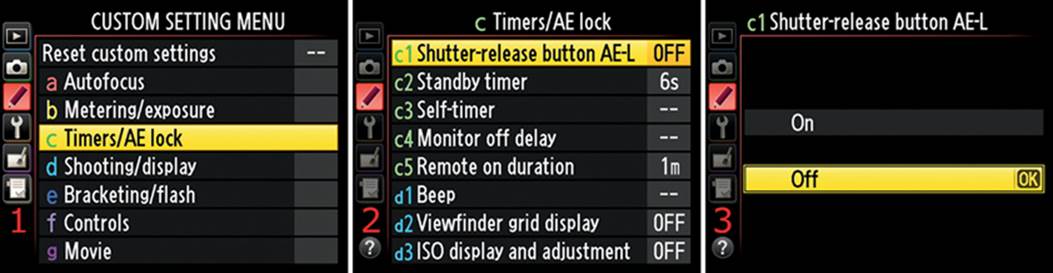
Figure 4.17 – Using Shutter-release button AE-L
Use the following steps to configure c1 Shutter-release button AE-L:
1. Select c Timers/AE lock from the Custom Setting Menu and scroll to the right (figure 4.17, screen 1).
2. Highlight c1 Shutter-release button AE-L and scroll to the right (figure 4.17, screen 2).
3. Choose either On or Off from the menu. In figure 4.17, screen 3, I selected On.
4. Press the OK button to lock in the setting.
Settings Recommendation: I use this feature only when I really need it. The rest of the time I use the AE-L/AF-L button to lock my exposure. I don’t think I’d leave Shutter-release button AE-L turned on all the time since I might be holding the Shutter-release button halfway down to track a moving subject through light and dark areas.
For people who shoot sunsets or similar scenes where the sun is included in the image, this is a nice function. You can meter from an area of the sky that has the best color and then swing the camera around to include the sun in the shot. The camera will expose for the originally metered area as long as you hold the Shutter-release button halfway down. Normally you’d do this with the AE-L/AF-L button.
c2 Standby Timer
(User’s Manual – Page 227)
The c2 Standby timer function controls the amount of time that your camera’s light meter stays on after you press the Shutter-release button halfway and then release it. The default value is 6 seconds.
When the light meter goes off, the various displays—like shutter speed and aperture—in the Control panel and Viewfinder go off, too. If you want your light meter to stay on longer for whatever reason, such as multiple exposures, you can adjust it to the following settings:
• 4 s – 4 seconds
• 6 s – 6 seconds (default)
• 10 s – 10 seconds
• 30 s – 30 seconds
• 1 min – 1 minute
• 5 min – 5 minutes
• 10 min – 10 minutes
• 30 min – 30 minutes
• No limit (meter stays on)
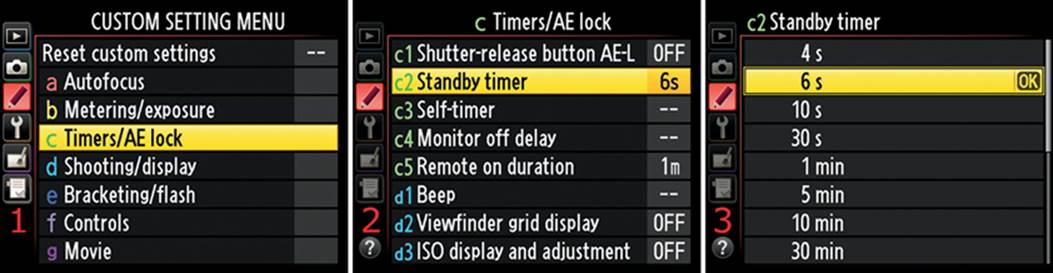
Figure 4.18 – Using Standby timer
Use the following steps to configure the c2 Standby timer setting:
1. Select c Timers/AE lock from the Custom Setting Menu and scroll to the right (figure 4.18, screen 1).
2. Highlight c2 Standby timer and scroll to the right (figure 4.18, screen 2).
3. Choose one of the nine options from the menu. In figure 4.18, screen 3, I selected 6 s. You can’t see all the available menu selections in screen 3. Scroll down on the menu to find the No limit setting.
4. Press the OK button to lock in the setting.
Settings Recommendation: There are times when you want the light meter to stay on for a longer or shorter time than normal. When I’m shooting multiple exposures, I set Standby timer to No limit. However, when I’m shooting normally, I leave it at 6 s. The longer the meter stays on, the shorter the battery life, so extend the time only if you really need it.
c3 Self-Timer
(User’s Manual – Page 227)
The c3 Self-timer setting is used to take pictures remotely or without touching the camera. Hands-off shooting can reduce vibrations so you have sharper pictures. The Self-timer also allows you to set your camera up on a tripod and have time to get into a group picture before the shutter fires. You can even use the Self-timer to shoot multiple shots without touching the camera.
There are three choices when you use the Self-timer:
• Self-timer delay – This setting allows you to specify a delay before the shutter fires so you have time to position yourself for the shot or allow vibrations to settle down. The time delays range from 2 to 20 seconds. This setting can be used instead of a remote release, and you won’t have cables to trip over.
• Number of shots – Use this setting to choose how many shots will be taken for each cycle of the Self-timer. You can choose one to nine shots in a row.
• Interval between shots – If you are taking more than one shot during a Self-timer cycle, this setting allows you to choose a time interval between each shot that ranges from 1/2 second to 3 seconds. The delay between shots allows vibrations from the previous shot to settle down.
Now let’s look at the screens and steps used to adjust each of these settings. First, we’ll look at the Self-timer delay. Here is a list of the four available settings:
• 2 s – 2 seconds
• 5 s – 5 seconds
• 10 s – 10 seconds
• 20 s – 20 seconds
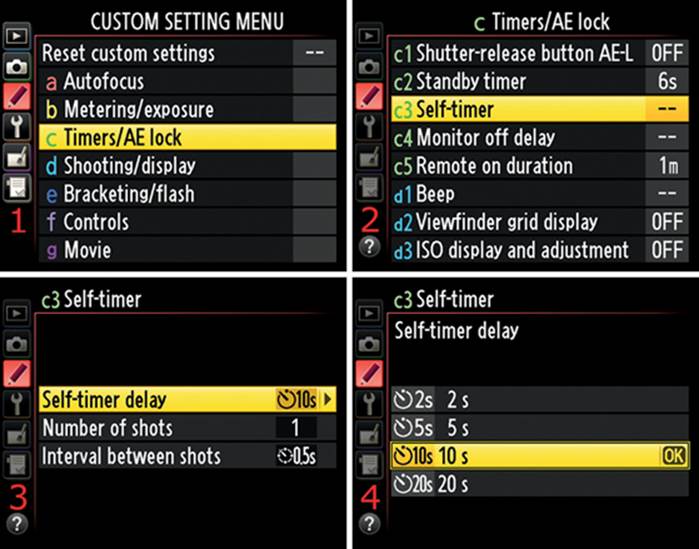
Figure 4.19 – Setting a Self-timer delay
Use the following steps to configure the Self-timer delay:
1. Select c Timers/AE lock from the Custom Setting Menu and scroll to the right (figure 4.19, screen 1).
2. Highlight c3 Self-timer and scroll to the right (figure 4.19, screen 2).
3. Select Self-timer delay from the menu and scroll to the right (figure 4.19, screen 3).
4. Choose one of the four options from the menu (2 s to 20 s). In figure 4.19, screen 4, I selected 10 s.
5. Press the OK button to lock in the setting.
Next, let’s look at how to configure the Number of shots for each Self-timer cycle. You can instruct the camera to take from one to nine pictures each time the Self-timer cycle completes.
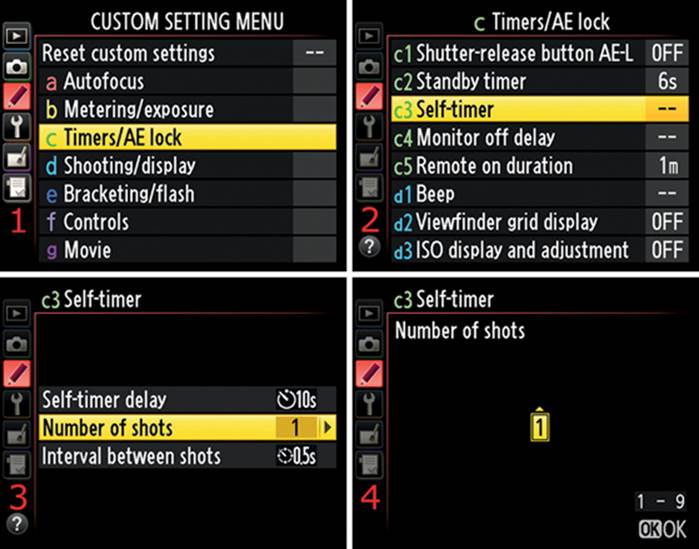
Figure 4.20 – Setting the Number of shots
Use the following steps to configure the Number of shots:
1. Select c Timers/AE lock from the Custom Setting Menu and scroll to the right (figure 4.20, screen 1).
2. Highlight c3 Self-timer and scroll to the right (figure 4.20, screen 2).
3. Select Number of shots from the menu and scroll to the right (figure 4.20, screen 3).
4. Choose the Number of shots, from 1 to 9, by scrolling up or down with the Multi selector. In figure 4.20, screen 4, I selected 1 shot.
5. Press the OK button to choose the setting.
Finally, let’s look at how to configure the Interval between shots for each Self-timer cycle. This is simply the time delay between each shot (0.5 to 3 seconds) when you have selected multiple images in Number of shots (1 to 9). Here is a list of the four available Interval between shots settings:
• 0.5 s – 1/2 second
• 1 s – 1 second
• 2 s – 2 seconds
• 3 s – 3 seconds
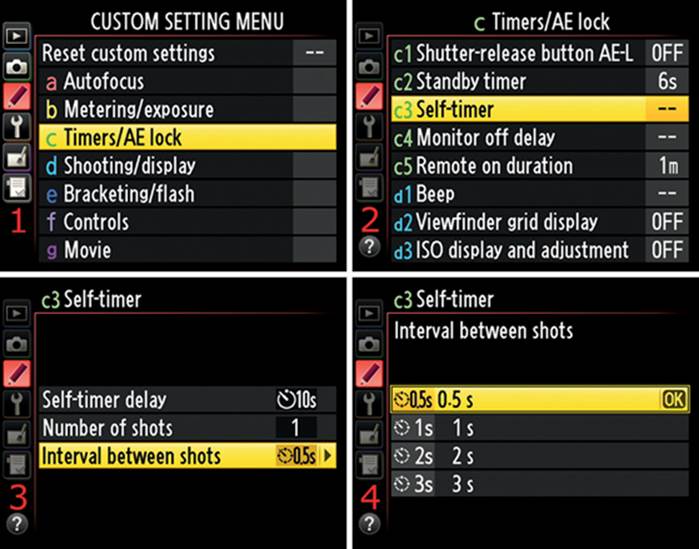
Figure 4.21 – Setting the Interval between shots
Use the following steps to configure the Interval between shots:
1. Select c Timers/AE lock from the Custom Setting Menu and scroll to the right (figure 4.21, screen 1).
2. Highlight c3 Self-timer and scroll to the right (figure 4.21, screen 2).
3. Select Interval between shots from the menu and scroll to the right (figure 4.21, screen 3).
4. Choose the Interval between shots, from 0.5 s to 3 s, by scrolling up or down with the Multi selector. In figure 4.21, screen 4, I selected 0.5 s.
5. Press the OK button to choose the setting.
Settings Recommendation: Often when I don’t want to take time to plug in a remote release cable, I just put my camera on a tripod and set the Self-timer delay to 2 or 5 seconds. The D610 makes a hands-off exposure so I don’t shake the camera or the tripod. If I must run to get into position for a group shot, I often increase the delay to at least 10 seconds so I don’t look like an idiot as I trip while running for position.
I also use the settings to control how many shots the camera takes each time I use the Self-timer and how long it delays between those shots to allow vibrations to go away. I’m sure you’ll agree that the Self-timer in your D610 is one of the most flexible timers in an HD-SLR camera.
c4 Monitor Off Delay
(User’s Manual – Page 228)
The c4 Monitor off delay setting lets you specify a time-out for the five ways you can use the LCD Monitor on the back of your camera. The Monitor will stay on until the time-out expires.
The D610 allows you to select individual display time-outs for each of the following five subfunctions:
• Playback – You can manually view pictures on the Monitor with the Playback button. Select a four-second to 10-minute Monitor off delay.
• Menus – The Monitor displays the in-camera menus. Select a four-second to 10-minute Monitor off delay.
• Information display – Press the Info button once or twice to see the Information display on the Monitor. Select a four-second to 10-minute Monitor off delay.
• Image review – You can see a picture on the Monitor immediately after you take it. Select a two-second to 10-minute Monitor off delay.
• Live view – You can use the Monitor, instead of the Viewfinder, to view your subject. Select a five-minute or longer (up to No limit) Monitor off delay.
Here are the available Monitor off delay values:
• 2 s – 2 seconds (Image review only)
• 4 s – 4 seconds (all five functions)
• 10 s – 10 seconds (all five functions)
• 20 s – 20 seconds (all five functions)
• 1 min – 1 minute (all five functions)
• 5 min – 5 minutes (all five functions)
• 10 min – 10 minutes (all five functions)
• 15 min – 15 minutes (Live view only)
• 20 min – 20 minutes (Live view only)
• 30 min – 30 minutes (Live view only)
• No limit (Live view only)
There is no need to provide figures and step-by-step instructions for each of the time-out types. If you examine one of them, you will know how to use all of them. As an example, figure 4.22 shows how to select the Monitor off delay > Playback time-out.
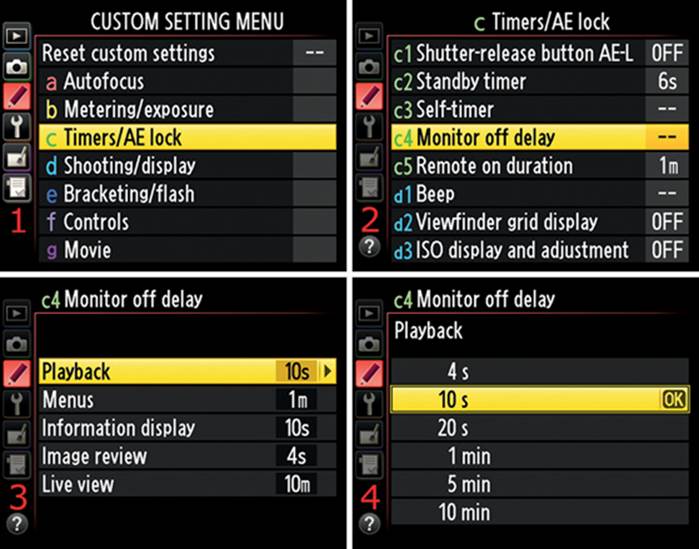
Figure 4.22 – Choosing a time-out (sample for all five delay types)
Use the following steps for each of the five delay types, with the understanding that the delay values vary, as shown in the previous list:
1. Select c Timers/AE lock from the Custom Setting Menu and scroll to the right (figure 4.22, screen 1).
2. Highlight c4 Monitor off delay and scroll to the right (figure 4.22, screen 2).
3. Choose one of the five display types (figure 4.22, screen 3). You can set the Monitor off delay for each type, then scroll to the right.
4. Figure 4.22, screen 4, shows the delay times for the Playback display, which I selected in screen 3.
5. Press the OK button to lock in the setting.
Settings Recommendation: I set Monitor off delay to 1 min for Playback, Information display, and Image review. I set the Menus time-out to 5 min because I like to scroll around for longer time periods as I configure various settings in the menus. I leave Live view at the default of 5 min.
If you want to conserve battery power, leave the Monitor off delay set to a low value, like 4 s to 20 s. The longer the monitor stays on, the shorter the battery life, so extend the monitor time only if you really need it. Like a computer screen, that big, luxurious VGA-resolution LCD pulls a lot of power. The Monitor and Control panel backlights are probably the biggest power drains in the entire camera. However, you don’t need to be overly concerned about this. For as much image review (chimping) as I do, I can still usually shoot all day on one full battery charge.
c5 Remote on Duration
(User’s Manual – Page 228)
Interestingly, the c5 Remote on duration setting controls how long the camera will wait for you to press the shutter-release button on your Nikon ML-L3 infrared remote. It works in partnership with the Shooting Menu > Remote control mode we explored in the previous chapter. Recall that Remote control mode gives you three settings to choose from:
• Delayed remote – Two-second delay after you press the shutter-release button on the ML-L3 wireless remote
• Quick-response remote – Instant release when you press the shutter-release button on the ML-L3 wireless remote
• Remote mirror-up – The first press of the shutter-release button on the ML-L3 wireless remote raises the mirror, and the second press fires the shutter
If you set Remote control mode to any of these three settings, the camera will stay in a ready state—looking for the remote signal from the ML-L3—for the time delay you set in Remote on duration. This means the camera stays ready to take a picture and leaves the exposure meter active until Remote on duration times out.
The following delay times are available for Remote on duration:
• 1 min – 1 minute (default)
• 5 min – 5 minutes
• 10 min – 10 minutes
• 15 min – 15 minutes
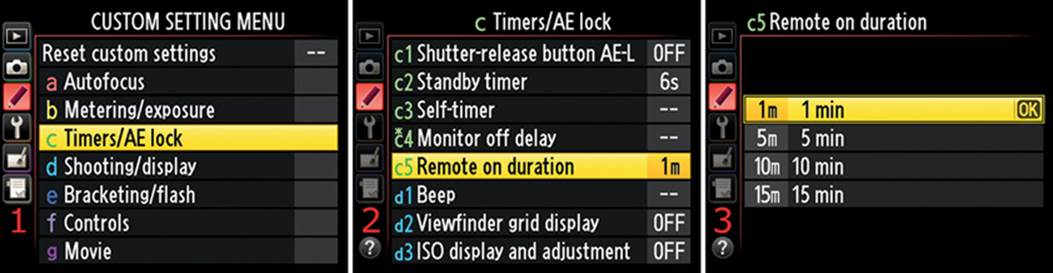
Figure 4.23 – Choosing a Remote on duration for Self-timer Remote control mode
Use the following steps to configure c5 Remote on duration:
1. Choose c Timers/AE lock from the Custom Setting Menu (figure 4.23, screen 1).
2. Select c5 Remote on duration from the menu and scroll to the right (figure 4.23, screen 2).
3. Select a time-out delay period from 1 min to 15 min (figure 4.23, screen 3).
4. Press the OK button.
Settings Recommendation: I used to leave my Remote on duration time set to 1 min (factory default). However, I have recently been leaving it set to 5 min. I wish there were a two-minute setting because 1 min is not quite enough sometimes, especially for large group portraits, and 5 min is often too long and wastes the battery. If you need this function, you’ll have to decide how long is long enough.
d Shooting/Display
Custom Settings d1–d13
Within the d Shooting/display menu, you’ll find 13 Custom settings:
• d1 Beep
• d2 Viewfinder grid display
• d3 ISO display and adjustment
• d4 Screen tips
• d5 CL mode shooting speed
• d6 Max. continuous release
• d7 File number sequence
• d8 Information display
• d9 LCD illumination
• d10 Exposure delay mode
• d11 Flash warning
• d12 MB-D14 battery type
• d13 Battery order
d1 Beep
(User’s Manual – Page 228)
The d1 Beep setting allows your camera to make a beeping sound to alert you during the following functions:
• Focus lock while in Single-servo AF (AF-S) mode
• Focus lock while in Live view mode
• Countdown in Self-timer and Delayed release mode operations
• Taking a picture in Quick-response remote or Remote mirror-up modes
• Trying to take a picture with the memory card locked
You can set the camera to beep with a high- or low-pitched tone—and you can adjust the volume—or you can turn the Beep sound Off. First let’s examine how to set the Volume or disable the Beep. The Volume settings under Beep in the Custom Setting Menu are 3, 2, 1, and Off (figure 4.24, screen 4).
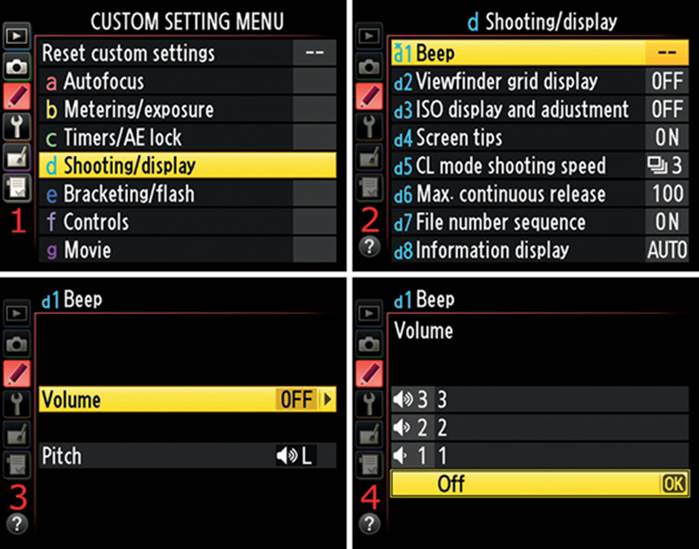
Figure 4.24 – Choosing a Volume level for Beep
Use the following steps to select one of the d1 Beep volume choices:
1. Select d Shooting/display from the Custom Setting Menu and scroll to the right (figure 4.24, screen 1).
2. Highlight d1 Beep and scroll to the right (figure 4.24, screen 2).
3. Select Volume from the menu and scroll to the right (figure 4.24, screen 3).
4. Choose one of the four options from the list (3–1 or Off). In figure 4.24, screen 4, I selected Off. You will hear a sample beep for each volume level as you choose it. The level 1 beep is rather quiet, so you may not hear it unless you hold the camera close to your ear.
5. Press the OK button to lock in the setting.
Next, let’s consider how to change the pitch of the Beep. You have two pitch levels available: High (H) and Low (L). I compared them to my piano, and the Low (L) sound is F# just above middle C. The High (H) sound is almost three octaves higher (B just before three octaves above middle C).
(You probably don’t need that much information; however, my somewhat compulsive personality requires that I give it to you. Notice that I didn’t give you the decibel level of the three Beep volume levels. Wouldn’t that be excessively excessive? Of course, with my trusty Radio Shack digital sound level meter, I do have that information. If you really want it, send me an e-mail.)
When Beep is active, you’ll see a little musical note displayed in the Information display (Monitor), above the battery charge symbol (figure 4.24.1, red arrow).
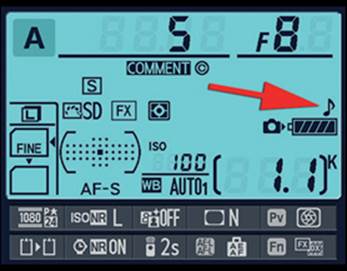
Figure 4.24.1 – Beep symbol in Information display
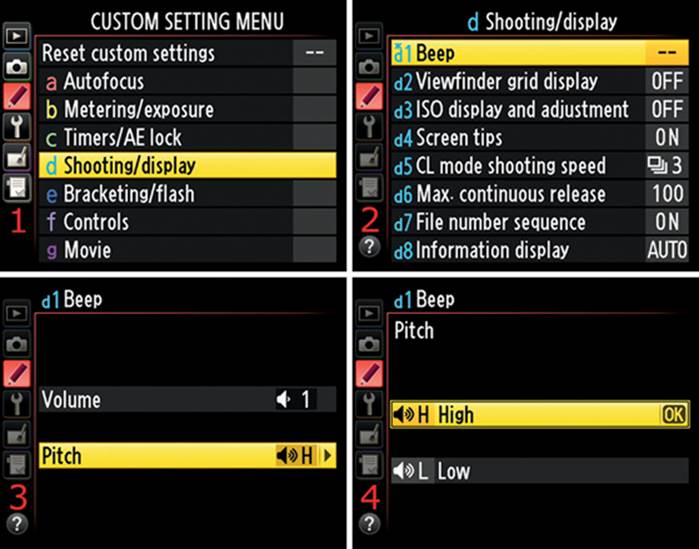
Figure 4.25 – Choosing a Pitch for the Beep
Here are the screens and steps to select a pitch for the beep:
1. Select d Shooting/display from the Custom Setting Menu and scroll to the right (figure 4.25, screen 1).
2. Highlight d1 Beep and scroll to the right (figure 4.25, screen 2).
3. Select Pitch from the menu and scroll to the right (figure 4.25, screen 3).
4. Choose one of the two options from the list (High or Low). In figure 4.25, screen 4, I selected High (default). You will hear a sample beep for each pitch as you choose it.
5. Press the OK button to lock in the setting.
Settings Recommendation: I don’t use the Beep. If I am using my camera in a quiet area, why would I want it beeping and disturbing those around me? I can just imagine me zooming in on that big grizzly bear, pressing the Shutter-release button, and listening to the grizzly roar his displeasure at my camera’s beep. I want to live, so I turn off Beep.
You might want the reassurance of hearing a beep when autofocus has been confirmed or when the Self-timer is counting down. If so, turn it on. The AF-assist illuminator flashes during Self-timer operations, so I generally use that instead of Beep.
This is another function that people either love or hate. You can have it either way, but be careful around big wild animals when Beep is enabled. They might think you’re calling them to supper, and you may be the main course.
By the way, Beep is automatically disabled when you’re using the Q or Quiet shutter-release mode on the Release mode dial, regardless of how this Custom setting is configured. It also does not sound when you use Movie live view mode.
d2 Viewfinder Grid Display
(User’s Manual – Page 229)
The d2 Viewfinder grid display setting causes gridlines to display in the camera’s Viewfinder. You can use these lines to make sure the camera is lined up correctly with your subject.
With the D610, you have not only a Viewfinder grid display, but also Live view (Lv) gridlines—the best of both worlds! There are only two selections in d2 View-finder grid display: On and Off.
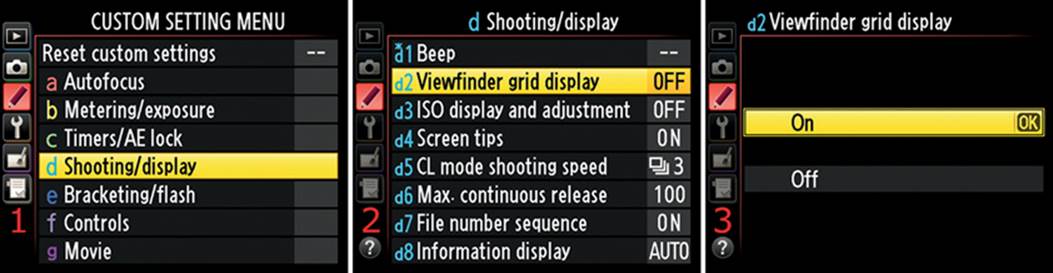
Figure 4.26 – Enabling the Viewfinder grid display
Use the following steps to enable or disable the d2 Viewfinder grid display setting:
1. Select d Shooting/display from the Custom Setting Menu and scroll to the right (figure 4.26, screen 1).
2. Highlight d2 Viewfinder grid display and scroll to the right (figure 4.26, screen 2).
3. Choose either On or Off from the menu. In figure 4.26, screen 3, I selected On.
4. Press the OK button to lock in the setting.
Settings Recommendation: I use these gridlines to line up things as I shoot so I won’t have tilted horizons and such. Many of us tend to tilt the camera one way or another, and gridlines help us keep it straight.
I especially enjoy shooting with gridlines enabled when I’m at the beach. Who needs tilted ocean views? When I shoot architecture, the gridlines are invaluable for making sure buildings, walls, and doors are straight. There are lots of ways to use the Viewfinder grid display.
If you set the Viewfinder grid display to On, I doubt that you’ll turn it back Off. The nice thing is that you can turn the gridlines On and Off at will. You don’t have to buy an expensive viewfinder replacement screen for those times when you need gridlines.
Using a Grid Display on the Live View Screen
This section pertains only to the Viewfinder grid display in the Viewfinder. However, you can also turn on gridlines when the Live view screen is active by pressing the Info button multiple times to scroll through the various display overlays. One of them is a grid display.
d3 ISO Display and Adjustment
(User’s Manual – Page 229)
The d3 ISO display and adjustment setting can modify how the D610 displays the ISO sensitivity in the Control panel. Instead of displaying the frame count in the Control panel, where you normally see how many images you have left before the memory card is full, the camera can display the ISO sensitivity. The Viewfinder and Information display (Monitor) both continue to display the frame count. There are three settings:
• Show ISO sensitivity – This setting displays the ISO sensitivity, instead of the frame count, on the Control panel.
• Show ISO/Easy ISO – This setting affects how you adjust the ISO sensitivity and how it displays. It works like Show ISO sensitivity, in that it replaces the frame count on the Control panel with the ISO sensitivity value. It also adds a way to change the ISO sensitivity while you take pictures. Normally you would use Shooting Menu > ISO sensitivity settings or press the ISO button and turn the Main command dial to change the ISO sensitivity. However, when you enable Show ISO/Easy ISO, the camera lets you adjust the ISO sensitivity with either the rear Main command dial or the front Sub-command dial alone (according to exposure mode), without using the ISO button. This applies only when you use the P, S, or A modes on the Mode dial. Normally, when you have the camera in P or S modes, you control the aperture (P mode) or shutter speed (S mode) with the Main command dial. The Sub-command dial does nothing. When you set the camera to Show ISO/Easy ISO, the normally unused Sub-command dial sets the ISO sensitivity when the P or S modes are set. Likewise, when the camera is set to A mode, you normally control the aperture with the Sub-command dial, and the Main command dial does nothing. When you enable Show ISO/Easy ISO in A mode, the camera lets you adjust ISO sensitivity with the unused Main command dial, and you continue to control the aperture with the Sub-command dial. For people who need to adjust ISO sensitivity quickly while shooting, this can be very convenient. M mode on the Mode dial is not affected by this setting. If you are using M mode, the camera acts as if you had selected Show ISO sensitivity and simply displays the ISO instead of the frame count. You cannot change the ISO sensitivity with either command dial in M mode, because the command dials control the aperture and shutter speed.
• Show frame count – This is the default setting. The camera functions as normal, with the frame count showing in the Control panel and Viewfinder.
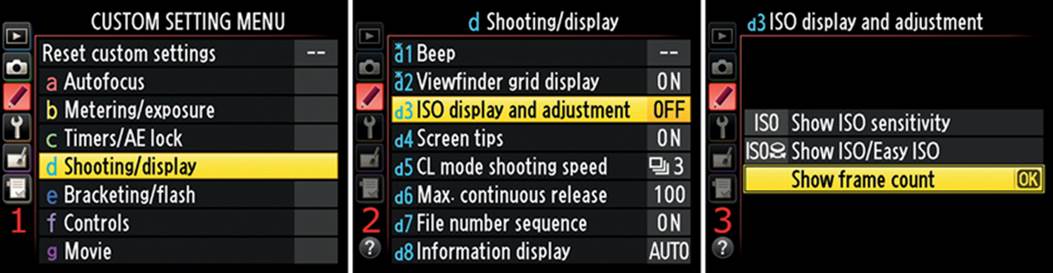
Figure 4.27 – Using ISO display and adjustment settings
Use the following steps to select a d3 ISO display and adjustment setting:
1. Select d Shooting/display from the Custom Setting Menu and scroll to the right (figure 4.27, screen 1).
2. Highlight d3 ISO display and adjustment and scroll to the right (figure 4.27, screen 2).
3. Choose one of the three settings from the menu. In figure 4.27, screen 3, I selected Show frame count (default).
4. Press the OK button to lock in the setting.
Settings Recommendation: I don’t find much use for this setting. My slow and deliberate tripod-based style of nature shooting rarely requires changing ISO sensitivity from its lowest setting. However, many people need to change ISO sensitivity on the fly and may not trust the Auto ISO sensitivity control, which adjusts ISO sensitivity automatically, within bounds, to get the shot.
This feature shows how interested Nikon is in giving us very fine control of our cameras. You can use automatic methods or control everything manually. ISO display and adjustment basically gives you manual control over a feature that most people would manage with Auto ISO sensitivity control.
If you are an action shooter and find yourself in varying light levels where you want to maintain fast manual control over ISO sensitivity, you might want to use this feature.
d4 Screen Tips
(User’s Manual – Page 229)
The d4 Screen tips setting allows you to enable small helpful tips on the second screen of the camera’s Information display. You can access this display by pressing the Info button twice. Pressing the Info button once brings up a summary display—you can’t edit anything. Pressing it twice shows a similar screen that allows you to change several settings. It’s a shortcut screen with settings that are accessed frequently, such as changing the Shooting menu bank or Custom setting bank.
Figure 4.28, screen 1, shows the screen that appears when you press the Info button once. Screen 2 appears when you press the Info button twice. The first screen is called the Information display, and I’ll call the second screen the Information display edit screen to prevent confusion.
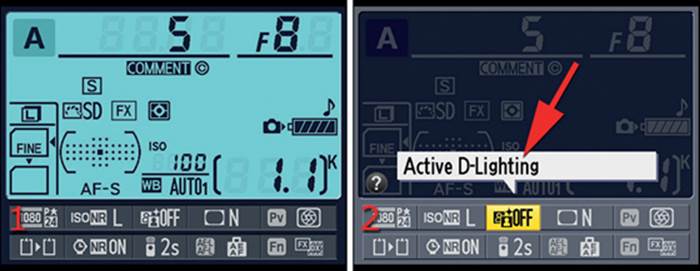
Figure 4.28 – Screen tips
Since I have Screen tips enabled on my camera, you can see the tip for changing Active D-Lighting (figure 4.28, screen 2, red arrow). If you press the OK button when you have one of the settings highlighted on the Information display edit screen (figure 4.28, screen 2), the camera will switch to a normal text menu and allow you to modify the setting.

Figure 4.29 – Enabling screen tips
Use the following steps to configure d4 Screen tips:
1. Select d Shooting/display from the Custom Setting Menu and scroll to the right (figure 4.29, screen 1).
2. Highlight d4 Screen tips and scroll to the right (figure 4.29, screen 2).
3. Choose either On or Off from the menu. In figure 4.29, screen 3, I selected On.
4. Press the OK button to lock in the setting.
Settings Recommendation: This helpful setting gives you tool tips for using the Information display edit screen. I leave this set to the factory default of On. These little tips don’t get in the way and may be helpful to remind you which setting you’re looking at on the Information display edit screen.
d5 CL Mode Shooting Speed
(User’s Manual – Page 229)
The d5 CL mode shooting speed setting controls how many frames per second (fps) the camera’s shutter can fire (maximum) in Continuous low speed release mode (CL on the Release mode dial).
The CL mode is for those who would like to use a conservative fps rate. With the proper settings, the camera can record 6 fps in Continuous high speed release mode (CH on the Release mode dial). However, unless you are shooting race cars going 200 miles per hour and have large memory cards, you may not want a lot of pictures of the same subject a few milliseconds apart.
In that case, use the CL mode and select fewer fps than CH mode provides. You can choose from 1 to 5 fps, as shown in figure 4.30. The default is 3 fps.
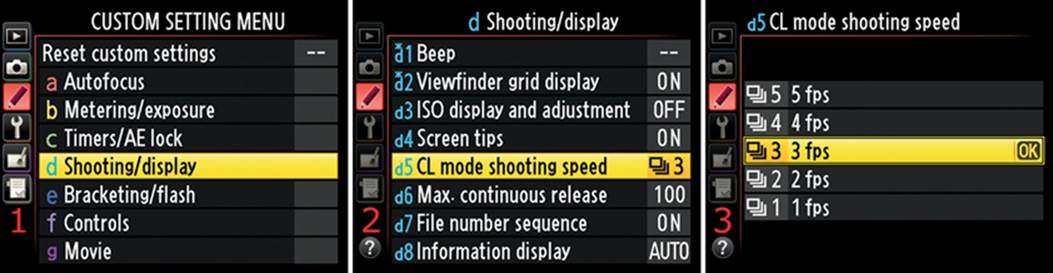
Figure 4.30 – Setting CL mode shooting speed
Use the following steps to configure d5 CL mode shooting speed:
1. Select d Shooting/display from the Custom Setting Menu and scroll to the right (figure 4.30, screen 1).
2. Highlight d5 CL mode shooting speed and scroll to the right (figure 4.30, screen 2).
3. Choose one of the five options from the list (from 1 fps to 5 fps). In figure 4.30, screen 3, I selected 3 fps.
4. Press the OK button to lock in the setting.
Remember, you always have CH mode for when you want to blast off images like there’s no end to your memory card or when you want to impress bystanders with that extra cool Nikon shutter clicking sound.
Settings Recommendation: I have always left my setting at the default of 3 fps since that is reasonably fast but does not waste card space. Play around with this setting and decide for yourself what speed you like. Again, remember that you have both low (CL) and high (CH) speeds for the camera’s shooting rate. This function is for the low speed setting (CL) found on the Release mode dial.
d6 Max. Continuous Release
(User’s Manual – Pages 230, 335)
The d6 Max. continuous release setting adjusts the maximum number of images you can shoot in a single burst. You can blast away until you have reached the number of exposures specified in figure 4.31, screen 3, which is up to 100 JPEG images.
Although you could reach 100 images in a single burst, it is improbable. Your camera is limited by the size of its buffer and the types of images you are shooting. Plus, during a burst the camera actively writes images from the buffer to one or both memory cards.
Page 335 in the User’s Manual specifies the camera buffer size for each image type. Here’s a summary of what it says:
• NEF (RAW) files – The in-camera image buffer can hold from 14 to 26 RAW images, depending on the type of compression used and the image bit depth (Shooting Menu > NEF (RAW) recording).
• JPEG files – The in-camera image buffer can hold from 51 to 100 JPEG images, depending on whether you are shooting L, M, or S image sizes; whether you are shooting fine, normal, or basic; and whether you have selected Optimal quality or Size priority compression (Shooting Menu > Image quality, Image size, and JPEG compression).
Unless you are shooting small JPEG basic files, the buffer will fill up before you reach the maximum of 100 shots specified in the Max. continuous release setting. If Shooting Menu > Long exposure NR is set to On, it further reduces the buffer capacity. Likewise, if the Shooting Menu > Auto distortion control is set to On, the memory buffer capacity could be cut in half.
However, the D610 has an ample memory buffer size for most of us, especially in JPEG mode. If you are shooting in RAW mode, it will not handle nearly the number of images as JPEG mode before running out of buffer space. High-speed event shooting may require that you shoot in JPEG mode to keep from running out of buffer space. Using fast memory cards (for fast image writing) can help, too.
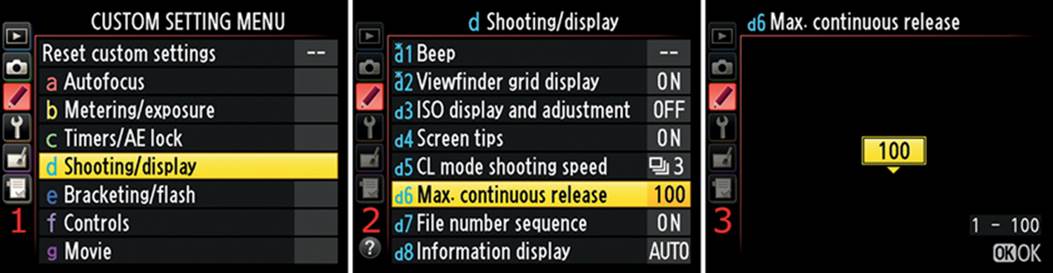
Figure 4.31 – How many images do you want to take in succession?
Use the following steps to configure d6 Max. continuous release:
1. Select d Shooting/display from the Custom Setting Menu and scroll to the right (figure 4.31, screen 1).
2. Highlight d6 Max. continuous release and scroll to the right (figure 4.31, screen 2).
3. Use the Multi selector to scroll up or down and set the number of images you want in each burst. In figure 4.31, screen 3, I selected 100 (default).
4. Press the OK button to lock in the setting.
Settings Recommendation: I want the buffer to hold as many images as it possibly can when I am blasting away in high-speed shooting modes, so I leave Max. continuous release set to 100.
However, you may want to limit the camera to a maximum burst of 10 or 20 images so the buffer will not fill up and slow the camera down. This also lets you maintain some control over your enthusiastic high-speed shooting. Do you really want dozens and dozens (and dozens) of pictures of those flying seagulls?
What Is the Memory Buffer?
Your D610 has internal memory chips, called the memory buffer, that will hold a limited number of images (up to 27 RAW, 57 Large JPEG fine, or 100 Large JPEG normal or basic; see User’s Manual page 335). The memory buffer allows you to shoot several images in quick succession while the camera writes them, one at a time, to the memory card(s). The buffer holds the last few pictures you took in temporary memory until the camera can store them on the more permanent memory of a memory card. Without an internal memory buffer, it would be nearly impossible for the camera to shoot several images quickly.
d7 File Number Sequence
(User’s Manual – Page 230)
The d7 File number sequence setting allows your camera to count the file numbers for each picture you take in a running sequence from 0001 to 9999. After 9999 pictures, it rolls back over to 0001, or you can cause it to reset the image number to 0001 when you format a memory card or insert a new one.
Here are the settings and an explanation of how they work:
• On – The File number sequence continues even if a new folder is created, a new memory card is inserted, or the current memory card is formatted. If the file number exceeds 9999 during a shoot, the camera will create a new folder on the same memory card and start writing the new images, starting at 0001, into the new folder. Similarly, if you accumulate 999 images in the current folder, the next image captured will result in the camera creating a new folder, but the file numbering will not be reset to 0001 unless that 999th image has a file number of 9999. In other words, no matter what you do with your memory cards, or how many folders you or the camera create, the File number sequence will continue incrementing until 9999 images have been taken. Only then will the File number sequence reset to 0001.
• Off – Whenever you format a memory card or insert a new one, or when you create a new folder, the number sequence starts over at 0001. If you exceed 999 images in a single folder, the camera creates a new folder and starts counting at 0001 again.
• Reset – This is similar to the On setting. However, it is not a true running total to 9999 because the image number is dependent on the folder in use. The camera simply takes the last number it finds in the current folder and adds 1 to it, up to 999. If you switch to an empty folder or create a new one, the numbering starts over at 0001. Since a folder cannot hold more than 999 pictures, you will not exceed 999 as a running sequence in any one folder. Each folder has its own number series and causes the File number sequence to Reset.
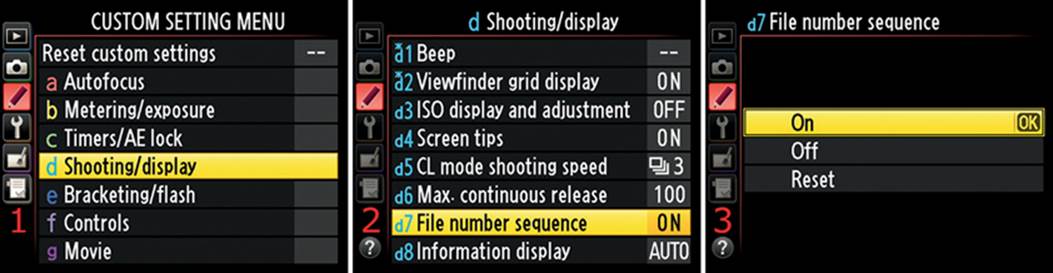
Figure 4.32 – Enabling File number sequence
Use the following steps to configure the d7 File number sequence:
1. Select d Shooting/display from the Custom Setting Menu and scroll to the right (figure 4.32, screen 1).
2. Highlight d7 File number sequence and scroll to the right (figure 4.32, screen 2).
3. Choose one of the three options from the list. In figure 4.32, screen 3, I selected On.
4. Press the OK button to lock in the setting.
Settings Recommendation: I heartily recommend that you set File number sequence to On. After much experience with Nikon DSLR cameras and many years of storing thousands of files, I’ve found that the fewer number of files with similar image numbers, the better. Why take a chance on accidentally overwriting the last shooting session when you transfer files to your computer just because they have the same image numbers?
Plus, I like to know how many pictures I’ve taken with each camera. Since I use the Shooting Menu > File naming function to add three letters to reflect the number of times my camera has rolled over 9,999 images (e.g., _1DY9999.NEF, _2DY9999.NEF, or _3DY9999.NEF), I am better able to determine how many images I’ve taken with the camera. I just have to be careful to change 1DY to 2DY when the File number sequence rolls over from 9999 to 0001.
d8 Information Display
(User’s Manual – Page 231)
The d8 Information display setting allows your camera to automatically sense how much ambient light is in the area where you are shooting. If the ambient light is bright, the color of the Information display screen will also be bright so it can overcome the ambient light.
To open the Information display screen, press the Info button. The Information display screen shows the current shooting information. Its color and brightness will adjust according to the ambient light the camera senses through the lens.
Figure 4.33 shows the difference between the light and dark screens, which you can select by using one of the two Manual settings or allowing Auto to select a screen automatically. Figure 4.33, screen 1, is the dark on light screen, and figure 4.33, screen 2, is the light on dark screen.
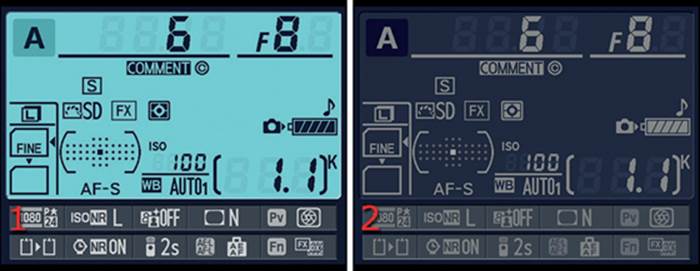
Figure 4.33 – B Dark on light (screen 1) and W Light on dark (screen 2) display screens
Try this: With your lens cap off, your camera turned on, and nothing displayed on the Monitor, press the Info button. If the ambient light is dim to bright, you’ll see a light blue information screen with black characters. Now go into a dark area or put your lens cap on and cover the eyepiece with your hand. You’ll see that with very little ambient light, the camera changes the Information display screen to light gray characters on a dark blue background. This assures that you won’t be blinded when you need to see the shooting information when you’re in a dark area. This may not impress you much, but I’m easily entertained!
As shown in figure 4.34, screen 3, there are two available selections for the Information display setting:
• Auto – Through the uncapped lens or uncovered Viewfinder eyepiece, the D610 decides how much ambient light there is and changes the color and contrast of the Information display screen accordingly.
• Manual – You can select the light or dark version of the Information display screen manually. If you choose Manual, you have two options: B Dark on light (light blue screen) or W Light on dark (dark blue screen) (figure 4.35, screen 4).
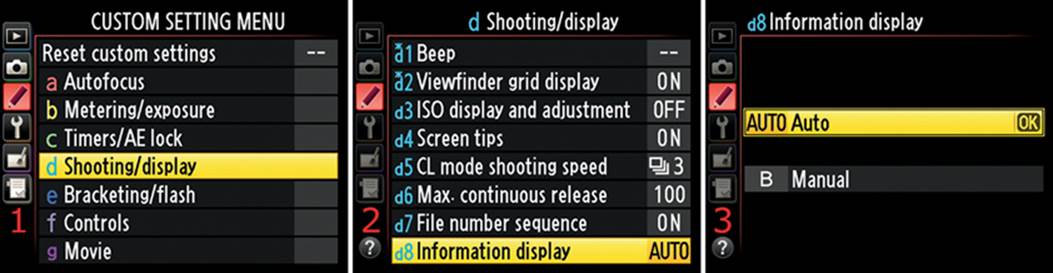
Figure 4.34 – Auto Information display
Use the following steps to configure the d8 Information display setting to Auto:
1. Select d Shooting/display from the Custom Setting Menu and scroll to the right (figure 4.34, screen 1).
2. Highlight d8 Information display and scroll to the right (figure 4.34, screen 2).
3. In figure 4.34, screen 3, I selected Auto. The camera will choose the light blue or dark blue screen depending on the ambient light level.
4. Press the OK button to lock in the setting.
If you want to manually select the screen color for the Information display screen, use the following steps:
1. Select d Shooting/display from the Custom Setting Menu and scroll to the right (figure 4.35, screen 1).
2. Highlight d8 Information display and scroll to the right (figure 4.35, screen 2).
3. Choose B Manual and scroll to the right (figure 4.35, screen 3).
4. The next screen shows the B Dark on light and W Light on dark choices. In figure 4.35, screen 4, I chose B Dark on light so the light blue screen will display when I press the Info button.
5. Press the OK button to lock in the setting.
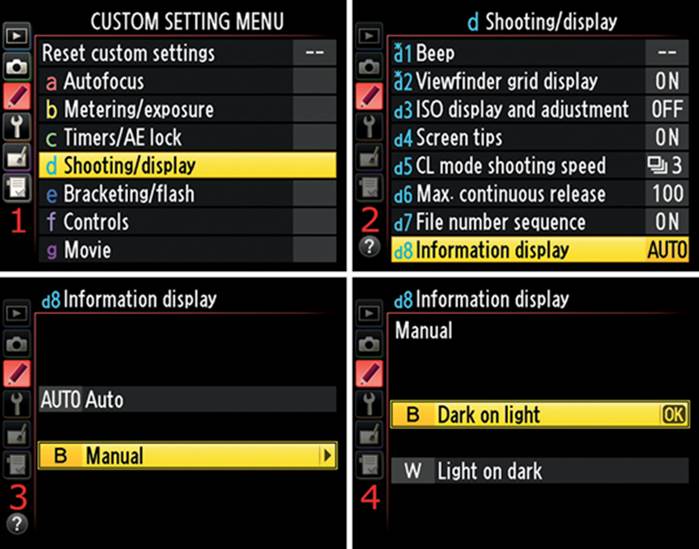
Figure 4.35 – Manual Information display
If you want to impress your friends and make your enemies jealous, show them how cool your camera is when it’s smart enough to adjust the screen color to the current light conditions. I warned you that I’m easily entertained, didn’t I?
Settings Recommendation: I leave my camera set to Auto because it seems to work very well at automatically selecting the proper screen for the current light conditions. If you prefer one screen over another, you can select it and it will stay that way all the time.
d9 LCD Illumination
(User’s Manual – Page 231)
The d9 LCD illumination setting gives you a simple way to set how the illumination of the Control panel backlight works. When it’s on, the Control panel lights up in yellowish green. Here are the two choices and how they work:
• Off (default) – If you leave LCD illumination set to Off, the backlight of the Control panel will not turn on unless you use the LCD illuminator on the ring surrounding the Shutter-release button. If you move the Power switch all the way to the right, the Control panel will light up.
• On – This setting makes the Control panel illumination come on anytime the exposure meter is active. If you shoot in the dark a lot and need to refer to the Control panel often, switch this setting to On.
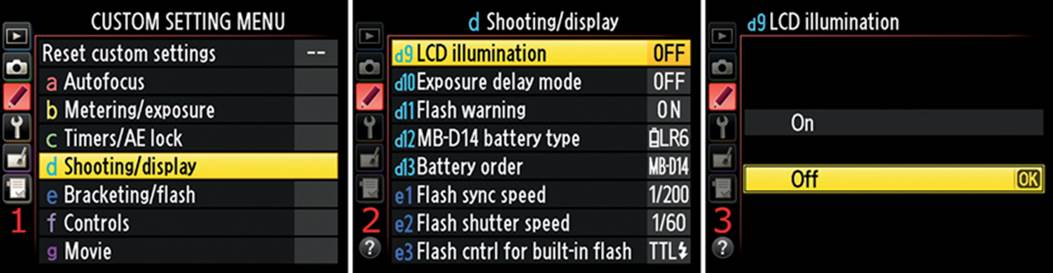
Figure 4.36 – LCD illumination
Use the following steps to configure the d9 LCD illumination setting:
1. Select d Shooting/display from the Custom Setting Menu and scroll to the right (figure 4.36, screen 1).
2. Highlight d9 LCD illumination and scroll to the right (figure 4.36, screen 2).
3. Choose either On or Off from the menu. In figure 4.36, screen 3, I selected Off.
4. Press the OK button to lock in the setting.
Settings Recommendation: This setting will affect the battery life since backlights pull a lot of power; therefore, I don’t suggest using the On setting unless you really need it. You have the LCD illuminator on the ring around the Shutter-release button to manually turn on the Control panel light when needed.
d10 Exposure Delay Mode
(User’s Manual – Page 231)
The d10 Exposure delay mode setting introduces a delay of one to three seconds after the Shutter-release button is pressed—and the reflex mirror is raised—before the shutter is actually released. The intention is that during the delay the camera vibrations will die down and the image will be sharper.
There are two settings in Exposure delay mode:
• On – The camera first raises the reflex mirror and then waits from one to three seconds, according to your configuration choice, before firing the shutter. This allows the vibrations from the mirror movement to dissipate before the shutter fires. Of course, this won’t be useful at all for shooting anything that moves. But for slow shooting of static scenes, this is great and keeps you from having to use Mirror-up (MUP), which requires two Shutter-release button presses to take a picture. Exposure delay mode has the same effect as MUP but requires only one Shutter-release button press after a delay is selected.
• Off – The shutter has no delay when this setting is turned off.
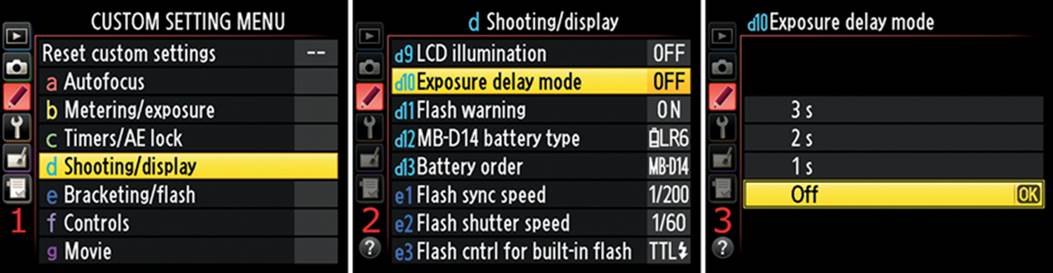
Figure 4.37 – Exposure delay mode
Use the following steps to configure d10 Exposure delay mode:
1. Select d Shooting/display from the Custom Setting Menu and scroll to the right (figure 4.37, screen 1).
2. Highlight d10 Exposure delay mode and scroll to the right (figure 4.37, screen 2).
3. Choose 1 s, 2 s, 3 s, or Off from the menu. In figure 4.37, screen 3, I selected Off.
4. Press the OK button to lock in the setting.
Settings Recommendation: Exposure delay mode is very important to me. As a nature shooter, I use it frequently for single shots. When I’m shooting hand-held—or on a tripod—and want a really sharp image, I often use this mode to prevent the camera’s internal reflex mirror movement from vibrating my camera and blurring my pictures. If you handhold your camera, shoot mostly static subjects, and want sharper pictures, this setting will help. On a tripod, this is a time saver compared to Mirror-up (MUP) mode, which requires two Shutter-release button presses or a 30-second time-out delay.
d11 Flash Warning
(User’s Manual – Page 231)
The d11 Flash warning setting enables a blinking lightning bolt warning in the Viewfinder when the camera detects that the ambient light is too low to take a sharp picture. You should raise the camera’s pop-up flash when you see the Flash warning. You won’t see the warning when you use one of the camera’s automatic modes because the camera will pop up the flash as needed. However, in release modes like P, S, A, or M you will see this warning often.
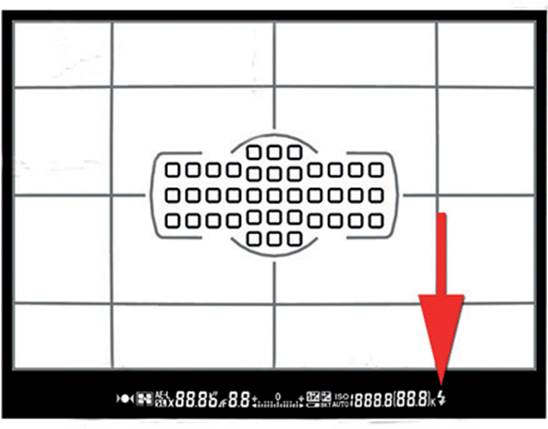
Figure 4.38 – Flash warning
Figure 4.38 (red arrow) shows the location of the small lightning bolt symbol in the lower right of the Viewfinder. It may be hard to see in the figure, so go into a low-light area, set your camera to P, S, A, or M mode, and press the Shutter-release button halfway while holding the camera to your eye. If the flash is not raised, the lightning bolt symbol will flash, symbolically asking you to use the built-in Speedlight.

Figure 4.39 – Flash warning settings
Use the following steps to configure the d11 Flash warning setting:
1. Select d Shooting/display from the Custom Setting Menu and scroll to the right (figure 4.39, screen 1).
2. Highlight d11 Flash warning and scroll to the right (figure 4.39, screen 2).
3. Choose either On or Off from the menu. In figure 4.39, screen 3, I selected On (default).
4. Press the OK button to lock in the setting.
Settings Recommendation: Flash warning defaults to On, which I use all the time. That way, if it’s too dark to make a normal exposure the camera warns me that I need to use flash. Especially for a new photographer, this function is helpful. There’s no point in turning it off, unless you don’t like it to flash just before you take a blurry picture.
d12 MB-D14 Battery Type
(User’s Manual – Page 232)
The d12 MB-D14 battery type setting applies only when you use AA batteries in your optional MB-D14 battery pack. It does not apply when you are using Nikon EN-EL15 lithium ion battery packs because they communicate with the camera.
If you have an MB-D14 battery pack and plan to use AA batteries, you’ll need to tell the camera what type of AA batteries you are using for this session. It certainly is not a good idea to mix AA battery types.
The MB-D14 can hold one EN-EL15 battery or six AA batteries. Nikon suggests that AA batteries be used only in emergencies and only in warm temperatures. The performance characteristics of AA batteries are significantly lower than the Nikon EN-EL15 lithium ion battery pack.
The camera will accept the following battery types:
• LR6 (AA alkaline)
• HR6 (AA Ni-MH) (nickel metal hydride)
• FR6 (AA lithium)
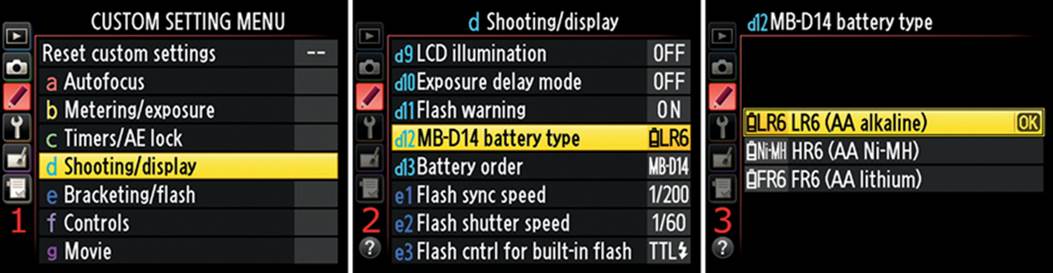
Figure 4.40 – MB-D14 battery type choices
Use the following steps to configure the d12 MB-D14 battery type setting:
1. Select d Shooting/display from the Custom Setting Menu and scroll to the right (figure 4.40, screen 1).
2. Highlight d12 MB-D14 battery type and scroll to the right (figure 4.40, screen 2).
3. Choose one of the three options from the list. In figure 4.40, screen 3, I selected LR6 (AA alkaline).
4. Press the OK button to lock in the setting.
Note: If you see that the battery symbol on the Control panel, Viewfinder, or Information display is on its last notch (figure 4.41), start thinking about replacing the old battery. If the battery symbol is blinking, replace the battery immediately because the Shutter-release button is disabled when the battery symbol is flashing.
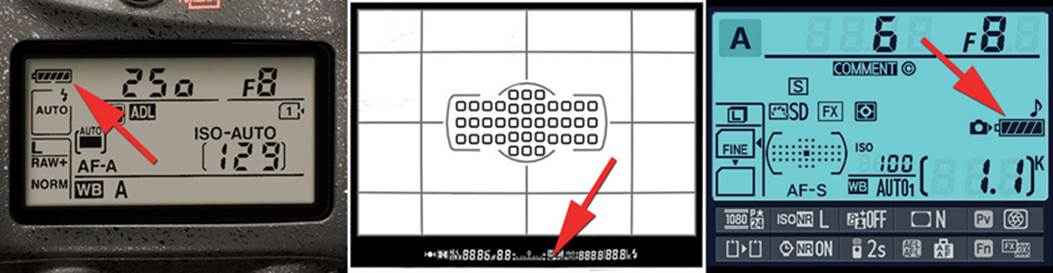
Figure 4.41 – Battery symbol locations
Settings Recommendation: Nikon does not recommend using certain AA batteries, such as LR6 (AA alkaline) and HR6 (AA Ni-MH), except in emergencies. Its primary objection to these two types of batteries is that they do not work well at lower temperatures. In fact, at temperatures below 68 degrees F (20 degrees C), an alkaline battery starts losing its ability to deliver power and will die rather quickly. You may not get as many shots out of a set of AA batteries, so your cost of shooting may rise.
However, AA batteries are readily available and relatively low cost, so some people like to use them, especially in an emergency. If you do choose to use AA batteries, stick with FR6 (AA lithium) since that is the same type of cell used in Nikon EN-EL batteries, and they are not affected as much by low temperatures. You can also use HR6 (AA Ni-MH) batteries safely since they are not as temperature sensitive, and they provide consistent power.
d13 Battery Order
(User’s Manual – Page 233)
When you are using an MB-D14 battery pack on your D610, the d13 Battery order setting lets you choose the order in which you want to use the available batteries. You can use the EN-EL 15 battery first or those in the MB-D14 battery pack first:
• Use MB-D14 batteries first (default) – When the camera is turned on it starts drawing its power from the MB-D14 battery pack first. After the battery pack is exhausted, the camera automatically switches to the EN-EL15 battery inside the camera.
• Use camera battery first – When you turn on the camera it uses the internal EN-EL15 battery to exhaustion before using the battery or batteries in the MB-D14 battery pack. If you select this option and remove the MB-D14 while the EN-EL15 battery in the camera is dead, you’ll have to remove and recharge the camera’s internal EN-EL15 battery before use.
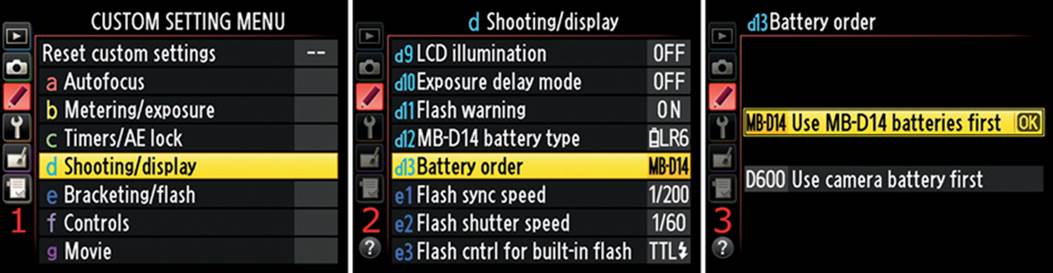
Figure 4.42 – Battery order choices
Use the following steps to configure the d13 Battery order setting:
1. Select d Shooting/display from the Custom Setting Menu and scroll to the right (figure 4.42, screen 1).
2. Highlight d13 Battery order and scroll to the right (figure 4.42, screen 2).
3. Choose one of the two options from the list. In figure 4.42, screen 3, I selected Use MB-D14 batteries first.
4. Press the OK button to lock in the setting.
Note: If you have the camera connected to an external power source, such as the Nikon EH-5b AC adapter (requires EP-5B power connector), the camera will use the external power source no matter what you have selected in Battery order.
Settings Recommendation: Which battery do you want to draw from first? I like to use the MB-D14 batteries first and have my camera’s internal EN-EL15 battery available as a backup. That way, if I remove the MB-D14, my camera won’t suddenly go dead due to a depleted battery. Nikon thinks the same way, evidently, since the camera defaults to Use MB-D14 batteries first.
e Bracketing/Flash
Custom Settings e1–e7
Within the e Bracketing/flash menu, you’ll find seven settings:
• e1 Flash sync speed
• e2 Flash shutter speed
• e3 Flash cntrl for built-in flash
• e4 Exposure comp. for flash
• e5 Modeling flash
• e6 Auto bracketing set
• e7 Bracketing order
e1 Flash Sync Speed
(User’s Manual – Page 234)
The e1 Flash sync speed setting lets you select a basic synchronization speed from 1/60 s to 1/200 s. The D610 has a more flexible Flash sync speed than many cameras.
Or, if you prefer, you can use the two Auto FP high-speed sync modes on your camera: 1/200 s (Auto FP) or 1/250 s (Auto FP). These Auto FP high-speed sync modes are available only with certain external Speedlights, not with the built-in pop-up Speedlight.
At the time of writing this book, the six Nikon Speedlights that can be used with the D610 in Auto FP high-speed sync modes are as follows:
• SB-910
• SB-900
• SB-800
• SB-700
• SB-600
• SB-R200
Auto FP high-speed sync enables the use of fill flash even in bright daylight with wide aperture settings. It allows you to set your camera to the highest shutter speed, up to 1/4000 second, and still use the external flash unit to fill in shadows. There are two upcoming subsections in this chapter, Auto FP High-Speed Sync Review and Special Shutter Speed Setting X + Flash Sync Speed, that provide a detailed discussion on how the Auto FP high-speed sync system works.
The following are your Flash sync speed choices (figure 4.43):
• 1/250 s (Auto FP)
• 1/200 s (Auto FP)
• 1/200 s
• 1/160 s
• 1/125 s
• 1/100 s
• 1/80 s
• 1/60 s
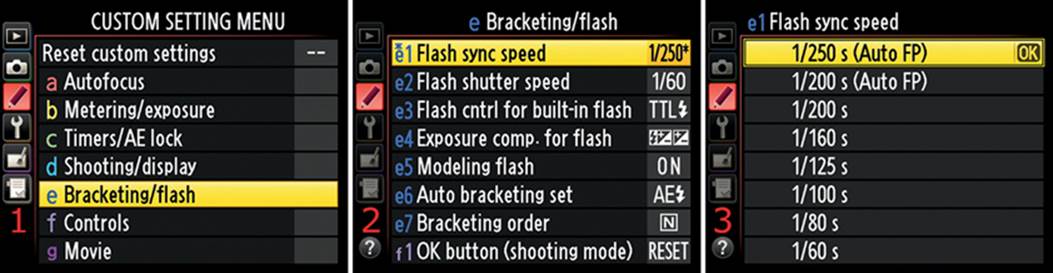
Figure 4.43 – Flash sync speed choices
Use the following steps to adjust the e1 Flash sync speed setting:
1. Select e Bracketing/flash from the Custom Setting Menu and scroll to the right (figure 4.43, screen 1).
2. Highlight e1 Flash sync speed and scroll to the right (figure 4.43, screen 2).
3. Choose one of the eight options from the list, from 1/60 s to 1/250 s (Auto FP). In figure 4.43, screen 3, I selected 1/250 s (Auto FP).
4. Press the OK button to lock in the setting.
When you’re using Auto FP high-speed sync mode, the output of your flash is reduced, but it doesn’t cut off the frame for exposures that use a shutter speed faster than the normal flash sync speed (X-sync). Why? Let’s review.
Auto FP High-Speed Sync Review
In a normal flash situation, with shutter speeds of 1/200 second and slower, the entire shutter is fully open and the flash can fire a single burst of light to expose the subject. It works like this: There are two shutter curtains in your camera. The first shutter curtain opens to expose the sensor to your subject, the flash fires to provide light for the correct exposure, then the second shutter curtain closes. For a very brief period of time, the entire sensor is uncovered. The flash fires during the time when the sensor is fully uncovered.
However, when your camera’s shutter speed is faster than 1/200 second, the shutter curtains are never fully open for the flash to expose the entire subject in one burst of light. This is because at fast shutter speeds the first shutter curtain starts opening and the second shutter curtain quickly follows. In effect, a slit of light scans across the surface of your sensor, exposing the subject. If the flash fired normally, the width of that slit between the shutter curtains would get a flash of light, but the rest of the sensor would be blocked by the curtains. A band of the image would be correctly exposed, and everything else would be underexposed.
What happens to your external Nikon Speedlight to allow it to follow that slit of light moving across the sensor? It changes into a pulsing strobe unit instead of a normal flash unit. Have you ever danced under a strobe light? A strobe works by firing a series of light pulses. Similarly, when your camera’s shutter speed is so fast that the Speedlight cannot fire a single burst of light for a correct exposure, it uses Auto FP high-speed sync mode and fires a series of light bursts as the slit between the shutter curtains travels in front of the image sensor. The Speed-light can fire hundreds of bursts per second. It looks like one flash of light, even though it is hundreds of bursts of light, one right after the other.
When the camera is in Auto FP high-speed sync mode, you’ll see something like this on your Speedlight’s LCD monitor: TTL FP or TTL BL FP. The FP designation tells you that the camera and the Speedlight are ready for you to use any shutter speed you’d like and still get a good exposure, even with wide-open apertures!
You can safely leave your camera set to 1/250 s (Auto FP) or 1/200 s (Auto FP) all the time since the Auto FP high-speed sync mode does not kick in until you raise the shutter speed above the maximum setting of 1/200 s. With slower shutter speeds, the flash works in normal mode and does not waste any power by pulsing the output. This pulsing of light reduces the maximum output of your flash significantly but allows you to use any shutter speed while your external Speedlight still fires. The higher the shutter speed, the lower the flash output. In effect, your camera is depending on you to have enough ambient light to offset the loss in power. I’ve found that even my powerful SB-900 Speedlight can provide only enough power to light a subject to about 8 ft (2.4 m) when I use a 1/4000 second shutter speed. With shutter speeds that fast, there needs to be enough ambient light to help the flash light the subject, unless you are very close to the subject.
However, now you can use wide apertures to isolate your subject in direct sunlight—which requires fast shutter speeds. The flash will adjust and provide great fill light if you use Auto FP high-speed sync mode.
Note: If your flash fires at full power in normal modes, the flash indicator will blink in the Viewfinder to let you know that all available flash power has been expended, and you need to check to see if the image is underexposed. When the camera is firing in Auto FP high-speed sync mode, you won’t get a warning in the Viewfinder if the image does not have enough light. Check the histogram often when you use Auto FP high-speed sync mode.
Special Shutter Speed Setting X + Flash Sync Speed
When you use the Manual (M) or Shutter-priority auto (S) exposure modes, you can turn the shutter speed all the way down to 30 seconds, then to bulb. There is one more setting below bulb, named X + Flash sync speed. This setting allows you to set the camera to a known shutter speed and shoot away. You will see X 200 if Custom setting e1 Flash sync speed is set to 1/200 s. Whatever Flash sync speed you select will show up after the X. If you select a Flash sync speed of 1/125 s, then X 125 will show up as the next setting below bulb; a Flash sync speed of 1/60 s means that X 60 will show up below bulb, and so forth.
The shutter speed will not vary from your chosen setting. The camera will adjust the aperture and flash in Shutter-priority auto (S) mode, or you can adjust the aperture while the flash controls exposure in Manual (M) mode.
This X-Sync mode is not available in Aperture-priority auto (A) or Programmed auto (P) modes since the camera controls the shutter speed in those two settings. You’ll use X + Flash sync speed primarily when you are shooting in Manual (M) or Shutter-priority auto (S) mode and want to use a known X-Sync speed.
Settings Recommendation: I leave my camera set to 1/250 s (Auto FP) all the time. The camera works just like it normally would until one of my settings increases the shutter speed to faster than 1/250 second, at which time it starts pulsing the light to match the travel of the shutter curtains. Once again, you won’t be able to detect this high-frequency strobe effect since it happens so fast it seems like a single burst of light.
Remember that the flash loses significant power (or reach) at faster shutter speeds because it is forced to work so hard. Be sure you experiment with this setting to get the best results. You can use a big aperture, like f/1.8, to create a very shallow depth of field in direct sunlight since you can use very fast shutter speeds. This will allow you to make images that many other cameras simply cannot create. Learn to balance the flash and ambient light in Auto FP high-speed sync mode. All this technical talk will make sense when you see the results. It’s pretty cool stuff!
e2 Flash Shutter Speed
(User’s Manual – Page 235)
The e2 Flash shutter speed setting controls the minimum shutter speed your camera can use in various flash modes. You can select shutter speeds between 30 s and 1/60 s.
Let’s consider each of the modes and their minimum shutter speeds:
• Front-curtain sync, Rear-curtain sync, or Red-eye reduction – In Programmed auto (P) mode or Aperture-priority auto (A) mode, you can select the slowest shutter speed from 1/60 s to 30 s. Shutter-priority auto (S) mode and Manual (M) mode cause the camera to ignore Flash shutter speed, and the slowest shutter speed is 30 s.
• Slow sync, Red-eye reduction with slow sync, or Slow rear-curtain sync – These three modes ignore Flash shutter speed, and the slowest shutter speed is 30 s.
The User’s Manual is a bit confusing on this subject, but the mode and minimum shutter speed information in the previous list is evident after study and testing. Therefore, Custom setting e2 Flash shutter speed is only partially used by the flash modes, because the default is preset to 30 seconds in Shutter-priority auto (S) and Manual (M) modes.
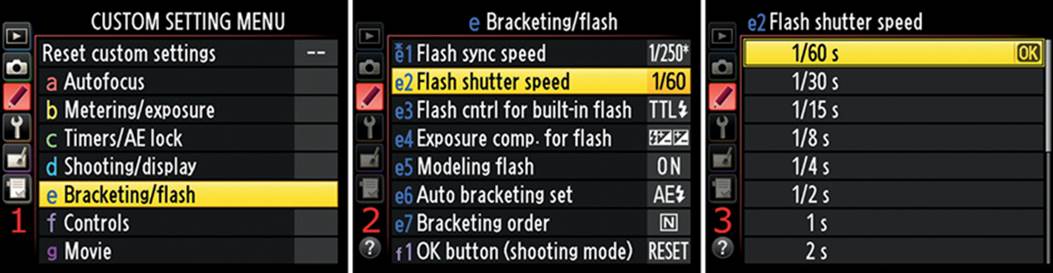
Figure 4.44 – Flash shutter speed choices
Use the following steps to set the e2 Flash shutter speed minimum:
1. Select e Bracketing/flash from the Custom Setting Menu and scroll to the right (figure 4.44, screen 1).
2. Highlight e2 Flash shutter speed and scroll to the right (figure 4.44, screen 2).
3. Choose one of the options from the list: 1/60 s to 30 s (scroll down to see all the available shutter speeds). In figure 4.44, screen 3, I selected 1/60 s (default).
4. Press the OK button to lock in the setting.
Settings Recommendation: I normally use 1/60 s. Shutter speeds slower than 1/60s can cause ghosting if the ambient light is too bright. The subject can move after the flash fires, but the open shutter and ambient light can record a blurred ghost effect. You’ll have a well-exposed picture of the subject plus a ghost of the subject in the image. Use slower shutter speeds only when you are sure that you’ll be in dark conditions and the flash will provide the only lighting, unless you’re shooting special effects, like a blurred aftereffect following your subject to imply movement.
e3 Flash Cntrl for Built-in Flash
(User’s Manual – Page 236)
The e3 Flash cntrl for built-in flash setting provides four distinct ways to control the output of the pop-up Speedlight flash. This Custom setting does not apply to flash units you attach via the Accessory shoe (hot-shoe) on top of the camera. It is only for the built-in flash. The four modes are as follows:
• TTL – TTL
• M – Manual
• RPT – Repeating flash
• CMD – Commander mode
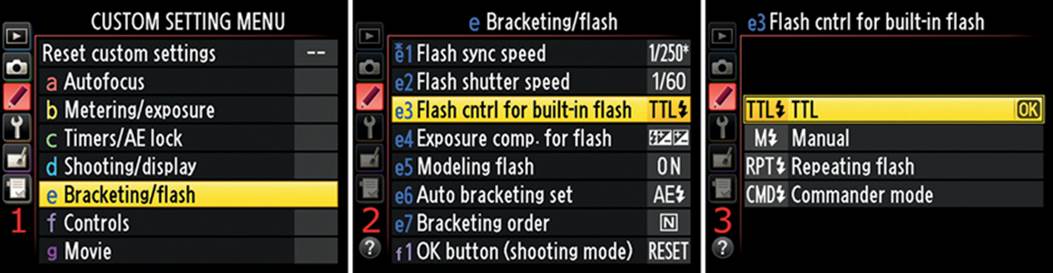
Figure 4.45 – Flash cntrl for built-in flash (TTL – TTL)
Use the following steps to choose one of the e3 Flash cntrl for built-in flash settings:
1. Select e Bracketing/flash from the Custom Setting Menu and scroll to the right (figure 4.45, screen 1).
2. Highlight e3 Flash cntrl for built-in flash and scroll to the right (figure 4.45, screen 2).
3. Choose one of the four options from the list. In figure 4.45, screen 3, I selected TTL – TTL. The other choices will be detailed in figures 4.46 to 4.48, which begin where figure 4.45 leaves off.
4. Press the OK button to lock in the setting.
Let’s consider each of the four Flash cntrl for built-in flash modes.
TTL – TTL
Also known as i-TTL, this mode is the standard way to use the camera for flash pictures. TTL stands for through the lens, and it creates a very accurate and balanced flash output using a preflash method to determine the correct exposure before the main flash burst fires.
TTL (i-TTL) is compatible with the Nikon SB-910, SB-900, SB-800, SB-700, SB-600, SB-400, and SB-R200 Speedlights.
TTL – TTL is a completely automatic mode and will adjust to various distances, along with the different shutter speeds and apertures your camera can use. The TTL – TTL setting was illustrated in figure 4.45.
M – Manual
The M – Manual mode, shown in figure 4.46, allows you to manually control the output of your flash. The settings range from Full power to 1/128th power. If you’ve been shooting in a studio for a long time, this setting will be quite familiar to you.

Figure 4.46 – Flash cntrl for built-in flash (M – Manual)
RPT – Repeating Flash
The RPT – Repeating flash setting turns your flash into a strobe unit so you can see the pulse (unlike Auto FP high-speed sync mode), which allows you to get creative with stroboscopic multiple flashes. As you can see in figure 4.47, screen 2, you use the Multi selector to scroll up and down to set the values, and you scroll left and right to move between Output, Times, and Frequency. Press the OK button when you have the settings configured.
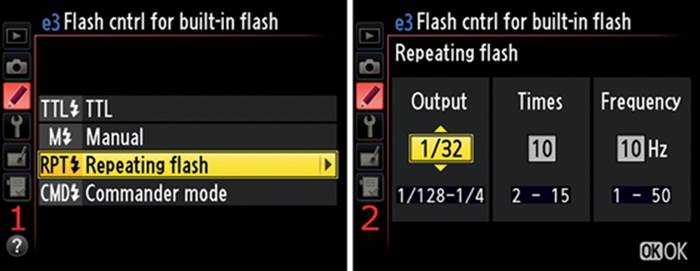
Figure 4.47 – Flash cntrl for built-in flash (RPT – Repeating flash)
Descriptions of the settings are as follows:
• Output – You can vary the power of the flash from 1/4 to 1/128 of full power. The more power the flash uses, the fewer times it can fire. The following table indicates how many times the built-in pop-up flash can fire using the various Output levels.
|
1/4 |
2 times |
|
1/8 |
2–5 times |
|
1/16 |
2–10 times |
|
1/32 |
2–10 or 15 times |
|
1/64 |
2–10, 15, 20, or 25 times |
|
1/128 |
2–10, 15, 20, 25, 30, or 35 times |
Table 4.1 – Times settings
• Times – This setting controls the number of times the strobe will flash per second. The range is from 2 to 10 flashes in one-step increments and from 15 to 35 flashes (at 1/128 of full power) in five-step increments (the number of times shown in Output). Refer to table 4.1 to see the number of times the flash can fire. Raising the power output (going toward 1/4 of full power) will decrease the number of times the flash can fire, and lowering the power (going toward 1/128 of full power) will increase the number of times the flash can fire. As you change the Output, you’ll see the maximum Times change.
• Frequency – This sets how often the flash fires per second. You could also call this the Hz, or hertz, setting. The frequency range is from 1 to 50 Hz.
RPT – Repeating flash is compatible with the Nikon SB-910, SB-900, and SB-800 Speedlights only.
CMD – Commander Mode
The CMD – Commander mode allows your camera to become a commander, or controller, of an unlimited number of external Speedlight flash units that are compatible with the Nikon Creative Lighting System (CLS). It can control up to two groups, or banks, with four available communication Channels (1–4). In figure 4.48, screen 2, you can see the Built-in flash, Group A, Group B, and Channel settings. The two columns have headers called Mode and Comp. (compensation). Use the Multi selector to move around and modify the settings.
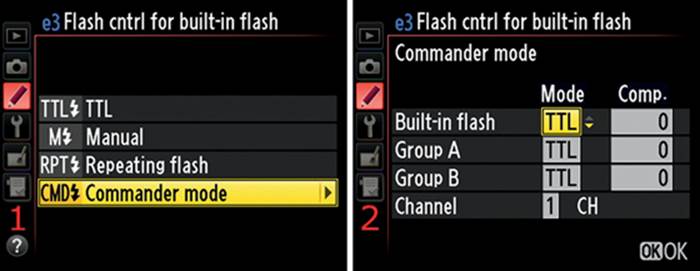
Figure 4.48 – Flash cntrl for built-in flash (CMD – Commander mode)
Descriptions of the four settings are as follows:
• Built-in flash – This option lets you set the built-in pop-up flash to one of three settings. These settings do not affect any of the flash units in Group A or Group B because they are external flash units being controlled wirelessly by the Commander mode:
a) TTL – Otherwise known as i-TTL mode, this is a completely automatic mode that monitors preflashes to determine the duration of the builtin flash for correct exposure. You can set Comp. to between +3.0 EV and –3.0 EV in 1/3 EV steps.
b) M – This mode allows you to choose a manual flash level between 1/1 (full power) to 1/128 (1/128 of full power).
c) – – – I call this the double-dash mode. It disables the built-in flash so it won’t add light to the image. The primary light burst from the built-in flash will not fire. However, the built-in flash must fire preflashes to determine the correct exposure and to communicate with any external flash units in Group A or Group B, which are being commanded.
• Group A and Group B – These are groups of an unlimited number of remote slaved Speedlights that your camera can control and fire using the Nikon CLS. Each group has four modes that can be applied to each flash unit in the group. The modes are as follows:
a) TTL – This mode works like Built-in flash except it causes all flash units being controlled in each Group to use TTL (i-TTL). You can also set Comp. between +3.0 EV and –3.0 EV in 1/3 EV steps. Comp. will affect all flash units in that group. TTL is compatible with all current Nikon Speedlights.
b) AA – This stands for auto aperture, and it is available only when your D610 is controlling an SB-910, SB-900, or SB-800 Speedlight flash unit in slave mode on a bank. This is an older technology that does not use the newer i-TTL exposure technology. It is included for people who are used to the older style of exposure. You can safely ignore this mode and use TTL instead, and you’ll get better exposures. If you really want to use AA mode, that’s fine. It works like TTL mode with less accurate exposures. You can set Comp. to between +3.0 EV and –3.0 EV in 1/3 EV steps. Comp. will affect all flash units in that group. AA mode is compatible with the Nikon SB-910, SB-900, and SB-800 Speedlights only.
c) M – This mode allows you to choose a manual flash level between 1/1 (full power) and 1/128 (1/128 of full power) for each of the flash units being controlled in a group. If you like to shoot manually for ultimate control, the camera gives you a way to control multiple groups of flash units manually. M mode is compatible with all current Nikon Speedlights.
d) – – – The flash units in the group do not fire. Double-dash mode disables an entire group so you can concentrate on configuring the other group. Then you can turn the disabled group back on and configure it, too. Or you can use just one group of slaved Speedlights (Group A or Group B) and disable the other.
• Channel – This is a communications channel on which your camera communicates with all grouped remote flashes. You choose one Channel to control all of your slaved flash units. You must match the Channel number for the camera to each flash unit. You have a choice of four Channel numbers: 1–4. This allows you to use your flash units near another photographer who is also controlling groups without accidentally firing the flash units on the other camera. Each photographer chooses a different channel to avoid communication conflicts.
An upcoming chapter, Speedlight Flash, is devoted to Nikon flash usage. It covers each of the flash and Commander modes in more detail.
Commander Mode Notes
When your camera controls multiple flash units in Commander mode, it is important that you understand a few points.
First, the camera communicates with the remote slaved flash groups (Group A and Group B) during the monitor preflash cycle, so the pop-up flash must be raised so it can communicate with the remote flash units.
Second, each remote flash unit has a small round photocell sensor on its side that picks up the monitor preflashes from your camera’s pop-up flash. Make sure those sensors are not blocked or exposed to direct, very bright light while in use or they may not be able to see the monitor preflashes.
Third, if you want to prevent the monitor preflashes from appearing in your photographs or don’t want people to squint when they fire, you can purchase the optional SG-3IR infrared panel for the pop-up flash, which you mount on the Accessory shoe (figure 4.49, red arrow). This infrared panel makes the monitor preflashes mostly invisible to humans and imaging sensors, yet the remote flash units can still see them and react properly.
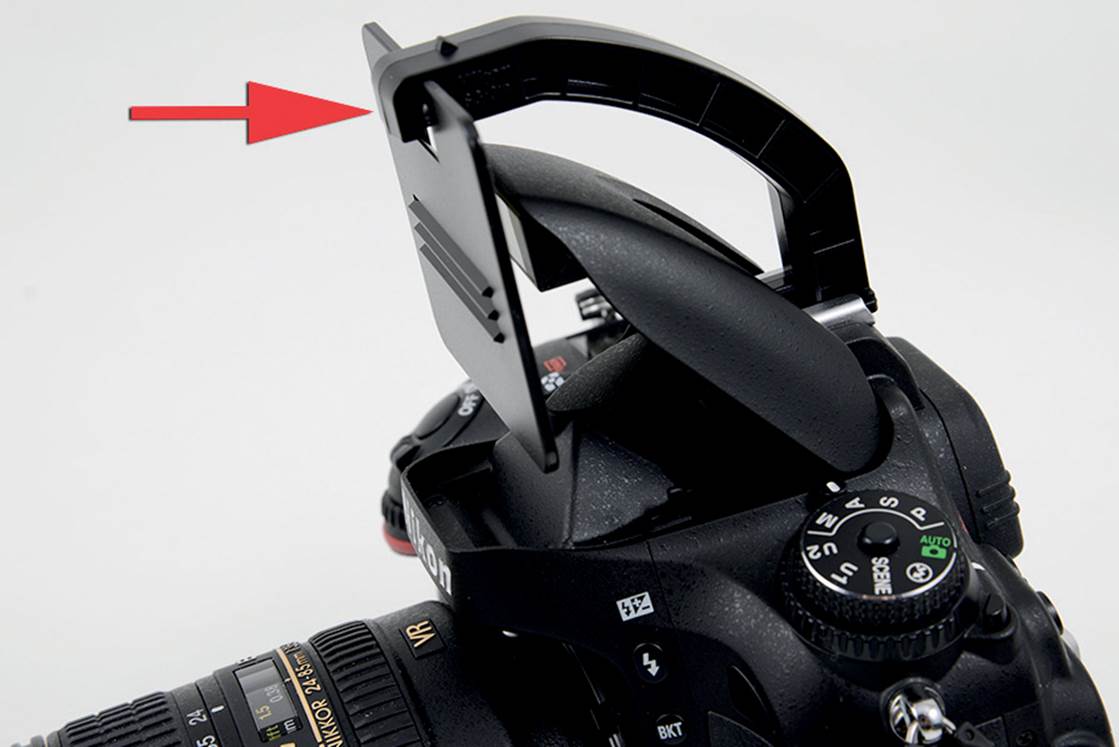
Figure 4.49 – Nikon SG-3IR infrared panel for built-in flash
Fourth, don’t position any of the remote flash units more than 33 ft (10.05 m) from the camera. That’s the maximum distance for which you can use the D610’s pop-up flash in Commander mode.
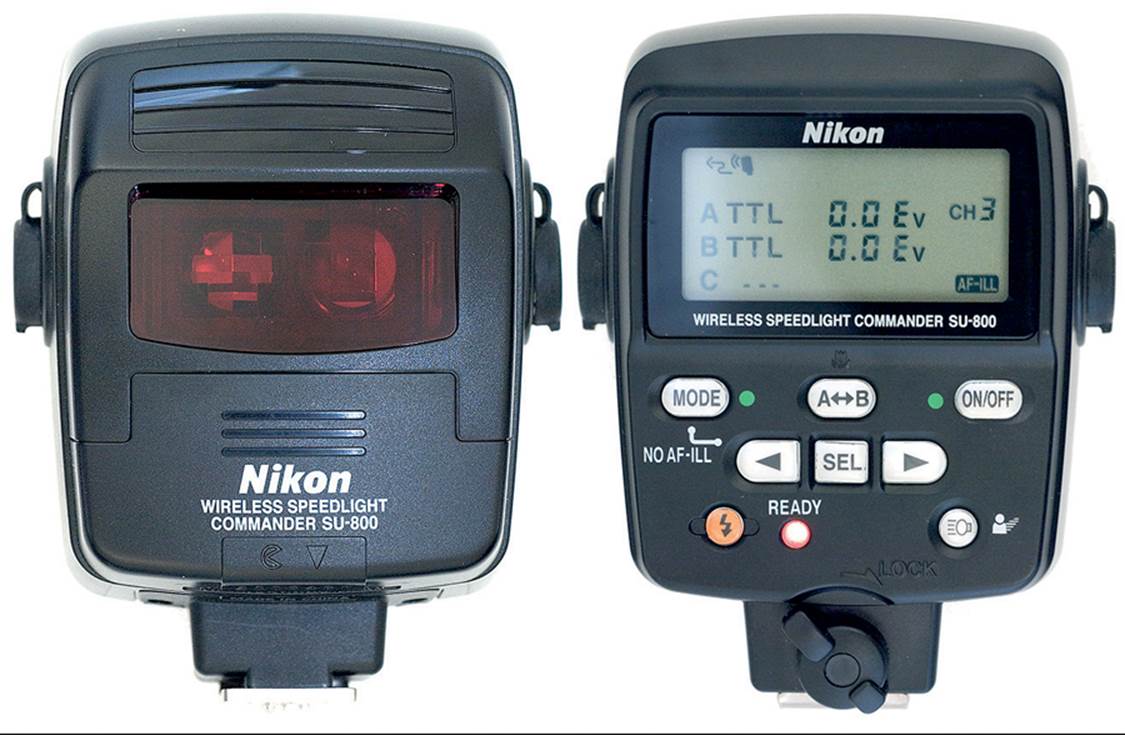
Figure 4.50 – Nikon SU-800 Wireless Speedlight Commander
If 33 ft is not enough reach, invest in the Nikon SU-800 Wireless Speedlight Commander (figure 4.50) that replaces the pop-up flash and Commander mode combo. Mount the SU-800 onto the Accessory shoe and let it control the remote slaves up to 66 ft (20.10 m) away.
Settings Recommendation: Learn to use the Commander mode on your D610. It opens up the Nikon CLS to you. You can then use your D610 to control multiple Nikon Speedlight flash units and really get creative with your lighting arrangements for portrait work and product shots. When I’m not using Commander mode, I leave Flash cntrl for built-in flash set to TTL for fully automatic flash pictures.
e4 Exposure Comp. for Flash
(User’s Manual – Page 240)
The e4 Exposure comp. for flash function originally appeared in the Nikon D4 professional camera. Interestingly, the more expensive, prolevel Nikon D800 does not have this function. Basically, it allows you to treat the subject and background differently when you use flash. You can separate the normal exposure compensation function (for the background) and the flash compensation function (for the subject). Exposure compensation can be applied to the background only, or to the background and subject (the entire frame) with flash. There are two available settings:
• Entire frame – Both the flash and the exposure compensation work normally.
• Background only – The nonflash exposure compensation (that you adjust with the Exposure compensation button) and the flash compensation (that you apply with the Flash compensation button) are separate. Flash compensation applies to the subject only, and nonflash exposure compensation applies to the background only.
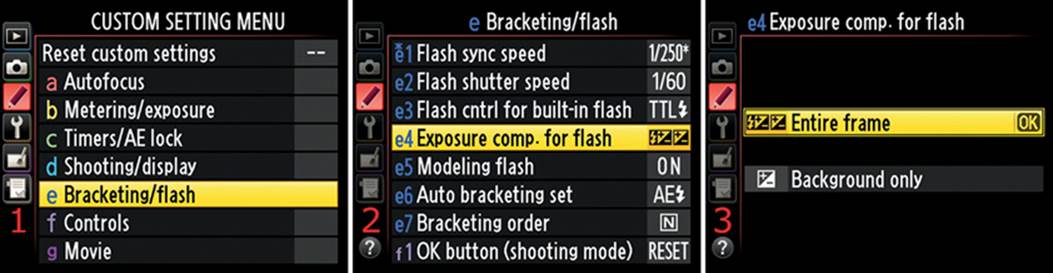
Figure 4.51 – Exposure comp. for flash
Use the following steps to choose a flash and exposure compensation combination:
1. Select e Bracketing/flash from the Custom Setting Menu and scroll to the right (figure 4.51, screen 1).
2. Highlight e4 Exposure comp. for flash and scroll to the right (figure 4.51, screen 2).
3. Choose either Entire frame or Background only. If you choose Background only, the nonflash and flash compensation functions are applied separately (figure 4.51, screen 3).
4. Press the OK button to lock in your choice.
Settings Recommendation: I leave my D610 set to Entire frame for most shooting. If I need to change the light level relationship between the subject and the background, I set the camera to Background only and experiment until I find the best compensation for balance or to emphasize one or the other. Why not spend some time experimenting and learning how to use this new technology?
e5 Modeling Flash
(User’s Manual – Page 241)
The e5 Modeling flash setting lets you fire a pulse of flashes to help you see how the light wraps around your subject. It works like modeling lights on studio flash units, except it pulses rapidly instead of shines. You can press the Depth-of-field preview button to see the effect if you set Modeling flash to On.
This function works with Nikon’s main Speedlight flash unit group: SB-910, SB-900, SB-800, SB-700, SB-600, and SB-R200. It also works with the pop-up flash for limited periods. My SB-400 flash unit does not work with Modeling flash.
Here’s what each of the settings for Modeling flash accomplishes:
• On – This setting allows you to see (somewhat) how your flash will light the subject. If you have this setting turned On, you can press the Depth-of-field preview button to fire the pop-up flash, or any attached and controlled external Speedlight unit, in a series of rapid pulses. These pulses are continuous and simulate the lighting that the primary flash burst will emit. The Modeling flash can be used only for a few seconds at a time to prevent the flash unit from overheating, so look quickly.
• Off – No Modeling flash will fire when you press the Depth-of-field preview button.
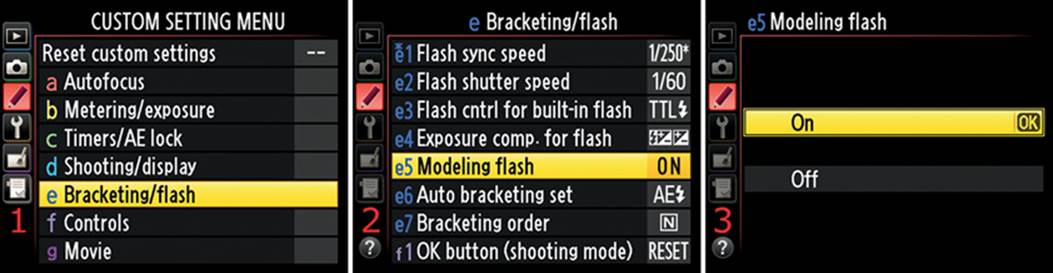
Figure 4.52 – Modeling flash settings
Use the following steps to configure the e5 Modeling flash settings:
1. Select e Bracketing/flash from the Custom Setting Menu and scroll to the right (figure 4.52, screen 1).
2. Highlight e5 Modeling flash and scroll to the right (figure 4.52, screen 2).
3. Choose either On or Off from the menu. In figure 4.52, screen 3, I selected On.
4. Press the OK button to lock in the setting.
Settings Recommendation: I often forget that I have this setting turned on and want to check the depth of field on a product shot. When I press the Depth-of-field preview button, I get the modeling light instead of the depth of field. I don’t find this feature to be particularly useful, and it often startles me. One of these days I’ll get around to turning it off. You might like it if you do a lot of studio-style flash photography. Give it a try, but be prepared—the pulsing and the sound of the flash can be somewhat startling if you don’t expect it.
e6 Auto Bracketing Set
(User’s Manual – Pages 241, 153)
The e6 Auto bracketing set function lets you choose how bracketing works. You can set up bracketing for the exposure system (AE), flash, White balance, and Active D-Lighting.
The basic idea behind bracketing is to take the same picture multiple times with different exposures, White balances, or Active D-Lighting levels.
It’s a way to play it safe so you get at least one excellent picture out of the series or so you can combine multiple images into one image with a higher dynamic range (HDR) or more accurate color.
Let’s start by reviewing the five types of bracketing:
• AE & flash – When you set up a session for bracketing, the camera will cause any type of normal picture you take to be bracketed, whether it is a standard exposure or is taken with flash.
• AE only – Your bracketing settings will affect only the exposure system, not the flash.
• Flash only – Your bracketing settings will affect only the flash system, not the exposure.
• WB bracketing – White balance bracketing works the same as exposure and flash bracketing, except it is designed for bracketing color in mired values; that is, color temperatures are adjusted instead of bracketing light in EV step values (see sidebar, What Is Mired?). This can be used only when you are shooting in JPEG mode.
• ADL bracketing – This allows bracketing Active D-Lighting in up to five separate exposures. Each consecutive exposure uses the next higher level of Active D-Lighting.
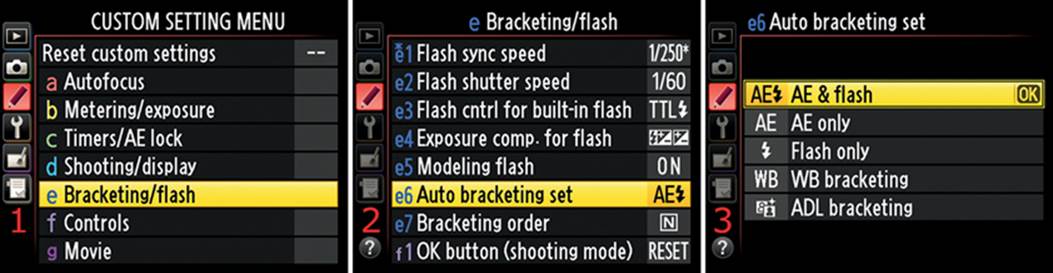
Figure 4.53 – Auto bracketing set choices
Use the following steps to select an e6 Auto bracketing set type:
1. Select e Bracketing/flash from the Custom Setting Menu and scroll to the right (figure 4.53, screen 1).
2. Highlight e6 Auto bracketing set and scroll to the right (figure 4.53, screen 2).
3. Choose one of the five options from the list. In figure 4.53, screen 3, I selected AE & flash.
4. Press the OK button to lock in the setting.
Now let’s consider how to use the bracketing system.
Steps to Use AE and Flash Bracketing
The primary type of bracketing for most photographers is generally AE bracketing, which simply means auto exposure bracketing. Since AE only and Flash only bracketing work the same way, this section explains how to bracket your images when you have selected AE & flash, AE only, or Flash only bracketing. You can use AE only or Flash only when you want to bracket just AE or just Flash but not the other. If you want to bracket both at the same time, use AE & Flash.
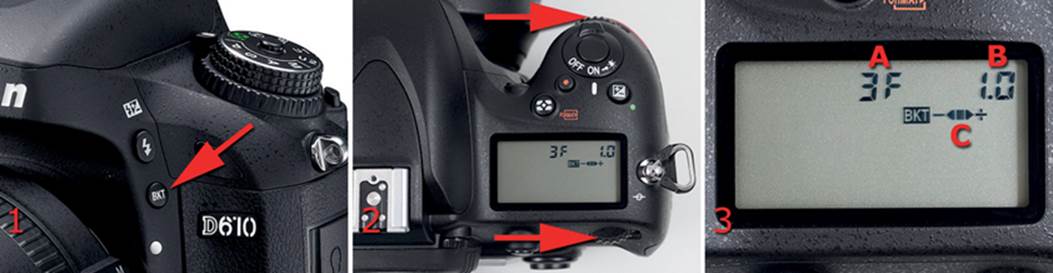
Figure 4.53.1 – BKT button, Main and Sub-command dials, and Control panel with AE/flash bracketing symbols
Use the following steps to shoot an exposure-bracketed series of images:
1. Select AE & flash, AE only, or Flash only in Custom Setting Menu > e Bracketing/flash > e6 Auto bracketing set (figure 4.53, screen 3).
2. Press and hold the BKT button (figure 4.53.1, image 1). BKT will appear on the Control panel along with a series of characters (figure 4.53.1, image 3A–C). Do not release the BKT button.
3. Turn the Main command dial (figure 4.53.1, image 2, bottom arrow) to select the number of shots in the bracket. The number of shots you select will appear on the Control panel. You can see in figure 4.53.1, image 3A, that I selected 3F. You can choose from the following options:
· 0F – Bracket not set
· 3F – Three-shot bracket (exposure order set in Custom setting e7)
· –2F – Two-shot bracket (normal and underexposed)
· +2F – Two-shot bracket (normal and overexposed)
4. Continue holding down the BKT button and turn the Sub-command dial (figure 4.53.1, image 2, top arrow) to select the bracketed exposure increment. The EV step value will appear on the Control panel. In figure 4.53.1, image 3B, you can see that I selected 1.0. You can choose from the following increments, which are affected by the setting in Custom setting b2:
· 0.3, 0.7, 1.0, 2.0, or 3.0 EV (with 1/3 step set in Custom setting b2)
· 0.5, 1.0, 2.0, or 3.0 EV (with 1/2 step set in Custom setting b2)
5. Release the BKT button and press the Shutter-release button to shoot your bracketed pictures. If you are using Single frame (S) release mode, you will have to press the Shutter-release button two or three times (depending on the number of shots selected in step 3). If you are using one of the Continuous (CL or CH) release modes, you can simply hold down the Shutter-release button and the camera will fire the number of shots selected in step 3. Figure 4.53.1, image 3C, shows the Bracketing progress indicator. Each time the shutter fires, a part of the indicator will disappear. If you are using Single frame (S) release mode, you must be sure that you have taken all shots in the bracketed series. If part of the progress indicator remains, you have not taken all the shots in the series. In a Continuous (CL or CH) release mode all shots will fire in quick succession when you hold down the Shutter-release button.
Settings Recommendation: I normally bracket with a 1 EV or 2 EV step value (1 or 2 stops) so I can get a good spread of light values for creating high dynamic range (HDR) images. In most cases I shoot a three-image bracket, with one image overexposed and one image underexposed by 1 or 2 stops. This allows me to combine detail in the highlight and shadow areas during HDR processing.
Using Bracketing Burst
Custom settings f2 and f3 allow you to assign Bracketing burst to either the Fn button or the Preview button. When the camera is in Single frame (S) or Quiet (Q) release modes, Bracketing burst lets the camera fire the entire bracketed series when you hold down the Fn button or Preview button and the Shutter-release button. It lets the camera override the fact that you normally have it set to shoot one frame at a time. In addition, if you have the camera set to one of the Continuous (CL or CH) release modes, it will fire the entire bracketed series over and over as long as you hold down the Shutter-release button and Fn or Preview button, instead of stopping after one bracket series.
Steps to Use WB Bracketing
WB bracketing allows you to shoot a bracketed series of images with various White balance color temperatures applied. With WB bracketing you can add amber or blue (or both) to the bracketed images to make them warmer or cooler, with lighter or darker tint levels.
WB bracketing does not work when your camera is in RAW mode. If you press the BKT button and turn the Command dials and nothing happens, the Image quality is probably set to a mode that shoots NEF (RAW) images.
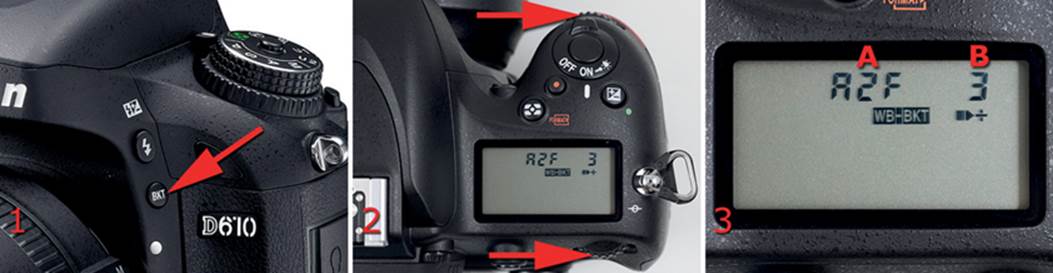
Figure 4.53.2 – BKT button, Main and Sub-command dials, and Control panel with WB bracketing symbols
Use the following steps to shoot a series of images with WB bracketing:
1. Select WB bracketing from Custom Setting Menu > e Bracketing/flash > e6 Auto bracketing set (figure 4.53, screen 3).
2. Press and hold the BKT button on the front of the camera (figure 4.53.2, image 1). WB-BKT will appear on the Control panel along with a series of characters (figure 4.53.2, image 3A–B). Do not release the BKT button.
3. Turn the Main command dial (figure 4.53.2, image 2, bottom arrow) to select the number of shots in the bracket. The number of shots you select will appear on the Control panel. In figure 4.53.2, image 3A, I selected A2F. You can choose from the following options:
• 0F – Bracket not set
· A2F – Two-shot bracket (one normal, one adds amber)
· b2F – Two-shot bracket (one normal, one adds blue)
· 3F – Three-shot bracket (one normal, one adds amber, one adds blue)
4. Now we’ll set the tint level of the amber or blue color by adding more or less color depth in mired amounts. Continue holding down the BKT button and change the mired number by turning the Sub-command dial left or right, up to three maximum. The mired number will appear on theControl panel. In figure 4.53.2, image 3B, I selected 3. Choose 1, 2, or 3, where 1 is 5 mired, 2 is 10 mired, and 3 is 15 mired. If you chose a three-shot bracket (3F), the direction of the color bracketing toward amber or blue is controlled by Custom setting e7 Bracketing order. If you selected MTR > under > over in Custom setting e7, the color change direction is normal > amber > blue. If you selected Under > MTR > over in Custom setting e7, the color change direction is amber > normal > blue.
5. Press the Shutter-release button to take the bracketed picture series. The camera will take only one picture, then it reapplies the color filtration for each image in the bracket and saves each image as a separate file with a new file number and bracketed color value. This is different from any form of AE or Flash bracketing (AE only, Flash only, AE & Flash), where you have to fire each individual frame of the bracket. All images in the bracket (up to three) simply appear on your memory card.
Note: White balance bracketing works differently when it comes to shooting the bracket. All you have to do is press the Shutter-release button once and the camera takes one image, makes copies, and applies the different WB bracketing values to each image. It then saves the two or three images, with their White balance settings, under different file names. You do not take multiple images in WB bracketing.
Settings Recommendation: I prefer to use RAW mode and make minor (or major) color adjustments in the post-processing stage. However, you may want to use WB bracketing when you shoot JPEGs because each time you modify and resave a JPEG image, the file is degraded. Photographers who are concerned with accurate color balance will find WB bracketing useful.
What Is Mired?
Mired changes simply modify the color of your image, in this case toward amber (reddish) or blue. In effect, it warms or cools the image. It’s applied directly to the image by the camera when you shoot JPEGs, or it is saved as a marker when you shoot RAW images. You don’t have to worry about mired values unless you are a color scientist. You can just determine whether you like the image the way it is or would prefer that it be warmer or cooler, and bracket accordingly. In WB bracketing the A direction warms and the b direction cools. Technically, mired is calculated by multiplying the inverse of the color temperature by 106. I’d rather let my camera calculate mired values and then judge them with my eye. Remember, if you shoot in RAW, you can modify color values during post-processing. However, WB bracketing modifications are permanently applied to JPEG files.
Steps to Use ADL Bracketing
ADL bracketing allows you to shoot a bracketed series of images with various levels of Active D-Lighting (ADL) applied. There are two types of ADL bracketing: two and three frame (represented as 2F or 3F on the Control panel) plus off (0F).
• Two-frame bracket (2F) – This type of ADL bracketing fires two shots. The first is taken with no ADL, and the second is taken with whatever level of ADL you selected in Shooting Menu > Active D-Lighting (Low, Normal, High, Extra high, or Auto). If ADL is set to Off in the Shooting Menu, the camera will take one image with no ADL and the second image with ADL set to Auto, which means it adjusts according to what the camera thinks is the best ADL level.
• Three-frame bracket (3F) – This version of ADL bracketing ignores the setting in Shooting Menu > Active D-Lighting. It captures three images: the first with no ADL (Off), the second with Normal ADL (Normal), and the third with High ADL (High).
• No bracketing (0F) – If you have not selected a bracketing mode, you will see 0F on the Control panel when you press the BKT button. Bracketing is currently off.
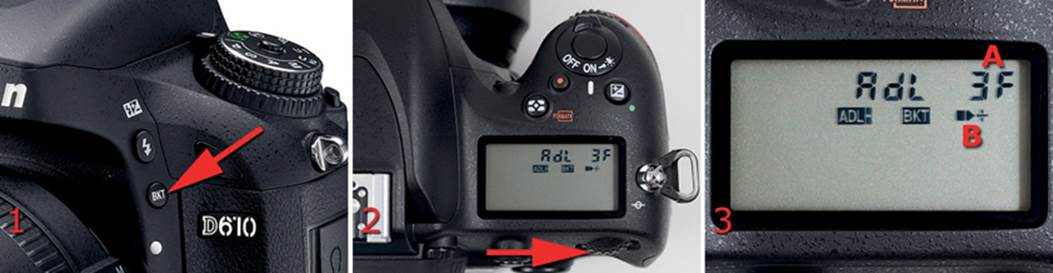
Figure 4.53.3 – BKT button, Main command dial, and Control panel with ADL bracketing symbols
Use the following steps to shoot an ADL-bracketed series of images:
1. Select ADL bracketing from Custom Setting Menu > e Bracketing/flash > e6 Auto bracketing set (figure 4.53, screen 3).
2. If you selected a two-frame (2F) bracket, set Shooting menu > Active D-Lighting to one of its ADL selections, such as Low, Normal, or High. One image will be taken with ADL off and the other at whatever setting you chose. If ADL is currently set to Off in the Shooting Menu, the camera will bracket like this: Off > Auto. For a three-frame (3F) bracket, the camera will automatically use this sequence: Off > Normal > High ADL bracketing.
3. Press and hold the BKT button while turning the Main command dial (figure 4.53.3, images 1 and 2) and verify that ADL- BKT appears on the Control panel. Continue rotating the Main command dial to choose one of the three settings (figure 4.53.3, image 3A):
· 0F – No bracketing selected
· 2F – Two-frame bracketing (Off > Active D-Lighting level from the Shooting Menu)
· 3F – Three-frame bracketing (Off > Normal > High)
4. Release the BKT button and press the Shutter-release button to take your bracketed pictures. Figure 4.53.3, image 3B, shows the Bracketing progress indicator. It will have two parts for a two-frame bracket and three parts for a three-frame bracket. Each time the shutter fires, a part of the indicator will disappear. If you are using Single frame (S) release mode, you must be sure that you have taken all the shots in the bracketed series. If part of the progress indicator remains, you have not taken all the shots in the series. In a Continuous (CL or CH) release mode, all shots will fire in quick succession when you hold down the Shutter-release button.
Note: See the sidebar a few pages back called Using Bracketing Burst for instructions on how to override the way the camera captures the bracketed image series in step 4.
Settings Recommendation: You might use each of the bracketing types for different reasons as you shoot. Many landscape or scenic shooters use AE only (exposure) bracketing quite frequently, with the express purpose of having several images of the same scene shot at different exposures so they can later combine them in high dynamic range imaging (HDR or HDRI) software. If you haven’t used bracketing before, I urge you to learn how. It is a powerful capability that seriously extends the camera’s facility for capturing a greater range of light and variety of color.
e7 Bracketing Order
(User’s Manual – Pages 241, 153)
The e7 Bracketing order setting allows you to choose the order of your exposure settings (normal, overexposed, and underexposed) during an exposure bracketing operation (see previous section, e6 Auto Bracketing Set).
There are two bracketing orders available in the D610. They allow you to control which images are taken first, second, and third in the bracketing series. The abbreviations used in this setting are as follows:
• MTR – Metered value (normal exposure)
• Under – Underexposed
• Over – Overexposed
Let’s see what the settings are and how they’re used during bracketing:
• MTR > under > over – With this setting, the normal exposure is taken first, followed by the underexposed image, then the overexposed image. For WB bracketing the pattern is normal > amber > blue. This setting does not apply to ADL bracketing.
• Under > MTR > over – A three-image bracket will be exposed in the following manner: underexposed, normal exposure, overexposed. For WB bracketing the pattern is amber > normal > blue. This does not apply to ADL bracketing.
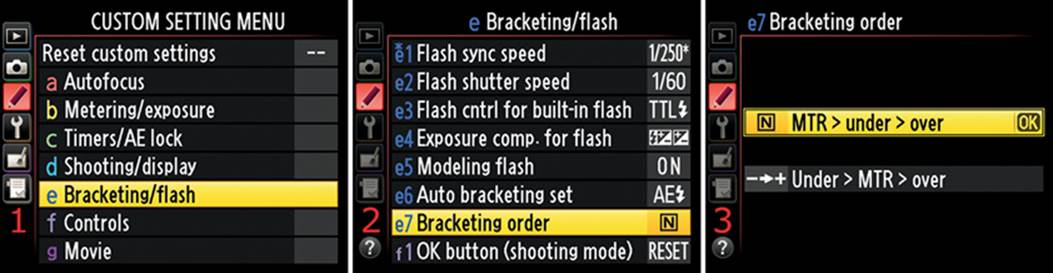
Figure 4.54 – Bracketing order choices
Finally, let’s look at the steps to configure the e7 Bracketing order setting:
1. Select e Bracketing/flash from the Custom Setting Menu and scroll to the right (figure 4.54, screen 1).
2. Highlight e7 Bracketing order and scroll to the right (figure 4.54, screen 2).
3. Choose one of the bracketing orders from the list. In figure 4.54, screen 3, I selected MTR > under > over.
4. Press the OK button to lock in the setting.
Settings Recommendation: I leave Bracketing order set to MTR > under > over so that when the images are displayed in series on the Monitor I can see the normal exposure (MTR) first and then watch how it varies as I scroll through the bracketed images. If that doesn’t suit you, change it to the other direction, Under > MTR > over. The normal exposure will be in the middle of the bracket instead of at the beginning. Some photographers prefer the more natural flow of that bracketing order (underexposed to overexposed).
f Controls
Custom Settings f1–f9
Within the Controls menu you’ll find nine settings:
• f1 OK button (shooting mode)
• f2 Assign Fn button
• f3 Assign preview button
• f4 Assign AE-L/AF-L button
• f5 Customize command dials
• f6 Release button to use dial
• f7 Slot empty release lock
• f8 Reverse indicators
• f9 Assign MB-D14 AE-L/AF-L button
f1 OK Button (Shooting Mode)
(User’s Manual – Page 241)
The f1 OK button (shooting mode) setting determines how the OK button in the center of the Multi selector works. All three of the available settings affect the currently active AF point in the Viewfinder whenever the camera is not in Auto-area AF mode and is in Shooting mode (versus Playback mode).
When you use Auto-area AF the camera controls the AF points as it sees fit, so this function has no effect. When you use Playback mode to view a picture, pressing the OK button opens the Retouch Menu. Shooting mode simply means you are not viewing anything on the Monitor and are ready to take a picture.
There are three selections in OK button (shooting mode):
• Select center focus point – When you are shooting, you often use the Multi selector with your thumb to navigate to an AF point in the Viewfinder. When you are done, unless you want to leave the AF point where it happens to be, you will have to scroll back to the center of the Viewfinder. Not anymore! If Select center focus point is chosen, the selected focus point resets to the center point when you press the OK button. This is the default action of the button.
• Highlight active focus point – Sometimes when you are looking at a confusing subject through the Viewfinder it may be hard to see the small black AF point. When Highlight active focus point is selected and you press the OK button, the entire group of AF points lights up in red for easy viewing.
• Not used – This does what it says: nothing happens when you press the OK button while in Shooting mode.
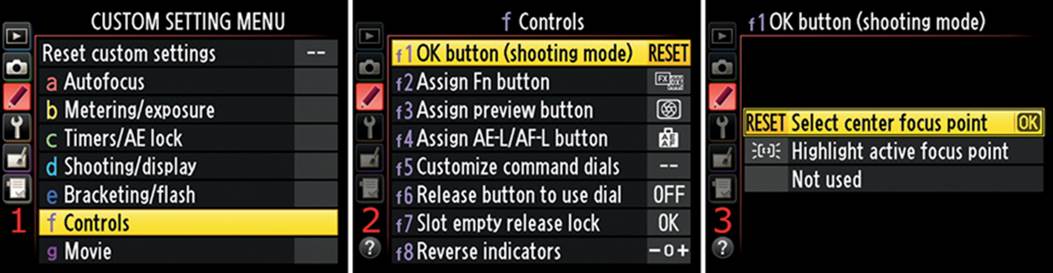
Figure 4.55 – OK button (shooting mode) choices
Use the following steps to choose one of the f1 OK button (shooting mode) settings:
1. Select f Controls from the Custom Setting Menu and scroll to the right (figure 4.55, screen 1).
2. Highlight f1 OK button (shooting mode) and scroll to the right (figure 4.55, screen 2).
3. Choose one of the options from the menu. In figure 4.55, screen 3, I chose Select center focus point.
4. Press the OK button to lock in the setting.
Note: When you have the camera set to Live view mode, pressing the OK button returns the square for the larger AF point back to the center, like the previously discussed Select center focus point setting. The Highlight active focus point setting has no effect in Live view. In fact, if you press the MENU button and open Custom setting f1 OK button (shooting mode) while you’re in Live view, you’ll find that it is grayed out. Live view mode defaults to Select center focus point.
Settings Recommendation: I have my camera set to Select center focus point so that when I press the OK button in Shooting mode the center AF point is selected. It saves time because I don’t have to manually scroll. I don’t find the Highlight active focus point setting all that useful since I can press the Shutter-release button halfway and the camera will highlight the active focus point. It seems like duplicate functionality to me, unless, of course, I am shooting in DX mode and have Custom setting a4 AF point illumination turned off so my Viewfinder DX view will be surrounded by a grayed-out area. In that situation, having an additonal way to highlight the current AF point is welcome. Frequent DX mode shooters, take notice of this setting!
If you would rather highlight the active focus point (area) with the OK button, simply choose the Highlight active focus point setting; then you can highlight the active AF point with both the OK button and the Shutter-release button (unless Custom setting a4 is disabled).
f2 Assign Fn Button, f3 Assign Preview Button, f4 Assign AE-L/AF-L Button
(User’s Manual – Pages 242–244)
The f2 Assign Fn button, f3 Assign preview button, and f4 Assign AE-L/AF-L button settings are all discussed in this section because they work the same way.
When I refer to Selected button, I am talking about the camera button you want to configure—Fn button, Preview button, or AE-L/AF-L button. When you see Selected button, mentally replace it with the name of the button you want to configure. You can assign various camera functions to any of these three buttons.
After we consider each of the screens used to assign the various functions, we’ll look at each function in detail in the list titled Assignable Function List. There are many different functions from which to choose. The screens, steps, and settings we are about to review are designed to let you customize the function of the Selected button.
The following figures show the Selected buttons with their default settings:
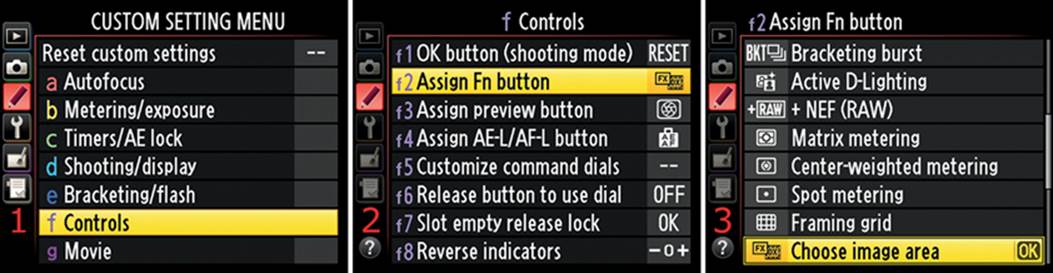
Figure 4.56 – Assign Fn button
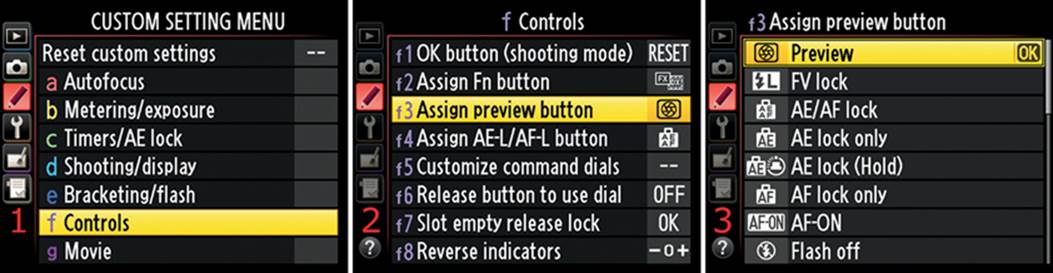
Figure 4.57 – Assign preview button
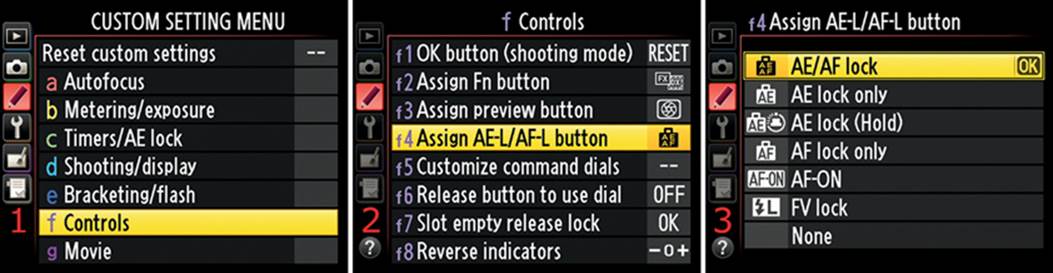
Figure 4.58 – Assign AE-L/AF-L button
Refer to figures 4.56 through 4.58 as you work through the following steps for each Selected button:
1. Select f Controls from the Custom Setting Menu and scroll to the right (figures 4.56, 4.57, or 4.58, screen 1).
2. Highlight Assign Selected button and scroll to the right (figures 4.56, 4.57, or 4.58, screen 2).
3. Select one of the functions from the list. The function you choose will be assigned to a single press of the Selected button (figures 4.56, 4.57, or 4.58, screen 3). See the upcoming section titled Assignable Function List for an explanation of each function.
4. Press the OK button to lock in your selection.
Now, let’s look at the Assignable Function List to see what amazing powers we can give each of the assignable buttons on our cameras. The f4 Assign AE-L/AF-L button setting uses a subset of the functions that are available to the other two buttons. In other words, not all of the functions are available for assignment to all three of the buttons.
The following list will not match the order shown on the menu screens for the various buttons. Instead, they are presented alphabetically to make it easier for future reference.
Assignable Function List
• 1 step spd/aperture – Normally the exposure value (EV) steps (1/3 step or 1/2 step) for the shutter speed and aperture are controlled by Custom setting b2 EV steps for exposure cntrl. However, if you select 1 step spd/aperture you can hold down the Selected button while rotating the rear Main command dial to change the shutter speed in 1 EV steps, overriding the 1/3 step or 1/2 step values set in Custom setting b2 EV steps for exposure cntrl. You can also do the same for the aperture by holding down the Selected button and rotating the front Sub-command dial. This function is not available for Assign AE-L/AF-L button.
• Access top item in My Menu – You can press the Selected button to jump directly to the top item in My Menu. This allows you to quickly use or modify your most used My Menu item. The monitor displays only the top My Menu item’s internal screen, not the overall My Menu selections. Use the MY MENU setting, instead, to display all of My Menu’s items when you press the Selected button. This function is not available for Assign AE-L/AF-L button.
• Active D-Lighting – You can hold down the Selected button while turning the Main command dial to select an Active D-Lighting level. The Control panel will show these levels in its bottom-right corner: oFF for Off, L (Low), n (Normal), H (High), HP (Extra high), and Auto (Shooting Menu > Active D-Lighting). This function is not available for Assign AE-L/AF-L button.
• AE/AF lock – Enabling this function causes AE (exposure) and AF (focus) to lock on the last meter and autofocus system reading while the Selected button is held down.
• AE lock (Hold) – Enabling this function causes AE (exposure) to lock on the last meter reading when the Selected button is pressed once. It stays locked until you press the Selected button again. In other words, the Selected button toggles AE lock.
• AE lock only – This function allows you to lock AE (exposure) on the last meter reading when you hold down the Selected button.
• AF lock only – When it is set, this function locks the AF (focus) system on the last autofocus reading while you hold down the Selected button.
• AF-ON – This causes the camera to initiate autofocus when you press the Selected button. The more expensive Nikon DSLRs have a dedicated AF-ON button in addition to the assignable buttons. Not to be left out, the D610 gives you a similar assignable functionality. When AF-ON is active the Shutter-release button cannot be used to focus.
• Bracketing burst – Normally, during a bracketing sequence with the shutter release set to Single frame release mode (S on the Release mode dial) or Quiet shutter-release mode (Q on the Release mode dial), you have to press the Shutter-release button once for each of the images in the bracket. The only way to shoot all the images in the bracketed series without letting up the Shutter-release button is to set the Release mode dial to CL or CH. If you select Bracketing burst, you can hold down the Selected button while holding down the Shutter-release button, and the camera will take all the images in the bracket in quick succession. In addition, any time you are using one of the Continuous release modes (CL or CH), the camera will fire the bracketed image series over and over—instead of stopping at the end of the series—when you hold down theSelected button. This applies to AE, Flash, and ADL bracketing, which take one image for each release of the shutter. WB bracketing takes the entire bracket in one shutter press by creating three images with varying white balances. Multiple shutter releases will capture numerous multi-image WB brackets. If you use this function for WB bracketing and hold down the Shutter-release button, you’ll create multiple groups of bracketed images on your memory card. Be careful with this function when you use WB bracketing or you may end up with a lot of unnecessary images. This function is not available for Assign AE-L/AF-L button.
• Center-weighted metering – If you normally use Matrix metering or Spot metering as your primary metering system, you can temporarily use Center-weighted area metering by holding down the Selected button. When you release the button, the camera returns to your customary meter type, such as Spot metering or Matrix metering. This function is not available for Assign AE-L/AF-L button.
• Choose image area – When you press the Selected button and rotate either Command dial you may choose an Image area setting. The camera will display 36–24 for FX and 24–16 for DX on the top Control panel. This function is not available for Assign AE-L/AF-L button.
• Choose non-CPU lens number – This function allows you to shoot with older AI or AI-S Nikkor lenses that do not have a CPU chip in them. You must first register the lens in the Setup Menu > Non-CPU lens data function. After you have registered one or more lenses, you can select them by assigning Choose non-CPU lens number to the Selected button. Simply hold down the Selected button while rotating either of the Command dials to scroll through up to nine registered non-CPU lenses. You’ll see n-1 to n-9 appear on the lower right corner of the Control panel on top of the camera as you scroll. Above that you’ll see the current focal length and aperture. This function is not available for Assign AE-L/AF-L button.
• Flash off – This is a temporary way to disable the flash for when you want to leave your flash turned on and still be able to take a picture without flash. While you hold down the Selected button, the flash is disabled. This function is not available for Assign AE-L/AF-L button.
• Framing grid – If you don’t have the gridlines enabled under Custom setting d2 Viewfinder grid display, you can temporarily enable the gridlines by pressing the Selected button, turning the Main command dial one click, and releasing the Selected button. This function is not available for Assign AE-L/AF-L button.
• FV lock – If you set Selected button to FV lock, the button will cause the builtin Speedlight or the external Speedlight to emit a monitor preflash and then lock the flash output to the level determined by the preflash until you press the Selected button a second time.
• Matrix metering – If you do not use Matrix metering as your primary metering system but want to use it occasionally, this setting allows you to turn it on while you hold down the Selected button. When you release the Selected button, the camera returns to your customary meter type, such as Spot metering or Center-weighted area metering. This function is not available for Assign AE-L/AF-L button.
• MY MENU – Pressing the Selected button displays My Menu, with the first item in the menu highlighted. This function is not available for Assign AE-L/AF-L button.
• +NEF (RAW) – When you are using one of the JPEG modes (JPEG fine, JPEG normal, or JPEG basic), you can also get an additional NEF (RAW) image by pressing the Selected button before you press the Shutter-release button. The Selected button toggles +NEF (RAW). If you keep the Shutter-release button pressed halfway between shots, the camera will take a series of RAW and JPEG images. When +NEF (RAW) is active, RAW+ will display above the other image format setting on the Control panel. This function is not available for Assign AE-L/AF-L button.
• None – Pressing the Selected button does nothing.
• Playback – This function causes the Selected button to act as if you had pressed the Playback button. Nikon included this so you can play back images when you use a big telephoto lens that requires two hands to use. This function is not available for Assign AE-L/AF-L button.
• Preview – This function shows you an actual view of what the camera sees with the aperture closed down to the selected aperture setting. Although it darkens the Viewfinder when you press the Selected button, you can see the depth of field (zone of sharp focus) that will be captured in the image. Normally, viewing the depth of field is controlled by the Depth-of-field preview button. Some people may not like the location of the Depth-of-field preview button and may decide to switch the Fn button (for instance) with the Depth-of-field preview button. This function is not available for the Assign AE-L/AF-L button.
• Spot metering – If you normally use a metering system other than Spot metering, you can temporarily switch to Spot metering by holding down the Selected button. When you release the button, the camera returns to your customary meter type, such as Center-weighted area metering or Matrix metering. This function is not available for Assign AE-L/AF-L button.
• Viewfinder virtual horizon – If you are concerned about keeping the camera level and the gridline display is insufficient for you, Nikon offers the View-finder virtual horizon. Press the Selected button once and the Viewfinder will display an indicator at the bottom. When you tilt the camera left or right, you’ll see a series of dots moving to the left or right. When the dots disappear, the camera is level. When you press the Selected button this function remains active until you take a picture or until the meter goes off. Be careful about tilting the camera forward or backward too much or it may skew the results of the left to right leveling action. This function does not work for forward and backwards tilt, only for left to right. If you need a true virtual horizon that works in all four axes, use Setup Menu > Virtual horizon instead. This function is not available for Assign AE-L/AF-L button.
Settings Recommendation: There are so many functions here that I’m loathe to recommend anything. People shoot in many different ways, and there are so many choices in this list that it’s hard to pin down just a few. However, you can experiment with the settings I use and see if they suit your style. If not, you have a lot of choices! Here are my favorite button assignments:
• Assign Fn button – Spot metering (my normal meter is Matrix metering)
• Assign preview button – Preview (depth-of-field preview)
• Assign AE-L/AF-L button – AE lock only
Using the Information Display to Change Button Assignments
You can assign the Selected button by using the Information display instead of the Custom Setting Menu selections. In figure 4.58.1 there are three screens shown. Each of them represents one of the assignable buttons we have discussed in this section.
If you prefer to use the Information display edit screen to access these buttons, instead of the camera’s normal menu, you can.
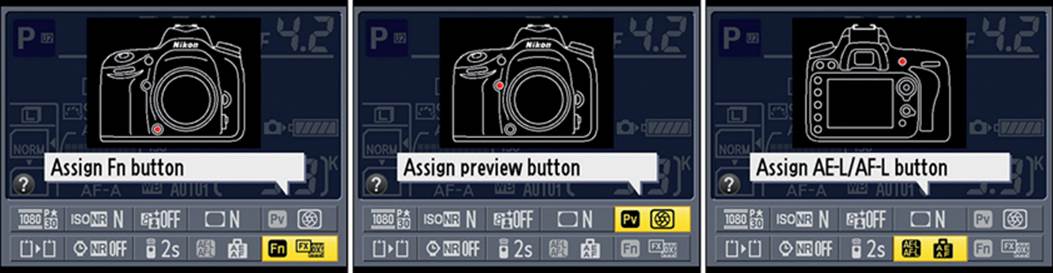
Figure 4.58.1 – Assigning buttons using the Information edit screen
Use these steps to assign the button of choice instead using of the Custom Setting Menu selections (f2–f4):
1. Open the Information display screen by pressing the Info button.
2. Press the Info button again to open the Information display edit screen, as shown in figure 4.58.1.
3. Scroll around with the Multi selector until you find the button you want to assign. The Screen tips will guide you if they are enabled in Custom setting d4. Highlight the button you want to assign.
4. Press the OK button to enter the configuration screen for that particular button, as shown in screen 3 of figures 4.56, 4.57, and 4.58.
The Nikon D610 is quite flexible in how it can be configured, isn’t it?
f5 Customize Command Dials
(User’s Manual – Page 245)
The f5 Customize command dials setting lets you change how the two Command dials operate. There are several operations you can modify:
• Reverse rotation
• Change main/sub
• Aperture setting
• Menus and playback
Reverse Rotation
This setting allows you to change which direction things increment when you rotate the Command dials. There are two selections: Exposure compensation and Shutter speed/aperture. If either of these is checked, both Command dials increment their settings in the opposite direction; they are reversed. Here are descriptions of how the two subfunctions work:
• Exposure compensation – Normally, when you hold down the Exposure compensation button and rotate the Main command dial in a counterclockwise direction, the camera’s Exposure compensation increases toward the plus side (e.g., +0.3, +0.7, +1.0). However, when you put a check mark in the Exposure compensation box, the same counterclockwise rotation of the Main command dial results in negative Exposure compensation (e.g., –0.3, –0.7, –1.0).
• Shutter speed/aperture – When the D610 is set to Aperture-priority auto (A) and you rotate the Sub-command dial to the right, the aperture normally decreases (e.g., f/5.6, f/6.3, f/7.1). If you put a check mark in the Shutter speed/aperture box, the direction of the aperture changes will be reversed when you turn the Sub-command dial to the right (e.g., f/5.6, f/5, f/4.5). This applies to the front and rear Command dials.
Use the following steps to reverse the rotation of the Command dials:
1. Select f Controls from the Custom Setting Menu and scroll to the right (figure 4.59, screen 1).
2. Highlight f5 Customize command dials and scroll to the right (figure 4.59, screen 2).
3. Choose Reverse rotation and scroll to the right (figure 4.59, screen 3).
4. Put a check mark in the Exposure compensation or Shutter speed/aperture box (or both) by highlighting the line and scrolling to the right with the Multi selector, and then select Done from the menu (figure 4.59, screen 4).
5. Press the OK button to lock in the setting(s).
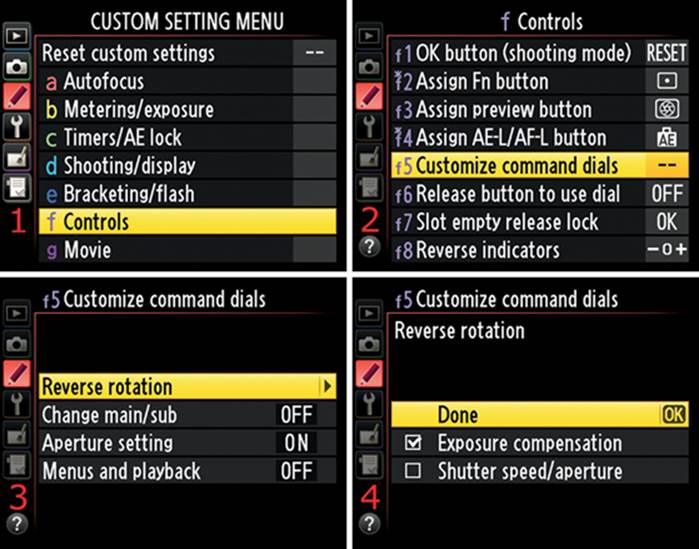
Figure 4.59 – Reverse rotation
Settings Recommendation: I leave the Command dials rotation set to the factory default. I find life confusing enough without my camera working backwards! Of course, you may have previously used a different brand of camera that worked in the opposite direction, so you might prefer to reverse the Command dial rotation.
Change Main/Sub
This setting allows you to swap the functionality of the two Command dials. The rear Main command dial will take on the functions of the front Sub-command dial and vice versa. Here are the three settings:
• On – The Main command dial controls the aperture in exposure modes A and M (on the Mode dial). The Sub-command dial controls the shutter speed in exposure modes S and M.
• On (Mode A) – The Main command dial controls the aperture in exposure mode A. The rest of the modes work like Off (the next setting).
• Off – The Main command dial controls the shutter speed, and the Sub-command dial controls the aperture (default).
Shooting mode P on the Mode dial is unaffected by Change main/sub.
Use the following steps to swap the functionality of the Command dials:
1. Select f Controls from the Custom Setting Menu and scroll to the right (figure 4.60, screen 1).
2. Highlight f5 Customize command dials and scroll to the right (figure 4.60, screen 2).
3. Choose Change main/sub from the menu and scroll to the right (figure 4.60, screen 3).
4. Select On, On (Mode A), or Off from the menu (figure 4.60, screen 4).
5. Press the OK button to lock in the setting.
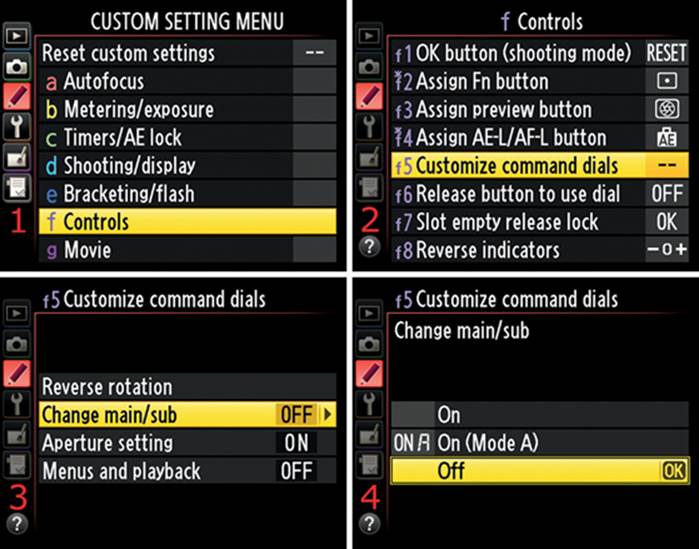
Figure 4.60 – Change main/sub
Settings Recommendation: I leave the Command dials set to the factory default (Off). I’ve been using Nikon cameras for too many years to change the Command dial functionality now. If you have other needs, you can set the controls however you want to. Nikon gives us a lot of flexibility with this camera.
Aperture Setting
There are two selections that allow you to modify how the camera treats CPU lenses that have aperture rings (non-G lenses). There are many excellent older, preowned AF Nikkor D lenses in eBay land, and your D610 can use them, in addition to the newer AF-S style G lenses. The two settings are as follows:
• Sub-command dial – This is the factory default setting. The aperture is set using the Sub-command dial.
• Aperture ring – This setting allows you to use the aperture ring of non-G lenses with a CPU to adjust the aperture instead of using the Sub-command dial. The EV increments will display only in 1 EV steps when this is active.
Use the following steps to change the style of Aperture setting:
1. Select f Controls from the Custom Setting Menu and scroll to the right (figure 4.61, screen 1).
2. Highlight f5 Customize command dials and scroll to the right (figure 4.61, screen 2).
3. Choose Aperture setting from the menu and scroll to the right (figure 4.61, screen 3).
4. Select Sub-command dial or Aperture ring (figure 4.61, screen 4).
5. Press the OK button to lock in the setting.
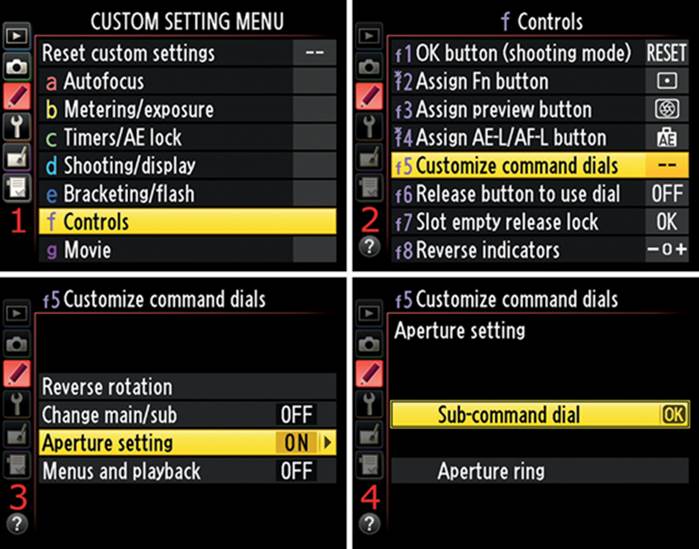
Figure 4.61 – Aperture setting (Sub-command dial versus Aperture ring)
Note: When you use a non-CPU lens, the aperture ring must always be used to set the aperture. If you are using a G lens with no aperture ring, you clearly can’t set the aperture with an aperture ring, so the camera ignores this setting. You can even use older non-CPU lenses and adjust the aperture with the lens aperture ring when you have the camera in Live view mode. I used a 1970s AI Nikkor 35mm f/2 (non-CPU) lens to test this. It worked great!
Settings Recommendation: For shooting still images, I leave Aperture setting set to Sub-command dial. I have some older AF Nikkor lenses that I like to use, so I keep them locked at their smallest aperture settings and use the Sub-command dial to change their apertures. I usually don’t adjust apertures with the old aperture ring on the lens unless I’m using older non-CPU manual-focus AI or AI-S lenses.
For shooting movies, the Aperture ring setting has gained quite a bit of importance. The Nikon D610 does not allow you to control the aperture with the Sub-command dial while you’re shooting a movie—a bad and shortsighted decision by Nikon for a camera in this class—therefore, you can control the aperture by using an older AI/AI-S-type or D-type lens that has an aperture ring. Fortunately, the camera will respond correctly when you use a manual aperture ring to adjust the aperture. Remember this setting! We will discuss this further in the chapter called Movie Live View.
Using an older Nikkor lens with an aperture ring opens up some possibilities for depth-of-field control during a movie, whether it is a CPU or a non-CPU lens. Moviemakers take note!
Menus and Playback
This setting is designed for people who do not like to use the Multi selector for viewing image Playback or Info screens. It also allows you to use the Command dials for scrolling through menus.
The following selections change how the menus and image playback displays work when you would rather not use the Multi selector:
• On – While you are viewing images during playback, turning the Main command dial to the left or right scrolls through the displayed images. Turning the Sub-command dial left or right scrolls through the data and histogram screens for each image. While you are viewing menus, turning the Main command dial left or right scrolls up or down in the screens. Turning the Sub-command dial left or right scrolls left or right in the menus. This setting simply gives you two ways to view your images and menus.
• On (image review excluded) – The Command dials will scroll around in the camera menus, as described in the On setting. However, you must use only the Multi selector to scroll through your pictures during image review (just after taking a picture).
• Off – This is the default action. The Multi selector is used to scroll through images, thumbnails, and menus.
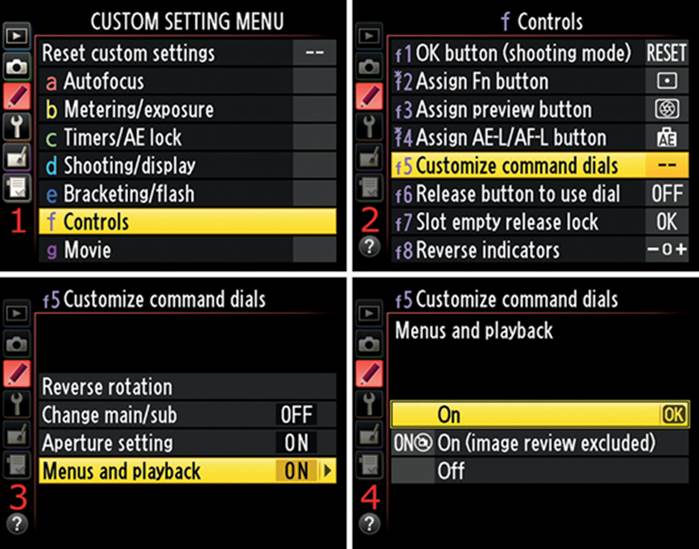
Figure 4.62 – Menus and playback setting
Use the following steps to configure Menus and playback:
1. Select f Controls from the Custom Setting Menu and scroll to the right (figure 4.62, screen 1).
2. Highlight f5 Customize command dials and scroll to the right (figure 4.62, screen 2).
3. Choose Menus and playback from the menu and scroll to the right (figure 4.62, screen 3).
4. Select one of the settings from the menu (figure 4.62, screen 4).
5. Press the OK button to lock in the setting.
Settings Recommendation: I leave Menus and playback set to On. I’ve heard others say how much they like this function, and now I use it myself. I like the fact that I can use either the Multi selector or the Command dials to move around in my camera’s menus and images. Try this one out; you may like it too!
f6 Release Button to Use Dial
(User’s Manual – Page 246)
The f6 Release button to use dial setting allows people who dislike holding down various buttons and turning Command dials at the same time to change the settings. This setting could be very useful to a person with limited hand strength because the camera would be easier to operate.
There are two settings under Release button to use dial:
• Yes (On) – This setting changes a two-step operation into a three-step operation. Normally, you would press and hold down a button while rotating a Command dial. When you select Yes under Release button to use dial, the camera allows you to press and release a button, rotate the Command dial, then press and release the button again. In other words, the normal (No) actions are to press and hold a button and then turn a Command dial. The Yes actions are to press and release a button, turn a Command dial, and press and release the button again. The initial button press locks the button so you do not have to hold your finger on it while turning the Command dial. After you have changed whatever you are adjusting, you must press the button a second time to unlock it. If the exposure meter turns off, or you press the Shutter-release button halfway down, you must start over.
• No (Off) – This is the default setting. You must press and hold a button while rotating the Command dials to change the camera function.
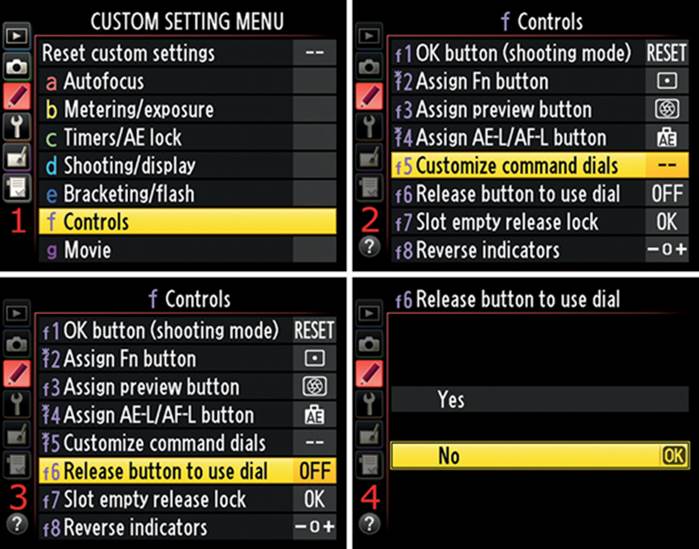
Figure 4.63 – Release button to use dial
Use the following steps to configure f6 Release button to use dial:
1. Select f Controls from the Custom Setting Menu and scroll to the right (figure 4.63, screen 1).
2. Highlight f5 Customize command dials and scroll to the right (figure 4.63, screen 2).
3. Highlight f6 Release button to use dial and scroll to the right (figure 4.63, screen 3).
4. Choose Yes or No from the list. In figure 4.63, screen 4, I selected No.
5. Press the OK button to lock in the setting.
Settings Recommendation: I haven’t found this function to be useful because it merely adds extra steps to changing settings. However, a person with limited hand dexterity or strength may find this to be a very useful function.
f7 Slot Empty Release Lock
(User’s Manual – Page 246)
The f7 Slot empty release lock setting is primarily designed for people who work with their camera tethered to a computer. If a memory card is not present, the camera will not normally let you take a picture.
However, when you enable Slot empty release lock, the camera will let you take quite a few pictures as it fills up the internal buffer memory. If the camera is not attached to a computer—with software designed to intercept the images—the pictures have nowhere to go, so you’ll lose them. You can’t insert a memory card after the fact and save them.
There are two settings available under f7 Slot empty release lock:
• Release locked – The camera simply refuses to take a picture unless a memory card with available storage space is inserted in the camera.
• Enable release – If your D610 is tethered to a computer and you know how to use the software, this setting is a great choice. Anytime you want to take pictures without a memory card, you’ll need to select this setting. Be careful, though; if the camera is not hooked up to a computer and you don’t have a memory card in the camera and then accidentally take an important picture, you can’t save it.

Figure 4.64 – Slot empty release lock
Use the following steps to choose one of the f7 Slot empty release lock settings:
1. Select f Controls from the Custom Setting Menu and scroll to the right (figure 4.64, screen 1).
2. Highlight f7 Slot empty release lock and scroll to the right (figure 4.64, screen 2).
3. Choose Release locked or Enable release from the list. In figure 4.64, screen 3, I selected Release locked.
4. Press the OK button to lock in the setting.
Settings Recommendation: I don’t often shoot in-studio with my camera tethered to a computer, but I’m glad the D610 provides the ability to do so. I don’t suggest leaving this setting on Enable release unless you know exactly why you are doing it. Otherwise you could lose your images if no card is in the camera. I’d much rather have the camera refuse to take a picture if I’ve inadvertently left out a memory card. Don’t you agree?
f8 Reverse Indicators
(User’s Manual – Page 246)
The f8 Reverse indicators setting lets you change the direction of your camera’s exposure displays. Normally, any time you see the exposure indicators in the Viewfinder or Information display, the + is on the right and the – is on the left.
This is backwards from Nikon cameras from only a couple of years ago, and some people do not like this reversal of directions.
In figure 4.65, screen 3, you can see both directions displayed. Notice how +/– becomes –/+ when they are reversed. You’ll see the same thing in any exposure indicators. Choose the style that makes you most comfortable. Most people leave this setting alone.
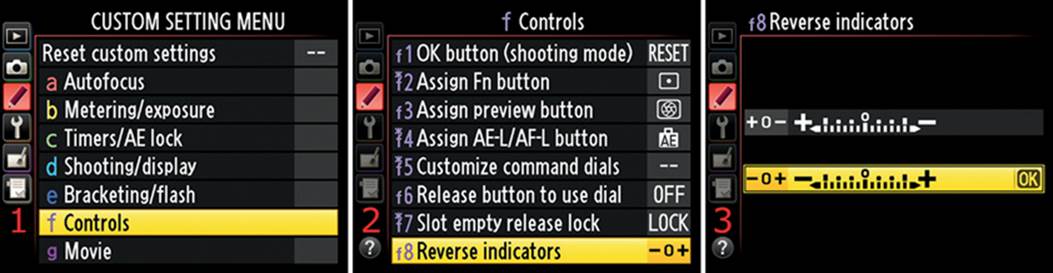
Figure 4.65 – Reverse indicators
Use the following steps to set the f8 Reverse indicators:
1. Select f Controls from the Custom Setting Menu and scroll to the right (figure 4.65, screen 1).
2. Highlight f8 Reverse indicators and scroll to the right (figure 4.65, screen 2).
3. Choose one of the selections from the list. In figure 4.65, screen 3, it is set to the factory default –/+ direction.
4. Press the OK button to lock in the setting.
Settings Recommendation: I like the exposure indicators with + on the left and – on the right. However, if you are used to a camera where it works the opposite way, or you would just prefer it the other way, it’s easy to change. Select your favorite indicator direction for maximum ease!
f9 Assign MB-D14 AE-L/AF-L Button
(User’s Manual – Page 247)
The f9 Assign MB-D14 AE-L/AF-L button setting lets you use the AE-L/AF-L button built into the optional MB-D14 battery pack in the same manner as the one on the camera body. There are seven distinct functions, similar to the ones used by Custom setting f4 Assign AE-L/AF-L button:
• AE/AF lock – Enabling this function causes AE (exposure) and AF (focus) to lock on the last meter and autofocus system reading while the AE-L/AF-L button on the MB-D14 is held down.
• AE lock only – This allows you to lock AE (exposure) on the last meter reading when you hold down the AE-L/AF-L button on the MB-D14.
• AE lock (Hold) – Enabling this function causes AE (exposure) to lock on the last meter reading when the AE-L/AF-L button on the MB-D14 is pressed once. It stays locked until you press the AE-L/AF-L button again. In other words, the AE-L/AF-L button on the MB-D14 toggles AE lock.
• AF lock only – This function locks the AF (focus) system on the last autofocus reading while you hold down the AE-L/AF-L button on the MB-D14.
• AF-ON – This causes the camera to initiate autofocus when you press the AE-L/AF-L button on the MB-D14. The Shutter-release button cannot be used to focus.
• FV lock – If you set the AE-L/AF-L button on the MB-D14 to FV lock, the button will cause the built-in Speedlight or an external Speedlight to emit a monitor preflash. It will lock the flash output to the level determined by the preflash until you press the AE-L/AF-L button on the MB-D14 a second time.
• Same as Fn button – This setting allows you to configure the AE-L/AF-L button on the MB-D14 so it executes whatever function you assigned to the camera’s Fn button in Custom setting f2 Assign Fn button.
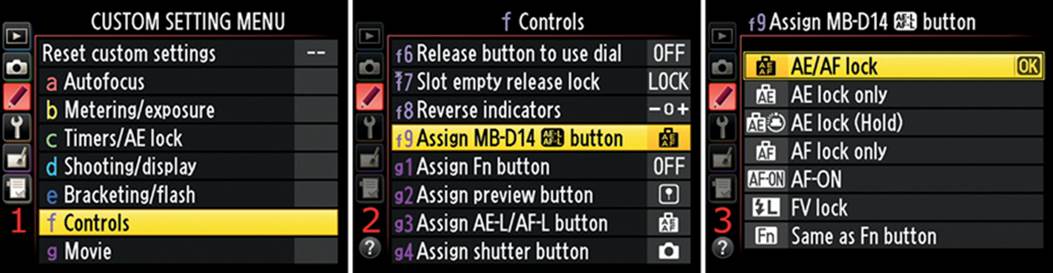
Figure 4.66 – Assign MB-D14 AE-L/AF-L button
Use the following steps to select an f9 Assign MB-D14 AE-L/AF-L button setting:
1. Select f Controls from the Custom Setting Menu and scroll to the right (figure 4.66, screen 1).
2. Highlight f9 Assign MB-D14 AE-L/AF-L button and scroll to the right (figure 4.66, screen 2).
3. Choose one of the selections from the list. In figure 4.66, screen 3, I selected AE/AF lock.
4. Press the OK button to lock in the setting.
Settings Recommendation: I generally use AE lock only for this button. You can assign one of the seven functions to this button as a separate assignment from any other button. If you don’t like AE lock only, you can assign your favorite instead.
g Movie
Custom Settings g1–g4
Within the g Movie menu you’ll find four settings in the D610:
• g1 Assign Fn button
• g2 Assign preview button
• g3 Assign AE-L/AF-L button
• g4 Assign shutter button
g1 Assign Fn Button, g2 Assign Preview Button, g3 Assign AE-L/AF-L Button
(User’s Manual – Pages 247–248)
The g Movie section has identical settings to the Assign Fn button, Assign preview button, and Assign AE-L/AF-L button in the f Controls section of the camera, so the three sections are combined here. Once again, I’ll use Selected button as a substitute for the actual button being assigned. When you see Selected button, mentally replace it with the name of the button you want to configure under the g Movie section. You can assign various camera functions to any of these three buttons. A list of functions is provided after the step-by-step method.
Here are the screens and steps to choose a function for all three assignable buttons.
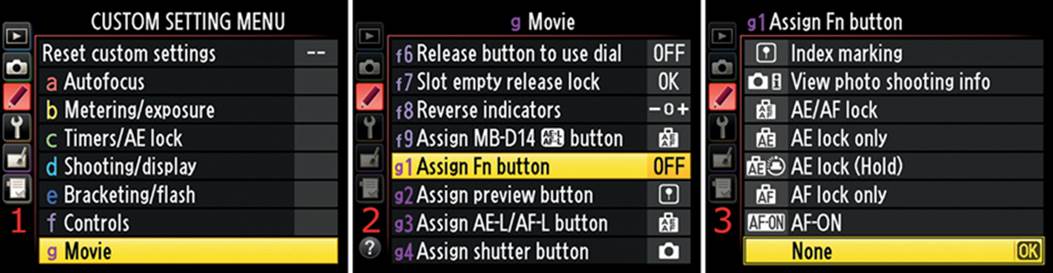
Figure 4.67 – Assign Fn button for Movie live view mode
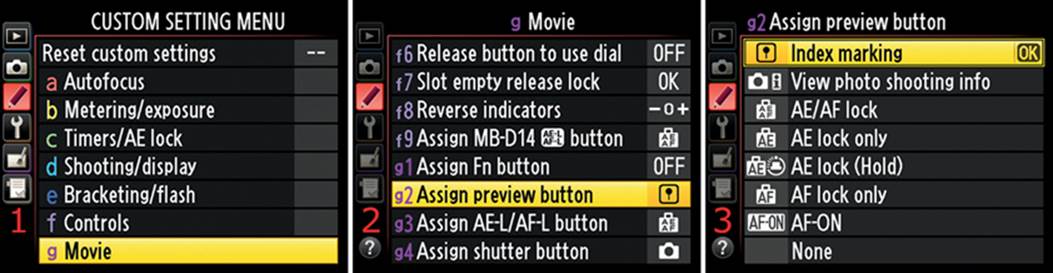
Figure 4.68 – Assign preview button for Movie live view mode
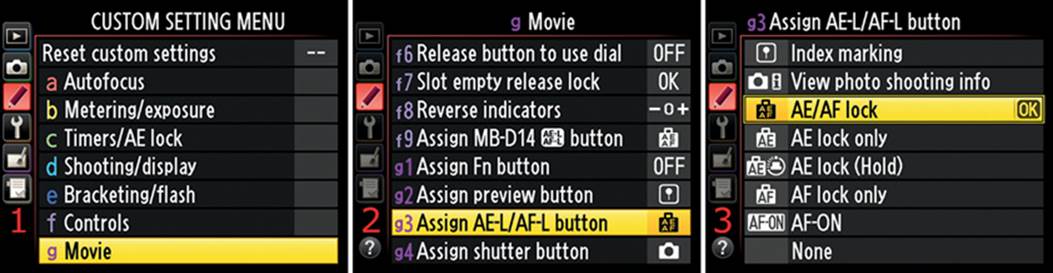
Figure 4.69 – Assign AE-L/AF-L button for Movie live view mode
Use these steps to assign the previously mentioned functions to the Selected button (figures 4.67, 4.68, and 4.69):
1. Select g Movie from the Custom Setting Menu and scroll to the right (figure 4.67, 4.68, or 4.69, screen 1).
2. Highlight Selected button and scroll to the right (figure 4.67, 4.68, or 4.69, screen 2).
3. Choose one of the assignment selections from the list. In figures 4.67, 4.68, and 4.69, screen 3, the default for each is selected.
4. Press the OK button to lock in the setting.
The following are detailed descriptions of what each of these button assignments allows you to do in g Movie mode. The list is in alphabetical order for easy reference:
• AE/AF lock – Enabling this function causes AE (exposure) and AF (focus) to lock on the last meter and autofocus system reading while the Selected button is held down.
• AE lock (Hold) – This function causes AE (exposure) to lock on the last meter reading when the Selected button is pressed and released once. It stays locked until you press the Selected button again or the exposure meter goes off.
• AE lock only – This allows you to lock AE (exposure) on the last meter reading when you hold down the Selected button.
• AF lock only – This function locks the AF (focus) system on the last autofocus reading while you hold down the Selected button.
• AF-ON – This causes the camera to initiate autofocus when you press the Selected button. The Shutter-release button cannot be used to focus.
• Index marking – If you have Index marking enabled while you are recording a movie, you can set an index mark at the current frame position by pressing the Selected button. This index mark does not appear in the movie itself. It is, however, available when you are viewing and editing movies.
• None – Pressing the Selected button in Movie live view mode does nothing.
• View photo shooting info – This function allows you to view shooting information for still images when you are using Movie live view mode. The resulting still images have a slightly reduced image size and a different ratio, which I will discuss in a moment. Normally, in Movie live view mode the camera displays the shutter speed, aperture, and ISO sensitivity (recording information) for a potential movie at the bottom of the Monitor. When you press the Selected button, the camera displays the shutter speed, aperture, and ISO sensitivity (shooting information) for still image creation instead. The camera will happily take still images when you are using Movie live view mode. However, note that there are some image size and ratio differences when you take a still image using Movie live view instead of Live view photography mode. When you are using Live view photography mode, a normal Large FX image is 6016 × 4016 (24.2 MP); however, in Movie live view, a Large still image is 6016 × 3376 (20.3 MP). When you use Movie live view, the camera enters the HD world, which is one of the reasons this camera is called an HD-SLR, not just a DSLR. Instead of the 3:2 aspect ratio used by Live view photography mode, the still image from Movie live view uses a 16:9 ratio. It is still a fully usable image at 20.3 MP. The ratio matches the look of an HDTV (16:9) instead of a normal picture format. You could use this mode for still images when you know the pictures will be displayed on an HDTV because it will match the HD ratio without the blank space on the sides that you see when you display a normal 3:2 image on a modern monitor. Test this for yourself on a newer LCD or LED computer monitor, and you will see how much more closely the 16:9 format matches the monitor’s display size. See the section Image Area in the chapter Shooting Menu for more detail on image aspect ratios.
Settings Recommendation: The Index marking function is very useful if you want to mark certain locations in a movie for future editing.
The View photo shooting info setting is very useful if you like to shoot 16:9 ratio 20.3 MP still images in Movie live view mode. You can toggle movie and still exposure information with the Selected button.
Sometimes when you are making movies the light suddenly changes when the subject moves near a window or a bright lamp in the room. The surroundings and the subject go dark while the camera adjusts to the much brighter light source. To prevent that from happening, it is a good idea to use AE lock (Hold). With a single touch of the Selected button, I can lock the camera at a correct exposure for the subject. If the subject walks in front of a bright window, the details outside the window will be blown out, but the subject will still be properly exposed. The camera does not change exposure levels when a sudden bright light is temporarily introduced.
However, what if I need to walk from a darker room into a bright room, or even go outside with my subject? I simply press the Selected button again, allow the camera to adjust to the new light source, and then press it once more to lock the exposure again. Many moviemakers use a similar method. I find AE lock (Hold) to be the most useful function to assign to the Selected button when I am shooting movies.
AF lock only is an excellent function to assign to the Selected button when you need to lock the focus and not have it update automatically, for whatever reason you may have.
I often use AE lock only when I want to lock the exposure but not the focus, such as when I meter the sky away from the sun during a colorful sunset, so the sun won’t excessively influence the light meter. Then I can recompose while holding the Selected button and take the picture.
If you are a high-speed sports shooter who needs to wring out every last drop of frame rate (frames per second, or fps) performance, you might want to use zone focusing to get the focus within acceptable range and not have autofocus slow down the camera. In that case you may want to assign the AF-ON function to the Selected button when you are shooting stills in Movie live view mode.
Of course, since there are eight functions, you should read about each one and experiment to find out when and why you might use it. You will likely need all of them at one time or another.
g4 Assign Shutter Button
(User’s Manual – Page 248)
The g4 Assign shutter button setting lets you choose how the Shutter-release button works in Movie live view mode only. You have two choices:
• Take photos – If you are in the middle of recording a movie and you absolutely must have a Large FX still image of something going on in the frame, you can acquire a 16:9 aspect ratio image by pressing the Shutter-release button all the way down. The camera will stop recording the movie and take a still image with a pixel ratio of 6016 × 3376 (20.3 MP). This image will closely match the format of an HDTV and a modern computer monitor because it is shorter and wider than a normal 3:2 aspect ratio FX image.
• Record movies – If you are going to shoot movies for a while instead of taking still images, you can select this setting and the camera will enter Movie live view mode whenever you press the Shutter-release button halfway down. When you are in Movie live view mode, you can focus by pressing the Shutter-release button halfway down again. Then press the Shutter-release button all the way down to start recording the movie. To stop recording the movie, simply press the Shutter-release button all the way down again. To stop Movie live view mode, press the Lv button. When you have this function selected, the camera behaves more like a true movie camera than a still camera. You cannot, of course, take still images when using this function because the Shutter-release button is set to enter, focus, start, and stop movie recording.
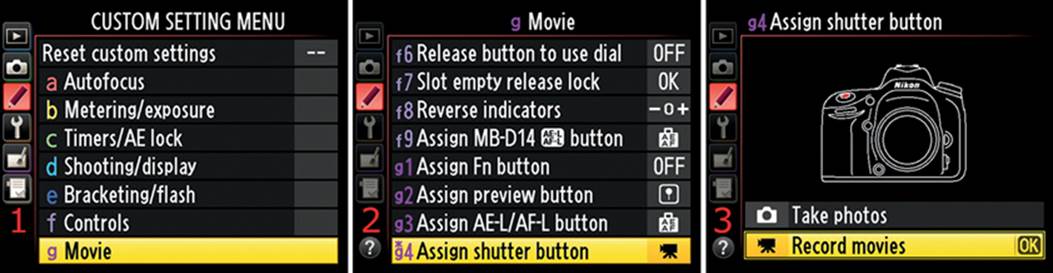
Figure 4.70 – Assign shutter button for Movie live view mode
Use these steps to assign the previously mentioned functions to the Shutter-release button:
1. Select g Movie from the Custom Setting Menu and scroll to the right (figure 4.70, screen 1).
2. Choose g4 Assign shutter button and scroll to the right (figure 4.70, screen 2).
3. Choose one of the two selections from the list. In figure 4.70, screen 3, Record movies is selected.
4. Press the OK button to lock in the setting.
Settings Recommendation: If you use the Record movies function, the camera focuses on recording a movie and turns off almost everything that has to do with still image creation. You can’t take pictures, measure preset white balance, take dust off reference photos, do interval timer photography, or do most other things related to still imagery in Movie live view mode.
If you think you might need to stop a movie and take a picture, don’t use Record movies; use Take photos instead. You can still shoot a movie, but you can stop the movie and get a quick 16:9 still image.
If you bought the Nikon D610 to take advantage of its superior video, you will most likely set the Record movies function and never look back. That’s what I did!
If you want the D610 for both movies and 16:9 still images, Take photos may be the best setting. You have the Live view photography mode for taking still images in normal FX format. Therefore, you might want to leave the camera set to Record movies for convenience. Then, when you flip the camera to Movie live view, you can do it all with the Shutter-release button instead of searching for the tiny red Movie record button.
Modified Custom Setting Notice
One thing to note is that whenever you have modified one of the Custom settings so it is no longer set to its factory default, a small asterisk will appear above the letter in the Custom setting name.
If you look carefully at Custom setting g4 Assign shutter button (figure 4.71, red arrow), you can see the small asterisk that shows it’s a modified function.
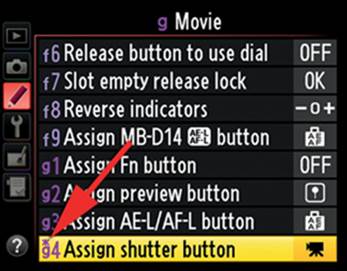
Figure 4.71 – Custom setting with modification
Author’s Conclusions
We’ve reached the end of the biggest chapter in the book. I’m glad you stayed with me all the way through this incredibly dense series of 50 functions.
Keep in mind that all of these settings can be modified in three different ways: with user settings U1 and U2 and the non-user setting (any other Mode dial position). Your Nikon D610, like a chameleon, can change to a different style of shooting with a mere turn of the Mode dial.
We will now move on to the Setup Menu and learn about the camera’s most basic settings. You won’t change these settings often, but they are very important, especially for initial camera configuration. The Setup Menu configuration is not stored in the user settings like the Shooting Menu and Custom Settings Menu. Whatever you change in the Setup Menu affects the camera at all times. Let’s see what more we can learn!