Mastering the Nikon D610 (2014)
6. Retouch Menu
Spirit of Texas in Semi Finals – Donald Heldoorn (TakeTwo)
Retouching allows you to modify your images in-camera. If you like to do digital photography but don’t particularly like to adjust images on a computer, these functions are for you. Obviously, the camera Monitor is not large enough to allow you to make extensive creative changes to an image, as you can with Nikon Capture NX2 or Photoshop on a computer. However, it is surprising what you can accomplish with the Retouch Menu.
The D610 has 20 Retouch Menu selections. The following is a list of each function and what it does:
• D-Lighting – This feature opens up detail in the shadows and tends to protect highlight details from blowing out. This is similar to the Shooting Menu > Active D-Lighting function, but it’s applied after the image is taken.
• Red-eye correction – This removes the unwanted red-eye effect caused by light from a flash reflecting back from the eyes of human subjects.
• Trim – This feature creates a trimmed (cropped) copy of a selected photograph. You can crop the image to several aspect ratios, including 1:1, 3:2, 4:3, 5:4, and 16:9.
• Monochrome – You can convert your color images to monochrome. There are three tints available, including Black-and-white (grays), Sepia (reddish), and Cyanotype (bluish).
• Filter effects – Seven filter effects are available that can be applied to the image to change its appearance. The seven filters are Skylight, Warm filter, Red intensifier, Green intensifier, Blue intensifier, Cross screen, and Soft.
• Color balance – To change the color balance of your image, you can increase or decrease the amount of Green, Blue, Amber, and Magenta.
• Image overlay – This creates a new image by overlaying two existing NEF (RAW) files. Basically, you can combine two RAW images to create special effects—like adding an image of the Moon into a separate landscape picture.
• NEF (RAW) processing – You can create highly specialized JPEG images from your NEF (RAW) files without using your computer.
• Resize – You can take a full-size image and convert it to several smaller sizes. This is useful if you would like to send an image via email or if you need a smaller image for other reasons.
• Quick retouch – The camera automatically tweaks the image with enhancements to saturation and contrast. In addition, when a subject is dark or backlit, the camera applies D-Lighting to open up shadow detail.
• Straighten – You can straighten an image with a crooked horizon by rotating it in-camera until it looks good. The camera will trim (crop) the edges of the image to create a normal perspective without the tilt.
• Distortion control – You can remove barrel and pincushion distortion that affects the edges of the image. You can cause the camera to make automatic adjustments, or you can do it manually. The camera automatically trims (crops) the edges of the image after adjustment.
• Fisheye – This feature allows you to incrementally bulge images from their centers in an often hilarious way to get that strange fisheye effect you can often see while looking through a door peephole. It provides a very distorted image that will make your friends either laugh or chase you. Warning: This effect can be dangerous to use on wives, sisters, and girlfriends! (Don’t ask me how I know!)
• Color outline – This creates an outline effect, as if you had traced an underlying image on paper with a pencil. The effect is monochrome, contrary to the name of the function. Nikon provides this effect to “create an outline of a photograph to use as a base for painting.” If you are a painter, this may be useful to you.
• Color sketch – This effect is very similar to Color outline; the main difference is that the result is in pastel color. The edges of the subjects in your image are sketched and colorized, similar to using colored pencils or crayon. You can control the vividness of the color and the contrast of the line edges.
• Perspective control – This is a useful control that helps adjust perspective distortion out of an image. It’s useful for pictures of things like buildings, which can have a falling-over-backward effect when shot with a wide-angle lens. You can adjust the building so it looks more natural. The camera automatically crops the edges of the image to allow the distortion to be removed.
• Miniature effect – This effect allows you to create a reverse diorama (an image with a very limited band of sharpness that is taken from a high vantage point) to make the image look fake. The image may be of a real subject, like a city shot from the top of a tall building; however, the Miniature effect causes the scene to look artificial, as if small models of reality were used.
• Selective color – You can use this function to create photographs with certain elements in color and the rest in black-and-white. Imagine a bright red rose with no color in the image except the rose petals. You can selectively choose a color with an eyedropper icon, and only that color will appear in the image.
• Edit movie – You can shorten a movie by cropping out a small section from a large movie file.
• Side-by-side comparison – You can compare a retouched image—created via the Retouch Menu—with the original image. The images are presented side by side so you can see the before and after versions.
The Retouch Menu of the D610 is shown in figure 6.1. It is the fifth menu down the menu selection bar, just below the Setup Menu. Its icon resembles a palette and paintbrush.
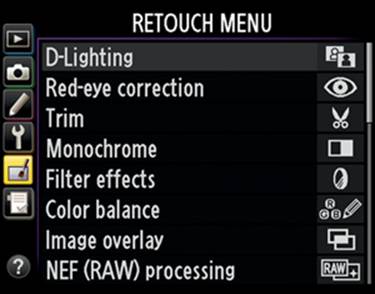
Figure 6.1 – Retouch Menu
Retouched File Numbering
When you use Retouch Menu items, the D610 does not overwrite your original file. It always creates a JPEG file with the next available image number. The retouched image will be numbered as the last image on the memory card. If you have 100 images on your card and you are retouching image number DSC_0047, the new JPEG image will be number DSC_0101 (it will be the 101st image).
Accessing the Retouch Functions – Two Methods
There are two methods for accessing the Retouch Menu. You can use the main Retouch Menu—under the MENU button—to choose an image to work with, or you can display an image in Playback mode and press the OK button to open the Retouch Menu. They work basically the same way, except the Playback Retouch Menu leaves out the step of choosing the image (since there is already an image on the screen), and it has fewer retouch selections. The most comprehensive retouch selections are available under the Retouch Menu.
Since both the Playback Retouch Menu and Retouch Menu methods have the same functions, we’ll discuss them as if you were using the Retouch Menu. However, in case you decide to use the Playback method, let’s discuss it briefly.
Playback Retouching
Use the following steps if you want to work with an image that you are viewing on the Monitor—what I call Playback retouching.
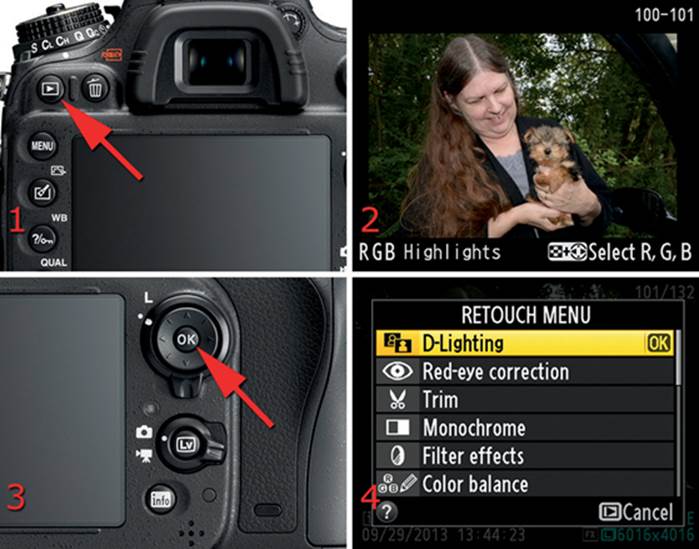
Figure 6.2 – Playback Retouch Menu
To use the Retouch Menu options, follow four basic steps:
1. Press the Playback button and choose a picture by displaying it on the Monitor (figure 6.2, images 1 and 2). You now have a picture ready for retouching.
2. Press the OK button to open an abbreviated Retouch Menu (figure 6.2, image 3).
3. Select one of the Playback Retouch Menu items (figure 6.2, screen 4).
4. Press the OK button when you have a Playback Retouch Menu item selected. You will then see the settings that you can apply to your picture.
Some of the Retouch Menu options are not available under the Playback Retouch Menu. Remember that Playback retouching is available by simply pressing the OK button when an image is displayed on the Monitor.
Limitations on Previously Retouched Images
Sometimes there are limitations imposed when you are working on an image that has already been retouched. You may not be able to retouch a previously retouched image with another retouch function. When you use the Playback retouch method, the items will be grayed out on the menu. If you use the Retouch Menu directly, any images that are overlaid with a box containing a yellow X cannot be retouched again with the current retouch function.
Using Retouch Menu Items Directly
The following functions work backwards from the Playback Retouch Menu just described. Instead of selecting an image first, you must select a Retouch Menu function first and then select an image to which you want to apply the effect. Let’s consider each Retouch Menu function.
D-Lighting
(User’s Manual – Page 264)
D-Lighting allows you to reduce the shadows in an image and maybe even rein in the highlights a bit. It lowers the overall image contrast, so it should be used sparingly. The D610 is not aggressive with its D-Lighting, so you can use it quickly if needed. Also, remember that Retouch Menu effects are applied to a copy of the image, so your original is safe.
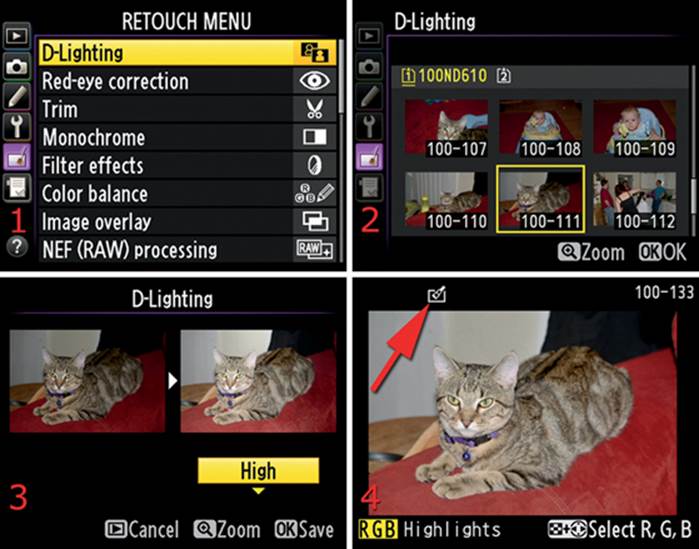
Figure 6.3 – D-Lighting Retouch Menu
Use the following steps to apply D-Lighting to an image:
1. Select D-Lighting from the Retouch Menu and scroll to the right (figure 6.3, screen 1).
2. Select the image you want to modify and press the OK button (figure 6.3, screen 2). You’ll see the image surrounded by a yellow box.
3. Choose the amount of D-Lighting you want for the chosen image by using the Multi selector to scroll up or down. You’ll choose from Low, Normal (or medium), and High D-Lighting (figure 6.3, screen 3). When the image on the right of the side-by-side comparison looks the way you want it to, press the OK button to save the new file.
4. The D610 will display a brief Image saved notice and then display the new file on the Monitor. The retouched image will have a small palette-and-paint-brush icon to show that it has been retouched (figure 6.3, screen 4, red arrow). The original image is still available for future retouching.
Settings Recommendation: There is no one setting that is correct for all images. I often use Normal (medium) to see if an image needs more or less D-Lighting, then I change it to High or Low if needed. Remember that any amount of D-Lighting has the potential to introduce noise in the darker areas of the image, so the less D-Lighting you use, the better.
Red-Eye Correction
(User’s Manual – Page 264)
Red-eye correction attempts to change bright red pupils—caused by reflected light from the flash—back to their normal dark color. Red eye makes a person look like one of those aliens with glowing eyes from a science fiction show. If you’ve used flash to create a picture, the Red-eye correction function will work on the image if it can detect any red eye. If it can’t detect red eye in the image, it will not open the red-eye system and will briefly display a screen that says Unable to detect red-eye in selected image.
If you try to select Red-eye correction for an image in which flash was not used, the camera will display a screen that says Cannot select this file.
Use the following steps to execute the Red-eye correction function:
1. Select Red-eye correction from the Retouch Menu and scroll to the right (figure 6.4, screen 1).
2. Select the image you want to modify and press the OK button (figure 6.4, screen 2).
3. You’ll see an hourglass on the Monitor for several seconds (figure 6.4, screen 3) while the Red-eye correction process takes place.
4. After Red-eye correction is complete, you can use the Playback zoom in button to zoom in on the image to see how well it worked. Zoom back out with the Playback zoom out/thumbnails button. Press the OK button to save the file with a new file name (figure 6.4, screen 4, red arrow) or press the Playback button to cancel.
5. You’ll see an Image saved message screen (figure 6.4, screen 5) and then the saved image will appear on the Monitor (figure 6.4, screen 6). Again, you can tell it is a retouched image because of the palette-and-paintbrush symbol above the top left corner of the image. This newly retouched image will have its own new file number.
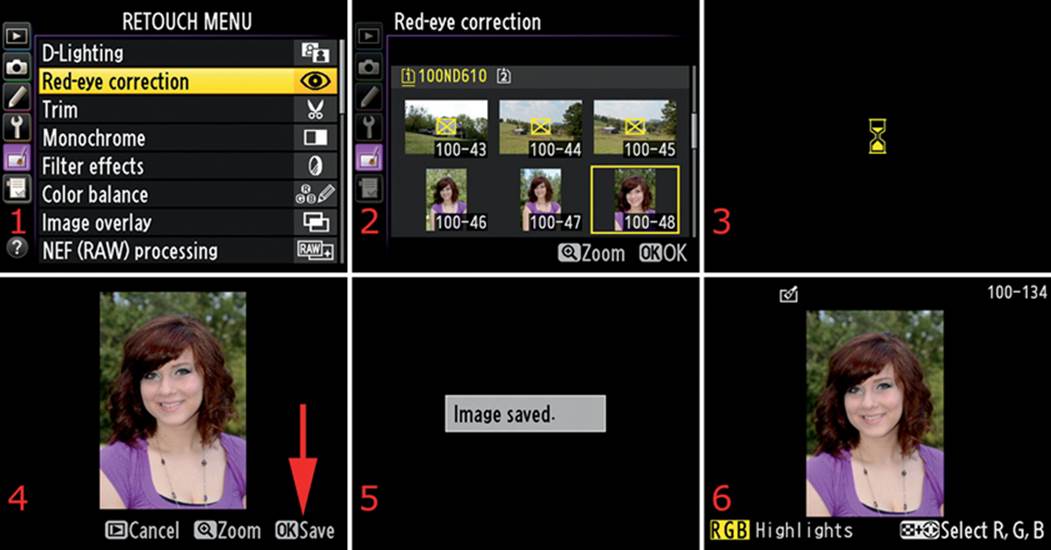
Figure 6.4 – Red-eye correction
Settings Recommendation: I’ve found that the Red-eye correction function works pretty well as long as the subject is fairly large in the frame. The image of the lovely young lady in figure 6.4, screen 4, had only minor red eye. That gives you an idea of how large in the frame the subject has to be for this function to work well. With small subjects, I’ve had it correct one eye that was closer to the camera (and therefore larger in the image) and not the other. I have also tried Red-eye correction for larger groups of people. Sometimes it works and other times it doesn’t.
I would rate this function as quite helpful but not always effective. However, it’s a good function for quick Red-eye correction on critical images you need to use immediately.
Trim
(User’s Manual – Page 265)
The Trim function allows you to crop an image in-camera, change its aspect ratio, and save the file as a new image. Your original image is not modified.
This is a useful function if you need to cut out, or trim, the most useful area of an image to remove distracting elements from the background.
Use the following steps to Trim an image in-camera:
1. Select the Trim function from the Retouch Menu and scroll to the right (figure 6.5, screen 1).
2. Select the image you want to modify (figure 6.5, screen 2). Press the OK button when you have selected your target image.
3. You’ll see a screen that has a crop outlined in yellow (figure 6.5, screen 3). Use the Playback zoom out/thumbnails button to crop or trim more of the image or the Playback zoom in button to crop less. Use the Multi selector to move the yellow selection rectangle in any direction within the frame until you find the best trim.
4. Select the Aspect ratio of the crop by rotating the Main command dial. Your choices are 3:2, 4:3, 5:4, 1:1 (square), or 16:9. Figure 6.5, screen 3 (red arrow), shows that the 1:1 Aspect ratio is selected.
5. When you have the crop correctly sized and the Aspect ratio set, press the OK button to save the image with a new file name, the results of which are seen in figure 6.5, screen 4. Before the retouched image is displayed you will see an Image saved message screen appear briefly.
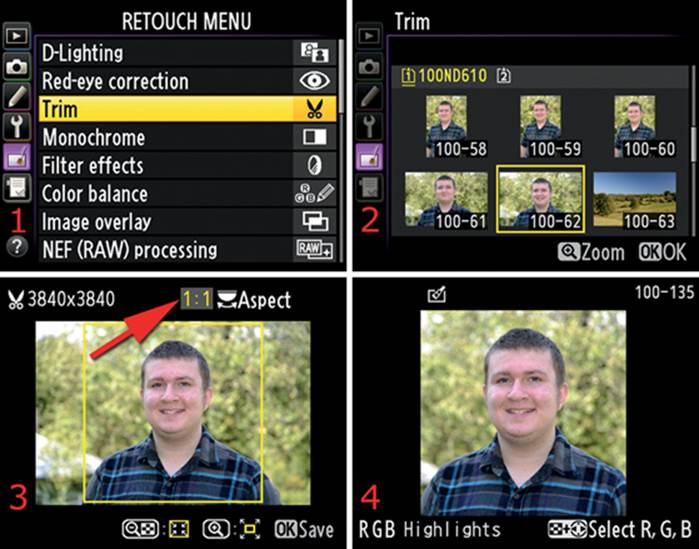
Figure 6.5 – Trim function
Settings Recommendation: This is a very useful function for cropping images without a computer. The fact that you have multiple Aspect ratios available is just icing on the cake. The D610 has some useful Aspect ratios, including a square (1:1) and an HD format (16:9).
Monochrome
(User’s Manual – Page 266)
The Monochrome function in the D610 is fun to play with and can make some nice images. Converting the images to one of the three monochrome tones is a good starting point for creative manipulation. The three different types of Monochrome are as follows: Black-and-white (grays), Sepia (golden tone), and Cyanotype (blue tone).
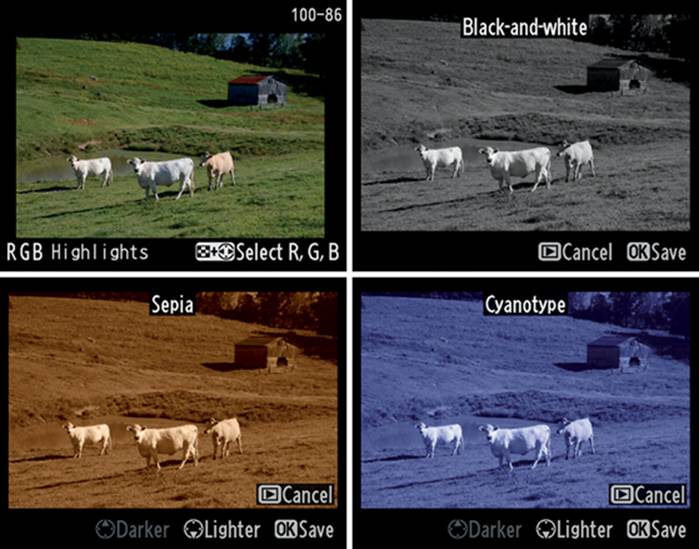
Figure 6.6 – Monochrome images
Figure 6.6 shows a sample of a normal color image and the three monochrome tones you can use. I chose the Darker setting on the Sepia and Cyanotype versions to show their maximum effects. Notice that the Black-and-white version has no darkness or lightness setting because the D610 provides only one level. However, for Sepia and Cyanotype, you can fine-tune the tint from light to very saturated in three levels.
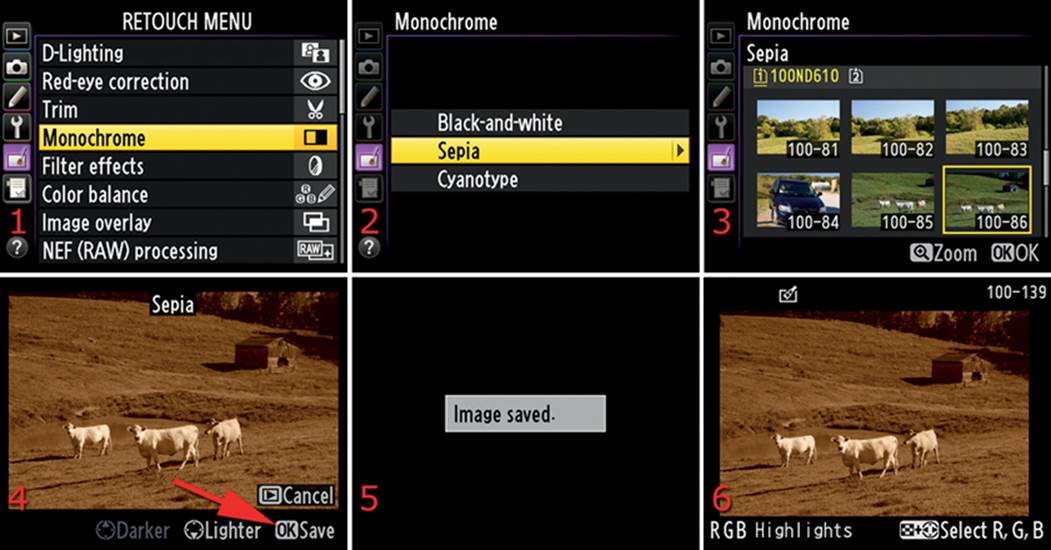
Figure 6.7 – Monochrome (Sepia) image creation
Use the following steps to create a Monochrome image from a color image:
1. Select Monochrome from the Retouch Menu and scroll to the right (figure 6.7, screen 1).
2. Select a Monochrome tone—Black-and-white, Sepia, or Cyanotype (figure 6.7, screen 2). I selected Sepia.
3. Select the image you want to modify (figure 6.7, screen 3).
4. For a Black-and-white image, you cannot adjust the level of lightness or darkness. For Sepia and Cyanotype, you can use the Multi selector to saturate or desaturate the tone (figure 6.7, screen 4). Scroll up or down and watch the screen until the tint is as dark or light as you want it to be. You can cancel the operation by pressing the Playback button.
5. Press the OK button to save the image with a new file name (figure 6.7, screen 4, red arrow).
6. A screen that says Image saved will briefly appear, then the final image will be displayed with a retouch icon in the top left of the Monitor (figure 6.7, screens 5 and 6).
Settings Recommendation: I normally use the Black-and-white conversion when I need an immediate Monochrome image. However, it’s a lot of fun to make a new image look old-fashioned with either Sepia or Cyanotype. Figure 6.8 is a Sepia creation of three lovely ladies, with a border added in Photoshop.
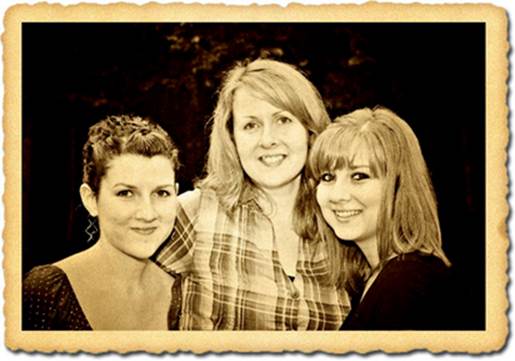
Figure 6.8 – Sample Sepia image conversion (border from Photoshop manipulation)
Filter Effects
(User’s Manual – Page 267)
The D610 allows you to add one of seven Filter effects to an image. You can intensify the image colors in various ways, add starburst effects to points of light, and add a softening effect for a dreamy look.
Here is a list of the effects:
• Skylight
• Warm filter
• Red intensifier
• Green intensifier
• Blue intensifier
• Cross screen (starburst filter)
• Soft
Skylight Filter Effect
This effect is rather mild and removes the blue effect caused by atmospheric diffraction in distant scenes. This effect makes an image slightly less blue.
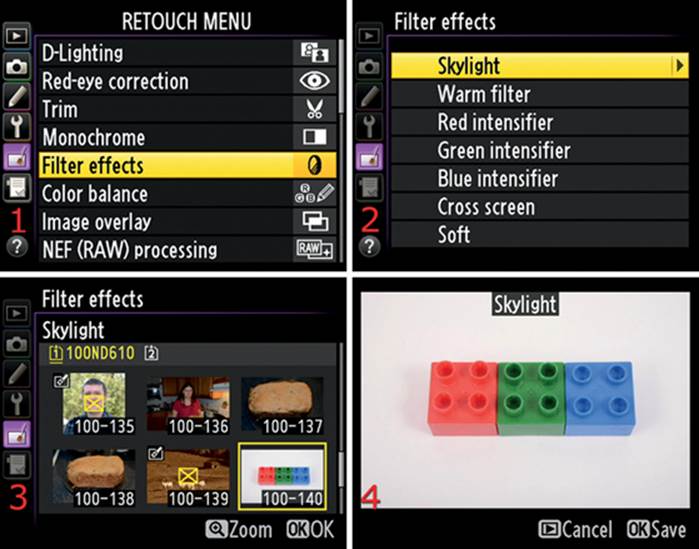
Figure 6.9 – Skylight filter effect
Use the following steps to choose the Skylight filter effect:
1. Select Filter effects from the Retouch Menu and scroll to the right (figure 6.9, screen 1).
2. Select Skylight and scroll to the right (figure 6.9, screen 2).
3. Choose an image and press the OK button (figure 6.9, screen 3). You can zoom in by pressing the Playback zoom in button if you want to examine the image first.
4. You will see the image with the Skylight effect added (figure 6.9, screen 4). Press the OK button to save the image with a new file name, or press the Playback button to cancel.
Warm Filter Effect
The Warm filter effect adds a mild red cast to the image to make it appear a little warmer.
Here’s how to set the Warm filter effect:
1. Select Filter effects from the Retouch Menu and scroll to the right (figure 6.10, screen 1).
2. Select Warm filter and scroll to the right (figure 6.10, screen 2).
3. Choose an image and press the OK button (figure 6.10, screen 3). You can zoom in by pressing the Playback zoom in button if you want to examine the image first.
4. You will see the image with the Warm filter effect added (figure 6.10, screen 4). Press the OK button to save the image with a new file name, or press the Playback button to cancel.
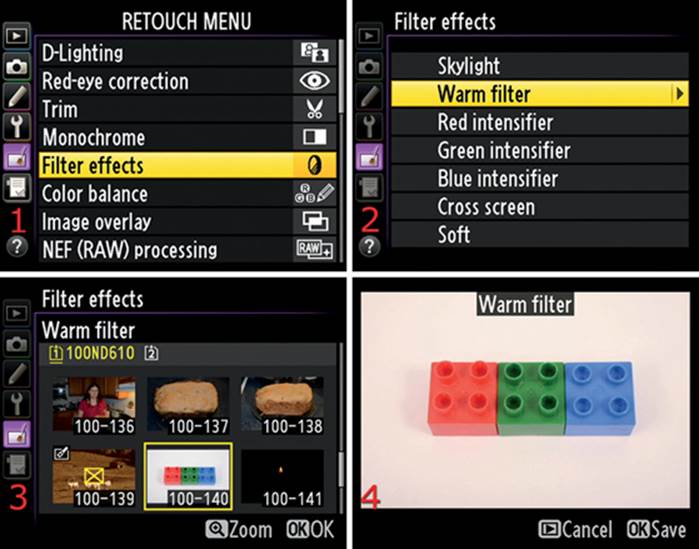
Figure 6.10 – Warm filter effect
Red Intensifier Filter Effect
The Red intensifier filter effect intensifies the reds in an image and adds a red cast. This effect can be controlled by making an initial selection then increasing or decreasing the effect by using the Multi selector to scroll up or down when the image is on-screen. Even though it doesn’t tell you, there are three levels of intensity. The default level is applied first. You can scroll up with the Multi selector for the maximum effect and scroll down for the minimum effect.
Here’s how to set the Red intensifier filter effect:
1. Select Filter effects from the Retouch Menu and scroll to the right (figure 6.11, screen 1).
2. Select Red intensifier and scroll to the right (figure 6.11, screen 2).
3. Choose an image and press the OK button (figure 6.11, screen 3). You can zoom in by pressing the Playback zoom in button if you want to examine the image first.
4. You will see a new image with the Red intensifier effect added (figure 6.11, screen 4). Press the OK button to save the image with a new file name, or press the Playback button to cancel.
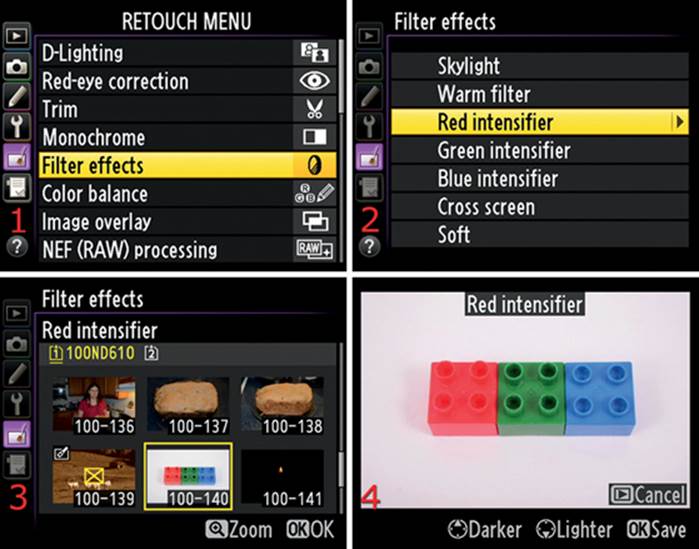
Figure 6.11 – Red intensifier filter effect
Green Intensifier Filter Effect
The Green intensifier filter effect intensifies the greens in an image and adds a green cast. This effect can be controlled by making an initial selection and then increasing or decreasing the effect by using the Multi selector to scroll up or down when the image is on-screen. Even though it doesn’t tell you, there are three levels of intensity. The default level is applied first. You can scroll up with the Multi selector for the maximum effect and scroll down for the minimum effect.
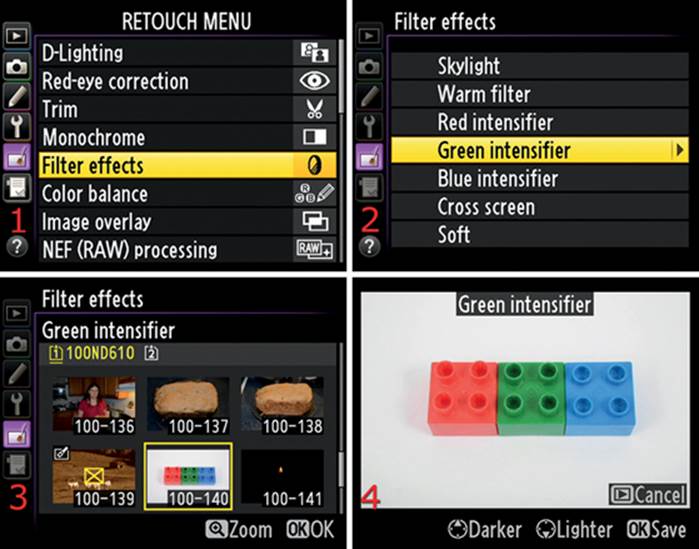
Figure 6.12 – Green intensifier filter effect
Here’s how to set the Green intensifier filter effect:
1. Select Filter effects from the Retouch Menu and scroll to the right (figure 6.12, screen 1).
2. Select Green intensifier and scroll to the right (figure 6.12, screen 2).
3. Choose an image and press the OK button (figure 6.12, screen 3). You can zoom in by pressing the Playback zoom in button if you want to examine the image first.
4. You will see a new image with the Green intensifier effect added (figure 6.12, screen 4). Press the OK button to save the image with a new file name, or press the Playback button to cancel.
Blue Intensifier Filter Effect
The Blue intensifier filter effect intensifies the blues in an image and adds a blue cast. This effect can be controlled by making an initial selection then increasing or decreasing the effect by using the Multi selector to scroll up or down when the image is on-screen. Even though it doesn’t tell you, there are three levels of intensity. The default level is applied first. You can scroll up for the maximum effect and scroll down for the minimum effect.
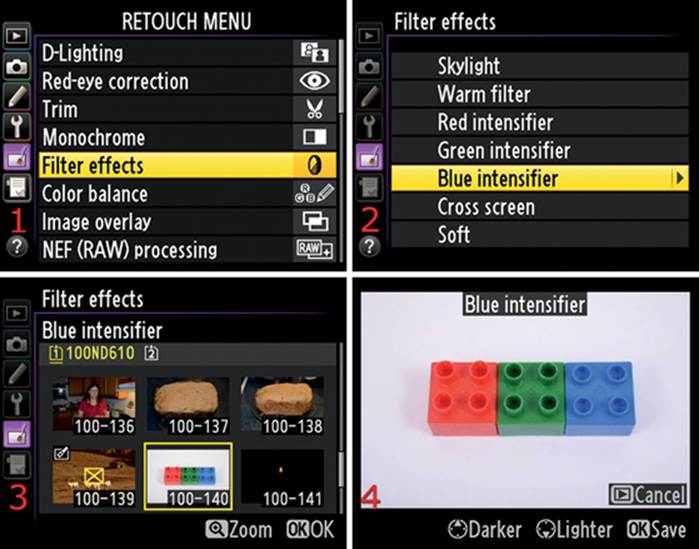
Figure 6.13 – Blue intensifier filter effect
Here’s how to set the Blue intensifier effect:
1. Select Filter effects from the Retouch Menu and scroll to the right (figure 6.13, screen 1).
2. Select Blue intensifier and scroll to the right (figure 6.13, screen 2).
3. Choose an image and press the OK button (figure 6.13, screen 3). You can zoom in by pressing the Playback zoom in button if you want to examine the image first.
4. You will see a new image with the Blue intensifier effect added (figure 6.13, screen 4). Press the OK button to save the image with a new file name, or press the Playback button to cancel.
Cross Screen Filter Effect
The Cross screen filter effect adds a starburst to any points of light. There are four adjustments for this effect, along with Confirm and Save commands. My subject for this test is two candle flames at a distance, shot from above.
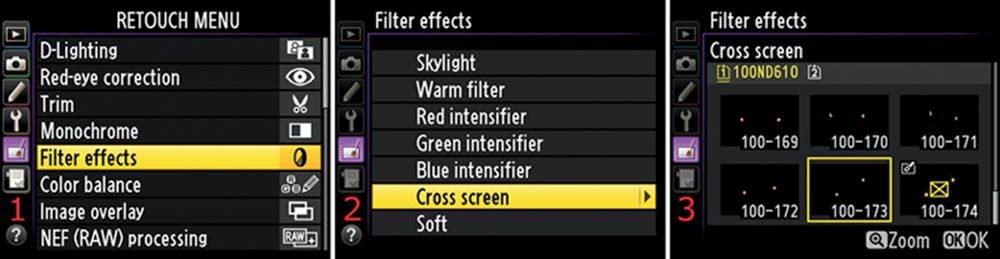
Figure 6.14 – Cross screen filter effect
To create the Cross screen filter effect, use the following steps:
1. Select Filter effects from the Retouch Menu and scroll to the right (figure 6.14, screen 1).
2. Select Cross screen and scroll to the right (figure 6.14, screen 2).
3. Choose an image with the Multi selector and press the OK button (figure 6.14, screen 3). You can zoom in by pressing the Playback zoom in button if you want to examine the image first.
4. Now follow steps 5 through 10. Step 5 and figure 6.15 start where figure 6.14, screen 3, leaves off.
5. The first adjustment is the Number of points (4, 6, or 8) in the starburst. Scroll to the right to select the Number of points (figure 6.15, screen 1). In figure 6.15, screen 2, you can see that an icon with the number of rays in the starburst is provided along with a numeral. I selected 8 points. Press the OK button to lock in your selection. You can zoom in by pressing the Playback zoom in button if you want to examine the image first. You will follow the same procedure for the next three adjustments, which are Filter amount, Filter angle, and Length of points on the starburst.
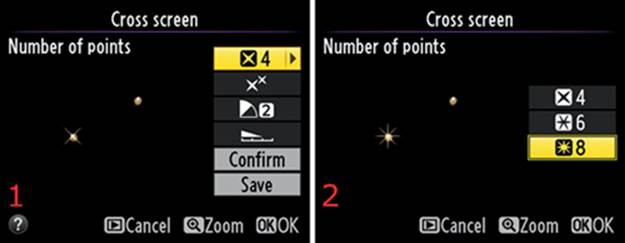
Figure 6.15 – Cross screen filter effect – Number of points
6. The second adjustment is the Filter amount (figure 6.16, screen 1). This adjustment affects the brightness of the light source(s). The more Xs, the brighter the light source. I selected the maximum level in figure 6.16, screen 2.
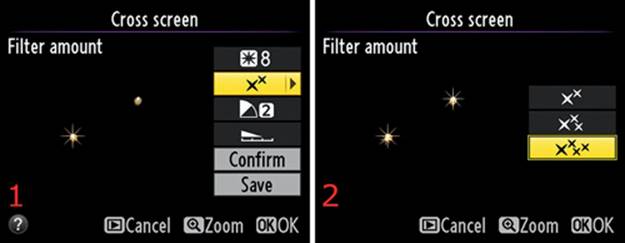
Figure 6.16 – Cross screen filter effect – Filter amount
7. Select the angle of the starburst rays with the Filter angle adjustment. You can rotate the rays in a clockwise direction until the starburst is at the angle you prefer (figure 6.17, screen 1). Notice that the rays are rotated clockwise by a few degrees in figure 6.17, screen 2. This is not a strong effect, but you can rotate the rays a few degrees in either the clockwise (3) or counterclockwise (1) direction.
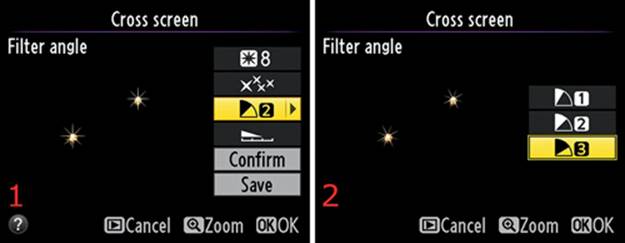
Figure 6.17 – Cross screen filter effect – Filter angle
8. Select the length of the starburst rays with the Length of points adjustment (figure 6.18, screen 1). I wanted the longest rays, so I selected the bottom setting in figure 6.18, screen 2. If you look closely, you can see that the rays are slightly longer in figure 6.18, screen 2.
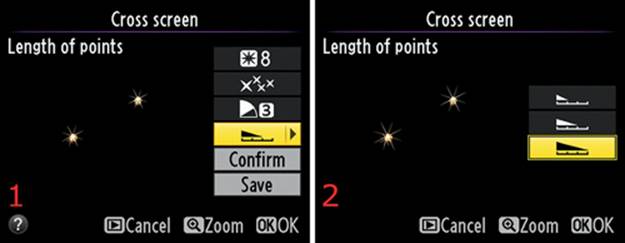
Figure 6.18 – Cross screen filter effect – Length of points
9. Select Confirm to see the effect applied to your image (figure 6.19). This is like an update button. You can change the adjustments in steps 5 through 8 multiple times and Confirm them each time to see the updated image until the effect is the way you want it. You must do the Confirm step after each change or you will not see a difference.
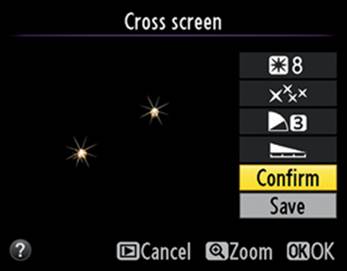
Figure 6.19 – Cross screen filter effect – Confirm
10. Select Save and press the OK button (figure 6.20, screen 1). After a moment you’ll see a screen that says Image saved (figure 6.20, screen 2). Then you’ll see the full-size image in normal Playback mode (figure 6.20, screen 3).
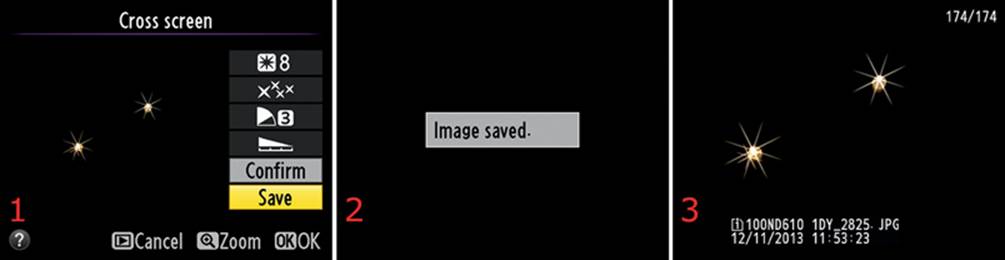
Figure 6.20 – Cross screen filter effect – Save
Settings Recommendation: As previously mentioned, the subject for the Cross screen filter test is two candles on a black background, looking down from above the candles. The D610 is more sensitive to the size of the points of light than previous Nikon cameras I’ve worked with. The size of the points of light had to be significantly smaller to have the starburst effect show up.
If you are testing this effect and can’t get the rays to appear, you may need to make the points of light smaller, but not too small. Try shooting a candle in a darkened area as an experiment. You will soon learn how small the point of light must be. The length of the candle flame can also make a difference.
In figure 6.16, screen 1, you can see that only one of the candles displayed a burst of rays until I selected a stronger, brighter effect. Small, round points of light work best with this effect.
Soft Filter Effect
The Soft filter effect is designed to give your subject that dreamy look popularized by old movies, where the beautiful woman looks soft and sweet. You can select from three levels of softness: Low, Normal, and High.
Figure 6.21, screens 1–4, show small versions of the original image and the three softness settings: screen 1 = Original, screen 2 = Low, screen 3 = Normal, screen 4 = High.
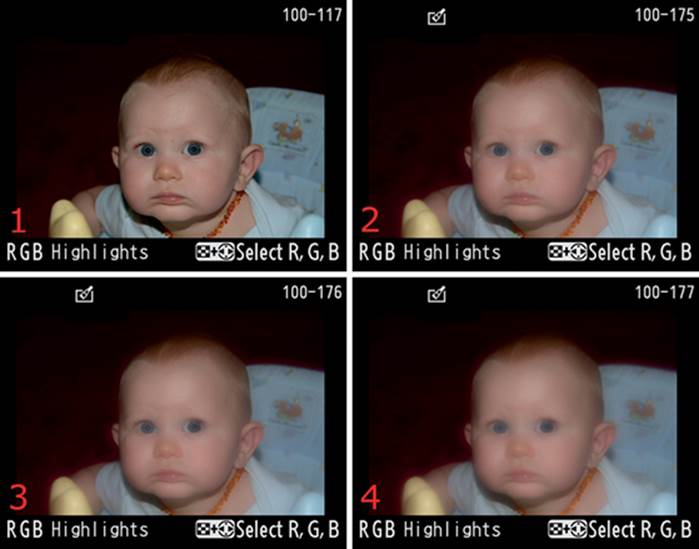
Figure 6.21 – Soft filter effect samples
This is an interesting effect. Even though the overall image has a softness to it after the effect has been applied, the subject is still somewhat sharp. It doesn’t look like the image is soft because of poor focus or camera movement. It’s like a softness has been overlaid on the image, and the original image is still sharp. You would have to see this misty look in a full-size image to understand what I mean.
Here are the steps to select one of the Soft filter levels:
1. Select Filter effects from the Retouch Menu and scroll to the right (figure 6.22, screen 1).
2. Choose Soft from the menu and scroll to the right (figure 6.22, screen 2).
3. Select the image to receive the Soft filter effect and press the OK button (figure 6.22, screen 3). You can zoom in if you want to examine the image first by pressing the Playback zoom in button.
4. You’ll see the word Normal surrounded by a yellow rectangle (figure 6.22, screen 4, red arrow). Use the Multi selector to scroll up or down and select one of the softness levels (Low, Normal, or High). The small image on the left is the original image, and the one on the right is the adjusted image. You can easily see the softness vary as you select different levels. Choose the level you want to use.
5. Press the OK button to save the new image and display it on the Monitor, as shown in figure 6.21.
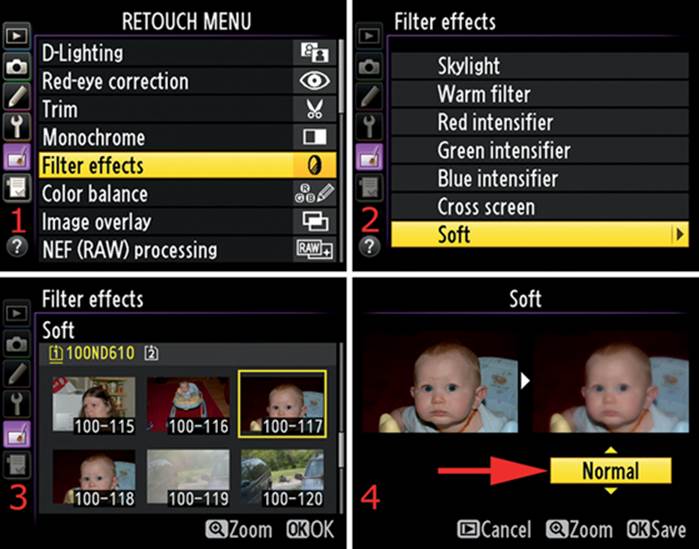
Figure 6.22 – Soft filter effect settings
Settings Recommendation: In comparing the levels of softness, I tend to like the Normal setting best. The Low setting looks like I made a mistake, and the High setting seems too soft to me. Compare the three levels and see which one works best for you.
Color Balance
(User’s Manual – Page 268)
Color balance lets you deliberately add various tones to your pictures. You can visually add a light or strong color cast.
You might want to warm things up a bit by adding a touch of red, or cool things down with a touch of blue. Or you could get creative and add various color casts to the picture for special effects. You’ll see what I mean when you try it. You can tone the image with the following color casts:
• Green
• Blue
• Amber
• Magenta
Figure 6.23 shows four samples of the tints. Notice that the red arrow in the first screen points to the color box. You move the little black square around in the color box to add tints to the image. In all four images, you can see that I moved the black square into a different area of the color box. The small picture above the color box shows how the final saved image will look. You can return the square to the center of the color box to neutralize any tints.
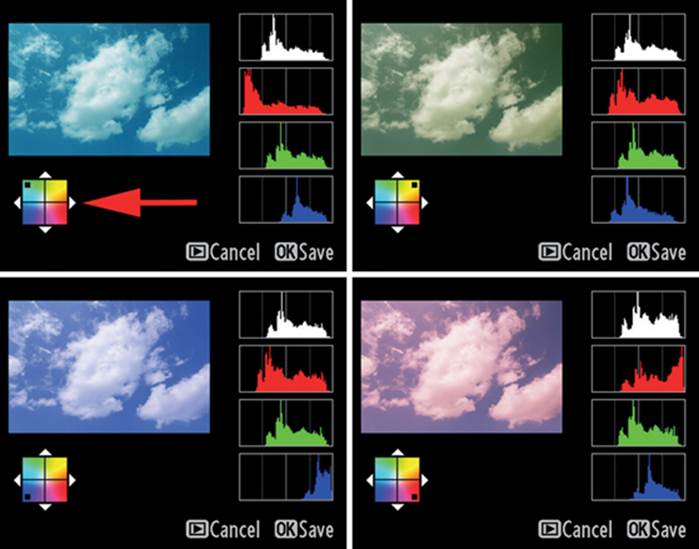
Figure 6.23 – Color balance samples
On the right side of each screen you can see the RGB histogram for the image. As you make color changes you will see the color shift in the histograms. Be careful not to overdo any particular color (clip it off on the right) or you will blow out the color channel, which removes all detail from that color. We’ll discuss the histogram in the chapter titled Metering, Exposure Modes, and Histogram.
Use the following steps to modify the Color balance in your image:
1. Select Color balance from the Retouch Menu and scroll to the right (figure 6.24, screen 1).
2. Select the image you want to modify and press the OK button (figure 6.24, screen 2). You can zoom in by pressing the Playback zoom in button if you want to examine the image first.
3. Use the Multi selector to move the black indicator square in the color box toward whatever color makes you happy (figure 6.24, screen 3). Watch the histograms as they display the changing color relationships in the red, green, and blue color channels. You can see the color changes as they are applied to the small version of your image in the upper-left corner of the screen.
4. Press the Playback button to cancel, or press the OK button to save the image with a new file name. The new image will then be displayed on the Monitor (figure 6.24, screen 4). You can tell it is a retouched image by the inclusion of the palette-and-paintbrush symbol in the top left corner of the screen.
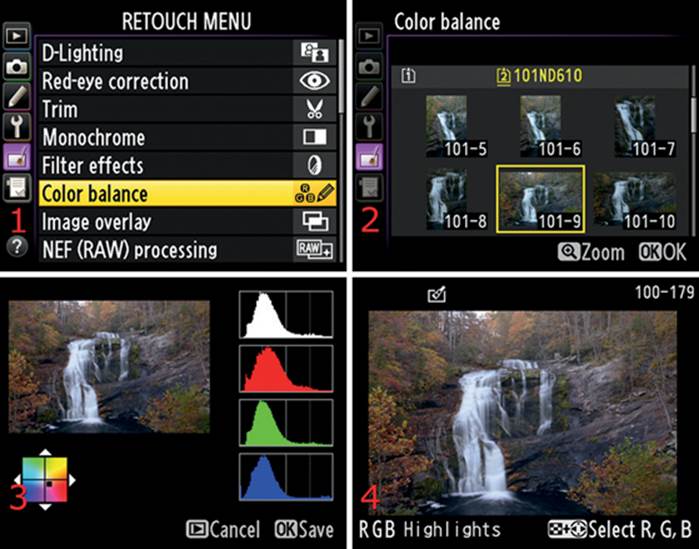
Figure 6.24 – Color balance settings
Settings Recommendation: This is a cool function for persnickety people, and I’m one of them! If you like to fine-tune the color of your pictures—but hate using the computer—here’s your control. You can introduce almost any color tint to an image by moving the black square in any direction within the color box, using combinations of colors to arrive at one that pleases you. This also allows you to offset existing color casts that were caused by the color temperatures of various light sources.
Image Overlay
(User’s Manual – Page 269)
The Image overlay function is a nice way to combine two RAW images as if they were taken as a multiple exposure. You can select two NEF (RAW) shots and combine them into a single new overlaid image.
The results can be a lot like what you get when you use Shooting Menu > Multiple exposure, but Image overlay gives you a visual way to overlay two separate images instead of shooting multiple exposures in one frame. The results can be high quality because the overlay is done using RAW image data.
Image Overlay Ideas
You can set up all sorts of special effects with Image overlay, from duplicating a person in a picture to making another person look transparent. Here’s how:
• Overlay idea # 1: Shoot two separate pictures of the same person against a solid colored background. Have the person stand on the right side in one picture and on the left side in the other picture. Have the person extend a hand, as if to shake hands. Overlay the two images and adjust the density to match. See if you can make people believe that long-lost twins just met.
• Overlay idea # 2: With your camera on a tripod, take a picture of someone sitting on the left side of a couch. Without moving the camera, shoot another person sitting on the right side of the same couch. Overlay the two images and lower the density of the second image so it is partially transparent, or ghosted.
Use the following steps to do an Image overlay:
1. Select Image overlay from the Retouch Menu and scroll to the right (figure 6.25, screen 1).
2. Insert the first RAW image in the Image 1 box (outlined in yellow) by pressing the OK button and selecting an image (figure 6.25, screen 3). Press the OK button again to return to the combination screen (figure 6.25, screen 4). You can vary the gain (density) of the first image by using theMulti selector to scroll up or down in the X1.0 field (figure 6.25, screen 4). The X1.0 setting is variable from X0.1 to X2.0. It lets you control how bright (transparent) or dark (dense) an image is so it can more closely match the density of the other image in the overlay. X1.0 is normal image density.
3. Use the Multi selector to move the yellow box to the Image 2 position (figure 6.25, screen 5). Press the OK button, select the second picture (figure 6.25, screen 6), then press the OK button again to insert the image (figure 6.25, screen 7). Use the X1.0 field to vary the density of the second image. Try to match the density as much as possible to provide a realistic overlay, unless you are trying to create a special effect, such as ghosting.
4. Use the Multi selector to move the yellow box to the Preview area. You’ll see two selections below it: Overlay and Save. Choose one of them and press the OK button (figure 6.25, screen 8).
5. If you select Overlay, the D610 will temporarily combine the images, and you’ll see a preview screen that displays a larger view of the new image. You can press the OK button to save the image with a new file name, or you can press the Playback zoom out/thumbnails button to return to the previous screen.
6. If you choose Save instead of Overlay and press the OK button, the D610 immediately combines the two images and saves the new image with a new file name without letting you preview the image first. Basically, the Save selection saves now, and Overlay gives you a preview of the combination so you can modify or save it.
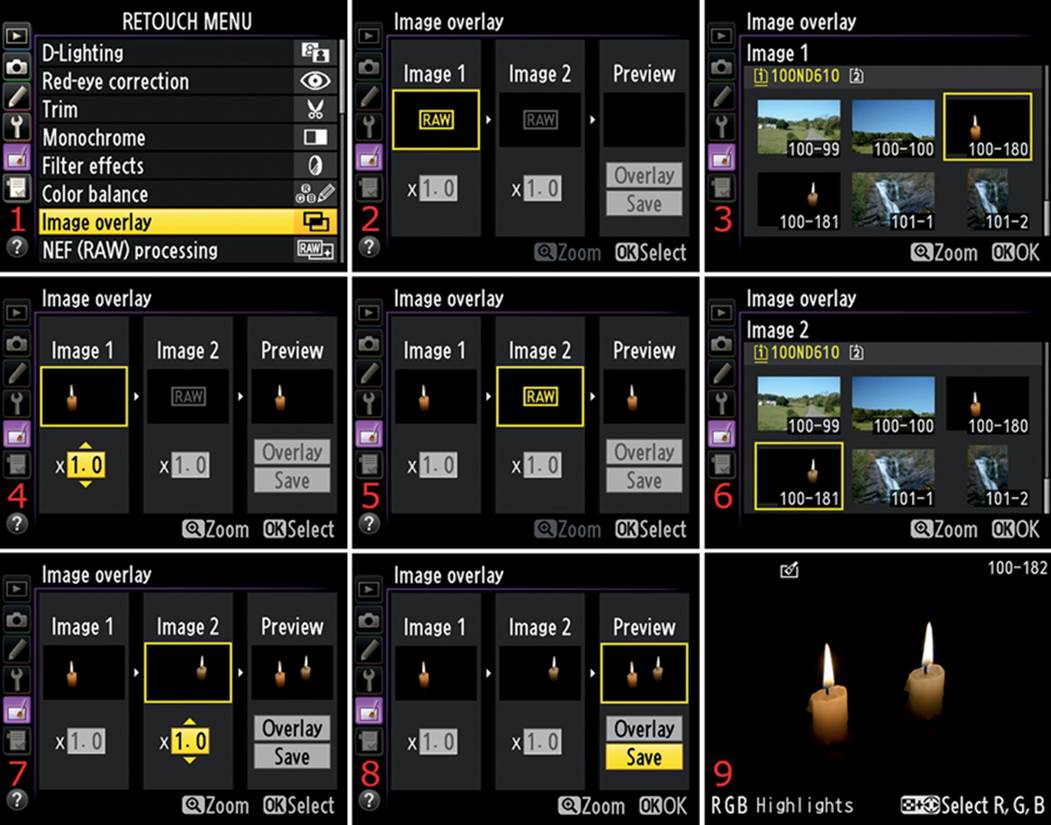
Figure 6.25 – Image overlay (combining two images into one)
Settings Recommendation: This is an easy way to overlay images without a computer. There are some drawbacks, though. One image may have a strong background that is impossible to remove, no matter how much you fiddle with the image density (X0.1 to X2.0). This is a situation in which a computer excels, since you can use software tools, like masking in Capture NX2 or Photoshop, to remove parts of the background and make a more realistic overlay. However, if you must combine two simple images in the field, you have a way to do it in-camera.
NEF (RAW) Processing
(User’s Manual – Page 271)
NEF (RAW) processing is a function that allows you to convert a RAW image to a JPEG inside the camera. If you normally shoot in RAW but need a JPEG quickly, this is a great function. It works only on images taken with the D610, so you can’t insert a card from a different Nikon camera and expect to process those images.
There are a lot of things you can do to an image during NEF (RAW) processing. A RAW file is not yet an image, so the camera settings you used when you took the picture are not permanently applied. In effect, when you use NEF (RAW) processing you are applying the camera settings to the JPEG image after the fact, and you can change the settings you used when you originally took the picture.
You can apply settings when you take a picture through the Shooting Menu or by using external camera controls. However, with NEF (RAW) processing, the settings are applied to the image after the fact, instead of while shooting. See the chapter titled Shooting Menu for a thorough explanation of each setting.
Let’s see how to convert a RAW image to JPEG—in the camera. If you don’t like working with computers but like to shoot RAW images, this is an important function!
Here’s a list of post-shooting adjustments you can make with in-camera NEF (RAW) processing, with basic explanations of each function:
• Image quality – With NEF (RAW) processing, you are converting a RAW file to a JPEG file, so the camera gives you a choice of FINE, NORM, or BASIC. These are equivalent to the Shooting Menu > Image quality settings called JPEG fine, JPEG normal, or JPEG basic.
• Image size – This lets you select how large the JPEG file will be. Your choices are L, M, or S, which are equivalent to the Large (24.2 MP), Medium (13.6 MP), and Small (6.0 MP) settings in Shooting Menu > Image size.
• White balance – This lets you change the White balance of the image after you’ve already taken the picture. You can select from a series of symbols that represent various types of White balance color temperatures. As you scroll up or down in the list of symbols, notice that the name of the corresponding White balance type appears just above the small picture. You can see the effect of each setting as it is applied.
• Exposure comp. – This function allows you to brighten or darken the image by applying +/– Exposure compensation to it. You can apply exposure compensation up to 2 EV in either direction (+2.0 to –2.0 EV).
• Picture Control – With this setting you can apply a different Picture Control than the one with which you took the image. It shows abbreviations—such as SD, NL, VI, MC, PT, or LS—for each Picture Control, plus any Custom Picture Controls you might have created with the designation of C-1, C-2, C-3, and so forth.
• High ISO NR – You can change the amount of High ISO NR applied to the image. The camera has H, N, L, or Off settings, which are equivalent to the Shooting Menu > High ISO NR settings called High, Normal, Low, and Off.
• Color space – You can choose from the camera’s two Color space settings: sRGB or Adobe RGB. Adobe RGB is abbreviated as AdobeRGB in this setting. This is equivalent to the Shooting Menu > Color space setting.
• Vignette control – This setting allows you to control how much automatic vignette (dark corner) removal you want to use. If a particular lens regularly causes light falloff in the corners of your pictures, this function can be useful. You can select from H, N, L, or Off.
• D-Lighting – This lets you manage the level of contrast in the image by brightening the shadows and protecting the highlights. You have four choices: Low (L), Normal (N), High (H), and Off.
• EXE – This simply means execute. When you select EXE and press the OK button, all your new settings will be applied to a new JPEG image, and it will be saved to the memory card with a separate file name.
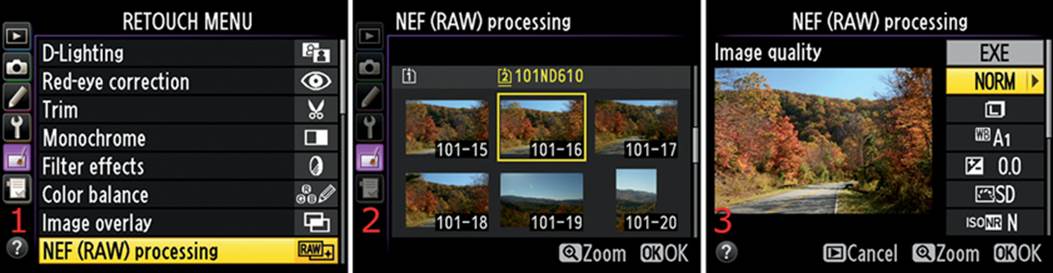
Figure 6.26 – NEF (RAW) processing
Now, let’s look at the steps you can use to convert a file from NEF (RAW) to JPEG in-camera:
1. Select NEF (RAW) processing from the Retouch Menu and scroll to the right (figure 6.26, screen 1).
2. Select a RAW image with the Multi selector and then press the OK button (figure 6.26, screen 2). Only NEF (RAW) images will be displayed. Now we’ll look at each setting shown in figure 6.26, screen 3. The following steps, and figures 6.27 through 6.39, begin where figure 6.26, screen 3, leaves off.
3. Select one of the Image quality settings—FINE, NORM, or BASIC—from the Image quality menu (figure 6.27). FINE gives you the best possible quality in a JPEG image. After you select the setting you want to use, press the OK button to return to the main NEF (RAW) processingconfiguration screen. You can cancel the operation with the Playback button. You can zoom in to check the image quality with the Playback zoom in button.
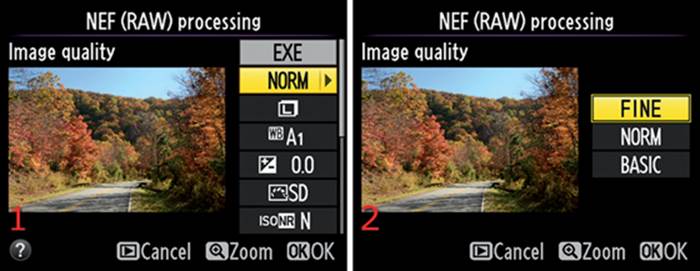
Figure 6.27 – NEF (RAW) processing – Image quality
4. Select one of the Image size settings from the Image size menu (figure 6.28). Your choices are L (24.2 MP), M (13.6 MP), and S (6.0 MP).
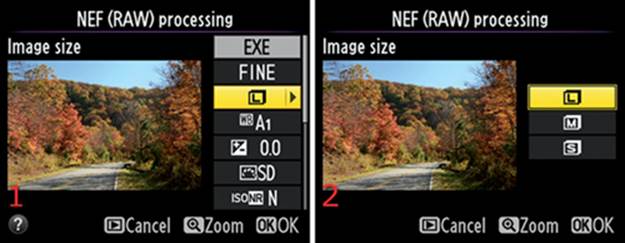
Figure 6.28 – NEF (RAW) processing – Image size
5. Select the setting you want to use then press the OK button to return to the main NEF (RAW) processing configuration screen. You can cancel the operation with the Playback button.
6. Select one of the White balance settings for your new JPEG (figures 6.29 to 6.32). You can choose from AUTO, Incandescent, Fluorescent, Direct sunlight, Flash, Cloudy, Shade, K-Choose color temp., or PRE – Preset manual (figure 6.29, screen 2). A1 and A2 (figure 6.29, screen 3) refer to normal and slightly warmer White balance settings. The tint of the White balance can be fine-tuned in figure 6.29, screen 4. Please review the chapter titled White Balance for information on each of these items. The Fluorescent, K, and PRE settings have additional screens with choices that you must select. Let’s examine the extra screens in those three settings.
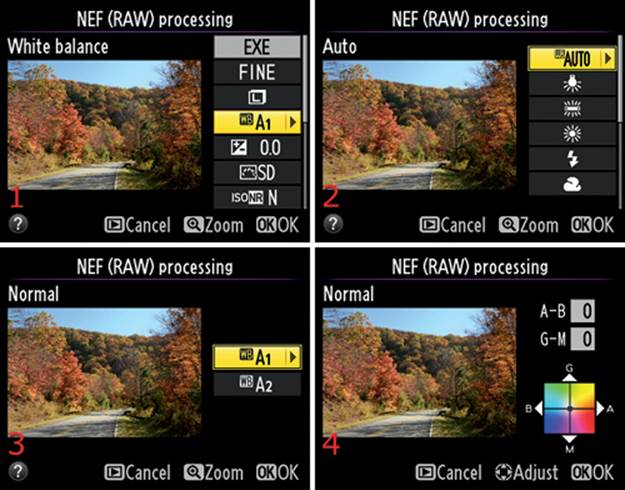
Figure 6.29 – NEF (RAW) processing – White balance
a) Fluorescent – You must choose a type of fluorescent light. There are seven choices, with names like Sodium-vapor, Warm-white, Cool-white, and so forth. Each choice has a number assigned to it. Figure 6.30, screen 3, shows Cool-white fluorescent, which is number 4 on the list. Scroll to the right to move to the fine-tuning screen, where you can adjust the color tint of the image by moving the black dot in the color box with the Multi selector (figure 6.30, screen 4). You can immediately press the OK button for no changes, or you can make fine-tuning changes and press theOK Button to save the setting, or you can press the Playback button to cancel.
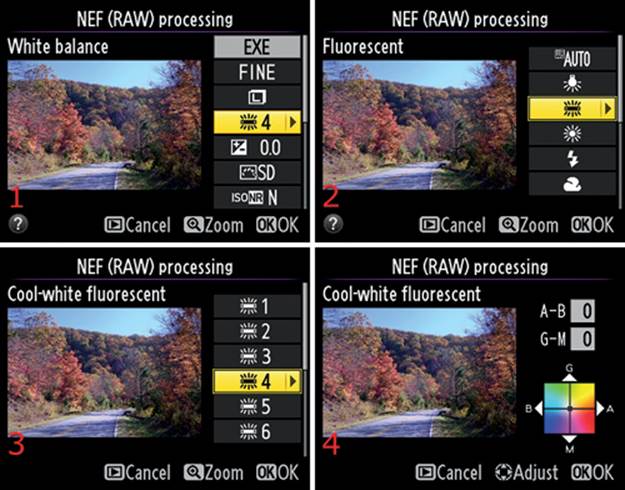
Figure 6.30 – NEF (RAW) processing – White balance – Fluorescent
b) K-Choose color temp. – You can choose a color temperature from the list shown in figure 6.31, screen 3. Remember that color temperatures change how the image color looks by warming it (red) or cooling it (blue). The list ranges from 2500K (cool) to 10000K (warm). You can also use the fine-tuning screen to modify the color’s base (figure 6.31, screen 4). Press the OK button to save the setting, or press the Playback button to cancel.
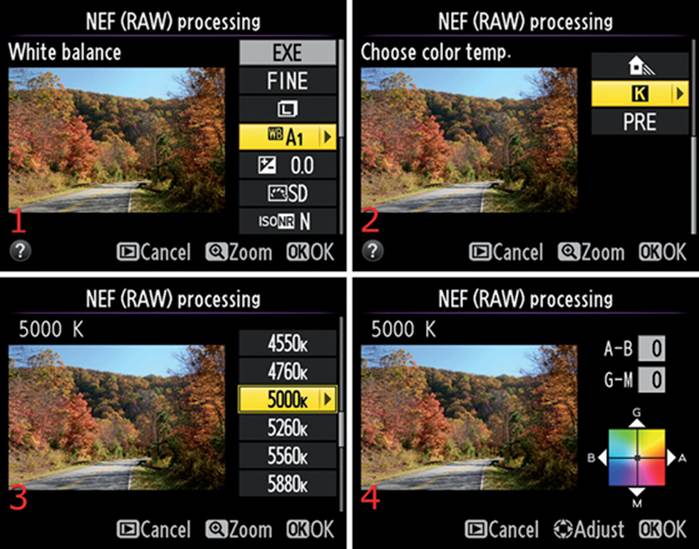
Figure 6.31 – NEF (RAW) processing – White balance – K-Choose color temp.
c) PRE-Preset manual – With this setting you can choose a saved White balance while letting the camera measure the ambient light reflected from a gray or white card (the PRE method). See the chapter titled White Balance for information on doing ambient light (PRE) readings. You can choose from up to four previous PRE readings that are stored in memory locations d-1 to d-4 (figure 6.32, screen 3). As you scroll through the list of settings, you’ll see the color temperature of the image change. My current d-1 setting contains a White balance in the 5K area—the color of the foliage looks about right for a sunny autumn day, which is about 5500K. Select the setting you want to use and press the OK button to return to the main NEF (RAW) processing configuration screen, or you can scroll to the right and fine-tune the colors of the individual White balance(figure 6.32, screen 4). You can see your fine-tuning adjustment change the color temperature of the image. If you decide you don’t want to fine-tune the White balance, simply press the OK button when you get to the fine-tuning screen. The camera will return to the main NEF (RAW) processing configuration screen. You can cancel the operation by pressing the Playback button.
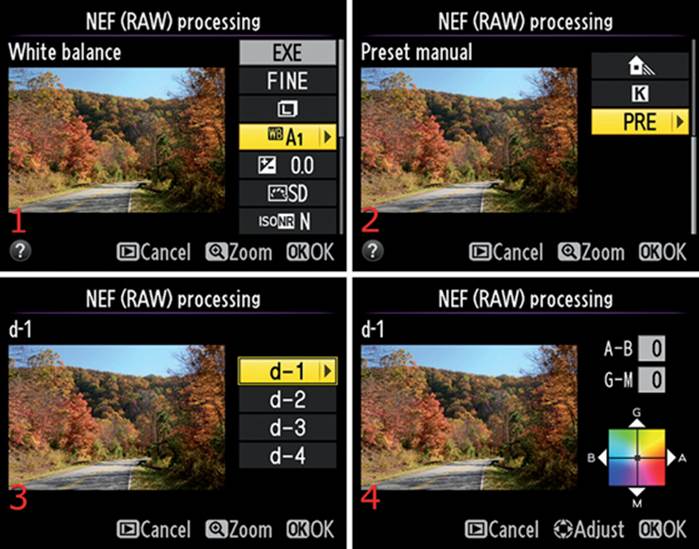
Figure 6.32 – NEF (RAW) processing – White balance – PRE-Preset manual
7. Now you can lighten or darken the image by selecting an Exposure comp. value from –2.0 – +2.0 EV steps (figure 6.33, screen 2). When the image looks right, press the OK button to return to the main NEF (RAW) processing configuration screen. You can cancel the operation by pressing the Playback button.
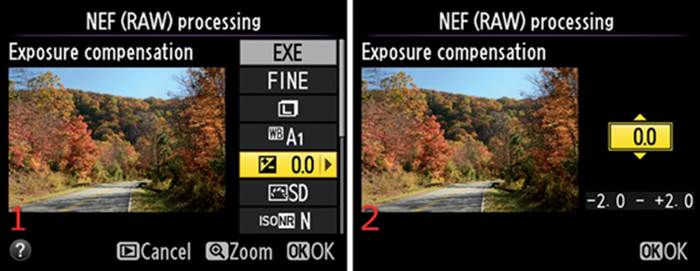
Figure 6.33 – NEF (RAW) processing – Exposure comp.
8. Next you can apply a Nikon Picture Control or one of your own Custom Picture Controls, if you’ve created any (figure 6.34, screen 2). These controls change how the image looks. You can make it sharper and give it more contrast, give it more or less color saturation, or change it to monochrome. In fact, you can even modify the settings of the current Picture Control by using the fine-tuning screen (figure 6.34, screen 3). Choose from SD (Standard), NL (Neutral), VI (Vivid), MC (Monochrome), PT (Portrait), LS (Landscape), or C-1 to C-9 (Custom Picture Controls), which appear farther down the list than shown in figure 6.34, screen 2. You can scroll to the right with the Multi selector if you want to fine-tune the image (figure 6.34, screen 3). Scroll up or down to select one of the settings—Sharpening, Contrast, Brightness, and so forth—and scroll left or right to modify the selected setting. If you make a mistake and want to start over, press the Delete button. The camera will display a screen that says Selected Picture Control will be reset to default settings. OK? Choose Yes or No and press the OK button. If a Picture Control is different than the factory default, an asterisk will appear next to its name in all menus. The Monochrome (MC) Picture Control lets you adjust not only things like Sharpening, Contrast, and Brightness in the fine-tuning screen, but it also gives you toning (tint) controls like the Shooting Menu > Set Picture Control function. When the image looks right, press the OK button to return to the main NEF (RAW) processing configuration screen. You can cancel the operation by pressing the Playback button.
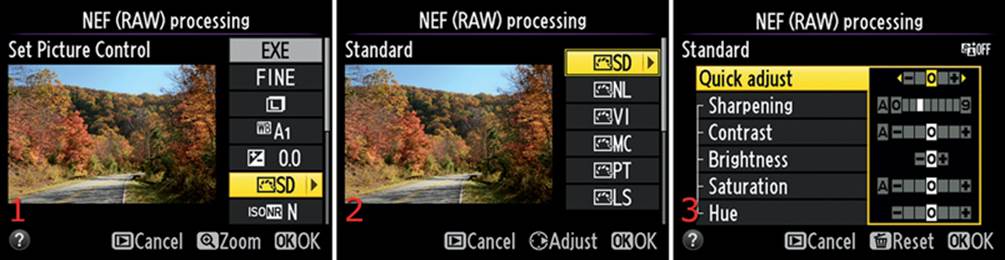
Figure 6.34 – NEF (RAW) processing – Picture Control
9. If the image needs high ISO noise reduction, you can apply it now (figure 6.35, screen 1). You have a choice of four settings: High (H), Normal (N), Low (L), or Off (figure 6.35, screen 2). Choose one and press the OK button to return to the main NEF (RAW) processing configuration screen. You can cancel the operation by pressing the Playback button. You can zoom in and check the image by pressing the Playback zoom in button.
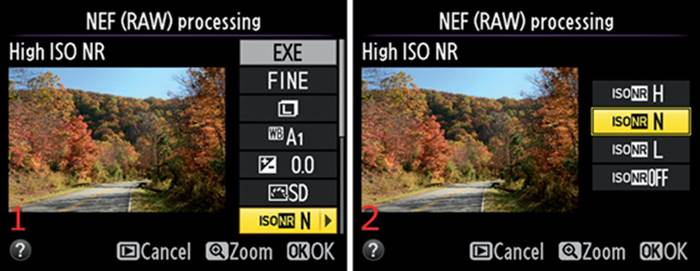
Figure 6.35 – NEF (RAW) processing – High ISO NR
10. Color space lets you choose one of the camera’s two color space settings: sRGB or Adobe RGB (figure 6.36, screen 2). Choose one and press the OK button to return to the main NEF (RAW) processing configuration screen. You can cancel the operation with the Playback button. You can zoom in and check the image first by pressing the Playback zoom in button.
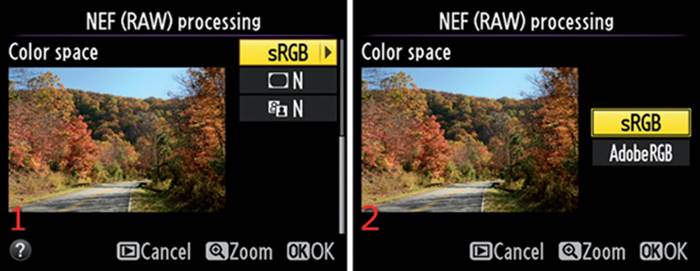
Figure 6.36 – NEF (RAW) processing – Color space
11. Vignette control allows you to lighten the corners of your images automatically. One minor problem with a full-frame sensor is that the extra bending of light that reaches to the corners of the frame can cause a small amount of light falloff, or darkening of the corners and edges. This is called vignetting. The camera has four settings to control vignetting: high (H), normal (N), low (L), or Off. The default is normal (N), which is generally the setting I use.
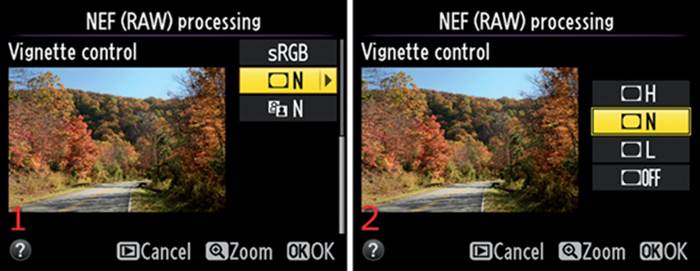
Figure 6.37 – NEF (RAW) processing – Vignette control
12. D-lighting (figure 6.38) is very similar to Shooting Menu > Active D-Lighting in that it restores shadow detail and protects highlights in your images. However, D-Lighting is applied after the fact, and Active D-Lighting is applied at the time the image is taken. Otherwise they are basically the same thing. You can select from high (H), normal (N), low (L), or Off (figure 6.38, screen 2). Press the OK button to set the D-Lighting level, or press the Playback button to cancel.
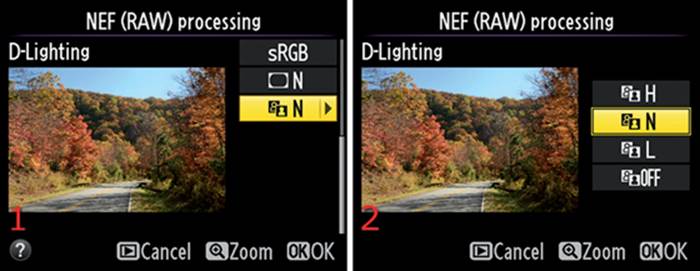
Figure 6.38 – NEF (RAW) processing – D-Lighting
13. When you are finished with NEF (RAW) processing, scroll up to the EXE (execute) selection and press the OK button (figure 6.39, screen 1). An hourglass will display for a few seconds while the new JPEG is being saved with your carefully crafted settings. A screen that says Image saved will appear briefly (figure 6.39, screen 2), and then the new JPEG will be displayed in a normal Playback screen (figure 6.39, screen 3) and will be saved on the memory card with a new file name. You can cancel the operation with the Playback button.
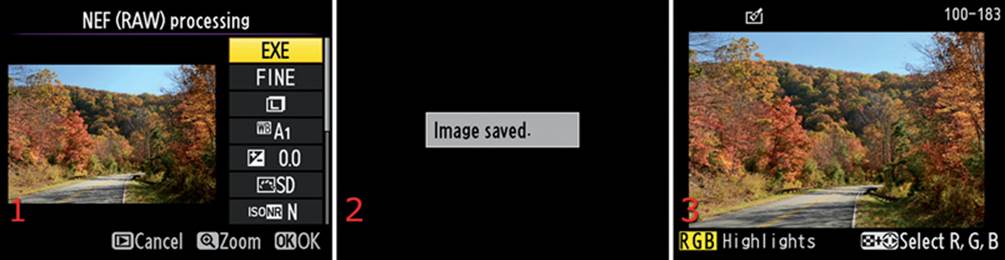
Figure 6.39 – NEF (RAW) processing – EXE (execute)
This is a nice way to create specialized JPEG images from NEF (RAW) files without using a computer. How much longer will it be until our cameras come with a keyboard, monitor, and mouse ports? They are computerized, after all!
Settings Recommendation: NEF (RAW) processing is a complex, multistep process because you’re doing a major conversion from NEF (RAW) to JPEG in-camera, without using your computer. You’re in complete control of each level of the conversion and can even replace the camera settings you originally used when you took the picture. If you want to simply convert the image without going through all these steps, just choose the EXE selection and press the OK button. That will convert the image with the camera settings you used to do the previous conversion, or it will use the factory default settings if you have never converted an image.
Resize
(User’s Manual – Page 272)
The Resize function allows you to convert an image from a full-size 24.2 MP picture (6016 x 4016) to a smaller one, with four extra-small sizes. This function appears to be designed so you can create images that can easily be emailed or used on a website or blog.
There are three selections:
• Select image – This selection allows you to choose one or more images for resizing
• Choose destination – This selection allows you to choose a destination for the resized pictures
• Choose size – You can choose from four sizes:
a) 1920×1280 – 2.5 M
b) 1280×856 – 1.1 M
c) 960×640 – 0.6 M
d) 640×424 – 0.3 M
Let’s examine the steps for resizing images:
1. Select Resize from the Retouch Menu and scroll to the right (figure 6.40, screen 1). Although it seems out of order, select Choose destination and scroll to the right (figure 6.40, screen 2). Select one of the card slots to be the destination for the resized images and press the OK button(figure 6.40, screen 3). This selection will be grayed out if one of the memory card slots is empty. In that case the destination will be the card slot that contains a card. Skip this step if you are using only one memory card.
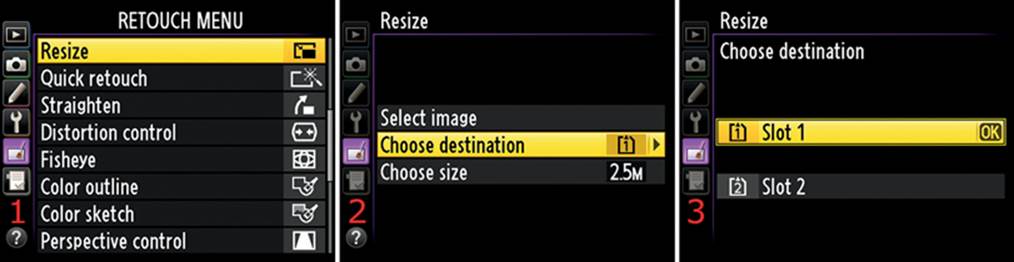
Figure 6.40 – Resize – Choose destination
2. Next, select Choose size and scroll to the right (figure 6.41, screen 2). You’ll see four sizes, from 2.5 M to 0.3 M (figure 6.41, screen 3). These are the actual megapixel sizes available for images after you save them. Select a size and press the OK button.
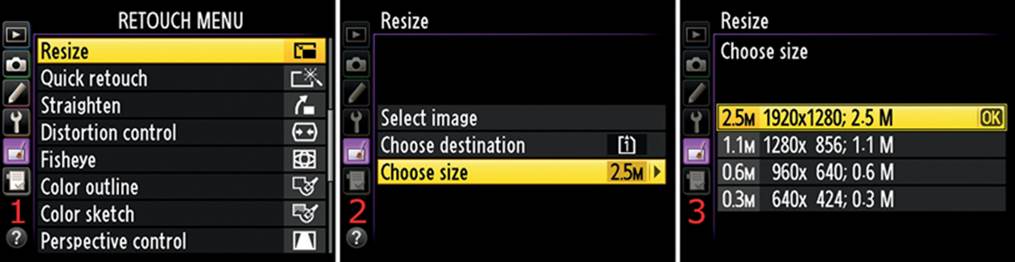
Figure 6.41 – Resize – Choose size
3. Next, choose Select image and scroll to the right (figure 6.42, screen 2). You’ll see six image thumbnails. Use the Multi selector to scroll around in this group of thumbnails. When you see an image you want to resize, press the Playback zoom out/thumbnails button to Set the image as the one to be resized. You can select and Set as many images as you’d like, and each of them will be resized. A tiny resize symbol will appear in the top right corner of each thumbnail you Set (figure 6.42, screen 3, red arrow). When you are done selecting images, press the OK button. A message will ask, Create resized copy? (figure 6.42, screen 4). Select Yes and press the OK button to create the resized images. A screen that says Image saved will briefly appear (figure 6.42, screen 5). The last image in the group of resized images will display (figure 6.42, screen 6). The resized images will look just like the originals, except for the palette-and-paintbrush retouch icon in the top-left corner (figure 6.42, screen 6) and the reduced size.
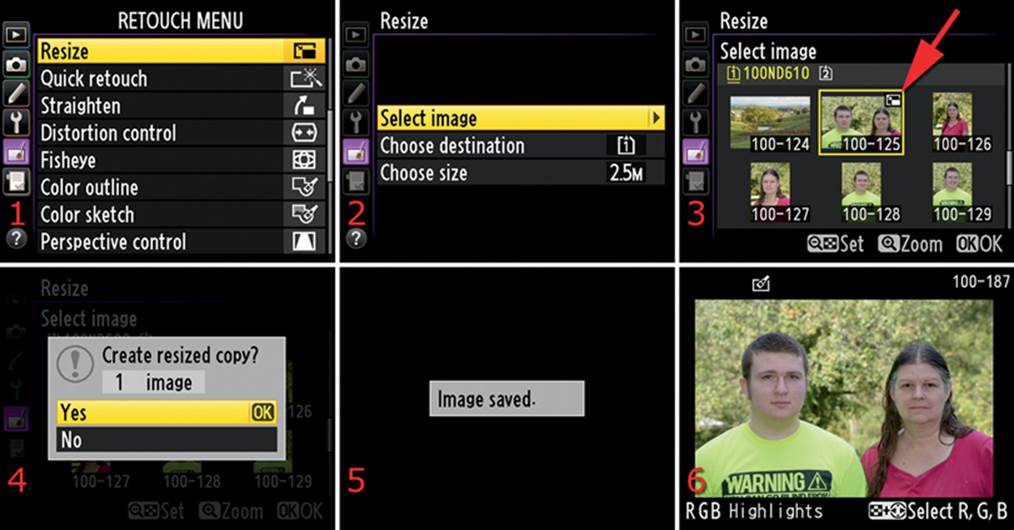
Figure 6.42 – Resize – Select image
Settings Recommendation: I use this function when I’m in the field and want to make a small image to send via email. The full-size JPEG file is often too large to send through some email systems. It’s nice to have a way to reduce the image size without having to find a computer. Please notice that this function does not reduce the image size by cropping, like the Trim function we studied earlier. Instead, it simply reduces the image in the same aspect ratio as the original, and it has a smaller megapixel size.
Quick Retouch
(User’s Manual – Page 273)
If you want to simply adjust an image so that all parameters are within viewable range, use the Quick retouch function. It creates a new copy of an existing image with “enhanced saturation and contrast,” according to the User’s Manual. D-Lighting is automatically applied to your old image, and the new image is supposed to look better. You can scroll up and down in the preview screen to see the range of enhancements that can be applied when the new image is created.
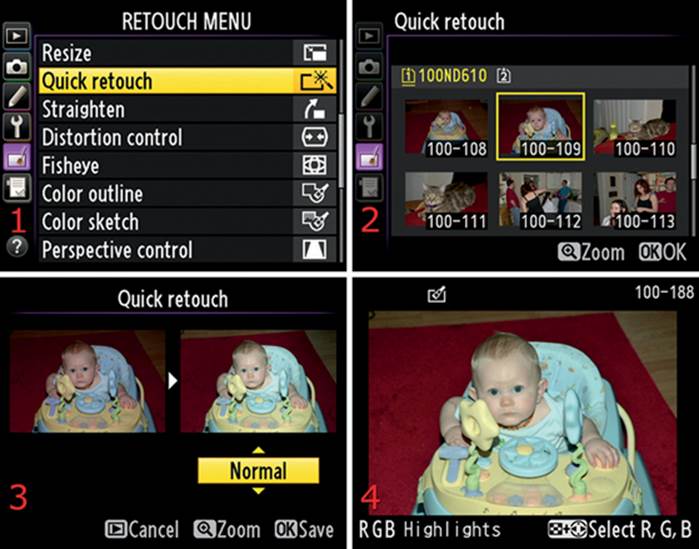
Figure 6.43 – Quick retouch of a cute baby image
Here are the steps to Quick retouch an image:
1. Select Quick retouch from the Retouch Menu and scroll to the right (figure 6.43, screen 1).
2. You’ll see the images that are eligible for Quick retouch. Use the Multi selector to scroll to an image you want to retouch, and press the OK button to select it (figure 6.43, screen 2).
3. Use the Multi selector to scroll up or down, and select High, Normal, or Low (figure 6.43, screen 3). I chose Normal. You can preview the effect of your changes by looking at the before and after images.
4. Press the OK button when you’re satisfied. The new image will be created and displayed on the Monitor (figure 6.43, screen 4).
Settings Recommendation: This function can help some images have a little more snap. I use Quick retouch only if I am going to give someone a JPEG image directly out of the camera and want to enhance it a little first.
Straighten
(User’s Manual – Page 274)
Straighten is another really cool function. Often, when I shoot a landscape or ocean view handheld, I forget to level the horizon. With Straighten I can level the image before anyone else sees it.
You can rotate an image up to 5 degrees clockwise or counterclockwise. You use the Multi selector to scroll right or left through a graduated scale. Each increment is equal to about 0.25 degree. As you rotate the image, the camera will automatically trim the edges so the picture looks normal. Of course, this means you are throwing away some of the image and making it smaller. However, it’s better for the image to be a little smaller and have a nice level horizon, don’t you think?
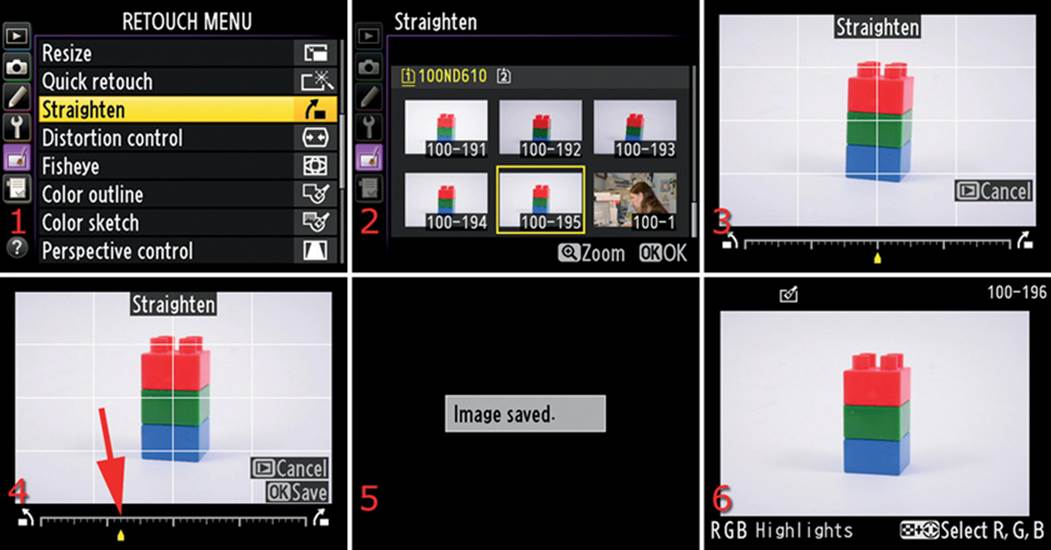
Figure 6.44 – Straighten an image
Here are the steps to Straighten or level an image:
1. Select Straighten from the Retouch Menu and scroll to the right (figure 6.44, screen 1).
2. With the Multi selector, scroll to the image you want to Straighten and press the OK button to select it (figure 6.44, screen 2).
3. Rotate the image to the right (clockwise) or the left (counterclockwise) in 0.25 degree increments with the Multi selector (figure 6.44, screen 3). Notice that there is a yellow pointer in the middle of the scale below the image in figure 6.44, screen 3. This image needs to be rotated to the left, so in figure 6.44, screen 4 (red arrow), you can see that I pushed the yellow pointer toward the left, which rotated the image counterclockwise. When you are happy with the new image, press the OK button to save it, or press the Playback button to cancel.
4. A screen that says Image saved will briefly appear (figure 6.44, screen 5).
5. You’ll see the newly straightened and saved image on the Monitor (figure 6.44, screen 6).
Settings Recommendation: This is a handy function to level an image—as long as it is not tilted more than 5 degrees—without using a computer.
Distortion Control
(User’s Manual – Page 274)
The Distortion control function is a companion to the Straighten function. The Straighten function levels the image from left to right, and the Distortion control function addresses barrel and pincushion distortion. Barrel distortion causes the edges of a subject to bow outward, like a barrel. Pincushion distortion is the opposite; the edges bow inward, like an hourglass. Using this control will remove some of the image edges as distortion compensation takes place. There are two settings in the Distortion control function: Auto and Manual.
Auto Distortion Control
You can use this setting only if you have a D or G lens on your D610. Select Auto when you want the camera to automatically make rough distortion adjustments, and then you can fine-tune the adjustments yourself if you think the new image needs it.

Figure 6.45 – Auto Distortion control
Here are the steps to let the camera make an Auto distortion adjustment:
1. Select Distortion control from the Retouch Menu and scroll to the right (figure 6.45, screen 1).
2. Choose Auto from the menu (figure 6.45, screen 2).
3. With the Multi selector, select the image you want to fix and press the OK button (figure 6.45, screen 3).
4. The camera will automatically make its best adjustment and then display the adjusted image (figure 6.45, screen 4). The yellow adjustment pointer will be centered along the scale at the bottom of the screen. You can move the pointer between barrel and pincushion distortion adjustments, as represented by the small icons on either end of the scale (the barrel is on the left, and the pincushion is on the right).
5. If you are not satisfied with the camera’s Auto adjustment, use the Multi selector to move the yellow pointer to the left to remove pincushion distortion (add barrel) or to the right to remove barrel distortion (add pincushion). I chose full pincushion distortion correction by adding barrel (figure 6.45, screen 5, red arrow).
6. When you are happy with the appearance of the image, press the OK button to save it, or press the Playback button to cancel.
7. You’ll see the new adjusted image on the Monitor (figure 6.45, screen 6).
The effect is not easy to see in these small images or on the Monitor of the camera. However, if you look closely at figure 6.45, screen 4, and compare it to screen 5, you can see a slight difference. Images that need greater adjustments should be corrected on a computer with full-sized images.
Manual distortion adjustments work the same way, except the camera does not make an Auto adjustment before displaying an image that you can manually adjust.
Manual Distortion Control
You are in control of this operation. You can adjust the image until you think it looks good, without interference from the camera.
Here are the steps to manually correct distortion:
1. Select Distortion control from the Retouch Menu and scroll to the right (figure 6.46, screen 1).
2. Choose Manual from the menu and scroll to the right (figure 6.46, screen 2).
3. Use the Multi selector to scroll to the image you want to fix, and press the OK button to select it (figure 6.46, screen 3). You can zoom in to check the image by pressing the Playback zoom in button.
4. The image will be displayed with the yellow pointer centered under the scale on the bottom of the screen (figure 6.46, screen 4). No adjustment has been made yet.
5. Move the yellow pointer along the scale to the left to remove pincushion distortion (add barrel) or to the right to remove barrel distortion (add pincushion). I chose full pincushion distortion correction by adding barrel (figure 6.46, screen 5, red arrow).
6. When you are happy with the appearance of the image, press the OK button to save it, or press the Playback button to cancel.
7. You’ll see the new adjusted image on the Monitor.
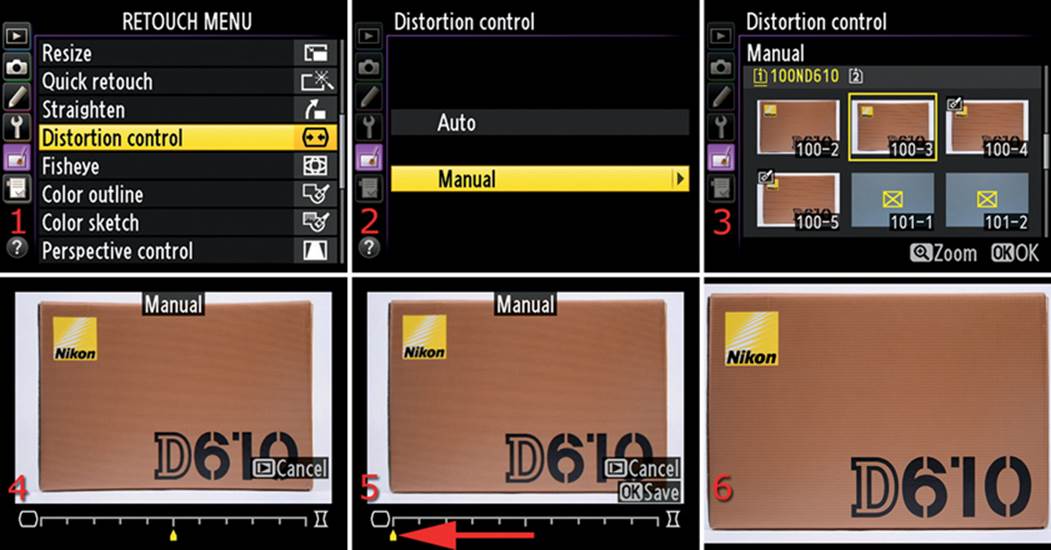
Figure 6.46 – Manual Distortion control
As with the Auto distortion adjustment, the Manual distortion adjustment is rather minor. If you look closely at figure 6.46, screen 4, and compare it to screen 5, you’ll see that the User’s Manual appears slightly less distorted.
Settings Recommendation: These functions are not overly useful because they do not allow for larger corrections. However, they do allow minor distortion correction. Use a program on your computer, such as Photoshop or Nikon Capture NX2, for greater distortion corrections.
Fisheye
(User’s Manual – Page 274)
The Fisheye function is quite fun! You can distort your friends and make hilarious pictures that will make everyone laugh (well, maybe not everyone). Although the results are not true circular fisheye images, they do have a similar distorted appearance.
Figure 6.47 shows four samples of the Fisheye setting. Notice the small yellow pointer at the bottom under the scale. The farther toward the right you move it, the more distorted the image. The first image is normal, the second and third images are more distorted, and the fourth image is fully fisheyed! (Can you detect trouble brewing with wives and girlfriends? I used a picture of my son to stay out of trouble!)
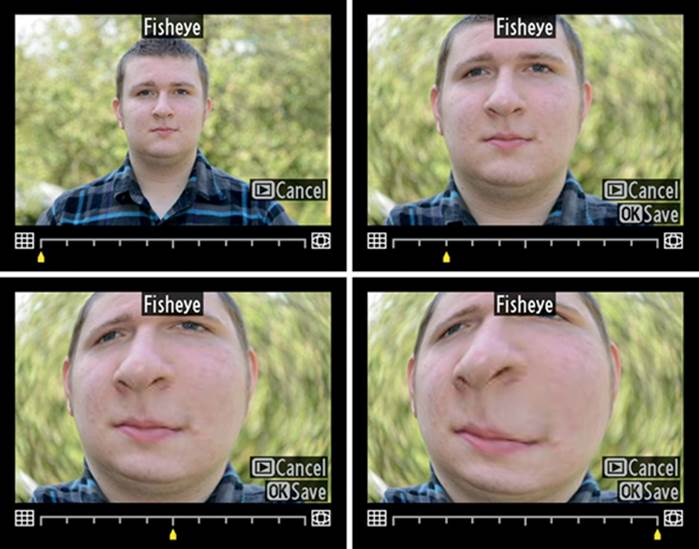
Figure 6.47 – Fisheye distortion samples

Figure 6.48 – Fisheye settings
Here are the steps to use Fisheye to distort one of your images:
1. Select Fisheye from the Retouch Menu and scroll to the right (figure 6.48, screen 1).
2. Scroll to the image you want to distort and press the OK button to select it (figure 6.48, screen 2).
3. Now press the Multi selector to the right and watch the yellow pointer move and the distortion grow (figure 6.48, images 3 and 4).
4. When you’ve found the perfect distortion amount (to the max, right?), simply press the OK button to save the image, or press the Playback button to cancel. An Image saved screen will appear briefly, and the finished product will appear on the Monitor (figure 6.48, screens 5 and 6).
Settings Recommendation: Be careful with this one! If you publish many pictures of your friends with this effect, I’m afraid they’ll start running when they see you with your camera.
Color Outline
(User’s Manual – Page 275)
Have you ever wanted to convert one of your images to a cartoon or a line drawing? Color outline will do it for you! This retouch setting creates an interesting outline effect on the distinct lines or color changes in your image.
Figure 6.49 shows an original image and the image after Color outline was applied. The final image is not actually in color.
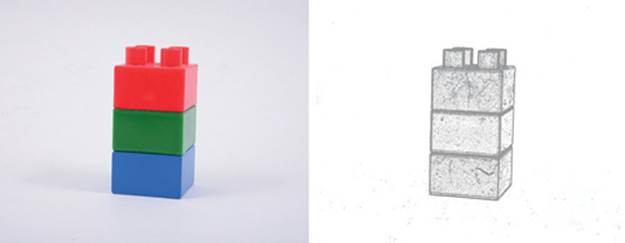
Figure 6.49 – Color outline sample
You can convert an image to a color outline by opening it in Photoshop and using the fill functions to add cartoon colors between the lines (like the Color sketch function, coming up next). Or you can post-process the image into a fine-art line tracing. This is an unusual functionality and shows the direction that our highly computerized cameras are going. They have computer power built in, so why not make use of it in new and fun ways?
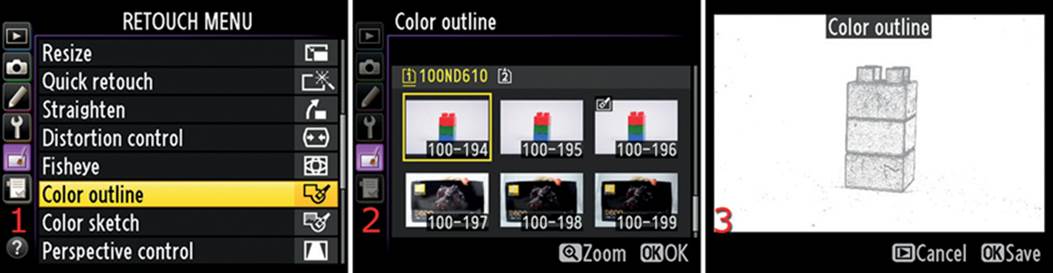
Figure 6.50 – Color outline settings
Here are the steps to create a Color outline:
1. Choose Color outline from the Retouch Menu (figure 6.50, screen 1).
2. Select an image from the list of thumbnails. You can either press the OK button to start the conversion to outline form, or press the Playback zoom in button to check the image first (figure 6.50, screen 2). After conversion, press the OK button to save the new image, or press the Playback button to cancel.
3. The new image will display on the Monitor (figure 6.50, screen 3).
Settings Recommendation: The Color outline setting gives you the opportunity to be creative and have some fun with your images. It makes a very sparse image that resembles a line drawing. You could use this as a basis for a painting, hand coloring, or just to have a cool-looking image that most cameras won’t make.
Color Sketch
(User’s Manual – Page 275)
With the Color sketch setting you can create a copy of your image that looks like a sketch made with colored pencils or crayons. This function is similar to Color outline, except it uses pastel colors instead of grayscale. Figure 6.51 shows an image before and after Color sketch was applied.
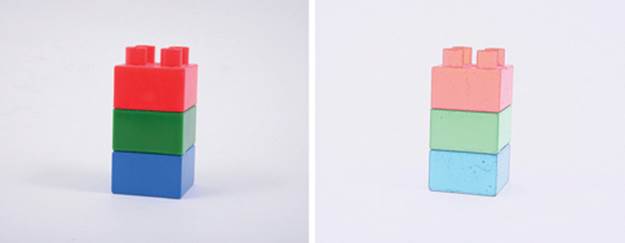
Figure 6.51 – Color sketch sample
You can convert an image to a Color sketch and change the Vividness (pastel color saturation) and Outlines (line and color contrast) until it meets your needs.
Use the following steps to create a Color sketch:
1. Choose Color sketch from the Retouch Menu (figure 6.52, screen 1).
2. Select an image and press the OK button (figure 6.52, screen 2).
3. You can now set the Vividness, or color saturation, of the pastel colors. Change the Vividness until you like the look (figure 6.52, screen 3).
4. Next, you’ll choose an Outlines setting, which will change the contrast of the lines and colors (figure 6.52, screen 4).
5. I set both Vividness and Outlines to the plus side, or maximum (figure 6.52, screen 5, red arrow). Press the OK button to make the new image, or press the Playback button to cancel. You can zoom in with the Playback zoom in button to check the image before you save it.
6. The new image will display on the Monitor (figure 6.52, screen 6).

Figure 6.52 – Color sketch settings
Settings Recommendation: Like Color outline, the Color sketch function lets you play around with the post-processing computer in your camera. Occasionally I like to play with these functions. Are they really useful? Well, I guess it depends on how often you need a Color outline or Color sketch. Maybe you have a great use for them in mind.
Perspective Control
(User’s Manual – Page 275)
Perspective control gives you control over some forms of perspective distortion in your images. When you take a picture from the base of a tall object, like a building, with a wide-angle lens, the building looks like it’s falling over backwards. With large-format view cameras, you can correct the problem by using their rise, fall, shift, tilt, and swing controls.
Nikon makes perspective-control lenses that perform some of the functions of a view camera, namely tilt and shift. However, good view cameras and perspective-controls lenses cost significantly more than the D610 camera.
Nikon has given D610 users some image correction capability with the Straighten, Distortion control, and Perspective control functions. We discussed the first two functions earlier in this chapter. Now let’s see how to use Perspective control.
Perspective control allows you to stretch the left, right, top, or bottom of an image to tilt leaning objects so they appear straighter in the corrected image. Figure 6.53, screen 3, shows the yellow pointers (red arrows) you can move to change the perspective of an image by tilting the top toward you or away from you or rotating the image to the left or right. This is a powerful control because it can help give certain images a much better perspective.
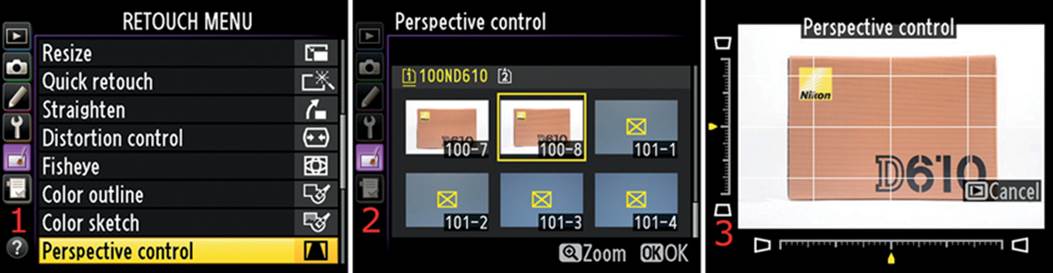
Figure 6.53 – Adjusting an image with Perspective control
Use the following steps to configure Perspective control:
1. Select Perspective control from the Retouch Menu and scroll to the right (figure 6.53, screen 1).
2. Choose an image from the list of thumbnails and press the OK button (figure 6.53, screen 2).
3. You’ll see gridlines for edge comparison and two slider controls that are operated by the Multi selector (figure 6.53, screen 3, red arrows). You can move the yellow pointer on the vertical scale up or down to tilt the top of the image toward you or away from you. Or you can slide the yellow pointer on the horizontal scale to the left or right to turn the edges toward you or away from you.
4. When the image looks the way you want it, press the OK button to save the image, or press the Playback button to cancel.
The images in figure 6.54 show what happens to the subject when you use the vertical slider (red arrows). Notice how the top of the subject leans either toward you or away from you (forward-to-backward tilt) depending on how the slider is positioned.
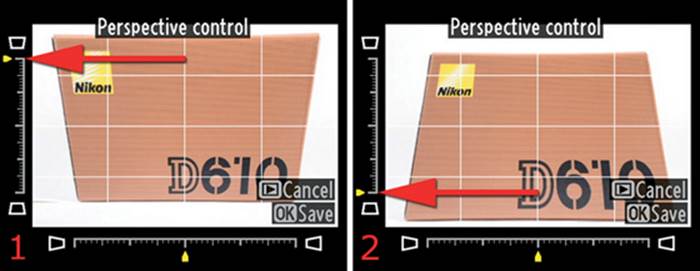
Figure 6.54 – Tilting the top of the image
Figure 6.55 shows how the image swings to the left or right as you move the yellow sliders along the horizontal scale (red arrows). Can you see how powerful this function is for controlling perspective? The camera automatically crops off the top and bottom of the stretched ends to keep the image looking like a normal rectangle, so the final image will be smaller.
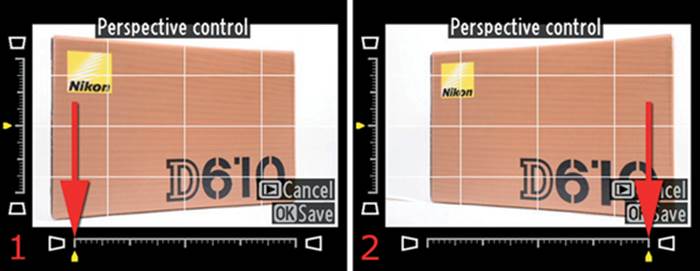
Figure 6.55 – Rotating the sides of the image
Settings Recommendation: Learn to use this powerful function! You now have excellent Perspective control, with no additional lens purchases! Add Straighten for leveling horizons (rotating the image), then Distortion control for removing barrel and pincushion distortion. You have the basics of a graphics program built right into your camera.
Miniature Effect
(User’s Manual – Page 276)
Miniature effect is unusual because it allows you to create a reverse diorama. A diorama is a small 3-D model that looks like the real thing. You may have seen a city diorama, where there are tiny detailed houses and cars and even figures of people. A diorama is often used to make a movie when the cost would be too high to use real scenes.
I call the Miniature effect a reverse diorama because the camera takes an image that you have shot and uses a very narrow band of sharpness with a very shallow depth of field to make it look like a diorama, but it is actually real.
Figure 6.56 is a sample Miniature effect image I took while overlooking a train depot from a bridge over the tracks. It’s best to shoot this type of image from a high vantage point so it looks like a real miniature.
The camera added extra saturation to the image to make the train cars look unreal. Notice that there is a band of sharpness running horizontally across the middle of the image. That very shallow depth of field in a full-sized image makes it look fake. The depth of field is usually that narrow only in closeup and macro shots.
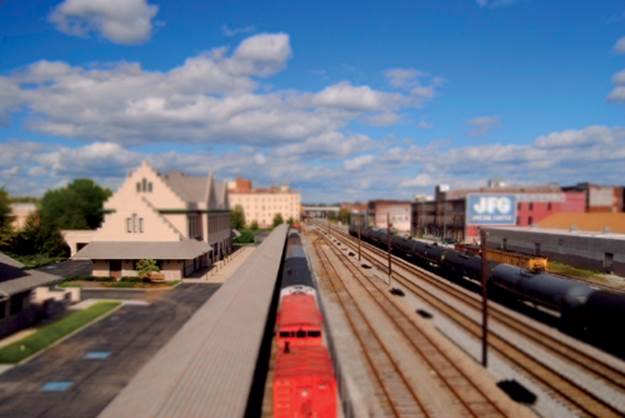
Figure 6.56 – Miniature effect reverse diorama
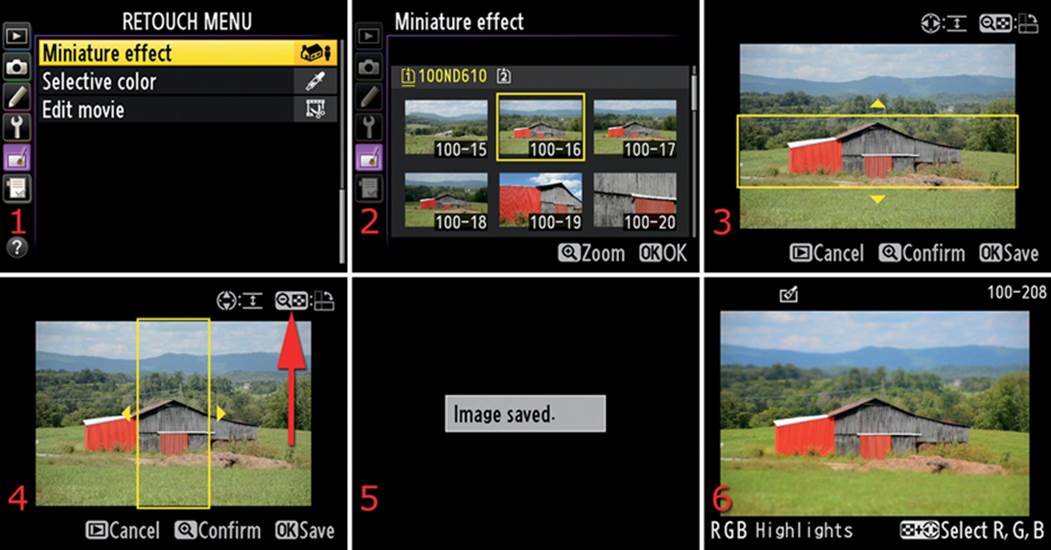
Figure 6.57 – Miniature effect settings
Here are the steps to create your own Miniature effect reverse diorama:
1. Select Miniature effect from the Retouch menu and scroll to the right (figure 6.57, screen 1).
2. Choose an image shot from a high vantage point that would make a good reverse diorama and press the OK button (figure 6.57, screen 2).
3. Notice the narrow yellow rectangle in figure 6.57, screen 3. This band represents a horizontal, movable band of sharpness. You can move it up or down on the screen until you find the optimum place to put the sharpness. Everything in front of and behind the band is blurry. If you are working with a vertical image, the band will be vertical instead of horizontal. To change the band’s orientation, press the Playback zoom out/thumbnails button (figure 6.57, screen 4, red arrow). After you position the band where you want it, press the OK button (Save).
4. You will now see an Image saved screen briefly, then the new Miniature effect image will be displayed on the Monitor (figure 6.57, screens 5 and 6). It is saved with a new file name on your memory card.
Settings Recommendation: You can get good effects when you are looking down on your subject, such as from a bridge, the top of a building, or an airplane. It’s a lot of fun to make these images, although it’s difficult to make one look realistic. Next time you are high above a real scene with lots of detail, try shooting a Miniature effect image for fun.
Selective Color
(User’s Manual – Page 277)
Selective color allows you to create black-and-white still images with selective colors left in. We have all seen pictures of a lovely red rose with only the petals in color while the rest of the image is black-and-white. Well, the Nikon D610 goes a step further and allows you to create black-and-white images with up to three selective colors. Let’s see how to do it.
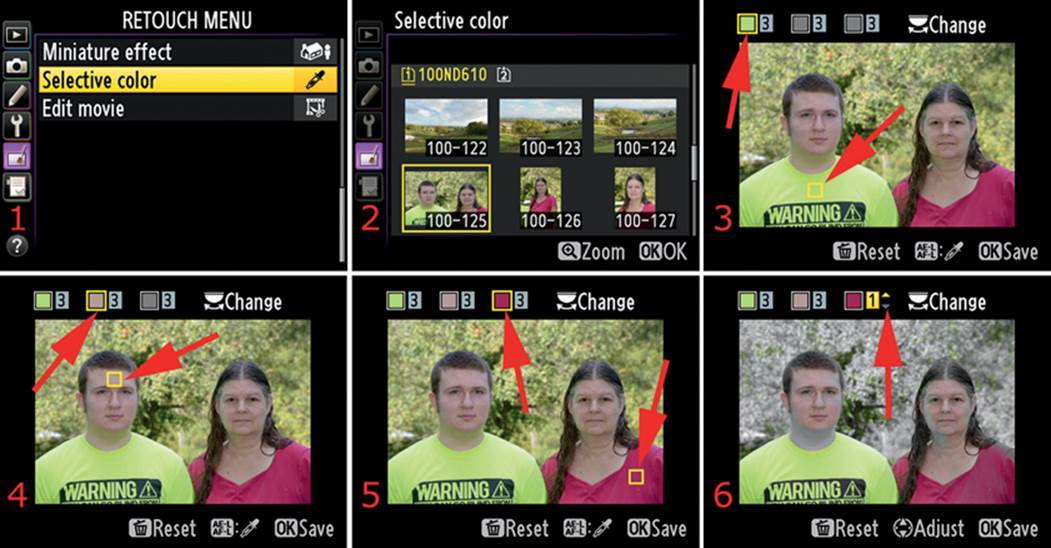
Figure 6.58 – Using Selective color
Use these steps to create black-and-white images with up to three selective colors:
1. Select Selective color from the Retouch Menu and scroll to the right (figure 6.58, screen 1).
2. Choose an image to use as a base and press the OK button (figure 6.58, screen 2).
3. Turn the Main command dial to select one of the color boxes (figure 6.58, screen 3, top red arrow) where you will store the colors you want to retain in your image. Turn the Main command dial multiple times in either direction to make it skip over a color box and move to the next box.
4. Use the Multi selector to scroll the yellow selection box to the location in the image from which you want to choose a color, then press the AE-L/AF-L button to select it (figure 6.58, screen 3, bottom red arrow). You can zoom in with the Playback zoom in button to select a color more precisely from a small section of the subject, and you can zoom back out with the Playback zoom out/thumbnails button. You can see that I chose the color of my son’s shirt for one of the color choices. In figure 6.58, screen 4, you can see that I chose his skin as the second color to keep. I pressed the AE-L/AF-L button to capture the color and store it in the second color box (red arrows). Figure 6.58, screen 5, shows that I chose the color of my wife’s blouse and stored it in the third color box (red arrows).
5. You can adjust the range of colors that will be retained by highlighting the up/down selector next to a color box with the Main command dial and then using the Multi selector to raise or lower the number from 1 to 7 (figure 6.58, screen 6, red arrow). The higher the number, the more colors, similar to the selected color in the color box, will be retained. The interface for moving around the color boxes needs improvement. It is slow and clunky.
6. After you have finished configuring the Selective color system, you can press the OK button to save the image. An hourglass will stay on the screen for a few seconds while the camera removes the colors you have disallowed, and an Image saved screen will appear briefly. The final image will then appear on the Monitor and will be saved under a new file name. Figure 6.58.1 shows before and after images.
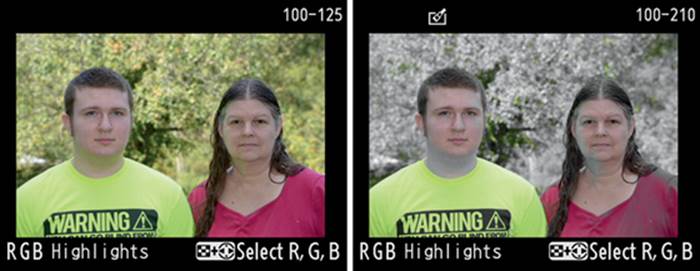
Figure 6.58.1 – Before and after Selective color
Settings Recommendation: Selective color images are a lot of fun. You can shoot images and later remove most of the colors for fine art black-and-white images. Other than the clunky interface surrounding the color boxes, this function is a useful one. You may want to spend a few minutes learning to use it and then see if you can make some art.
Edit Movie
(User’s Manual – Page 69)
Edit movie gives you a two-step process to cut a section out of the middle of a movie created with your D610, or you can remove a beginning or ending segment. In addition, you can save an individual frame as a still image from anywhere in the movie.
There are two individual parts to the process of editing a movie—Choose start point and Choose end point—and you use them one at a time. When you complete one of the start point or end point choices, the camera saves the file as a new movie with a new file name. This tends to create a bunch of smaller movies on your memory card that you’ll need to delete—take care that you don’t delete the wrong one!
There are three parts to Edit movie:
• Choose start point – This allows you to delete frames from the beginning of your movie and choose a new starting point
• Choose end point – This allows you to delete frames from the end of your movie and choose a new ending point
• Save selected frame – You can take a low-resolution snapshot of any frame in the movie
Since Choose start point and Choose end point use exactly the same screens and steps, the two functions are combined in the next section. Do one function, then, if needed, do the other by repeating the steps.
Choose Start Point and Choose End Point
Let’s examine the steps to remove a movie segment:
1. Press the Playback button to display movies and pictures on your Monitor. Scroll back and forth with the Multi selector and find the movie you would like to trim.
2. Press the OK button to start playing the movie (figure 6.59, screen 1). Watch the progress bar in the bottom left corner of the movie until it gets close to the point where you want to trim it (figure 6.59, screen 2, left red arrow), then press the Multi selector to pause the movie (figure 6.59, screen 2, right red arrow). While the movie is playing, you can jump back or ahead by 10 seconds at a time by turning the Main command dial. You can also scroll left or right to examine individual frames. If you use the Main command dial while the movie is playing, it will automatically pause the movie when it jumps 10 seconds. You can start the movie again by pressing the OK button. You can make the movie display faster or slower (2x, 4x, 8x, and 16x) by tapping left or right on the Multi selector while the movie is playing. This can save time when you are dealing with a long movie. Basically, you want to get to the point in the movie where you plan to make the change, then move to the next step.
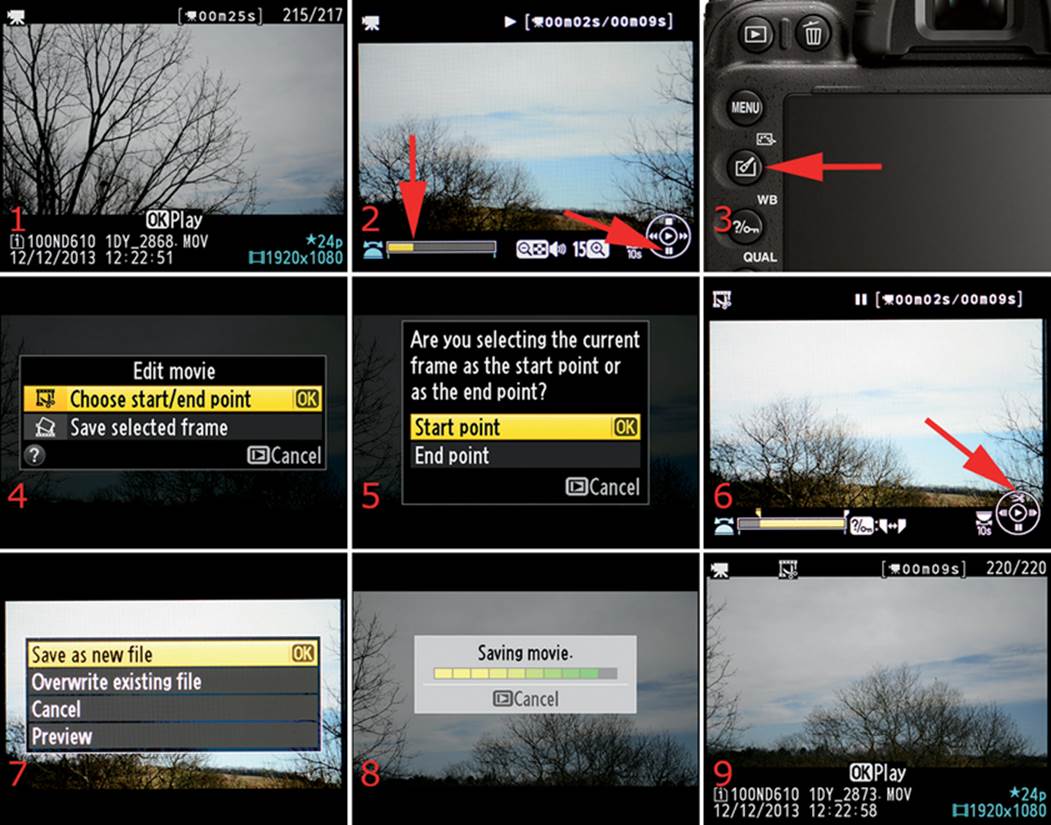
Figure 6.59 – Edit movie
3. With the movie paused, press the Retouch/Picture Control button (figure 6.59, image 3), and the information shown in figure 6.59, screen 4, will appear. Highlight Choose start/end point and press the OK button.
4. Another message will appear, as shown in figure 6.59, screen 5, which gives you the choice of choosing the Start point or End point. Decide whether you are cutting off the beginning of the movie (Start point) or the end of the movie (End point), and press the OK button to execute the command.
5. Press up on the Multi selector (figure 6.59, screen 6, red arrow, which indicates a scissors symbol) and a new window will open and allow you to save the trimmed movie (figure 6.59, screen 7). From this screen you can choose Save as new file, Overwrite existing file (be careful, this destroys the original file), Cancel, or Preview. Cancel is self-explanatory. Preview plays the shortened movie without actually trimming it, and then it jumps back to the screen shown in figure 6.59, screen 7.
6. Press the OK button when you have highlighted your choice. If you selected Save as new file, the camera will save the new trimmed movie under a new file name and display it on the Monitor, ready for playing (figure 6.59, screens 8 and 9).
7. Repeat these steps for trimming the other end of the movie, if you would like to, and select the other choice in step 4.
This process will leave several trimmed versions of the movie on your memory card—the final of which is the fully trimmed version—unless you choose Overwrite existing file. If you decide to use the overwrite method, back up the movie first in case you make a mistake.
Note: Your movie must be at least two seconds long when you’re done or the camera will refuse to cut any more frames; it will give you the terse message Cannot edit movie.
Save Selected Frame
You can save an individual low-resolution frame from anywhere in the movie. The frame size is based on the Shooting Menu > Movie settings > Frame size/frame rate setting:
• A 1920×1080 movie contains single still images of just over 2 MP
• A 1280×720 movie contains single still images of just under 1 MP
Let’s examine how it’s done using the Retouch Menu:
1. Choose Edit movie from the Retouch Menu and scroll to the right (figure 6.60, screen 1).
2. Select Save selected frame and scroll to the right (figure 6.60, screen 2).
3. Choose one of the available movies and press the OK button (figure 6.60, screen 3).
4. Press the OK button to start playing the movie, and when it gets to the point where you want to cut out a frame, press the Multi selector to pause the movie (figure 6.60, screen 4). While the movie is playing, you can press left or right on the Multi selector to move through it a frame at a time until you find your favorite frame. You can jump 10 seconds forward or backward in the movie by rotating the Main command dial. Notice that the icon above the movie in screen 4 looks like a frame being removed from a piece of film (red arrow).
5. Press up on the Multi selector when you have located the frame you want, and a small box will appear that says Proceed? Yes/No (figure 6.60, screen 5). Choose Yes from the menu, and the camera will make a copy of the frame as a separate image. While the selected frame is being saved you will see an hourglass then a screen that says Done.
6. The new image will be displayed on the Monitor (figure 6.60, screen 6). It is in the format of the movie, with a 16:9 ratio, even though it is now a still image. The icon at the top of the screen, which looks like a pair of scissors over a film frame, indicates that the image has been cut out of a movie (figure 6.60, screen 6, red arrow).
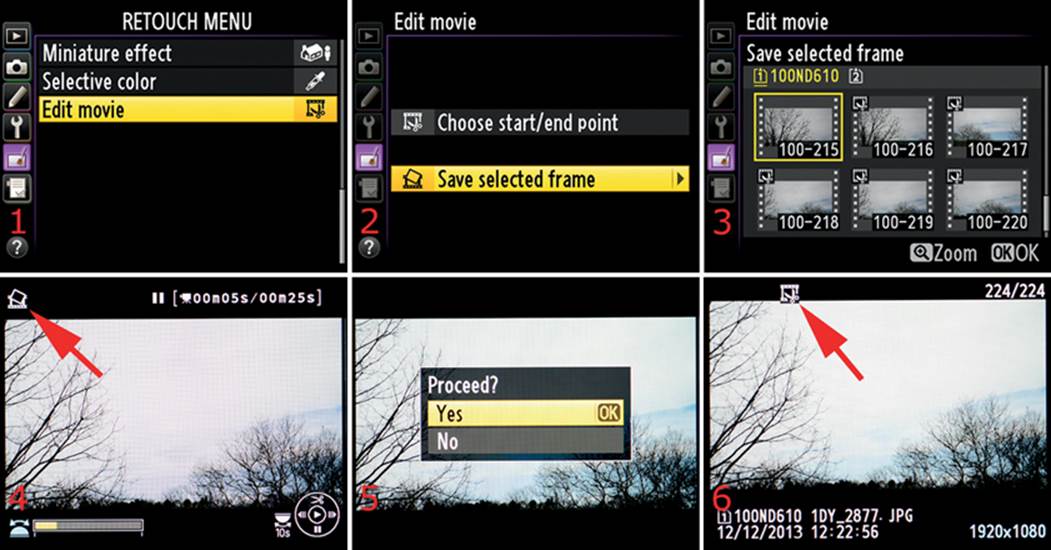
Figure 6.60 – Save selected frame from movie
Settings Recommendation: This series of steps becomes easier when you do it a few times. Practice it once or twice, and you’ll remember it later.
Side-by-Side Comparison
(User’s Manual – Page 279)
Side-by-side comparison allows you to compare an image you’ve retouched with the original source image. Interestingly, this function is not available from the Retouch Menu. You’ll find it on the Playback Retouch Menu, which you access by pressing the OK button when a picture is displayed on the Monitor.
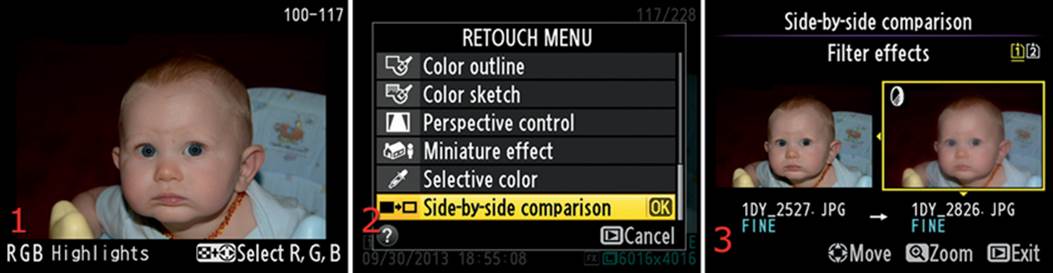
Figure 6.61 – Side-by-side comparison
Here are the steps to compare the original and retouched images side by side on the Monitor:
1. Press the Playback button to bring an image up on the Monitor. Find an original image that you know has been retouched (figure 6.61, screen 1) or any image marked with the retouched symbol. If you try to use an image that has not been retouched, the following steps will fail.
2. Press the OK button to access the Playback Retouch Menu. Scroll all the way to the bottom of the menu, select Side-by-side comparison, and press the OK button (figure 6.61, screen 2).
3. The original image will appear on the left, and one of the retouched versions will appear on the right (figure 6.61, image 3). If you retouched an original image more than once, a yellow arrow will appear above or below the retouched image. This means you can scroll up or down to see the other retouched versions. The retouched picture of the baby in figure 6.61, screen 3, shows the Soft filter effect. There is at least one more retouched image, which can be accessed with the Multi selector, as indicated by the yellow arrow on the bottom of the retouched image.
Settings Recommendation: I often use this function when I want to compare images to which I’ve added a color cast so I can see how they compare to the original. It’s very convenient since you can choose the original image or one of the retouched images and the camera is smart enough to place them in the proper position in the Side-by-side comparison. You can tell an image is retouched by looking for the retouch icon in the upper-left corner of the image when it’s displayed on the Monitor.
Author’s Conclusions
Nikon has given camera users who dislike computers a way to work with their images in-camera. Although the Retouch Menu is not as fully featured as a computer graphics program, it does allow you to do quick and convenient conversions.
At first I didn’t think this group of Retouch Menu functions would be all that useful to me. However, I find myself using them more in the field than I expected. Whether you use them often or not, it’s good to know they are there for emergencies.
Next we’ll move into the final menu system in the camera. It’s called My Menu, and it may become very valuable to you as you learn how it works. It’s a place to put your often-used, favorite settings so you can get to them very quickly. In the next chapter, we’ll see how My Menu and its cousin, Recent Settings, work.
All materials on the site are licensed Creative Commons Attribution-Sharealike 3.0 Unported CC BY-SA 3.0 & GNU Free Documentation License (GFDL)
If you are the copyright holder of any material contained on our site and intend to remove it, please contact our site administrator for approval.
© 2016-2026 All site design rights belong to S.Y.A.