Canon EOS 70D: The Guide to Understanding and Using Your Camera (2014)
Chapter 20. After the Shutter Is Tripped

In-Camera Post-processing
The EOS 70D has the ability to perform significant post-processing of RAW images, saving the result of each as a JPEG image. You can even use the same RAW file multiple times, applying different processing each time, and save a unique JPEG for each of those processing efforts. Note that the camera cannot post-process M-RAW, S-RAW, or existing JPEG images (although, a JPEG image can be downsized).
In-camera post-processing is not available if the camera is in Multiple Exposure mode or in HDR Mode, nor when the camera has a cable plugged into the A/V OUT/DIGITAL port.
To access the post-processing functions, open the Play1 menu and select Raw Image Processing. Only the RAW images from all the folders on the current memory card will be available for display as you scroll the images. Once you have selected the image for post-processing, touch the SET icon on the LCD Monitor or press the SET button. This will open a menu of adjustment options. You can use either the touch feature or the Multi-controller to select the adjustment you want to change, then either rotate the Quick Control Dial to scroll through the available values or press the SET button to open a dedicated screen for setting the option’s value; of course, the touch feature can be used here as well. If there is a small area in the image that you want to visually evaluate prior to or after making adjustments, press the Magnify button or touch the Magnify icon on the LCD Monitor to get an enlargement of a portion of the image; drag your finger over the LCD Monitor, or use the white-bordered box and the white rectangle as navigation guides while using the Multi-controller for scrolling to the desired portion of that image. Though you must touch the Magnify icon on the LCD Monitor or press the Reduce button to get back to the adjustment options, that position is held, allowing you to quickly get back to that same small area to evaluate the most recent changes.
Before saving the results of this post-processing, use the Image Quality option (at the bottom of the two-column list of icons) to select a JPEG Image Quality for the saved file. All the JPEG Image Quality values are available. Near the bottom-right of the two columns of options is an icon showing a bent arrow superimposed on the outline of a sheet of paper; this icon represents the Save option. Select this Save option, then press the SET button. Now, select the OK option and press the SET button. Read the Image Saved information to ensure you have the right file in the correct folder. Press the SET button to return to the original RAW image so that you can create a different JPEG file using different adjustment settings, or to scroll to another RAW file for more post-processing. When you’re through with post-processing, press the MENU button or touch the MENU icon to return to the Play1 menu.
To resize JPEG files, open the Play2 menu and select the Resize option and press SET. Only qualified images (no RAW files and no JPEG S3 images) are available for selection. Swipe your finger across the LCD Monitor or rotate the Quick Control Dial to scroll to the desired image. When you press the SET button or touch the SET icon, a menu of available JPEG image sizes is displayed. Again, touch the appropriate icon, rotate the Quick Control Dial, or press the Multi-controller to select the image size you want, and then press SET. Now you should see a query regarding saving a new file. Select OK and press SET.
I think it’s interesting that with today’s super-fast digital processors and massive amounts of cache and memory, we can find a cool, shady picnic bench and process our pictures while still out in nature. Nonetheless, I do find that the 24-inch monitor on my computer gives me a huge advantage in trying to determine just how much brightness to set or how much change to make in white balance.
Transferring Images to a Computer
Memory Card Reader
Essentially all memory card readers, even those built into a personal computer, use the USB data-transfer architecture; a few use the FireWire (also known as IEEE 1394 and i.LINK) data-transfer architecture. These architectures have evolved over the past few years, during which the original FireWire advantage has been lost to version 3.0 of USB. Most current personal computers come with USB 3.0 as a standard component, and a USB 3.0 adapter card can be added at a reasonable price to most personal computers that don’t have USB 3.0 already. Most of Apple’s current Mac computers come with USB 3.0 ports, and some have FireWire ports as well. Note that adding an adapter card to a Mac can be a challenge, if it’s even possible.
FireWire 800, the current version of FireWire, is capable of 800 Mb/s (megabits per second), or 100 MB/s (megabytes per second). By comparison, the original version of USB (1.0) offered a data rate of 1.5 Mb/s; version 1.1 upped that data rate to 12 Mb/s; version 2.0, attempting to compete with FireWire 400 (at 400 Mb/s), was capable of 480 Mb/s; and the specifications for version 3.0 state a data rate of 5,000 Mb/s (that’s 625 MB/s), though no devices are currently capable of exploiting that potential. Lexar is currently selling a USB 3.0 memory card reader, which the company claims is capable of up to 500 MB/s. At the time of writing this book, the fastest memory cards appear to be 1000X CF memory cards, which are capable of 150 MB/s, so that becomes the point of constraint in a USB 3.0 configuration. With a USB 2.0 (60 MB/s) configuration, or even a FireWire 800 (100 MB/s) configuration, the data-transfer architecture is the constraint for fast memory cards.
If you need to acquire a new memory card reader, I highly recommend buying a USB 3.0–capable reader that has one slot for CF memory cards and another slot for SD memory cards. It is USB 2.0–compatible, which allows you to use this overly capable reader on your current personal computer, but lets you move it to a USB 3.0 port when one becomes available, either by adding an adapter card to the current computer, or—aha!—buying a new computer. Just be sure that new computer provides USB 3.0 support.
Another purchase consideration: Be sure the memory card reader is capable of handling the particular memory card you have, as well as those you intend to buy. On a 5D series or a 1D series Canon DSLR, if you currently use something like a 133x CF memory card, most any CF-capable memory card reader will work; however, if you plan on adding a new super-fast UDMA 7-capable CF memory card to handle high-resolution video, your current memory card reader is probably not up to the task. Each new generation of SD memory cards has required a corresponding new generation of memory card reader, though each subsequent new generation of SD memory card reader has been able to read the memory cards from the preceding generations.
USB Cable
The EOS 70D package includes a USB cable that can be used to transfer images from the camera’s memory card to a personal computer (some folks express concern regarding potential damage to the memory card and would rather never remove their memory card from the camera). Canon describes this as direct image transfer. There are also some utilities in the accompanying Canon software package that allow you to perform minimal customization of certain camera facilities, and these rely on the USB cable for computer-to-camera communication.
There are a couple of considerations, though, in favor of not using the USB cable for image transfer:
• Unless you are using the optional (and not too convenient) AC adapter, the image transfer is driven by the camera’s battery. Be sure to check the charge level before heading out for the next shoot.
• The very best data transfer rate will be limited to the camera’s internal USB chip, which is generally USB version 2.0. Most professional and serious amateur photographers find that they get much faster image transfers by removing the memory card from the camera and using a good memory card reader. An unintended benefit of this approach is that the camera does not wind up in some precarious position while tethered to the computer.
Wireless Data Transfer
The EOS 70D’s built-in Wi-Fi capability can be used for transferring images from the camera to another similarly capable camera, Canon’s Image Gateway, a PictBridge-capable Wi-Fi printer, and (by way of the EOS Utility) your computer.
Eye-Fi makes SD memory cards with the ability to transfer images directly from the camera to your iPhone, iPad, many Android devices, or your available wireless-connected personal computer, using the standard Wi-Fi protocols. They are intended to continuously transfer images to your computer, so their memory capacities tend to be 16 GB or less. Some variants also provide geotagging capabilities, but this is accomplished with a technology known as Wi-Fi Positioning System (WPS), not GPS, so precision is usually in yards, not feet. However, it’s certainly adequate for determining whether your image was captured in Boston or Philadelphia. Note that an Eye-Fi memory card cannot be used when the EOS 70D’s Wi-Fi feature is enabled.
Canon makes no claims regarding data transfer rates, but does caution that transfers over Wi-Fi can take longer than transfers over the USB cable. There are three currently dominant versions of the Wi-Fi implementation: IEEE 802.11b, which can transfer data at rates up to 11 Mb/s; IEEE 802.11g, which can transfer data at rates up to 54 Mb/s; and IEEE 802.11n, which can transfer data at rates up to 150 Mb/s; all significantly less than USB 2.0’s rate of 480 Mb/s.
Storage Considerations
Short-term:
Thumb drives. The capacity of these little USB devices is often sufficient to store several dozen or even a few hundred images. Though their physical capacity limits their usefulness for long-term storage, they are a practical and convenient means of storing images for the short-term, especially for the transfer of images to another computer, such as at a camera-club show. Be aware that few of these thumb drives are rated in terms of data-transfer rates, so the actual speed of operation can vary significantly.
CDs and DVDs. For the short-term (months-long) storage needs associated with transferring data for archiving, these media work well, and they can certainly take a significant amount of abuse in USPS or courier handling with no loss of data. I work with a museum that interviews military veterans and stores the video footage on DVDs. Copies of these DVDs are shipped to the veteran and to the Library of Congress. In the six years I’ve been involved, we have yet to experience a media problem.
When you’re paying $0.30 to $4.00 per disc for CD or DVD media, you are getting media that use an extremely thin layer of aluminum as the base for recording. The aluminum will start to corrode after a while, which will render the disk unreadable. You can expect such a recording to last about seven years, depending on temperatures, moisture levels, atmospheric pollutants, and other factors. Many purists use only media based on gold rather than aluminum, but pay a significant premium for such media. Delkin is one source of gold-based DVDs, and they claim their DVDs to be 100-year storage devices. Be careful: there are media available that look like gold, but are just anodized aluminum, and their descriptions usually include terms like extended life.
Internal hard drive. By default, this is the location where we tend to save our images when they’re transferred from the camera, as well as where we save the images we’ve created in post-processing. Today’s internal disk drives are fast enough and have sufficient capacity that most other forms of storage simply can’t compete. In my computers, I have at least two disk drives, one for the bootable operating system and all the programs I’ve installed, and the other reserved just for data. A 2 TB (terabyte, or thousand GB) hard drive costs roughly $150, and is getting cheaper. If you can store 75,000 images on that disk, the storage cost per image becomes $0.002. That’s a bit more than the cost of storing them on DVDs, but the hard drive gives you essentially instantaneous access to those images, and it would require about 200 DVDs to contain that many images.
Long-term:
A major concern regarding long-term storage is the durability of the storage medium.
CDs. Recordable Compact Discs (CD-Rs) will hold as much as 700 MB of data, which is not that much in a world of 25-MB images. The worst part is that these discs are designed to be written with the low-powered lasers in our personal computers, so their life expectancy averages about seven years. I find it difficult to recommend these media, and encourage you to consider moving any images already stored on CD-R media to some other form of backup.
CD-RW media are intended to be written and read by the same CD drive. They are fine for backup, but only if you will have the same CD drive that created the disk available for reading during the recovery.
DVDs. Here, again, longevity—the period of time during which you should expect to be able to read a previously written disc—becomes a concern. DVD-R and DVD+R discs, the two types used for storing data by using the DVD drive in a personal computer, are experiencing a useful life expectancy of two to 15 years, still not a very impressive amount of time. Again, if you have DVDs with valuable images stored on them, you may want to consider another backup format.
External hard drives. All the facts stated about internal hard drives are also true of external hard drives. The significant additional factor is the type of cabling by which the external drive is attached to the personal computer. The most popular connection used today is the USB or FireWire connection. In fact, some external hard drive enclosures offer both, typically USB 2.0 and FireWire 800. Be aware that neither will provide a data transfer rate close to what is available to an internal hard drive. There are some external hard drive enclosures designed to attach to your local network router, which then makes that external drive available to anyone on the local network. The newest connection technology, and the fastest, is by way of an external enclosure designed to connect to a personal computer via an external Serial Advanced Technology Attachment (eSATA) cable. As with USB 3.0, you may need to add an adapter card to your computer to provide the eSATA port, though a few newer personal computers are now providing one, typically on the back panel. Apple is providing Thunderbolt, a new data-transfer technology, on some of their newest Macs. The Thunderbolt-compatible hard drives currently available are capable of 125 MB/s. As a comparison, drives attached by USB 2.0 can transfer data at a rate of 60 MB/s, FireWire 800 at a rate of 100 MB/s, wirelessly over your 802.11g local network at almost 7 MB/s, or hard-wired on your local network at speeds up to 125 MB/s, but the current eSATA data transfer rate is 375 MB/s. Only USB 3.0 has the ability to provide a faster data-transfer rate, with some new-to-market external hard drives claiming 625 MB/s.
Cloud storage and other “real-time but off-site” facilities. Personally, I don’t use any of these facilities. I just don’t feel comfortable letting some profit-motivated organization assume control over my collection of images. They would work fine as a backup to my backup, though. The major advantage they offer is that the images are stored off-site. Most of us feel pretty comfortable having our images backed up on a DVD, hard drive, or whatever we tend to have on our desk, but that backup becomes useless if the office or house it’s stored in suffers catastrophic damage due to tornado, hurricane, flood, fire, theft, riot, malicious break-in, or other disastrous event.
There have been some noteworthy examples of companies suddenly shutting down, with all customer-stored data lost. When Kodak’s Gallery service closed down in mid-2012, people were hoping that their images on Kodak’s Gallery made a successful transition to Shutterfly. For display and sharing of images, some of these sites are quite good, but study the fine print closely to see what—if any—ownership rights you are surrendering by using their services. As an example, this was part of the terms for the now-defunct Kodak Gallery: “To maintain free storage, you need to meet the following minimum purchase requirement within 90 days of first uploading images, and then every 12 months thereafter... If you do not purchase the required amount as set forth above from us for a period of 12 months, we may delete the images stored in your account.” When Yahoo! acquired Flickr and consolidated the existing Yahoo! Photos site into it, the company told Yahoo! Photos users, “If users don’t tell Yahoo! what to do with the photos before the site closes, their photos will be deleted and will no longer be accessible.” This would be problematic if, for example, you were in the upper reaches of the Amazon River for six months.
There’s a similar concern about photos you upload to Facebook and other social media sites: per their terms and conditions, most will not allow anyone other than the registered user to close the account and download the accumulated photos, e-mail, etc., even if the registered user has died, and you are the mother, wife, daughter, estate administrator, or any other court-appointed authority. Years of correspondence and images are untouchable and subject to destruction.
In-Computer Post-processing
There are very good image-editing programs available, many of which include library management. Canon’s Digital Photo Professional (DPP) software, which is included on a CD along with the camera, is certainly good, and doesn’t require spending more money to acquire it.
The de facto standard is Adobe Photoshop, though some photographers are finding that Adobe Lightroom or Adobe Photoshop Elements meet their needs; all three products support ACR. Through the Adobe Camera Raw (ACR) software component, Adobe attempts to provide updates that allow its software products to support the RAW files from new cameras as soon as they are released on the market. Without a compatible version of ACR, Adobe products cannot process a camera’s RAW files. Of course, you can always open your Canon-captured RAW files in Canon’s Digital Photo Professional (DPP) software, make whatever edits you wish to perform in DPP, save the file as a high-quality TIFF file, then open that TIFF file in just about any version of Photoshop to continue with your editing. Adobe usually provides support for a new camera’s RAW files in their free DNG converter, which will read the RAW format and save the image in the DNG format, which is supported by essentially all Adobe products and many other software providers. The nicest part of this approach is that you don’t have to immediately update all your expensive software in order to process the RAW files from your new camera.
Printing
Some folks are satisfied to have their photos available as an attachment to an e-mail, an upload to a website, or an integrated part of a web-based newsletter. Many place excellent photo images in the hands of stock-photo brokers. But most of us, especially professional photographers, want to see our images committed to paper. There are certainly photographers who choose to deal with professional printers, giving themselves more time to spend behind the camera or post-processing their images, but many of us do our own printing. For on-site printing, there are two major categories to consider: stand-alone printers and computer-connected printers.
Stand-alone printers: Some photographers simply want to dump the contents of their memory card to paper, saving the time and hassle of dealing with a big-box store’s printing service. Several printer manufacturers build small printers specifically for that kind of job. Printers such as those in the Epson PictureMate series can run as stand-alone devices, without any connection to a personal computer. Some models can utilize a rechargeable battery, allowing you to generate prints just about anywhere. Such machines let the user plug a memory card directly into it, select the images to be printed, and wait while the prints slide out of the printer. The images are sharp and colorful, and the paper/ink combos are capable of lasting 100 years in a glass-covered frame displayed out of direct sunlight without fading, or as long as 200 years in an album. But the printers are slow and moderately expensive, the print sizes are limited (often 4” × 6” is the only size option), and the paper and ink are rather specific, so you won’t be finding many discounts or sales.
Computer-connected printers: The majority of photographers who do their own printing purchase personal computer-connected printers. These vary from the $100 black-cartridge-plus-color-cartridge printers that will handle photo paper up to letter-size, to some very sophisticated, multi-foot-wide roll-paper printers capable of using any of a dozen or more ink cartridges, and costing thousands of dollars. Fine art photographers love these printers. The most common photo printers range from the very capable $200 all-purpose printers up to the photo-specific $500–$800 printers. The $200 printers provide separate cartridges for black, yellow, cyan, and magenta inks; are capable of handling letter-size photo paper; and often have memory card readers built into the printer, allowing direct printing without going through the computer. The $500–$800 class of printers is generally capable of handling Tabloid (11” × 17”) or Super-B (13” × 19”) paper in a variety of different weights and surface finishes. These printers typically come with at least two different black inks and five colors, allowing for much improved color accuracy in the final prints, and many have built-in card readers allowing you to print without a computer (though I would presume you’re not trying to print fine art without a bit of in-computer post-processing).
The folks at Red River Paper have given me permission to share the following table with you:
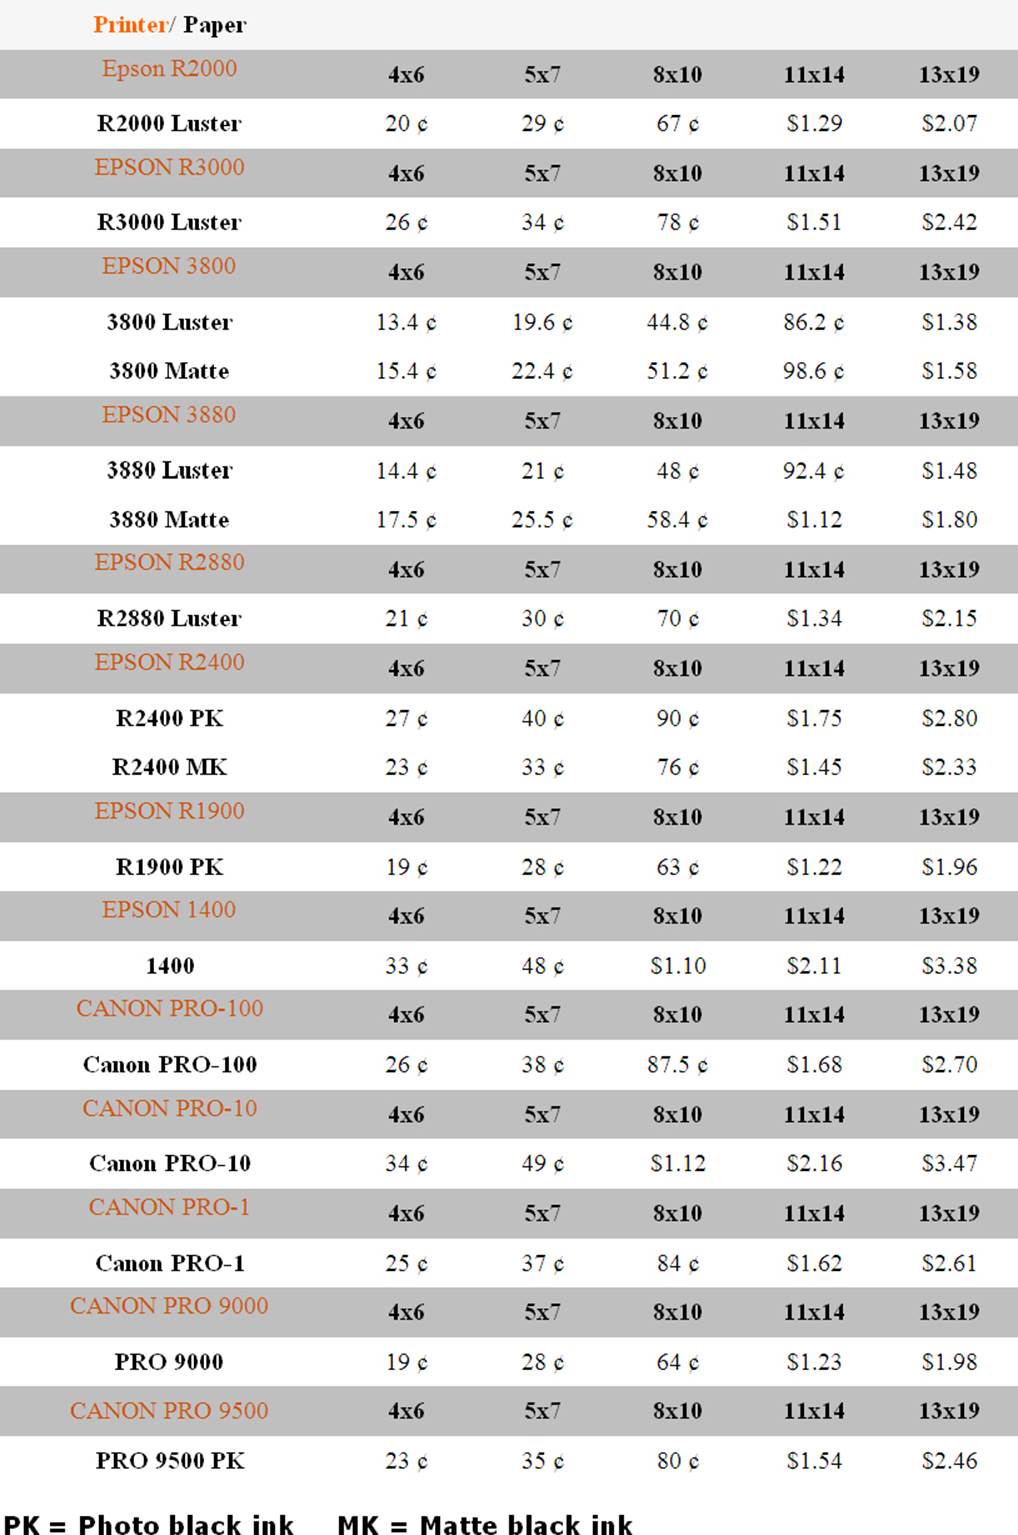
This table shows a number of the current models of Epson and Canon photo printers, and the cost of ink (just the ink) for various paper sizes and, in some cases, various paper types, such as matte versus luster. If you want more details on this data, check out the Red River Paper website:
http://www.redrivercatalog.com/cost-of-inkjet-printing.html
Of course, paper costs will vary according to weight, finish, composition, and size.
Last, let’s take a look at PictBridge. PictBridge is a standard created by the Camera & Imaging Products Association (CIPA) in 2003. It’s not an open-source standard, but several camera and printer manufacturers, including Canon, have acquired authorization to implement it on their equipment. This is another approach to printing directly from the camera to a printer, no computer required.

In the simplest of terms, to use PictBridge, you must have both a camera and a printer that conform to the PictBridge standard (the EOS 70D is one). Note that the camera’s Wi-Fi feature must be disabled to allow the A/V OUT/DIGITAL port to become active. Turn on the printer. A USB cable is plugged into the printer’s Type-A USB port on the front of the printer (not the USB port that is typically on the back of the printer and used to connect the printer to the computer) and into the USB Type Mini-B A/V OUT/DIGITAL port on the camera; a USB interface cable is supplied with the camera for this type of connection. After powering on the camera, press the Playback button to access the images currently on the memory card, and use the Quick Control Dial or the touch feature to scroll through those images until you locate the image to be printed. To confirm that the camera and the printer are properly connected and communicating with each other, look in the upper-left corner of the image and make sure that there is a PictBridge logo with a SET icon in the opposite corner. With the desired image located and the PictBridge logo displayed, touch the SET icon or press the SET button to open the setup screen. On this screen, I find that using the touch feature is the fastest way to select an option, open the option, and set a value, though the Multi-controller can be used as well. The three options under the small display of the image are accessed by selecting the Paper Settings option, pressing SET, then navigating across a panel for each option. When your setup is complete, select the Print option and press SET.
Remember where the power is coming from to drive the image to the printer! Be sure you have sufficient charge on the battery, or use the Canon ACK-E6 AC adapter kit.
All materials on the site are licensed Creative Commons Attribution-Sharealike 3.0 Unported CC BY-SA 3.0 & GNU Free Documentation License (GFDL)
If you are the copyright holder of any material contained on our site and intend to remove it, please contact our site administrator for approval.
© 2016-2026 All site design rights belong to S.Y.A.