Game Programming Algorithms and Techniques: A Platform-Agnostic Approach (2014)
Chapter 14. Sample Game: Tower Defense for PC/Mac
The tower defense genre has been around for many years, but its popularity really took off in custom maps for games such as StarCraft and Warcraft III. It’s such a popular genre that today there are many tower defense games on nearly every gaming platform.
This chapter takes a look at a sample implementation of a futuristic tower defense game called __Defense. It is fully rendered in 3D, though the gameplay occurs on a 2D plane. The code for this game was written in C# using the XNA/MonoGame frameworks.
Overview
Before you read this chapter, you should visit the book’s website and download the source code for this game. The link to the source code, along with instructions on how to build it, can be found at http://gamealgorithms.net/source-code/defense/. Once you’ve got the game running and have played it, you’re ready to continue on. But before we dive into the code analysis, let’s take a brief look at the different technologies used to make __Defense (pictured in Figure 14.1).
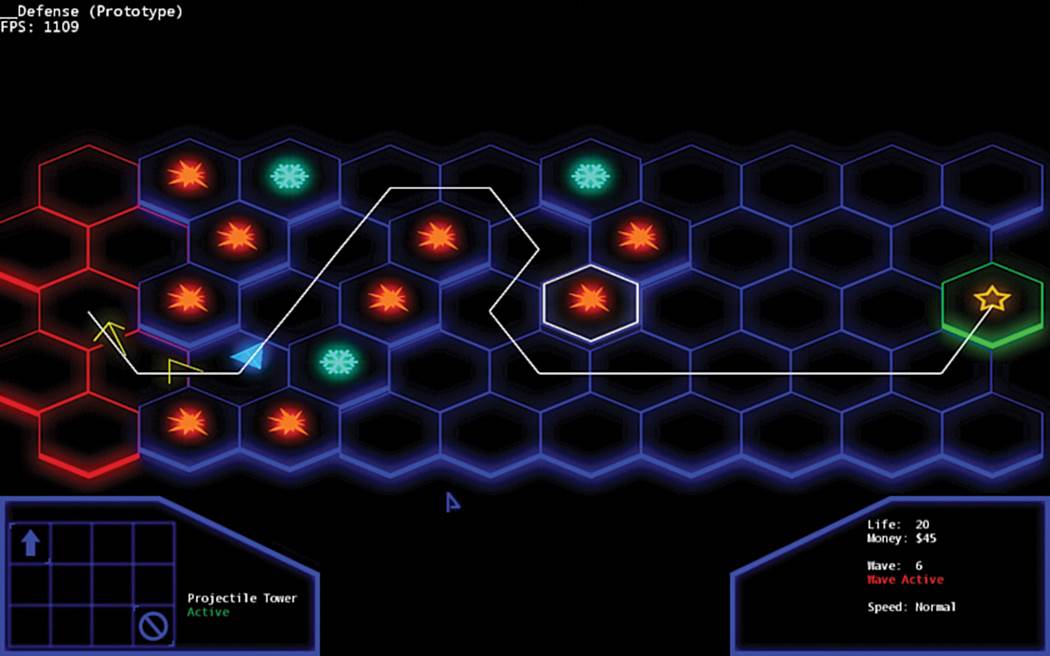
Figure 14.1 __Defense in action.
C#
Microsoft developed C# (pronounced C sharp) in order to have a language that was similar to C++ or Java, but enabled rapid development of Windows applications on the .NET framework. Like Java, C# is not compiled directly into native code, but into a byte code that can then run on a virtual machine. At first, there was only a virtual machine that could run on PCs, but now there are open-source implementations of the C# virtual machine on many different platforms.
Though there initially were many similarities between C# and Java, over time the languages have diverged pretty dramatically. But because it is syntactically very much related to both C++ and Java, the language is still relatively easy to pick up for someone experienced in either of these languages. Over time, C# has become the language of choice for rapidly developing GUI apps for Windows. Because of this and other reasons, C# is a very popular choice for game development tools—engines such as the newer versions of Frostbite (used for the Battlefield series) use C# heavily in their toolchain.
Most of the language constructs in C# should be immediately familiar to a C++ programmer, but a couple of aspects are worth mentioning. First of all, there (usually) is no memory management in C#. All basic types and structs are always allocated on the stack, and all classes are always allocated on the heap. The language is garbage collected, so you don’t have to worry about leaking memory—once an object is no longer referenced, it will be deleted at some point in the future. An “unmanaged” mode in C# does allow for lower-level access, but it’s not recommended unless it’s for a very specific reason.
There is one unique feature of the language that’s used quite a bit in the code for this game. Normal rules of class encapsulation state that all data in a class should be private and only be accessible via getter or setter functions. So in C++, a 2D vector class might be implemented like this:
class Vector2
{
public:
int GetX() { return x; }
void SetX(int value) { x = value; }
int GetY() { return y; }
void SetY(int value) { y = value; }
private:
int x,y;
};
Then if you had an instance of a Vector2, in order to set the x-value to 10, you would call the SetX function like so:
Vector2 v;
v.SetX(10);
The annoying thing about getter and setter functions, though, is that they are typically quite verbose. To solve this, C# added properties, which are basically getter and setter functions, but the fact that they are functions is hidden from the code that uses them. Properties are accessed syntactically as if they were variables, but they still have all the protection that creating getter/setter functions can provide. Therefore, the preceding class in C# could be expressed as follows:
class Vector2
{
private int x, y;
public int X
{
get { return x; }
set { x = value; }
}
// Same for Y property
...
}
Then the code using the Vector2 would look like this:
Vector2 v = new Vector();
v.X = 10; // Automatically calls get property on X
The neat thing about a property is it follows the syntax of a normal variable, even though it secretly isn’t one. There are quite a few other unique features in C#, as well, but the majority of them do not really see use in the code for this game. When going through the code, if you find yourself struggling with C#-isms, you can find many references online for learning C# coming from a C++ or Java background.
XNA
XNA is a 2D and 3D game library for C# that was created by Microsoft for the development of games that work on the PC, Xbox 360, and Windows Phone 7. PC development is completely free, but in order to develop for the Xbox 360, there is a $100/year subscription (though students can get one year free at http://www.dreamspark.com/). However, paying the fee also allows you to potentially release your game on the Xbox Live Indie Games store. There have been some major commercial successes that used the XNA framework. One of the most popular is the indie gameBastion, which launched on the Xbox 360 in 2011.
I personally think XNA is a great framework for first learning how to program games (especially 3D ones). It handles the more tedious aspects of programming a game—such as creating a window, initializing the graphics library, and most importantly, loading in art files. In XNA, writing code that can load a 3D model, initialize the camera/projection matrices, and then render the model can be done in only a handful of lines. That’s because XNA has built-in support for loading a large number of media files, including textures, models, sounds, and even certain types of videos.
Although it certainly might be easier to prototype a 3D game in a full engine such as Unity or UDK, the problem with such engines is that they do most of the programming heavy lifting for you. For instance, if you want to use pathfinding in one of those engines, you can use the built-in pathfinding and never have to implement A* once. But in XNA, if you want to have pathfinding, you have to implement it yourself, which means you will have to understand the algorithm well.
Unfortunately, Microsoft has decided to abandon XNA, and they no longer will be providing updates to the framework. But even though XNA has been orphaned by Microsoft, the framework still lives on in MonoGame.
MonoGame
MonoGame is an open-source and cross-platform implementation of the XNA framework. It uses all of the same class and namespace names that XNA does, so it really is a very quick process to convert an XNA game to MonoGame. In the case of __Defense, it took maybe 15 minutes to get the XNA project to work in MonoGame. The first two versions of MonoGame only supported 2D games, but as of version 3.0 (released in March 2013), the framework now supports most of the 3D functionality, as well.
What’s great about MonoGame is that because it’s written in a cross-platform manner, it works on a large number of platforms. At the time of writing, it runs on Windows, Windows 8 Metro, Mac, Linux, iOS, and Android (though the mobile versions are not free). The aforementionedBastion was ported from XNA to MonoGame, and that’s how it was released on so many additional platforms, including Mac, Linux, iOS, and even the Chrome Web Store. In the future, it may even be possible to develop Xbox One games using MonoGame, depending on how Microsoft implements their system for development on retail units.
One important aspect of the XNA framework that hasn’t quite yet been fully implemented by MonoGame is the ability to convert assets from their original format to the custom format that XNA/MonoGame uses. So in order to prepare assets for use in MonoGame, you have to build them using XNA and then copy those files into the appropriate directory for the MonoGame project. But the MonoGame developers are actively working on a content pipeline for MonoGame, so by the time you’re reading this, it may no longer be an issue. But for now, if you want to change any of the models or textures for this game, you have to build the assets in the XNA solution before it will work in the MonoGame ones.
Code Analysis
Compared to the sample game in the last chapter, there’s a lot more code to go through for __Defense. But that makes sense because the mechanics and interface for this game are far more involved than Ship Attack. If you try to just jump in and go through the files without reading this section, it may be difficult to grasp it all. The best approach is to consult this section while perusing through the code.
Settings
Normally, it’s best if settings are stored in external files for ease of editing (as in Chapter 11, “Scripting Languages and Data Formats”). Because this game is relatively simple, it felt a bit unnecessary to write the code for parsing in settings from a file. However, I didn’t want to just have all the parameters hard-coded all over the place, so I ended up consolidating most of them into three source files.
Balance.cs has all of the parameters that affect the balance of the game. So parameters such as the number of waves, number of enemies, health of enemies, and anything that adjusts the difficulty of the game are stored in Balance.cs. Any settings that don’t particularly affect the balance of the game (such as whether the game is full screen and the camera speed) are in GlobalDefines.cs. Finally, DebugDefines.cs is mostly unused, but has a few parameters related to debugging the game.
Singleton
A singleton is a class that’s globally accessible and has only one instance in the entire program. It’s one of the most commonly used design patterns and often one of the first classes to implement in a new engine. Although you could try to implement a singleton using a global class, that’s typically not the best way to do so. For this game’s code, the singleton implementation is in Patterns/Singleton.cs.
The way Singleton works is it’s a templated class that has a static instance of the templated type, and a static Get function that returns the static instance. It sounds a little complicated, but the end result is that in order for a class to be a singleton, all it must do is inherit from Singletonlike this:
public class Localization : Patterns.Singleton<Localization>
That makes the Localization class a singleton that can be globally accessible anywhere via the Get function, as shown here:
Localization.Get().Text("ui_victory");
Several classes in this game are singletons, including GraphicsManager, InputManager, PhysicsManager, SoundManager, and GameState. It might seem like the camera would also be a good candidate for a singleton. However, the camera isn’t a singleton because if the game were a split-screen game, there could potentially be multiple cameras. In order to try to keep the code flexible, avoiding assumptions like this that may not be true for every game is typically a good idea.
Game Class
Game1.cs has the main game class, but it really doesn’t have very much code. Initialize is called when the game is first loaded, and it simply instantiates some of the singletons. Update and Draw are called every frame, and they just call Update and Draw on the appropriate singletons. So overall, there really is not much happening in this file.
One small thing worth noting, though, is the following code snippet from Update:
if (fDeltaTime > 0.1f)
{
fDeltaTime = 0.1f;
}
This forces the minimum frame rate to be 10 FPS. The reason for this is if the game is paused in the debugger, when it’s unpaused the elapsed time might be several seconds. By limiting the minimum FPS to 10, it makes sure that there’s never an elapsed time that’s so long that the behavior of the game becomes unstable.
Game State
The overall state of the game is controlled by GameState (in GameState.cs), which is why it’s the largest file in the game. It’s a state machine, but because the main menu and pause state have so little behavior, almost all of the code in GameState is for controlling the overall gameplay. Because so much of the code is for one particular state, I did not use the state design pattern (as in Chapter 9, “Artificial Intelligence”). But if a particular game has a lot of different states (such as different game modes, for instance), it probably would be a good idea to refactor this to use the design pattern instead.
Anything related to the overall state of the game, such as the amount of money, the health, the time until the next wave, and so on, are also stored in GameState. So the majority of the member variables in GameState are very game specific, but there are some that aren’t. One is the linked list of all of the active game objects in the world. All new game objects must go through the SpawnGameObject function in GameState, as that’s what adds it to the game world. Then, in UpdateGameplay, all of the game objects are updated provided that the game is not paused.
There are a couple of wrinkles worth mentioning in UpdateGameplay. First of all, it doesn’t actually iterate on the game object linked list, but on a copy of the game object linked list. This is to allow for the fact that some game objects might need to remove game objects (including themselves) during the update. In C#, the foreach does not allow for modification of the container during the loop, which is why the copy is made. Although this may seem very inefficient, keep in mind that classes are always passed by reference in C#. So copying the list is just doing a shallow copy of pointer data, which isn’t really that computationally expensive. The other notable code in this function is that the delta time that UpdateGameplay receives is not always the delta time that is passed to all of the game objects. This is what allows the player to change the speed of the game using the +/- keys.
GameState also has an instance of the Camera class that it keeps track of. Another important member variable in this class is the UI stack, which is a stack of all the currently active user interface screens. The UI system will be discussed in further detail later in this chapter.
Game Objects
The base game object class is in Objects/GameObject.cs. In __Defense, all game objects are both drawable and updatable, so there isn’t a complex hierarchy of interfaces to implement for different categories of game objects. The world transform matrix is built from a vector for position, a float for scale, and a quaternion for the rotation, as discussed in Chapter 4, “3D Graphics.” All game objects have a bounding sphere, and any game objects that also want to have an AABB (such as the Tiles) can set the m_bUseAABB Boolean to true in their constructor.
The Tower class (Objects/Tower.cs) inherits from GameObject and has all the behavior specific to towers. Most notably, it has functions for building and upgrading towers, as well as changing the texture depending on whether or not the tower is active. Because the game currently has two types of towers, it makes sense that there are two children of Tower: ProjectileTower and SlowTower. The custom behavior for each of these towers is more or less implemented in its Update functions.
The Tile class that inherits from GameObject really doesn’t have much functionality—it just provides for being able to attach a Tower onto a Tile. It may seem like overkill to have the Tile as a separate game object, but this was done so that the height of the tiles can dynamically change. This still would have been possible even if the tiles weren’t game objects, but it definitely was a simpler implementation to make them a subclass of GameObject. The children class of Tile (TileRed and TileGreen) were intended to have different functionality than the baseTile, but they don’t really anymore (except red tiles can’t be built on).
Projectiles are spawned by ProjectileTower, and all they do is travel toward the enemies and deal damage when they get to them. The movement is done with a lerp (discussed in Chapter 3, “Linear Algebra for Games”), and they just slowly get closer and closer to the enemy’s position. Originally, the collision between the projectile and the enemy was done using an instantaneous bounding sphere check (like in Chapter 7, “Physics”). But the problem with this was that the higher level enemies had such huge bounding spheres that the projectile would almost instantly collide and disappear. So to make the game more challenging, the code was changed so that irrespective of the enemy size, the projectile has to make it to the center of the enemy to deal damage.
Both towers use functions that iterate through all the enemies in the world. In the case of the ProjectileTower, it finds the closest enemy, whereas the SlowTower finds all the enemies within range. Both of these functions use brute-force algorithms to determine which enemies to affect. One way to solve this issue would be through the use of a partitioning algorithm such as a quadtree, which was mentioned in Chapter 7. But implementing such an algorithm is beyond the scope of this book, so for simplicity the code here sticks to the brute-force system. However, if__Defense were to be a commercial game, we likely would want to eliminate the brute-force algorithm for performance reasons.
The Enemy game object has some custom behavior that allows it to move along a given path through the world. It has access to a linked list of nodes representing the path that’s generated by the Pathfinder. In the Update function, it uses linear interpolation to move between two nodes; once it reaches a node, it then continues to the next node on the path. The facing of the enemy is computed using quaternions in the SetDirection function, and a couple of assorted functions allow for enemies being snared (as in Figure 14.2) or killed.
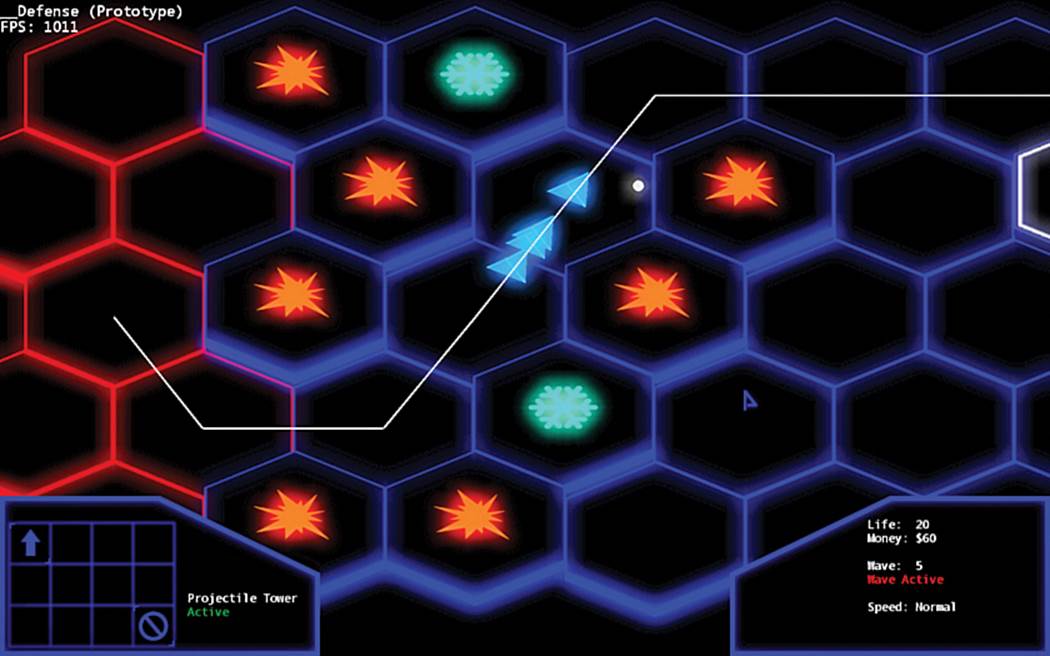
Figure 14.2 Enemies in blue are snared.
Level
The level data is all processed in Level.cs. Right now, the level layout is hard-coded in the TileData array that’s in the LoadLevel function. This is definitely not ideal, but it would have been an unnecessary complexity for this game to actually load in the data from a file. The rest of theLoadLevel function basically loops through the array and places the tiles in the correct spots. Because the tiles are hexagons, the calculations for the center position are a bit more complex than they would be for square tiles. There is one other function here, called Intersects, that will be discussed when we cover the physics of the game.
Timer
The Timer class (in Utils/Timer.cs) is a utility class that allows for registration of functions that get called after a period of time. Because each game object has an instance of a Timer class, it becomes a handy way to have delayed behavior. Rather than needing to add many floating point variables to track how much time is remaining to call a particular function, you can simply add a timer, like so:
m_Timer.AddTimer("HideError", duration, ClearErrorMessage, false);
The first parameter for the AddTimer function is just a unique name for the timer, the second is how long until the timer fires, the third is the name of the function to call, and the last parameter is whether or not the timer is looping. For example, it’s possible to set up a function to be called once per second using the Timer class.
Pathfinding
Pathfinding (in the appropriately named Pathfinder.cs) is implemented using the A* algorithm (which is discussed in Chapter 9). Because enemies always spawn from the same location, the pathfinding code does not recalculate the path for every enemy. Instead, the Pathfinder has a global path that it saves as the optimal path for new enemies to take. This optimal path is shown in game as the white line segments.
In tower defense, it’s important to not allow the player to fully block off the path of the enemies. If there were no path, the enemies would just get stuck as soon as they spawned, and the game would not be challenging in the slightest. To solve this problem, before a new tower is built,GameState checks with the Pathfinder to make sure that the new tower will not make the path unsolvable. If the path would become unsolvable, the build request is denied and the game shows an appropriate error message to the player. If the path is solved, the game builds the tower and sets the global path to the new path. Figure 14.3 shows a location where tower placement would be denied because it fully blocks the path.
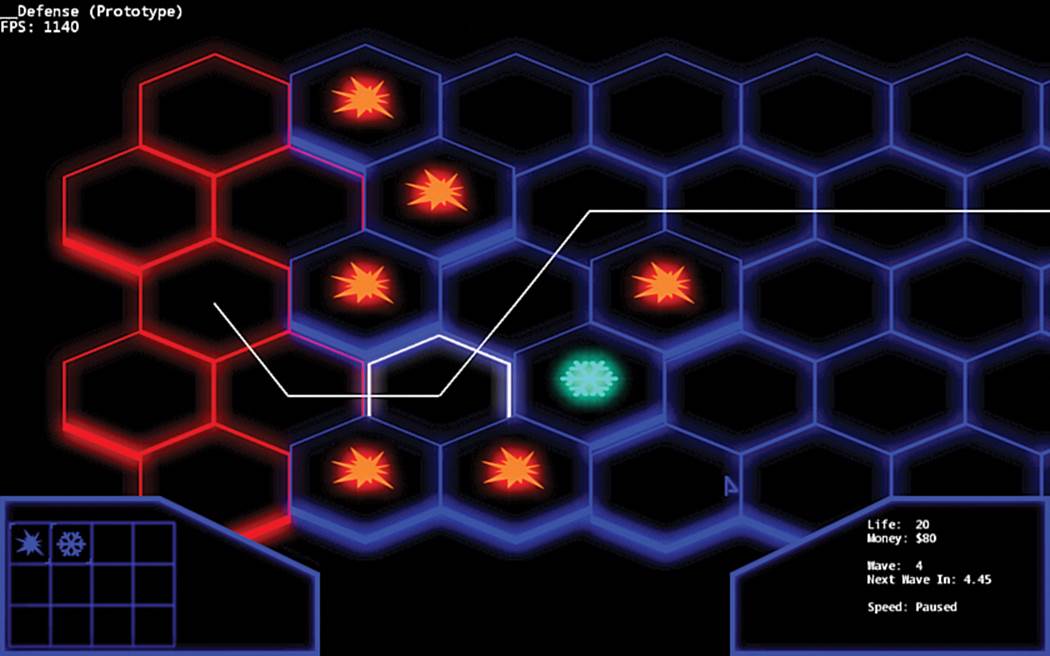
Figure 14.3 The game won’t allow building a tower on the selected tile (outlined in white) because it blocks the path.
If the tower location is valid, the global path will change. But this new tower will potentially invalidate the path of any enemy that’s active at the time. In order to fix this issue, the ComputeAStar function can also be called on an individual enemy. So when the global path changes due to a new tower, any active enemies will recompute their new best path. It is possible that some enemies might end up fully blocked by the tower being built, but that won’t trivialize the entire game, so the system doesn’t worry about it. It turns out it’s actually possible to get the game into an unwinnable state if you box in an enemy so that it’s only in range of snare towers and can never die, but you really have to try to cause this bug to occur.
If you look at ComputeAStar closely, you’ll notice that it actually searches for the path from the goal node to the start node. That’s because if the path were computed the other way, the result would be a linked list of nodes from the end goal back to the start goal, which isn’t what the enemies need. So to eliminate the need to reverse the path, it’s instead computed backward.
Camera and Projection
The game uses an orthographic projection, which was covered in Chapter 4. This means that there is no sense of depth because objects further away from the camera are not smaller. As for the camera (in Camera.cs), it’s fairly simple in this game. There really is not much functionality beyond the ability to pan the camera around the level. In order to pan, both the eye position and the target position of the camera are changed by the same amount, which is passed to the camera via the AddToPan function. The camera can also zoom in and out if the mouse scroll wheel is used. Finally, there’s also some code for animating the camera to a specific location, though it’s currently not in use.
This game also uses mouse picking (covered in Chapter 8, “Cameras”) in order to enable the player to click and select a tile. Even though picking is a camera-related algorithm, the code for this is in InputManager.CalculateMouseRay. In order to perform picking, you need to know both the position of the mouse in screen space as well as the camera matrix. So the choice was to either pass in the position of the mouse to the camera or have the input manager access the camera matrix. Because the drawing code also needs the camera matrix, and the camera matrix was already globally accessible through GameState, the picking code ended up in InputManager.
Input
Everything related to the keyboard and mouse input is in InputManager.cs. The keyboard binding system is very similar to the “more complex system” discussed in Chapter 5, “Input.” In the InitializeBindings function, an abstract action such as Pan_Left is bound to a specific key and a specific state of that key (either just pressed, just released, or held).
Then every frame, the UpdateKeyboard function is called, which makes a linked list of all the actions that are active on that particular frame. This list is first passed to the UI, which can process any actions it cares about. The remaining actions are then sent to GameState for processing. Right now, the only actions GameState processes are the bindings related to panning because it has access to the Camera class.
The mouse is handled separately from the keyboard (in UpdateMouse), but with the same idea. A mouse click is first sent to the UI (to see if a button was clicked), and then if the UI does not care about the click, it’s sent to the GameState. The GameState checks the mouse clicks to select the appropriate Tile when one is clicked. Because it’s also possible to pan with the mouse (instead of using the keyboard), UpdateMouse also does some checks to see if the mouse is on the edge of the screen, which signifies a pan must occur.
Physics
Physics is only really used in this game for the purpose of collision detection. Due to this, all the PhysicsManager does is generate a model space bounding sphere or bounding box for a particular model. Because the model space bounding data will never change for the same model, it caches it in a sorted list. So every time a particular mesh (such as “Miner”) is requested, it checks to see if it already previously computed the bounding sphere or box. This way, every time an enemy spawns, there’s no need to recalculate the model space bounds.
In terms of actual collision detection, it’s really only used to check the picking ray against all of the tiles in the world. XNA provides built-in Ray, BoundingSphere, and BoundingBox (AABB) classes. All of these classes can check for intersections with each other, so I did not have to implement any of the intersection tests that were covered in Chapter 7. The intersection between the picking ray and the tiles occurs in the Level.Intersects function. This function basically creates a list of all the tiles that intersect with the ray and then selects the tile that’s closest to the start position of the ray.
Localization
As mentioned in Chapter 10, “User Interfaces,” it’s typically not a good idea to hard-code text strings that are displayed onscreen because it makes it more complex to translate the game to other languages. For this game, all text strings that are displayed onscreen (other than the debug FPS)are stored in the Languages/en_us.xml file. If you open up the file, you’ll see the format is relatively simple, with the data for each entry stored inside <text> tags, like this:
<text id='ui_err_money'>You don't have enough money.</text>
This string can then be grabbed by its ID in code:
Localization.Get().Text("ui_err_money")
The code for the Localization class is not terribly complex. On load, it parses in the XML and then populates a dictionary with the key/value pairs. The Text function then just performs a lookup into the dictionary. With this system, it would be relatively easy to translate the game to another language by loading in a different XML file.
Graphics
The GraphicsManager is responsible for most of the rendering logic. When it’s first initialized, if the game is set to full-screen mode, it determines the current desktop resolution and sets the game’s resolution to that. Otherwise, it uses the resolution that’s specified in GlobalDefines. But the most important function of the GraphicsManager class is to handle rendering of all the game objects.
A game object can specify in its constructor which draw order group it’s in. There are three possibilities: background, default, and foreground. Each draw order group has its own list in GraphicsManager, so the game objects are added to the appropriate list when they are added to the world. The purpose of the different groups is to allow for specific objects to always be in front of or behind the objects that are in the default group (which is nearly all objects).
Drawing normally is done with z-buffering, which if you remember from Chapter 4 means that it only draws a particular pixel if there’s nothing in front of it that has already been drawn. However, the draw function in GraphicsManager only enables z-buffering for the default group. First, z-buffering is disabled and the background group is drawn. This group can be used for a skybox, foe example, which is a cube that encompasses the entire world and has a texture of the sky (or space). Then z-buffering is enabled and the default group, which contains the vast majority of game objects, is drawn. Finally, z-buffering is disabled once more and the foreground objects are drawn. This group allows for objects such as a first-person model to be drawn without worrying about clipping into other objects.
There’s some other functionality in GraphicsManager, but it’s not as critical. You’ll find a few small helper functions for things such as drawing 2D and 3D lines as well as drawing a filled rectangle. Finally, the bloom effect on the XNA version causes the tiles to glow. The effect isimplemented as per a Microsoft sample (http://xbox.create.msdn.com/en-US/education/catalog/sample/bloom). However, the details of how the bloom effect and multiple render targets work is beyond the scope of this book, and it’s not too important anyway because it’s just a graphical enhancement.
Sound
Because this game only has a handful of 2D sounds, the SoundManager class is extraordinarily simple. All it does is load in WAV files into a dictionary, where the key is the cue name, and the value is the wave file. Then sounds can be played anywhere with the PlaySoundCue function:
SoundManager.Get().PlaySoundCue("Alarm");
This isn’t a fabulous implementation, however. Most notably, sounds will not pause when the game is paused. Because of this, you would never want to actually release a game with a sound system like the one here. But it works on a very basic level.
User Interface
The UI system ended up being rather complex for this game, most notably because of the tooltips. But before we look at the tooltip code, let’s look at the basic layout of the UI system. There is a UIScreen class (in UI/UIScreen.cs) that represents a particular menu or HUD. So, for example, the main menu is in UIMainMenu while the HUD that’s shown during gameplay is in UIGameplay. The system supports multiple UIScreens visible at once, which is handled by the UI stack in GameState. So, for example, the UIGameplay and UIPauseMenu screens are both visible at the same time when the game is paused. Only the top-most screen on the stack receives any input, however, which prevents actions such as clicking on buttons in the build grid while the game is paused.
UIScreens can have any number of buttons (UI/Button.cs) on them. Every frame, the active UIScreen receives the location of the mouse cursor and can highlight a button as appropriate. If a click occurs, it will then call whatever function is registered to be called when that particularButton is clicked. Buttons can be initialized in three different ways: They can be text-only buttons, image-only buttons, or buttons that are “hot zones” (meaning they show tooltips, but can’t be clicked). For text-only and image-only buttons, the constructor requires specifying a callback function that gets called when the button is clicked. Right now, the menu system does not support keyboard navigation because it was designed for a PC with a mouse, though it’s certainly a feature that could be added.
Although the UIScreen system isn’t that complicated, the tooltip system ended up being much more complex. There were a few reasons it ended up that way. First of all, by default, text rendering in XNA cannot wrap to a specific width. You give it a string and it’ll simply draw that string until the text ends. For a tooltip, it’s important that it wraps around nicely to a specific maximum width. Second, I wanted to be able to arbitrarily change the font and color in the middle of a text string to help certain information pop out on the tooltips. This is also something that XNA does not provide by default. To solve these two problems, I ended up using the extremely useful MarkupTextEngine, which was released by “astroboid” under the Microsoft Permissive License (http://astroboid.com/2011/06/markup-text-rendering-in-xna.html). It worked marvelously to solve those two problems, though the code for it might be a bit difficult to understand.
That wasn’t the end of the tooltip complexity, though. I also wanted to be able to dynamically change the text inside of tooltips. I didn’t want the tooltip text to just be fixed (as in “This costs $500”) because then whenever any values were changed in Balance.cs, the tooltip text would have to change also. Instead, I wanted to be able to replace placeholders in the tooltips with actual values. So instead of “This costs $500,” the tooltip string would be “This costs ${0},” with the {0} getting replaced with the correct value. And to even make it more complex, I wanted to be able to colorize things depending on the situation. So if a building costs $500, but you don’t have $500, I wanted the text to be red so it pops out that there isn’t enough money to purchase the building. The end result of the tooltip system is shown in Figure 14.4.
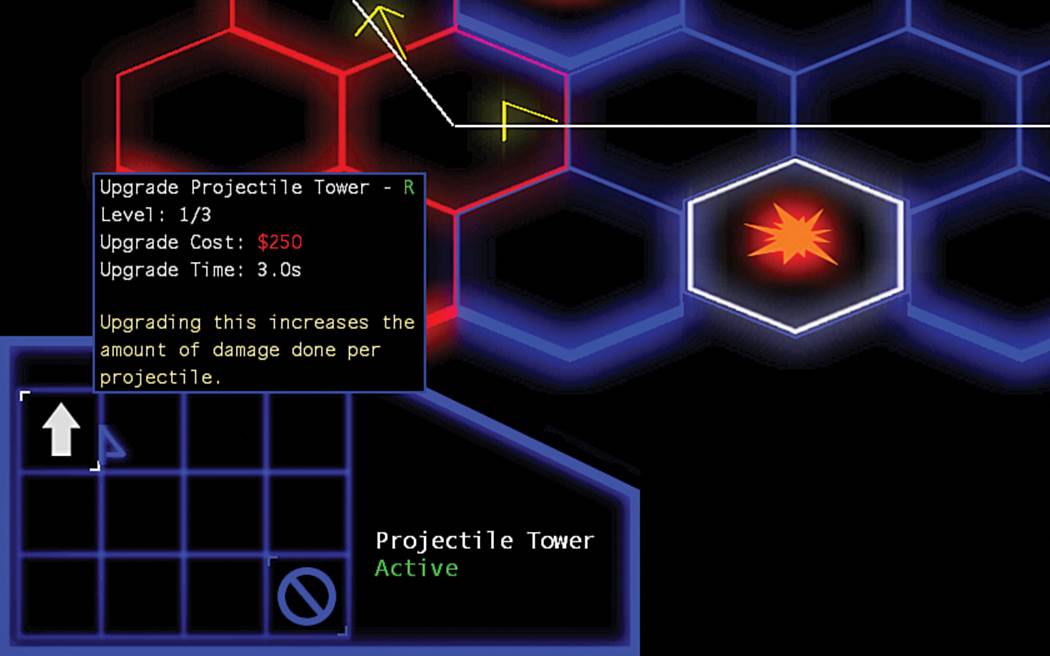
Figure 14.4 A tooltip in action.
This is where the Tooltip class comes into play. To initialize a tooltip, you provide the key to the localized string, the screen space position of where the bottom-left corner of the tooltip should be, and a list of TipData. The TipData list is what gives the Tooltip class someinformation on what exactly it needs to replace the placeholder values with. This is so it knows that, for example, {0} refers to the monetary cost of the tower. This information is what all of the CreateTowerBuildCost and similar functions generate.
Where it gets a bit messy is in the InitializeGrid function in UIGameplay. The grid is the series of buttons in the bottom-left part of the HUD, which are the buttons that allow you to build all the different towers and such. Because there are multiple grid buttons, and some complex tooltips for said grid buttons, the function to create the tooltips ends up being pretty long. If the game had a lot more grid buttons, it would be very impractical to initialize the buttons in this manner. This ideally would be something that’s also stored in an external data file. But for this game, it was simpler to implement in the manner it was done.
Exercises
Now that we’ve reviewed the code for __Defense, here are some ideas on what could be done to improve the game.
1. Add More Waves/Rebalance the Game
One idea would be to add more waves and make the game more challenging. All of the data related to the game’s balance is in Balance.cs. The information about the number and difficulty of waves is stored in the Waves array. Adding more waves is just a matter of adding more elements to the array and increasing the TotalWaves variable. To change the difficulty or add more levels of enemies, modify the Enemies array.
2. Add a New Tower
Add a new “lightning” tower that chains between multiple targets, decreasing the damage as it jumps between chains. To get a new tower functioning on a basic level will require touching several files. First, you need to add a new LightningTower class and add an entry to theeTowerType enum. The chain effect requires finding the nearest enemy within range (much like the ProjectileTower does), but once it finds the first enemy, it needs to continue and find the next enemy in the chain. Then, GameState.TryBuild needs to be updated to handle the new tower type. Finally, the grid needs to be updated in UIGameplay so that it’s possible to build the new tower (it would also be a good idea to add a keybind for this, as well).
Once the new tower is functional, there are a few things left to make it pretty. You’ll want to add new custom tooltip text in en_us.xml, and also create a couple of new textures. Take a look at the textures in XNAContent/Buildings and XNAContent/UI to get an idea of what the textures should look like. You need to reference these new textures in LightingTower and UIGameplay, respectively. Remember that if you do make new textures, only the XNA project will actually build them. So even if you want to use them in a MonoGame project, they first must be built in the XNA one.
3. Create an External Balance File
Although the Balance.cs file works, it would be better if all of that data was stored in an external file. Create a JSON file that stores all of the balance information, and then load it in when the game is loaded. To serialize/deserialize the JSON, the most popular library in C# is JSON.NET. Once you get this working, you could move even more of the data (such as level data or the button grid) into separate JSON files.
Summary
The sample game in this chapter was a culmination of many of the algorithms and techniques discussed in the earlier chapters. A game object model was implemented (as in Chapter 1, “Game Programming Overview”), and the objects construct their world transform matrix from a scale, rotation, and translation (as in Chapter 4). Objects have AABBs (from Chapter 7) and are collided against with a ray for mouse picking (as in Chapter 8). A* pathfinding is used to determine the paths of the enemies as they travel toward the home base (as in Chapter 9). Finally, both the input and UI systems implemented for __Defense are very similar to the systems discussed in Chapters 5 and 10, respectively. Hopefully, the discussion in this chapter has given you a sense of how you can make a more complex game now that you’ve completed all the chapters of this book.