Android Application Development: A Beginner's Tutorial (2015)
Chapter 27. Content Providers
A content provider is an Android component used for encapsulating data that is to be shared with other applications. How the actual data is stored, be it in a relational database or a file or a mix of both, is not important. What is important is that a content provider offers a standard way of accessing data in other applications.
This chapter discusses the content provider and explains how to access data in a provider using a content resolver.
Overview
You already learned how to store files and data in a relational database. If your data needs to be shared with other applications, you need a content provider that encapsulates the stored data. Do not use a content provider if your data is to be consumed only by other components in the same application.
To create a content provider, you extend the android.content.ContentProvider class. This class offers CRUD methods, namely methods for creating, retrieving, updating and deleting data. Then, the subclass of ContentProvider has to be registered in the application manifest using theprovider element, located under <application>. This class is discussed further in the next section.
Once a content provider is registered, components under the same application can access it, but not other applications. To offer the data to other applications, you must declare a read permission and a write permission. Alternatively, you can declare one permission for both read and write. Here is an example:
<provider
android:name=".provider.ElectricCarContentProvider"
android:authorities="com.example.contentproviderdemo1"
android:enabled="true"
android:exported="true"
android:readPermission="com.example.permission.READ_DATA"
android:writePermission="com.example.permission.WRITE_DATA">
</provider>
In addition, you need to use the permission element to re-declare the permissions in your manifest:
<permission
android:name="com.example.permission.READ_DATA"
android:protectionLevel="normal"/>
<permission
android:name="com.example.permission.WRITE_DATA"
android:protectionLevel="normal"/>
<application ... />
The permission names can be anything as long as it does not conflict with the existing ones. As such, it is a good idea to include your domain as part of your permission names.
Data in a content provider is referenced by a unique URI. The consumers of a content provider must know this URI in order to access the content provider’s data.
The application containing a content provider does not need to be running for its data to be accessed.
Android comes with a number of default content providers, such as Calendar, Contacts, WordDictionary, etc. To access a content provider, you use the android.content.ContentResolver object that you can retrieve by calling Context.getContentResolver(). Among methods in theContentResolver class are methods with identical names as the CRUD methods in the ContentProvider class. Calling one of these methods on the ContentResolver invokes the identically-named method in the target ContentProvider.
An application needing access to data in a content provider must declare that it intends to use the data, so the user installing the app is aware of what data will be exposed to the application. The consuming application must use the uses-permission element in its manifest. Here is an example.
<uses-permission
android:name="com.example.permission.READ_DATA"/>
<uses-permission
android:name="com.example.permission.WRITE_DATA"/>
The ContentProvider Class
This section introduces the CRUD methods in the ContentProvider class. Primarily, you need to know how to access the underlying data when overriding these methods. You can store the data in any format, but, as you will soon find out, it makes perfect sense to store the data in a relational database.
The data in a content provider is identified by URIs having this format:
content://authority/table
The authority serves as an Android internal name and should be your domain name is reverse. Right after it is the table name.
To refer to a single data item, you use this format:
content://authority/table/index
For example, suppose the authority is com.example.provider and the data is stored in a relational database table named customers, the first row is identified by this URI:
content://com.example.provider/customers/1
The rest of the section discusses ContentProvider methods for accessing and manipulating the underlying data.
The query Method
To access the underlying data, use the query method. Here is its signature:
public abstract android.database.Cursor query (android.net.Uri uri,
java.lang.String[] projection, java.lang.String selection,
java.lang.String[] selectionArgs,
java.lang.String sortOrder)
uri is the URI identifying the data. The projection is an array containing names of the columns to be included. The selection defines which data items to select and the selectionArgs contains arguments for the selection. Finally, the sortOrder defines the column based on which the data is to be sorted.
The insert Method
The insert method is called to add a data item. The signature of this method is as follows.
public abstract android.net.Uri insert(android.net.Uri uri,
ContentValues values)
You pass column key/value pairs in a ContentValues object to this method. Use the put methods of ContentValues to add a key/value pair.
The update Method
You use this method to update a data item or a set of data items. The signature of the method allows you to pass new values in a ContentValues as well as a selection to determine which data items will be affected. Here is the signature of update.
public abstract int update(android.net.Uri uri,
ContentValues values, java.lang.String selection,
java.lang.String[] selectionArgs)
The update method returns the number of data items affected.
The delete Method
The delete method deletes a data item or a set of data items. You can pass a selection and selection arguments to tell the content provider which data items should be deleted. Here is the signature of delete.
public abstract int delete(android.net.Uri uri,
java.lang.String selection,
java.lang.String[] selectionArgs)
The delete method returns the number of records deleted.
Creating A Content Provider
The ContentProviderDemo1 project is an application that contains a provider and three activities. The app is for green car enthusiasts and allows the user to manage electric cars. The underlying data is stored in a SQLite database. As the activities are in the same application as the provider, they do not need special permissions to access the data. The ContentResolverDemo1 project in the next section demonstrates how to access the content provider from a different application.
As always, I will start by showing the application manifest, which is given in Listing 27.1.
Listing 27.1: The manifest of ContentProviderDemo1
<?xml version="1.0" encoding="utf-8"?>
<manifest xmlns:android="http://schemas.android.com/apk/res/android"
package="com.example.contentproviderdemo1" >
<permission
android:name="com.example.permission.READ_ELECTRIC_CARS"
android:protectionLevel="normal"/>
<permission
android:name="com.example.permission.WRITE_ELECTRIC_CARS"
android:protectionLevel="normal"/>
<application
android:allowBackup="true"
android:icon="@drawable/ic_launcher"
android:label="@string/app_name"
android:theme="@style/AppTheme" >
<activity
android:name=".activity.MainActivity"
android:label="@string/app_name" >
<intent-filter>
<action android:name="android.intent.action.MAIN" />
<category
android:name="android.intent.category.LAUNCHER" />
</intent-filter>
</activity>
<activity
android:name=".activity.AddElectricCarActivity"
android:parentActivityName=".activity.MainActivity"
android:label="@string/app_name" >
</activity>
<activity
android:name=".activity.ShowElectricCarActivity"
android:parentActivityName=".activity.MainActivity"
android:label="@string/app_name" >
</activity>
<provider
android:name=".provider.ElectricCarContentProvider"
android:authorities="com.example.contentproviderdemo1"
android:enabled="true"
android:exported="true"
android:readPermission="com.example.permission.
READ_ELECTRIC_CARS"
android:writePermission="com.example.permission.
WRITE_ELECTRIC_CARS">
</provider>
</application>
</manifest>
Pay special attention to the lines in bold. Under <application> there are declarations of three activities and a provider. There are also two permission elements that define the permissions that external applications need to request to access the content provider.
The content provider, represented by the ElectricCarContentProvider class, is shown in Listing 27.2. Note the static final CONTENT_URI that defines the URI for the provider. Note also that ElectricCarContentProvider uses a database manager that takes care of data access and manipulation.
Listing 27.2: The content provider
package com.example.contentproviderdemo1.provider;
import android.content.ContentProvider;
import android.content.ContentUris;
import android.content.ContentValues;
import android.database.Cursor;
import android.net.Uri;
import android.util.Log;
public class ElectricCarContentProvider extends ContentProvider {
public static final Uri CONTENT_URI =
Uri.parse("content://com.example.contentproviderdemo1"
+ "/electric_cars");
public ElectricCarContentProvider() {
}
@Override
public int delete(Uri uri, String selection,
String[] selectionArgs) {
String id = uri.getPathSegments().get(1);
return dbMgr.deleteElectricCar(id);
}
@Override
public String getType(Uri uri) {
throw new UnsupportedOperationException("Not implemented");
}
@Override
public Uri insert(Uri uri, ContentValues values) {
long id = getDatabaseManager().addElectricCar(values);
return ContentUris.withAppendedId(CONTENT_URI, id);
}
@Override
public boolean onCreate() {
// initialize content provider on startup
// for this example, nothing to do
return true;
}
@Override
public Cursor query(Uri uri, String[] projection,
String selection,
String[] selectionArgs,
String sortOrder) {
if (uri.equals(CONTENT_URI)) {
return getDatabaseManager()
.getElectricCarsCursor(projection, selection,
selectionArgs, sortOrder);
} else {
return null;
}
}
@Override
public int update(Uri uri, ContentValues values,
String selection,
String[] selectionArgs) {
String id = uri.getPathSegments().get(1);
Log.d("provider", "update in CP. uri:" + uri);
DatabaseManager databaseManager = getDatabaseManager();
String make = values.getAsString("make");
String model = values.getAsString("model");
return databaseManager.updateElectricCar(id, make, model);
}
private DatabaseManager dbMgr;
private DatabaseManager getDatabaseManager() {
if (dbMgr == null) {
dbMgr = new DatabaseManager(getContext());
}
return dbMgr;
}
}
ElectricCarContentProvider extends ContentProvider and overrides all its abstract methods for CRUD operations. At the end of the class there is a definition of DatabaseManager and a method named getDatabaseManager that returns a DatabaseManager. The DatabaseManager is presented in Listing 27.3. It is similar to the DatabaseManager class discussed in Chapter 18, “Working with the Database” which explains how it works in detail. Please refer to this chapter if you have forgotten how to work with relational databases.
Listing 27.3: The database manager
package com.example.contentproviderdemo1.provider;
import android.content.ContentValues;
import android.content.Context;
import android.database.Cursor;
import android.database.sqlite.SQLiteDatabase;
import android.database.sqlite.SQLiteOpenHelper;
import android.util.Log;
public class DatabaseManager extends SQLiteOpenHelper {
public static final String TABLE_NAME = "electric_cars";
public static final String ID_FIELD = "_id";
public static final String MAKE_FIELD = "make";
public static final String MODEL_FIELD = "model";
public DatabaseManager(Context context) {
super(context,
/*db name=*/ "vehicles_db",
/*cursorFactory=*/ null,
/*db version=*/1);
}
@Override
public void onCreate(SQLiteDatabase db) {
String sql = "CREATE TABLE " + TABLE_NAME
+ " (" + ID_FIELD + " INTEGER, "
+ MAKE_FIELD + " TEXT,"
+ MODEL_FIELD + " TEXT,"
+ " PRIMARY KEY (" + ID_FIELD + "));";
db.execSQL(sql);
}
@Override
public void onUpgrade(SQLiteDatabase db, int arg1,
int arg2) {
db.execSQL("DROP TABLE IF EXISTS " + TABLE_NAME);
// re-create the table
onCreate(db);
}
public long addElectricCar(ContentValues values) {
Log.d("db", "addElectricCar");
SQLiteDatabase db = this.getWritableDatabase();
return db.insert(TABLE_NAME, null, values);
}
// Obtains single ElectricCar
ContentValues getElectricCar(long id) {
SQLiteDatabase db = this.getReadableDatabase();
Cursor cursor = db.query(TABLE_NAME, new String[] {
ID_FIELD, MAKE_FIELD, MODEL_FIELD},
ID_FIELD + "=?",
new String[] { String.valueOf(id) }, null,
null, null, null);
if (cursor != null) {
cursor.moveToFirst();
ContentValues values = new ContentValues();
values.put("id", cursor.getLong(0));
values.put("make", cursor.getString(1));
values.put("model", cursor.getString(2));
return values;
}
return null;
}
public Cursor getElectricCarsCursor(String[] projection,
String selection,
String[] selectionArgs, String sortOrder) {
SQLiteDatabase db = this.getReadableDatabase();
Log.d("provider:" , "projection:" + projection);
Log.d("provider:" , "selection:" + selection);
Log.d("provider:" , "selArgs:" + selectionArgs);
return db.query(TABLE_NAME, projection,
selection,
selectionArgs,
sortOrder,
null, null, null);
}
public int updateElectricCar(String id, String make,
String model) {
SQLiteDatabase db = this.getWritableDatabase();
ContentValues values = new ContentValues();
values.put(MAKE_FIELD, make);
values.put(MODEL_FIELD, model);
return db.update(TABLE_NAME, values, ID_FIELD + " = ?",
new String[] { id });
}
public int deleteElectricCar(String id) {
SQLiteDatabase db = this.getWritableDatabase();
return db.delete(TABLE_NAME, ID_FIELD + " = ?",
new String[] { id });
}
}
The CONTENT_URI in ElectricCarContentProvider specifies the URI used for accessing the content provider. However, client applications should only know the content of this URI and do not need to depend on this class. The Util class in Listing 27.4 contains a copy of the URI for the clients of the content provider.
Listing 27.4: The Util class
package com.example.contentproviderdemo1;
import android.net.Uri;
public class Util {
public static final Uri CONTENT_URI =
Uri.parse("content://com.example.contentproviderdemo1" +
"/electric_cars");
public static final String ID_FIELD = "_id";
public static final String MAKE_FIELD = "make";
public static final String MODEL_FIELD = "model";
}
Listings 27.5, 27.6 and 27.7 are activity classes that access the content provider. They all access the content provider by using the ContentResolver object created for the application. You retrieve it by calling getContentResolver from the activity classes.
Listing 27.5: The MainActivity class
package com.example.contentproviderdemo1.activity;
import android.app.Activity;
import android.content.Intent;
import android.database.Cursor;
import android.os.Bundle;
import android.view.Menu;
import android.view.MenuItem;
import android.view.View;
import android.widget.AdapterView;
import android.widget.AdapterView.OnItemClickListener;
import android.widget.CursorAdapter;
import android.widget.ListAdapter;
import android.widget.ListView;
import android.widget.SimpleCursorAdapter;
import com.example.contentproviderdemo1.R;
import com.example.contentproviderdemo1.Util;
public class MainActivity extends Activity {
@Override
protected void onCreate(Bundle savedInstanceState) {
super.onCreate(savedInstanceState);
setContentView(R.layout.activity_main);
ListView listView = (ListView) findViewById(
R.id.listView);
Cursor cursor = getContentResolver().query(
Util.CONTENT_URI,
/*projection=*/ new String[] {
Util.ID_FIELD, Util.MAKE_FIELD,
Util.MODEL_FIELD},
/*selection=*/ null,
/*selectionArgs=*/ null,
/*sortOrder=*/ "make");
startManagingCursor(cursor);
ListAdapter adapter = new SimpleCursorAdapter(
this,
android.R.layout.two_line_list_item,
cursor,
new String[] {Util.MAKE_FIELD,
Util.MODEL_FIELD},
new int[] {android.R.id.text1, android.R.id.text2},
CursorAdapter.FLAG_REGISTER_CONTENT_OBSERVER);
listView.setAdapter(adapter);
listView.setChoiceMode(ListView.CHOICE_MODE_SINGLE);
listView.setOnItemClickListener(
new OnItemClickListener() {
@Override
public void onItemClick(
AdapterView<?> adapterView,
View view, int position, long id) {
Intent intent = new Intent(
getApplicationContext(),
ShowElectricCarActivity.class);
intent.putExtra("id", id);
startActivity(intent);
}
});
}
@Override
public boolean onCreateOptionsMenu(Menu menu) {
getMenuInflater().inflate(R.menu.menu_main, menu);
return true;
}
@Override
public boolean onOptionsItemSelected(MenuItem item) {
switch (item.getItemId()) {
case R.id.action_add:
startActivity(new Intent(this,
AddElectricCarActivity.class));
return true;
default:
return super.onOptionsItemSelected(item);
}
}
}
Listing 27.6: The AddElectricCarActivity class
package com.example.contentproviderdemo1.activity;
import android.app.Activity;
import android.content.ContentValues;
import android.os.Bundle;
import android.view.Menu;
import android.view.View;
import android.widget.EditText;
import com.example.contentproviderdemo1.provider.
ElectricCarContentProvider;
import com.example.contentproviderdemo1.R;
public class AddElectricCarActivity extends Activity {
@Override
protected void onCreate(Bundle savedInstanceState) {
super.onCreate(savedInstanceState);
setContentView(R.layout.activity_add_electric_car);
}
@Override
public boolean onCreateOptionsMenu(Menu menu) {
getMenuInflater().inflate(R.menu.add_electric_car, menu);
return true;
}
public void cancel(View view) {
finish();
}
public void addElectricCar(View view) {
String make = ((EditText) findViewById(
R.id.make)).getText().toString();
String model = ((EditText) findViewById(
R.id.model)).getText().toString();
ContentValues values = new ContentValues();
values.put("make", make);
values.put("model", model);
getContentResolver().insert(
ElectricCarContentProvider.CONTENT_URI, values);
finish();
}
}
Listing 27.7: The ShowElectricCarActivity class
package com.example.contentproviderdemo1.activity;
import android.app.Activity;
import android.app.AlertDialog;
import android.content.ContentUris;
import android.content.ContentValues;
import android.content.DialogInterface;
import android.database.Cursor;
import android.net.Uri;
import android.os.Bundle;
import android.util.Log;
import android.view.Menu;
import android.view.MenuItem;
import android.view.View;
import android.widget.EditText;
import android.widget.TextView;
import com.example.contentproviderdemo1.R;
import com.example.contentproviderdemo1.Util;
public class ShowElectricCarActivity extends Activity {
long electricCarId;
@Override
protected void onCreate(Bundle savedInstanceState) {
super.onCreate(savedInstanceState);
setContentView(R.layout.activity_show_electric_car);
getActionBar().setDisplayHomeAsUpEnabled(true);
Bundle extras = getIntent().getExtras();
if (extras != null) {
electricCarId = extras.getLong("id");
Cursor cursor = getContentResolver().query(
Util.CONTENT_URI,
/*projection=*/ new String[] {
Util.ID_FIELD, Util.MAKE_FIELD,
Util.MODEL_FIELD},
/*selection=*/ "_id=?",
/*selectionArgs*/ new String[] {
Long.toString(electricCarId)},
/*sortOrder*/ null);
if (cursor != null && cursor.moveToFirst()) {
String make = cursor.getString(1);
String model = cursor.getString(2);
((TextView) findViewById(R.id.make))
.setText(make);
((TextView) findViewById(R.id.model))
.setText(model);
}
}
}
@Override
public boolean onCreateOptionsMenu(Menu menu) {
getMenuInflater().inflate(R.menu.show_electric_car, menu);
return true;
}
@Override
public boolean onOptionsItemSelected(MenuItem item) {
switch (item.getItemId()) {
case R.id.action_delete:
deleteElectricCar();
return true;
default:
return super.onOptionsItemSelected(item);
}
}
private void deleteElectricCar() {
new AlertDialog.Builder(this)
.setTitle("Please confirm")
.setMessage(
"Are you sure you want to delete " +
"this electric car?")
.setPositiveButton("Yes",
new DialogInterface.OnClickListener() {
public void onClick(
DialogInterface dialog,
int whichButton) {
Uri uri = ContentUris.withAppendedId(
Util.CONTENT_URI, electricCarId);
getContentResolver().delete(
uri, null, null);
dialog.dismiss();
finish();
}
})
.setNegativeButton("No",
new DialogInterface.OnClickListener() {
public void onClick(
DialogInterface dialog,
int which) {
dialog.dismiss();
}
})
.create()
.show();
}
public void updateElectricCar(View view) {
Uri uri = ContentUris.withAppendedId(Util.CONTENT_URI,
electricCarId);
ContentValues values = new ContentValues();
values.put(Util.MAKE_FIELD,
((EditText)findViewById(R.id.make)).getText()
.toString());
values.put(Util.MODEL_FIELD,
((EditText)findViewById(R.id.model)).getText()
.toString());
getContentResolver().update(uri, values, null, null);
finish();
}
}
As the content provider is accessed from components in the same application, you should not expect to encounter any problems. Figure 27.1 shows a ListView in the main activity. Of course, when you first run the application, the list will be empty.
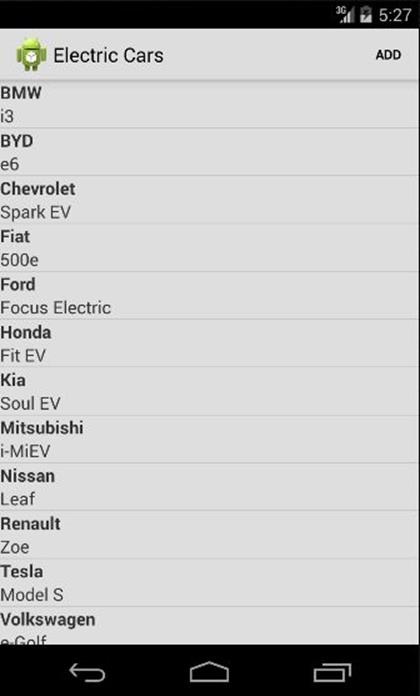
Figure 27.1: The main activity
Touch the Add button on the action bar to add an electric car. Figure 27.2 shows how the Add activity looks like.
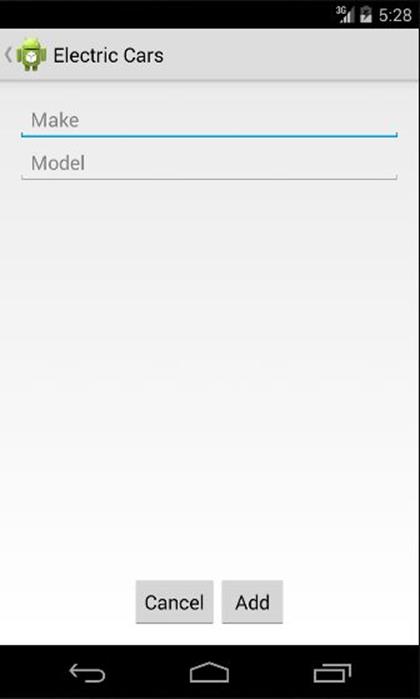
Figure 27.2: The AddElectricCarActivity
Type in a make and a model and touch the Add button to add a vehicle. Alternatively, touch the Cancel button to cancel. You will be redirected to the main activity.
From the main activity, you can select a car to view and edit the details. Figure 27.3 shows the ShowElectricCarActivity activity.
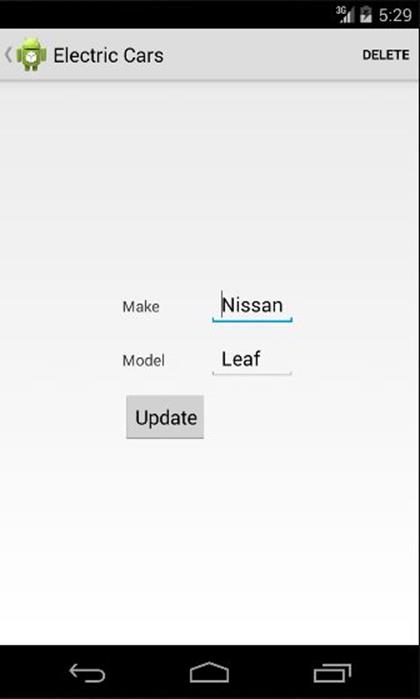
Figure 27.3: The ShowElectricCarActivity
You can update a car or delete it from this activity.
Consuming A Content Provider
The second application in this chapter, the ContentResolverDemo1 project, shows how you can access a content provider from a different application. The only difference between accessing a content provider from the same application and an external application is that you have to request a permission to access the provider in the manifest of the external application.
Listing 27.8 shows the manifest for the ContentResolverDemo1 project.
Listing 27.8: The manifest for ContentResolverDemo1
<?xml version="1.0" encoding="utf-8"?>
<manifest xmlns:android="http://schemas.android.com/apk/res/android"
package="com.example.contentresolverdemo1" >
<uses-permission android:name="com.example.permission.READ_ELECTRIC_CARS"/>
<uses-permission android:name="com.example.permission.WRITE_ELECTRIC_CARS"/>
<application
android:allowBackup="true"
android:icon="@drawable/ic_launcher"
android:label="@string/app_name"
android:theme="@style/AppTheme" >
<activity
android:name="com.example.contentresolverdemo1.MainActivity"
android:label="@string/app_name" >
<intent-filter>
<action android:name="android.intent.action.MAIN" />
<category android:name="android.intent.category.LAUNCHER" />
</intent-filter>
</activity>
</application>
</manifest>
The application contains one activity that shows data from the content provider. The activity class is a copy of the MainActivity class in the ContentProviderDemo1 project. The activity is shown in Figure 27.4.

Figure 27.4: Showing data from a content provider
Summary
A content provider is an Android component used for encapsulating data that is to be shared with other applications. This chapter shows how you can create a content provider and consume its data from an external application using a ContentResolver.
All materials on the site are licensed Creative Commons Attribution-Sharealike 3.0 Unported CC BY-SA 3.0 & GNU Free Documentation License (GFDL)
If you are the copyright holder of any material contained on our site and intend to remove it, please contact our site administrator for approval.
© 2016-2026 All site design rights belong to S.Y.A.