Introduction to Android Application Development, Fourth Edition (2014)
Part VI. Appendixes
B. Quick-Start Guide: The Android Emulator
The most useful tool provided with the Android SDK is the emulator. Developers use the emulator to quickly develop Android applications for a variety of hardware. This Quick-Start Guide is not a complete documentation of the emulator commands. Instead, it is designed to get you up and running with common tasks. Please see the emulator documentation provided with the Android SDK for a complete list of features and commands.
The Android emulator is integrated with the Android IDE, which is included in the ADT Bundle, or integrated with Eclipse after installing the ADT plugin. The emulator is also available within the /tools directory of the Android SDK, and you can launch it as a separate process. The best way to launch the emulator is by using the Android Virtual Device Manager.
When this appendix discusses an IDE, the focus is on the Android IDE. Whenever we refer to the Android IDE, the same instructions apply to Eclipse with the ADT plugin. Because the Android IDE and Eclipse with the ADT plugin are equivalent, from here on, we will mention only the Android IDE.
Simulating Reality: The Emulator’s Purpose
The Android emulator (shown in Figure B.1) simulates a real device environment where your applications run. As a developer, you can configure the emulator to closely resemble the devices on which you plan to deploy your applications.
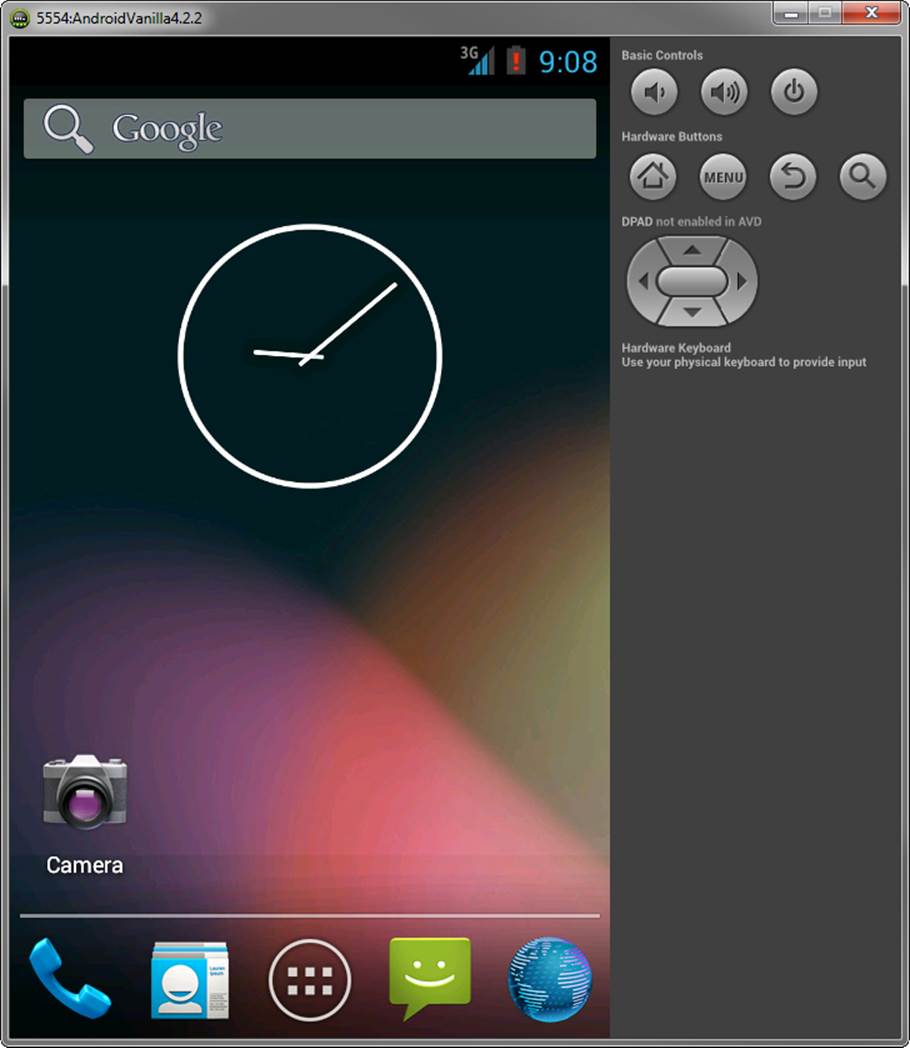
Figure B.1 A typical Android emulator.
Here are some tips for using the emulator effectively:
![]() You can use keyboard commands to easily interact with the emulator.
You can use keyboard commands to easily interact with the emulator.
![]() Mouse clicking within the emulator window works, as do scrolling and dragging. So do the keyboard arrow buttons. Don’t forget the side buttons, such as the volume control. These work, too.
Mouse clicking within the emulator window works, as do scrolling and dragging. So do the keyboard arrow buttons. Don’t forget the side buttons, such as the volume control. These work, too.
![]() If your computer has an Internet connection, so does your emulator. The browser works. You can toggle networking using the F8 key.
If your computer has an Internet connection, so does your emulator. The browser works. You can toggle networking using the F8 key.
![]() Different Android platform versions show slightly different underlying user experiences (the basics of the Android operating system) on the emulator. For example, older platform targets have a basic Home screen and use an application drawer to store installed applications, whereas the newer smartphone-centric platform versions such as Android 4.2+ use sleeker controls and an improved Home screen, and the Honeycomb (Android 3.0+) platform targets include the holographic theme and ActionBar navigation. The emulator uses the basic user interface, which is frequently overridden, or skinned, by manufacturers and carriers. In other words, the operating system features of the emulator might not match what real users see.
Different Android platform versions show slightly different underlying user experiences (the basics of the Android operating system) on the emulator. For example, older platform targets have a basic Home screen and use an application drawer to store installed applications, whereas the newer smartphone-centric platform versions such as Android 4.2+ use sleeker controls and an improved Home screen, and the Honeycomb (Android 3.0+) platform targets include the holographic theme and ActionBar navigation. The emulator uses the basic user interface, which is frequently overridden, or skinned, by manufacturers and carriers. In other words, the operating system features of the emulator might not match what real users see.
![]() The Settings application can be useful for managing system settings. You can use the Settings application to configure the user settings available within the emulator, including networking, screen options, and locale options.
The Settings application can be useful for managing system settings. You can use the Settings application to configure the user settings available within the emulator, including networking, screen options, and locale options.
![]() The Dev Tools application can be useful for setting development options. These include many useful tools, from a terminal emulator to a list of installed packages. Additionally, tools for accounts and sync testing are available. JUnit tests can be launched directly from here.
The Dev Tools application can be useful for setting development options. These include many useful tools, from a terminal emulator to a list of installed packages. Additionally, tools for accounts and sync testing are available. JUnit tests can be launched directly from here.
![]() To switch between portrait and landscape modes of the emulator, use the 7 and 9 keys on the numeric keypad (or the Ctrl+F11 and Ctrl+F12 keys).
To switch between portrait and landscape modes of the emulator, use the 7 and 9 keys on the numeric keypad (or the Ctrl+F11 and Ctrl+F12 keys).
![]() You can use the F6 key to emulate a trackball with your mouse. This takes over exclusive control of your mouse, so you must use F6 to get control back again.
You can use the F6 key to emulate a trackball with your mouse. This takes over exclusive control of your mouse, so you must use F6 to get control back again.
![]() The Menu button is a context menu for the given screen. Keep in mind that newer devices do not always have the physical keys such as Home, Menu, Back, and Search.
The Menu button is a context menu for the given screen. Keep in mind that newer devices do not always have the physical keys such as Home, Menu, Back, and Search.
![]() Invoke the application lifecycle: To easily stop an application, just press Home (on the emulator) and you’ll get onPause() and onStop() Activity lifecycle events. To resume, launch the application again. To pause the application, press the Power button (on the emulator). Only theonPause() method will be called. You’ll need to press the Power button a second time to activate the display to be able to unlock the emulator to see the onResume() method call.
Invoke the application lifecycle: To easily stop an application, just press Home (on the emulator) and you’ll get onPause() and onStop() Activity lifecycle events. To resume, launch the application again. To pause the application, press the Power button (on the emulator). Only theonPause() method will be called. You’ll need to press the Power button a second time to activate the display to be able to unlock the emulator to see the onResume() method call.
![]() Notifications such as incoming SMS messages appear in the status bar, along with indicators for simulated battery life, signal strength and speed, and so on.
Notifications such as incoming SMS messages appear in the status bar, along with indicators for simulated battery life, signal strength and speed, and so on.
 Warning
One of the most important things to remember when working with the emulator is that it is a powerful tool, but it is no substitute for testing on the true target device. The emulator often provides a much more consistent user experience than a physical device, which moves around in the physical world, through tunnels and cell signal dead zones, with many other applications running and sucking down battery and resources. Always budget time and resources to thoroughly exercise your applications on target physical devices and in common situations as part of your testing process.
Working with Android Virtual Devices
The Android emulator is a not a real device, but a generic Android system simulator for testing purposes. Developers can simulate different types of Android devices by creating AVD configurations.
 Tip
Tip
It can be helpful to think of an AVD as providing the emulator’s personality. Without an AVD, an emulator is an empty shell, not unlike a CPU with no attached peripherals.
Using AVD configurations, Android emulators can simulate
![]() Different target platform versions
Different target platform versions
![]() Different screen sizes and resolutions
Different screen sizes and resolutions
![]() Different input methods
Different input methods
![]() Different network types, speeds, and strengths
Different network types, speeds, and strengths
![]() Different underlying hardware configurations
Different underlying hardware configurations
![]() Different external storage configurations
Different external storage configurations
Each emulator configuration is unique, as described within its AVD profile, and stores its data persistently, including installed applications, modified settings, and the contents of its emulated SD card. A number of emulator instances with different AVD configurations are shown in Figure B.2.
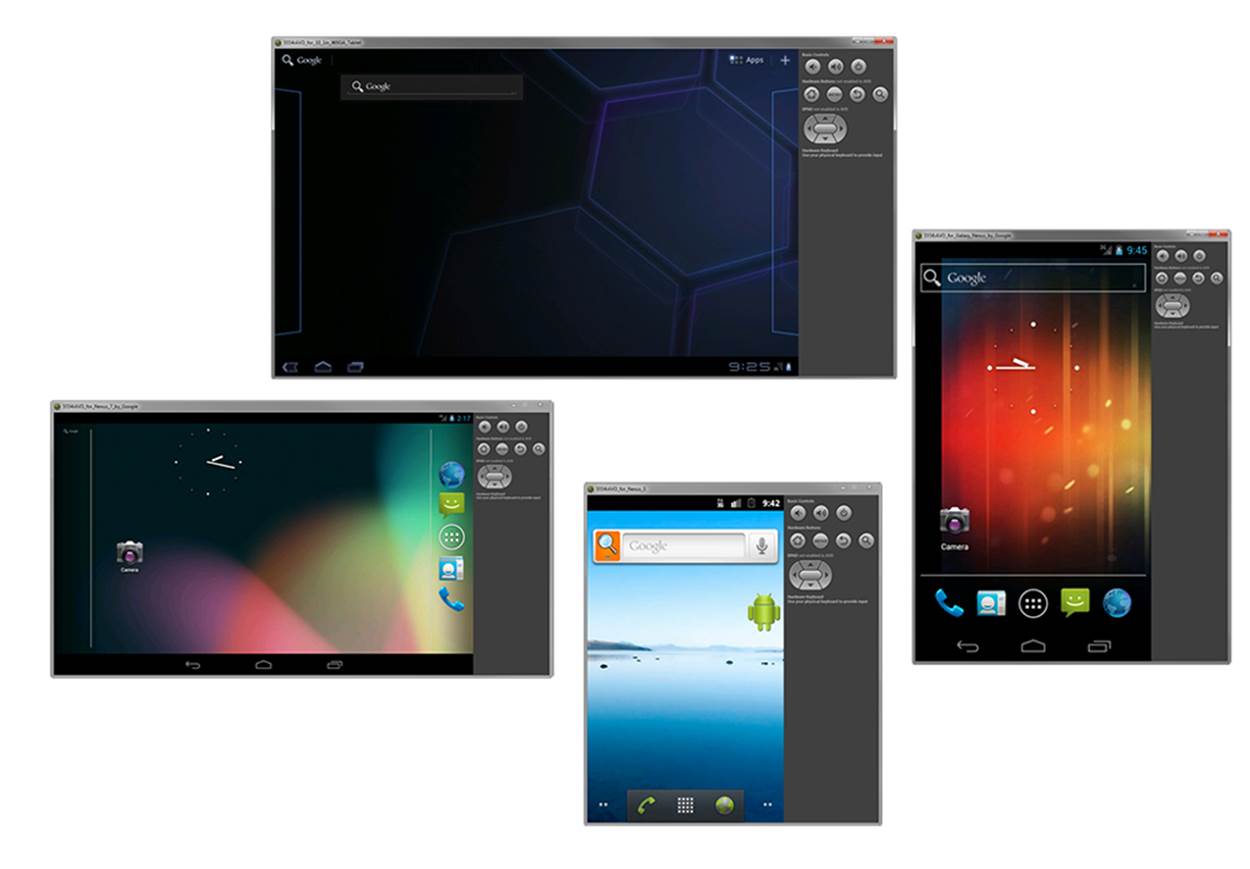
Figure B.2 AVD configurations described in different emulator settings.
Using the Android Virtual Device Manager
To run an application in the Android emulator, you must configure an Android Virtual Device (AVD). To create and manage AVDs, you can use the Android Virtual Device Manager from within the Android IDE or use the android command-line tool provided with the Android SDK in the/tools subdirectory. Each AVD configuration contains important information describing a specific type of Android device, including the following:
![]() The friendly, descriptive name for the configuration
The friendly, descriptive name for the configuration
![]() The target Android platform version
The target Android platform version
![]() The screen size, aspect ratio, and resolution
The screen size, aspect ratio, and resolution
![]() Hardware configuration details and features, including how much RAM is available, which input methods exist, and optional hardware details such as camera support
Hardware configuration details and features, including how much RAM is available, which input methods exist, and optional hardware details such as camera support
![]() Simulated external storage (virtual SD cards)
Simulated external storage (virtual SD cards)
Figure B.3 illustrates how you can use the Android Virtual Device Manager to create and manage AVD configurations.
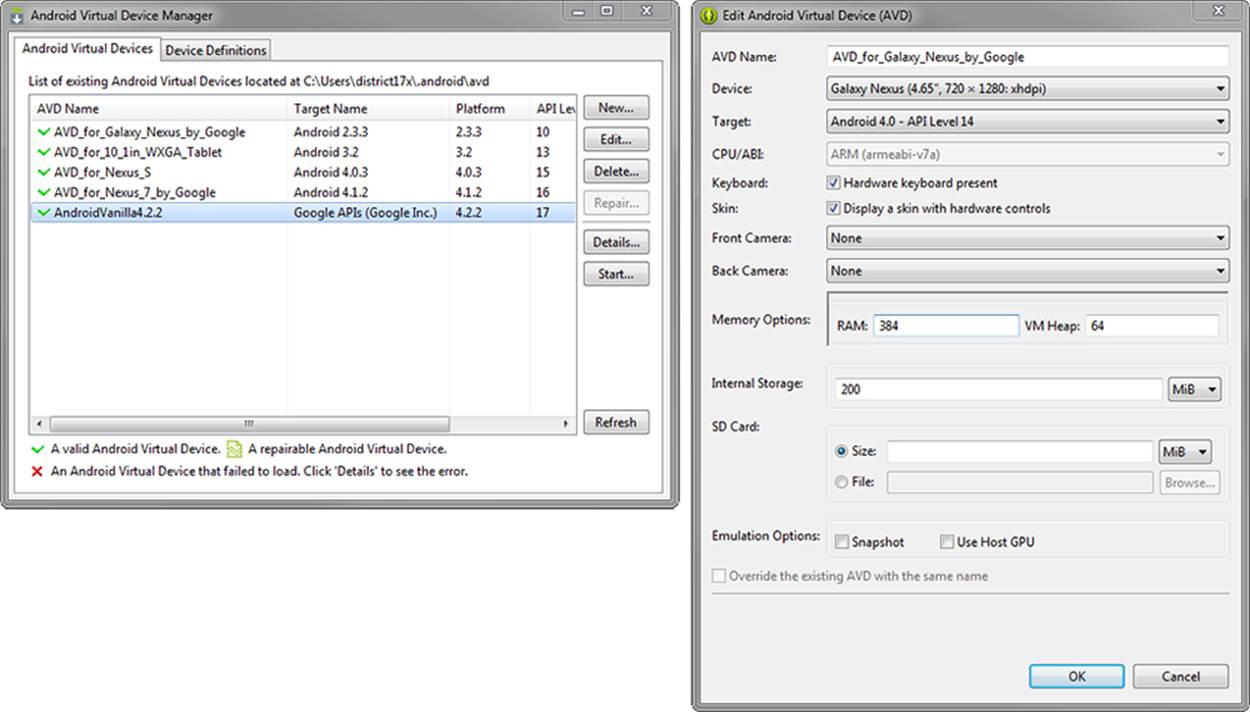
Figure B.3 The Android Virtual Device Manager (left) can be used to create AVD configurations (right).
Creating an AVD
Follow these steps to create an AVD configuration within the Android IDE:
1. Launch the Android Virtual Device Manager from within the Android IDE by clicking the little green Android device icon (![]() ) on the toolbar. You can also launch it by selecting Window, Android Virtual Device Manager from the Android IDE menu.
) on the toolbar. You can also launch it by selecting Window, Android Virtual Device Manager from the Android IDE menu.
2. Click the Android Virtual Devices menu item (Figure B.3, left). The configured AVDs are displayed as a list.
3. Click the OK button to create a new AVD (Figure B.3, right).
4. Choose a name for the AVD. If you are trying to simulate a specific device, you might want to name it as such. For example, a name such as Nexus7 might refer to an AVD that simulates the Nexus 7 tablet running the Android 4.1.2 platform.
5. Choose a Device for the AVD. In this case, since we are naming our device Nexus7, we can choose the Nexus 7 (7.27”, 800 × 1280: tvdpi) device from the device selection drop-down.
6. Choose a build Target. This represents the version of the Android platform running on the emulator. The platform is represented by the API level. For example, to support Android 4.2.2, use API Level 17. However, this is also where you choose whether or not to include the optional Google APIs. If your application relies on the Maps application and other Google Android services, you should choose the target with the Google APIs. For a complete list of API levels and which Android platforms they represent, see http://d.android.com/guide/topics/manifest/uses-sdk-element.html#ApiLevels.
7. Choose an SD card capacity. This capacity can be configured in kibibytes or mibi-bytes. Each SD card image takes up space on your hard drive and takes a long time to generate; don’t make your card capacities too large, or they will hog your hard drive space. Choose a reasonable size, such as 1024MiB or less. The minimum is 9MiB. Just make sure you have adequate disk space on your development computer and choose an appropriate size for your testing needs. If you’re dealing with images or videos, you may need to allocate much more capacity.
8. Configure or modify any other hardware characteristics that you would like enabled or disabled. If your application will be using a front or back camera, you may choose to emulate these cameras, or, provided your host computer has camera hardware, you may attach them to your AVD. If you want to disallow using your host computer’s hardware keyboard, or remove the skin and hardware controls when running the emulator, you may deselect the default options. We have found it easier to keep these options enabled. There are also Emulation Options you should consider enabling such as the Snapshot or Use Host GPU. Snapshot eliminates the wait time for launching an AVD by persisting the AVD’s state between executions, and Use Host GPU leverages the host’s graphics processor for rendering OpenGL ES within the AVD.
9. Click the OK button and wait for the operation to complete. Because the Android Virtual Device Manager formats the memory allocated for SD card images, creating an AVD configuration sometimes takes a few moments.
Creating AVDs with Custom Hardware Settings
As mentioned earlier, you can choose specific hardware configuration settings within your AVD configurations. You need to know what the default settings are to determine whether you need to override them. Some of the hardware options available are shown in Table B.1.
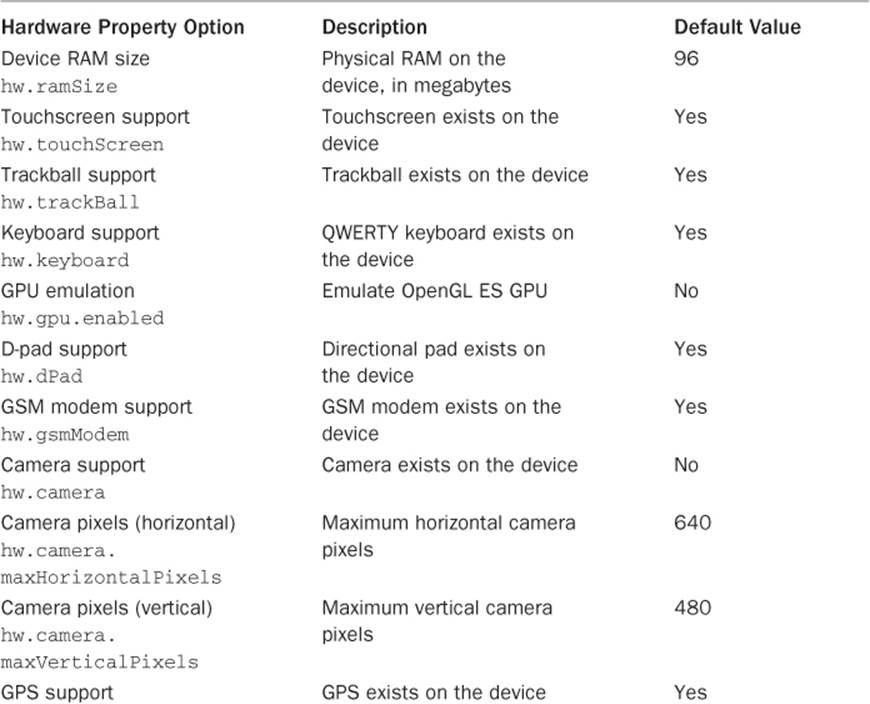
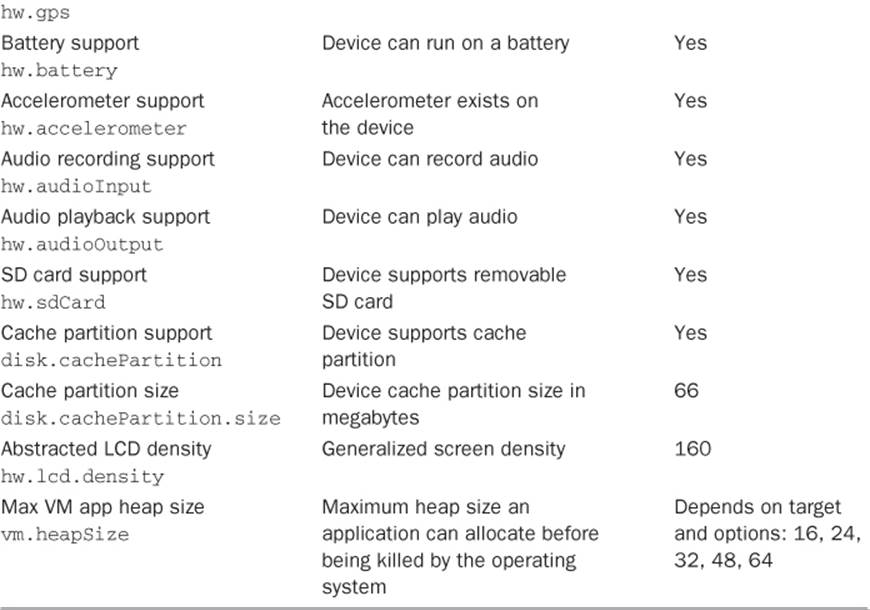
Table B.1 Important Hardware Profile Options
Tip
You can save time, money, and a lot of grief by spending a bit of time up front configuring AVDs that closely match the hardware upon which your application will run. Share the specific settings with your fellow developers and testers. We often create device-specific AVDs and name them after the device.
Launching the Emulator with a Specific AVD
After you have configured the AVD you want to use, you are ready to launch the emulator. Although there are a number of ways to do this, there are four methods you will likely use on a regular basis:
![]() From within the Android IDE, you can configure the application’s Debug or Run configuration to use a specific AVD.
From within the Android IDE, you can configure the application’s Debug or Run configuration to use a specific AVD.
![]() From within the Android IDE, you can configure the application’s Debug or Run configuration to enable the developer to choose an AVD manually upon launch.
From within the Android IDE, you can configure the application’s Debug or Run configuration to enable the developer to choose an AVD manually upon launch.
![]() From within the Android IDE, you can launch an emulator directly from within the Android Virtual Device Manager.
From within the Android IDE, you can launch an emulator directly from within the Android Virtual Device Manager.
![]() The emulator is available within the /tools directory of the Android SDK and can be launched as a separate process from the command line (generally necessary only if you are not using the Android IDE).
The emulator is available within the /tools directory of the Android SDK and can be launched as a separate process from the command line (generally necessary only if you are not using the Android IDE).
Maintaining Emulator Performance
The Android emulator is slow if you do not choose any special configuration options when setting up your virtual devices or if you do not follow well-known tricks. That said, here are a few tips that will help ensure the best and speediest emulator experience possible:
![]() Enable the Snapshot feature in your AVD. Then, before you start using your AVD, launch it once, let it boot up, and shut it down to set a baseline snapshot. This is especially important with the newest platform versions such as Jelly Bean. Subsequent launches will be faster and more stable. You can even turn off saving a new snapshot to speed up exiting and it will continue to use the old snapshot.
Enable the Snapshot feature in your AVD. Then, before you start using your AVD, launch it once, let it boot up, and shut it down to set a baseline snapshot. This is especially important with the newest platform versions such as Jelly Bean. Subsequent launches will be faster and more stable. You can even turn off saving a new snapshot to speed up exiting and it will continue to use the old snapshot.
![]() Launch your emulator instances before you need them, such as when you first launch the Android IDE, so that when you’re ready to debug, they’re already running.
Launch your emulator instances before you need them, such as when you first launch the Android IDE, so that when you’re ready to debug, they’re already running.
![]() Keep the emulator running in the background between debugging sessions in order to quickly install, reinstall, and debug your applications. This saves valuable minutes of waiting for the emulator to boot up. Instead, simply launch the Debug configuration from the Android IDE and the debugger reattaches.
Keep the emulator running in the background between debugging sessions in order to quickly install, reinstall, and debug your applications. This saves valuable minutes of waiting for the emulator to boot up. Instead, simply launch the Debug configuration from the Android IDE and the debugger reattaches.
![]() Keep in mind that application performance is much slower when the debugger is attached. This applies to both running in the emulator and on a device.
Keep in mind that application performance is much slower when the debugger is attached. This applies to both running in the emulator and on a device.
![]() If you’ve been using an emulator for testing many apps, or just need a very clean environment, consider re-creating the AVD from scratch. This will give you a new environment clean of any past changes or modifications. This can help speed up the emulator, too, if you have lots of apps installed.
If you’ve been using an emulator for testing many apps, or just need a very clean environment, consider re-creating the AVD from scratch. This will give you a new environment clean of any past changes or modifications. This can help speed up the emulator, too, if you have lots of apps installed.
Tip
If your development machine has an Intel processor that supports hardware virtualization, you can take advantage of a special Android emulator system image that Intel provides to further speed up your development environment. To learn more about how to install and set up an Intel Android 4.2 Jelly Bean x86 emulator system image, see the following URL: http://software.intel.com/en-us/articles/android-4-2-jelly-bean-x86-emulator-system-image.
Configuring Emulator Startup Options
The Android emulator has a number of configuration options above and beyond those set in the AVD profile. These options are configured in the Android IDE Debug and Run configurations for your specific applications, or when the emulator is launched from the command line. Some emulator startup settings include numerous disk image, debug, media, network, system, UI, and help settings. For a complete list of emulator startup options, consult the Android emulator documentation: http://d.android.com/tools/help/emulator.html#startup-options.
Launching an Emulator to Run an Application
The most common way to launch the emulator involves launching a specific emulator instance with a specific AVD configuration, either through the Android Virtual Device Manager or by choosing a Run or Debug configuration for your project in the Android IDE and installing or reinstalling the latest incarnation of your application.
Tip
Remember that you can create Run configurations and Debug configurations separately, with different options, using different startup options and even different AVDs.
To create a Debug configuration for a specific project within the Android IDE, take the following steps:
1. Choose Run, Debug Configurations (or right-click the project and choose Debug As...).
2. Double-click on Android Application.
3. Name your Debug configuration (we often use the project name).
4. Choose the project by clicking on the Browse button.
5. Switch to the Target tab and choose the appropriate Deployment Target Selection Mode. Either choose a specific AVD to use with the emulator (only those matching your application’s target SDK are shown) or select the Always prompt to pick device option to be prompted upon launch to choose an AVD on the fly.
Tip
If you have Android devices connected via USB when you attempt to run or debug your application from the Android IDE, you will be prompted to choose your target at runtime despite having selected a specific AVD. This enables you to redirect the install or reinstall operation to a device other than an emulator. You can always force this behavior by choosing the Always prompt to pick device option for your Deployment Target Selection Mode on the Target tab of your Debug configuration. We find setting the mode to Always prompt to pick device helps if you switch between debugging on emulators and devices frequently, and setting a specific target is more useful when debugging with only a specific AVD emulator instance.
6. Configure any emulator startup options on the Target tab. You can enter any options not specifically shown on the tab as normal command-line options in the Additional Emulator Command Line Options field.
The resulting Debug configuration might look something like Figure B.4.
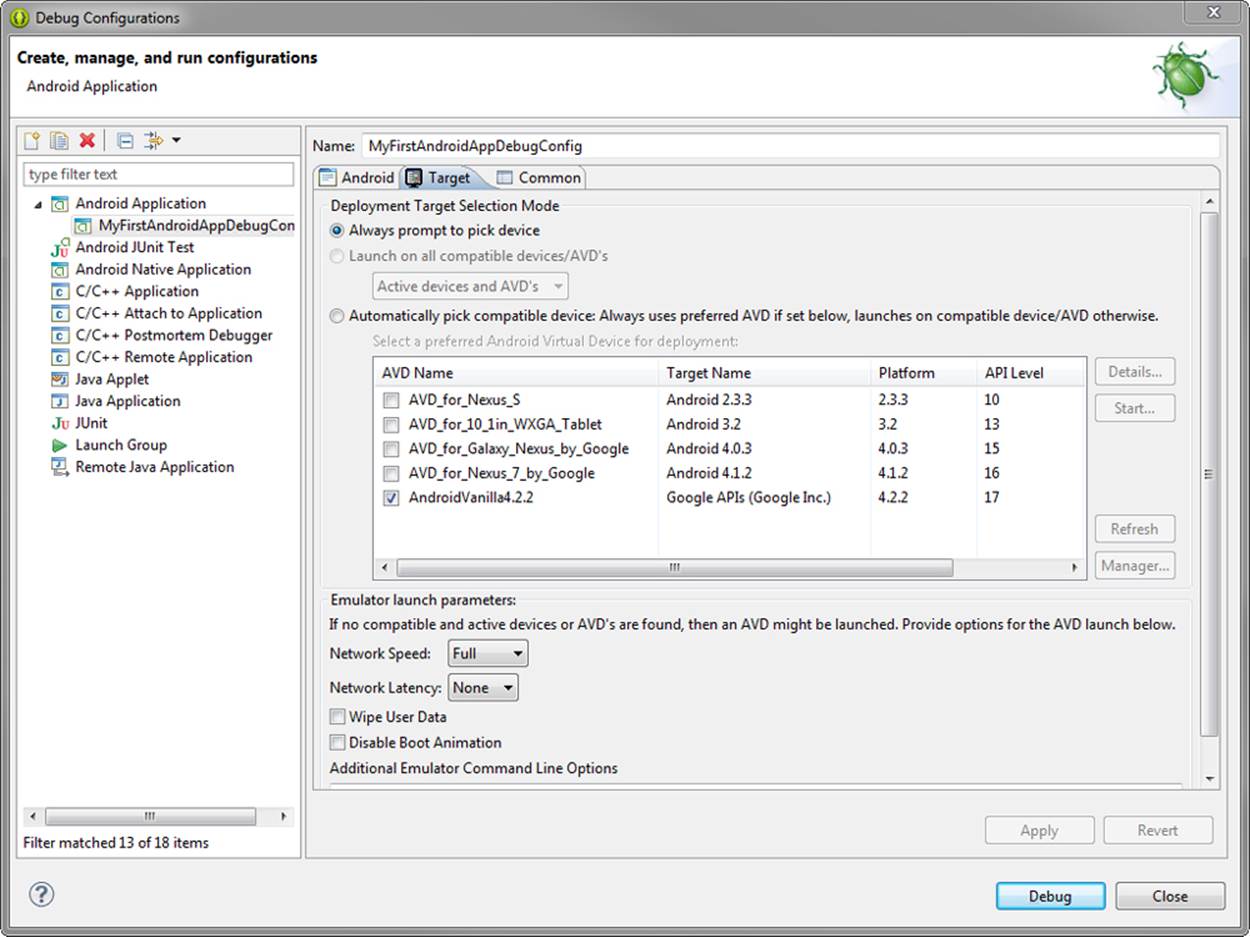
Figure B.4 Creating a Debug configuration in the Android IDE.
You can create Run configurations in a very similar fashion. If you set a specific AVD for use in the Deployment Target Selection Mode settings, that AVD is used with the emulator whenever you debug your application in the Android IDE. However, if you choose the Always prompt to pick device option, you are prompted to select an AVD from the Android Device Chooser when you first try to debug the application, as shown in Figure B.5. After you have launched that emulator, the Android IDE pairs the emulator with your project for the duration of your debugging session.
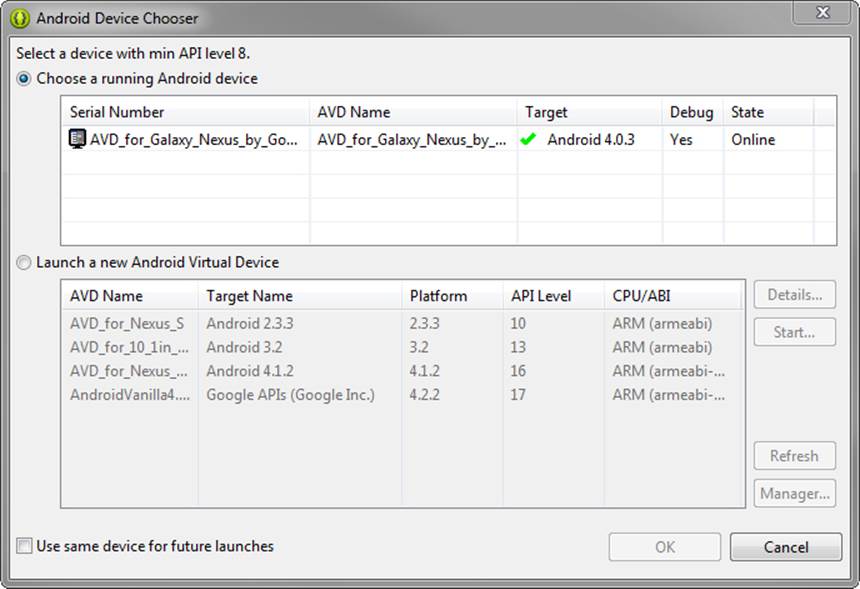
Figure B.5 The Android Device Chooser.
Launching an Emulator from the Android Virtual Device Manager
Sometimes you just want to launch an emulator on the fly—for example, to have a second emulator running to interact with your first emulator to simulate calls, text messages, and such. In this case, you can simply launch it from the Android Virtual Device Manager. To do this, take the following steps:
1. Launch the Android Virtual Device Manager from within the Android IDE (![]() ) on the toolbar. You can also launch it by selecting Window, Android Virtual Device Manager from the Android IDE menu.
) on the toolbar. You can also launch it by selecting Window, Android Virtual Device Manager from the Android IDE menu.
2. Click the Android Virtual Devices menu item on the left menu. The configured AVDs are displayed as a list.
3. Select an existing AVD configuration from the list or create a new AVD that matches your requirements.
4. Hit the Start button.
5. Configure any launch options necessary.
6. Hit the Launch button. The emulator now launches with the AVD you requested.
Warning
You cannot run multiple instances of the same AVD configuration simultaneously. If you think about it, this makes sense because the AVD configuration keeps the state and persistent data.
Configuring the GPS Location of the Emulator
To develop and test applications that use Google Maps support with location-based services, you need to create an AVD with a target that includes the Google APIs. After you have created the appropriate AVD and launched the emulator, you need to configure its location. The emulator does not have location sensors, so the first thing you need to do is seed your emulator with GPS coordinates.
To configure your emulator with pretend coordinates, launch your emulator (if it is not already running) with an AVD supporting the Google APIs and follow these steps:
In the emulator:
1. Press the Home key to return to the Home screen.
2. Find and launch the Maps application.
3. Click through the various startup dialogs, if this is the first time you’ve launched the Maps application.
4. Choose the My Location menu item (![]() ) and enable location on the device if it is not already enabled.
) and enable location on the device if it is not already enabled.
In the Android IDE:
5. Click the DDMS perspective in the top-right corner of the Android IDE.
6. You see an Emulator Control pane on the upper-right side of the IDE. Scroll down to the Location Controls.
7. Manually enter the longitude and latitude of your location. Note that they are in reverse order. For example, Yosemite Valley has the coordinates Longitude: -19.588542 and Latitude: 37.746761.
8. Click Send.
Back in the emulator, notice that the map now shows the location you seeded. Your screen should display your location as Yosemite, as shown in Figure B.6. This location persists across emulator launches.
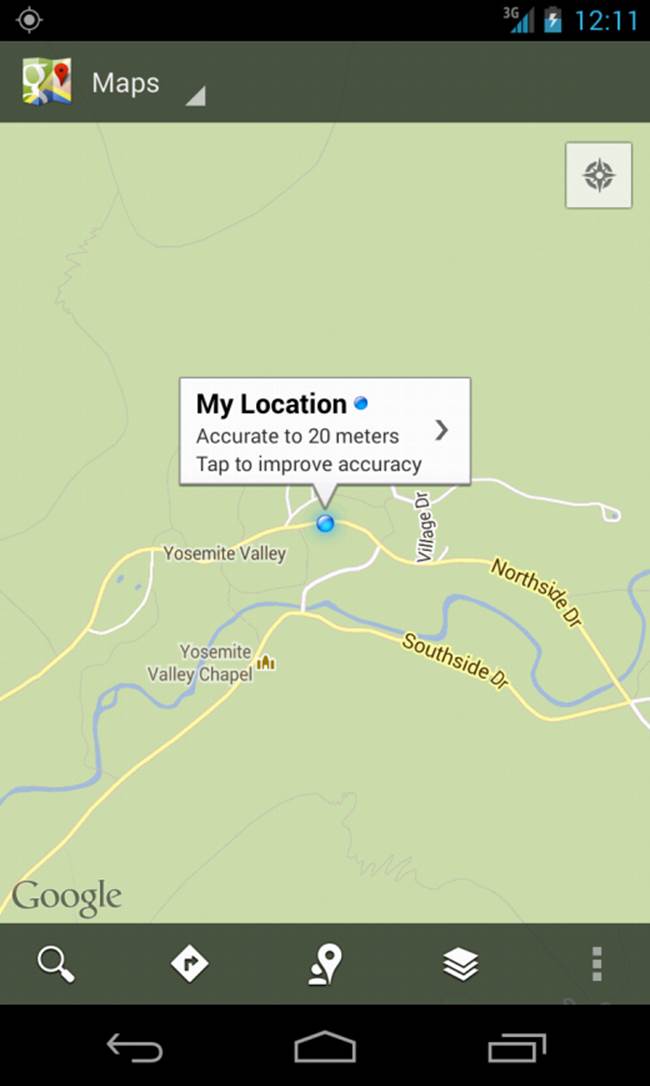
Figure B.6 Setting the location of the emulator to Yosemite Valley.
You can also use GPX 1.1 coordinate files to send a series of GPS locations through DDMS to the emulator, if you prefer. GPX 1.0 files are not supported by DDMS.
Tip
Wondering where we got the coordinates for Yosemite? To find a specific set of coordinates for use, you can go to http://maps.google.com. Navigate to the location you want the coordinates for. Next, right-click the location and choose “What’s here?” The latitude and longitude will be placed in the search field.
Calling between Two Emulator Instances
You can have two emulator instances call each other using the Dialer application provided on the emulator. The emulator’s “phone number” is its port number, which can be found in the title bar of the emulator window. To simulate a phone call between two emulators, you must perform the following steps:
1. Launch two different AVDs so two emulators are running simultaneously. (Using the Android AVD and SDK Manager is easiest.)
2. Note the port number of the emulator you want to receive the call.
3. In the emulator that makes the call, launch the Dialer application.
4. Type the port number you noted as the number to call. Press Enter (or Send).
5. You see (and hear) an incoming call on the receiving emulator instance. Figure B.7 shows an emulator with port 5556 (left) using the Dialer application to call the emulator on port 5554 (right).
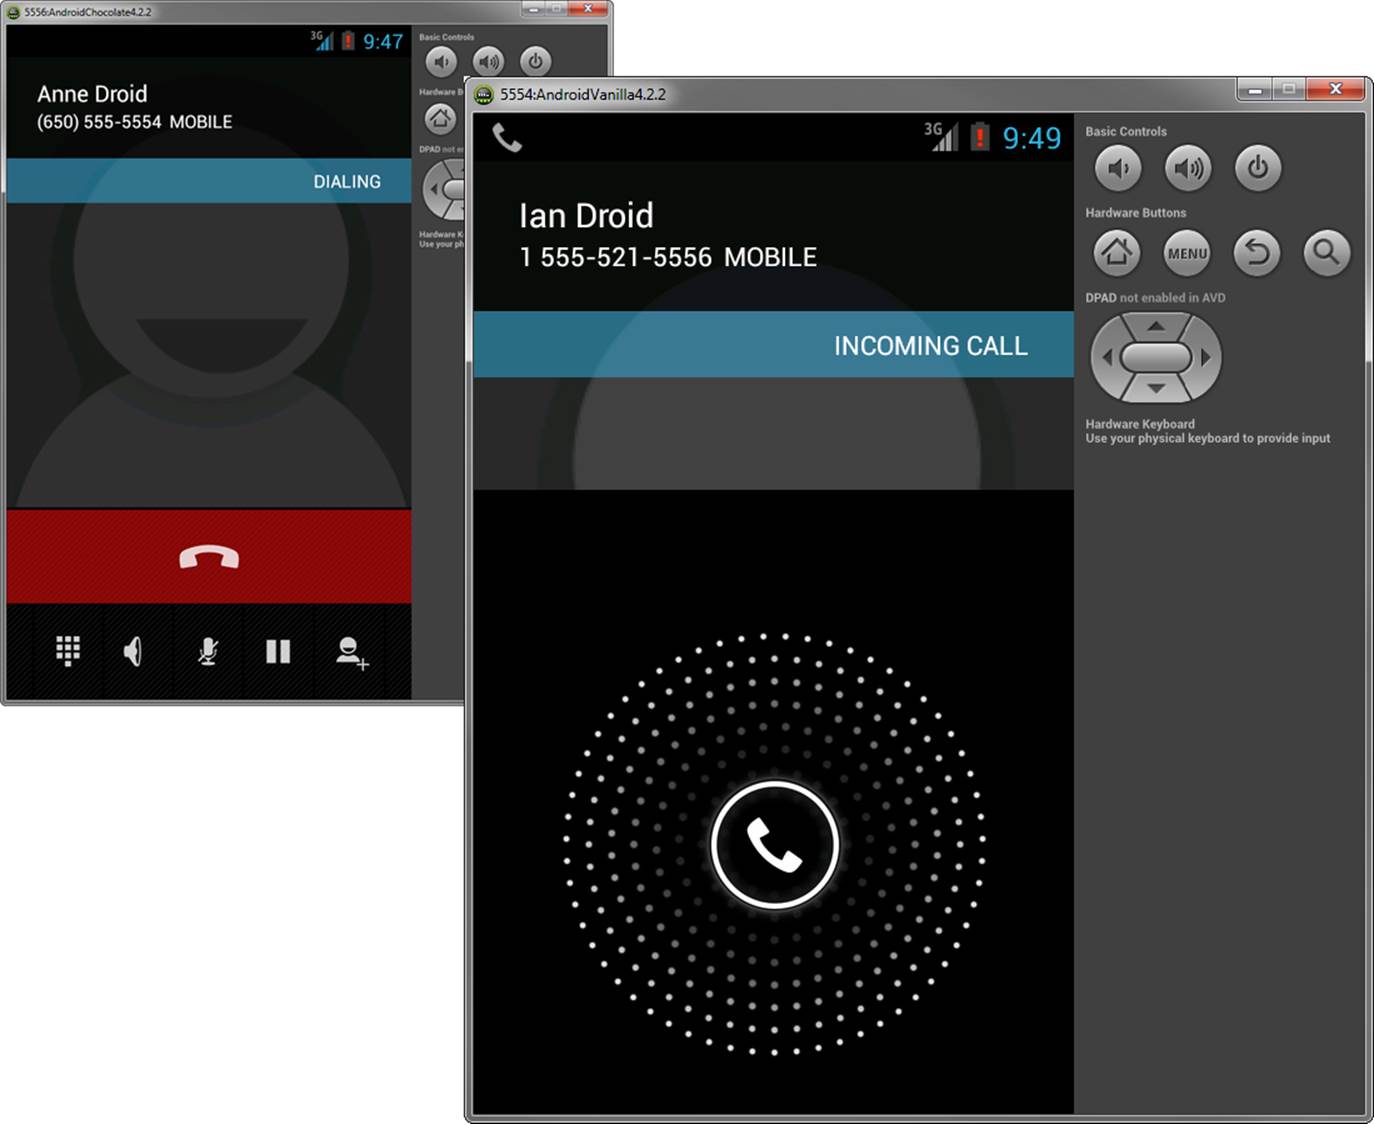
Figure B.7 Simulating a phone call between two emulators.
6. Answer the call by pressing Send or swiping across the Dialer app.
7. Pretend to chat for a bit. Figure B.8 shows a call in progress.
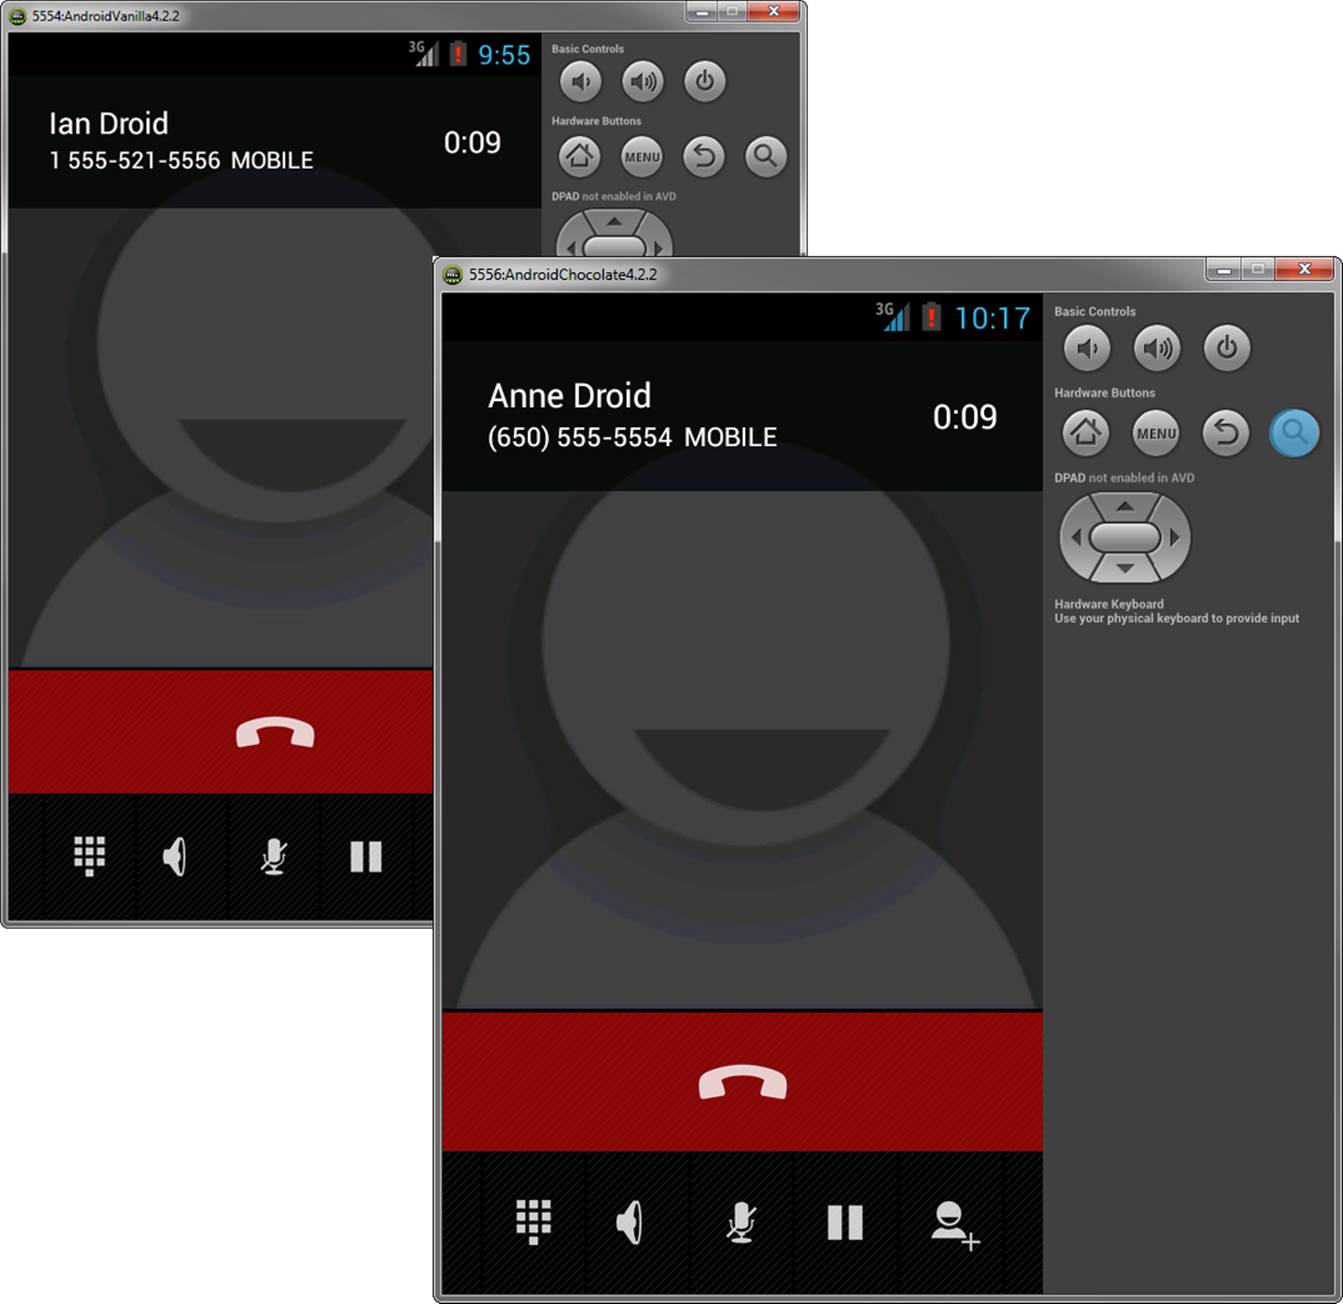
Figure B.8 Two emulators with a phone call in progress.
8. You can end either emulator call at any time by pressing the End key.
Messaging between Two Emulator Instances
You can send SMS messages between two emulators, exactly as previously described for simulating calls, by using the emulator port numbers as SMS addresses. To simulate a text message between two emulators, you must perform the following steps:
1. Launch two instances of the emulator.
2. Note the port number of the emulator you want to receive the text message.
3. In the emulator that sends the text, launch the Messaging application.
4. Type the port number you noted as the “To” field for the text message. Enter a text message, as shown in Figure B.9 (left). Press the Send button.
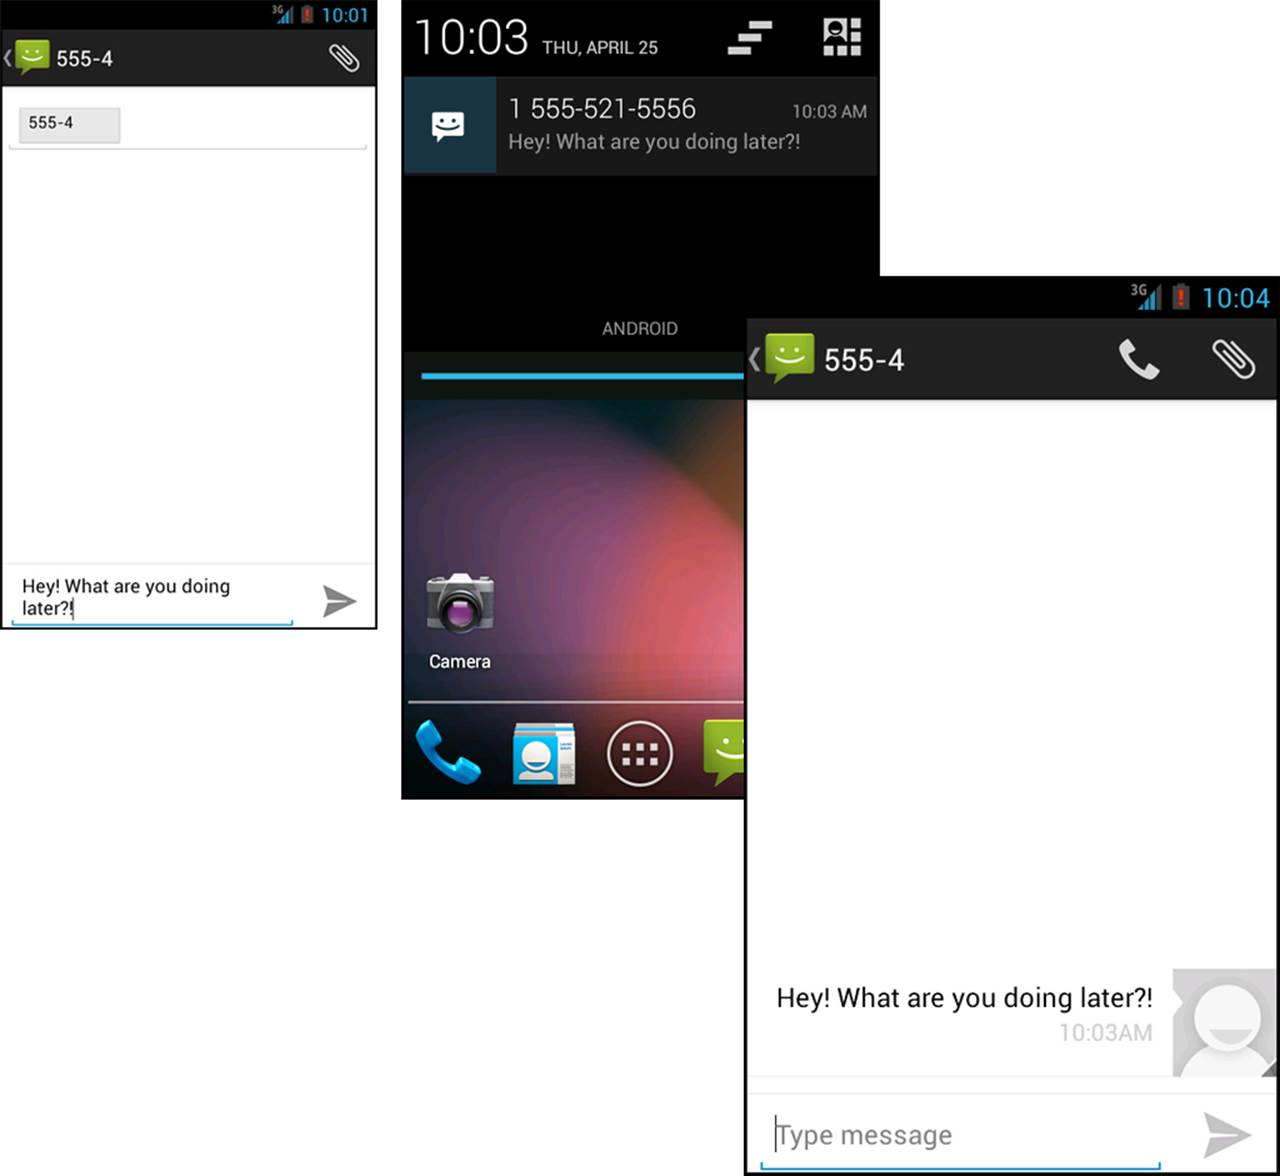
Figure B.9 Emulator at port 5556 (left) crafting a text message to send to another emulator at port 5554 (center, right).
5. You see (and hear) an incoming text message on the receiving emulator instance. Figure B.9 (center, top) shows an emulator with port 5554 receiving a text message from the emulator on port 5556 (left).
6. View the text message by pulling down the status bar or launching the Messaging app.
7. Pretend to chat for a bit. Figure B.9 (right, bottom) shows a text message conversation in progress.
Interacting with the Emulator through the Console
In addition to using the DDMS tool to interact with the emulator, you can also connect directly to the Emulator console using a Telnet connection and then issue commands. For example, to connect to the Emulator console of the emulator using port 5554, you would do the following:
telnet localhost 5554
You can use the Emulator console to issue commands to the emulator. To end the session, just type quit or exit. You can shut down this instance of the emulator using the kill command.
Warning
You may need to enable Telnet on your system in order to proceed through the following sections if this has not already been done.
Using the Console to Simulate Incoming Calls
You can simulate incoming calls to the emulator from specified numbers. The console command for issuing an incoming call is
gsm call <number>
For example, to simulate an incoming call from the number 555-1212, you would issue the following console command:
gsm call 5551212
The result of this command in the emulator is shown in Figure B.10. The name “Anne Droid” shows up because we have an entry in the Contacts database that ties the phone number 555-1212 to a contact named Anne Droid.
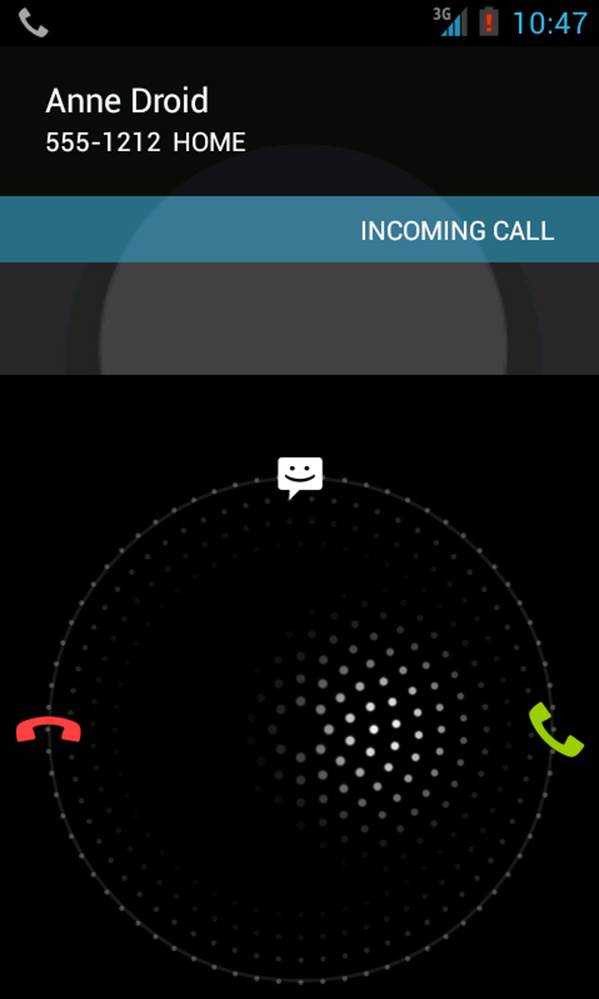
Figure B.10 Incoming call from 555-1212 (configured as a contact named Anne Droid), prompted via the Emulator console.
Using the Console to Simulate SMS Messages
You can simulate SMS messages to the emulator from specified numbers as well, just as you can from DDMS. The command for issuing an incoming SMS is
sms send <number> <message>
For example, to simulate an incoming SMS from the number 555-1212, you would issue the following command:
sms send 5551212 What's up!
In the emulator, you get a notification on the status bar informing you of a new message. It even displays the contents on the bar for a moment and then rolls away, showing the Message icon. You can pull down the status bar to see the new message or launch the Messaging application. The result of the preceding command in the emulator is shown in Figure B.11.
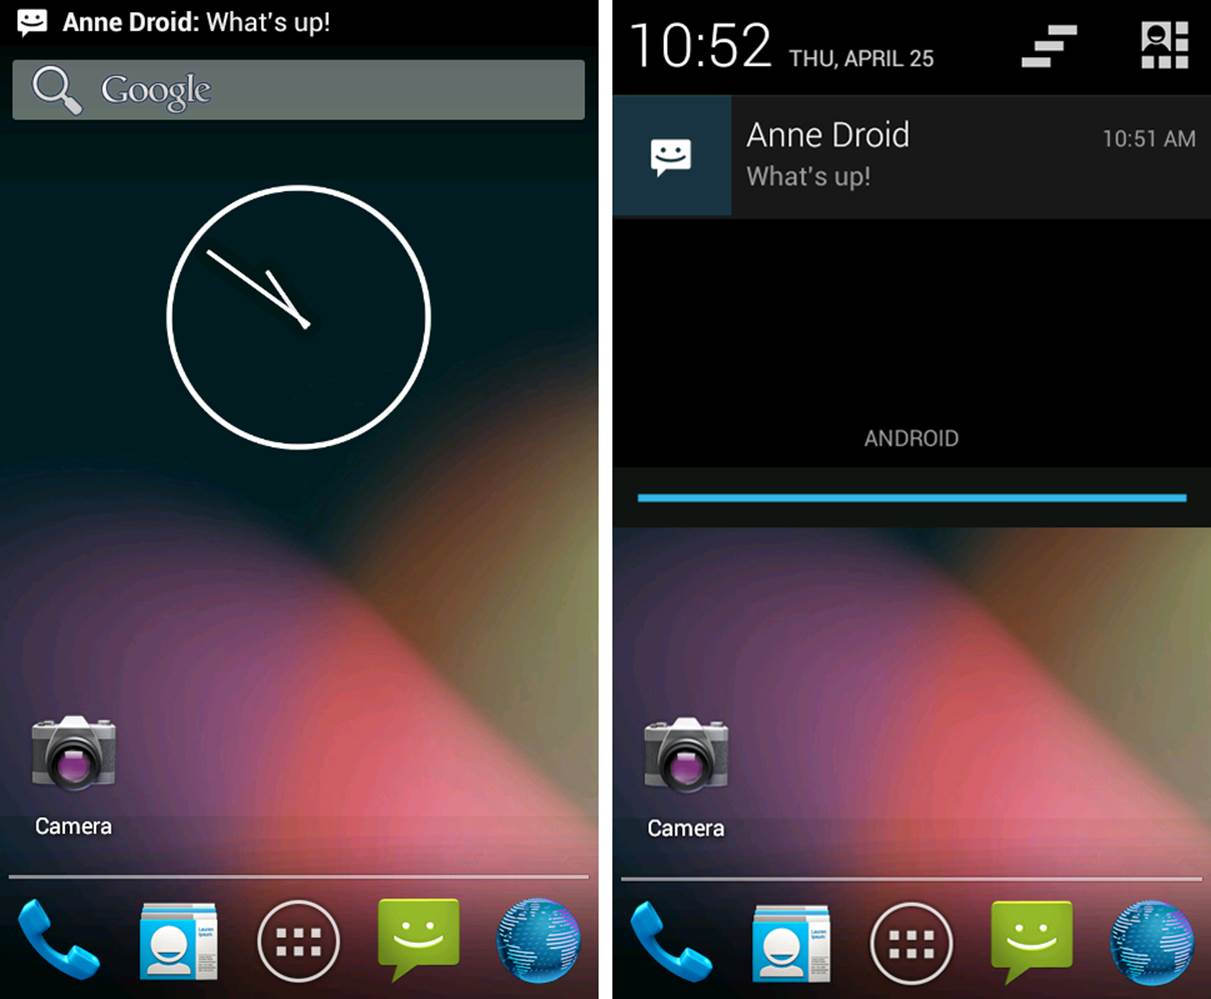
Figure B.11 An incoming SMS from 555-1212 (configured as a contact named Anne Droid), prompted via the Emulator console.
Using the Console to Send GPS Coordinates
You can use the Emulator console to issue GPS commands to the emulator. The command for a simple GPS fix is
geo fix <longitude> <latitude> [<altitude>]
For instance, to set the fix for the emulator to the top of Mount Everest, launch the Maps application in the emulator by selecting Menu, My Location. Then, within the Emulator console, issue the following command to set the device’s coordinates appropriately:
geo fix 86.929837 27.99003 8850
Using the Console to Monitor Network Status
You can monitor the network status of the emulator and change the network speed and latency on the fly. The command for displaying network status is
network status
Typical results from this request look something like this:
Current network status:
download speed: 0 bits/s (0.0 KB/s)
upload speed: 0 bits/s (0.0 KB/s)
minimum latency: 0 ms
maximum latency: 0 ms
OK
Using the Console to Manipulate Power Settings
You can manage “fake” power settings on the emulator using the power commands. You can turn the battery capacity to 99% charged as follows:
power capacity 99
You can turn the AC charging state to off (or on) as follows:
power ac off
You can turn the battery status to the options unknown, charging, discharging, not-charging, or full as follows:
power status full
You can turn the battery present state to true (or false) as follows:
power present true
You can turn the battery health state to the options unknown, good, overheat, dead, overvoltage, or failure as follows:
power health good
You can show the current power settings by issuing the following command:
power display
Typical results from this request look something like this:
power display
AC: offline
status: Full
health: Good
present: true
capacity: 99
OK
Using Other Console Commands
There are also commands for simulating hardware events, port redirection, and checking, starting, and stopping the virtual machine. For example, quality assurance personnel will want to check out the event subcommands, which can be used to simulate key events for automation purposes. It’s likely this is the same interface used by the ADB Exerciser Monkey, which presses random keys and tries to crash your application.
Enjoying the Emulator
Here are a few more tips for using the emulator, just for fun:
![]() On the Home screen, press and hold the screen to change the wallpaper.
On the Home screen, press and hold the screen to change the wallpaper.
![]() If you press and hold an icon (usually an application icon) from within the All Apps launcher, you can place a shortcut to it on your Home screen for easy access. Newer platform versions also enable other options, such as uninstalling the application or getting more information, which is very handy.
If you press and hold an icon (usually an application icon) from within the All Apps launcher, you can place a shortcut to it on your Home screen for easy access. Newer platform versions also enable other options, such as uninstalling the application or getting more information, which is very handy.
![]() If you press and hold an icon on your Home screen, you can move it around or dump it into the trash to get it off the screen.
If you press and hold an icon on your Home screen, you can move it around or dump it into the trash to get it off the screen.
![]() Press and fling the device’s Home screen to the left and right for more space. Depending on which version of Android you’re running, you find a number of other pages, with App Widgets such as Google Search and lots of empty space where you can place other Home screen items.
Press and fling the device’s Home screen to the left and right for more space. Depending on which version of Android you’re running, you find a number of other pages, with App Widgets such as Google Search and lots of empty space where you can place other Home screen items.
![]() A way to add widgets to your Home screen is to launch the All Apps screen, then navigate to Widgets. There are many different widgets available, and selecting one is how you can add those widgets to your Home screen, as shown in Figure B.12.
A way to add widgets to your Home screen is to launch the All Apps screen, then navigate to Widgets. There are many different widgets available, and selecting one is how you can add those widgets to your Home screen, as shown in Figure B.12.
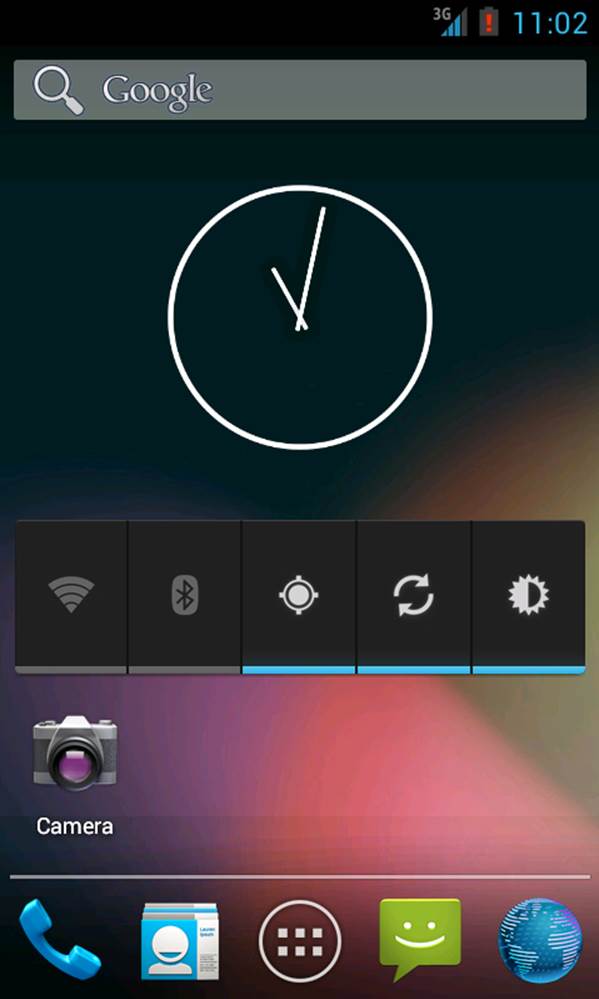
Figure B.12 Customizing the emulator Home screen with a Power Control App Widget.
In other words, the emulator can be personalized in many of the same ways as a regular device. Making these sorts of changes can be useful for comprehensive application testing.
Understanding Emulator Limitations
The emulator is powerful, but it has several important limitations:
![]() It is not a device, so it does not reflect actual behavior, only simulated behavior. Simulated behavior is generally more consistent (less random) than what users experience in real life on real devices.
It is not a device, so it does not reflect actual behavior, only simulated behavior. Simulated behavior is generally more consistent (less random) than what users experience in real life on real devices.
![]() It simulates phone calls and messaging, but you cannot place or receive true calls or SMS messages. There is no support for MMS.
It simulates phone calls and messaging, but you cannot place or receive true calls or SMS messages. There is no support for MMS.
![]() It has a limited ability to determine device state (network state, battery charge).
It has a limited ability to determine device state (network state, battery charge).
![]() It has a limited ability to simulate peripherals (headphones, sensor data).
It has a limited ability to simulate peripherals (headphones, sensor data).
![]() There is limited API support (for example, no SIP or third-party hardware API support). When developing certain categories of applications, such as augmented reality applications, 3D games, and applications that rely upon sensor data, you’re better off using the real hardware.
There is limited API support (for example, no SIP or third-party hardware API support). When developing certain categories of applications, such as augmented reality applications, 3D games, and applications that rely upon sensor data, you’re better off using the real hardware.
![]() Performance is limited (modern devices often perform much better than the emulator at many tasks, such as video and animation).
Performance is limited (modern devices often perform much better than the emulator at many tasks, such as video and animation).
![]() There is limited support for manufacturer- or operator-specific device characteristics, themes, or user experiences. Some manufacturers, however, such as Motorola, have provided emulator add-ons to more closely mimic the behavior of specific devices.
There is limited support for manufacturer- or operator-specific device characteristics, themes, or user experiences. Some manufacturers, however, such as Motorola, have provided emulator add-ons to more closely mimic the behavior of specific devices.
![]() On Android 4.0 and later, the emulator can use attached Web cameras to emulate device hardware cameras. On previous versions of the tools, the camera would respond but took fake pictures.
On Android 4.0 and later, the emulator can use attached Web cameras to emulate device hardware cameras. On previous versions of the tools, the camera would respond but took fake pictures.
![]() There is no USB, Bluetooth, or NFC support.
There is no USB, Bluetooth, or NFC support.
Summary
In this appendix, you learned about one of the most useful tools incorporated with the Android SDK, the Android emulator. The Android emulator is available as part of the Android IDE and is also available from the command line. The emulator is an effective development tool for simulating real devices. When your application requires testing on many different device configurations, rather than purchasing every device you would like to support, the Android Virtual Device Manager allows for varying emulator configurations, making testing cost-effective. Even though the emulator has limitations and is not meant to be a replacement for testing on real hardware, you have learned much of what the emulator has to offer and have discovered firsthand just how close to reality the emulator performs.
Quiz Questions
1. What is the keyboard shortcut to toggle networking of an emulator?
2. What is the keyboard shortcut for toggling between portrait and landscape modes?
3. What is the keyboard shortcut for emulating a trackball with your mouse?
4. Which Activity lifecycle events does pressing the Home key invoke?
5. What is the hardware configuration property for supporting GPU emulation within your AVD configurations?
6. What is the command for connecting to an emulator from the console?
7. What is the command for a simple GPS fix?
Exercises
1. Using the Android documentation, devise a list of the Android emulator category command-line parameters.
2. Using the Android documentation, name the command-line option for enabling GPU emulation.
3. Using the Android documentation, design a command for creating an AVD from the command line.
References and More Information
Android Tools: “Managing Virtual Devices”:
http://d.android.com/tools/devices/index.html
Android Tools: “Managing AVDs with AVD Manager”:
http://d.android.com/tools/devices/managing-avds.html
Android Tools: “Managing AVDs from the Command Line”:
http://d.android.com/tools/devices/managing-avds-cmdline.html
Android Tools: “Android Emulator”:
http://d.android.com/tools/help/emulator.html
Android Tools: “Using the Android Emulator”:
http://d.android.com/tools/devices/emulator.html
Android Tools: “android”:
http://d.android.com/tools/help/android.html
All materials on the site are licensed Creative Commons Attribution-Sharealike 3.0 Unported CC BY-SA 3.0 & GNU Free Documentation License (GFDL)
If you are the copyright holder of any material contained on our site and intend to remove it, please contact our site administrator for approval.
© 2016-2026 All site design rights belong to S.Y.A.