The Android Developer’s Cookbook: Building Applications with the Android SDK, Second Edition (2013)
Chapter 9. Hardware Interface
Android devices have multiple types of hardware that are built in and accessible to developers. Sensors, such as a camera, accelerometer, magnetometer, pressure sensor, temperature sensor, and proximity sensor, are available on most devices. Telephony, Bluetooth, near field communication (NFC), and other wireless connections are also accessible to the developer in some form. This chapter shows how to leverage these hardware APIs to enrich the experience of an application. Note that these recipes are best run on actual Android devices because the emulator might not provide accurate or realistic behavior of hardware interfaces.
Camera
The camera is the most visible and most used sensor in an Android device. It is a selling point for most consumers, and the capabilities are getting better with each generation. Image-processing applications normally work on an image after it is taken, but other applications, such as augmented reality, use the camera in real time with overlays.
There are two ways to access the camera from an application. The first is by declaring an implicit intent as described in Chapter 2, “Application Basics: Activities and Intents.” The implicit intent launches the default camera interface:
Intent intent = new Intent("android.media.action.IMAGE_CAPTURE");
startActivity(intent);
The second way leverages the Camera class, which provides more flexibility in the settings. This creates a custom camera interface, which is the focus of the recipes that follow. Camera hardware access requires explicit permission in the AndroidManifest.xml file:
<uses-permission android:name="android.permission.CAMERA" />
This is implied in the following recipe.
Recipe: Customizing the Camera
Control of the camera is abstracted into various components in the Android system:
![]() Camera class—Accesses the camera hardware
Camera class—Accesses the camera hardware
![]() Camera.Parameters class—Specifies the camera parameters such as picture size, picture quality, flash modes, and method to assign GPS location
Camera.Parameters class—Specifies the camera parameters such as picture size, picture quality, flash modes, and method to assign GPS location
![]() Camera Preview methods—Sets the camera output display and toggles streaming video preview to the display
Camera Preview methods—Sets the camera output display and toggles streaming video preview to the display
![]() SurfaceView class—Dedicates a drawing surface at the lowest level of the view hierarchy as a placeholder to display the camera preview
SurfaceView class—Dedicates a drawing surface at the lowest level of the view hierarchy as a placeholder to display the camera preview
Before describing how these are tied together, the layout structure is introduced. The main layout is shown in Listing 9.1 and includes a SurfaceView class to hold the camera output.
Listing 9.1. res/layout/main.xml
<LinearLayout
xmlns:android="http://schemas.android.com/apk/res/android"
android:layout_width="match_parent"
android:layout_height="match_parent"
android:orientation="vertical">
<SurfaceView android:id="@+id/surface"
android:layout_width="match_parent"
android:layout_height="match_parent">
</SurfaceView>
</LinearLayout>
A control interface can be added on top of this view by using a separate layout, as shown in Listing 9.2. This layout contains a button at the bottom center of the screen to take a picture.
Listing 9.2. res/layout/cameraoverlay.xml
<LinearLayout xmlns:android="http://schemas.android.com/apk/res/android"
android:layout_width="match_parent"
android:layout_height="match_parent"
android:orientation="vertical"
android:gravity="bottom"
android:layout_gravity="bottom">
<LinearLayout
xmlns:android="http://schemas.android.com/apk/res/android"
android:layout_width="match_parent"
android:layout_height="wrap_content"
android:orientation="horizontal"
android:gravity="center_horizontal">
<Button
android:id="@+id/button"
android:layout_width="wrap_content"
android:layout_height="wrap_content"
android:text="take picture"
/>
</LinearLayout>
</LinearLayout>
The main activity involves multiple functionalities. First, the layout is set up as follows:
1. The window settings are changed to be translucent and full screen. (In this instance, they hide the title and notification bar.)
2. The SurfaceView class defined in the previous layout (R.id.surface) is then filled by the camera preview. Each SurfaceView contains a SurfaceHolder class for access and control over the surface. The activity is added as the SurfaceHolder’s callback, and the type is set toSURFACE_TYPE_PUSH_BUFFERS, which means it creates a “push” surface and the object does not own the buffer. This makes video streaming more efficient.
3. A LayoutInflater class is declared to inflate another layout (cameraoverlay.xml) over the original (main.xml) layout.
Next, the activity sets a trigger for taking a picture:
1. An OnClickListener class is added on the button from the cameraoverlay layout, so when clicked, it takes a picture (mCamera.takePicture()).
2. The takePicture() method needs to have the following interfaces implemented:
![]() ShutterCallback() to define any effects needed after the picture is taken, such as a sound to let the user know that the picture has been captured.
ShutterCallback() to define any effects needed after the picture is taken, such as a sound to let the user know that the picture has been captured.
![]() PictureCallback() for raw picture data if the hardware has enough memory to support this feature. (Otherwise, the data might return as null.)
PictureCallback() for raw picture data if the hardware has enough memory to support this feature. (Otherwise, the data might return as null.)
![]() A second PictureCallback() method for the compressed picture data. This calls the local method done() to save the picture.
A second PictureCallback() method for the compressed picture data. This calls the local method done() to save the picture.
Then, the activity saves any pictures that were taken:
1. The compressed picture byte array is saved to a local variable tempData for manipulation. BitmapFactory is used to decode the byte array into a Bitmap object.
2. The media content provider is used to save the bitmap and return a URL. If this main activity were called by another activity, this URL would be the return information to the caller activity to retrieve the image.
3. After this process, finish() is called to kill the activity.
Finally, the activity sets up a response to a change in the surface view:
1. A SurfaceHolder.CallBack interface is implemented. This requires three methods to be overridden:
![]() surfaceCreated()—Called when the surface is first created. Initialize objects here.
surfaceCreated()—Called when the surface is first created. Initialize objects here.
![]() surfaceChanged()—Called after surface creation and when the surface changes (for example, format or size).
surfaceChanged()—Called after surface creation and when the surface changes (for example, format or size).
![]() surfaceDestroyed()—Called between removing the surface from the view of the user and destroying the surface. This is used for memory cleanup.
surfaceDestroyed()—Called between removing the surface from the view of the user and destroying the surface. This is used for memory cleanup.
2. The parameters for the camera are changed when the surface is changed (such as PreviewSize based on the surface size).
These functionalities are in the complete activity shown in Listing 9.3.
Listing 9.3. src/com/cookbook/hardware/CameraApplication.java
package com.cookbook.hardware;
import android.app.Activity;
import android.content.Intent;
import android.graphics.Bitmap;
import android.graphics.BitmapFactory;
import android.graphics.PixelFormat;
import android.hardware.Camera;import android.hardware.Camera.PictureCallback;import android.hardware.Camera.ShutterCallback;
import android.os.Bundle;
import android.provider.MediaStore.Images;
import android.util.Log;
import android.view.LayoutInflater;
import android.view.SurfaceHolder;import android.view.SurfaceView;
import android.view.View;
import android.view.Window;
import android.view.WindowManager;
import android.view.View.OnClickListener;
import android.view.ViewGroup.LayoutParams;
import android.widget.Button;
import android.widget.Toast;
public class CameraApplication extends Activity
implements SurfaceHolder.Callback {
private static final String TAG = "cookbook.hardware";
private LayoutInflater mInflater = null;
Camera mCamera;
byte[] tempData;
boolean mPreviewRunning = false;
private SurfaceHolder mSurfaceHolder;
private SurfaceView mSurfaceView;
Button takepicture;
@Override
public void onCreate(Bundle savedInstanceState) {
super.onCreate(savedInstanceState);
getWindow().setFormat(PixelFormat.TRANSLUCENT);
requestWindowFeature(Window.FEATURE_NO_TITLE);
getWindow().setFlags(WindowManager.LayoutParams.FLAG_FULLSCREEN,
WindowManager.LayoutParams.FLAG_FULLSCREEN);
setContentView(R.layout.main);
mSurfaceView = (SurfaceView)findViewById(R.id.surface);
mSurfaceHolder = mSurfaceView.getHolder();
mSurfaceHolder.addCallback(this);// Uncomment the following line if using less than Android 3.0 (API 11)
// mSurfaceHolder.setType(SurfaceHolder.SURFACE_TYPE_PUSH_BUFFERS);
mInflater = LayoutInflater.from(this);
View overView = mInflater.inflate(R.layout.cameraoverlay, null);
this.addContentView(overView,
new LayoutParams(LayoutParams.MATCH_PARENT,
LayoutParams.MATCH_PARENT));
takepicture = (Button) findViewById(R.id.button);
takepicture.setOnClickListener(new OnClickListener(){
public void onClick(View view){
mCamera.takePicture(mShutterCallback,
mPictureCallback, mjpeg);
}
});
}
ShutterCallback mShutterCallback = new ShutterCallback(){
@Override
public void onShutter() {}
};
PictureCallback mPictureCallback = new PictureCallback() {
public void onPictureTaken(byte[] data, Camera c) {}
};
PictureCallback mjpeg = new PictureCallback() {
public void onPictureTaken(byte[] data, Camera c) {
if(data !=null) {
tempdata=data;
done();
}
}
};
void done() {
Bitmap bm = BitmapFactory.decodeByteArray(tempdata,
0, tempdata.length);
String url = Images.Media.insertImage(getContentResolver(),
bm, null, null);
bm.recycle();
Bundle bundle = new Bundle();
if(url!=null) {
bundle.putString("url", url);
Intent mIntent = new Intent();
mIntent.putExtras(bundle);
setResult(RESULT_OK, mIntent);
} else {
Toast.makeText(this, "Picture cannot be saved",
Toast.LENGTH_SHORT).show();
}
finish();
}
@Override
public void surfaceChanged(SurfaceHolder holder, int format,
int w, int h) {
Log.e(TAG, "surfaceChanged");
try {
if (mPreviewRunning) {
mCamera.stopPreview();
mPreviewRunning = false;
}
Camera.Parameters p = mCamera.getParameters();
p.setPreviewSize(w, h);
mCamera.setParameters(p);
mCamera.setPreviewDisplay(holder);
mCamera.startPreview();
mPreviewRunning = true;
} catch(Exception e) {
Log.d("",e.toString());
}
}
@Override
public void surfaceCreated(SurfaceHolder holder) {
Log.e(TAG, "surfaceCreated");
mCamera = Camera.open();
}
@Override
public void surfaceDestroyed(SurfaceHolder holder) {
Log.e(TAG, "surfaceDestroyed");
mCamera.stopPreview();
mPreviewRunning = false;
mCamera.release();
mCamera=null;
}
}
Note that the camera preview from the camera hardware is not standardized, and some Android devices might show the preview sideways. In this case, simply add the following to the onCreate() method of the CameraPreview activity:
this.setRequestedOrientation(ActivityInfo.SCREEN_ORIENTATION_LANDSCAPE);
Other Sensors
The proliferation of small and low-power micro-electro-mechanical systems (MEMS) is becoming more evident. Smartphones are becoming aggregators of sensors, and the push for sensor accuracy by smartphone manufacturers is driving the need for better-performing devices.
As discussed in Chapter 1, “Overview of Android,” each Android phone has a selection of different sensors. The standard two are a three-axis accelerometer to determine device tilt and a three-axis magnetometer to determine compass direction. Other devices that might be integrated are temperature sensor, proximity sensor, light sensor, and gyroscope. Following are the currently supported sensors in the Android SDK:
![]() TYPE_ACCELEROMETER—Measures acceleration in meters per second squared
TYPE_ACCELEROMETER—Measures acceleration in meters per second squared
![]() TYPE_AMBIENT_TEMPERATURE—Measures temperature in degrees Celsius (replaced TYPE_TEMPERATURE in API Level 14)
TYPE_AMBIENT_TEMPERATURE—Measures temperature in degrees Celsius (replaced TYPE_TEMPERATURE in API Level 14)
![]() TYPE_GRAVITY—Measures movement on a three-dimensional axis including the magnitude of gravity
TYPE_GRAVITY—Measures movement on a three-dimensional axis including the magnitude of gravity
![]() TYPE_GYROSCOPE—Measures orientation based on angular momentum
TYPE_GYROSCOPE—Measures orientation based on angular momentum
![]() TYPE_LIGHT—Measures ambient light in lux
TYPE_LIGHT—Measures ambient light in lux
![]() TYPE_LINEAR_ACCELERATION—Measures movement on a three-dimensional axis without the effects of gravity
TYPE_LINEAR_ACCELERATION—Measures movement on a three-dimensional axis without the effects of gravity
![]() TYPE_MAGNETIC_FIELD—Measures magnetic field in microteslas
TYPE_MAGNETIC_FIELD—Measures magnetic field in microteslas
![]() TYPE_PRESSURE—Measures air pressure
TYPE_PRESSURE—Measures air pressure
![]() TYPE_PROXIMITY—Measures the distance of a blocking object in centimeters
TYPE_PROXIMITY—Measures the distance of a blocking object in centimeters
![]() TYPE_RELATIVE_HUMIDITY—Measures humidity as a percentage
TYPE_RELATIVE_HUMIDITY—Measures humidity as a percentage
![]() TYPE_TEMPERATURE—Measures temperature in degrees Celsius
TYPE_TEMPERATURE—Measures temperature in degrees Celsius
The getSensorList() method lists all the available sensors in a particular device. SensorManager manages all sensors. It provides various sensor event listeners with two callback functions—onSensorChanged() and onAccuracyChanged()—that are used to listen for sensor value and accuracy changes.
Recipe: Getting a Device’s Rotational Attitude
Ideally, the accelerometer measures the Earth’s gravitational field as G = 9.8m/sec2, and the magnetometer measures the Earth’s magnetic field that ranges from H = 30μT to 60μT depending on the device’s location in the world. These two vectors are enough to implement a simple textbook estimation of rotation, as used in the getRotationMatrix() method. This recipe shows how to use this information.
The coordinate system of the device (also known as the body) frame is defined in this way:
![]() The x axis is defined along the direction of the short side of the screen (along the menu keys).
The x axis is defined along the direction of the short side of the screen (along the menu keys).
![]() The y axis is defined along the direction of the long side of the screen.
The y axis is defined along the direction of the long side of the screen.
![]() The z axis is defined as pointing out of the screen.
The z axis is defined as pointing out of the screen.
The coordinate system of the world (also known as inertial) frame is defined in this way:
![]() The x axis is the cross-product of the y axis with the z axis.
The x axis is the cross-product of the y axis with the z axis.
![]() The y axis is tangential to the ground and points toward the North Pole.
The y axis is tangential to the ground and points toward the North Pole.
![]() The z axis points perpendicular to the ground toward the sky.
The z axis points perpendicular to the ground toward the sky.
These two systems are aligned when the device is flat on a table with the screen facing up and pointing north. In this case, the accelerometer measures (0, 0, G) in the x, y, and z directions. At most locations, the magnetic field of the Earth points slightly toward the ground at an angle ![]() and even when the device points north is given by (0, H cos(
and even when the device points north is given by (0, H cos(![]() ), -H sin(
), -H sin(![]() )).
)).
As the device tilts and rotates, SensorManager.getRotationMatrix() provides the 3×3 rotation matrix R[] to get from the device coordinate system to the world coordinate system and 3×3 inclination matrix I[] (rotation around the x axis) to get from the true magnetic field direction to the ideal case (0, H, 0).
Note that if the device is accelerating or is near a strong magnetic field, the values measured do not necessarily reflect the proper reference frame of the Earth.
Another way to express the rotation is by using SensorManager.getOrientation(). This provides the rotation matrix R[] and the attitude vector attitude[]:
![]() attitude[0]—Azimuth (in radians) is the rotation angle around the world-frame z axis required to have the device facing north. It takes values between -PI and PI, with 0 representing north and PI/2 representing east.
attitude[0]—Azimuth (in radians) is the rotation angle around the world-frame z axis required to have the device facing north. It takes values between -PI and PI, with 0 representing north and PI/2 representing east.
![]() attitude[1]—Pitch (in radians) is the rotation angle around the world-frame x axis required to have the device face straight up along the long dimension of the screen. It takes values between -PI and PI with 0 representing device face up, and PI/2 means it points toward the ground.
attitude[1]—Pitch (in radians) is the rotation angle around the world-frame x axis required to have the device face straight up along the long dimension of the screen. It takes values between -PI and PI with 0 representing device face up, and PI/2 means it points toward the ground.
![]() attitude[2]—Roll (in radians) is the rotation angle around the world-frame y axis required to have the device face straight up along the short dimension of the screen. It takes values between -PI and PI with 0 representing device face up, and PI/2 means it points toward the right.
attitude[2]—Roll (in radians) is the rotation angle around the world-frame y axis required to have the device face straight up along the short dimension of the screen. It takes values between -PI and PI with 0 representing device face up, and PI/2 means it points toward the right.
This recipe displays the attitude information to the screen. The layout provides a text with ID attitude, as shown in Listing 9.4.
Listing 9.4. res/layout/main.xml
<?xml version="1.0" encoding="utf-8"?>
<LinearLayout xmlns:android="http://schemas.android.com/apk/res/android"
android:orientation="vertical"
android:layout_width="match_parent"
android:layout_height="match_parent"
>
<TextView android:id="@+id/attitude"
android:layout_width="match_parent"
android:layout_height="wrap_content"
android:text="Azimuth, Pitch, Roll"
/>
</LinearLayout>
The main activity is shown in Listing 9.5. The accelerometer and magnetometer are registered to return data to the sensor listener. SensorEventListener then assigns values based on which sensor triggered the callback. The attitude information is determined based on the rotation matrix, converted from radians to degrees, and is displayed on the screen. Note that the refresh rate of the sensors can take on different values as follows:
![]() SENSOR_DELAY_FASTEST—Fastest update rate possible
SENSOR_DELAY_FASTEST—Fastest update rate possible
![]() SENSOR_DELAY_GAME—Update rate suitable for games
SENSOR_DELAY_GAME—Update rate suitable for games
![]() SENSOR_DELAY_NORMAL—The default update rate suitable for screen orientation changes
SENSOR_DELAY_NORMAL—The default update rate suitable for screen orientation changes
![]() SENSOR_DELAY_UI—Update rate suitable for the user interface
SENSOR_DELAY_UI—Update rate suitable for the user interface
Listing 9.5. src/com/cookbook/orientation/OrientationMeasurements.java
package com.cookbook.orientation;
import android.app.Activity;
import android.hardware.Sensor;import android.hardware.SensorEvent;import android.hardware.SensorEventListener;import android.hardware.SensorManager;
import android.os.Bundle;
import android.widget.TextView;
public class OrientationMeasurements extends Activity {
private SensorManager myManager = null;
TextView tv;
@Override
public void onCreate(Bundle savedInstanceState) {
super.onCreate(savedInstanceState);
setContentView(R.layout.main);
tv = (TextView) findViewById(R.id.attitude);
// Set Sensor Manager
myManager = (SensorManager)getSystemService(SENSOR_SERVICE);
myManager.registerListener(mySensorListener,
myManager.getDefaultSensor(Sensor.TYPE_ACCELEROMETER),
SensorManager.SENSOR_DELAY_GAME);
myManager.registerListener(mySensorListener,
myManager.getDefaultSensor(Sensor.TYPE_MAGNETIC_FIELD),
SensorManager.SENSOR_DELAY_GAME);
}
float[] mags = new float[3];
float[] accels = new float[3];
float[] rotationMat = new float[9];
float[] inclinationMat = new float[9];
float[] attitude = new float[3];
final static double RAD2DEG = 180/Math.PI;
private final SensorEventListener mySensorListener
= new SensorEventListener() {
@Override
public void onSensorChanged(SensorEvent event)
{
int type = event.sensor.getType();
if(type == Sensor.TYPE_MAGNETIC_FIELD) {
mags = event.values;
}
if(type == Sensor.TYPE_ACCELEROMETER) {
accels = event.values;
}
SensorManager.getRotationMatrix(rotationMat,
inclinationMat, accels, mags);
SensorManager.getOrientation(rotationMat, attitude);
tv.setText("Azimuth, Pitch, Roll:\n"
+ attitude[0]*RAD2DEG + "\n"
+ attitude[1]*RAD2DEG + "\n"
+ attitude[2]*RAD2DEG);
}
public void onAccuracyChanged(Sensor sensor, int accuracy) {}
};
}
For consistent data, it is good practice to avoid putting computationally intensive code into the onSensorChanged() method. Also note that SensorEvent is reused for subsequent sensor data. Therefore, for precise data, it is good practice to use the clone() method on event values, for example:
accels = event.values.clone();
This ensures that if the accels data is used elsewhere in the class, it does not keep changing as the sensors continue sampling.
Recipe: Using the Temperature and Light Sensors
The temperature sensor is used to determine the temperature of the phone for internal hardware calibration. The light sensor measures ambient light and is used to automatically adjust the brightness of the screen.
These sensors are not available on all phones, but if they exist, the developer can use them for alternative reasons. The code to read the values from these sensors is shown in Listing 9.6. It can be added to the activity in the previous recipe to see the result.
Listing 9.6. Accessing the Temperature and Light Sensors
private final SensorEventListener mTListener
= new SensorEventListener(){
@Override
public void onAccuracyChanged(Sensor sensor, int accuracy) {}
@Override
public void onSensorChanged(SensorEvent event) {
Log.v("test Temperature",
"onSensorChanged:"+event.sensor.getName());
if(event.sensor.getType()==Sensor.TYPE_AMBIENT_TEMPERATURE){
tv2.setText("Temperature:"+event.values[0]);
}
}
};
private final SensorEventListener mLListener
= new SensorEventListener(){
@Override
public void onAccuracyChanged(Sensor sensor, int accuracy) {}
@Override
public void onSensorChanged(SensorEvent event) {
Log.v("test Light",
"onSensorChanged:"+event.sensor.getName());
if(event.sensor.getType()==Sensor.TYPE_LIGHT){
tv3.setText("Light:"+event.values[0]);
}
}
};
myManager.registerListener(mTListener, sensorManager
.getDefaultSensor(Sensor.TYPE_TEMPERATURE),
SensorManager.SENSOR_DELAY_FASTEST);
myManager.registerListener(mLListener, sensorManager
.getDefaultSensor(Sensor.TYPE_LIGHT),
SensorManager.SENSOR_DELAY_FASTEST);
Telephony
The Android telephony API provides a way to monitor basic phone information, such as the network type, connection state, and utilities for manipulating phone number strings.
Recipe: Using the Telephony Manager
The telephony API has a TelephonyManager class, which is an Android system service, to access information about the telephony services on the device. Some of the telephony information is permission protected, so access must be declared in the AndroidManifest.xml file:
<uses-permission android:name="android.permission.READ_PHONE_STATE" />
The main activity is shown in Listing 9.7.
Listing 9.7. src/com/cookbook/hardware.telephony/TelephonyApp.java
package com.cookbook.hardware.telephony;
import android.app.Activity;
import android.os.Bundle;
import android.telephony.TelephonyManager;
import android.widget.TextView;
public class TelephonyApp extends Activity {
TextView tv1;
TelephonyManager telManager;
@Override
public void onCreate(Bundle savedInstanceState) {
super.onCreate(savedInstanceState);
setContentView(R.layout.main);
tv1 =(TextView) findViewById(R.id.tv1);
telManager = (TelephonyManager)
getSystemService(TELEPHONY_SERVICE);
StringBuilder sb = new StringBuilder();
sb.append("deviceid:")
.append(telManager.getDeviceId()).append("\n");
sb.append("device Software Ver:")
.append(telManager.getDeviceSoftwareVersion()).append("\n");
sb.append("Line number:")
.append(telManager.getLine1Number()).append("\n");
sb.append("Network Country ISO:")
.append(telManager.getNetworkCountryIso()).append("\n");
sb.append("Network Operator:")
.append(telManager.getNetworkOperator()).append("\n");
sb.append("Network Operator Name:")
.append(telManager.getNetworkOperatorName()).append("\n");
sb.append("Sim Country ISO:")
.append(telManager.getSimCountryIso()).append("\n");
sb.append("Sim Operator:")
.append(telManager.getSimOperator()).append("\n");
sb.append("Sim Operator Name:")
.append(telManager.getSimOperatorName()).append("\n");
sb.append("Sim Serial Number:")
.append(telManager.getSimSerialNumber()).append("\n");
sb.append("Subscriber Id:")
.append(telManager.getSubscriberId()).append("\n");
sb.append("Voice Mail Alpha Tag:")
.append(telManager.getVoiceMailAlphaTag()).append("\n");
sb.append("Voice Mail Number:")
.append(telManager.getVoiceMailNumber()).append("\n");
tv1.setText(sb.toString());
}
}
The main layout XML file, shown in Listing 9.8, outputs the screen shown in Figure 9.1.
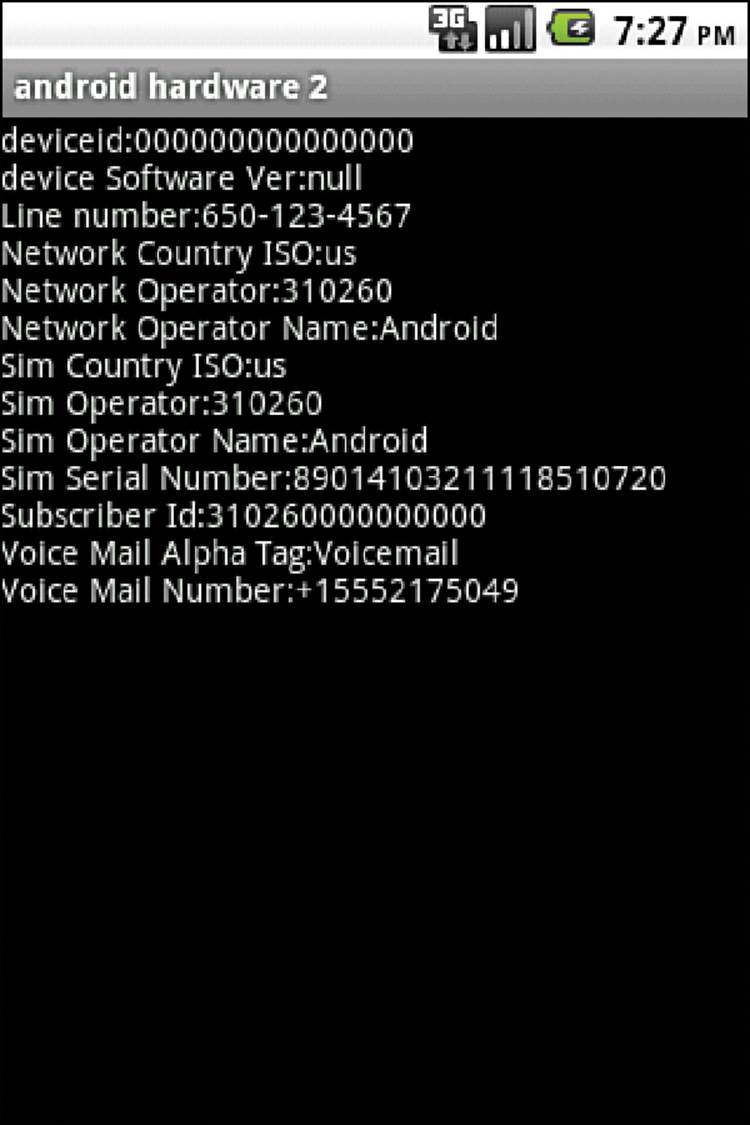
Figure 9.1 Output using the TelephonyManager class
Listing 9.8. res/layout/main.xml
<?xml version="1.0" encoding="utf-8"?>
<LinearLayout xmlns:android="http://schemas.android.com/apk/res/android"
android:orientation="vertical"
android:layout_width="match_parent"
android:layout_height="match_parent"
>
<TextView
android:id="@+id/tv1"
android:layout_width="match_parent"
android:layout_height="wrap_content"
android:text="@string/hello"
/>
</LinearLayout>
Recipe: Listening for Phone States
The PhoneStateListener class provides information about the different telephony states on the device, including network service state, signal strength, and message-waiting indicator (voicemail). Some require explicit permission, as shown in Table 9.1.
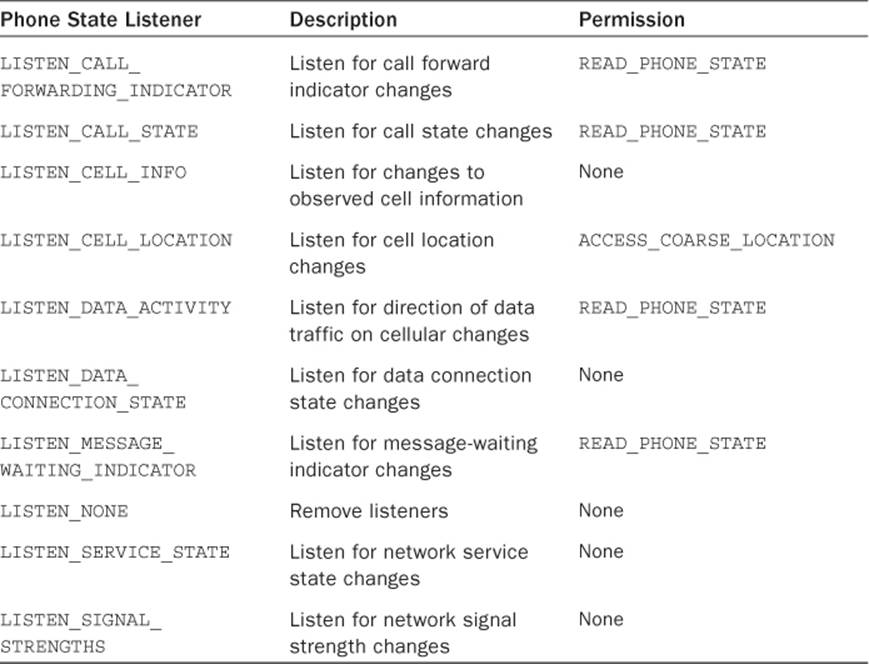
Table 9.1 Possible Phone State Listener Events and Required Permissions
For example, to listen for an incoming call, TelephonyManager needs to register a listener for the PhoneStateListener.LISTEN_CALL_STATE event. The three possible call states are:
![]() CALL_STATE_IDLE—Device not being used for a phone call
CALL_STATE_IDLE—Device not being used for a phone call
![]() CALL_STATE_RINGING—Device receiving a call
CALL_STATE_RINGING—Device receiving a call
![]() CALL_STATE_OFFHOOK—Call in progress
CALL_STATE_OFFHOOK—Call in progress
This recipe lists the phone call state changes as they occur. By using the LogCat tool (discussed in Chapter 16, “Debugging”), these different states can be seen when an incoming call or outgoing call occurs.
The main activity is shown in Listing 9.9. It creates a new inner class extending PhoneStateListener, which overrides the onCallStateChanged method to catch the phone call state changes. Other methods that can be overridden are onCallForwardingIndicator(), onCellLocationChanged(), and onDataActivity().
Listing 9.9. src/com/cookbook/hardware.telephony/HardwareTelephony.java
package com.cookbook.hardware.telephony;
import android.app.Activity;
import android.os.Bundle;
import android.telephony.PhoneStateListener;import android.telephony.TelephonyManager;
import android.util.Log;
import android.widget.TextView;
public class HardwareTelephony extends Activity {
TextView tv1;
TelephonyManager telManager;
@Override
public void onCreate(Bundle savedInstanceState) {
super.onCreate(savedInstanceState);
setContentView(R.layout.main);
tv1 =(TextView) findViewById(R.id.tv1);
telManager = (TelephonyManager)
getSystemService(TELEPHONY_SERVICE);
telManager.listen(new TelListener(),
PhoneStateListener.LISTEN_CALL_STATE);
}
{
private class TelListener extends PhoneStateListener {
public void onCallStateChanged(int state, String incomingNumber)
super.onCallStateChanged(state, incomingNumber);
Log.v("Phone State", "state:"+state);
switch (state) {
case TelephonyManager.CALL_STATE_IDLE:
Log.v("Phone State",
"incomingNumber:"+incomingNumber+" ended");
break;
case TelephonyManager.CALL_STATE_OFFHOOK:
Log.v("Phone State",
"incomingNumber:"+incomingNumber+" picked up");
break;
case TelephonyManager.CALL_STATE_RINGING:
Log.v("Phone State",
"incomingNumber:"+incomingNumber+" received");
break;
default:
break;
}
}
}
}
Recipe: Dialing a Phone Number
To make a phone call from an application, the following permission needs to be added to the AndroidManifest.xml file:
<uses-permission android:name="android.permission.CALL_PHONE" />
The act of making a call can use either the ACTION_CALL or ACTION_DIALER implicit intent. When using the ACTION_DIALER intent, the phone dialer user interface is displayed with the specified phone number ready to call. This is created using:
startActivity(new Intent(Intent.ACTION_CALL,
Uri.parse("tel:15102345678")));
When using the ACTION_CALL intent, the phone dialer is not shown and the specified phone number is just dialed. This is created using:
startActivity(new Intent(Intent.ACTION_DIAL,
Uri.parse("tel:15102345678")));
Bluetooth
Bluetooth from the IEEE standard 802.15.1 is an open, wireless protocol for exchanging data between devices over short distances. A common example is from a phone to a headset, but other applications can include proximity tracking. To communicate between devices using Bluetooth, four steps need to be performed:
1. Turn on Bluetooth for the device.
2. Find paired or available devices in a valid range.
3. Connect to devices.
4. Transfer data between devices.
To use the Bluetooth service, the application needs to have BLUETOOTH permission to receive and transmit and BLUETOOTH_ADMIN permission to manipulate Bluetooth settings or initiate device discovery. These require the following lines in the AndroidManifest.xml file:
<uses-permission android:name="android.permission.BLUETOOTH" />
<uses-permission android:name="android.permission.BLUETOOTH_ADMIN" />
All the Bluetooth API functionality resides in the android.bluetooth package. There are five main classes that provide the features:
![]() BluetoothAdapter—Represents the Bluetooth radio interface that is used to discover devices and instantiate Bluetooth connections
BluetoothAdapter—Represents the Bluetooth radio interface that is used to discover devices and instantiate Bluetooth connections
![]() BluetoothClass—Describes the general characteristics of the Bluetooth device
BluetoothClass—Describes the general characteristics of the Bluetooth device
![]() BluetoothDevice—Represents a remote Bluetooth device
BluetoothDevice—Represents a remote Bluetooth device
![]() BluetoothSocket—Represents the socket or connection point for data exchange with another Bluetooth device
BluetoothSocket—Represents the socket or connection point for data exchange with another Bluetooth device
![]() BluetoothServerSocket—Represents an open socket listening for incoming requests
BluetoothServerSocket—Represents an open socket listening for incoming requests
These are discussed in detail in the following recipes.
Recipe: Turning on Bluetooth
Bluetooth is initialized using the BluetoothAdapter class. The getDefaultAdapter() method retrieves information about the Bluetooth radio interface. If null is returned, it means the device does not support Bluetooth:
BluetoothAdapter myBluetooth = BluetoothAdapter.getDefaultAdapter();
Activate Bluetooth using this BluetoothAdapter instance to query the status. If not enabled, the Android built-in activity ACTION_REQUEST_ENABLE can be used to ask the user to start Bluetooth:
if(!myBluetooth.isEnabled()) {
Intent enableIntent = new Intent(BluetoothAdapter
.ACTION_REQUEST_ENABLE);
startActivity(enableIntent);
}
Recipe: Discovering Bluetooth Devices
After Bluetooth is activated, to discover paired or available Bluetooth devices, use the BluetoothAdapter instance’s startDiscovery() method as an asynchronous call. This requires registering a BroadcastReceiver to listen for ACTION_FOUND events that tell the application whenever a new remote Bluetooth device is discovered. This is shown in the example code in Listing 9.10.
Listing 9.10. Discovering Bluetooth Devices
private final BroadcastReceiver mReceiver = new BroadcastReceiver() {
public void onReceive(Context context, Intent intent) {
String action = intent.getAction();
// When discovery finds a device
if (BluetoothDevice.ACTION_FOUND.equals(action)) {
// Get the BluetoothDevice object from the intent
BluetoothDevice device = intent.getParcelableExtra(
BluetoothDevice.EXTRA_DEVICE);
Log.v("BlueTooth Testing",device.getName() + "\n"
+ device.getAddress());
}
}
};
IntentFilter filter = new IntentFilter(BluetoothDevice.ACTION_FOUND);
registerReceiver(mReceiver, filter);
myBluetooth.startDiscovery();
The BroadcastReceiver can also listen for ACTION_DISCOVERY_STARTED events and ACTION_DISCOVERY_FINISHED events that tell the application when the discovery starts and ends.
For other Bluetooth devices to discover the current device, the application can enable discoverability using the ACTION_REQUEST_DISCOVERABLE intent. This activity displays another dialog on top of the application to ask users whether or not they want to make the current device discoverable:
Intent discoverableIntent
= new Intent(BluetoothAdapter.ACTION_REQUEST_DISCOVERABLE);
startActivity(discoverableIntent);
Recipe: Pairing with Bonded Bluetooth Devices
Bonded Bluetooth devices are those that have already paired with the current device sometime in the past. When pairing two Bluetooth devices, one connects as a server and the other as the client using the BluetoothSocket and BluetoothServerSocket classes. To get the bonded Bluetooth devices, the BluetoothAdapter instance’s method getBondedDevices() can be used:
Set<BluetoothDevice> pairedDevices = mBluetoothAdapter.getBondedDevices();
Recipe: Opening a Bluetooth Socket
To establish a Bluetooth connection with another device, the application needs to implement either the client-side or server-side socket. After the server and client are bonded, there is a connected Bluetooth socket for each device on the same RFCOMM (Bluetooth transport protocol). However, the client device and server device obtain the Bluetooth socket in different ways. The server receives the Bluetooth socket instance when an incoming connection is accepted. The client receives the instance when it opens an RFCOMM channel to the server.
Server-side initialization uses the generic client-server programming model with applications requiring an open socket for accepting incoming requests (similar to TCP). The interface BluetoothServerSocket should be used to create a server listening port. After the connection is accepted, aBluetoothSocket class is returned and can be used to manage the connection.
BluetoothServerSocket can be obtained from the BluetoothAdapter instance’s method listenUsingRfcommWithServiceRecord(). After the socket is obtained, the accept() method starts listening for a request and returns only when either a connection has been accepted or an exception has occurred. The BluetoothSocket class then returns when accept() returns a valid connection. Finally, the close() method should be called to release the server socket and its resources because RFCOMM allows only one connected client per channel at a time. This does not close the connectedBluetoothSocket. The following excerpt shows how these steps are done:
BluetoothServerSocket myServerSocket
= myBluetoothAdapter.listenUsingRfcommWithServiceRecord(name, uuid);
myServerSocket.accept();
myServerSocket.close();
Note that the accept() method is a blocking call and so it should not be implemented inside the main thread. It is a better idea to implement this inside a working thread, as shown in Listing 9.11.
Listing 9.11. Establishing a Bluetooth Socket
private class AcceptThread extends Thread {
private final BluetoothServerSocket mmServerSocket;
public AcceptThread() {
// Use a temporary object that is later assigned
// to mmServerSocket, because mmServerSocket is final
BluetoothServerSocket tmp = null;
try {
// MY_UUID is the app's UUID string, also used by the client
tmp = mAdapter.listenUsingRfcommWithServiceRecord(NAME,MY_UUID);
} catch (IOException e) { }
mmServerSocket = tmp;
}
public void run() {
BluetoothSocket socket = null;
// Keep listening until an exception occurs or a socket is returned
while (true) {
try {
socket = mmServerSocket.accept();
} catch (IOException e) {
break;
}
// If a connection was accepted
if (socket != null) {
// Do work to manage the connection (in a separate thread)
manageConnectedSocket(socket);
mmServerSocket.close();
break;
}
}
}
/** will cancel the listening socket and cause thread to finish */
public void cancel() {
try {
mmServerSocket.close();
} catch (IOException e) { }
}
}
To implement the client device mechanism, the BluetoothDevice needs to be obtained from the remote device. Then the socket needs to be retrieved to make the connection. To retrieve the BluetoothSocket class, use the BluetoothDevice method createRfcommSocketToServiceRecord(UUID)with the UUID used in listenUsingRfcommWithServiceRecord. After the socket is retrieved, the connect() method can be used to initiate a connection. This method is also blocking and should also be implemented in a separate thread, as shown in Listing 9.12. The UUID is inside theBluetoothDevice object that is found during discovery.
Listing 9.12. Connecting to a Bluetooth Socket
private class ConnectThread extends Thread {
private final BluetoothSocket mmSocket;
private final BluetoothDevice mmDevice;
public ConnectThread(BluetoothDevice device) {
// Use a temporary object that is later assigned to mmSocket,
// because mmSocket is final
BluetoothSocket tmp = null;
mmDevice = device;
// Get a BluetoothSocket to connect with the given BluetoothDevice
try {
// MY_UUID is the app's UUID string, also used by the server code
tmp = device.createRfcommSocketToServiceRecord(MY_UUID);
} catch (IOException e) { }
mmSocket = tmp;
}
public void run() {
// Cancel discovery because it will slow down the connection
mAdapter.cancelDiscovery();
try {
// Connect the device through the socket. This will block
// until it succeeds or throws an exception.
mmSocket.connect();
} catch (IOException connectException) {
// Unable to connect; close the socket and get out
try {
mmSocket.close();
} catch (IOException closeException) { }
return;
}
// Do work to manage the connection (in a separate thread)
manageConnectedSocket(mmSocket);
}
/** will cancel an in-progress connection and close the socket */
public void cancel() {
try {
mmSocket.close();
} catch (IOException e) { }
}
}
After the connection is established, the normal InputStream and OutputStream can be used to read and send data between the Bluetooth devices.
Recipe: Using Device Vibration
Device vibration is a common feature in all cellular phones. To control vibration on an Android device, a permission must be defined in the AndroidManifest.xml file:
<uses-permission android:name="android.permission.VIBRATE" />
Then, using the device vibrator is just another Android system service provided by the framework. It can be accessed using the Vibrator class:
Vibrator myVib = (Vibrator) getSystemService(Context.VIBRATOR_SERVICE);
With a Vibrator instance, just call the vibrate() method to start device vibration:
myVib.vibrate(3000); //Vibrate for 3 seconds
If needed, the cancel() method can be used to stop a vibration before it finishes:
myVib.cancel(); //Cancel the vibration
It is also possible to vibrate in a rhythmic pattern. This is specified as a vibration-pause sequence. For example:
long[] pattern = {2000,1000,5000};
myVib.vibrate(pattern,1);
This causes the device to wait for 2 seconds and then start a pattern of vibrating for 1 second, then pausing for 5 seconds, indefinitely. The second argument to the vibrate() method is the index of the pattern at which to start repeating. This can be set to -1 to cause no repeat of the pattern at all.
Recipe: Accessing the Wireless Network
Many applications use the network connectivity of the Android device. To better understand how to handle application behavior due to network changes, Android provides access to the underlying network state. This is done by broadcasting intents to notify application components of changes in network connectivity and offer control over network settings and connections.
Android provides a system service through the ConnectivityManager class to let developers monitor the connectivity state, set the preferred network connection, and manage connectivity failover. This is initialized as follows:
ConnectivityManager myNetworkManager
= (ConnectivityManager) getSystemService(Context.CONNECTIVITY_SERVICE);
To use the connectivity manager, the appropriate permission is needed in the AndroidManifest.xml file for the application:
<uses-permission android:name="android.permission.ACCESS_NETWORK_STATE" />
The connectivity manager does provide the two methods, getNetworkInfo() and getActiveNetworkInfo(), to obtain the details of the current network in a NetworkInfo class. However, a better way to monitor the network changes is to create a broadcast receiver, as shown in the following example:
private BroadcastReceiver mNetworkReceiver = new BroadcastReceiver(){
public void onReceive(Context c, Intent i){
Bundle b = i.getExtras();
NetworkInfo ni = (NetworkInfo)
b.get(ConnectivityManager.EXTRA_NETWORK_INFO);
if(ni.isConnected()){
//Do the operation
}else{
//Announce to the user the network problem
}
}
};
After a broadcast receiver is defined, it can be registered to listen for ConnectivityManager.CONNECTIVITY_ACTION intents:
this.registerReceiver(mNetworkReceiver,
new IntentFilter(ConnectivityManager.CONNECTIVITY_ACTION));
The mNetworkReceiver class defined previously extracts only the NetworkInfo from ConnectivityManager.EXTRA_NETWORK_INFO. However, the connectivity manager has more information that can be exposed. Following are the different types of information available:
![]() EXTRA_EXTRA_INFO—Contains additional information about the network state
EXTRA_EXTRA_INFO—Contains additional information about the network state
![]() EXTRA_IS_FAILOVER—Returns a boolean value if the current connection is the result of a failover network
EXTRA_IS_FAILOVER—Returns a boolean value if the current connection is the result of a failover network
![]() EXTRA_NETWORK_INFO—Returns a NetworkInfo object
EXTRA_NETWORK_INFO—Returns a NetworkInfo object
![]() EXTRA_NETWORK_TYPE—Triggers a CONNECTIVITY_ACTION broadcast
EXTRA_NETWORK_TYPE—Triggers a CONNECTIVITY_ACTION broadcast
![]() EXTRA_NO_CONNECTIVITY—Returns a boolean value if there is no network connectivity
EXTRA_NO_CONNECTIVITY—Returns a boolean value if there is no network connectivity
![]() EXTRA_OTHER_NETWORK_INFO—Returns a NetworkInfo object about the available network for failover when the network is disconnected
EXTRA_OTHER_NETWORK_INFO—Returns a NetworkInfo object about the available network for failover when the network is disconnected
![]() EXTRA_REASON—Returns a String value that describes the reason for connection failure
EXTRA_REASON—Returns a String value that describes the reason for connection failure
ConnectivityManager also provides the capability to control network hardware and failover preferences. The setNetworkPreference() method can be used to select a network type. To change the network, the application needs to set another permission in the AndroidManifest.xml file:
<uses-permission android:name="android.permission.CHANGE_NETWORK_STATE" />
Near Field Communication (NFC)
NFC is a wireless technology that is built into many Android devices. When there are two devices with NFC capability, and small amounts of data such as playlists, web addresses, and contact information are to be moved, NFC is a fantastic medium for communication. It is ideal because it does not require complicated passwords, discovery, or device pairing. When using Android Beam, a simple tap on one device with an accept dialog tap on the other will transfer data using NFC between devices.
NFC reads and transfers small bits of data between devices through the use of encoded NFC Data Exchange Format (NDEF) messages. Each NDEF message contains at least one NDEF record. This record will contain the following fields:
![]() 3-bit type name format (TNF)
3-bit type name format (TNF)
![]() Variable-length type
Variable-length type
![]() Variable-length ID (optional)
Variable-length ID (optional)
![]() Variable-length payload
Variable-length payload
The 3-bit TNF field can contain many different values that are used by Android as part of the tag dispatch system to decide how to map a MIME type or URI to the NDEF message being read. If the tag is recognized, the ACTION_NDEF_DISCOVERED intent is used and an activity that handles this intent will be started. If no activities are registered when a tag is scanned or if the data is unrecognized, the ACTION_TECH_DISCOVERED intent is started and the user will be prompted to choose a program to open. When developing an application, developers may want to take advantage of the foreground dispatch system to keep the Android system from exiting the app and opening another to process the NFC data.
Using NFC in applications requires permission to access the NFC hardware. The following can be added to the AndroidManifest.xml file:
<uses-permission android:name="android.permission.NFC" />
By using a minimum SDK level of 10, read and write support for NFC, as well as enhanced NDEF options, is available for use in applications. For those wanting to use Android Beam, a minimum level of 14 must be used.
Recipe: Reading NFC Tags
Working with NFC is generally tied to reading and writing. The code in Listing 9.13 can be used to build a reader that will return some of the data stored in NFC tags. This data is then shown inside a TextView.
Listing 9.13. src/com/cookbook/nfcreader/MainActivity.java
package com.cookbook.nfcreader;
import com.cookbook.nfcreader.R;
import android.app.Activity;
import android.app.PendingIntent;
import android.content.Intent;
import android.content.IntentFilter;
import android.nfc.NdefMessage;
import android.nfc.NdefRecord;
import android.nfc.NfcAdapter;
import android.os.Bundle;
import android.os.Parcelable;
import android.util.Log;
import android.widget.TextView;
public class MainActivity extends Activity {
protected NfcAdapter nfcAdapter;
protected PendingIntent nfcPendingIntent;
private static final String TAG = MainActivity.class.getSimpleName();
@Override
protected void onCreate(Bundle savedInstanceState) {
super.onCreate(savedInstanceState);
setContentView(R.layout.activity_main);
nfcAdapter = NfcAdapter.getDefaultAdapter(this);
nfcPendingIntent = PendingIntent.getActivity(this, 0,
new Intent(this, this.getClass()).addFlags(Intent.FLAG_ACTIVITY_SINGLE_TOP),
0);
}
public void enableForegroundMode() {
Log.d(TAG, "enableForegroundMode");
IntentFilter tagDetected = new IntentFilter(NfcAdapter.ACTION_TAG_DISCOVERED);
IntentFilter[] writeTagFilters = new IntentFilter[] {tagDetected};
nfcAdapter.enableForegroundDispatch(this, nfcPendingIntent,
writeTagFilters, null);
}
public void disableForegroundMode() {
Log.d(TAG, "disableForegroundMode");
nfcAdapter.disableForegroundDispatch(this);
}
@Override
public void onNewIntent(Intent intent) {
Log.d(TAG, "onNewIntent");
String stringOut = "";
if (NfcAdapter.ACTION_TAG_DISCOVERED.equals(intent.getAction())) {
TextView textView = (TextView) findViewById(R.id.main_tv);
Parcelable[] messages =
intent.getParcelableArrayExtra(NfcAdapter.EXTRA_NDEF_MESSAGES);
if (messages != null) {
for (int i = 0; i < messages.length; i++) {
NdefMessage message = (NdefMessage)messages[i];
NdefRecord[] records = message.getRecords();
for (int j = 0; j < records.length; j++) {
NdefRecord record = records[j];
stringOut += "TNF: " + record.getTnf() + "\n";
stringOut += "MIME Type: " + new String(record.getType()) + "\n";
stringOut += "Payload: " + new String(record.getPayload()) + "\n\n";
textView.setText(stringOut);
}
}
}
}
}
@Override
protected void onResume() {
Log.d(TAG, "onResume");
super.onResume();
enableForegroundMode();
}
@Override
protected void onPause() {
Log.d(TAG, "onPause");
super.onPause();
disableForegroundMode();
}
}
The application built in Listing 9.13 uses the foreground dispatch system to ensure that the application is used to process any scanned NFC tags. Note that in the onPause() method, disableForegroundMode() is called to stop the application from being the default handler for NFC tags. TheonResume() method restores this capability.
Recipe: Writing NFC Tags
Android devices that support NFC are also able to write to unprotected NFC tags. Listing 9.14 shows a sample application that will write information to an NFC tag. Note that when writing to NFC tags, the information on the card will be erased and replaced with the information written to it.
Listing 9.14. src/com/cookbook/nfcwriter/MainActivity.java
package com.cookbook.nfcwriter;
import java.io.IOException;
import java.nio.charset.Charset;
import android.app.Activity;
import android.app.PendingIntent;
import android.content.Intent;
import android.content.IntentFilter;
import android.nfc.NdefMessage;
import android.nfc.NdefRecord;
import android.nfc.NfcAdapter;
import android.nfc.Tag;
import android.nfc.tech.Ndef;
import android.nfc.tech.NdefFormatable;
import android.os.Bundle;
import android.view.View;
import android.view.View.OnClickListener;
import android.widget.Button;
import android.widget.Toast;
public class MainActivity extends Activity implements OnClickListener {
protected NfcAdapter nfcAdapter;
private Button mainButton;
private boolean mInWriteMode;
@Override
protected void onCreate(Bundle savedInstanceState) {
super.onCreate(savedInstanceState);
setContentView(R.layout.activity_main);
nfcAdapter = NfcAdapter.getDefaultAdapter(this);
mainButton = (Button)findViewById(R.id.main_button);
mainButton.setOnClickListener(this);
}
public void onClick(View v) {
displayMessage("Touch and hold tag against phone to write.");
beginWrite();
}
@Override
protected void onPause() {
super.onPause();
stopWrite();
}
@Override
public void onNewIntent(Intent intent) {
if(mInWriteMode) {
mInWriteMode = false;
Tag tag = intent.getParcelableExtra(NfcAdapter.EXTRA_TAG);
writeTag(tag);
}
}
private void beginWrite() {
mInWriteMode = true;
PendingIntent pendingIntent = PendingIntent.getActivity(this, 0,
new Intent(this, getClass()).addFlags(Intent.FLAG_ACTIVITY_SINGLE_TOP), 0);
IntentFilter tagDetected =
new IntentFilter(NfcAdapter.ACTION_TAG_DISCOVERED);
IntentFilter[] filters = new IntentFilter[] { tagDetected };
nfcAdapter.enableForegroundDispatch(this, pendingIntent, filters, null);
}
private void stopWrite() {
nfcAdapter.disableForegroundDispatch(this);
}
private boolean writeTag(Tag tag) {
byte[] payload = "Text stored in an NFC tag".getBytes();
byte[] mimeBytes = "text/plain".getBytes(Charset.forName("US-ASCII"));
NdefRecord cardRecord = new NdefRecord(NdefRecord.TNF_MIME_MEDIA,
mimeBytes, new byte[0], payload);
NdefMessage message = new NdefMessage(new NdefRecord[] { cardRecord });
try {
Ndef ndef = Ndef.get(tag);
if (ndef != null) {
ndef.connect();
if (!ndef.isWritable()) {
displayMessage("This is a read-only tag.");
return false;
}
int size = message.toByteArray().length;
if (ndef.getMaxSize() < size) {
displayMessage("There is not enough space to write.");
return false;
}
ndef.writeNdefMessage(message);
displayMessage("Write successful.");
return true;
} else {
NdefFormatable format = NdefFormatable.get(tag);
if (format != null) {
try {
format.connect();
format.format(message);
displayMessage("Write successful\nLaunch a scanning app or scan and choose to read.");
return true;
} catch (IOException e) {
displayMessage("Unable to format tag to NDEF.");
return false;
}
} else {
displayMessage("Tag doesn't appear to support NDEF format.");
return false;
}
}
} catch (Exception e) {
displayMessage("Write failed.");
}
return false;
}
private void displayMessage(String message) {
Toast.makeText(MainActivity.this, message, Toast.LENGTH_LONG).show();
}
}
The application built in Listing 9.14 will write “Text stored in an NFC tag” as the payload for the message with a MIME type of “text/plain.” You can see these values being placed in the writeTag() method. By changing these values, you can change how the NFC tag will be handled by the Android system.
Universal Serial Bus (USB)
Starting with Android 3.1, USB devices can be used in Android in either host or accessory mode. Older Android devices running Gingerbread 2.3.4 can use accessory mode provided that the Google support APIs are included. The following two classes are used when developing for accessory mode:
![]() UsbManager—Allows communication with connected USB accessories
UsbManager—Allows communication with connected USB accessories
![]() UsbAccessory—Represents a USB device with methods for retrieving information about it
UsbAccessory—Represents a USB device with methods for retrieving information about it
Host mode allows the Android-powered device to control whatever is connected. This also means that the Android device will be powering the USB device. Examples of devices that would be used in host mode include keyboards, mice, and other input devices. Host mode is available in Android 3.1 and above. The following classes are used when developing in host mode:
![]() UsbManager—Accesses the state of USB connections and communicates with USB devices
UsbManager—Accesses the state of USB connections and communicates with USB devices
![]() UsbDevice—Represents the USB device that is plugged in
UsbDevice—Represents the USB device that is plugged in
![]() UsbInterface—An interface on a UsbDevice
UsbInterface—An interface on a UsbDevice
![]() UsbEndpoint—An endpoint of a UsbInterface
UsbEndpoint—An endpoint of a UsbInterface
![]() UsbDeviceConnection—Sends and receives messages to a USB device
UsbDeviceConnection—Sends and receives messages to a USB device
![]() UsbRequest—Represents a USB request packet
UsbRequest—Represents a USB request packet
![]() UsbConstants—Constants that are used for the USB protocol
UsbConstants—Constants that are used for the USB protocol
Accessory mode allows the USB device to power the Android device. USB devices that use accessory mode must follow the rules of the Android Accessory Development Kit (ADK). Examples of USB devices that would be used in accessory mode include external diagnostic devices, music controllers, docking stations, and other similar devices.
When developing with a USB device plugged in, developers will probably not be able to use USB debugging. When this is the case, LogCat can still be used, but over a wireless connection. This is done by using ADB (Android Debug Bridge) over TCP. To do this, start with the Android device in debug mode and connected to a computer. Enable Wi-Fi on the device and find the current IP address. Open the terminal or command prompt and navigate to the SDK installation directory and into the platform-tools directory. Type the following into the command prompt or terminal:
adb tcpip 5555
This will change the connection mode from USB to TCP/IP. If this is not changed, attempts to connect to the device over the network will fail. To connect to the device, type the following, where DEVICEIPADDRESS is the IP address of the device to be connected:
adb connect DEVICEIPADDRESS:5555
Note that for some operating systems, the port (:5555) does not need to be added to the command. The port number is not limited to 5555; any open port can be used. If the connect command is run with the port and it fails, try running the command again without specifying any port number.
Once connected, all of the commands can be run that would normally run under ADB. Of these, adb logcat is probably the most important.
After using the network to debug an application and to revert to USB, type adb usb into the console and ADB will restart, looking for USB connections.
For more information on ADB and how to use it, visit http://developer.android.com/tools/help/adb.html.
All materials on the site are licensed Creative Commons Attribution-Sharealike 3.0 Unported CC BY-SA 3.0 & GNU Free Documentation License (GFDL)
If you are the copyright holder of any material contained on our site and intend to remove it, please contact our site administrator for approval.
© 2016-2026 All site design rights belong to S.Y.A.