The Android Developer’s Cookbook: Building Applications with the Android SDK, Second Edition (2013)
Chapter 10. Networking
Network-based applications provide increased value for a user, in that content can be dynamic and interactive. Networking enables multiple features, from social networking to cloud computing.
This chapter focuses on the network state, short message service (SMS), Internet resource-based applications, and social networking applications. Knowing the network state is important to applications that fetch or update information that is available through a network connection. SMS is a communication service component that enables the exchange of short text messages between mobile phone devices. Internet resource-based applications rely on web content such as HTML (HyperText Markup Language), XML (eXtensible Markup Language), and JSON (JavaScript Object Notation). Social networking applications, such as Twitter, are important methods for people to connect with each other.
Reacting to the Network State
Knowing how and if a device is connected to a network is a very important facet of Android development. Applications that stream information from a network server may need to warn users about the large amount of data that may be charged to their accounts. Application latency issues may also be a concern. Making some simple queries enables users to find out if they are currently connected through a network device and how to react when the connection state changes.
Recipe: Checking for Connectivity
The ConnectivityManager is used for determining the connectivity of a device. This recipe can be used to determine what network interfaces are connected to a network. Listing 10.1 uses the ConnectivityManager to display if the device is connected via Wi-Fi or Bluetooth.
Listing 10.1. src/com/cookbook/connectivitycheck/MainActivity.java
package com.cookbook.connectivitycheck;
import android.app.Activity;
import android.content.Context;
import android.net.ConnectivityManager;
import android.net.NetworkInfo;
import android.os.Bundle;
import android.widget.TextView;
public class MainActivity extends Activity {
TextView tv;
@Override
protected void onCreate(Bundle savedInstanceState) {
super.onCreate(savedInstanceState);
setContentView(R.layout.activity_main);
tv = (TextView) findViewById(R.id.tv_main);
try {
String service = Context.CONNECTIVITY_SERVICE;
ConnectivityManager cm = (ConnectivityManager)getSystemService(service);
NetworkInfo activeNetwork = cm.getActiveNetworkInfo();
boolean isWiFi = activeNetwork.getType() == ConnectivityManager.TYPE_WIFI;
boolean isBT = activeNetwork.getType() == ConnectivityManager.TYPE_BLUETOOTH;
tv.setText("WiFi connected: "+isWiFi+"\nBluetooth connected: "+isBT);
} catch(Exception nullPointerException) {
tv.setText("No connected networks found");
}
}
}
Listing 10.1 uses the constants TYPE_WIFI and TYPE_BLUETOOTH to check for connectivity on these networks. In addition to TYPE_WIFI and TYPE_BLUETOOTH, the following constants can also be used to determine connectivity:
![]() TYPE_DUMMY—For dummy data connections
TYPE_DUMMY—For dummy data connections
![]() TYPE_ETHERNET—For the default Ethernet connection
TYPE_ETHERNET—For the default Ethernet connection
![]() TYPE_MOBILE—For the default mobile data connection
TYPE_MOBILE—For the default mobile data connection
![]() TYPE_MOBILE_DUN—For DUN-specific mobile data connections
TYPE_MOBILE_DUN—For DUN-specific mobile data connections
![]() TYPE_MOBILE_HIPRI—For high-priority mobile data connections
TYPE_MOBILE_HIPRI—For high-priority mobile data connections
![]() TYPE_MOBILE_MMS—For an MMS-specific mobile data connection
TYPE_MOBILE_MMS—For an MMS-specific mobile data connection
![]() TYPE_MOBILE_SUPL—For an SUPL-specific mobile data connection
TYPE_MOBILE_SUPL—For an SUPL-specific mobile data connection
![]() TYPE_WIMAX—For the default WiMAX data connection
TYPE_WIMAX—For the default WiMAX data connection
Figure 10.1 shows an application running with the code from Listing 10.1. Even though Bluetooth has been enabled, it reports false for being connected because it does not currently have an active connection.
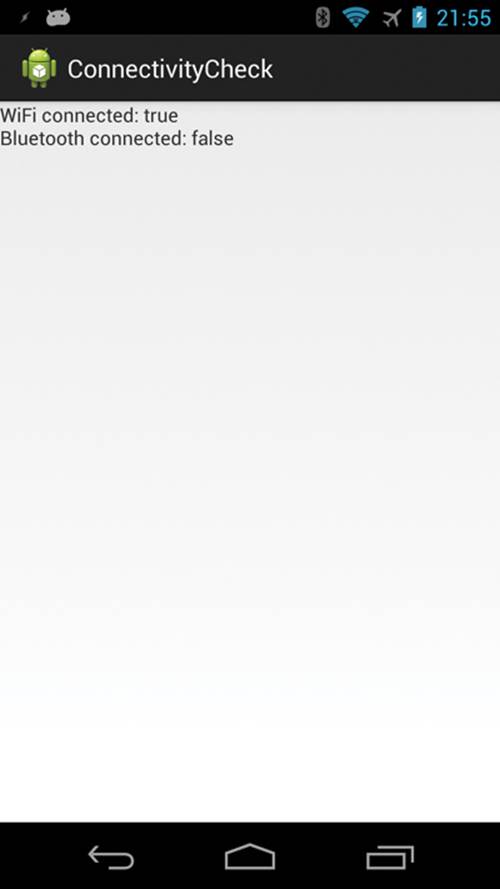
Figure 10.1 Checking for device connectivity
Recipe: Receiving Connectivity Changes
A broadcast receiver can be used to check the status of network connectivity when it is necessary to react to changes in connectivity status.
A broadcast receiver can be declared in the application manifest, or it can be a subclass inside the main activity. While both are accessible, this recipe uses a subclass in conjunction with the onCreate() and onDestroy() methods to register and unregister the receiver.
As this recipe checks for connectivity, the following permissions need to be added to the application manifest:
<uses-permission android:name="android.permission.INTERNET" />
<uses-permission android:name="android.permission.ACCESS_NETWORK_STATE" />
Listing 10.2 shows the code needed to check for connectivity changes. When a change is detected, the application will display a toast message informing the user of the change.
Listing 10.2. src/com/cookbook/connectivitychange/MainActivity.java
package com.cookbook.connectivitychange;
import android.app.Activity;
import android.content.BroadcastReceiver;
import android.content.Context;
import android.content.Intent;
import android.content.IntentFilter;
import android.net.ConnectivityManager;
import android.net.NetworkInfo;
import android.os.Bundle;
import android.widget.Toast;
public class MainActivity extends Activity {
private ConnectivityReceiver receiver = new ConnectivityReceiver();
@Override
protected void onCreate(Bundle savedInstanceState) {
super.onCreate(savedInstanceState);
setContentView(R.layout.activity_main);
IntentFilter filter = new IntentFilter(ConnectivityManager.CONNECTIVITY_ACTION);
receiver = new ConnectivityReceiver();
this.registerReceiver(receiver, filter);
}
@Override
public void onDestroy() {
super.onDestroy();
if (receiver != null) {
this.unregisterReceiver(receiver);
}
}
public class ConnectivityReceiver extends BroadcastReceiver {
@Override
public void onReceive(Context context, Intent intent) {
ConnectivityManager conn = (ConnectivityManager)context.getSystemService(Context.CONNECTIVITY_SERVICE);
NetworkInfo networkInfo = conn.getActiveNetworkInfo();
if (networkInfo != null && networkInfo.getType() == ConnectivityManager.TYPE_WIFI) {
Toast.makeText(context, "WiFi is connected", Toast.LENGTH_SHORT).show();
} else if (networkInfo != null) {
Toast.makeText(context, "WiFi is disconnected", Toast.LENGTH_SHORT).show();
} else {
Toast.makeText(context, "No active connection", Toast.LENGTH_SHORT).show();
}
}
}
}
Figure 10.2 shows the message that appears when Wi-Fi is connected. Figure 10.3 shows the message that appears when both Wi-Fi and mobile data have been disconnected.
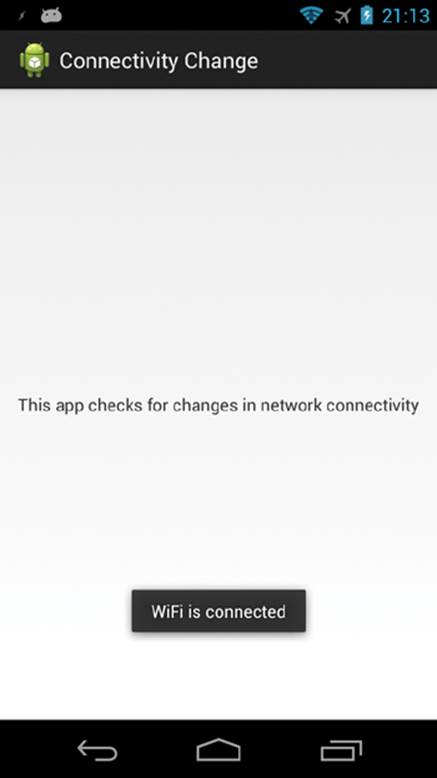
Figure 10.2 When Wi-Fi is enabled, a toast message appears informing the user of the connection
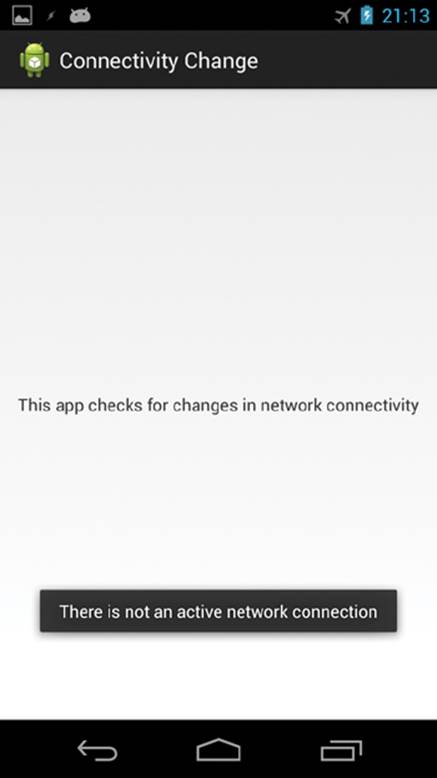
Figure 10.3 Wi-Fi and mobile data are disabled, so a toast informing the user of the lack of network connectivity is displayed
Using SMS
The Android Framework provides full access to SMS functionality using the SmsManager class. Early versions of Android placed SmsManager in the android.telephony.gsm package. Since Android 1.5, where SmsManager supports both GSM and CDMA mobile telephony standards, theSmsManager class is now placed in the android.telephony package.
Sending an SMS through the SmsManager class is fairly straightforward:
1. Set the permission in the AndroidManifest.xml file to send SMS:
<uses-permission android:name="android.permission.SEND_SMS" />
2. Use the SmsManager.getDefault() static method to get an SMS manager instance:
SmsManager mySMS = SmsManager.getDefault();
3. Define the destination phone number and the message that is to be sent. Use the sendTextMesssage() method to send the SMS to another device:
String destination = "16501234567";
String msg = "Sending my first message";
mySMS.sendTextMessage(destination, null, msg, null, null);
This is sufficient to send an SMS message. However, the three additional parameters in the previous call set to null can be used as follows:
![]() The second parameter is the specific SMS service center to use. Set this to null to use the default service center from the carrier.
The second parameter is the specific SMS service center to use. Set this to null to use the default service center from the carrier.
![]() The fourth parameter is a PendingIntent to track if the SMS message was sent.
The fourth parameter is a PendingIntent to track if the SMS message was sent.
![]() The fifth parameter is a PendingIntent to track if the SMS message was received.
The fifth parameter is a PendingIntent to track if the SMS message was received.
To use the fourth and fifth parameters, a sent message and a delivered message intent need to be declared:
String SENT_SMS_FLAG = "SENT_SMS";
String DELIVER_SMS_FLAG = "DELIVER_SMS";
Intent sentIn = new Intent(SENT_SMS_FLAG);
PendingIntent sentPIn = PendingIntent.getBroadcast(this,0,sentIn,0);
Intent deliverIn = new Intent(SENT_SMS_FLAG);
PendingIntent deliverPIn
= PendingIntent.getBroadcast(this,0,deliverIn,0);
Then, a BroadcastReceiver class needs to be registered for each PendingIntent to receive the result:
BroadcastReceiver sentReceiver = new BroadcastReceiver(){
@Override public void onReceive(Context c, Intent in) {
switch(getResultCode()){
case Activity.RESULT_OK:
//sent SMS message successfully;
break;
default:
//sent SMS message failed
break;
}
}
};
BroadcastReceiver deliverReceiver = new BroadcastReceiver(){
@Override public void onReceive(Context c, Intent in) {
//SMS delivered actions
}
};
registerReceiver(sentReceiver, new IntentFilter(SENT_SMS_FLAG));
registerReceiver(deliverReceiver, new IntentFilter(DELIVER_SMS_FLAG));
Most SMSs are restricted to 140 characters per text message. To make sure the message is within this limitation, use the divideMessage() method that divides the text into fragments in the maximum SMS message size. Then, the method sendMultipartTextMessage() should be used instead of the sendTextMessage() method. The only difference is the use of an ArrayList of messages and pending intents:
ArrayList<String> multiSMS = mySMS.divideMessage(msg);
ArrayList<PendingIntent> sentIns = new ArrayList<PendingIntent>();
ArrayList<PendingIntent> deliverIns = new ArrayList<PendingIntent>();
for(int i=0; i< multiSMS.size(); i++){
sentIns.add(sentIn);
deliverIns.add(deliverIn);
}
mySMS.sendMultipartTextMessage(destination, null,
multiSMS, sentIns, deliverIns);
Recipe: Autosending an SMS Based on a Received SMS
Because most SMS messages are not read by the recipient until hours later, this recipe sends an autoresponse SMS when an SMS is received. This is done by creating an Android service in the background that can receive incoming SMSs. An alternative method is to register a broadcast receiver in the AndroidManifest.xml file.
The application must declare permission to send and receive SMSs in the AndroidManifest.xml file, as shown in Listing 10.3. It also declares a main activity SMSResponder that creates the autoresponse and a service ResponderService to send the response when an SMS is received.
Listing 10.3. AndroidManifest.xml
<?xml version="1.0" encoding="utf-8"?>
<manifest xmlns:android="http://schemas.android.com/apk/res/android"
package="com.cookbook.SMSResponder"
android:versionCode="1"
android:versionName="1.0">
<application android:icon="@drawable/icon"
android:label="@string/app_name">
<activity android:name=".SMSResponder"
android:label="@string/app_name">
<intent-filter>
<action android:name="android.intent.action.MAIN" />
<category android:name="android.intent.category.LAUNCHER" />
</intent-filter>
</activity>
<service android:enabled="true" android:name=".ResponderService">
</service>
</application>
<uses-permission android:name="android.permission.RECEIVE_SMS"/>
<uses-permission android:name="android.permission.SEND_SMS"/>
</manifest>
The main layout file shown in Listing 10.4 contains a LinearLayout with three views: a TextView to display the message used for the autoresponse, Button used to commit changes on the reply message inside the application, and EditText where the user can enter a reply message.
Listing 10.4. res/layout/main.xml
<?xml version="1.0" encoding="utf-8"?>
<LinearLayout xmlns:android="http://schemas.android.com/apk/res/android"
android:orientation="vertical"
android:layout_width="match_parent"
android:layout_height="match_parent">
<TextView android:id="@+id/display"
android:layout_width="match_parent"
android:layout_height="wrap_content"
android:text="@string/hello"
android:textSize="18dp"
/>
<Button android:id="@+id/submit"
android:layout_width="wrap_content"
android:layout_height="wrap_content"
android:text="Change my response"
/>
<EditText android:id="@+id/editText"
android:layout_width="match_parent"
android:layout_height="match_parent"
/>
</LinearLayout>
The main activity is shown in Listing 10.5. It starts the service that listens and autoresponds to SMS messages. It also allows the user to change the reply message and save it in SharedPreferences for future use.
Listing 10.5. src/com/cookbook/SMSresponder/SMSResponder.java
package com.cookbook.SMSresponder;
import android.app.Activity;
import android.content.Intent;
import android.content.SharedPreferences;
import android.content.SharedPreferences.Editor;
import android.os.Bundle;
import android.preference.PreferenceManager;
import android.util.Log;
import android.view.View;
import android.view.View.OnClickListener;
import android.widget.Button;
import android.widget.EditText;
import android.widget.TextView;
public class SMSResponder extends Activity {
TextView tv1;
EditText ed1;
Button bt1;
SharedPreferences myprefs;
Editor updater;
String reply=null;
@Override
public void onCreate(Bundle savedInstanceState) {
super.onCreate(savedInstanceState);
setContentView(R.layout.main);
myprefs = PreferenceManager.getDefaultSharedPreferences(this);
tv1 = (TextView) this.findViewById(R.id.display);
ed1 = (EditText) this.findViewById(R.id.editText);
bt1 = (Button) this.findViewById(R.id.submit);
reply = myprefs.getString("reply",
"Thank you for your message. I am busy now."
+ "I will call you later");
tv1.setText(reply);
updater = myprefs.edit();
ed1.setHint(reply);
bt1.setOnClickListener(new OnClickListener() {
public void onClick(View view) {
updater.putString("reply", ed1.getText().toString());
updater.commit();
SMSResponder.this.finish();
}
});
try {
// Start service
Intent svc = new Intent(this, ResponderService.class);
startService(svc);
}
catch (Exception e) {
Log.e("onCreate", "service creation problem", e);
}
}
}
The majority of code is contained in the service, as shown in Listing 10.6. It retrieves SharedPreferences for this application first. Then, it registers a broadcast receiver for listening to incoming and outgoing SMS messages. The broadcast receiver for outgoing SMS messages is not used here but is shown for completeness.
The incoming SMS broadcast receiver uses a bundle to retrieve the protocol description unit (PDU), which contains the SMS text and any additional SMS metadata, and parses it into an Object array. The method createFromPdu() converts the Object array into an SmsMessage. Then the method getOriginatingAddress() can be used to get the sender’s phone number, and getMessageBody() can be used to get the text message.
In this recipe, after the sender address is retrieved, the respond() method is called. This method tries to get the data stored inside SharedPreferences for the autorespond message. If no data is stored, it uses a default value. Then, it creates two PendingIntents for sent status and delivered status. The method divideMessage() is used to make sure the message is not oversized. After all the data is managed, it is sent using sendMultiTextMessage().
Listing 10.6. src/com/cookbook/SMSresponder/ResponderService.java
package com.cookbook.SMSresponder;
import java.util.ArrayList;
import android.app.Activity;
import android.app.PendingIntent;
import android.app.Service;
import android.content.BroadcastReceiver;
import android.content.Context;
import android.content.Intent;
import android.content.IntentFilter;
import android.content.SharedPreferences;
import android.os.Bundle;
import android.os.IBinder;
import android.preference.PreferenceManager;
import android.telephony.SmsManager;
import android.telephony.SmsMessage;
import android.util.Log;
import android.widget.Toast;
public class ResponderService extends Service {
//the action fired by the Android system when an SMS was received
private static final String RECEIVED_ACTION =
"android.provider.Telephony.SMS_RECEIVED";
private static final String SENT_ACTION="SENT_SMS";
private static final String DELIVERED_ACTION="DELIVERED_SMS";
String requester;
String reply="";
SharedPreferences myprefs;
@Override
public void onCreate() {
super.onCreate();
myprefs = PreferenceManager.getDefaultSharedPreferences(this);
registerReceiver(sentReceiver, new IntentFilter(SENT_ACTION));
registerReceiver(deliverReceiver,
new IntentFilter(DELIVERED_ACTION));
IntentFilter filter = new IntentFilter(RECEIVED_ACTION);
registerReceiver(receiver, filter);
IntentFilter attemptedfilter = new IntentFilter(SENT_ACTION);
registerReceiver(sender,attemptedfilter);
}
private BroadcastReceiver sender = new BroadcastReceiver(){
@Override
public void onReceive(Context c, Intent i) {
if(i.getAction().equals(SENT_ACTION)) {
if(getResultCode() != Activity.RESULT_OK) {
String recipient = i.getStringExtra("recipient");
requestReceived(recipient);
}
}
}
};
BroadcastReceiver sentReceiver = new BroadcastReceiver() {
@Override public void onReceive(Context c, Intent in) {
switch(getResultCode()) {
case Activity.RESULT_OK:
//sent SMS message successfully;
smsSent();
break;
default:
//sent SMS message failed
smsFailed();
break;
}
}
};
public void smsSent() {
Toast.makeText(this, "SMS sent", Toast.LENGTH_SHORT);
}
public void smsFailed() {
Toast.makeText(this, "SMS sent failed", Toast.LENGTH_SHORT);
}
public void smsDelivered() {
Toast.makeText(this, "SMS delivered", Toast.LENGTH_SHORT);
}
BroadcastReceiver deliverReceiver = new BroadcastReceiver() {
@Override public void onReceive(Context c, Intent in) {
//SMS delivered actions
smsDelivered();
}
};
public void requestReceived(String f) {
Log.v("ResponderService","In requestReceived");
requester=f;
}
BroadcastReceiver receiver = new BroadcastReceiver() {
@Override
public void onReceive(Context c, Intent in) {
Log.v("ResponderService","On Receive");
reply="";
if(in.getAction().equals(RECEIVED_ACTION)) {
Log.v("ResponderService","On SMS RECEIVE");
Bundle bundle = in.getExtras();
if(bundle!=null) {
Object[] pdus = (Object[])bundle.get("pdus");
SmsMessage[] messages = new SmsMessage[pdus.length];
for(int i = 0; i<pdus.length; i++) {
Log.v("ResponderService","FOUND MESSAGE");
messages[i] =
SmsMessage.createFromPdu((byte[])pdus[i]);
}
for(SmsMessage message: messages) {
requestReceived(message.getOriginatingAddress());
}
respond();
}
}
}
};
@Override
public void onStart(Intent intent, int startId) {
super.onStart(intent, startId);
}
public void respond() {
Log.v("ResponderService","Responding to " + requester);
reply = myprefs.getString("reply",
"Thank you for your message. I am busy now."
+ "I will call you later.");
SmsManager sms = SmsManager.getDefault();
Intent sentIn = new Intent(SENT_ACTION);
PendingIntent sentPIn = PendingIntent.getBroadcast(this,
0,sentIn,0);
Intent deliverIn = new Intent(DELIVERED_ACTION);
PendingIntent deliverPIn = PendingIntent.getBroadcast(this,
0,deliverIn,0);
ArrayList<String> Msgs = sms.divideMessage(reply);
ArrayList<PendingIntent> sentIns = new ArrayList<PendingIntent>();
ArrayList<PendingIntent> deliverIns =
new ArrayList<PendingIntent>();
for(int i=0; i< Msgs.size(); i++) {
sentIns.add(sentPIn);
deliverIns.add(deliverPIn);
}
sms.sendMultipartTextMessage(requester, null,
Msgs, sentIns, deliverIns);
}
@Override
public void onDestroy() {
super.onDestroy();
unregisterReceiver(receiver);
unregisterReceiver(sender);
}
@Override
public IBinder onBind(Intent arg0) {
return null;
}
}
Using Web Content
To launch an Internet browser to display web content, the implicit intent ACTION_VIEW can be used as discussed in Chapter 2, “Application Basics: Activities and Intents,” for example:
Intent i = new Intent(Intent.ACTION_VIEW);
i.setData(Uri.parse("http://www.google.com"));
startActivity(i);
It is also possible for developers to create their own web browser by using WebView, which is a View that displays web content. As with any view, it can occupy the full screen or only a portion of the layout in an activity. WebView uses WebKit, the open source browser engine used in Apple’s Safari, to render web pages.
Recipe: Customizing a Web Browser
There are two ways to obtain a WebView object. It can be instantiated from the constructor:
WebView webview = new WebView(this);
Alternatively, a WebView can be used in a layout and declared in the activity:
WebView webView = (WebView) findViewById(R.id.webview);
After the object is retrieved, a web page can be displayed using the loadURL() method:
webview.loadUrl("http://www.google.com/");
The WebSettings class can be used to define the features of the browser. For example, network images can be blocked in the browser to reduce the data loading using the setBlockNetworkImage() method. The font size of the displayed web content can be set using the setDefaultFontSize()method. Some other commonly used settings are shown in the following example:
WebSettings webSettings = webView.getSettings();
webSettings.setSaveFormData(false);
webSettings.setJavaScriptEnabled(true);
webSettings.setSavePassword(false);
webSettings.setSupportZoom(true);
Recipe: Using an HTTP GET
Besides launching a browser or using the WebView widget to include a WebKit-based browser control in an activity, developers might also want to create native Internet-based applications. This means the application relies on only the raw data from the Internet, such as images, media files, and XML data. Just the data of relevance can be loaded. This is important for creating social networking applications. Two packages are useful in Android to handle network communication: java.net and android.net.
In this recipe, an HTTP GET is used to retrieve XML or JSON data (see www.json.org/ for an overview). In particular, the Google search Representational State Transfer (REST) API is demonstrated, and the following query is used:
http://ajax.googleapis.com/ajax/services/search/web?v=1.0&q=
To search for any topic, the topic just needs to be appended to the query. For example, to search for information on the National Basketball Association (NBA), the following query returns JSON data:
http://ajax.googleapis.com/ajax/services/search/web?v=1.0&q=NBA
The activity needs Internet permission to run. So, the following should be added to the AndroidManifest.xml file:
<uses-permission android:name="android.permission.INTERNET"/>
The main layout is shown in Listing 10.7. It has three views: EditText for user input of the search topic, Button to trigger the search, and TextView to display the search result.
Listing 10.7. res/layout/main.xml
<?xml version="1.0" encoding="utf-8"?>
<LinearLayout xmlns:android="http://schemas.android.com/apk/res/android"
android:orientation="vertical"
android:layout_width="match_parent"
android:layout_height="match_parent"
>
<EditText
android:id="@+id/editText"
android:layout_width="match_parent"
android:layout_height="wrap_content"
android:singleLine="true"
/>
<Button
android:id="@+id/submit"
android:layout_width="wrap_content"
android:layout_height="wrap_content"
android:text="Search"
/>
<TextView
android:id="@+id/display"
android:layout_width="match_parent"
android:layout_height="match_parent"
android:text="@string/hello"
android:textSize="18dp"
/>
</LinearLayout>
The main activity is shown in Listing 10.8. It initiates the three layout elements in onCreate(). Inside the OnClickListener class for the button, it calls searchRequest(). This composes the search item using the Google REST API URL and then initiates a URL class instance. The URL class instance is then used to get an HttpURLConnection instance.
The HttpURLConnection instance can retrieve the status of the connection. When HttpURLConnection returns a result code of HTTP_OK, it means the whole HTTP transaction went through. Then, the JSON data returned from the HTTP transaction can be dumped into a string. This is done using an InputStreamReader passed to a BufferReader to read the data and create a String instance. After the result from HTTP is obtained, it uses another function processResponse() to parse the JSON data.
Listing 10.8. src/com/cookbook/internet/search/GoogleSearch.java
package com.cookbook.internet.search;
import java.io.BufferedReader;
import java.io.IOException;
import java.io.InputStreamReader;
import java.net.HttpURLConnection;
import java.net.MalformedURLException;
import java.net.URL;
import java.security.NoSuchAlgorithmException;
import org.json.JSONArray;
import org.json.JSONException;
import org.json.JSONObject;
import android.app.Activity;
import android.os.Bundle;
import android.util.Log;
import android.view.View;
import android.view.View.OnClickListener;
import android.widget.Button;
import android.widget.EditText;
import android.widget.TextView;
public class GoogleSearch extends Activity {
/** called when the activity is first created */
TextView tv1;
EditText ed1;
Button bt1;
static String url =
"http://ajax.googleapis.com/ajax/services/search/web?v=1.0&q=";
@Override
public void onCreate(Bundle savedInstanceState) {
super.onCreate(savedInstanceState);
setContentView(R.layout.main);
tv1 = (TextView) this.findViewById(R.id.display);
ed1 = (EditText) this.findViewById(R.id.editText);
bt1 = (Button) this.findViewById(R.id.submit);
bt1.setOnClickListener(new OnClickListener() {
public void onClick(View view) {
if(ed1.getText().toString()!=null) {
try{
processResponse(
searchRequest(ed1.getText().toString()));
} catch(Exception e) {
Log.v("Exception Google search",
"Exception:"+e.getMessage());
}
}
ed1.setText("");
}
});
}
public String searchRequest(String searchString)
throws MalformedURLException, IOException {
String newFeed=url+searchString;
StringBuilder response = new StringBuilder();
Log.v("gsearch","gsearch url:"+newFeed);
URL url = new URL(newFeed);
HttpURLConnection httpconn
= (HttpURLConnection) url.openConnection();
if(httpconn.getResponseCode()==HttpURLConnection.HTTP_OK) {
BufferedReader input = new BufferedReader(
new InputStreamReader(httpconn.getInputStream()),
8192);
String strLine = null;
while ((strLine = input.readLine()) != null) {
response.append(strLine);
}
input.close();
}
return response.toString();
}
public void processResponse(String resp) throws IllegalStateException,
IOException, JSONException, NoSuchAlgorithmException {
StringBuilder sb = new StringBuilder();
Log.v("gsearch","gsearch result:"+resp);
JSONObject mResponseObject = new JSONObject(resp);
JSONObject responObject
= mResponseObject.getJSONObject("responseData");
JSONArray array = responObject.getJSONArray("results");
Log.v("gsearch","number of results:"+array.length());
for(int i = 0; i<array.length(); i++) {
Log.v("result",i+"] "+array.get(i).toString());
String title = array.getJSONObject(i).getString("title");
String urllink = array.getJSONObject(i)
.getString("visibleUrl");
sb.append(title);
sb.append("\n");
sb.append(urllink);
sb.append("\n");
}
tv1.setText(sb.toString());
}
}
The detailed mechanism used requires an understanding of the incoming JSON data structure. In this case, the Google REST API provides all the result data under the results JSONArray. Figure 10.4 shows the search result for NBA.
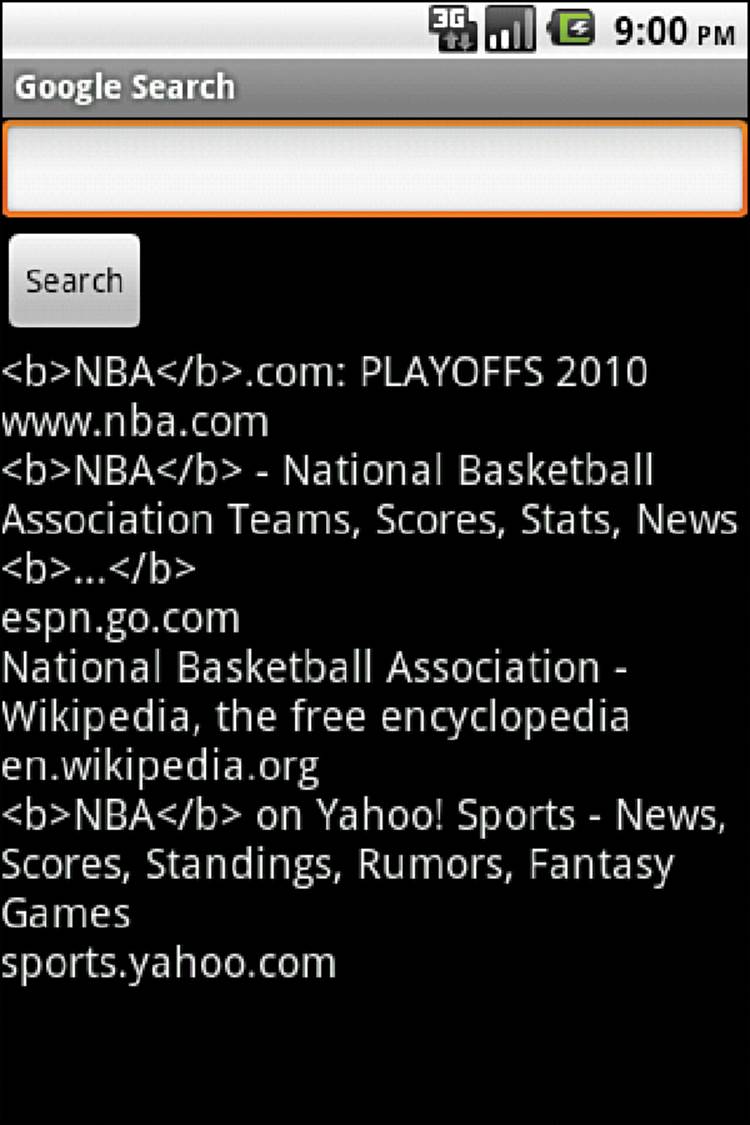
Figure 10.4 The search result from the Google REST API query
Note that this recipe will run on Android projects only prior to API Level 11. This is due to running network requests on the main thread. The next recipe, “Using HTTP POST,” uses an AsyncTask to fix the NetworkOnMainThreadException that is thrown.
Recipe: Using HTTP POST
Sometimes, raw binary data needs to be retrieved from the Internet such as an image, video, or audio file. This can be achieved with the HTTP POST protocol by using setRequestMethod(), such as:
httpconn.setRequestMethod(POST);
Accessing data through the Internet can be time-consuming and unpredictable. Therefore, a separate thread should be spawned anytime network data is required.
In addition to the methods shown in Chapter 3, “Threads, Services, Receivers, and Alerts,” there is a built-in Android class called AsyncTask that allows background operations to be performed and publishes results on the UI thread without needing to manipulate threads or handlers. So, thePOST method can be implemented asynchronously with the following code:
private class MyGoogleSearch extends AsyncTask<String, Integer, String> {
protected String doInBackground(String... searchKey) {
String key = searchKey[0];
try {
return searchRequest(key);
} catch(Exception e) {
Log.v("Exception Google search",
"Exception:"+e.getMessage());
return "";
}
}
protected void onPostExecute(String result) {
try {
processResponse(result);
} catch(Exception e) {
Log.v("Exception Google search",
"Exception:"+e.getMessage());
}
}
}
This excerpt can be added to the end of the GoogleSearch.java activity in Listing 10.8. It provides the same result with one additional change to the code inside the button OnClickListener to
new MyGoogleSearch().execute(ed1.getText().toString());
Recipe: Using WebViews
WebViews are useful for displaying content that may change on a semiregular basis, or for data that may need to be changed without having to force an update to the application. WebViews can also be used to allow web applications access to some client-side features of the Android system such as using the toast messaging system.
To add a WebView to an application, the following should be added to the layout XML:
<WebView xmlns:android="http://schemas.android.com/apk/res/android"
android:id="@+id/webview"
android:layout_width="match_parent"
android:layout_height="match_parent" />
The following permission must also be added to the application manifest:
<uses-permission android:name="android.permission.INTERNET" />
To create a simple page without any user interaction, add the following to the onCreate() method of the main activity:
WebView myWebView = (WebView) findViewById(R.id.webview);
myWebView.loadUrl("http://www.example.com/");
In order to enable JavaScript on the page inside of the WebView, the WebSettings must be changed. This can be done using the following:
WebSettings webSettings = myWebView.getSettings();
webSettings.setJavaScriptEnabled(true);
To trigger native methods from JavaScript, a class that can be used as an interface needs to be created. Listing 10.9 shows an activity with all of the pieces put together.
Listing 10.9. src/com/cookbook/viewtoaweb/MainActivity.java
package com.cookbook.viewtoaweb;
import android.app.Activity;
import android.content.Context;
import android.os.Bundle;
import android.webkit.JavascriptInterface;
import android.webkit.WebSettings;
import android.webkit.WebView;
import android.widget.Toast;
public class MainActivity extends Activity {
@Override
protected void onCreate(Bundle savedInstanceState) {
super.onCreate(savedInstanceState);
setContentView(R.layout.activity_main);
WebView myWebView = (WebView) findViewById(R.id.webview);
WebSettings webSettings = myWebView.getSettings();
webSettings.setJavaScriptEnabled(true);
myWebView.addJavascriptInterface(new WebAppInterface(this), "Android");
myWebView.loadUrl("http://www.devcannon.com/androidcookbook/chapter10/webview/");
}
public class WebAppInterface {
Context context;
WebAppInterface(Context c) {
context = c;
}
@JavascriptInterface
public void triggerToast(String toast) {
Toast.makeText(context, toast, Toast.LENGTH_SHORT).show();
}
}
}
The following HTML is used to trigger the code from Listing 10.9:
<input type="text" name="toastText" id="toastText" />
<button id="btn" onClick="androidToast()">Toast it</button>
The following JavaScript is used to trigger the code:
function androidToast() {
var input = document.getElementById('toastText');
Android.triggerToast(input.value);
}
Figure 10.5 displays the WebView with a toast that was launched from the page being viewed.
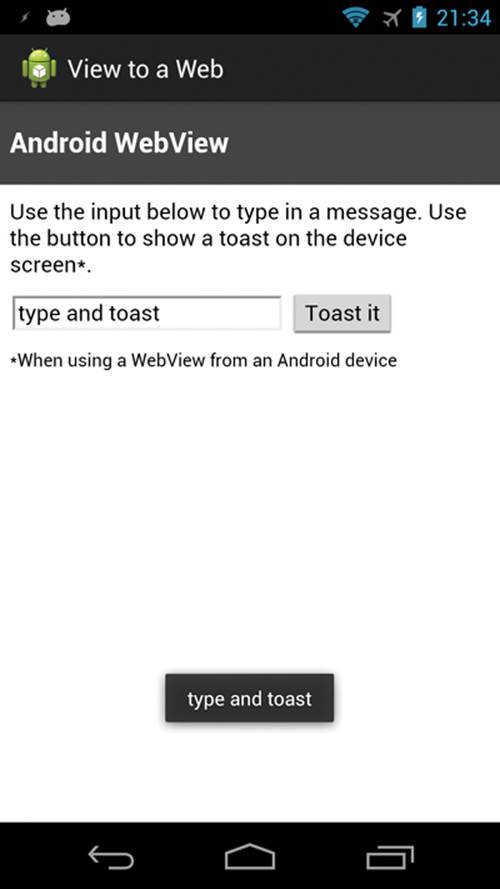
Figure 10.5 Triggering a toast message from a page inside a WebView
Recipe: Parsing JSON
JSON is a very popular format for data transfer, especially when used with web services. Android has included a set of classes in the org.json package that can be imported into code to allow manipulation of JSON data.
To get started parsing, first a JSON object needs to be created; this can be done like so:
private JSONObject jsonObject;
Some data in JSON format is also needed. The following creates a string containing some JSON data:
private String jsonString =
"{\"item\":{\"name\":\"myName\",\"numbers\":[{\"id\":\"1\"},{\"id\":\"2\"}]}}";
Because a string is not a JSON object, one will need to be created that contains the value of the string. This can be done like so:
jsonObject = new JSONObject(jsonString);
Now that there is an object to manipulate, data can be gotten from it. If the getString() method were used to pull data from an “object” that is inside the jsonObject, a JSONException would be thrown. This is because it is not a string. To pull a specific value, another object must be set up that contains the desired string, like so:
JSONObject itemObject = jsonObject.getJSONObject("item");
The value of "name" can be gotten by using the following:
String jsonName = itemObject.getString("name");
A loop may be used to get the information stored in the "numbers" section of jsonObject. This can be done by creating a JSONArray object and looping through it, as follows:
JSONArray numbersArray = itemObject.getJSONArray("numbers");
for(int i = 0;i < numbersArray.length();i++){
numbersArray.getJSONObject(i).getString("id");
}
Listing 10.10 shows how parsing may be put together inside an activity and displayed in a TextView. Note that when pulling JSON data from a remote location, such as through a web service, a separate class or AsyncTask must be used so that the main UI thread is not blocked.
Listing 10.10. src/com/cookbook/parsejson/MainActivity.java
package com.cookbook.parsejson;
import org.json.JSONArray;
import org.json.JSONException;
import org.json.JSONObject;
import android.app.Activity;
import android.os.Bundle;
import android.widget.TextView;
public class MainActivity extends Activity {
TextView tv;
private JSONObject jsonObject;
private String jsonString = "{\"item\":{\"name\":\"myName\",\"numbers\":[{\"id\":\"1\"},{\"id\":\"2\"}]}}";
@Override
protected void onCreate(Bundle savedInstanceState) {
super.onCreate(savedInstanceState);
setContentView(R.layout.activity_main);
tv = (TextView) findViewById(R.id.tv_main);
try {
jsonObject = new JSONObject(jsonString);
JSONObject itemObject = jsonObject.getJSONObject("item");
String jsonName = "name: " +itemObject.getString("name");
JSONArray numbersArray = itemObject.getJSONArray("numbers");
String jsonIds = "";
for(int i = 0;i < numbersArray.length();i++){
jsonIds += "id: " +
numbersArray.getJSONObject(i).getString("id").toString() + "\n";
}
tv.setText(jsonName+"\n"+jsonIds);
} catch (JSONException e) {
e.printStackTrace();
}
}
}
Recipe: Parsing XML
The official Android documentation recommends the use of XmlPullParser for parsing XML data. You may use any method you prefer to get XML data; however, for this recipe, a simple one-node XML string will be used. Listing 10.11 shows an activity that will display the process of reading the XML document, including the node and text value, into a TextView.
The XML data is processed one line at a time, with the next() method moving to the next line. In order to parse for specific nodes inside the XML data, an if else statement must be added for them in the while loop.
Listing 10.11. src/com/cookbook/parsexml/MainActivity.java
package com.cookbook.parsexml;
import java.io.IOException;
import java.io.StringReader;
import org.xmlpull.v1.XmlPullParser;
import org.xmlpull.v1.XmlPullParserException;
import org.xmlpull.v1.XmlPullParserFactory;
import android.app.Activity;
import android.os.Bundle;
import android.widget.TextView;
public class MainActivity extends Activity {
TextView tv;
@Override
protected void onCreate(Bundle savedInstanceState) {
super.onCreate(savedInstanceState);
setContentView(R.layout.activity_main);
tv = (TextView) findViewById(R.id.tv_main);
String xmlOut = "";
XmlPullParserFactory factory = null;
try {
factory = XmlPullParserFactory.newInstance();
} catch (XmlPullParserException e) {
e.printStackTrace();
}
factory.setNamespaceAware(true);
XmlPullParser xpp = null;
try {
xpp = factory.newPullParser();
} catch (XmlPullParserException e) {
e.printStackTrace();
}
try {
xpp.setInput(new StringReader("<node>This is some text</node>"));
} catch (XmlPullParserException e) {
e.printStackTrace();
}
int eventType = 0;
try {
eventType = xpp.getEventType();
} catch (XmlPullParserException e) {
e.printStackTrace();
}
while (eventType != XmlPullParser.END_DOCUMENT) {
if(eventType == XmlPullParser.START_DOCUMENT) {
xmlOut += "Start of XML Document";
} else if (eventType == XmlPullParser.START_TAG) {
xmlOut += "\nStart of tag: "+xpp.getName();
} else if (eventType == XmlPullParser.END_TAG) {
xmlOut += "\nEnd of tag: "+xpp.getName();
} else if (eventType == XmlPullParser.TEXT) {
xmlOut += "\nText: "+xpp.getText();
}
try {
eventType = xpp.next();
} catch (XmlPullParserException e) {
e.printStackTrace();
} catch (IOException e) {
e.printStackTrace();
}
}
xmlOut += "\nEnd of XML Document";
tv.setText(xmlOut);
}
}
Social Networking
Twitter is a social networking and microblogging service that enables its users to send and read messages known as tweets. Twitter is described as the “SMS of the Internet,” and indeed, each tweet cannot exceed 140 characters (although links are converted to shorter links and not counted against the 140-character limit). Twitter users can follow other people’s tweets or be followed by others.
Recipe: Reading the Owner Profile
Starting with API Level 14 (Ice Cream Sandwich), developers are able to access the owner profile. This is a special contact that stores RawContact data. To read the owner profile of a device, the following permission must be added to the AndroidManifest.xml file:
<uses-permission android:name="android.permission.READ_PROFILE" />
The following enables access to profile data:
// sets the columns to retrieve for the owner profile - RawContact data
String[] mProjection = new String[]
{
Profile._ID,
Profile.DISPLAY_NAME_PRIMARY,
Profile.LOOKUP_KEY,
Profile.PHOTO_THUMBNAIL_URI
};
// retrieves the profile from the Contacts Provider
Cursor mProfileCursor =
getContentResolver().query(Profile.CONTENT_URI,mProjection,null,null,null);
// Set the cursor to the first entry (instead of -1)
boolean b = mProfileCursor.moveToFirst();
for(int i = 0, length = mProjection.length;i < length;i++) {
System.out.println("*** " +
mProfileCursor.getString(mProfileCursor.getColumnIndex(mProjection[i])));
}
Note that where System.out.println() is used is the place where logic can be inserted to process the profile information. It is also worth mentioning that the output will be shown in LogCat, even though it is not a method from Log.*.
Recipe: Integrating with Twitter
Some third-party libraries exist to assist in integrating Twitter into Android applications (from http://dev.twitter.com/pages/libraries#java):
![]() Twitter4J by Yusuke Yamamoto—An open source, Mavenized, and Google App Engine-safe Java library for the Twitter API, released under the BSD license
Twitter4J by Yusuke Yamamoto—An open source, Mavenized, and Google App Engine-safe Java library for the Twitter API, released under the BSD license
![]() Scribe by Pablo Fernandez—OAuth module for Java, Mavenized, and works with Facebook, LinkedIn, Twitter, Evernote, Vimeo, and more
Scribe by Pablo Fernandez—OAuth module for Java, Mavenized, and works with Facebook, LinkedIn, Twitter, Evernote, Vimeo, and more
For this recipe, the Twitter4J library by Yusuke Yamamoto is used, which has documentation at http://twitter4j.org/en/javadoc/overview-summary.html. The recipe enables users to log in to Twitter by using OAuth and make a tweet.
Twitter has made changes to its authentication system that now require applications to register in order to access the public feed. To get started, an application has to be registered at https://dev.twitter.com/apps/new. During the registration process, OAuth public and private keys will be generated. They will be used in this recipe, so take note of them.
As this application will be accessing the Internet, it will need the INTERNET permission. There will also be a check to make sure that the device is connected to a network, so the ACCESS_NETWORK_STATE permission is also required. This is done by editing the AndroidManifest.xml file, as shown in Listing 10.12.
Listing 10.12. AndroidManifest.xml
<?xml version="1.0" encoding="utf-8"?>
<manifest xmlns:android="http://schemas.android.com/apk/res/android"
package="com.cookbook.tcookbook"
android:versionCode="1"
android:versionName="1.0" >
<uses-sdk
android:minSdkVersion="9"
android:targetSdkVersion="17" />
<uses-permission android:name="android.permission.INTERNET" />
<uses-permission android:name="android.permission.ACCESS_NETWORK_STATE" />
<application
android:allowBackup="true"
android:icon="@drawable/ic_launcher"
android:label="@string/app_name"
android:theme="@style/AppTheme" >
<activity
android:name="com.cookbook.tcookbook.MainActivity"
android:label="@string/app_name" >
<intent-filter>
<action android:name="android.intent.action.MAIN" />
<category android:name="android.intent.category.LAUNCHER" />
</intent-filter>
<intent-filter>
<action android:name="android.intent.action.VIEW" />
<category android:name="android.intent.category.DEFAULT" />
<category android:name="android.intent.category.BROWSABLE" />
<data android:scheme="oauth" android:host="tcookbook"/>
</intent-filter>
</activity>
</application>
</manifest>
For the layout of the application, everything will be put into the activity_main.xml file. This file will contain a button that is visible on page load and then several buttons, TextViews, and an EditText widget. Note that some of these will be hidden with android:visibility="gone". Listing 10.13 shows the contents of the activity_main.xml file.
Listing 10.13. res/layout/activity_main.xml
<LinearLayout xmlns:android="http://schemas.android.com/apk/res/android"
xmlns:tools="http://schemas.android.com/tools"
android:layout_width="match_parent"
android:layout_height="match_parent"
android:orientation="vertical" >
tools:context=".MainActivity" >
<Button android:id="@+id/btnLoginTwitter"
android:layout_width="match_parent"
android:layout_height="wrap_content"
android:text="Login with OAuth"
android:layout_marginLeft="10dip"
android:layout_marginRight="10dip"
android:layout_marginTop="30dip"/>
<TextView android:id="@+id/lblUserName"
android:layout_width="match_parent"
android:layout_height="wrap_content"
android:padding="10dip"
android:layout_marginTop="30dip"/>
<TextView android:id="@+id/lblUpdate"
android:text="Enter Your Tweet:"
android:layout_width="match_parent"
android:layout_height="wrap_content"
android:layout_marginLeft="10dip"
android:layout_marginRight="10dip"
android:visibility="gone"/>
<EditText android:id="@+id/txtUpdateStatus"
android:layout_width="match_parent"
android:layout_height="wrap_content"
android:layout_margin="10dip"
android:visibility="gone"/>
<Button android:id="@+id/btnUpdateStatus"
android:layout_width="match_parent"
android:layout_height="wrap_content"
android:text="Tweet it!"
android:layout_marginLeft="10dip"
android:layout_marginRight="10dip"
android:visibility="gone"/>
<Button android:id="@+id/btnLogoutTwitter"
android:layout_width="match_parent"
android:layout_height="wrap_content"
android:text="Logout/invalidate OAuth"
android:layout_marginLeft="10dip"
android:layout_marginRight="10dip"
android:layout_marginTop="50dip"
android:visibility="gone"/>
</LinearLayout>
One activity is used in the application, and two classes are used: one to help with connection detection and one to display an alert message when the wrong application OAuth keys are used.
In the main activity, several constants are set up for use. These include the OAuth Consumer key and Consumer secret. A connectivity check is run to make sure that the user can reach Twitter. Several OnClickListener classes are also registered to trigger logic such as login, logout, and update when clicked.
As Twitter handles authentication for the user, the information passed back is saved in application preferences and is checked again when the user attempts to log in to the application. An AsyncTask is also used to move any tweets made to a background thread.
Listing 10.14 shows the contents of the activity in full.
Listing 10.14. src/com/cookbook/tcookbook/MainActivity.java
package com.cookbook.tcookbook;
import twitter4j.Twitter;
import twitter4j.TwitterException;
import twitter4j.TwitterFactory;
import twitter4j.User;
import twitter4j.auth.AccessToken;
import twitter4j.auth.RequestToken;
import twitter4j.conf.Configuration;
import twitter4j.conf.ConfigurationBuilder;
import android.app.Activity;
import android.app.ProgressDialog;
import android.content.Intent;
import android.content.SharedPreferences;
import android.content.SharedPreferences.Editor;
import android.content.pm.ActivityInfo;
import android.net.Uri;
import android.os.AsyncTask;
import android.os.Build;
import android.os.Bundle;
import android.os.StrictMode;
import android.text.Html;
import android.util.Log;
import android.view.View;
import android.widget.Button;
import android.widget.EditText;
import android.widget.TextView;
import android.widget.Toast;
public class MainActivity extends Activity {
// Replace the following value with the Consumer key
static String TWITTER_CONSUMER_KEY = "01189998819991197253";
// Replace the following value with the Consumer secret
static String TWITTER_CONSUMER_SECRET =
"616C6C20796F75722062617365206172652062656C6F6E6720746F207573";
static String PREFERENCE_NAME = "twitter _ oauth";
static final String PREF_KEY_OAUTH_TOKEN = "oauth_token";
static final String PREF_KEY_OAUTH_SECRET = "oauth_token_secret";
static final String PREF_KEY_TWITTER_LOGIN = "isTwitterLoggedIn";
static final String TWITTER_CALLBACK_URL = "oauth://tcookbook";
static final String URL_TWITTER_AUTH = "auth_url";
static final String URL_TWITTER_OAUTH_VERIFIER = "oauth_verifier";
static final String URL_TWITTER_OAUTH_TOKEN = "oauth_token";
Button btnLoginTwitter;
Button btnUpdateStatus;
Button btnLogoutTwitter;
EditText txtUpdate;
TextView lblUpdate;
TextView lblUserName;
ProgressDialog pDialog;
private static Twitter twitter;
private static RequestToken requestToken;
private static SharedPreferences mSharedPreferences;
private ConnectionDetector cd;
AlertDialogManager adm = new AlertDialogManager();
@Override
public void onCreate(Bundle savedInstanceState) {
super.onCreate(savedInstanceState);
setContentView(R.layout.activity_main);
// used for Android 2.3+
if (Build.VERSION.SDK_INT > Build.VERSION_CODES_GINGERBREAD) {
StrictMode.ThreadPolicy policy =
new StrictMode.ThreadPolicy.Builder().permitAll().build();
StrictMode.setThreadPolicy(policy);
}
setRequestedOrientation(ActivityInfo.SCREEN_ORIENTATION_PORTRAIT);
cd = new ConnectionDetector(getApplicationContext());
if (!cd.isConnectingToInternet()) {
adm.showAlertDialog(MainActivity.this, "Internet Connection Error",
"Please connect to working Internet connection", false);
return;
}
if(TWITTER_CONSUMER_KEY.trim().length() == 0 ||
TWITTER_CONSUMER_SECRET.trim().length() == 0){
adm.showAlertDialog(MainActivity.this,
"Twitter OAuth tokens",
"Please set your Twitter OAuth tokens first!", false);
return;
}
btnLoginTwitter = (Button) findViewById(R.id.btnLoginTwitter);
btnUpdateStatus = (Button) findViewById(R.id.btnUpdateStatus);
btnLogoutTwitter = (Button) findViewById(R.id.btnLogoutTwitter);
txtUpdate = (EditText) findViewById(R.id.txtUpdateStatus);
lblUpdate = (TextView) findViewById(R.id.lblUpdate);
lblUserName = (TextView) findViewById(R.id.lblUserName);
mSharedPreferences = getApplicationContext().getSharedPreferences("MyPref", 0);
btnLoginTwitter.setOnClickListener(new View.OnClickListener() {
@Override
public void onClick(View arg0) {
// Call login Twitter function
loginToTwitter();
}
});
btnUpdateStatus.setOnClickListener(new View.OnClickListener() {
@Override
public void onClick(View v) {
String status = txtUpdate.getText().toString();
if (status.trim().length() > 0) {
new updateTwitterStatus().execute(status);
} else {
Toast.makeText(getApplicationContext(),
"Please enter status message", Toast.LENGTH_SHORT).show();
}
}
});
btnLogoutTwitter.setOnClickListener(new View.OnClickListener() {
@Override
public void onClick(View arg0) {
// Call logout Twitter function
logoutFromTwitter();
}
});
if (!isTwitterLoggedInAlready()) {
Uri uri = getIntent().getData();
if (uri != null && uri.toString().startsWith(TWITTER_CALLBACK_URL)) {
String verifier = uri.getQueryParameter(URL_TWITTER_OAUTH_VERIFIER);
try {
AccessToken accessToken = twitter.getOAuthAccessToken(requestToken, verifier);
Editor e = mSharedPreferences.edit();
e.putString(PREF_KEY_OAUTH_TOKEN, accessToken.getToken());
e.putString(PREF_KEY_OAUTH_SECRET,accessToken.getTokenSecret());
e.putBoolean(PREF_KEY_TWITTER_LOGIN, true);
e.commit();
// Log.e("Twitter OAuth Token", "> " + accessToken.getToken());
btnLoginTwitter.setVisibility(View.GONE);
lblUpdate.setVisibility(View.VISIBLE);
txtUpdate.setVisibility(View.VISIBLE);
btnUpdateStatus.setVisibility(View.VISIBLE);
btnLogoutTwitter.setVisibility(View.VISIBLE);
long userID = accessToken.getUserId();
User user = twitter.showUser(userID);
String username = user.getName();
lblUserName.setText(Html.fromHtml("<b>Welcome " + username + "</b>"));
} catch (Exception e) {
Log.e("***Twitter Login Error: ",e.getMessage());
}
}
}
}
private void loginToTwitter() {
if (!isTwitterLoggedInAlready()) {
ConfigurationBuilder builder = new ConfigurationBuilder();
builder.setOAuthConsumerKey(TWITTER_CONSUMER_KEY);
builder.setOAuthConsumerSecret(TWITTER_CONSUMER_SECRET);
Configuration configuration = builder.build();
TwitterFactory factory = new TwitterFactory(configuration);
twitter = factory.getInstance();
if(!(Build.VERSION.SDK_INT >= Build.VERSION_CODES.HONEYCOMB)) {
try {
requestToken = twitter.getOAuthRequestToken(TWITTER_CALLBACK_URL);
this.startActivity(new Intent(Intent.ACTION_VIEW,
Uri.parse(requestToken.getAuthenticationURL())));
} catch (TwitterException e) {
e.printStackTrace();
}
} else {
new Thread(new Runnable() {
public void run() {
try {
requestToken = twitter.getOAuthRequestToken(TWITTER_CALLBACK_URL);
MainActivity.this.startActivity(new Intent(Intent.ACTION_VIEW,
Uri.parse(requestToken.getAuthenticationURL())));
} catch (TwitterException e) {
e.printStackTrace();
}
}
}).start();
}
} else {
Toast.makeText(getApplicationContext(),"Already logged into Twitter",
Toast.LENGTH_LONG).show();
}
}
class updateTwitterStatus extends AsyncTask<String, String, String> {
@Override
protected void onPreExecute() {
super.onPreExecute();
pDialog = new ProgressDialog(MainActivity.this);
pDialog.setMessage("Updating to Twitter...");
pDialog.setIndeterminate(false);
pDialog.setCancelable(false);
pDialog.show();
}
protected String doInBackground(String... args) {
// Log.d("*** Text Value of Tweet: ",args[0]);
String status = args[0];
try {
ConfigurationBuilder builder = new ConfigurationBuilder();
builder.setOAuthConsumerKey(TWITTER_CONSUMER_KEY);
builder.setOAuthConsumerSecret(TWITTER_CONSUMER_SECRET);
String access_token =
mSharedPreferences.getString(PREF_KEY_OAUTH_TOKEN, "");
String access_token_secret =
mSharedPreferences.getString(PREF_KEY_OAUTH_SECRET, "");
AccessToken accessToken =
new AccessToken(access_token, access_token_secret);
Twitter twitter =
new TwitterFactory(builder.build()).getInstance(accessToken);
twitter4j.Status response = twitter.updateStatus(status);
// Log.d("*** Update Status: ",response.getText());
} catch (TwitterException e) {
Log.d("*** Twitter Update Error: ", e.getMessage());
}
return null;
}
protected void onPostExecute(String file_url) {
pDialog.dismiss();
runOnUiThread(new Runnable() {
@Override
public void run() {
Toast.makeText(getApplicationContext(),
"Status tweeted successfully", Toast.LENGTH_SHORT).show();
txtUpdate.setText("");
}
});
}
}
private void logoutFromTwitter() {
Editor e = mSharedPreferences.edit();
e.remove(PREF_KEY_OAUTH_TOKEN);
e.remove(PREF_KEY_OAUTH_SECRET);
e.remove(PREF_KEY_TWITTER_LOGIN);
e.commit();
btnLogoutTwitter.setVisibility(View.GONE);
btnUpdateStatus.setVisibility(View.GONE);
txtUpdate.setVisibility(View.GONE);
lblUpdate.setVisibility(View.GONE);
lblUserName.setText("");
lblUserName.setVisibility(View.GONE);
btnLoginTwitter.setVisibility(View.VISIBLE);
}
private boolean isTwitterLoggedInAlready() {
return mSharedPreferences.getBoolean(PREF_KEY_TWITTER_LOGIN, false);
}
protected void onResume() {
super.onResume();
}
}
More information on using Twitter4j can be found in the following resources:
![]() www.androidhive.info/2012/09/android-twitter-oauth-connect-tutorial/ by Ravi Tamada
www.androidhive.info/2012/09/android-twitter-oauth-connect-tutorial/ by Ravi Tamada
![]() http://blog.doityourselfandroid.com/2011/08/08/improved-twitter-oauth-android/ by Do-it-yourself Android
http://blog.doityourselfandroid.com/2011/08/08/improved-twitter-oauth-android/ by Do-it-yourself Android
![]() http://davidcrowley.me/?p=410 by David Crowley
http://davidcrowley.me/?p=410 by David Crowley
![]() https://tutsplus.com/tutorials/?q=true&filter_topic=90 by Sue Smith
https://tutsplus.com/tutorials/?q=true&filter_topic=90 by Sue Smith
![]() http://blog.blundell-apps.com/sending-a-tweet/ by Blundell
http://blog.blundell-apps.com/sending-a-tweet/ by Blundell
Recipe: Integrating with Facebook
Facebook has changed rapidly in the last couple of years, and it remains one of the top social networking sites. One thing the Facebook team has done recently is to clean up their documentation to help developers. The official documentation can be found athttps://developers.facebook.com/docs/getting-started/facebook-sdk-for-android/3.0/.
To get started with Facebook development, first download the Facebook SDK and the Facebook android package (APK) from https://developers.facebook.com/resources/facebook-android-sdk-3.0.zip. The APK is provided as a means of authentication without having to use a WebView. If the Facebook application is already installed on the phone, the APK file need not be installed.
Next, add the Facebook SDK as a library project to the Eclipse installation. This is done by choosing File → Import and then General → Existing Projects into Workspace. Note that Facebook warns against using the “Copy projects into workspace” options, as this may build incorrect filesystem paths and cause the SDK to function incorrectly.
After the Facebook SDK has been imported, the sample projects are available for experimentation. Note that most of the projects require the generation of a key hash that will be used to sign applications and that developers can add to their Facebook developer profile for quick SDK project access.
The key is generated by using the keytool utility that comes with Java. Open a terminal or command prompt and type the following to generate the key:
OS X:
keytool -exportcert -alias androiddebugkey -keystore ~/.android/debug.keystore |
[ccc]openssl sha1 -binary | openssl base64
Windows:
keytool -exportcert -alias androiddebugkey -keystore %HOMEPATH%\.android\debug.
keystore [ccc]| openssl sha1 -binary | openssl base64
The command should be typed in a single line, although terminals or command prompt windows may show it breaking into multiple lines. When the command is executed, a password prompt should appear. The password to enter is android. After the key has been generated successfully, it will be displayed. Note that if a “'keytool' is not recognized as an internal or external command . . .” error is generated, move to the bin directory of the JRE installation directory and try again. If there is a similar error for “openssl,” download OpenSSL fromhttp://code.google.com/p/openssl-for-windows/. If there are still errors, make sure that the bin directories have been added to the system path or that the exact directories are being used instead of %HOMEPATH%.
If more than one computer will be used for development, a hash must be generated for each one and added to the developer profile at https://developers.facebook.com/.
Once that is done, dig into the sample applications and log in with them. The showcase example project, called HelloFacebookSample, demonstrates how to access a profile, update a status, and even upload photos.
The last step in creating an application that integrates with Facebook is to create a Facebook app that will then be tied to the Android application by using a generated key hash. This will take care of integration and allow users to authenticate themselves while using the application.
The developer site gives a terrific breakdown of all the pieces needed to get started. Be sure to read the official Scrumptious tutorial, which can be found at http://developers.facebook.com/docs/tutorials/androidsdk/3.0/scrumptious/.
All materials on the site are licensed Creative Commons Attribution-Sharealike 3.0 Unported CC BY-SA 3.0 & GNU Free Documentation License (GFDL)
If you are the copyright holder of any material contained on our site and intend to remove it, please contact our site administrator for approval.
© 2016-2025 All site design rights belong to S.Y.A.