Professional Android 4 Application Development (2012)
Chapter 4. Understanding Fragments
What's in this Chapter?
Using Views and layouts
Optimizing layouts
Creating resolution-independent user interfaces
Extending, grouping, creating, and using Views
Using Adapters to bind data to Views
To quote Stephen Fry on the role of style as part of substance in the design of digital devices:
As if a device can function if it has no style. As if a device can be called stylish that does not function superbly…. Yes, beauty matters. Boy, does it matter. It is not surface, it is not an extra, it is the thing itself.
—Stephen Fry, The Guardian (October 27, 2007)
Although Fry was describing the style of the devices themselves, the same can be said of the applications that run on them. Bigger, brighter, and higher resolution displays with multitouch support have made applications increasingly visual. The introduction of devices optimized for a more immersive experience—including tablets and televisions—into the Android ecosystem has only served to increase the importance of an application's visual design.
In this chapter you'll discover the Android components used to create UIs. You'll learn how to use layouts, Fragments, and Views to create functional and intuitive UIs for your Activities.
The individual elements of an Android UI are arranged on screen by means of a variety of Layout Managers derived from the ViewGroup class. This chapter introduces several native layout classes and demonstrates how to use them, how to create your own, and how to ensure your use of layouts is as efficient as possible.
The range of screen sizes and display resolutions your application may be used on has expanded along with the range of Android devices now available to buy. Android 3.0 introduced the Fragment API to provide better support for creating dynamic layouts that can be optimized for tablets as well as a variety of different smartphone displays.
You'll learn how to use Fragments to create layouts that scale and adapt to accommodate a variety of screen sizes and resolutions, as well as the best practices for developing and testing your UIs so that they look great on all screens.
After being introduced to some of the visual controls available from the Android SDK, you'll learn how to extend and customize them. Using View Groups, you'll combine Views to create atomic, reusable UI elements made up of interacting subcontrols. You'll also create your own Views, to display data and interact with users in creative new ways.
Finally, you'll examine Adapters and learn how to use them to bind your presentation layer to the underlying data sources.
Fundamental Android UI Design
User interface (UI) design, user experience (UX), human computer interaction (HCI), and usability are huge topics that can't be covered in the depth they deserve within the confines of this book. Nonetheless, the importance of creating a UI that your users will understand and enjoy using can't be overstated.
Android introduces some new terminology for familiar programming metaphors that will be explored in detail in the following sections:
· Views—Views are the base class for all visual interface elements (commonly known as controls or widgets). All UI controls, including the layout classes, are derived from View.
· View Groups—View Groups are extensions of the View class that can contain multiple child Views. Extend the ViewGroup class to create compound controls made up of interconnected child Views. The ViewGroup class is also extended to provide the Layout Managers that help you lay out controls within your Activities.
· Fragments—Fragments, introduced in Android 3.0 (API level 11), are used to encapsulate portions of your UI. This encapsulation makes Fragments particularly useful when optimizing your UI layouts for different screen sizes and creating reusable UI elements. Each Fragment includes its own UI layout and receives the related input events but is tightly bound to the Activity into which each must be embedded. Fragments are similar to UI View Controllers in iPhone development.
· Activities—Activities, described in detail in the previous chapter, represent the window, or screen, being displayed. Activities are the Android equivalent of Forms in traditional Windows desktop development. To display a UI, you assign a View (usually a layout or Fragment) to an Activity.
Android provides several common UI controls, widgets, and Layout Managers.
For most graphical applications, it's likely that you'll need to extend and modify these standard Views—or create composite or entirely new Views—to provide your own user experience.
Android User Interface Fundamentals
All visual components in Android descend from the View class and are referred to generically as Views. You'll often see Views referred to as controls or widgets (not to be confused with home screen App Widgets described in Chapter 14, “Invading the Home Screen)—terms you're probably familiar with if you've previously done any GUI development.
The ViewGroup class is an extension of View designed to contain multiple Views. View Groups are used most commonly to manage the layout of child Views, but they can also be used to create atomic reusable components. View Groups that perform the former function are generally referred to as layouts.
In the following sections you'll learn how to put together increasingly complex UIs, before being introduced to Fragments, the Views available in the SDK, how to extend these Views, build your own compound controls, and create your own custom Views from scratch.
Assigning User Interfaces to Activities
A new Activity starts with a temptingly empty screen onto which you place your UI. To do so, call setContentView, passing in the View instance, or layout resource, to display. Because empty screens aren't particularly inspiring, you will almost always use setContentView to assign an Activity's UI when overriding its onCreate handler.
The setContentView method accepts either a layout's resource ID or a single View instance. This lets you define your UI either in code or using the preferred technique of external layout resources.
@Override
public void onCreate(Bundle savedInstanceState) {
super.onCreate(savedInstanceState);
setContentView(R.layout.main);
}
Using layout resources decouples your presentation layer from the application logic, providing the flexibility to change the presentation without changing code. This makes it possible to specify different layouts optimized for different hardware configurations, even changing them at run time based on hardware changes (such as screen orientation changes).
You can obtain a reference to each of the Views within a layout using the findViewById method:
TextView myTextView = (TextView)findViewById(R.id.myTextView);
If you prefer the more traditional approach, you can construct the UI in code:
@Override
public void onCreate(Bundle savedInstanceState) {
super.onCreate(savedInstanceState);
TextView myTextView = new TextView(this);
setContentView(myTextView);
myTextView.setText("Hello, Android");
}
The setContentView method accepts a single View instance; as a result, you use layouts to add multiple controls to your Activity.
If you're using Fragments to encapsulate portions of your Activity's UI, the View inflated within your Activity's onCreate handler will be a layout that describes the relative position of each of your Fragments (or their containers). The UI used for each Fragment is defined in its own layout and inflated within the Fragment itself, as described later in this chapter.
Note that once a Fragment has been inflated into an Activity, the Views it contains become part of that Activity's View hierarchy. As a result you can find any of its child Views from within the parent Activity, using findViewById as described previously.
Introducing Layouts
Layout Managers (or simply layouts) are extensions of the ViewGroup class and are used to position child Views within your UI. Layouts can be nested, letting you create arbitrarily complex UIs using a combination of layouts.
The Android SDK includes a number of layout classes. You can use these, modify them, or create your own to construct the UI for your Views, Fragments, and Activities. It's up to you to select and use the right combination of layouts to make your UI aesthetically pleasing, easy to use, and efficient to display.
The following list includes some of the most commonly used layout classes available in the Android SDK:
· FrameLayout—The simplest of the Layout Managers, the Frame Layout pins each child view within its frame. The default position is the top-left corner, though you can use the gravity attribute to alter its location. Adding multiple children stacks each new child on top of the one before, with each new View potentially obscuring the previous ones.
· LinearLayout—A Linear Layout aligns each child View in either a vertical or a horizontal line. A vertical layout has a column of Views, whereas a horizontal layout has a row of Views. The Linear Layout supports a weight attribute for each child View that can control the relative size of each child View within the available space.
· RelativeLayout—One of the most flexible of the native layouts, the Relative Layout lets you define the positions of each child View relative to the others and to the screen boundaries.
· GridLayout—Introduced in Android 4.0 (API level 14), the Grid Layout uses a rectangular grid of infinitely thin lines to lay out Views in a series of rows and columns. The Grid Layout is incredibly flexible and can be used to greatly simplify layouts and reduce or eliminate the complex nesting often required to construct UIs using the layouts described above. It's good practice to use the Layout Editor to construct your Grid Layouts rather than relying on tweaking the XML manually.
Each of these layouts is designed to scale to suit the host device's screen size by avoiding the use of absolute positions or predetermined pixel values. This makes them particularly useful when designing applications that work well on a diverse set of Android hardware.
The Android documentation describes the features and properties of each layout class in detail; so, rather than repeat that information here, I'll refer you to http://developer.android.com/guide/topics/ui/layout-objects.html.
You'll see practical example of how these layouts should be used as they're introduced in the examples throughout this book. Later in this chapter you'll also learn how to create compound controls by using and/or extending these layout classes.
Defining Layouts
The preferred way to define a layout is by using XML external resources.
Each layout XML must contain a single root element. This root node can contain as many nested layouts and Views as necessary to construct an arbitrarily complex UI.
The following snippet shows a simple layout that places a TextView above an EditText control using a vertical LinearLayout.
<?xml version="1.0" encoding="utf-8"?>
<LinearLayout xmlns:android="http://schemas.android.com/apk/res/android"
android:orientation="vertical"
android:layout_width="match_parent"
android:layout_height="match_parent">
<TextView
android:layout_width="match_parent"
android:layout_height="wrap_content"
android:text="Enter Text Below"
/>
<EditText
android:layout_width="match_parent"
android:layout_height="wrap_content"
android:text="Text Goes Here!"
/>
</LinearLayout>
For each of the layout elements, the constants wrap_content and match_parent are used rather than an exact height or width in pixels. These constants, combined with layouts that scale (such as the Linear Layout, Relative Layout, and Grid Layout) offer the simplest, and most powerful, technique for ensuring your layouts are screen-size and resolution independent.
The wrap_content constant sets the size of a View to the minimum required to contain the contents it displays (such as the height required to display a wrapped text string). The match_parent constant expands the View to match the available space within the parent View, Fragment, or Activity.
Later in this chapter you'll learn how to set the minimum height and width for your own controls, as well as further best practices for resolution independence.
Implementing layouts in XML decouples the presentation layer from the View, Fragment, and Activity controller code and business logic. It also lets you create hardware configuration-specific variations that are dynamically loaded without requiring code changes.
When preferred, or required, you can implement layouts in code. When assigning Views to layouts in code, it's important to apply LayoutParameters using the setLayoutParams method, or by passing them in to the addView call:
LinearLayout ll = new LinearLayout(this);
ll.setOrientation(LinearLayout.VERTICAL);
TextView myTextView = new TextView(this);
EditText myEditText = new EditText(this);
myTextView.setText("Enter Text Below");
myEditText.setText("Text Goes Here!");
int lHeight = LinearLayout.LayoutParams.MATCH_PARENT;
int lWidth = LinearLayout.LayoutParams.WRAP_CONTENT;
ll.addView(myTextView, new LinearLayout.LayoutParams(lHeight, lWidth));
ll.addView(myEditText, new LinearLayout.LayoutParams(lHeight, lWidth));
setContentView(ll);
Using Layouts to Create Device Independent User Interfaces
A defining feature of the layout classes described previously, and the techniques described for using them within your apps, is their ability to scale and adapt to a wide range of screen sizes, resolutions, and orientations.
The variety of Android devices is a critical part of its success. For developers, this diversity introduces a challenge for designing UIs to ensure that they provide the best possible experience for users, regardless of which Android device they own.
Using a Linear Layout
The Linear Layout is one of the simplest layout classes. It allows you to create simple UIs (or UI elements) that align a sequence of child Views in either a vertical or a horizontal line.
The simplicity of the Linear Layout makes it easy to use but limits its flexibility. In most cases you will use Linear Layouts to construct UI elements that will be nested within other layouts, such as the Relative Layout.
Listing 4.1 shows two nested Linear Layouts—a horizontal layout of two equally sized buttons within a vertical layout that places the buttons above a List View.

Listing 4.1: Linear Layout
<?xml version="1.0" encoding="utf-8"?>
<LinearLayout
xmlns:android="http://schemas.android.com/apk/res/android"
android:layout_width="match_parent"
android:layout_height="match_parent"
android:orientation="vertical">
<LinearLayout
android:layout_width="fill_parent"
android:layout_height="wrap_content"
android:orientation="horizontal"
android:padding="5dp">
<Button
android:text="@string/cancel_button_text"
android:layout_width="fill_parent"
android:layout_height="wrap_content"
android:layout_weight="1"/>
<Button
android:text="@string/ok_button_text"
android:layout_width="fill_parent"
android:layout_height="wrap_content"
android:layout_weight="1"/>
</LinearLayout>
<ListView
android:layout_width="match_parent"
android:layout_height="match_parent"/>
</LinearLayout>
code snippet PA4AD_Ch4_Layouts/res/layout/linear_layout.xml
If you find yourself creating increasingly complex nesting patterns of Linear Layouts, you will likely be better served using a more flexible Layout Manager.
Using a Relative Layout
The Relative Layout provides a great deal of flexibility for your layouts, allowing you to define the position of each element within the layout in terms of its parent and the other Views.
Listing 4.2 modifies the layout described in Listing 4.1 to move the buttons below the List View.
Listing 4.2: Relative Layout
<?xml version="1.0" encoding="utf-8"?>
<RelativeLayout
xmlns:android="http://schemas.android.com/apk/res/android"
android:layout_width="match_parent"
android:layout_height="match_parent">
<LinearLayout
android:id="@+id/button_bar"
android:layout_alignParentBottom="true"
android:layout_width="fill_parent"
android:layout_height="wrap_content"
android:orientation="horizontal"
android:padding="5dp">
<Button
android:text="@string/cancel_button_text"
android:layout_width="fill_parent"
android:layout_height="wrap_content"
android:layout_weight="1"/>
<Button
android:text="@string/ok_button_text"
android:layout_width="fill_parent"
android:layout_height="wrap_content"
android:layout_weight="1"/>
</LinearLayout>
<ListView
android:layout_above="@id/button_bar"
android:layout_alignParentLeft="true"
android:layout_width="match_parent"
android:layout_height="match_parent">
</ListView>
</RelativeLayout>
code snippet PA4AD_Ch4_Layouts/res/layout/relative_layout.xml
Using a Grid Layout
The Grid Layout was introduced in Android 3.0 (API level 11) and provides the most flexibility of any of the Layout Managers.
The Grid Layout uses an arbitrary grid to position Views. By using row and column spanning, the Space View, and Gravity attributes, you can create complex without resorting to the often complex nesting required to construct UIs using the Relative Layout described previously.
The Grid Layout is particularly useful for constructing layouts that require alignment in two directions—for example, a form whose rows and columns must be aligned but which also includes elements that don't fit neatly into a standard grid pattern.
It's also possible to replicate all the functionality provided by the Relative Layout by using the Grid Layout and Linear Layout in combination. For performance reasons it's good practice to use the Grid Layout in preference to creating the same UI using a combination of nested layouts.
Listing 4.3 shows the same layout as described in Listing 4.2 using a Grid Layout to replace the Relative Layout.
Listing 4.3: Grid Layout
<?xml version="1.0" encoding="utf-8"?>
<GridLayout
xmlns:android="http://schemas.android.com/apk/res/android"
android:layout_width="match_parent"
android:layout_height="match_parent"
android:orientation="vertical">
<ListView
android:background="#FF444444"
android:layout_gravity="fill">
</ListView>
<LinearLayout
android:layout_gravity="fill_horizontal"
android:orientation="horizontal"
android:padding="5dp">
<Button
android:text="Cancel"
android:layout_width="fill_parent"
android:layout_height="wrap_content"
android:layout_weight="1"/>
<Button
android:text="OK"
android:layout_width="fill_parent"
android:layout_height="wrap_content"
android:layout_weight="1"/>
</LinearLayout>
</GridLayout>
code snippet PA4AD_Ch4_Layouts/res/layout/grid_layout.xml
Note that the Grid Layout elements do not require width and height parameters to be set. Instead, each element wraps its content by default, and the layout_gravity attribute is used to determine in which directions each element should expand.
Optimizing Layouts
Inflating layouts is an expensive process; each additional nested layout and included View directly impacts on the performance and responsiveness of your application.
To keep your applications smooth and responsive, it's important to keep your layouts as simple as possible and to avoid inflating entirely new layouts for relatively small UI changes.
Redundant Layout Containers Are Redundant
A Linear Layout within a Frame Layout, both of which are set to MATCH_PARENT, does nothing but add extra time to inflate. Look for redundant layouts, particularly if you've been making significant changes to an existing layout or are adding child layouts to an existing layout.
Layouts can be arbitrarily nested, so it's easy to create complex, deeply nested hierarchies. Although there is no hard limit, it's good practice to restrict nesting to fewer than 10 levels.
One common example of unnecessary nesting is a Frame Layout used to create the single root node required for a layout, as shown in the following snippet:
<?xml version="1.0" encoding="utf-8"?>
<FrameLayout
xmlns:android="http://schemas.android.com/apk/res/android"
android:layout_width="match_parent"
android:layout_height="match_parent">
<ImageView
android:id="@+id/myImageView"
android:layout_width="match_parent"
android:layout_height="match_parent"
android:src="@drawable/myimage"
/>
<TextView
android:id="@+id/myTextView"
android:layout_width="match_parent"
android:layout_height="wrap_content"
android:text="@string/hello"
android:gravity="center_horizontal"
android:layout_gravity="bottom"
/>
</FrameLayout>
In this example, when the Frame Layout is added to a parent, it will become redundant. A better alternative is to use the Merge tag:
<?xml version="1.0" encoding="utf-8"?>
<merge
xmlns:android="http://schemas.android.com/apk/res/android">
<ImageView
android:id="@+id/myImageView"
android:layout_width="match_parent"
android:layout_height="match_parent"
android:src="@drawable/myimage"
/>
<TextView
android:id="@+id/myTextView"
android:layout_width="match_parent"
android:layout_height="wrap_content"
android:text="@string/hello"
android:gravity="center_horizontal"
android:layout_gravity="bottom"
/>
</merge>
When a layout containing a merge tag is added to another layout, the merge node is removed and its child Views are added directly to the new parent.
The merge tag is particularly useful in conjunction with the include tag, which is used to insert the contents of one layout into another:
<?xml version="1.0" encoding="utf-8"?>
<LinearLayout
xmlns:android="http://schemas.android.com/apk/res/android"
android:orientation="vertical"
android:layout_width="match_parent"
android:layout_height="match_parent">
<include android:id="@+id/my_action_bar"
layout="@layout/actionbar"/>
<include android:id="@+id/my_image_text_layout"
layout="@layout/image_text_layout"/>
</LinearLayout>
Combining the merge and include tags enables you to create flexible, reusable layout definitions that don't create deeply nested layout hierarchies. You'll learn more about creating and using simple and reusable layouts later in this chapter.
Avoid Using Excessive Views
Each additional View takes time and resources to inflate. To maximize the speed and responsiveness of your application, none of its layouts should include more than 80 Views. When you exceed this limit, the time taken to inflate the layout becomes significant.
To minimize the number of Views inflated within a complex layout, you can use a ViewStub.
A View Stub works like a lazy include—a stub that represents the specified child Views within the parent layout—but the stub is only inflated explicitly via the inflate method or when it's made visible.
// Find the stub
View stub = findViewById(R.id. download_progress_panel_stub);
// Make it visible, causing it to inflate the child layout
stub.setVisibility(View.VISIBLE);
// Find the root node of the inflated stub layout
View downloadProgressPanel = findViewById(R.id.download_progress_panel);
As a result, the Views contained within the child layout aren't created until they are required—minimizing the time and resource cost of inflating complex UIs.
When adding a View Stub to your layout, you can override the id and layout parameters of the root View of the layout it represents:
<?xml version="1.0" encoding="utf-8"?>
<FrameLayout "xmlns:android=http://schemas.android.com/apk/res/android"
android:layout_width="match_parent"
android:layout_height="match_parent">
<ListView
android:id="@+id/myListView"
android:layout_width="match_parent"
android:layout_height="match_parent"
/>
<ViewStub
android:id="@+id/download_progress_panel_stub"
android:layout="@layout/progress_overlay_panel"
android:inflatedId="@+id/download_progress_panel"
android:layout_width="match_parent"
android:layout_height="wrap_content"
android:layout_gravity="bottom"
/>
</FrameLayout>
This snippet modifies the width, height, and gravity of the imported layout to suit the requirements of the parent layout. This flexibility makes it possible to create and reuse the same generic child layouts in a variety of parent layouts.
An ID has been specified for both the stub and the View Group it will become when inflated using the id and inflatedId attribute, respectively.
![]()
When the View Stub is inflated, it is removed from the hierarchy and replaced by the root node of the View it imported. If you need to modify the visibility of the imported Views, you must either use the reference to their root node (returned by the inflate call) or find the View by usingfindViewById, using the layout ID assigned to it within the corresponding View Stub node.
Using Lint to Analyze Your Layouts
To assist you in optimizing your layout hierarchies, the Android SDK includes lint—a powerful tool that can be used to detect problems within you application, including layout performance issues.
The lint tool is available as a command-line tool or as a window within Eclipse supplied as part of the ADT plug-in, as shown in Figure 4.1.
Figure 4.1
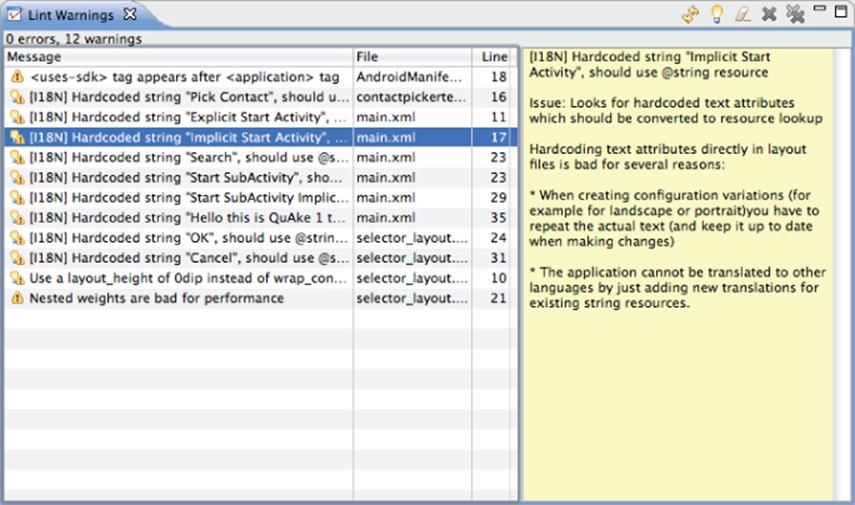
In addition to using Lint to detect each optimization issue described previously in this section, you can also use Lint to detect missing translations, unused resources, inconsistent array sizes, accessibility and internationalization problems, missing or duplicated image assets, usability problems, and manifest errors.
Lint is a constantly evolving tool, with new rules added regularly. A full list of the tests performed by the Lint tool can be found at http://tools.android.com/tips/lint-checks.
To-Do List Example
In this example you'll be creating a new Android application from scratch. This simple example creates a new to-do list application using native Android Views and layouts.
![]()
Don't worry if you don't understand everything that happens in this example. Some of the features used to create this application, including ArrayAdapters, ListViews, and KeyListeners, won't be introduced properly until later in this and subsequent chapters, where they'll be explained in detail. You'll also return to this example later to add new functionality as you learn more about Android.
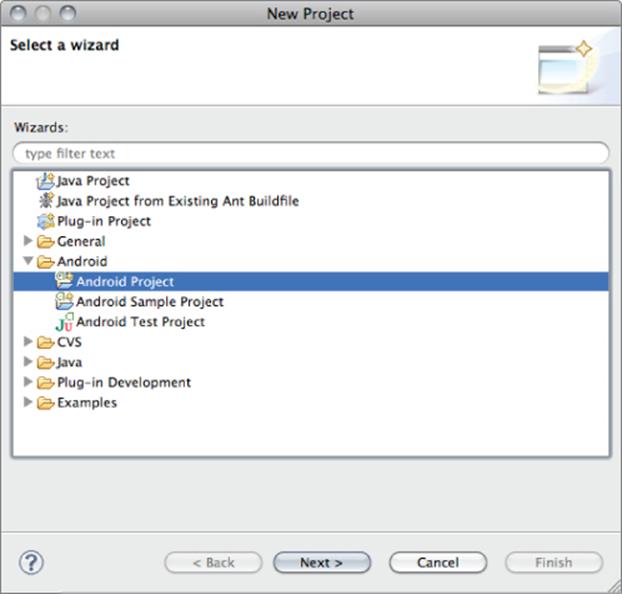
1. Create a new Android project. Within Eclipse, select File → New → Project, and then choose Android Project within the Android node (as shown in Figure 4.2) before clicking Next.
Figure 4.2
2. Specify the project details for your new project.
1. Start by providing a project name, as shown in Figure 4.3, and then click Next.
2. Select the build target. Select the newest platform release, as shown in Figure 4.4, and then click Next.
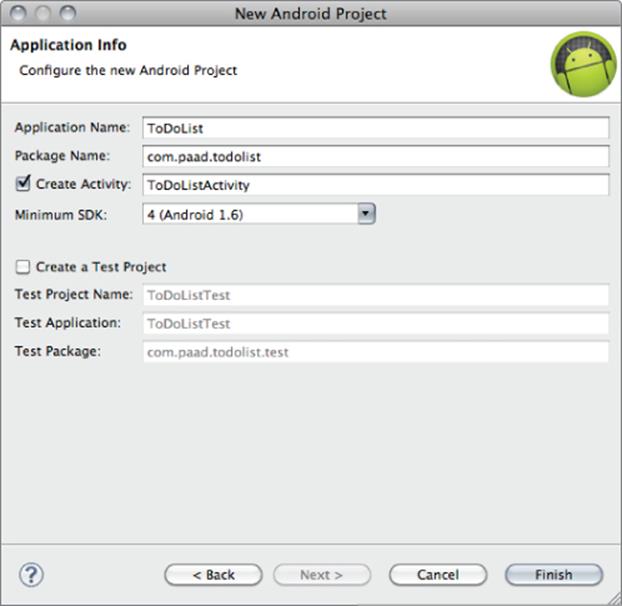
3. Enter the details for your new project, as shown in Figure 4.5. The Application name is the friendly name of your application, and the Create Activity field lets you name your Activity (ToDoListActivity). When the remaining details are entered, click Finish to create your new project.
Figure 4.3
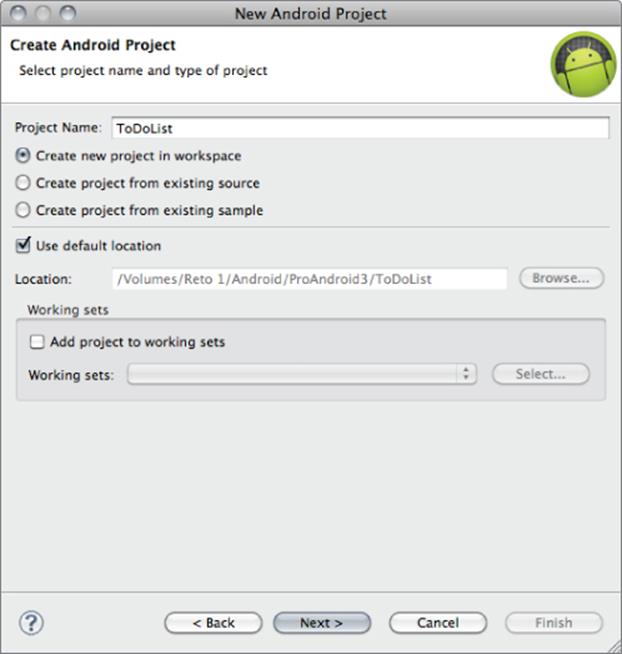
Figure 4.4
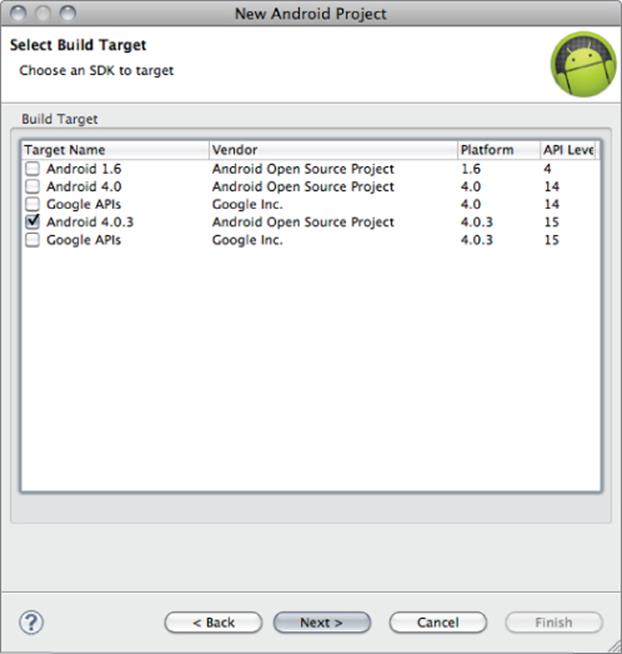
Figure 4.5
3. Before creating your debug and run configurations, take this opportunity to create a virtual device for testing your applications.
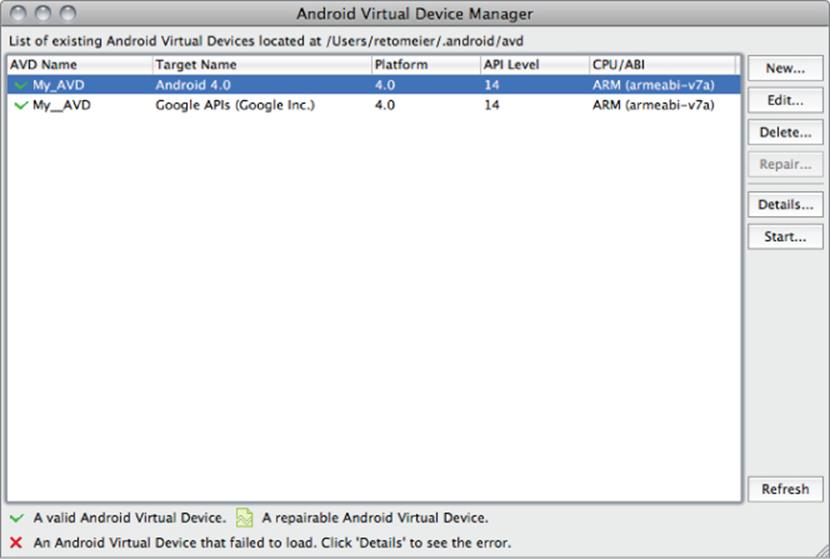
1. Select Window → AVD Manager. In the resulting dialog (see Figure 4.6), click the New button.
Figure 4.6
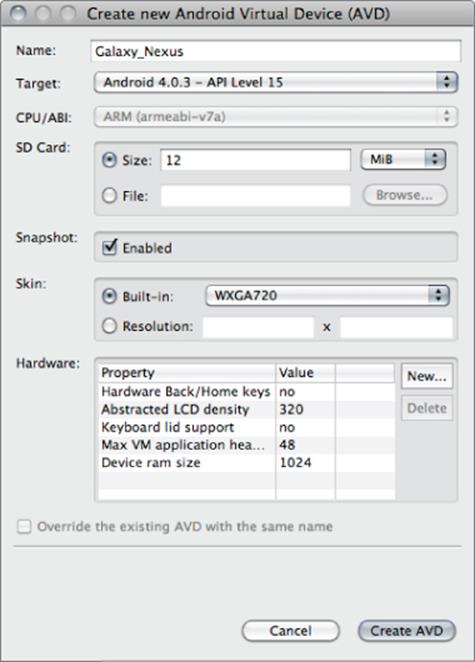
2. In the dialog displayed in Figure 4.7, enter a name for your device and choose an SDK target (use the same platform target as you selected for your project in step 2.2) and the screen resolution. Set the SD Card size to larger than 8MB, enable snapshots, and then press Create AVD.
Figure 4.7
4. Now create your debug and run configurations. Select Run → Debug Configurations and then Run → Run Configurations, creating a new configuration for each specifying the TodoList project. If you want to debug using a virtual device, you can select the one you created in step 3 here; alternatively, if you want to debug on a device, you can select it here if it's plugged in and has debugging enabled. You can either leave the launch action as Launch Default Activity or explicitly set it to launch the new ToDoListActivity.
5. In this example you want to present users with a list of to-do items and a text entry box to add new ones. There's both a list and a text-entry control available from the Android libraries. (You'll learn more about the Views available in Android, and how to create new ones, later in this Chapter.)
The preferred method for laying out your UI is to create a layout resource. Open the main.xml layout file in the res/layout project folder and modify it layout to include a ListView and an EditText within a LinearLayout. You must give both the EditText and ListView an ID so that you can get references to them both in code:
<?xml version="1.0" encoding="utf-8"?>
<LinearLayout xmlns:android="http://schemas.android.com/apk/res/android"
android:orientation="vertical"
android:layout_width="match_parent"
android:layout_height="match_parent">
<EditText
android:id="@+id/myEditText"
android:layout_width="match_parent"
android:layout_height="wrap_content"
android:hint="@string/addItemHint"
android:contentDescription="@string/addItemContentDescription"
/>
<ListView
android:id="@+id/myListView"
android:layout_width="match_parent"
android:layout_height="wrap_content"
/>
</LinearLayout>
6. You'll also need to add the string resources that provide the hint text and content description included in step 5 to the strings.xml resource stored in the project's res/values folder. You can take this opportunity to remove the default “hello” string value:
<?xml version="1.0" encoding="utf-8"?>
<resources>
<string name="app_name">ToDoList</string>
<string name="addItemHint">New To Do Item</string>
<string name="addItemContentDescription">New To Do Item</string>
</resources>
7. With your UI defined, open the ToDoListActivity Activity from your project's src folder. Start by ensuring your UI is inflated using setContentView. Then get references to the ListView and EditText using findViewById:
public void onCreate(Bundle savedInstanceState) {
super.onCreate(savedInstanceState);
// Inflate your View
setContentView(R.layout.main);
// Get references to UI widgets
ListView myListView = (ListView)findViewById(R.id.myListView);
final EditText myEditText = (EditText)findViewById(R.id.myEditText);
}
![]()
When you add the code from step 7 into the ToDoListActivity, or when you try to compile your project, your IDE or compiler will complain that the ListView and EditText classes cannot be resolved into a type.
You need to add import statements to your class to include the libraries that contain these Views (in this case, android.widget.EditText and android.widget.ListView). To ensure the code snippets and example applications listed in this book remain concise and readable, not all the necessary import statements within the code listings are included within the text (however they are all included in the downloadable source code).
If you are using Eclipse, classes with missing import statements are highlighted with a red underline. Clicking each highlighted class will display a list of “quick fixes,” which include adding the necessary import statements on your behalf.
8. Still within onCreate, define an ArrayList of Strings to store each to-do list item. You can bind a ListView to an ArrayList using an ArrayAdapter. (This process is described in more detail later in this chapter.) Create a new ArrayAdapter instance to bind the to-do item array to the ListView.
public void onCreate(Bundle savedInstanceState) {
super.onCreate(savedInstanceState);
// Inflate your View
setContentView(R.layout.main);
// Get references to UI widgets
ListView myListView = (ListView)findViewById(R.id.myListView);
final EditText myEditText = (EditText)findViewById(R.id.myEditText);
// Create the Array List of to do items
final ArrayList<String> todoItems = new ArrayList<String>();
// Create the Array Adapter to bind the array to the List View
final ArrayAdapter<String> aa;
aa = new ArrayAdapter<String>(this,
android.R.layout.simple_list_item_1,
todoItems);
// Bind the Array Adapter to the List View
myListView.setAdapter(aa);
}
9. Let users add new to-do items. Add an onKeyListener to the EditText that listens for either a “D-pad center button” click or the Enter key being pressed. (You'll learn more about listening for key presses later in this chapter.) Either of these actions should add the contents of the EditText to the to-do list array created in step 8, and notify the ArrayAdapter of the change. Finally, clear the EditText to prepare for the next item.
public void onCreate(Bundle savedInstanceState) {
super.onCreate(savedInstanceState);
// Inflate your View
setContentView(R.layout.main);
// Get references to UI widgets
ListView myListView = (ListView)findViewById(R.id.myListView);
final EditText myEditText = (EditText)findViewById(R.id.myEditText);
// Create the Array List of to do items
final ArrayList<String> todoItems = new ArrayList<String>();
// Create the Array Adapter to bind the array to the List View
final ArrayAdapter<String> aa;
aa = new ArrayAdapter<String>(this,
android.R.layout.simple_list_item_1,
todoItems);
// Bind the Array Adapter to the List View
myListView.setAdapter(aa);
myEditText.setOnKeyListener(new View.OnKeyListener() {
public boolean onKey(View v, int keyCode, KeyEvent event) {
if (event.getAction() == KeyEvent.ACTION_DOWN)
if ((keyCode == KeyEvent.KEYCODE_DPAD_CENTER) ||
(keyCode == KeyEvent.KEYCODE_ENTER)) {
todoItems.add(0, myEditText.getText().toString());
aa.notifyDataSetChanged();
myEditText.setText("");
return true;
}
return false;
}
});
}
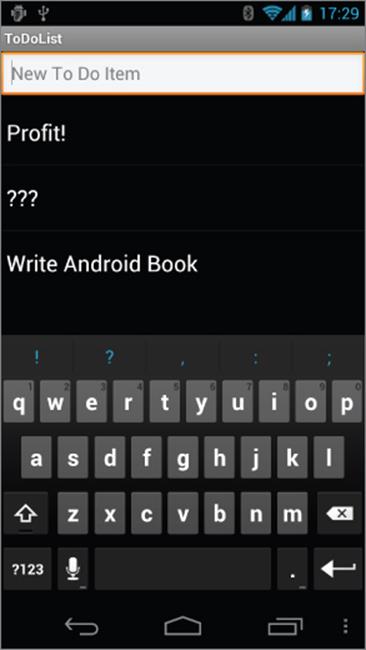
10. Run or debug the application and you'll see a text entry box above a list, as shown in Figure 4.8.
11. You've now finished your first Android application. Try adding breakpoints to the code to test the debugger and experiment with the DDMS perspective.
Figure 4.8
![]()
All code snippets in this example are part of the Chapter 4 To-Do List Part 1 project, available for download at www.wrox.com.
As it stands, this to-do list application isn't spectacularly useful. It doesn't save to-do list items between sessions; you can't edit or remove an item from the list; and typical task-list items, such as due dates and task priorities, aren't recorded or displayed. On balance, it fails most of the criteria laid out so far for a good mobile application design. You'll rectify some of these deficiencies when you return to this example.
Introducing Fragments
Fragments enable you to divide your Activities into fully encapsulated reusable components, each with its own lifecycle and UI.
The primary advantage of Fragments is the ease with which you can create dynamic and flexible UI designs that can be adapted to suite a range of screen sizes—from small-screen smartphones to tablets.
Each Fragment is an independent module that is tightly bound to the Activity into which it is placed. Fragments can be reused within multiple activities, as well as laid out in a variety of combinations to suit multipane tablet UIs and added to, removed from, and exchanged within a running Activity to help build dynamic UIs.
Fragments provide a way to present a consistent UI optimized for a wide variety of Android device types, screen sizes, and device densities.
Although it is not necessary to divide your Activities (and their corresponding layouts) into Fragments, doing so will drastically improve the flexibility of your UI and make it easier for you to adapt your user experience for new device configurations.
![]()
Fragments were introduced to Android as part of the Android 3.0 Honeycomb (API level 11) release. They are now also available as part of the Android support library, making it possible to take advantage of Fragments on platforms from Android 1.6 (API level 4) onward.
To use Fragments using the support library, you must make your Activity extend the FragmentActivity class:
public class MyActivity extends FragmentActivity
If you are using the compatibility library within a project that has a build target of API level 11 or above, it's critical that you ensure that all your Fragmentrelated imports and class references are using only the support library classes. The native and support library set of Fragment packages are closely related, but their classes are not interchangeable.
public class MyActivity extends FragmentActivity
If you are using the compatibility library within a project that has a build target of API level 11 or above, it's critical that you ensure that all your Fragment-related imports and class references are using only the support library classes. The native and support library set of Fragment packages are closely related, but their classes are not interchangeable.
Creating New Fragments
Extend the Fragment class to create a new Fragment, (optionally) defining the UI and implementing the functionality it encapsulates.
In most circumstances you'll want to assign a UI to your Fragment. It is possible to create a Fragment that doesn't include a UI but instead provides background behavior for an Activity. This is explored in more detail later in this chapter.
If your Fragment does require a UI, override the onCreateView handler to inflate and return the required View hierarchy, as shown in the Fragment skeleton code in Listing 4.4.

Listing 4.4: Fragment skeleton code
package com.paad.fragments;
import android.app.Fragment;
import android.os.Bundle;
import android.view.LayoutInflater;
import android.view.View;
import android.view.ViewGroup;
public class MySkeletonFragment extends Fragment {
@Override
public View onCreateView(LayoutInflater inflater,
ViewGroup container,
Bundle savedInstanceState) {
// Create, or inflate the Fragment's UI, and return it.
// If this Fragment has no UI then return null.
return inflater.inflate(R.layout.my_fragment, container, false);
}
}
code snippet PA4AD_Ch04_Fragments/src/MySkeletonFragment.java
You can create a layout in code using layout View Groups; however, as with Activities, the preferred way to design Fragment UI layouts is by inflating an XML resource.
Unlike Activities, Fragments don't need to be registered in your manifest. This is because Fragments can exist only when embedded into an Activity, with their lifecycles dependent on that of the Activity to which they've been added.
The Fragment Lifecycle
The lifecycle events of a Fragment mirror those of its parent Activity; however, after the containing Activity is in its active—resumed—state adding or removing a Fragment will affect its lifecycle independently.
Fragments include a series of event handlers that mirror those in the Activity class. They are triggered as the Fragment is created, started, resumed, paused, stopped, and destroyed. Fragments also include a number of additional callbacks that signal binding and unbinding the Fragment from its parent Activity, creation (and destruction) of the Fragment's View hierarchy, and the completion of the creation of the parent Activity.
Figure 4.9 summarizes the Fragment lifecycle.
Figure 4.9
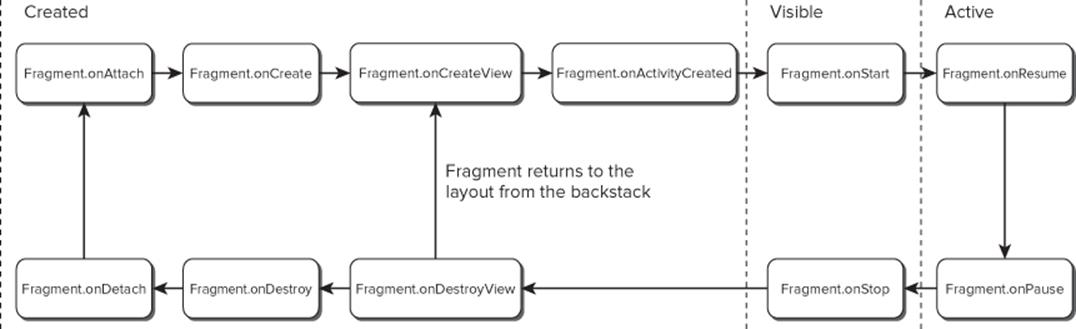
The skeleton code in Listing 4.5 shows the stubs for the lifecycle handlers available in a Fragment. Comments within each stub describe the actions you should consider taking on each state change event.
![]()
You must call back to the superclass when overriding most of these event handlers.
Listing 4.5: Fragment lifecycle event handlers
package com.paad.fragments;
import android.app.Activity;
import android.app.Fragment;
import android.os.Bundle;
import android.view.LayoutInflater;
import android.view.View;
import android.view.ViewGroup;
public class MySkeletonFragment extends Fragment {
// Called when the Fragment is attached to its parent Activity.
@Override
public void onAttach(Activity activity) {
super.onAttach(activity);
// Get a reference to the parent Activity.
}
// Called to do the initial creation of the Fragment.
@Override
public void onCreate(Bundle savedInstanceState) {
super.onCreate(savedInstanceState);
// Initialize the Fragment.
}
// Called once the Fragment has been created in order for it to
// create its user interface.
@Override
public View onCreateView(LayoutInflater inflater,
ViewGroup container,
Bundle savedInstanceState) {
// Create, or inflate the Fragment's UI, and return it.
// If this Fragment has no UI then return null.
return inflater.inflate(R.layout.my_fragment, container, false);
}
// Called once the parent Activity and the Fragment's UI have
// been created.
@Override
public void onActivityCreated(Bundle savedInstanceState) {
super.onActivityCreated(savedInstanceState);
// Complete the Fragment initialization – particularly anything
// that requires the parent Activity to be initialized or the
// Fragment's view to be fully inflated.
}
// Called at the start of the visible lifetime.
@Override
public void onStart(){
super.onStart();
// Apply any required UI change now that the Fragment is visible.
}
// Called at the start of the active lifetime.
@Override
public void onResume(){
super.onResume();
// Resume any paused UI updates, threads, or processes required
// by the Fragment but suspended when it became inactive.
}
// Called at the end of the active lifetime.
@Override
public void onPause(){
// Suspend UI updates, threads, or CPU intensive processes
// that don't need to be updated when the Activity isn't
// the active foreground activity.
// Persist all edits or state changes
// as after this call the process is likely to be killed.
super.onPause();
}
// Called to save UI state changes at the
// end of the active lifecycle.
@Override
public void onSaveInstanceState(Bundle savedInstanceState) {
// Save UI state changes to the savedInstanceState.
// This bundle will be passed to onCreate, onCreateView, and
// onCreateView if the parent Activity is killed and restarted.
super.onSaveInstanceState(savedInstanceState);
}
// Called at the end of the visible lifetime.
@Override
public void onStop(){
// Suspend remaining UI updates, threads, or processing
// that aren't required when the Fragment isn't visible.
super.onStop();
}
// Called when the Fragment's View has been detached.
@Override
public void onDestroyView() {
// Clean up resources related to the View.
super.onDestroyView();
}
// Called at the end of the full lifetime.
@Override
public void onDestroy(){
// Clean up any resources including ending threads,
// closing database connections etc.
super.onDestroy();
}
// Called when the Fragment has been detached from its parent Activity.
@Override
public void onDetach() {
super.onDetach();
}
}
code snippet PA4AD_Ch04_Fragments/src/MySkeletonFragment.java
Fragment-Specific Lifecycle Events
Most of the Fragment lifecycle events correspond to their equivalents in the Activity class, which were covered in detail in Chapter 3. Those that remain are specific to Fragments and the way in which they're inserted into their parent Activity.
Attaching and Detaching Fragments from the Parent Activity
The full lifetime of your Fragment begins when it's bound to its parent Activity and ends when it's been detached. These events are represented by the calls to onAttach and onDetach, respectively.
As with any handler called after a Fragment/Activity has become paused, it's possible that onDetach will not be called if the parent Activity's process is terminated without completing its full lifecycle.
The onAttach event is triggered before the Fragment's UI has been created, before the Fragment itself or its parent Activity have finished their initialization. Typically, the onAttach event is used to gain a reference to the parent Activity in preparation for further initialization tasks.
Creating and Destroying Fragments
The created lifetime of your Fragment occurs between the first call to onCreate and the final call to onDestroy. As it's not uncommon for an Activity's process to be terminated without the corresponding onDestroy method being called, so a Fragment can't rely on its onDestroy handler being triggered.
As with Activities, you should use the onCreate method to initialize your Fragment. It's good practice to create any class scoped objects here to ensure they're created only once in the Fragment's lifetime.
![]()
Unlike Activities, the UI is not initialized within onCreate.
Creating and Destroying User Interfaces
A Fragment's UI is initialized (and destroyed) within a new set of event handlers: onCreateView and onDestroyView, respectively.
Use the onCreateView method to initialize your Fragment: Inflate the UI, get references (and bind data to) the Views it contains, and then create any required Services and Timers.
Once you have inflated your View hierarchy, it should be returned from this handler:
return inflater.inflate(R.layout.my_fragment, container, false);
If your Fragment needs to interact with the UI of its parent Activity, wait until the onActivityCreated event has been triggered. This signifies that the containing Activity has completed its initialization and its UI has been fully constructed.
Fragment States
The fate of a Fragment is inextricably bound to that of the Activity to which it belongs. As a result, Fragment state transitions are closely related to the corresponding Activity state transitions.
Like Activities, Fragments are active when they belong to an Activity that is focused and in the foreground. When an Activity is paused or stopped, the Fragments it contains are also paused and stopped, and the Fragments contained by an inactive Activity are also inactive. When an Activity is finally destroyed, each Fragment it contains is likewise destroyed.
As the Android memory manager nondeterministically closes applications to free resources, the Fragments within those Activities are also destroyed.
While Activities and their Fragments are tightly bound, one of the advantages of using Fragments to compose your Activity's UI is the flexibility to dynamically add or remove Fragments from an active Activity. As a result, each Fragment can progress through its full, visible, and active lifecycle several times within the active lifetime of its parent Activity.
Whatever the trigger for a Fragment's transition through its lifecycle, managing its state transitions is critical in ensuring a seamless user experience. There should be no difference in a Fragment moving from a paused, stopped, or inactive state back to active, so it's important to save all UI state and persist all data when a Fragment is paused or stopped. Like an Activity, when a Fragment becomes active again, it should restore that saved state.
Introducing the Fragment Manager
Each Activity includes a Fragment Manager to manage the Fragments it contains. You can access the Fragment Manager using the getFragmentManager method:
FragmentManager fragmentManager = getFragmentManager();
The Fragment Manager provides the methods used to access the Fragments currently added to the Activity, and to perform Fragment Transaction to add, remove, and replace Fragments.
Adding Fragments to Activities
The simplest way to add a Fragment to an Activity is by including it within the Activity's layout using the fragment tag, as shown in Listing 4.6.
Listing 4.6: Adding Fragments to Activities using XML layouts
<?xml version="1.0" encoding="utf-8"?>
<LinearLayout xmlns:android="http://schemas.android.com/apk/res/android"
android:orientation="horizontal"
android:layout_width="match_parent"
android:layout_height="match_parent">
<fragment android:name="com.paad.weatherstation.MyListFragment"
android:id="@+id/my_list_fragment"
android:layout_width="match_parent"
android:layout_height="match_parent"
android:layout_weight="1"
/>
<fragment android:name="com.paad.weatherstation.DetailsFragment"
android:id="@+id/details_fragment"
android:layout_width="match_parent"
android:layout_height="match_parent"
android:layout_weight="3"
/>
</LinearLayout>
code snippet PA4AD_Ch04_Fragments/res/layout/fragment_layout.xml
Once the Fragment has been inflated, it becomes a View Group, laying out and managing its UI within the Activity.
This technique works well when you use Fragments to define a set of static layouts based on various screen sizes. If you plan to dynamically modify your layouts by adding, removing, and replacing Fragments at run time, a better approach is to create layouts that use container Views into which Fragments can be placed at runtime, based on the current application state.
Listing 4.7 shows an XML snippet that you could use to support this latter approach.
Listing 4.7: Specifying Fragment layouts using container views
<?xml version="1.0" encoding="utf-8"?>
<LinearLayout xmlns:android="http://schemas.android.com/apk/res/android"
android:orientation="horizontal"
android:layout_width="match_parent"
android:layout_height="match_parent">
<FrameLayout
android:id="@+id/ui_container"
android:layout_width="match_parent"
android:layout_height="match_parent"
android:layout_weight="1"
/>
<FrameLayout
android:id="@+id/details_container"
android:layout_width="match_parent"
android:layout_height="match_parent"
android:layout_weight="3"
/>
</LinearLayout>
code snippet PA4AD_Ch04_Fragments/res/layout/fragment_container_layout.xml
You then need to create and add the corresponding Fragments to their appropriate parent containers within the onCreate handler of your Activity using Fragment Transactions, as described in the next section.
Using Fragment Transactions
Fragment Transactions can be used to add, remove, and replace Fragments within an Activity at run time. Using Fragment Transactions, you can make your layouts dynamic—that is, they will adapt and change based on user interactions and application state.
Each Fragment Transaction can include any combination of supported actions, including adding, removing, or replacing Fragments. They also support the specification of the transition animations to display and whether to include the Transaction on the back stack.
A new Fragment Transaction is created using the beginTransaction method from the Activity's Fragment Manager. Modify the layout using the add, remove, and replace methods, as required, before setting the animations to display, and setting the appropriate back-stack behavior. When you are ready to execute the change, call commit to add the transaction to the UI queue.
FragmentTransaction fragmentTransaction = fragmentManager.beginTransaction();
// Add, remove, and/or replace Fragments.
// Specify animations.
// Add to back stack if required.
fragmentTransaction.commit();
Each of these transaction types and options will be explored in the following sections.
Adding, Removing, and Replacing Fragments
When adding a new UI Fragment, specify the Fragment instance to add, along with the container View into which the Fragment will be placed. Optionally, you can specify a tag that can later be used to find the Fragment by using the findFragmentByTag method:
FragmentTransaction fragmentTransaction = fragmentManager.beginTransaction();
fragmentTransaction.add(R.id.ui_container, new MyListFragment());
fragmentTransaction.commit();
To remove a Fragment, you first need to find a reference to it, usually using either the Fragment Manager's findFragmentById or findFragmentByTag methods. Then pass the found Fragment instance as a parameter to the remove method of a Fragment Transaction:
FragmentTransaction fragmentTransaction = fragmentManager.beginTransaction();
Fragment fragment = fragmentManager.findFragmentById(R.id.details_fragment);
fragmentTransaction.remove(fragment);
fragmentTransaction.commit();
You can also replace one Fragment with another. Using the replace method, specify the container ID containing the Fragment to be replaced, the Fragment with which to replace it, and (optionally) a tag to identify the newly inserted Fragment.
FragmentTransaction fragmentTransaction = fragmentManager.beginTransaction();
fragmentTransaction.replace(R.id.details_fragment,
new DetailFragment(selected_index));
fragmentTransaction.commit();
Using the Fragment Manager to Find Fragments
To find Fragments within your Activity, use the Fragment Manager's findFragmentById method. If you have added your Fragment to the Activity layout in XML, you can use the Fragment's resource identifier:
MyFragment myFragment =
(MyFragment)fragmentManager.findFragmentById(R.id.MyFragment);
If you've added a Fragment using a Fragment Transaction, you should specify the resource identifier of the container View to which you added the Fragment you want to find. Alternatively, you can use the findFragmentByTag method to search for the Fragment using the tag you specified in the Fragment Transaction:
MyFragment myFragment =
(MyFragment)fragmentManager.findFragmentByTag(MY_FRAGMENT_TAG);
Later in this chapter you'll be introduced to Fragments that don't include a UI. The findFragmentByTag method is essential for interacting with these Fragments. Because they're not part of the Activity's View hierarchy, they don't have a resource identifier or a container resource identifier to pass in to the findFragmentById method.
Populating Dynamic Activity Layouts with Fragments
If you're dynamically changing the composition and layout of your Fragments at run time, it's good practice to define only the parent containers within your XML layout and populate it exclusively using Fragment Transactions at run time to ensure consistency when configuration changes (such as screen rotations) cause the UI to be re-created.
Listing 4.8 shows the skeleton code used to populate an Activity's layout with Fragments at run time.
Listing 4.8: Populating Fragment layouts using container views
public void onCreate(Bundle savedInstanceState) {
super.onCreate(savedInstanceState);
// Inflate the layout containing the Fragment containers
setContentView(R.layout.fragment_container_layout);
FragmentManager fm = getFragmentManager();
// Check to see if the Fragment back stack has been populated
// If not, create and populate the layout.
DetailsFragment detailsFragment =
(DetailsFragment)fm.findFragmentById(R.id.details_container);
if (detailsFragment == null) {
FragmentTransaction ft = fm.beginTransaction();
ft.add(R.id.details_container, new DetailsFragment());
ft.add(R.id.ui_container, new MyListFragment());
ft.commit();
}
}
code snippet PA4AD_Ch04_Fragments/src/MyFragmentActivity.java
You should first check if the UI has already been populated based on the previous state. To ensure a consistent user experience, Android persists the Fragment layout and associated back stack when an Activity is restarted due to a configuration change.
For the same reason, when creating alternative layouts for run time configuration changes, it's considered good practice to include any view containers involved in any transactions in all the layout variations. Failing to do so may result in the Fragment Manager attempting to restore Fragments to containers that don't exist in the new layout.
To remove a Fragment container in a given orientation layout, simply mark its visibility attribute as gone in your layout definition, as shown in Listing 4.9.
Listing 4.9: Hiding Fragments in layout variations
<?xml version="1.0" encoding="utf-8"?>
<LinearLayout xmlns:android="http://schemas.android.com/apk/res/android"
android:orientation="horizontal"
android:layout_width="match_parent"
android:layout_height="match_parent">
<FrameLayout
android:id="@+id/ui_container"
android:layout_width="match_parent"
android:layout_height="match_parent"
android:layout_weight="1"
/>
<FrameLayout
android:id="@+id/details_container"
android:layout_width="match_parent"
android:layout_height="match_parent"
android:layout_weight="3"
android:visibility="gone"
/>
</LinearLayout>
code snippet PA4AD_Ch04_Fragments/res/layout-port/fragment_container_layout.xml
Fragments and the Back Stack
Chapter 3 described the concept of Activity stacks—the logical stacking of Activities that are no longer visible—which allow users to navigate back to previous screens using the back button.
Fragments enable you to create dynamic Activity layouts that can be modified to present significant changes in the UIs. In some cases these changes could be considered a new screen—in which case a user may reasonably expect the back button to return to the previous layout. This involves reversing previously executed Fragment Transactions.
Android provides a convenient technique for providing this functionality. To add the Fragment Transaction to the back stack, call addToBackStack on a Fragment Transaction before calling commit.
FragmentTransaction fragmentTransaction = fragmentManager.beginTransaction();
fragmentTransaction.add(R.id.ui_container, new MyListFragment());
Fragment fragment = fragmentManager.findFragmentById(R.id.details_fragment);
fragmentTransaction.remove(fragment);
String tag = null;
fragmentTransaction.addToBackStack(tag);
fragmentTransaction.commit();
Pressing the Back button will then reverse the previous Fragment Transaction and return the UI to the earlier layout.
When the Fragment Transaction shown above is committed, the Details Fragment is stopped and moved to the back stack, rather than simply destroyed. If the Transaction is reversed, the List Fragment is destroyed, and the Details Fragment is restarted.
Animating Fragment Transactions
To apply one of the default transition animations, use the setTransition method on any Fragment Transaction, passing in one of the FragmentTransaction.TRANSIT_FRAGMENT_* constants.
transaction.setTransition(FragmentTransaction.TRANSIT_FRAGMENT_OPEN);
You can also apply custom animations to Fragment Transactions by using the setCustomAnimations method. This method accepts two animation XML resources: one for Fragments that are being added to the layout by this transaction, and another for Fragments being removed:
fragmentTransaction.setCustomAnimations(R.animator.slide_in_left,
R.animator.slide_out_right);
This is a particularly useful way to add seamless dynamic transitions when you are replacing Fragments within your layout.
![]()
The Android animation libraries were significantly improved in Android 3.0 (API level 11) with the inclusion of the Animator class. As a result, the animation resource passed in to the setCustomAnimations method is different for applications built using the support library.
Applications built for devices running on API level 11 and above should use Animator resources, whereas those using the support library to support earlier platform releases should use the older View Animation resources.
You can find more details on creating custom Animator and Animation resources in Chapter 11, “Advanced User Experience.”
Interfacing Between Fragments and Activities
Use the getActivity method within any Fragment to return a reference to the Activity within which it's embedded. This is particularly useful for finding the current Context, accessing other Fragments using the Fragment Manager, and finding Views within the Activity's View hierarchy.
TextView textView = (TextView)getActivity().findViewById(R.id.textview);
Although it's possible for Fragments to communicate directly using the host Activity's Fragment Manager, it's generally considered better practice to use the Activity as an intermediary. This allows the Fragments to be as independent and loosely coupled as possible, with the responsibility for deciding how an event in one Fragment should affect the overall UI falling to the host Activity.
Where your Fragment needs to share events with its host Activity (such as signaling UI selections), it's good practice to create a callback interface within the Fragment that a host Activity must implement.
Listing 4.10 shows a code snippet from within a Fragment class that defines a public event listener interface. The onAttach handler is overridden to obtain a reference to the host Activity, confirming that it implements the required interface.
Listing 4.10: Defining Fragment event callback interfaces
public interface OnSeasonSelectedListener {
public void onSeasonSelected(Season season);
}
private OnSeasonSelectedListener onSeasonSelectedListener;
private Season currentSeason;
@Override
public void onAttach(Activity activity) {
super.onAttach(activity);
try {
onSeasonSelectedListener = (OnSeasonSelectedListener)activity;
} catch (ClassCastException e) {
throw new ClassCastException(activity.toString() +
" must implement OnSeasonSelectedListener");
}
}
private void setSeason(Season season) {
currentSeason = season;
onSeasonSelectedListener.onSeasonSelected(season);
}
code snippet PA4AD_Ch04_Fragments/src/SeasonFragment.java
Fragments Without User Interfaces
In most circumstances, Fragments are used to encapsulate modular components of the UI; however, you can also create a Fragment without a UI to provide background behavior that persists across Activity restarts. This is particularly well suited to background tasks that regularly touch the UI or where it's important to maintain state across Activity restarts caused by configuration changes.
You can choose to have an active Fragment retain its current instance when its parent Activity is re-created using the setRetainInstance method. After you call this method, the Fragment's lifecycle will change.
Rather than being destroyed and re-created with its parent Activity, the same Fragment instance is retained when the Activity restarts. It will receive the onDetach event when the parent Activity is destroyed, followed by the onAttach, onCreateView, and onActivityCreated events as the new parent Activity is instantiated.
The following snippet shows the skeleton code for a Fragment without a UI:
![]()
Although you use this technique on Fragments with a UI, this is generally not recommended. A better alternative is to move the associated background task or required state into a new Fragment, without a UI, and have the two Fragments interact as required.
public class NewItemFragment extends Fragment {
@Override
public void onAttach(Activity activity) {
super.onAttach(activity);
// Get a type-safe reference to the parent Activity.
}
@Override
public void onCreate(Bundle savedInstanceState) {
super.onCreate(savedInstanceState);
// Create background worker threads and tasks.
}
@Override
public void onActivityCreated(Bundle savedInstanceState) {
super.onActivityCreated(savedInstanceState);
// Initiate worker threads and tasks.
}
}
To add this Fragment to your Activity, create a new Fragment Transaction, specifying a tag to use to identify it. Because the Fragment has no UI, it should not be associated with a container View and generally shouldn't be added to the back stack.
FragmentTransaction fragmentTransaction = fragmentManager.beginTransaction();
fragmentTransaction.add(workerFragment, MY_FRAGMENT_TAG);
fragmentTransaction.commit();
Use the findFragmentByTag from the Fragment Manager to find a reference to it later.
MyFragment myFragment =
(MyFragment)fragmentManager.findFragmentByTag(MY_FRAGMENT_TAG);
Android Fragment Classes
The Android SDK includes a number of Fragment subclasses that encapsulate some of the most common Fragment implementations. Some of the more useful ones are listed here:
· DialogFragment—A Fragment that you can use to display a floating Dialog over the parent Activity. You can customize the Dialog's UI and control its visibility directly via the Fragment API. Dialog Fragments are covered in more detail in Chapter 10, “Expanding the User Experience.”
· ListFragment—A wrapper class for Fragments that feature a ListView bound to a data source as the primary UI metaphor. It provides methods to set the Adapter to use and exposes the event handlers for list item selection. The List Fragment is used as part of the To-Do List example in the next section.
· WebViewFragment—A wrapper class that encapsulates a WebView within a Fragment. The child WebView will be paused and resumed when the Fragment is paused and resumed.
Using Fragments for Your To-Do List
The earlier to-do list example used a Linear Layout within an Activity to define its UI.
In this example you'll break the UI into a series of Fragments that represent its component pieces—the text entry box and the list of to-do items. This will enable you to easily create optimized layouts for different screen sizes.
1. Start by creating a new layout file, new_item_fragment.xml in the res/layout folder that contains the Edit Text node from the main.xml.
<?xml version="1.0" encoding="utf-8"?>
<EditText xmlns:android="http://schemas.android.com/apk/res/android"
android:id="@+id/myEditText"
android:layout_width="match_parent"
android:layout_height="wrap_content"
android:hint="@string/addItemHint"
android:contentDescription="@string/addItemContentDescription"
/>
2. You'll need to create a new Fragment for each UI component. Start by creating a NewItemFragment that extends Fragment. Override the onCreateView handler to inflate the layout you created in step 1.
package com.paad.todolist;
import android.app.Activity;
import android.app.Fragment;
import android.view.KeyEvent;
import android.os.Bundle;
import android.view.LayoutInflater;
import android.view.View;
import android.view.ViewGroup;
import android.widget.EditText;
public class NewItemFragment extends Fragment {
@Override
public View onCreateView(LayoutInflater inflater, ViewGroup container,
Bundle savedInstanceState) {
return inflater.inflate(R.layout.new_item_fragment, container, false);
}
}
3. Each Fragment should encapsulate the functionality that it provides. In the case of the New Item Fragment, that's accepting new to-do items to add to your list. Start by defining an interface that the ToDoListActivity can implement to listen for new items being added.
public interface OnNewItemAddedListener {
public void onNewItemAdded(String newItem);
}
4. Now create a variable to store a reference to the parent ToDoListActivity that will implement this interface. You can get the reference as soon as the parent Activity has been bound to the Fragment within the Fragment's onAttach handler.
private OnNewItemAddedListener onNewItemAddedListener;
@Override
public void onAttach(Activity activity) {
super.onAttach(activity);
try {
onNewItemAddedListener = (OnNewItemAddedListener)activity;
} catch (ClassCastException e) {
throw new ClassCastException(activity.toString() +
" must implement OnNewItemAddedListener");
}
}
5. Move the editText.onClickListener implementation from the ToDoListActivity into your Fragment. When the user adds a new item, rather than adding the text directly to an array, pass it in to the parent Activity's OnNewItemAddedListener.onNewItemAdded implementation.
@Override
public View onCreateView(LayoutInflater inflater, ViewGroup container,
Bundle savedInstanceState) {
View view = inflater.inflate(R.layout.new_item_fragment, container, false);
final EditText myEditText =
(EditText)view.findViewById(R.id.myEditText);
myEditText.setOnKeyListener(new View.OnKeyListener() {
public boolean onKey(View v, int keyCode, KeyEvent event) {
if (event.getAction() == KeyEvent.ACTION_DOWN)
if ((keyCode == KeyEvent.KEYCODE_DPAD_CENTER) ||
(keyCode == KeyEvent.KEYCODE_ENTER)) {
String newItem = myEditText.getText().toString();
onNewItemAddedListener.onNewItemAdded(newItem);
myEditText.setText("");
return true;
}
return false;
}
});
return view;
}
6. Next, create the Fragment that contains the list of to-do items. Android provides a ListFragment class that you can use to easily create a simple List View based Fragment. Create a new class that Extends ListFragment.
package com.paad.todolist;
import android.app.ListFragment;
public class ToDoListFragment extends ListFragment {
}
![]()
The List Fragment class includes a default UI consisting of a single List View, which is sufficient for this example. You can easily customize the default List Fragment UI by creating your own custom layout and inflating it within the onCreateView handler. Any custom layout must include a List View node with the ID specified as @android:id/list.
7. With your Fragments completed, it's time to return to the Activity. Start by updating the main.xml layout, replacing the List View and Edit Text with the ToDo List Fragment and New Item Fragment, respectively.
<?xml version="1.0" encoding="utf-8"?>
<LinearLayout xmlns:android="http://schemas.android.com/apk/res/android"
android:orientation="vertical"
android:layout_width="match_parent"
android:layout_height="match_parent">
<fragment android:name="com.paad.todolist.NewItemFragment"
android:id="@+id/NewItemFragment"
android:layout_width="match_parent"
android:layout_height="wrap_content"
/>
<fragment android:name="com.paad.todolist.ToDoListFragment"
android:id="@+id/TodoListFragment"
android:layout_width="match_parent"
android:layout_height="wrap_content"
/>
</LinearLayout>
8. Return to the ToDoListActivity. Within the onCreate method, use the Fragment Manager to get a reference to the ToDo List Fragment before creating and assigning the adapter to it. Because the List View and Edit Text Views are now encapsulated within fragments, you no longer need to find references to them within your Activity. You'll need to expand the scope of the Array Adapter and Array List to class variables.
private ArrayAdapter<String> aa;
private ArrayList<String> todoItems;
public void onCreate(Bundle savedInstanceState) {
super.onCreate(savedInstanceState);
// Inflate your view
setContentView(R.layout.main);
// Get references to the Fragments
FragmentManager fm = getFragmentManager();
ToDoListFragment todoListFragment =
(ToDoListFragment)fm.findFragmentById(R.id.TodoListFragment);
// Create the array list of to do items
todoItems = new ArrayList<String>();
// Create the array adapter to bind the array to the listview
aa = new ArrayAdapter<String>(this,
android.R.layout.simple_list_item_1,
todoItems);
// Bind the array adapter to the listview.
todoListFragment.setListAdapter(aa);
}
9. Your List View is now connected to your Array List using an adapter, so all that's left is to add any new items created within the New Item Fragment. Start by declaring that your class will implement the OnNewItemAddedListener you defined within the New Item Fragment in step 3.
public class ToDoList extends Activity
implements NewItemFragment.OnNewItemAddedListener {
10. Finally, implement the listener by implementing an onNewItemAdded handler. Add the received string variable to the Array List before notifying the Array Adapter that the dataset has changed.
public void onNewItemAdded(String newItem) {
todoItems.add(newItem);
aa.notifyDataSetChanged();
}
![]()
All code snippets in this example are part of the Chapter 4 To-Do List Part 2 project, available for download at www.wrox.com.
The Android Widget Toolbox
Android supplies a toolbox of standard Views to help you create your UIs. By using these controls (and modifying or extending them, as necessary), you can simplify your development and provide consistency between applications.
The following list highlights some of the more familiar toolbox controls:
· TextView—A standard read-only text label that supports multiline display, string formatting, and automatic word wrapping.
· EditText—An editable text entry box that accepts multiline entry, word-wrapping, and hint text.
· Chronometer—A Text View extension that implements a simple count-up timer.
· ListView—A View Group that creates and manages a vertical list of Views, displaying them as rows within the list. The simplest List View displays the toString value of each object in an array, using a Text View for each item.
· Spinner—A composite control that displays a Text View and an associated List View that lets you select an item from a list to display in the textbox. It's made from a Text View displaying the current selection, combined with a button that displays a selection dialog when pressed.
· Button—A standard push button.
· ToggleButton—A two-state button that can be used as an alternative to a check box. It's particularly appropriate where pressing the button will initiate an action as well as changing a state (such as when turning something on or off).
· ImageButton—A push button for which you can specify a customized background image (Drawable).
· CheckBox—A two-state button represented by a checked or unchecked box.
· RadioButton—A two-state grouped button. A group of these presents the user with a number of possible options, of which only one can be enabled at a time.
· ViewFlipper—A View Group that lets you define a collection of Views as a horizontal row in which only one View is visible at a time, and in which transitions between visible views can be animated.
· VideoView—Handles all state management and display Surface configuration for playing videos more simply from within your Activity.
· QuickContactBadge—Displays a badge showing the image icon assigned to a contact you specify using a phone number, name, email address, or URI. Clicking the image will display the quick contact bar, which provides shortcuts for contacting the selected contact—including calling and sending an SMS, email, and IM.
· ViewPager—Released as part of the Compatibility Package, the View Pager implements a horizontally scrolling set of Views similar to the UI used in Google Play and Calendar. The View Pager allows users to swipe or drag left or right to switch between different Views.
This is only a selection of the widgets available. Android also supports several more advanced View implementations, including date-time pickers, auto-complete input boxes, maps, galleries, and tab sheets. For a more comprehensive list of the available widgets, head tohttp://developer.android.com/guide/tutorials/views/index.html.
Creating New Views
It's only a matter of time before you, as an innovative developer, encounter a situation in which none of the built-in controls meets your needs.
The ability to extend existing Views, assemble composite controls, and create unique new Views makes it possible to implement beautiful UIs optimized for your application's workflow. Android lets you subclass the existing View toolbox or implement your own View controls, giving you total freedom to tailor your UI to optimize the user experience.
![]()
When designing a UI, it's important to balance raw aesthetics and usability. With the power to create your own custom controls comes the temptation to rebuild all your controls from scratch. Resist that urge. The standard Views will be familiar to users from other Android applications and will update in line with new platform releases. On small screens, with users often paying limited attention, familiarity can often provide better usability than a slightly shinier control.
The best approach to use when creating a new View depends on what you want to achieve:
· Modify or extend the appearance and/or behavior of an existing View when it supplies the basic functionality you want. By overriding the event handlers and/or onDraw, but still calling back to the superclass's methods, you can customize a View without having to re-implement its functionality. For example, you could customize a TextView to display numbers using a set number of decimal points.
· Combine Views to create atomic, reusable controls that leverage the functionality of several interconnected Views. For example, you could create a stopwatch timer by combining a TextView and a Button that resets the counter when clicked.
· Create an entirely new control when you need a completely different interface that you can't get by changing or combining existing controls.
Modifying Existing Views
The Android widget toolbox includes Views that provide many common UI requirements, but the controls are necessarily generic. By customizing these basic Views, you avoid re-implementing existing behavior while still tailoring the UI, and functionality, to your application's needs.
To create a new View based on an existing control, create a new class that extends it, as shown with the TextView derived class shown in Listing 4.11. In this example you extend the Text View to customize its appearance and behavior.
Listing 4.11: Extending Text View
import android.content.Context;
import android.graphics.Canvas;
import android.util.AttributeSet;
import android.view.KeyEvent;
import android.widget.TextView;
public class MyTextView extends TextView {
public MyTextView (Context context, AttributeSet attrs, int defStyle)
{
super(context, attrs, defStyle);
}
public MyTextView (Context context) {
super(context);
}
public MyTextView (Context context, AttributeSet attrs) {
super(context, attrs);
}
}
code snippet PA4AD_Ch04_Views/src/MyTextView.java
To override the appearance or behavior of your new View, override and extend the event handlers associated with the behavior you want to change.
In the following extension of the Listing 4.11 code, the onDraw method is overridden to modify the View's appearance, and the onKeyDown handler is overridden to allow custom key-press handling.
public class MyTextView extends TextView {
public MyTextView (Context context, AttributeSet ats, int defStyle) {
super(context, ats, defStyle);
}
public MyTextView (Context context) {
super(context);
}
public MyTextView (Context context, AttributeSet attrs) {
super(context, attrs);
}
@Override
public void onDraw(Canvas canvas) {
[ ... Draw things on the canvas under the text ... ]
// Render the text as usual using the TextView base class.
super.onDraw(canvas);
[ ... Draw things on the canvas over the text ... ]
}
@Override
public boolean onKeyDown(int keyCode, KeyEvent keyEvent) {
[ ... Perform some special processing ... ]
[ ... based on a particular key press ... ]
// Use the existing functionality implemented by
// the base class to respond to a key press event.
return super.onKeyDown(keyCode, keyEvent);
}
}
The event handlers available within Views are covered in more detail later in this chapter.
Customizing Your To-Do List
The to-do list example uses TextView controls to represent each row in a List View. You can customize the appearance of the list by extending Text View and overriding the onDraw method.
In this example you'll create a new TodoListItemView that will make each item appear as if on a paper pad. When complete, your customized to-do list should look like Figure 4.10.
Figure 4.10

1. Create a new ToDoListItemView class that extends TextView. Include a stub for overriding the onDraw method, and implement constructors that call a new init method stub.
package com.paad.todolist;
import android.content.Context;
import android.content.res.Resources;
import android.graphics.Canvas;
import android.graphics.Paint;
import android.util.AttributeSet;
import android.widget.TextView;
public class ToDoListItemView extends TextView {
public ToDoListItemView (Context context, AttributeSet ats, int ds) {
super(context, ats, ds);
init();
}
public ToDoListItemView (Context context) {
super(context);
init();
}
public ToDoListItemView (Context context, AttributeSet attrs) {
super(context, attrs);
init();
}
private void init() {
}
@Override
public void onDraw(Canvas canvas) {
// Use the base TextView to render the text.
super.onDraw(canvas);
}
}
2. Create a new colors.xml resource in the res/values folder. Create new color values for the paper, margin, line, and text colors.
<?xml version="1.0" encoding="utf-8"?>
<resources>
<color name="notepad_paper">#EEF8E0A0</color>
<color name="notepad_lines">#FF0000FF</color>
<color name="notepad_margin">#90FF0000</color>
<color name="notepad_text">#AA0000FF</color>
</resources>
3. Create a new dimens.xml resource file, and add a new value for the paper's margin width.
<?xml version="1.0" encoding="utf-8"?>
<resources>
<dimen name="notepad_margin">30dp</dimen>
</resources>
4. With the resources defined, you're ready to customize the ToDoListItemView appearance. Create new private instance variables to store the Paint objects you'll use to draw the paper background and margin. Also create variables for the paper color and margin width values. Fill in the initmethod to get instances of the resources you created in the last two steps, and create the Paint objects.
private Paint marginPaint;
private Paint linePaint;
private int paperColor;
private float margin;
private void init() {
// Get a reference to our resource table.
Resources myResources = getResources();
// Create the paint brushes we will use in the onDraw method.
marginPaint = new Paint(Paint.ANTI_ALIAS_FLAG);
marginPaint.setColor(myResources.getColor(R.color.notepad_margin));
linePaint = new Paint(Paint.ANTI_ALIAS_FLAG);
linePaint.setColor(myResources.getColor(R.color.notepad_lines));
// Get the paper background color and the margin width.
paperColor = myResources.getColor(R.color.notepad_paper);
margin = myResources.getDimension(R.dimen.notepad_margin);
}
5. To draw the paper, override onDraw and draw the image using the Paint objects you created in step 4. After you've drawn the paper image, call the superclass's onDraw method and let it draw the text as usual.
@Override
public void onDraw(Canvas canvas) {
// Color as paper
canvas.drawColor(paperColor);
// Draw ruled lines
canvas.drawLine(0, 0, 0, getMeasuredHeight(), linePaint);
canvas.drawLine(0, getMeasuredHeight(),
getMeasuredWidth(), getMeasuredHeight(),
linePaint);
// Draw margin
canvas.drawLine(margin, 0, margin, getMeasuredHeight(), marginPaint);
// Move the text across from the margin
canvas.save();
canvas.translate(margin, 0);
// Use the TextView to render the text
super.onDraw(canvas);
canvas.restore();
}
6. That completes the ToDoListItemView implementation. To use it in the To-Do List Activity, you need to include it in a new layout and pass that layout in to the Array Adapter constructor. Start by creating a new todolist_item.xml resource in the res/layout folder. It will specify how each of the to-do list items is displayed within the List View. For this example, your layout need only consist of the new ToDoListItemView, set to fill the entire available area.
<?xml version="1.0" encoding="utf-8"?>
<com.paad.todolist.ToDoListItemView
xmlns:android="http://schemas.android.com/apk/res/android"
android:layout_width="match_parent"
android:layout_height="match_parent"
android:padding="10dp"
android:scrollbars="vertical"
android:textColor="@color/notepad_text"
android:fadingEdge="vertical"
/>
7. The final step is to change the parameters passed in to the ArrayAdapter in onCreate of the ToDoListActivity class. Replace the reference to the default android.R.layout.simple_list_item_1 with a reference to the new R.layout.todolist_item layout created in step 6.
int resID = R.layout.todolist_item;
aa = new ArrayAdapter<String>(this, resID, todoItems);
Creating Compound Controls
![]()
All code snippets in this example are part of the Chapter 4 To-do List Part 3 project, available for download at www.wrox.com.
Compound controls are atomic, self-contained View Groups that contain multiple child Views laid out and connected together.
When you create a compound control, you define the layout, appearance, and interaction of the Views it contains. You create compound controls by extending a ViewGroup (usually a layout). To create a new compound control, choose the layout class that's most suitable for positioning the child controls and extend it:
public class MyCompoundView extends LinearLayout {
public MyCompoundView(Context context) {
super(context);
}
public MyCompoundView(Context context, AttributeSet attrs) {
super(context, attrs);
}
}
As with Activities, the preferred way to design compound View UI layouts is by using an external resource.
Listing 4.12 shows the XML layout definition for a simple compound control consisting of an Edit Text for text entry, with a Clear Text button beneath it.
Listing 4.12: A compound View layout resource
<?xml version="1.0" encoding="utf-8"?>
<LinearLayout xmlns:android="http://schemas.android.com/apk/res/android"
android:orientation="vertical"
android:layout_width="match_parent"
android:layout_height="wrap_content">
<EditText
android:id="@+id/editText"
android:layout_width="match_parent"
android:layout_height="wrap_content"
/>
<Button
android:id="@+id/clearButton"
android:layout_width="match_parent"
android:layout_height="wrap_content"
android:text="Clear"
/>
</LinearLayout>
code snippet PA4AD_Ch04_Views/res/layout/clearable_edit_text.xml
To use this layout in your new compound View, override its constructor to inflate the layout resource using the inflate method from the LayoutInflate system service. The inflate method takes the layout resource and returns the inflated View.
For circumstances such as this, in which the returned View should be the class you're creating, you can pass in the parent View and attach the result to it automatically.
Listing 4.13 demonstrates this using the ClearableEditText class. Within the constructor it inflates the layout resource from Listing 4.12 and then finds a reference to the Edit Text and Button Views it contains. It also makes a call to hookupButton that will later be used to hook up the plumbing that will implement the clear text functionality.
Listing 4.13: Constructing a compound View
public class ClearableEditText extends LinearLayout {
EditText editText;
Button clearButton;
public ClearableEditText(Context context) {
super(context);
// Inflate the view from the layout resource.
String infService = Context.LAYOUT_INFLATER_SERVICE;
LayoutInflater li;
li = (LayoutInflater)getContext().getSystemService(infService);
li.inflate(R.layout.clearable_edit_text, this, true);
// Get references to the child controls.
editText = (EditText)findViewById(R.id.editText);
clearButton = (Button)findViewById(R.id.clearButton);
// Hook up the functionality
hookupButton();
}
}
code snippet PA4AD_Ch04_Views/src/ClearableEditText.java
If you prefer to construct your layout in code, you can do so just as you would for an Activity:
public ClearableEditText(Context context) {
super(context);
// Set orientation of layout to vertical
setOrientation(LinearLayout.VERTICAL);
// Create the child controls.
editText = new EditText(getContext());
clearButton = new Button(getContext());
clearButton.setText("Clear");
// Lay them out in the compound control.
int lHeight = LinearLayout.LayoutParams.WRAP_CONTENT;
int lWidth = LinearLayout.LayoutParams.MATCH_PARENT;
addView(editText, new LinearLayout.LayoutParams(lWidth, lHeight));
addView(clearButton, new LinearLayout.LayoutParams(lWidth, lHeight));
// Hook up the functionality
hookupButton();
}
After constructing the View layout, you can hook up the event handlers for each child control to provide the functionality you need. In Listing 4.14, the hookupButton method is filled in to clear the Edit Text when the button is pressed.
Listing 4.14: Implementing the Clear Text Button
private void hookupButton() {
clearButton.setOnClickListener(new Button.OnClickListener() {
public void onClick(View v) {
editText.setText("");
}
});
}
code snippet PA4AD_Ch04_Views/src/ClearableEditText.java
Creating Simple Compound Controls Using Layouts
It's often sufficient, and more flexible, to define the layout and appearance of a set of Views without hard-wiring their interactions.
You can create a reusable layout by creating an XML resource that encapsulates the UI pattern you want to reuse. You can then import these layout patterns when creating the UI for Activities or Fragments by using the include tag within their layout resource definitions.
<include layout="@layout/clearable_edit_text"/>
The include tag also enables you to override the id and layout parameters of the root node of the included layout:
<include layout="@layout/clearable_edit_text"
android:id="@+id/add_new_entry_input"
android:layout_width="match_parent"
android:layout_height="wrap_content"
android:layout_gravity="top"/>
Creating Custom Views
Creating new Views gives you the power to fundamentally shape the way your applications look and feel. By creating your own controls, you can create UIs that are uniquely suited to your needs.
To create new controls from a blank canvas, you extend either the View or SurfaceView class. The View class provides a Canvas object with a series of draw methods and Paint classes. Use them to create a visual interface with bitmaps and raster graphics. You can then override user events, including screen touches or key presses to provide interactivity.
In situations in which extremely rapid repaints and 3D graphics aren't required, the View base class offers a powerful lightweight solution.
The SurfaceView class provides a Surface object that supports drawing from a background thread and optionally using openGL to implement your graphics. This is an excellent option for graphics-heavy controls that are frequently updated (such as live video) or that display complex graphical information (particularly, games and 3D visualizations).
![]()
This section focuses on building controls based on the View class. To learn more about the SurfaceView class and some of the more advanced Canvas paint features available in Android, see Chapter 10.
Creating a New Visual Interface
The base View class presents a distinctly empty 100-pixel-by-100-pixel square. To change the size of the control and display a more compelling visual interface, you need to override the onMeasure and onDraw methods.
Within onMeasure your View will determine the height and width it will occupy given a set of boundary conditions. The onDraw method is where you draw onto the Canvas.
Listing 4.15 shows the skeleton code for a new View class, which will be examined and developed further in the following sections.
Listing 4.15: Creating a new View
public class MyView extends View {
// Constructor required for in-code creation
public MyView(Context context) {
super(context);
}
// Constructor required for inflation from resource file
public MyView (Context context, AttributeSet ats, int defaultStyle) {
super(context, ats, defaultStyle );
}
//Constructor required for inflation from resource file
public MyView (Context context, AttributeSet attrs) {
super(context, attrs);
}
@Override
protected void onMeasure(int wMeasureSpec, int hMeasureSpec) {
int measuredHeight = measureHeight(hMeasureSpec);
int measuredWidth = measureWidth(wMeasureSpec);
// MUST make this call to setMeasuredDimension
// or you will cause a runtime exception when
// the control is laid out.
setMeasuredDimension(measuredHeight, measuredWidth);
}
private int measureHeight(int measureSpec) {
int specMode = MeasureSpec.getMode(measureSpec);
int specSize = MeasureSpec.getSize(measureSpec);
[ ... Calculate the view height ... ]
return specSize;
}
private int measureWidth(int measureSpec) {
int specMode = MeasureSpec.getMode(measureSpec);
int specSize = MeasureSpec.getSize(measureSpec);
[ ... Calculate the view width ... ]
return specSize;
}
@Override
protected void onDraw(Canvas canvas) {
[ ... Draw your visual interface ... ]
}
}
code snippet PA4AD_Ch04_Views/src/MyView.java
![]()
The onMeasure method calls setMeasuredDimension. You must always call this method within your overridden onMeasure method; otherwise, your control will throw an exception when the parent container attempts to lay it out.
Drawing Your Control
The onDraw method is where the magic happens. If you're creating a new widget from scratch, it's because you want to create a completely new visual interface. The Canvas parameter in the onDraw method is the surface you'll use to bring your imagination to life.
The Android Canvas uses the painter's algorithm, meaning that each time you draw on to the canvas, it will cover anything previously drawn on the same area.
The drawing APIs provide a variety of tools to help draw your design on the Canvas using various Paint objects. The Canvas class includes helper methods for drawing primitive 2D objects, including circles, lines, rectangles, text, and Drawables (images). It also supports transformations that let you rotate, translate (move), and scale (resize) the Canvas while you draw on it.
When these tools are used in combination with Drawables and the Paint class (which offer a variety of customizable fills and pens), the complexity and detail that your control can render are limited only by the size of the screen and the power of the processor rendering it.
![]()
One of the most important techniques for writing efficient code in Android is to avoid the repetitive creation and destruction of objects. Any object created in your onDraw method will be created and destroyed every time the screen refreshes. Improve efficiency by making as many of these objects (particularly instances of Paint and Drawable) class-scoped and by moving their creation into the constructor.
Listing 4.16 shows how to override the onDraw method to display a simple text string in the center of the control.
Listing 4.16: Drawing a custom View
@Override
protected void onDraw(Canvas canvas) {
// Get the size of the control based on the last call to onMeasure.
int height = getMeasuredHeight();
int width = getMeasuredWidth();
// Find the center
int px = width/2;
int py = height/2;
// Create the new paint brushes.
// NOTE: For efficiency this should be done in
// the views's constructor
Paint mTextPaint = new Paint(Paint.ANTI_ALIAS_FLAG);
mTextPaint.setColor(Color.WHITE);
// Define the string.
String displayText = "Hello World!";
// Measure the width of the text string.
float textWidth = mTextPaint.measureText(displayText);
// Draw the text string in the center of the control.
canvas.drawText(displayText, px-textWidth/2, py, mTextPaint);
}
code snippet PA4AD_Ch04_Views/src/MyView.java
So that we don't diverge too far from the current topic, a more detailed look at the Canvas and Paint classes, and the techniques available for drawing more complex visuals is included in Chapter 10.
![]()
Android does not currently support vector graphics. As a result, changes to any element of your Canvas require that the entire Canvas be repainted; modifying the color of a brush will not change your View's display until the control is invalidated and redrawn. Alternatively, you can use OpenGL to render graphics. For more details, see the discussion on SurfaceView in Chapter 15, “Audio, Video, and Using the Camera.”
Sizing Your Control
Unless you conveniently require a control that always occupies a space 100 pixels square, you will also need to override onMeasure.
The onMeasure method is called when the control's parent is laying out its child controls. It asks the question, “How much space will you use?” and passes in two parameters: widthMeasureSpec and heightMeasureSpec. These parameters specify the space available for the control and some metadata to describe that space.
Rather than return a result, you pass the View's height and width into the setMeasuredDimension method.
The following snippet shows how to override onMeasure. The calls to the local method stubs measureHeight and measureWidth, which are used to decode the widthHeightSpec and heightMeasureSpec values and calculate the preferred height and width values, respectively.
@Override
protected void onMeasure(int widthMeasureSpec, int heightMeasureSpec) {
int measuredHeight = measureHeight(heightMeasureSpec);
int measuredWidth = measureWidth(widthMeasureSpec);
setMeasuredDimension(measuredHeight, measuredWidth);
}
private int measureHeight(int measureSpec) {
// Return measured widget height.
}
private int measureWidth(int measureSpec) {
// Return measured widget width.
}
The boundary parameters, widthMeasureSpec and heightMeasureSpec, are passed in as integers for efficiency reasons. Before they can be used, they first need to be decoded using the static getMode and getSize methods from the MeasureSpec class.
int specMode = MeasureSpec.getMode(measureSpec);
int specSize = MeasureSpec.getSize(measureSpec);
Depending on the mode value, the size represents either the maximum space available for the control (in the case of AT_MOST), or the exact size that your control will occupy (for EXACTLY). In the case of UNSPECIFIED, your control does not have any reference for what the size represents.
By marking a measurement size as EXACT, the parent is insisting that the View will be placed into an area of the exact size specified. The AT_MOST mode says the parent is asking what size the View would like to occupy, given an upper boundary. In many cases the value you return will either be the same, or the size required to appropriately wrap the UI you want to display.
In either case, you should treat these limits as absolute. In some circumstances it may still be appropriate to return a measurement outside these limits, in which case you can let the parent choose how to deal with the oversized View, using techniques such as clipping and scrolling.
Listing 4.17 shows a typical implementation for handling View measurements.
Listing 4.17: A typical View measurement implementation
@Override
protected void onMeasure(int widthMeasureSpec, int heightMeasureSpec) {
int measuredHeight = measureHeight(heightMeasureSpec);
int measuredWidth = measureWidth(widthMeasureSpec);
setMeasuredDimension(measuredHeight, measuredWidth);
}
private int measureHeight(int measureSpec) {
int specMode = MeasureSpec.getMode(measureSpec);
int specSize = MeasureSpec.getSize(measureSpec);
// Default size if no limits are specified.
int result = 500;
if (specMode == MeasureSpec.AT_MOST) {
// Calculate the ideal size of your
// control within this maximum size.
// If your control fills the available
// space return the outer bound.
result = specSize;
} else if (specMode == MeasureSpec.EXACTLY) {
// If your control can fit within these bounds return that value.
result = specSize;
}
return result;
}
private int measureWidth(int measureSpec) {
int specMode = MeasureSpec.getMode(measureSpec);
int specSize = MeasureSpec.getSize(measureSpec);
// Default size if no limits are specified.
int result = 500;
if (specMode == MeasureSpec.AT_MOST) {
// Calculate the ideal size of your control
// within this maximum size.
// If your control fills the available space
// return the outer bound.
result = specSize;
} else if (specMode == MeasureSpec.EXACTLY) {
// If your control can fit within these bounds return that value.
result = specSize;
}
return result;
}
code snippet PA4AD_Ch04_Views/src/MyView.java
Handling User Interaction Events
For your new View to be interactive, it will need to respond to user-initiated events such as key presses, screen touches, and button clicks. Android exposes several virtual event handlers that you can use to react to user input:
· onKeyDown—Called when any device key is pressed; includes the D-pad, keyboard, hang-up, call, back, and camera buttons
· onKeyUp—Called when a user releases a pressed key
· onTrackballEvent—Called when the device's trackball is moved
· onTouchEvent—Called when the touchscreen is pressed or released, or when it detects movement
Listing 4.18 shows a skeleton class that overrides each of the user interaction handlers in a View.
Listing 4.18: Input event handling for Views
@Override
public boolean onKeyDown(int keyCode, KeyEvent keyEvent) {
// Return true if the event was handled.
return true;
}
@Override
public boolean onKeyUp(int keyCode, KeyEvent keyEvent) {
// Return true if the event was handled.
return true;
}
@Override
public boolean onTrackballEvent(MotionEvent event ) {
// Get the type of action this event represents
int actionPerformed = event.getAction();
// Return true if the event was handled.
return true;
}
@Override
public boolean onTouchEvent(MotionEvent event) {
// Get the type of action this event represents
int actionPerformed = event.getAction();
// Return true if the event was handled.
return true;
}
code snippet PA4AD_Ch04_Views/src/MyView.java
Further details on using each of these event handlers, including greater detail on the parameters received by each method and support for multitouch events, are available in Chapter 11.
Supporting Accessibility in Custom Views
Creating a custom View with a beautiful interface is only half the story. It's just as important to create accessible controls that can be used by users with disabilities that require them to interact with their devices in different ways.
Accessibility APIs were introduced in Android 1.6 (API level 4). They provide alternative interaction methods for users with visual, physical, or age-related disabilities that make it difficult to interact fully with a touchscreen.
The first step is to ensure that your custom View is accessible and navigable using the trackball and D-pad events, as described in the previous section. It's also important to use the content description attribute within your layout definition to describe the input widgets. (This is described in more detail in Chapter 11.)
To be accessible, custom Views must implement the AccessibilityEventSource interface and broadcast AccessibilityEvents using the sendAccessibilityEvent method.
The View class already implements the Accessibility Event Source interface, so you need to customize only the behavior to suit the functionality introduced by your custom View. Do this by passing the type of event that has occurred—usually one of clicks, long clicks, selection changes, focus changes, and text/content changes—to the sendAccessibilityEvent method. For custom Views that implement a completely new UI, this will typically include a broadcast whenever the displayed content changes, as shown in Listing 4.19.
Listing 4.19: Broadcasting Accessibility Events
public void setSeason(Season _season) {
season = _season;
sendAccessibilityEvent(AccessibilityEvent.TYPE_VIEW_TEXT_CHANGED);
}
code snippet PA4AD_Ch04_Views/src/SeasonView.java
Clicks, long-clicks, and focus and selection changes typically will be broadcast by the underlying View implementation, although you should take care to broadcast any additional events not captured by the base View class.
The broadcast Accessibility Event includes a number of properties used by the accessibility service to augment the user experience. Several of these properties, including the View's class name and event timestamp, won't need to be altered; however, by overriding thedispatchPopulateAccessibilityEvent handler, you can customize details such as the textual representation of the View's contents, checked state, and selection state of your View, as shown in Listing 4.20.
Listing 4.20: Customizing Accessibility Event properties
@Override
public boolean dispatchPopulateAccessibilityEvent(final
AccessibilityEvent event) {
super.dispatchPopulateAccessibilityEvent(event);
if (isShown()) {
String seasonStr = Season.valueOf(season);
if (seasonStr.length() > AccessibilityEvent.MAX_TEXT_LENGTH)
seasonStr = seasonStr.substring(0, AccessibilityEvent.MAX_TEXT_LENGTH-1);
event.getText().add(seasonStr);
return true;
}
else
return false;
}
code snippet PA4AD_Ch04_Views/src/SeasonView.java
Creating a Compass View Example
In the following example you'll create a new Compass View by extending the View class. This View will display a traditional compass rose to indicate a heading/orientation. When complete, it should appear as in Figure 4.11.
Figure 4.11
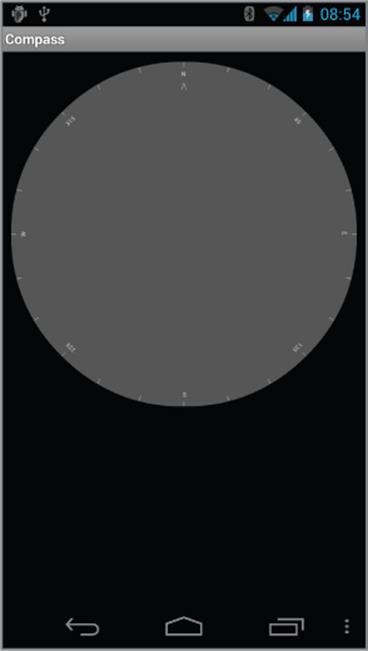
A compass is an example of a UI control that requires a radically different visual display from the Text Views and Buttons available in the SDK toolbox, making it an excellent candidate for building from scratch.
![]()
In Chapter 11 you will learn some advanced techniques for Canvas drawing that will let you dramatically improve its appearance. Then in Chapter 12, “Hardware Sensors,” you'll use this Compass View and the device's built-in accelerometer to display the user's current orientation.
1. Create a new Compass project that will contain your new CompassView, and create a CompassActivity within which to display it. Within it, create a new CompassView class that extends View and add constructors that will allow the View to be instantiated, either in code or through inflation from a resource layout. Also add a new initCompassView method that will be used to initialize the control and call it from each constructor.
package com.paad.compass;
import android.content.Context;
import android.content.res.Resources;
import android.graphics.Canvas;
import android.graphics.Paint;
import android.util.AttributeSet;
import android.view.View;
import android.view.accessibility.AccessibilityEvent;
public class CompassView extends View {
public CompassView(Context context) {
super(context);
initCompassView();
}
public CompassView(Context context, AttributeSet attrs) {
super(context, attrs);
initCompassView();
}
public CompassView(Context context,
AttributeSet ats,
int defaultStyle) {
super(context, ats, defaultStyle);
initCompassView();
}
protected void initCompassView() {
setFocusable(true);
}
}
2. The Compass View should always be a perfect circle that takes up as much of the canvas as this restriction allows. Override the onMeasure method to calculate the length of the shortest side, and use setMeasuredDimension to set the height and width using this value.
@Override
protected void onMeasure(int widthMeasureSpec, int heightMeasureSpec) {
// The compass is a circle that fills as much space as possible.
// Set the measured dimensions by figuring out the shortest boundary,
// height or width.
int measuredWidth = measure(widthMeasureSpec);
int measuredHeight = measure(heightMeasureSpec);
int d = Math.min(measuredWidth, measuredHeight);
setMeasuredDimension(d, d);
}
private int measure(int measureSpec) {
int result = 0;
// Decode the measurement specifications.
int specMode = MeasureSpec.getMode(measureSpec);
int specSize = MeasureSpec.getSize(measureSpec);
if (specMode == MeasureSpec.UNSPECIFIED) {
// Return a default size of 200 if no bounds are specified.
result = 200;
} else {
// As you want to fill the available space
// always return the full available bounds.
result = specSize;
}
return result;
}
3. Modify the main.xml layout resource and replace the TextView reference with your new CompassView:
<?xml version="1.0" encoding="utf-8"?>
<FrameLayout xmlns:android="http://schemas.android.com/apk/res/android"
android:orientation="vertical"
android:layout_width="match_parent"
android:layout_height="match_parent">
<com.paad.compass.CompassView
android:id="@+id/compassView"
android:layout_width="match_parent"
android:layout_height="match_parent"
/>
</FrameLayout>
4. Create two new resource files that store the colors and text strings you'll use to draw the compass.
1. Create the text string resources by modifying the res/values/strings.xml file.
<?xml version="1.0" encoding="utf-8"?>
<resources>
<string name="app_name">Compass</string>
<string name="cardinal_north">N</string>
<string name="cardinal_east">E</string>
<string name="cardinal_south">S</string>
<string name="cardinal_west">W</string>
</resources>
2. Create the color resource res/values/colors.xml.
<?xml version="1.0" encoding="utf-8"?>
<resources>
<color name="background_color">#F555</color>
<color name="marker_color">#AFFF</color>
<color name="text_color">#AFFF</color>
</resources>
5. Return to the CompassView class. Add a new property to store the displayed bearing, and create get and set methods for it.
private float bearing;
public void setBearing(float _bearing) {
bearing = _bearing;
}
public float getBearing() {
return bearing;
}
6. Return to the initCompassView method and get references to each resource created in step 4. Store the string values as instance variables, and use the color values to create new class-scoped Paint objects. You'll use these objects in the next step to draw the compass face.
private Paint markerPaint;
private Paint textPaint;
private Paint circlePaint;
private String northString;
private String eastString;
private String southString;
private String westString;
private int textHeight;
protected void initCompassView() {
setFocusable(true);
Resources r = this.getResources();
circlePaint = new Paint(Paint.ANTI_ALIAS_FLAG);
circlePaint.setColor(r.getColor(R.color.background_color));
circlePaint.setStrokeWidth(1);
circlePaint.setStyle(Paint.Style.FILL_AND_STROKE);
northString = r.getString(R.string.cardinal_north);
eastString = r.getString(R.string.cardinal_east);
southString = r.getString(R.string.cardinal_south);
westString = r.getString(R.string.cardinal_west);
textPaint = new Paint(Paint.ANTI_ALIAS_FLAG);
textPaint.setColor(r.getColor(R.color.text_color));
textHeight = (int)textPaint.measureText("yY");
markerPaint = new Paint(Paint.ANTI_ALIAS_FLAG);
markerPaint.setColor(r.getColor(R.color.marker_color));
}
7. The next step is to draw the compass face using the String and Paint objects you created in step 6. The following code snippet is presented with only limited commentary. You can find more detail about drawing on the Canvas and using advanced Paint effects in Chapter 11.
1. Start by overriding the onDraw method in the CompassView class.
@Override
protected void onDraw(Canvas canvas) {
2. Find the center of the control, and store the length of the smallest side as the compass's radius.
int mMeasuredWidth = getMeasuredWidth();
int mMeasuredHeight = getMeasuredHeight();
int px = mMeasuredWidth / 2;
int py = mMeasuredHeight / 2 ;
int radius = Math.min(px, py);
3. Draw the outer boundary, and color the background of the Compass face using the drawCircle method. Use the circlePaint object you created in step 6.
// Draw the background
canvas.drawCircle(px, py, radius, circlePaint);
4. This Compass displays the current heading by rotating the face so that the current direction is always at the top of the device. To achieve this, rotate the canvas in the opposite direction to the current heading.
// Rotate our perspective so that the ‘top' is
// facing the current bearing.
canvas.save();
canvas.rotate(-bearing, px, py);
5. All that's left is to draw the markings. Rotate the canvas through a full rotation, drawing markings every 15 degrees and the abbreviated direction string every 45 degrees.
int textWidth = (int)textPaint.measureText("W");
int cardinalX = px-textWidth/2;
int cardinalY = py-radius+textHeight;
// Draw the marker every 15 degrees and text every 45.
for (int i = 0; i < 24; i++) {
// Draw a marker.
canvas.drawLine(px, py-radius, px, py-radius+10, markerPaint);
canvas.save();
canvas.translate(0, textHeight);
// Draw the cardinal points
if (i % 6 == 0) {
String dirString = "";
switch (i) {
case(0) : {
dirString = northString;
int arrowY = 2*textHeight;
canvas.drawLine(px, arrowY, px-5, 3*textHeight,
markerPaint);
canvas.drawLine(px, arrowY, px+5, 3*textHeight,
markerPaint);
break;
}
case(6) : dirString = eastString; break;
case(12) : dirString = southString; break;
case(18) : dirString = westString; break;
}
canvas.drawText(dirString, cardinalX, cardinalY, textPaint);
}
else if (i % 3 == 0) {
// Draw the text every alternate 45deg
String angle = String.valueOf(i*15);
float angleTextWidth = textPaint.measureText(angle);
int angleTextX = (int)(px-angleTextWidth/2);
int angleTextY = py-radius+textHeight;
canvas.drawText(angle, angleTextX, angleTextY, textPaint);
}
canvas.restore();
canvas.rotate(15, px, py);
}
canvas.restore();
}
8. The next step is to add accessibility support. The Compass View presents a heading visually, so to make it accessible you need to broadcast an accessibility event signifying that the “text” (in this case, content) has changed when the bearing changes. Do this by modifying the setBearingmethod.
public void setBearing(float _bearing) {
bearing = _bearing;
sendAccessibilityEvent(AccessibilityEvent.TYPE_VIEW_TEXT_CHANGED);
}
9. Override the dispatchPopulateAccessibilityEvent to use the current heading as the content value to be used for accessibility events.
@Override
public boolean dispatchPopulateAccessibilityEvent(final AccessibilityEvent event) {
super.dispatchPopulateAccessibilityEvent(event);
if (isShown()) {
String bearingStr = String.valueOf(bearing);
if (bearingStr.length() > AccessibilityEvent.MAX_TEXT_LENGTH)
bearingStr = bearingStr.substring(0, AccessibilityEvent.MAX_TEXT_LENGTH);
event.getText().add(bearingStr);
return true;
}
else
return false;
}
![]()
All code snippets in this example are part of the Chapter 4 Compass project, available for download at www.wrox.com.
Run the Activity, and you should see the CompassView displayed. See Chapter 12 to learn how to bind the CompassView to the device's compass sensor.
Using Custom Controls
Having created your own custom Views, you can use them within code and layouts as you would any other View. Note that you must specify the fully qualified class name when you create a new node in the layout definition.
<com.paad.compass.CompassView
android:id="@+id/compassView"
android:layout_width="match_parent"
android:layout_height="match_parent"
/>
You can inflate the layout and get a reference to the CompassView, as usual, using the following code:
@Override
public void onCreate(Bundle savedInstanceState) {
super.onCreate(savedInstanceState);
setContentView(R.layout.main);
CompassView cv = (CompassView)this.findViewById(R.id.compassView);
cv.setBearing(45);
}
You can also add your new view to a layout in code:
@Override
public void onCreate(Bundle savedInstanceState) {
super.onCreate(savedInstanceState);
CompassView cv = new CompassView(this);
setContentView(cv);
cv.setBearing(45);
}
Introducing Adapters
Adapters are used to bind data to View Groups that extend the AdapterView class (such as List View or Gallery). Adapters are responsible for creating child Views that represent the underlying data within the bound parent View.
You can create your own Adapter classes and build your own AdapterView-derived controls.
Introducing Some Native Adapters
In most cases you won't have to create your own Adapters from scratch. Android supplies a set of Adapters that can pump data from common data sources (including arrays and Cursors) into the native controls that extend Adapter View.
Because Adapters are responsible both for supplying the data and for creating the Views that represent each item, Adapters can radically modify the appearance and functionality of the controls they're bound to.
The following list highlights two of the most useful and versatile native Adapters:
· ArrayAdapter—The Array Adapter uses generics to bind an Adapter View to an array of objects of the specified class. By default, the Array Adapter uses the toString value of each object in the array to create and populate Text Views. Alternative constructors enable you to use more complex layouts, or you can extend the class (as shown in the next section) to bind data to more complicated layouts.
· SimpleCursorAdapter—The Simple Cursor Adapter enables you to bind the Views within a layout to specific columns contained within a Cursor (typically returned from a Content Provider query). You specify an XML layout to inflate and populate to display each child, and then bind each column in the Cursor to a particular View within that layout. The adapter will create a new View for each Cursor entry and inflate the layout into it, populating each View within the layout using the Cursor's corresponding column value.
The following sections delve into these Adapter classes. The examples provided bind data to List Views, though the same logic will work just as well for other Adapter View classes, such as Spinners and Galleries.
Customizing the Array Adapter
By default, the Array Adapter uses the toString values of each item within an object array to populate a Text View within the layout you specify.
In most cases you will need to customize the Array Adapter to populate the layout used for each View to represent the underlying array data. To do so, extend ArrayAdapter with a type-specific variation, overriding the getView method to assign object properties to layout Views, as shown inListing 4.21.
Listing 4.21: Customizing the Array Adapter
public class MyArrayAdapter extends ArrayAdapter<MyClass> {
int resource;
public MyArrayAdapter(Context context,
int _resource,
List<MyClass> items) {
super(context, _resource, items);
resource = _resource;
}
@Override
public View getView(int position, View convertView, ViewGroup parent) {
// Create and inflate the View to display
LinearLayout newView;
if (convertView == null) {
// Inflate a new view if this is not an update.
newView = new LinearLayout(getContext());
String inflater = Context.LAYOUT_INFLATER_SERVICE;
LayoutInflater li;
li = (LayoutInflater)getContext().getSystemService(inflater);
li.inflate(resource, newView, true);
} else {
// Otherwise we'll update the existing View
newView = (LinearLayout)convertView;
}
MyClass classInstance = getItem(position);
// TODO Retrieve values to display from the
// classInstance variable.
// TODO Get references to the Views to populate from the layout.
// TODO Populate the Views with object property values.
return newView;
}
}
code snippet PA4AD_Ch04_Adapters/src/MyArrayAdapter.java
The getView method is used to construct, inflate, and populate the View that will be added to the parent Adapter View class (e.g., List View), which is being bound to the underlying array using this Adapter.
The getView method receives parameters that describe the position of the item to be displayed, the View being updated (or null), and the View Group into which this new View will be placed. A call to getItem will return the value stored at the specified index in the underlying array.
Return the newly created and populated (or updated) View instance as a result from this method.
Using Adapters to Bind Data to a View
To apply an Adapter to an AdapterView-derived class, call the View's setAdapter method, passing in an Adapter instance, as shown in Listing 4.22.
Listing 4.22: Creating and applying an Adapter
ArrayList<String> myStringArray = new ArrayList<String>();
int layoutID = android.R.layout.simple_list_item_1;
ArrayAdapter<String> myAdapterInstance;
myAdapterInstance =
new ArrayAdapter<String>(this, layoutID, myStringArray);
myListView.setAdapter(myAdapterInstance);
code snippet PA4AD_Ch04_Adapters/src/MyActivity.java
This snippet shows the simplest case, in which the array being bound contains Strings and each List View item is represented by a single Text View.
The following example demonstrates how to bind an array of complex objects to a List View using a custom layout.
Customizing the To-Do List Array Adapter
This example extends the To-Do List project, storing each item as a ToDoItem object that includes the date each item was created.
You will extend ArrayAdapter to bind a collection of ToDoItem objects to the ListView and customize the layout used to display each to-do item within the List View.
1. Return to the To-Do List project. Create a new ToDoItem class that stores the task and its creation date. Override the toString method to return a summary of the item data.
package com.paad.todolist;
import java.text.SimpleDateFormat;
import java.util.Date;
public class ToDoItem {
String task;
Date created;
public String getTask() {
return task;
}
public Date getCreated() {
return created;
}
public ToDoItem(String _task) {
this(_task, new Date(java.lang.System.currentTimeMillis()));
}
public ToDoItem(String _task, Date _created) {
task = _task;
created = _created;
}
@Override
public String toString() {
SimpleDateFormat sdf = new SimpleDateFormat("dd/MM/yy");
String dateString = sdf.format(created);
return "(" + dateString + ") " + task;
}
}
2. Open the ToDoListActivity and modify the ArrayList and ArrayAdapter variable types to store ToDoItem objects rather than Strings. You then need to modify the onCreate method to update the corresponding variable initialization.
private ArrayList<ToDoItem> todoItems;
private ArrayAdapter<ToDoItem> aa;
public void onCreate(Bundle savedInstanceState) {
super.onCreate(savedInstanceState);
// Inflate your view
setContentView(R.layout.main);
// Get references to the Fragments
FragmentManager fm = getFragmentManager();
ToDoListFragment todoListFragment =
(ToDoListFragment)fm.findFragmentById(R.id.TodoListFragment);
// Create the array list of to do items
todoItems = new ArrayList<ToDoItem>();
// Create the array adapter to bind the array to the listview
int resID = R.layout.todolist_item;
aa = new ArrayAdapter<ToDoItem>(this, resID, todoItems);
// Bind the array adapter to the listview.
todoListFragment.setListAdapter(aa);
}
3. Update the onNewItemAdded handler to support the ToDoItem objects.
public void onNewItemAdded(String newItem) {
ToDoItem newTodoItem = new ToDoItem(newItem);
todoItems.add(0, newTodoItem);
aa.notifyDataSetChanged();
}
4. Now you can modify the todolist_item.xml layout to display the additional information stored for each to-do item. Start by modifying the custom layout you created earlier in this chapter to include a second TextView. It will be used to show the creation date of each to-do item.
<?xml version="1.0" encoding="utf-8"?>
<RelativeLayout xmlns:android="http://schemas.android.com/apk/res/android"
android:layout_width="match_parent"
android:layout_height="match_parent">
<TextView
android:id="@+id/rowDate"
android:background="@color/notepad_paper"
android:layout_width="wrap_content"
android:layout_height="match_parent"
android:padding="10dp"
android:scrollbars="vertical"
android:fadingEdge="vertical"
android:textColor="#F000"
android:layout_alignParentRight="true"
/>
<com.paad.todolist.ToDoListItemView
android:id="@+id/row"
android:layout_width="match_parent"
android:layout_height="match_parent"
android:padding="10dp"
android:scrollbars="vertical"
android:fadingEdge="vertical"
android:textColor="@color/notepad_text"
android:layout_toLeftOf="@+id/rowDate"
/>
</RelativeLayout>
6. To assign the ToDoItem values to each ListView Item, create a new class (ToDoItemAdapter) that extends an ArrayAdapter with a ToDoItem-specific variation. Override getView to assign the task and date properties in the ToDoItem object to the Views in the layout you created in step 4.
package com.paad.todolist;
import java.text.SimpleDateFormat;
import java.util.Date;
import java.util.List;
import android.content.Context;
import android.view.LayoutInflater;
import android.view.View;
import android.view.ViewGroup;
import android.widget.ArrayAdapter;
import android.widget.LinearLayout;
import android.widget.TextView;
public class ToDoItemAdapter extends ArrayAdapter<ToDoItem> {
int resource;
public ToDoItemAdapter(Context context,
int resource,
List<ToDoItem> items) {
super(context, resource, items);
this.resource = resource;
}
@Override
public View getView(int position, View convertView, ViewGroup parent) {
LinearLayout todoView;
ToDoItem item = getItem(position);
String taskString = item.getTask();
Date createdDate = item.getCreated();
SimpleDateFormat sdf = new SimpleDateFormat("dd/MM/yy");
String dateString = sdf.format(createdDate);
if (convertView == null) {
todoView = new LinearLayout(getContext());
String inflater = Context.LAYOUT_INFLATER_SERVICE;
LayoutInflater li;
li = (LayoutInflater)getContext().getSystemService(inflater);
li.inflate(resource, todoView, true);
} else {
todoView = (LinearLayout) convertView;
}
TextView dateView = (TextView)todoView.findViewById(R.id.rowDate);
TextView taskView = (TextView)todoView.findViewById(R.id.row);
dateView.setText(dateString);
taskView.setText(taskString);
return todoView;
}
}
7. Return to the ToDoListActivity and replace the ArrayAdapter declaration with a ToDoItemAdapter:
private ToDoItemAdapter aa;
8. Within onCreate, replace the ArrayAdapter<ToDoItem> instantiation with the new ToDoItemAdapter:
aa = new ToDoItemAdapter(this, resID, todoItems);
If you run your Activity and add some to-do items, it should appear as shown in Figure 4.12.
Figure 4.12
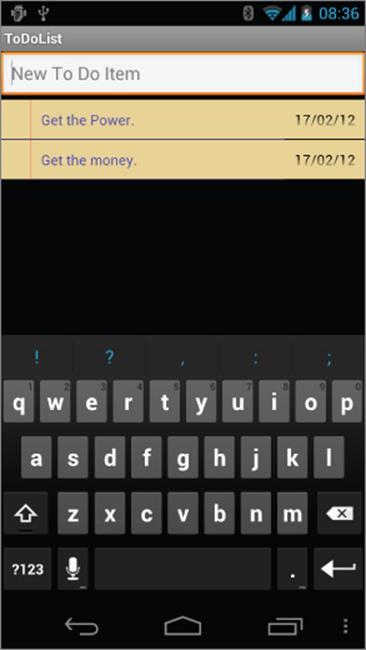
![]()
All code snippets in this example are part of the Chapter 4 To-do List Part 4 project, available for download at www.wrox.com.
Using the Simple Cursor Adapter
The SimpleCursorAdapter is used to bind a Cursor to an Adapter View using a layout to define the UI of each row/item. The content of each row's View is populated using the column values of the corresponding row in the underlying Cursor.
Construct a Simple Cursor Adapter by passing in the current context, a layout resource to use for each item, a Cursor that represents the data to display, and two integer arrays: one that contains the indexes of the columns from which to source the data, and a second (equally sized) array that contains resource IDs to specify which Views within the layout should be used to display the contents of the corresponding columns.
Listing 4.23 shows how to construct a Simple Cursor Adapter to display recent call information.
Listing 4.23: Creating a Simple Cursor Adapter
LoaderManager.LoaderCallbacks<Cursor> loaded =
new LoaderManager.LoaderCallbacks<Cursor>() {
public Loader<Cursor> onCreateLoader(int id, Bundle args) {
CursorLoader loader = new CursorLoader(MyActivity.this,
CallLog.CONTENT_URI, null, null, null, null);
return loader;
}
public void onLoadFinished(Loader<Cursor> loader, Cursor cursor) {
String[] fromColumns = new String[] {CallLog.Calls.CACHED_NAME,
CallLog.Calls.NUMBER};
int[] toLayoutIDs = new int[] { R.id.nameTextView, R.id.numberTextView};
SimpleCursorAdapter myAdapter;
myAdapter = new SimpleCursorAdapter(MyActivity.this,
R.layout.mysimplecursorlayout,
cursor,
fromColumns,
toLayoutIDs);
myListView.setAdapter(myAdapter);
}
public void onLoaderReset(Loader<Cursor> loader) {}
};
getLoaderManager().initLoader(0, null, loaded);
code snippet PA4AD_Ch4_Adapters/src/MyActivity.java
You'll learn more about Content Providers, Cursors, and Cursor Loaders in Chapter 8, “Databases and Content Providers,” where you'll also find more Simple Cursor Adapter examples.
Chapter 5
Intents and Broadcast Receivers
What's in this Chapter?
Introducing Intents
Starting Activities, sub-Activities, and Services using implicit and explicit Intents
Using Linkify
Broadcasting events using Broadcast Intents
Using Pending Intents
An introduction to Intent Filters and Broadcast Receivers
Extending application functionality using Intent Filters
Listening for Broadcast Intents
Monitoring device state changes
Managing manifest Receivers at run time
This chapter looks at Intents—probably the most unique and important concept in Android development. You'll learn how to use Intents to broadcast data within and between applications and how to listen for them to detect changes in the system state.
You'll also learn how to define implicit and explicit Intents to start Activities or Services using late runtime binding. Using implicit Intents, you'll learn how to request that an action be performed on a piece of data, enabling Android to determine which application components can best service that request.
Broadcast Intents are used to announce events systemwide. You'll learn how to transmit these broadcasts and receive them using Broadcast Receivers.
Introducing Intents
Intents are used as a message-passing mechanism that works both within your application and between applications. You can use Intents to do the following:
· Explicitly start a particular Service or Activity using its class name
· Start an Activity or Service to perform an action with (or on) a particular piece of data
· Broadcast that an event has occurred
You can use Intents to support interaction among any of the application components installed on an Android device, no matter which application they're a part of. This turns your device from a platform containing a collection of independent components into a single, interconnected system.
One of the most common uses for Intents is to start new Activities, either explicitly (by specifying the class to load) or implicitly (by requesting that an action be performed on a piece of data). In the latter case the action does not need to be performed by an Activity within the calling application.
You can also use Intents to broadcast messages across the system. Applications can register Broadcast Receivers to listen for, and react to, these Broadcast Intents. This enables you to create event-driven applications based on internal, system, or third-party application events.
Android broadcasts Intents to announce system events, such as changes in Internet connectivity or battery charge levels. The native Android applications, such as the Phone Dialer and SMS Manager, simply register components that listen for specific Broadcast Intents—such as “incoming phone call” or “SMS message received”—and react accordingly. As a result, you can replace many of the native applications by registering Broadcast Receivers that listen for the same Intents.
Using Intents, rather than explicitly loading classes, to propagate actions—even within the same application—is a fundamental Android design principle. It encourages the decoupling of components to allow the seamless replacement of application elements. It also provides the basis of a simple model for extending an application's functionality.
Using Intents to Launch Activities
The most common use of Intents is to bind your application components and communicate between them. Intents are used to start Activities, allowing you to create a workflow of different screens.
![]()
The instructions in this section refer to starting new Activities, but the same details also apply to Services. Details on starting (and creating) Services are available in Chapter 9, “Working in the Background.”
To create and display an Activity, call startActivity, passing in an Intent, as follows:
startActivity(myIntent);
The startActivity method finds and starts the single Activity that best matches your Intent.
You can construct the Intent to explicitly specify the Activity class to open, or to include an action that the target Activity must be able to perform. In the latter case, the run time will choose an Activity dynamically using a process known as intent resolution.
When you use startActivity, your application won't receive any notification when the newly launched Activity finishes. To track feedback from a sub-Activity, use startActivityForResult, as described later in this chapter.
Explicitly Starting New Activities
You learned in Chapter 3, “Creating Applications and Activities,” that applications consist of a number of interrelated screens—Activities—that must be included in the application manifest. To transition between them, you will often need to explicitly specify which Activity to open.
To select a specific Activity class to start, create a new Intent, specifying the current Activity's Context and the class of the Activity to launch. Pass this Intent into startActivity, as shown in Listing 5.1.
Listing 5.1: Explicitly starting an Activity
Intent intent = new Intent(MyActivity.this, MyOtherActivity.class);
startActivity(intent);
code snippet PA4AD_Ch05_Intents/src/MyActivity.java
After startActivity is called, the new Activity (in this example, MyOtherActivity) will be created, started, and resumed—moving to the top of the Activity stack.
Calling finish on the new Activity, or pressing the hardware back button, closes it and removes it from the stack. Alternatively, you can continue to navigate to other Activities by calling startActivity. Note that each time you call startActivity, a new Activity will be added to the stack; pressing back (or calling finish) will remove each of these Activities, in turn.
Implicit Intents and Late Runtime Binding
An implicit Intent is a mechanism that lets anonymous application components service action requests. That means you can ask the system to start an Activity to perform an action without knowing which application, or Activity, will be started.
For example, to let users make calls from your application, you could implement a new dialer, or you could use an implicit Intent that requests the action (dialing) be performed on a phone number (represented as a URI).
if (somethingWeird && itDontLookGood) {
Intent intent =
new Intent(Intent.ACTION_DIAL, Uri.parse("tel:555-2368"));
startActivity(intent);
}
Android resolves this Intent and starts an Activity that provides the dial action on a telephone number—in this case, typically the Phone Dialer.
When constructing a new implicit Intent, you specify an action to perform and, optionally, supply the URI of the data on which to perform that action. You can send additional data to the target Activity by adding extras to the Intent.
Extras are a mechanism used to attach primitive values to an Intent. You can use the overloaded putExtra method on any Intent to attach a new name / value pair (NVP) that can then be retrieved using the corresponding get[type]Extra method in the started Activity.
The extras are stored within the Intent as a Bundle object that can be retrieved using the getExtras method.
When you use an implicit Intent to start an Activity, Android will—at run time—resolve it into the Activity class best suited to performing the required action on the type of data specified. This means you can create projects that use functionality from other applications without knowing exactly which application you're borrowing functionality from ahead of time.
In circumstances where multiple Activities can potentially perform a given action, the user is presented with a choice. The process of intent resolution is determined through an analysis of the registered Broadcast Receivers, which are described in detail later in this chapter.
Various native applications provide Activities capable of performing actions against specific data. Third-party applications, including your own, can be registered to support new actions or to provide an alternative provider of native actions. You'll be introduced to some of the native actions, as well as how to register your own Activities to support them, later in this chapter.
Determining If an Intent Will Resolve
Incorporating the Activities and Services of a third-party application into your own is incredibly powerful; however, there is no guarantee that any particular application will be installed on a device, or that any application capable of handling your request is available.
As a result, it's good practice to determine if your call will resolve to an Activity before calling startActivity.
You can query the Package Manager to determine which, if any, Activity will be launched to service a specific Intent by calling resolveActivity on your Intent object, passing in the Package Manager, as shown in Listing 5.2.
Listing 5.2: Implicitly starting an Activity
if (somethingWeird && itDontLookGood) {
// Create the impliciy Intent to use to start a new Activity.
Intent intent =
new Intent(Intent.ACTION_DIAL, Uri.parse("tel:555-2368"));
// Check if an Activity exists to perform this action.
PackageManager pm = getPackageManager();
ComponentName cn = intent.resolveActivity(pm);
if (cn == null) {
// If there is no Activity available to perform the action
// Check to see if the Google Play Store is available.
Uri marketUri =
Uri.parse("market://search?q=pname:com.myapp.packagename");
Intent marketIntent = new
Intent(Intent.ACTION_VIEW).setData(marketUri);
// If the Google Play Store is available, use it to download an application
// capable of performing the required action. Otherwise log an
// error.
if (marketIntent.resolveActivity(pm) != null)
startActivity(marketIntent);
else
Log.d(TAG, "Market client not available.");
}
else
startActivity(intent);
}
code snippet PA4AD_Ch05_Intents/src/MyActivity.java
If no Activity is found, you can choose to either disable the related functionality (and associated user interface controls) or direct users to the appropriate application in the Google Play Store. Note that Google Play is not available on all devices, nor the emulator, so it's good practice to check for that as well.
Returning Results from Activities
An Activity started via startActivity is independent of its parent and will not provide any feedback when it closes.
Where feedback is required, you can start an Activity as a sub-Activity that can pass results back to its parent. Sub-Activities are actually just Activities opened in a different way. As such, you must register them in the application manifest in the same way as any other Activity. Any manifest-registered Activity can be opened as a sub-Activity, including those provided by the system or third-party applications.
When a sub-Activity is finished, it triggers the onActivityResult event handler within the calling Activity. Sub-Activities are particularly useful in situations in which one Activity is providing data input for another, such as a user selecting an item from a list.
Launching Sub-Activities
The startActivityForResult method works much like startActivity, but with one important difference. In addition to passing in the explicit or implicit Intent used to determine which Activity to launch, you also pass in a request code. This value will later be used to uniquely identify the sub-Activity that has returned a result.
Listing 5.3 shows the skeleton code for launching a sub-Activity explicitly.
Listing 5.3: Explicitly starting a sub-Activity for a result
private static final int SHOW_SUBACTIVITY = 1;
private void startSubActivity() {
Intent intent = new Intent(this, MyOtherActivity.class);
startActivityForResult(intent, SHOW_SUBACTIVITY);
}
code snippet PA4AD_Ch05_Intents/src/MyActivity.java
Like regular Activities, you can start sub-Activities implicitly or explicitly. Listing 5.4 uses an implicit Intent to launch a new sub-Activity to pick a contact.
Listing 5.4: Implicitly starting a sub-Activity for a result
private static final int PICK_CONTACT_SUBACTIVITY = 2;
private void startSubActivityImplicitly() {
Uri uri = Uri.parse("content://contacts/people");
Intent intent = new Intent(Intent.ACTION_PICK, uri);
startActivityForResult(intent, PICK_CONTACT_SUBACTIVITY);
}
code snippet PA4AD_Ch05_Intents/src/MyActivity.java
Returning Results
When your sub-Activity is ready to return, call setResult before finish to return a result to the calling Activity.
The setResult method takes two parameters: the result code and the result data itself, represented as an Intent.
The result code is the “result” of running the sub-Activity—generally, either Activity.RESULT_OK or Activity.RESULT_CANCELED. In some circumstances, where OK and cancelled don't sufficiently or accurately describe the available return results, you'll want to use your own response codes to handle application-specific choices; setResult supports any integer value.
The Intent returned as a result often includes a data URI that points to a piece of content (such as the selected contact, phone number, or media file) and a collection of extras used to return additional information.
Listing 5.5, taken from a sub-Activity's onCreate method, shows how an OK and Cancel button might return different results to the calling Activity.
Listing 5.5: Returning a result from a sub-Activity
Button okButton = (Button) findViewById(R.id.ok_button);
okButton.setOnClickListener(new View.OnClickListener() {
public void onClick(View view) {
long selected_horse_id = listView.getSelectedItemId();
Uri selectedHorse = Uri.parse("content://horses/" +
selected_horse_id);
Intent result = new Intent(Intent.ACTION_PICK, selectedHorse);
setResult(RESULT_OK, result);
finish();
}
});
Button cancelButton = (Button) findViewById(R.id.cancel_button);
cancelButton.setOnClickListener(new View.OnClickListener() {
public void onClick(View view) {
setResult(RESULT_CANCELED);
finish();
}
});
code snippet PA4AD_Ch05_Intents/src/SelectHorseActivity.java
If the Activity is closed by the user pressing the hardware back key, or finish is called without a prior call to setResult, the result code will be set to RESULT_CANCELED and the result Intent set to null.
Handling Sub-Activity Results
When a sub-Activity closes, the onActivityResult event handler is fired within the calling Activity. Override this method to handle the results returned by sub-Activities.
The onActivityResult handler receives a number of parameters:
· Request code—The request code that was used to launch the returning sub-Activity.
· Result code—The result code set by the sub-Activity to indicate its result. It can be any integer value, but typically will be either Activity.RESULT_OK or Activity.RESULT_CANCELED.
· Data—An Intent used to package returned data. Depending on the purpose of the sub-Activity, it may include a URI that represents a selected piece of content. The sub-Activity can also return information as an extra within the returned data Intent.
![]()
If the sub-Activity closes abnormally or doesn't specify a result code before it closes, the result code is Activity.RESULT_CANCELED.
Listing 5.6 shows the skeleton code for implementing the onActivityResult event handler within an Activity.
Listing 5.6: Implementing an On Activity Result handler
private static final int SELECT_HORSE = 1;
private static final int SELECT_GUN = 2;
Uri selectedHorse = null;
Uri selectedGun = null;
@Override
public void onActivityResult(int requestCode,
int resultCode,
Intent data) {
super.onActivityResult(requestCode, resultCode, data);
switch(requestCode) {
case (SELECT_HORSE):
if (resultCode == Activity.RESULT_OK)
selectedHorse = data.getData();
break;
case (SELECT_GUN):
if (resultCode == Activity.RESULT_OK)
selectedGun = data.getData();
break;
default: break;
}
}
code snippet PA4AD_Ch05_Intents/src/MyActivity.java
Native Android Actions
Native Android applications also use Intents to launch Activities and sub-Activities.
The following (noncomprehensive) list shows some of the native actions available as static string constants in the Intent class. When creating implicit Intents, you can use these actions, known as Activity Intents, to start Activities and sub-Activities within your own applications.
![]()
Later you will be introduced to Intent Filters and how to register your own Activities as handlers for these actions.
· ACTION_ALL_APPS—Opens an Activity that lists all the installed applications. Typically, this is handled by the launcher.
· ACTION_ANSWER—Opens an Activity that handles incoming calls. This is normally handled by the native in-call screen.
· ACTION_BUG_REPORT—Displays an Activity that can report a bug. This is normally handled by the native bug-reporting mechanism.
· ACTION_CALL—Brings up a phone dialer and immediately initiates a call using the number supplied in the Intent's data URI. This action should be used only for Activities that replace the native dialer application. In most situations it is considered better form to use ACTION_DIAL.
· ACTION_CALL_BUTTON—Triggered when the user presses a hardware “call button.” This typically initiates the dialer Activity.
· ACTION_DELETE—Starts an Activity that lets you delete the data specified at the Intent's data URI.
· ACTION_DIAL—Brings up a dialer application with the number to dial prepopulated from the Intent's data URI. By default, this is handled by the native Android phone dialer. The dialer can normalize most number schemas—for example, tel:555-1234 and tel:(212) 555 1212 are both valid numbers.
· ACTION_EDIT—Requests an Activity that can edit the data at the Intent's data URI.
· ACTION_INSERT—Opens an Activity capable of inserting new items into the Cursor specified in the Intent's data URI. When called as a sub-Activity, it should return a URI to the newly inserted item.
· ACTION_PICK—Launches a sub-Activity that lets you pick an item from the Content Provider specified by the Intent's data URI. When closed, it should return a URI to the item that was picked. The Activity launched depends on the data being picked—for example, passingcontent://contacts/people will invoke the native contacts list.
· ACTION_SEARCH—Typically used to launch a specific search Activity. When it's fired without a specific Activity, the user will be prompted to select from all applications that support search. Supply the search term as a string in the Intent's extras using SearchManager.QUERY as the key.
· ACTION_SEARCH_LONG_PRESS—Enables you to intercept long presses on the hardware search key. This is typically handled by the system to provide a shortcut to a voice search.
· ACTION_SENDTO—Launches an Activity to send data to the contact specified by the Intent's data URI.
· ACTION_SEND—Launches an Activity that sends the data specified in the Intent. The recipient contact needs to be selected by the resolved Activity. Use setType to set the MIME type of the transmitted data. The data itself should be stored as an extra by means of the key EXTRA_TEXT orEXTRA_STREAM, depending on the type. In the case of email, the native Android applications will also accept extras via the EXTRA_EMAIL, EXTRA_CC, EXTRA_BCC, and EXTRA_SUBJECT keys. Use the ACTION_SEND action only to send data to a remote recipient (not to another application on the device).
· ACTION_VIEW—This is the most common generic action. View asks that the data supplied in the Intent's data URI be viewed in the most reasonable manner. Different applications will handle view requests depending on the URI schema of the data supplied. Natively http: addresses will open in the browser; tel: addresses will open the dialer to call the number; geo: addresses will be displayed in the Google Maps application; and contact content will be displayed in the Contact Manager.
· ACTION_WEB_SEARCH—Opens the Browser to perform a web search based on the query supplied using the SearchManager.QUERY key.
![]()
In addition to these Activity actions, Android includes a large number of broadcast actions to create Intents that are broadcast to announce system events. These broadcast actions are described later in this chapter.
Introducing Linkify
Linkify is a helper class that creates hyperlinks within Text View (and Text View-derived) classes through RegEx pattern matching.
Text that matches a specified RegEx pattern will be converted into a clickable hyperlink that implicitly fires startActivity(new Intent(Intent.ACTION_VIEW, uri)), using the matched text as the target URI.
You can specify any string pattern to be treated as a clickable link; for convenience, the Linkify class provides presets for common content types.
Native Linkify Link Types
The Linkify class has presets that can detect and linkify web URLs, email addresses, and phone numbers. To apply a preset, use the static Linkify.addLinks method, passing in a View to Linkify and a bitmask of one or more of the following self-describing Linkify class constants: WEB_URLS,EMAIL_ADDRESSES, PHONE_NUMBERS, and ALL.
TextView textView = (TextView)findViewById(R.id.myTextView);
Linkify.addLinks(textView, Linkify.WEB_URLS|Linkify.EMAIL_ADDRESSES);
![]()
Most Android devices have at least two email applications: Gmail and Email. In situations in which multiple Activities are resolved as possible action consumers, users are asked to select their preference. In the case of the emulator, you must have the email client configured before it will respond to Linkified email addresses.
You can also linkify Views directly within a layout using the android:autoLink attribute. It supports one or more of the following values: none, web, email, phone, and all.
<TextView
android:layout_width="match_parent"
android:layout_height="match_parent"
android:text="@string/linkify_me"
android:autoLink="phone|email"
/>
Creating Custom Link Strings
To linkify your own data, you need to define your own linkify strings. Do this by creating a new RegEx pattern that matches the text you want to display as hyperlinks.
As with the native types, you can linkify the target Text View by calling Linkify.addLinks; however, rather than passing in one of the preset constants, pass in your RegEx pattern. You can also pass in a prefix that will be prepended to the target URI when a link is clicked.
Listing 5.7 shows a View being linkified to support earthquake data provided by an Android Content Provider (which you will create in Chapter 8, “Databases and Content Providers”). Note that rather than include the entire schema, the specified RegEx matches any text that starts with “quake” and is followed by a number, with optional whitespace. The full schema is then prepended to the URI before the Intent is fired.
Listing 5.7: Creating custom link strings in Linkify
// Define the base URI.
String baseUri = "content://com.paad.earthquake/earthquakes/";
// Contruct an Intent to test if there is an Activity capable of
// viewing the content you are Linkifying. Use the Package Manager
// to perform the test.
PackageManager pm = getPackageManager();
Intent testIntent = new Intent(Intent.ACTION_VIEW, Uri.parse(baseUri));
boolean activityExists = testIntent.resolveActivity(pm) != null;
// If there is an Activity capable of viewing the content
// Linkify the text.
if (activityExists) {
int flags = Pattern.CASE_INSENSITIVE;
Pattern p = Pattern.compile("\\bquake[\\s]?[0-9]+\\b", flags);
Linkify.addLinks(myTextView, p, baseUri);
}
code snippet PA4AD_Ch05_Linkify/src/MyActivity.java
Note that in this example, including whitespace between “quake” and a number will return a match, but the resulting URI won't be valid. You can implement and specify one or both of a TransformFilter and MatchFilter interface to resolve this problem. These interfaces, defined in detail in the following section, offer additional control over the target URI structure and the definition of matching strings, and are used as in the following skeleton code:
Linkify.addLinks(myTextView, p, baseUri,
new MyMatchFilter(), new MyTransformFilter());
Using the Match Filter
To add additional conditions to RegEx pattern matches, implement the acceptMatch method in a Match Filter. When a potential match is found, acceptMatch is triggered, with the match start and end index (along with the full text being searched) passed in as parameters.
Listing 5.8 shows a MatchFilter implementation that cancels any match immediately preceded by an exclamation mark.
Listing 5.8: Using a Linkify Match Filter
class MyMatchFilter implements MatchFilter {
public boolean acceptMatch(CharSequence s, int start, int end) {
return (start == 0 || s.charAt(start-1) != ‘!');
}
}
code snippet PA4AD_Ch05_Linkify/src/MyActivity.java
Using the Transform Filter
The Transform Filter lets you modify the implicit URI generated by matching link text. Decoupling the link text from the target URI gives you more freedom in how you display data strings to your users.
To use the Transform Filter, implement the transformUrl method in your Transform Filter. When Linkify finds a successful match, it calls transformUrl, passing in the RegEx pattern used and the matched text string (before the base URI is prepended). You can modify the matched string and return it such that it can be appended to the base string as the data for a View Intent.
As shown in Listing 5.9, the TransformFilter implementation transforms the matched text into a lowercase URI, having also removed any whitespace characters.
Listing 5.9: Using a Linkify Transform Filter
class MyTransformFilter implements TransformFilter {
public String transformUrl(Matcher match, String url) {
return url.toLowerCase().replace(" ", "");
}
}
code snippet PA4AD_Ch05_Linkify/src/MyActivity.java
Using Intents to Broadcast Events
So far, you've looked at using Intents to start new application components, but you can also use Intents to broadcast messages anonymously between components via the sendBroadcast method.
As a system-level message-passing mechanism, Intents are capable of sending structured messages across process boundaries. As a result, you can implement Broadcast Receivers to listen for, and respond to, these Broadcast Intents within your applications.
Broadcast Intents are used to notify applications of system or application events, extending the event-driven programming model between applications.
Broadcasting Intents helps make your application more open; by broadcasting an event using an Intent, you let yourself and third-party developers react to events without having to modify your original application. Within your applications you can listen for Broadcast Intents to to react to device state changes and third-party application events.
Android uses Broadcast Intents extensively to broadcast system events, such as changes in network connectivity, docking state, and incoming calls.
Broadcasting Events with Intents
Within your application, construct the Intent you want to broadcast and call sendBroadcast to send it.
Set the action, data, and category of your Intent in a way that lets Broadcast Receivers accurately determine their interest. In this scenario, the Intent action string is used to identify the event being broadcast, so it should be a unique string that identifies the event. By convention, action strings are constructed using the same form as Java package names:
public static final String NEW_LIFEFORM_DETECTED =
"com.paad.action.NEW_LIFEFORM";
If you want to include data within the Intent, you can specify a URI using the Intent's data property. You can also include extras to add additional primitive values. Considered in terms of an event-driven paradigm, the extras equate to optional parameters passed into an event handler.
Listing 5.10 shows the basic creation of a Broadcast Intent using the action defined previously, with additional event information stored as extras.
Listing 5.10: Broadcasting an Intent
Intent intent = new Intent(LifeformDetectedReceiver.NEW_LIFEFORM);
intent.putExtra(LifeformDetectedReceiver.EXTRA_LIFEFORM_NAME,
detectedLifeform);
intent.putExtra(LifeformDetectedReceiver.EXTRA_LONGITUDE,
currentLongitude);
intent.putExtra(LifeformDetectedReceiver.EXTRA_LATITUDE,
currentLatitude);
sendBroadcast(intent);
code snippet PA4AD_Ch05_BroadcastIntents/src/MyActivity.java
Listening for Broadcasts with Broadcast Receivers
Broadcast Receivers (commonly referred to simply as Receivers) are used to listen for Broadcast Intents. For a Receiver to receive broadcasts, it must be registered, either in code or within the application manifest—the latter case is referred to as a manifest Receiver. In either case, use an Intent Filter to specify which Intent actions and data your Receiver is listening for.
In the case of applications that include manifest Receivers, the applications don't have to be running when the Intent is broadcast for those receivers to execute; they will be started automatically when a matching Intent is broadcast. This is excellent for resource management, as it lets you create event-driven applications that will still respond to broadcast events even after they've been closed or killed.
To create a new Broadcast Receiver, extend the BroadcastReceiver class and override the onReceive event handler:
import android.content.BroadcastReceiver;
import android.content.Context;
import android.content.Intent;
public class MyBroadcastReceiver extends BroadcastReceiver {
@Override
public void onReceive(Context context, Intent intent) {
//TODO: React to the Intent received.
}
}
The onReceive method will be executed on the main application thread when a Broadcast Intent is received that matches the Intent Filter used to register the Receiver. The onReceive handler must complete within five seconds; otherwise, the Force Close dialog will be displayed.
Typically, Broadcast Receivers will update content, launch Services, update Activity UI, or notify the user using the Notification Manager. The five-second execution limit ensures that major processing cannot, and should not, be done within the Broadcast Receiver itself.
Listing 5.11 shows how to implement a Broadcast Receiver that extracts the data and several extras from the broadcast Intent and uses them to start a new Activity. In the following sections you will learn how to register it in code or in your application manifest.
Listing 5.11: Implementing a Broadcast Receiver
public class LifeformDetectedReceiver
extends BroadcastReceiver {
public final static String EXTRA_LIFEFORM_NAME
= "EXTRA_LIFEFORM_NAME";
public final static String EXTRA_LATITUDE = "EXTRA_LATITUDE";
public final static String EXTRA_LONGITUDE = "EXTRA_LONGITUDE";
public static final String
ACTION_BURN = "com.paad.alien.action.BURN_IT_WITH_FIRE";
public static final String
NEW_LIFEFORM = "com.paad.alien.action.NEW_LIFEFORM";
@Override
public void onReceive(Context context, Intent intent) {
// Get the lifeform details from the intent.
Uri data = intent.getData();
String type = intent.getStringExtra(EXTRA_LIFEFORM_NAME);
double lat = intent.getDoubleExtra(EXTRA_LATITUDE, 0);
double lng = intent.getDoubleExtra(EXTRA_LONGITUDE, 0);
Location loc = new Location("gps");
loc.setLatitude(lat);
loc.setLongitude(lng);
if (type.equals("facehugger")) {
Intent startIntent = new Intent(ACTION_BURN, data);
startIntent.putExtra(EXTRA_LATITUDE, lat);
startIntent.putExtra(EXTRA_LONGITUDE, lng);
context.startService(startIntent);
}
}
}
code snippet PA4AD_Ch05_BroadcastIntents/src/LifeformDetectedReceiver.java
Registering Broadcast Receivers in Code
Broadcast Receivers that affect the UI of a particular Activity are typically registered in code. A Receiver registered programmatically will respond to Broadcast Intents only when the application component it is registered within is running.
This is useful when the Receiver is being used to update UI elements in an Activity. In this case, it's good practice to register the Receiver within the onResume handler and unregister it during onPause.
Listing 5.12 shows how to register and unregister a Broadcast Receiver in code using the IntentFilter class.
Listing 5.12: Registering and unregistering a Broadcast Receiver in code
private IntentFilter filter =
new IntentFilter(LifeformDetectedReceiver.NEW_LIFEFORM);
private LifeformDetectedReceiver receiver =
new LifeformDetectedReceiver();
@Override
public void onResume() {
super.onResume();
// Register the broadcast receiver.
registerReceiver(receiver, filter);
}
@Override
public void onPause() {
// Unregister the receiver
unregisterReceiver(receiver);
super.onPause();
}
code snippet PA4AD_Ch05_BroadcastIntents/src/MyActivity.java
Registering Broadcast Receivers in Your Application Manifest
To include a Broadcast Receiver in the application manifest, add a receiver tag within the application node, specifying the class name of the Broadcast Receiver to register. The receiver node needs to include an intent-filter tag that specifies the action string being listened for.
<receiver android:name=".LifeformDetectedReceiver">
<intent-filter>
<action android:name="com.paad.alien.action.NEW_LIFEFORM"/>
</intent-filter>
</receiver>
Broadcast Receivers registered this way are always active and will receive Broadcast Intents even when the application has been killed or hasn't been started.
Broadcasting Ordered Intents
When the order in which the Broadcast Receivers receive the Intent is important—particularly where you want to allow Receivers to affect the Broadcast Intent received by future Receivers—you can use sendOrderedBroadcast, as follows:
String requiredPermission = "com.paad.MY_BROADCAST_PERMISSION";
sendOrderedBroadcast(intent, requiredPermission);
Using this method, your Intent will be delivered to all registered Receivers that hold the required permission (if one is specified) in the order of their specified priority. You can specify the priority of a Broadcast Receiver using the android:priority attribute within its Intent Filter manifest node, where higher values are considered higher priority.
<receiver
android:name=".MyOrderedReceiver"
android:permission="com.paad.MY_BROADCAST_PERMISSION">
<intent-filter
android:priority="100">
<action android:name="com.paad.action.ORDERED_BROADCAST" />
</intent-filter>
</receiver>
It's good practice to send ordered broadcasts, and specify Receiver priorities, only for Receivers used within your application that specifically need to impose a specific order of receipt.
One common use-case for sending ordered broadcasts is to broadcast Intents for which you want to receive result data. Using the sendOrderedBroadcast method, you can specify a Broadcast Receiver that will be placed at the end of the Receiver queue, ensuring that it will receive the Broadcast Intent after it has been handled (and modified) by the ordered set of registered Broadcast Receivers.
In this case, it's often useful to specify default values for the Intent result, data, and extras that may be modified by any of the Receivers that receive the broadcast before it is returned to the final result Receiver.
// Specify the default result, data, and extras.
// The may be modified by any of the Receivers who handle the broadcast
// before being received by the final Receiver.
int initialResult = Activity.RESULT_OK;
String initialData = null;
String initialExtras = null;
// A special Handler instance on which to receive the final result.
// Specify null to use the Context on which the Intent was broadcast.
Handler scheduler = null;
sendOrderedBroadcast(intent, requiredPermission, finalResultReceiver,
scheduler, initialResult, initialData, initialExtras);
Broadcasting Sticky Intents
Sticky Intents are useful variations of Broadcast Intents that persist the values associated with their last broadcast, returning them as an Intent when a new Receiver is registered to receive the broadcast.
When you call registerReceiver, specifying an Intent Filter that matches a sticky Broadcast Intent, the return value will be the last Intent broadcast, such as the battery-level changed broadcast:
IntentFilter battery = new IntentFilter(Intent.ACTION_BATTERY_CHANGED);
Intent currentBatteryCharge = registerReceiver(null, battery);
As shown in the preceding snippet, it is not necessary to specify a Receiver to obtain the current value of a sticky Intent. As a result, many of the system device state broadcasts (such as battery and docking state) use sticky Intents to improve efficiency. These are examined in more detail later in this chapter.
To broadcast your own sticky Intents, your application must have the BROADCAST_STICKY uses-permission before calling sendStickyBroadcast and passing in the relevant Intent:
sendStickyBroadcast(intent);
To remove a sticky Intent, call removeStickyBroadcast, passing in the sticky Intent to remove:
removeStickyBroadcast(intent);
Introducing the Local Broadcast Manager
The Local Broadcast Manager was introduced to the Android Support Library to simplify the process of registering for, and sending, Broadcast Intents between components within your application.
Because of the reduced broadcast scope, using the Local Broadcast Manager is more efficient than sending a global broadcast. It also ensures that the Intent you broadcast cannot be received by any components outside your application, ensuring that there is no risk of leaking private or sensitive data, such as location information.
Similarly, other applications can't transmit broadcasts to your Receivers, negating the risk of these Receivers becoming vectors for security exploits.
To use the Local Broadcast Manager, you must first include the Android Support Library in your application, as described in Chapter 2.
Use the LocalBroadcastManager.getInstance method to return an instance of the Local Broadcast Manager:
LocalBroadcastManager lbm = LocalBroadcastManager.getInstance(this);
To register a local broadcast Receiver, use the Local Broadcast Manager's registerReceiver method, much as you would register a global receiver, passing in a Broadcast Receiver and an Intent Filter:
lbm.registerReceiver(new BroadcastReceiver() {
@Override
public void onReceive(Context context, Intent intent) {
// TODO Handle the received local broadcast
}
}, new IntentFilter(LOCAL_ACTION));
Note that the Broadcast Receiver specified can also be used to handle global Intent broadcasts.
To transmit a local Broadcast Intent, use the Local Broadcast Manager's sendBroadcast method, passing in the Intent to broadcast:
lbm.sendBroadcast(new Intent(LOCAL_ACTION));
The Local Broadcast Manager also includes a sendBroadcastSync method that operates synchronously, blocking until each registered Receiver has been dispatched.
Introducing Pending Intents
The PendingIntent class provides a mechanism for creating Intents that can be fired on your application's behalf by another application at a later time.
A Pending Intent is commonly used to package Intents that will be fired in response to a future event, such as a Widget or Notification being clicked.
![]()
When used, Pending Intents execute the packaged Intent with the same permissions and identity as if you had executed them yourself, within your own application.
The PendingIntent class offers static methods to construct Pending Intents used to start an Activity, to start a Service, or to broadcast an Intent:
int requestCode = 0;
int flags = 0;
// Start an Activity
Intent startActivityIntent = new Intent(this, MyOtherActivity.class);
PendingIntent.getActivity(this, requestCode,
startActivityIntent, flags);
// Start a Service
Intent startServiceIntent = new Intent(this, MyService.class);
PendingIntent.getService(this, requestCode,
startServiceIntent , flags);
// Broadcast an Intent
Intent broadcastIntent = new Intent(NEW_LIFEFORM_DETECTED);
PendingIntent.getBroadcast(this, requestCode,
broadcastIntent, flags);
The PendingIntent class includes static constants that can be used to specify flags to update or cancel any existing Pending Intent that matches your specified action, as well as to specify if this Intent is to be fired only once. The various options will be examined in more detail when Notifications and Widgets are introduced in Chapters 10 10 and 14, respectively.
Creating Intent Filters and Broadcast Receivers
Having learned to use Intents to start Activities/Services and to broadcast events, it's important to understand how to create the Broadcast Receivers and Intent Filters that listen for Broadcast Intents and allow your application to respond to them.
In the case of Activities and Services, an Intent is a request for an action to be performed on a set of data, and an Intent Filter is a declaration that a particular application component is capable of performing an action on a type of data.
Intent Filters are also used to specify the actions a Broadcast Receiver is interested in receiving.
Using Intent Filters to Service Implicit Intents
If an Intent is a request for an action to be performed on a set of data, how does Android know which application (and component) to use to service that request? Using Intent Filters, application components can declare the actions and data they support.
To register an Activity or Service as a potential Intent handler, add an intent-filter tag to its manifest node using the following tags (and associated attributes):
· action—Uses the android:name attribute to specify the name of the action being serviced. Each Intent Filter must have at least one action tag. Actions should be unique strings that are self-describing. Best practice is to use a naming system based on the Java package naming conventions.
· category—Uses the android:name attribute to specify under which circumstances the action should be serviced. Each Intent Filter tag can include multiple category tags. You can specify your own categories or use the following standard values provided by Android:
· ALTERNATIVE—This category specifies that this action should be available as an alternative to the default action performed on an item of this data type. For example, where the default action for a contact is to view it, the alternative could be to edit it.
· SELECTED_ALTERNATIVE—Similar to the ALTERNATIVE category, but whereas that category will always resolve to a single action using the intent resolution described next, SELECTED_ALTERNATIVE is used when a list of possibilities is required. As you'll see later in this chapter, one of the uses of Intent Filters is to help populate context menus dynamically using actions.
· BROWSABLE—Specifies an action available from within the browser. When an Intent is fired from within the browser, it will always include the browsable category. If you want your application to respond to actions triggered within the browser (e.g., intercepting links to a particular website), you must include the browsable category.
· DEFAULT—Set this to make a component the default action for the data type specified in the Intent Filter. This is also necessary for Activities that are launched using an explicit Intent.
· HOME—By setting an Intent Filter category as home without specifying an action, you are presenting it as an alternative to the native home screen.
· LAUNCHER—Using this category makes an Activity appear in the application launcher.
· data—The data tag enables you to specify which data types your component can act on; you can include several data tags as appropriate. You can use any combination of the following attributes to specify the data your component supports:
· android:host—Specifies a valid hostname (e.g., google.com).
· android:mimetype—Specifies the type of data your component is capable of handling. For example, <type android:value=”vnd.android.cursor.dir/*”/> would match any Android cursor.
· android:path—Specifies valid path values for the URI (e.g., /transport/boats/).
· android:port—Specifies valid ports for the specified host.
· android:scheme—Requires a particular scheme (e.g., content or http).
The following snippet shows an Intent Filter for an Activity that can perform the SHOW_DAMAGE action as either a primary or an alternative action based on its mime type.
<intent-filter>
<action
android:name="com.paad.earthquake.intent.action.SHOW_DAMAGE"
/>
<category android:name="android.intent.category.DEFAULT"/>
<category
android:name="android.intent.category.SELECTED_ALTERNATIVE"/>
<data android:mimeType="vnd.earthquake.cursor.item/*"/>
</intent-filter>
You may have noticed that clicking a link to a YouTube video or Google Maps location on an Android device prompts you to use YouTube or Google Maps, respectively, rather than the browser. This is achieved by specifying the scheme, host, and path attributes within the data tag of an Intent Filter, as shown in Listing 5.13. In this example, any link of the form that begins http://blog.radioactiveyak.com can be serviced by this Activity.
Listing 5.13: Registering an Activity as an Intent Receiver for viewing content from a specific website using an Intent Filter
<activity android:name=".MyBlogViewerActivity">
<intent-filter>
<action android:name="android.intent.action.VIEW" />
<category android:name="android.intent.category.DEFAULT" />
<category android:name="android.intent.category.BROWSABLE" />
<data android:scheme="http"
android:host="blog.radioactiveyak.com"/>
</intent-filter>
</activity>
code snippet PA4AD_Ch05_Intents/AndroidManifest.xml
Note that you must include the browsable category in order for links clicked within the browser to trigger this behavior.
How Android Resolves Intent Filters
The process of deciding which Activity to start when an implicit Intent is passed in to startActivity is called intent resolution. The aim of intent resolution is to find the best Intent Filter match possible by means of the following process:
1. Android puts together a list of all the Intent Filters available from the installed packages.
2. Intent Filters that do not match the action or category associated with the Intent being resolved are removed from the list.
· Action matches are made only if the Intent Filter includes the specified action. An Intent Filter will fail the action match check if none of its actions matches the one specified by the Intent.
· For category matching, Intent Filters must include all the categories defined in the resolving Intent, but can include additional categories not included in the Intent. An Intent Filter with no categories specified matches only Intents with no categories.
3. Each part of the Intent's data URI is compared to the Intent Filter's data tag. If the Intent Filter specifies a scheme, host/authority, path, or MIME type, these values are compared to the Intent's URI. Any mismatch will remove the Intent Filter from the list. Specifying no data values in an Intent Filter will result in a match with all Intent data values.
· The MIME type is the data type of the data being matched. When matching data types, you can use wildcards to match subtypes (e.g., earthquakes/*). If the Intent Filter specifies a data type, it must match the Intent; specifying no data types results in a match with all of them.
· The scheme is the “protocol” part of the URI (e.g., http:, mailto:, or tel:).
· The hostname or data authority is the section of the URI between the scheme and the path (e.g., developer.android.com). For a hostname to match, the Intent Filter's scheme must also pass.
· The data path is what comes after the authority (e.g., /training). A path can match only if the scheme and hostname parts of the data tag also match.
4. When you implicitly start an Activity, if more than one component is resolved from this process, all the matching possibilities are offered to the user. For Broadcast Receivers, each matching Receiver will receive the broadcast Intent.
Native Android application components are part of the intent-resolution process in exactly the same way as third-party applications. They do not have a higher priority and can be completely replaced with new Activities that declare Intent Filters that service the same actions.
Finding and Using Intents Received Within an Activity
When an application component is started through an implicit Intent, it needs to find the action it's to perform and the data to perform it on.
To find the Intent used to start the Activity, call getIntent, as shown in Listing 5.14.
Listing 5.14: Finding the launch Intent in an Activity
@Override
public void onCreate(Bundle savedInstanceState) {
super.onCreate(savedInstanceState);
setContentView(R.layout.main);
Intent intent = getIntent();
String action = intent.getAction();
Uri data = intent.getData();
}
code snippet PA4AD_Ch05_Intents/src/MyOtherActivity.java
Use the getData and getAction methods to find the data and action, respectively, associated with the Intent. Use the type-safe get<type>Extra methods to extract additional information stored in its extras Bundle.
The getIntent method will always return the initial Intent used to create the Activity. In some circumstances your Activity may continue to receive Intents after it has been launched. You can use widgets and Notifications to provide shortcuts to displaying data within your Activity that may still be running, though not visible.
Override the onNewIntent handler within your Activity to receive and handle new Intents after the Activity has been created.
@Override
public void onNewIntent(Intent newIntent) {
// TODO React to the new Intent
super.onNewIntent(newIntent);
}
Passing on Responsibility
To pass responsibility for action handling to the next best Activity, use startNextMatchingActivity.
Intent intent = getIntent();
if (isDuringBreak)
startNextMatchingActivity(intent);
This lets you add additional conditions to your components that restrict their use beyond the ability of the Intent Filter-based intent-resolution process.
Selecting a Contact Example
In this example you'll create a new Activity that services ACTION_PICK for contact data. It displays each of the contacts in the contacts database and lets the user select one, before closing and returning the selected contact's URI to the calling Activity.
![]()
This example is somewhat contrived. Android already supplies an Intent Filter for picking a contact from a list that can be invoked by means of the content: //contacts/people/ URI in an implicit Intent. The purpose of this exercise is to demonstrate the form, even if this particular implementation isn't particularly useful.
1. Create a new ContactPicker project that includes a ContactPicker Activity:
package com.paad.contactpicker;
import android.app.Activity;
import android.content.Intent;
import android.database.Cursor;
import android.net.Uri;
import android.os.Bundle;
import android.provider.ContactsContract.Contacts;
import android.view.View;
import android.widget.AdapterView;
import android.widget.ListView;
import android.widget.SimpleCursorAdapter;
public class ContactPicker extends Activity {
@Override
public void onCreate(Bundle savedInstanceState) {
super.onCreate(savedInstanceState);
setContentView(R.layout.main);
}
}
2. Modify the main.xml layout resource to include a single ListView control. This control will be used to display the contacts.
<?xml version="1.0" encoding="utf-8"?>
<LinearLayout xmlns:android="http://schemas.android.com/apk/res/android"
android:orientation="vertical"
android:layout_width="match_parent"
android:layout_height="match_parent">
<ListView android:id="@+id/contactListView"
android:layout_width="match_parent"
android:layout_height="wrap_content"
/>
</LinearLayout>
3. Create a new listitemlayout.xml layout resource that includes a single TextView control. This control will be used to display each contact in the List View.
<?xml version="1.0" encoding="utf-8"?>
<LinearLayout xmlns:android="http://schemas.android.com/apk/res/android"
android:orientation="vertical"
android:layout_width="match_parent"
android:layout_height="match_parent"
>
<TextView
android:id="@+id/itemTextView"
android:layout_width="match_parent"
android:layout_height="wrap_content"
android:padding="10dp"
android:textSize="16dp"
android:textColor="#FFF"
/>
</LinearLayout>
4. Return to the ContactPicker Activity. Override the onCreate method.
@Override
public void onCreate(Bundle savedInstanceState) {
super.onCreate(savedInstanceState);
setContentView(R.layout.main);
4.1 Create a new Cursor to retrieve the people stored in the contact list, and bind it to the List View using a SimpleCursorArrayAdapter. Note that in this example the query is executed on the main UI thread. A better approach would be to use a Cursor Loader, as shown in Chapter 8.
final Cursor c = getContentResolver().query(
ContactsContract.Contacts.CONTENT_URI, null, null, null, null);
String[] from = new String[] { Contacts.DISPLAY_NAME_PRIMARY };
int[] to = new int[] { R.id.itemTextView };
SimpleCursorAdapter adapter = new SimpleCursorAdapter(this,
R.layout.listitemlayout,
c,
from,
to);
ListView lv = (ListView)findViewById(R.id.contactListView);
lv.setAdapter(adapter);
4.2 Add an onItemClickListener to the List View. Selecting a contact from the list should return a path to the item to the calling Activity.
lv.setOnItemClickListener(new ListView.OnItemClickListener() {
public void onItemClick(AdapterView<?> parent, View view, int pos,
long id) {
// Move the cursor to the selected item
c.moveToPosition(pos);
// Extract the row id.
int rowId = c.getInt(c.getColumnIndexOrThrow("_id"));
// Construct the result URI.
Uri outURI =
ContentUris.withAppendedId(ContactsContract.Contacts.CONTENT_URI, rowId);
Intent outData = new Intent();
outData.setData(outURI);
setResult(Activity.RESULT_OK, outData);
finish();
}
});
c. Close off the onCreate method:
}
5. Modify the application manifest and replace the intent-filter tag of the Activity to add support for the ACTION_PICK action on contact data:
<?xml version="1.0" encoding="utf-8"?>
<manifest xmlns:android="http://schemas.android.com/apk/res/android"
package="com.paad.contactpicker">
<application android:icon="@drawable/ic_launcher">
<activity android:name=".ContactPicker" android:label="@string/app_name">
<intent-filter>
<action android:name="android.intent.action.PICK"></action>
<category android:name="android.intent.category.DEFAULT"></category>
<data android:path="contacts" android:scheme="content"></data>
</intent-filter>
</activity>
</application>
</manifest>
6. This completes the sub-Activity. To test it, create a new test harness ContactPickerTester Activity. Create a new layout resource—contactpickertester.xml—that includes a TextView to display the selected contact and a Button to start the sub-Activity:
<?xml version="1.0" encoding="utf-8"?>
<LinearLayout xmlns:android="http://schemas.android.com/apk/res/android"
android:orientation="vertical"
android:layout_width="match_parent"
android:layout_height="match_parent"
>
<TextView
android:id="@+id/selected_contact_textview"
android:layout_width="match_parent"
android:layout_height="wrap_content"
/>
<Button
android:id="@+id/pick_contact_button"
android:layout_width="match_parent"
android:layout_height="wrap_content"
android:text="Pick Contact"
/>
</LinearLayout>
7. Override the onCreate method of the ContactPickerTester to add a click listener to the Button so that it implicitly starts a new sub-Activity by specifying the ACTION_PICK and the contact database URI (content://contacts/):
package com.paad.contactpicker;
import android.app.Activity;
import android.content.Intent;
import android.database.Cursor;
import android.net.Uri;
import android.os.Bundle;
import android.provider.ContactsContract;
import android.view.View;
import android.view.View.OnClickListener;
import android.widget.Button;
import android.widget.TextView;
public class ContactPickerTester extends Activity {
public static final int PICK_CONTACT = 1;
@Override
public void onCreate(Bundle savedInstanceState) {
super.onCreate(savedInstanceState);
setContentView(R.layout.contactpickertester);
Button button = (Button)findViewById(R.id.pick_contact_button);
button.setOnClickListener(new OnClickListener() {
@Override
public void onClick(View _view) {
Intent intent = new Intent(Intent.ACTION_PICK,
Uri.parse("content://contacts/"));
startActivityForResult(intent, PICK_CONTACT);
}
});
}
}
8. When the sub-Activity returns, use the result to populate the Text View with the selected contact's name:
@Override
public void onActivityResult(int reqCode, int resCode, Intent data) {
super.onActivityResult(reqCode, resCode, data);
switch(reqCode) {
case (PICK_CONTACT) : {
if (resCode == Activity.RESULT_OK) {
Uri contactData = data.getData();
Cursor c = getContentResolver().query(contactData, null, null, null, null);
c.moveToFirst();
String name = c.getString(c.getColumnIndexOrThrow(
ContactsContract.Contacts.DISPLAY_NAME_PRIMARY));
c.close();
TextView tv = (TextView)findViewById(R.id.selected_contact_textview);
tv.setText(name);
}
break;
}
default: break;
}
}
9. With your test harness complete, simply add it to your application manifest. You'll also need to add a READ_CONTACTS permission within a uses-permission tag to allow the application to access the contacts database.
<?xml version="1.0" encoding="utf-8"?>
<manifest xmlns:android="http://schemas.android.com/apk/res/android"
package="com.paad.contactpicker">
<uses-permission android:name="android.permission.READ_CONTACTS"/>
<application android:icon="@drawable/ic_launcher">
<activity android:name=".ContactPicker" android:label="@string/app_name">
<intent-filter>
<action android:name="android.intent.action.PICK"></action>
<category android:name="android.intent.category.DEFAULT"></category>
<data android:path="contacts" android:scheme="content"></data>
</intent-filter>
</activity>
<activity android:name=".ContactPickerTester"
android:label="Contact Picker Test">
<intent-filter>
<action android:name="android.intent.action.MAIN" />
<category android:name="android.intent.category.LAUNCHER" />
</intent-filter>
</activity>
</application>
</manifest>
![]()
All code snippets in this example are part of the Chapter 5 Contact Picker project, available for download at Wrox.com.
When your Activity is running, press the “pick contact” button. The contact picker Activity should appear, as shown in Figure 5.1.
Figure 5.1
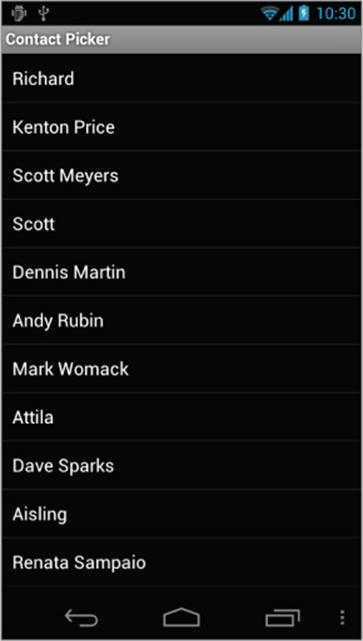
After you select a contact, the parent Activity should return to the foreground with the selected contact name displayed (see Figure 5.2).
Figure 5.2
Using Intent Filters for Plug-Ins and Extensibility
Having used Intent Filters to declare the actions your Activities can perform on different types of data, it stands to reason that applications can also query to find which actions are available to be performed on a particular piece of data.
Android provides a plug-in model that lets your applications take advantage of functionality, provided anonymously from your own or third-party application components you haven't yet conceived of, without your having to modify or recompile your projects.
Supplying Anonymous Actions to Applications
To use this mechanism to make your Activity's actions available anonymously for existing applications, publish them using intent-filter tags within their manifest nodes, as described earlier.
The Intent Filter describes the action it performs and the data upon which it can be performed. The latter will be used during the intent-resolution process to determine when this action should be available. The category tag must be either ALTERNATIVE or SELECTED_ALTERNATIVE, or both. Theandroid:label attribute should be a human-readable label that describes the action.
Listing 5.15 shows an example of an Intent Filter used to advertise an Activity's capability to nuke Moon bases from orbit.
Listing 5.15: Advertising supported Activity actions
<activity android:name=".NostromoController">
<intent-filter
android:label="@string/Nuke_From_Orbit">
<action android:name="com.pad.nostromo.NUKE_FROM_ORBIT"/>
<data android:mimeType="vnd.moonbase.cursor.item/*"/>
<category android:name="android.intent.category.ALTERNATIVE"/>
<category
android:name="android.intent.category.SELECTED_ALTERNATIVE"
/>
</intent-filter>
</activity>
code snippet PA4AD_Ch05_Intents/AndroidManifest.xml
Discovering New Actions from Third-Party Intent Receivers
Using the Package Manager, you can create an Intent that specifies a type of data and a category of action, and have the system return a list of Activities capable of performing an action on that data.
The elegance of this concept is best explained by an example. If the data your Activity displays is a list of places, you might include functionality to View them on a map or “Show directions to” each. Jump a few years ahead and you've created an application that interfaces with your car, allowing your phone to handle driving. Thanks to the runtime menu generation, when a new Intent Filter—with a DRIVE_CAR action—is included within the new Activity's node, Android will resolve this new action and make it available to your earlier application.
This provides you with the ability to retrofit functionality to your application when you create new components capable of performing actions on a given type of data. Many of Android's native applications use this functionality, enabling you to provide additional actions to native Activities.
The Intent you create will be used to resolve components with Intent Filters that supply actions for the data you specify. The Intent is being used to find actions, so don't assign it one; it should specify only the data to perform actions on. You should also specify the category of the action, eitherCATEGORY_ALTERNATIVE or CATEGORY_SELECTED_ALTERNATIVE.
The skeleton code for creating an Intent for menu-action resolution is shown here:
Intent intent = new Intent();
intent.setData(MyProvider.CONTENT_URI);
intent.addCategory(Intent.CATEGORY_ALTERNATIVE);
Pass this Intent into the Package Manager method queryIntentActivityOptions, specifying any options flags.
Listing 5.16 shows how to generate a list of actions to make available within your application.
Listing 5.16: Generating a list of possible actions to be performed on specific data
PackageManager packageManager = getPackageManager();
// Create the intent used to resolve which actions
// should appear in the menu.
Intent intent = new Intent();
intent.setData(MoonBaseProvider.CONTENT_URI);
intent.addCategory(Intent.CATEGORY_SELECTED_ALTERNATIVE);
// Specify flags. In this case, to return only filters
// with the default category.
int flags = PackageManager.MATCH_DEFAULT_ONLY;
// Generate the list
List<ResolveInfo> actions;
actions = packageManager.queryIntentActivities(intent, flags);
// Extract the list of action names
ArrayList<String> labels = new ArrayList<String>();
Resources r = getResources();
for (ResolveInfo action : actions )
labels.add(r.getString(action.labelRes));
code snippet PA4AD_Ch05_Intents/src/MyActivity.java
Incorporating Anonymous Actions as Menu Items
The most common way to incorporate actions from third-party applications is to include them within your Menu Items or Action Bar Actions.
The addIntentOptions method, available from the Menu class, lets you specify an Intent that describes the data acted upon within your Activity, as described previously; however, rather than simply returning a list of possible Receivers, a new Menu Item will be created for each, with the text populated from the matching Intent Filters' labels.
To add Menu Items to your Menus dynamically at run time, use the addIntentOptions method on the Menu object in question: Pass in an Intent that specifies the data for which you want to provide actions. Generally, this will be handled within your Activities' onCreateOptionsMenu oronCreateContextMenu handlers.
As in the previous section, the Intent you create will be used to resolve components with Intent Filters that supply actions for the data you specify. The Intent is being used to find actions, so don't assign it one; it should specify only the data to perform actions on. You should also specify the category of the action, either CATEGORY_ALTERNATIVE or CATEGORY_SELECTED_ALTERNATIVE.
The skeleton code for creating an Intent for menu-action resolution is shown here:
Intent intent = new Intent();
intent.setData(MyProvider.CONTENT_URI);
intent.addCategory(Intent.CATEGORY_ALTERNATIVE);
Pass this Intent in to addIntentOptions on the Menu you want to populate, as well as any options flags, the name of the calling class, the Menu group to use, and the Menu ID values. You can also specify an array of Intents you'd like to use to create additional Menu Items.
Listing 5.17 gives an idea of how to dynamically populate an Activity Menu.
Listing 5.17: Dynamic Menu population from advertised actions
@Override
public boolean onCreateOptionsMenu(Menu menu) {
super.onCreateOptionsMenu(menu);
// Create the intent used to resolve which actions
// should appear in the menu.
Intent intent = new Intent();
intent.setData(MoonBaseProvider.CONTENT_URI);
intent.addCategory(Intent.CATEGORY_SELECTED_ALTERNATIVE);
// Normal menu options to let you set a group and ID
// values for the menu items you're adding.
int menuGroup = 0;
int menuItemId = 0;
int menuItemOrder = Menu.NONE;
// Provide the name of the component that's calling
// the action -- generally the current Activity.
ComponentName caller = getComponentName();
// Define intents that should be added first.
Intent[] specificIntents = null;
// The menu items created from the previous Intents
// will populate this array.
MenuItem[] outSpecificItems = null;
// Set any optional flags.
int flags = Menu.FLAG_APPEND_TO_GROUP;
// Populate the menu
menu.addIntentOptions(menuGroup,
menuItemId,
menuItemOrder,
caller,
specificIntents,
intent,
flags,
outSpecificItems);
return true;
}
code snippet PA4AD_Ch05_Intents/src/MyActivity.java
Listening for Native Broadcast Intents
Many of the system Services broadcast Intents to signal changes. You can use these messages to add functionality to your own projects based on system events, such as time-zone changes, data-connection status, incoming SMS messages, or phone calls.
The following list introduces some of the native actions exposed as constants in the Intent class; these actions are used primarily to track device status changes:
· ACTION_BOOT_COMPLETED—Fired once when the device has completed its startup sequence. An application requires the RECEIVE_BOOT_COMPLETED permission to receive this broadcast.
· ACTION_CAMERA_BUTTON—Fired when the camera button is clicked.
· ACTION_DATE_CHANGED and ACTION_TIME_CHANGED—These actions are broadcast if the date or time on the device is manually changed (as opposed to changing through the inexorable progression of time).
· ACTION_MEDIA_EJECT—If the user chooses to eject the external storage media, this event is fired first. If your application is reading or writing to the external media storage, you should listen for this event to save and close any open file handles.
· ACTION_MEDIA_MOUNTED and ACTION_MEDIA_UNMOUNTED—These two events are broadcast whenever new external storage media are successfully added to or removed from the device, respectively.
· ACTION_NEW_OUTGOING_CALL—Broadcast when a new outgoing call is about to be placed. Listen for this broadcast to intercept outgoing calls. The number being dialed is stored in the EXTRA_PHONE_NUMBER extra, whereas the resultData in the returned Intent will be the number actually dialed. To register a Broadcast Receiver for this action, your application must declare the PROCESS_OUTGOING_CALLS uses-permission.
· ACTION_SCREEN_OFF and ACTION_SCREEN_ON— Broadcast when the screen turns off or on, respectively.
· ACTION_TIMEZONE_CHANGED—This action is broadcast whenever the phone's current time zone changes. The Intent includes a time-zone extra that returns the ID of the new java.util.TimeZone.
![]()
A comprehensive list of the broadcast actions used and transmitted natively by Android to notify applications of system state changes is available at http://developer.android.com/reference/android/content/Intent.html.
Android also uses Broadcast Intents to announce application-specific events, such as incoming SMS messages, changes in dock state, and battery level. The actions and Intents associated with these events will be discussed in more detail in later chapters when you learn more about the associated Services.
Monitoring Device State Changes Using Broadcast Intents
Monitoring the device state is an important part of creating efficient and dynamic applications whose behavior can change based on connectivity, battery charge state, and docking status.
Android broadcasts Intents for changes in each of these device states. The following sections examine how to create Intent Filters to register Broadcast Receivers that can react to such changes, and how to extract the device state information accordingly.
Listening for Battery Changes
To monitor changes in the battery level or charging status within an Activity, you can register a Receiver using an Intent Filter that listens for the Intent.ACTION_BATTERY_CHANGED broadcast by the Battery Manager.
The Broadcast Intent containing the current battery charge and charging status is a sticky Intent, so you can retrieve the current battery status at any time without needing to implement a Broadcast Receiver, as shown in Listing 5.18.
Listing 5.18: Determining battery and charge state information
IntentFilter batIntentFilter = new IntentFilter(Intent.ACTION_BATTERY_CHANGED);
Intent battery = context.registerReceiver(null, batIntentFilter);
int status = battery.getIntExtra(BatteryManager.EXTRA_STATUS, -1);
boolean isCharging =
status == BatteryManager.BATTERY_STATUS_CHARGING ||
status == BatteryManager.BATTERY_STATUS_FULL;
code snippet PA4AD_Ch05_Intents/src/DeviceStateActivity.java
Note that you can't register the battery changed action within a manifest Receiver; however, you can monitor connection and disconnection from a power source and a low battery level using the following action strings, each prefixed with android.intent.action:
· ACTION_BATTERY_LOW
· ACTION_BATTERY_OKAY
· ACTION_POWER_CONNECTED
· ACTION_POWER_DISCONNECTED
Listening for Connectivity Changes
Changes in connectivity, including the bandwidth, latency, and availability of an Internet connection, can be significant signals for your application. In particular, you might choose to suspend recurring updates when you lose connectivity or to delay downloads of significant size until you have a Wi-Fi connection.
To monitor changes in connectivity, register a Broadcast Receiver (either within your application or within the manifest) to listen for the android.net.conn.CONNECTIVITY_CHANGE (ConnectivityManager.CONNECTIVITY_ACTION) action.
The connectivity change broadcast isn't sticky and doesn't contain any additional information regarding the change. To extract details on the current connectivity status, you need to use the Connectivity Manager, as shown in Listing 5.19.
Listing 5.19: Determining connectivity state information
String svcName = Context.CONNECTIVITY_SERVICE;
ConnectivityManager cm = (ConnectivityManager)context.getSystemService(svcName);
NetworkInfo activeNetwork = cm.getActiveNetworkInfo();
boolean isConnected = activeNetwork.isConnectedOrConnecting();
boolean isMobile = activeNetwork.getType() ==
ConnectivityManager.TYPE_MOBILE;
code snippet PA4AD_Ch05_Intents/src/DeviceStateActivity.java
![]()
The Connectivity Manager is examined in more detail in Chapter 16, “Bluetooth, NFC, Networks, and Wi-Fi.”
Listening for Docking Changes
Android devices can be docked in either a car dock or desk dock. These, in term, can be either analog or digital docks. By registering a Receiver to listen for the Intent.ACTION_DOCK_EVENT (android.intent.action.ACTION_DOCK_EVENT), you can determine the docking status and type of dock.
Like the battery status, the dock event Broadcast Intent is sticky. Listing 5.20 shows how to extract the current docking status from the Intent returned when registering a Receiver for docking events.
Listing 5.20: Determining docking state information
IntentFilter dockIntentFilter =
new IntentFilter(Intent.ACTION_DOCK_EVENT);
Intent dock = registerReceiver(null, dockIntentFilter);
int dockState = dock.getIntExtra(Intent.EXTRA_DOCK_STATE,
Intent.EXTRA_DOCK_STATE_UNDOCKED);
boolean isDocked = dockState != Intent.EXTRA_DOCK_STATE_UNDOCKED;
code snippet PA4AD_Ch05_Intents/src/DeviceStateActivity.java
Managing Manifest Receivers at Run Time
Using the Package Manager, you can enable and disable any of your application's manifest Receivers at run time using the setComponentEnabledSetting method. You can use this technique to enable or disable any application component (including Activities and Services), but it is particularly useful for manifest Receivers.
To minimize the footprint of your application, it's good practice to disable manifest Receivers that listen for common system events (such as connectivity changes) when your application doesn't need to respond to those events. This technique also enables you to schedule an action based on a system event—such as downloading a large file when the device is connected to Wi-Fi—without gaining the overhead of having the application launch every time a connectivity change is broadcast.
Listing 5.21 shows how to enable and disable a manifest Receiver at run time.
Listing 5.21: Dynamically toggling manifest Receivers
ComponentName myReceiverName = new ComponentName(this, MyReceiver.class);
PackageManager pm = getPackageManager();
// Enable a manifest receiver
pm.setComponentEnabledSetting(myReceiverName,
PackageManager.COMPONENT_ENABLED_STATE_ENABLED,
PackageManager.DONT_KILL_APP);
// Disable a manifest receiver
pm.setComponentEnabledSetting(myReceiverName,
PackageManager.COMPONENT_ENABLED_STATE_DISABLED,
PackageManager.DONT_KILL_APP);
All materials on the site are licensed Creative Commons Attribution-Sharealike 3.0 Unported CC BY-SA 3.0 & GNU Free Documentation License (GFDL)
If you are the copyright holder of any material contained on our site and intend to remove it, please contact our site administrator for approval.
© 2016-2025 All site design rights belong to S.Y.A.