Professional Android 4 Application Development (2012)
Chapter 5. Intents and Broadcast Receivers
What's in this Chapter?
Introducing Intents
Starting Activities, sub-Activities, and Services using implicit and explicit Intents
Using Linkify
Broadcasting events using Broadcast Intents
Using Pending Intents
An introduction to Intent Filters and Broadcast Receivers
Extending application functionality using Intent Filters
Listening for Broadcast Intents
Monitoring device state changes
Managing manifest Receivers at run time
This chapter looks at Intents—probably the most unique and important concept in Android development. You'll learn how to use Intents to broadcast data within and between applications and how to listen for them to detect changes in the system state.
You'll also learn how to define implicit and explicit Intents to start Activities or Services using late runtime binding. Using implicit Intents, you'll learn how to request that an action be performed on a piece of data, enabling Android to determine which application components can best service that request.
Broadcast Intents are used to announce events systemwide. You'll learn how to transmit these broadcasts and receive them using Broadcast Receivers.
Introducing Intents
Intents are used as a message-passing mechanism that works both within your application and between applications. You can use Intents to do the following:
· Explicitly start a particular Service or Activity using its class name
· Start an Activity or Service to perform an action with (or on) a particular piece of data
· Broadcast that an event has occurred
You can use Intents to support interaction among any of the application components installed on an Android device, no matter which application they're a part of. This turns your device from a platform containing a collection of independent components into a single, interconnected system.
One of the most common uses for Intents is to start new Activities, either explicitly (by specifying the class to load) or implicitly (by requesting that an action be performed on a piece of data). In the latter case the action does not need to be performed by an Activity within the calling application.
You can also use Intents to broadcast messages across the system. Applications can register Broadcast Receivers to listen for, and react to, these Broadcast Intents. This enables you to create event-driven applications based on internal, system, or third-party application events.
Android broadcasts Intents to announce system events, such as changes in Internet connectivity or battery charge levels. The native Android applications, such as the Phone Dialer and SMS Manager, simply register components that listen for specific Broadcast Intents—such as “incoming phone call” or “SMS message received”—and react accordingly. As a result, you can replace many of the native applications by registering Broadcast Receivers that listen for the same Intents.
Using Intents, rather than explicitly loading classes, to propagate actions—even within the same application—is a fundamental Android design principle. It encourages the decoupling of components to allow the seamless replacement of application elements. It also provides the basis of a simple model for extending an application's functionality.
Using Intents to Launch Activities
The most common use of Intents is to bind your application components and communicate between them. Intents are used to start Activities, allowing you to create a workflow of different screens.
![]()
The instructions in this section refer to starting new Activities, but the same details also apply to Services. Details on starting (and creating) Services are available in Chapter 9, “Working in the Background.”
To create and display an Activity, call startActivity, passing in an Intent, as follows:
startActivity(myIntent);
The startActivity method finds and starts the single Activity that best matches your Intent.
You can construct the Intent to explicitly specify the Activity class to open, or to include an action that the target Activity must be able to perform. In the latter case, the run time will choose an Activity dynamically using a process known as intent resolution.
When you use startActivity, your application won't receive any notification when the newly launched Activity finishes. To track feedback from a sub-Activity, use startActivityForResult, as described later in this chapter.
Explicitly Starting New Activities
You learned in Chapter 3, “Creating Applications and Activities,” that applications consist of a number of interrelated screens—Activities—that must be included in the application manifest. To transition between them, you will often need to explicitly specify which Activity to open.
To select a specific Activity class to start, create a new Intent, specifying the current Activity's Context and the class of the Activity to launch. Pass this Intent into startActivity, as shown in Listing 5.1.

Listing 5.1: Explicitly starting an Activity
Intent intent = new Intent(MyActivity.this, MyOtherActivity.class);
startActivity(intent);
code snippet PA4AD_Ch05_Intents/src/MyActivity.java
After startActivity is called, the new Activity (in this example, MyOtherActivity) will be created, started, and resumed—moving to the top of the Activity stack.
Calling finish on the new Activity, or pressing the hardware back button, closes it and removes it from the stack. Alternatively, you can continue to navigate to other Activities by calling startActivity. Note that each time you call startActivity, a new Activity will be added to the stack; pressing back (or calling finish) will remove each of these Activities, in turn.
Implicit Intents and Late Runtime Binding
An implicit Intent is a mechanism that lets anonymous application components service action requests. That means you can ask the system to start an Activity to perform an action without knowing which application, or Activity, will be started.
For example, to let users make calls from your application, you could implement a new dialer, or you could use an implicit Intent that requests the action (dialing) be performed on a phone number (represented as a URI).
if (somethingWeird && itDontLookGood) {
Intent intent =
new Intent(Intent.ACTION_DIAL, Uri.parse("tel:555-2368"));
startActivity(intent);
}
Android resolves this Intent and starts an Activity that provides the dial action on a telephone number—in this case, typically the Phone Dialer.
When constructing a new implicit Intent, you specify an action to perform and, optionally, supply the URI of the data on which to perform that action. You can send additional data to the target Activity by adding extras to the Intent.
Extras are a mechanism used to attach primitive values to an Intent. You can use the overloaded putExtra method on any Intent to attach a new name / value pair (NVP) that can then be retrieved using the corresponding get[type]Extra method in the started Activity.
The extras are stored within the Intent as a Bundle object that can be retrieved using the getExtras method.
When you use an implicit Intent to start an Activity, Android will—at run time—resolve it into the Activity class best suited to performing the required action on the type of data specified. This means you can create projects that use functionality from other applications without knowing exactly which application you're borrowing functionality from ahead of time.
In circumstances where multiple Activities can potentially perform a given action, the user is presented with a choice. The process of intent resolution is determined through an analysis of the registered Broadcast Receivers, which are described in detail later in this chapter.
Various native applications provide Activities capable of performing actions against specific data. Third-party applications, including your own, can be registered to support new actions or to provide an alternative provider of native actions. You'll be introduced to some of the native actions, as well as how to register your own Activities to support them, later in this chapter.
Determining If an Intent Will Resolve
Incorporating the Activities and Services of a third-party application into your own is incredibly powerful; however, there is no guarantee that any particular application will be installed on a device, or that any application capable of handling your request is available.
As a result, it's good practice to determine if your call will resolve to an Activity before calling startActivity.
You can query the Package Manager to determine which, if any, Activity will be launched to service a specific Intent by calling resolveActivity on your Intent object, passing in the Package Manager, as shown in Listing 5.2.
Listing 5.2: Implicitly starting an Activity
if (somethingWeird && itDontLookGood) {
// Create the impliciy Intent to use to start a new Activity.
Intent intent =
new Intent(Intent.ACTION_DIAL, Uri.parse("tel:555-2368"));
// Check if an Activity exists to perform this action.
PackageManager pm = getPackageManager();
ComponentName cn = intent.resolveActivity(pm);
if (cn == null) {
// If there is no Activity available to perform the action
// Check to see if the Google Play Store is available.
Uri marketUri =
Uri.parse("market://search?q=pname:com.myapp.packagename");
Intent marketIntent = new
Intent(Intent.ACTION_VIEW).setData(marketUri);
// If the Google Play Store is available, use it to download an application
// capable of performing the required action. Otherwise log an
// error.
if (marketIntent.resolveActivity(pm) != null)
startActivity(marketIntent);
else
Log.d(TAG, "Market client not available.");
}
else
startActivity(intent);
}
code snippet PA4AD_Ch05_Intents/src/MyActivity.java
If no Activity is found, you can choose to either disable the related functionality (and associated user interface controls) or direct users to the appropriate application in the Google Play Store. Note that Google Play is not available on all devices, nor the emulator, so it's good practice to check for that as well.
Returning Results from Activities
An Activity started via startActivity is independent of its parent and will not provide any feedback when it closes.
Where feedback is required, you can start an Activity as a sub-Activity that can pass results back to its parent. Sub-Activities are actually just Activities opened in a different way. As such, you must register them in the application manifest in the same way as any other Activity. Any manifest-registered Activity can be opened as a sub-Activity, including those provided by the system or third-party applications.
When a sub-Activity is finished, it triggers the onActivityResult event handler within the calling Activity. Sub-Activities are particularly useful in situations in which one Activity is providing data input for another, such as a user selecting an item from a list.
Launching Sub-Activities
The startActivityForResult method works much like startActivity, but with one important difference. In addition to passing in the explicit or implicit Intent used to determine which Activity to launch, you also pass in a request code. This value will later be used to uniquely identify the sub-Activity that has returned a result.
Listing 5.3 shows the skeleton code for launching a sub-Activity explicitly.
Listing 5.3: Explicitly starting a sub-Activity for a result
private static final int SHOW_SUBACTIVITY = 1;
private void startSubActivity() {
Intent intent = new Intent(this, MyOtherActivity.class);
startActivityForResult(intent, SHOW_SUBACTIVITY);
}
code snippet PA4AD_Ch05_Intents/src/MyActivity.java
Like regular Activities, you can start sub-Activities implicitly or explicitly. Listing 5.4 uses an implicit Intent to launch a new sub-Activity to pick a contact.
Listing 5.4: Implicitly starting a sub-Activity for a result
private static final int PICK_CONTACT_SUBACTIVITY = 2;
private void startSubActivityImplicitly() {
Uri uri = Uri.parse("content://contacts/people");
Intent intent = new Intent(Intent.ACTION_PICK, uri);
startActivityForResult(intent, PICK_CONTACT_SUBACTIVITY);
}
code snippet PA4AD_Ch05_Intents/src/MyActivity.java
Returning Results
When your sub-Activity is ready to return, call setResult before finish to return a result to the calling Activity.
The setResult method takes two parameters: the result code and the result data itself, represented as an Intent.
The result code is the “result” of running the sub-Activity—generally, either Activity.RESULT_OK or Activity.RESULT_CANCELED. In some circumstances, where OK and cancelled don't sufficiently or accurately describe the available return results, you'll want to use your own response codes to handle application-specific choices; setResult supports any integer value.
The Intent returned as a result often includes a data URI that points to a piece of content (such as the selected contact, phone number, or media file) and a collection of extras used to return additional information.
Listing 5.5, taken from a sub-Activity's onCreate method, shows how an OK and Cancel button might return different results to the calling Activity.
Listing 5.5: Returning a result from a sub-Activity
Button okButton = (Button) findViewById(R.id.ok_button);
okButton.setOnClickListener(new View.OnClickListener() {
public void onClick(View view) {
long selected_horse_id = listView.getSelectedItemId();
Uri selectedHorse = Uri.parse("content://horses/" +
selected_horse_id);
Intent result = new Intent(Intent.ACTION_PICK, selectedHorse);
setResult(RESULT_OK, result);
finish();
}
});
Button cancelButton = (Button) findViewById(R.id.cancel_button);
cancelButton.setOnClickListener(new View.OnClickListener() {
public void onClick(View view) {
setResult(RESULT_CANCELED);
finish();
}
});
code snippet PA4AD_Ch05_Intents/src/SelectHorseActivity.java
If the Activity is closed by the user pressing the hardware back key, or finish is called without a prior call to setResult, the result code will be set to RESULT_CANCELED and the result Intent set to null.
Handling Sub-Activity Results
When a sub-Activity closes, the onActivityResult event handler is fired within the calling Activity. Override this method to handle the results returned by sub-Activities.
The onActivityResult handler receives a number of parameters:
· Request code—The request code that was used to launch the returning sub-Activity.
· Result code—The result code set by the sub-Activity to indicate its result. It can be any integer value, but typically will be either Activity.RESULT_OK or Activity.RESULT_CANCELED.
· Data—An Intent used to package returned data. Depending on the purpose of the sub-Activity, it may include a URI that represents a selected piece of content. The sub-Activity can also return information as an extra within the returned data Intent.
![]()
If the sub-Activity closes abnormally or doesn't specify a result code before it closes, the result code is Activity.RESULT_CANCELED.
Listing 5.6 shows the skeleton code for implementing the onActivityResult event handler within an Activity.
Listing 5.6: Implementing an On Activity Result handler
private static final int SELECT_HORSE = 1;
private static final int SELECT_GUN = 2;
Uri selectedHorse = null;
Uri selectedGun = null;
@Override
public void onActivityResult(int requestCode,
int resultCode,
Intent data) {
super.onActivityResult(requestCode, resultCode, data);
switch(requestCode) {
case (SELECT_HORSE):
if (resultCode == Activity.RESULT_OK)
selectedHorse = data.getData();
break;
case (SELECT_GUN):
if (resultCode == Activity.RESULT_OK)
selectedGun = data.getData();
break;
default: break;
}
}
code snippet PA4AD_Ch05_Intents/src/MyActivity.java
Native Android Actions
Native Android applications also use Intents to launch Activities and sub-Activities.
The following (noncomprehensive) list shows some of the native actions available as static string constants in the Intent class. When creating implicit Intents, you can use these actions, known as Activity Intents, to start Activities and sub-Activities within your own applications.
![]()
Later you will be introduced to Intent Filters and how to register your own Activities as handlers for these actions.
· ACTION_ALL_APPS—Opens an Activity that lists all the installed applications. Typically, this is handled by the launcher.
· ACTION_ANSWER—Opens an Activity that handles incoming calls. This is normally handled by the native in-call screen.
· ACTION_BUG_REPORT—Displays an Activity that can report a bug. This is normally handled by the native bug-reporting mechanism.
· ACTION_CALL—Brings up a phone dialer and immediately initiates a call using the number supplied in the Intent's data URI. This action should be used only for Activities that replace the native dialer application. In most situations it is considered better form to use ACTION_DIAL.
· ACTION_CALL_BUTTON—Triggered when the user presses a hardware “call button.” This typically initiates the dialer Activity.
· ACTION_DELETE—Starts an Activity that lets you delete the data specified at the Intent's data URI.
· ACTION_DIAL—Brings up a dialer application with the number to dial prepopulated from the Intent's data URI. By default, this is handled by the native Android phone dialer. The dialer can normalize most number schemas—for example, tel:555-1234 and tel:(212) 555 1212 are both valid numbers.
· ACTION_EDIT—Requests an Activity that can edit the data at the Intent's data URI.
· ACTION_INSERT—Opens an Activity capable of inserting new items into the Cursor specified in the Intent's data URI. When called as a sub-Activity, it should return a URI to the newly inserted item.
· ACTION_PICK—Launches a sub-Activity that lets you pick an item from the Content Provider specified by the Intent's data URI. When closed, it should return a URI to the item that was picked. The Activity launched depends on the data being picked—for example, passingcontent://contacts/people will invoke the native contacts list.
· ACTION_SEARCH—Typically used to launch a specific search Activity. When it's fired without a specific Activity, the user will be prompted to select from all applications that support search. Supply the search term as a string in the Intent's extras using SearchManager.QUERY as the key.
· ACTION_SEARCH_LONG_PRESS—Enables you to intercept long presses on the hardware search key. This is typically handled by the system to provide a shortcut to a voice search.
· ACTION_SENDTO—Launches an Activity to send data to the contact specified by the Intent's data URI.
· ACTION_SEND—Launches an Activity that sends the data specified in the Intent. The recipient contact needs to be selected by the resolved Activity. Use setType to set the MIME type of the transmitted data. The data itself should be stored as an extra by means of the key EXTRA_TEXT orEXTRA_STREAM, depending on the type. In the case of email, the native Android applications will also accept extras via the EXTRA_EMAIL, EXTRA_CC, EXTRA_BCC, and EXTRA_SUBJECT keys. Use the ACTION_SEND action only to send data to a remote recipient (not to another application on the device).
· ACTION_VIEW—This is the most common generic action. View asks that the data supplied in the Intent's data URI be viewed in the most reasonable manner. Different applications will handle view requests depending on the URI schema of the data supplied. Natively http: addresses will open in the browser; tel: addresses will open the dialer to call the number; geo: addresses will be displayed in the Google Maps application; and contact content will be displayed in the Contact Manager.
· ACTION_WEB_SEARCH—Opens the Browser to perform a web search based on the query supplied using the SearchManager.QUERY key.
![]()
In addition to these Activity actions, Android includes a large number of broadcast actions to create Intents that are broadcast to announce system events. These broadcast actions are described later in this chapter.
Introducing Linkify
Linkify is a helper class that creates hyperlinks within Text View (and Text View-derived) classes through RegEx pattern matching.
Text that matches a specified RegEx pattern will be converted into a clickable hyperlink that implicitly fires startActivity(new Intent(Intent.ACTION_VIEW, uri)), using the matched text as the target URI.
You can specify any string pattern to be treated as a clickable link; for convenience, the Linkify class provides presets for common content types.
Native Linkify Link Types
The Linkify class has presets that can detect and linkify web URLs, email addresses, and phone numbers. To apply a preset, use the static Linkify.addLinks method, passing in a View to Linkify and a bitmask of one or more of the following self-describing Linkify class constants: WEB_URLS,EMAIL_ADDRESSES, PHONE_NUMBERS, and ALL.
TextView textView = (TextView)findViewById(R.id.myTextView);
Linkify.addLinks(textView, Linkify.WEB_URLS|Linkify.EMAIL_ADDRESSES);
![]()
Most Android devices have at least two email applications: Gmail and Email. In situations in which multiple Activities are resolved as possible action consumers, users are asked to select their preference. In the case of the emulator, you must have the email client configured before it will respond to Linkified email addresses.
You can also linkify Views directly within a layout using the android:autoLink attribute. It supports one or more of the following values: none, web, email, phone, and all.
<TextView
android:layout_width="match_parent"
android:layout_height="match_parent"
android:text="@string/linkify_me"
android:autoLink="phone|email"
/>
Creating Custom Link Strings
To linkify your own data, you need to define your own linkify strings. Do this by creating a new RegEx pattern that matches the text you want to display as hyperlinks.
As with the native types, you can linkify the target Text View by calling Linkify.addLinks; however, rather than passing in one of the preset constants, pass in your RegEx pattern. You can also pass in a prefix that will be prepended to the target URI when a link is clicked.
Listing 5.7 shows a View being linkified to support earthquake data provided by an Android Content Provider (which you will create in Chapter 8, “Databases and Content Providers”). Note that rather than include the entire schema, the specified RegEx matches any text that starts with “quake” and is followed by a number, with optional whitespace. The full schema is then prepended to the URI before the Intent is fired.
Listing 5.7: Creating custom link strings in Linkify
// Define the base URI.
String baseUri = "content://com.paad.earthquake/earthquakes/";
// Contruct an Intent to test if there is an Activity capable of
// viewing the content you are Linkifying. Use the Package Manager
// to perform the test.
PackageManager pm = getPackageManager();
Intent testIntent = new Intent(Intent.ACTION_VIEW, Uri.parse(baseUri));
boolean activityExists = testIntent.resolveActivity(pm) != null;
// If there is an Activity capable of viewing the content
// Linkify the text.
if (activityExists) {
int flags = Pattern.CASE_INSENSITIVE;
Pattern p = Pattern.compile("\\bquake[\\s]?[0-9]+\\b", flags);
Linkify.addLinks(myTextView, p, baseUri);
}
code snippet PA4AD_Ch05_Linkify/src/MyActivity.java
Note that in this example, including whitespace between “quake” and a number will return a match, but the resulting URI won't be valid. You can implement and specify one or both of a TransformFilter and MatchFilter interface to resolve this problem. These interfaces, defined in detail in the following section, offer additional control over the target URI structure and the definition of matching strings, and are used as in the following skeleton code:
Linkify.addLinks(myTextView, p, baseUri,
new MyMatchFilter(), new MyTransformFilter());
Using the Match Filter
To add additional conditions to RegEx pattern matches, implement the acceptMatch method in a Match Filter. When a potential match is found, acceptMatch is triggered, with the match start and end index (along with the full text being searched) passed in as parameters.
Listing 5.8 shows a MatchFilter implementation that cancels any match immediately preceded by an exclamation mark.
Listing 5.8: Using a Linkify Match Filter
class MyMatchFilter implements MatchFilter {
public boolean acceptMatch(CharSequence s, int start, int end) {
return (start == 0 || s.charAt(start-1) != ‘!');
}
}
code snippet PA4AD_Ch05_Linkify/src/MyActivity.java
Using the Transform Filter
The Transform Filter lets you modify the implicit URI generated by matching link text. Decoupling the link text from the target URI gives you more freedom in how you display data strings to your users.
To use the Transform Filter, implement the transformUrl method in your Transform Filter. When Linkify finds a successful match, it calls transformUrl, passing in the RegEx pattern used and the matched text string (before the base URI is prepended). You can modify the matched string and return it such that it can be appended to the base string as the data for a View Intent.
As shown in Listing 5.9, the TransformFilter implementation transforms the matched text into a lowercase URI, having also removed any whitespace characters.
Listing 5.9: Using a Linkify Transform Filter
class MyTransformFilter implements TransformFilter {
public String transformUrl(Matcher match, String url) {
return url.toLowerCase().replace(" ", "");
}
}
code snippet PA4AD_Ch05_Linkify/src/MyActivity.java
Using Intents to Broadcast Events
So far, you've looked at using Intents to start new application components, but you can also use Intents to broadcast messages anonymously between components via the sendBroadcast method.
As a system-level message-passing mechanism, Intents are capable of sending structured messages across process boundaries. As a result, you can implement Broadcast Receivers to listen for, and respond to, these Broadcast Intents within your applications.
Broadcast Intents are used to notify applications of system or application events, extending the event-driven programming model between applications.
Broadcasting Intents helps make your application more open; by broadcasting an event using an Intent, you let yourself and third-party developers react to events without having to modify your original application. Within your applications you can listen for Broadcast Intents to to react to device state changes and third-party application events.
Android uses Broadcast Intents extensively to broadcast system events, such as changes in network connectivity, docking state, and incoming calls.
Broadcasting Events with Intents
Within your application, construct the Intent you want to broadcast and call sendBroadcast to send it.
Set the action, data, and category of your Intent in a way that lets Broadcast Receivers accurately determine their interest. In this scenario, the Intent action string is used to identify the event being broadcast, so it should be a unique string that identifies the event. By convention, action strings are constructed using the same form as Java package names:
public static final String NEW_LIFEFORM_DETECTED =
"com.paad.action.NEW_LIFEFORM";
If you want to include data within the Intent, you can specify a URI using the Intent's data property. You can also include extras to add additional primitive values. Considered in terms of an event-driven paradigm, the extras equate to optional parameters passed into an event handler.
Listing 5.10 shows the basic creation of a Broadcast Intent using the action defined previously, with additional event information stored as extras.
Listing 5.10: Broadcasting an Intent
Intent intent = new Intent(LifeformDetectedReceiver.NEW_LIFEFORM);
intent.putExtra(LifeformDetectedReceiver.EXTRA_LIFEFORM_NAME,
detectedLifeform);
intent.putExtra(LifeformDetectedReceiver.EXTRA_LONGITUDE,
currentLongitude);
intent.putExtra(LifeformDetectedReceiver.EXTRA_LATITUDE,
currentLatitude);
sendBroadcast(intent);
code snippet PA4AD_Ch05_BroadcastIntents/src/MyActivity.java
Listening for Broadcasts with Broadcast Receivers
Broadcast Receivers (commonly referred to simply as Receivers) are used to listen for Broadcast Intents. For a Receiver to receive broadcasts, it must be registered, either in code or within the application manifest—the latter case is referred to as a manifest Receiver. In either case, use an Intent Filter to specify which Intent actions and data your Receiver is listening for.
In the case of applications that include manifest Receivers, the applications don't have to be running when the Intent is broadcast for those receivers to execute; they will be started automatically when a matching Intent is broadcast. This is excellent for resource management, as it lets you create event-driven applications that will still respond to broadcast events even after they've been closed or killed.
To create a new Broadcast Receiver, extend the BroadcastReceiver class and override the onReceive event handler:
import android.content.BroadcastReceiver;
import android.content.Context;
import android.content.Intent;
public class MyBroadcastReceiver extends BroadcastReceiver {
@Override
public void onReceive(Context context, Intent intent) {
//TODO: React to the Intent received.
}
}
The onReceive method will be executed on the main application thread when a Broadcast Intent is received that matches the Intent Filter used to register the Receiver. The onReceive handler must complete within five seconds; otherwise, the Force Close dialog will be displayed.
Typically, Broadcast Receivers will update content, launch Services, update Activity UI, or notify the user using the Notification Manager. The five-second execution limit ensures that major processing cannot, and should not, be done within the Broadcast Receiver itself.
Listing 5.11 shows how to implement a Broadcast Receiver that extracts the data and several extras from the broadcast Intent and uses them to start a new Activity. In the following sections you will learn how to register it in code or in your application manifest.
Listing 5.11: Implementing a Broadcast Receiver
public class LifeformDetectedReceiver
extends BroadcastReceiver {
public final static String EXTRA_LIFEFORM_NAME
= "EXTRA_LIFEFORM_NAME";
public final static String EXTRA_LATITUDE = "EXTRA_LATITUDE";
public final static String EXTRA_LONGITUDE = "EXTRA_LONGITUDE";
public static final String
ACTION_BURN = "com.paad.alien.action.BURN_IT_WITH_FIRE";
public static final String
NEW_LIFEFORM = "com.paad.alien.action.NEW_LIFEFORM";
@Override
public void onReceive(Context context, Intent intent) {
// Get the lifeform details from the intent.
Uri data = intent.getData();
String type = intent.getStringExtra(EXTRA_LIFEFORM_NAME);
double lat = intent.getDoubleExtra(EXTRA_LATITUDE, 0);
double lng = intent.getDoubleExtra(EXTRA_LONGITUDE, 0);
Location loc = new Location("gps");
loc.setLatitude(lat);
loc.setLongitude(lng);
if (type.equals("facehugger")) {
Intent startIntent = new Intent(ACTION_BURN, data);
startIntent.putExtra(EXTRA_LATITUDE, lat);
startIntent.putExtra(EXTRA_LONGITUDE, lng);
context.startService(startIntent);
}
}
}
code snippet PA4AD_Ch05_BroadcastIntents/src/LifeformDetectedReceiver.java
Registering Broadcast Receivers in Code
Broadcast Receivers that affect the UI of a particular Activity are typically registered in code. A Receiver registered programmatically will respond to Broadcast Intents only when the application component it is registered within is running.
This is useful when the Receiver is being used to update UI elements in an Activity. In this case, it's good practice to register the Receiver within the onResume handler and unregister it during onPause.
Listing 5.12 shows how to register and unregister a Broadcast Receiver in code using the IntentFilter class.
Listing 5.12: Registering and unregistering a Broadcast Receiver in code
private IntentFilter filter =
new IntentFilter(LifeformDetectedReceiver.NEW_LIFEFORM);
private LifeformDetectedReceiver receiver =
new LifeformDetectedReceiver();
@Override
public void onResume() {
super.onResume();
// Register the broadcast receiver.
registerReceiver(receiver, filter);
}
@Override
public void onPause() {
// Unregister the receiver
unregisterReceiver(receiver);
super.onPause();
}
code snippet PA4AD_Ch05_BroadcastIntents/src/MyActivity.java
Registering Broadcast Receivers in Your Application Manifest
To include a Broadcast Receiver in the application manifest, add a receiver tag within the application node, specifying the class name of the Broadcast Receiver to register. The receiver node needs to include an intent-filter tag that specifies the action string being listened for.
<receiver android:name=".LifeformDetectedReceiver">
<intent-filter>
<action android:name="com.paad.alien.action.NEW_LIFEFORM"/>
</intent-filter>
</receiver>
Broadcast Receivers registered this way are always active and will receive Broadcast Intents even when the application has been killed or hasn't been started.
Broadcasting Ordered Intents
When the order in which the Broadcast Receivers receive the Intent is important—particularly where you want to allow Receivers to affect the Broadcast Intent received by future Receivers—you can use sendOrderedBroadcast, as follows:
String requiredPermission = "com.paad.MY_BROADCAST_PERMISSION";
sendOrderedBroadcast(intent, requiredPermission);
Using this method, your Intent will be delivered to all registered Receivers that hold the required permission (if one is specified) in the order of their specified priority. You can specify the priority of a Broadcast Receiver using the android:priority attribute within its Intent Filter manifest node, where higher values are considered higher priority.
<receiver
android:name=".MyOrderedReceiver"
android:permission="com.paad.MY_BROADCAST_PERMISSION">
<intent-filter
android:priority="100">
<action android:name="com.paad.action.ORDERED_BROADCAST" />
</intent-filter>
</receiver>
It's good practice to send ordered broadcasts, and specify Receiver priorities, only for Receivers used within your application that specifically need to impose a specific order of receipt.
One common use-case for sending ordered broadcasts is to broadcast Intents for which you want to receive result data. Using the sendOrderedBroadcast method, you can specify a Broadcast Receiver that will be placed at the end of the Receiver queue, ensuring that it will receive the Broadcast Intent after it has been handled (and modified) by the ordered set of registered Broadcast Receivers.
In this case, it's often useful to specify default values for the Intent result, data, and extras that may be modified by any of the Receivers that receive the broadcast before it is returned to the final result Receiver.
// Specify the default result, data, and extras.
// The may be modified by any of the Receivers who handle the broadcast
// before being received by the final Receiver.
int initialResult = Activity.RESULT_OK;
String initialData = null;
String initialExtras = null;
// A special Handler instance on which to receive the final result.
// Specify null to use the Context on which the Intent was broadcast.
Handler scheduler = null;
sendOrderedBroadcast(intent, requiredPermission, finalResultReceiver,
scheduler, initialResult, initialData, initialExtras);
Broadcasting Sticky Intents
Sticky Intents are useful variations of Broadcast Intents that persist the values associated with their last broadcast, returning them as an Intent when a new Receiver is registered to receive the broadcast.
When you call registerReceiver, specifying an Intent Filter that matches a sticky Broadcast Intent, the return value will be the last Intent broadcast, such as the battery-level changed broadcast:
IntentFilter battery = new IntentFilter(Intent.ACTION_BATTERY_CHANGED);
Intent currentBatteryCharge = registerReceiver(null, battery);
As shown in the preceding snippet, it is not necessary to specify a Receiver to obtain the current value of a sticky Intent. As a result, many of the system device state broadcasts (such as battery and docking state) use sticky Intents to improve efficiency. These are examined in more detail later in this chapter.
To broadcast your own sticky Intents, your application must have the BROADCAST_STICKY uses-permission before calling sendStickyBroadcast and passing in the relevant Intent:
sendStickyBroadcast(intent);
To remove a sticky Intent, call removeStickyBroadcast, passing in the sticky Intent to remove:
removeStickyBroadcast(intent);
Introducing the Local Broadcast Manager
The Local Broadcast Manager was introduced to the Android Support Library to simplify the process of registering for, and sending, Broadcast Intents between components within your application.
Because of the reduced broadcast scope, using the Local Broadcast Manager is more efficient than sending a global broadcast. It also ensures that the Intent you broadcast cannot be received by any components outside your application, ensuring that there is no risk of leaking private or sensitive data, such as location information.
Similarly, other applications can't transmit broadcasts to your Receivers, negating the risk of these Receivers becoming vectors for security exploits.
To use the Local Broadcast Manager, you must first include the Android Support Library in your application, as described in Chapter 2.
Use the LocalBroadcastManager.getInstance method to return an instance of the Local Broadcast Manager:
LocalBroadcastManager lbm = LocalBroadcastManager.getInstance(this);
To register a local broadcast Receiver, use the Local Broadcast Manager's registerReceiver method, much as you would register a global receiver, passing in a Broadcast Receiver and an Intent Filter:
lbm.registerReceiver(new BroadcastReceiver() {
@Override
public void onReceive(Context context, Intent intent) {
// TODO Handle the received local broadcast
}
}, new IntentFilter(LOCAL_ACTION));
Note that the Broadcast Receiver specified can also be used to handle global Intent broadcasts.
To transmit a local Broadcast Intent, use the Local Broadcast Manager's sendBroadcast method, passing in the Intent to broadcast:
lbm.sendBroadcast(new Intent(LOCAL_ACTION));
The Local Broadcast Manager also includes a sendBroadcastSync method that operates synchronously, blocking until each registered Receiver has been dispatched.
Introducing Pending Intents
The PendingIntent class provides a mechanism for creating Intents that can be fired on your application's behalf by another application at a later time.
A Pending Intent is commonly used to package Intents that will be fired in response to a future event, such as a Widget or Notification being clicked.
![]()
When used, Pending Intents execute the packaged Intent with the same permissions and identity as if you had executed them yourself, within your own application.
The PendingIntent class offers static methods to construct Pending Intents used to start an Activity, to start a Service, or to broadcast an Intent:
int requestCode = 0;
int flags = 0;
// Start an Activity
Intent startActivityIntent = new Intent(this, MyOtherActivity.class);
PendingIntent.getActivity(this, requestCode,
startActivityIntent, flags);
// Start a Service
Intent startServiceIntent = new Intent(this, MyService.class);
PendingIntent.getService(this, requestCode,
startServiceIntent , flags);
// Broadcast an Intent
Intent broadcastIntent = new Intent(NEW_LIFEFORM_DETECTED);
PendingIntent.getBroadcast(this, requestCode,
broadcastIntent, flags);
The PendingIntent class includes static constants that can be used to specify flags to update or cancel any existing Pending Intent that matches your specified action, as well as to specify if this Intent is to be fired only once. The various options will be examined in more detail when Notifications and Widgets are introduced in Chapters 10 10 and 14, respectively.
Creating Intent Filters and Broadcast Receivers
Having learned to use Intents to start Activities/Services and to broadcast events, it's important to understand how to create the Broadcast Receivers and Intent Filters that listen for Broadcast Intents and allow your application to respond to them.
In the case of Activities and Services, an Intent is a request for an action to be performed on a set of data, and an Intent Filter is a declaration that a particular application component is capable of performing an action on a type of data.
Intent Filters are also used to specify the actions a Broadcast Receiver is interested in receiving.
Using Intent Filters to Service Implicit Intents
If an Intent is a request for an action to be performed on a set of data, how does Android know which application (and component) to use to service that request? Using Intent Filters, application components can declare the actions and data they support.
To register an Activity or Service as a potential Intent handler, add an intent-filter tag to its manifest node using the following tags (and associated attributes):
· action—Uses the android:name attribute to specify the name of the action being serviced. Each Intent Filter must have at least one action tag. Actions should be unique strings that are self-describing. Best practice is to use a naming system based on the Java package naming conventions.
· category—Uses the android:name attribute to specify under which circumstances the action should be serviced. Each Intent Filter tag can include multiple category tags. You can specify your own categories or use the following standard values provided by Android:
· ALTERNATIVE—This category specifies that this action should be available as an alternative to the default action performed on an item of this data type. For example, where the default action for a contact is to view it, the alternative could be to edit it.
· SELECTED_ALTERNATIVE—Similar to the ALTERNATIVE category, but whereas that category will always resolve to a single action using the intent resolution described next, SELECTED_ALTERNATIVE is used when a list of possibilities is required. As you'll see later in this chapter, one of the uses of Intent Filters is to help populate context menus dynamically using actions.
· BROWSABLE—Specifies an action available from within the browser. When an Intent is fired from within the browser, it will always include the browsable category. If you want your application to respond to actions triggered within the browser (e.g., intercepting links to a particular website), you must include the browsable category.
· DEFAULT—Set this to make a component the default action for the data type specified in the Intent Filter. This is also necessary for Activities that are launched using an explicit Intent.
· HOME—By setting an Intent Filter category as home without specifying an action, you are presenting it as an alternative to the native home screen.
· LAUNCHER—Using this category makes an Activity appear in the application launcher.
· data—The data tag enables you to specify which data types your component can act on; you can include several data tags as appropriate. You can use any combination of the following attributes to specify the data your component supports:
· android:host—Specifies a valid hostname (e.g., google.com).
· android:mimetype—Specifies the type of data your component is capable of handling. For example, <type android:value=”vnd.android.cursor.dir/*”/> would match any Android cursor.
· android:path—Specifies valid path values for the URI (e.g., /transport/boats/).
· android:port—Specifies valid ports for the specified host.
· android:scheme—Requires a particular scheme (e.g., content or http).
The following snippet shows an Intent Filter for an Activity that can perform the SHOW_DAMAGE action as either a primary or an alternative action based on its mime type.
<intent-filter>
<action
android:name="com.paad.earthquake.intent.action.SHOW_DAMAGE"
/>
<category android:name="android.intent.category.DEFAULT"/>
<category
android:name="android.intent.category.SELECTED_ALTERNATIVE"/>
<data android:mimeType="vnd.earthquake.cursor.item/*"/>
</intent-filter>
You may have noticed that clicking a link to a YouTube video or Google Maps location on an Android device prompts you to use YouTube or Google Maps, respectively, rather than the browser. This is achieved by specifying the scheme, host, and path attributes within the data tag of an Intent Filter, as shown in Listing 5.13. In this example, any link of the form that begins http://blog.radioactiveyak.com can be serviced by this Activity.
Listing 5.13: Registering an Activity as an Intent Receiver for viewing content from a specific website using an Intent Filter
<activity android:name=".MyBlogViewerActivity">
<intent-filter>
<action android:name="android.intent.action.VIEW" />
<category android:name="android.intent.category.DEFAULT" />
<category android:name="android.intent.category.BROWSABLE" />
<data android:scheme="http"
android:host="blog.radioactiveyak.com"/>
</intent-filter>
</activity>
code snippet PA4AD_Ch05_Intents/AndroidManifest.xml
Note that you must include the browsable category in order for links clicked within the browser to trigger this behavior.
How Android Resolves Intent Filters
The process of deciding which Activity to start when an implicit Intent is passed in to startActivity is called intent resolution. The aim of intent resolution is to find the best Intent Filter match possible by means of the following process:
1. Android puts together a list of all the Intent Filters available from the installed packages.
2. Intent Filters that do not match the action or category associated with the Intent being resolved are removed from the list.
· Action matches are made only if the Intent Filter includes the specified action. An Intent Filter will fail the action match check if none of its actions matches the one specified by the Intent.
· For category matching, Intent Filters must include all the categories defined in the resolving Intent, but can include additional categories not included in the Intent. An Intent Filter with no categories specified matches only Intents with no categories.
3. Each part of the Intent's data URI is compared to the Intent Filter's data tag. If the Intent Filter specifies a scheme, host/authority, path, or MIME type, these values are compared to the Intent's URI. Any mismatch will remove the Intent Filter from the list. Specifying no data values in an Intent Filter will result in a match with all Intent data values.
· The MIME type is the data type of the data being matched. When matching data types, you can use wildcards to match subtypes (e.g., earthquakes/*). If the Intent Filter specifies a data type, it must match the Intent; specifying no data types results in a match with all of them.
· The scheme is the “protocol” part of the URI (e.g., http:, mailto:, or tel:).
· The hostname or data authority is the section of the URI between the scheme and the path (e.g., developer.android.com). For a hostname to match, the Intent Filter's scheme must also pass.
· The data path is what comes after the authority (e.g., /training). A path can match only if the scheme and hostname parts of the data tag also match.
4. When you implicitly start an Activity, if more than one component is resolved from this process, all the matching possibilities are offered to the user. For Broadcast Receivers, each matching Receiver will receive the broadcast Intent.
Native Android application components are part of the intent-resolution process in exactly the same way as third-party applications. They do not have a higher priority and can be completely replaced with new Activities that declare Intent Filters that service the same actions.
Finding and Using Intents Received Within an Activity
When an application component is started through an implicit Intent, it needs to find the action it's to perform and the data to perform it on.
To find the Intent used to start the Activity, call getIntent, as shown in Listing 5.14.
Listing 5.14: Finding the launch Intent in an Activity
@Override
public void onCreate(Bundle savedInstanceState) {
super.onCreate(savedInstanceState);
setContentView(R.layout.main);
Intent intent = getIntent();
String action = intent.getAction();
Uri data = intent.getData();
}
code snippet PA4AD_Ch05_Intents/src/MyOtherActivity.java
Use the getData and getAction methods to find the data and action, respectively, associated with the Intent. Use the type-safe get<type>Extra methods to extract additional information stored in its extras Bundle.
The getIntent method will always return the initial Intent used to create the Activity. In some circumstances your Activity may continue to receive Intents after it has been launched. You can use widgets and Notifications to provide shortcuts to displaying data within your Activity that may still be running, though not visible.
Override the onNewIntent handler within your Activity to receive and handle new Intents after the Activity has been created.
@Override
public void onNewIntent(Intent newIntent) {
// TODO React to the new Intent
super.onNewIntent(newIntent);
}
Passing on Responsibility
To pass responsibility for action handling to the next best Activity, use startNextMatchingActivity.
Intent intent = getIntent();
if (isDuringBreak)
startNextMatchingActivity(intent);
This lets you add additional conditions to your components that restrict their use beyond the ability of the Intent Filter-based intent-resolution process.
Selecting a Contact Example
In this example you'll create a new Activity that services ACTION_PICK for contact data. It displays each of the contacts in the contacts database and lets the user select one, before closing and returning the selected contact's URI to the calling Activity.
![]()
This example is somewhat contrived. Android already supplies an Intent Filter for picking a contact from a list that can be invoked by means of the content: //contacts/people/ URI in an implicit Intent. The purpose of this exercise is to demonstrate the form, even if this particular implementation isn't particularly useful.
1. Create a new ContactPicker project that includes a ContactPicker Activity:
package com.paad.contactpicker;
import android.app.Activity;
import android.content.Intent;
import android.database.Cursor;
import android.net.Uri;
import android.os.Bundle;
import android.provider.ContactsContract.Contacts;
import android.view.View;
import android.widget.AdapterView;
import android.widget.ListView;
import android.widget.SimpleCursorAdapter;
public class ContactPicker extends Activity {
@Override
public void onCreate(Bundle savedInstanceState) {
super.onCreate(savedInstanceState);
setContentView(R.layout.main);
}
}
2. Modify the main.xml layout resource to include a single ListView control. This control will be used to display the contacts.
<?xml version="1.0" encoding="utf-8"?>
<LinearLayout xmlns:android="http://schemas.android.com/apk/res/android"
android:orientation="vertical"
android:layout_width="match_parent"
android:layout_height="match_parent">
<ListView android:id="@+id/contactListView"
android:layout_width="match_parent"
android:layout_height="wrap_content"
/>
</LinearLayout>
3. Create a new listitemlayout.xml layout resource that includes a single TextView control. This control will be used to display each contact in the List View.
<?xml version="1.0" encoding="utf-8"?>
<LinearLayout xmlns:android="http://schemas.android.com/apk/res/android"
android:orientation="vertical"
android:layout_width="match_parent"
android:layout_height="match_parent"
>
<TextView
android:id="@+id/itemTextView"
android:layout_width="match_parent"
android:layout_height="wrap_content"
android:padding="10dp"
android:textSize="16dp"
android:textColor="#FFF"
/>
</LinearLayout>
4. Return to the ContactPicker Activity. Override the onCreate method.
@Override
public void onCreate(Bundle savedInstanceState) {
super.onCreate(savedInstanceState);
setContentView(R.layout.main);
4.1 Create a new Cursor to retrieve the people stored in the contact list, and bind it to the List View using a SimpleCursorArrayAdapter. Note that in this example the query is executed on the main UI thread. A better approach would be to use a Cursor Loader, as shown in Chapter 8.
final Cursor c = getContentResolver().query(
ContactsContract.Contacts.CONTENT_URI, null, null, null, null);
String[] from = new String[] { Contacts.DISPLAY_NAME_PRIMARY };
int[] to = new int[] { R.id.itemTextView };
SimpleCursorAdapter adapter = new SimpleCursorAdapter(this,
R.layout.listitemlayout,
c,
from,
to);
ListView lv = (ListView)findViewById(R.id.contactListView);
lv.setAdapter(adapter);
4.2 Add an onItemClickListener to the List View. Selecting a contact from the list should return a path to the item to the calling Activity.
lv.setOnItemClickListener(new ListView.OnItemClickListener() {
public void onItemClick(AdapterView<?> parent, View view, int pos,
long id) {
// Move the cursor to the selected item
c.moveToPosition(pos);
// Extract the row id.
int rowId = c.getInt(c.getColumnIndexOrThrow("_id"));
// Construct the result URI.
Uri outURI =
ContentUris.withAppendedId(ContactsContract.Contacts.CONTENT_URI, rowId);
Intent outData = new Intent();
outData.setData(outURI);
setResult(Activity.RESULT_OK, outData);
finish();
}
});
c. Close off the onCreate method:
}
5. Modify the application manifest and replace the intent-filter tag of the Activity to add support for the ACTION_PICK action on contact data:
<?xml version="1.0" encoding="utf-8"?>
<manifest xmlns:android="http://schemas.android.com/apk/res/android"
package="com.paad.contactpicker">
<application android:icon="@drawable/ic_launcher">
<activity android:name=".ContactPicker" android:label="@string/app_name">
<intent-filter>
<action android:name="android.intent.action.PICK"></action>
<category android:name="android.intent.category.DEFAULT"></category>
<data android:path="contacts" android:scheme="content"></data>
</intent-filter>
</activity>
</application>
</manifest>
6. This completes the sub-Activity. To test it, create a new test harness ContactPickerTester Activity. Create a new layout resource—contactpickertester.xml—that includes a TextView to display the selected contact and a Button to start the sub-Activity:
<?xml version="1.0" encoding="utf-8"?>
<LinearLayout xmlns:android="http://schemas.android.com/apk/res/android"
android:orientation="vertical"
android:layout_width="match_parent"
android:layout_height="match_parent"
>
<TextView
android:id="@+id/selected_contact_textview"
android:layout_width="match_parent"
android:layout_height="wrap_content"
/>
<Button
android:id="@+id/pick_contact_button"
android:layout_width="match_parent"
android:layout_height="wrap_content"
android:text="Pick Contact"
/>
</LinearLayout>
7. Override the onCreate method of the ContactPickerTester to add a click listener to the Button so that it implicitly starts a new sub-Activity by specifying the ACTION_PICK and the contact database URI (content://contacts/):
package com.paad.contactpicker;
import android.app.Activity;
import android.content.Intent;
import android.database.Cursor;
import android.net.Uri;
import android.os.Bundle;
import android.provider.ContactsContract;
import android.view.View;
import android.view.View.OnClickListener;
import android.widget.Button;
import android.widget.TextView;
public class ContactPickerTester extends Activity {
public static final int PICK_CONTACT = 1;
@Override
public void onCreate(Bundle savedInstanceState) {
super.onCreate(savedInstanceState);
setContentView(R.layout.contactpickertester);
Button button = (Button)findViewById(R.id.pick_contact_button);
button.setOnClickListener(new OnClickListener() {
@Override
public void onClick(View _view) {
Intent intent = new Intent(Intent.ACTION_PICK,
Uri.parse("content://contacts/"));
startActivityForResult(intent, PICK_CONTACT);
}
});
}
}
8. When the sub-Activity returns, use the result to populate the Text View with the selected contact's name:
@Override
public void onActivityResult(int reqCode, int resCode, Intent data) {
super.onActivityResult(reqCode, resCode, data);
switch(reqCode) {
case (PICK_CONTACT) : {
if (resCode == Activity.RESULT_OK) {
Uri contactData = data.getData();
Cursor c = getContentResolver().query(contactData, null, null, null, null);
c.moveToFirst();
String name = c.getString(c.getColumnIndexOrThrow(
ContactsContract.Contacts.DISPLAY_NAME_PRIMARY));
c.close();
TextView tv = (TextView)findViewById(R.id.selected_contact_textview);
tv.setText(name);
}
break;
}
default: break;
}
}
9. With your test harness complete, simply add it to your application manifest. You'll also need to add a READ_CONTACTS permission within a uses-permission tag to allow the application to access the contacts database.
<?xml version="1.0" encoding="utf-8"?>
<manifest xmlns:android="http://schemas.android.com/apk/res/android"
package="com.paad.contactpicker">
<uses-permission android:name="android.permission.READ_CONTACTS"/>
<application android:icon="@drawable/ic_launcher">
<activity android:name=".ContactPicker" android:label="@string/app_name">
<intent-filter>
<action android:name="android.intent.action.PICK"></action>
<category android:name="android.intent.category.DEFAULT"></category>
<data android:path="contacts" android:scheme="content"></data>
</intent-filter>
</activity>
<activity android:name=".ContactPickerTester"
android:label="Contact Picker Test">
<intent-filter>
<action android:name="android.intent.action.MAIN" />
<category android:name="android.intent.category.LAUNCHER" />
</intent-filter>
</activity>
</application>
</manifest>
![]()
All code snippets in this example are part of the Chapter 5 Contact Picker project, available for download at Wrox.com.
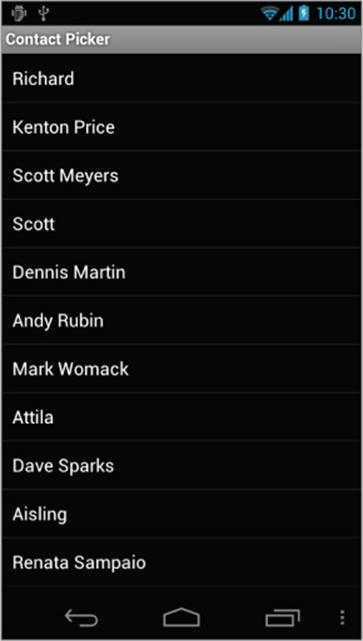
When your Activity is running, press the “pick contact” button. The contact picker Activity should appear, as shown in Figure 5.1.
Figure 5.1
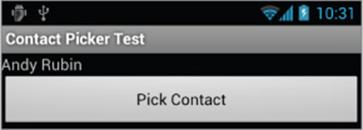
After you select a contact, the parent Activity should return to the foreground with the selected contact name displayed (see Figure 5.2).
Figure 5.2
Using Intent Filters for Plug-Ins and Extensibility
Having used Intent Filters to declare the actions your Activities can perform on different types of data, it stands to reason that applications can also query to find which actions are available to be performed on a particular piece of data.
Android provides a plug-in model that lets your applications take advantage of functionality, provided anonymously from your own or third-party application components you haven't yet conceived of, without your having to modify or recompile your projects.
Supplying Anonymous Actions to Applications
To use this mechanism to make your Activity's actions available anonymously for existing applications, publish them using intent-filter tags within their manifest nodes, as described earlier.
The Intent Filter describes the action it performs and the data upon which it can be performed. The latter will be used during the intent-resolution process to determine when this action should be available. The category tag must be either ALTERNATIVE or SELECTED_ALTERNATIVE, or both. Theandroid:label attribute should be a human-readable label that describes the action.
Listing 5.15 shows an example of an Intent Filter used to advertise an Activity's capability to nuke Moon bases from orbit.
Listing 5.15: Advertising supported Activity actions
<activity android:name=".NostromoController">
<intent-filter
android:label="@string/Nuke_From_Orbit">
<action android:name="com.pad.nostromo.NUKE_FROM_ORBIT"/>
<data android:mimeType="vnd.moonbase.cursor.item/*"/>
<category android:name="android.intent.category.ALTERNATIVE"/>
<category
android:name="android.intent.category.SELECTED_ALTERNATIVE"
/>
</intent-filter>
</activity>
code snippet PA4AD_Ch05_Intents/AndroidManifest.xml
Discovering New Actions from Third-Party Intent Receivers
Using the Package Manager, you can create an Intent that specifies a type of data and a category of action, and have the system return a list of Activities capable of performing an action on that data.
The elegance of this concept is best explained by an example. If the data your Activity displays is a list of places, you might include functionality to View them on a map or “Show directions to” each. Jump a few years ahead and you've created an application that interfaces with your car, allowing your phone to handle driving. Thanks to the runtime menu generation, when a new Intent Filter—with a DRIVE_CAR action—is included within the new Activity's node, Android will resolve this new action and make it available to your earlier application.
This provides you with the ability to retrofit functionality to your application when you create new components capable of performing actions on a given type of data. Many of Android's native applications use this functionality, enabling you to provide additional actions to native Activities.
The Intent you create will be used to resolve components with Intent Filters that supply actions for the data you specify. The Intent is being used to find actions, so don't assign it one; it should specify only the data to perform actions on. You should also specify the category of the action, eitherCATEGORY_ALTERNATIVE or CATEGORY_SELECTED_ALTERNATIVE.
The skeleton code for creating an Intent for menu-action resolution is shown here:
Intent intent = new Intent();
intent.setData(MyProvider.CONTENT_URI);
intent.addCategory(Intent.CATEGORY_ALTERNATIVE);
Pass this Intent into the Package Manager method queryIntentActivityOptions, specifying any options flags.
Listing 5.16 shows how to generate a list of actions to make available within your application.
Listing 5.16: Generating a list of possible actions to be performed on specific data
PackageManager packageManager = getPackageManager();
// Create the intent used to resolve which actions
// should appear in the menu.
Intent intent = new Intent();
intent.setData(MoonBaseProvider.CONTENT_URI);
intent.addCategory(Intent.CATEGORY_SELECTED_ALTERNATIVE);
// Specify flags. In this case, to return only filters
// with the default category.
int flags = PackageManager.MATCH_DEFAULT_ONLY;
// Generate the list
List<ResolveInfo> actions;
actions = packageManager.queryIntentActivities(intent, flags);
// Extract the list of action names
ArrayList<String> labels = new ArrayList<String>();
Resources r = getResources();
for (ResolveInfo action : actions )
labels.add(r.getString(action.labelRes));
code snippet PA4AD_Ch05_Intents/src/MyActivity.java
Incorporating Anonymous Actions as Menu Items
The most common way to incorporate actions from third-party applications is to include them within your Menu Items or Action Bar Actions.
The addIntentOptions method, available from the Menu class, lets you specify an Intent that describes the data acted upon within your Activity, as described previously; however, rather than simply returning a list of possible Receivers, a new Menu Item will be created for each, with the text populated from the matching Intent Filters' labels.
To add Menu Items to your Menus dynamically at run time, use the addIntentOptions method on the Menu object in question: Pass in an Intent that specifies the data for which you want to provide actions. Generally, this will be handled within your Activities' onCreateOptionsMenu oronCreateContextMenu handlers.
As in the previous section, the Intent you create will be used to resolve components with Intent Filters that supply actions for the data you specify. The Intent is being used to find actions, so don't assign it one; it should specify only the data to perform actions on. You should also specify the category of the action, either CATEGORY_ALTERNATIVE or CATEGORY_SELECTED_ALTERNATIVE.
The skeleton code for creating an Intent for menu-action resolution is shown here:
Intent intent = new Intent();
intent.setData(MyProvider.CONTENT_URI);
intent.addCategory(Intent.CATEGORY_ALTERNATIVE);
Pass this Intent in to addIntentOptions on the Menu you want to populate, as well as any options flags, the name of the calling class, the Menu group to use, and the Menu ID values. You can also specify an array of Intents you'd like to use to create additional Menu Items.
Listing 5.17 gives an idea of how to dynamically populate an Activity Menu.
Listing 5.17: Dynamic Menu population from advertised actions
@Override
public boolean onCreateOptionsMenu(Menu menu) {
super.onCreateOptionsMenu(menu);
// Create the intent used to resolve which actions
// should appear in the menu.
Intent intent = new Intent();
intent.setData(MoonBaseProvider.CONTENT_URI);
intent.addCategory(Intent.CATEGORY_SELECTED_ALTERNATIVE);
// Normal menu options to let you set a group and ID
// values for the menu items you're adding.
int menuGroup = 0;
int menuItemId = 0;
int menuItemOrder = Menu.NONE;
// Provide the name of the component that's calling
// the action -- generally the current Activity.
ComponentName caller = getComponentName();
// Define intents that should be added first.
Intent[] specificIntents = null;
// The menu items created from the previous Intents
// will populate this array.
MenuItem[] outSpecificItems = null;
// Set any optional flags.
int flags = Menu.FLAG_APPEND_TO_GROUP;
// Populate the menu
menu.addIntentOptions(menuGroup,
menuItemId,
menuItemOrder,
caller,
specificIntents,
intent,
flags,
outSpecificItems);
return true;
}
code snippet PA4AD_Ch05_Intents/src/MyActivity.java
Listening for Native Broadcast Intents
Many of the system Services broadcast Intents to signal changes. You can use these messages to add functionality to your own projects based on system events, such as time-zone changes, data-connection status, incoming SMS messages, or phone calls.
The following list introduces some of the native actions exposed as constants in the Intent class; these actions are used primarily to track device status changes:
· ACTION_BOOT_COMPLETED—Fired once when the device has completed its startup sequence. An application requires the RECEIVE_BOOT_COMPLETED permission to receive this broadcast.
· ACTION_CAMERA_BUTTON—Fired when the camera button is clicked.
· ACTION_DATE_CHANGED and ACTION_TIME_CHANGED—These actions are broadcast if the date or time on the device is manually changed (as opposed to changing through the inexorable progression of time).
· ACTION_MEDIA_EJECT—If the user chooses to eject the external storage media, this event is fired first. If your application is reading or writing to the external media storage, you should listen for this event to save and close any open file handles.
· ACTION_MEDIA_MOUNTED and ACTION_MEDIA_UNMOUNTED—These two events are broadcast whenever new external storage media are successfully added to or removed from the device, respectively.
· ACTION_NEW_OUTGOING_CALL—Broadcast when a new outgoing call is about to be placed. Listen for this broadcast to intercept outgoing calls. The number being dialed is stored in the EXTRA_PHONE_NUMBER extra, whereas the resultData in the returned Intent will be the number actually dialed. To register a Broadcast Receiver for this action, your application must declare the PROCESS_OUTGOING_CALLS uses-permission.
· ACTION_SCREEN_OFF and ACTION_SCREEN_ON— Broadcast when the screen turns off or on, respectively.
· ACTION_TIMEZONE_CHANGED—This action is broadcast whenever the phone's current time zone changes. The Intent includes a time-zone extra that returns the ID of the new java.util.TimeZone.
![]()
A comprehensive list of the broadcast actions used and transmitted natively by Android to notify applications of system state changes is available at http://developer.android.com/reference/android/content/Intent.html.
Android also uses Broadcast Intents to announce application-specific events, such as incoming SMS messages, changes in dock state, and battery level. The actions and Intents associated with these events will be discussed in more detail in later chapters when you learn more about the associated Services.
Monitoring Device State Changes Using Broadcast Intents
Monitoring the device state is an important part of creating efficient and dynamic applications whose behavior can change based on connectivity, battery charge state, and docking status.
Android broadcasts Intents for changes in each of these device states. The following sections examine how to create Intent Filters to register Broadcast Receivers that can react to such changes, and how to extract the device state information accordingly.
Listening for Battery Changes
To monitor changes in the battery level or charging status within an Activity, you can register a Receiver using an Intent Filter that listens for the Intent.ACTION_BATTERY_CHANGED broadcast by the Battery Manager.
The Broadcast Intent containing the current battery charge and charging status is a sticky Intent, so you can retrieve the current battery status at any time without needing to implement a Broadcast Receiver, as shown in Listing 5.18.
Listing 5.18: Determining battery and charge state information
IntentFilter batIntentFilter = new IntentFilter(Intent.ACTION_BATTERY_CHANGED);
Intent battery = context.registerReceiver(null, batIntentFilter);
int status = battery.getIntExtra(BatteryManager.EXTRA_STATUS, -1);
boolean isCharging =
status == BatteryManager.BATTERY_STATUS_CHARGING ||
status == BatteryManager.BATTERY_STATUS_FULL;
code snippet PA4AD_Ch05_Intents/src/DeviceStateActivity.java
Note that you can't register the battery changed action within a manifest Receiver; however, you can monitor connection and disconnection from a power source and a low battery level using the following action strings, each prefixed with android.intent.action:
· ACTION_BATTERY_LOW
· ACTION_BATTERY_OKAY
· ACTION_POWER_CONNECTED
· ACTION_POWER_DISCONNECTED
Listening for Connectivity Changes
Changes in connectivity, including the bandwidth, latency, and availability of an Internet connection, can be significant signals for your application. In particular, you might choose to suspend recurring updates when you lose connectivity or to delay downloads of significant size until you have a Wi-Fi connection.
To monitor changes in connectivity, register a Broadcast Receiver (either within your application or within the manifest) to listen for the android.net.conn.CONNECTIVITY_CHANGE (ConnectivityManager.CONNECTIVITY_ACTION) action.
The connectivity change broadcast isn't sticky and doesn't contain any additional information regarding the change. To extract details on the current connectivity status, you need to use the Connectivity Manager, as shown in Listing 5.19.
Listing 5.19: Determining connectivity state information
String svcName = Context.CONNECTIVITY_SERVICE;
ConnectivityManager cm = (ConnectivityManager)context.getSystemService(svcName);
NetworkInfo activeNetwork = cm.getActiveNetworkInfo();
boolean isConnected = activeNetwork.isConnectedOrConnecting();
boolean isMobile = activeNetwork.getType() ==
ConnectivityManager.TYPE_MOBILE;
code snippet PA4AD_Ch05_Intents/src/DeviceStateActivity.java
![]()
The Connectivity Manager is examined in more detail in Chapter 16, “Bluetooth, NFC, Networks, and Wi-Fi.”
Listening for Docking Changes
Android devices can be docked in either a car dock or desk dock. These, in term, can be either analog or digital docks. By registering a Receiver to listen for the Intent.ACTION_DOCK_EVENT (android.intent.action.ACTION_DOCK_EVENT), you can determine the docking status and type of dock.
Like the battery status, the dock event Broadcast Intent is sticky. Listing 5.20 shows how to extract the current docking status from the Intent returned when registering a Receiver for docking events.
Listing 5.20: Determining docking state information
IntentFilter dockIntentFilter =
new IntentFilter(Intent.ACTION_DOCK_EVENT);
Intent dock = registerReceiver(null, dockIntentFilter);
int dockState = dock.getIntExtra(Intent.EXTRA_DOCK_STATE,
Intent.EXTRA_DOCK_STATE_UNDOCKED);
boolean isDocked = dockState != Intent.EXTRA_DOCK_STATE_UNDOCKED;
code snippet PA4AD_Ch05_Intents/src/DeviceStateActivity.java
Managing Manifest Receivers at Run Time
Using the Package Manager, you can enable and disable any of your application's manifest Receivers at run time using the setComponentEnabledSetting method. You can use this technique to enable or disable any application component (including Activities and Services), but it is particularly useful for manifest Receivers.
To minimize the footprint of your application, it's good practice to disable manifest Receivers that listen for common system events (such as connectivity changes) when your application doesn't need to respond to those events. This technique also enables you to schedule an action based on a system event—such as downloading a large file when the device is connected to Wi-Fi—without gaining the overhead of having the application launch every time a connectivity change is broadcast.
Listing 5.21 shows how to enable and disable a manifest Receiver at run time.
Listing 5.21: Dynamically toggling manifest Receivers
ComponentName myReceiverName = new ComponentName(this, MyReceiver.class);
PackageManager pm = getPackageManager();
// Enable a manifest receiver
pm.setComponentEnabledSetting(myReceiverName,
PackageManager.COMPONENT_ENABLED_STATE_ENABLED,
PackageManager.DONT_KILL_APP);
// Disable a manifest receiver
pm.setComponentEnabledSetting(myReceiverName,
PackageManager.COMPONENT_ENABLED_STATE_DISABLED,
PackageManager.DONT_KILL_APP);
code snippet PA4AD_Ch05_Intents/src/DeviceStateActivity.java
All materials on the site are licensed Creative Commons Attribution-Sharealike 3.0 Unported CC BY-SA 3.0 & GNU Free Documentation License (GFDL)
If you are the copyright holder of any material contained on our site and intend to remove it, please contact our site administrator for approval.
© 2016-2026 All site design rights belong to S.Y.A.