Android Development Patterns: Best Practices for Professional Developers (2016)
Chapter 12. Multimedia
Creating an application that can display data and take user input is fine; however, applications that contain video and audio can do much more than simply provide something to look at or listen to. By adding multimedia to your application, you can draw a user in and provide another dimension for user feedback and manipulation. In this chapter, you learn how to work with audio and video within your application.
Working with Audio
Audio is an almost ever-present obligatory addition to many of the applications and system functionalities of your Android device. Most notifications have an audio cue attached to them, as do messaging and contact applications.
Within the Android system, sound playback has been implemented with a variety of support codecs. These codecs allow for container files to be played back on the device. Table 12.1 lists the supported audio codecs that you can use in your application.
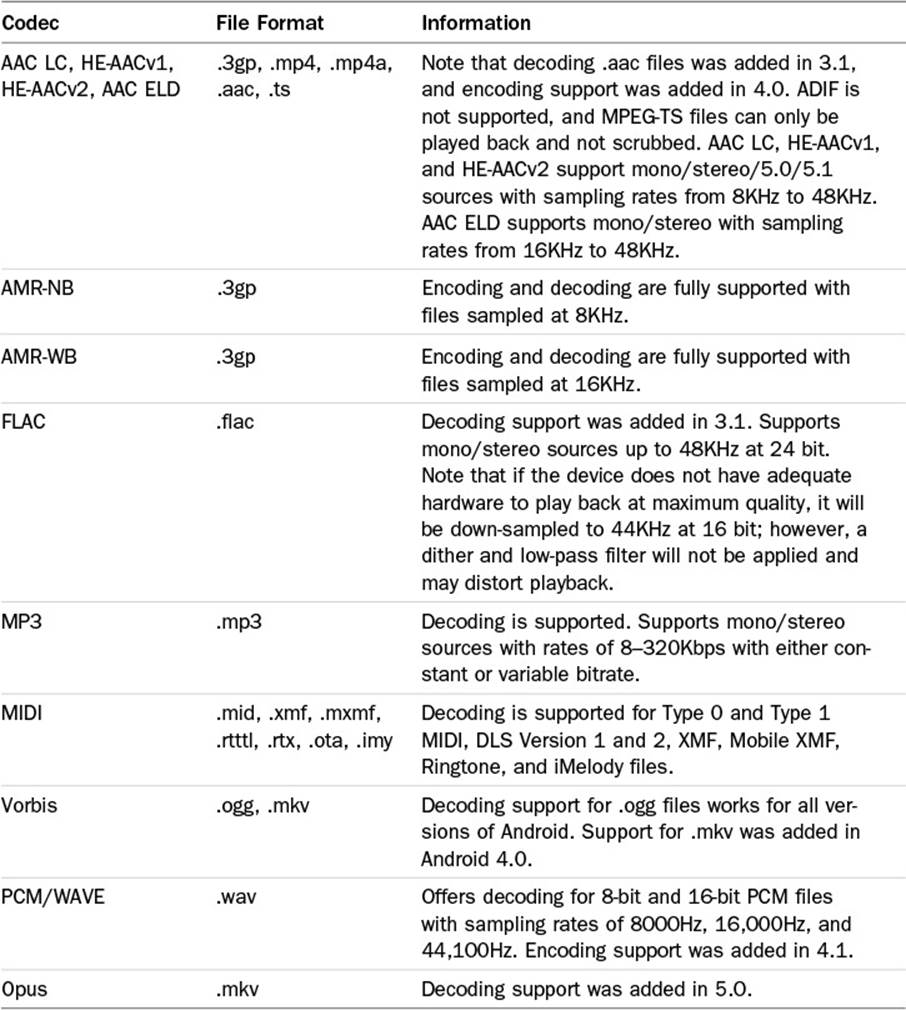
Table 12.1 Supported Audio Codecs and Containers
Audio Playback
Android has a few different ways for leveraging audio playback. One of the most common ways is to use a SoundPool. Depending on the structure and functionality of your application, MediaPlayer can also be directly used.
Starting with the first version of the Android API, the SoundPool class has been used to manage sound playback. This is done by leveraging the internal MediaPlay service and decoding audio into raw 16-bit PCM streams that can then be used in your application. SoundPool is ideal for loading short, quick sounds that are used in games, events such as taps and clicks, and sounds that provide system feedback. SoundPool is not ideal for loading large audio files such as music and soundtracks because all sounds are loaded into a small shared memory pool. Larger audio files should instead be played back using MediaPlayer. Audio that you customize with filters and effects should be processed through AudioTrack.
The upside is that this allows you to ship compressed audio files with your application, which saves you from forcing users to download an application that is mostly large audio files.
The downside to this is that the files must be decoded before they are ready for use. Depending on the size and duration of the audio source, this has the potential of adding a significant delay to the playback of the file. To best alleviate this, you should consider loading the required audio sources before they will be needed for playback. This can be done during a “loading” sequence, or in the background of the application when it is starting.
As per current application design patterns, a splash screen should be shown to reinforce branding and also to load resources that will be needed by the application. If your application has only one “loading” screen, this is a suitable place for preparing audio streams.
You may also be worried about resource management because loading a soundtrack, sound effects, and other audio cues may quickly overtake the available system resources. This is a valid concern and one that you do have some control over. When using SoundPool, you can designate the maximum number of samples that can be active at a given time. This limit can be further tweaked with a priority setting so that the essential audio streams will not be discarded when too many samples are requested.
To use SoundPool, you need to declare the variable as well the samples you want to use. This is done as follows:
private SoundPool mSoundPool;
int sound1 = 0;
int sound2 = 0;
int sound3 = 0;
Note
To help eliminate bottlenecks in processing audio, starting with API 21 rigid design patterns are enforced. Because of this, you must either create two blocks of code to execute the proper block based on the version of Android running on the device, or create restricted applications that will only work for targeted versions of Android.
Due to the difference in the internals of media players starting with Lollipop (API 21), you need to do the following if you plan on supporting multiple versions of Android:
// For KitKat 4.4.4 and below,
// the warning is suppressed so you can support current versions of Android
@SuppressWarnings("deprecation")
protected void legacySoundPool() {
// change values as needed
mSoundPool = new SoundPool(6, AudioManager.STREAM_MUSIC, 0);
}
// Starting with API 21, you must use the builder pattern to achieve
// proper performance of SoundPool
@TargetApi(Build.VERSION_CODES.LOLLIPOP)
protected void builderSoundPool() {
// change values as needed
AudioAttributes attributes = new AudioAttributes.Builder()
.setUsage(AudioAttributes.USAGE_GAME)
.setContentType(AudioAttributes.CONTENT_TYPE_MUSIC)
.build();
mSoundPool = new
SoundPool.Builder().setAudioAttributes(attributes).setMaxStreams(6).build();
}
// Now that methods have been created to handle both pre and post API 21
// The proper method can be called when you need to use SoundPool
if (Build.VERSION.SDK_INT >= Build.VERSION_CODES.LOLLIPOP) {
builderSoundPool();
} else{
legacySoundPool();
}
In this code block, two methods were created to help get around various player issues as well as to initialize the SoundPool. In the legacySoundPool() method, SoundPool is used as a constructor. The SoundPool constructor takes several arguments.
The first argument is the maximum number of audio streams that will play simultaneously. The second argument is the type of audio that will be streamed. This value is used to make some internal optimizations for how the audio is handled within the AudioManager. A value ofSTREAM_MUSIC is the most common and is suitable for gaming applications. The third argument is more of a placeholder that is used to adjust the quality of the audio sample.
When using a builder to invoke SoundPool, you need to use AudioAttributes and helper methods to set the values you want to use with the SoundPool by chaining them together. This is seen in the preceding code block as the .setUsage() and .setContentType()methods for the AudioAttributes, and using setAudioAttributes() and setMaxStreams() to set the attributes and values needed for the SoundPool.
After a SoundPool object is ready for use, you need to use a try-catch block to set up your audio assets and load them into the sound pool. The following shows a sample block for loading an audio asset:
builderSoundPool();
try {
AssetManager assetManager = getAssets();
AssetFileDescriptor descriptor;
// open the sound asset, then load it into the SoundPool
descriptor = assetManager.openFd("pewpew.mp3");
sound1 = soundPool.load(descriptor, 0);
} catch(IOException e) {
// You need to put your error handling logic here
}
After an asset is successfully loaded into the SoundPool using the load() method, you can call that asset to play with the play() method. This method takes several arguments:
![]() The first argument is the soundID, which is returned from the load() method.
The first argument is the soundID, which is returned from the load() method.
![]() The second argument is leftVolume, which changes how loud the playback will be on the left channel (the range is from 0.0 to 1.0).
The second argument is leftVolume, which changes how loud the playback will be on the left channel (the range is from 0.0 to 1.0).
![]() The third argument is rightVolume, which changes how loud the playback will be on the right channel (the range is from 0.0 to 1.0).
The third argument is rightVolume, which changes how loud the playback will be on the right channel (the range is from 0.0 to 1.0).
![]() The fourth argument is the priority, which is used to determine if the sound should be stopped based on the maximum number of simultaneous audio streams that can be played back (note that 0 is the lowest priority).
The fourth argument is the priority, which is used to determine if the sound should be stopped based on the maximum number of simultaneous audio streams that can be played back (note that 0 is the lowest priority).
![]() The fifth argument is used to determine if the audio stream is a one-shot or loop; using any number greater than or equal to 0 will end playback at the end of the file, whereas a value of -1 will play the sound as a loop.
The fifth argument is used to determine if the audio stream is a one-shot or loop; using any number greater than or equal to 0 will end playback at the end of the file, whereas a value of -1 will play the sound as a loop.
![]() The sixth argument is used to determine the playback rate of the audio file; a value of 0.5 will play back at half-rate, whereas a value of 2 will play back at twice the default rate.
The sixth argument is used to determine the playback rate of the audio file; a value of 0.5 will play back at half-rate, whereas a value of 2 will play back at twice the default rate.
The following is an example of playing audio back with the play() method:
mSoundPool.play(sound1, 1, 1, 0, 0, 1);
If you need to stop a sound that is playing, do so by using the stop() method and passing the soundID of the item you want to stop playing. The following shows an example of stopping sound1 from playing:
mSoundPool.stop(sound1);
Tip
To effectively use a SoundPool, consider creating “sound packs” that can be loaded for a specific Activity and then released when the Activity is closed or destroyed. This can be done by calling mSoundPlayer.release(). When the release method is called, all loaded audio samples as well as any used memory are released. This allows you to create an application that minimizes load time and will have the right sounds ready when the user needs them.
Now that you know how to play audio files, it is time to learn about how to capture or record them.
Audio Recording
Audio can be recorded or captured through the use of the MediaRecorder class. This API is used to perform the necessary steps to record audio to your device.
Note
The Android emulator is a useful tool; however, it does not contain the ability to allow you to test the recording behavior of an actual device. When adding an audio-capture feature to your application, you need to test with a real device.
To record audio, do the following:
1. Initialize the recorder.
2. Set the audio source via setAudioSource().
3. Set the output format via setOutputFormat().
4. Set the encoder to use via setAudioEncoder().
5. Set the file output via setOutputFile().
6. Ready the device to record via prepare().
7. Start the recording via start().
8. End the recording via stop().
9. Either reuse the object with reset() or release the object with release().
In practice, this would appear as follows in your application logic:
MediaRecorder mRecorder = new MediaRecorder();
// use the device microphone
mRecorder.setAudioSource(MediaRecorder.AudioSource.MIC);
mRecorder.setOutputFormat(MediaRecorder.OutputFormat.THREE_GPP);
mRecorder.setAudioEncoder(MediaRecorder.AudioEncoder.AMR_NB);
// replace OUTPUT_LOCATION with the proper filesystem path or variable
mRecoder.setOutputFile(OUTPUT_LOCATION);
try {
mRecoder.prepare();
} catch (IllegalStateException e) {
// handle the error here
} catch (IOException e) {
// handle the error here
}
try {
mRecorder.start();
} catch (IllegalStateException e) {
// handle the error here
}
try {
// use a button, timer, or other method to call the following:
mRecoder.stop();
} catch (IllegalStateException e) {
// handle the error here
}
// If you want to use the same MediaRecoder object use this
mRecorder.reset();
// If you want to discard the MediaRecoder object use this
mRecorder.release();
mRecoder = null;
Playing the recording back can be done via the MediaPlayer class. MediaPlayer can be used to play back not only audio files but also video files. MediaPlayer needs to be initialized and then pointed to the file to play; it then uses the prepare() and start() methods to begin playback.
The following two methods demonstrate how you can start and stop playback of audio files:
private void startPlayback() {
mPlayer = new MediaPlayer();
try {
// change FILETOPLAY to the path and file that you want to playback
mPlayer.setDataSource(FILETOPLAY);
// already in a try/catch block, no need to wrap prepare() in another
mPlayer.prepare();
mPlayer.start();
} catch (IllegalStateException e) {
// handle the error here
} catch (IOException e) {
// handle the error here
}
}
private void stopPlayback() {
mPlayer.release();
mPlayer = null;
}
Now that you understand how audio works with Android, let’s look at how video works.
Working with Video
Similar to how Android supports a wide variety of audio formats and codecs, it also supports a variety of video containers and codecs. Table 12.2 lists the supported video formats.
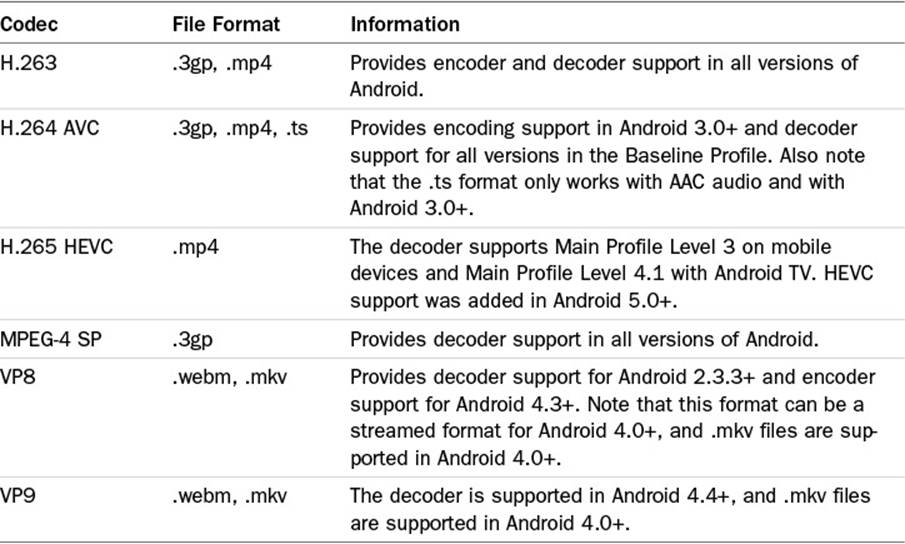
Table 12.2 Supported Video Codecs and Containers
Video Playback
Video files can be played back in a variety of different ways, including using the MediaPlayer class. However, there is a View that specifically exists for playing back video files.
Unlike audio files, video needs access to the screen. This means that you either need to use a VideoView or SurfaceView. Note that, depending on what your application does, you may find it easier to work with a VideoView.
When using a VideoView, note that if the Activity is moved into the background, the View will not retain state automatically. This means that you need to pause and save the playback state on pause and restore the video on resume of the Activity.
Adding a VideoView can be as simple as dragging and dropping it from the Design view of Android Studio into your layout. Alternatively, you can add the following XML to your layout XML file:
<VideoView
android:id="@+id/myVideoView"
android:layout_width="match_parent"
android:layout_height="match_parent"
android:layout_centerInParent="true" />
Now that you have the VideoView added to your layout, you will want to play a video in it. To work with a remote or streaming video, you need to create a URI for it. This can be done as follows:
// change the value to an actual video, this is only an example
String videoAddress = "https://video.website.com/video.mp4";
Uri videoURI = Uri.parse(videoAddress);
For applications that will be streaming video files, you need to add the INTERNET permission to your application manifest. As a reminder, this is done by adding the following permission to your application manifest XML:
<uses-permission android:name="android.permission.INTERNET" />
The video can then be programmatically attached to the VideoView by referencing the ViewView and using the setVideoURI() method. This is shown as follows:
VideoView myVideoView = (VideoView)findViewById(R.id.myVideoView);
myVideoView.setVideoURI(videoURI);
If you only wanted to play a video without user interaction, you could finish here by using the start() method on the VideoView object. However, if you want to add scrubbing and other controls, you can use the MediaController class with your VideoView. This is done by creating a MediaController object, anchoring it to the VideoView, and then setting the MediaController object to the VideoView, as follows:
MediaController myMediaController = new MediaController(this);
myMediaController.setAnchorView(myVideoView);
MyViewView.setMediaController(myMediaController);
If you want to use the MediaPlayer class rather than the VideoView, you will need to use a SurfaceView. The SurfaceView is a special view that is used as a canvas to be drawn on. Because video playback involves multiple frames being drawn, the SurfaceView is used as the screen to draw the frames on.
Adding a SurfaceView to your application is done in one of two ways: You can use the Design mode in Android Studio and then drag and drop the SurfaceView into your layout, or you can add the following code to your layout XML file:
<SurfaceView
android:id="@+id/mySurfaceView"
android:layout_width="match_parent"
android:layout_height="match_parent" />
In your Activity class, you need to implement SurfaceHolder.Callback and MediaPlayer.OnPreparedListener. The following shows a sample of how your main Activity might look:
public class MainActivity extends Activity
implements SurfaceHolder.Callback, OnPreparedListener {
// your activity code
}
When you add the required implementations, Android Studio should automatically generate some method stubs for you. If it doesn’t, add the following to your Activity:
@Override
public void surfaceChanged(SurfaceHolder arg0, int arg1, int arg2, int arg3) {
// TODO Auto-generated method stub
}
@Override
public void surfaceCreated(SurfaceHolder arg0) {
// MediaPlayer code will go in this method
}
@Override
public void surfaceDestroyed(SurfaceHolder arg0) {
// TODO Auto-generated method stub
}
@Override
public void onPrepared(MediaPlayer mp) {
// MediaPlayer start method should be called here
}
The next step is to create a few variables, set them, set up the MediaPlayer, and then start the player. The following shows an example of this:
// create variables
private MediaPlayer mPlayer;
private SufaceHolder mSurfaceHolder;
private SurfaceView mSurfaceView;
String videoAddress = "https://video.website.com/video.mp4";
// other code in your activity...
@Override
protected void onCreate(Bundle savedInstanceState) {
// onCreate code...
mSurfaceView = (SurfaceView) findViewById(R.id.mySurfaceView);
mSurfaceHolder = mSurfaceView.getHolder();
mSurfaceHolder.addCallback(this);
}
// other code in your activity...
@Override
public void surfaceCreated(SurfaceHolder arg0) {
// Remember to handle the setup of the MediaPlayer for the version
// of Android that you are targeting, make changes as needed
try {
mPlayer = new MediaPlayer();
mPlayer.setDisplay(mSurfaceHolder);
mPlayer.setDataSource(videoAddress);
mPlayer.prepare();
mPlayer.setOnPreparedListener(this);
mPlayer.setAudioStreamType(AudioManager.STREAM_MUSIC);
} catch (Exception e) {
// handle the exception
}
}
// other code in your activity...
@Override
public void onPrepared(MediaPlayer mp) {
mPlayer.start();
}
In the preceding example, note the comments to help you place the code in the proper location in your application. When working with MediaPlayer, remember to use the builder pattern when working with API 21+.
You should also consider using a service to prepare playback for video and audio files to keep any potential sluggishness and ANR errors from wrecking your application.
Summary
In this chapter, you learned that Android has wide support for many types of media files. You learned that audio files can be bundled in your application as sound effects. You learned that these files can be included in a compressed format to save device space and then be processed into memory for playback.
You learned that there is a limit to how many files can be played simultaneously and that files loaded into memory can be bundled into sound packs that can be loaded when needed and released when finished to clear out used system resources.
You also learned that Android has broad support for video containers and codecs. Some video files, such as VP9 and WebM, offer better compression and quality than other files but are only supported in newer versions of Android.
Lastly, you learned that video files can be played back with a VideoView. You were shown how to include a VideoView and then use it in conjunction with a MediaController to add controls such as a play/pause button as well as a scrubbing bar. You also learned that videos can leverage the MediaPlayer class and be played back on a SurfaceView, and you were shown the basic setup of doing this in an Activity.
All materials on the site are licensed Creative Commons Attribution-Sharealike 3.0 Unported CC BY-SA 3.0 & GNU Free Documentation License (GFDL)
If you are the copyright holder of any material contained on our site and intend to remove it, please contact our site administrator for approval.
© 2016-2026 All site design rights belong to S.Y.A.