Android Development Patterns: Best Practices for Professional Developers (2016)
Chapter 11. Working with Location Data
Many applications may benefit from adding support or processing location data. There are many examples of how location can be used and why it is important. In this chapter, you learn ways to access and use user location data.
At first glance, it may seem simple to work with location data. Most Android devices contain a GPS or similar sensor, so it may be easy to believe that by simply turning this sensor on you should have access to the data you want.
This, however, is not the case. A user may not wish to turn on their device sensors because it diminishes battery life and may not return a perceivable benefit. Some users may also not want their exact movements and locations recorded and will turn off all location services and providers.
This is not the end of the road, though, because Android offers several options to work with location data. Depending on the data you will be working with, you need permissions for your application to access sensor data.
Permissions
Due to the sensitivity of working with location data, a permission request needs to be added to your application. You can request the use of either a coarse or fine location.
The ACCESS_COARSE_LOCATION permission does not use the GPS sensor data and returns a location that is accurate to within about one city block. This information is distilled through cell-tower and Wi-Fi data from the device.
For many applications, this is an acceptable amount of location data because enough information will be returned to be used to display information relevant to the user’s city or area.
Adding this permission is the same as adding other permissions into your application manifest:
<uses-permission android:name="android.permission.ACCESS_COARSE_LOCATION"/>
Applications that serve current weather conditions or city- or area-specific advertisements would benefit from this type of location data. In each of these application types, the precise location of a user is not necessarily needed.
Note
If you are using an advertisement service in your application, you should review their requirements because some advertisers require the precise or fine location of a user in order to comply with their terms of service. If you want to extend battery life and not require the use of GPS information, you may want to find another advertising service.
To turn things up a notch and acquire the precise location of a user by use of GPS or similar sensor data as well as the passive location provider, you can use the ACCESS_FINE_LOCATION:
<uses-permission android:name="android.permission.ACCESS_FINE_LOCATION"/>
To demonstrate the difference in how these locations are reported, a simple application can be built that gets the device location and displays it when the buttons are pressed. This can be built using an Activity, a service, and a layout, as well as by adding permissions to the application manifest. Listing 11.1 shows the contents of the Activity for the application.
Listing 11.1 Contents ofMainActivity.java
package com.dutsonpa.mylocation;
import android.app.AlertDialog;
import android.content.DialogInterface;
import android.content.Intent;
import android.location.Location;
import android.location.LocationManager;
import android.os.Bundle;
import android.provider.Settings;
import android.support.v7.app.AppCompatActivity;
import android.view.Menu;
import android.view.MenuItem;
import android.view.View;
import android.widget.Button;
import android.widget.TextView;
import android.widget.Toast;
public class MainActivity extends AppCompatActivity {
Button buttonFineLocation;
Button buttonCoarseLocation;
MyLocationService myLocationService;
TextView textViewResults;
@Override
protected void onCreate(Bundle savedInstanceState) {
super.onCreate(savedInstanceState);
setContentView(R.layout.activity_main);
textViewResults = (TextView)findViewById(R.id.textViewResults);
// use a service for location to avoid blocking the UI thread
myLocationService = new MyLocationService(MainActivity.this);
// set up GPS button click
buttonFineLocation = (Button) findViewById(R.id.buttonFineLocation);
buttonFineLocation.setOnClickListener(new View.OnClickListener() {
@Override
public void onClick(View v) {
Location fineLocation =
myLocationService.getLocation(LocationManager.GPS_PROVIDER);
if (fineLocation != null) {
double latitude = fineLocation.getLatitude();
double longitude = fineLocation.getLongitude();
textViewResults.setText("GPS: \nLatitude: " + latitude
+ "\nLongitude: " + longitude);
} else {
// The GPS is not currently enabled, the user needs to enable it
showProviderDialog("GPS");
textViewResults.setText("Please enable the GPS to receive location");
}
}
});
// set up Network Provider button click
buttonCoarseLocation = (Button) findViewById(R.id.buttonCoarseLocation);
buttonCoarseLocation.setOnClickListener(new View.OnClickListener() {
@Override
public void onClick(View v) {
// get the location from the service
Location coarseLocation = myLocationService
.getLocation(LocationManager.NETWORK_PROVIDER);
if (coarseLocation != null) {
double latitude = coarseLocation.getLatitude();
double longitude = coarseLocation.getLongitude();
textViewResults.setText("Network Provided: \nLatitude: " + latitude
+ "\nLongitude: " + longitude);
} else {
// There is not network provider, the user needs to enable it
showProviderDialog("NETWORK");
textViewResults.setText("Please enable WiFi to receive location");
}
}
});
}
public void showProviderDialog(String provider) {
// Build an AlertDialog
AlertDialog.Builder alertDialogBuilder = new AlertDialog.Builder(this)
.setTitle(provider + " SETTINGS")
.setMessage(provider
+ " is not enabled. Would you like to enable it in the settings menu?")
.setPositiveButton("Settings",
new DialogInterface.OnClickListener() {
public void onClick(DialogInterface dialog, int which) {
Intent intent = new Intent(
Settings.ACTION_LOCATION_SOURCE_SETTINGS);
MainActivity.this.startActivity(intent);
}
})
.setNegativeButton("Cancel",
new DialogInterface.OnClickListener() {
public void onClick(DialogInterface dialog, int which) {
dialog.cancel();
}
});
// Show the AlertDialog
AlertDialog alertDialog = alertDialogBuilder.show();
}
@Override
public boolean onCreateOptionsMenu(Menu menu) {
// Inflate the menu; this adds items to the action bar if it is present.
getMenuInflater().inflate(R.menu.menu_main, menu);
return true;
}
@Override
public boolean onOptionsItemSelected(MenuItem item) {
// Handle action bar item clicks here. The action bar will
// automatically handle clicks on the Home/Up button, so long
// as you specify a parent activity in AndroidManifest.xml.
int id = item.getItemId();
//noinspection SimplifiableIfStatement
if (id == R.id.action_settings) {
return true;
}
return super.onOptionsItemSelected(item);
}
}
Stepping through the Activity, you will find that it contains the definition for two buttons: the service that will be used to get the location, and a TextView definition. The onCreate() method sets the layout to be used and then sets the value for the TextView. The service is also defined, and the Activity is passed as the context that is needed by the service. This service is used to prevent blocking on the UI thread and needs to be used in order to avoid Application Not Responding errors and exceptions.
The click events for the buttons are then defined. Each one contains a check to see if a location is available from either the GPS or the network provider. When a location exists, the latitude and longitude are set as double values and then inserted into the TextView on the page.
If the location is not available, the showProviderDialog() method is called and it passes a String of either GPS or NETWORK. This method uses a builder pattern to assemble an AlertDialog. This pattern is used to set all the elements of the AlertDialog before it is then displayed via an AlertDialog variable that’s set equal to alertDialogBuild.show().
Using an AlertDialog allows you to inform the user of sensor status and allows them an opportunity to get to the device settings to enable data to be collected. Because the alert dialog contains a “positive” button and a “negative” button, users can choose to cancel the operation if they do not want to enable the location sensors.
Figure 11.1 shows an alert dialog displayed onscreen when the device does not have any network data available.
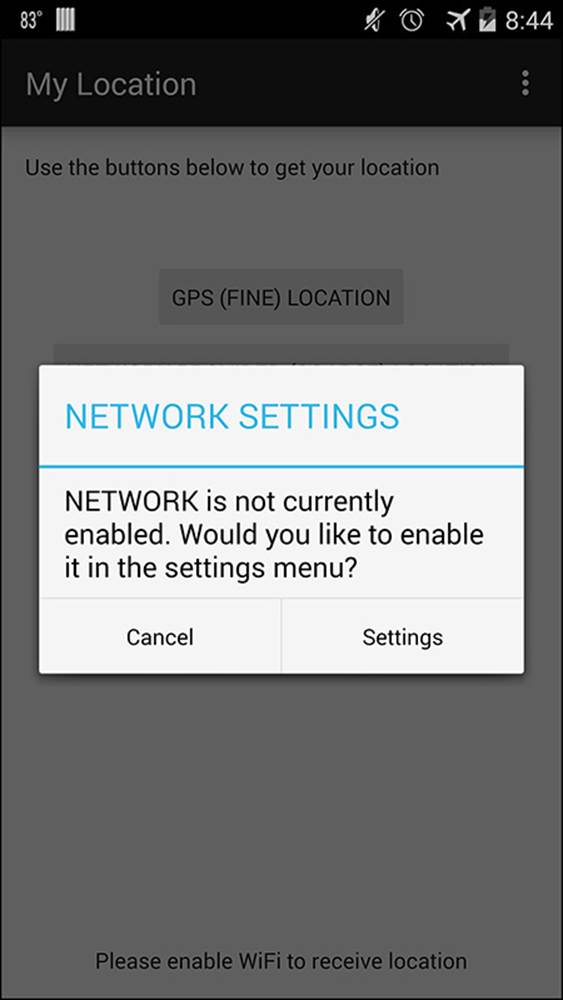
Figure 11.1 By clicking the Settings button, the user is taken to the location-sharing settings of the device.
Note
You cannot directly turn on the GPS with your application. This would violate the trust and security your application has with the user. You can detect if the GPS is disabled and allow the user to turn it on through the system settings. This gives the end user the comfort of controlling when applications are reporting location data.
Listing 11.2 shows the contents of the service that is referenced from the main activity.
Listing 11.2 Contents ofMyLocationService.java
package com.dutsonpa.mylocation;
import android.app.Service;
import android.content.Context;
import android.content.Intent;
import android.location.Location;
import android.location.LocationListener;
import android.location.LocationManager;
import android.os.Bundle;
import android.os.IBinder;
public class MyLocationService extends Service implements LocationListener {
protected LocationManager locationManager;
Location location;
// create a distance value in meters to use for update frequency
private static final long UPDATE_DISTANCE_FILTER = 10;
// create a 2 minute time value for use as update frequency
private static final long UPDATE_MIN_FREQUENCY = 1000 * 60 * 2;
/*
* Note that using a value of "0" for the variables above will request
* updates as often as the device can provide, however this will require
* much more battery usage, avoid using "0" if possible
*/
public MyLocationService(Context context) {
locationManager = (LocationManager)
context.getSystemService(LOCATION_SERVICE);
}
// create a getter for location
public Location getLocation(String provider) {
// Is a location provider enabled?
if (locationManager.isProviderEnabled(provider)){
locationManager.requestLocationUpdates(provider, UPDATE_MIN_FREQUENCY,
UPDATE_DISTANCE_FILTER, this);
// Has it been 2 minutes or moved 10 meters?
if (locationManager != null){
// There is a provider and it is time to send a location update
location = locationManager.getLastKnownLocation(provider);
return location;
}
}
// Location provider is not enabled, return null
return null;
}
@Override
public IBinder onBind(Intent intent) {
return null;
}
@Override
public void onLocationChanged(Location location) {
// specific logic for location change
}
@Override
public void onStatusChanged(String provider, int status, Bundle extras) {
// specific logic for a status change
}
@Override
public void onProviderEnabled(String provider) {
// specific logic for a provider being enabled
}
@Override
public void onProviderDisabled(String provider) {
// specific logic for a provider being disabled
}
}
Starting with the class declaration, you can see that LocationListener is implemented. This is an interface that allows the location information to be updated. It contains four public methods that you can use for performing specific logic during the lifecycle of location management. In this example, these public classes are not used but are shown with an @Override notation and a comment within that explains what each does.
The LocationManager is defined that is used to manage what location provider is available as well as to manage the frequency of the updates. Location is also defined as an object, so that location data can be set and passed through the service.
A method named MyLocationService is defined that requires a context passed to it. In turn, it sets the value for the LocationManager object so that it has a properly defined context.
The getLocation() method is the “getter” method that does most of the lifting in this service. It starts out by checking for an enabled location provider. If a location is not found, the method will return a null value. When a location provider exists, you can use therequestLocationUpdates() method by providing the provider being used, the update time frequency, the updated distance frequency, and this, which refers to the LocationListener implemented in this class.
When an update is found, the locationManager is populated and then set to use the getLastKnownLocation() method. This method will populate the location with longitude and latitude data for the last known location from the device.
Now that the service has been created, you will need to make sure you have set up proper permissions in your application manifest. Due to this application using the GPS for location data, you will need to use ACCESS_FINE_LOCATION.
Note
By using ACCESS_FINE_LOCATION, you are using a greater permission request than ACCESS_COARSE_LOCATION. Because of this, you do not need to include both permissions because the coarse location permission is implied.
The layout for the application contains a RelativeLayout with two TextViews and two Buttons. Listing 11.3 shows the contents of the layout used in the application.
Listing 11.3 Contents ofactivity_main.xml
<RelativeLayout xmlns:android="http://schemas.android.com/apk/res/android"
xmlns:tools="http://schemas.android.com/tools"
android:layout_width="match_parent"
android:layout_height="match_parent"
android:paddingLeft="@dimen/activity_horizontal_margin"
android:paddingRight="@dimen/activity_horizontal_margin"
android:paddingTop="@dimen/activity_vertical_margin"
android:paddingBottom="@dimen/activity_vertical_margin" tools:context=".
MainActivity">
<TextView android:text="@string/hello_world"
android:layout_width="wrap_content"
android:layout_height="wrap_content"
android:id="@+id/textView" />
<Button
android:layout_width="wrap_content"
android:layout_height="wrap_content"
android:text="GPS (FINE) Location"
android:id="@+id/buttonFineLocation"
android:layout_marginTop="50dp"
android:layout_below="@+id/textView"
android:layout_centerHorizontal="true" />
<Button
android:layout_width="wrap_content"
android:layout_height="wrap_content"
android:text="Network Provided (COARSE) Location"
android:id="@+id/buttonCoarseLocation"
android:layout_below="@+id/buttonFineLocation"
android:layout_centerHorizontal="true" />
<TextView
android:layout_width="wrap_content"
android:layout_height="wrap_content"
android:text="Location Data will appear here"
android:id="@+id/textViewResults"
android:layout_alignParentBottom="true"
android:layout_centerHorizontal="true" />
</RelativeLayout>
In the layout XML, you can see that the IDs have been set that are referenced and used in the main activity. You should also notice that some values have been hard-coded rather than using the traditional strings.xml file. There is an example in the first TextView of using thestrings.xml file, and this should be followed in all your applications. The hard-coded values in the other TextView as well as both Buttons are displayed for ease of reading and understanding this example.
Google Play Services Locations API
In the previous example, the android.location package was used to demonstrate working with fine and coarse location data. This package is still a viable option; however, Google strongly recommends converting all existing applications and writing all new applications using the Locations API.
One of the major benefits of using the Locations API is that you give Google the responsibility of managing compatibility and thus allow it to push updates that will not require you to rewrite your code in order to take advantage of new optimizations.
A practical benefit of using the Locations API is the Fused Location Provider. This provider uses some clever algorithms to determine an accurate guess of where a user is with minimal impact to battery life, allowing you a much finer control of location awareness while also extending the amount of time the device can remain powered and functional. It also allows you to set some parameters manually to increase or decrease precision and frequency of location data when you need it.
Note
Using Google Play Services requires the device running your app to be running at least Android 2.3 and have access to the Google Play Store. Some builds of Android may not be compatible, including popular third-party custom ROMs and some devices that are based on Android but choose not to include Google Play Services and applications.
Working with Google Play Services is covered in depth in Chapter 15, “Google Play Services.” However, Listing 11.4 shows an activity that uses the Locations API to retrieve the current location.
Listing 11.4 Activity Using the Locations API
package com.dutsonpa.locationsapi;
import android.app.Activity;
import android.content.DialogInterface;
import android.content.DialogInterface.OnCancelListener;
import android.content.Intent;
import android.content.IntentSender.SendIntentException;
import android.location.Location;
import android.os.Bundle;
import android.util.Log;
import android.widget.TextView;
import android.widget.Toast;
import com.google.android.gms.common.ConnectionResult;
import com.google.android.gms.common.GooglePlayServicesUtil;
import com.google.android.gms.common.api.GoogleApiClient;
import com.google.android.gms.location.LocationServices;
public class GooglePlayServicesActivity extends Activity implements
GoogleApiClient.ConnectionCallbacks,
GoogleApiClient.OnConnectionFailedListener {
private static final String TAG = "GooglePlayServicesActiv";
private static final String KEY_IN_RESOLUTION = "is_in_resolution";
protected static final int REQUEST_CODE_RESOLUTION = 1;
private GoogleApiClient mGoogleApiClient;
private boolean mIsInResolution;
/** Set variables other variables **/
protected Location myLastLocation;
protected TextView myTextView;
@Override
protected void onCreate(Bundle savedInstanceState) {
super.onCreate(savedInstanceState);
if (savedInstanceState != null) {
mIsInResolution = savedInstanceState.getBoolean(KEY_IN_RESOLUTION, false);
}
setContentView(R.layout.activity_google_play_services);
myTextView = (TextView) findViewById(R.id.textView);
}
@Override
protected void onStart() {
super.onStart();
if (mGoogleApiClient == null) {
mGoogleApiClient = new GoogleApiClient.Builder(this)
// Notice the addApi(LocationServices.API) added below
.addConnectionCallbacks(this)
.addOnConnectionFailedListener(this)
.addApi(LocationServices.API)
.build();
}
mGoogleApiClient.connect();
}
@Override
protected void onStop() {
if (mGoogleApiClient != null) {
mGoogleApiClient.disconnect();
}
super.onStop();
}
@Override
protected void onSaveInstanceState(Bundle outState) {
super.onSaveInstanceState(outState);
outState.putBoolean(KEY_IN_RESOLUTION, mIsInResolution);
}
@Override
protected void onActivityResult(int requestCode, int resultCode, Intent data) {
super.onActivityResult(requestCode, resultCode, data);
switch (requestCode) {
case REQUEST_CODE_RESOLUTION:
retryConnecting();
break;
}
}
private void retryConnecting() {
mIsInResolution = false;
if (!mGoogleApiClient.isConnecting()) {
mGoogleApiClient.connect();
}
}
@Override
public void onConnected(Bundle connectionHint) {
Log.i(TAG, "GoogleApiClient connected");
// create a location object by using the Location API
myLastLocation =
LocationServices.FusedLocationApi.getLastLocation(mGoogleApiClient);
if (myLastLocation != null) {
myTextView.setText("Latitude: "+ myLastLocation.getLatitude()
+ "\nLongitude: " + myLastLocation.getLongitude());
} else {
Toast.makeText(this, "Location data not available",
Toast.LENGTH_LONG).show();
}
}
@Override
public void onConnectionSuspended(int cause) {
Log.i(TAG, "GoogleApiClient connection suspended");
retryConnecting();
}
@Override
public void onConnectionFailed(ConnectionResult result) {
Log.i(TAG, "GoogleApiClient connection failed: " + result.toString());
if (!result.hasResolution()) {
GooglePlayServicesUtil.getErrorDialog(
result.getErrorCode(), this, 0, new OnCancelListener() {
@Override
public void onCancel(DialogInterface dialog) {
retryConnecting();
}
}).show();
return;
}
if (mIsInResolution) {
return;
}
mIsInResolution = true;
try {
result.startResolutionForResult(this, REQUEST_CODE_RESOLUTION);
} catch (SendIntentException e) {
Log.e(TAG, "Exception while starting resolution activity", e);
retryConnecting();
}
}
}
When using the Google Play Services, you must build an API client that will manage your connection to the Google Play Services. This also means that some of the Activity lifecycle must be managed to help keep state between the API client and the device.
For example, the onStop() method is used to disconnect the API client as soon as the activity becomes invisible. When the activity is started, the client is reconnected if it still exists, or re-created if it had been destroyed.
During the creation in the onStart() method, the methods that you want to use are initialized. This is noted in the code example as the addApi(LocationServices.API) portion of code used to build the mGoogleApiClient object.
Because most of the code is related to working with Google Services, the other point I draw your attention to is the onConnected() method. In this method, you can see that when the client has been connected, the myLastLocation object is set to contain the location of the device. This is done by using getLastLocation(), which is part of the FusedLocationApi method within the Location API.
The FusedLocationApi is the Fused Location Provider, and it uses any location data that it currently has to make a best guess on the current location of the device. Depending on the resolution or accuracy level being used by the app, or other apps using the Location API, this may be accurate to within a few feet for a fine level or accuracy, or a city block (roughly 100 meters) if coarse location data is being used.
Using the Location API to get location updates can be done by creating a LocationRequest object and then setting the update frequency and accuracy that you want to use. The following snippet shows a method that is used to create a location request update:
protected void createLocationRequest() {
myLocationRequest = new LocationRequest();
// set the length of update requests
myLocationRequest.setInterval(UPDATE_INTERVAL_IN_MILLISECONDS);
// set a maximum of how often an update can be requested
myLocationRequest.setFastestInterval(FASTEST_UPDATE_INTERVAL_IN_MILLISECONDS);
// set the accuracy of the requested location
myLocationRequest.setPriority(LocationRequest.PRIORITY_HIGH_ACCURACY);
}
In this example, you can see that a LocationRequest is created and then has properties set that will influence how often it is updated and how accurate it should be. Even with some of these values set, you should be aware that they may not run at the time you want them. ThesetInterval() will set a request up; however, if another app is also running and using the Location API with a faster interval, your application will receive faster updates than you may set here.
To get around this timing issue, the setFastestInterval method is used to specify a maximum amount of updates your application can handle. This can be helpful to you because you may be using some processor time to draw updates to a map or to update various aspects of your UI. If you are constantly having to run logic to handle an update, you could experience screen flicker or application jank.
The setPriority() method allows you to control the accuracy of the location that is returned. If you only need a rough guesstimate for a location (such as a weather application), you could use PRIORITY_LOW_POWER. This uses minimal power and provides a location with city-level accuracy. Should you want a little more precision, you can step up to PRIORITY_BALANCED_POWER_ACCURACY, which is nearly the same resolution as using coarse accuracy. If you are working on an application that needs to access the GPS or fine-level accuracy, you can use PRIORITY_HIGH_ACCURACY.
Should you find that you need a location, but are not interested in using any battery to use the location, you can use a setting of PRIORITY_NO_POWER. This allows the location data to be piggy-backed from another application that is requesting data. This is not ideal for situationswhere you need relatively accurate information, but it can be helpful if you need the location for a region and want to save as much battery power as possible.
Summary
This chapter discussed how to access location data through the location providers included in the Android platform.
You started out by learning how the android.location package can be used to locate a device based on either coarse or fine accuracy. You learned that using location data requires adding a permission to your application manifest and that using the fine level of accuracy will use more battery life than using a network-provided location.
You were shown a sample application that updates based on a time period or distance to request a location update. This was shown as an example of how to minimize battery impact while providing an acceptable level of location accuracy.
Lastly, you learned that you can leverage the Google Play Services Location API to set up a client that uses the Fused Location Provider to return location data. This provider allows you to minimize location requests and even use minimal power in your application by using another application that is requesting location data to share it with your application.