Android Development Patterns: Best Practices for Professional Developers (2016)
Chapter 15. Google Play Services
Google Play services is a collection of APIs provided from Google that help developers take advantage of data, calculations, and methods to create better applications. This is done by allowing you to tap into the vast data sets and communication assets that Google has integrated into its many services.
In this chapter, you learn how to add Google Play Services to your application, create a client to communicate with the services, and gain exposure to some of the APIs that are bundled in Google Play Services.
Adding Google Play Services
If you have never used Google Play Services in an application before, you need to do some initial setup. You should start by opening the Android SDK manager and downloading the most current version of the Google Play Services. If you do not see this in the manager, you may need to scroll to the bottom of the list and expand the Tools section.
If you are inside of Android Studio 1.3+, when you use the icon to open the SDK Manager, the preferences window will open with Android SDK selected from the menu on the left. You will then need to click the SDK Tools tab and click the checkbox next to it. Note that you may receive a message that not all packages can be installed. When this happens, click the button to launch the standalone SDK Manager, and then you should be able to check the box and download the required packages.
Note
If you have already created an AVD to use for testing your application, make sure it supports the Google APIs. If you use an AVD that doesn’t support the Google APIs, your application will not function properly and may cause an ANR or crash at runtime.
After you download Google Play Services, you are then ready to alter your application Gradle file. Open the build.gradle file for your application module. This is located in your project’s ApplicationDirectory/app/build.gradle. In the Dependencies section, add the following line:
dependencies {
// other dependencies may be listed here
compile 'com.google.android.gms:play-services:7.8.0'
}
Note that you should use the most current version available; in this example, the version 7.8.0 is used, but it will increment as newer versions of Google Play Services are released.
After you make the edit, you need to re-sync your Gradle build file. This can be done by clicking the Sync Project with Gradle Files message that appears at the top of the editor screen. If you do not see the banner, you can use the context menu and click Tools, Android, Sync Project with Gradle Files.
When the build finishes, you are ready to begin using Google Play Services in your application.
If you have a large project with many imports and/or heavy framework usage, you may receive an error when you attempt to compile. This is due to a limit of having only 65,536 methods in your application. You can selectively compile just the portions of Google Play Services by calling them as a dependency rather than using all of them, like so:
// use this
compile 'com.google.android.gms:play-services-fitness:7.8.0'
// instead of this
compile 'com.google.android.gms:play-services:7.8.0'
Table 15.1 lists the currently available services.
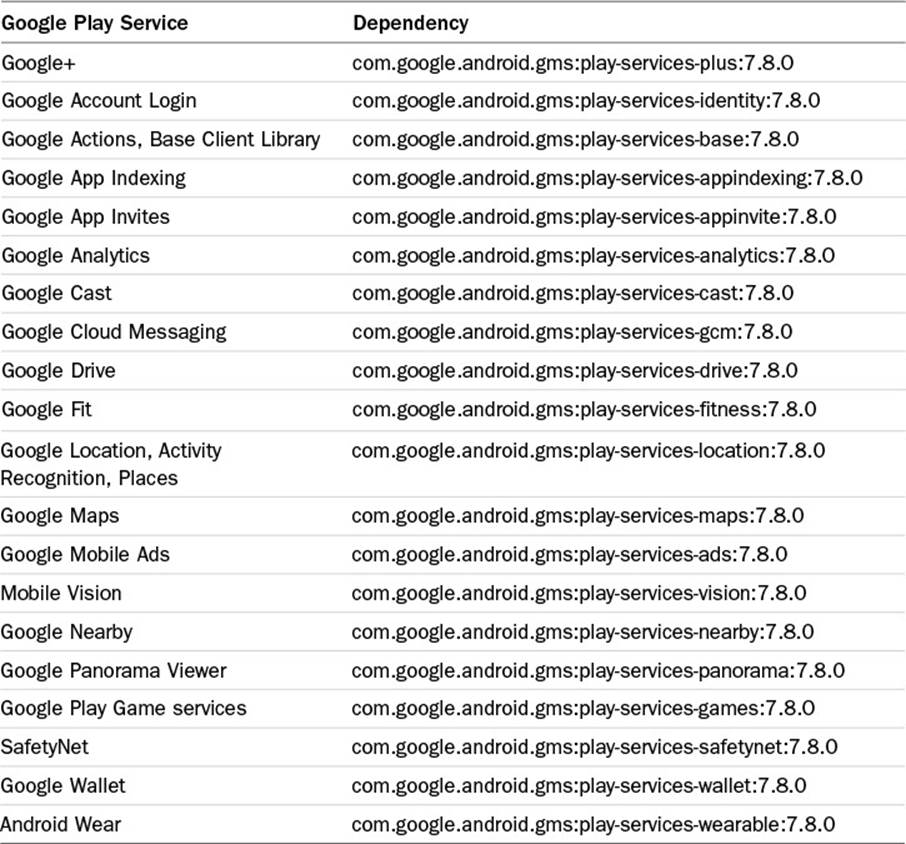
Table 15.1 Available Google Play Services
Using Google API Client
The easiest way to connect to Google Play Services is to use the Google API Client. In previous chapters, the Google API Client was used to establish connections using the builder pattern. The builder pattern is preferred because it allows you to quickly add and remove services as well as optimize the creation of the connections and resources needed.
The following snippet is a refresher on how to use the builder pattern to create a GoogleApiClient:
GoogleApiClient myGoogleApiClient = new GoogleApiClient.Builder(this)
.addApi(Drive.API)
.addScope(Drive.SCOPE_FILE)
.addConnectionCallbacks(this)
.addOnConnectionFailListener(this)
.build();
To complete a connection, not only must you add the API you want to use, but you must also implement a callback interface for ConnectionCallbacks and OnConnectionFailedListener. These are needed to protect the application from crashing when the services are unavailable or when the device running the app does not support using Google services.
There are three methods you can override in your Activity that allow you to place logic to deal with connection, suspension, and failure. Each method gives you an opportunity to place your logic and even recover from a potential error.
If you encounter an error that triggers the onConnectionFailed() method, attempt to resolve the error by calling the hasResolution() method on the ConnectionResult object. This allows you to have the user fix what is wrong and attempt the connection again. If a resolution is not available, use GoogleApiAvailability.getErrorDialog(), which gives information and a potential solution (such as updating Google Play Services on their device) to the connection error.
Listing 15.1 demonstrates using the onConnected(), onConnectionSuspended, and onConnectionFailed methods as well as building a dialog for the user to interact with when an error occurs.
Listing 15.1 Override Methods Used when Connecting to Google Play Services
// set up variables used when connection failure occurs
// requestCode to pass with activity - cannot be a negative number
private static final int REQUEST_RESOLVE_ERROR = 1331;
// tag for the error dialog fragment
private static final String DIALOG_ERROR = "dialog_error";
// set a boolean to track if error resolution is happening
private boolean myResolvingError = false;
@Override
public void onConnected(Bundle connectionHint) {
// the connection is good, add logic for success here
}
@Override
public void onConnectionSuspended(int cause) {
// there was a connection, but it has now failed
// disable any components that rely on the connection working here
}
@Override
public void onConnectionFailed(ConnectionResult result) {
// the connection has failed, this may be for one or more of the
// APIs you are attempting to use with the GoogleApiClient
// is an error currently being resolved?
if (myResolvingError) {
// an error is already in process
return;
} else if (result.hasResolution()) {
try {
myResolvingError = true;
result.startResolutionForResult(this, REQUEST_RESOLVE_ERROR);
} catch (SendIntentException e) {
// problem connecting to resolution intent, try connecting again
myGoogleApiClient.connect();
}
} else {
// cannot use hasResolution(), call showErrorDialog() to build a dialog
// and display contents of GoogleApiAvailability.getErrorDialog()
showErrorDialog(result.getErrorCode());
myResolvingError = true;
}
}
private void showErrorDialog(int errorCode) {
// create a fragment for the error dialog
ErrorDialogFragment dialogFragment = new ErrorDialogFragment();
// create a bundle to pass the error arguments
Bundle args = new Bundle();
args.putInt(DIALOG_ERROR, errorCode);
// set the arguments into the dialogFragment and then show it
dialogFragment.setArguments(args);
dialogFragment.show(getSupportFragmentManager(), "errordialog");
}
// this is called from ErrorDialogFragment on dialog dismiss
public void onDialogDismissed() {
myResolvingError = false;
}
// the dialog fragment to display the error
public static class ErrorDialogFragment extends DialogFragment {
public ErrorDialogFragment() { }
@Override
public Dialog onCreateDialog(Bundle savedInstanceState) {
// get error code and return the dialog
int errorCode = this.getArguments().getInt(DIALOG_ERROR);
return GoogleApiAvailability.getInstance().getErrorDialog(
this.getActivity(), errorCode, REQUEST_RESOLVE_ERROR);
}
@Override
public void onDismiss(DialogInterface dialog) {
// on dismiss call onDialogDismissed to set myResolvingError to false
((MyActivity) getActivity()).onDialogDismissed();
}
}
// user has resolved issue onActivityResult callback is then called
@Override
protected void onActivityResult(int requestCode, int resultCode,
Intent data) {
if (requestCode == REQUEST_RESOLVE_ERROR) {
myResolvingError = false;
// check if the error is now OK and that a connection has not
// already been established or attempted
if (resultCode == RESULT_OK) {
if (!myGoogleApiClient.isConnecting() &&
!myGoogleApiClient.isConnected()) {
myGoogleApiClientConnect();
}
}
}
}
The listing should be fairly well documented with inline comments; however, you should take special note of the Boolean myResolvingError that is used to keep track of the connection state. It should also be noted that Google Play Services have an ErrorDialogFragmentalready defined so that you do not need to define it again.
It can be easy to forget that a user may decide to “pocket” his device or rotate his screen in the middle of a connection being established. When this happens, the Activity is restarted and any connections may be left in a connecting state. By saving the value of the Boolean inside ofonSaveInstanceState(), you can overcome this particular issue.
The following shows how this can be saved in the onSaveInstanceState() method and restored during the onCreate() method:
private static final String STATE_RESOLVING_ERROR = "resolving_error";
@Override
protected void onSaveInstanceState(Bundle outState) {
super.onSaveInstanceState(outState);
outState.putBoolean(STATE_RESOLVING_ERROR, myResolvingError);
}
@Override
protected void onCreate(Bundle savedInstanceState) {
super.onCreate(savedInstanceState);
// the rest of your onCreate code should be here
myResolvingError = savedInstanceState != null
&& savedInstanceState.getBoolean(STATE_RESOLVING_ERROR, false);
}
Now that you know how to create a connection using the GoogleApiClient, it is time to see some examples of using Google Play Services.
Google Fit
Google Fit is part of Google Play Services. It allows you to use the sensors in a device mixed with the computational heavy powers of Google to track the activity of a user. What makes Google Fit great is that it can use information from all of the devices a person may have and that are deemed the most accurate. This makes the only fitness “wearable” that a user needs the one they usually always have with them.
Note that Google Fit is actually a collection of APIs used to make the magic happen. The following is a list of these APIs and what they are used for with Google Fit:
![]() Sensors API: Gives access to raw sensor data from devices and companion devices
Sensors API: Gives access to raw sensor data from devices and companion devices
![]() Recording API: Allows data to be stored and recorded with subscriptions
Recording API: Allows data to be stored and recorded with subscriptions
![]() History API: Allows for batching fitness data by inserting, deleting, and reading it
History API: Allows for batching fitness data by inserting, deleting, and reading it
![]() Sessions API: Allows data to be grouped into sessions via metadata
Sessions API: Allows data to be grouped into sessions via metadata
![]() Bluetooth Low Energy API: Allows compatibility with BLE devices, enabling data to be interpreted and read from various BLE devices
Bluetooth Low Energy API: Allows compatibility with BLE devices, enabling data to be interpreted and read from various BLE devices
![]() Config API: Allows the use of custom data types and configuration settings used with Google Fit
Config API: Allows the use of custom data types and configuration settings used with Google Fit
Enable API and Authentication
Some of the Google Play Services provided require more setup than just creating a connection client. Using Google Fit requires that you log in to your Google Developer Console (https://console.developers.google.com) and either create a new project or choose one you have already added. After you have created or chosen a project, you then need to enable the Fitness API. This can be done by finding the APIs & Auth menu and then typing Fitness into the search box. This then shows you the Fitness API page, which gives a brief description of what it does. Clicking the Enable API button near the top of the page will turn the API on for your project.
Now that you have the API enabled, you need to manage the connection to it. This is done by generating an OAuth 2.0 client for your Android app. This is done by clicking the Credentials link that is under the APIs & Auth menu. This will then show you a page that allows you to add your OAuth credentials. Before you click the Add Credentials link, make sure your project is properly filled out for the OAuth Consent screen. Filling out this data can be done by using the tabs at the top of the page. The OAuth Consent screen is shown to users when they initially make a connection to your application with their data. This also gives you an opportunity to add branding, policies, terms of service, and a Google+ page for users to see that allows them to make sure they understand that the data really is going to the app they want and to know what you will be doing with the information.
After you fill out the information you want to provide, you can save your changes and then go back to the Credentials tab and click the Add Credentials button on the page. This activates a drop-down menu asking what type of credentials you would like to add. You should then choose the OAuth 2.0 Client ID option.
Next, you are asked to choose the application type. There are many options listed, but you should click the option for Android because you will be using the API in your Android app. When you click this option, the page shows options that pertain to creating a client for your app. You can give the client ID a name and then pass in a signing-certificate fingerprint. If you do not already have one, you will need to run the following command from your command line or terminal:
keytool -exportcert -alias androiddebugkey -keystore ~/.android/debug.keystore
-list -v
Note that the entire sample should be on one line, but was broken into two lines here. You should also correct the path to where your keystore file is. If you need to use the debug.keystore file, it is at the following location:
![]() OS X and Linux: ~/.android/debug.keystore
OS X and Linux: ~/.android/debug.keystore
![]() Windows: %USERPROFILE%\.android\debug.keystore
Windows: %USERPROFILE%\.android\debug.keystore
When the command is run, you are prompted for the password to your keystore (if you are using the debug.keystore file, the password is empty, so you may press the Enter key to continue when prompted for a password). You will then see the output of your certificate. This contains quite a bit of data about the certificate. The piece of information you require is in the Certificate Fingerprints section. You need to copy the values displayed in the SHA1 section.
After typing or pasting your fingerprint into the required field in the Developer Console, you need to add the package name for your application and then decide if you want to allow deep linking from Google+. Deep linking allows clicks and shares of your application to automatically launch or prompt for an install of your application based on the deep-link data.
When you have made your decision, you can then click the Create button to generate your OAuth 2.0 client. After a few moments, you should receive your OAuth 2.0 client ID.
App Configuration and Connection
Google Fit is part of Google Play Services. In the first section of the chapter you were shown that you need to add a dependency to your application’s build.gradle file. As a reminder, you need to add the following to the dependencies section of the app build.gradlefile:
dependencies {
// other dependencies may be listed here
compile 'com.google.android.gms:play-services:7.8.0'
}
You are now ready to create the GoogleApiClient and add the Fitness API as well as specify the scopes you need to access. A list maintained by Google can be found at https://developers.google.com/fit/android/authorization (note that the field names start with “FITNESS”). Thefollowing demonstrates an example of building a client and adding two scopes for access to user data:
myClient = new GoogleApiClient.Builder(this)
.addApi(Fitness.API)
.addScope(FitnessScopes.SCOPE_ACTIVITY_READ)
.addScope(FitnessScopes.SCOPE_BODY_READ_WRITE)
.addConnectionCallbacks(this)
.addOnConnectionFailedListener(this)
.build();
Once the client has been made, you can then start making the calls you need inside of the onConnected() method. This may include creating listeners so that you can display live data, display heart rate, and even allow the user to manage their weight.
Nearby Messages API
One of the newer services that is provided by Google Play Services is the Nearby API. The Nearby API allows devices on either the Android or iOS platform to exchange messages. This is done by creating a publish-subscribe service that allows for small amounts of binary data to go between the devices. Transmission is done through either Wi-Fi, Bluetooth, or even by an ultrasonic modem that uses the speaker and microphone to send and parse data.
This means that you can now control the range of messages sent. Messages are no longer limited by physical space and can reach as far as any device with an Internet connection, or as close as within 5 feet (1.5 meters) of each other.
Although offered as a Google service when using the messaging portion of the Nearby API, having a Google Account is not required for the users of your application. However, to provide unique-in-time pairing codes as well as maintain common tokens and API keys to authenticate the application token, as a developer you will need to add this API in the Google Developers Console and generate an SHA1 fingerprint of your certificate.
Enabling Nearby Messages
Open the Google Developer Console (https://console.developers.google.com) and either create a new application or choose the existing application you will be working with. Once the project has been created or selected, click the APIs & Auth menu and then the APIs link.
If you do not see the Nearby Messages API in the list of available APIs, use the search box and type nearby messages. A link to the API then appears. By clicking the API, you can use the Enable API button to allow your application access to the API.
Once the API has been enabled, you then need to get the SHA1 fingerprint of your keystore certificate. This can be done by using the keytool command in your command line or terminal. For precise instructions, refer to the section “Enable API and Authentication,” earlier in the chapter.
After obtaining your SHA1 fingerprint, click the Credentials link that is under the APIs & Auth menu in the Google Developer Console. You should then click the Add Credentials button and choose API Key from the drop-down menu.
Of the options displayed, you should choose Android key, name the key, and then click the Add Package Name and Fingerprint button. Enter in your application package name and pass in the SHA1 fingerprint and then click the Create button. This processes and generates your API key.
After generating the API key is complete, you need to make some modifications to your Android application. The first thing you need to do is add a Google Play Services dependency to the application module of your project. Open up the build.gradle file of your app and make sure you add the call to the dependencies section as follows:
dependencies {
// other files
compile 'com.google.android.gms:play-services:7.8.0'
}
Next, you need to add a meta-data element that contains your generated API key to your application manifest XML. This element can be added anywhere inside of the <application> element. It should contain both a name and value property and look similar to the following:
<meta-data
android:name="com.google.android.nearby.messages.API_KEY"
android:value="GENERATED_API_KEY_GOES_HERE" />
The next thing you need to configure is your GoogleApiClient. This only requires that you add the Nearby Messages API. The following shows a sample client built using the builder method:
myGoogleApiClient = new GoogleApiClient.Builder(this)
.addApi(Nearby.MESSAGES_API)
.addConnectionCallbacks(this)
.addOnConnectionFailedListener(this)
.build();
Sending and Receiving Messages
The Nearby Messages API allows small payloads of data to be passed through a publisher and subscriber model. When a device wants to connect to another device, it sends out a small payload of data as a message using either Bluetooth or ultrasonic transmissions to any devices near it that are listening. This makes the sender the publisher and the listeners the subscribers. When tokens are received, they are then sent to the server for validation. If the validation is successful, a connection is created and the subscription process is complete.
Note
The Nearby Messages API really does live up to its name. Note that it is not called the Nearby Video Streaming or Nearby Photo Sharing service. Transmitting large media files is expensive in both time and battery cost and will only end up aggravating users. Keep to using it for data payloads that are 3KB or less.
To publish a message, you need to create a message object that contains a byte array and then pass it using the Nearby.Messages.publish() method. The following example shows a snippet of this being done:
message = new Message(myByteArray);
Nearby.Messages.publish(myGoogleApiClient, message)
.setResultCallback(new ErrorCheckingCallback("publish()"));
From this snippet, notice that a callback method is used to pass back an error with a String value of "publish()" to let you know that something went wrong when you attempted to publish. The use of a ResultCallback is required so that you can keep a status on the success or failure of your broadcast. The following status codes may be passed to help you determine what happened if something goes wrong:
![]() APP_NOT_OPTED_IN: The user has not granted permission to use Nearby.Messages.
APP_NOT_OPTED_IN: The user has not granted permission to use Nearby.Messages.
![]() BLE_ADVERTISING_UNSUPPORTED: The client made a request using BLE_ONLY and the device does not support BLE.
BLE_ADVERTISING_UNSUPPORTED: The client made a request using BLE_ONLY and the device does not support BLE.
![]() BLE_SCANNING_UNSUPPORTED: The client made a scanning request using BLE_ONLY and the device does not support BLE.
BLE_SCANNING_UNSUPPORTED: The client made a scanning request using BLE_ONLY and the device does not support BLE.
![]() BLUETOOTH_OFF: The client made a request that requires Bluetooth and it is currently disabled.
BLUETOOTH_OFF: The client made a request that requires Bluetooth and it is currently disabled.
![]() TOO_MANY_PENDING_REQUESTS: There are more than five PendingIntents triggered from the app to Messages#subscribe.
TOO_MANY_PENDING_REQUESTS: There are more than five PendingIntents triggered from the app to Messages#subscribe.
To subscribe to messages from a publisher, you need to create an instance of MessageListener and use Nearby.Mesasges.subscribe(). The following snippet shows an example of this:
messageListener = new MessageListener() {
@Override
public void onFound(final Message message) {
// logic for handling the message payload
}
};
Nearby.Messages.subscribe(myGoogleApiClient, messageListener)
.setResultCallback(new ErrorCheckingCallback("subscribe()"));
Similar to when publishing messages, when subscribing to messages, you must use a ResultCallback. In the previous example, a string was passed to help identify where an error occurred. The same status codes may also be passed here that are passed when publishing.
Listing 15.2 shows a larger example of setting up a client, publishing, and subscribing using Nearby Messages.
Listing 15.2 Publishing and Subscribing in an Activity
@Override
protected void onStart() {
// set up a connection to services unless already connected
super.onStart();
if (!myGoogleApiClient.isConnected()) {
myGoogleApiClient.connect();
}
}
@Override
protected void onStop() {
if (myGoogleApiClient.isConnected()) {
// save some battery by using unpublish/unsubscribe
Nearby.Messages.unpublish(myGoogleApiClient, myMessage)
.setResultCallback(new ErrorCheckingCallback("unpublish()"));
Nearby.Messages.unsubscribe(myGoogleApiClient, myMessageListener)
.setResultCallback(new ErrorCheckingCallback("unsubscribe()"));
}
myGoogleApiClient.disconnect();
super.onStop();
}
// GoogleApiClient connection callback
@Override
public void onConnected(Bundle connectionHint) {
Nearby.Messages.getPermissionStatus(myGoogleApiClient).setResultCallback(
new ErrorCheckingCallback("getPermissionStatus", new Runnable() {
@Override
public void run() {
publishAndSubscribe();
}
})
);
}
// onActivityResult is called when a button tap occurs in the
// Nearby permission dialog
@Override
protected void onActivityResult(int requestCode, int resultCode,
Intent data) {
super.onActivityResult(requestCode, resultCode, data);
if (requestCode == REQUEST_RESOLVE_ERROR) {
mResolvingError = false;
if (resultCode == RESULT_OK) {
// no errors, or permission issues, time to publish/subscribe
publishAndSubscribe();
} else {
// either an error or permission denial happened, see resultCode
showToast("Failed to resolve error with code " + resultCode);
}
}
}
private void publishAndSubscribe() {
// when GoogleApiClient is connected subscription to nearby messages
// happens automatically. However, this code may execute more than once
// during the activity lifecycle, these requests to subscribe() that use
// the same MessageListener will be ignored
Nearby.Messages.publish(myGoogleApiClient, myMessage)
.setResultCallback(new ErrorCheckingCallback("publish()"));
Nearby.Messages.subscribe(myGoogleApiClient, myMessageListener)
.setResultCallback(new ErrorCheckingCallback("subscribe()"));
}
// this ResultCallback displays a toast when errors occur
// it also displays the Nearby opt-in dialog when needed
private class ErrorCheckingCallback implements ResultCallback<Status> {
private final String method;
private final Runnable runOnSuccess;
private ErrorCheckingCallback(String method) {
this(method, null);
}
private ErrorCheckingCallback(String method, @Nullable Runnable runOnSuccess) {
this.method = method;
this.runOnSuccess = runOnSuccess;
}
@Override
public void onResult(@NonNull Status status) {
if (status.isSuccess()) {
Log.i(TAG, method + " succeeded.");
if (runOnSuccess != null) {
runOnSuccess.run();
}
} else {
// currently the only resolvable error is that the device is not opted
// in to Nearby. Starting the resolution displays an opt-in dialog
if (status.hasResolution()) {
if (!mResolvingError) {
try {
status.startResolutionForResult(MainActivity.this,
REQUEST_RESOLVE_ERROR);
mResolvingError = true;
} catch (IntentSender.SendIntentException e) {
showToastAndLog(Log.ERROR, method +
" failed with exception: " + e);
}
} else {
// This is reached on init due to both publishing and
// subscribing at the same time. Instead of informing the user
// with a Toast, just log that it happened
Log.i(TAG, method + " failed with status: " + status
+ " while resolving error.");
}
} else {
showToastAndLog(Log.ERROR, method + " failed with : " + status
+ " resolving error: " + mResolvingError);
}
}
}
}
Remember that when publishing or subscribing communication actively, your device can use 2–3 times the normal battery rate. This makes it imperative that you call the unpublish() and unsubscribe() methods in the onPause() and/or onStop() methods of your app.
It is also recommended that you are clear to users about what data is going to be broadcast so that they don’t feel like their privacy is being threatened and that malicious users may be intercepting data they deem sensitive.
Summary
In this chapter, you learned about Google Play Services. You learned how to create a client in your application to connect to the services as well as how to add the needed dependencies. You also learned that some of these services require some setup within the Google Developer Console.
You learned that services can be included individually or as a complete bundle of all services. It may seem like including all of them is a good idea; however, you were informed that this will limit the number of methods you can use, including methods used in included libraries.
Finally, you were given examples of integrating with two of the many Google Play Services. You were shown how to enable the API in the Developer Console and connect to each service, and you were given some sample snippets of how to begin using these services in your application.