Android Development Patterns: Best Practices for Professional Developers (2016)
Chapter 16. Android Wear
Android Wear was introduced in June 2014 as a way of changing how people use their mobile devices. Google initially advertised the platform as an extension of a user’s mobile device, giving the user “glanceable” notifications that would inform without taking a person away from the experience they were currently involved in. In this chapter, you learn about the design and creation of notifications and applications for Android Wear.
Android Wear Basics
Android Wear is a fascinating extension of the Android family. Android Wear devices run a modified version of Android that works with many of the same classes, packages, and sensors that are in other Android devices. As a developer, there are some differences you should be aware of that will help you deliver quality apps. The following is a list of considerations you should keep in mind when creating your app:
![]() Wear devices have much smaller batteries than other Android devices.
Wear devices have much smaller batteries than other Android devices.
![]() Leaving sensors in a data collection mode will impact battery life.
Leaving sensors in a data collection mode will impact battery life.
![]() Not all Wear devices have the same amount of pixels or pixel density.
Not all Wear devices have the same amount of pixels or pixel density.
![]() Not all users will have a watch with a square or round face.
Not all users will have a watch with a square or round face.
![]() Not all Wear devices contain the same sensors.
Not all Wear devices contain the same sensors.
![]() Tasks should be completed in 5 seconds or less.
Tasks should be completed in 5 seconds or less.
Each of the items in this list is something that can have a profound impact on the user installing, keeping, or killing the app with a bad rating in the Play store.
Tip
As a general rule, whenever there is a Google service available, you should leverage it to minimize sensor collection impact and to increase battery life. For example, using the Google Fit API for pedometer data can save battery life by determining if data from a connected Android device (such as a mobile phone) is as accurate as or more accurate than a Wear device.
Android Wear devices were created to be slightly different to allow users to choose a device that matches their personal style and use case. As listed previously, some considerations need to be taken when you are working with these different styles.
To help you make better apps, the Wearable UI Library can be used in creating widgets, such as cards, as well as utility classes, such as WatchViewStub, to help you invoke the correct layout XML file. The Wearable UI Library should be included by default when creating a new Wear project with Android Studio, but if you are working with a legacy project or not using Android Studio, you can add the following to your gradle.build file in your wear module:
dependencies {
// other dependencies
compile 'com.google.android.support:wearable:+'
compile 'com.google.android.gms:play-services-wearable:+'
}
Screen Considerations
What makes Android Wear different from standard Android devices is the device screen. Just like with other Android devices, you should refrain from using exact pixel numbers. This has everything to do with different manufacturers using different pixel densities as well as different resolutions for each device. You can, and should, use DP values because these will scale appropriately using a calculated measurement.
Another difference between Wear devices and Android devices is that Wear devices are currently available in two basic shapes: round and square. Knowing this, you are given the opportunity to create two layouts for your application. It is not necessary to create two separate layouts; however, the user experience may be less than ideal because the layout of a square face will be cropped when viewed on a round watch face. This potential problem can be mitigated by using either the WatchViewStub class or a BoxInsetLayout.
The WatchViewStub class detects the watch face shape and inflates the correct layout. This class is automatically invoked at runtime and is able to inflate the correct layout based on the attributes and values placed in your main activity layout XML. The following shows a snippet of XML that will inflate different layouts based on the screen shape of the device:
<android.support.wearable.view.WatchViewStub
xmlns:android="http://schemas.android.com/apk/res/android"
xmlns:app="http://schemas.android.com/apk/res-auto"
xmlns:tools="http://schemas.android.com/tools"
android:id="@+id/watch_view_stub"
android:layout_width="match_parent"
android:layout_height="match_parent"
app:rectLayout="@layout/activity_wear_rect"
app:roundLayout="@layout/activity_wear_round">
</android.support.wearable.view.WatchViewStub>
This snippet of code uses two properties that contain values that help the application find and inflate the proper layout XML file. The first property is app:rectLayout, and it contains a value of @layout/activity_wear_rect. This means that when the screen is determined to be a square or rectangle, the file res/layout/activity_wear_rect.xml will be used for the UI layout.
Similarly, the app:roundLayout property contains a value of @layout/activity_wear_round, which will use the file res/layout/activity_wear_round.xml to render the UI layout for Wear devices that have a round face.
A drawback to using this particular method of screen layout handling is that you are unable to directly access your app view until the layout has been inflated. This can be overcome by using setOnLayoutInflatedListener() on the WatchViewStub object to create a listener that will execute code when the detection and layout inflation has been completed. The following snippet shows how this can be accomplished in the onCreate() method of your Activity:
@Override
protected void onCreate(Bundle savedInstanceState) {
super.onCreate(savedInstanceState);
setContentView(R.layout.activity_wear);
WatchViewStub stub = (WatchViewStub) findViewById(R.id.watch_view_stub);
stub.setOnLayoutInflatedListener(new WatchViewStub.OnLayoutInflatedListener() {
@Override public void onLayoutInflated(WatchViewStub stub) {
// the view has been inflated and can now be used
TextView tv = (TextView) stub.findViewById(R.id.text);
// rest of your code
}
});
}
If you decide that you do not want to work with the added complexity of maintaining two layouts, you can use a single layout that leverages BoxInsetLayout. Also note that starting a new Wear project in Android Studio will create a layout that includes this layout element by default.
The BoxInsetLayout class extends a FrameLayout that places the main layout area inside of the viewable area of the screen shape. Gravity is added to handle the placement of the included layout widgets. The following snippet demonstrates how this is achieved:
<android.support.wearable.view.BoxInsetLayout
xmlns:android="http://schemas.android.com/apk/res/android"
xmlns:app="http://schemas.android.com/apk/res-auto"
android:background="@drawable/wear_background"
android:layout_height="match_parent"
android:layout_width="match_parent"
android:padding="15dp">
<FrameLayout
android:layout_width="match_parent"
android:layout_height="match_parent"
android:padding="5dp"
app:layout_box="all">
<TextView
android:gravity="center"
android:layout_height="wrap_content"
android:layout_width="match_parent"
android:text="@string/hello_text"
android:textColor="@color/black" />
<ImageButton
android:background="@null"
android:layout_gravity="bottom|left"
android:layout_height="50dp"
android:layout_width="50dp"
android:src="@drawable/btn_left" />
<ImageButton
android:background="@null"
android:layout_gravity="bottom|right"
android:layout_height="50dp"
android:layout_width="50dp"
android:src="@drawable/btn_right" />
</FrameLayout>
</android.support.wearable.view.BoxInsetLayout>
In this snippet example, the gravity is set on the TextView and ImageButton elements in order to align them properly to the screen. You should also note that values are set in dp to allow them to scale based on the pixel density of the device rendering the layout.
To help with the visual layout of applications, Google provides a UI kit that can be downloaded in either PDF or Adobe Illustrator format from https://developer.android.com/design/downloads/index.html. Note that there are other design guidelines there, so look for the Wear section.
These design assets are crucial for making quality apps that will match the built-in styles that ship with Android Wear. They also provide the layout specifications used for button, image, text, and even card placement and padding.
Debugging
Just like when you create an Android app, being able to run, test, and debug your Wear application is essential. There are two ways to get this accomplished. You can use either an actual Wear device or an emulator.
Connecting to an Emulator
Developers who have access to physical devices will always have the edge when it comes to developing Wear apps. This is because they have greater access to device functionality, real-world use, and extra sensor data. However, not having a device does not automatically preclude you from developing Wear applications. Emulators are provided for both square- and round-faced devices.
To create a Wear emulator, you need to open the AVD Manager. If you are using Android Studio, you can either use the icon shortcut or click Tools, Android, AVD Manager.
When the AVD Manager opens, click Create Virtual Device; then, from the window that appears, choose the size, shape, resolution, and pixel density you would like to emulate. By default, some hardware profiles are available for selection. If you want, you can also choose to create your own by clicking the New Hardware Profile button.
Once you have either created a new profile or chosen an existing one, click the Next button. The next window allows you to choose the version of Android you want installed on the emulated Wear device.
Note
If you are missing a version that you believe is available, click the Cancel button and close the AVD Manager window. Then, open the SDK Manager and make sure you are up to date and have selected the SDK files for the version of Android Wear you want to develop with.
After choosing the version you want to work with, clicking the Next button takes you to a summary window that allows you to make any last-minute changes and to review the selected options for the emulator. If you are happy with the results, you can click the Finish button to create the Wear emulator.
Once it has been created, launching a Wear emulator is the same as launching an Android emulator. You can either run a Wear application from Android Studio and choose the Wear emulator device as the target, or you can launch the device from the AVD Manager window by clicking the Play action button.
Now at this point, you have an emulator that runs an application; however, it will not offer full functionality until you have paired the emulator with an Android device. To do this, you need to install the Android Wear app from the Google Play store on your Android device.
Next, you should connect your device through USB to your computer. Note that your Android device must have debugging enabled by having Developer Mode enabled. Once connected, you should then forward the communication port for your emulator to your Android device. This command must be run every time you connect your Android device to your computer; it is done by using the following adb command from a command line or terminal:
adb -d forward tcp:5601 tcp:5601
You then need to open the Android Wear app on your Android device and connect to the emulator. This is done by choosing to pair with a new watch and then using the menu in the upper-right corner to select Pair with Emulator.
When you are connected, you can then click the menu icon in the top right of the Android Wear application and select Try Out Watch Notifications. Note that the text in this menu may change, but there will be an option to view or test notifications. To confirm that the emulator and device are working, you can try sending a notification to the emulator. If everything is set up properly, you should see the notification on the emulator. Figure 16.1 shows a screenshot taken while testing a notification on a Wear emulator.
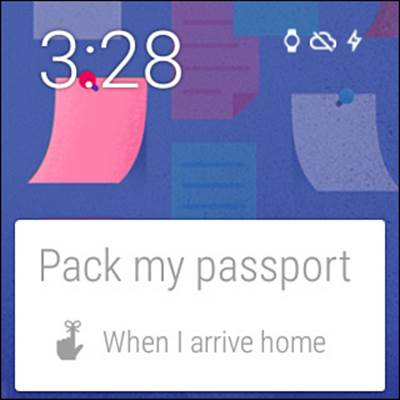
Figure 16.1 This sample notification was sent from a connected phone to the emulator.
Connecting to a Wear Device
The first step to debugging a Wear device is to enable debugging via the Developer Options on the device. This menu is initially hidden; however, it can be enabled by going to the Settings of the device and then opening the About option. This displays information about your device. In the same way that you unlock the Developer Options menu on Android tablets and phones, you need to tap on Build Number seven times. You can then swipe away the About screen, and you should see a new menu option below About called Developer Options.
You may then be able to toggle Debug over Bluetooth to true. If it is grayed out, you first need to enable ADB Debugging followed by enabling Debug over Bluetooth.
Similar to working with a Wear emulator, you need an Android device with debugging enabled that’s connected to your computer through USB in order complete the debugging setup. The difference is that instead of first enabling debugging over Bluetooth in the Android Wear app and then using a port forward with the adb command, you open the Android Wear app and click the gear icon in the upper left to open the Settings menu.
On the Settings page, you need to scroll to the bottom and select your Wear device for the Device to Debug item in the Debugging over Bluetooth section as well as enable the slider for the Debugging over Bluetooth item. The text in the section should change to “Host: disconnected” and “Target: connected” if the Wear device is configured for Bluetooth debugging.
To connect the host, you need to run the following adb commands with your Android device connected via USB and with USB debugging enabled:
adb forward tcp:4444 localabstract:/adb-hub
adb connect localhost:4444
When the second command is executed, the text inside of the Debugging over Bluetooth section should now show “Host: connected.” Figure 16.2 shows the settings window of an Android device connected to a Moto 360 Android Wear device with Bluetooth debugging enabled and connected.
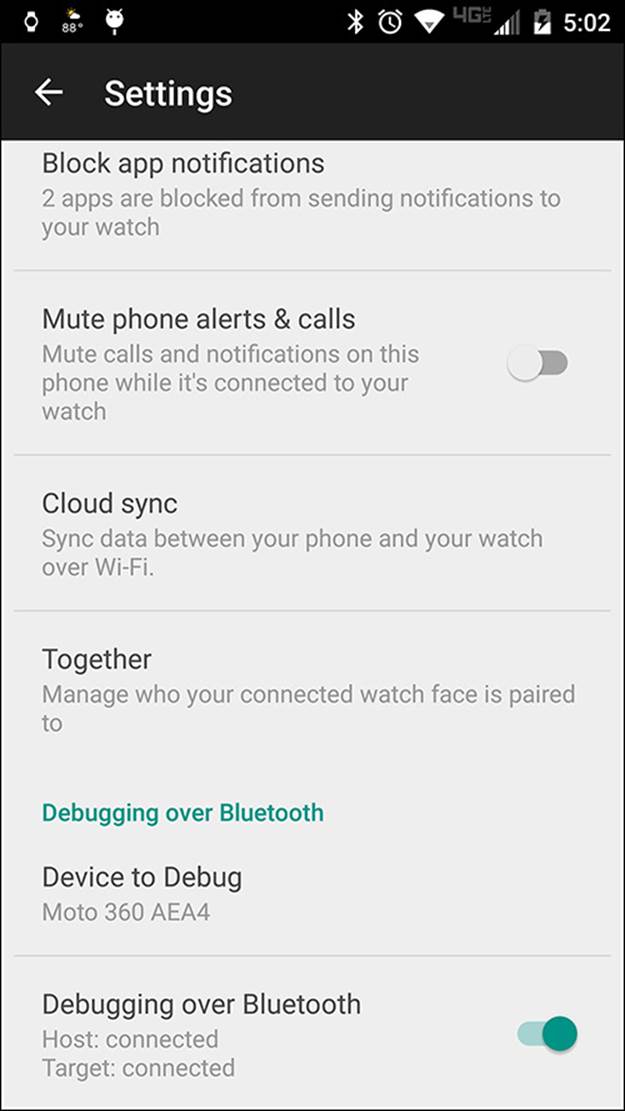
Figure 16.2 The Wear device is selected, and Bluetooth debugging is enabled and connected on both the Wear and Android devices.
Note that once the devices are connected, you need to allow debugging from the computer to your Wear device. The screen on your Wear device changes to give you the option to allow debugging, to cancel debugging, or to trust the device that is currently connected. Choosing to trust the connected device allows you to skip the dialog when you connect; however, you should still use caution when adding a permanent connection.
Communicating with Android Wear
Now that you are connected and can debug your app from either an emulator or device, you need to start sending information between the Wear device and your companion Android device. In order to provide the best experience possible, you may want to include the Android support library, Google Play Services, and the Wearable UI support library. These dependencies should be added to the build.gradle of the app module.
Note
If you are creating a client by using GoogleApiClient and adding the Wearable API along with other APIs, you may run into client connection errors on devices that do not have the Android Wear app installed. You can avoid these errors by using theaddApiIfAvailable() method and passing the Wearable API so that the missing API can be gracefully handled by your client.
Notifications, actions, and data can be passed back and forth between a Wear device and an Android device. Much of this is handled by Google Play Services, and also requires the installation of the Android Wear application on the Android device. Let’s look at how information can be displayed and how data is transferred between devices.
Notifications
By default, notifications are automatically bridged to Wear devices. For many, this is a major reason to use a Wear device because it allows users to receive notifications quickly that they may otherwise miss or be interrupted by when using their phone. However, something that makes notifications different for Wear devices is that they are able to have custom actions attached.
A standard notification needs to be built using an instance of NotificationCompat.Builder. The following snippet shows a notification being built and sent with an Intent through the NotificationManager:
int notificationId = 007;
Intent viewIntent = new Intent(this, ViewEventActivity.class);
viewIntent.putExtra(EXTRA_EVENT_ID, eventId);
PendingIntent viewPendingIntent =
PendingIntent.getActivity(this, 0, viewIntent, 0);
// create notification using support library
NotificationCompat.Builder notificationBuilder =
new NotificationCompat.Builder(this)
.setSmallIcon(R.drawable.ic_event)
.setContentTitle(eventTitle)
.setContentText(eventLocation)
.setContentIntent(viewPendingIntent);
// set up instance of NotificationManager service
NotificationManagerCompat notificationManager =
NotificationManagerCompat.from(this);
// Use notify() to build the notification and send
notificationManager.notify(notificationId, notificationBuilder.build());
When this notification appears on the Wear device, the specified PendingIntent is triggered by the user swiping the notification to the left and then tapping the Open button. This will then open the PendingIntent used in the setContentIntent() that was added when the notification was built. However, this does not open the notification on the Wear device; instead, it opens it on the handheld device.
Just like with standard device notifications, you can specify another action by using the addAction() method to the NotificationBuilder. The addAction() method allows you to set an icon (drawable), a description (String), and an Intent to launch when tapped. By adding to the previous snippet, the notificationBuilder includes the following:
// use addAction() to add
NotificationCompat.Builder notificationBuilder =
new NotificationCompat.Builder(this)
.setSmallIcon(R.drawable.ic_event)
.setContentTitle(eventTitle)
.setContentText(eventLocation)
.setContentIntent(viewPendingIntent);
.addAction(R.drawable.ic_menu_share,
getString(R.string.share), sharePendingIntent);
If you have an action that you only want visible on a Wear device, you need to create an Intent and an action to use, and then use the extend() method and pass WearableExtender with the action attached to it via the addAction() method. The following snippet demonstrates this in action:
// create the intent used for the reply action
Intent actionIntent = new Intent(this, ActionActivity.class);
PendingIntent actionPendingIntent =
PendingIntent.getActivity(this, 0, actionIntent,
PendingIntent.FLAG_UPDATE_CURRENT);
// create the action that will trigger on tap
NotificationCompat.Action action =
new NotificationCompat.Action.Builder(R.drawable.ic_action,
getString(R.string.label), actionPendingIntent)
.build();
// create the notification, attach the action, and build
Notification notification =
new NotificationCompat.Builder(mContext)
.setSmallIcon(R.drawable.ic_message)
.setContentTitle(getString(R.string.title))
.setContentText(getString(R.string.content))
.extend(new WearableExtender().addAction(action))
.build();
// remember to send notifications via NotificationManagerCompat
This snippet of code completes the build of the notification object, so you do not have to do this when you call the notify() method to display the notification. With this snippet, you have created an action that only appears on a Wear device and not on the phone or other device to which it is connected.
Sending Data
To optimize the process of sending information between devices, the Wearable Data Layer API has several components that are used specifically for Wear devices. The following is a list of objects and services that are part of the API:
![]() DataItem: Object that stores data to be synced between handheld and wearable devices.
DataItem: Object that stores data to be synced between handheld and wearable devices.
![]() Asset: Object that stores binary blob data; assets will be automatically cached to improve Bluetooth performance.
Asset: Object that stores binary blob data; assets will be automatically cached to improve Bluetooth performance.
![]() DataListener: Used for determining when data layer events are in the foreground; note that it will only work when your app is in the foreground.
DataListener: Used for determining when data layer events are in the foreground; note that it will only work when your app is in the foreground.
![]() WearableListenerService: When not working exclusively in the foreground, WearableListenerService should be extended, allowing the system to control the lifecycle and data binding.
WearableListenerService: When not working exclusively in the foreground, WearableListenerService should be extended, allowing the system to control the lifecycle and data binding.
![]() ChannelApi: This API is useful for transferring files that are large, such as movies, music, and other media files. Use of the ChannelApi allows you to transfer files without creating a container file first and then synchronizing the data.
ChannelApi: This API is useful for transferring files that are large, such as movies, music, and other media files. Use of the ChannelApi allows you to transfer files without creating a container file first and then synchronizing the data.
![]() MessageApi: Small payload messages use the MessageApi. These are messages such as media player commands and one-way directives.
MessageApi: Small payload messages use the MessageApi. These are messages such as media player commands and one-way directives.
Like with other Google Play Services, you need to create a client to access the Wearable Data Layer. The following snippet demonstrates the minimum code needed to create and connect a client:
GoogleApiClient myGoogleApiClient = new GoogleApiClient.Builder(this)
.addConnectionCallbacks(new ConnectionCallbacks() {
@Override
public void onConnected(Bundle connectionHint) {
Log.d(TAG, "onConnected: " + connectionHint);
// Data Layer ready for use
}
@Override
public void onConnectionSuspended(int cause) {
// log the cause of connection pause
Log.d(TAG, "onConnectionSuspended: " + cause);
}
}).addOnConnectionFailedListener(new OnConnectionFailedListener() {
@Override
public void onConnectionFailed(ConnectionResult result) {
// log reason for connection failure
Log.d(TAG, "onConnectionFailed: " + result);
}
}).addApi(Wearable.API).build();
The process for building the client uses the builder pattern to create the client and includes the onConnected(), onConnectionSuspended(), and onConnectionFailed() methods. Depending on how you want your application to work and what messaging information you are planning to pass back and forth, you need to insert your code into the onConnected() method where the comment Data Layer ready for use is.
When sending messages with the MessageApi, you can choose a specific node or available connections between the Wear and connected device, or you can broadcast to all of them. Specifying the node and capabilities creates a more streamlined service, but will require extra implementation to handle the hand-off between different nodes (such as Bluetooth and Wi-Fi switching on and off).
The following snippet of code shows you how to find all available nodes and return them in a HashSet of Strings that can then be used for sending a message:
private Collection<String> getNodes() {
HashSet<String> results = new HashSet<String>();
NodeApi.GetConnectedNodesResult nodes =
Wearable.NodeApi.getConnectedNodes(myGoogleApiClient).await();
for (Node node : nodes.getNodes()) {
results.add(node.getId());
}
return results;
}
For a full example of sending, receiving, and working with Android Wear, see the official sample code available at https://github.com/googlesamples/android-FindMyPhone/.
Summary
In this chapter, you learned about Android Wear and when Wear devices were introduced. You were also introduced to the concepts Google has set forward to create apps that match with the purpose of using a Wear device. You learned that similarly to Android devices, Wear devices come in different shapes and sizes, including watch face shapes. You learned how to provide different layout files to match the different shapes, as well as how to leverage the BoxInsetLayout to make your layout scale to be displayed on both shapes of watch faces.
You also learned how to create an emulator for Android Wear by using the AVD Manager as well as how to connect to the emulator and enable debugging to work with data from your actual Android device. You were then shown how to enable Bluetooth debugging through the Developer Options on the Wear device.
You also learned about extending notifications to Wear devices and how to customize the messages to only appear on the Wear device. You then were given a brief overview of the APIs and objects that can be used to synchronize and send data between the connected and Wear devices.
All materials on the site are licensed Creative Commons Attribution-Sharealike 3.0 Unported CC BY-SA 3.0 & GNU Free Documentation License (GFDL)
If you are the copyright holder of any material contained on our site and intend to remove it, please contact our site administrator for approval.
© 2016-2026 All site design rights belong to S.Y.A.