Android Development Patterns: Best Practices for Professional Developers (2016)
Chapter 18. Optimization
Creating a well-balanced app goes beyond creating network connections, adding data storage, and using eye-popping visuals. A well-crafted app takes into consideration the limitations of the device and uses various techniques to maximize the experience for the end user. In this chapter, you learn about extending the Application class, setting up custom logging for your app, changing the configuration based on the version of your app, and managing device memory.
Application Optimization
When you’re creating your app, the odds are high that you have spent a considerable amount of time going over the critical onCreate() method, adding a proper amount of unit testing, and using the Log class to fine-tune the expected objects and values being used in your application. These are all excellent steps in creating a solid high-performance app. However, each of these steps can be modified to give you even finer control over your application and to enhance the experience you are offering to your users.
When it comes to an overall schematic of your application, every optimization counts and every bit of performance you can squeeze out of the app will make a difference. The following recommendations and tips will help you create an app that runs leaner and longer.
Application First
When looking back on the Activity lifecycle of Android, the first thing you learn is that code in the onCreate() method will always be executed first. This is true when speaking directly of the lifecycle of your app; however, any ContentProviders will execute theironCreate() method and any code inside of it will initialize and run before the onCreate() in your Activity.
There is a step you can add between the ContentProvider.onCreate() and the onCreate() of your app. This is done by extending the Application object. The following demonstrates this in action:
package mypackage;
public class MyApplication extends Application {
// custom subclass
public void onCreate() {
// this onCreate() will run before any others
}
}
In order to use this subclass, you need to add it to your application manifest. This is done by setting the android:name property in the <application> element. You can also list your Activity, the services needed, and any receivers your app needs. The following code demonstrates how to do this in your application manifest XML:
<?xml version="1.0" encoding="utf-8"?>
<manifest
xmlns:android="http://schemas.android.com/apk/res/android"
package="mypackage.MyApplication">
<application
android:name="mypackage.MyApplication"
android:allowBackup="true"
android:icon="@drawable/ic_launcher"
android:label="@string/app_name"
android:theme="@style/AppTheme">
<activity android:name="MyActivity"> <intent-filter>
<action android:name="android.intent.action.MAIN" /> </intent-filter>
</activity>
<!-- the rest of your services, receivers, etc -->
</application>
</manifest>
Given a cursory glance, using this application setup might not seem to be that great of an enhancement; however, by using this in your app, you can now perform the following tasks:
![]() Initialize the SDKs and libraries your app needs.
Initialize the SDKs and libraries your app needs.
![]() Register any dynamic broadcast receivers your app uses.
Register any dynamic broadcast receivers your app uses.
![]() Create and manage any services your app needs.
Create and manage any services your app needs.
![]() Manage the actual starting point of your app by having it be the absolute entry point because it is called first.
Manage the actual starting point of your app by having it be the absolute entry point because it is called first.
Most of these benefits may be done in a regular Activity; however, a standard app may be called in a variety of ways. This could be through a service, an explicit or implicit Intent, or other broadcast receivers. The ability to control the actual flow so that you can manage state is a boon for making sure your app is able to respond appropriately at any stage of being invoked.
Note
Running various library initializations and doing some setup work will help your application get up to speed and working quickly; however, you should never do any blocking work (such as creating network connection) inside of Application.onCreate(). Adding anything that will block will cause your app to create an ANR or crash immediately on launch, thus rendering your app useless.
Application Logging
While you are working on extending the application, you may want to implement a different form of logging. The Log class gives you the ability to throw specific log messages and types in your application. One of the biggest problems with logging inside of an app is unit testing. The Log class tends to throw a RuntimeException when used in local unit tests. Another problem is that if you are creating libraries that will be used in other Android projects, you must make sure to remove your log messages or else others will run into the same errors and exceptions when running their own unit tests.
To get around this potential problem, you can create a class that extends Handler that routes your custom messages to LogCat and registers it to run at app launch. You can then create a method that gets the handler, sets a logging level, and displays the message to LogCat. The following shows a sample method that could be called from the onCreate() method of your main Activity:
private void initLogging() {
// set package name
final String pkg = getClass().getPackage().getName();
// set handler for the package
final AndroidLogHandler alh = new AndroidLogHandler(pkg);
// create the logger
Logger logger = Logger.getLogger(pkg);
logger.addHandler(alh);
logger.setUseParentHandlers(false);
// set default log level here
logger.setLevel(Level.FINEST);
logger.info("Logging initialized with default level " + logger.getLevel());
}
Another benefit of this type of logging is that you can create logic checks to determine if logging should be sent. You can check the currently logging level, and if it’s not at the level you want, nothing will be logged. The following shows an example of this in action:
private void nameCheck(String name) {
if (LOGGER.isLoggable(Level.WARNING)) {
LOGGER.warning("checking name: " + name);
}
}
For a full example of both extending Application and implementing this logging example, a sample app that can be imported into Android Studio has been created by Doug Stevenson, one of the Android team members. This sample application can be found athttps://github.com/AnDevDoug/devtricks.
Application Configuration
One of the best features that the Gradle build system brings to Android is the ability to create custom configurations for your Android Studio project. You should consider versioning your configuration for a variety of reasons, including the following:
![]() To change credentials for API and database authentication
To change credentials for API and database authentication
![]() To change ports or endpoints for various services
To change ports or endpoints for various services
![]() To toggle testing and debugging output
To toggle testing and debugging output
![]() To use modified constants, variables, and resources
To use modified constants, variables, and resources
![]() To create a white label app
To create a white label app
The values or constants you want to use as defaults should be stored inside of an XML file in your res/values directory. The files you wish to alternate between can then be versioned into a new folder; to keep things easy, you could create a new directory in the res directory, leaving you with a folder path of res/values-1.
This should leave you with the following structure in your project:
res/values/config.xml // original config file path
res/values-1/config.xml // dev config file path
This particular method of storing information does not leverage the power of the Gradle build system, but does allow you load the constants you need and keep them in properly versioned files. In order to leverage the power of the Gradle system, you can inject values that are contained inside of the ProductFlavors section of the gradle.build file in your app module.
The values placed are stored in a resValue entry that then lists the type, key, and value. The following shows a sample entry from the app module’s gradle.build file that sets up a configuration based on the same version of the app, but in different folders:
apply plugin: 'com.android.application'
android {
// set compile options and other resources
defaultConfig {
// you can inject resources here in addition to others you may have set
}
buildTypes {
// you can inject resources here in addition to others you may have set
}
productFlavors {
// set up production resource injection
prod {
versionName '1.0'
resValue 'string', 'my_api_key', 'HARKNESS'
}
// set up development resource injection
dev {
versionName '1.0-dev'
resValue 'string', 'my_api_key', 'BADWOLF'
}
}
}
dependencies {
// add your dependencies
}
When the app is built, you can then gain access to the values by either calling them in the onCreate() method of your application or by loading them into the object model. Depending on the route you take, you can access the values via the getResources() method. To load the values from the preceding sample snippet, you would use the following:
getResources().getString(R.string.my_api_key)
Memory Management
Changing the way you load configuration files and how your app is initialized is great for making sure your app gets off on the right foot; however, none of that will matter if your app is constantly running out of memory and throwing an OutOfMemoryError that confuses users and leaves them uninstalling your app and using a different one.
When developing your application, it is important that you are doing what you can to maximize the efficiency of your code base. This means that you should take great care in how objects are created, what types you are using, and that you are not blocking the natural garbage collection process.
You can minimize how often garbage collection runs by minimizing the amount of objects you create. This even applies to temporary objects. If you can create a single object and repurpose the value of it, you will better off than creating new objects. Garbage collection is a wonderful thing, but it is still a drain on system resources.
Take advantage of the getMemoryClass() function. This function checks the size of the memory heap (in MB) that is available for your app. If you attempt to go beyond this limit, your app will throw an OutOfMemoryError exception. Note that getMemoryClass() is a method on ActivityManager. This can be used as follows:
int memoryClass = activityManager.getMemoryClass();
When creating threads for your app, you should be aware that each thread is a garbage collection root. Devices in the market before Android Lollipop was released use the Dalvik Virtual Machine and will keep references to these threads open so that garbage collection does not occur automatically on them. This makes it an absolute necessity for you to close threads when you are finished with them. Failure to do so will lock the memory allocated to them, which will not be released until the process (your app) is terminated by the system. You can avoid spinning up new threads by using a Loader for a short asynchronous operation within an Activity lifecycle; a Service should be used when you need to report back to an Activity by means of a BroadcastReceiver, or you could use an AsyncTask for other short-term operations.
When using a Service, make sure it only runs for the amount of time you need it. Creating an IntentService allows you to create a Service that will finish when it is finished handling an Intent. Services may be necessary for your app to work correctly; however, they expose your app as a potential bottleneck for memory and battery problems for users. A user who believes your app is a problem will not hesitate to remove it from their device. If you need to have a long-running Service, you should consider setting the android:process property in your Service in the AndroidManifest.xml file. Make sure that when you do this you avoid allowing the Service to make changes or influence the UI in any way. If it does, you may more than double the amount of memory your Service uses.
Using Proguard is not just a recommended step for code obfuscation: It also optimizes your code by finding unused code and removing it. The returned code is compacted and should reduce the amount of RAM required to run the code. You can combine using Proguard withzipalign to make sure that the uncompressible resources in your apk file are aligned correctly within the archive. This in turn saves on the amount of RAM needed to run your app. The zipalign tool can be run by using the following code in your terminal (provided that the Android SDK is in your system path):
zipalign 4 infile.apk outfile.apk
Note that you can pass an argument of -f to force overwriting the outfile.apk file should it already exist. Using an argument of -v will show the verbose output of the utility. If you believe that your apk file is already aligned but would like to verify it, you can run the following:
zipalign -c -v 4 outfile.apk
The argument of -c will “confirm” the alignment of the file. The -v argument is still used as a verbose output of the utility running.
Garbage Collection Monitoring
When viewing the log from LogCat or from DDMS, you’ll see several messages related directly to garbage collection. The following list explains the messages that you will find and what they mean:
![]() GC [reason]: The reason that garbage collection was run. Here are some possible reasons:
GC [reason]: The reason that garbage collection was run. Here are some possible reasons:
![]() GC_CONCURRENT: Garbage collection that frees up memory as the memory heap fills up.
GC_CONCURRENT: Garbage collection that frees up memory as the memory heap fills up.
![]() GC_FOR_ALLOC: Garbage collection that occurs because the app has attempted to allocate memory when the memory heap was already full, causing the system to stop the app and reclaim memory.
GC_FOR_ALLOC: Garbage collection that occurs because the app has attempted to allocate memory when the memory heap was already full, causing the system to stop the app and reclaim memory.
![]() GC_HPROF_DUMP_HEAP: Garbage collection that occurs due to the creation of an HPROF file for further analysis of the memory heap.
GC_HPROF_DUMP_HEAP: Garbage collection that occurs due to the creation of an HPROF file for further analysis of the memory heap.
![]() GC_EXPLICIT: An explicitly called garbage collection. If you are seeing this, you or one of your included libraries may have a problem as garbage collection is being forced to run manually.
GC_EXPLICIT: An explicitly called garbage collection. If you are seeing this, you or one of your included libraries may have a problem as garbage collection is being forced to run manually.
![]() Amount freed: The amount of memory freed or reclaimed from garbage collection.
Amount freed: The amount of memory freed or reclaimed from garbage collection.
![]() Heap stats: The percentage free and the (number of live objects) / (total heap size).
Heap stats: The percentage free and the (number of live objects) / (total heap size).
![]() External memory stats: The external allocated memory on API level 10 and lower, shown as (amount of allocated memory) / (limit at which collection will occur).
External memory stats: The external allocated memory on API level 10 and lower, shown as (amount of allocated memory) / (limit at which collection will occur).
![]() Pause time: The larger the heap, the longer the pause time. Concurrent pause times will show two pauses: One at the beginning of the collection and another near the end.
Pause time: The larger the heap, the longer the pause time. Concurrent pause times will show two pauses: One at the beginning of the collection and another near the end.
Checking Memory Usage
Besides using the DDMS or LogCat tool to view memory usage in Android Studio, you may want to use an adb command-line tool to view the status of memory management. Remember that when using adb you need to have your device in debugging mode and connected to yourcomputer. To make sure your device is connected and that your computer can see your device, you can run the following command:
adb devices
Note that Linux and OS X terminal windows may need to use ./adb to execute the command. You may also see the following message:
*daemon not running. starting it now on port 5037 *
If the next line tells you that the daemon was started successfully, you should check your device to see if it has connected or is ready to exchange SSH keys with the computer. Once you have verified that your phone is set up correctly, you can run the adb devices command again to see the devices that are connected to your computer.
If you are not using a physical device, you can start an Android emulator and run the command to make sure the emulator is connected properly to your system. If it is properly attached, you should see it listed similar to the following:
List of devices attached
emulator-5554 device
With a device listed, you can now use adb to collect the memory information for a specific package. The following command displays the results from the com.android.phone package:
adb shell dumpsys meminfo com.android.phone
Figure 18.1 shows the command being run and the output that is returned in a terminal window.
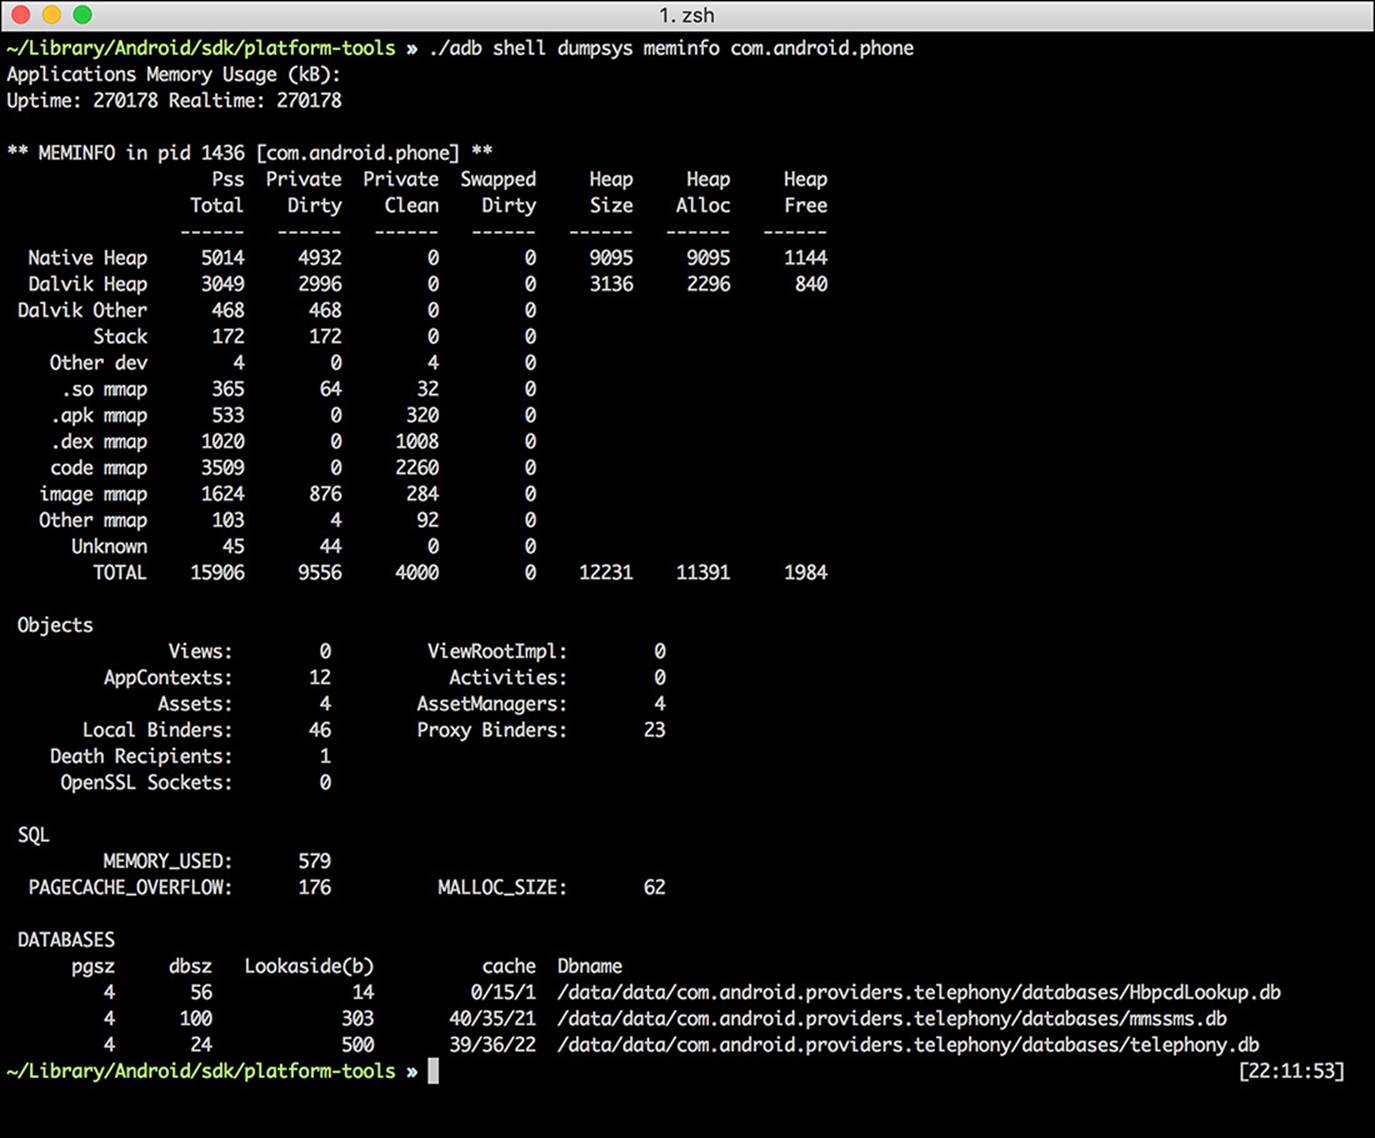
Figure 18.1 You can discover a considerable amount of memory information about the packages on your device.
The returned values are a snapshot of how the com.android.phone package is behaving on the device. You can see if the package has increased in memory size since launch, the size of the memory heap as well as space available for it, the number of objects that have been created, and database information.
Note that the package com.android.phone is just an example. When testing your app, make sure to be testing package(s) you use to get results that are relative to your app.
Although all the information presented is important, pay particularly close attention to the Pss Total and the Private Dirty columns. The Pss Total column represents all connections to the main device memory thread, whereas the Private Dirty column keeps track of the actual amount of RAM your application is using on the heap since the app was started.
Performance
You can do a few things inside your code that can help optimize not only the memory in use, but also the speed at which the system will run your code on a device. Many optimizations may be overlooked due to timelines, or even just because the code you use is the way you are familiar with coding and is something you have always done. That doesn’t mean that your app will not work; however, it does mean that some devices may not be able to run your app at the speed you expect, making some users frustrated with the bad performance they perceive.
Working with Objects
It was previously mentioned that garbage collection for your application will run based on the number of objects you create. You can minimize object creation by not using temporary objects and working directly on an existing object.
When you use a method that returns a String that will be appended to a StringBuffer object, there is no need to create a new object to contain the return String and then add the temp object to the StringBuffer object. Instead, you should try to work directly with theStringBuffer object, skipping the temporary object all together.
You should also consider using StringBuilder when you do not have multiple threads accessing it at the same time. StringBuilder does not have every method marked for synchronization like StringBuffer does and will give a considerable performance boost when working with Strings.
If you do not need to modify the state of an object, you should make your methods static. This increases the initial time needed for your method, and grants the additional bonus of you knowing that your method will not be changing the state of the object.
Static Methods and Variables
In addition to making your methods static, you should also make any constants static final. Adding this to a variable you will be using as constant, the system knows that it will not need to store your object into a field that will need to be referenced every time you want to use the variable.
You should also avoid the use of enum. In standard Java, an enum provides an incredibly useful way of handling constants; however, when using one, you double the amount of memory allocated for it. If you can get by without using an enum, you should do it.
When getting values for your variables, you should avoid using getters. Android is faster when working directly with an object instead through a method call. This is due to the virtual method call being much more processor and memory intensive than using a direct field lookup. The exception to this rule is when you are working with interfaces where using getters is an acceptable practice because the field cannot be directly accessed.
Enhanced for Loops
When you find yourself needing to iterate over a value, how you choose to build your for loop matters. You should be acquainted with for loops, so the following code should be familiar:
int total = 0;
for (int i = 0; i < myArray.length; ++i) {
total += myArray[i].myItem;
}
In this example, an int is set up to contain a total count and then the for loop is executed to get the number of myItems that are stored in the myArray to be stored in the total variable. This loop is functional, but it is not optimized. Even though the variable i is defined, the length of myArray must be looked up on every single iteration. To speed this up, you can use the enhanced for loop syntax that was introduced in Java 1.5:
int total = 0;
for (<type> a : myArray) {
total += a.myItem;
}
By using this syntax, the compiler is already aware of the length of the myArray object and avoids having to perform a lookup every time the loop runs. Note that <type> should be changed to the type (int, String, etc) that you are expecting to work with.
float, double, and int
Even though a double will take up two times the space in memory that a float will take, try to use a double if possible.
An interesting performance note is that a float will be two times slower than an int to process. If you do not need the extra precision of a float or double, you should opt for an int or an Integer if you need to handle potential null values or need a wrapper.
Optimized Data Containers
Android has included several data containers you can leverage that yield a more memory-performant app. Instead of using a HashMap, consider using one of the following, depending on the data your HashMap would store:
![]() SparseArray instead of HashMap <Integer, Object>
SparseArray instead of HashMap <Integer, Object>
![]() SparseBooleanArray instead of HashMap <Integer, Boolean>
SparseBooleanArray instead of HashMap <Integer, Boolean>
![]() SparseIntArray instead of HashMap <Integer, Integer>
SparseIntArray instead of HashMap <Integer, Integer>
![]() SparseLongArray instead of HashMap <Integer, Long>
SparseLongArray instead of HashMap <Integer, Long>
![]() LongSparseArray instead of HashMap <Long, Object>
LongSparseArray instead of HashMap <Long, Object>
Using these built-in types is faster and they are optimized for Android to work with. They are allocation-free and do not auto-box keys. SparseArrays are also more memory efficient because they do not require as much overhead as a HashMap.
You should use a plain or raw array (int[]) instead of a HashMap when you can. This helps with performance because a wrapper is not needed to perform field lookups.
Summary
In this chapter, you learned some new methods for enhancing the performance as well as the organization of your app. You learned that you can control the entry point of your app and optimize the resources it will need to use by extending the Application class.
You also learned that by creating your own logging implementation in conjunction with extending the Application class, you can create a log that works with unit testing instead of throwing errors.
You learned that you can also create different configurations that you can use based on the version of your app. This is incredibly useful when working with different credentials for services, APIs, and database access across different environments.
You learned about streamlining your app for maximum memory usage by incorporating various tactics, such as minimizing object creation, being aware of how much memory is available for your app, and using command-line tools in conjunction with the adb command to view memory usage.
Finally, you learned about increasing performance by writing code that is optimized for Android. This includes using static final variables, being careful with primitive types, and not using a HashMap, because many other data containers are available that will yield similar results with better performance.