Android Development Patterns: Best Practices for Professional Developers (2016)
Chapter 19. Android TV
There have been many attempts to create an experience that a group of people can take part in and share while staying in the comfort of their own home. Many homes have at least one TV, and it is generally located in an area with lots of space where can be viewed by many people. Android TV takes advantage of this space by allowing you to create applications that can be used and enjoyed in this environment. In this chapter, you learn the basics of creating an Android TV application and some of what the Android TV SDK offers to help you get your app to the big screen.
The Big Picture
Phones, tablets, and other Android devices are wonderful for taking your life with you, but when it comes to enjoying content with friends, family, and others, it can get a little crowded around a small screen.
Some content doesn’t do as well in the small screen space and needs more space in order to be fully enjoyed. Apps that stream video and music or even deliver a multiplayer experience can be used and enjoyed easier on a TV.
Google has stepped into the TV domain before and had many early successes with partners using the Google TV platform. This platform was an early attempt to provide many of Google’s services to the masses using the biggest screen in the house. In June 2014, it was announced at Google I/O that Android TV would be the successor to Google TV.
Android TV focuses on providing the following services:
![]() Cinematic access to your personalized Google goods
Cinematic access to your personalized Google goods
![]() Voice search
Voice search
![]() App and content recommendations based on content consumption
App and content recommendations based on content consumption
![]() Games and apps
Games and apps
Android TV may not appear to be too different from a standard Android device in basic capability; in this respect, almost any app can be ported to Android TV for users to start enjoying. This comes with a few caveats, however: Because of the form-factor of the TV, some considerations need to be made to make the app work correctly and be useable on an Android TV–capable device.
Ten-Foot View
When working with Android TV, you will often hear about the “ten-foot view,” which is the typical viewing distance from user to screen. This means that the amount of detail that goes into an app changes. Whereas precision and detail are massive factors to consider on a small-screen device, many of those details can now become lost or difficult to pick out when viewed from a distance.
When designing a user interface, you should use a grid or similar system so that items are large, easy to read, and easy to navigate with a remote. You should also build your app to be presented in landscape rather than portrait orientation.
Apps built for Android TV should use Fragments to help you manage sections of the screen rather than a single View that is stretched or scaled to fit. Because of the landscape orientation of TVs, you should also implement GridViews rather than ListViews, because a GridViewwill take advantage of the available horizontal screen space.
To help you with your visual layout, consider using the Leanback support library. Leanback is required by Android TV; however, this support library includes a theme that will give you many of the recommended styles your app should be using as well as a head start on getting your app visually ready. The following shows how this theme can be applied by adding it to the <activity> element of your application manifest XML:
<activity
android:name="com.example.android.TvActivity"
android:label="@string/app_name"
android:theme="@style/Theme.Leanback">
If you do not want to use this particular theme, at least implement the following, because Android TV apps should not show a title bar:
<activity
android:name="com.example.android.TvActivity"
android:label="@string/app_name"
android:theme="@android:style/Theme.NoTitleBar">
Many resources are sharable between a standard Android app and an Android TV app; however, you should never share layout resources. Always make sure to create separate ones. You should not be using an ActionBar in the Android TV because it is difficult for a user to navigate with using a remote.
If your app integrates with advertisement services, note the following:
![]() The user should be able to dismiss full-screen non-video ads immediately using the remote control.
The user should be able to dismiss full-screen non-video ads immediately using the remote control.
![]() It is recommended that you use video ads that can be dismissed within 30 seconds.
It is recommended that you use video ads that can be dismissed within 30 seconds.
![]() If an ad is not full screen, the user should be able to interact and click it using a remote.
If an ad is not full screen, the user should be able to interact and click it using a remote.
![]() Ads should not attempt to open a web browser or link to a web URL.
Ads should not attempt to open a web browser or link to a web URL.
![]() Ads should not be able to link to other apps that are not available for TV devices.
Ads should not be able to link to other apps that are not available for TV devices.
If, for any reason, you require loading or using web resources, you must use a WebView, not a browser. A full browser implementation is not currently supported on Android TV. This is especially important when you are creating multiplatform (Android and Android TV) apps.
Controls are also different on a TV. Because users are away from the screen, you need to think about how navigation should work with a remote. Remotes should have a two-axis directional pad. This provides movement along the X and Y planes and, depending on your app, you should add a visual clue to where the cursor is so that the user can quickly make directional changes. You should also take care to ensure that every element in your app is accessible via a controller.
Your app should be built without any reliance on the user having to press the Menu key on a remote. This doesn’t mean you can’t wire the key in, but it does mean that you should have a Settings or Options area with all of the menu items available.
To help a user visually understand the interface, there are four states an item such as a button can be in to show visual styles:
![]() Focused: android:state_focused="true"
Focused: android:state_focused="true"
![]() Hovered: android:state_hovered="true"
Hovered: android:state_hovered="true"
![]() Pressed: android:state_pressed="true"
Pressed: android:state_pressed="true"
![]() Default: No property required for the default state
Default: No property required for the default state
The following code snippet will alter the assigned drawable resource based on these states:
<?xml version="1.0" encoding="utf-8"?>
<selector xmlns:android="http://schemas.android.com/apk/res/android">
<!-- focused -->
<item android:state_focused="true"
android:drawable="@drawable/button_focused" />
<!-- hovered -->
<item android:state_hovered="true"
android:drawable="@drawable/button_focused" />
<!-- pressed -->
<item android:state_pressed="true"
android:drawable="@drawable/button_pressed" />
<!-- default -->
<item android:drawable="@drawable/button_normal" />
</selector>
Along with visual indicators, you should also add audio cues. These cues can help a user determine that input was received, and they are of particular help when reaching the end of a scrollable list.
TV Capabilities
TVs come in different sizes and shapes, and not all TVs even contain the same aspect ratio. Many TVs may contain an aspect ratio of 16:9, whereas others may have a 4:3 or even a 21:9 aspect ratio. Despite these current differences in aspect ratio, Google recommends that you build your visual assets for a 1920×1080 screen (HD). In addition to this size, you should add 5% to the size to account for motion as part of the interface. This gives you a working space of 2016×1134px.
Another issue that some TV screens present is “overscan,” which used to refer to the margin of space that falls outside the bezel or display range when the image is projected on the TV screen. Today, this applies to the zoom level a TV may have enabled. You can get around this issue by making sure that your critical content has at least 48px of space from the left and right sides of the screen as well 27px of space between the top and bottom. If you are working at a different size, you should be safe by using a margin of 10% for the width and height of the screen. This area is known as the “action-safe area.”
The following shows a LinearLayout that takes into consideration the margin values to make sure the content shown will be inside of the action-safe area:
<?xml version="1.0" encoding="utf-8"?>
<LinearLayout xmlns:android="http://schemas.android.com/apk/res/android"
android:id="@+id/base_layout"
android:layout_width="match_parent"
android:layout_height="match_parent"
android:orientation="vertical"
android:layout_marginTop="27dp"
android:layout_marginLeft="48dp"
android:layout_marginRight="48dp"
android:layout_marginBottom="27dp" >
</LinearLayout>
Tip
As a reminder to those new to using the android:orientation property, it contains a value of vertical, which does not mean that the layout will be in portrait. Instead, views will be stacked rather than placed side-by-side.
To recap, when working with a screen, you should plan on the following:
![]() Background assets should be 2016×1134px.
Background assets should be 2016×1134px.
![]() Designs should fit within 1920×1080px.
Designs should fit within 1920×1080px.
![]() The action-safe area is inside of 1728×972px.
The action-safe area is inside of 1728×972px.
Many TVs also differ in included functionality. To address these issues, the following feature descriptors are unavailable to Android TV:
![]() android.hardware.touchscreen
android.hardware.touchscreen
![]() android.hardware.faketouch
android.hardware.faketouch
![]() android.hardware.telephony
android.hardware.telephony
![]() android.hardware.camera
android.hardware.camera
![]() android.hardware.bluetooth
android.hardware.bluetooth
![]() android.hardware.nfc
android.hardware.nfc
![]() android.hardware.location.gps
android.hardware.location.gps
![]() android.hardware.microphone
android.hardware.microphone
![]() android.hardware.sensor
android.hardware.sensor
Note that even though android.hardware.microphone is listed here, this does not apply to the microphone input of a remote or controller.
If you have created a cross-platform application that does use one or more of these features on other devices but will continue to function without them, you can add android:required="false" to any element. This way, users can enjoy all of the features or enhancements of your app on their phone or tablet, and still have some functionality on their Android TV.
Text, Color, and Bitmaps
Text sizes, colors, and bitmaps all important when you are working with Android TV. The variety in the technology, size, and shape of a TV adds a new layer of complexity and fragmentation to deal with. To provide the best experience, make sure you implement the following guidelines:
![]() Text should have a minimum size of 12sp (scale-independent).
Text should have a minimum size of 12sp (scale-independent).
![]() Text by default should have a size of 18sp.
Text by default should have a size of 18sp.
![]() Card titles should be sized at 16sp in Roboto Condensed.
Card titles should be sized at 16sp in Roboto Condensed.
![]() Card subtext should be sized at 12sp in Roboto Condensed.
Card subtext should be sized at 12sp in Roboto Condensed.
![]() Browse screen titles should be 44sp in Roboto Regular.
Browse screen titles should be 44sp in Roboto Regular.
![]() Browse category titles should be 20sp in Roboto Condensed.
Browse category titles should be 20sp in Roboto Condensed.
![]() Details content titles should be 34sp in Roboto Regular.
Details content titles should be 34sp in Roboto Regular.
![]() Details subtext should be 14sp in Roboto Regular.
Details subtext should be 14sp in Roboto Regular.
![]() Make your text concise and easy to read in chunks rather than in long paragraphs and sentences.
Make your text concise and easy to read in chunks rather than in long paragraphs and sentences.
![]() Use light-colored text on dark-colored backgrounds.
Use light-colored text on dark-colored backgrounds.
![]() Sans-serif and anti-aliased fonts are the easiest to read on TV screens.
Sans-serif and anti-aliased fonts are the easiest to read on TV screens.
![]() Use dp and sp units rather than absolute pixels.
Use dp and sp units rather than absolute pixels.
Using sp units over dp (density-independent) units is suggested with Android TV, as it will scale based on user font-size preferences. A dp value may or may not be accurate based on the device and TV in use.
It is important to follow these guidelines so that when users are using their Android TV your app looks same on the Browse screen and when viewing the Details sceen and the Cards of recently used or viewed items, thus giving the user a consistent and enjoyable experience.
You should always avoid using “light” or “thin” fonts and styles because this may give your fonts an aliased or jagged appearance on some TV screens.
When working with color, keep the following guidelines in mind:
![]() Colors will not render the same on TV screens as they do on monitors, phones, and tablets.
Colors will not render the same on TV screens as they do on monitors, phones, and tablets.
![]() Some TVs apply smoothing, sharpening, saturation, and other filters that may distort or change color.
Some TVs apply smoothing, sharpening, saturation, and other filters that may distort or change color.
![]() Environmental differences may change color hue, brightness, and saturation.
Environmental differences may change color hue, brightness, and saturation.
![]() Some TV are unable to show perfect gradients and will instead provide color bands.
Some TV are unable to show perfect gradients and will instead provide color bands.
![]() Be careful when using pure or highly saturated colors for large areas of the screen; these may be displayed at an overly intense level compared to the rest of your colors.
Be careful when using pure or highly saturated colors for large areas of the screen; these may be displayed at an overly intense level compared to the rest of your colors.
![]() Avoid filling the screen with pure white.
Avoid filling the screen with pure white.
![]() Add high contrast to elements that are different from each other so that the images and sections do not appear muddy and are easy to visually recognize as different areas.
Add high contrast to elements that are different from each other so that the images and sections do not appear muddy and are easy to visually recognize as different areas.
![]() Always make sure that text and backgrounds have a high level of contrast; otherwise, text may become impossible to read.
Always make sure that text and backgrounds have a high level of contrast; otherwise, text may become impossible to read.
Your app should have an app banner that can be displayed on the home screen of the Android TV device. This banner should be 320×180px (xhdpi resource). There should be legible text in the image rather than just a picture. Note that if you offer a multilingual app, you must include an app banner for every language you support. This app banner is configured by adding the following property to your application manifest XML:
<application
...
android:banner="@drawable/banner">
<!-- other manifest elements go here -->
</application>
The home screen of Android TV displays recommendations based on user activity. These recommendations consist of a few components:
![]() Large icon
Large icon
![]() Small icon
Small icon
![]() Content title
Content title
![]() Content text
Content text
![]() Background (optional)
Background (optional)
Figure 19.1 shows a wireframe of the card that displays these components for apps.
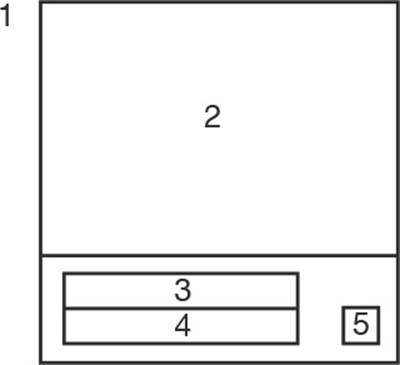
Figure 19.1 (1) Background image, (2) large icon, (3) content title, (4) content text, (5) small icon
Follow these guidelines for the large icon:
![]() Cannot be a transparent image.
Cannot be a transparent image.
![]() Minimum height of 176dp.
Minimum height of 176dp.
![]() Minimum width of 2/3 the height (if 176dp tall, the minimum width should be 117dp).
Minimum width of 2/3 the height (if 176dp tall, the minimum width should be 117dp).
![]() Maximum width of 4/3 the height (if 176dp tall, the maximum width should be 234dp).
Maximum width of 4/3 the height (if 176dp tall, the maximum width should be 234dp).
The small icon should follow these guidelines:
![]() Flat image.
Flat image.
![]() Will be displayed at 100% opacity when the card is selected and at 50% when the card is not selected.
Will be displayed at 100% opacity when the card is selected and at 50% when the card is not selected.
![]() Icon should be imposed over the colored background for the title and content section.
Icon should be imposed over the colored background for the title and content section.
![]() The icon should have a size of 16×16dp with a white icon on a transparent background saved in a monocolor PNG format.
The icon should have a size of 16×16dp with a white icon on a transparent background saved in a monocolor PNG format.
As a reminder, the text on these cards should follow these guidelines:
![]() Card titles should be sized at 16sp in Roboto Condensed.
Card titles should be sized at 16sp in Roboto Condensed.
![]() Card subtext should be sized at 12sp in Roboto Condensed.
Card subtext should be sized at 12sp in Roboto Condensed.
The background image will be shown as a full-screen background when your card is selected. It should not be just a larger or expanded image of the large icon, but should show another image of your app or content that enhances the experience. It should follow these guidelines:
![]() Must be 2016×1134 (otherwise, the system will scale).
Must be 2016×1134 (otherwise, the system will scale).
![]() Must not be transparent.
Must not be transparent.
Widgets are provided in the Leanback support library that add support for these background images as well as update them as items gain and lose focus.
When you’re working with bitmaps, the same performance enhancements apply that are recommended with standard Android apps. The following list contains the recommendations for working with large bitmaps in your Android TV app:
![]() Use the recycle() method on any Bitmap objects when they are no longer needed.
Use the recycle() method on any Bitmap objects when they are no longer needed.
![]() Load images when they are needed rather than preloading them.
Load images when they are needed rather than preloading them.
![]() Use an AsyncTask or a similar background process to get images from the network.
Use an AsyncTask or a similar background process to get images from the network.
![]() Either work with appropriately sized images or resize the images when you download them rather than trying to put too large of an image in place.
Either work with appropriately sized images or resize the images when you download them rather than trying to put too large of an image in place.
Building an App
The quickest way to get started building an Android TV app is to use Android Studio and start a new project. When you are in the New Project Wizard, uncheck the Phone and Tablet option and check the TV option. After you choose this option, you can set a target SDK level. Similar to when you work with phone and tablet apps, choose a minimum level rather than a maximum level. Note that Android TV requires a minimum level of Lollipop (API level 21).
Note
If you cannot choose the TV option because it is grayed out, launch the Android SDK Manager and update your SDK packages.
After finishing the New Project Wizard, you will have a project with three layout files:
![]() activity_details.xml
activity_details.xml
![]() activity_main.xml
activity_main.xml
![]() playback_controls.xml
playback_controls.xml
As mentioned earlier, it is good practice to create Android TV apps using Fragments. Each of these files contains a Fragment that will handle a different portion of your app.
Another file you should be aware of is res/values/themes.xml. This file is included automatically when you create a new Android TV project and includes the theme for Leanback. It also sets up the styles of several items. The following shows the file’s content:
<resources>
<style name="Theme.Example.Leanback" parent="Theme.Leanback">
<item name="android:windowEnterTransition">@android:transition/fade</item>
<item name="android:windowExitTransition">@android:transition/fade</item>
<item name="android:windowSharedElementExitTransition">
@android:transition/move
</item>
<item name="android:windowSharedElementEnterTransition">
@android:transition/move
</item>
<item name="android:windowAllowReturnTransitionOverlap">true</item>
<item name="android:windowAllowEnterTransitionOverlap">true</item>
<item name="android:windowContentTransitions">true</item>
<item name="android:colorPrimary">@color/search_opaque</item>
</style>
</resources>
The next file you should examine is the application manifest XML. This file contains several important elements, including Leanback declarations as well as setting up your project activities. The following shows the contents of the AndoridManifest.xml file:
<?xml version="1.0" encoding="utf-8"?>
<manifest xmlns:android="http://schemas.android.com/apk/res/android"
package="com.dutsonpa.helloatv" >
<uses-permission android:name="android.permission.INTERNET" />
<uses-permission android:name="android.permission.RECORD_AUDIO" />
<uses-feature
android:name="android.hardware.touchscreen"
android:required="false" />
<uses-feature
android:name="android.software.leanback"
android:required="true" />
<application
android:allowBackup="true"
android:icon="@mipmap/ic_launcher"
android:label="@string/app_name"
android:supportsRtl="true"
android:theme="@style/Theme.Leanback" >
<activity
android:name=".MainActivity"
android:banner="@drawable/app_icon_your_company"
android:icon="@drawable/app_icon_your_company"
android:label="@string/app_name"
android:logo="@drawable/app_icon_your_company"
android:screenOrientation="landscape" >
<intent-filter>
<action android:name="android.intent.action.MAIN" />
<category android:name="android.intent.category.LEANBACK_LAUNCHER" />
</intent-filter>
</activity>
<activity android:name=".DetailsActivity" />
<activity android:name=".PlaybackOverlayActivity" />
<activity android:name=".BrowseErrorActivity" />
</application>
</manifest>
It is worth taking particular notice of the element <category android:name="android.intent.category.LEANBACK_LAUNCHER" />. If you do not include this filter, your app will not be visible to users running the Google Play Store on their Android TV device. Beyond that, it will not even be visible when loading your app through developer tools. This filter should always be in place when creating Android TV apps.
As previously mentioned, not all hardware features of Android are supported on Android TV. To make sure that app knows that a touchscreen is not required, it has been included along with the property android:required="false". This allows the system to function even though a touchscreen is not detected, as well as to display your app in the Play Store on the Android TV device.
The last file you should check is the gradle.build file in the app module. This file contains some support libraries that you will want to include to make your app function correctly. Note the following dependencies that should be included:
dependencies {
compile fileTree(dir: 'libs', include: ['*.jar'])
compile 'com.android.support:recyclerview-v7:23.0.1'
compile 'com.android.support:leanback-v17:23.0.1'
compile 'com.android.support:appcompat-v7:23.0.1'
compile 'com.github.bumptech.glide:glide:3.4.+'
}
Each of these dependencies offers methods that your app will need. Here’s a list of them and what they do:
![]() recyclerview: This provides the needed classes for displaying long lists and is required by the Leanback library.
recyclerview: This provides the needed classes for displaying long lists and is required by the Leanback library.
![]() leanback: This provides the widgets, themes, and media playback support essential for proper Android TV app functionality.
leanback: This provides the widgets, themes, and media playback support essential for proper Android TV app functionality.
![]() appcompat: This provides compatible dialogs, activities, and other classes that allow your app to work with different base versions of Android.
appcompat: This provides compatible dialogs, activities, and other classes that allow your app to work with different base versions of Android.
![]() glide: This is not a required dependency; however, it provides a visual media service that efficiently retrieves and processes visual media files. You can learn more about glide by visiting https://github.com/bumptech/glide.
glide: This is not a required dependency; however, it provides a visual media service that efficiently retrieves and processes visual media files. You can learn more about glide by visiting https://github.com/bumptech/glide.
![]() cardview: This dependency is not included in the example; however, consider using it for displaying media files as well as descriptions on cards.
cardview: This dependency is not included in the example; however, consider using it for displaying media files as well as descriptions on cards.
Now that you have a sample project ready to go, it is time to look at how you debug and view it.
Emulation and Testing
If you own an Android TV device, you may be able to use it to debug over USB. The process to enable Developer Mode is similar to a standard Android device. In short, you need to perform the following steps:
1. Navigate to the system settings.
2. Find the Device row and select About.
3. Scroll down to Build and click or press the Enter key on your remote repeatedly until a message appears saying “You are now a developer.”
4. Navigate to the Preferences row and select Developer options.
5. Select USB Debugging and select On.
6. Connect a USB cable between your Android TV device and your computer.
When you connect the USB cable to your computer, you may see an “Allow USB Debugging” message appear; you can then select to always allow or just for this time. Once you have done that, running the adb command from a console or terminal window should show the AndroidTV device. Once it appears in the list, you can then use Android Studio or the adb command to start working with and debugging your app.
If you do not have an Android TV device, you can still create an emulator using the AVD Manager. Either you can create a manual emulator, or you can follow the wizard by following these steps:
![]() Select “TV” for the Category type.
Select “TV” for the Category type.
![]() Select a TV size and resolution that you wish to emulate and then click Next.
Select a TV size and resolution that you wish to emulate and then click Next.
![]() Select the version of Android TV that wish to run on the emulator as well as the CPU type. (Note that on most systems, selecting an x86 will yield a faster running emulator.) Click Next.
Select the version of Android TV that wish to run on the emulator as well as the CPU type. (Note that on most systems, selecting an x86 will yield a faster running emulator.) Click Next.
![]() Confirm the device settings, or use the buttons and fields to make changes. (Note that changing the Android TV to run in Portrait orientation is possible, but not recommended). Click Next.
Confirm the device settings, or use the buttons and fields to make changes. (Note that changing the Android TV to run in Portrait orientation is possible, but not recommended). Click Next.
![]() Wait for the emulator to be built, select the emulator, and then click the launch icon to start the AVD.
Wait for the emulator to be built, select the emulator, and then click the launch icon to start the AVD.
Note that when you are emulating a TV, either you need a monitor with a higher resolution than the AVD or you need to scale the AVD.
There are two ways you can scale the AVD:
![]() You can open the AVD Manager and click the Edit button (the icon that looks like a pencil) for your Android TV AVD and then change the Scale setting to scale to make the AVD appear larger or smaller on your monitor.
You can open the AVD Manager and click the Edit button (the icon that looks like a pencil) for your Android TV AVD and then change the Scale setting to scale to make the AVD appear larger or smaller on your monitor.
![]() You can change your launch configuration to scale from inside of Android Studio. This can be done by clicking Run in the File menu and then clicking Edit Configurations. In the window that appears, find the Target Device section and click the Emulator radio button and choose your AVD. Now scroll back up and click the Emulator tab. In this section, there is a line labeled Additional Command Line options. In this field, enter the percent you want the emulator to scale to. For example, if you want the emulator to appear at 70% of normal size, type -scale 0.70.
You can change your launch configuration to scale from inside of Android Studio. This can be done by clicking Run in the File menu and then clicking Edit Configurations. In the window that appears, find the Target Device section and click the Emulator radio button and choose your AVD. Now scroll back up and click the Emulator tab. In this section, there is a line labeled Additional Command Line options. In this field, enter the percent you want the emulator to scale to. For example, if you want the emulator to appear at 70% of normal size, type -scale 0.70.
Remember, testing with an emulator is not nearly as good as using an actual device to test with. If you have the ability to get actual hardware, you should do so. This will allow you to test with remotes, controllers, as well as other Bluetooth peripherals and devices.
For simple testing with your emulator, you can use the arrow, Esc (for back), and Enter keys to navigate your application.
Summary
In this chapter, you learned about Android TV and the various components that make up differences between standard Android and Android TV applications.
You learned that dealing with larger screens requires you to think differently to support the features and size of a TV screen versus the smaller screen of phones and tablets. You learned that the layout used on Android TV apps is focused on grids and Fragments.
You also learned about the importance of visual styling. Because TVs are bigger and have a variety of screen technologies in use, text, colors, and images are displayed differently. Therefore, care should be taken to make sure your app is legible and clearly visible.
You learned about the base components required to make an app work on Android TV, including declarations for Leanback support. Leanback not only provides widgets, themes, and utilities, but is necessary for your app to appear in the Google Play Store that is accessible from the Android TV device. You also learned about other dependencies that the Leanback library needs as well as some optional ones that will help you create better Android TV apps.
Finally, you learned about testing your Android TV app on a physical device and an emulator. You were informed about how to unlock developer mode on an actual Android TV device and how to connect to it from your computer. You were then instructed on how to create an emulator using the AVD Manager and how to scale it using two different methods to make sure you can see your app on your computer regardless of the resolution of your monitor or computer screen.
All materials on the site are licensed Creative Commons Attribution-Sharealike 3.0 Unported CC BY-SA 3.0 & GNU Free Documentation License (GFDL)
If you are the copyright holder of any material contained on our site and intend to remove it, please contact our site administrator for approval.
© 2016-2026 All site design rights belong to S.Y.A.